• Welcome to Smashboards, the world's largest Super Smash Brothers community! Over 250,000 Smash Bros. fans from around the world have come to discuss these great games in over 19 million posts!

    You are currently viewing our boards as a visitor. Click here to sign up right now and start on your path in the Smash community!

Make Your Move 8: -TOP 50 POSTED-

wrkngclsshr

Smash Rookie
Joined
Apr 15, 2010
Messages
17
Location
Bursting Out Into Song
Blagheraghaerhereas.

Enough of that, onto-
~~Octillery~~

Well, I actually got to preview it... Too bad I didn't really read it that well due to a certain incredibly annoying, but addicting life sim (wary).

AAAAAAAAANNNNYYWAAAAAAAYS, Octillery, now that I actually read it seriously, ignoring my insignificant complaint about the dull headers, I found it a very nice read. A step above Forretress definitely.

You've done a great job at expressing Octillery's abilities (especially Suction Cups), which I love. Tie that with the fact that you chose this through a DICE ROLL, job well done. When I found out you were doing Octillery, one of the first things that came to mind was Suction Cups (and how the hell Remoraid turns into an Octopus, but that's a different story). Glad to see that it worked.

Like other movesets I've read, I was looking forward for the playstyle, which you deserve a cookie for. The Built-For-Doubles aspect was interesting, which I don't believe I see very much here. Octillery makes every neglected heavyweight who's name doesn't rhyme with Sing DeDeRee, Fake, or Monkey Song a chance for the limelight


To be honest, I really don't know what to say. The moveset was creative, easy to read, and you squeezed every bit of potential Octillery had. Great job, Joe :D

EDIT: Well, I think I just stole a moveset's first post. Oops.
 

MarthTrinity

Smash Lord
Joined
Aug 9, 2007
Messages
1,954
Location
The Cosmos Beneath Rosalina's Skirt
http://chiefmendez.wordpress.com/2010/06/14/moveset-graveyard-1/

A new article appears on The Stadium written moi! This one requires some participation from others in order to be a long running article, so if you have dead movesets you're no longer interested in finishing, please send them in! It'd be totally helpful for the article and of course I will give you 100% credit for your hard work!

Thanks~<3
:014:
 

cutter

Smash Champion
Joined
Jun 4, 2008
Messages
2,316
Location
Getting drilled by AWPers


B.B. Hood

Art courtesy of Aberu Chan from Deviantart


Background


Baby Bonnie Hood, better known as B.B. Hood, is a feared darkhunter from Darkstalkers, who hunts down some of the most vile and horrific monsters around. In exchange, she receives monstrous sums of money for bounties. She is probably one of the best darkhunters out there, ranked as a “Special S-Class hunter”. Even just her stare alone induces fear into the lower ranked darkstalkers.

After Darkstalkers, MvC2, and a few other fighting games, B.B. Hood has now set her sights on Smash, hoping to score another massive bounty on a fair amount of the fighters out there.


Stats​

Size: 7
Weight: 6
Ground Speed: 7
Air Speed: 8
Fall Speed: 7
1st jump: 8
2nd jump: 6

Crawl: YES
Glide: No
Wall Jump: No
Wall Cling: No


Specials

Neutral Special: Spray & Pray

With an evil smile on her face, B.B. Hood crouches down in a slight backward position, whips out her signature Uzi, and opens fire in the direction she is facing; in a direct, horizontal line. If the B button is pressed just once, then a three-round burst is fired. However, if the B button is held down, then B.B. Hood continues to unload a rain of lead on her target(s). Each bullet does roughly 1-3%, depending on how fresh the attack is. The range of the bullets is just over three-fourths the length of Final Destination. Each bullet provides 4 frames of hitstun, the same as Falco’s laser in Melee, and they are physical projectiles can potentially be cancelled out. Due to the velocity and volley of fire though, this is a lot tougher to do than it sounds. They do not pierce targets, they don’t travel in perfect straight lines like space animal lasers, and if they hit a wall or platform, they simply disappear. Because of the recoil from the gun, the bullets eventually start to get fired upward slowly, but this can be controlled. As B.B. Hood is firing, you can hold the control stick either up or down to have her manually adjust the angle of her Uzi. Most of the time, you’ll be doing this to move downward to counteract the recoil from the automatic fire. However, you can angle your fire upward on purpose to gun down airborne opponents or those on platforms. Regardless of either the recoil or the manual angling of the attack, B.B. Hood can only fire at a maximum of 40 degrees (with respect to the ground) either up or down. To stop firing, simply release the B button, in which B.B. Hood will quickly put away her Uzi with a bit of lag to it (about 20 frames).

After a total of 30 rounds have been fired, B.B. has to reload her Uzi. This is automatically done after 30 rounds, or it can also be manually done by pressing the B button twice in succession very quickly. B.B. Hood fidgets around in her basket, and in one motion, loads the new clip, ***** the weapon, and she goes back into her default pose. While reloading, B.B. Hood can’t run, attack, roll, air dodge (if she’s in the air), spot dodge, and double jump. B.B. Hood initially starts with a full clip at the beginning of each stock. So even if she dies, despite how much ammo she has left, B.B. Hood will respawn with a full 30 rounds of rock and roll.

Wait... did I just say “air dodge” and “in the air”? Yes, B.B. Hood can also do this attack in the air. The same aspects of Spray & Pray still apply just as if she were on the ground, so she initially fires directly horizontally and then slowly rises upward from the recoil. You can then angle the fire up or down as you see fit.


Side Special: Smile & Missile

Holding her basket over her shoulder just as if she were holding an RPG, B.B. Hood fires a missile straight out of it. The missile travels in a straight path, but it can also be angled if you input either up or down on the control stick before B.B. Hood fires the missile. If you do, then the missile then travels at a straight 30-degree angle (with respect to the ground). Initially, the missile travels fairly slowly, but it picks up speed and continues to accelerate as similar to Snake’s Nikita. The size of the missile itself is just over a stage block long, and it too is also a physical projectile. However, unlike Spray & Pray, Smile & Missile packs a wallop and has a huge amount of priority (it will always beat Meta Knight’s Tornado). The resulting blast radius is roughly the size of Snake’s grenades, dealing 16%. The knockback sends foes up at around an 80-degree angle, KOs Mario starting at 105%, and it has very good shield damage and shieldstun. B.B. Hood is immune to the splash damage of the missile, but her teammates are not.

Smile & Missile is fairly easy to dodge, but the move has IASA frames as B.B. Hood puts away her basket after firing the missile. This can result in some nasty mixups involving B.B. Hood’s other projectiles, namely Spray & Pray, or a quick defensive retreat to avoid punishment. Sadly, there aren’t too many extremely useful applications for Smile & Missile in 1v1 play other than as an edgeguarding tool or setting up projectile traps. That doesn’t mean the attack is useless though. It simply augments B.B. Hood’s projectile game with an attack that does more than just build up damage.


Up Special: Extendo-Basket

This is definitely no ordinary basket. Upon execution, the basket handle quickly elongates as if it were like a big rubber band. At the same time, a small grappling hook protrudes out of the bottom of the basket which will latch onto the ledge of the stage. This tether recovery has a tether range roughly the same area as Zero Suit Samus’s Up Special. In terms of an attack, B.B. Hood stretches her basket to a height of roughly two stage blocks and slings it around once at a conic range of roughly 50 degrees with respect to the y-axis in each direction. If an opponent is hit by the basket, it does 8% and has very minimal knockback at a horizontal downward angle. However, if an opponent gets hit by the small grapple hook at the bottom of the basket, then this sweetspot area will cause 14%, the “slashing sound” knowing that the foe was hit by the sweetspot, and considerable knockback at a very high angle.

Like most Up Specials, after using this attack B.B. Hood will fall into the helpless state. And like virtually all tether recoveries, this is especially vulnerable to edgehogging. Suffice to say, B.B. Hood is not a character that wants to live offstage.


Down Special: Malice & Mine

With that evil smile on her face once again as she looks toward the camera, a land mine falls out of B.B. Hood’s dress right beside her. She kicks the mine in the direction she was facing, at about a distance of half a stage block. The land mine itself has a size of about three-fourths of a stage block. The mine acts just like a Motion Sensor Bomb; if an opponent or item touches it, the mine explodes and those caught in the blast radius (same as a MSB) are blasted back in flames at a high, upward angle that deals 13%, KOing Mario at around 125%. If the mine isn’t triggered, then it will automatically explode after 2 seconds. Like her other specials, Malice and Mine is an attack that can also be adjusted during its startup. Depending on how hard you push the control stick down when executing the attack, that will determine how far B.B. Hood kicks the mine. When the control stick is smashed downward just as if you were going to execute a down smash, then B.B. Hood will kick the mine at a distance of just under two stage blocks. The power and detonation time of the mine will remain unchanged. Just like Smile & Missile, B.B. Hood is immune to the splash damage from her own mines but your teammates aren’t.

When done in the air, the mine falls right out of B.B. Hood’s dress and it falls downward at a slight angle in the direction she was facing. The automatic 2-second detonation still applies, and if the mine touches an item or enemy, it will also automatically explode. This move also has IASA frames as soon as B.B. Hood kicks the mine, so it can be immediately linked into another Malice & Mine or into anything else you wish. Keep up the pressure!


Standards

Jab Combo: Meek Strike

With extreme trepidation, B.B. Hood just throws out a pretty weak jab that extends very little from her body. Pressing A again will then result in B.B. Hood kicking the ground forward with a bit of force; this time having some respectable range to the attack. The third time the A button is pressed, B.B. Hood hastily swings her basket forward with a range that is about the length of Captain Falcon’s forward tilt. The first hit deals a measly 2%, the second 5%, and then the last hit 7% with knockback that sends the foe directly up and away from B.B. Hood. Probably one of B.B. Hood’s weakest and shortest ranged attacks in her repertoire concerning the first jab, but the second and third hits are just above mediocre. It is a jab that is quick to start and quick to end, but an opponent can DI out of the second hit to avoid the third if they know what they’re doing. In that case, you can attempt to jab cancel and follow their DI into something else.

Forward Tilt: Tricky Basket

B.B. Hood swings her basket in a horizontal arc while skipping a little forward and smiling while doing so. Like most forward tilts, this attack can be angled up and down depending on the angle that the control stick is tilted at. The basket covers a range that is about just under Marth’s Jab, and it does a solid 10% no matter where the foe is hit by the basket. This move doesn’t even start KOing until around 220%, so use it more as an occasional spacing attack. For small characters or crouching/crawling ones, use the down-angled version of this attack and for high/airborne characters, use the up-angled form. This is a pretty mundane tilt, but it’s still something that you can’t fully ignore.

Up Tilt: Sneeze Kick

B.B. Hood sneezes lightly, and as she does so, she kicks her right leg up as a reflex behind her. The attack is quite similar to Fox’s Up Tilt, but it only does 6% fresh and the knockback of the move sends the foe in an upward diagonal direction away from B.B. Hood. It is much faster (hits on frame 3!) and it has slightly better cooldown than it though. When an opponent is breathing down on your neck behind you and you don’t have time to turn around to do a Malice & Mine, this is a pretty viable move. It can potentially set up a few other moves for a combo, but don’t expect it to be the end-all combo starter ala Fox’s Up Tilt.

Down Tilt: Shoe Thrust
While crouching down, B.B. Hood lies reclined in the “crab position” and kicks both her legs outward directly horizontally from where she is facing. This attack comes out surprisingly fast and has deceptive range of just under a stage block, but the cooldown time is just below average for a tilt attack. There are a small amount of IASA frames during the time B.B. Hood retracts her legs, but these IASA frames only are active for when you’re inputting another Down Tilt. No matter where you hit with this attack, it will deal 9% and push the opponent directly away from B.B. Hood. This poke should be used sparingly, and while it does have great priority, it’s one of the handful of moves in B.B. Hood’s moveset that isn’t disjointed.


Dash Attack: Surprise & Hop​

As B.B. Hood is running, a mole pops out of the ground beside her. With astonishment, B.B. Hood lets out a yell, jumps very slightly, but at the same time oh-so-conveniently thrusts her knee out to hit an unsuspecting foe with. This move comes out very quickly and ends very quickly as well. As a result, this attack is very weak at just 5% when fresh and its knockback is quite pitiful as it will never KO. It does have enough hitstun to be able to combo into a fair amount of B.B. Hood’s quick attacks at moderate percents when it pops the foe into the air. This is not an attack that should be just thrown out blindly, as even though the cooldown is low it can result in some very easy punishment, or at least getting shieldgrabbed at minimum.

Smashes​

Forward Smash: Shyness Strike

B.B. Hood winds up her basket and then swings it hard with both hands. The range is roughly similar to Marth’s forward smash during the middle of the attack, but it does not cover the same arc as it does as B.B. Hood swings her basket at a horizontal arc instead of a vertical arc. The attack has above average startup time and average cooldown time. If an opponent is hit by the basket, it does 17% and has knockback at an exact 45-degree angle. Shyness Strike starts to KO Mario at around 130%. So while it isn’t one of B.B. Hood’s strongest attacks, it is probably her most reliable for scoring quick KOs. It is also possible to be hit behind B.B. Hood while she winds up and swings in front of her; this rear hitbox deals 8% and has below mediocre knockback sending foes at an upward angle away from B.B. Hood. Both the windup hit and actual swing are disjointed hitboxes. Charging this smash will increase the size of B.B. Hood’s basket to roughly twice its size when fully charged, which means that the hitbox of the attack increases in addition to the damage output (up to 24% fully charged) and knockback increases commonly associated with charging up a smash.

Up Smash: Cheer & Fire​

B.B. Hood pulls out a huge champagne-esque bottle and it immediately turns into a massive Molotov cocktail, spewing a huge pillar of flames upward that extend up to about 2.5 stage blocks from B.B. Hood’s head. Each “hit” deals 4%, with 7 “hits” in total and the final one knocking back the foe directly upward. It starts to KO Mario at around 125%. It serves as an excellent anti-air attack due to its massive reach and disjointed hitbox. There is pretty much no down aerial out there that can possibly beat this move head-on.

Probably the most interesting thing about Cheer & Fire is its ability to have its angle adjusted. This is normally seen in forward tilts and forward smashes, but with this being an up smash, this is a bit of a twist! Without any other inputs, Cheer & Fire fires directly upward from B.B. Hood’s head. By pressing the control stick either left or right just before the attack goes off, B.B. Hood is able to start the attack from a 60-degree angle in its respective direction. Additionally, you can also control the angle of the attack while it’s going on. This means even if you didn’t initially put in a left or right input on the control stick to angle Cheer & Fire, you can still move the attack over in the direction you want it. This is useful for airborne opponents that changed their direction anticipating Cheer & Fire and hoping for easy punishment. It’s also very nifty for someone attempting to Smash DI out of Cheer & Fire; as they attempt to SDI out of the flames, you can change the angle of the attack if you’re fast enough can keep them trapped.

Another note about Cheer & Fire: This is a fire-based attack, so if this hits a pokemon who is weak to fire-type attacks, this move will do slightly more damage, slightly more knockback, and the foe will have a harder time DIing out of the attack. Consequently, a pokemon who is resistant to fire-type attacks will suffer slightly less damage, slightly less knockback, and will have an easier time DIing out of the attack. This is further magnified for pokemon with a quadruple weakness to fire (Foretress) and a quadruple resistance (Kingdra).


Down Smash: Hyper Apples
B.B. hood pulls out two apple bombs and tosses one to each side of her. The apples travel a horizontal distance of a stage block and a half. Like the mines in Malice & Mine, the apple bombs behave in a very similar manner; if something touches the apple bombs, they will explode on contact. The apple bombs have a much shorter fuse than the mines do however, with a timed delay of about 1 second instead of 2. The blast radius is also slightly smaller than one that a mine produces. The size of the apples is roughly about as big as an Item Capsule. This move does not have any IASA frames on it, so it can’t just be spammed to make a wall of traps on both sides of B.B. Hood. Nevertheless, its end time is reasonable enough combined with decent shield pressure to get away from someone and retreat back or to go on the attack or get the spacing needed for something like a short hopped Smile & Missile.

Charging up this smash results in simply more apple bombs being thrown on each side. Uncharged, it’s one apple on each side. Fully charged, that goes all the way up to *four* apples on each side. Each apple deals 12% damage. Knockback is very sharp horizontally with moderate power. If the opponent doesn’t DI the hit, there is a very good chance they’ll hit the ground and have to tech, resulting in a possible techchase into something else. And with multiple apples, opponents at low enough percents can be comboed from the multiple of explosions on one side.


Aerials

Neutral Aerial: Tornado Strike​

It looks similar to Meta Knight’s infamous Mach Tornado, but don’t let imitators fool you. As B.B. Hood spins around to turn into a small tornado, the hitbox covers just where her body would have been and slightly more. The attack does 1% for a maximum of 12 hits total for 12%. Those caught inside will have to SDI out of the tornado to escape; the vacuum effect makes normal DIing of the attack practically impossible to do. There is also a very tiny vacuum effect that works outside of the tornado to pull someone inside, but this is quite minimal and not too noticeable. This aerial has nowhere near the overwhelming priority or ridiculous duration that the Mach Tornado has. B.B. Hood’s Tornado Strike lasts very quickly and is suited more for a situational pressure or defensive aerial. The move autocancels at any time during the attack when B.B. Hood hits the ground.

Forward Aerial: Stumble & Blade​

An aerial version of this move from Darkstalkers/MvC2. B.B. Hood quickly pulls out two knives and then assumes a diving motion as she plunges the knives in a downward arc that covers the same arc as Marth’s Forward Aerial, but with far less range. Throughout the entirety of the attack, anyone being hit by the knives will be dealt a whopping 17% and will be knocked back very badly at a mostly horizontal angle. This attack’s power rivals that of many smashes, and it is a very powerful punishing tool for B.B. Hood due to its reliability and speed. The downside? Well, after the attack, B.B. Hood has to get back upright, which results in a lot of cooldown time. She experiences even worse lag if she lands before the attack fully finishes. Definitely not something to be approaching with, especially short hopped. This move will end before B.B. Hood touches the ground on a full hop. Keep this in mind as another potential mixup.

Back Aerial: Blindfire​

Without even looking behind her, B.B. Hood pulls out her Uzi and fires a five-round burst starting from a downward angle and moving upward to finish the last shot at an upward angle. Each bullet deals 3% and knocks the opponent slightly upward into the next shot that she’ll fire. If the opponent is reasonably close to the barrel of the Uzi (about a half length of a stage block), then all of the hits will combo right into each other for the full 15%. If they’re farther out, then they will more than likely get hit by just a few of the bullets and take minimal damage with very little hitstun. The main upside is the quick cooldown and the very low landing lag though, so this can make for a decent retreat move but an even better approach. Beware good SDIers though.

Up Aerial: Apple Juggle​

Reaching into her basket, B.B. Hood pulls out an apple bomb and chucks it straight upward. After going up for about one stage block in height, it lets off a tiny explosion to deal 8%. Hit opponents will be knocked back at a slightly below moderate distance, not KOing Mario off the top until around 140%. There is a considerable amount of delay after B.B. Hood tosses up an apple bomb as she frantically fidgets around in her basket looking for... something. The initial startup is slightly below average, and the while the move does not autocancel at all, it has fairly low landing lag. This makes for another good anti-air attack aside from Cheer & Fire, but its priority is much lower given that the apple behaves as a projectile, and it lasts for a short period of time compared to the long duration from Cheer & Fire.

Down Aerial: Stab Swing

B.B. Hood swings her basket in a downward motion that covers about a third of a circumference of a circle. As she does so, some knives slip out of her basket and stick out from one of it as she swings the basket during the attack. The basket extends outward about a stage block downward for a radius length and it does 9% and sends someone directly upward. The knives stick out from the outside of the basket and provide the sweetspot hitbox of the attack. An opponent struck by the knives will take a hefty 15% and be sent at a very awkward downward angle with moderate knockback. This can be meteor cancelled with appropriate timing. The start-up time is just about average and the ending lag afterward isn’t too bad. There is a fair amount of landing lag if B.B. Hood lands before she fully swings her basket downward, but if the basket does its full motion downward back to B.B. Hood, then the attack will autocancel. To get the spike off, you must hit the opponent on the side that the knives are sticking out, which is the side that faces away from where B.B. Hood is positioned. The other end of the basket is just the blunt end, resulting in the normal 9% you get for any other area.

Throws

Standing Grab​

B.B. Hood’s standing grab is probably one of the worst in the game. It’s right there in the cellar with the Ice Climbers and Pikachu for its range. B.B. Hood very meekly swipes open air with her right hand without even looking. It’s as if she doesn’t want to even touch whatever she might grab!

Dash Grab

B.B. Hood finally gets the courage to throw herself out there. As she does, she slings out her basket which helps to extend the range of B.B. Hood’s grab range somewhat. In exchange, the dash grab starts up slightly longer than her normal standing grab, and there is a slight bit longer lag time as B.B. Hood has to collect herself if she whiffs.

Pivot Grab

Similar to the dash grab, B.B. Hood swings around her basket, hoping to snare something with it. It should be noted that her pivot grab has slightly less lag time than the dash grab, and the pivot has the most range out of all of B.B. Hood’s grabs, coming in at just under one stage block.

Note: If B.B. Hood grabs someone bigger than her, such as Bowser, King Dedede, or Ganondorf, she actually jumps right on top of their faces and hangs on to dear life. This does not change the functionality of the grab at all; it’s just a nice aesthetic touch.


Pummel​

With an evil glint in her eyes, B.B. Hood pulls out a knife and begins to stab the opponent incessantly in a frenzy. The pummel is quite weak at 1% per hit, but its pummel rate is close to Kirby’s, giving B.B. Hood a great way to refresh her stale moves since each pummel counts as an individual attack on the stale moves list.

Forward Throw: Kick ’em when they’re down

B.B. Hood trips the foe to the ground, and before they can even get up she fires a three round burst from her Uzi. Each bullet deals 3% damage each and then leaves the foe on the ground in the prone position after the throw ends. This means your opponent will have to either roll, use a get up attack, or stand up, resulting in a techchase situation. This throw cannot be teched at all, so the foe’s options become greatly limited after that.

Back Throw: Assassinate​

B.B. Hood takes the knife she was previously stabbing the opponent with and slits their throat as hard as possible. This throw deals *major* damage coming in at an eye-opening 16%. The opponent is sent at a downward diagonal angle away from B.B. Hood with really no chance of any sort of follow up. This throw is designed almost purely for damage, and is usually a safe bet if you don’t feel like techchasing with the forward throw.

Up Throw: Vertical Spray & Pray​

B.B. Hood tosses up her target into the air to a height of about 2.5 stage blocks above her, very similar to Fox’s Up Throw. B.B. Hood then pulls out her Uzi and unloads ten rounds directly up into the air. The bullets will all travel in random directions, and do 1% per hit. The initial throw upward does 4%. Every time this throw is executed, it won’t always connect for the same amount of damage due to the fact that the bullet spray is going to be random for each throw. All the bullets could hit the foe, or all of them could miss completely. Also consider that the foe can DI this throw and further increase the possibilities of how many bullets they get pelletted by. While this is an unreliable throw in terms of damage, it will still toss the opponent up into the air regardless of any further damage the bullets do. This can be useful against characters that struggle in the air where it can turn into a positional advantage.

Down Throw: Careless Knives​

As B.B. Hood pins her foe to the ground, she goes to swing her basket right into their face. However, her basket “accidentally” opens up and all of her knives come out, falling right into the foe and stabbing them in multiple locations. A total of ten knives fall out and do 1% each for a total of 10%. The opponent gets knocked back a modest distance right in front of B.B. Hood and upward, which creates some potential follow-ups or traps if you read your opponent correctly. The knockback growth is also very small, meaning that you can still feasibly DI chase and/or airdodge read your opponent even at 200%.


Art courtesy of UdonCrew of Deviantart


Final Smash - Cool Hunting​

After breaking a Smash Ball, B.B. Hood has the ability to call in her buddies to do more than just plaster someone with bullet holes. As soon as the B button is pressed, two big men are summoned right alongside B.B. Hood; one an army soldier armed with a bazooka, and the other a hunter armed with a double-barrel shotgun. It should also be pointed out that B.B. Hood is invincible during the entire length of the Final Smash. An instant later, both men and B.B. Hood open fire in the direction that B.B. Hood is facing. Three “walls” of projectiles are fired, which each person firing a total of 26 shots each. They are as follows:

- B.B. Hood fires her Uzi at the height of just under Mario’s head. Each bullet deals 1% and completely traps the foe with no chance for any type of DI. Unlike her other Uzi-based attacks, these bullets travel in perfectly straight lines and the bullets can be seen as clear as day.
- The hunter fires his shotgun at about the range of Ganondorf’s head. Each shot he does deals 2% and sends the foe slightly downward.
- The army soldier fires his bazooka slightly slower, but still at a quite fast rate of fire. Each hit deals 4%, but it is a bit tough for smaller characters to get hit by all of these shots. Like the hunter, the shots are fired at just where Ganondorf’s head would be.

The final hit comes from B.B. Hood’s last bullet, which deals all the knockback of the attack. With all 26 shots from each character, this Final Smash can potentially deal an eye-opening *182%* if all the shots connect and will almost certainly KO if that happens. After the Final Smash ends, the two men disappear, B.B. Hood spins her Uzi around in her hand, and then puts it away with a bit of an evil smile.

As amazing as it sounds, the range of fire is not exactly that wide for a final smash. While the shots traverse the entire length of the stage in which direction they get fired from, the final smash only covers up to the height of a standing Ganondorf, and only for just a small concentrated beam of fire. The move also lasts fairly short for final smash as well, clocking in at about a 3 second duration. Cool Hunting trades the range and duration of Samus’s Zero Laser Final Smash for the ability to dish out unbelievable pain and having a somewhat faster startup. Of course, you’re more than likely going to feel like an idiot for activating this while your opponent is behind you. This final smash can also be executed in the air as well, so make sure to take that into account when trying to find an opening for connecting Cool Hunting!


Playstyle - Mobile Armory​

B.B. Hood is armed to the teeth with enough weaponry to make even Snake jealous. However, if you think B.B. Hood is your typical defensive camper that just likes to stay one spot for the most part and take potshots with projectiles, then that’s not exactly how you should think of her. Most camping styles, such as Snake’s grenade camping and laser camping with space animals have the user assume a generally static position on the stage and force the opponent to come to that one location and be in an advantageous position. While B.B. Hood can camp this way, she is much better off using her agility and jumping capabilities to run around the arena and bombard the area with her arsenal. This will put an opponent on their heels, because the mixups and adjustments that B.B. Hood can make on the fly with her three main specials will keep an opponent guessing. When B.B. Hood assumes the role of a static camper, her mixups with her projectiles become a lot more limited, and it is easier for the opponent to break through her defenses and traps.

Spray & Pray is your bread and butter move. It’s what makes B.B. Hood B.B. Hood. Use the versatility of being able to angle your shots both while on the ground and in the air. If you’re retreating or your opponent is running away from you for some reason, you should almost always take the opportunity to unload on them for free damage. This works best for characters that aren’t adept at quickly zoning inside B.B. Hood, as the minimal hitstun will be more of an annoyance for fast, aggressive characters than anything to them. Always try to keep a mental note of roughly how much ammo you have remaining in your clip, because you never want to be caught off-guard by running empty and having to open yourself up while reloading. This is a prime moment for your foe to easily punish you due to B.B. Hood’s extreme vulnerability during this time. Use common sense when knowing when to reload; do it when your foe is offstage or they’re flying off the screen to their death, for example. Remember, Spray & Pray is your general utility move, but getting caught having to reload discourages spamming it... alongside the damage decay it quickly receives.

Projectiles can also be used aggressively to approach instead of just being staple attacks for the common camper. For example, a short-hopped, down-angled Smile & Missile is a great way of applying shield pressure, which can then be followed up by abusing the IASA frames into Spray & Pray if they retreat, or even another Smile & Missile for additional pressure. Heck, even a short hip Malice & Mine can be a beneficial mixup for dropping a mine right next to a shielding opponent. Your options open up similar to what you could have done if you short-hopped, down-angled Smile & Missile; further shield pressure with your specials (or even throwing in a tilt there for good measure to make things a bit interesting) or retreat to go back to Uzi camping.

Should someone get inside of B.B. Hood’s projectile mayhem, you have few good options of realistically fighting back, but there are some. The main one will be Malice & Mine, which will keep rushdown characters from breathing down your neck all the time. Malice & Mine also serves as an excellent punishing tool against spotdodgers due to the extended hitbox of the attack because of the mine just lying there. Short hoppers should be answered by full hopping a Malice & Mine to hopefully drop a mine right on their face. If they full hop at you, then it’s recommended to angle a Cheer & Fire in their direction. Remember though, Cheer & Fire only goes down to a 60 degree angle at the steepest. If you whiff on that, then it can be quite easy for the foe to punish you with ease due to the duration of the attack and inability to hit anywhere to the side of the “invisible cone” that Cheer & Fire covers. Another good option of keeping some of the more distant but still close aggressors away would be to throw out an unsuspecting down tilt. This should not be used often however; B.B. Hood’s down tilt can be unsafe on block against characters with either speed or range to punish her as she retracts her legs. Stick to punishment out of shield; don’t shieldgrab unless your opponent is practically point-blank beside you. As noted before, B.B. Hood’s standing grab range is simply pitiful and you’re usually better off jumping out of your shield with a Stumble & Blade for maximum punishment. For KOing, Shyness Strike and Stumble & Blade should be saved as much as possible, for they are B.B. Hood’s most reliable KO moves. They do not have to worry about the opponent falling into your projectile traps and are simple, yet effective punishing tools.

B.B. Hood is in huge trouble if she’s knocked off stage; especially if she’s hit at an awkward angle. Her second jump really isn’t anything to write home about, and with just a tether recovery to aid her after that, she is in great risk of getting gimped by someone such as Meta Knight offstage. This is mitigated though by her three excellent specials -- especially Spray & Pray and Malice & Mine. They’ll help to keep extremely savvy edgeguarders from getting all over B.B. Hood, but don’t expect to always work against those who are more careful yet are still intelligent at edgeguarding. This is by far B.B. Hood’s biggest weakness, so stay away from the edges of stages as much as you can once you reach moderate to higher percentages.

With death and destruction being rained on every square inch of the battlefield combined with a subpar recovery, B.B. Hood is not exactly an ideal teammate for 2v2 play. Her constantly moving and shooting around style is prone to have your teammate caught in the crossfire more often than not. An ideal teammate for B.B. Hood would be someone who also has excellent mobility to be able to weave in and out of B.B. Hood’s deadly mix of weapons and projectiles. G&W and Meta Knight fit this mold quite well. Both have some of the best overall mobility in the game and provide excellent offense and defense. Good communication between you and your teammate is an absolute must should you decide to play B.B. Hood in teams. The collateral damage from accidental friendly fire can quickly accumulate if you’re careless with your specials.


Extras

Entrance: B.B. Hood frolics onto the battlefield, skipping as she does. Her dog follows her and barks happily as he goes over into the foreground to watch the fight.

Note: The dog is like the Pokemon Trainer. He’s just there for aesthetic purposes and does nothing to affect a match at all. The butterflies that also fly around B.B. hood also are there for the same reason as the dog.

Up Taunt: B.B. Hood looks up with widened eyes and a beaming smile at the butterflies flying around her. She looks back and forth a bit before resuming her default pose.

Down Taunt: B.B. Hood bends down to her shoes, and she makes sure they’re tightened and buckled up before rising back up.

Side Taunt: With her evil grin, B.B. Hood pulls out her Uzi, spins it around, flips it up, and catches it again all in one fluid motion. She then puts it away back in her basket.

Victory Pose 1: B.B. Hood spins around once and then looks at the camera, punching the air three times with a very determined expression on her face.

Victory Pose 2: Similar to the first victory pose, except B.B. Hood does a much more complex spin before posing toward the camera, punching the air just once.

Victory Pose 3: A man appears and gives B.B. Hood a huge wad of money. She smirks as she counts the bills in her hands.

Losing Pose: Tears well out from B.B. Hood’s eyes as she sobs at her knees in defeat. She doesn’t clap at all.


Kirby Hat​

After swallowing and copying B.B. Hood, Kirby gets the head part of B.B. Hood’s red robe, which covers the entirety of Kirby. He also gets the small little bow tie just under his mouth. Kirby is now able to pull out his own Uzi, which is smaller than B.B. Hood’s, and unleash a barrage of automatic fire in the exact same way she does. However, because Kirby’s Uzi is smaller than B.B. Hood’s, it only carries 20 rounds instead of 30. In exchange, Kirby is able to reload his Uzi slightly faster.


Snake Codec​

Snake: Colonel, did my kiddy fairy tale book just come alive?!?
Colonel: Far from it, Snake. That’s Baby Bonnie Hood; better known as B.B. Hood. She is an extremely feared -- and lethal bounty hunter.
S: You gotta be pulling my leg! She’s wearing a dress, has a basket, and a dog... and butterflies around her too.
C: That same basket is her weapons cache, Snake. It contains an Uzi, an integrated RPG system, grenades, combat knives, Molotov cocktails, and she is also armed with proximity mines.
S: So, looks like she tried to take a page out of my own book...
C: You could say so, Snake. But remember: while armed to the teeth, her weaponry is still dated and inferior to yours. Don’t underestimate her at all. Remember your training, Snake.
S: ...Understood.


Costumes​

- Red dress/shoes, white apron, blonde hair, light brown basket,
yellow butterflies (default)

- Purple dress/shoes, light blue apron, light pink hair,
dark brown basket, purple butterflies

- Dark blue dress/shoes, white apron, light blonde hair, dark brown
basket, light blue butterflies

- Blue dress/shoes, white apron, blonde hair, light brown
basket, turquoise butterflies

- Pale blue dress/shoes, white apron, light blue hair, brown
basket, white butterflies, pale skin

- Black dress/shoes, cream apron, pink hair, dark brown basket, gray
butterflies, dark skin


That took a few days, but it was worth it. :)
 

Neherazade

Smash Journeyman
Joined
Apr 5, 2009
Messages
359
Location
Gensokyo.
Spray and Pray?
Malice and... something else?
Do I sense League of Legends fever in the SWF community?

w/e. Just skimming the sets, I was impressed. both BB hood and Octillery (just two days ago I started brainstorming a set for this guy lol). Still, I feel that something is lacking. I've never played/heard of BB's origin, but i didn't really get a feel for her character. While that's not the point of MYM of course, I love when the set reveals something about the character. It helps to bring them to life, while making the set much more fulfilling to the reader. Maybe a more in-depth read will rectify that for me? Who knows. Off to my English project! (yes, another one. i can't wait for summer when I'll be able to post sets...)
 

Hyper_Ridley

Smash Champion
Joined
Dec 21, 2007
Messages
2,291
Location
Hippo Island
B.B. Hood

Is it wrong if I literally lol'd at the idea of Red Riding Hood with an Uzi and blowing everything to kingdom come?

While I do remember a Master Chief set posted in one of the earlier MYMs, your extended absence until now meant that you had a lot of catching up to do in terms of quality, but you've definitely done your homework. I was surprised at how unique BB Hood is despite being in one of the most cliche MYM archetypes. It's definitely nice to see a run-and-gun style projectile wielder instead of the typical "hold the fort!" variety. Also nice to see an ammo-based move without having the ammo as an overarching mechanic. ;)

If there's one thing I'd like to criticize, I feel your writing could be tightened up a bit. For example, the whole paragraph about USmash's effects on Pokemon is uneeded since it's a built-in Smash Bros mechanic so by saying that the attack is fire-based we can assume all that stuff. Similarly, the section in the playstyle guide about her Uzi move feels like a long-winded way of saying "This is her bread and butter projectile due to its versatality but if you abuse it you'll be vulnerable while you reload". I also found it funny how one of the longest sections is her close-range escape options when the start of it reads that she has few. :laugh:

But yeah, pretty good return to MYM. Should be interesting to see what you come up with next.
 

JOE!

Smash Hero
Joined
Oct 5, 2008
Messages
8,075
Location
Dedham, MA
HR and JOE! present: Drugs and other assorted bad things


WAND! MAKE MY MYM REALLY INACTIVE!


OSHI- WE NEED DRAGON-SET POWER!


there ya go sundance


DOoooo-deee-Doo-do-dee-dooooO!!!!!


get ready for this biches...​


click here to see his trainer


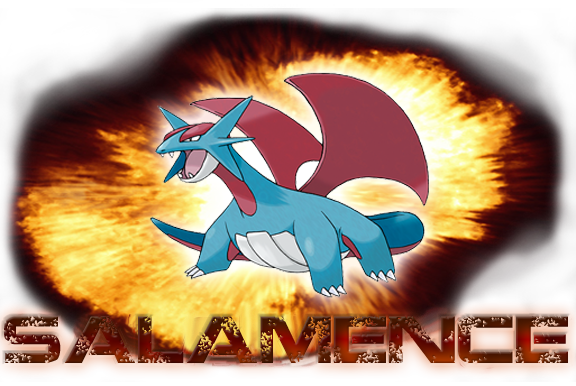
Salamence, the Dragon Pokémon. Salamence is the final evolution of Bagon. It is able to exhale powerful blasts of fire while flying. He enjoys a very nice amount of popularity with both casual and competitive Pokemon fans, thanks to his cool design and extreme usefulness in the metagame, to the point where there has a been recent movement to ban him in a similar vein as Meta Knight. Will Salamence be forced into ubers to compete with monsters such as Mewtwo and Wobbefett?.


GROUND: On land, Salamence isn't quite in his element. He walks about as fast as DK, and has a dash similar to Game & Watch (middle compared to the cast). Each has him trotting along on all fours.

SIZE: He is quite comparable to Ganondorf here, being as weighty and as big (only horizontal instead of vertical). His head makes him about as tall as Shiek however.

AIR: Where he truly shines is in the air! He has an aerial Di comparable to Wario, and a fallspeed similar to Yoshi, making him naturally much more speedy than on land. On top of this, Salamence sports an impressive 5 jumps. The 1st being like Ivysaur's mediocre jump, but the remaining 4 mid-air jumps are like Shiek's second jump! Combined with a Glide as fast as Pit's, and you have a formidable recovery.

WEAKNESS: Ice based attacks do 10% more Kb to Salamence, much like Fire does to Ivy, water to Zard and Grass to Squirtle.

So over-all Salamence is rather mediocre on the ground, along with having standard heavyweight syndrome with his size and such. Once airborne however Salamence can move like no other! Having 4 incredible mid-air jumps, great speed and fall rate and a very fast glide for his size makes him a dominating force in the skies!


NEUTRAL SPECIAL:
OUTRAGE
Ah, the attack that makes Salamence the utter bad-*** that he is! I mean, who can take a STAB Outrage from the dragon with the highest ATTK to abuse it with?

Sadly, this isn’t that attack…

However, Outrage here refers to Salamence’s knack for becoming uncontrollably enraged in battle, and how powerful he becomes!

To activate outrage, you need to hold B down for an entire 5 seconds, which are entirely interruptible, causing you to have to start over if someone hits you. After the 5 seconds of him snarling angrily have passed, Salamence roars toward the sky as a vortex of orange and purple flame surrounds him! This vortex is about as wide as Link’s Spin-Attack, and covers his body up to his head, doing a decent 2% per second to anyone coming in contact, but no actual KB. This lasts for 10 seconds, but charging it up again can prolong the timer at the expense of being immobile.

Now you may be thinking, “A damage aura is nice, but why such the extreme charge up?” This is for two reasons:

1) While Outraged, Salamence’s move-set changes, unlocking his Dragon-Type attacks, which will be described on the moves affected.​

2) Aside from changing his move-set and providing a free aura of damage, Salamence has two methods of reducing the charge time, either by taking 50% damage (reduces the time to activate by 1 second for every 50% taken in the same stock), or by using his down smash, Focus Energy, beforehand (reduces timer by 2 seconds, fully charged).​

When Outrage expires, Salamence expieriences 1 second of tiring (end lag). If Salamence is using an attack he will not tire until he reaches the end lag of the attack, with the attack's end lag counting towards that 1 second. Make that last attack while Outraged count!

SIDE SPECIAL: TWISTER / DRAGON RAGE
Salamence rears back, becoming a tad taller than Ganon now as he flaps his wings twice in front of him. As he does so, as you’ve probably guessed from the name, a vortex of air is formed that is about the size of Justice Man in front of him, and lasts for about 3 seconds. If you happen to catch a foe in your twister, they are trapped in a spinning animation for the entire 3 seconds, taking rapid hits for up to 15% (unless they DI out/get knocked out). Unfortunately for Salamence, 1.5 of those seconds are used up during the animation and end lag of the summon!

Now, that may sound like a long time, but keep in mind the foe had nearly 2x as long to either get out of the thing or avoid it in the first place. However Salamence, being the epic Flying-Type that he is, has a few tricks up his sleeve to make good use of the Twister in the remaining time it is out. Via methods to be explained below, Salamence can use his mastery of the air to extend the duration, move about, and even create a turret out of his little vortex of pain!

To note, whilst airborne the twister will slowly drop down to earth at about Jigg’s fall speed. It will then have the 1 second timer it would normally have once it hits a surface. (yet only 1 twister may be on the field at a time)

While Outraged, Salamence’s Twister becomes Dragon Rage! Dragon rage differs from the Twister in that it is a swirling mass of Dragon Fire instead of air, thus doing 3x the damage when a foe is trapped inside (45% max!). However, it is much slower when Salamence tries to affect it with his wind abilities…


UP SPECIAL: AERIAL ACE
Speaking of wind abilities, few are as deadly as Aerial Ace. With it’s guaranteed accuracy in the form of transcendent priority (think Ness’s Fair…it ignores other attacks) and a hit box the size of Ike’s Fair, there are few who wouldn’t be fearful …

Salamence goes through a brief animation of him flashing white and Shaking his neck and tail slightly, taking about as long as Olimar’s Whistle (with a few frames of super armor as well!) The hitbox comes out 2.5-5 seconds afterwords! Meaning that Salamence is free to do whatever he pleases once the summoning animation is complete. When the hit box finally comes out, it is a wind-effect in the form of a diagonally slash, covering the distance of Ike’s Fair (as mentioned earlier) and doing a decent 13% with KB that shoots diagonally upwards to kill around 160%

While this is all well and gimmicky, keep in mind what this does for our dragon:

1) First and most importantly, it makes foes afraid to approach him. This buys him time to potentially get a Twister going, charge Focus Energy, or more importantly Outrage.

2) It gives his big frame a defensive maneuver. Not only does it alleviate his lack of an Up B (although he has multiple jumps) recovery via a small window of Super Armor, but nothing can interrupt the timer! Picture poor Salamence being combed/CG’ed by a Penguin or Warlordian move set, only to have his attacker be sliced by a torrent of wind.

For added shenanigans, initiating the move again resets the timer…


DOWN SPECIAL: INTIMIDATE
An ability as a special input? What is this I don’t even…

Well, it actually makes sense, as Salamence has to actually you know, Intimidate his foe. Anywho, after moderate startup lag Salamence glows faintly red as he growls his name, taking about the same time as his Aerial Ace, while taking an …intimidating pose. When he does this, any character within a stage builder block facing him becomes Intimidated (they glow feint blue for a moment) and are frozen with fear until Salamence’s animation ends, leaving both parties in a neutral state.

Beyond the obvious move-interrupting properties it gives to Salamence, as in the games, Intimidated foes suffer a halving of their Attk, or having all their moves staled halfway when it comes to Smash. This effect lasts for 5 seconds, and cannot be stacked on the same target while they are already intimidated.

There are plenty of uses for this, such as the obligatory “use at high % to lol at kill moves”, but other applications could actually be for use on a team mate. As with their moves staled, somebody like Shiek could combo endlessly, racking up absurd damage within 5 seconds. Or, one could use it passive-aggressively, keeping yourself close to the foe for Aerial Ace, luring them in with their newfound ability to combo your big frame only to get wailed by it. Perhaps the best use is to not use it at all however. Any player who knows about Salamence will be…intimidated to be within a SBB of him knowing he can intimidate them, thus continuing the mind game Salamence starts with Aerial Ace, giving him opportune time to build up his rage.


JAB: BITE
Salamence whips his head forward in a small arc, and takes a nip at anyone within reach (about the same as Zard’s dtilt in lag/range). Getting bitten does about 6% and knockback that won’t kill till like past 200%.

…what are you looking at me like that for? Is this MYM4? He can have a decent jab that’s not lol-creative if he wants!


UP TILT: STEEL WING
Finally, that one attack that’s been said over and over! Salamence bends his head down momentarily, and raises his wings to an upward position, flashing for a brief moment when they are fully erect!

…lolwut

Ok, sounds stupidly simple, essentially taking a short moment of lag just to raise his wings. But the catch here is that his wings become a constant hitbox for 10% damage to anyone who gets sliced by them, until he does Utilt again/other move that de-toggles it! The KB from hitting the wings is set, similar to the 1st hit of Falcon’s Nair (not much), and will send the opponent at an opposite angle from where they hit them.

This has a multitude of uses, as seen below, but the most blatant is that you now have a permanent hitbox above you, covering an area the size of Link’s Usmash! The wings have no hurtbox, and don’t stale, making aerial approaches to you essentially useless. The downside to this move though? You are limited to your crappy grounded jump, locking you from your aerial game! So be wise about how you use this, as against some foes being grounded outweighs the benefit of a bladed umbrella above you.


FORWARD TILT: FIRE FANG
Stepping forward slightly, Salamence strikes forward with his head, mouth open and full of flames! This has about the same lag as DK’s Ftilt, but with slightly more range as Salamence steps forward. Hitting with his head does 5%, but hitting with the flaming mouth will do 8%, as well as burn the foe! Being burned causes the foe to take 3% per second in rapid hits as they are on fire, and lasts for 2 seconds. While sweet-spotting fire fang does excellent damage (over time), it only does slightly more knockback than your Jab. While outraged, your sweet-spot grows into a small burst of fire inside your mouth, similar to Mario’s Fsmash.

Interestingly, if you manage to nail a twister with the sweetspot, the twister will carry the flames and shoot them out! This causes the twister to now become a miniature turret of sorts, shooting out a cloud of small embers for 1% damage on either side. These embers shoot out at the rate of fox’s laser, and cover an area the size of the twister on either side, but don’t cause flinching. Combined with outrage it is very easy to create a terrifying vortex of fire!


DOWN TILT: GUST / DRAGON PULSE / WHIRLWIND
With barely any lag, Salamence flaps his wings downward, being able to do so at a rate of about 3 flaps per second. What this incredibly simple move does however is create a wind-effect around himself each time he flaps his wings, pushing everything within ½ a SBB away from him!

With outrage, he creates a small ring of fire around himself on the ground, instead of a wave. This Dragon Pulse hits below shields, and knocks opponents skyward for 4%, similar to DK’s ground pound. Even better, with Steel Wing you get an extra-powerful gust, making a wind effect of 1.5 SBBs around you (although it de-toggles Steel Wing)! Combine both outrage and steel wing, and you can create a huge burst of fire around yourself, sure to clear the area!

If a twister is nearby, the wind from gust can actually re-fuel it’s supply of air! A single flap of your wings will replenish .5 seconds to its duration, and a Steel-Wing’ed flap will do 3 times as much. This is tremendously useful considering how you want to keep your little vortex of death out to apply your own attacks to.


DASH ATTACK: RAZOR WING / DRAGON RUSH
As Salamence dashes, pressing A will cause him to suddenly turn, slicing one of his axe-like wings forward in a arc about the size of Ike’s Ftilt, and do 10% with negligible knockback by itself. While he stops his momentum however, his wings moving like that create a strong wind effect forward, pushing items/foes/etc away about a stage builder block. This wind can also cause a “flare” of fire with the wind if he is in outrage, doing an extra 5% and flinching, making it now a SBB-sized hitbox. This move also causes him to turn around, so use stuff like DTilt to clear some space afterwords. This has below average startup and end lag.

If Salamence has Steel Wing up, he can’t exactly use them to do a sweeping attack now can he? Instead, he will lower his head, exposing his 6 horns to the foe and charging forwards even faster! Getting nailed by the horns do 6 hits for 2% each (12% total) and launch foes diagonally upwards, killing at about 160%. Great for approaching as even aerial enemies, or those on platforms aren't safe. Low startup lag, moderate end lag.


FORWARD SMASH: DOUBLE EDGE
Salamence spins around with his wings out-stretched horizontally. This moves him forwards 2 character lengths and his wings are a hitbox that deals 13-25% with knockback that KOs at 140-105%. Below average startup lag, moderate end lag. With Steel Wing active, Salamence's wings remain in their upwards position, making the hitbox vertically focused instead of the almost purely horizontal hitbox normally. Like the in-game move, Salamence takes some recoil damage, but it' always a static 8% regardless of how much he charges it. This is a nicely damaging move, though the fact that Salamence takes nearly as much damage as he deals isn't very appealing...


DOWN SMASH: FOCUS ENERGY/ OUTRAGE
Salamence growls as he charges up the smash, and when you release...nothing happens except you incur moderate end lag. For anything to happen, you MUST charge the move completely. Salamence will have an orange tint to his scales upon a successful charge. The next smash attack Salamence performs will automatically be at full charge with Focus Energy active, but it only has one use per charge. Definitely find the time to use this when you can.

If you have Outrage going, your down smash becomes, OUTRAGE! Yes, here he finally actually uses outrage, shouting his name as his cloud expands around himself almost like an explosion of dragon-power! This smash cannot be charged, but it does KB that is just below the power of the falcon punch, in a hitbox comparable to Ike's usmash all at once. On the damage side, this does the normal damage of outrage, plus a burn effect like Fire Fang and Dragon Breath. While quick to come out, Salamence suffers hefty end-lag and loses his rage.


UP SMASH: WING ATTACK/ WING SLASH
Salamence jumps upwards one Bowser height and flaps his wings, creating a small gust of wind along the ground that travels 1/6 of battlefield. His wings are also hitboxes, and they deals 10-20% with horizontal knockback that KOs at 140-125%. Moderate startup lag, below average end lag. Salamence ends the move in the air.

With Steel Wing active, Salamence delivers a stronger flap, causing the wind to travel twice as far and the damage increases to 13-24% with KO potential at 130-115%. Salamence falls back the ground after using the move in this case, with Steel Wing disabled.


GLIDE ATTACK: DRAGON BREATH
Without losing control of his glide, Salamence opens his mouth and breaths a torrent of fire down in front of him! This reaches about half the distance of Bowser’s fire breath, but doesn’t shrink the longer he holds it. Getting hit by this fire is the same as getting hit by any fire-breath type move, except you also have a burn inflicted upon you like with Fire Fang (6% over 2 sec).

Foes are not the only thing that can be burned though, flying over the stage or a platform while using Dragon Breath lets you set the ground ablaze! These trails of fire are about as tall as Jigglypuff, and have no definite range. However, they only last for about 4 seconds, but in that time they do the 3% per second of your burn effect.

Furthermore, your wind abilities have a few ways of manipulating these fires. As seen in Razor Wing, attacks like Dtilt and Usmash create wind boxes, which will “fan the flames”, so to speak, making big hitboxes of fire around themselves where the wind effect usually is. The Twister can suck up flames like with Ftilt, but then spread them elsewhere on the stage, refreshing the fire’s hitbox, but in random patches that are only as big as the fire’s left by Mario Finale. Might as well mention this here, but water from any source will put out the flames, as well as douse a burning character.

It is important to note that Dragon Breath simply replaces his Neutral Air while gliding, as all his other aerials can be done as he glides!


NEUTRAL AIR: FIRE BALL / DRACO METEOR
Simply enough, Salamence shoots 4 small fireballs in rapid succession at a 30 degree downwards angle. They travel very quickly and deal 3% a pop with flinching knockback. No knockback on the final one though. Low startup lag, moderate end lag. This move is modeled after Shiek's needles, one of the most broken smash bros characters of all time...

Oh wait, Salamence is even more broken than Shiek, hence him using his own falling projectile when outraged. Now Salamence roars as his outrage aura forms into a meteor-like object and slowly falls at the same trajectory as the fireballs. This meteor is half the size of Bowser and deals 13% with knockback that KOs at 130%. Sadly, this version has moderate startup lag on both ends, but that's when you use Aerial Ace to really make your opponent experience the raw terror of Draco Meteor!


BACK AIR: TAIL LASH
Using that rather long tail he has, Salamence whips it up and down once, taking about half the time of Yoshi’s Bair, with over twice the range. This has multiple hitboxes, one on the downswing, one on the up and two when between. Each hit doing about 8% and KB in the direction the tail is going, that won’t kill past 200% (the knockback is too much for the next hit to occur for ridiculous damage). The main use of this is to either get people airborne and/or to punish shields, as when you swoop down, most foes will expect a direct attack, and drop the shield when your main body has passed.


DOWN AIR: SWOOP
Speaking of swooping down, Dair has you fall faster momentarily with a screech, as you extend your claws and bring your tail down like a certain space-piratey dragon. This lasts for about half a second, but can be canceled early by pressing A or Jump into his neutral fly state (this requires available midair jumps). While the hitbox his active, hitting the claws do multiple hits of 2% per claw hit, with damage usually doing around 8% but with potential to do more, and flinching damage. Being hit by the tail does 4%, and knocks foes diagonally upwards, into your claws. Great for wreaking havoc onto ground-bound foes, as the claws can scrape away at a shield enough for the tail to hit, and scoop the victim into your talons. This has below average startup lag, moderate end lag and landing lag.


FORWARD AIR: DRAGON CLAW
Doing a loop mid-air, Salamence rakes the sky in front of him with his talons! Doing 12% and KB similar to Ganon’s Uair, this move is all the more scary in that it has the hitbox of both Ganon’s Uair, and Bowser’s Fair as if they were plopped together in one continuous loop! However, it takes as long as both of them combined to pull off as well. Like a certain other infamous loop move, this ends with Salamence in his glide state, and from there he could do it again. Great for juggles/punishing or offstage KO’s, you’ll be sure to use Dragon Claw in any of your aerial battles.


UP AIR: GALE FORCE / RAIN OF FIRE
Slowing down, Salamence will raise his wings upward ala Steel Wing (and do like 5% and negligible Kb if he hits a guy with this part), then powerfully slam them down to his sides; recovering from the distance he fell while doing this. When he slams his wings down, a HUGE windbox is created below him, the size of 3+ Bowsers! (if you had them in a triangle that is). This has the same lag times as Ganon's Fair, but without the randomly extra-long end lag Ganon's Fair has to deal with (meaning, the end lag doesn't CONTINUE PAST THE ANIMATION FOR THE MOVE)

As with all his wind moves, this will push foes downward, or away if he does this close to the stage, making the wind blow across it for about ½ FD. This move takes a hotter turn with outrage on however, as you then rain burning embers down upon the stage! Along with a slightly weaker push effect, the huge hitbox now has flames attached, doing 2 hits for 5% to anyone who is caught by it.

Truly an awe-inspiring move to those who cannot compete with Salamence’s aerial dominance, use this fro gimping, stage control, trap-destruction, crowd control in teams, you name it! Also, with all that air slamming down, one would think a certain vortex could be affected? When done to a Twister, it makes the twister even wider momentarily! For the next 2 seconds the twister will grow to 2x its width, granted you are able to keep it up after you spawned it, then get to the air to do this.


GRAB: Salamence grabs you with his mouth. Good range, ok speed. Hold on, this looks exactly the same as his jab....

lolmindgaems

PUMMEL:
/ FLAMETHROWER
Under normal circumstances, this is your average pummel. Salamence bites the victim, dealing 2% a pop.

While outraged, Salamence delivers a more brutal move, pushing his enemy with a billow of flames. It deals 3 hits of 3% each, with the enemy left 3 character lengths away from Salamence. This ends the grab, but Salamence is completely invincible while he does this, so you can use it in a team setting in case your enemy's teammate tries to interrupt the grab.


SIDE THROW: TAIL WIND/EMBERS
Salamence tosses his opponent forward as far as 1/2 of battlefield, dealing 9% in the process. After throwing, he growls, causing a wind current to start flowing past the screen in the direction he threw the enemy. These last for 8 seconds, during which time the enemy is given a moderate pushing effect like most wind moves, and Salamence moves 25% faster as long as he is moving in the direction of the wind (otherwise unaffected). Using the throw in the opposite direction of the currently active wind current will override the active one.

With outrage activated, you will send embers from yourself along the wind! This is essentially the same as the ember effect from Ftilt-> Twister, only coming from you in the direction the wind blows. Speaking of Twister, Tailwinds move the twister along the ground! While the wind is blowing, your twister floats around at about the speed of DDD's Dash. Now we all know how epic the little death tornado is by itself, imagine it moving around the field!

This wind can also affect your fires from dragon breath, causing them to slowly grow in the direction the wind is flowing, spreading just faster than the rate at which they disappear at. A good strategy is to either create a small patch of fire, then land and grab a foe facing the way you spread the fire to create a growing line of fire, or to create a very long patch and go the opposite way, as the long patch will then "refresh" itself.

UP THROW: FLY
Salamence hops up and takes off into the air while moving the enemy to his talons. Salamence can freely move around with the control stick until the enemy escapes his clutches, though the timer ticks down 20% slower than a normal grab. Before that happens, press the Attack Button for Salamence to flip while tossing the enemy upwards as high as Bowser, dealing 9% in the process. You can fly underneath the stage and use this throw for an epic stage spike, but remember that Salamence will have to then make it back to solid ground with his regular aerial mobility options. The upwards knockback of the throw prevents you from casually flying over the edge and tossing your opponent off-screen, though they'll still have to recover with Salamence close by.


DOWN THROW: INCINERATE
Salamence charges up a blast of fire in his mouth with his enemy still locked in his jaws! The resulting plume of searing flame delivers 10% and knockback that KOs at 135%. And it looks ******, which is the best part.

Now, if you have Tail Wind and Steel Wing activated, and use this throw while facing the direction of the wind, Salamence will use his wings as a sail of sorts and move along the ground as he charges the attack (which takes about .6 seconds). He can cover up to 1/3 of battlefield with this, and he reaches the edge he stops. This is great for getting your opponent closer to the edge of the stage for gimping attempts.


Salamence grabbed the Smash Ball! Upon activation, the screen zooms in on Salamence as he seemingly goes into Outrage automatically, only with a bright red fire instead of his usual Dragon-element variety, and lights the area around himself on fire in the radius of DK's Down B!

This new "infernal" outrage surrounds Salamence for the next 10 seconds, and behaves just like his standard version...except for a few key differences. For starters, he's invincible
. Second, the damage from his outrage attacks are doubled, including the damage aura! This makes it juts painful to be near him, let alone attacked by Salamence while he does this. Finally, anything he touches with the aura is set on fire, doing double the normal damage! Including the stage, it should be no problem for Salamence to light the field ablaze with his new red fires, which also reach up twice as high as normal.

Once the Inferno ceases, Salamence suffers end lag comparable to when Outrage finishes, but with a cinematic view as to be un-punished. However, any of those epic fires you left on the stage / victims will remain!


Alright, so Salamence is infamous for being by far the best offensive Pokemon in the metagame. He can go physical, he can go special, he is matter, he is anti-matter, he can see your past, he can see your future, he consumes time, and he'll consume you! Of course, pokemon is all about setting up those offensive powerhouses...which is why in Brawl Salamence can do the set-up and the powerhousing by himself. (smirk2)

Ok, so as you've probably gathered by now, Salamence's ultimate goal is to activate his OUTRAGE and just **** the opponent. That is very true, but that 5 second charge time is going to cause some issues. While a fully charged DSmash knocks off 2 from the stat, that's still 3 seconds that you don't have time spare with an opponent coming after you. Every 50% takes off another second, but Salamence isn't Scarmiglione, he doesn't have self-damaging moves! This is where the "set-up" phase of Salamence comes into play, by playing carefully, and dare I say it, somewhat defensivley.

Yeah, Salamence doesn't have true setting up to do so much as he has to focus on a different strategy until it's time to unleash his full draconan might. Salamence has 2 traps in the form of Twister and his Glide Attack, along with a bunch of wind moves for keeping the enemy at bay and enhacning the effectiveness of BOTH of his traps (specifically, Dtilt, Dash Attack, Usmash, and Uair). Combined with his fantastic air control, he can effectively fly out of reach while damaging you from any point on the stage! Retreating Nairs are good camping fun. With Steel Wing he can hold a constant anti-air defense while using his FTilt, Jab, and Grab to attack offenders on the ground. Not but not least is Aerial Ace, which effectively makes opponents afraid to go near you lest they can't retreat in time to avoid the slash.

Of course, Salamence does have some offensive options during this time, specifically in his great aerial game. He's got a nice "cross-up" of sorts with his DAir/FAir and BAir. He can attack the opponent head-on, or soar past them and strike with his tail after his body is out of harm's way. A frontal attack has the advantage of keeping him facing his opponent for continued pressure; a BAir allows Salamence to hit-and-run for a more defensive follow-up. Speaking of offensive aerial games, Salamence's low jumps give him a great air-to-ground game since he's pretty much naturally SHFF(LC)ing them in addition to what I just mentioned. When you factor in that his Uair is even built for attacking opponents beneath Salamence, it becomes clear that he'd rather keep his opponent pinned down on the ground than engage them in a dogfight. Aerial Ace can be used offensively as a very nice pressure tool; good luck punishing laggy attacks when another hitbox comes out before you can retaliate. You could even use it for some light combos.

Ok, enough playing with your food, it's time to unleash the full power of Salamence! Ideally you'll find time to use this in the 100-150% range, where a fully charged DSmash will allow you to complete the activation of Outrage in 1 second. If Captain Falcon can find time to spam Falcon Punches that take 1 second to complete you can definitley find time to do it with a superior moveset (here's a hint: Aerial Ace!). Once Outrage is activated, you'll want to go full throttle on your opponent to make the most of the 10 seconds you have. FTilt becomes a very nice, spammy option when you have a massive sweet-spot to inflict burn damage. Salamence's wind-based moves go from GTFO moves to pure annoyance factor as you push your opponent just out of reach while inflicting a bit of damage at the same time. Just generally staying in close-range combat deals passive damage from Salamence's aura! By the time you unleash Salamence's wrath, your opponent should have at least 80%, and the might of Outrage should be enough to put them into prime KO range for many of Salamence's attacks. Assuming you can't KO them outright, Salamence has more than enough options to attempt a gimp, from his various wind attacks to UThrow. Salamence has no shortage of ways to finish off an opponent, but if you don't defeat them by the time Outrage expires, you can say goodbye to a stock yourself!

Playing Salamence is like using one of his Choice-item movesets in a real game of Pokemon. You have to play conservatively at first so you can get him into attacking position safely, but when you do he really tears it up. However, when he goes into offensive mode he has to commit to it, and awakening his power at an inopportune time could cost you the game.


Salamence is like Meta Knight when it comes to matchups. He usually has the overall advantage, but it's never something that can't be overcome with skill.

VS DARK BOWSER: 40 / 60 Slight-Moderate Disadvantage

When it comes to shutting down a character, few do it as good as Dark Bowser. Even the mighty Dragon Pokemon is not immune to his cage, as his great width makes him a relatively easier target for it, and it's "drop-down" nature can screw up Salamence's air game. However, clever use of jumps and glides can out-maneuver the cage, and punish DB for trying it.

If...lets face it, when Salamence gets nabbed by that cage, it could actually be a good thing! Being stuck in a cage gives you ample time to build up your Outrage, as DB then has to send things at you, which you can mostly deal with by a simple Dtilt blowing them away (in fact, most of DB's uses of Minions or Clouds are rendered null if Salamence gets a tailwind or other wind effect going). That said, if you are actively defending yourself with such moves, you aren't taking advantage of trying to Outrage. Even worse, is that Steel Wing is such a great means of getting out of the cage (short hop 5 times and it shatters), yet is constantly detoggled by defending yourself or leaving you prone. In short: Salamence is lucky compared to most characters while caged, but as always thats right where Dark Bowser wants him.

If DB decides to try and get up close and personal, whether it be in the cage or just approach (lol), the ball goes to Salamence's court. Salamence has a much faster grab for it's range, better melee attacks as he has the burn element in Ftilt, which will still hit on clash as the fiery tip is transcendent, Double Edge, the always scary Aerial Ace, and of course given the chance, Outrage. This isn't to say DB isn't formidable in a scrap himself, just that move per move Salamence should usually come on top in these situations. When the fight goes airborne, it is somewhat even, but of course most of the time it will go to the guy with the wings. Salamence's style of swooping down for punishers or Dragon Breath is perfect vs Dark bowser's game, as he can avoid his aerials and swiftly capitalize with moves such as swoop, and his nair is enough to pester DB out of all his own aerial attacks. Dragon Breath's fire will be a great asset here as well, seeing as you can hide in it and make DB think twice about approaching to get in range to grab you in the cage. unfortunately the same cannot be said of Twister and Intimidate, both leave you more prone than anything to getting caged than not, as twister roots you and intimidate makes you get flung shorter distances away.

All in all, that dang cage and clouds are what win it for Dark Bowser. Being able to pressure Salamence into dong one thing or the other is invaluable as it then keeps him from gaining his scary momentum, which will pretty much make DB's life a living hell. Playing smart and using counter-pick stages will be ideal here, but over-all DB will eventually get that grab in as he pressures or punishes you into acting a certain way, and then it's just pure frustration trying to take back the lead.

VS JACK SPICER: 60 / 40 Slight-Moderate Advantage

While most set-up characters would give Salamence time to charge a DSmash (and perhaps even an early Outrage!), Jack does part of his set-up by attacking. How crazy is that? Sadly, until he fully sets up, unoutraged Salamence > Jack without Jackbots. Salamnece has the ability to play defensively or offensively, and defensive tactics like Twister are going to make life hell for Jack until he gets some parts. Jack's best bet to get some parts is to punish a wiffed attack with Sphere of Yun to get in a few free hits, but with Twister in the way he may not get to Salamence in time...but then again, landing a Sphere of Yun gives Jack access to Twister, so he can camp right back momentarily. Salamence can get a high lead in damage and gimp Jack's amazing second jump with a wind attack or fly.

If Jack gets 3 parts to make so much as 1 Jackbot, he can quickly shift momentum in his favor. Jack now has a massive extended hitbox on most of his attacks, and since the Jackbots have super-armor they can easily cut through Salamence's attacks and give their leader even more parts for more mayhem! Goiing offensive against a Jack with bodyguards is a scary thought when he can use his DSmash to take you out. Salamence will be hard-pressed to activate Outrage when Jack's army is going after him, and even if he does complete it, Jack's range with his minions allows him to survive long enough for Salamence to tire and become vulnerable to an FSmash.

Basically, if Salamence can play patiently he wins. However, if Jack does find a few holes in Salamence's deffense he can probably make an epic comeback. Salamence still has the advantage because of his sheer variety of options, but Jack's Jackbots can brute-force their way through even the most diverse of strategies.

VS WEEZING: 90 / 10 Wombo-Combo levels of ****

So yeah, as seen with Dark Bowser, Salamence's wind abilities essentially flip a big fat bird to Gas Abilities. As it turns out, a certain poison type RELIES on them to work. Hell, simply hopping around with the occasional Gale Force is enough to essentially screw over his entire game, as he cant get you and you blow away his gasses.

With this in mind, a few Steel-winged Dtilts should keep you safe enough to focus energy from time to time, then play keep-away for a bit in order to get some outrage going...then just whup some toxic-***. Seriously, even without Outrage 1 tailwind is enough to ruin Weezing, as it will provide a constant wind effect to the poor guy. From there, just stand facing him the way the wind is blowing and you are immune to his offense, and free to go to town on him. hell, just walking around with Steel Wing up in general is great as he conveniently levitates for you!

The only redeeming factor for the big floating fat monster is if Salamence somehow just utterly fails at playing Salamence, and takes 0 advantage of the fact he can essentially say "lolno" to Weezing's toxins. Otherwise, this is just another case of a wall falling to the ultimate sweeper.

VS AXEL GEAR: 50/ 50 Even

Salamence finds himself in a bit of a dillema when he tries to defend himself from the onslaught known as an approaching Axel Gear. Twister can be bypassed thanks to the super-armor of Axel's BUrst Dash, and both of Salamence's traps are ground-based, so Axel can charge an USmash and use his Burst Dash and Toxic to bypass both of them (that's the power of pinsolmovement attacks!) Axel's infamous Lightning Barrier is activated too quickly for Salamence to reliably charge a DSmash during Axel's preparation phase.

Well, ok, Salamence does have one trick up his sleeve; Steel Wing! Suddenly all that aerial prowess to get around Slamence's stage-control isn't looking as appealing to the Black Knight (MYM6 Black Knight: *warp powders*). When Axel approaches from the ground, Salamence can use a Grab and Tailwind to make subsequent approaches more dificult. What stops this from being some monstrous defensive option is that Salamence can't readily access his stage-control moves with Steel Wing up, and without acess to all his midair jumps he's gonna have some trouble evading the projectiles that frequently accompany Axel's offense. Use Steel Wing, but use it responsibly.

Salamence isn't in much better shape than Axel when it comes to KOing through that Lightning Barrier. Outraged Salamence doesn't acquire any new vertical KO options, and all the wind attacks in the world won't get Axel through the electrical cage. If Salamence waits for the barrier to end before unleashing Outrage, Axel can use the startup time to start up a new barrier, wait out Outrage, then punish Salamence's tiring stage with a charged up UThrow into the barrier to a KO. Then again, Salamence DOES have his own Uthrow that can KO Axel in a very similar manner without the fuel cost.

Overall, both combatants have a lot of stuff to abuse each other with, so it comes down to who can abuse their options better.

VS FORRETRESS: 60 / 40 Moderate Advantage

Forretress really falls apart when it comes to fighting aerial opponents, and who does the whole "abuse of ground characters" thing better than Salamence?

Using his aerials, Salamence can really just bully Forretress as long as he wants, granted he watches out for Bide, and given the nature of Forretress' game, they both would like some time to set-up. This can backfire for both of them ironically, as even though Salamence can get going on a Twister or Outrage, Forretress can easily interrupt him after getting at least 10 spikes on the field, and launching them at him with Rapid Spin. Intimidate wont do much here either, as Forretress really doesn't have many moves that stale in the classic sense, or simply use salamence's moves against him. Even your fires wont do too much as Bide's jets of air will have a similar effect as your Tailwind, blowing them away from Forretress!

Stage pick is the biggest factor to this MU however, as it would be an all too easy win on FD for the Dragon pokemon, but at the same time be quite the ordeal on Battlefield, where Salamence will be forced to wade through 3 tiers of spikes, and be on the ground alot due to Forretress hiding under platforms.

Over-all however, regardless of stage pick, Salamence should come up on top over the bagworm simply due to how difficult it would be for Forretress to kill Salamence given his tremendously good air-game, and how Twister and outrage would simply screw with many of Forretress' counter-moves, returning the hitstun of either one while Salamence could be freely wailing on him with Double-edge or the like. Just be careful of his own aerials when aproaching, getting spikes launched at you can be quite annoying.


Supporting actors:
 

flyinfilipino

Smash Master
Joined
Sep 11, 2007
Messages
4,319
Location
North Carolina
@B.B. Hood

I remember this character; I used to use her all the time in that one game at the arcade (MvC2?) along with the big mummy dude and Mega Man. Fun times!

For such a long hiatus between movesets (MYM4 to MYM8), you do a pretty good job of jumping right back into the swing of things, cutter. You've got a good amount of attack description, playstyle description, and you've just got pretty good writing in general. I do remember that Master Chief was one of the only movesets back then that mentioned frames in moves. You've got pretty much all the details down, along with a few fun little quirks here and there. (You used the word "trepidation"!)

Enough about writing, though. B.B. Hood is a fun character to start with (gun-wielding fairy tale girls are pretty cool), and you do a good job of translating her quirkiness into Smash. Her attacks manage to be goofy and killer at the same time; you really make sure to keep all of her personality in there. Her Special moves are vaguely reminiscent of Snake, but then again, I don't remember her moves from the actual game. The rest of her attacks are pretty straight forward, but I didn't find them dull to read through because the actual attacks were pretty fun. I think you might have gone a tad bit overboard with detail in some places. Like HR said, the Pokemon thing in the Up Smash was kind of unnecessary. Her attacks are pretty tame for MYM standards, but they work.

Overall, B.B. Hood's a solid effort in my eyes, especially considering how long you've been away, cutter. I'd probably use her if she was in Smash and had this set (or any set, for that matter). Great job here, and I hope to see you continue to improve in the future! :bee:


I guess Salamence is next. :)
 

TWILTHERO

Smash Lord
Joined
Aug 19, 2007
Messages
1,880
Location
Canada
Salamence

I found this to be a very good set actually. He has a fitting playstyle and I like the idea of using Outrage to get out Sala's stronger KO options, and he has more than one of actually charging up the move. Plus, I like moves like his down smash (which decently decreases the neutral special charge) and his up special.

Some complaints, I'm a little confused with the down special.

Beyond the obvious move-interrupting properties it gives to Salamence, as in the games, Intimidated foes suffer a halving of their Attk, or having all their moves staled halfway when it comes to Smash. This effect lasts for 5 seconds, and cannot be stacked on the same target while they are already intimidated.
Notice the word "or" in it. So you're saying to me that this move has a 50/50 chance for one of the effects? I'm assuming it's a small typo, where "And" is suppose to be, but...

Also, when you say stuff like, "10% more knockback" and "transcendent priority"...I'm not exactly a fan of using these terms. Does 10% more knockback mean that he'll suffer damage by 1.1x or he'll be KOed 10% sooner? I would prefer if you just write it plain out like that, tbh. This is a nitpick...but stuff like this kinda makes me cringe a bit.

Overall, I don't have much to say about this set, other than I really enjoyed this set. The organization made this moveset easily readable, and the first and last image were both lulz. Great job to the both of you, and hope to see more sets from you guys in the future! (H)
And sorry if this comes off as a n00b comment. v_v

I'll comment B.B. Hood and Octillery for a later time.

More about my future sets, Red (3 in 1 trainer set) is coming along swimmingly, as Pikachu is done, and Lapras is 1/3rd in. :bee:
 

JOE!

Smash Hero
Joined
Oct 5, 2008
Messages
8,075
Location
Dedham, MA
Some complaints, I'm a little confused with the down special.

Notice the word "or" in it. So you're saying to me that this move has a 50/50 chance for one of the effects? I'm assuming it's a small typo, where "And" is suppose to be, but...
it means that it emulates halving attk by making their moves stale, similar to saying:

"blah de blah blah, or blarg in layman's terms"

Also, when you say stuff like, "10% more knockback" and "transcendent priority"...I'm not exactly a fan of using these terms. Does 10% more knockback mean that he'll suffer damage by 1.1x or he'll be KOed 10% sooner? I would prefer if you just write it plain out like that, tbh. This is a nitpick...but stuff like this kinda makes me cringe a bit.
10% means he takes 1.1x the KB....if it were 10% sooner it'd be worded as such >.>

as for transcendance, ive posted a whole article on the Op as to how that works. Really guys, its an in-smash thing and it should be known by us guys who make movesets <.<


thanks for the comment :bee:
 

MasterWarlord

Smash Champion
Joined
Aug 24, 2008
Messages
2,902
Location
Not wasting countless hours on a 10 man community
SALAMENCE

I actually found it a bit strange that Salamence has so many defensive tools and focuses on defense for a large portion of his game. While you suggest Outrage is the only reason he’d really want to do this, I honestly see a lot more defensive tools then offensive, what with his trappish/aerial camping game/anti-air game with Steel Wing. That’s not to say I don’t like it, but I feel it’s somewhat downplayed and somewhat OOC. I also question why he wants to play so campy and defensive to avoid damage when he wants to take it. . .

Of course, the logical conclusion is this is just his primary means of racking damage, and I ultimately like this phase, particularly the reactionary part of it with him being on the air against grounded foes or constantly staying grounded with Steel Wing against aerial foes. The main attraction is probably the twister/trappyness, but the fact that he has plenty of ways to defend himself/get foes away/actual attacks makes him stand out significantly, and there’s some campyness in it as well.

I honestly don’t see Outrage being all that useful even once you do finally get it off aside from the damaging aura, which is good for getting foes away, sure, but he can already do that. Some of his moves help him spread/create flames while in outrage. . .But that seems more like a help to his defensive game. Outrage doesn’t really help that much in getting the kill I don’t think, and I imagine his main kill method probably wouldn’t even use Outrage at all – just having him grab foes and bring them off the side blast zones, then gimp them. I again see nothing wrong with this, but it feels awkward when Outrage is so emphasized and –very- OOC for Salamence. My overall opinion of the set is still fairly high, mind you.

OCTILLERY

Octillery is easily better then Salamence or Forretress IMO. He’s one of the first characters in a while who’s doubles play doesn’t feel tacky and doesn’t interfere with his singles playstyle at all. The turret playstyle in doubles spits upon the other obvious stuff we’ve done for it, and vastly expands on Cradily’s potential. While his singles playstyle isn’t as amazing as his doubles one, there’s still some interesting trappish stuff in there with him spraying ink everywhere and him “inking” foes to make them take more time to get up from tripping. Of course the whole “Octillery Support” thing is still highly relevant in singles for gimping foes and such.

My only real complaint here is that I feel you didn’t go into his singles playstyle strategy enough and that is rather awkward for you to immediately jump into his doubles playstyle. Considering how much his playstyle varies based off whether he’s playing singles or doubles, I think you probably should’ve just made whole different sections.

This comment would be a longer one if I could find more stuff to criticize, but there isn't anything to find. Great moveset you’ve got here, Joe.

I –will- get to Cutter’s moveset. Joe has been bugging me in the chat about commenting his sets all day.
 

cutter

Smash Champion
Joined
Jun 4, 2008
Messages
2,316
Location
Getting drilled by AWPers
Spray and Pray?
Malice and... something else?
Do I sense League of Legends fever in the SWF community?

w/e. Just skimming the sets, I was impressed. both BB hood and Octillery (just two days ago I started brainstorming a set for this guy lol). Still, I feel that something is lacking. I've never played/heard of BB's origin, but i didn't really get a feel for her character. While that's not the point of MYM of course, I love when the set reveals something about the character. It helps to bring them to life, while making the set much more fulfilling to the reader. Maybe a more in-depth read will rectify that for me? Who knows. Off to my English project! (yes, another one. i can't wait for summer when I'll be able to post sets...)
This was something I was willing to chance a bit since there aren't many people out there who know who B.B. Hood is, but I think you'll get a decent idea of who she (mainly in the playstyle and specials) is when you go back to read the moveset in detail. Thanks for bringing this up though; I will definitely keep the idea of having a reader get more of an actual feel for a more unknown character (as this will probably be a factor in my next possible moveset) in mind.

B.B. Hood

Is it wrong if I literally lol'd at the idea of Red Riding Hood with an Uzi and blowing everything to kingdom come?

While I do remember a Master Chief set posted in one of the earlier MYMs, your extended absence until now meant that you had a lot of catching up to do in terms of quality, but you've definitely done your homework. I was surprised at how unique BB Hood is despite being in one of the most cliche MYM archetypes. It's definitely nice to see a run-and-gun style projectile wielder instead of the typical "hold the fort!" variety. Also nice to see an ammo-based move without having the ammo as an overarching mechanic. ;)

If there's one thing I'd like to criticize, I feel your writing could be tightened up a bit. For example, the whole paragraph about USmash's effects on Pokemon is uneeded since it's a built-in Smash Bros mechanic so by saying that the attack is fire-based we can assume all that stuff. Similarly, the section in the playstyle guide about her Uzi move feels like a long-winded way of saying "This is her bread and butter projectile due to its versatality but if you abuse it you'll be vulnerable while you reload". I also found it funny how one of the longest sections is her close-range escape options when the start of it reads that she has few. :laugh:

But yeah, pretty good return to MYM. Should be interesting to see what you come up with next.
@B.B. Hood

I remember this character; I used to use her all the time in that one game at the arcade (MvC2?) along with the big mummy dude and Mega Man. Fun times!

For such a long hiatus between movesets (MYM4 to MYM8), you do a pretty good job of jumping right back into the swing of things, cutter. You've got a good amount of attack description, playstyle description, and you've just got pretty good writing in general. I do remember that Master Chief was one of the only movesets back then that mentioned frames in moves. You've got pretty much all the details down, along with a few fun little quirks here and there. (You used the word "trepidation"!)

Enough about writing, though. B.B. Hood is a fun character to start with (gun-wielding fairy tale girls are pretty cool), and you do a good job of translating her quirkiness into Smash. Her attacks manage to be goofy and killer at the same time; you really make sure to keep all of her personality in there. Her Special moves are vaguely reminiscent of Snake, but then again, I don't remember her moves from the actual game. The rest of her attacks are pretty straight forward, but I didn't find them dull to read through because the actual attacks were pretty fun. I think you might have gone a tad bit overboard with detail in some places. Like HR said, the Pokemon thing in the Up Smash was kind of unnecessary. Her attacks are pretty tame for MYM standards, but they work.

Overall, B.B. Hood's a solid effort in my eyes, especially considering how long you've been away, cutter. I'd probably use her if she was in Smash and had this set (or any set, for that matter). Great job here, and I hope to see you continue to improve in the future! :bee:


I guess Salamence is next. :)
I quoted both of these because I wanted to address the criticism of my extra paragraph when describing how B.B. Hood's Usmash interacts with Pokemon. I should first start out by saying that B.B. Hood's Usmash was probably one of the first few attacks I started on since it was basically a a really easy direct transition from the same attack in Darkstalkers/MvC2 into Smash. This is relevant because it accurately represents my writing style; I don't just start directly from the top at the background/stats of a character and just go down linearly from there. I jump around a lot and get the "easy" stuff that doesn't take too much thinking to flesh out and I just start writing about that. Once I start writing, I just needed a little push and thoughts/ideas just start pouring out of my head. The extra paragraph was a byproduct of that when I first begun B.B. Hood's moveset, and you can see that I started to taper off a little bit in terms of detail/explanation on other attacks.

Overall, I agree that this is a perfectly acceptable criticism considering that now I will remember in the future about how elemental-based attacks will automatically interact with Pokemon typing. I had looked at Foretress and Kingdra and wondered "Hmm they're both on opposite sides of the spectrum for getting hit by fire attacks... and Cheer & Fire is a fire-based attack" and that too also contributed to me writing up that unnecessary paragraph. I just got a little too eager lol.

@ flyinfilipino: Yes it is MvC2! B.B. Hood is easily my favorite character, even if she does suck :p

Thanks for the comments so far guys! I eagerly await to hear what more people have to say about B.B. Hood :3
 

Wizzerd

Smash Ace
Joined
Feb 24, 2009
Messages
929
If anyone hasn't noticed, I'm leaving tomorrow for around a month. I was hoping to finish a set by then, but alas, it was not to be. I'm sure I'll return with plenty of mental set ideas, though. =) And one other thing...

[collapse=Just because I'm obligated to rip off Rool's comment format (smirk2)]
Regal Bryant

Regal's playstyle is convoluted, but you already know it and acknowledged it very soon in the playstyle section. He's also very similar to sets posted not long before it, but you already know that too. Dammit, Junahu, how am I supposed to comment on a set which you already know all the flaws of?

Regardless, I'll try. If there's any complaint that I can level at it that hasn't been mentioned before, it's that some of the effects from the various kicks seem a little forced especially considering they come from the same motion, like in the UAir and NSpec, though I can't deny they play into his playstyle. I don't particularly mind this, but you criticized something similar on Hariyama, so here we are. And if there's another complaint, it's that he doesn't benefit that much more from pushing the foe than most other characters - he certainly does benefit to a greater degree, but I think there was a lot of potential in doing things like retooling the FSmash to be unable to be DIed out of against the ledge as well as walls, and I was shocked that there wasn't an onstage meteor smash to be found in Regal given how easily those can play in with ledges (or can USmash do that?). But I'm really just suggesting things rather than critiquing them at this point.

He's very good for what he does, and I disagree that he's essentially the same as most characters like you say in the playstyle section given the prevalence of star KO moves and that he's better with damage racking at the edge too anyway from what I can gather. Ultimately a solid set from you, Juna, if not quite on the level of Nurse Joy.​

Spartan Warrior

I don't have much to add here, unfortunately. Spartan Warrior suffers from being just too much - too many concepts jockeying for room, like with the shielding and alternate weapon, and the writing style makes it all even tougher (though I won't elaborate seeing as you have an excuse for it and it's been covered enough already...)

This wouldn't bother me too much, but the thing is that most of these options don't add much of anything, and Spartan just isn't that exciting as a whole. The playstyle summary feels a little vague and unsatisfying as well. Don't get me wrong - I think you did do a good job with implementing all these elements of Smash you wanted to get more of a spotlight. I just think that Spartan ends up having a little too much dressing, and in the end he doesn't amount to all that much.​

Solar Man

I'm fairly neutral on Solar Man. I can agree that the writing is fairly bad. You said in the chat that you're unsure of how to balance the energy expenses; I can understand that, but why are you so inconsistent about what you use to describe expenses? You use vague terms, exact measurements, fractions, etc; it would have at least been more clear if we could compare them to one another.

The playstyle isn't very exciting; it does flow and probably better than most of your other sets, though. The playstyle section itself feels somewhat poorly written though; it feels like you're either talking about something that we know already, that's irrelevant or just going move-by-move. The playstyle is self-explanatory; I just think you could benefit from some elaboration here.

There's nothing really good about it, but it's still not horrible at all. I don't really have anything to add; just know that I don't hate it like I did Drifblim.​

Axel Gear

What a set this is! I'll not be the first to say this is one of my favorites of yours. Using traps and projectiles to strengthen approaches rather than camping with them is a wonderful concept which you've pulled off very well. I've always been impressed by your capability to make such naturally grounded playstyles without sacrificing feasibility, something I can't really do.

If I have a criticism it's that you're unclear about what happens with Lightning Barrier on unconventional stages (especially scrolling ones), but the move is incredibly clever nonetheless. I hope you can forgive me for giving such a brief comment, because I don't really have much to say besides great job, man, and that I hope your creative spark doesn't die while doing joint sets down the road.​

Bob-Omb

I'll try not to be too harsh here since you didn't plan this to stand on its own, but the bottom line is that Bob-Omb doesn't really work as its own set. I agree with MW that there are too many exploitations of the mechanic that ultimately become fairly useless. Bob-Omb's ultimate goal is always to just blow up, so he's ultimately fairly predictable regardless of what he does. I won't linger on this because it wasn't meant to be its own set, though... it does sound like it could be interesting paired with Goomba and Koopa, but it isn't, and so I couldn't find myself liking it that much.​

Forretress

Much better than Spartan, IMO, and the fact that it was made in a single night makes it all the more impressive. Forretress has some flaws to get over, but most are explainable (if not totally excusable) by the fact that this was made in a single night, and it's still plenty good in its own right.

Most have already covered what I don't like about the set, the stretched and fillerish inputs, though those could be chalked up to this being a one-nighter. I will say though that I'm surprised the Side Special hasn't been commented on much. Summoning Pineco seems really proppish and out of character - summoning an evolutionary relative might work for some other Pokemon (Vespiquen?) but Forretress isn't known for having any connection to Pineco beyond evolving from it.

Spikes are great for what they are, and there are plenty of things that I like about Forretress. If I were to judge it totally based on its positive traits I'd like it an awful lot, but there are too many things dragging it down for me to love it, though I still like it. As MW said in his audio comment, there's a lot of good and a lot of bad too. Still, I also agree with MW in finding it your best, so nice job, JOE!.

And as a note, use images from legendarypokemon, not from bulbapedia, as theirs fluctuate in size.​

Wiz and Kupa

I don't really see how blowing up the inner tube qualifies as "playstyle" as much as a random stat booster, and why of all things it's the DTilt is beyond me. The playstyle section is mostly talking about single moves more than overall strategies, which could be chalked up to it not beginning its life as a serious set.

Wiz and Kupa overall just don't know what they want to be, starting out as a joke set and steadily attempting to turn into a serious one that doesn't really work out. Thankfully, your next set was a lot better, which we're getting to...​

Kingdra

I'm sorry, Plorf, but I don't have a lot to add, especially since I bashed your writing style and detail a lot when this was being made for Lance. Suffice to say, gimping isn't a very good concept to base a set on entirely. It works in Octillery because of how uniquely it's utilized, but here it's... just gimping, which can't carry the entire set as a concept in my eyes. That being said, there's plenty of negative opinion going around about Kingdra already so I'm willing to leave it at that.​

Miles Edgeworth

Miles Edgeworth was actually a really fun set, TWILTY. The playstyle is mostly based on a mechanic which exists to make Edgeworth able to fight and there are STILL two of those missing capitals in the Up Tilt/Down Tilt (d)... but in the end it actually manages to coascale into something that sounds really fun to play and probably very true to character (like Frf, I've been wanting to pick up a Phoenix Wright game for, like... forever).

Some of the moves, like the tilts and aerials, feel rather generic overall. That being said, I expected there'd be some concessions made to let Edgeworth be able to actually defend himself. I probably would have left it at "gathers evidence and kills". Overall, this is EASILY your best TWILTY, and I'm really looking forward to Red... and I'm really sorry about that incredibly negative review of Roxas from way back when. (cry2) (hug)​

Weezing

Oh God, I hate Weezing for just being two Koffings stuck together, though I don't hate this set. The writing style is... really, really dense, but since plenty of people have gone over that already I won't say any more. But as HR said, Explosion is... really, really flawed. It should be practically an OHKO if it destroys all of your gas at once, and it sounds pretty impossible to land. Weezing's underpowered overall if you ask me given that he has so much lag, which basically makes it very difficult to start setting up. He isn't even particularly strong after setting up to make up for it.

But that being said, the concept of making traps as an ammo bank hasn't been touched on at all bar Sheep Man, who did it a lot differently... so the base concept is really good. The problem is that all the lag makes him too underpowered for me to like him that much.​

Dark Booze

This is another case of a set I can't really comment because A) everyone's said everything I want to say and B) there isn't much TO say, he's a strong candidate for your best. The way you managed to split everything between insmash and unsmash will probably pay off down the road in the voting period and you did manage to balance him for both modes with surprising ease. And he's obviously great in terms of concepts, the concept of TORTURING the foe in the cage might not be that incredible on its own, but you do so much with it that I can't help but love it. Dark Bowser, might I note, also has some of your best organization ever, up there with Kel. Simply put, great job MW, and there's a reason this comment is so bad =P​

Pokey

My god this is a massive improvement, n88. You still have a little more pushing to do before you can fully become one of us (gobble gobble) and it might be a little out of character for Pokey to use his body segments as ammo, but it's overall a big step up, and I shudder to see what you come up with next.

I'm really pleased by all the ways you managed to manipulate the mechanic, like the DTilt, as MW said. Some of the ways are just underpowered though... but other people have said that enough that I'll leave that be. I'd like to touch on the Down Special though, because it sounds like it effectively destroys his segments if he has to make them again. Why not have him be able to resummon them with a Smash input or something?

Seriously though, impressive job. I'm starting to see you as the king of random Mario enemy movesets by this point. ;)

Empoleon

As I'm sure you realized, I was one of the main people looking forward to this, and I'm glad to say it lived up to my expectations. He feels genuinely like a fusion of two MYMers rather than a mishmash of them, andeven if agi apparently did most of the writing, I can definitely feel Sundance's influence in places ("Empoleon starts off his set with a move that any penguin with super powers should be able to use.").

So his playstyle is apparently... being awesome move interactions, move interactions, move interactions. I generally don't like it when playstyles play out that way (ie Tomahawk Man), but the fact that you aren't just going move-by-move in the playstyle section shows that you legitimately put some thought into it or at least that you're willing to sell it to us. The interactions do have a theme in mind overall anyway in bogging down the opponent and increasing Empoleon's durability... but that makes some of the more direct attacking interactions seem less relevant, like the DSmash X DSmash tractor sprinklers. Then again, they still play into "being awesome" (wary).

As Rool said, there's some Pokemon Syndrome; not only Secret Power but Defog... and that's probably it. I really enjoyed this, possibly excessively out of character bias (wary); nice job.​

The Sniper

You're definitely a great newcomer, Centigrade, for picking up on all these things on your second set. Sniper actually has a consistent playstyle and he doesn't get bogged down in irrelevant inputs either. Of course, as MW said, there are some unneccessary inputs like the Down Special and all the props can be a little jarring (then again, I haven't played Team Fortress 2, so it could be fitting), but it's overall a great job from you.

If there's anything fresh I have to critique, it's the organization. Sniper's is good, but the colors are a little too dark (I had to read half the set highlighted). You don't seem to be using color codes, which can be found here and here. Just put the code where you'd put the color. This could really help with finding more fitting colors.

I hate to spend most of a comment just talking about organization, so here goes. I actually found the playstyle section well-written, and you definitely know what you're talking about in the matchups (even if the Axel Gear one is mildly underdetailed). In the end The Sniper wasn't incredible, but I hardly ask that from a relative newcomer and The Sniper is perfectly capable of standing on his own merits. Good job, Centigrade; well done indeed.​

Octillery

Wow, this is the third Joe set I'm commenting at once. Octillery's probably your best one too. At first glance he's little more than a generic gimper like Kingdra, but Suction Cups and Octillery Support make this much more than a standard gimper, and a lot more interesting to read.

That being said... Octillery Support is a little confusing to me. Is the only way to get Octillery off using a spinning-based attack? I don't like when aesthetic effects are extended to being more than, well, aesthetic effects, as it just gives some characters a random advantage that doesn't come into play anywhere else. In addition, I'm worried that some characters wouldn't even be able to hit him if he stays behind them, and since the exact place he latches on isn't elaborated on it gets really worrysome. It could also spite characters if they need to set up badly since Octillery can constantly DTilt them and they can't really hit them due to needing to set up, and this is assuming that they can hit him in the first place. So basically, moar detail.

That being said, Octillery's still a great experience. He works much better in 1vs1 than I expected, like Nurse Joy, and in multiplayer he sounds like a blast to play as. Definitely a unique take on gimping. THAT BEING SAID, the same thing I said about Forretress's image applies to Octillery (wary).​

B.B. Hood

B.B. Hood was actually very good from a relative newcomer and good on its own merits actually. But before I get into the set itself, could you cut the font size? It's generally not necessary to change the size of the body text, since it makes it somewhat difficult to read. I'm also worried that the images might stretch the page for some people... I'm not one of them due to the massive size of my computer screen, but you still might want to fix this up. It's well organized outside of this, it's just unlikely that people will enjoy your set if they have trouble reading it.

As filip said, you've made the jump from MYM4 to MYM8 with surprising ease. B.B. Hood has good creativity while staying within certain bounds, and the playstyle is actually nicely done already. Like with Sniper the props can be jarring, but I'm sure it's fitting as after all I'm not familiar with the character at all...

Overall, B.B. Hood is surprisingly difficult to comment on; she's not incredible but you haven't overlooked anything fatal and as such it's a very solid set and an excellent way to shift into a new MYM. Kudos, cutter.​

Salamence

So, Salamence. I remember reading some of HR's moves for Lance's Salamence and how many of them typoed him "Salmence" and "Slamence" or what have you. Needless to say, joint Salamence has none of this but instead has Outrage, which plays into a very nicely done playstyle, even if it might not play out perfectly as you'd like as MW said.

If I was to make a criticism, it's that Salamence suffers from a very common problem among joints. You two have very different and very apparent writing styles - Joe is constantly enthusiastic and uses all the chat emotes and HR has the more clinical writing style with the lag on each end always condensed into one sentence. I'm fond of both writing styles, mind you, but right now it's like Gambit. It's just too obvious who wrote what for my comfort. Overall though, it's a strong joint from the two of you, so nice job. (Y)​
[/collapse]
 

mantlecore77

Smash Journeyman
Joined
Jul 17, 2008
Messages
440
Location
Ohio
I shall now review Jason like I would if I was on drugs:

(sighs loudly) This, uh... This a good moveset. Isit?Ithinkitis.Really?Yeah.Yes?No.No?Yes. AAAAAHHHHHHH!!!..... Why are there no giraffes in this comment?
[CENTERThat's better.[/CENTER]
This made my God **** year.
 

32º Centigrade

Smash Rookie
Joined
Sep 12, 2009
Messages
14
I hate getting behind on comments. Blame it on E3 fever.


Octillery is my favorite set of yours, Joe, from this contest at least. Suction Cups and Octillery Support are definitely the highlights on the set. The only problem I have is the emphasis on doubles in the playstyle section. 1v1 isn't nearly as elaborated. I hate having nothing else to really talk about, but you did a great job working with the material given and got so much out of just an octopus.


I'm not sure how I feel on Salamence, however. He seems too overpowered. According to the playstyle, he revolves around using Outrage to finish his opponents off, but he seems more than capable of doing that without Outrage, losing any unique playstyle and just being an offensive aerial character. I do like the ideas used in the set, Steel Wing in particular, and they do flow together to create space to use Outrage, but at the same time, Outrage just isn't necessary. The writing style got confusing at times, too. Maybe it was just me, but I had to read over Twister a couple times to understand it. Again, not quite sure how I feel about this one.
 

goldwyvern

Smash Ace
Joined
Nov 25, 2008
Messages
519
Location
Holy keys locked in the jet, Batman!

Arcanine

Arcanine is a pokemon from the first generation, and the evolved form of Growlithe. He is known for his great speed and usage of fire attacks. He runs into Smash full-speed!

STATS
Power: 2.5/10
Speed: 9/10
Size: 9.5/10
Jump: 2.5/10
Weight: 8/10
Fall Speed: 7.5/10
Traction: 8.5/10


Arcanine is a large, heavy beast, but has a lot of speed as well. If only he had easier means to KO or recover, then he'd be a very broken force to deal with. Luckily, he doesnt, so he has as much balnce as the only survivor of the aborted sets of Blue could. Yup, dont expect an extremely thrilling set, or one with great balnce, as Arcanine orginally was going to have 5 characters backing him to make up for his inability to conveniently KO or recover.

Specials

Neutral Special: Extremespeed
If standing still while using this move, Arcanine will laglessly begin to dash. If Arcanine is already dashing when this move is inputted, then Arcanine will run faster, just barely faster than Sonic and no longer require a direction to continue running for 10 seconds, with pressing the input again bringing Arcanine to a complete halt. You can turn Arcanine around by pressing in the opposite direction and can jump a small distance while still moving by pressing up or the jump button, bringing him 2 Kirbies up and 3 Ike’s forward, during this time able to use any of his aerials. You can use any of Arcanine’s other moves while in Extremespeed, with Dash Attack executed with a tap and Jab with a double tap. Arcanine will run off a ledge if not turned around, but will auto jump if the is something his jump can go over in his path.

Side Special: Flame Wheel
While standing still, this attack does nothing, but when running or in the air, Arcanine will perform a flaming Somersault that slows down Arcanine to his regular dash speed for 2 seconds if he is in Extremespeed and propel him 2 stage builder blocks straight forward if he is in the air. This somersault deals 11% and forward knockback that KOs at about 175%. There is little ending lag to the move as the fire fades and Arcanine continues to run or move in the air.

Up Special: Howl
Arcanine will raise his head and release a howl (as the name implies). This happens over 1.2 seconds. If performed successfully, Arcanine will deal 5% extra damage and slightly more knockback, as well as increasing his jump height to 3.5/10, for 6 seconds. There is only .1 seconds of end lag as Arcanine brings down his head.

Down Special: Heat Wave
Arcanine will shake his body slightly and an area around him 3 Ganondorf heights in diameter will begin to phase and become wavy and orange-tinted. In this area, Arcanine and all of his teammate’s, as well as all of their projectiles or traps will seem to be 1 stage builder farther to the left than they really are due to distortion, and all opponents will be dealt 1% per second. This Heat Wave only lasts 7 seconds and Arcanine can only have one out at a time.

Standards

Jab: Bite
Arcanine will snap its head forward in .1 seconds and bite, dealing 4% damage and flinching knockback. There is no end lag to this attack to speak of, which means Arcanine can immediately follow up with another attack.

Dash Attack: Flare Blitz
Arcanine’s limbs and mane will burst into flame spontaneously and leave small amounts of sparks behind them. Arcanine is on fire for 5 seconds. After inputting the move, the spot Arcanine was standing on will burst into flame as well, leaving a Bowser-width, Kirby crouch-height blaze that deals 2% and flinching knockback. Arcanine’s entire body is a high-priority hitbox that deals 9% and moderately small forward knockback. Another thing to note is that when on fire, Arcanine’s body is not distorted when in Heat Wave. From this, Arcanine can still input moves if he is in Extremespeed.

FTilt: Fire Fang
Arcanine makes a motion almost identical to his Jab, but this time taking .3 seconds of starting lag as Arcanine’s teeth light on fire. He then bites, dealing 3% and a set amount of knockback behind him; about 3 stage builder blocks. This attack has .2 seconds of end lag and has moderate priority.

UTilt: Fire Spin
Arcanine will tilt his head upwards, almost as high as Howl, and spray a stream of fire that begins to spin around in a tornado in front of Arcanine’s face. Simply tapped, the tornado is about the size of Kirby and immediately fires forward in .6 seconds, going at Metaknight’s dash speed until it goes offscreen, dealing multiple hits of 1% and flinching knockback. Holding it down for up to .7 seconds more will increase its damage to 2% and its size by 1.5x. Holding it longer to about 2 seconds will make it the size of Dedede and deal 3% with vacuum knockback that pulls the opponent 3 stage builder blocks in the direction it was moving. Arcanine can hold this without firing it, dealing the same knockback and damage, just staying in front of Arcanine as a disjointed hitbox.

DTilt: Flamethrower
Arcanine will point his head down and spew fire onto the ground, covering in front of his head and the ground in front him with a hitbox dealing 4% and very small knockback forward. If in Extremespeed, the ground hitbx will trail behind him for 1 stage builder block as he runs, dealing 1% hits that flinch with small knockback towards Arcanine. Until about 35%, this is guaranteed to land more than 3 hits. Above that, and it will only land 1 or 2 hits, but that might just be enough.

Smashes

FSmash: Take Down
Arcanine will bend its front legs slightly as he charges, slowing his dash speed to regular when in Extremespeed. Upon release, Arcanine will leap straight forward 2-5 Stage Builder Blocks, his whole body being a hitbox dealing 12-31% and 3 stage builder blocks of set knockback forward. The opponent is also knocked into their downed position. Arcanine takes hitstun with 3-7% recoil, also bringing him to a standstill if he was running while charging.

DSmash: Flash Fire
Arcanine doesn’t have a charge animation for this smash, simply standing still or running for the charge. After release, for the next 6 seconds, if Arcanine touches a fire hitbox, including his own (not heat wave or other heat based hitboxes, it must by fire), he will take no damage or knockback from the attack if it is his opponent’s. Afterwards, for the following 5 seconds, all of Arcanine’s fire-based hitboxes will deal 2% extra damage, as well as having all KO moves KO at 15% less. If Arcanine doesn’t touch a fire-based hitbox in those 6 seconds, then he will look weakened and his dash speed is slowed down until Extremespeed is just under Captain Falcon’s dash speed and stays like that for 6 more seconds.

USmash: Sunny Day
Arcanine lowers his headslightly as he charges. When released he begins his animation for Howl, but about 2/3 into the animation a fireball ½ the size of Kirby flies out of his mouth flying upwards at Luigi’s run speed uncharged and Metaknight’s walk speed fully charged. If anyone is actually hit by the fireball, it will deal 13% and upwards knockback KOing at 135%.This is not used for attacking though, oh no. As long as the “sun” is on-screen, all fire or heat based hitboxes (Arcanine’s, any of his teammates, and any of his opponent’s) will deal 1-3% extra damage per hit depending on the charge.

Aerials

Nair: Overheat
Arcanine’s body starts to heat up. Getting a little hot in here, isn’t it? Unlike moves such as Flare Blitz, this does not turn Arcanine’s body into a hitbox. We don’t need any more of those. What this does do is increase all damage from jointed fire attacks (Arcanine does have a couple) by 2% until he lands on the ground. This effect appears and disappears almost instantaneously (.15 seconds), allowing for a move to be input almost immediately after activating it.

Uair: Headbutt
Arcanine will rear back his head and shift himself slighty towards facing the background. After .5 seconds of starting lag, Arcanine’s mane will burst into flame and he will smack his head back into position. While this does have a smallish hitbox, it deals 8% and has knockback that KOs at 165%. There is .2 seconds of ending lag as Arcanine repositions himself.

Fair: Roar
Arcanine breaths in some air over .2 seconds and then releases a loud roar, forcing every foe within 2 stage builder blocks of his head forward 4 stage builder blocks at their dash speed (still falling if in the air). There is a small amount of end lag (roughly .3 seconds) as Arcanine catches his breath.

Bair: Tail Whip
Arcanine can’t reach behind its back in a quadrapedal position. Oh woe is him D:. Alas, his tail is flexible! Arcanine spins his tail in a circular motion, taking .9 seconds and dealing 2% to foes that hit the hitbox (which is roughly 3x the size of a soccer ball) while forcing them to turn around Mario Cape style although any momentum in their movement that they had stays. Arcanine’s tail spins even if he touches the ground and both ends of the attack have no lag.

Dair: Body Slam
Arcanine will spread its legs out, leaving his underbelly exposed. He will lose all forward momentum and only fall down as long as you hold down or A. Getting hit by his underside will deal 4% and a mild spike, possibly . His entire body is a hitbox except the tops of his back and the top of his head. If the foe is on the ground when they are hit, they are pitfalled.

Grabgame

Grab: Drive-by Grapple
Arcanine will quickly open and shut his jaws, snatching up the opponent in his teeth. Arcanine can run around with the foe in his mouth, but cannot leave the ground. If Arcanine is on fire, he will deal 1% per second as well.

Pummel: Crunch
Arcanine bites down on his foe, dealing 3% with a slight amount of lag. Regularly you can get off 1 or 2 of these in a single grab.

Down Throw: Stomp
I know this isnt a MW set, but hey I might as well have something Pokemon-related as the title of this move. Arcanine opens his mouth, dropping his foe in front of him. If he was running while dropping them, they will be trampled dealing 8% and flinch while still staying on the ground where they were dropped. This is a very nice beginning to a monster damage racking.

Other directional throw: Ember
Arcanine will blow some fire onto his foe, dealing 4%. He will then throw his opponent a small set distance in the direction you pointed by waving his head with all his strength and letting go.

Final Smash: Fire Blast

Arcanine managed to get the Smash Ball! Whoah! And now, he's firing off a huge wave of fire, as thin as Ike and about 3 times his height, dealing 15% and a large amount of knockback, KOing at 100%! This huge wave of firewill absorb power from all fire and heat-based hitboxes currently onstage, becoming bigger and more powerful! For each hitbox it passes by, it becomes a stage builder block taller and a soccer ball wider, as well as dealing 2% more damage! If youve set up a lot, this attack is a powerhouse!

Taunts:
Up: Arcanine releases a smaller howl than his Up Special.
Down: Arcanine will shake himself like a shaggy dog thats just been in water, having small sparks fall off his body.
Side: Arcanine will blow a small tuft of fire forwards before saying, "Canine! Arc, arc!"


Playstyle

Arcanine is mostly based around a simple concept: make the stage an inescapable hell of fire hitboxes, the heart of which you force the foe into as you hit and run constantly, keeping them in with flinch damage, then getting up Flash Fire and going for the KO with Flame Wheel, as Sunny Day is impractical to actually attempt to KO with, especially since Arcanine likes his foes on the ground at his level (If you can KO with it, though, Ill lol). While this seems like a very flowchart playstyle, it has a few variations to it, such as how you want to keep the foe where you want them, and exactly where that is.

At the begining of the match, Arcanine will have the simple task of getting up all his field effects that he needs at the begining. Sunny Day, a Heat Wave, and Extremespeed are obvious. Arcanine during this phase can ready his foe for the more intense part of his damage racking game by placing Flare Blitz fire trails and maybe holding a Fire Spin up. After youve gotten them roughed up a bit, you now have the more complicated part of Arcanine at your disposal. putting up all of your damage buffing effects and replenishing them can be tedious, but also slightly easier with your Extremespeed. In order to get maximum damage, Arcanine will have to stay on the ground (only being in midair for dodging, the occasional shorthopped attack, or supplementary damage) and get his foe to where his concentrated damage field is (hopefully all fit inside of a Heat Wave). Using his spacing moves and Fire Spin, Arcanine can force his foe into the optimal damaging zone, and then run back and forth, landing continuous attacks and also placing more and more flinching hitboxes to make sure the foe stays in the same spot, even possibly using a shorthopped Dair to pitfall his foe. Its actually quite possible to do some sort of ultra-fast, drive-by-esque, flinching knockback combo (SHOCK).

Although flinch combos a KO does not make. After youve managed to place layers of damage racking on the foe, simply let the ones you dont need dissipate and approach vigorously with your monstrous speed to pressure the foe right into to the edge, where you can easily use a Flame Wheel for the KO. Although if your against a somehow faster or more pressuring/approaching character during your KO phase, you can also easily use a familiar hit-and-run technique to a similar effect, laying on extra damage while still getting away from them before immediately tturning to hit them again until you have a large enough opening to KO.

Arcanine is not perfect though. Flame Wheel can be a very easy move to predict, as well as shield, which makes Arcanine probably less likely to KO unless the foe is unable to do so, and how likely is that? Seriously, Im not alluding to anything, its just unlikely. Also, with his paltry jumps and no recovery (are you really going to need to recover right when you put Howl in effect?). Overall, Arcanine's trouble KOing and recovering make up for how absolutely potent his damage racking skizllz are.​

Yea, you can tell this was a slightly rushed set for a 6-in-1 pokejoint. I dont expect to be better than Kingdra, really, as its basically the exact same circumstance. I just was the only person to actually get their set done for Blue so I decided to post it as soon as Blue officially was dead. Thanks for the A-OK, Khold!
 

darth meanie

Smash Journeyman
Joined
Jun 6, 2008
Messages
452
So, I've been gone for a while now. Sorry. Lots of stuff, some of it out of my control, some of it not though. Let me make up for it with a commentary wall though. I try to avoid missing sets.

[collapse=Not because I'm ripping off Rool, but because I'm about to lay down a lot of text, mm'kay? I have my own crappy formatting]Miles Edgeworth

Gee, I read this moveset earlier, but I had to skim over it again in order to remember everything for this. Anyways, Edgeworth is a mixed bag. On the one hand, he's basically a much more streamlined and user-friendly version of Inspector Lunge, and has a great basic concept working for him. The mini-courtroom battle is pretty sweet. I would have liked to have seen the player on the other side being able to participate though; come up with their own excuses or cover stories rather than just sitting back while the Edgeworth player plays for a little bit.

At the same time though while using the location of an opponent's attacks makes perfect sense for Lunge, seeing as he's recreating their actual attack, for Edgeworth it doesn't make as much sense, which is a bit of a disappointment; the idea, while good in Lunge, lacks the proper context in Edgeworth.

And while I can appreciate that Edgeworth does actually need those attacks of his to knock opponents away so he can do his thing, it feels weird that some moves seem like they could KO on a character where it really doesn't fit as well. Damage also seems relatively unimportant when all it does at best is give him assistance in the endgame, rather than helping him gather evidence.

It's a good set Twilt, and easily your best in my humble opinion, but it wasn't perfect. I get the feeling from a number of your sets that certain ideas seem to just fall off during your sets; this was especially bad in the case of Joshua, where moves like the Down Special and Side Special became almost footnotes in the end, despite being awesome, possibly playstyle shifting moves.

For example, the Side Special and Down Special get little more than lip service in the playstyle, despite how they could be important in forcing certain moves out of your opponent. I really feel that with all of those moves that are basically simple attacks, you could have expanded into more strategies.

That's a minor flaw in the end though, and it's really a well-done moveset and a big step up from you TWILT. Good job.


Weezing

Weezing's has an excellent core concept. Instead of using different moves to create gases, he creates them automatically, and uses the rest of his moves to manipulate them. It creates an interesting economy to his resources as he slowly spreads gas around, moving it, changing it, or absorbing it for other attacks. In the end though, he'll destroy it all when he goes for the KO, and sets up a defensive fortress of poisons to defend himself when he blows them all up.

It's a really unique way to approach it, and opens up a lot of avenues we don't usually take. At the same time though, I do have a few problems with this moveset.

For one thing, the writing is atrocious. It's never been exactly your strong suit, but it feels so stuffy and unapproachable that it gags me, much like Weezing himself. It's a bad sign when I'm not even done with the specials and I'm tempted to start skimming.

Explosion also feels like it doesn't work exactly well; characters like Falco could really mess him up, especially since Falco's lasers have transcendent priority. The grab also seems a little weird, the cost of absorbing all that gas doesn't seem to make up for the advantage of increased range or speed, especially since you explicitly suggest using his grab early when he doesn't have much gas to avoid incurring this cost. What was the point of it to begin with then? Besides that, a directional throw doesn't really seem all that justified, and it's not like you couldn't come up with something else, what with his four different types of gas at his disposal.

All that said though, I liked the moveset in the end, but a few issues seriously nag me about it. It's what keeps an already good moveset from being really great.


Dark Bowser

Since everyone seems to be performing sexual favors to you over this moveset, I'm afraid I'll have to be a bit contrary. The playstyle really doesn't excite me all that much; while the cage itself is a very cool idea, it's really just about the only thing he's got, the rest of his moves all just play out of it. I'd rather see moves flowing into each other than seeing everything revolve around just one.

Giving Dark Bowser a whole bunch of different options to mess with the cage isn't really all that good when mostly just a few are ever going to be really useful in comparison to others, at least during normal match settings. Interactions such as the dash attack popping you up when a Thwomp is shaking the cage seem a little forced to me at best. These sort of overly complex interactions are common in a lot of your sets, notably in Lunge and Huff n Puff, and it feels more confusing than it's worth.

Don't get me wrong though, I actually do like this set. I seriously do. You clearly enjoyed making this moveset, and I could tell throughout reading it. And even though I don't love the basic concept, it's certainly not a bad one, and being able to do things such as camp from the cage is a pretty cool idea for a back up plan.

And what most impresses me is the fact that he has a unique, viable three-on-one boss moveset with its own playstyle, and you don't have to make any significant changes to do it, simply tweaking some of his options, most being just basic rebalancing. Isolating foes in cages works equally well in either setting, but still plays out differently. This is also probably one of the characters most suitable for a 3-on-1 boss moveset like this, seeing as he actually is a 3-on-1 boss in the source material.

The Fawful addition was just icing on the cake; MasterWarlord making extras again? I can hardly believe it. This really is a good moveset from you, and honestly, it's probably the moveset of yours I've enjoyed the most since Spy. It's good to see that you can create vibrant, engaging movesets after more droll excursions like the Kommodo Brothers.


Jack Spicer

This moveset was a major nostalgia trip for me, y'know that? I haven't seen this show in years. Anywho, it's great to see another moveset from you, and one that's not bad at all. The gear mechanic is a little awkward, but it's not bad, and it works great in making him functional as an offensive character even before he gets his Jackbots assembled.

His attacks are pretty straightforward, and get boosted up by having Jackbots present in a way that actually seems to work out pretty well; instead of simply ordering attacks he attacks with them. It's simple but works for what the moveset is trying to accomplish. He also can actually maintain his supply of gears while going on the offensive, and since destroyed Jackbots drop gears themselves, it's hard for him to fall too far behind.

There are the occasional oddball moves inside, especially the side and down special. The Side Special seems potentially rather broken, and the Down Special feels a little forced. Why isn't he immune to grabs anways? If anything, I'd think splitting into two or three would make grabbing basically impossible!

Unlike most other people, who didn't really like the Monkey Jack, I think it's a brilliant last-ditch move. If you manage to lose your Jackbots or get to too high a damage percentage where almost any attack will likely kill you, Monkey Jack gives him the ability to fight effectively even after losing everything. The damage over time seems a little over the top though, a 2% a second he'd be incredibly easy just to stall to death. Imagine a Fox player spamming his reflector after a double jump.

The Secret Apprentice

Commenting my own set am I? Well sure, why not?

The Secret Apprentice has probably the worst reception I've suffered in a long time, and to be fair, it was a one-day moveset I cooked up on a whim, so I didn't have high expectations. In response to some of the complaints, I'll note that while some of his moves were punishable, those usually weren't the moves he was more likely to go with for approaching; that line in the playstyle though was confusing and I can understand the complaint there. I'll admit that I did borrow the hit and repel idea heavily from Doppelori, attempting to rework it into my idea.

As for the heavily lambasted mechanic, it was pretty much copied exactly from how it worked in the game itself. The reason I feel it failed so horribly though was that I didn't really have much of a playstyle in mind until I thought of using a Force meter to balance out some more exciting Force powers, and used it as a crutch to form the playstyle around. As a result, the playstyle ended up feeling forced. It was sloppy, and the kind of mistake that I don't usually make; I blame my rushed creative process here.

I don't regret making this set though, I needed to get something out though, as I've been more or less paralyzed by minutia on some of my other ideas. I maintain that despite it's flaws, it's not a bad set, if certainly not up to the rather high benchmark people have come to expect of me. (Cue Wizzerd complaining about my ego)

What I do regret is that I now feel even less certain about the other sets I'm working on right now, as I haven't felt like I've gotten any real winner ideas for a while. Such is movesetting though.


Pokey

One question I have to ask is how quickly can Pokey make new segments? You never even hint at this in the move; are we talking Pikmin speed or Princess Peach's plucking move speed or what? I assume it must be pretty fast for Pokey to be balanced though; if the move was slow at all Pokey would be pretty much garbage tier.

I really like the idea behind this moveset, I really do. Trapping opponents inside arches of spines? Leaving your own body behind as a trap, and shifting yourself for different attacks? It's brilliant, and I'd've never expected so many cool ideas out of this relatively minor minion. And then there are even more ideas you didn't touch on, like digging underneath the shade of your own towers of spiny body segments for the foe to try to move through.

Move flow could've been improved; things like the Side Tilt's spine length increase would be better left to something else other than an awkward add on to an already existing attack. Otherwise though, this really came out as a brilliant moveset with a surprisingly rich playstyle to it, and sounds annoying to play against. The playstyle section could've been written better; summary statements like that he has a versatile playstyle dumb down the set and simply aren't true, but the concepts themselves were so rich I was able to grasp the playstyle in spite of it.

I really like it, and it's a huge step up from Dark Samus. Organization is a bit of a problem though; the headers were to close to the text and the odd left-right switching was a bit disorienting. The center alignment also was difficult to read. There also really should've been some sort of aerials or throw put in somehow though; even if he'd never want to go in the air, it'd be good for Pokey to not be completely wrecked if an enemy knocks him away, which is his major weakness.

A grab that stuck an enemy with spines similar to the Down Tilt would've been nice as well, and could've opened up more moves, since there's still so much potential for different use of the body segments. All said though, this really was a good moveset, and a great step up from you. Happy to have read it.


Empoleon

Oh god, I'm like halfway through this list aren't I? And I haven't even started reading this set yet...

And this moveset is exactly what move interactions shouldn't look like. He's a defensive, set-up focused character, but instead of focusing on a few ideas, you simply threw everything you possibly could together in every possible combination so he'd have a defensive answer to everything. And I know that that's the entire point, but it ends up getting it all confused; besides, when you've already got Iron Defense and Mist as god-tier defensive moves, what's the point of adding in those others?

Besides, these move interactions are painfully forced. Using Ice Beam to turn rain into hail is one thing, but using Featherdance to turn Whirlpool into a drill is hilarious in a very bad way.

He also seems ridculously overpowered, as with a pair of Iron Defense inside Mist he'll basically be untouchable to almost every attack, and he can deal double damage on almost every attack he has just as an extra bonus, not to mention that he can heal and trap foes, not to mention the fact that with two levels of Iron Defense he can camp with Secret Power, which now deals a whopping 36% damage. Dear Lord.

I hate to be hating on this set, but it really fell apart on me. The playstyle ended up feeling like nothing more than the move interactions that made it up, which themselves were overshadowed by a few moves that already do everything he needs.


The Sniper

This moveset strikes me as being a set that would have very much been at home in the MYM5 era. It has a simple, but clear playstyle and a lot of fairly creative attacks that would have been right at home when creative moves was heavily emphasized.

Don't take that as an insult though, as I've observed it's actually the natural progression for a movesetter to make; I basically had to move from MYM3 quality to MYM6 quality in the space of six movesets at a fairly steady pace; the fact that this is your second moveset and is this good is actually something to be praised.

The Sniper has a couple of kinks you need to work out. Moves like the covering the foe with the hat, and other attacks that are limited to single use are generally frowned upon when there's not a clear reason for the move to be limited like that.

The razorback would have worked perfectly fine as a special mechanic instead of being awkwardly existent only during certain attacks. I do like though how several of his moves are designed to discourage the foe from attacking him, such as the razorback and the back aerial, although the fact that he still takes full damage and knockback makes the razorback less useful, especially when he's near getting KO'd.

The playstyle isn't a very complex or new one, but it's in character and it works pretty well, although as others have said, offense and approaching really doesn't work for the Sniper. Trying to force it into him to make him more versatile is worse than focusing on what he's already strong at.


Octillery

Oh god, the puns. The puns.

Octillery is okay overall, but he's not really all that impressive. His 2v2 playstyle (which now seems to be practically the norm here, despite such a metagame not even existing in brawl) is rich and fun, but the individual moves feel a little sporadic in their effects. Screwing with traction in three different, similar looking ways is a little disorienting, and in the end didn't feel like it really built up to all that much.

That said, using Octillery Support effectively for both attacking enemies and supporting allies was an impressive move (although the way some attacks change under it felt kind of odd), and the way he helps allies as basically being a backpack with a turret is brilliant.

I liked Octillery, but he didn't really do anything that wowed me though; the 2v2 stuff was nice, but there were too many moves that didn't feel like they amounted to much, and despite the move interactions, there wasn't all that much flow between ideas. Still an enjoyable read though JOE!


[/collapse]


AAAAAAAAAAAAAAAAAAAAAAAND I'm sorry, but I've shot my brain out now, it's 1 AM, and I still have 3 more sets to read. Anything I say from here on out would be pure waffling statements that don't say anything to hide the fact that I've lost the ability to maintain focus and just scrolled through the movesets and called it reading. I'll not do that to myself or to you. Rest assured that BB. Hood, Salamence, and Arcanine have not been forgotten.
 

Katapultar

Smash Lord
Joined
Nov 24, 2008
Messages
1,258
Location
Australia
I've decided to comment a bit on the awesomeness that is Arcanine. . . who's a. . . [SIZE=+7]LEGENDARY POKEMON[/SIZE]

That ^ ^ ^, you forgot to mention in the set!

Anyway, Arcanine looks like a funky concept with the dashing and all (Starting a Dash from a Neutral Special and working it up with other moves is quite the idea). I was like 'what?' when I saw the effect of Heat Wave (can Aracanine use traps? lolno. probably a support kind of thing)

Despite being rushed, I still think Arcanine is a pretty good set, short and easy to read. Best of yours I opinionise.

Sorry if the comment is too short. I think it's kind of worth it though.;)
 

JOE!

Smash Hero
Joined
Oct 5, 2008
Messages
8,075
Location
Dedham, MA
I've decided to comment a bit on the awesomeness that is Arcanine. . . who's a. . . [SIZE=+7]LEGENDARY POKEMON[/SIZE]
ok, im just gonna ask you now.

how the hell did you not get around to commenting either the Spartan OR Salamence?

both seem to be your bag, the spartan is fun and friggen EDUCATONAL, as well as loaded with pics. Salamence is loaded with pics and is FUN, and even informs you about the pokemon metagame.


what gives? it seems these are two sets you'd be in awe of yet you ignore them completley
 

Agi

Smash Lord
Joined
Jul 27, 2008
Messages
1,120
Location
SE Washington
Empoleon
He also seems ridculously overpowered, as with a pair of Iron Defense inside Mist he'll basically be untouchable to almost every attack, and he can deal double damage on almost every attack he has just as an extra bonus, not to mention that he can heal and trap foes, not to mention the fact that with two levels of Iron Defense he can camp with Secret Power, which now deals a whopping 36% damage. Dear Lord.
This... this is the main part of the comment I needed to cover, largely because it's been mentioned so many other times. I'm unable to edit it in now, due to Sundance posting the set, but Mist was not intended to be a perfect shield. I mentioned in the description of the FSmash (and maybe in Mist itself, I can't quite remember) that dealing a certain % inside the mist would cause it to dissipate... but what I forgot to mention is that foes can attack the mist itself while standing outside, and that you can only expel mist for a limited amount of time in the first place. Likewise, I also forgot to mention something on Iron Defense: that it only buffs up his melee attacks, not Ice Beam/Secret Power/Bubblebeam. Other than that, it's actually refreshing to get a negative comment. Better to get it over with now than to have it bashed to pieces an MYM or two down the road.

Yes I'll get around to replying to most of, if not all the comments eventually. I have read all of them.
 

Hyper_Ridley

Smash Champion
Joined
Dec 21, 2007
Messages
2,291
Location
Hippo Island
His 2v2 playstyle (which now seems to be practically the norm here, despite such a metagame not even existing in brawl)
Um, you do realize that EVO has doubles tourneys in addition to the singles tourneys, and that there is an entire thread in the tactical board about the doubles metagame, right?

(smirk2)


Arcanine is a respectable effort. It's nice to see a hit-and-run playstyle attempted, it's really rare in MYM, and you did a good job of giving him motivation to do that instead of generic rushdown because of having to retreat to set-up damage buffs. lol @ drive-by combos, I'd rather be shot than be combod personally (wary). Yeah, he's definitely underpowered, but it's one of those "part of a scrapped multi-character set" scenarios, I can't really fault for you for it...although I would like to know why Salamence is the only one of these to try become a stand-alone set (shifty).

EDIT: Taking Wiz's Axel Gear coment to heart, I have added moar detailz on Lightning Barrier so it only lasts for 3 seconds on moving stages. Furthermore, all you guys who felt the move was too intruding on the match will be happy to hear that I've cut the duration of the move in half, from a minute to 30 seconds! Lots more chances for a KO on both sides! I noted the changes on his little version history stuff on the very bottom of the set as proof of the changes.
 

MasterWarlord

Smash Champion
Joined
Aug 24, 2008
Messages
2,902
Location
Not wasting countless hours on a 10 man community
B. B. HOOD

It’s definitely great to see you’re actually trying to live up to the new standards after having been gone for so long – the detail is the most blatant thing that shows how much effort you put into this one. . .But you’re actually doing more work then necessary, as you’re adding a bit –too much- detail. Specific frame data and mentions of IASA frames and such is a bit intimidating and doesn’t really contribute much to the set’s actual concepts.

You certainly seem to know what you’re doing here with said details and a shockingly well written playstyle section, and the basic concept you’ve got going of B. B. Hood being a hit and run camper is a fairly unique one. However; I don’t feel that her moves particularly support her goal at all – yes, you’ve got the projectiles. Yes, they’re bad enough so she can’t just be a defensive camper. . .Where’s the hit and run part, though? None of her moves particularly help her with pulling off this part of her playstyle – the unique part of it.

ARCANINE

Ignoring the fact that he’s underpowered (And it’s not a truly blatant case of it), the main thing that shows Arcanine was meant to be part of another set are those fairly random buffs he has in there. . .Which are actually among the more relevant parts of the set considering the large quantity of irrelevant generic attacks (Which are ultimately the main thing I dislike about the set). He can keep running away to get up his buffs, then do some drive by attacks with his faster ones. It’s a somewhat unique playstyle – the lack of flow is the main thing that drags it down. That and the cloned throws. :ohwell:

Obligatory response to Meanie's comment: I would hardly call most of the interactions in Dark Bowser “overly complex” despite agreeing with you on those of Lunge and Huff’n’Puff. Dark Bowser’s dashing attack is a part of his offensive style he uses against defensive opponents – the part where he comes into the cage, remember? It’s essentially a replacement for him just stomping on top of the cage with dtilt. If you see Dark Bowser playing too specifically, then you’re probably picturing him too specifically in Brawl, where virtually everybody can be classified as “offensive” by MYM’s standards. Dark Bowser is very much so acknowledging the existence of fellow MYM sets and has the tools to end a turtling fest and pressure foes when needed. The only move I really forfeit is the fair, which was made pretty much exclusively for 3v1 and the only purpose of it for 1v1 is to “combo” into a Dark Cloud.
 

augustoflores

Smash Hero
Joined
Feb 2, 2010
Messages
5,718
Location
Rialto, CA
NNID
augustoflores
3DS FC
4828-5782-2252
Switch FC
SW-2867-0942-2202
MYM is very interesting... i am holding out until MYM9. lates!!!
 

flyinfilipino

Smash Master
Joined
Sep 11, 2007
Messages
4,319
Location
North Carolina
@Octossault:

You know, I've always really liked Octillery. Sure, it's a strange evolution, but an octopus tank is just too cool. Especially since octopi octopuses are already really cool animals. If I had an Octillery in real life, he'd probably be my little buddy. But I digress...

Reading Octillery's Specials alone was really exciting; it seems there could be a lot of potential applications of a mobile...tank thing combined with another character. It's a pretty cool idea and would probably be really fun to mess around with. Some of Octillery's attacks on his own aren't that exciting in animation (a blast of ink this way, and that way) but I imagine coming up with attacks for an octopus is kind of hard; you did a good job using all of his potential, though. Not too much to nitpick, really, except that the Final Smash is kind of strange. :)

Overall, Octillery's got some cool concepts going on as a supporting character. I feel like that's really his main attraction, but it's pretty clever, so I can forgive the multitude of ink blasts. :bee:


Now I guess Salamence and the rest of the Pokemon are next.
 

darth meanie

Smash Journeyman
Joined
Jun 6, 2008
Messages
452
MYM is very interesting... i am holding out until MYM9. lates!!!
There's no need to do that, MYM8 is still going strong, and we're not even halfway through the contest. There's still plenty of time to make several sets for the contest. Good luck with any movesets you have in mind, and welcome to MYM.
 

Katapultar

Smash Lord
Joined
Nov 24, 2008
Messages
1,258
Location
Australia
ok, im just gonna ask you now.

how the hell did you not get around to commenting either the Spartan OR the Salamence?

both seem to be your bag, the spartan is fun and friggen EDUCATONAL, as well as loaded with pics. Salamence is loaded with pics and is FUN, and even informs you about the pokemon metagame.


what gives? it seems these are two sets you'd be in awe of yet you ignore them completley
Sorry about that. I was aware of those sets, and I liked them. The only reason I didn't comment was because I didn't really read them completely (no offense, I have a very poor attention span, which is why I haven't got any sets completed lately), and even just saying that I liked them because of the final smash or because of the something little for the sake of it being there kind of seemed wrong. Besides, there's plenty of people who will comment on them so there's no need for me to do so. I don't have the time. :urg:

Yes, I did like Spartan because of his uberly awesome final smash, and Salamence has a memorable opening. I didn't read the sets, but I still like them (just not as much as Wiz and Kupa, which the no1 set for me in this mym).


Irrelevant to above post, I just realised that mantlecore77 posted (did anyone else?) I just want to say hello, and that I've read a lot of your older sets, like Peter Griffin, Dixie Kong, and Donald and Goofy to name a few (they're very colorful for the standards). I hope you can make a moveset or 2 for MYM8, because I enjoyed reading your sets. :)
 

n88

Smash Lord
Joined
Oct 10, 2008
Messages
1,530
Thought I'd let you guys know that I've updated Pokey. He now has a Grab/Throws section, making him a bit more complete as a moveset.

Also, I read Arcanine, but I don't have all that much to say, and I hate being the broken record guy who jumps on the commenting bandwagon and repeats what the last two guys said. Still, the playstyle really does come together nicely, albeit at the expense of a few generic attacks. On a minor note, it's a bit odd to see that the attack names read "FSmash" and "DTilt" rather than the more commonly spelled-out names.
 

Junahu

Smash Ace
Joined
Nov 15, 2005
Messages
899
Location
Shropshire Slasher
¬_¬ I have a serious amount of catching up to do, and everyone knows that the quality of my commentry takes a nose-dive when I have more than one moveset to comment on. So lets snip all that fluff out and just say what I want to say. I'm sure everyone will berate me in the chat later, but whatevs..

.. final warning.. these are opinions, rather subjective ones at that. So don't get antsy if I have a bad opinion of your moveset. I always look at a moveset intending to find fault with it


Forretress:
Like/Dislike: Dislike
Reason: Pokemon aren't competitive muffins, Forretress is canonically more about using a couple of spikes for defense, along with his clamshell defense and spinning for mobility.
Nothing else to complain about really, given how quickly the set was created. So long as the set helps you see your own faults yourself, then this set will have served its purpose.

Miles Edgeworth:
Like/Dislike: Dislike
Reason: :dizzy: I think I've read this moveset before, back when it was called Pheonix Wright (or back when Spadefox made Pheonix Wright Edgeworth). Just because he's identical to Pheonix Wright whenever you control him in the games, doesn't mean that your moveset should ape him too. And it's not worth it to shoehorn the court system into a fighting game, it just breaks up matchflow.

Dark Bowser (again):
Like/Dislike: Like
BUT... : Zook and DM have both made good points on Bowser's junkie like need to use his cage to achieve anything. And with the cage cutting off all the foe's options, there's only really two guaranteed strings of attacks Bowser will need; one to damage, and one to KO... which sounds rather like your Sandman set, only with more freedom in setting up and punishing.

Jack Spicer:
Like/Dislike: Like
BUT... : Building Jackbots AFTER having already fought at point-blank to get parts, is the exact opposite of how things go down in the cartoon. Jack should be using his bots as distractions so he can achieve his own goals during the chaos.

Apprentice:
Like/Dislike: Like
BUT... : Up-Special-Smash DOESN'T recover, but Up-Special-tilt DOES!? That would be so infuriating it's not even funny and it just highlights the overall problem with Special-Smashes.
Putting all the force powers in the specials was a smart, responsible move, but you really should have put the regular attacks at the start of the set, because they read like a major letdown after reading all the awesome force-powers.

Pokey:
Like/Dislike: Meh
Reason: I never approve of skipping inputs without a good reason, and Pokey should totally be able to jump and use aerials (Each jump could have Pokey spring off of his lowest piece, leaving it behind [giving him 4 jumps at the most])

Empoleon:
Like/Dislike: Dislike
Reason: Other than it not particularly suiting him, there are so many crossreferenced interactions between the various trinkets he can set up that even you failed to keep track of them all (e.g. Iron Defense is a status effect, so having it and a Rain Danced Aqua Ring on him is impossible) 6_6 they do sound fun though. And I never truly hate a nice versatile moveset
Iron Defense is intolerably broken. With both buffs, Empoleon doesn't even flinch from anything less than 15% (that's.... EVERYTHING short of a laggy Smash), cannot be grabbed, and deals double damage himself. There's literally nothing the foe can do to him that Empoleon can't simply shield or suck up.

Sniper:
Like/Dislike: Like
BUT... : Down Special has no reason to be there, it could easily have been intergrated straight into Neutral Special (especially since you say it can ONLY be used during that move anyhow), or you could simply let him aim the sniper rifle... like a sniper...

Octillery:
Like/Dislike: Like...ish
BUT... : It's hard to understand how moves are performed when attached to a wall. Do you still press up for an up-tilt, or do you tilt in a direction that is perpendicular to Octillery's current foothold? And what of moves like Down-Smash? Does he just ink the wall uselessly?
Octozooka is nowhere near as useful as you claim. A 10% increase on the (quite low) normal trip rate.. is an almost unnoticeable increase, and most players would just muscle through it. A lot of readers seem to have a mistaken impression on this, and assume one or two will guarantee a trip. Even landing 10 in 10 seconds, would only double the existing trip rate, so it's still nowhere near quaranteed.. or even LIKELY, that the foe would trip, even under such impossible circumstances.

BB Hood:
Like/Dislike: Like
AND... : I'm glad to see a "real" (real as in tangible) moveset, and I hate how noone gives this kind of effort nearly enough credit. I love to lose myself in something that is so willing to expound itself on relatively given aspects of attacks such as IASA frames. But even as the set drifts into superfluous detail, and it does that like clockwork, it remains quite aware of the reader, which is something similar sets always ignore.
I'm not too big a fan of the elements you recycled for her aerials though

Bkup&Wiz (again):
Like/Dislike: This was a moveset!?
...: I keep hearing this nasty false rumour, that this moveset is anything BUT a sneaky cross criticism at the way playstyle only exists because we say so, and a cheeky look at how our efforts must look like to a layman. Please, tell me this is just an informed, witty parody of how far we have NOT progressed in the last couple of years. Because if this is at all serious, then I'm really going to start worrying.


There, now my conscience is relatively clear (barring Salamence, who is a competitve muffin, and Arcanine, who has orange text), and I can get back into MYM (I couldn't even work on my own movesets, knowing how far behind I was)
 

BKupa666

Barnacled Boss
Moderator
Joined
Aug 12, 2008
Messages
7,788
Location
Toxic Tower
ARCANINE
Arcanine reminds me of my MYM4 Hades set with his fire attacks and whatnot, but with something along the lines of Disco Kid's playstyle. Both sets revolve around keeping opponents stunned and damaged, leading into the KO. I don't mind the generic attacks much, as there are still glimmers of creativity here and there, and their simpleness doesn't hurt the set much. Plus, you blatantly acknowledge how you rushed the set to place into a 6-in-1 moveset, which I won't hold that against you, considering you had five other sets to fill with unique ideas. To me, he's only as underpowered as he is because he was originally part of a multi-character set. In other words, he's balanced to be part of a larger set...but he's solo, thus he kind of blows at the game. Arcanine's flow is actually decent in my opinion, considering he has clear moves meant for spacing, then buffing, then comboing. Arcanine is a decent middle of the road set, IMO; I appreciate the flow more than anything else, which is probably why I label it as such. I will say that the Grammar Nazi in me wants to scream at various points in the moveset, though (WARY).
 

BKupa666

Barnacled Boss
Moderator
Joined
Aug 12, 2008
Messages
7,788
Location
Toxic Tower
Dionysus


Recognize this convivial fellow? Dionysus is the Greek god of wine and revelry. He has extensive control over vines, as well as the ability to 'liberate' mortals by altering their mind into a maddened state, courtesy of his special wine. Although he was born from a mortal woman, Dionysus is one of the more powerful Gods, and is not to be trifled with.

Statistics

Aerial Movement: 7
Movement: 6
Size: 6
Weight: 6
Jumps: 5.5
Fall Speed: 5
Power: 2
Traction: 2

Dionysus' playstyle cannot be conveyed through statistics...unless there's an 'awesome' statistic somewhere in the mix. The god of wine is a set-up character, but rather than using it as a fortress to camp from, Dionysus brings characters in for tea. And damage, lots of damage. Once his stage is set, Dionysus gives his zone a mind of its own. Naturally, this is a perfect tool with which to drive your foes loony. Literally, sometimes.

Specials

Neutral Special - Vineyard
Dionysus laughs warmly, clapping his hands and causing a lush spread of walk-through vegetation to erupt from the ground at his feet over three seconds. Dionysus can move after clapping (he's not immobile while the vineyard is growing). This vibrant spread of flora reaches up two Ganondorfs, and covers a Stage Builder block and a half. Only one vineyard can be present at a time, adding to its mythical nature.

Dionysus' godly jumble of plants cannot be destroyed by anyone but Dionysus himself (by removing its 30 HP) when it is fully grown; if hit at all while growing, however, the vineyard vanishes. Seeing as how the god of wine relies on his vineyard for many attacks, taking one down and repositioning it somewhere more strategic is a Herculean task. Dionysus' vineyard vanishes when he loses a stock.

Dionysus' vineyard serves as his operative base. From his base, he can pull off a multitude of majestic tasks. Dionysus can manually pull his opponents into his vineyard, or allow them to play risky and come in...with a potential huge reward for them. No matter how you slice it, the initial placement of your vineyard is an unspeakably important phase of Dionysus' game.


{ 0% }

Side Special - Winds of Fertility
Dionysus holds his pot (pictured) out, causing a swirling pink wind to coil out instantaneously and stretch slowly out in a straight line. This godly wind is rather thin, winding forward a Stage Builder block per half second. Dionysus can angle the wind in any direction prior to unleashing the wind, which can reach out infinitely as long as Dionysus is not interrupted. He can cancel the move by pressing B or rolling. Should a foe enter into this tempting wind, they'll be pulled toward Dionysus at double Inhale's speed. Those mortals just can't resist themselves, aye?

In addition, although equally important, should Dionysus cast this wind over his vineyard, purple grapes will begin popping up here and there among the plants, at a rate of five grapes per half second. If he manages to do so for two seconds, the vineyard will gain a pink aura, meaning grapes will be present in the vineyard for the rest of its lifespan. As Dionysus can use grapes to become a much more intimidating opponent, foes will have to approach and prevent him from granting his vineyard endless grapes. They'll be in the range of his vineyard, and may even be pulled in by the wind itself.

{ 0% }

Down Special - Wine of Olympus
Dionysus chuckles, waving his arm for every grape in his vineyard to fly into the pot instantly. He stirs his concoction for a split second, before stowing it in his robes. Tap the input again, and Dionysus will begin drinking his homemade wine, similarly to Young Link's Melee taunt. Each grape in the mixture allows it to heal Dionysus of 2% when he drinks it; he heals at a rate of 6% per second. If Dionysus' vineyard has the gift of endless grapes, they'll flow into the wine as he drinks it, allowing Dionysus to heal infinitely.

Am I hearing cries of broken already? Well, what better incentive for opponents to haul their ass over to the vineyard and intervene? But wait! It's not like the grapes are restricted to gods only. Opponents can walk into the vineyard and use their grab to extract a goblet, toss in several grapes from the foliage, and drink the holy mixture. As a result...they heal all of their damage. All over the course of half a second.

What's the rub, you may ask? The godly mixture is quite powerful to take in for mortals; the drinker remains stunned for a second. That's a long-ass time. Plenty of time for Dionysus to punish the thieves who stole from his vineyard. If your opponent is bold, desperate, or facing an incompetent Dionysus, he may try and pull this trick off to turn the tables in his favor. Take advantage of any who dare to do so.

{ 0% }

Up Special - Vine Snare
Dionysus whistles, causing a thin vine to rocket from the top of his vineyard to wherever he is (traveling around or through obstacles), with .2 second startup lag. The vine wraps around the god of wine's foot and pulls him instantly back to his vineyard, releasing him upon reaching its destination. Dionysus can save himself from many KOs by using his vine to pull him back. However, if a character can hit the vine with absolutely any non-projectile attack, the vine will release him into a helpless state.

Unless you're using a long, held-out attack (fucking Meta Knight) to gimp Dionysus, the vine will often be too fast to hit. A skilled Dionysus will have to be blasted off so fast that the vine won't have time to reach him before he's gone. This, in combination with Dionysus drinking wine to heal himself, makes the god an irritating character to kill. Dionysus becomes a moderate-priority hitbox as the vine pulls him back. Foes smacked by the returning god take 7-8% and set knockback.

What with its infinite range, Dionysus has other uses for this move than its recovery properties. If he's stuck on one side of New Pork City (if you're fucked up enough to play there), his vineyard is on the opposite end, and a foe is about to go recover all their damage by getting wasted, why not pull yourself back with a vine and punish them? Why not indeed...


{ 7-8% }

Grab and Throws

Grab - Enchanted Vines
Dionysus can only grab once a vineyard has been erected; grabbing is his most-effective method of doing...well, everything. Dionysus snaps his fingers, causing a thin vine to instantly erupt out of his vineyard and hone in on the nearest character at Dedede's dashing speed. They'll travel endlessly to reach their target, but if they miss once, they'll retreat back to the vineyard at the speed from whence they came. A caught character is pulled back to the vineyard in .5 second, no matter how far away they are. Once they're in the vineyard, they are held on the outside of the vineyard where the vine began, and shit gets real.

Oh, but there's more. A whole hell of a lot more. This grab has next to no lag on either end, and there's no limit to how many vines Dionysus can send out at once. You can literally send out a hydra pillar of vines at your character, which would be a good strategy, except that vines disappear with just one hit. A character can take out multiple vines with one move; they're just that thin. I wonder where those stunning moves piece into the moveset now...Dionysus can grab from anywhere onstage. And offstage, as well; Dionysus can technically 'grab' while airborne.

To add to the fun, Dionysus can grab multiple characters in FFAs or alternate game modes. You can attack each victim in the order you grabbed them; if you wish to skip over an opponent in this cycle, press the shield button to proceed to the next character in the queue.


{ 0% }

Pummel - Feeding Grapes
Dionysus can only pummel opponents if he has grown grapes for his vineyard. The vine holds the victim, while another moving vine plucks a grape from the vineyard and crams it into their protesting mouth. Each force-feeding takes .4 second, and deals 1% to the victim. With enough grapes on the vine, you can build up a fair amount of damage this way.

However, there's an important twist to these grapes. See, these holy grapes are a lot to take for mortals. If you manage to force-feed a character ten grapes in one grab, they'll lose their minds, along with a stock. But they're not out of the picture yet. Nope, they're yours to control. By pressing B (useless anyways, since your vineyard is already out) within three seconds of the 'KO', Dionysus assumes control for fifteen seconds. You can now turn a solo into a duo against your opponents; your controlled character has super and grab armor, in addition to a slight buff on all attacks, making them a formidable warrior on your side.

Dionysus has no need to worry about being attacked while controlling a character; shield while playing a possessed victim to control Dionysus instead (pressing B returns him to possessing the victim). In single-player matches, you can stall to run the clock if necessary. Let it be known that running the victim off the edge will not subtract another stock; it will only end your fifteen seconds as they respawn. Why waste all that hard work for nothing? You'll have to get your opponent past 100% before you can think of brainwashing them anyways.


{ 1% }

Throw - Swinging from Vines
Pay attention, kiddies; this is Dionysus' primary form of both damage-dealing and KOing. By simply tapping a direction, the victim's vine lightly tosses them in that direction. The character takes 5%, along with some hitstun. This throw will never KO...But wait! Why not just grab the character again? After the toss, Dionysus can send out another vine to grab the stunned opponent. They'll have to DI extremely well to get away from another grab. Even if they manage to do so, Dionysus can stick around and use a stunning move to ensure the grab lands (he can move around while grabbing and throwing, as his vineyard does all the work). A seasoned Dionysus can stack multiple throws on a single opponent for the majority of their damage.

Now, by rotating the control stick 360-degrees prior to holding it in a direction, the vine will wind up before it throws the victim. This results in a stronger throw, dealing 12% and KOing at 145%. You definitely won't be able to re-grab the character after this throw, but you shouldn't be using it anyways until you're ready to finish them off. In which case leading into this from a weak throw may be the best option.


{ 5% weak, 12% strong }

Basic Attacks

Jab - Jug Juggler
Dionysus' pot splits into three jugs, which he juggles in a Bowser-sized circle with .1 second of startup lag. This move is unique in that one tap of A starts the juggling...and doesn't stop; you must tap A again to cancel, with minimal ending lag. Dionysus can also move slowly back and forth while juggling, in an attempt to catch a character with his circle of hitboxes. Each jug deals a mere 2% and stun characters slightly, hindering their DI. If Dionysus is moderately close to a vineyard, he can trap a character in his juggling and walk them in himself. Get 'er done!

{ 2% per pot }

Dash Attack - Bowling Pot
Dionysus leans back for .3 second, before rolling his pot forward along the ground like a bowling ball. The pot travels half of Battlefield at Mario's dash before returning to its master with slight lag. Opponents who hit the pot take 7-8% and fall to the ground, while sliding in the direction of the roll. Dionysus can either roll a foe away from him for safety, or roll them toward the vineyard to grab them.

[ 7-8% ]

Forward Tilt - Pot Head
Dionysus holds his pot over his head for .2 second, before slamming it to the ground in front of him. The pot shatters on the ground, giving the god of wine .3 second ending lag as he magically sweeps it back together. The pot is a Soccer Ball-sized, and has two hitboxes. Opponents standing fairly close to Dionysus get the pot stuck on their heads, taking 5% and remaining stunned for as long as a grab. If they barely nick the edge of the pot, they take low set knockback instead. Dionysus' tilts are primarily for combat when he's forced from his vineyard; he can escape back to his safety zone or force a foe in with his grab. Whatever puts the wind in your sails.

{ 5% }

Down Tilt - Broken Pottery
With a casual sweep of his hand, Dionysus turns his pot into shattered shards (this would be the move name in the MYM4 era...), allowing them to fall to the ground a character width in front of him. Releasing the shards is near lagless; Dionysus then allows the shards to sit for a half second, before they reassemble in his hands instantly. Characters who are hit by the sharp shards take multiple stunning hits of 1% for the duration of the move, as well as a short period afterwards. Stun them near a vineyard for an easy grab, or escape back and drink while they're immobile.

{ 1-8% }

Up Tilt - Potted Plant
A thin green plant begins growing up out of Dionysus' pot, extending up Snake's height in .35 second, before retreating. The move's hitbox emerges when the plant reaches half its full height. If the plant comes into contact with a character, it loops around their leg and slams them to the ground in their downed position, dealing 6%. As with his other two tilts, Dionysus can send vines after the victim to grab them when they get up (time it to avoid them blocked vines with a get-up attack), or flee while they're down. Although Dionysus is best off using his other two tilts for stunning foes for a grab, he can use the plant to throw a character to their doom if he's near an edge. He can also use this as a laser-lock set-up when teamed with a Falco.

{ 6% }

Smashes

Forward Smash - Grape Barrage
Dionysus points forward vigorously, for a barrage of green grapes (different from the purple grapes, which need to be grown by Side Special) to shoot out from his vineyard like bullets. The grapes are the size of a Deku Nut, and travel at Sonic's dash speed off the opposite boundary. Dionysus has .3 second lag on each end of the move, but he doesn't really need to worry about this; his vineyard will shoot the grapes no matter where he's standing. This is the case for all of Dionysus' smashes; they all use the vineyard and can be activated from anywhere. Keep in mind you need a vineyard to perform Dionysus' smashes...

Back to this smash. The barrage of grapes lasts for approximately .5 second; the multiple small hitboxes have the potential to trap characters caught with an initial grape for that whole time. Each grape deals 1%; a barrage of these babies have the potential to deal in the mid-teens, damage-wise. There's no knockback to the move, though; even if the foe is near a boundary, the grapes won't carry them off. Useless smash? Hardly. Looking past the damage-building capabilities, Dionysus can send out vines before unleashing his grapes of wrath, grabbing the foe right out of the barrage in which they're trapped. Try to time the grab so that the vine snares them at the end of the Smash, or a stray grape may hit your opponent out of the grab.


{ 1% per grape }

Down Smash - Soporific Gas
Dionysus sweeps both hands outward with .45 second startup lag, causing purple gas ((SHOCK)) to hiss out, all around his vineyard. By just C-Stick smashing, the gas only covers a Stage Builder block around the vineyard; at full charge, the gas stretches out to two and a half blocks. The gas lasts for a second and a half before vanishing; any characters who are in its midst during this time are put to sleep for the duration of the gas.

Dionysus can then proceed to send a vine after his snoozing victim. Although slightly slower than F-Smash, Dionysus can use this Smash to grab foes more efficiently, as the non-damaging gas won't knock foes out of the vine's grasp. If they're asleep while being grabbed, the character will be unable to mash away until they've woken up. If you don't mind the lack of damage, this is the perfect set-up Smash for Dionysus.


{ 0% }

Up Smash - Vine Pillar
Dionysus points upwards, with .4 second lag on both ends. Immediately after, a pillar of vines, as wide as the vineyard itself, erupts upwards to the upwards blast zone. The vines travel upwards at an incredibly rapid pace, hold their position at the screen top for a split second, before descending back into the vineyard just as fast as they emerged. Dionysus cannot grab while the vines are out, but considering the mass vines' massive hitbox, this isn't a huge issue.

You see, if a character is hit by these tendrils, they are pulled right back down to the vineyard, wrapped in multiple vines. While this itself deals no damage, Dionysus is now allowed three free chained throws on the victim, courtesy of the multiple vines. The throws start automatically; as soon as the foe is thrown once, a vine automatically regrabs them and throws them again, giving them no chance to escape until after the third throw. The charge of the Smash determines the strength of the throws.

At minimum charge, the throws are identical to the usual light throws Dionysus uses, dealing 5% for each throw. Dionysus can use a normal grab on the character after a weakly-charged U-Smash to continue damage-building. At maximum charge, each throw deals 12%, with the last throw dealing knockback that KOs around 145%, just like his powerful regular throw. Dionysus can rack damage and throw multiple characters around like an octopus on crack with this Smash. The strictly vertical hitbox can be awkward to land though; because of this, you may be reduced to using this Smash as means to keep characters out of the sky above your vineyard.


{ 15 - 36% }

Aerials

Neutral Air - Divine Attraction
Dionysus begins glowing with a godly light, covering about the range of those generic spinning attacks Brawl characters (and Stanley) have for N-Airs. He begins glowing after .65 second, and remains shining for nearly three seconds (during which he can move normally). Characters who enter this godly light are captivated by the god of wine, becoming immobile directly where they entered the glow for a full second.

Just because the light deals no damage doesn't mean this move is useless. Oh no. Dionysus can perform his own moves (ala F-Smash, U-Smash) and jump right in, pulling the foe away into a world of hurt, while he is impervious to their effects. He can grab them out of the shine, or in a team battle, position himself in front of a teammate charging a Smash (or Warlock Punch). If he's desperate, Dionysus can simply leap right off the edge for a suicide KO!


{ 0% }

Forward / Back Air - Vine Lasso
Dionysus whips out a vine noose, and whips it forward (backward) a Battlefield platform. He holds it out for as long as Lucas' rope snake before stowing it in his toga. Characters who are caught by the noose (not the vine itself, mind you) are caught by it, like a dog (or...something else) on a rope. Dionysus can hold his slave victim there for as long as a grab. He can take advantage of his victim's immobility much like with N-Air, although the much shorter period of incapacitation makes this much more difficult.

Instead, when a victim is snared, press the control stick in the opposite direction to throw the opponent that way, dealing 7% and moderate set knockback. Dionysus is also turned around by the throw; these aerials can either be used for this, or merely to throw a character toward a vineyard...or teammate's attack.


{ 7% }

Up Air - Blustery Wind
Dionysus points upwards, causing a flurry of vineyard leaves to spin around his head in a vortex. There is little lag on either end of this move; the attack lasts for .6 second by default, but by holding the input, Dionysus can hold the move for up to 1.25 second. Release A and Dionysus ends the vortex.

Characters caught in the spinning leaves take constant hits of 1%, until the vortex ends or is released. At this point, they take knockback that KOs at upwards of 250%. Not great at all, but still enough to toss a foe toward a vineyard. Release the vortex when they're facing in the proper direction; you can even keep them in the vortex for a little longer, so they spin into that direction, taking damage in the process. Touch the ground, however, and the character is released.


{ 1-11% }

Down Air - Plant Stem
Dionysus points down, causing a long green plant stem to rocket down to the ground (or off the bottom blast line), after .5 second startup lag. The stem is rather thin, and can be passed through (no gimping!). A leaf the size of a Stage Builder block rests at the top of the stem. For the 1.5 second the stem lasts, Dionysus can stand on the leaf; it serves as a drop-through platform for characters. Two stems can be out at a time.

If a character is caught underneath the stem as it comes down, they are trapped there for the duration of its lifespan, taking 8%. This can potentially push an aerial character down for an offstage KO, but it's incredibly difficult to set up. Plus, by the time Dionysus has enough damage on a character to get them offstage, he's better off just trying to KO them. By trapping a character under a stem, Dionysus can hit the trapped character toward a vineyard. It's essentially like grabbing and throwing them, without using the actual grab and throw that accompanies the vineyard.

Dionysus has a few other crazy uses for this aerial as well. If he doesn't want to position himself at his vineyard with Up Special, he can use stem platforms to return to the stage. If Dionysus wants to, say, trap a character between a vineyard and himself, this is clearly the superior option, as Up Special would allow the character an opening to escape. All sorts of multiplayer mindgames 'stem' from this move as well. Dionysus can help a poor Ivysaur teammate recover, set up platforms for Silver to move around, or even just short-hop a stem under a character using a laggy aerial, allowing their teammate to take advantage of their landing lag. Don't forget that the teammate can simply charge a Smash in front of a character trapped under a stem...


{ 8% }

Final Smash

Final Smash - Winery of the Ages
Dionysus chuckles warmly, causing the stage to sprout all sorts of plants and floral matter, as well as gain a slight green tint. Vines surround the entire perimeter of the screen, wiggling ominously. Touch these babies, and they'll throw your character around at hyper speed, getting them up past 100% within a few seconds. Your character has no way to escape their ruthless grasp, and will obtain several hundred damage within the ten seconds of the Final Smash. As the vines begin vanishing after this time, the character (still thrown mercilessly) is slowly pulled away to their doom.

Now, here comes the truly frightening aspect of the Final Smash. By grabbing, Dionysus claps his hands, causing every single effin' (it's necessary there, right Wiz?) vine to zoom toward the center of the screen at an unbelievable speed, meeting in the middle. If a character is far away from the center of the screen, they're uck-fayed. In the case that the character is near the center of the stage, they can air dodge to evade the vines (they retract just as rapidly as they came). However, their retraction speed means Dionysus can grab multiple times during one Final Smash. Plus, because the god of wine isn't at risk of being grabbed, he can add to the victim's dilemma; he can push them toward the perimeter with one of the attacks that would ordinarily push a character toward a vineyard, then grab after using a stunning attack.


{ 5% per throw }

Solo Playstyle

All big trees start with a tiny seed. All mighty vineyards start with an initial use of Neutral Special. To remain viable, Dionysus must determine a place to set up his vineyard. Without his vineyard, Dionysus loses to any character...and has trouble with Ganondorf. If you're on a simple stage, setting up your vineyard near the middle of the stage is your best bet, so as to keep your opponent close to it at all times (put it on one side, and your opponent will undoubtedly flee to the opposite side). Dionysus has no need to worry about stage hazards, though; only he can destroy his vineyard once it is grown.

Of course, because your opponent can instantly destroy your vineyard during its growth, Dionysus must defend it immediately after summoning it. Because it is so vital to his game, you must do whatever it takes to prevent it from taking that one little hit that will wither it away. You know those moves designed to push characters toward the vineyard? They can be pulled out here to do the opposite. Walk a victim away with your jab, bowl them away with dash attack, toss them away with F-Air/B-Air...whatever it takes. If your opponent is a pesky camper, you may have to suffer the hits yourself to keep your precious vineyard growing.

Now, your vineyard is grown, and Dionysus is ready for action. At the end of the day, he wants to grab you near his vineyard, use multiple grabs and throws to build damage, then KO you with a strong throw once you have enough damage. Let's break this down so K...kiddies can understand. First and foremost comes getting a character to the vineyard. Because Dionysus' grab can reach out infinitely to grab an opponent, they may seem like the best option. They're not. Although the tendrils can pull a character back quickly enough, they take forever to reach out long distances. Plenty of time for any competent player to time their attack that sends the vines back to where they came from. Remember, any attack will cause a vine to retract, and one attack can cancel out multiple vines at once.

Instead, Dionysus will want to get a character somewhat close to his vineyard before attempting a grab. Side Special is a great tool with which to do so, if Dionysus is standing near the vineyard. If not, he can use moves in the vein of those listed a few paragraphs above that you're more than capable of scrolling up to see, to hit characters toward the vineyard, before grabbing them. Dionysus can activate his grab from anywhere, yes? Once they're close enough, stunning attacks such as your tilts, F-Smash, D-Smash, N-Air, and D-Air prevent characters from simply hitting away vines. You could just try this tactic far away from the vineyard, but waiting for the vines to reach all the way out there just gives victims more time to escape their stun...or to read what you're trying to do, if you send them out before attempting to land a stunner.

Of course, there are times when this strategy is simply not sufficient. Campers, for example, can simply keep Dionysus at bay with their flow of projectiles. Other characters have methods of fleeing away from Dionysus as he attempts to herd them toward a grab. What's he to do? How about growing some grapes in your vineyard with Side Special, then drinking a sweet wine of them with Down Special? If your opponent refuses to cooperate, why not force them to intervene by healing yourself?

Should your rival stay away to camp or flee, Dionysus will have more than enough time to grow some grapes (more than likely an infinite supply of them). Because Dionysus is obnoxiously tough to kill anyways, what with his ability to all but return to his vineyard at will, plus two free platforms for extra jumps (to kill him, you've got to hit him so damn hard that the vine won't have time to grab him back), you'll want to prevent him healing himself at all costs.

Once you've landed a grab, you'll want to get the damage going. Use a light throw and quickly grab, to snatch your victim right back up again. If they are floaty or can DI well, you'll want to place yourself in the direction you're throwing them, and use an immobilizing aerial to ensure their capture. With some practice, damage-stacking with weak throws becomes almost second nature.

Deserving of a mention is Dionysus' pummel; feeding grapes to an opponent give them some extra damage, but it should only be done once they have quite some damage built up. The risk of the opponent escaping is much greater at lower percentages, and you'll want to use that grab to build some actual damage (rather than a measly 1%). Taking control of a character serves no real purpose in a single player match other than to stall (you can't kill them by suiciding, and because they respawn, you can't walk them into a dangerous position and leave them there). You'll really squeeze the juice of usefulness from mind control in team matches.

Now, time to finish off those foolish mortals. Although all of Dionysus' aerials (sans D-Air) have suicide KO potential, Dionysus puts himself at risk to be gimped by recovering opponents hitting his vine when doing so. It's safer (not to mention easier) to simply use a strong throw to toss a victim off a blast zone. The vineyard is fairly tall, so it won't take too long before a vertically-thrown character enters a Star KO. Speaking of strong throws, if Dionysus is getting his ass kicked, try using a strong throw to get some space between him and his opponent, and drink away the pain.

Mastering the god of wine is a matter of the mastering the collaborative use of his powers and those of his vineyard. Learn which of Dionysus' attacks are the most effective in setting a character up for a grab, then finishing the job by using your vineyard to build the damage and throw them away like garbage. Dionysus is quite limited on his own; if he gets gangbanged by an opponent before he can grow his vineyard and use it effectively, he'll find it nearly impossible to come back and win. Work your godly powers and prosper!


Team Playstyle

Dionysus becomes a different character in team battles, for two different reasons. First of all, depending on your teammate, your vineyard's strong throw is no longer your best KO move. In addition, driving a character insane and possessing them becomes infinitely more useful here.

If you pull in a character or two, why waste time and effort tossing them around like juggling balls? Call over Bowser to F-Smash them out of the way, or Meta Knight to grind up against them like a spinning hooker, building damage faster than Dionysus ever could. Wanna heal your teammate by allowing them to use their devouring grab to eat the victim and digest them (I can dream)? Grab a character and give your ravenous friend free reign.

Dionysus serves as an amazing teammate because of his vine grab; even if team attack is on, all your teammate has to do to ensure his safety is to allow an opponent to remain closer to the vineyard, so the vine targets them instead. Even if a teammate is grabbed, Dionysus can still grab while they are being held; even if the teammate can't mash free, Dionysus can skip over his friend to throw his enemy instead.

Dionysus can possess a character in a team battle to stack the odds against his opponent even higher. If you want to KO a certain character, take control of the other one and use their super armor to overwhelm their teammate. Combined with your teammate's attacks, a KO is likely. Even if the possession causes the character to lose their last stock, you can still assume control before they wither away after the allotted fifteen seconds. If your teammate is equipped with stunning attacks, they can stun a grabbed character, allowing Dionysus to force-feed the ten grapes much earlier than usual. If not, the teammate can still fight to keep the victim's teammate from coming to their rescue, while Dionysus puts those big round grapes in their mouth.

Dionysus has little room to deviate from grabbing and throwing characters to build damage and KO in solo matches. When these options are coupled with those of a teammate, the potential domination that can ensue is unholy (proper use of the word). Every grab Dionysus pulls off ensures more damage than usual with your teammate's help; even after this, he can still regrab and continue the madness. Possession's true potential is realized here as well (it's near useless in solo matches, and dangerous to attempt in FFA's). Dionysus is compatible with almost every single character in a team match, allowing for hours of fun to be spent just experimenting with the possibilities of their combined attacks.


Match-Ups

Vs. Dark Bowser: 60/40 - Dionysus' Favor
Dark Bowser can approach Dionysus right off the bat to try preventing him from putting up a vineyard. If he manages to do so, Dionysus is easy pickings; a few measly stunners won't come anywhere close to KOing Dark Bowser. Dark Bowser must keep up pressure on a vulnerable Dionysus though, or he'll set up a vineyard and screw with your game. For starters, Dionysus can allow the vineyard to take the hits of Dark Bowser's camping (the vineyard can't be damaged by enemy fire).

In addition, vines are a major thorn in Dark Bowser's side. Although he can hit away vines just fine, if he whiffs an attack, he's likely to be grabbed and damaged thoroughly. He's heavy, of course, but his size allows for Dionysus to keep grabbing and throwing over and over again. Vines also make caging Dionysus incredibly difficult. Dionysus can use Up Special as a get-out-of-jail-free card while in a cage (it cuts through obstacles). Also, if Dark Bowser is in the cage with the god of wine, any grab vines will pull open cage bars to pull the male heavyweight antagonist out, leaving Dionysus free to escape. To combat this, Dark Bowser should attempt to cage Dionysus as far away from his vineyard as possible, so the vine takes longer to reach the characters.

If Dark Bowser can prevent Dionysus from putting up a vineyard, he walks away with the match easily. At the very least, approaching instantly takes away all the time Dionysus would otherwise have to strategically set up his vineyard. However, the god of wine is more likely than not to get up a vineyard eventually, which really increases the difficulty of the match for Dark Bowser.


Vs. Salamence: 25/75: Salamence's Favor
Dionysus is forced to interrupt Salamence's rage (which he'll be charging from a distance as Dionysus places his vineyard); to do so, he'll have to approach Salamence, or use his Side Special, which takes time to travel long distances. A Dionysus trying to get Salamence to approach is incredibly stupid; Dionysus will find it much more of a threat being KOed earlier with Salamence's powered-up attacks than Salamence does facing a healed Dionysus, when his attacks will KO the god of wine early enough anyways. His speedy aerial abilities can zoom past vines if timed correctly, and Salamence is no slouch at taking out vines either. Another thorn in Dionysus' side is that Salamence can free himself from a grab with Aerial Ace.

Dionysus will have to stick around and stun Salamence to keep him easy-to-grab, but in doing so, he risks getting slashed himself. What with his hefty weight, Salamence can outlast the god of wine with ease. Because of his incredible jumps, he can also attempt to gimp Dionysus without putting himself into much danger. Dionysus will want to keep Salamence on the ground with his anti-air, multi-throw U-Smash. However, even this move misses Salamence if he's not above the vineyard. Because Salamence has a foolproof method of escaping Dionysus' most important move, and is given a chance to prepare said method at the start of most matches, he triumphs over Dionysus more often than not.


Extras

..........................................................................................
.........................................................................................................................................................................................................................................................................................................................................................................................................................................................................................................................................................

.............................................
....................................................................................................................................................................................................................................................................................................................................................

..........................................................................................
.........................................................................................................................................................................................................................................................................................................................................................................................................................................................................................................................................................

.............................................
....................................................................................................................................................................................................................................................................................................................................................

Made you look.
 

MasterWarlord

Smash Champion
Joined
Aug 24, 2008
Messages
2,902
Location
Not wasting countless hours on a 10 man community
Dark Bowser (again):
Like/Dislike: Like
BUT... : Zook and DM have both made good points on Bowser's junkie like need to use his cage to achieve anything. And with the cage cutting off all the foe's options, there's only really two guaranteed strings of attacks Bowser will need; one to damage, and one to KO... which sounds rather like your Sandman set, only with more freedom in setting up and punishing.
Oh no, Dark Bowser HAS to use ONE move! Because nobody else in Smash has to do that to be played remotely effectively (Read: Everybody just spams a couple of moves and ignores over half of their moveset)! Please, and how -can- you compare this to Sandman? When they're in the cage and I'm on the outside, I can be summong Thwomps, dtilting, blowing in Dark Clouds/Fsmash fire, blowing in a Bob-Omb, or trying to grab them from below with uair. All perfectly viable options. When I'm inside the cage with them, I can be using my dashing attack in combination with the Thwomps, fsmash to camp, or pressure them to a wall with ftilt and use my jab there. Nevermind how I can be using my minions which my foe can't. There are plenty of options for damage racking.

Okay, he has limited courses of action for KOs, but that's because he only has a handful of KO moves, mainly his dsmash. Then again, he could always just blow them off-stage in a Dark Cloud once he has enough damage on them or let himself be knocked off-stage so they have to come off-stage to gimp him, then just gimp them. Of course, this is all ignoring how differently he plays against offensive/defensive foes. . .Why in all hell is -this- moveset randomly the target of this sort of thing? This is among my least forced movesets.

Bkup&Wiz (again):
Like/Dislike: This was a moveset!?
...: I keep hearing this nasty false rumour, that this moveset is anything BUT a sneaky cross criticism at the way playstyle only exists because we say so, and a cheeky look at how our efforts must look like to a layman. Please, tell me this is just an informed, witty parody of how far we have NOT progressed in the last couple of years. Because if this is at all serious, then I'm really going to start worrying.
Because Smady tells us it's a moveset - he's trying to prove his point with that one, methinks. (Rolleyes)

Empoleon:
Like/Dislike: Dislike
Reason: Other than it not particularly suiting him, there are so many crossreferenced interactions between the various trinkets he can set up that even you failed to keep track of them all (e.g. Iron Defense is a status effect, so having it and a Rain Danced Aqua Ring on him is impossible) 6_6 they do sound fun though. And I never truly hate a nice versatile moveset
I thought you were trying to -not- prove Smady's point? Empoleon is a very flowing moveset with a focused defensive playstyle, Agi simply got lost and threw out "versatality" as an excuse for the playstyle summary rather then attempting to actually explain it. You're suppossed to be adamant about not wanting to believe whatever the moveset tells you.

Edit: ........Was writing replies while spam/moveset was posted. Didn't refresh. Will edit in comment.
 

Junahu

Smash Ace
Joined
Nov 15, 2005
Messages
899
Location
Shropshire Slasher
Oh no, Dark Bowser HAS to use ONE move! Because nobody else in Smash has to do that to be played remotely effectively (Read: Everybody just spams a couple of moves and ignores over half of their moveset)!
That's their metagames for their respective competitive playstyles. People are disgusting opportunists and they will ALWAYS use the "best" move if it will help them win. It has nothing to do with the designs or intentions of the movesets themselves. Even the best designed games like Pacman.. or even CHESS, have metagames that seem to go directly against the intentions of the game itself.
While Dedede might have that one thing he does in a competitive match, he still has the flexability and consistancy to be played at lower skill levels in different ways, which is mainly the point of Brawl to begin with.
Though in DB's defense, he CAN be played without the grab, at least at a casual level. Thanks to the minions and his Up-Special and his b-air, he is explicitly better than Brawl Bowser in a casual FFA.
:dizzy: So I guess this arguement is all kind of pointless. Sorry, but I may as well keep debating...

Please, and how -can- you compare this to Sandman? When they're in the cage and I'm on the outside, I can be summong Thwomps, dtilting, blowing in Dark Clouds/Fsmash fire, blowing in a Bob-Omb, or trying to grab them from below with uair. All perfectly viable options. When I'm inside the cage with them, I can be using my dashing attack in combination with the Thwomps, fsmash to camp, or pressure them to a wall with ftilt and use my jab there. Nevermind how I can be using my minions which my foe can't. There are plenty of options for damage racking.
While these are all options, that's all they really are when the foe is trapped, options that lead to the exact same conclusions. The fact the foe is in the cage significantly reduces what they can do to avoid getting pounded, and therefore renders the standard contextual uses of these options moot. You can fill the cage with minions... or dark clouds, no difference to the end result because the foe can realistically avoid neither.

Of course, this is all ignoring how differently he plays against offensive/defensive foes. . .Why in all hell is -this- moveset randomly the target of this sort of thing? This is among my least forced movesets.
It's the fact that he's open ended in so many ways, that makes us realise that most of them go directly through a specific move, which creates a bottleneck. There is only so much you can do to get the foe in the cage, and the mutating manner of the metagame all but guarantees there will eventually be a way to consistantly avoid the cage (and the subsequent backup plan) alltogether. And that's all before Count Cannoli steals your grab..
But we're targetting DB, BECAUSE we like the moveset and we have to criticise it to fully come to terms with what it achieves. Or at least I am.. don't you find the comments I give where I do nothing but gush, a bit... boring? They're certainly not the helpful comments I should be giving.
 

Katapultar

Smash Lord
Joined
Nov 24, 2008
Messages
1,258
Location
Australia
Yay, a moveset for a greek god! Dionysus is an epic set, I read the coolness of the specials, and understand the awesomeness of the grab. I noticed that he has a GREAT WRITING STYLE , which I applaude.

Anyways...

*Skims to the end*

Wait a minute? No extras? Kupa sets always have extras!!! What if I want to know what his taunts are, or his victory poses?? Surely a symbol of god,me would nice!! [size=+3]NOOOOOOOO!![/size]


I don't like this set. :smash:

Joking. Just poking fun at the fact that you skipped out the extras. In reading the set, the writing style is what appealed to me the most. Quite awesome it is.

I reckon Dionysus should be a potential candidate for Survivor (Good moveset right here MW and Khold).
 

Agi

Smash Lord
Joined
Jul 27, 2008
Messages
1,120
Location
SE Washington
(e.g. Iron Defense is a status effect, so having it and a Rain Danced Aqua Ring on him is impossible) 6_6 they do sound fun though. And I never truly hate a nice versatile moveset
Iron Defense is intolerably broken. With both buffs, Empoleon doesn't even flinch from anything less than 15% (that's.... EVERYTHING short of a laggy Smash), cannot be grabbed, and deals double damage himself. There's literally nothing the foe can do to him that Empoleon can't simply shield or suck up.
Two comments to make on this. For one, yes, you can't have Iron Defense in an Aqua Ring. I never intended him to be able to use Iron Defense in an Aqua Ring, and if I did say that he was supposed to I apologize. You could Iron Defense after freezing a Rain Ring, though. And yes, it would take a laggy smash to break through the doubled Iron Defense... which is why Empoleon's attacks are so incredibly slow and it was made possible to pummel/throw through the defenses. Even then, you'd only have to land two of those laggy smashes to break the Iron Defense for the rest of the game.

Yes I know that the only real posts I've made this contest have been replies to Empoleon. Yes I do feel bad about that.
 

Hyper_Ridley

Smash Champion
Joined
Dec 21, 2007
Messages
2,291
Location
Hippo Island
Dionysus

REALLY, people? Still no comments for him (ok, Kat gave him one, that's still only 1). I am disappoint.

Anyways, the drunken God is a mighty fun set, thanks in part to the sheer concept of, well, a drunken God who fights with grapes xD. I can't believe you were able to come up with so many cool atacks for a character who feels like he shouldn't have any real potential.

The playstyle is also pretty cool. I didn't realize it until Junahu pointed it out, but it's unique how he wants to stay in the center of the stage for most of his game.

And best extras ever (h)
 

MasterWarlord

Smash Champion
Joined
Aug 24, 2008
Messages
2,902
Location
Not wasting countless hours on a 10 man community
Dionysus

VVNitpickingVV

I rather like how Dionysus fights through manipulating a single object – a turret, essentially. The vineyard is essentially an extension of Dionysus that can generate hitboxes of its’ own. What I don’t like is that something that’s so much a part of him has to be summoned and that so many inputs are useless without it. Maybe he could have a new Neutral B that interacts with his Vineyard, but inputting any of his vineyard moves without one ignores their normal functions and just summons it? That’s a general idea that could be applied to a lot of MYM sets and more of a specific suggestion, so bah. I’m rambling about something that doesn’t bother me that much anyway. . .

My only other complaint is that I feel that it takes too long to get up the vineyard, and Dinoysus just has his standards and aerials to defend himself with for 3 seconds. Solely because of that Dinoysus is pretty low on the tier list, and it’s not like his main moveset is particularly overpowered to make up for it. Methinks the start-up time for the vineyard should be more generous, but it should be vulnerable to attack with no buffs to the stamina. If anything this would compliment Dinoysus’ game, as Dinoysus likes his foes to be as close to the Vineyard as possible for his grab.

^^Nitpicking^^

Anyway, yeah. I’m number crunching for a balance complaint, and those are the most legitimate complaints I can find beyond a bit of redundancy in the playstyle summary. Dinoysus turns a lot of concepts about a character who stays close to an outside object on their heads – he has all the range in the world, but prefers to fight at close range and to keep foes close to him for as long as possible, as well as somebody who actually stays in the middle of the stage, god forbid (*Shoots Rool before he can claim Pegasus did it first*). His way of luring the foe in with healing is also pretty interesting and hasn’t really been that much of a focus before beyond in Joy, where healing the foe doesn’t matter seeing having damage on her enemies doesn’t help her anyway. Dionysus has more flow then one would give him credit for with those generic standards – there’s this one small detail where he needs actual attacks to himself, and I also like how they all use the pot so it’s a –recurring- prop, which makes it feel more like a legitimate weapon rather than a random prop.

One last thing I’d like to touch on is how interestingly/differently Dinoysus plays in doubles without ever going out of his way to make obligatory team based moves for rather obvious stuff – everything he does is very natural and shows how well this moveset is designed. I’m somewhat hesitant to say it so quickly, but this may very well be the big name moveset we were waiting on from you to really help you break the ice.

That's their metagames for their respective competitive playstyles. People are disgusting opportunists and they will ALWAYS use the "best" move if it will help them win. It has nothing to do with the designs or intentions of the movesets themselves. Even the best designed games like Pacman.. or even CHESS, have metagames that seem to go directly against the intentions of the game itself.
It’s pretty easy to land the cage, particularly with all of the set-ups you have for the spacing/ways to force approaches. I was honestly worried about him being overpowered due to it being too easy to land and was searching hard for match-ups he –lost-. The only thing that really screws over Dark Bowser’s cage are teleporting characters who can just casually pop out of the cage, and even then, the Brawl teleports (Read: Zelda Up-B) are incapable of going through solid stuff, so. . .*Shrug*

While Dedede might have that one thing he does in a competitive match, he still has the flexability and consistancy to be played at lower skill levels in different ways, which is mainly the point of Brawl to begin with. Though in DB's defense, he CAN be played without the grab, at least at a casual level. Thanks to the minions and his Up-Special and his b-air, he is explicitly better than Brawl Bowser in a casual FFA.
So I guess this arguement is all kind of pointless. Sorry, but I may as well keep debating...
I don’t particularly know why I jumped on you – most probably the lack of responses from Zook/DM. It is good to have actual discussion on this.

While these are all options, that's all they really are when the foe is trapped, options that lead to the exact same conclusions. The fact the foe is in the cage significantly reduces what they can do to avoid getting pounded, and therefore renders the standard contextual uses of these options moot. You can fill the cage with minions... or dark clouds, no difference to the end result because the foe can realistically avoid neither.
Kay, I’m playing Dedede and am trapped instead inside the cage. I can try to kill all the minions first before I get out, and I can constantly float in the cage and “wall of pain” the cage with my bair. If a Dark Cloud is up on that side of the cage to prevent me from going that high, I just do it on the other side of the cage cause he can only have one Dark Cloud out.

You have to choose from all of the options to try to actually hit the foe based off how they’re resisting in the same way you choose your attacks in a standard Brawl, and it’s not like it’s impossible to resist. Of course the result of them accumulating damage is the same (Not that it’s the same combo based total of damage each time by any means) – it’s not like Dark Bowser KOs through some obligatory mechanic. He actually needs damage – he’s more of a damage racker then a killer.

It's the fact that he's open ended in so many ways, that makes us realise that most of them go directly through a specific move, which creates a bottleneck. There is only so much you can do to get the foe in the cage, and the mutating manner of the metagame all but guarantees there will eventually be a way to consistantly avoid the cage (and the subsequent backup plan) alltogether. And that's all before Count Cannoli steals your grab..

Then the same can be assumed for basically every character’s core playstyle moves – while Dark Bowser relies very heavily on just one move, he has many set-ups for this specific move and it’s a very good move in it’s own right. We have many movesets to worry out viability before Dark Bowser. Also, Cannoli can’t steal grabs. (Smirk2)

But we're targetting DB, BECAUSE we like the moveset and we have to criticise it to fully come to terms with what it achieves. Or at least I am.. don't you find the comments I give where I do nothing but gush, a bit... boring? They're certainly not the helpful comments I should be giving.
Honestly, I knew that already – it seemed to be the main reason Zook read it in the first place. I was just mainly making a point that these criticisms are more something that I feel should be addressed to MYM (Including several of my own sets) as a whole and that Dark Bowser does a fairly good job of avoiding them.

I’m rather annoyed when criticism is dictated to me that I disagree with, but I vastly prefer a direct dialogue about it like we’re having now so I can actually attempt to defend myself.
 

BKupa666

Barnacled Boss
Moderator
Joined
Aug 12, 2008
Messages
7,788
Location
Toxic Tower
Comment Responses:

Kat: Thanks for being the first to comment, as usual. I imagine this set is your second favorite, behind Kupa and Wiz, yes?

HR: Well, shucks, thanks for putting up a comment at 12:43 AM, even if it's just a simple (Y) to the set. I'll be touching on some move choices in MW's comment shortly, so read on for that. Otherwise...yeah, best extras so far, by far.

MW: Let's get those nitpicks dealt with first. Dionysus relying on his vineyard to perform Smashes and grabs/throws was what I ended up using simply to help him stand out as a moveset, as well as emphasize the importance of the vineyard. I included a long growing time for the vineyard to give characters a chance to pressure Dionysus and take it down easily, simply because it cannot be taken down after it's up. Campers and pressure characters are among Dionysus' lesser matchups because of this. Although allowing the vineyard to be attacked by others could allow for an easier grab if they dare to approach, I wanted to give the 'baiting in' phase of the playstyle more emphasis by requiring Dionysus to, you know, do something to bring in opponents, rather than simply sit back and wait until they decide to approach and attack. Or camp. And the redundancy...honestly, I thought people would have a much harder time understanding Dionysus than they did, so I went out of my way to clarify whatever I could in the playstyle. I can see how this could be irritating to a veteran such as yourself, but I wanted Dionysus to be an accessible set (hence the writing style some MYMers adore).

Anyways, I decided to use the pot as a weapon because not only did it have potential for several different moves, but because the last thing I wanted to do was delve into magic 'god' syndrome. I allowed Dionysus to grab multiple characters at once specifically for multiplayer matches, then tweaked the possession pummel to become more of a part of the game, as its single-player applications are limited at best (although not out of the picture entirely). Hopefully Dionysus stays relevant in the contest because of his depth, if not for the originality everyone is pointing out.
 

32º Centigrade

Smash Rookie
Joined
Sep 12, 2009
Messages
14
Arcanine: First of all, this set was a nice, quick read, and easy to understand for the most part. There seems to be a lack of detail in favor for the readability, but not so jarring that I didn't understand what you were saying. At first, I didn't see much flow to the moves at all, but it all tied together in the playstyle pretty well. For being rushed, it's a pretty good set.

As for Dionysus, I wish I had more to say, but there really isn't much to complain about. He was a pretty fun read throughout the whole set. If I have to nitpick, I don't think the brainwashing is really necessary. I would have liked to have seen something where he gets the opponent drunk. After all, he is the god of wine, isn't he? But he's great as he is, and definitely up to the standard of your sets.

Also, I appreciate all the comments on Sniper. Hopefully I'll put your criticisms to good use in the future.
 
Top Bottom