Welcome to Smashboards, the world's largest Super Smash Brothers community! Over 250,000 Smash Bros. fans from around the world have come to discuss these great games in over 19 million posts!
You are currently viewing our boards as a visitor. Click here to sign up right now and start on your path in the Smash community!
It appears that you are using ad block :'(
Hey, we get it. However this website is run by and for the community... and it needs ads in order to keep running.
Please disable your adblock on Smashboards, or go premium to hide all advertisements and this notice. Alternatively, this ad may have just failed to load. Woops!
Charlotte isn't getting back to the comforts of Banette, I feel, because it feels positively meme-ish still. So many of the moves feel disappointing in how irrelevant they are to the playstyle, which shows signs of being interesting at several points. The idea of a character with a growing hurtbox and which also changes shape is fascinating, never being covered to that specific detail. However, here it's not thought out at all... a lot of the inputs are kind of generic, being your basic vore expository. There are also a lot of problems with props – Charlotte summoning them out of hammer space constantly – and the odd interactions with opponents that wouldn't be fitting for most, shall we say. It all feels very jarring and disjointed.
Hmmm, so Charlotte isn't anything too special. Not that I care an awful lot, with her being something I put together with one idea. Perhaps the problem is that I try to bite off more than I can chew, with numerous past attempts being fairly complicated ideas. I don't think making a set for a serpentine-esque creature is the easiest thing in a fighting game since we're taking about a character with no limbs, but then again that's kind of like an excuse when you consider the fact that Charlotte does have 2 forms. Though I made the set orientated on the 2nd form because that's pretty much how Charlotte does all the fighting. The props do make sense since Charlotte is a "Witch", and if one was to delve into the series a little they'd probably understand where I was coming from. Maybe.
Perhaps I need to take a different approach in order to gain some appeal, because continuing with random ideas isn't going to work. But thanks for the comment.
When you mean by "listed inputs", do you mean avoid just listing the normal, smash, aerial, and grab attacks and go into more specific details on the animation of each attack move, or do you want me to explain who should each of these attacks should be used and the specific strategies involved in using these moves. I could do some sketches and drawing for visual aid to help tell the viewers what the attacks would look like, but then again, I'm not a good artist.
Compared to my Deadpool moveset with my other previous movesets (Ash and Marona), do you think I better or worse? I tried to add as much details as I can.
EDIT: Also, am I allowed to repost and revise one of my earlier movesets? I was thinking of reworking on Ash's moveset a little bit. The reason is noting the gameplay of Phantom Brave, any item can be used as a weapon for any character, I want to expand the flexibility of what Phantom Brave is like. Most of the promotional artwork features Ash wielding a sword (which is some of his attacks uses a sword and occasionally his own fists and kicks), but Phantom Brave allows a lot of customization of your characters and what weapons they can wield. Apparently, I don't to just stick with the generic swords, because Super Smash Bros have too many sword and fist users.
If you really want me to creative and not try to base a moveset from another fighting game (Deadpool's moveset is loosely based out of his appearance in Marvel vs. Capcom 3), then I should try something even creative when making Flonne's and Asagi's movesets.
I meant it as a combination of both. Each input has to have its own significance as a move within the playstyle - it needs to be unique and compelling in its own right. This is admittedly challenging, but this series of contest has gone on for so long that standards have become fiendishly high, which has its advantages and disadvantages.
I would not include diagrams unless you're confident about their quality. I would also not try to remake a character you've already made until long after you've posted it. And eh, fighting game movesets are usually hard to pull off, so I would avoid those until you get more comfortable as a Make Your Move member. Hope I helped.
Could you elaborate on a couple of things, so I can come up with a way to fix things?
For Sho... what do you mean, exactly, by random effects and 'lack of connection'? I'm not sure on exactly what you mean or how I can fix that.
Also, I noticed he's missing stuff to. I'll send Sho through the 'Remake MAchine' and put him under the new template tomorrow. It'd take too long to do tonight.
But yeah, please do look through Tao's new stuff and tell me what you think. :3
Well, with Sho the minions only come out randomly - Sho has no way of telling which he's going to summon, so can't prepare or set up for them. This also has to do with connection. It'd be a lot better if some moves directly impacted his minions, or other parts of his moveset, to give them a different effect that makes him a more focused character.
The changes you made were sufficient to make it into a full moveset. However, a lot of it still feels like it uses generic inputs. Sorry if that's harsh, but I think it's mostly due to the character lacking potential.
Hmmm, so Charlotte isn't anything too special. Not that I care an awful lot, with her being something I put together with one idea. Perhaps the problem is that I try to bite off more than I can chew, with numerous past attempts being fairly complicated ideas. I don't think making a set for a serpentine-esque creature is the easiest thing in a fighting game since we're taking about a character with no limbs, but then again that's kind of like an excuse when you consider the fact that Charlotte does have 2 forms. Though I made the set orientated on the 2nd form because that's pretty much how Charlotte does all the fighting. The props do make sense since Charlotte is a "Witch", and if one was to delve into the series a little they'd probably understand where I was coming from. Maybe.
Perhaps I need to take a different approach in order to gain some appeal, because continuing with random ideas isn't going to work. But thanks for the comment.
I hope I helped you decide on what direction you're taking. You have plenty of gusto and Banette stands as a good set even today, so don't be discouraged - your friends at Make Your Move only have faith in you to do well.
Well, as I said, most of the moves were ones she already used. I made up a few myself, you may be able to tell which ones. But seriously, I wanted to keep her pretty close to her own game appearence. I did what I could. xD But I like her and think she's a fun character to make a moveset for. :3
And yeah, I'll come up with something to make SHo more involved in his minion summoning...
I meant it as a combination of both. Each input has to have its own significance as a move within the playstyle - it needs to be unique and compelling in its own right. This is admittedly challenging, but this series of contest has gone on for so long that standards have become fiendishly high, which has its advantages and disadvantages.
I would not include diagrams unless you're confident about their quality. I would also not try to remake a character you've already made until long after you've posted it. And eh, fighting game movesets are usually hard to pull off, so I would avoid those until you get more comfortable as a Make Your Move member. Hope I helped.
Thanks it helped a bit. I'll try to reference the moves themselves rather than comparing other movesets from the already established moves. I'll also try to see if I reference each others' moves to see significance of the gameplay (e.g. having Marona's down throw follow up with a quick side smash for large damage).
I was reading Junahu's Etna's moveset from one of our previous MYM and can't believe how much detail was placed her moveset. Not only Junahu's describes the attacks but also the gameplay use there as well.
"Hurry Starfy! Find some extra weight to throw overboard before the ship sinks!"
Very few people have actually played the very awesome Densetsu no Stafy series (The Legendary Starfy in English) which is a downright shame considering how enjoyable the games are. Often referred to has a "marine platformer", Starfy has a great focus on underwater exploration and swimming rather than excessive amounts of platforms to leap across. That said, Starfy's pretty used to adventuring, both in the water and out. In fact, he's even met one of the other Smashers during his adventures! Who? Why, none other than that greedy, greedy Wario! Yes, in Densetsu no Stafy 3's eighth stage, Starfy meets Wario in the undersea ruins. Making use of Wario's natural accident prone "power ups" (such as Flaming Wario, Puffy Wario and Bubble Wario) to progress through the ruins. Ultimately, Starfy defeated the area's boss, Gachatakkoru, and was given a Wario Hat, Wario's nose and moustache, a GBA with a copy of WarioWare and a pile of gold from the treasure hunter.
Backstory aside, you're here for an Event Match and an Event Match ye shall receive!
Description: "Hurry Starfy! Find some extra weight to throw overboard before the ship sinks!"
The goal of this Event Match should be very clear once you land the first strike on Wario. Upon hitting Wario, coins will fly out! Yes, this -IS- in fact a Coin Match...but not the typical Coin Match. You see, Starfy cannot collect the coins that fly out of Wario and will start with zero coins as well. Touching a coin will simply cause it to slide around whereas attacking them will knock them into the sea below!
This is what you're going to have to do; attack Wario so he drops his coins and then force the coins off the Pirate Ship...all while it's sinking! You see, even though Starfy has exceptional swimming skills...he's a really sweet little starfish; he just doesn't want Wario to get hurt! Your main goal here is going to be to keep Wario in the air as much as possible using your aerial game so that the ship doesn't sink! The longer the portly Wario and his coin horde are on the stage, the faster it'll sink! Getting off the ship and into the air however will cause it to rise back up at a slow rate, so either stay in the air or stay in the water as much as possible.
Wario has a whopping 250 coins you're gonna have to knock out of him...and the fastest way to do so is obviously to kick his fat arse and send him off the side blast zones! Not only will this knock a large chunk of gold coins out of him, it'll also send them immediately into the water and keep him on the revival platform for at least a bit. Also note that the less coins Wario still has, the slower the ship will sink...so really, this Event Match is much harder in the beginning moments.
With that all said...Wario's not going to take this laying down. Oh most certainly not. You see, Wario doesn't see the good of losing all his precious money and he's a bit too thick to realize the imminent danger he's in...so he's gonna be fighting you for these coins! Wario has appropriate AI depending on what difficulty you picked for this...but if there are coins knocked loose from him, Wario will stop whatever he's doing and trying and gather them all up. Be very careful though, Wario's powerful attacks and good air game can really put a hurt on the little starfish...and you only have two stock to win this so play carefully. Fortunately, your only threat here is Wario and the hazards of the stage itself; if things get too hectic, you can always retreat to the water considering Starfy can't drown. . .
I'm sure Wario will thank you for this later...er...maybe not...
- New B special. He still has 9 minions, but the move is executed differently, being a little less random and high-risk.
An example would be summoning the Neoclassical Drake. The move now goes through "cycles", and you will always know what you're summoning. The Drake, now being summoned 1% of the time, has a 1% chance of being the very first thing you can summon, but a 50% chance of being the very last thing in the cycle. That means you're seriously vulnerable while you wait to summon the big lizard.
- ALSO, Sho can alter the AI of the noise a little, as long as he hasn't angered them by attacking them. He can make them do anything from protecting him, to restraining enemies instead of attacking them.
There are three exceptions to this, but that's mentioned in the actual move description.
You can see the moveset a few pages back, OR look it over on my website here.
EDIT: Also, he does have a special victory pose for if you win a match while in Leo Cantus form. I thought TWEWY fans would like it. Maybe. :3
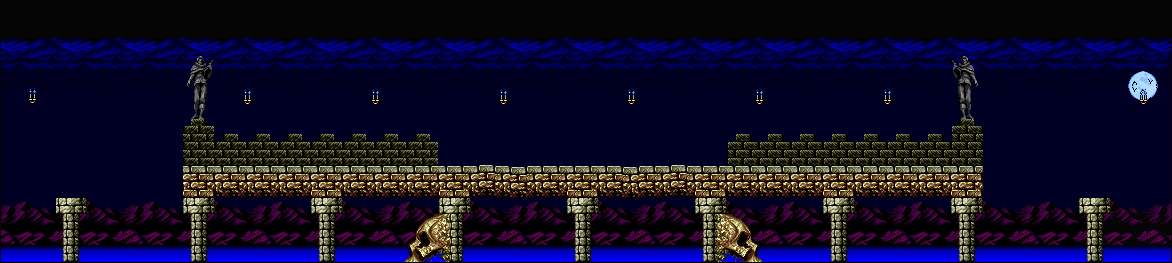
Before we get to the meat and potatoes of the event itself, note that it takes place on a new stage; the one presented above. The most notable feature of this stage, is the center two sections of the bridge, which are weak from age and will collapse if enough damage is dealt to them. Essentially, a cross between Bridge of Eldin and Skyworld. If both sections are destroyed in short order (i.e. without giving them a chance to respawn, Bridge of Eldin style) the entire main platform of the stage sinks into the lake, forcing players to seek temporary refuge on the two tiny platforms either side. The main platform will eventually rise back up, fully repaired, but in the meantime players will be busy knocking eachother off the tiny platforms.
The other feature of this stage, is the various candlesticks lining the area. They don't affect anything in the match, but drop retro-hearts when struck out by an attack. Retro-hearts recover about as much health as food does if a player scarfs one down. Note that if Items are turned off, hearts will not appear out of candlesticks
From a competitive standpoint, this is purely a counterpick stage that clearly favours camping and setting up. While the stage itself is barely bigger than Final Destination, the fact that the main platform can be put out of commission, leaving just two platforms on opposite ends of the screen, means that players specialising in long range or gimping will always be out to destroy those weak sections of the stage. Movesets that like this stage in particular, would be Cloud of Darkness, MM9:Megaman, Defense orientated Morton players, and Arche.
On the opposite end of the scale, Diglett is almost sure to die, should the main platform ever sink. Luckily, the mole hills of dirt he creates by "jumping" will act to repair any destructable (or recently destroyed) terrain they touch. Also, all of the pillar supports of the stage are 'interconnected' by warp-pipe logic. What this means is if Diglett digs down a pillar and off the bottom of the screen, he will dig back up a different pillar. If the main platform is sinking, digging down any pillar will make Diglett reappear at one of the safe tiny platforms either side.
Event Name:Return to the Beautiful Dark
Blurb: "The Great King has returned to full power. Defeat him, Simon!"
Event Stage: Hear Now the Requiem of Blood
Event Music:Simon 1994RD
Character's you can use in this Event;
Simon Belmont
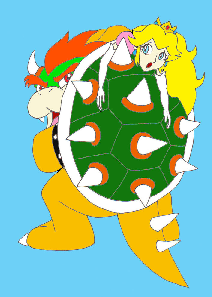
Event Rules: Your opponent for this Brawl, is none other than the king of evil himself.... Bowser. Not only is he 1.3x bigger and stronger in this event, but he's also completely invulnerable to damage and knockback (outside of throws, and explosions). You have an AI Mario on your side, though Bowser will focus exclusively on making him die as soon as possible.
Don't worry, you don't have to save Mario, or anything like that. Your goal is simply to find a way to KO the king of the koopas, twice. Simon himself only has the one stock, as does Mario, so let Mario take all the hits while you figure out how to KO Bowser.
You actually have two options here, both based directly on famous Bowser weaknesses. The first option, is to lure Bowser into hitting the weak spots on the stage with his Down-B slam. If the slam ends up breaking that section, Bowser will fall to his demise. On Hard difficulty, Bowser needs a lot more coaxing in order to make him whip out his Down-B in the right place, and is fond of directly destroying a weakened section himself in order to avoid accidentally Down-Bing it later. In contrast, on Easy, Bowser uses Down-B with a rather distressing frequency. In fact, he alternates between this and his Neutral B flames, almost exactly like in SMB3's Bowser battle.
For the second option, note that the stage has spiked bombs resting atop both of the tiny platforms (a feature exclusive to this event). They explode if anyone touches one, so the obvious idea is to hurl Bowser into the bombs. They do enough damage and knockback so that Bowser will be KO'd if you throw him into both bombs. On Easy, and sometimes on Normal, Mario likes to focus on grabs and throws. Between you and Mario's concerted efforts, throwing Bowser onto the bombs for massive damage shouldn't be too hard.
You could potentially combine the options, by destroying the weak points of the stage to make it sink into the lake. Then only the tiny, bomb rigged, platforms will be available. Bowser can still just stall by grabbing the ledge over and over, rather than jump right into a bomb. Thus you need to get to the ledge he's planning on grabbing first, and edge hog him
I've managed to snag some internet, so here's some beyond the grave goodness.
Commander Shepard
Class: Adept
Commander Shepard is the customizable protagonist of the Mass Effect series. He (or she) can be one of six different classes. This version is an Adept, one who has mastered Biotic abilities, allowing them to manipulate Mass Effect fields in combat.
Statistics:
Size: 7 Shepard is a normal sized Human, no larger than Snake.
Weight: 4 Adepts are extremely lightly armored, meaning that their survivability is rather poor and they get knocked around easily.
Ground Speed: 4 Slightly below average walking and running speed, as adepts aren't known for their physical strength.
Air Speed: 4 Normally, Shepard isn't very mobile in the air, but he has ways around that.
Fall Speed: 4 Thanks to their lack of armor and gear, an adept is a bit on the floaty side.
Specials:
Neutral Special: Lift
Shepard waves his hand in a lifting motion, and creates an anti-gravity Mass Effect field in front of him, 1.5 battlefield platforms wide and half a Ganondorf tall. Any opponents who come into contact with this field are dealt 3% damage and are immediately enveloped in it and lifted off of the ground, falling upwards at a rate similar to a character falling while holding a parasol. In addition, character caught in the field are unable to affect their horizontal momentum normally, meaning that they will continue drifting in the direction and speed that they were moving at when they entered the field unless they use a move of some sort to affect their momentum. They remain in this state for the next three seconds, regardless of whether that have left the field or not, allowing you to catch fast moving characters in it and watch them carry themselves right off of the stage, doing the first part of your job for you, though most characters will be able to use some sort of move to prevent themselves from being KO'd outright. The lift field lasts for only one second after being placed, and hitting the opponent with a second lift while they are affected by the first does not extend the duration of it's effect, so correct timing is key in it's usage.
If this move is used in the air, however, Shepard instead uses lift on himself, slowing his fall speed to that of a parasol assisted fall and increasing his aerial control and movement speed to match the likes of Wario. This can be used as much as you want in the air, and it can be canceled any aerial or special. This essentially gives Adept-Shepard godlike horizontal recovery, as well as amazing aerial mobility.
Forward Special: Throw
The most basic power of most Biotics, Throw does exactly what it says it does: throw the target. Shepard heaves a Soccer Ball sized mass effect field forward, traveling ad a speed similar to Link's boomerang. The shot can be angled 30˚ up or down if the control stick is tilted in that direction. Opponents hit my the attack are dealt 7% damage with powerful, horizontal knockback at a slight downward angle. This means that grounded opponents will be shoved back and into the ground, while airborne foes will be sent flying a much farther distance. If the throw manages to send the opponent off-stage it will typically KO around 100%, or less if the opponent has a poor recovery. Otherwise, it sets up for gimps and edge-guarding, and is a great way to keep the opponent away from you on stage.
Throw also make shielding proponents slide away about half of a battlefield platform when hit, depending on their traction. This means then even if the opponent blocks, you can keep your distance from them.
Back Special: Pull
What? Five specials? Yes! This move is the polar opposite of throw in just about every way. The only similarity they DO share is in the startup. Mass Effect field thrown forward looks identical to the one used by Throw, and can be aimed up or down in a similar manner (thug aiming is inversed, meaning that to aim up, you would have to tilt down-back on the control stick). Once it hits the opponent, it acts completely differently. Opponents hit by Pull are enveloped by a Mass Effect field similar to Lift and dealt 7% damage. While under the effect of this field, the opponent is pulled towards you at their normal air speed for three seconds, and their momentum can't be affected without the use of a non-jump ability.
Shielding opponents are pulled towards you just as far as Throw pushes them away, leading to grab set ups on unaware opponents.
Up Special: Singularity
After a short startup that allows the attack to be aimed similar to Yoshi's egg toss, Shepard creates a swirling mass effect field the size of Kirby in the air 1-2 battlefield platforms away in the chosen direction, depending on whether the B button is tapped or held. This field warps gravity in it's vicinity like a miniature black hole, causing opponents, items, and projectiles near it to be pulled towards it by a continuous wind hitbox with a strength varying on the distance from the singularity. The pull's strength ranges from the edge of Dedede's suction at 1 battlefield platform away, to strong enough to hold an airborne opponent in a tight orbit around the singularity at a quarter of a battlefield platform's distance. The singularity lasts 5 seconds before fading, and only one singularity can be placed every 10 seconds, preventing characters from being locked into the air.
Singularity provides a large amount of stage control and gives you yet another tool to move the opponent around the stage. it is especially useful for keeping your opponent off of the ground to make Throw more effective.
Down Special: Barrier
Shepard creates a biotic barrier one Ganondorf high in front of him, blocking any attacks theta hit it and acting as a normal wall for it's duration. Mass Effect fields such as Pull, Trow, and Singularity can be fired through your own barrier freely, though. The barrier breaks if it takes more than 35% damage, and lasts for 10 seconds before fading. A new barrier cannot be placed until the old one is destroyed or fades away. The Barrier can be placed in mid air, but fades much quicker, disappearing in 3 seconds
The barrier rounds out your suite of stage control abilities, Allowing you to block incoming approaches and attack, while being able to keep up your own attacks with Throw, Pull, and Singularity.
Smash Attacks:
Forward Smash: Warp
Shepard hurls a very fast (about the same speed as Falco's Blaster), nearly transparent Mass Effect field forward. this can be angled up or down similarly to Throw and Pull. Opponents hit by Warp are dealt no knockback, and are dealt 10-18% damage over the next 5 seconds, depending on the charge. Pretty lackluster, right? Well, luckily, If warp impacts an active Mass Effect field, it reacts MUCH more violently.
When warp hits a Mass Effect field, it causes that field to detonate in an explosion of energy about the size of a Bob-omb explosion, dealing 16-25% damage and KO-ing around 110-70%, depending on the charge. The mass effect fields that Warp can detonate include just about anything that remains on the stage for any amount of time, such as Barrier or Singularity, as well as fields created around opponents when they are hit by moves such as Pull or Lift. This means that not only can you use Warp as a followup attack to trapping the opponent in a field, you can also turn you other persistent fields such as Barrier or Singularity into explosive traps.
Up Smash: M-100 Grenade Launcher
Shepard unslings the grenade launcher strapped to his back and fires a shot upwards at a 60˚ angle with enough force to travel 1.5 Ganondorfs upward before reaching it's max height..These grenades deal 12% damage with upward knockback that KO's around 160%, making them ideal for hitting opponents held in the air by Lift or Pull. The grenades are set to detonate on contact with any surface, or if their timer runs out. The amount of time before they explode is decided by charging the smash. uncharged, the grenade will in a quarter of a second, detonating about half of a Ganondorf above Shepard in it's arc. Fully charged, it will detonate three seconds after being launched.
These grenades make for an effective way to target opponents lifted or pulled out of the air without leaving the ground, though they don't do much for your stage control unless you charge them. They also serve a secondary purpose. Like most projectiles, the grenades are affected by Singularity's pull, meaning you can launch a charged grenade, then place a singularity to fling the grenade into a new trajectory, giving you almost complete (albeit difficult) control over where a grenade goes.
Down Smash: Personal Barrier
After a decent amount of startup, Shepard creates a biotic barrier covering his whole body, giving him 10% heavy armor for the next 10-25% damage dealt to him, depending on the charge. If down smash is used again while Shepard still has a barrier covering him, he detonates the barrier as if it had been hit by Warp. This is the attack that allows you to go on the offensive if need be. An adept's close range capabilities aren't the best, but being able so absorb a light hit and then counterattack makes for a lot of opportunities where there normally wouldn't be. It also provides the necessary coverage on both sides of you for dodge happy opponents.
Aerials:
Neutral Air: Repel
Shepard releases a quick burst of biotic energy around him. This burst travels about a quarter of a battlefield platform in all directions, and deals 5% damage with moderate set knockback. The direction of the knockback is always directly away from Shepard, meaning that opponents above you will get knocked upwards, while opponents below you will get spiked. This makes for a great spacing move and is easily abusable thanks to the mobility provided by Lift. Unfortunately, the move has just enough end lag to be punished if it is dodged, so it isn't spammable.
This is the ideal move to use while retreating, or to lead into a ground assault, as he move has very little lag upon ending, and it makes great use of the mobility from Lift to get in and out as needed. Due to it's set knockback, it will never KO unless you manage to spike a character with a weak recovery with it, but that same set knockback means that you always know where they will end up after a hit, allowing for juggling and knocking opponents into hazards and singularities.
Forward Air: Stasis
Shepard covers one hand with Biotic energy and swipes it in front of him quickly, creating a disjointed hitbox the size of Meta Knight's sword in front of him. Opponents hit by this attack are dealt 5% damage and instantly enveloped in a special Mass Effect field that freezes the opponent in exactly the state they were in when they were hit. Airborne opponents will remain frozen in the air, and attacking opponents will be frozen mid-animation. In addition, opponents in Stasis are immune to damage and knockback and the stasis field cannot be detonated by Warp. Opponents trapped in Stasis can escape at normal grab difficulty.
Landing a hit from Stasis allows you to get some space between you and your opponent, and makes it far easier to land another move as long as you can time the attack to when the opponent comes out of stasis.
Down Air: M-4 Shuriken
Shepard quickly draws his Shuriken machine pistol and fires a second long spray of projectiles downwards in a 40˚ cone, dealing rapid hits of 0.5-1% each for up to 12% damage at point blank range, and only dealing about 4% total at it's maximum range of one Ganondorf. This is a great move of making quick overhead passes while racking damage, and also makes it difficult for opponents to approach from below as you pass overhead.
Back Air: Aerial Push
Shepard releases a short range concussive blast behind him that acts similarly to Throw and Push that deals 7% damage on hit. The main difference is that it also pushes Shepard away as well, in a manner similar to ROB's Back Air. Combined with the mobility provided by Lift, this move can be used as an excellent poke or get away move, allowing you to quickly fly in and attack the opponent while using the attacks momentum boost to get away and avoid counterattack. It has heavy end-lag though, even on landing. This means that it is extremely difficult to follow the attack up if it hits, and opponents with fast projectiles can still punish you if you hit their shield. The ability to use this in the air, however, makes this one of your go-to KO options once you have your opponent where you want them.
Up Air: Aerial Pull
Shepard launches a Pull projectile straight up that acts identically to a normal Pull, except that instead of pulling the opponent toward you, the opponent if pulled straight down. This is another method to bring aerial opponents down to the ground, and while it is mach harder to land than something such as your up tilt, a successful hit leaves the opponent far more vulnerable and makes it much easier to line up your next shot.
Standard Attacks:
Jab: Push
Holding his palm out in front of him, Shepard essentially creates a quick point blank version of Throw in front of him, only dealing 5% damage on hit, but with the exact same knockback properties as Throw, essentially functioning as the ideal GTFO move, even getting shielding opponents out of the way. The only problem though is that spot dodges leave you wide open for punishment, so don't get predictable with this move.
Forward Tilt: M-3 Predator
Shepard draws his Predator heavy pistol and fires a shot forward, dealing 3%damage and flinching knockback to opponents hit my the attack. While the gun is drawn, pressing the attack button again will have Shepard fire another shot at the cost of the accuracy of that shot. The second shot will vary 10˚*up or down, and each additional shot afterwards will increase that variance by another 10˚, up to a max of 60˚. This keeps the shots from being spammable, but allows you to get multiple shots off at closer ranges. This is ideal for racking up damage on immobilized opponents without knocking them away yet, and is good for keeping your distance with the occasional shot.
Down Tilt: Blast-Off
Shepard creates a small biotic explosion on the ground in front of him, dealing 8% damage and launching the opponent up and and away at an angle. This attack is your primary way of knocking opponents into the air directly, rather than slowly pulling them or lifting them up.
Up Tilt: Gravity
Shepard waves an arm above him and creates a short lived, upward focused version of Singularity directly above him. For the next two seconds, opponents, items, and projectiles in a 60˚ cone above the singularity are pulled downwards at twice the normal force of gravity. This is your primary tool to get air-based opponents down to your level, as while Shepard wants your opponents in the air, he has few ways to attack characters far above him that like to stay there. It can also combine with a normal Singularity to further influence an opponent's movement, or to bring a grenade from your Up Smash down right in front of you.
Dash Attack: Glide
For the next two seconds, Shepard hovers at ground level as if he were using Lift, and can use any of his aerials during this time. You will not lose altitude of you glide off a ledge, allowing this to be used to attack offstage opponents quickly and efficiently. Not only does this give you a speed boost while on the ground (as Shepard's aerial movement speed while using Lift is faster than his dash speed), but it allows you to transition from a ground based defense to an aerial offense and back again much easier than normal.
Grab: Stasis
Shepard attempts to trap the opponent in a stasis field in a manner similar to Forward Air, and opponents hit by this attack are similarly frozen. This is still a normal grab, though, and the stasis field is canceled when a direction is pressed for a throw. Instead of a pummel, pressing the A button simply allows Shepard to move normally and act as if he had hit the opponent with a normal Stasis attack.
Forward Throw: Barrier Blast
Shepard Blast the opponent forward by materializing a Barrier right on top of them, dealing 10% damage with decent forward knockback, and leaving you with a Barrier between you and your opponent. This is best used as a reset button to get space between you and your opponent to begin attacks with projectiles again, it also sets up for detonating the Barrier to hit an unaware opponent at low percents, as they don't fly very far wen hit.
Down Throw: Slam
Shepard raises the opponent upwards before slamming hem into the ground in front of him, dealing an impressive 15% damage and bouncing them a short ways into the air if they fail to tech the impact. This makes them an easy target for Lift or Throw and is one of your most reliable ways to begin dealing heavy damage.
Back Throw: Hand Cannon
Shepard blasts the opponent behind him, then draws a slow but powerful heavy piston and shoots them in mid-air, dealing a total of 13% damage with great diagonal-upward knockback, KO-ing around 150%, making this the go-to throw for KOs.
Up Throw: Suspend
The opponent is enveloped in a lift field then blasted forward, dealing 5% damage and leaving the opponent drifting upwards and away from you at speed the blast's moderate knockback leaves them at, meaning that heavily damaged opponents will fly aways from you at rather fast speeds, while lightly damaged opponents will end up floating lazily in front of you.
Final Smash: Mass Stasis
The Smash ball empowers Shepard and he releases a massive wave of biotic energy that traps any opponent within three battlefield platforms of him in any direction in a Stasis field. These fields last for ten seconds, and unlike normal stasis fields, these allow trapped opponents to take damage while in Stasis. When the fields dissipate, all who were in them take the combined knockback of all of the attacks that hit them, likely resulting in a KO if you manage to focus all of your attacks on a single opponent.
Playstyle:
Adepts manipulate the world around them, forcing opponents to fight them on their terms. As an adept, Shepard focuses on immobilizing the opponent in order to deal damage effectively and to line up a kill shot with either Throw (or a variant) or detonating a field with Warp. While Shepard's abilities make it easy to move the opponent around and get them into the air, actually damaging them and finishing the off is where he struggles the most. Because opponents lifted of pulled are entirely capable of dodging or attacking while in the air, simply spamming projectiles at them won't work. You either need to get in close with Lift or your dash attack and go on the offensive, or you need to get tricky with your timings and angles to land a Grenade, Warp, or Throw. This is where Barriers, either free-standing or personal, come in handy. A free-standing barrier will protect you from the extremely likely projectile spam coming from an immobilized opponent while you continue to shoot projectiles at them, while a personal barrier greatly decreases the risk of approaching aggressively, allowing you to absorb a hit or two while punishing with a forward or back aerial, or even a grab, which is probably Shepard's best damage dealing tool.
Once the opponent is off the edge, either from Lift momentum, or your own attacks, your job becomes much easier. Shepard's attack are very much made for gimping, with connecting even one offstage resulting in almost certain doom except at the lowest damage percentages or against the best recoveries. The ability to momentarily hover out and use aerials with your dash attack and Lift make it easy to get in the opponent's face and disrupt their recovery as well. You can even place a barrier in mid-air (though they don't last long, so be careful about it) to block a recovery route.
An adept's weakness comes in the form of aerial based opponents with strong vertical mobility. Shepard's own vertical mobility is very poor, meaning that is it not hard to stay out of his reach in the air. In addition, Shepard's lack of any sort of vertical recovery means that he himself is an excellent gimp target if the opponent has attacks that out prioritize his own or good projectiles.
Overall, Shepard can combine quick bursts of fluid offense with a very controlling and versatile defense. This allows him to reduce the opponent's control over the situation to a bare minimum, and with all of the variables under your control, victory should come very easily.
Welcome to the User Rankings! Every Monday, I'll be compiling the entire of the last week's activity in the thread and showing off, just who is the most active member? The point of this exercise is to recognise the most dedicated among us – those make your movers who are currently pushing the boundaries, as well as highlighting all movesets made by them.
To get on this list, you need to have made a moveset in this or a previous Make Your Move, as well as having posted in the Make Your Move 10 thread. The cut-off point for tallying is 5PM on Monday EST, 3PM PMT or 10PM GMT; other removals or changes are at my own discretion. The breakdown of points is as follows:
30points for a Moveset 5 points for a Comment 4 points for a Secondary Submission 2 points for a Secondary Submission Comment 1 point for a Regular Post +Regular Posts do not stack
+Secondary Submissions are MYminis, Joke Movesets and other miscellaneous submissions
Dual apologies for missing last week due to being busy, and this edition being late in of itself! It has been a hectic exam period for me, which will only come to an end this Friday morning. Nonetheless, I have not forgotten about the user rankings, and I will be implementing the shiny new rating system into it come this weekend. Yes, this is the big change I was talking about. Don't worry - it won't effect points, but it does add a certain level of depth to the analysis, no?
These last two weeks were rather odd ones. We had only one moveset from a "veteran" in Wario, and newcomers dominated much of the activity, even in the mini side of things. The person who dominated the fortnight was, of course, Majora, a returning member from a year-or-so-ago who posted two sets, Sho Minamimoto and Taokaka. This on top of a torrid of posting that landed him squarely above spots two and three, what with his inquisitive nature and ambition to improve - a bright spark indeed. Next was myself, which was purely down to my excessive commenting - nailing thirteen sets in twelve comments. At this point, I'm not sure if I'll implement the late comment system. Go me. Last but not least in the top spots, Koric got out Pierrot and Doppleganger Arle - a dual-personality from the Puyo-Puyo series. And hey, that even matches with my mini that week! Very suave.
So in all, not a bad couple of weeks. Sadly, we did lose darth meanie, the winner of last contest's user rankings, to the gaiety and flamboyancy of those luscious money grabbing law schools in California. While you dry your tears, let me remind you that this does leave an opening for a new winner in Make Your Move X. Lets see if the competition heats up!
Remember to check out the stadium to find all of the sets mentioned.
Hehe. Wow. Maybe if I keep working at this, I can get somewhere this time!
I think I may have FINALLY gotten an idea for a new character... It should be pretty interesting, considering he'll be my first (literally) spineless character. I mean, he's practically skin and bones... except for, well, the skin and bones.
I'll get started on the moveset pretty soon here. Here's your hint:
Bees!
Hehe... Also, now that I'm here. Those are some pretty cool banners, SD. Gotta love the nostalgia of your first moveset. x3
EVENT MATCH: Mewtwo Strikes Back
Description: A mysterious host has sent invitations to the world's greatest Pokemon Trainers. Unfortunatly, the host has taken the Pokemon away and made evil clones! Use you're wits(and you're last Pokemon) to take him down!
Play as: Pokemon Trainer (Squirtle only) 5 stock (stamina mechanic off)
Objective: Defeat the clones, and KO Mewtwo himself.
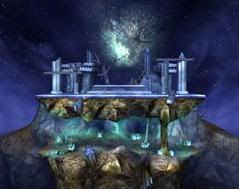
Stage: Spear Pillar (Legendaries off...mostly)
This is really a brutal event match. Firstly, you start out only having Squirtle, in a 1v1 with another Squirtle(lvl 9, one stock), which is colored in a style like the clones in the movie. While this may seem easy, throughout the match there are randomly spawning Pokeball Pokemon (Either from Brawl or MYM), all working for the other team. To start out with, there will only be 2 out at a time. No Items will appear.
After you defeat Squirtle, you go on to face Jigglypuff,(lvl 9, one stock), similarly colored differently. There can now be 3 random Poke's on the stage at once.
After that, you face an off-colored Ivysaur(lvl 9, one stock) with there being 4 Poke's on the stage at once. After the Ivysaur is defeated, you have access to you're own Ivysaur.
After Ivysaur, a Pikachu(looking like the clone in the movie) (lvl9, one stock) will appear, and 5 Random Poke's can be on the stage at once. Getting tired? Remember, this is a gauntlet.
After Pika, You face Charizard (lvl 9, one stock), with 6 random Poke's at a time trying to kill you. Once you defeat him, you're own Charizard can be used.
After Charizard, you face an off-colored Lucario (lvl9, one stock) with 7 random Poke's trying to kill you. Almost done! Just a little more!.
Finally, you face Mewtwo, the mastermind himself. (BTW, this is JOE! and darth_meanie's ewtwo, linked here). This will be all hell, let me tell you. Firstly, this Mewtwo has off the charts AI. Call it level 12, if you will. Next, he has 3 stocks. Thirdly, he has 10 Pokemon at a time out to keep you down. And Last... The legendaries come back and will switch between themselves every minute. Yeah, you're as good as dead.
If you manage to beat this, you get alternate colorings for each character you faced, get 3 trophy's (Ash Ketchum and Pikachu, Giovanni, and Mewtwo's metallic costume from the movie). AND an alternate coloring for Pokemon Stadium 2 that looks like Mewtwo's arena from the movie and does not change.
Well, here he is. This guy is my last moveset for a while, I'm going to go see what else I can get involved with. I may or may not get into another moveset this contest. :3 Of course, I'd still appreciate some feedback.
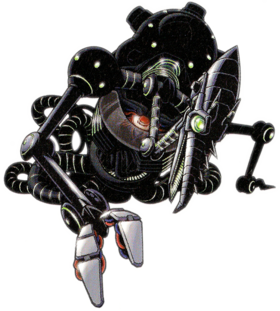
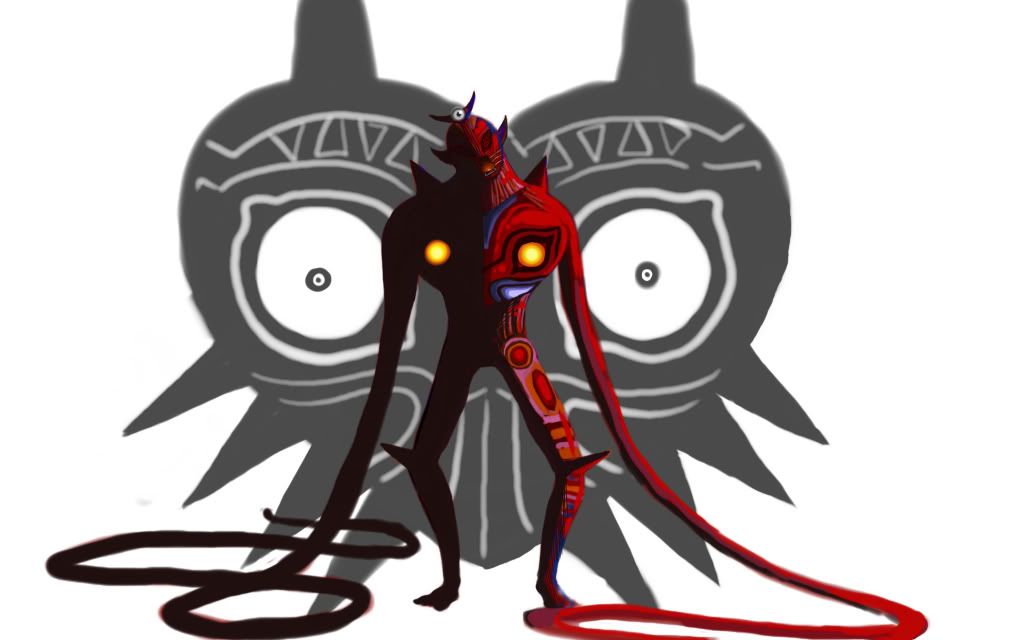
?---\ ARAKUNE /---? Seeker of the Azure
A black blob-like creature with a white mask who formerly worked in Sector Seven as a scientist. He is formerly a human named "Lotte Carmine". After an attempt to study the Boundary, due to his inferiority complex over Kokonoe's genius, he became what he is today, now housing innumerable insects with his now-blobby body and thriving on knowledge. His horrible condition has rendered him virtually insane and lacking any reliable memory, as well as distorting his speech to near incoherency - most of his dialogue consists of gibberish, insane laughter and tortured screaming.
==============================
?---\ STATISTIC ANOMALIES /---?
===============
Size: He's roughly Snake's size, being slightly taller. Weight: A mid-heavyweight, despite his looks. Walk Speed: 4 out of 10... I wouldn't even consider that walking. Run Speed: 7 out of 10. He gets some pretty nasty speed. First Jump: 5 out of 10. His first jump is not amazingly special. Second Jump: 5 out of 10. His second jump is also not spectacular. Recovery: 6 out of 10. Arakune is pretty average in several conventional departments. Priority: 6.5 out of 10. What he loses in Priority, he makes up in surprises. Traction: 8 out of 10. He's got some impressive ground control. Fall Speed: 8 out of 10. If anything, he tries to make himself fall faster. Ground's his forte, after all. Air Movement: 3 out of 10.Aside from gliding, Arakune has little going for him in air attacks and movement.
Crawl: No Wall Jump: No Wall Cling: Yes Glide: Yes
==============================
?---\ GREATEST COMMON FACTORS /---?
===============
A: Bonecutter 2%
A long, sharp bone juts out from Arakune's body, and swings at his opponent.
===============
Dash Attack: Slime Shark 5%
Arakune does not have a real dash attack. Instead, when he dashes forward, he deals damage to anyone he hits. He melts down and turns into a bizarre shark-looking creature that swims across the ground at high speed.
===============
Up Tilt: Flytrap 6%
Arakune squishes down, and a strange, almost Sarlac-like mouth opens on his back and bites opponents. Knockback is dismal.
===============
Side Tilt: Slime Drill 5%
Arakune leans back, and a drill of slime juts from his stomach and into his opponent. It's a multi-hit attack with poor knockback.
===============
Down Tilt: Bonetail 4%
A long bone juts from Arakune's... tail? and stabs at the opponent. This has the most knockback of all of his tilts, but not by much.
===============
Ledge Attack (Strong): Dolphin 2%
Arakune jumps up from the ledge, turning into his shark-like form, and dives onto the ledge before reforming. This pushes opponents back away from the ledge.
===============
Ledge Attack (Weak): Bone Hook 1%
A bone sticks out of Arakune's back, and hits the opponent, knocking them behind Arakune as he liquifies onto the stage before returning to... err... normal.
===============
==============================
?---\ SECOND POWER /---?
===============
Forward Smash: Scorpion Stab 12%
Arakune hunches forward as a bone shaped like a scorpion tail comes from his shoulder and smacks the opponent away. Knockback is noteworthy.
===============
Up Smash: Scorpion Spike 14%
Arakune hunches forward as the scorpion-tail bone comes from his shoulder. However, unlike the forward smash, he swings it overhead and down. This attack knocks the opponent down to the ground if they're in the air.
===============
Down Smash: Larval Lash 10%
A large, white worm rapidly coils around Arakune's base, dealing damage to anyone who touches it, and knocking them back a short distance.
===============
==============================
?---\ HIGH ROUNDING /---?
===============
Up Aerial: Slime Shank 14%
Arakune turns to a form resembling a disc, and suddenly, slime in the form of a large spike shoots from his body, sending opponends flying up.
===============
Forward Aerial: Slime Lance 8%
An enormous, lance-shaped bone protrudes from Arakune's body. This aerial moves him forward as he uses it, and can assist in recovery.
===============
Back Aerial: Surprise 6%
Without changing his position in the air whatsoever, several small, sharp bones suddenly jut from his back and stick the opponent. This attack has high priority, negating many attacks.
===============
Down Aerial: Dark Veil 13%
Arakune takes on a form making him look like a cloak, and many red sharp objects stab out of him at opponents below.
===============
Neutral Aerial: Spin Cycle 11%
Arakune takes the cloak form again, but rapidly spins around, hitting opponents in the process with his very fast attack.
===============
==============================
?---\ CARRY-OVERS /---?
===============
Grab: Devourer None (Yet!)
Arakune latches onto his opponent and ensnares them, eventually taking the form of a large sphere with a large mouth and eye, with the opponent inside.
===============
Pummel: Submission 2%
The strange sphere chews on the opponent.
===============
Up Throw: Spout 11%
The sphere opens a hole on top of it, and shoots the opponent out in a fountain of slime. Arakune then reverts to... 'normal'.
===============
Forward Throw: Disdain 12%
The sphere simply spits the opponent out, making a face of disgust before returning to 'normal'.
===============
Back Throw: Face Turn 12%
The mouth on the sphere awkwardly shifts to the other side, spits the opponent out, then laughs maniacally.
===============
Down Throw: Absorb 10%
The sphere absorbs energy from the opponent, dealing damage, before they are released on the ground. This heals 1% of Arakune's damage with each use.
===============
==============================
?---\ PRIME NUMBERS /---?
===============
Neutral B: Crimson 6%
Arakune turns into a strange, alligator-like maw and spits purple smoke into the opponent's face, causing them to enter cursed state. During cursed state, Arakune summons minions with an absolute maximum of 3 on screen at a time, should you mash buttons.
Pressing the A button summons small fish-like insects that poke their heads out of the ground near the cursed opponent, and then jump out at them.
Pressing the B button summons bats that fly down from the top of the screen into the ground near the opponent, disappearing. They then fly out of the ground under the opponent's feet, and fly away.
Pressing the Y button summons weird snail-like insects that fall down near the opponent and bounce toward them twice before disappearing.
Pressing the X button summons bizarre worm-like insects that come down from the corner of the screen and dive-bomb the opponent.
The curse effect lasts for roughly 15 seconds. All bugs do 5% damage.
===============
Side B: Insect Sling 5% (attack), 5% (insect)
Arakune crouches, and a bone comes from his back, pulling him back like a crossbow of some description. When fired, an insect flies out of Arakune and hits the ground, then proceeds to squirm around shortly after.
===============
Up B: If p, then q None
Arakune does a third jump, higher than his regular jumps. At the end of it, he disappears, and teleports in the direction you hold the control stick. Otherwise, he will teleport down at an angle in the direction he was facing.
===============
Down B: Equals 0 None
Arakune turns invisible, save for a very faint, white outline of his body. He stays invisible doing everything, but will return to normal after being hit, or after hitting the opponent. He is able to attack without becoming invisible, but if he actually hits an opponent, his position is revealed.
===============
==============================
?---\ FINAL EQUATION /----?
===============
Unlimited! None
Arakune enters unlimited state for 15 seconds. All opponents become cursed, and all of Arakune's buttons summon 3x insects than normal, with no limit to the number that can be onscreen at once. The insects assault random opponents, and deal 10% damage instead of 5. Arakune is vulnerable during the final smash, and is susceptable to any damage.
===============
==============================
---\ HOW TO SEEK THE AZURE /---
===============
So, you've picked up Arakune. What can you tell about him? He's a ground character? He's got a very unorthodox playstyle? He's mostly close-range, but can forcefully give himself an obscenely long-range projectile?
All of those are true. Arakune is essentially a surprise character. His moves are very quick to happen, and are gone as soon as they appeared. This leaves opponents to keep their distance from Arakune, and to be very wary of what exactly he does. After all, your surprise attacks may only work once or twice!
But, keeping your distance is a poor choice against Arakune. This is the point where the opponent gets chased down and infected with Arakune's Crimson. Then, as the opponent gets away, now infected, Arakune can hit them with long-range attacks from anywhere in the stage!
Of course, the usefulness changes when the fight adds more people, or even when Arakune gets a smash ball.
In a 4-way free-for-all, the bugs are less effective and more effective at the same time. This allows Arakune to occasionally enter the fight only to attack once or twice and leave, but allows him to still attack from a safe distance. The problem is, since only so many bugs are able to be on screen at a time, this limits damage dealt the more players are infected. However, it may not matter, considering how fast the attacks come out.
Arakune reaches his full, dangerous capacity in his final smash, Unlimited. With this, everyone is infected, and the bugs essentially come out every time Arakune presses a button, without a limit to how many can be onscreen. This leads to a very hard trek for the opponents to get to Arakune, who is still vulnerable, and is button mashing in the darkness to get his bugs on weakening his opponents before he comes out and finishes the job.
==============================
?---\ RESPONSE ACTION /---?
===============
Idle Animation
Arakune drips and writhes in his standard, grotesque fashion with his head nodding up and down. He also frequently mutters to himself.
===============
Sleep Animation
Arakune melts into a puddle. He's very difficult to hit with projectiles and high attacks.
===============
Shielding Animation
Arakune's body turns to something resembling stone, and he puffs his stomach out.
===============
Forward Roll
Arakune seeps into a puddle and appears farther ahead, facing the opposite direction.
===============
Backward Roll
Arakune turns into a puddle and appears farther behind.
===============
Air Dodge
Arakune enters his cloak animation from his aerials, and moves out of the way of attacks.
===============
Dizzy Animation
Arakune drips more than usual, trying to maintain his usual form and keeping from collapsing into a puddle.
===============
Ledge Grab Animation
Arakune sticks a bone hook out of his shoulder and dangles there.
===============
Ledge Return Animation (Strong)
Arakune jumps onto the stage with a light hop, with his standard jumping and falling animations.
===============
Ledge Return Animation (Weak)
Arakune quickly slithers onto the stage and weakly reforms to 'normal'.
===============
Stage Entry
Arakune is sitting on a throne of his own slime and bones, reading a book. He closes the book, and enters his standard pose saying, "Don't you understand that we're being watched?"
===============
Stage Select
Arakune screams, and begins yelling "AZURE! AZURE! AZURE!".
===============
==============================
?---\ SUCCESSFUL TEST /---?
===============
Taunt 1
Arakune turns his head away, saying "Ignorance makes you worthless."
===============
Taunt 2
Arakune leans forward, his head extending forward noticeably, and says quietly, "It's not what you think it is..."
===============
Taunt 3
Arakune does a bizarre worm-like animation standing upright, laughing maniacally.
===============
Victory 1
Arakune is in his sphere form, eating something, while saying "Time to induldge!"
===============
Victory 2
Arakune looks back at the losers and speaks very quickly, saying "So you focused all your energy to overload your armagus? Bahahahaha!!"
===============
Victory 3
Arakune slithers into view from offscreen, and glares toward the camera, saying "Nothing connects!"
- (You only get this animation if you win a match in unlimited mode!)
===============
Loss
Arakune slithers away offscreen.
===============
==============================
?---\ PERIPHERALS /---?
===============
Kirby Hat
Kirby wears Arakune's mask, and can use Insect Sling.
===============
Unlock Criteria
- Win 1,250 matches of vs. mode
- Win Boss Battles with Taokaka on Normal difficulty or higher
===============
==============================
EDIT: That event match sounds amazing and frustrating at the same time. xD Yay for unlockable skins! :3
EDIT 2: Holy crap, that got on the Stadium fast. o_O I updated my site, too. :3 Arakune's page has the moveset there too, as well as a popularity counter. xD Meta Ridley's still number 1.
Commander Shepard
Sorry, Lol, but I'm not too impressed with this set. Like in Pucci, you have more generic moves than I'd like, but the core playstyle isn't as good. This reminds me of Flame Hyenard in a way: the first half of the set is decent, but then it just fizzles out. The tilts, aerials, and grab game all have at least a couple generic attacks, and don't tie in that interestingly to the rest of the set. That said, I did enjoy the first half, particularly the forwards smash(though the up smash gravity manipupation is suspiciously similar to a certain robot master set...) Not too bad, but you can do better.
Alright, finally done. It's my first moveset...and I have a feeling it's definitely not my best work, but if I feel comfortable doing another set again, I definitely will for this competition. Hopefully for my first entry, this does well. Feedback is appreciated!
Accessing BioTechnical Diary Installments...
Utilizing Research Group Alpha 7323
Confirm?
Entry #001
“Basics” - 43/55/2XXX
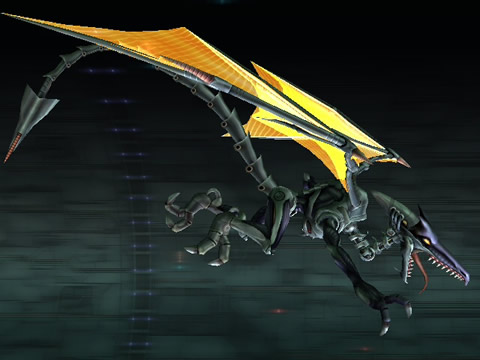
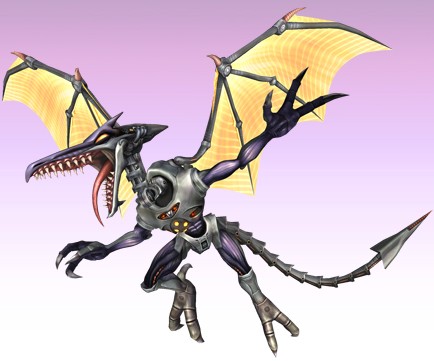
On all accounts, the so-called 'Meta' Ridley we have now is the same Ridley as he was on Norion, the same Ridley as he was at Tallon IV, and the same Ridley that had the same power on Zebes. The fact that the rest of the group requires the “Meta” designation seems unnecessary to me. A soldier is still a soldier even when he has no weapon, is he not? But, I digress. Moving on.
Geoform 187, or as we know him as Meta Ridley, has been rebuilt once more, much to our pleasure. After falling at Norion, his whereabouts beyond that became uncertain until he was able to rejoin the army on Zebes once again. After that, however, most leads run dry. Let's just say the Galactic Federation and some X parasites had their way with him.
But that not of our concern. We have rebuilt the true Ridley for a new task. Our specialized reconnaissance squadrons located a rift in the time-space plane in the Renuclas System and have deemed it the same rift that allowed the Hunter, Samus Aran, to travel into what has now been established as the “Smash World”. This place has almost heavenly qualities, and itself has its own heavenly state of being, but oddly enough it acts almost as a recreation of all the home worlds of every organism in it. We have not been able to confirm how or why it exists.
What does matter, however, is that it has resources. We want them. Ridley does as well. As well as know, he likes to take care of things himself, so its only fitting that we are sending the mighty one to tackle such a divine task.
But, is he up for it? Of course, as far as I've convinced myself.
Ridley has been retrofitted with a new type of armor plating called “Smash Phazyte Armor”, or SPA. This SPA plating, according to the Team of Weapon Research and Development (TWRD) has odd capabilities and capacities that allow Ridley to fight the good fight, no matter what the cost.
Ridley is still a fast fighter, this is for sure. His speed on the ground definitely outweighs his capabilities in the air, but in either situation his presence cannot be taken lightly. His agility and ability to follow up on previous attacks makes him an extremely overwhelming force, but his investments come at a cost: because of the inherent strengths of his SPA armor, his natural strength has taken into rapid decline. We cannot figure out why this is the case, and we are researching it as I write, but unfortunately Ridley may have to rely on his speed and agility to make up for lack of power in most areas.
That doesn't mean his SPA is all without its benefits. First, Ridley's speed and quickness, as I mentioned, have been greatly enhanced. Ridley's ability to move from a standing position into the air or into moving on the ground is extremely fine-tuned. If anything, it's likely he'll never be hit at all, even though his obvious size may get the best of him in close-quarters.
But what is the most amazing thing about the SPA armor is that it creates its own energy and can use an increase of energy to deal more damage when using energy and projectile based attacks, as well as gaining the ability to “charge” some physical attacks in a way many have never seen. Not only does this allow him to charge up some of his stronger attacks quicker, but particular ones will benefit from the longer Ridley is in combat.
I almost find his abilities unnerving. He'll be a force to be reckoned with.
For statistical purposes, I have put together a chart of all of his capabilities for future records. All numeral records are “out of 10”, with the lowest possible score being a 1 and 10 being the highest (in terms of non-subjective scoring, the higher a unit is, the more of it there is; for example, the higher the “weight” scoring is, the heavier the actual weight is):
Power- 4/10: One of the main drawbacks of Meta Ridley's SPA plating is that it severely reduces his power.
Walking Speed – 3/10: Ridley apparently has no problem walking rather slow, as dragons do. He hunches down, his claws eager to swipe.
Dashing Speed – 8/10: Ridley can quickly burst into a dash at remarkable speed, his legs propelling him extremely quickly with each pounding step of his feet.
Weight – 9/10: Thanks to his heavy armor, plus his natural body weight, Meta Ridley is, well, heavy.
Range – 7/10: Ridley is all about close-quarters combat, but his ranged attacks make him deadly always.
Attack Speed – 8/10: Ridley's attacks come out fast and furious.
Priority – 7/10: Ridley's attacks are good, but they may not cut through all of an enemy's attempts.
Start-up – 8/10: Most of Ridley's attacks come out rather fast.
Ending – 8/10: Likewise when ending.
Size – 9/10: A lot of weight cued him to be large, and we all know this.
First Jump – 8/10: Ridley covers a lot of distance with this jump and he jumps off the ground extremely quickly.
Second Jump – 6/10: Not as far as his first jump, his second jump gives him still some worthwhile distance with a flap of his wings.
Third Jump – 4/10: With one last flap, Ridley gets a bit more distance with a third jump. This is primarily used for horizontal spacing rather than recovery distance.
Fall Speed – 8/10: He's heavy, so he falls fast, but his wings keep him from being the fastest of the fallers.
Wall Jump: No
Wall Cling: Yes
Crawl: No
Tether: No
Glide: Yes
Entry #002
“Standard As” - 43/56/2XXX
Ridley has progressed quite well. Thus, we've begun combat exercises and have, so far, categorized his attacking abilities into rough divisions based on the actual fundamentals of the attacks. For this entry, we'll refer to them as “A Attacks”
-Jab - Claw Rush
Meta Ridley's Claw Rush is very effective at close range, but because of the lackluster length of his arms, the combo can be tricky. Ridley first attacks with a single swipe from his right claw, then follows up with a bite from his toothy jaw. The jab combo can be ended right there, allowing Meta Ridley to follow up on the bite with another attack, but because the bite makes the opponent relinquish, Meta Ridley cannot follow up with another jab to start repeating jab combos. He must be in range to do this.
However, Meta Ridley has been able to come up with a successful finisher for this combo. If, during the bite part of the combo, someone were to have the ambition to move him back (move the control stick back when the second hit of the jab combo is occurring) during this, Meta Ridley will swing his tail instead of biting and send his opponent several feet away from him. The timing has to be just right, and it can be a finishing kill if used at the right time, but if the timing is off the finisher will not happen.
Dash Attack – Dragon Drill
The SPA plating Meta Ridley possesses comes quite handy in combat. When dashing, he leaves the ground just ever so slightly above the surface (though not enough to dodge any ground-based attacks) and spins in the air for one rotation like a drill, which can cause damage to anyone that it connects with. The amazing SPA comes into play here, as the energy quickly generated by this spin makes the plating invincible for just one moment right as the attack ends, much like Smash subject Donkey Kong's spinning special makes him invincible for a very brief moment right when its used. With good timing, this can be an amazing approach for Meta Ridley while still dealing damage.
Ridley has developed a means of attacking with his tail, as always, making him profoundly dangerous on the ground, also as always. His Tail Shark attack has him spearing his tail through his legs at an opponent before him, sometimes causing a trip. This attack can hurt even when his tail retreats back behind him, so anyone approaching must be wary. His Tail Tower attack has him shoot his tail directly above him, and he can even send it slightly diagonally right or left. But his most impressive of the tail-oriented attacks is his Tail Skewer, an attack that can sent out right in front of him, diagonally downward, or diagonally above him. If it connects at decent range, it will simply deliver damage with a sharp blow. But, if the opponent is close enough, the tail will skewer the opponent. If this happens, damage dealt stays the same, but Ridley can then do another Tail Skewer in the same direction, causing the opponent to be dealt damage again and slammed on the ground, causing a bounce that cannot be teched.
Entry #003
“Aerials” - 43/57/2XXX
Meta Ridley finally needed to buff his aerial combat, namely because it possesses so much potential for devastating attacks. However, he also realized the best way to use the air is to keep everyone else out of it.
Neutral Aerial – Burn Blitz
Quickly releasing energy in his armor, Meta Ridley surrounds himself with his wings as they glow with a red-hot intensity and give off a tremendous amount of heat, causing damage to anyone who comes in contact with his curled wingspan. Burn Blitz works much like a shield, as Ridley can drop it and reuse the technical as many times as he wants as long as he stays in the air, and thanks to being able to drop and reuse it quickly, he doesn't suffer from any sort of warm-up or cooldown. However, Ridley is prone to projectiles when encased and can only slightly move horizontally as he falls (or rises if using it from a jump), but if it's dropped just at the right time, Ridley will land with his wings still burning for a brief moment, allowing small contact with an opponent, causing them to flinch and be set up for a combo.
Forward Aerial – Wing Spike
Using his amazing wingspan, Ridley extends his right wing and attempts to slam an opponent downwards with it if it connects. The wing has a lot of range, but the attack only works if the opponent finds himself completely encompassed by the wing – if not, it simply does damage and knockback. The spike is quick to use, making it a great combo starter or tech-chase starter if done near the ground.
Backward Aerial – Plasma Lash
Ridley is a big target, so to keep his back undefended would be unwise. Thus, if a foe is attacking from the read, Ridley slightly spuns and releases a wave of plasma that works great as a keep-away tactic. The attack does not do much damage, as the plasma mostly surrounds Ridley's back-half and doesn't move out that much, but its knockback definitely can shut down an offensive push (though to find its killing capabilities, Ridley may have to put down a lot more damage in other ways).
Upward Aerial – Reaper
The “Reaper” was named as such because of Ridley's haunting ability to grab anyone out of the air like snatching someone's soul right from their body. In this attack, he extends his neck upward, jolting his body up to cover just a bit more distance, and bites in an attempt to chomp down on an enemy above him. It's a hard attack to land, but we've seen it happen – when someone falls into his clutches, Ridley immediately throws them downwards with a solid amount of knockback.
Devastating, this attack is. With enough damage piled on, it can be used as an intimidating kill move, but also as a feared combo starter, as a fast-falled Reaper allows Ridley to follow up with another aerial extremely quickly, named the Reaper's counterpart, “SenseBurst.”
Downward Aerial – SenseBurst
If Ridley learned anything from Samus's battles, its that a lot of energy can be put into one movement that can devastate an opponent or keep the user alive. Ridley just loves devastation, as we know, so for Samus's SenseMove, Ridley has developed his own extreme attack, “SenseBurst.”
Senseburst utilizes Ridley's armor in one of the strongest ways, releasing an immense amount of energy as Ridley shoots his feet down in a mid-air “slam” of his heels. If Ridley's feet connect with an opponent, they become temporarily “shocked”, allowing Ridley to follow up with another attack if he has the opportunity to do so.
Though the attack will not blast an enemy in any direction, a fully charged SenseBurst may stun an opponent into complete freefall.
Entry #004
“Smashes” - 43/58/2XXX
Meta Ridley is progressing quite quickly. He has developed these new, more powerful attacks that make him that much more of a force. His SPA truly shines in this category. One of the most amazing things about the SPA armor Meta Ridley possesses is that it actually decreases the amount of time it takes for a Smash attack to become fully charged.
Forward Smash – Outrage
Meta Ridley leans back ever so slightly and, if uncharged, he lunges forward just a bit to deal damage with a gnashing bite from his fearsome mouth, and this can be sent diagonally or straight-forward. But, if he were to charge up this lunge with the SPA armor, Ridley travels more distance (depending on how long it has been charged) and immediately attacks when he comes into contact with an opponent with the same kind of bite, though a burst of energy comes from this bite now. If sent straight-forward, the charged Outrage will just send him along the ground and he can move out of it. If sent diagonally downard, he comes to a stop a bit sooner. But, if it is diagonally upward, Ridley travels in the air to deal damage. If done in the air, but Ridley does not meet an opponent, Ridley still retains his unused jumps and can attack.
Up Smash – Nuclear Ring
With a roar sent toward the heavens, from Meta Ridley's jaw bursts an orb that shatters and casts a ring of energy just above Ridley's head. The orb is released from Ridley's mouth, travels very quickly to a predetermined distance very close to Ridley's head, then explodes into a ring that does damage across its entirety. Utilizing the SPA armor, a charged Nuclear Ring will explode with a larger diameter. This attack can be tilted slightly left and right, making it useful as an anti-air tactic in more than one way.
Down Smash – Zebesian Counter
Meta Ridley originally opted for basing a lot of his downward facing attacks with his tail, but after mastering the art of countering, this seems to be his primary choice. When initiating the Zebesian Counter, Meta Ridley's SPA plating hardens immensely, making him completely invincible. If done at the right time, an oncoming attack will be stopped completely by his armor. Ridley will then grab the opponent and fire a beam of energy, which he can aim diagonal or forward, and the orientation of the beam will determine where Ridley's victim is sent.
Due to being a Smash move, this move can be charged - the longer it is charged, the higher its damage output and knockback if it works. This also makes it somewhat safe since very few will attack a charged counter attack.
Entry #005
“Specials” 43/59/2XXX
When it comes right down to it, Meta Ridley felt comfortable in retaining the techniques learned on Frigate Orpheon – it is, thus, no surprise that many of his more prominent attacks happen to be of those used in combat on Tallon IV.
Neutral Special – Kinetic Breath
Meta Ridley's signature attack, Kinetic Breath deals continuous damage with a steady stream of plasma flowing from the bowels of his bio-technological body. Kinetic Breath can be shot uncharged for quick damage – this version retains its width and depth, but the length of its usability is quite short. However, if charged (in the same manner subject Lucario can charge his Aura Sphere), the plasma stream becomes much longer and, if not used all at once, can be rapid fired until it returns to an uncharged strength. If used in the air, Ridley will fire it forward, but if in a glide, Ridley fires it diagonally downward towards the stage.
But Kinetic Breath retains more strength in another way it can be used. If Meta Ridley is using his shield, he can immediately attack “out-of-shield” (OOS) with this attack. The OOS Kinetic Breath acts like a shotgun, firing a short spread of plasma that lacks as much power as the uncharged regular Kinetic Breath, but deals more knockback and hitstun.
Forward Special – Meson Bomb Launcher
Ah yes, the Meson Bomb Launcher. There's nothing quite as deadly as this weapon. Ridley can easily make use of the MBL when bombing structures, but when it comes to fighting opponents one-on-one (or even in groups), he has a few more tricks up his sleeve.
The MBL can fire up to five Meson Bombs (to do so, one rapidly taps the input for this weapon for each desired release of a bomb), all of which are fired at a curved path forward. The first of the bombs has the lowest distance, and the succeeding bombs increase in range. Ridley can choose to fire as many as he wants, and can do this on the ground, in the air, and gliding, but only up to five at a time. The bombs are about the size of a Gooey Bomb, but do not have adhesive properties.
The bombs themselves will detonate upon impact when connecting with either an opponent or anything else, such as the stage itself. Ridley has to wait a few moments before initiating the attack again, though this wait time decreases the less bombs are used at one time (and is extremely trivial if Ridley only fires one at a time).
The MBL can also be charged, much like a Smash Attack, which produces one significantly larger Hyper Meson Bomb (roughly twice the size of a regular Meson Bomb). Hyper Meson Bombs cannot be fired from the air (either normal air or in a glide). When attempted, however, they are fired with a much straighter flight path and have more damage output and knockback. HMBs can even slightly spike opponents if it connects from above or at least the uppermost portion of their body.
Up Special – Multi-Missile System
With a potential amount of three jumps (one ground, two air), as well as a glide, the premise of having a true recovery move seemed unnecessary to Ridley, but after a lot of encouragement, he made use of his Multi-Missile System to do the trick. When used, Ridley flaps his wings once, but very strongly, propelling him more vertically than horizontally. When his wings flap, missiles drop from his body and immediately move forward at a slight diagonal arch. The missiles drop as Ridley bursts upwards, so by the time Ridley has moved completely out of the way of the missiles, they are now traveling forward.
In total, eight small missiles are fired, each with their own individual smoke trail. They move about randomly, but in general will land at around the same distance if fired from the same spot over and over again. The Multi-Missile System, if used in the air, puts Meta Ridley into free-fall, while if used on the ground, makes him burst up into the air higher than his first jump and can be used OOS. If used on the ground, the missiles do not experience the same delay as they do when used in the air.
Down B - Ultrathermal Flamestrike Projector
One of Meta Ridley's strongest attacks is also one that may be familiar to many a bounty hunter. Or, well, particularly Samus in this case. Utilizing jet boosters embedded in his legs and feet, Ridley can create a pseudo-shock wave when he lands on the ground, one that surpasses that of Ridley's actual size.
When used on the ground, Meta Ridley's SPA armor lets fly a burst of energy that travels across the ground. If charged, the diameter of the shockwave that emanates from the blast increases. However, if used in the air, Meta Ridley drops downwards extremely quickly, a flame rapidly developing around his lower body. If Meta Ridley connects with the stage while doing this, he will land and emanate a strong shockwave. This attack can spike if Meta Ridley manages to connect with his feet with an opponent.
Entry #006
“Grabbing” 43/60/2XXX
After perfecting his onslaught of special moves, Meta Ridley developed more CQC skills that would allow him to fight opponents right up in his face if his other options were not up to the job.
Grab and Pummel
Meta Ridley's grab is one fluid motion; his right wing bats the opponent to the ground, followed by Meta Ridley pinning the foe to the ground with his left foot. He then bites at the opponent's unprotected body before the foe breaks out or is thrown.
Forward Throw
Meta Ridley bites down on the opponent and hurls them forward, flinging them into the air with a good bit of damage, but not so much knockback. However, because of how low the knockback is, it is very useful for comboing.
Back Throw
While holding down the opponent with his foot, Meta Ridley's tail swings around, skewers the opponent, then flings them backward with much more knockback than Forward Throw, making it a stronger option for a kill move.
Up Throw
After releasing the opponent from the hold of his foot, Meta Ridley bites down on the opponent and flings them upward, following up with a laser shot from his mouth. Both parts of this grab have been found to be relatively weak, but the quick succession of the laser with an aerial attack has proven to be mostly successful.
Down Throw
Meta Ridley holds down the foe while his tail whips the victim twice rapidly. Then, he flings the opponent into the air slightly, followed by a third strike of the tail that makes the opponent bounce off the ground (this is untechable) and pop up into the air in a manner similar to that of Kirby's Down Throw.
Jump Throw
Meta Ridley, not content with just pinning an opponent to the ground, can jump into the air with his grabbed opponent, then spike them down towards the ground for more damage. This is only possible if Ridley jumps immediately after grabbing the opponent. Once in the air (the distance he travels is roughly the size of a full hop), Ridley can slam the opponent diagonally forward and downward, or hit them backward at the same trajectory, but behind Ridley.
The uses for this are many, considering Ridley can now utilize two new kill moves since the throws from the air send the characters hurtling away much farther than regular throws. However, Ridley must throw as quickly as possible when he reaches the apex of his jump, as the moment he starts to fall, the opponent will be grab-released. This can be used to his advantages, though, as he can follow up with another attack off a grab release, or let them be hit by an opponent's attack in doubles or FFA.
Entry #007
“Final Smash” [MASTER INDEX UNAVAILABLE]
Meta Ridley has been going through a lot of changes as of late. He's become increasingly power, agile, even more intelligent (not to say he wasn't already). In just several days he has mastered the art of fighting. But lately, things have gotten out of hand. His original training area was deemed to small, so he destroyed it. The same goes for the second one. We had to move him to an enlarged warehouse, and even that has been tearing at his seams.
But then, things got even worse.
He began to dig at the ground. Dive-bombing at it. Eventually his veins began to turn blue. And one day he escaped. We could not find where he went until we heard rumbling beneath our feet, like an earthquake of an epic scale. And out of nowhere came Ridley, bursting through the ground with a wave of Phazon trailing behind him.
We dubbed it, “Phazon Eruption”.
When Meta Ridley obtains a Smash Ball, as it seems like he's been able to do this easily, his body becomes instantly corrupted with Phazon and goes into Hyper Mode. He then jumps into the air, slowly flips backwards, and dives straight into the stage out of sight. After a few moments, the stage begins to rumble and Phazon begins to corrupt the stage, causing damage to anyone who comes in contact with the radioactive substance.
Then, out of nowhere, Ridley bursts through the stage diagonally, spearing anyone he comes into contact with directly extremely far distances, even for a kill, while behind him trails a wall of phazon that crashes upon the stage and does more damage. Ridley then lands back on the stage, followed by the loss of corruption from both his body and the stage.
We don't know what to do with him anymore. All we can do is pray now that nothing else goes wrong, that nothing gets worse. But it will.
Entry #???
…
We've...unable...contact the rest...High Command...chosen...escaped...retrieved more...danger...in ruins...
Meta Ridley is meant to be played as an intimidating character, namely because of how many options he has out of standard attacks. Thus, Ridley becomes a fighter that takes advantage of reacting to opponents and using his different outputs to set up combos or go for a kill. His biggest factor is timing, as most of his unique abilities need a mastery of timing to work. Because of his, his learning curve is higher than others.
Meta Ridley must play very smart and essentially bait an opponent right into a good position, as well as putting on ground pressure with his good speed. His ability to rush opponents gives him an easy way to unsettle an opponent and make them fall right into his traps.
One of his biggest downfalls is that he is big and heavy, making him chain-grab fodder. A Ridley main needs to not only be swift on the ground to avoid any chain-grab/lock setups, but also needs to maintain constant awareness of projectiles with power-shielding, spot-dodging, regular shielding, or even using the invincibility frames of his dash attack to keep the pressure on.
If anything, Meta Ridley wants to use as many options as possible, as well as as many secondary options (like timing outputs) as possible, to keep the opponent guessing and to make it harder to be countered.
Meta Ridley also wants to be aware that the longer they stay alive, the quicker and stronger some of his attacks become – at longer lifespans, Ridley's Smash attacks require even less time to go into full charge and his down aerial, Senseburst, becomes that much more effective.
Essentially, Ridley needs to be able to use his number of set-ups into combos to make damage output that much more devastating because he isn't the strongest character out there. If Ridley can master his set-ups in a match, bringing on damage becomes so much easier – from his tilts, grabs, Senseburst and more, setting up a string of attacks should not be hard for the commander.
Bowser’s at it again! Take the princess all the way to your castle!
You get 3 stocks as Bowser in this Event Match and start out against Mario and Peach on Peach’s castle, typical fare. Mario and Peach both have a single stock, and if Peach dies you lose the event match. Peach’s AI is incredibly stupid and even Mario’s AI surprisingly isn’t all that great, so this phase of the event match passes by easily enough as you start up the kidnapping.
After killing Mario, the screen fades out and back in as it loads the next stage, much like the Melee All-Star Matches. When the game loads, you will find yourself on Luigi’s Mansion against Luigi and Peach, with your damage percentage and stocks carrying over. . .However, Peach’s damage percentage also carries over, and you still lose if she dies. Luigi is slightly more competent than Mario, though at the least this stage doesn’t have obnoxious Bullet Bills that can kill Peach.
After this, the next fight you’re brought to is against Wario on Mario Circuit – presumably Wario wants to take advantage of your hard work and sell the princess for a ransom. There are no edges for Peach to stupidly wander off of, but team attack is turned off for this fight, meaning Wario can “accidentally” hit Peach. The Shy Guy cars don’t particularly help matters.
As you continue your trek through Mushroomy Kingdom, DK seems to of gotten on your trail. Not only is it annoying to ensure that Peach follows along the scrolling stage with her stupid AI, DK is entirely unallied to Peach, with his primary goal being to grab Peach, use his fthrow, then carry her off the side blast zone. While very threatening, it’s made more possible by the fact you can get a cheap KO on DK by abusing the side blast zones.
Picking up a ride on the Gangplank Galleon, K. Rool discovers Bowser as a stow-away and decides to take Peach as payment for the boat ride. K. Rool will attack Peach full-on, and while he doesn’t have any suicide KOs to use on her he is immune to all of the hazards on the ship, enabling him to be rather carelessly reckless.
Due to K. Rool’s ship being unattended, Bowser seems to of gotten stranded on Yoshi’s Island with Peach still in tow. Here, you must fight the fighting Yoshi team from the N64 – all 30 of them. Thankfully, they’re still as easy as ever, but mindlessly spamming attacks to kill them all is significantly more annoying with Peach obnoxiously getting in the way.
Just because that wasn’t enough, you have a final match against both Mario and Luigi on Rainbow Cruise as you attempt to make it to your sky lair. The Mario Bros. haven’t even gotten that much smarter, but keeping Peach alive on this wonky scrolling stage is absolute hell. You essentially have to kill the Mario Bros. in the starting phase on the ship. . .Otherwise, you’re going to have to do Peach’s platforming for her by grabbing her with Side B and moving her over to safety. Aside from your Side B, one of the other things making this Event Match actually possible is a large quantity of healing items spawning – there’s enough of them that you’d think the Event Match would almost be too easy, but Peach’s AI is so stupid that you’ll have to guard the healing items for her for significant periods of time before she’ll finally decide to consume them.
I wanted to read your moveset, Rapture, but I did Meta Ridley myself, and I couldn't hold interest for very long. xD Sorry, don't take it to mean you did a bad job or anything.
I wanted to read your moveset, Rapture, but I did Meta Ridley myself, and I couldn't hold interest for very long. xD Sorry, don't take it to mean you did a bad job or anything.
It's one of my older movesets, and I forgot how I did on it. There's a link in my sig to my site where I put my MYM movesets, but here's the link here...
As it happens, Meta Ridley appears to be my most viewed moveset at the moment. ^^;
And yeah, it's no issue, so many people like Ridley that nobody's gonna be happy if only one Ridley set can exist ever. Everyone will want their own version, and I'm no exception. Some day, I might touch up all of my old sets. xD Some of them could use it, maybe.
And actually, that's why I have Sho as a moveset. I promised to make a Sho moveset, took forever to finish, and then an amazing Sho set was made by someone else. But a promise is a promise, I posted my Sho regardless and moved on to new stuff.
If you think I've evolved beyond the joys of murder moveset-making, then you'd be wrong! Here comes the Mental Organism Designed Only for Killing! And now you'll know why!
Originally a regular human named George Tarleton, MODOK was selected at random by the terrorist group known as AIM (Advanced Ideas Mechanics) to undergo various and torturous experiments in order to uncover the mysteries of the Cosmic Cube- an item capable of reshaping the reality around its wielder. As a result, MODOK became an insane, cranially gifted monstrosity that turned on his creators and the new leader of AIM, changing his given codename from MODOC (Mobile Organism Designed Only for Computing) to… well, you know.
Another result of the experiment included giving MODOK incredible psionic abilities and superhuman intelligence. Now the first one seems obvious enough as to how this can help MODOK in battle, but the second? Well, due to his massive intelligence, MODOK can form and reform various objects around him, from force field barriers effective against energy attacks to recalling every fact he has ever known. So how will this twelve-foot madman fare against the rest of the Smash cast?
And now with me is… well, the man himself, who will be going through his statistics and-
That’s quite enough out of you, lesser being! PSIONIC BLASTER!!!
SHIIII-
Now where was I… ah yes!
=-=-=-=-=-=-=-=-=-=-=
STATS AND OTHER COOL STUFF (On a 1-5 ranking basis)
=-=-=-=-=-=-=-=-=-=-=
Ground Speed: 1 (I am not a peon to be running around! My underlings do the dirty work for me while I wait patiently on my hover chair like the benevolent genius that I am! Well, granted, I do fall behind most others in- bah, never mind!)
Aerial Speed: 4 (Naturally, my throne has top-tier mechanics that enable it to glide at great altitudes and speeds! I'll make that Jigglypuff look like a weighted donut!)
Aerial Control: 5 (A 5?!? The most this blasted thing can afford is a 5?!? I can move around in the air at will! To state my aerial control is a 5 is an understatement! Do you understand me?!? DO YOU?!?)
Power: 3 (I don't require brute strength to dish out hurt to whoever is unfortunate enough to cross me! My array of technology and psionic abilities balance out whatever I may be lacking... WHICH HAPPENS TO BE VERY VERY LITTLE!)
Attack Speed: 2 (While an unfortunate amount of my techniques do require some time to initiate, I am not helpless at close quarters! I have more than a few tricks up my various compartmental sleeves in such a scenario!)
Jump Skills: 5 (Again, a mere 5?!? I know I am humble- far more than that feeble Mendez or weakling Warlord- but PLEASE! My ten second levitation is far more flexible than any silly double jump everyone else has to offer!)
W-Wait, what are you doing, human?!?
GET THE HELL OUT OF MY THREAD YOU UGLY SON OF A-
NOOOOOOO!!!
That guy is an *******. Anyway, I'll continue where he left off- and he no doubt would've lied about these next few statistics.
Weight: 5 (According to the Marvel Universe Wiki, MODOK is a whopping 750 pounds. That's more than Haggar, who we all know is already a mass of muscle. So the mental organism is as heavy as Bowser.)
Height: 5 (Referencing the MUW once more, MODOK is tallied at twelve-feet, just as I mentioned earlier on. That's pretty damn big, but for the sake of giving him a fighting chance, his height will be scaled to match Bowser, Dedede, and the other large heavyweights.
DID YOU JUST CALL ME ROTUND?!?
NO, SHUT THE HELL UP YOU ROTTING SACK OF CRAP OR I'LL TELL JOE YOU CALLED WOLF A CLONE AGAIN.
...
Thank you...
Playstyle: MODOK is the hardest character to pick up because, quite frankly, nobody plays like him in Brawl, Melee, or 64. Instead of a double jump like most everyone else in the game has, or even a multi-jump, MODOK has a ten second "levitate" mode that lets MODOK travel in vertical, horizontal, and diagonal directions in all eight directions. Not only that, but if MODOK is knocked out of his flight mode, he can still recover into it. Say a regular character is attacked after he/she performs their double jump- they cannot perform it again. Well it's different for MODOK- instead of being unable to levitate further, MODOK is still able to use the remaining time of his flight along with his recovery move.
This more or less grants MODOK unparalleled aerial control and along with his heavy weight, he can stay in the air for a very long time. This does not come without flaws, however- since he has no regular jump, he cannot perform tactics that would require short hopping and attempting to do so will only put MODOK into the air for a brief second before making him land.
His flight mode's uniqueness doesn't end there- while every character can only perform their smash and tilt attacks on the ground, MODOK can perform almost all of his IN THE AIR- yes they replace his aerials and I'm aware that this seems like a lazy design choice- regardless of which attack it is. Better yet, you are able to CONTINUE LEVITATING AROUND even after you make the input, giving MODOK even more aerial superiority, since he can move AND charge up his attacks at the same time. Better yet, some moves are cancelable into his special moves, so even if your opponent blocks or, worse, avoids your smash/tilt, you can cover your fumbling butt with a Balloon Bomb or Analyze Cube! Hell, I haven't even gone into how you should play MODOK, but that's just how esoteric MODOK's normal game mechanics are! Well, onto the playstyle itself!
Several of MODOK's moves aim towards covering a large amount of space in various directions around MODOK to compensate for his fat-*** size. However, there are some moves that not only serve as excellent defensive tools for MODOK, they can push him out of that defensive playstyle in order to lock down his foes in a circle of carefully-planned pain. There are few worse things than seeing an analyzed MODOK crashing down on your position, your escape routes blocked by Balloon Bombs, Barriers, and other assortments of danger, and the last thing you hear is maniacal laughter. That said, he still requires the opponent to be nearby him in order to actually break out. So his worst match-ups involve anyone who can easily circumvent his minefield of defensive layers and rip his fat head up, or anyone with an equally superior air game as his.
=-=-=-=-=-=-=-=-=-=-=
SO MANY WAYS TO KILL, SO LITTLE TIME...
=-=-=-=-=-=-=-=-=-=-=
B (Analyze Cube): MODOK briefly taps a button on the arm of his chair while putting his other hand to his mouth in a mocking manner along the lines of, "Oh oops, did I do that? SILLY ME!" Anyway, he summons a small cube of data that floats around about four Mario-distances away from MODOK. He can perform this while airborne as while, with the cube appearing a shorter distance away from MODOK, about three Mario-distances. This move deals a small amount of damage (5%) and very little knockback, yet the distance at which it is summoned is convenient because several of his smashes are special cancelable, meaning that you can and should summon these cubes at points where the enemy will usually get knocked to. Why? Because with every Analyze Cube that hits the opponent, MODOK gains one Level of Understanding. A Level of Understanding, or a LOU from now on, provides several good bonuses for MODOK and can totally switch up your gameplan. You can see how many LOUs you have on the flare on MODOK's forehead and from the tallymark next to MODOK's health percentage. The larger and brighter the flare, the more you have. A purple flare means you're at max LOU.
First, all of his attacks receive small damage and knockback bonuses proportional to the amount of LOUs he has, which max out at 9. At 1 LOU he has 1% damage increase and minimal knockback increase and at 2 LOU, he has 2% damage increase and a slight boost to said knockback bonus. Rinse and repeat up to 9 LOUs. Even scarier for you is that this boost is entirely passive and permanent as long as he keeps up a high LOU. You suddenly get an entirely different beast; MODOK goes from a purely defensive character to someone with great defensive tools and now, a very threatening offense. His defensive devices suddenly turn into obstacles that your opponent must navigate through to escape MODOK and he can switch up his entire game. Luckily, this damage and knockback boost is proportional to your LOU; if you lose one LOU, your bonuses go down one level. However, a handful of his moves receive different yet equally helpful boosts- if not downright upgrades- at the cost of LOUs, but I'll delve more into that when I get to the move itself. Oh, and two things- the beginning and ending lags for Analyze Cube is PHENOMENAL: easily MODOK's quickest move. He could spam it all day if he wanted to! Well, not a good idea, but you get the picture. Second is that you can't power up your Analyze Cubes at the cost of an LOU. That'd be silly. YOU'RE SILLY. Oh, and one other thing- like nearly all of MODOK’s specials, Analyze Cube leaves you standing still in mid-air, meaning you cannot control your movements before, during the move itself, or while it recovers. Although the recovery is so damn quick that it doesn’t make much of a difference.
B^ (Battering Ram): MODOK turns right to face toward/away from the screen as he inputs his chair to emit a slight boost of acceleration, briefly making MODOK a missile that he can slightly control. After a quarter of a second for the turn, MODOK rushes in a direction you choose- by holding the movement stick in the desired direction- and yells out, "BODY ATTACK!" Your entire body is the hitbox and the range of the hitbox, so that's slightly helpful for movement, since you travel a short distance as a moving projectile- about three and a half Mario-distances from your starting point. During Battering Ram, you'll damage anyone (8%) stupid enough to get in your way and knock them back a fair distance. Do note, however, that this limited range makes this for a bit of a poor recovery move, though his ten second levitation makes up for that. A few handy notes about Battering Ram is that MODOK isn't put in a helpless state when he uses it unlike a vast majority of recovery moves and crafty MODOK players can use Battering Ram in place of a regular ground walk/run. This is good, since the recovery of the move is quick (It ain't Analyze Cube, though).
I took some liberties away from MVC3 because you couldn't power this up in said game. OH WELL. Yes, you CAN power up your Battering Ram using LOUs that you saved up. If you hold down the special button, you transition into Hyper Battering Ram, using up one LOU at the benefit of gaining a much longer-lasting and controllable Battering Ram. He gets an extra two charges that he can use at whim, the damage increases (10%), and the knockback is heightened. Not only that, but his hitboxes increase and the speed of each charge increases. So now he has gone from a short distance to that of a respectable recovery move. However, this charged-up Battering Ram has its flaws: unlike the uncharged version, you go into a helpless state once you come out of it and you're down one LOU. Both versions of this attack are air performable and can be linked into by non-special moves.
BV (Balloon Bomb): MODOK puts one leg over the other before tapping another button on his chair arm. As he leisurely does so, a small cannon pops out of the back of his chair, aiming towards the direction MODOK is facing, and releases a small mine at the same time MODOK presses the button. After the bomb is released, MODOK uncrosses his legs and gets back into fighting stance. This is the Balloon Bomb; one of MODOK's key defensive tools and, with LOU, offensive blockades. Balloon Bomb tracks the nearest foe when they come near, going through passable platforms, though not too smart enough to go AROUND objects like the environment, to deal damage (8%) and knockback equal to that of a Smart Bomb, though without all the explosiveness. Do note that you may only have one balloon bomb out at a time. On it's own, it's a decent move for MODOK to use, since it's basically a heat-seeking mine that floats and is the size of Kirby, and lasts for a whopping ten seconds until it detonates on its own. It serves as one of MODOK's defensive tools and every MODOK player should use it. However, there IS a problem with it- the beginning lag sounds as painfully long as it reads, because it takes an entire second for the bomb to actually come out. Once it does, though, the ending lag is almost instantaneous.
Like with Battering Ram, you can power up your Balloon Bomb at the cost of a single LOU to create a Jamming Bomb. It's similar to the Balloon Bomb in that it tracks the foe, although it doesn't wait around to do so- it goes straight after whatever it pleases, and it smart enough to move around obstacles to attack the foe. It also moves at a faster rate and deals a bit more damage (10%), although the beginning and ending lags are still the same. However, since you're using up an LOU, it obviously has an added effect. Well, if the Jamming Bomb lands, your victim's controls are scrambled in a variety of ways, making it a doozy to immediately figure out what control scheme you've been cursed with- left could be jump, down could be walk right, shield could be normal attack, etc. Makes for a nasty surprise should anyone be caught by one of these. Both versions of this attack are air performable and can be linked into from other non-special moves. However, both versions of this attack also leaves you stranded in whatever position you were prior to activating the move, which uses up some of your levitation time. Do note that you can keep spamming this move to remain airborne if you DO run out of levitation.
B> (Psionic Blast): MODOK briefly focuses power in the gem on his forehead to gather energy, then releases it as a laser beam similar to ROB's. The laser itself is thin and deals 10% damage with decent knockback. This move is kind of slow to come out, taking half a second to start up, and is equally as slow to end, ensuring this move to be a projectile move used from far away. The laser itself, however, has a strange hitbox- the beam itself is capable of hitting about a platform above and below it, giving it some flexibility. Otherwise, it's a handy tool for any MODOK player to use and should be used to heckle foes from afar behind your Barriers, acid pools, and Balloon Bombs. Note, however, that the laser WILL stop through solid objects and unlike a vast majority of MODOK’s moves, you can’t control yourself if you activate this move in mid-air, rendering you stationary from where you used Psionic Blast until the move ends. This also uses up whatever time you have left of your levitation, although you CAN abuse this move in mid-air if you’ve run out.
This move becomes absolutely terrifying when LOU is thrown into the mix. The longer you hold the special button, the more LOUs that you'll absorb. When Psionic Blast is released with a single LOU invested, you get an increased damage output (13%) as well as increased knockback. Your opponent will also take some additional damage over a short period of time through the burn you inflict, although it is a bit minimal until you invest more LOUs and the burn itself only damages, not stuns, and the range of the beam is vertically wider. But like I said, the longer you hold down the special button, the more LOUs you invest. That means you can potentially power this move up to insane lengths at the cost of your LOUs. It IS a bit enticing, but why waste all those LOUs for a beefed up Psionic Blast? For one, the damage, knockback, range, and duration of burn is increased proportional to the amount of LOU you invest and once you reach 9 LOUs- the max- Psionic Blast turns into a borderline Final Smash. The fight freezes for a moment as it shifts focus to MODOK briefly, alerting everyone that he charged it up fully, and releases a Hyper Psionic Blast that pierces EVERYTHING- the stage, enemies, everything. It's size is equal to that of Final Destination and the damage is immense- 30% for a pseudo FS, and you'll still inflict additional burn over time. The charge-up time takes a total of three seconds and the attack uses up ALL of your LOUs. But this attack is seriously insane; it'll kill Jigglypuff at 0% for goodness' sake. And for those aspiring MODOK fans, don't worry- you can cancel out of your charge by pressing the shield button during, although you don't get your LOUs back that you already invested. But don't worry, your foes can do it for you as well! Both versions of this move are air performable and can be linked into from non-special attacks.
FINAL SMAAASH (Max Power): MODOK makes several computations in his chair arm pad, automatically bringing his LOU up to the magic 10. But... how? The Smash Ball obviously has greater power than your mortal mind can imagine! Uh, sorry, MODOK slipped in there. Anyway, you'll know when MODOK reaches LOU 10 because he'll be wearing a copy of Galactus' helmet made of psionic energy, so you'll know when it's over by the time the helmet is gone. Which is about fifteen seconds. So during this, MODOK receives the usual damage/knockback bonuses he normally would from his normal attacks, albeit by an added percentage from the normal max. Not to mention all his moves get speed boosts just from the added LOU. MODOK will even be able to keep his LOUs he received before the final smash, because after the transformation period is over, MODOK will revert to his old self with however many LOUs he had prior. Hell, even his Barrier doesn't need to be charged in order to reach max height and sturdiness- just toss it out! Do be warned, however, that unlike several other transformation final smashes, MODOK can still be hurt, stunned, and even knocked out. But his specials become an entirely different story and more or less prevent that possibility.
For one, all versions of his specials are automatically LOU'd and do not use up any of his LOUs. In fact, they are supercharged to a point where MODOK becomes completely ridiculous. Instead of a regular Analyze Cube, MODOK summons a field of multi-hitting Analyze Cubes in front of him, covering the horizontal entirety of Battlefield, making a nearly impassable minefield of stun. The cubes themselves deal no extra damage or knockback, nor do they give MODOK any more time or LOUs for the Final Smash. These cubes don’t give MODOK any regular LOU either, so don’t think you’ll cap at nine once you revert. Although they remain for the same amount of time, they also hit up to three times before disappearing. Battering Ram gets a total of SEVEN charges, after which he is not rendered helpless, and all charges deal enough knockback to ensure that all subsequent charges land as well as 10% damage each, with the last charge ensuring a kill at medium percentages. Balloon Bomb becomes even crazier, with an extra five arms shooting out an extra five Jamming Bombs that not only track the opponent in the same way a regular Jamming Bomb does, but take different routes in order to do so! Finally, we have out beloved Psionic Blast, which was scary enough for 9 LOUs. But when you get to ten, Psionic Blast turns into a projectile version of Falcon Punch, Warlock Punch, and fully charged Eruption all at the same time. This Psionic Blast takes five seconds to activate, during which MODOK is enveloped in an electric field that prevents interruption and will knock back anyone foolish to approach him, and when he does, watch out. Because this blast covers the entire ship on Rainbow Cruise, annihilating everything and anything it sees, killing foes in one hit regardless of weight or health. Luckily, MODOK automatically reverts to normal after this.
=-=-=-=-=-=-=-=-=-=-=
BY MY CALCULATIONS, YOU'LL BE DEAD IN SECONDS!
=-=-=-=-=-=-=-=-=-=-=
Neutral A (R.A.M- Rapid Assist Machine-Gun): A compartment in the back of MODOK's chair opens up and fires a quick succession of four bullets in front of MODOK, the firing range reaching to about one and a half Mario-distances. However, since the firing trajectory has a diagonal direction to it, starting from directly above MODOK's big head, it has a bit of a vertical hitbox to it, though not much. It takes a quarter of a second for MODOK to unleash R.A.M, another quarter to fire all four shots, and a third quarter to shelve the weapon for further use. Each individual bullet deals 2% damage, tallying to a possible 8%, although the low knockback remains the same on each bullet to prevent from any possible stacking of knockback. Luckily, the move comes out quick and ends just as quickly, making this a nice tool for MODOK's defensive game. You might be thinking where these bullets go if you fire them off the stage, next to an edge. Well, they travel for another quarter of a second before burning out and disappearing, meaning you can rapid fire this to an extent to gimp recovering opponents. Do note that this is one of MODOK's only moves that can only be performed on the ground and as such, will perform a different move all together if the input is performed in midair. There's one other thing about this move you should know- assuming you're able to land this on an opponent, whether or not they are hit or if they block it, you're able to cancel into one of your tilts, smashes, or special moves, making this an even MORE versatile move than it originally was.
Side A (S.P.A- Superheated Psionic Attack): MODOK leans to the side, tilting his chair a bit to his left, as a mechanical arm comes out of the side underneath the floating chair, along with a small block at the end of said arm with an opening. The arm straightens itself outward and directly below MODOK's floating figure and emits a small psionic blast. Keep in mind that I only refer to it as "blast" because "explosion" is far too much of an exaggeration- it isn't a projectile, but an energy projection similar to Mario's side smash. Anyway, after the psionic blast comes out, the arm quickly goes back into MODOK's chair. The beginning and ending lags of this move are quick and the range is horizontally good- about two Mario-distances away- and despite the lack of a good vertical hitbox, SPA still manages to be helpful enough to keep away any would-be rushdown fighters. The damage isn't too shabby either (6%) Now here's a VERY interesting aspect about the move, and I'm not talking about cancelability, because that's a common theme with almost every one of MODOK's moves. MODOK is able to perform this exact move IN THE AIR. Yep, almost all of MODOK's aerial moves consist of his tilts and smashes. Yes, their inputs are the same and yes their animations are completely the same. This may seem like a lazy design choice but the truth is, this benefits MODOK's otherwise poor-sounding aerial game quite greatly, since when using this in the air, MODOK gains a larger hitbox for SPA since he now hits opponents UNDER him for equal damage/knockback. And like I mentioned before, you can cancel this move into smashes or specials, making SPA an even more useful move and one of MODOK’s primary kill moves.
Up A (A.D.D- Air Defense Device): The same mechanical arm and large block in LITRAKA returns, except this time from a compartment in the back of MODOK's chair, as the arm extends diagonally in front of and above MODOK, firing off another psionic blast from the block before crumpling back into MODOK's chair. The start-up time is a bit shorter than LITRAKA's- from half a second to a bit more than a quarter- but the cooldown is slightly increased from LITRAKA's as well. The range takes a turn for the situational as well, with no horizontal hitbox in front of MODOK to protect him from incoming groundbound enemies. Instead, this move takes to the skies as MODOK's go-to anti air attack. The hitbox is almost as identical to LITRAKA's- instead of 6x4/6x5, it's 5x5 ground or air, since you're only smacking enemies out of the air with this one. That said, it gets a nice damage increase (11&) from LITRAKA and the knockback is heightened, further emphasizing MODOK's dominance over the air even when he's on the ground. This move doesn't change much in the air, although it's far easier to hit someone due to the usual control over your movements before and after the move occurs and during the move itself. And as with several other moves, he can cancel this into a smash or special attack, although considering the nature of this move, it'd be best to simply summon a Barrier or Balloon Bomb and escape rather than pursue further.
Down Tilt (C.A.D.O.T.T- Corrosive Acid Designed Only To Trip): Yeah, you read that right, I said TRIP. Anyway, MODOK's chair deactivates its hover for as long as MODOK is "crouched"- he's still in his chair but it's grounded for his crouch- as a small cannon pops out of the top of the chair and spits out a small glob of sizzling green acid. The glob travels a small vertical distance over MODOK's head before gravity takes over and redirects the glob to travel straight down and land in front of MODOK. Yeah, the range of the move is as limited as it seems which is rather uncharacteristic for MODOK. The recovery on this move is unimpressive as well, taking slightly below half a second to come out and half a second to draw the cannon back in. It even takes almost a full second for the glob to finish its brief journey anyway. However, this move has two different properties depending on where it hits: the first is if you hit someone during the glob's initial descent, before it hits the ground. You damage the foe for meager damage (6%) and knock him back a bit. You can still cancel out of this move in either version though. The second type of CADOTT is when it hits the ground- it forms an unavoidable pile of acid that is as horizontally large as a crouching Snake. Whenever someone so much as TOUCHES the acid- save MODOK, needless to say- they take damage (4%) and trip regardless of their health percentage. The best part about this is that you can not only CANCEL out of this move, you can JUMP- well, HOVER- cancel out of this move, making it highly versatile if you want to set traps. Note that attempting to even DODGE around this puddle won't work- whether you're walking, running, downed, recovering, dodging, or attacking, you're gonna get tripped. The puddle lasts for ten seconds and fizzes out after said seconds are up. This is another one of those ground-only moves for MODOK but it's so damn helpful that you can't help but remain initially grounded for this one move. If you try to create an acid puddle next to an edge, that'll work too- as long as your quarry rolls ONTO the stage and doesn't leap over it. And trying to shoot the glob off-stage will only result in a fast and descending- and pointless- glob.
Dash A (A.R.S.E- A Reversal Surprise Execution): This is far more fun than naming Mr. Freeze's moves. Now while I- err, MODOK- said that his speed was poor, that doesn't mean his dash attack is completely useless. During MODOK's "dash", his chair goes into a sort of boost mode, letting loose far more flames from the bottom. Using this incendiary upgrade, MODOK quickly uses momentum to crash his large body into anyone in his way butt first, then quickly lets loose an extra blast from beneath his chair to boost himself further away from his ending point. In retrospect, this move basically keeps MODOK in the same spot where he activated the move during the dash. Naturally, there are exceptions such as if you're near an edge, but that goes without saying; he'll either run off-stage or experience the usual sudden stoppage every other edge-bound dash attack faces. The tackle and overheat come out in short successions of each other but have totally different properties. The tackle is full-bodied, with a 180 degree radius in front of MODOK that hurts foes (7%) and knocks them away a small distance. He travels for about two Mario-distances before stopping and automatically transitioning into part two. About a tenth of a second after that, his booster lets loose a roar of flame that deals more damage (10%) and knockback than the tackle. The flame has a slightly shorter range than that of the tackle, but that's only taking the movement during the tackle into account. The burst actually propels MODOK to where he first made the input, effectively placing him out of harm's way if the enemy isn't hit by ARSE. And yes, I'm still laughing at how I managed to fit ARSE in a moveset. Uh, needless to say, you can't perform this in the air. And it isn't cancelable either by move or jump, so this CAN be useful in certain situations, just nowhere NEAR as helpful as MODOK's other moves.
=-=-=-=-=-=-=-=-=-=-=
WHERE WOULD YOU LIKE ME TO SEND YOUR CORPSE?!?
=-=-=-=-=-=-=-=-=-=-=
Fsmash (L.I.T.R.A.K.A- Laser Intended To Repulse And Keep Away): A much larger compartment opens up in the chair's headboard's side, revealing a large block with an open end controlled by a mechanical arm, and that by MODOK. The maniac spins around in his chair to extend the reach of the large block as the arm simultaneously extends and psionic energy is blasted a short distance from the expulsion point, as MODOK turns back to face the direction he was originally facing and the large block plus the arm safely packed in his chair. The beginning animation of the move almost sounds as lengthy as it reads- it takes half a second to start- but the range, a combination of the extension on the arm and the large psionic blast, is tremendous- Mario-distances doesn't even describe it. It's an entire 6x4 square in stage builder, with the good damage (11%) and tremendous knockback. Better yet, the recovery is noticeably shorter than the start-up, taking a bit more than a quarter of a second to recover. Like with several of MODOK's other moves, you can use this in the air with no detriments to your hitbox- in fact, the range increases to a 6x5 block in stage builder, since you're hitting someone below you as well. And since you can still move around the opening and ending animations of the move, as well as during the move itself, you can increase the versatility, range, and safeness of LITRAKA even further by slightly moving forward in mid-air and then slightly moving backwards when the move is finished. Or not- the strategies are limitless! The free movement offered during LITRAKA helps out a lot since the ending lag is rather slow and, as such, you can use the aforementioned two aspects to negate the ending lag... more or less.
Usmash (E.R.O.G.E.- Explosive Release Of Glowing Energy): Yeah... kind of dropped the ball with this name. Anyway, MODOK's chair builds up some heat, causing the chair to slowly lower to the ground, before MODOK flips his chair so that he's basically upside down. Shortly after that, his chair releases the energy, causing MODOK to slam into the ground. The disgruntled madman quickly spins himself in a counterclockwise motion before he gets back into his fighting stance. An important factor is that MODOK has super armor after he is shot into the ground and before he starts spinning to recover himself. The explosion that is released from the bottom of his chair- or the top of his hitbox- covers the entire top half of MODOK's frame in a 200 degree radius, with the explosion dealing a large amount of damage for MODOK (13%) as well as some great vertical knockback, making this MODOK's go-to kill move for anyone jumping in. One note to add, however, is that unlike MODOK's other smash attacks, this one isn't special cancelable. And the ending lag is as painfully long as it sounds, and even though the super armor helps out a bit, he's still wide open if he whiffs this- the recovery time is a full second. However, the beginning lag for this move isn't as lengthy as the ending lag- it takes a bit more than a quarter of a second until the actual EROGE occurs. When using this in the air, however, EROGE becomes a totally different story. When MODOK uses this in mid-air, he is still free to move around during the charge-up animation, albeit at a slowed pace due to the build-up at the chair. When the move actually comes out, MODOK is shot downward at a fast pace, similar to Shiek/Toon Link's aerial down attacks. Except the momentum given by the force doesn't do damage or knockback- it sends MODOK quickly back down to Earth. This is useful if you're fighting a losing battle in the sky, as it's basically Usmash without the horrendous recovery. Unfortunately, like the ground version, EROGE isn't special cancelable. There is also lack of control over the move during and after it comes out, unlike several other airborne moves.
Dsmash (Barrier): Huhn? No acronym? Nope, because this isn’t even a proper attack! MODOK puts a hand in front of him and summons a triangular, rotating, and highly reflective barrier that about as tall as Bowser. It stops any non-Final Smash projectile in its tracks and prevents any character from even moving AROUND it, meaning you’ll have to jump over it or attack it enough times for it to dissapate. It’ll also collapse after ten seconds but still, it’s a handy device for negating ranged characters of their range game and to slow down any sluggish fighter. Hell, MODOK can actually attack through it and stand in the middle of the shield, letting the barrier absorb hits while MODOK dishes out his own brands of pain. It takes a half a second for the shield to come out but it takes MODOK a full second to actually finish the animation. However, this is a key move for MODOK because it encourages foes to either go below it, which is a fair rarity, above it, which encourages them to fight at a point where MODOK thrives, or wait/attack the Barrier for it to disappear, during which MODOK can prepare his defenses. By charging up the smash, you actually extend the vertical size and staying power of the Barrier from ten to fifteen seconds and increases the size of the Barrier to two Bowsers on top of each other. This doesn’t increase the durability, however- just the size and how long it lasts on its own. Nonetheless, this is one of MODOK’s most helpful moves in terms of utility, due to the movement and attack penalties it enforces. This move cannot be performed in air, however, nor can it be linked into from other moves.
=-=-=-=-=-=-=-=-=-=-=
YOU ARE NO MATCH FOR MODOK!
=-=-=-=-=-=-=-=-=-=-=
Nair (G.O.A.T- Gyration Of Absolute Terror): While MODOK has his R.A.M. on the ground, inputting the normal button in air produces a totally different move. MODOK spins around in a complete circles three times until he forces himself to a stop. Like some of his other moves, MODOK’s entire body acts as the hitbox and range for the move, making this a good defensive attack for when you need it. While the knockback isn’t anything special, MODOK can move around while using this in the air. The start-up is instantaneous but MODOK has some difficulty steadying him self after the move ends, making this an unsafe move to throw out… well, it WOULD be but it has some special properties. Any time before the third spin, MODOK can cancel GOAT into a smash or special attack while in midair, since all of his specials ARE cancelable and air performable. Additionally, you can control your aerial movements during and after this move comes out, making it highly versatile for smart players since if you miss, you can move away while your special attacks cover your tracks. As such, this is one of MODOK’s best options in mid-air considering you’re pretty much your own defensive barrier, it has great mindgame potential, and can protect you should you choose to move around with it.
Bair (B.O.C.O.P.A.S- Battery Operated Cords Of Pain And Suffering)- MODOK taps a button on his chair arm pad as a panel slides into the chair on its back, as two cords, with electrical plugs at the ends of them, lash out at anyone behind MODOK before withdrawing back into the chair. The cords reach out two and a half Mario-distances away, making this a very handy move if someone wants to flank MODOK from behind. BOCOPAS comes out in two moves in very quick successions. First, the cords shoot out from the back of the chair, dealing minor damage (5%) and knockback. After that, the plugs emit a large amount of electricity, rapidly damaging the foe over time. The pkugs have an awkward hitbox since they generate electric jolts from the plugs, dealing around 9% damage and a large amount of knockback, making this another one of MODOK’s go-to kill moves. BOCOPAS is really one of MODOK’s most versatile air-only moves; you can move around with it in the same manner and conditions as a large majority of his attacks, cancel it into a smash or special attack, and use it as a keep away tool if your LITRAKA is too slow, since the BOCOPAS comes out in a quarter of second, subsists for an extra half a second, and then quickly withdraws into the chair, taking another quarter of a second. It’s important to know, however, that the range of the BOCOPAS is narrower than that of LITRAKA- the horizontal range is good but the vertical range is rather poor except at the plugs themselves, and not all the hits from the plugs will land. As such, make this something along the lines of a sweetspot for BOCOPAS.
Dair (Q.Y.P.R.A.S.- Quick Yet Prompt Return And Smash)- This move sounds exactly as it does; MODOK create a psionic barrier at the bottom of his chair and deactivates the boosters, using his natural body weight and size to speed down to Earth. While this may sound similar to EROGE, it is quite different. First, the trajectory of QYPRAS involves MODOK traveling straight back down to the ground, while EROGE keeps MODOK at a slightly diagonal angle. Also, the dive during QYPRAS deals a good amount of damage (9%) and the large and high-priority hitbox ensures that MODOK is kept safe during his descent, while the damage in EROGE is all in the explosive release. However, the QYPRAS is weaker and comes out a bit slower than ERGOE- an extra quarter of a second- and can only be performed in the air, while EROGE is ground and air performable. QYPRAS has a huge advantage over EROGE, however, and it is that it’s cancelable and controllable. Sure, if you leave it alone, MODOK sinks straight downward from his aerial position, but you can change the direction of a fall a bit by moving the movement stick left and right. You can also prematurely end the descent by activating one of his special moves, making this not an excellent, cancelable-into, and fast falling move, as well as a great fake out tool that will keep opponents even taller on their toes. When MODOK lands, his chair takes a moment- three quarters of a second- to reactivate the boosters, so it’s a good idea to make sure that you either land this move or cancel out of it.
=-=-=-=-=-=-=-=-=-=-=
THE ULTIMATE BATTLE OF BRAIN VERSUS BRAWN!
=-=-=-=-=-=-=-=-=-=-=
Grab A (Killer Illumination): MODOK's two cables from BOCOPAS swiftly reach out in front of him, quickly plugging into whoever is unfortunate enough to be near grab range. Once the plugs pierce the opponent, he/she is lifted up into the air above MODOK as the madman sits there, gleefully watching his opponent squirm helplessly. The pummel involves administering electric shocks to the victim, dealing a base damage of 2% for every pummel and increasing by half a percent for every LOU you have, granting a possible total of 7% damage for every pummel. Y-Yeesh! Oh, and just for the record and so I don't have to repeat myself every time; whenever an electric shock or projectile is involved in a throw, anyone nearby the opponent during the two will take some of the splash damage and knockback, although they certainly won't feel as hurt as your unfortunate quarry.
Fthrow (H.I.A.F.A- Heave In A Forward Angle): MODOK's cords twist around so that they arc forward, the grabbed foe detaching from the cords, tossing the unfortunate fool a good distance away and dealing a decent amount of damage (8%). While MODOK isn't well-known for his grab game, this move still serves a good purpose for MODOK in that as soon as he comes out of it, he can activate an Analyze Cube during the foe's flight, pretty much making this a good way to get free LOUs. Not to mention MODOK recovers quickly from this throw, so anyone waiting for you to finish up will either be incredibly swift or sadly mistaken.
Bthrow (P.U.A.F.E- Poor Unfortunate And Fried Enemy): MODOK unplugs one of his cords from the opponent as the remaining cord holding up the opponent and continue to administer electric shocks to the trapped enemy, while MODOK charges up the gem on his forehead to release a super-powered Psionic Blast. The blast knocks the opponent off the cord and in the direction opposite MODOK was facing. MODOK and his victim gain superarmor for as long as the animation lasts, and deals a good amount of damage for MODOK (12%) and even more knockback than HIAFA. While this makes it seem like an ideal move, MODOK turns back around to face the direction he was in prior to the grab, making this move a pure grab to keep the opponent away rather than a ticket to an LOU; the raw stats are higher but the versatility is lower.
Uthrow (U.V.A- Unrelenting Voltage Administration): MODOK keeps the opponent overhead, continuing to release even more shocks into the opponent, the sheer amount of electricity showing signs from the smoke coming from the foe's grilled hide. When the enemy lets out enough black smoke, MODOK is satisfied as the Balloon Bomb cannon pops out and fires one at the airborne and exhausted foe, launching him into the air. All this adds up to MODOK's most damaging throw (13%) and a mix-up opportunity depending on your LOU, since the knockback of this move is entirely vertical. This also warrants for the most indirect damage for anyone nearby the grabbed victim, since the Balloon Bomb's explosion will be sure to knock anyone willing to steal MODOK's kill.
Dthrow (T.U.S.H.A.P- The Unfortunate Soul Holds a Pose): MODOK administers a few more electric shocks against the opponent before slamming them into the ground in front of him, dealing a small amount of damage (8%) and no knockback; they are instead put into a grounded state. However, you can quickly follow up with a acid puddle to automatically put them out of a prone state and then cancel THAT into an Analyze Cube, making this a highly versatile throw for the tactical MODOK. Also, during the throw animation- as in, before the opponent lands and after the shocks- MODOK and his victim retain super armor for that time, so nobody can interrupt you or your "friend's torment.
=-=-=-=-=-=-=-=-=-=-=
NEVER AGAIN SHALL I FORGET TO LOBOTOMIZE ONE OF MY OWN CLONES!
=-=-=-=-=-=-=-=-=-=-=
Taunt 1: MODOK snaps his fingers as a small mechanical cup holder pops out of his left chair arm, revealing a full ice cream sundae. MODOK takes a sip of it before the sundae retracts into the arm, as MODOK gets back into his fighting stance. Strangely, enough, it'll always be full- I guess MODOK put an automatic sundae machine in his chair somewhere...
Taunt 2: A fly buzzes around a distracted MODOK before landing on his forehead. Annoyed, MODOK slaps the bug on his head, missing and creating a red mark while the fly buzzes away. MODOK briefly rubs the red spot on his head before getting his head back into the battle. The red mark disappears after half a second and is purely aesthetic.
Taunt 3: MODOK leans too far back into his chair, the madman kicking out wildly as he rotates in a full circle backward, before resettling himself back into position. This doesn't deal any damage to the opponent nor does it knock them back- it only serves to emphasize MODOK's large weight.
Victory 1: MODOK taps a few buttons on his chair arm pad, cackling slightly, before he presses a big red button on the end of the arm, laughing more loudly now. He then starts spinning and flying off-screen, as you hear him performing his most convincing mad-man laugh.
Victory 2: MODOK summons a teleporter next to him, declaring, "Captain America is next on my list!" before entering the device and exiting the results room, the teleporter disappearing as well.
Victory 3: MODOK starts spinning wildly in his chair to the point that he cannot control it. He spins so quickly that he begins moving around on his own, screaming as he does, even moving across the background of the results room, before collapsing on the ground where the winner stands, dizzied to the point of exhaustion.
Loss: Rather than clap, MODOK begins angrily tapping the pad on his chair arm so harshly, the pad short-circuits and electrocutes MODOK, causing the depressed madman to sigh and start clapping with the others.
Entrance: MODOK is carried in while on his chair, asleep, by two AIM agents. By the time they place him on the ground, MODOK wakes up and angrily thrashes about, knocking the agents away with psionic energy and entering his combat stance.
Series Emblem: The trademark gem on his forehead, along with a reflective sparkle in the center.
Idle Pose: MODOK sighs and starts clicking a few buttons on his chair arm pad, as two headphones automatically pop out of the headrest behind MODOK and playing music, the madman making devil horns with his hands accompanied by head-banging. If he moves, the headphones automatically retract into the chair.
Costumes: Good Ol' MODOK (Original), Red Shell with purple gem (Red Team), Blue shell with yellow gem (Blue Team), Green shell with white gem (Green Team), Yellow shell with white gem, mascara, and lipstick along with red limbs (M.O.D.A.M.)
Unlock Method: Fight in 750 Brawls, beat Classic with four secret characters, or get him in SSE.
SSE Role:
M.O.D.O.K. was actually enslaved by The Ancient Minister to develop Subspace Bombs until the factory's destruction. If you go back after you beat the game, you'll find a secret door with a disgruntled MODOK behind it looking for a fight. Once you beat him, he'll become a part of your roster.
After Pucci, Shepard shares similar problems, which is a shame. I found that the moveset trickles out by the end – though in my opinion, I prefer what I'd call Shepard's “filler” to Pucci's. You start off with strong concepts – the use of mass effect fields in particular really sets up for something great. The zoning execution is similar to Guldo, but pulled off in a completely offensive way that gives it a lot of room to build on its playstyle. What is the major failure here for me, is that you keep introducing more and more ways to manipulate areas of mass effect, and never try to make a more profound use of it. It doesn't really come together all that well, as a lot of it is conflicting in some moves being used for just spacing and some of the uses of mass effect get to be somewhat obtuse.
It's not a disaster by any means – even when the mass effect gets to be a little redundant, you still make pragmatic use of it and have a plethora of unique ways to manipulate it. I was particularly impressed by how you were able to use up all of Shepard's abilities – the transition you made to Brawl with them was pretty smooth, and proves that a Mass Effect set can be made well. However, while these ideas are commonly interesting, they don't form a compelling moveset – Shepard is only notable for being so good at spacing. I also wouldn't mind the filler so much, but here it seemed to badly affect the playstyle, so in the end it lacks a crucial amount of flow and the set ends up feeling very shallow.
One aspect of the set I'll only touch upon, but I feel deserves mentioning is the writing style. It's really good, and I'm impressed with how easily you were able to introduce such complicated mechanics so effortlessly. Definitely a high point of both this and your previous set.
Sadly, Arakune can be criticised much in the same way as Taokaka, due to them being from the same game, being made within a small amount of time of each other and you not really changing your methods. Though what he does is a lot more interesting than Taokaka's slashes, it still lacks any kind of flow between the moves – even in a basic way, he doesn't play particularly offensively or defensively, and his moves don't really go together all that well. What does go together is purely do to his moves naturally working together from BlazBlue, but it doesn't transition well here. I think what would help most for you is a playstyle section after the moves and focus on making flow between your inputs, which was probably best accomplished with Sho's minions. It all feels a bit too tame when you could be really imaginative with how these sets work. Don't be afraid to go nuts with your movesets – in fact, make that your goal.
First of all, as just stated with Arakune, you should put your playstyle at the end of the set rather than in the statistics. Like, all the parts about how Ridley plays and so on. It seems like you put a lot of effort into this moveset, and to better structure your thoughts would make it easier for readers to empathise with you. With your level of experience, this set is actually surprisingly good, especially considering it's for a popular character like Ridley. You have the writing style down [it's well written], moves aren't horribly under-detailed [though the lack of damage percentages is a big negative] and there isn't a move that doesn't seem like a perfect fit for Ridley.
The big problem, though, is that the moves do lack a sense of flow. They should work together in a focused way to let Ridley have his own unique playstyle. A good way to begin this is to make your specials more prominent, and make them interact easily with the rest of the moves. A simple example being, making the kinetic breath linger in one area, then have moves focused on spacing the opponent into the lingering fire. Simple interactions like this are what make a good submitter, and I think you have the potential to improve a lot. What with the organisation and opening or statistics section, you clearly have a lot of passion, and it's definitely appreciated.
MODOK is certainly a step forward for you, Smashbot. It's not without its own little bumps in the road, though, and I feel like you'll be digging yourself a bigger hole if you don't address some of these problems. For one thing, while you take a step forward in detail, you do add a lot of superfluous information that bogs down the writing style somewhat. Though I did say to add detail from Genesect, here you do have some random quipping that could be removed in a lot of the inputs. You also have a habit of stating kind of pointless details, which is perhaps partly my fault for telling you to use more detail. It's minor, but it also is a big improvement that you're only colouring the headers now... but that new font I just saw now is bad. Change it back, it's practically unreadable.
Moving on to the actual set, I was impressed by how diverse you made each of the inputs in consideration, and how you mostly successfully avoided the trappings of the Marvel vs. Capcom 3 moveset. Where this set really could've been so much better is with the LOUs, though, as they basically just act as a generic buff to some of his moves. As I've said to you before, a change this simplistic isn't enough to be worthwhile with the central mechanic, no less. The LOUs should really have served a more focused and specific goal, with the rest of the moves more centred around them. For example, it would have been too easy and a better option to make a lot of the moves to do with specifically spacing toward the LOUs, and have the LOUs as some kind of minefield, etcetera etcetera. It just doesn't feel that interesting. Nonetheless, you've shown you can improve and adapt well, so I have full faith in your submissions improving even more from here on out.
Hazama, eat your heart out. :3 (The picture is not mine, it's the best I could find, and then PHOTOSHOPPED by me. Tough.) The ultimate troll, Emidius Amarandos, is ready for action!
\\\\\ EMIDIUS AMARANDOS ///// The Holder of Balance
Emidius works to maintain balance between light and darkness through all varieties of time and space. He simply prevents either light or darkness from gaining or maintaining too much power by giving power to the weaker side, or killing one who attempts to step on the other. Some see him as a god, but he is the mediator of gods, ending their arguments before they cause problems for regular people.
He is a character in the same work of fiction that Guardian 787 and Ramses came from, if you remember these sets.
==============================
\\\\\ POWER ESTIMATE /////
===============
Size: Emidius is roughly Captain Falcon's size, and actually has a similar frame. Weight: Emidius is a super-heavyweight character who is very difficult to knock around, even with Final Smashes. Walk Speed: 5/10. Emidius has a long stride going on... Run Speed: None. Emidius doesn't run, because... Well, you'll see. First Jump: None. Second Jump: None. Recovery: None. Priority: 10/10. When it comes to a clash of power, Emidius is unmatched when he actually tries. Traction: 10/10. He isn't on the ground for most of the match; what does it matter? Fall Speed: 0/10. Emidius doesn't fall unwillingly. Air Movement: 10/10. Emidius' air movement is greater than any character could hope to manage.
Crawl: No. Wall Jump: No. Wall Cling: No.
==============================
\\\\\ WHAT? /////
===============
This is what you're probably thinking. He doesn't run, or jump? Well, not quite! Emidius has infinite flight in the same fashion as Pit's Wings of Icarus... only faster, and more controllable. When he runs, he's essentially flying sideways. For this same reason, his Up & B is not a recovery move.
However, despite this, it is possible to KO Emidius. He requires very high damage to be KO'd, and he can recover from any distance, but it is possible.
==============================
\\\\\ KID GLOVES /////
===============
A: Dismiss 1%
Emidius dismisses the opponent, waving his hand at them. This attack has obscenely short range, and does very little damage. However, it has surprising knockback, nearly equivalent to a Falcon Punch.
===============
Dash Attack: Evasion 0%
Emidius performs this attack while walking. He will step into the background and walk there for a short distance before crossing back. This essentially works as a dodge more than an attack.
===============
Up Tilt: Bug Net 1%
Emidius reaches up slowly with his left hand. Should an opponent contact his hand, they will be forced to the ground easily. If they are already on the ground, they will flinch, taking 1% damage.
===============
Side Tilt: Space Invader 1%
Emidius sticks his arm slowly out in front of him, pushing opponents just far enough away for him to be out of reach of any character''s melee reach.
===============
Down Tilt: Sakurai Style 0%
Emidius steps forward slightly farther than normal, and if his foot hits an opponent, they trip, taking no damage.
===============
Ledge Attack (Strong): No Wasted Effort 0%
Emidius teleports onto the ledge, pushing opponents off, but dealing no damage.
===============
Ledge Attack (Weak): No Wasted Effort 0%
Emidius teleports onto the ledge, pushing opponents off, but dealing no damage.
===============
==============================
\\\\\ GODHAND /////
===============
Forward Smash: Right Hook 50%
Emidius performs a very generic-looking punch. However, an enormous shockwave bursts from the end of his arm and crosses the entire length of the screen. The shockwave is very fast, but is very easy to dodge if you know it's coming. It deals 50% damage, but low knockback. The move hits the opponent and sends them back, not not very far, instead doing more of a multi-hit as the shockwave passes through them. When charging Right Hook, Emidius pulls back farther, but can actually hold the charge at maximum and delay the attack as long as he wants. When the fully charged Right Hook is unleashed, the attack doesn't shoot across the screen like the uncharged version; instead, the shockwave comes out as an enormous shield-like obstruction that goes a very short distance from Emidius. The shockwave stretches from the top to bottom blast lines, and stops all attacks and reflects projectiles that hit it. If the barrier hits an opponent, they will take a whopping 90% damage and fly straight to the side.
===============
Up Smash: Gravitational Rend --%
Emidius raises a hand to the sky, and a small wormhole appears over him. Everything gets sucked toward the wormhole, taking damage that changes depending on distance from the wormhole. If an opponent hits the wormhole, they are spiked down to Emidius for 20% damage. When the attack is charged, which takes a full second, the wormhole is smaller, but more powerful. The opponent gets sucked toward the wormhole, but instead of getting spiked, they are sucked in, and then dropped out of another wormhole a time later, dealing 30% damage.
===============
Down Smash: Master of Combat 130%
Emidius enters a subtle combat pose, but does nothing. He holds the pose for about two seconds before stopping the pose. If he is attacked with a melee attack during this pose, he will unleash a heavy combo of kicks into the opponent, dealing a beefy 130% damage. The opponent will then enter a dizzy state, but will not suffer knockback. If the move is blocked, which is certainly possible (and easy), Emidius will break their shield instead of unleashing a combo, sending them into the air for a Gravitational Rend followup.
===============
==============================
\\\\\ HEAVENLY MANEUVERS /////
===============
Up Aerial: Hades Mode 0%
Emidius floats in the air, and his jacket turns a dark gray. In this form, his attacks are slower and more powerful. The screen shakes when he walks or lands, and if an opponent is close enough, they will trip when he walks near them.
===============
Forward Aerial: Zeus Mode 0%
Emidius floats in the air, and his hair turns white, and his coat a golden color. In this form, his attacks are faster and weaker, and do electric damage. He does electric damage and stun to opponents who get immediately close to him.
===============
Back Aerial: Poseidon Mode 0%
Emidius floats in the air, and his hair turns a dark green, and his coat a dark blue. In this form, his attacks are far stronger, but do little to no knockback. They also freeze the opponent on contact. He stands on water, and is unable to swim or drown.
===============
Down Aerial: Ares Mode 0%
Emidius floats in the air, and his coat turns blood red. In this form, his attacks all have longer range and do more damage. They do burn damage, and opponents who touch him take burn damage. He leaves a damaging trail of fire behind him when he walks.
===============
Neutral Aerial: Balance Mode 0%
Emidius floats in the air, and his coat returns to normal, as does his coat. In this form, his moveset is returned to normal.
===============
==============================
\\\\\ SPATIAL RENDING /////
===============
Grab: Resolving Conflict None
Emidius grips his opponent's hand in a hand shake firmly. Opponents cannot escape his grip unless they have 0% damage.
===============
Pummel: Indicisive None
Emidius releases his opponent.
===============
Up Throw: Northern Border ...
Emidius releases his opponent, and picks them up carefully, holding them above him. The stage then proceeds to move toward the upper blast line until his victim crosses it, losing a stock.
===============
Forward Throw: Eastern Border ...
Emidius picks his opponent up by the shoulders and holds them toward the right side of the screen. The stage then begins to move toward the blast line until his victim crosses it, losing a stock.
===============
Back Throw: Western Border ...
Emidius picks his opponent up by the shoulders and holds them toward the left side of the screen. The stage then begins to move toward the blast line until his victim crosses it, losing a stock.
===============
Down Throw: Southern Border ...
Emidius lays his opponent down on the ground like Snake's down throw, but then floats over them. They are forced to remain down until the stage drops down to the blast line and takes their stock.
===============
==============================
\\\\\ ELEMENTAL FORTE /////
===============
Neutral B: Nexus Shot --%
Emidius points his hand at his opponent in a gun-posture. He then pretends to shoot, and one of five attacks comes out. The attack is not charged.
Balance Mode: An attack identical to the Light Arrow final smash comes out, but without zooming in. The attack does the same damage and knockback as Sheik's Light Arrow, shooting across the stage and sending opponents more horizontally than vertically away.
Hades Mode: An attack identical to Isaac's attack as an Assist Trophy, only much larger. He creates an enormous stone wall and it slides over the stage, pushing opponents to the side a long ways, but not necessarily to the blastline. If an opponent gets caught between the wall and a platform, they will take 25% damage and get shot up or down where they will continue being pushed by the wall. If they get trapped, they may fly through the wall toward Emidius.
Poseidon Mode: An attack identical to Squirtle's Triple Finish Hydro Pump shoots out, but deals much more powerful knockback. The attack itself does roughly 20% damage, but the knockback is comparable to Kyogre's hydro pump. You can hold the B button down while using this to maintain the stream of water.
Zeus Mode: An attack similar to the Zero Laser, only a large bolt of electricity that cannot be aimed comes out and does heavy electric damage up to about 60%. There is no knockback like the Zero Laser, and it does not last nearly as long.
Ares Mode: An attack identical to the Mario Finale final smash comes out, but without zooming in. The fire spreads vertically faster than the Mario Finale, doing fire damage of up to 50% on anyone who gets hit.
===============
Side B: Submission 1%
Emidius gut punches his opponent, causing them to enter a sleeping state. If an opponent is not immediately available, he will grunt, look up, and teleport to the nearest opponent.
This attack changes depending on the mode Emidius is in. The above Submission is used by Balance Mode Emidius.
Hades Mode: Emidius traps the opponent in a stone box and spawns a sword in his hands, which he then stabs through the box for 100% damage. The opponent falls out of the box with no knockback.
Poseidon Mode: Emidius traps a nearby opponent in an ice-crystal structure, and then shatters it, dealing 70% to the opponent and releasing them in a frozen state.
Zeus Mode: A bolt of lightning comes straight down on an opponent near Emidius, stunning them and dealing 30%, stunning them heavily.
Ares Mode: The floor below a nearby opponent melts, causing them to enter a swiming and near-drowning state, as well as taking progressive fire damage.
===============
Up B: Wings of the Scales 0%
Emidius extends large metal wings from his back that make a shape resembling balancing scales. If an opponent is near enough to Emidius, standing within his wingspan(roughly 3.5 marios on either side of him), they will be judged. The move will either judge them to be pure or evil, randomly each time. If they are pure, they will be healed fully. If they are evil, their soul will be stolen, and they will recieve 999% damage for no knockback. Emidius can use this move once, but cannot use it again until he dies.
===============
Down B: Not Ready Yet 0%
Emidius enters a pose where he sticks his hands out toward opponents, and freezes them in place. If Emidius touches them, they become unfrozen and move as normal. This includes tilts, meaning that he can enter a 4-way-free-for-all and fight everyone individually. Touching the opponent is qualified as physical contact, not necessarily an attack. Emidius can attack opponents to unfreeze them, but they will not take any of the damage. Also, your opponent can use frozen opponents as platforms, but cannot unfreeze them.
This attack freezes the timer in timed matches, making it possible to stall, but insanely unproductive.
===============
==============================
\\\\\ IN CASE OF EMERGENCY /////
===============
Emergency 0%
Emidius looks directly at the screen, a worried expression on his face. He says "I... must go.", and rushes off the side of the screen. His damage meter disappears, and he is now out of the fight. He returns to the fight when the number of the players' stocks remaining (not counting his own) equals the number of players not including him.
So, in a 4-way fight, Emidius will leave until there are 3 stock between the remaining players. In a 3-way fight, 2 stock. If it is 1v1, the sequence will still happen, but Emidius will return after roughly ten seconds, saying "It was a false alarm."
===============
==============================
\\\\\ CONTROLLING YOUR POWERS /////
===============
Emidius is an interesting character. At first glance, you look at him, and notice things right away... His A attack is his only weak attack! None of his tilts do damage, and his dash attack is a dodge! And on top of that, he can't run, so how are you using a dash attack to begin with?
You may grab your opponent, and then begin to beat on them, only to see that the pummel attack only releases them. Then you start to think, "What kind of crappy, useless character is this? I'm gonna give him a taste of the Zero Laser!" Emidius takes the attack, and his damage meter shoots up, but the only thing that changed is that he is now farther down Final Destination than he was before... He took no knockback, but instead got pushed.
Emidius is a character who can fit a number of styles. When you jump, you realize that Emidius has free air movement, which is why he cannot jump, run, or use a recovery: At that point, he's flying. His flight is not infinite... As time goes on, he slowly begins to descend, and he becomes slower moving up. The problem with staying in the air for too long is that the amount of time you use the flight(max of 20 seconds) is the amount of time you have to wait before flying, with interest(max of 10 seconds).
Furthermore, most of your attacks are still on the ground. In the air, Emidius can only transform into elemental adaptations: Fire, Water, Wind, and Earth, each with different bonuses to his attacks. It is advised you enter the air to do this, and nothing more.
It doesn't matter much what you do, considering most of your moves do some serious damage. However, Emidius' Up Smash can reel in running opponents and spike them down straight into a grab, where he can gently let them go... on the other side of the blast line.
It isn't advised that you use his tilts often, considering how useless they are when it comes to a real, serious fight. Spamming the A button doesn't help either. Instead, your main focus should be the C stick and B button, as those attacks are where business gets done.
===============
==============================
\\\\\ BALANCED BEHAVIORS /////
===============
Idle Animation
Emidius stands quietly, with his hands in his coat pockets. He looks straight ahead, and does not do anything else during his animation.
===============
Sleep Animation
Emidius puts his hand up to his face, but stays upright, not moving.
===============
Shielding Animation
Emidius stands perfectly still in his idle animation.
===============
Forward Roll
Emidius teleports a ways ahead of him.
===============
Backward Roll
Emidius teleports a ways behind him.
===============
Air Dodge
Emidius adjusts his glasses, and is given invincibility frames.
===============
Dizzy Animation
Emidius looks around in confusion, but otherwise appears unaffected.
===============
Ledge Grab Animation
Emidius holds onto the ledge with one hand, hanging there calmly.
===============
Ledge Return Animation (Strong)
Emidius teleports onto the ledge.
===============
Ledge Return Animation (Weak)
Emidius teleports onto the ledge.
===============
Stage Entry
A shaft of light engulfs the entire stage, and Emidius comes down on a balancing scale. He steps off and teleports to his starting spot.
===============
Stage Select
Emidius says, "Let's not rush this too much, now..."
===============
==============================
\\\\\ SHAMING YOUR OPPONENTS /////
===============
Taunt 1
Emidius adjusts his glasses.
===============
Taunt 2
A book appears in Emidius' hands, and he pages through it before putting it away.
===============
Taunt 3
Emidius looks over his shoulder, and shrugs, saying "Well... no more sneak attacks, then?"
===============
Victory 1
Emidius bows to the losers and slowly walks offscreen.
===============
Victory 2
Emidius sighs, closing a book he had been paging through like in his taunt, and looks at the screen, saying "Go easy next time... That was boring."
===============
Victory 3
Emidius is not present in the victory screen at all.
===============
Loss
Emidius switches places with the 1st place winner on the results screen, and does one of his victory animations regardless.
===============
==============================
\\\\\ EXTRA DETAILS /////
===============
Kirby Hat
Kirby wears his glasses, and is allowed to use a B attack that shoots fully charged Super Scope shots.
===============
Unlock Criteria
- Unlock all other content in the game, have played for 100 hours, and have played 1,500 versus matches.
Event Description-In the bleak future, the world has been torn to ruins by nuclear war and ruthless violence. As the many Mega-gangs spread their brand of anarchy across the land, the roads of the future are now a chaotic battleground, and nobody is safe. As Mach Rider, it is your duty to not only clear the path of scum and villainy, but also rescue the band of helpless villagers on the other side. Are you a bad enough Mach Rider to rescue the villagers?
The event itself takes place on a deserted wasteland that stretches out infinitely, and has no hazards or obstacles whatsoever. This has you controlling Chief Mendez's Mach Rider set, as he zooms his way across the wasteland on his trusty bike. The wasteland has properties very similar to Big Blue, without any cars to stand and get comfortable on. It scrolls by itself at a quick rate, and Mach Rider has to keep up with the camera, or get knocked out. Mach Rider starts off the event at 2nd gear(Making him steadily even with the camera), but going at 3-4th gear will cause Mach Rider to outrun the screen.
Don't think for a second you'll be smooth sailing, because you wont. Throughout your little cruise, you'll be constantly attacked by various Quadrunners!
These 4-wheeled wretches will come at you from both behind and in front. They act like any other normal enemies, and you can easily blast them down with your dash attack or the guns on your bike. However, running into them will slow you down, making it very easy to get overwhelmed and die horribly. Likewise, different colored quadrunners have different properties. Pink Quadrunners are the absolute wimpiest, as given away by their color scheme. The don't try anything besides running into you, which can do a rather bitter 4~6% damage. They all die in 1 hit though, making them a minor threat. Green Quadrunners are a bit tougher, having 15% stamina, and being able to shoot small, slow bullets straightforward. Each of these bullets do 3$ damage, but don't cause Mach Rider to flinch, and thus slow down, thankfully. Blue Quadrunners are quite a mean bunch, having 25% HP. They move much faster than the other Quadrunners, and can shoot bullets both behind them and in front. Each of those bullets go as fast a a super scope shot, and do 10% damage, thankfully still without any knockback. Black Quadrunners are the absolute worst, being the toughest and meanest of them all! They take 50% damage before letting up, and carry a gigantic bazooka with them! A fire of this bazooka is much like a Cracker Launcher, shooting a deadly explosive that does 20% damage AND causes Mach Rider to get knocked back and slow down greatly. Yes, a hit from a black Quadrunner is usually a instant KO unless you get real lucky.
For the first couple of moments you'll mostly be swarmed by Pink Quadrunners, which are easily gunned down. But after about 3 waves, Greens and Blues start jumping in to make your life miserable. It's right here where the event becomes stupid hard, since the screen is completely swarmed with Pink Quadrunners being backed up by the stronger ones. As such, it's best to gun down as much of the Pink ones as you can before the Blue or Greens can make their move.
After this wave, Blues and Greens will start more steadily coming at you from the front, making them easy to gun down. But then soon, they'll start trying to sneak-attack you from the rear. As they're going at a rather fast speed, it's wise to stay near the middle of the screen and jump over the Quadrunners as they zoom by, leaving them in front of your guns.
It's after this that the Quads stop playing nice, and none other than a Black Quadrunner FALLS FROM THE SKY! Yes, if you're standing right under it, you'll get knocked out of the park, unlucky you. While you're trying to square off against this overpowered runner, those nasty Pink ones will start entering from the back, trying to swarm you again. Once again, you should try to keep a steady rhythm and jump over the Pink ones as they come, and blow them up once they're in your sights. Obviously, you have to be wary of the Black Quadrunner, as another one will take it's place once you destroy the first one.
The final wave occurs right after you destroy the 2nd Black runner, as a 3rd Black Quadrunner eases in from the front, trying to shoot you with it's Bazooka. While that's happening, Blue and Green Quadrunners will start diving from the sky, in a rather predictable pattern going from left to right. Likewise, just blow these things up while dealing with the Black Quadrunner. And no, this isn't easy at all.
And FINALLY after getting through that ungodly final wave, you're rewarded with...a boss fight.
BOSS- Rougue Landmaster
Yes, it's a gigantic Landmaster! Even in your event matches you won't escape them!
This baby has 200% health, and is a rather straightforward fight for the first 50%. It's much faster than a usual Landmaster, and just running into it causes a mean 10% damage with some minor slowdown. However, it running into YOU is pretty much an instant KO. It'll occasionally point it's cannon down at you and fire it's laser blast in your face, which does 15% damage with some knockback, but generally not enough to kill at low percentages.
Things get more interesting once it's reduced to 150%, as then suddenly the scene shifts to a deserted city! The Landmaster then steers into the background to take refuge as you zoom throughout the ruins of the city, watching all the rubble and metal zip by. A moment later, the Landmaster pops out of the background, crashing through a wall in an attempt to run you over. Avoiding the Landmaster's sneak attack will make the camera zoom out to the foreground as the tank makes a sharp turn and drives into the background, in yet another attempt to flatten you. It'll do this process 2 more times, by then it'll situate itself on the main level, leaving it open to attack for 8 seconds. If you fail to reduce it's HP to 80% by then(and you probably will), it'll repeat the same schtick, but slightly faster each time.
Once you get it's HP to the desired amount, the scenery will shift into a giant series of elevated roads, and the tank rushes to a separate parallel road in the background. Shortly after, the Landmaster will point it's cannon at Mach Rider, and a large visible crosshair will show up on screen. As you could probably tell, this crosshair is to be avoided at all costs; The Landmaster will fire laser shots from the background, predictably having the same properties as the normal laser shots. After 13 seconds of this barrage, the roads will start to slowly merge together, putting the Landmaster on the same plane as you, thus open for attack. As such, this time you have to get him to 30% HP, but you only have 5 seconds to do it. If you don't get it done by those 5 seconds, the roads will start forking apart again as he repeats the same action, but in quicker succession between the shots. So once you DO get his HP down, the Landmaster's road will fork off and form directly above Mach Rider's road. A short moment later, the Landmaster's road makes a sharp turn, which the Landmaster artlessly jumps over to run once again at the very left edge of Mach Rider's lane. The Landmaster is thus placed behind Mach Rider's direction, and it starts getting much more aggressive as it chases our biker. It's constantly firing it's cannon, which can be evaded by slick jumping and gear shifting. However, it's impossible to jump over the Landmaster to get a clear shot, as it'll instantly shoot you out of the sky if you jump anywhere near it. Unlike his other phases, the Landmaster will keep doing this forever; To get it to stop, you'll have to shoot down an occasional oil barrel, usually shelved on a random strip of metal somewhere in the background.(Which is clearly labelled with one of those flashing commands.) Shooting the barrel will cause the oil to leak out, letting out an oil puddle which you have to jump over.(If you don't, you'll slip on it and die.) When the Landmaster catches up to the puddle, it'll start spinning out of control, but still moving forward at a steady rate. It's right HERE where you'll have to opportunity to jump over the Landmaster(You'll know because the flashing command says so) and open fire on it's hide.
So as you thought, the Landmaster keeps spinning like this for 7 seconds. If you don't destroy it before it gains control, it'll drive into the foreground and ramble it's way back to the very left edge of the screen, where it does the same thing again.
So after much frustrating trial-and-error, you finally destroy the Landmaster boss. The Landmaster will catch on fire and uncontrollably scramble into the background, where it crashes into a stray rock and EXPLODES! So at the final end of the journey, the Mach Rider automatically slows the hell down as he makes his way to the now-safe villagers. The rider puts up his visor a bit and jumps off his motorcycle, and walks up to the villagers. He then turns around and looks at the wreckage of the burning Landmaster.
"What the hell happened there!?" one of the villagers says loudly, upon seeing the burning cluster of steel outside. Mach Rider calmly puts his hands on his hips and says, "I guess you could say that Landmaster's driving skills were absolutely...." He then composedly sets his visor back down.
"Smokin'"
The usual "Success" victory catch is then replaced with, YEEEEEEEEEAAAAAAAAAAAAHHH!!!!!!
Anyone who has completed even just the first level of Donkey Kong Country 2 should remember the feeling of approaching an ordinary barrel, just for this guy to pop out at the last second. Klobber pursues nearby opponents with mindless determination, wearing a barrel over his torso with which to clobber dat dere Diddy. Although Klobber cannot actually damage the Kong, he can push him into dangerous obstacles or off platforms. However, oftentimes, Klobber gets so caught up with this task that he dashes right to his doom himself. If bopped on the head, Klobber retreats into his barrel; his own protection may be turned against him as it can be tossed away as usual. Different species of Klobber steal items from Diddy upon contact, and also appear in exploding barrels or simply chuck explosives from a distance (in DKC3).
S T A T I S T I C S
Fall Speed:9 Movement:8.5 Aerial Movement:8 Weight:8 Size:7 Jumps:2 Traction:0.5
I spy with my bloodshot twitching eye...an interesting little traction stat down there, as well as a surprisingly fast dash. Quite a treacherous combo for sure; true to his enemy appearance, Klobber skids around quite a bit onstage as he sprints around, making tire-squealing noises all the while. Otherwise, Klobber operates as you would expect a true Kremling to: pure heavyweight insanity. His barrel does lend him a few unique attributes, however. Klobber takes no damage from any attacks that hit his barrel, although he is not invulnerable to knockback. His head and feet are regular hurtboxes, as they bulge from his barrel in a more exaggerated manner than in DKC2. However, by crouching, Klobber ducks into his barrel, completely hiding his hurtboxes.
If attacked by a move dealing more than 5% while crouching, Klobber rolls across the ground at a speed proportional to the attack he is hit with (a 10% attack will launch him at Mario's dash speed, for example). Klobber can shield himself from a majority of weak projectiles from a distance, although if he takes more than 10% in one crouch, he suffers a second and a half of lag, as he dizzily emerges from his barrel (he automatically comes up after ten seconds or 15%).
If opponents refuse to approach Klobber as he tanks, he has an he has an alternate tactic to use. By dashing forward and ducking while skidding, Klobber transitions smoothly into rolling at the same (fast) speed. While rolling, Klobber's barrel has the same properties as it does while he crouches; however, when attacked, Klobber simply returns to his normal dash with his momentum, rather than being rolled backward. This allows him to essentially take a free, painless hit from a stronger projectile or trap while getting in an opponent's face, where he wants to be.
S P E C I A L S
NEUTRAL SPECIAL - KOLLISION Klobber's feet begin spinning rapidly for .45 second, with a familiar cartoon Roadrunner effect. During this time, the player may angle Klobber's charge in any direction, before he lets loose. And when I say let loose, I'm not kidding around. Klobber charges a Battlefield platform in one direction, reaching this distance just barely slower than a space animal Side Special. Characters who come into contact with Klobber's barrel take a set 5% and are knocked back the same distance Klobber dashed, remaining stunned for .1 for each 10% they have. If a character hits Klobber's barrel with an attack that deals more than 5%, he is knocked back to where he initiated the charge, albeit taking no damage.
Of course, Klobber loves to play around with this move in order to do what he does best...push foes around, preferably right off the stage. Fortunately for him, Klobber suffers very little ending lag, allowing him to use this move multiple times to push a foe around like a woman...or a shopping cart. He finds this useful for both damage-racking and KOing. Of course, just like before, Klobber's pushiness comes with a price: the psychotic guy is supremely reckless while attempting to body-slam opponents. If opponents dodge just one body-slam and Klobber falls offstage, he falls to his doom in a helpless state. When Klobber gets close to the edge and goes for a gimp, he must ensure his foes are unable to dodge the final few slams. In many cases, he must also follow them offstage and use aerials to ensure they are smashed to their doom. Should you care? Hell yes. Does Klobber? Not in the slightest...this is all business for this crazy crocodile.
SIDE SPECIAL - BOMB CHUCK Klobber reaches into his barrel with one tap of B, throwing a Pokeball-sized yellow grenade on a second press. He lobs the explosive in a Ganondorf-high arc half of Battlefield forward over .55 second. While reaching into his barrel, Klobber can tap A to add additional grenades (up to five) to his barrage; the grenades spread out upon landing, spaced a nice half-character width apart. The grenade (or grenades) explodes one second after landing, creating a Wario-sized explosion of particles. These blast bits deal multiple hits of 1%, totaling up to 12%, and remain onstage for an additional .5 second. These trapping hits are easy for Klobber to knock into opponents from, so opponents will want to make it a priority to dodge.
Now, this is a priority actually worth talking about...spot-dodging grenades won't help much, attacking the grenades is futile, and shields are eaten up like the victims in Kupa's fantasies. Foes must roll or jump in either direction to stand much chance of dodging these babies. If an opponent is forced to jump off an edge, an opening is made for Klobber to gimp them, while if they move toward him, they are in a position to be Kollided with. Although the grenades are no substitute for Klobber's direct physical attacking or gimping, due to the time before they explode, he can use them as a valuable asset in priming foes to be body-slammed to their doom. He's ready to have a bomb (no pun intended).
DOWN SPECIAL - KA-BOOM Klobber cackles maniacally, as TNT appears on the front of his barrel with .25 second startup lag. His barrel begins flashing with increasing frequency over the course of seven seconds, after which it detonates in a blast as large as 1.5 Bowsers, damaging nearby opponents as well as Klobber (he can't cancel the explosion...beware!). The TNT barrel explodes on the slightest contact with an opponent, or any attack (including projectiles). The damage and knockback of the move is variable, depending on how far Klobber dashed immediately prior to colliding (while he retains his momentum...stopping to catch your breath before exploding will do nothing). If Klobber is attacked while standing still, the blast deals 7% and KOs at 170%; for every Battlefield platform Klobber dashes before blowing, 7% is added to the damage dealt, and subtracted from the KO percent. After detonating, a regular barrel reappears around Klobber's body, hiding his elusive actual body from sight. Klobber can also explode immediately on command by simply tapping B, although this is only advisable offstage, when the explosion will refresh Klobber's jumps.
Klobber is taking a risk every time he straps himself to a TNT barrel. If an opponent attacks Klobber's barrel with a disjointed attack or projectile, he'll be the only one taking the damage (he can't even crouch to absorb projectiles without blasting off again). Klobber cannot simply charge into the fray wearing a TNT barrel expecting everything to come up smelling like roses. Instead, he must turn this risk into a calculated risk; if an opponent is stunned, buried, or otherwise incapacitated, Klobber can dash at them and explode, damaging himself but pushing the enemy closer to the edge in the process. Depending on his proximity to an edge, Klobber's blast can also push opponents offstage, or even to a KO if he explodes after dashing right off the stage himself (he must dash off in this scenario, as he loses all momentum by jumping). Although the move's damage is worrisome to Klobber, he suffers none of the move's knockback, instead taking the end lag of Dedede's canceled Up Special (regularly canceled, not canceled right over the ground) and gaining a cartoony black tint. Such a move is the epitome of Klobber's insanity, which can work either for or against him, depending on how he puts his aggressiveness to use.
UP SPECIAL - HOOP HELICOPTER Klobber begins spinning rapidly in place, causing the three metal hoops of his barrel to grow slightly after .3 second, surrounding his barrel and spinning along with him to hold him airborne. This continues until B is pressed a second time, or until Klobber hits solid ground. That's not to say Klobber is propelled upward...he's far too heavy for that. Instead, his descent speed is quartered, allowing him to drift slowly downward, moving side to side with quite a bit of maneuverability. If Klobber is high enough above the ledge, he can easily reach it safely; he can even get ahold of it if he drifts below a bit, due to holding his arms up stupidly while spinning. The hoops deal 6% and put opponents in a footstool effect, putting them in prime range of Klobber's aerials.
Like Down Special, Klobber can use Up Special immediately out of a dash; if he is attempting to hurry after an offstage opponent before they recover, this tactic can prove quite beneficial. Klobber can ensure a KO by sacrificing himself, as he slowly hovers down in front of a recovering victim, blocking them with his high-priority hoops; this is an ideal KO option, as Klobber will never die first because of his floaty state. He can also dash offstage with a TNT barrel and hover at a foe using his hoops. The spinning hoops allow him to "suicide-bomb" opponents with force from his dash momentum, which he would not retain if he simply jumped offstage. He also has increased mobility from the hoops, allowing him to pursue offstage opponents more effectively than if he simply dashed offstage. Unless he wants an ensured KO, Klobber can even recover from most of these crazed attacks, as he can either hover back to the stage, or use his refreshed jumps after detonating.
Onstage, Klobber can use the input the same way, except he spins comically on the ground, becoming unable to jump and moving side to side at half his regular speed. Ordinarily, he ends his grounded spin with .4 second end lag, but if he spins longer than three seconds, he gets dizzy and trips (not a problem in the air, due to no ground for clumsy feet to slip on). Although the effects that were so useful offstage are nullified by ground, Klobber's hoops create a moderate wind effect, allowing him to push opponents and items (including his own grenades) around. In addition, Klobber's ability to reflect most projectiles with his hoops while spinning becomes more prominent; although spinning to reflect projectiles is laggier than absorbing them with a crouch, hoops can defend against projectiles that would stun Klobber if he tried to crouch to tank them.
S T A N D A R D S
JAB - FLAIL Klobber waves his claws madly a short distance in front of him, with little lag on either end. By tapping this input, he flails for half a second, although he is able to hold it out as long as he wishes. Each hit deals 2%, and can trap nearby opponents, allowing for Klobber to build damage aggressively. Adding to his insanity, Klobber can tap A during the startup lag of Kollision to flail as he charges forward. His scratching will damage opponents for half a second, before pushing them back as usual. If Klobber needs to damage an opponent a bit more in order to stun them longer when Kolliding with them, he can flail before bumping them back to do so. Although he's likely not doing this strategically...this is mere primal bloodlust from Klobber.
DASH ATTACK - SKID Klobber's feet begin spinning rapidly, as he turns his head around, seemingly preparing to dash in the opposite direction. This animation is identical to the one Klobber uses when he turns around, plagued by his terrible traction. Instead of doing so, however, Klobber simply continues moving forward, kicking back opponents in his path with his clawed feet. His fast-moving feet deal one solid hit of 9% and knockback that KOs at 155%. Klobber has minimal lag on either end of this move, and is able to hold it out for as long as he wishes. It becomes obvious after around a second that Klobber is using this move, seeing as how he is able to turn around after this time, even with his slippery dash. Even so, if an opponent attempts to punish Klobber as he dashes around madly, he can pull a fast one (literally) on his enemy, often pushing them back into a range where they can be Kollided with effectively.
FORWARD TILT - BOUNCE Klobber pops into his barrel and turns horizontally onto the ground, over the course of .35 second. Immediately afterward, he rolls forward a Battlefield platform, hoping to slam into a victim. If he does so, he rolls back to his original location and pops out with minimal lag; if he misses, however, Klobber does this much more slowly, not having the momentum of an opponent to push him. Victims take a run-of-the-mill 8% and are bounced back a Battlefield platform in a brief stunned state. While this may seem like little more than a Brawl tilt in flashy lipstick, the move proves to be highly useful for Klobber as he attempts to Kollide with opponents. You see, Klobber charges a Battlefield platform's distance with Neutral Special, and the further back a foe is in this range, the further back they are pushed by Klobber. Couple that with the slight stun the move inflicts on opponents, and Klobber is well-prepared to knock his opponent back the maximum range (although it is unlikely he can alternate F-Tilt and Neutral Special for this effect every time).
DOWN TILT - BOP Klobber enters his barrel and flips forward, landing on the top of the barrel a character width in front of him, over .65 second. Somehow, his head pops back out the top afterward, after .4 second ending lag. However, during this time, the input can be pressed again for Klobber to remain in his barrel and perform an identical motion, flipping over and over to progress forward. Coming into contact with the front of Klobber's barrel does a simple 6% and knockback that KOs at 160%. Getting stomped on by the underside of the barrel buries opponents rather than launching them. If Klobber uses Neutral Special on a buried opponent, they will suffer the combined stun from all the times he Kollided with them upon escaping. This is a great defensive mechanism, as well as a set-up tool.
UP TILT - DROP THE BOMB Klobber jumps upward Ganondorf's height over .45 second, tucking in his feet, but dropping a row of tree Pokeball-sized grenades beneath him at the apex of his jump. His head is a weak hitbox of 5% that pops opponents up lightly, while the grenades' explosions deal 12% and horizontal knockback that KOs around 110%. These explode if an opponent touches them, or when Klobber returns to the ground. After Klobber reaches his peak height, he gains free aerial movement; he is able to control the direction of his jump during his start-up lag. Klobber is able to leap at opponents and use aerials, although opponents will have trouble approaching, considering Klobber has a row of bombs beneath him to provide defense. He is not harmed by his own bombs, so he is able to land among them after using an aerial, using their explosions to defend himself from opponents who would punish the landing lag that follows his aerials. The grenades also ensure that opponents will have trouble intercepting Klobber out of his aerials at close range.
S M A S H E S
FORWARD SMASH - FLATTEN Klobber tucks into his barrel and begins rolling in place to charge, then steamrolls forward, moving from Mario to Fox's dash speed, depending on charge time. Opponents in Klobber's path become flattened like paper, sticking to Klobber's barrel and rolling over and over; they take approximately 5% per rotation. Although damage does not change with charge time, Klobber rolls over more frequently when moving faster, leading to more damage in the process. While rolling, Klobber can tap A to bounce up Ganondorf's height, to snare opponents who try to short-hop his roll. Any other input causes Klobber to pop back out, with moderate ending lag; be sure to stop him from losing control, as the nutcase will roll right off the ledge if you let him. The opponent always reforms after one second, ending the move. Before this time, Klobber should aim to roll his opponent into grenades of his, or even right off the stage for a suicide KO. As with damage, he will find the move more useful for these tasks if he travels faster.
DOWN SMASH - BLAST Klobber jumps up a tiny distance for .55 second, before slamming down, causing the bombs stored in his barrel to explode. This creates a Bowser-sized blast on either side of him, each of which deal 12-21% and knockback that KOs from 135-120%. The clouds are handy tools for pushing opponents (and grenades) in any direction he desires. Much like grenades, his D-Smash explosion clouds remain onstage for a period of time (three seconds, in this case). However, these simply remain as smoky obscuring obstacles, rather than hitboxes; Klobber can charge out from inside these to blindside opponents with whatever move he chooses to rush them with, be it Neutral Special, F-Smash, or any similar move. Although this is a helpful tactic, the fact that only two clouds can remain onstage at once, combined with the move's lag, keeps this from becoming a focal playstyle point.
UP SMASH - KANNON No, this move does not summon the enemy, Kannon...what set do you think this is for, Skurvy 3.0?! Klobber enters his barrel, seemingly doing little to charge the attack; during this time, the barrel can be angled 45 degrees to either side of Klobber. Upon release, Klobber extends his head in the chosen direction, stretching his previously-invisible neck out to an almost comical length of a Battlefield platform. If he grabs an opponent, he snaps onto them with his teeth, dealing 9-14% and pulling them back into his barrel with him; should he miss, his neck snaps back to its invisible state, leaving Klobber with .65 second end lag. Once Klobber has snagged an opponent, he has the ability to aim his barrel, just like while charging the Smash; this time, however, pressing A launches the opponent in the chosen direction, as if out of a cannon. This deals a constant 10%, and KOs from 150-135%. Out of Klobber's Smashes, this has the best range...he can even pull an opponent through a drop-through platform to capture them in his barrel!
A E R I A L S
NEUTRAL AIR - BARREL BLOCK Klobber leans his barrel into the background, keeping his head and limbs (his hurtboxes) in the foreground, with minimal startup lag. He can hold his torso in the background as long as he wishes, but he has no way to move about or defend himself in mid-air while doing so. He also suffers from atrocious landing lag, unless remedied by U-Tilt. Characters who attempt to air-dodge and become overlapped with Klobber's barrel take 10% and are bounced forward, with knockback that KOs around 160%. Klobber can tap A to bring his body back into the foreground, having the same effect for .5 second, although the close range of the move makes this significantly less useful than suddenly leaning back to counter a dodging opponent.
FORWARD AIR - TAKE DOWN Klobber lunges forward a Battlefield platform with .3 second startup lag, reaching out to grab an opponent. If Klobber manages to catch one, he holds them beneath his body and plummets at the speed of Dedede fast-falling. Upon landing, the opponent takes 9% and becomes buried in the ground, as if from a Pitfall item. Although Klobber suffers quite a bit of ending (and/or landing) lag if he misses the grab, he is able to transition smoothly into Neutral Special if he actually lands the attack. If Klobber decides to, he can also simply KO an opponent by plummeting off the bottom blast zone with them in tow. Considering an opponent can break free from Klobber (whose arm strength is no match for Bowser's) with grab difficulty, however, this is horribly risky, as Klobber won't stop plummeting, even if his opponent breaks free. Onstage, Klobber will become stuck in the ground head-first himself if this occurs.
BACK AIR - RECLINE Klobber leans backwards onto the back of his barrel, lying horizontally in midair. He enters this pose with .45 second lag, and is able to hold it as long as he wishes; he exits the pose with little lag, but crash-lands horribly slowly if he is allowed to land while reclining. While lying horizontally, Klobber's barrel becomes a solid platform, usable by any character. Although Klobber's trickery can backfire if he helps an opponent he is gimping to recover by jumping off his stomach, he can also exit the animation with an opponent on top. This rolls the opponent underneath his body and into a footstooled state; if they try to recover upward, Klobber can re-enter the pose, holding his opponent down with the back of his barrel. There is little middle ground for this move's effectiveness...if pulled out offstage, Klobber will either send his opponent to his doom, or plummet to his own while trying.
UP AIR - THROW DOWN Klobber snaps upward with his massive jaws, attempting to dig into his opponent's ankle with .35 second lag on both ends. Should he connect, the opponent takes 6% and is tossed down by Klobber, suffering an additional 7% in the process. To add to its gimping capabilities, Klobber waits for half a second before tossing his lunch, allowing him to fast-fall offstage before throwing them right off the blast zone. Although he -can- potentially perform a suicide KO, he will always die first, due to being on the bottom (no innuendo intended). Onstage, Klobber can bring fleeing opponent down to Kollision range, as well as snatch up grenades through drop-through platforms to reposition them directly below (he doesn't even need to worry about the grenades going off, as he is invulnerable to their blasts).
DOWN AIR - KNOCK Klobber immediately tucks into his barrel and begins falling in place (albeit not performing a stall-then-fall). He can hold this pose out as long as he wishes, ending it with moderate lag. Anyone under Klobber takes 7% and are pushed down Mario's height in a stunned state. This is -not- a spike; however, Klobber is able to use this multiple times to effectively gimp an opponent. After landing on an opponent, Klobber is launched up 1.25 times the distance he fell, before popping back out. If he dropped from a short enough distance, he is able to bounce off an opponent multiple times, pushing them closer and closer to their doom. The trick to this move is plummeting from a height low enough to allow this combo, while simultaneously being high enough to allow Klobber to recover safely.
G R A B - G A M E
GRAB - SNAP UP Klobber dashes forward a Battlefield platform rapidly, opening his mouth to chomp up a character in his path, with .4 second ending lag. Should he manage to do so, he holds them in his mouth limply, as if dragging a corpse. Klobber does not stop at edges with this move, allowing him to charge offstage to grab a victim. However, he enters a helpless state if he misses; ensuring the capture of a victim prior to charging is advisable.
PUMMEL - MAD DASH Klobber dashes forward at half his regular speed, dragging his struggling opponent along behind him. Each pummel causes Klobber to move half a Battlefield platform, and are fairly rapid. Klobber can continue to pummel offstage, defying gravity and moving forward while falling. If the opponent escapes offstage, Klobber is not rendered helpless; that said, he'll still want to build their damage to the point where he can dash far enough offstage to ensure a gimp. He can throw while moving, but is unable to directly turn around, as this input is filled by B-Throw (although B-Throw turns Klobber around regardless).
FORWARD THROW - RELEASE Klobber opens his mouth, dropping his opponent in a prone position in front of him (this deals a minute 3%). The opponent is now largely at Klobber's mercy; they are vulnerable to a Kollision no matter what they do. If they roll away from Klobber, they put themselves right into Kollision range. If they stand still or use a get-up attack, Klobber can back himself into a good range regardless. Klobber may face trouble if opponents roll toward him, however, as the opponent won't be pushed back far if he chooses to Kollide with them. In addition, if he charges too early, Klobber's attempts to push his opponent around may be thwarted by a get-up attack. Offstage, this throw serves less of a purpose for Klobber, other than allowing him to break his own grab and attempt to recover, leaving his opponent for dead.
BACK THROW - OVERHEAD SLAM Klobber whips the opponent in his mouth over his head, slamming them to the ground behind him ruthlessly without letting go. Other than dealing a pleasant 8%, this refreshes the difficulty with which opponents must break free from his grab. Despite holding onto his victim after slamming them, Klobber cannot spam this throw all the way to the edge, as he turns himself around every time he uses it. In addition, for each additional B-Throw he uses, the difficulty is only refreshed by half that gifted by the prior throw. Offstage, Klobber can flip an opponent away from the stage, possibly putting them just out of range of the edge (although this does not stun them).
DOWN THROW - TREADMILL Klobber releases his opponent between his legs, before moving his legs rapidly (Roadrunner-style again) to dash forward at half his regular speed, dealing multiple rapid hits of 1%. The throw deals 6% on its own before releasing the victim with a bit of set knockback, but Klobber can use his pummel to dash forward, holding out the hits for longer. Opponents can mash free after the initial hits, although offstage, they may wish to be careful doing so, as escaping at the wrong angle may weakly push them downward, or further from the stage.
UP THROW - WINDMILL Klobber begins spinning his opponent, still held in his mouth, around and around above his head rapidly. He is able to hold this throw out for up to three seconds before they are automatically tossed, his opponent becoming blurrier and blurrier as he spins them faster. For each second Klobber spins his victim, 5% is dealt; the throw can initially KO around 170%, although this total can be reduced to 155% by spinning them the maximum amount. If Klobber initiates the move offstage, he rises a Ganondorf per second, as his spinning opponent lifts him higher. Klobber can toss his opponent without hovering up much, in an attempt to stage-spike them, or rise a bit and toss his opponent directly toward the blast zone for the KO. Although the opponent can break free while he spins them, Klobber can slam them down with B-Throw (onstage) before spinning them, most likely allowing him the time required to spin them the maximum time.
F I N A L - S M A S H
FINAL SMASH - KARNAGE Klobber lets out a primal yell, causing a multitude of Ka-booms (red kamikaze Klobbers wearing TNT barrels) to drop from the top blast zone, wherever the opponent is standing. The first Ka-boom lands and begins chasing the victim around ruthlessly at Klobber's dash speed. It explodes in a stunning blast twice Bowser's size on contact with its target, or if it is attacked; your opponent's priority should be to dodge. A split second after the first Ka-boom lands, a second one drops, exploding on impact with the stage. This blast also stuns opponents, allowing a third Ka-boom to plummet a split second later, exploding and dealing knockback that KOs around 65%. Each explosion deals 25% to characters, regardless of its effects; if an opponent is immediately caught by the first Ka-boom, they are likely to take all three hits. If the opponent is KOed by the first set of three Ka-booms, they stop falling; if the opponent survives, a second set of three enemies attacks, identically to the first. Klobber is immune to his kin, and can aid them by using Neutral Special to push opponents into the first two Klobbers, allowing the final and deadliest to connect.
P L A Y S T Y L E
As his deranged appearance may suggest, Klobber plays a reckless, fast-paced game of tag...and keep on tagging. His surprising speed allows him to traverse the stage with ease, as well as distance, position and space himself to wherever he desires for various attacks of his. The majority of the time, Klobber won't think to sit back and wait things out; he will aim to charge his opponent as soon and as rapidly as possible. His barrel even provides him with extra protection while approaching; he can dash and crouch to breeze through traps in his path. He can also crouch into his barrel to avoid projectiles, although he cannot hold out one crouch without being stunned, forcing him to crouch multiple times, which renders him vulnerable.
Klobber's Neutral Special, Kollision, is the bread and butter of his essence, both in his games and in Smash. He can use it in combination with various stunning attacks of his to build plenty of damage on opponents. Although Klobber may not need to beat up on certain opponents too much to finish them with a gimp, it never hurts to have the extra safety net of extra stun dealt by his Kollisions (to avoid punishment, or an accidental suicide). Klobber has a number of fast moves to set opponents up for a Kollision, if necessary. The majority of his tilts are able to incapacitate an opponent, while he can jab an opponent while steamrolling forward, dealing extra damage while not sacrificing any Kollision stun. U-Tilt is also a crafty tool with which to add aerials to your damage-building repertoire of moves. While Klobber may find himself in a world of pain should he try to short-hop aerials, U-Tilt bombs open up new doors for Klobber, while damaging opponents on their own.
Side Special grenades are another helpful staple of Klobber's moveset. Although they are one of few moves Klobber needs a bit of room to perform, they are usually well worth the effort (which is not too painstaking, due to Klobber's speed). Klobber can either toss a small number of grenades to force an opponent in either direction, preferably toward him or the edge, or toss five at once to increase the chances of stunning his victim. While this stun may not seem spectacular, considering the somewhat-telegraphed nature of the projectile, it allows Klobber to safely use his more dangerous attacks, such as Down Special or grab (as he will already be at a range from throwing the grenades). He is also able to move grenades around with moves such as Up Special and U-Air, placing them in more-convenient locations (or even pushing them right into an attacking victim!), or simply toss them skyward to bring down those cowardly sparrows. Experiencing the thrill of landing Klobber's most over-the-top, effective and crazy moves requires a bit of sweat and risk-taking, but the euphoric results are worth grabbing some popcorn and watching. Try going to practice mode and dashing all the way across Hyrule Temple with Down Special for a real mind-blower!
In the end, the thrilling finale will most likely end in a gimp. Although D-Smash, U-Smash and U-Throw can send opponents flying from the stage, they will become incredibly telegraphed over time, which is in stark contrast to Klobber's offstage game. Klobber comes packed to the brim with brutal gimping tactics, some of which require a suicide KO, while some allow him to escape in one piece. Before he can worry about choosing from his gimping playbook, however, Klobber must take his opponent to the edge and beyond. Continued use of Kollision is the most obvious option, although smart Klobbers (the players, to avoid an oxymoron) will throw some stunners mixed in here and there to ensure each successive Kollision is landed. Remember, if Klobber misses just once, he may skid right off the stage to his doom, as you scream at him to stand still.
Plus, stunners may help Klobber land a Down Special, which can knock opponents offstage without Klobber having to put himself at risk...yet. Klobber can also opt to drag a victim offstage in person. F-Smash allows Klobber to build damage while rolling his opponent closer to (or directly to) their doom, allowing for more Kollision stun should they escape. Although grab is more difficult to drag opponents offstage with, due to Klobber's slower movement speed, opponents are less likely to survive his throws than they are should they escape his F-Smash. Klobber doesn't worry his flat, totally-bopable head about a little extra labor, dragging around an enemy, if he gets to watch them suffer in the process.
Once an opponent is offstage, it becomes a real uphill battle for them to recover, if Klobber maximizes his offensive gimping potential. He can simply hover in front of an opponent with Up Special to footstool them (all the way to the bottom blast zone if necessary), or continuously move at them with hoops spinning, pushing his victim right off the blast zone with multiple hits. Throwing a TNT barrel into the mix requires a bit more set-up, but allows Klobber to recover more often than not, as his victim will likely be blasted to a KO, not required Klobber to pursue them to the point of no return. Simpler options include using Neutral Special, grab, F-Smash, or F-Air to push or pull opponents into a suicide KO. U-Air and (multiple) D-Air spikes and throws round out Klobber's offensive gimping options.
But, like Billy Mays says, that's not all! If he wishes, Klobber can also react to his opponent, whether they decide to go for broke and recover, or dodge around Klobber to reach the stage. He can act as a physical barrier to opponents with N-Air, as well as 'catch and release' recovering opponents with B-Air. Although Klobber can execute successful gimps with all the above tactics and more, he will generally want to stick to options he can recover from, or at least those that cause his opponent to die first. Klobber may find it wise to react to his opponent's offstage maneuvers, but for the most part, he is able to use his gimping options rather liberally, as they are varied enough to counter the majority of Brawl's recovery tactics. Plus, there's a lot to be said of the diabolical fun that comes from trying out Klobber's options in different circumstances.
Klobber's main challenge comes from pushing his opponent offstage before they can do the same to him. Despite Klobber not taking damage from attacks that hit his barrel, he can be knocked around (or even sent rolling, if he's crouching) and off the edge himself. Without an opponent to gimp, Klobber is at an extreme disadvantage offstage, as while moving toward the edge with Up Special, his head is vulnerable to spikes (he can't even use U-Air while his hoops are spinning to turn this on them). Energy projectiles can also push Klobber further and further away, or until he falls too far below the edge, due to his hoops giving him no vertical boost. If Klobber can get a victim offstage, however, he has essentially subtracted a stock from his victim, barring a screw-up from his player. He also stands a higher chance of recovering if he has an opponent to bounce off of, or even refresh his jumps by recovering. Klobber's stubborn determination to push his opponent around is apparent in all aspects of his game, even at the cost of his own safety; his matches often lead to down-to-the-wire finishes, with both opponents offstage with one stock left, as well as jaw-dropping gimps that turn the tide in even the most dire situations.
M A T C H - U P S
VS. KAPTAIN K. ROOL - 75 / 25 It appears Klobber has the upper hand in this mutinous battle, due to his superior approaching speed when compared to Kaptain's escaping speed. Klobber can pursue K. Rool with little to no difficulty at all; dash-rolling allows him to bypass one projectile of Rool's, which is likely all he'll have time to shoot before Klobber is at his throat. Even if he manages to start a barrage of projectiles, Klobber can jump and avoid with his aerial mobility, as K. Rool -definitely- won't have his clouds up yet. Klobber has an easier time landing his stunning moves and Kollision on Kaptain's large torso, and finds it laughable gimping Kaptain's simplistic booster recovery.
If Kaptain wants any hope of besting his psychotic underling, he needs to land a stunning move of his own (Side Special, grab or jab works fine and dandy) to immobilize Klobber in his tracks, before he can get any offensive momentum started. He also must keep this assault up constantly while building damage with regular kannonballs; Klobber has no comparable worry, as none of K. Rool's moves are particularly devastating for him. As a slight silver lining for Kaptain, Klobber becomes a predictable opponent who will -always- be approaching him, due to his inability to tank K. Rool's damaging kannonballs. Nevertheless, although K. Rool knows what will be coming his way, he stands a small chance of actually standing up to it.
VS. SPIDER-MAN - 40 / 60 Unlike Brawl characters, Spidey is able to cling to walls for an obscenely-long period of time, which even Klobber finds near impossible to match. In addition, Spidey's onstage attacks prove challenging for Klobber to navigate. For starters, Spidey can simply throw out Side Special as Klobber approaches, freezing him in his tracks and buying the favorite neighborhood arachnid time to set up more of his webbing. While Klobber is stunned, he can also simply put a webline on him, and begin his sadistic game of cat-and-mouse. While a fast character, Klobber has difficulty keeping up with and dodging Spidey's attacks while attached to a webline, due to constantly skidding all over the place.
Klobber is also in trouble offstage, as Spidey can simply cling to the underside of the stage, effectively removing the majority of Klobber's options. Now, Klobber will find himself attempting to stage-spike Spidey with Up Special or Neutral Special, which Spidey has ample opportunity to dodge. To defeat Squitter's idol, Klobber can attempt to stun Spidey with grenades from afar, before blasting him clear off the stage with Down Special. While both characters have versatility in their options, Spidey is able to eliminate Klobber's pride and joy moves without blinking an eye, while Klobber skids and struggles to keep up.
VS. WARIO (LAND WARIO) - 50 / 50 The fat illegitimate plumber finds keeping up with Klobber a pain, so he'll most likely make setting up pitfalls D-Tilt traps an even higher priority than he usually does. Although Klobber is able to stun Wario from a distance by stepping back and tossing grenades, a good Wario is able to keep Klobber at bay fairly easily; the croc in a barrel can roll through one trap at a time, but Wario is likely to have many more out by that time. At the very least, Klobber has an uphill battle trying to use Neutral Special with the likelihood of becoming buried or torched so high. Once the Wario player has allowed the trap paranoia to set into the Klobber player, he is able to pressure his opponent more easily, leading him into a trap and, eventually, a KO.
However, Wario's offensive options are somewhat slow compared to Klobber's, who can easily keep up with him at close range. Plus, Klobber generally won't even need to damage Wario all that much for a KO. Therefore, if Klobber can get Wario offstage, a successful gimp is more imminent than it is on most characters. Klobber must gimp from above Wario, due to the threat of his Money Bag. However, while doing so, Klobber can avoid sacrificing himself, as Wario's puffy cheeks blow him upward every time he bounces off him with D-Air, or hovers down on top with Up Special. Simply put, Wario owns the match on the ground, while Klobber dominates offstage. The offensive characters run even for the most part, although the individual styles and tactics of each Wario or Klobber player can rank one above the other in different circumstances.
E X T R A S
UP TAUNT - RASPY ROAR Klobber enters his barrel briefly, before popping out and roaring, like he did when encountered in DKC2.
SIDE TAUNT - FALCON 3.0 Klobber extends his hand, beckons, and calls out, "Come on!" in a Daffy Duck-esque voice, similarly to his DK64 incarnation.
DOWN TAUNT - TIME BOMB A mysterious ticking noise is heard from the lower half of Klobber's barrel. While most would panic about the apparent blast to come, Klobber simply cackles stupidly. Miraculously, no explosion occurs.
ENTRANCE - BURIED TREASURE A wooden treasure chest appears onstage; it shakes briefly, before Klobber charges out, feet spinning comically, sending bananas and golden coins flying everywhere.
VICTORY POSE #1 - BARREL BONANZA A pile of wooden barrels is seen onstage. Nothing appears out of the ordinary, until Klobber bursts from one of the barrels, sending the others rolling in all directions.
VICTORY POSE #2 - BLUFFING Klobber is seen wearing a TNT barrel, which begins flashing dangerously, similarly to his Down Special. However, just as the barrel appears to be bursting at the hoops, it fizzles out, as Klobber laughs maniacally.
VICTORY POSE #3 - UNDERGARMENTS Klobber strikes a pose, causing the hoops of his barrel to clatter to the ground, and its individual wooden planks to fall. However, those expecting to finally catch a glimpse of Klobber's body are disappointed, as Klobber reveals a second barrel beneath his first.
VICTORY THEME - PRIMAL DRUMS The clip played when Diddy dies in a jungle stage serves as Klobber's victory jingle.
LOSS POSE - STOW AWAY Klobber's barrel lies motionless in the background. It is not revealed whether he is simply hiding in shame, or if the barrel is actually empty and Klobber is nowhere in sight.
“So Ridley is too big to fit in the fight, eh? Then explain his opponents!”
Player: Ridley
Stock: 1
So, Ridley, scourge of the spaceways has decided once and for all to prove that he works as a playable character. The problem, however, is well…he requires a lot of resizing. And by that I mean that he is currently microscopic and therefore cannot be seen by his opponents! You start this event match on an Electro-Plankton stage with Ridley as the only character. Your goal is to kill 10 of the things the stage is named after. Upon doing this, Ridley starts to grow like he got a mega mushroom, only he doesn’t stop growing until he’s bigger than the stage and the screen fades to black…
The screen fades back in with Ridley finding himself in the middle of a forested Pikmin stage, and he seems to have disturbed Captain Olimar and Louie from collecting some obligatory junk for his slave-driver boss back on Hocotate. Without warning, they attack, and Ridley has to defeat them too! After KOing both of them (they each have 1 stock), a bunch of Pikmin run on-screen to help their fallen comrades. You can attack them to “eat” them and recover 2% per killed Pikmin, and after 7 seconds of this Ridley grows again.
It turns out the grass was in the middle of Yoshi’s Island, and Ridley is now his ordinary playable size (well ok, he’s technically been his “normal” size on each screen), which is great as he seems to have woken up Yoshi from his slumber! Yoshi only has 1 stock but his double jump has full super-armor making it difficult to finish him off. After defeating him you are granted no healing as Ridley grows yet AGAIN.
Oh God, it seems we weren’t actually in Yoshi’s Island, but a park in the middle of Fourside as Ridley now is in his super-mushroom size while fighting a super-mushroom Bowser! Oh, and there’s also Samus present, but upon seeing Ridley she goes into a shield-break state over the sheer fear of him so you can just casually FSmash her into a pit. If you can defeat Bowser you win, and prove that even after passing for Rodan Ridley can still fight as a playable character!
The Ridley moveset used for this event would be my upcoming Ridley set, but if you'd like feel free to envision it as Rapture's Meta Ridley for convenience sake.
First of all, as just stated with Arakune, you should put your playstyle at the end of the set rather than in the statistics. Like, all the parts about how Ridley plays and so on. It seems like you put a lot of effort into this moveset, and to better structure your thoughts would make it easier for readers to empathise with you. With your level of experience, this set is actually surprisingly good, especially considering it's for a popular character like Ridley. You have the writing style down [it's well written], moves aren't horribly under-detailed [though the lack of damage percentages is a big negative] and there isn't a move that doesn't seem like a perfect fit for Ridley.
The big problem, though, is that the moves do lack a sense of flow. They should work together in a focused way to let Ridley have his own unique playstyle. A good way to begin this is to make your specials more prominent, and make them interact easily with the rest of the moves. A simple example being, making the kinetic breath linger in one area, then have moves focused on spacing the opponent into the lingering fire. Simple interactions like this are what make a good submitter, and I think you have the potential to improve a lot. What with the organisation and opening or statistics section, you clearly have a lot of passion, and it's definitely appreciated.
I think a lot of what Ridley is about, or Meta Ridley (however you want to refer to him) is that a good number of his moves work as set-ups into others, so it's more about creatively than linear flow. But I do agree, I think I could have planned it out a bit better. Like Ridley's parts may just be better than the sum of the whole, but even the whole Ridley is ****ing badass.
I'll definitely take all of this into account for my next set. Thanks!
Klobber is a moveset where I have to take pity on you because of the limitations presented by the character, much less considering you insisted on not showing the rest of his body even when it’s blatantly obvious what it looks like. The basic concept of gimping isn’t exactly a breath of fresh air, and you don’t exactly do that much to differentiate it from other gimpers. The main things that let it work is how Klobber has a more elaborate focus on how he gets the foe off-stage in the first place than most gimpers, with the best part being the grab that directly transitions into gimping once you get off-stage. Klobber’s grenades (Including the ones generated from the utilt) add a surprising amount of depth as it gives him a defensive barrier that lasts briefly enough that it can legitimately aids his approaches (And he does pretty much everything as he approaches. . .) rather than just being fodder for the usual defense. Still, at the end of the day it’s a gimper with a fair handful of moves that are only –very slightly- relevant to his game when other options are considered, though there’s almost no 100% filler moves in here. Of course, there is the character excuse, but it only goes so far. . .
I would say this moveset was more of a definitive moveset for Klobber, the best you could do with it, if it wasn’t a moveset for Ka-Boom. The kamikaze Down Special contributes a surprisingly minimal amount to the moveset when I felt that was his one source of potential that could make him truly interesting. Considering you have the letters “TNT” randomly appear on his barrel briefly you want to ensure this is Klobber and not Ka-Boom, but it only makes it more awkward that you go into Ka-Boom’s territory and only bring out so little. A Ka-Boom moveset is an obvious choice to make over a Klobber one, and while the moveset is indeed titled Klobber, it’s essentially a green Ka-Boom with that Down Special.
MODOK is certainly a step forward for you, Smashbot. It's not without its own little bumps in the road, though, and I feel like you'll be digging yourself a bigger hole if you don't address some of these problems. For one thing, while you take a step forward in detail, you do add a lot of superfluous information that bogs down the writing style somewhat. Though I did say to add detail from Genesect, here you do have some random quipping that could be removed in a lot of the inputs. You also have a habit of stating kind of pointless details, which is perhaps partly my fault for telling you to use more detail. It's minor, but it also is a big improvement that you're only colouring the headers now... but that new font I just saw now is bad. Change it back, it's practically unreadable.
Moving on to the actual set, I was impressed by how diverse you made each of the inputs in consideration, and how you mostly successfully avoided the trappings of the Marvel vs. Capcom 3 moveset. Where this set really could've been so much better is with the LOUs, though, as they basically just act as a generic buff to some of his moves. As I've said to you before, a change this simplistic isn't enough to be worthwhile with the central mechanic, no less. The LOUs should really have served a more focused and specific goal, with the rest of the moves more centred around them. For example, it would have been too easy and a better option to make a lot of the moves to do with specifically spacing toward the LOUs, and have the LOUs as some kind of minefield, etcetera etcetera. It just doesn't feel that interesting. Nonetheless, you've shown you can improve and adapt well, so I have full faith in your submissions improving even more from here on out.
1. Okay, so a bit less detail. I get what you're saying, though, I really do. On the other hand it's good to know that if I muck up I can just blame you
2. Yeah, don't think I can find a text that won't jump off the screen and stab you in the eyes except maybe Impact. But again, that might tick a few retinae off as well.
3. I figured that in the playstyle and the Analyze Cube description, I described how MODOK turns into a highly offensive threat with defensive tools with high-enough LOUs. I mean, MODOK still isn't without his own weaknesses- he's still slow on the ground and fat as hell- but he's a different kind of beast now. It changes up his gamestyle from rewarding defensive gameplay to rewarding smart players who use their LOUs correctly.
4. Oh boy, no pressure here. Just higher expectations from a fossil. <_< This'll make Hakan even more of a nightmare now...
And since we can apparently submit multiple events for this week's MYMini, I'll put in another entry:
=-=-=-=-=-=-=-=-=-=-= EVENT MATCH: EVERYTHING MUST GO!
=-=-=-=-=-=-=-=-=-=-=
Description: Some of the sale items are still here? Quickly, dispose of them before the store reopens!
Play As: Tom Nook (2 Stocks)
Play Against: Wario (Infinite Stocks), Bowser Jr. (Infinite Stocks), King Dedede (Infinite Stocks)
Stage: Smashville (With some additions- two long and solid platforms appear underneath the main stage to prevent anyone/anything from falling through it and there's a large department store in the background.
This probably isn't like any event match you'll see in a while- upon the 3, 2, 1, of the battle, items will be littered around the modified battlefield, and Tom Nook's job is to dispose of all of these items, either by using them, throwing them off the battlefield, using them to the point where they disappear upon being dropped, or until your enemies use them up. Yes, your enemies CAN indirectly help you with this task, although they'll still try to beat you up. And with only two stocks, you'll want to keep these rapscallions at bay using the items that appear. You have two minutes to get rid of the items, which can range from food to crates to Smash Balls. Everything must go before the time runs out, or else it's game over. As soon as the last item disappears from play, the event ends. Keep in mind that the items WILL continue to fall from the sky until the thirty second mark, so you'll have to constantly be on your toes in order to keep the stage clean of items.
I added Emidius to my site. Problem is, cuz Webs is a total fart in general, I can't have more than 20 pages, so I'll have to put movesets all on pages depending on the contest. r_r" Yippee. I'll work on it later.
Feedback is appreciated. Meanwhile, I will add something of playstyle to my characters, since I think that'd be helpful. :3
EDIT: Sho has his "Sho Style" section under his final smash, talking about his playstyle, or how I feel he's intended to be with that set.
EDIT: Taokaka has her "Kaka Style" section under her final smash.
EDIT: Did I say Emidius? I meant Arakune. I added his "How To Seek the Azure" section under his final smash.
I'd like you guys to check this out, you know!
EDIT: Now I say Emidius. His "Control Your Power" section is now under his final smash.
Wow. Emidius... is definitely a nutty moveset, as I recommended you to make. It's pretty much exactly what I wanted out of you, though there are quite a few issues I have and I feel you still have a lot of improvement to be doing. However, I really was impressed by how you happily abandoned the generic attacks I've seen in your last two movesets for many of these really wacky inputs that, while they don't work together yet, do give off a sense of character and would make the set quite fun to play as. It's not that you don't have damage percentages, but you blatantly ignore them in favour of the characterisation, which is brave, but honestly you could have balanced the smashes to be less powerful and given him some actual reason to use his other moves. Emidius is basically an extremely cocky God-like character with his many brush-offs and nonchalant nudges to the opponent. There is a semblance of playstyle – a lot of moves will put the opponent into prone, flinching or simply position them away from Emidius, at which point he can use his smashes.
This is your best set, I'd say, though there are quite a few problems. You really need to make each move more detailed just to give a better sense of how the move works. For example, the forward smash – an amazingly powerful beam – has no mention of charge time, which is very important when you have a move this important to the character. The basic movement of the character – infinite flight – also would allow for some cheap stalling tactics, so there should be a limit on it. There's also a sense of a lack of flow between the moves, which, because of how oddly the character works, would actually be quite easy in this set's case. All you really needed was a lot of moves that either try to put the opponent above you to hit with your wormhole, or shield breaking moves to make them vulnerable to what would be assumable longer charge times on the smashes. Your playstyle for this set also pointed out an aspect I didn't see before in him being able to grab and release off-stage... this is kinda neat, but like some other things, it could use some more description and depth.
With Klobber, what the moveset achieves isn't nearly as impressive as Necky due to the character choice having a lot more potential, which is put to mostly good use here, though it's nowhere near the level of the aforementioned birdie. As always with your sets, though, this is one chocked full of well-imagined and realised inputs that compliment the character perfectly while always extending his playstyle's breadth. Here, Klobber has plenty of moves taking advantage of his unique mobility and protection given by his barrel, with most of them being very successful in outlining a gimping playstyle. Considering how unique Necky was, that Klobber ends up as a gimper is a little bit disappointing, but it works.
The flow of the set isn't its strongest point, though it's certainly executed with an expected finesse. One of the best parts is in Klobber's purely offensive style, wherein the old Doppelori complex concerning retreat in a chasing set is handled here by use of Klobber's backward momentum. He has plenty of moves in the mix, of course, to aid him in disguising his pursuit. I hate to reference other comments, but Warlord was very correct and I agree with his assessment of the Ka-Boom influence, where the down special is mostly wasted potential. If I'm being honest, a moveset for Ka-Boom was what I thought you were going for, and probably would have been a more compelling set. Not to say I dislike what you did here, especially with the character's low potential in mind, but it's sort of halfway Necky in not really appearing that difficult to make, and halfway Ka-Boom in having some awesome ideas left out due to the character choice.
And this all seems like rather harsh criticism! Indeed, it's kind of hard to substantiate what this set could have been. For what it is, it's great. You have the offensive playstyle coupled with the dashing grab and gimping off stage, combined with the minor interactions to do with momentum... it's a strong playstyle, and one of the best we've seen so far in the contest. A lot of what puts it there is more to do with your own talents, though, in selling a lot of the set with such a great writing style, and less to do with an interesting concept, like Necky or King Boo. So it's a bit of a tame outing from you, at least.
Klobber:
Now this is more like it! Aside from the Kaboom stuff with the grenades and TNT, you made an in-character set for a character with no character. Pretty good stuff. Klobber's moveset translates very well how he acts in the games, basically just insanely rushing the opponent to knock them offstage to their doom. However, I'm a bit concerned with some of the attacks being semi-generic. For example, the jab does serve a purpose in using it for some extra damage and stun while Kolliding, but Klobber will almost always want to do that, and won't really jab anywhere else. You could have quite easily just added the function of the jab to the Kolllide special, and used the actual jab for something else. The other concern I have about the set is the back throw. Doing 12% damage and refreshing the grab, that can do a ridiculous amount of damage for one mistake, as 2 b-throws + another throw could easily end up doing 30% guaranteed damage for just one grab, not to mention the possible followups! Still, despite these criticisms, I really enjoyed the set, and I think it's currently one of the front-runners for this MYM. Keep it up Kupa!
His specials and smash attacks have been nerfed and tweaked a little... His flying is no longer infinite... His tilts are also a little different.
EDIT: He now has a killing move that isn't a smash attack or a special move. And it'd be pretty humiliating to be hit with this and die. xD
EDIT: I am reserving a character for a moveset. We'll see how it goes. I'll put as much time as I can into each individual section, and will try to go for more detail. Hopefully I can pull it off.
Shepard’s moveset comes across as simplistic in writing, but would be very awkward to actually play when so few of his moves have direct simplistic hitboxes. The singularities come across as abused in the later inputs in the set to try to fill it up, much less when they aren’t performing that differently from how they did in the core moves at the start of the moveset. This is further evidenced by the fact that the inputs that –don’t- involve the singularities (Few and far between) are rarely relevant, showcasing you don’t really know what to do outside abuse them. For how much you used them I would’ve expected you to come up with a more unique playstyle then simplistic gimping and a basic aerial affinity, and I’m quite disappointed you touched so little on the grenades when you have so much fodder to manipulate them with. Unlike many other recently posted sets, this doesn’t have the character as an excuse – it’s quite obvious Shepard could do a hell of a lot better than this.
Concrete Man is one of the robot masters in Megaman 9, being a construction worker before he went rogue. In-game, his signature abilities were his concrete shot to freeze opponents, and his powerful shoulder charge to murder them while stunned. Here's his MYM incarnation.
Specials:
Neutral Special: Concrete shot
Concrete man shoots a wet blob of concrete out of his arm cannon. This travels at an arc at ganon's run speed (landing a BF platform away if you shoot it directly forwards) and you can aim it via the control stick. Should it hit the stage, a minion it can 1-shot, or projectiles, it will nullify the projectile/minion (if it hit one) and turn into a solid block of concrete, half a stage builder block in width/height. The projectile itself does 12% damage upon contact with an opponent (or minion, if the minion can survive it), and will freeze the opponent into statue form, which they must escape out of at half grab difficulty. Once formed into a block of concrete, it will either stick to the stage (if it hit the ground, another concrete block, or some other part of the stage), or be an item you can pick up and throw (but not walk through!) similarly to a crate. A concrete block has 15% health, and Concrete man has an unlimited supply of them. Lag isn't too bad. (Basically, this move works exactly like the concrete shot weapon from Megaman 9, except you can aim it.) Finally, should a concrete block be broken, it will shatter into 2 small pieces of debris, with 3% health apiece. (This will become important later, wait for it...)
Side Special: Hoohoo bombardment
Yes, there is really an enemy called a Hoohoo. (Link: http://megaman.wikia.com/wiki/Hoohoo) Anyway, using this input causes a Hoohoo to appear from the blastzone behind Concrete Man, a stage builder block above his head. The robo-bird is carrying a circular rock (with 8% HP) slightly larger than Mario's fireball, and travels at Pika's run speed. When it flies over an enemy (or gets destroyed, it has 8% HP as well), it will drop the rock (if still intact), which falls straight down at Ganon's run speed, doing 8% damage and minor knockback. But wait, there's more! If the rock is destroyed by contact with the stage, it will split into two small pieces of debris (identical to the ones from destroyed concrete blocks, they have 3% health), which shoot out in a small arc a bowser width to the side, doing 3% damage and really minor knockback. If these smaller pieces didn't hit anything (if they did, they'll break on contact and be destroyed), they will just sit there. Only two Hoohoo's can be onstage at a time, lag is low.
Down Special: Gagabyoall
Seriously, who named these things? Anyway, using this input causes Concrete Man to drop a Gagabyoall (http://megaman.wikia.com/wiki/Spine scroll down a bit.), a minor enemy from Megaman 9. (It's the width of a concrete block, but the height is merely half a pokeball.) Once it hits the stage, it will immediately begin moving forwards at Ganon's run speed, doing 7% damage and decent knockback to whatever it hits, until it falls off the stage. Boring? Not at all, as if it happens to run into a concrete block (or another Gagabyoall), it will bounce off of it and begin moving in the other direction! Additionally, these things have a hefty 30% stamina, so the Gagabyoall will likely continue bothering the enemy until it finally falls off the stage. Obviously, a good strategy is to bounce one of these back and forth between two concrete blocks to lock the area off to the opponent until the Gagabyoall eventually destroys the barriers. You can only have two of these onstage at a time, lag's not bad. Finally, should one of these fall into a pitfall (you'll see why this matters later), it will become stuck and basically become a trap inside the ground for the opponent until destroyed. (If this happens on a platform, the minion will stick out the bottom as well, becoming a hitbox on both sides of the platform.)
Up Special: Destruction Stomp
Not the most imaginative name ever, but you get the idea. When you use this input, Concrete man will fly in an arc similar to Yoshi's eggs (quite literally, you control the direction he'll fly in the exact same way). HOWEVER, once he reaches the end of the arc (where the egg would explode) OR you press the A button, he will immediately drop straight down until he hits ground. (You can cancel this into helpless by pressing airdodge, should you wish to grab a ledge). During this move, Concrete Man himself is the hitbox, doing 18% and good knockback, with super armor. This means that you can always break through your concrete barriers while recovering, and only being knocked VERY far offstage will keep you from making it back in one piece. In addition, this is a nice way to nail an opponent trapped by concrete blocks, as it's easy to mess with the timing of when you'll drop down. Startup lag is fine, but the end lag is bad. Finally, when you hit the stage, you cause a ground-shaking hitbox across the entire stage/platform that you hit, which does 5%, but stun that the opponent has to escape out of at half grab difficulty.
Standards:
Dash attack: Shoulder Charge
*Not a ripoff of Wario's side special... okay, you got me.*
Concrete man charges forwards at mario's run speed, doing 18% damage and good knockback to whatever he hits. Additionally, during this charge, you can still use your tilts as well as your first jump (yes, you still use your tilts while in midair). As if that wasn't enough, Concrete man has heavy armor during this charge (that is to say, he has super armor unless the attack does 7% or more damage to him in one hit) However, Concrete man will NOT turn around upon reaching the end of the stage, so you'll have to cancel out of the move by pressing the input again. As a sidenote, the hitbox of this attack doesn't quite reach all the way to the ground, so small ground-based traps (or pieces of debris from your concrete blocks...) won't be hit by this. Lag isn't too bad.
Front Tilt: Suction Arm
Concrete Man uses his arm cannon to create a vortex similar to Kirby's inhale. However, this can't suck up enemies or minions, (although it will pull them towards you) no, instead it will suck up the debris left by destroyed concrete blocks (and hoohoo rocks). Anyway, this will last for as long as you hold down the button, lag is low. So why do you want to suck up all the debris? Well, if you simply tap this input instead of holding it, Concrete man will instead start shooting out all the debris he's collected (at the rate of 10 pieces per second) in short arcs similar to his concrete shot. Each piece does 3% damage and slight forwards knockback, and you can aim it up to 45 degrees with the control stick. This is really good for collecting debris you just destroyed with a shoulder charge (as you can use this to suck behind you while still charging). As if that wasn't enough, it's a fun and useful tactic to trap the opponent with an arc of debris while charging, forcing them to either get hit by the debris or nailed by you (Or perhaps use the debris flamethrower-style, as it's quite difficult to DI out of the path of debris when you're constantly moving forwards). Additionally, debris will only shatter if it causes damage (to the opponent or something else), so any debris you miss with can just be sucked right back up with this tilt for later use! Lag is pretty low to boot, making this a very good move.
Up Tilt: Construction Lift
A rather simple move at first glance, Concrete man will bend down with his hand at ground level and pick up whatever's directly in front of him, holding it above his head at the level of the low battlefield platforms. Once you have it held, you can use it like any item, either dropping it in place with the grab button, or throwing it via a smash input. The main use of this move is while charging, as it lets you pick something up without having to stop and become vulnerable. For example, you could pick up a concrete block or down special minion to drop it on a platform above you, or perhaps simply toss it at the enemy. Or as an alternative, you could pick up the enemy while running directly below some platform traps (whether yours or the enemy's), and dragging them through them. Finally, if the opponent/object being held smacks into a solid object while you're charging, it will take (and deal) 15% damage and be released from your hold. Lag is fairly low.
Down Tilt: Wet Concrete
Concrete Man fires a spray of (no prizes for guessing) wet concrete down in front of him. If an opponent/minion is standing (or dodging!) there, they'll become stuck in the concrete, and have to escape at grab difficulty. (They can still attack and shield, but they can't move their legs at all or dodge). If you use this move while charging, he'll continue spraying concrete (behind him, not in front of him) for as long as you hold the button, making it completely impossible to simply dodge past Concrete Man during his charge. One last note, if you fill a pitfall with concrete using this move, it will double the effectiveness of the pitfall. Lag is okay.
Jab: Bulldozer
Concrete Man shoves his arms to push whatever's out in front of him, doing 5% damage with decent range and set bowser-width knockback. So what's the point? Well, this will let you push your concrete blocks around (even ones stuck to the stage, as it will rip them from their foundations), without destroying them or having to spend a day repositioning them with up tilt. Additionally, anything he shoves is added to the hitbox, letting him shove whole piles of concrete blocks (unlike the up tilt, which only lets you do one at a time.) But wait, there's more! You can hold this input while charging to cause him to continue pushing everything in his way (the new 5% shove hitbox overwrites the original 18% one), letting you move all your onstage blocks in one charge. Lag is low.
Grab Game:
Instead of just grabbing enemies, with this move Concrete man can grab any concrete structures he's created (including statued enemies). If he's already holding an frozen enemy/piece of concrete, he'll simply start working on that instead of grabbing out. Anyway, once you've grabbed something, a small cursor will appear over the center of the structure.
Control stick: Aim
A simple enough "move", moving the control stick will cause your cursor to move over the structure. You can move the cursor a bowser width in 0.2 seconds, and your cursor will not go beyond the edges of your structure.
Standard Pummel: Shattering punch
Using this will cause concrete man to punch out a concrete shot-sized hole in the concrete, causing a pair of pieces of debris to fall out. Also, if you're holding an opponent, they take 5% damage. A slightly slow pummel. (Should this break the structure into pieces, concrete man will hold onto the largest piece.)
Special Pummel: Concrete mold
Using this will cause concrete man to use his arm cannon to apply additional concrete at the cursor's location at the rate of a concrete shot-sized block over 0.1 seconds. Each concrete shot-sized amount after the first increases the stamina of the structure by 10%, however each individual concrete shot-sized piece of the structure can only take 15% damage before disintegrating. (Additionally, this will not increase the time it takes for the opponent to break out of a concrete shell, so you'll need to work quickly. Finally, remember, each concrete shot block of concrete equates to two debris pieces when destroyed.)
Finally, you can use the grab button to simply drop the structure or the shield button to return back to normal whilst holding the structure. Why would you want to create such odd structures out of concrete? Well, that comes down to the next section, the...
Smashes:
Forwards Smash: Hammer time
Concrete man swings both arms over his head (think Ike's Forwards smash minus the sword) with ok range and rather small lag, doing 12-24% damage and good knockback. However, if you're holding a concrete structure, Concrete man will swing that with him, vastly increasing the range. In addition, the damage (as will the knockback and lag) will be multiplied by a factor of 1.1 per concrete shot in the structure. Finally, if at least two concrete shots worth of concrete are contained within the structure, a ground-shaking hitbox will be added a stage builder block on either side of where the "hammer" hits ground, doing 5% per concrete block and stun the opponent has to escape out of at half grab difficulty, though little knockback. (As a note, the concrete structure you use in this move will take damage equal to that dealt by the smash, making this useful should you hold an opponent, and non-spammable.)
Down Smash: Decimation
Concrete Man will punch the ground (should he be holding a concrete structure, he will piledrive it into the groun), doing 15% (or damage equal to the health of the concrete structure) but with very small range. However, in addition to rapidly demolishing any concrete structure you're holding (which creates enormous amounts of debris for your forwards tilt), this will also create a pitfall trap in the ground, which opponents (if they walk into it or you drove them into it via this smash) will have to escape at grab difficulty. Lag is quite low, but you're unlikely to actually hit anything aside from whatever you're carrying due to the pathetic range. Finally, unlike normal pitfalls, Concrete Man's pitfalls are completely visible, looking like a thin, deep indentation in the ground.
Up Smash: Improvised Current
Concrete Man reaches into the ground, pulling up a water pipe with 20% stamina from inside the stage (even if it's just a flimsy platform... yay for Capcom logic), and bending it to create a forwards current, which will reach from the pipe itself, all the way to the nearest pitfall/concrete block/edge of the stage. Anything that stands in that area will be pushed along at mario's run speed, even while they're in stun from an earth-shaking move. Lag isn't too bad, only one of these can be active at a time. Charging this move will increase the speed of the current, from Mario's walk to mario's run at full (1 second) charge. Unfortunately, if a piece of debris gets pushed into a pitfall by the current, it will reduce the pitfall's effectiveness by 20%, until 5 pieces eliminates the pitfall altogether (however, you can later use your suction arm to clean it out.)
Aerials:
Forwards Aerial: Semi-generic spike
Concrete Man swings his arms (and concrete structure, should he have one) forwards in what's an aerial version of his front smash (12% damage with small lag without a structure, 1.1x multiplier to knockback, damage, and lag for each concrete block in the structure). However, instead of just generic knockback, this will instead spike upon hitting the opponent, and when they hit the ground, they'll be in stun, which they must escape out of at half grab difficulty. Additionally, if you manage to spike them into a pitfall, in finest Wario rip-off fashion, you'll spike them through the stage and out the bottom for a near-guaranteed KO.
Down Aerial: Spike plant
If there's one thing more common in Megaman than bottomless pits, it's spikes. Pressing this input will cause Concrete man to toss down a small pokeball-sized circular projectile. This doesn't do damage or have any effect unless it hits the ground, at which point it will expand to a stage builder-block worth of spikes, which do 12% and decent upwards knockback. Only one of these is allowed onstage at a time, lag is low.
Neutral Aerial: Dust bomb
What's one fun cliche about construction sites? They're ridiculously dusty! Well, pressing this input will cause Concrete man to toss a small brown pokeball-sized "bomb" in the direction you select with the control stick (default is straight down, it moves at ganon's run speed), that does 3% damage, but explodes into a cloud of dust a battlefield platform in diameter. This dust cloud will last for 8 seconds, and you can have as many onstage as you want. Anyway, while inside the dust, all traps and minions are invisible, and characters are only visible via a small black oval silhouette, showing their positioning, but not what they happen to be doing. Lag is okay.
Back Aerial: Bullseye!
Concrete Man turns and swings his arms, doing 8% damage with meh knockback. As I bet you've guessed by now, there's a second purpose to this move, and that's to use your concrete structure you're holding as a projectile! If you're holding one, Concrete Man will toss it in the direction you hold the control stick. The projectile will do 5% damage per concrete block, travel at ganon's run speed (though it is subject to gravity), and do knockback in the direction thrown. If it lands on an opponent (that is, it's travelling mostly downwards and the opponent is grounded), it will break and pitfall them for your enjoyment. Lag is ok.
Up Aerial: Aerial Tackle
Concrete Man makes a grab above himself. Should you catch a concrete structure (thrown upwards by the back air), that's that and the end of the move. However, if you catch the opponent in the bowser-sized grab area, concrete man will grab them and plummet straight down, doing 12% and stunning them at grab difficulty (or a suicide KO if offstage) upon landing. Between this and the forwards aerial, this makes it a really bad idea to come out and personally gimp Concrete Man's less-than-ideal recovery.
Playstyle:
There's a few main supports to Concrete Man's game here. Concrete structures, debris pieces, and pitfalls are the main components you should worry about, and like any structurally sound building, they all rely on each other. Let's take them one at a time.
Constructing Concrete:
First and most obviously, there's your concrete shot. However, the main tool for construction here would be your grab game. Grab one of your concrete blocks, and make it into a weapon suiting your tastes. Want a long but fragile club? Sure! Prefer a shorter but sturdier weapon? You can do that too. Anyway, once you've made your weapon of choice, it's time to break it over your opponent's head. A good weapon upgrades your forwards smash, forwards air, and back air to Meta-knight levels of effectiveness, and even after it breaks, it leaves out tons of debris for you to work with. If you'd rather leave your creation intact for a while, you can glue it to the stage with the down tilt, making it a barrier for trapping the opponent.
Damaging with Debris:
This is comparatively simple, but quite fun and effective. Basically, take all the debris from the concrete blocks you've destroyed (both with the dash attack and your broken concrete weapons, and don't forget the side special), suck them up with the forwards tilt (you can do this while charging, as your dash attack doesn't hit quite to the ground and so leaves debris intact), then later spit them out to murder a pitfalled or stunned opponent.
Playing with Pitfalls:
Yeah, alliteration abuse. Anyway, pitfalls are created by your down smash (creating debris for you to use in the process, should you have a concrete structure), but getting the opponent into them is where concrete man shines. First off, you can use your bulldozer shove while dashing to just push the opponent into the nearest pitfall. Alternatively, you can use your up smash to make a current, stun the opponent, and just watch as they're pushed right into the pitfall. Don't forget that your down tilt will double your pitfalls effectiveness, and that you can stick your down special minions in one to make it a constant hitbox that's quite difficult to get rid off.
Finishing Construction:
Overall, Concrete Man is a grounded character who specializes in making the stage a death zone for enemies, as he can trap it with pitfalls and spikes, dash back and forth over it in VERY difficult to avoid fashion (thanks to down tilt blocking dodges, and being able to jump), obscure all said traps with dust, and just plain out murder opponents with powerful concrete weapons. Like a well designed building, you can still function without any particular piece, but putting them all together is where Concrete Man truly shines.
Feel free to tell me if there's stuff I can fix. x_x This was weird to make.
* * * MAJORA * * * Malevolent Mask Spirit
Majora's Mask is the primary antagonist, as well as the final boss in Majora's Mask. The Mask itself manifests in three forms: a hovering mask, Majora's Mask; a pedantic legged-being, Majora's Incarnation; and a vicious humanoid monster with whips as arms, Majora's Wrath.
However, a legend also holds that Majora was once a great beast that existed before time's flow. The legend holds that the beast encountered a traveler who played Music for the beast, allowing it to finally experience the flow of time. After three days, the beast died, and its outer shell was crafted into a mask that held the beast's soul.
==============================
* * * Ways of the Ancient Evil * * *
Size: Majora changes size between the Mask, which is Link's size, Incarnation, which is Falcon's size, and Wrath, which is Ganondorf's size. Weight: The forms are all relatively light heavyweights. Walk Speed: Majora's Incarnation cannot walk, but Majora's Wrath is capable of slowly sauntering toward the opponent. Run Speed: Majora's Incarnation has a relatively slow run, but he also can't move any slower. Majora's Wrath runs like Mewtwo, at a decent speed. First Jump: Majora takes the form of Majora's Mask in the air, getting free flight for a period of time like Pit's Wings of Icarus. However, they speed up faster, and have a lower max speed. Recovery: Majora's Up & B is not a recovery Priority: Majora has some dangerous priority in his attacks. Traction: Majora has very high traction. Fall Speed: Majora cann't be put into helpless state, and can't fall, but his descent while flying is his normal flying speed. Air Movement: Amazing, considering Majora's Mask moves with limited free flight.
Crawl: No Wall Jump: Majora's Incarnation Wall Cling: Majora's Mask
===============
Majora switches constantly between his three forms throughout the battle: When in the air, he takes the form of free-floating Majora's Mask, whose only attacks are aerials.
The Down-B transforms Majora between Majora's Wrath and Majora's Incarnation. Majora's Incarnation is weaker, faster, and lighter, but has many fast multi-hit attacks. Majora's Wrath is stronger, slower, and heavier, while his attacks tend to be one-hit and have long range and knockback.
==============================
==============================
* * * Advent of the Rejected God * * *
===============
Neutral B: Searing Gaze 25%
Majora turns into mask form and performs an attack similar to his neutral air... However, instead of making a barrier of fire, he shoots a laser of fire that can be aimed slightly up and down. The laser gets weaker over the course of five seconds, until it is nothing but a thin stream that does 5% and no knockback.
===============
Side B: Saucer Sweep 20%
Majora turns into mask form and sweeps across the stage, spinning violently. The attack moves low and moves a long distance, but is hard to turn around. Contact with the mask at full speed results in 20% damage, knocking the opponent straight up.
===============
Up B: Assisted Recovery 0%
Majora jumps high in the air and drops one of the Majora's Wrath tops onto the stage. if the opponent touches the tops after they land, they deal 5% and act like bumpers.
===============
Down B: Context Sensitive 0% / 10%
Majora switches between Majora's Wrath and Majora's Incarnation. They begin to morph into the other form quickly, and each one has a unique action at the end.
Majora's Incarnation does his stretching animation from Majora's Mask, and sings its own theme song.
Majora's Wrath stretches, and whips out its tendrils to both sides, striking nearby opponents for 10% damage.
===============
==============================
* * * New Awakening * * *
A: Redvine / Battery 4% / 2%
When Majora's Wrath uses this attack, he stabs his arm forward a long ways, reaching past Marth's reach. The attack hits once for 4% before retracting.
When Majora's Incarnation uses this attack, he dashes forward performing a low-knockback attack similar to Luigi's dash attack.
===============
Dash Attack: Base Slide 3%
Majora's Wrath does not have a dash attack.
Majora's Incarnation ducks low to the ground and slides feet-first through the opponent, knocking them up.
===============
Up Tilt: Dread Upper 4% / 7%
Majora's Wrath performs an upward swing with his arm, knocking the opponent up instead of away, dealing 7%.
Majora's Incarnation performs a shoryuken-esque uppercut that knocks the opponent away in a high arc, dealing 4%.
===============
Side Tilt: Keepaway 4% / 8%
Majora's Wrath swipes its arm at the opponent, knocking them back away from him for 8% and medium-low knockback.
Majora's Incarnation does a 4-hit punch combo, barely pushing the opponent at all, not knocking them down, but making them flinch.
===============
Down Tilt: Dark Sweep 3% / 6%
Majora's Wrath hovers just off the ground and sweeps his arms on either side of him, knocking opponents off their feet for 6%.
Majora's Incarnation does the splits, knocking opponents back a very short distance for 3%.
===============
Ledge Attack (Strong): Return to Power 2%
Majora's Wrath climbs back onto stage, swinging his arms across it to clear it of opponents.
Majora's Incarnation does the same, however, his sweep has less reach.
===============
Ledge Attack (Weak): Power Struggle 1%
Majora's Wrath climbs back onto the stage, flailing his arm wildly as he pulls himself up. This attack has high priority and prevents a lot of attacks from hitting him.
Majora's Incarnation climbs back onto the stage, forcing his body up into a makeshift tackle, knocking opponents away.
===============
==============================
* * * Advent of Power * * *
===============
Forward Smash: Pirouette / Manic Rage 11% / 10%
Majora's Wrath leans toward the opponent, doing a pirouette with arms outstretched, pulling them in for one of his only multi-hit attacks, the Pirouette. This attack, when charged for roughly a half second, moves forward slowly and does 13%.
Majora's Incarnation leans forward in a fashion similar to Majora's Wrath and performs an attack strongly resembling Diddy Kong's forward smash. When charged for roughly a full second, he performs the attack twice in a row, dealing up to 20%.
===============
Up Smash: Nightmare Upper / Tantrum 15% / 9%
Majora's Wrath uses a dark-nature attack similar to the Dread Upper. This attack, however, deals dark damage, hits harder, and is a slower move in general. The move charges for roughly a second, and when fully charged, does 21%.
Majora's Incarnate raises his hands in the air and jumps up and down angrily, stomping and whatnot, hitting anyone who happens to be above him for 9%. This smash cannot be charged.
===============
Down Smash: Writhing Evil / Punishment 13% / 11%
Majora's Wrath stabs his arms into the ground, and they branch out a distance from him, hurting opponents they touch with dark damage for 13%.
The move can be charged for a second and a half, causing the arms to go farther and do 15%.
Majora's Incarnate does several leg sweeps to his opponent rapidly for 11% at high speed, doing low knockback. This move cannot be charged, but is pretty fast.
===============
==============================
* * * Mask of Disdain * * *
===============
Up Aerial: Golden Prod 8%
Majora's Mask juts up a little with the spikes on top of its head as an attack.
===============
Forward Aerial: Rim Grind 9%
Majora's Mask spins horizontally, dragging its spikes into whatever opponent is nearby.
===============
Back Aerial: Tendril Shear 11%
Majora's Mask's tendrils shoot from the back of the mask and impale the opponent behind him.
===============
Down Aerial: Gaze 13%
Majora's Mask darkens and its eyes glow brightly, and start flashing. Opponents nearby below it take damage and enter a dizzy state.
===============
Neutral Aerial: Flames of Wrath 17%
Majora's Mask spreads its tendrils out in all directions, and a ring of fire surrounds it. If anyone touches the fire, they take a hefty 17% and get knocked a ways away.
===============
==============================
* * * Power Incarnate * * *
===============
Grab: Sacrifice Preparations None (Yet)
Majora's Wrath cannot grab opponents. However, Majora's Incarnation can! Majora's Incarnation grabs the opponent by the collar, crouching down to their level.
===============
Pummel: Fool 1%
Majora's Incarnation headbuts his opponent, sticking the spikes on his... eye... into them.
===============
Up Throw: Pirouette of Pain 9%
Majora's Incarnation throws the opponent up, causing them to land on the spikes on his head as he does a pirouette.
===============
Forward Throw: Copeira 12%
Majora's Incarnation releases the opponent, turns around, hunches down, and kicks the opponent by sticking his leg back firmly. This throw has the most knockback of his throws.
===============
Back Throw: Falcon Punch 8%
Majora's Incarnation releases the opponent, pulls them over, gets behind them, and winds up a punch, making a sound resembling Kirby's "Fakon pawch!", and sends the opponent flying... a short distance a way with only 8% more damage.
===============
Down Throw: Victory Dance 11%
Majora's Incarnation throws the opponent to the ground, stands on them, and... does the Kozachok. The dancing and the humiliation amount to 11% damage.
===============
* * * Behind the Mask * * *
===============
Let Time Flow
Majora hunches down and screams as everything stops: The opponent characters, the timer on the screen, any damage being taken from a Lip's Stick or pikmin, everything stops. The screen goes dark, and you can vaguely see Majora turning into something very, very large. The screen returns to normal, and reveals that Majora has turned into an enormous beast-like monster.
A sun appears in the background, moving from the right side of the screen to the left side. After a few seconds, Majora begins to dance. The sun moves across the sky and it becomes night. The moon does the same, but as the moon rises, you see that it has a number on it: The number goes down from 72 to 0 as three days pass relatively quickly in the background. At the end, the beast stops, and you see a whisp resembling a soul fly out of every fighter; if they have more than one stock remaining, they lose one stock. If they have one remaining, they take 720% damage.
At the end of the Final Smash, Majora reverts to Majora's Wrath, who collapses into a powerless state for a period of roughly fifteen to twenty seconds.
===============
==============================
* * * Enraged Style * * *
===============
Majora, as a character, puts a lot of requirement on transforming throughout the match. Should a situation arise where you need speed over power, OR if you need a grab game, then Majora's Incarnation is your viable choice.
However, if you need strength and a long reach, then Majora's Wrath is by far better. Majora's Mask functions as sort an aerial game, as well as being part of special attacks.
When Majora gets the smash ball, it is advised that you use it early on in a match, or at least in a 4-way fight. Later in a match, opponents take much less damage if they've already sustained heavy damage to begin with. The only way this could be avoided is if they had two or more stocks remaining. In a 1v1 fight, Majora may or may not KO the opponent, but he will be left vulnerable to attack for 15 seconds that he can't be knocked out of.
===============
==============================
* * * Actions of Anger * * *
===============
Idle Animation
Majora's Wrath stands hunched forward, his arms awaying from side to side.
Majora's Incarnation dances in place, humming his own theme song.
===============
Sleep Animation
Majora reverts to mask form and sinks to the ground, the glow in his eyes disappearing.
===============
Shielding Animation
Majora reverts to the mask form, and a shield forms around it.
===============
Forward Roll
Majora sprints around the opponent ahead of him, and faces the opposite direction.
===============
Backward Roll
Majora sprints backwards away from the opponent.
===============
Air Dodge
Majora's Mask spins around, eyes flickering, and dodges into the background.
===============
Dizzy Animation
Majora holds its hands to its head and either wheezes angrily, or screams in pain depending on if it is Majora's Wrath or Incarnation respectively.
===============
Ledge Grab Animation
Majora's Wrath latches onto the edge by one of its arms.
===============
Ledge Return Animation (Strong)
Majora climbs up onto the stage, glaring straight ahead as it gets to its feet.
===============
Ledge Return Animation (Weak)
Majora slowly struggles onto the ledge and gets onto his feet, breathing heavily.
===============
Stage Entry
The moon from Majora's Wrath appears behind the stage, and spits out Majora's Wrath, who lands at his starting position.
===============
Stage Select
A loud roar is heard, and the controller rumbles.
===============
==============================
* * * Mocking the Humans * * *
===============
Taunt 1
Majora does its transformation pose, and shouts almost...happily.
===============
Taunt 2
Majora performs a "come at me" gesture, growling menacingly.
===============
Taunt 3
Majora shrieks and puts its arms in the air, similar to how they both do when defeated.
===============
Victory 1
Majora's Wrath poses in a way similar to its transformation pose, arms outstretched and standing tall.
===============
Victory 2
Majora's Incarnation dances to and hums the Numa Numa.
===============
Victory 3
Majora's Mask spins around, as cracks begin to form in it, and the spirit escapes from the mask.
===============
Loss
Majora's Mask sits on the background floor, powerless.
===============
==============================
* * * Extra Criteria * * *
===============
Kirby Hat
Kirby wears Majora's Mask, and can shoot a weaker version of the Searing Gaze.
===============
Unlock Criteria
- Defeat Boss Battles with Toon Link, Young Link, and Link on normal difficulty or higher in less than 7 minutes, 20 seconds (each).