• Welcome to Smashboards, the world's largest Super Smash Brothers community! Over 250,000 Smash Bros. fans from around the world have come to discuss these great games in over 19 million posts!

    You are currently viewing our boards as a visitor. Click here to sign up right now and start on your path in the Smash community!

Make Your Move X - Congratulations winners! MYMXI start date OCTOBER 10TH!

Status
Not open for further replies.

MasterWarlord

Smash Champion
Joined
Aug 24, 2008
Messages
2,902
Location
Not wasting countless hours on a 10 man community
BANE

Banballow’s ways of manipulating his wire are endless, but not redundant or feeling like they should be scrunched together into fewer inputs. Banballow not only has to dedicate a moveset to manipulating the wire itself, but the gas clusters, bubbles, and utilt holes in the wire, so he’s got quite his hands full. In addition to no redundancy in all of this manipulation of these mechanics, how they all work and interact is perfectly logical with very little stretching for potential, which makes it seem far more feasible than it would otherwise. Other great bits include how he’s constantly setting up and pressuring foes at the same time, as well as the boss section, which worked out far better than I expected with him even easily standing out from other bosses.

I would’ve expected you to take a hell of a lot more creative license for a character with a “boss fight” with a single generic attack of spraying his flamethrower about, and I commend you for not doing that, but that’s just the thing. In the process of creating such a complex and compelling moveset, the actual character got left in the dust to an extent – you made a moveset for a guy with a flamethrower with an overly long cord. Aside from minimal playing on his actual undead aspects, Banballow is made out to be too intelligent in the moveset with all of the complex interactions when he’s a idiot – did you notice that his homemade flamethrower has a Pop Can on the end? Considering how helpless he feels in close combat, he could’ve really used some more zombie moves anyway, though god help you in finding something that you want to delete in favor of generic melee in this masterpiece of a set.
 

SirKibble

Smash Champion
Joined
May 2, 2008
Messages
2,400

What’s this?


Your Pokemon egg is hatching!


It’s. . .


A Pichu!


Give a nickname to your new Pichu?
> Yes

What will you name him?
> Cuddlemuffins


Uh, oh! Pichu is displeased with the nickname you gave him! He’s renaming himself. . .


THOR, GOD OF THUNDER


> Character <
“Thor, God of Thunder,” the Pichu (henceforth referred to as just “Thor”), is a Pichu who was born with incredible capacity, far beyond that of any typical Pokemon. Pokedex readings at his birth read him to be roughly Lv. 97, and he uses Electric-type moves totally foreign to any Pokemon expert. Within minutes of his birth, he defeated his trainer, stole a Poke Ball from him, and used it to catch a wild Castform.


He is often seen riding this Castform, who doesn’t seem to mind being Thor’s transportation. This Castform, through years of rigorous training, can change forms at will, and also uses any attack Thor instructs it to. It is content, when not providing transportation, to remain inside its Poke Ball.


> Statistics <
Thor’s statistics are identical to those of Melee’s Pichu. In fact, without using his moves, one would be prone to think he and Pichu were the same character (but since Pichu isn’t in Brawl, I suppose that won’t be an issue for us, will it).


> Specials <

Down Special -- Call Castform

Thor pulls a Poke Ball from hammerspace and holds it in front of him. The Poke Ball opens and Castform comes out, with Thor immediately riding on top of him. This happens quickly, and affects Thor in a number of ways:

  • Castform is almost the same height as Thor, and hovers just above the ground, making them twice as tall together as Thor is normally.
  • Their combined weight is 1.5x Thor’s normal weight.
  • Castform runs / floats only 0.8x as fast as Thor.
  • Castform both jumps up and falls down slightly slower than Thor. He has the same jump height for his ground jump, and has three mid-air jumps. These do not function like normal jumps, but cause Castform to whiz through the air in whatever direction the control stick is tilted (or directly up if it isn’t tilted), for about the length of a battlefield platform. You may also hold the jump button down after jumping to cause Castform to “float,” similar to Peach, except that he cannot move while floating. He can hover in place for up to two seconds each time he goes into the air. Upon hitting the ground, this timer is reset.

If you are riding Castform, using the Down Special again will have him retreat back into his Poke Ball, which takes the same amount of time. Castform and Pichu can be separated if they take too much damage. It’s about twice as hard to separate them as it is to get an opponent to drop an item by hitting them. If they are separated, Castform is no longer under your control, but will sit still, not move, and be susceptible to any abuse opponents wish to give him. If they knock him off the edge, you won’t be able to use him for the rest of your current stock. If you run into Castform when he’s separated from Thor, Thor will immediately remount him. If that’s not a possibility, you can use your Down Special within a Smart Bomb’s radius of Castform to call him back into his Poke Ball from a distance.

NOTE: Riding Castform changes many of Thor’s moves, and a few moves can only be used while riding Castform. For those that stay the same, Thor simply uses the move as if he were his normal self, but elevated because he’s standing on Castform.


Neutral Special -- Thunder

Thor’s Thunder is quite different from Pichu’s or Pikachu’s. Thor slams his hands to the ground (or just thrusts them down if this is used in the air). This happens almost as quickly as Jigglypuff’s Pound. Electricity bursts up from the ground around him for the same range as DK’s Down Special, reaching only about as high as Kirby stands when ducking down, but dealing 16% damage and very high upward knockback. This electricity disappears almost immediately after appearing.

If used from the air, Thor creates a ball of electricity slightly larger than those of Pikachu’s Thunder Jolt, which slowly moves downward, at about half the speed of Luigi’s Fireball. Any number of these may be out at a time. Upon impact with an opponent, they’ll deal 3% damage with flinching knockback, but when they hit the ground, they’ll do exactly what the move does when used from the ground.

Castform Bonus: The only bonus you’ll get for riding Castform with this move is that, each time you enter the air, the first time you use this move, you will hover in place and not fall. Each consecutive time, this effect will wear off slightly, and by the fourth time using it, you will fall at normal speed again.


Side Special -- Lightning Toss

Thor throws a bolt of lightning about the size of the Lightning Bolt item in Brawl. He does so with about as much lag as a PK Fire, and the bolt travels about the speed of Lucario’s Aura Sphere. The toss can be angled diagonally at a 45 degree angle either up or down, or even straight up or down if you like (it goes directly forward by default), and travels the same distance as Luigi’s Fireball before disappearing. If it hits an opponent, it will explode into a vortex of lightning 1.5x the size of a Party Ball that does 3 hits of 4% electrical damage each, each of which has only flinching knockback. The lightning sphere lasts about a second before vanishing.

Castform Bonus: During Thor’s startup for this move, Castform switches to Sunny Form, and the lightning bolt thrown has a red glow to it. The final of the 3 hits produces with it a heated explosion, dealing an additional 8% damage and good diagonal knockback.

Up Special -- Hyper Flash

Thor vanishes into thin air, in like fashion to Meta Knight’s Dimensional Cape, though slightly faster. The direction you tilt the control stick during Thor’s disappearance determines which direction he will move before reappearing. He moves as fast as Lucario’s Extremespeed, but can’t be seen during the movement. He moves about the length of two Stage Builder blocks before stopping and reappearing. As he reappears, his body flashes brightly, dealing 15% and high horizontal knockback to anyone he’s touching. It’s difficult to hit with, but rather rewarding. He then enters a Helpless state.

Castform Bonus: Castform both helps and hurts this move. Castform doesn’t disappear with Thor, but moves alongside him, making your opponents very capable of watching you move. As they move, Castform switches to Rainy form. When Thor reappears, Castform immediately creates a sort of whirlpool around him about half the size of a Smart Bomb explosion. This deals 2% damage to enemies that touch it, does not even cause them to flinch, but pushes them away from the whirlpool, much like Squirtle’s Water Gun or Mario’s F.L.U.D.D. It also destroys weaker projectiles that come in contact with it, though higher-priority ones will go straight through.This whirlpool remains around Thor for roughly one second, helping to protect him until he hits the ground.


> Standards <

Neutral Attack -- Static Attack

This move must be charged before it can be used to attack. The first three times you use it, Thor will charge up by spinning rapidly on the ground. He does this in the same amount of time as Luigi’s Luigi Tornado attack. When Thor is fully charged with static electricity, purple streaks of lightning will course around his body, purely a visual effect. If used when fully charged, Thor will hold both hands to the sky for a moment, then an electrical field the size of a Smart Bomb’s explosion appears around him. This happens moderately quickly. The field lasts for one second, and pulls enemies within its range toward Thor at about Captain Falcon’s run speed. Thor himself is the hitbox for this move, dealing 10% and moderate diagonal knockback to anyone who touches him during the duration of this move. Ending lag after the electric field disappears is very punishable.


Forward Tilt -- Spark Whip

Thor extends his hand and a streak of lightning as long as Zero Suit Samus’s whip extends from it. Starting lag is moderate. As long as the button is held down, you may point the whip in any direction, which Thor does almost immediately upon the control stick being tilted. Note that the whip remains almost completely straight always, and does not fold and bend nearly as much as Sheik’s. The whip deals 5% damage and weak knockback to anyone it hits. Holding this for more than five seconds will cause Thor to automatically retract the whip, and he takes 5% damage and flinching knockback from it if you allow this to happen. Release earlier to retract the whip safely. Retracting has little lag.


Up Tilt -- Skyshock

Thor clenches his fists and turns his face upward. With a high-pitched “Chuuu!!” the air nearby sparkles with electricity. The electricity lingers within about two Stage Builder blocks from Thor’s initial position for two seconds, dealing steady damage that can accumulate up to 20% to airborne opponents within its range. Note that opponents touching the ground will not be damaged by this electricity. There is minimal lag on both ends of this move, but Thor cannot use it again until the first one has finished.


Down Tilt -- Castform Kick

NOTE: This move is only useable with Castform present. If you try to use it without him, Thor will perform his Neutral Attack.

Thor abruptly kicks Castform out from under him, propelling the poor Weather Pokemon forward quickly over the distance of a Stage Builder block. Castform is a high-priority hitbox that deals 12% damage and weak knockback to anyone he contacts. This separates Thor and Castform, but Thor suffers only a little ending lag, so he can usually catch up to Castform quickly and remount. Beware of dodge-happy opponents, though.


Dash Attack -- Lightning Rush

Thor immediately becomes a ball of electricity his same size, and moves forward at 2X his normal running speed for two Stage Builder blocks’ length before turning back to normal and skidding to a stop. Starting lag is minimal, but ending lag is rather long. Enemies touched while in lightning ball mode take 6% damage and are strongly stunned (like Zero Suit Samus’s stun gun).

Castform Bonus: Castform joins Thor in the ball of electricity, making it twice its normal size.


> Smashes <

Forward Smash -- Storm Spear

As Thor charges up, a long bolt of lightning appears in his hand. Upon releasing the charge, he throws the spear directly forward. It’s unaffected by gravity, travels twice the speed of a PK Thunder, and disappears after travelling half the length of Final Destination. It explodes upon impact, dealing 10% damage and moderately weak knockback to whoever or whatever it hit.

Castform Bonus: As you may have gathered, this move doesn’t really gain anything from charging. That changes if you have Castform with you. As Thor charges, Castform switches to each of his three forms in a random order, adding something to the to-be-thrown spear each time. The first form’s effect takes place automatically as long as Castform is present, the second if you reach half charge, and the third only if you make it all the way to full charge. The effects are:

  • Sunny Form: Fire encircling the spear increases damage to 18%.
  • Rainy Form: A watery eruption increases knockback to be moderately high.
  • Snowy Form: Any icy surprise encases enemies who get hit in ice!

Remember, the order you get effects in is random, but you can watch Castform as he changes to know which ones are being added when!


Up Smash -- Cloud Bolt

NOTE: This move can only be performed with Castform. Without him, Thor will do his Forward Smash attack instead.

Castform turns to Rainy form and puffs a cloud into the sky. As Thor charges up, the cloud rises higher and higher into the sky. It can get twice as high as Battlefield’s higher platform. You may also tilt the control stick left or right as Thor charges to alter the final product of this move. When Thor releases his charge, he will clap his hands above his head to shoot an insanely fast lightning bolt into the cloud, which will stop moving. He does this will moderate startup and ending lag. This bolt is thin, but deals 8% damage and moderate upward knockback to anyone who touches it. The cloud seethes with electricity for half a second, during which time it also deals 8% damage and moderate upward knockback to anyone who touches it. Then the cloud will shoot the lightning bolt either straight down or at a 40 degree angle whichever direction you angled it. Thor is free to move during the time before this, so try to get your opponents into the bolt’s trajectory, as it deals 18% damage and high upward knockback. If Thor is hit by this bolt, he will amplify the electricity like Pichu or Pikachu does when hit by their Thunder attack, having a similar hitbox to those moves, but dealing the same amount of damage and knockback as the bolt itself normally does.


Down Smash -- Fog

NOTE: Without Castform, Thor will use his Forward Smash in place of this move.

This move is actually used as it is “charging,” so in truth, the longer you hold the button, the longer the move is actually in use. Castform, switching to Snowy form, begins blowing foggy air from his mouth. The fog spreads horizontally the longer the move is used, and can fill half of Final Destination if it goes to its maximum time. The fog is 1.5X as tall as Thor. Fog obviously blocks your opponents from seeing as well (particularly shorter ones), but more importantly, the foggy clouds conduct electricity. Whenever any electric attack hits the clouds, any opponents touching any part of the clouds will take 5% damage and flinching knockback. The clouds last for eight seconds or until another set of fog clouds are created.


> Aerials <

Neutral Aerial -- Charge Transfer

Thor pulses with electricity the moment you use this move, and you can hold the button to prolong this for up to two seconds. If you end it without hitting anyone, or the time runs out, you will enter a Freefall state. If, however, you hit an opponent with it, Thor will latch onto them for half a second, then jump off, propelling himself into the air like Captain Falcon does for his Up Special. The opponent hit will now be surging with electricity. They will take 2% damage per second this remains, with no knockback, for up to 10 seconds. However, if they hit you or another of their opponents while they are electrified, their attack will deal double the knockback it normally would, at which point the electricity will leave them.


Forward Aerial -- Electromagnetic Arc

An unseen force pushes Thor backward about one Stage Builder block’s length, then throws him forward. He spirals out of control as he’s thrown, but is a high-priority hitbox dealing 14% damage to anyone he hits before he regains control about two Stage Builder Blocks’ length later. This move has little startup lag, but the ending lag before you can actually move Thor again is a bit punishable.

Castform Bonus: Snowy form Castform has an idea to make this move even better. As Thor flies forward, he freezes him. The ice-bound Pokemon hurdles forward dealing 19% damage instead, though you’ll have to break out of the ice to regain control of him again. Castform will hover near Thor the whole time and will automatically be remounted when Thor breaks out of the ice.


Backward Aerial -- False Arc

Thor is swung backward just like in his Forward Aerial, but instead of rebounding forward, he will simply spin rapidly in mid-air, dealing multi-hit damage to those he touches that can reach up to 12%. This looks like normal Pichu’s Neutral Aerial, but faster, and has about the same amount of lag.

Castform Bonus: Snowy Castform once again appears for this move (so your opponents can’t rely on Castform to tell if it’s a fake or not), but this time, he’s got a different idea. Similar to Sonic’s Homing Attack, if an opponent is close by, Castform will blow Thor toward them as he spins. He can move about 1.5X a Stage Builder block’s distance with this, and Castform blows him quickly through the air. Castform will follow quickly after blowing, allowing Thor to remount automatically.


Up Aerial -- Shock Jump

A surprise burst of electricity beneath Thor sends him tumbling upward the same distance as one of his mid-air jumps. He takes 4% damage from this, but can use it up to 2 times each time he enters the air for extra height. The electrical pulse does no damage to opponents. . .

Castform Bonus: . . .but if your Castform is with you, it will cause him to sparkle with electricity for the next four seconds. Anyone he touches will take 4% damage and weak diagonal knockback. (Except in the case of the Down Tilt, where it will increase the damage to 20% and slightly increase the knockback Castform does when he hits an enemy, as well as stunning them.)


Down Aerial -- Electro Comet

A stall-then-fall attack, Pichu curls into a ball, and surges with electricity as he descends. He moves quickly, dealing 7% damage and weak diagonal knockback to anyone he hits on the way. Upon striking the ground, he will collapse and have to stand back up again via whatever stand-up method you choose.

Castform Bonus: Castform is the heart of this move. Sunny form Castform provides a fun fiery look to Thor’s descending form, as well as a slight increase in size, but the real fun begins when Thor hits the ground. An eruption about the size of Bowser accompanies the impact, dealing 13% damage and strong diagonal knockback.


> Grab / Throws <

Grab and Pummel

Thor grabs like normal Pichu unless you have Castform with you, in which case he will leap from the Weather Pokemon’s back forward the same distance as Link’s Hookshot, grabbing onto the first opponent he touches. This will separate Thor and Castform.

Only with Castform can you Pummel, in which case Castform will slam into the opponent each time you hit the button. This is a painfully slow Pummel, as Castform has to recovery from hitting himself against the opponent each time, but it deals 5% per hit, though you won’t usually get more than one in.


Forward Throw -- Mega Stun

Thor pulses an absurd amount of electricity into his unfortunate victim, who takes only 2% damage, but is stunned very strongly. This takes quite some time to break free of, so it’s a good setup for a strong finisher, or to put some distance in between you and your opponent if necessary.


Backward Throw -- Freeze Slide

NOTE: This move can only be used with Castform present. If you try to use it without Castform, Thor will use the Forward Throw in its place.

Rushing forward, Snowy Castform circles around the opponent twice, encasing them in ice, then slams into them from the front, sending them sliding backward along the ground. This deals 6% damage, but if your opponent doesn’t break the ice in time, they’ll slide to their death. You’ll need to be positioned very well or have an opponent at pretty high damage to make that happen, though, so use this throw with good judgment.


Up Throw -- Shooting Star

NOTE: Castform is required to use this move. Forward Throw will be substituted if this move is attempted.

Sunny Form Castform wriggles his way underneath the struggling opponent, then bursts into flame and jumps, thrusting his victim into the air. They move directly upward at about the speed of Mario’s run, and will only stop moving when they break the move’s grip, at which point the flames go out and they can move as normal. At higher damages, this is more difficult, so opponents can easily be forced off the screen once they reach high damage. If they strike another opponent while on fire, the hit opponent will take 10% damage and moderate diagonal knockback. Lag is high on this move.


Down Throw -- In the Clutches of Castform

NOTE: This move cannot be performed without Castform. Thor will use his Forward Throw if you try to use this move.

Castform rises up and slams down onto the opponent, holding them to the ground. Thor is free to move around and do whatever attacks he wants. Castform’s grip is about as strong as a typical ice-encasing. Obviously, this separates Thor and Castform. Thor cannot remount Castform by touching him until Castform is no longer holding down an opponent. Any knockback will release the opponent from Castform’s grip.


> Final Smash <

Final Smash -- Judgment

Thor leaps into the air, to the same spot Lucario goes during his Final Smash. Castform remains on the ground (if you lost Castform this stock, he’ll reappear—lucky you!). You gain control of Castform while Thor rains down terror from above. Thor will shoot lightning bolts at calculated angles (in the general area of an opponent most of the time) every second or so. The bolts deal 20% damage and strong diagonal knockback. Castform has the following attacks:

  • Neutral Special – Weather Ball
    Castform shoots a sphere the size of a Poke Ball forward, which moves at the same speed as Lucario’s Aura Sphere, for the same distance. Depending on his current form, it will do different things. Sunny Form’s ball deals 16% and moderate diagonal knockback. Rainy Form’s deals 10% and high horizontal knockback. Finally, Snowy Form’s deals 12% damage, no knockback, and freezes the opponent.
  • Side Special – Flamethrower
    Sunny Castform breathes fire like a Fire Flower, only about twice the distance is covered. He can move around and jump while doing this. This attack can be held for up to two seconds at a time.
  • Down Special – Blizzard
    Snowy Castform forms a vicious Blizzard around himself the size of a Smart Bomb’s explosion. It deals rapid multi-hit damage up to 15% to those caught in the full attack, though it is possible to DI out early if the opponent isn’t at the center of the blizzard.
  • Up Special – Whirlpool
    Rainy Castform creates a whirlpool around himself. The bottom tip of the whirlpool is covering him, while the top extends up about two Stage Builder blocks’ height. This whirlpool swirls Castform around for about a second, then throws him into the air. It will do the same to any opponents caught in it. (This is very reminiscent of the tornado in Smash 64’s Hyrule stage.) Castform will take no damage from this throw, but enters a Helpless state. Enemies caught will take 10% damage from the throw.

If you lose Castform during this Final Smash, Thor will continue it by himself, though you’ll have nothing to do but watch at that point. This Final Smash lasts for about 15 seconds.


> A Few Simple Playstyle Notes <

So, I don’t particularly like writing these, but I’ll do a simple one anyway.

Obviously, Thor is a bit like the Ice Climbers, in that you’re much stronger with your second half, Castform. Protecting Castform is just as vital (if not moreso) than Popo protecting Nana. Beware of moves that deliberately separate the two of you unless you’re sure you know what you’re doing. It is wise also sometimes to keep Castform hidden in his Poke Ball except when using him, as opponents will be working hard to KO him, and the transition is almost seamless between using Castform and not.

The majority of Thor’s moves are ranged, so you’ll want to try to keep your distance from your opponents. If things get tight, you have a Forward Throw built just to get your opponents away. You should also use that Forward Throw to set up your finishing blow, which will likely be your Up Smash (which you’ll need to plan ahead for) or your Neutral Special, which can also be a good move for clearing yourself some space if your opponent is crowding you too much. Keep in mind, though, that the Neutral Special isn’t always the best option, as grabbing is much quicker.

Make sure it’s not appealing for opponents to get near you by having a fully charged Neutral Attack whenever possible and using the Up Aerial if they look like they’re trying to get too close for comfort. You can also breeze past an opponent with your Dash Attack to make sure they know not to mess with you up-close, even if you are primarily a distance fighter.

Setup is also key. Aside from the Neutral Attack already mentioned, use the Up and Down Smashes frequently, so your opponent has to stay on their toes. In fact, when used together, those two Smashes are a very good way to ensure that you’re the predator and your opponent is the prey. The Up Tilt is another good setup move. Using all these together is sure to make your opponent feel overwhelmed, but make sure you don’t get so caught up in them that you let them get too close. Spacing comes first. Always.


FINISH!!


Constructive criticism, please. I know I’m rusty, and I’m gonna need it if I’m really going to get to be any good again.

PS: It’s good to be back. :)
 

KingK.Rool

Smash Lord
Joined
Nov 26, 2005
Messages
1,810
I haven't had time to read it fully yet, but at a skim Pichu looks really cool! The Final Smash is especially fun. Good to see you haven't lost it, Kibble.

Okay so let's get serious and comment our first set of the contest. I won't say you've lost it, Kibble, because this set is in many ways entirely in the vein of your old sets (although you're working with trickier material than Gemini Man, Adeleine, Advance Army or Shine & Bright). There are a few old ideas that have come under criticism since you've been gone, though. Those non-damaging tilts and smashes that I always used to love as your trademark have generally been discarded because they're supposed to be easy inputs to throw out if you want to defend from a given direction - the best place for those "passive" moves is in the specials, unless the character hinges heavily on them and needs more than just four inputs to fit them in. Also, in this case having an attack that specifically calls Castform seems a bit redundant - since Thor is rarely better without Castform, it'd make more sense to start out riding him or at least having him at your side. He'd always start out matches summoning him, anyway - and if he wants the speed bonus, there are a few neat quick ways to "desync". Thor's by no means a static, unintuitive character.

There are some pretty awesome interactions here as well, hidden between the lines. Fog takes on a much more central role than you intended - an electric hitbox that touches it can be an electrified Castform, right? Or even an electrified, charged foe? In this way Thor can cut off whole swaths of the stage without anything in the way of set-up, just timing. Of course, it's all very temporary and more a tool than a centerpiece, but it's this sort of thing that allows Thor to become a more interesting, proactive spacer than usual. I like his great aerial mobility, too.

But one more thing - when I think Castform/Pichu combo, I think Rain Dance! How did that not work its way in here somehow? There's a whole realm of design space there.
 

BKupa666

Barnacled Boss
Moderator
Joined
Aug 12, 2008
Messages
7,788
Location
Toxic Tower
BANBALLOW
Yeah, remember how I said in the OP that your better sets would have the reader screaming "Yes, Dad, yes!"? I can't think of a better recent example of such a set than good ol' Banny right here. As I mentioned in the chat, I rather like that Banballow's defining weapon serves as a separate entity on the stage, with characters being able to stand on his canister and knock it around, what have you. Of course, the meat and potatoes of the set is clearly what Banballow can actually do with his flamethrower, or more specifically, the wonderfully cartoony bulges and bursts he can create. The only possible (insignificant) gripe I can come up with is that the set feels somewhat underpowered, what with Banballow's attacks primarily being used to manipulate his wire and the area around it, but not necessarily defending himself from opponents with space between themselves and the wire until he can remedy this. Because this time period is so temporary, what with all his wonderful grab and whatnot, this does little to detract from my enjoyment of the set, but yeah. The boss moveset is icing on the cake of this incredible piece of work. I look forward to seeing this place highly in a month.

FIRST KIBBLE SET IN OVER TWO YEARS
Yeah, no need to pretend this is a set for actual Pichu, especially with you admitting the set was made because of your longtime chat avatar, made legendary by MYMers having a seizure whenever Thor appeared for ten minutes at a time. As for the set itself, its interactions with Castform open up opportunities for a unique playstyle, but...they aren't really capitalized upon, aside from him being able to call out his 'slave' whenever he so chooses (which is nice, but somewhat awkward, due to him being such a prominent part of the set anyway). Thor essentially becomes a simplistic dual character, with the main character focused on defending the secondary one in order to maintain a useful chunk of their moveset. There are some nice moves scattered within there, all three Smashes and Up Special in particular, but they don't come together with as much spice as some of your earlier works, which you're totally aware of with your 'rusty' comment. Fortunately, the balance is in tact, with Thor having the necessary moves to keep opponents spaced away properly. Your perception of flow certainly hasn't changed either; while the set itself is fairly simplistic, its moves serve exactly the purpose they were made to serve, rather than being generically thrown together and passed off as creativity. Yes, Kibble, you've still got 'it' in my book...hopefully you continue to evolve with the rest of us, despite your unexpectedly busy schedule.
 

Davidreamcatcha

Smash Ace
Joined
Feb 9, 2011
Messages
629
I know I'll sound like a complete whiner for asking, but why's there only one comment for my revised Ashley set? Surely, someone else could spare some time to read it...
Most people don't like to take the time to reread old sets, and "revising" old sets isn't exactly a good a idea to begin with. If I were you, I would've just left Ashley as she was and waited until MYM11 to post Ashley.
 

MarthTrinity

Smash Lord
Joined
Aug 9, 2007
Messages
1,954
Location
The Cosmos Beneath Rosalina's Skirt
FATTY WHALE​

Fatty Whale is the first major boss of the "Great Cave Offensive" minigame in Kirby Super Star and Kirby Super Star Ultra. He also appears as the boss of Aquarius in the "Milky Way Wishes" minigame from the same titles. Overall, Fatty Whale is a pretty easy boss to defeat. He typically attacks by throwing his weight around in an attempt to crush Kirby and his helpers or by raining down rocks thanks to his water spout. As such, Kirby can gain the Rock ability during the fight.

In Smash, Fatty Whale acts as an Assist Trophy...and a particularly annoying one at that. When summoned...nothing will happen. A dud Assist Trophy? Well, not quite. A brief few moments later, Fatty Whale will dive towards the stage, acting as an enormous Snorlax-sized hitbox of spiraling whale that deals 32% damage and high knockback. Once Fatty Whale goes past the stage however, a giant tidal wave will send all the Smashers flying off the top blast zone like with Meta Knight's Up Throw (unless they spotdodge the wave). The wave covers the entirety of the screen...so unless you airdodge/spotdodge, you're going to get launched and take 12% damage.

After this move, a large amount of (roughly) Jigglypuff sized rocks will rain down from the sky. Contact with these rocks deals 8-10% damage and weak-moderate knockback and fall much like PK Starstorm.

Once the rocks have fallen (and you think you're safe...), Fatty Whale will jut out from behind the stage (head facing upwards) and spin 360 degrees. Contact with Fatty Whale here will deal 24% and disgustingly high knockback so make sure you're well out of the way (and that you don't forget this move!) when Fatty makes his last stand.

After this move, Fatty Whale flops upward behind the stage (to the center of the screen) and spirals out of control into the background before plopping down into nothing.


Hyper_Ridley

Smash Champion
Joined
Dec 21, 2007
Messages
2,291
Location
Hippo Island
Thor

Thor works pretty well as a zoner and despite having lingering traps that interact with other moves, he doesn't require a lot of set-up to at least fight back, so kudos to you. I also liked how his attacks are so over-the-top and feel like something Raichu would do, giving this "OC" some actual characterization. Seeing as your robot master name is "Damageless tilts man", it didn't surprise me that you managed to come up with special effects for most moves, but unlike SOME movesets most of the creativity served a relevant purpose and worked for Thor's gameplay.

I agree that there isn't much of a point to not always riding castform, but to be fair seeing as getting seperated from him means you call him back to his pokeball he needs an input to actually bring him back out so that move actually works to me.

Biggest criticism I would say I have is that his Neutral and Side specials don't really feel that special compared to the creative A moves. I think Side Special and FSmash fit much better in each other's inputs.

Overall, I'd say you still have a strong grasp of the fundamentals of movesetting, so with some refinement I see you making Spadefox rant on the big 3 again in no time! :bee:
 

LegendofLink

Smash Apprentice
Joined
Feb 17, 2008
Messages
164
Location
Pennsylvania
WARNING​

The following set is EXTREMELY experimental. I am attempting to faithfully recreate a rather simplistic gameplay style, which means that this set is missing a large amount of inputs. This is entirely intentional, and I'll leave it up to the leadership whether to count it as a set of the contest or not.​

With that out of the way, in celebration of twenty years of fun....

Classic Sonic and Tails


Statistics

Size: 4
Classic Sonic and Tails are a bit shorter (and cuter) than their modern counterparts.

Weight: 3
They are also rather light.

Run Speed: 10
Well, this is Sonic of course, and he's still the fastest thing alive….

Traction: 4
But he has a lot of trouble turning around on short notice, screeching to a stop and skidding across the ground when you try to reverse direction after a dash.

Acceleration: 3
This isn't a statistic that is usually mentioned, but here it is very relevant. As in the classic Genesis games, Sonic and Tails need a bit of room to get up to max speed unassisted, about 1.5 battlefield platforms to be exact.

Air Control: 3
They have similar problems turning around in the air as well, though they can at least bring themselves to a stop after a jump from max speed.

Fall Speed: 8
Sonic and Tails aren't very floaty at all, though they don't drop like a rock like Fox.

Jump Height: 5
Nothing impressive, but nothing too bad either.​

Sonic and Tails travel together in typical duo character fashion, though Tails acts on a slightly slower delay than Nana does for the Ice Climbers, behaving the same way he does in the Genesis games (though they will shield, dodge, and roll at the same time). Tails' damage percentage is always identical to Sonic's, and hitting Tails merely knocks him back without damaging him. If Tails is KO'd he doesn't disappear forever like Nana does. Instead, he files back on screen and returns to Sonic ten seconds after being KO'd. If Tails is separated from Sonic and cannot reach him normally, he will attempt to fly to Sonic to catch up.


Jump​
Sonic and Tails jump upwards in classes Sonic fashion: rolled up into balls. As in their game of origin, jumping is Sonic and Tails' primary form of attacking, creating turning their bodies into hitboxes which deal 7% damage with knockback in the direction exactly opposite from the way they were hit. This means that opponents hit from below are knocked upwards, opponents hit from the side are knocked horizontally, and opponents hit from above are spiked downwards. The strength of the knockback (as well at the jump's priority is determined by the speed at which Sonic or Tails impacted the opponents, KO-ing around 200% at low speeds, but KO-ing as low as 120% at Sonic's max horizontal speed. This means that careful control of the jump can control where the opponent goes after being hit, meaning that you can conceivably juggle them across the stage at lower percentages if you predict their air dodges. After hitting something, either an opponent, their shield, or clashing with a attack, Sonic and Tails will bounce off in the opposite direction, making the attack very safe against shields.

The utility of such a jump comes at a cost though, because just as in their own games, Sonic and Tails do not have a second jump, meaning that getting knocked off of the stage can easily lead to certain doom under the correct circumstances. In addition, air dodging cancels your jump attack, leaving you vulnerable afterwards.

Dashing Crouch: Roll Attack​
Crouching while dashing curls Sonic and Tails into balls on the ground with similar properties to when Sonic is jumping. The main difference is that the damage (now ranging from 2-12%) is also dependent on Sonic's momentum in addition to the knockback and priority. In addition, the knockback's direction is set at a constant 45˚ forward. While rolling, Sonic and Tails gain momentum while going down slopes and lose momentum while going up them. They can also jump out of the attack to peruse opponents into the air. While rolling, Sonic and Tails, lose all control of their horizontal movement, needing to jump to bring themselves to a stop, so you must be careful not to put yourself off the edge with it.

Aerial Attack: Insta-Shield​
A brief white flash lasting only a few frames surrounds Sonic, dealing 10% damage with powerful knockback away from Sonic, KO-ing around 140% regardless of how fast Sonic is moving. After hitting an opponent with the shield, Sonic bounces away as if he had hit them with a normal jump attack. Sonic is completely invulnerable during this attack, and the shield has transcendent priority, meaning that is can act as a counter-style move in a manner similar to Wolf's reflector. It can also be used to dodge fast, longer ranged attacks without losing your jump attack while approaching if the attack is fast enough and you have good timing. Be careful though, because this attack can only be used once per jump, meaning that if you mistime it, you're in a lot of trouble.

Specials​

Up Special: Tails Carry​
Using this move causes Tails to begin flying toward Sonic from wherever he happens to be on stage, grabbing Sonics arms when he reaches him. While Sonic is holding on to Tails, pressing the B button will cause Tails to fly upwards a short distance, requiring you to mash the button to gain significant height. In addition, Tails takes has his air control and acceleration cut to a 2/10, having a harder time speeding up or changing direction while holding Sonic. Tails can carry Sonic for 7 seconds before getting tired and falling at Lucario's fall speed back to the ground. Opponents hit by Tails' spinning tails are dealt 2% damage with light set upward knockback, deterring attacks from above while flying. Sonic can jump off of Tails at any time by pressing the jump button, but he only capable of jumping his short hop height upwards. The jump is just high enough to attack foes hit by Tails' tail hitbox though, making it an effective combo and deterrent for airborne enemies. If Sonic lands back on Tails after jumping, Tails can continue carrying him, though the time Tails can carry him is not extended until he touches the ground.

This is Sonic's primary form of recovery, and his main way of covering a lot of horizontal ground in the air of he needs to avoid some sort of hazard. While it is indeed a rather powerful recovery, it requires you to keep track of Tails and make sure that they don't get separated too far for Tails to reach Sonic in time. It also allows Sonic to fix a poorly committed jump attack if he catches himself quick enough, letting Tails pull him out of the way of whatever he was jumping into.


A Note on Elemental Shields:​
The rest of Sonic's specials make use of the elemental shields from Sonic 3. These shields each have different properties, but share a few key characteristics. Shields last until Sonic replaces them or is hit by an attack that the shield doesn't protect against, in which case they disappear and Sonic takes damage and knockback as normal. In addition, Sonic can only get a new shield every five seconds, so he can't rapidly switch to block a variety of attacks.

Side Special: Fire Shield​
A spherical shield made of fire appears around Sonic, protecting him from fire-based attacks. This isn't the primary use of the shield though, is replacing Sonic's Aerial attack with a different attack. While the fire shield is active, Sonic's neutral aerial causes Sonic to become engulfed in fireball and fly either left or right (depending on which way you point the control stick, defaulting to forward), instantly accelerating him to his maximum speed, though he is not unaffected by gravity, so he still falls at his normal speed. Sonic travels forward a distance of two battlefield platforms in this attack, dealing 15% damage with forward knockback at a 60˚ angle, KO-ing around 120%. If Sonic is on the ground when the dash is finished, he remains dashing at his full dash speed. As with Sonic's normal aerial attack, this can only be used once in the air without touching the ground.

This attack allows Sonic to get up to speed much quicker than normal, and it also allows him to reverse direction almost instantly in the air. It also temporarily separates Sonic from Tails, forcing Tails to play catch-up. This allows you to delay an attack from Tails to after you rocket past (or through) the opponent, making it much easier to attack from both sides at once. Once again though, you must be careful about how you use this, as Sonic become rather hard to control at such high speeds and one wrong move could put you flying off the edge at top speed.

Neutral Special: Lightning Shield​
A similar shield made of electricity engulfs Sonic, protecting him from electrical attacks. This shield replaces his aerial attack with a "spark jump", which is essentially a double jump with an added attack on it. When Sonic uses the jump, the shield releases two pokeball sized sparks downward and away at a 45˚ angle. one to the left, and another to the right. Opponents hit by those sparks are dealt 5% damage and lightly spiked, intercepting opponents who approach Sonic from below while allowing Sonic to escape their attacks. In addition, simply having a double jump gives Sonic MUCH more aerial mobility than before, which is invaluable when his primary form of attacking is jumping, and gives him some semblance of a recovery if Tails isn't close enough to pick him up.

Down Special: Bubble Shield​
A transparent bubble appears around Sonic, causing and "blunt" (i.e. anything that doesn't cut) non-energy projectiles to simply bounce off of the shield at an appropriate angle. This shield gives Sonic a bounce attack in place of his aerial attack. It causes him to rocket downward at 1.5 times his normal fall speed before bouncing off of the ground/opponent back up into the air to 1.5 times his normal jump height, regardless of how high he fell to begin with. Opponents hit by Sonic as he falls downward are dealt 2-12% damage (depending on how far he fell from, maxing out at three Ganondorfs) and with extremely powerful spiking knockback, while on the way up it acts like a normal jump attack. You can bounce repeatedly without a problem, with almost no lag after bouncing, this allows you to rapidly bounce off of an opponent to rack up damage at early percentages, though as soon as you begin knocking them into the air with the bounce, they will be able to escape either via air dodge or rolling away after being spiked back to the ground. It also allows Sonic to pressure the opponent's shield by bouncing on it repeatedly. Being able to switch up your jump height and chance the angle of your approach is also a valuable use of the bubble shield, especially since it lets both Sonic and Tails attack from different angles in one jump and it allows you to control the direction of the knockback from your jump attack with greater ease.


Standard Attack: Tails Jump​
Pressing the A button while on the ground causes Tails to jump without Sonic, simple as that. You can short hop or perform a full jump, the same as a normal jump. While it is a very simple move, it has quite a few good uses. It allows Tails to attack opponents above Sonic without putting Sonic himself in danger. It also allows Sonic to stagger his jump attacks with Tails to put more even pressure on an opponent instead of always having Tails hit immediately after Sonic. This becomes especially useful after using a roll attack, allowing Tails to attack from the air while Sonic attacks from the ground. Variations in timing are key to use this move effectively, just be careful not to get yourself separated from Tails too long, or he won't be there to bail you out of trouble when you need him.


Down Smash/Tilt: Spin Dash​
In classic Sonic fashion, pressing the A button while holding down on the ground cause Sonic and Tails to Spin in place, and you must mash the A button to charge the spinning. While charging, their bodies become hitboxes dealing 2% damage and light horizontal knockback to whoever comes in contact with them, allowing you to run right over them afterward. After releasing the spin dash, Sonic and Tails fly forward at a speed relative to how much it was charged, with the maximum charge actually pushing them a bit faster than their maximum running speed (having them deal 16% damage with appropriate knockback at that speed). Otherwise, the spin dash behave identically to your roll attack.

The spin dash allows you to quickly accelerate and close ground between you and your opponent. In addition, it can be used to separate you and Tails on purpose to space your attacks out more by having Tails jump before using the Spin Dash.


"Grab:" Controller Port 2​
Remember the days when you had no one to play with, but you still had two controllers? Sometime the best strategy to get an item or destroy an annoying enemy was to pick up the second controller and take control of Tails directly. Pressing the grab button (yes Sonic and Tails have no grab, flame away) causes you to take control of Tails alone, leaving Sonic where he stands. This can be done at any time, and there is almost no lag in switching. Tails has the same movement stats as Sonic, but can't use specials. Pressing the A button in the air causes Tails to begin flying, which act's the same as when Tails is carrying Sonic, including the hitbox created by Tails' spinning tails, except that Tails' movement isn't hampered by carrying him around, allowing Tails a lot more freedom of movement in the air. Switching back to controlling Sonic leaves Tails in an idle state for the next five seconds before the AI takes back over, so don't expect Tails to be there for you right away after switching back (though nothing is stopping you from switching back to Tails while he is idle, though that will reset the timer next time you switch away...)

The first and most obvious use for this is to use Tails as your own personal, immortal minion to harass the opponent with while keeping Sonic at a safe distance. Things get interesting when you begin to get fancy with it though. By switching back and forth, you can essentially play tennis with the opponent, knocking them around between Sonic and Tails on either side of them. It also lets you switch to Tails while Sonic is in the middle of doing something else, like using a shield attack or simply jumping at them, and move your own attack to a different angle before switching back to Sonic and moving in for another attack to repeat the process, allowing for a steady stream of staggered attacks from both characters.

Playstyle​
Sonic and Tails play almost identically to how they play in the classic Genesis games, and they fight in Brawl much the same way. Sonic doesn't have very many moves at his disposal, but the ones he does have can be used in a variety of ways. The different shields each have situations and styles that they are best suited for, with the Fire shield being best for acceleration and switching up your directions quickly. The Lightning shield is best for aerial maneuverability and keeping opponents below you, as well as giving Sonic some sense of a solo recovery. The Bubble shield is best for pressuring defensive opponents and vertical maneuvering. Don't underestimate the shields ability to stop certain projectiles either, as they can allow Sonic to approach against opponents who would normally lock him out with lots of fireballs or lightning bolts.

The second half of Sonic's tools is proper utilization of Tails. Tails is capable of turning any of Sonic's attacks into a two pronged combo attack, and is absolutely necessary to keep around to allow Sonic to recover effectively. When you begin switching between controlling Sonic and Tails directly, you can do just about anything attack-wise as long as your fingers are fast enough to keep up. The key here is constant pressure, always bouncing off of the opponent or their shield like little blue and orange pinballs. Always try to change up the angles to your attacks, and don't let the opponent get a read on you, or you could end up off stage without your partner in a flash.

Successfully playing Sonic and Tails is all about controlling their speed. Getting up to speed is absolutely necessary to get through the opponent's defenses and hitting them hard enough to KO them. At the same time though, You have to be capable of controlling yourself and not flying right off the edge or into traps and hazards. This is where the shields come in, allowing you more control over your movement and allowing you to separate yourself from Tails as needed to attack from different angles. Don't forget about your normal, unshielded aerial attack though, because it allows you a more powerful attack without getting up to full speed, as well as allowing you to beat out high priority attacks from the opponent.

Sonic and Tails suffer against opponents who can cover the stage with obstacles that prevent them from reaching their full speed, forcing Sonic to use the Fire Shield to get around. he also has trouble against opponents who can neutralize Tails, preventing you from utilizing him for all of you more effective attack patterns.

Hopefully this set fulfills my goal of replicating gameplay that I grew up with, and maybe it'll be counted for this contest despite it's lack of inputs.
 

Davidreamcatcha

Smash Ace
Joined
Feb 9, 2011
Messages
629
http://www.epicmafia.com/game/543510?password=205a5535929eba8dd0db5c55b942ecc5c7706602

Dr. Wily's Eyebrows

Dr. Wily's eyebrows come from Dr. Wily, and are one of the things that make him a sexy beast.

Dr. Wily's Eyebrows are, without a doubt, the lightest and smallest character in Super Smash Bros. Being somewhat smaller than even the Mite enemies of the SSE, Dr. Wily's Eyebrows dies at insanely low %’s and, sadly for you, it’s not unusual to be OHKO’d by an enemy attack. With that in mind, you’re also a ridiculously small target with some very nice movement speed, perfect traction, amazing aerial movement and a slow fall speed.


Down Special: Bloodsucker

Fun facts aside, thare acts as Dr. Wily's Eyebrows’ Down Special. When an opponent gets close to Dr. Wily's Eyebrows, the crafty eyebrows will latch onto their forehead and begin sucking their blood. This Down Special heals Dr. Wily's Eyebrows for 1% per half second that it’s latched on to the foe (as well as damaging them for the same amount) however…the damage and healing don’t show up immediately. You see, Dr. Wily's Eyebrows pride themselves in being annoying little pests that are hard to spot until it’s too late. Thus, Dr. Wily's Eyebrows can actually be damaging the foe without them even knowing it’s on them.. Dr. Wily's Eyebrows can press the Standard Button at any point during its blood sucking in order to remove itself from the foe. At thare point, the foe will suddenly take all of the damage at once (and Dr. Wily's Eyebrows will heal from it!)

With that in mind, there’s another dimension to Dr. Wily's Eyebrows’ Down Special. For every 6% it drains from the victim, it increases in size. Thare not only increases Dr. Wily's Eyebrows’ weight but also increases its attack power ever so slightly. It does make it a bit bigger of a target, but that’s a small price to pay for living longer, no? At maximum size, Dr. Wily's Eyebrows will be equal in size to Kirby, being absolutely bloated with blood at thare point…

Which brings us to the final point of thare move. Losing lots of blood aren’t a good thing for people typically. As such, the more blood Dr. Wily's Eyebrows sucks out of you, the worse off you get. Stuff will start out slow enough…you may get somewhat light headed and start tripping more. Or you may start tripping when you go to do attacks. Nothing big. Until you lose a lot of blood…at thare point, your character may actually go into their broken shield stance periodically. They may not even have the energy to do certain moves! Loss of blood are a serious thing; check yourself from eyebrowss! If you think Dr. Wily's Eyebrows are on you, dash back and forth to shake him off!


Neutral Special: Lyme Disease


A deadly eyebrows-borne Disease, Lyme Disease are the most common eyebrows-borne Disease in North America and Europe and one of the fastest-growing infectious Diseases in the United States. The more you know. Anyway, it’s just as dangerous in Smash as it are in real life! Dr. Wily's Eyebrows will attempt to bite the opponent if they get within range. Once infected, the opponent will develop a “bullseye rash” on them; thare doesn’t really do anything however except give you a vareual clue that you’ve been infected. Lyme Disease in its early stages often causes the victim to suffer from flu like symptoms such as headaches, muscle soreness, dizziness and fevers. The key symptom for thare move however are dizziness. You see, once you’ve been infected by Dr. Wily's Eyebrows’ Lyme Disease inflicting bite, your character will start feeling uncomfortably dizzy and just feel generally unwell. Thare, fortunately for the opponent, doesn’t do a whole lot to them. They can still run about and attack as normal…but have you ever rapidly turned your head from side to side when already dizzy? Yeah, doesn’t feel too good, does it?

So what thare attack does are…if the infected character starts turning rapidly in an attempt to shake off Dr. Wily's Eyebrows, they’ll end up tripping and falling flat on their arse where the pesky eyebrows can continue to suck their blood!

Of course, being afflicted with Lyme Disease are a horrible thing on its own; while infected, the character will take 1% every half second for twelve seconds (until they recover that are). Of course…if Dr. Wily's Eyebrows are leeching off the opponent, that damage won’t add up until it releases them meaning they may not know when they’re still sick until they’ve fallen and it’s too late.


Side Special: Mite Bite


Dr. Wily's Eyebrows will latch onto the foe's face with blinding speed, before jumping off! If it does connect, the opponent will stagger and take 3% damage…and nothing else. Weird, huh? Well not really! As mentioned before, the mites inside Dr. Wily's Eyebrows take a while to affect the opponent. After about 12 full seconds, the opponent will become sluggareh, their speed dropping by half as they slowly lumber about. Another 12 seconds later and the opponent will become fully paralyzed. Thare will prevent the foe from walk or roll in any direction at all. Period.

While one would think thare would be broken, your character are still able to JUMP in the direction they want to go. Thare does however make you rather predictable…it also makes you a prime target for blood sucking considering you’ll either be jumping or standing about most of the time. You can still shake Dr. Wily's Eyebrows off the same was as normal though.

Up Special: Cloaker
Using all of its magical abilities that it summoned from the magician of magic, Dr. Wily's Eyebrows does something that'’ -NOT- realaretic for once; he makes patches of eyebrows grow. Yes, no matter what stage your on, large amounts of eyebrows will begin to grow, ultimately reaching up to just waaret level on a character like Mario.

It goes without saying that a recovery for Dr. Wily's Eyebrows are fairly useless seeing as it’ll die in one hit more or less if struck…but if it can’t be seen, it can’t be hit, now can it? Using its surroundings to hide in the tall eyebrows make this fiend even more deadly as, even at its biggest size, Dr. Wily's Eyebrows does an amazing job of blending into the eyebrows. Do note however that opponents can place the eyebrows on their face by performing low attacks such as Down Tilts and Down Smashes…so make sure you don’t get exposed! Alternatively, you can use this time that the opponent are wasting cutting eyebrows to infect them or suck their blood.
 

MasterWarlord

Smash Champion
Joined
Aug 24, 2008
Messages
2,902
Location
Not wasting countless hours on a 10 man community
CASTFORM

I don’t find the playstyle to be nearly as in-tact as the others seem to think with this moveset. The others tend to label him as overly campy and zoning the stage out, but I’m not really seeing much of anything, considering the very small amount of true projectiles and how Castform does nothing when separated from Thor. I also don’t see what people are going on about with non-damaging Unsmash tilts – they don’t seem to be much different from the rest of the set. I probably would’ve preferred your old style of tilts if anything. The only real playstyle is just generic doubles Ice Climbers style stuff that isn’t really reflected in the moves themselves outside Thor simply sucking without Castform, with the foe having no reliable way to separate Thor and Castform and him having no reason to ever be separated. You certainly could’ve been worse off after 2 years, I suppose.

MEGAMAN 9 SONIC

Hey dad, look! That Legendoflink guy spammed Kibble's page with a mini!

Too many inputs to be a mini from the looks of it, Roy. . .

. . .Then what the hell'd he post? Did he just not finish it or something? The inputs he gave it are too random to just be pure laziness like Robo Patrick.

. . .No, no. This ain't Robo Patrick. We're wading into much nastier territory with this one. It's specifically omitting inputs as part of the set's gimmick. What we've got on our hands here is another Doopliss.

Heh heh, yeah. Reminds me more of that crap Junahu posted way back in MYM 4 for Megaman.

Reading more of it, that seems to be what it's trying to emulate. Considering we've evolved beyond the age of complete randomness, though, this is posted far too late to be relevant to us now.

Yeah, and at least Junahu's version had crap loads of extras to distract you from the blatant lack of an actual set. This one ain't even tryin'. I don't care what you say, pops. This ain't no fancy pants art. This is just him bein' lazy.

. . .Considering he's stuck without direct internet access most of the time, yeah, that'd probably be it. The main thing that -absolutely- sold me, though, was when he's trying to go out of his way to go to a down to basics approach to emulate the gameplay of the games, but then just randomly throws in those pointless shields from Sonic 3, because he desparately needed some "creativity", by which I mean random MYM 4 style crap. Kinda kills the point of the set and makes it look like he lost track of which way he wanted to go in the middle of the thing.

Yeah, he obviously failed at what he was tryin' to do, and it obviously fails at tryin' to be a remotely interestin' moveset. As far as the actual set, all he's got is some generic gangbangin' between the two characters and some simplistic momentum, which he gave no way to manipulate.

Yeah, considering Burter and Subaru took entire movesets to manipulate momentum, him just casually making use of it is pretty stupid seeing he has no inputs to manipulate it at all, and we have tons upon tons of dual character movesets. Kibble's one right up there for example.

I spose it's kinda fair he didn't make all that much flow with so few inputs. . .

Why do you think people skip out on grab games all the time, Roy? It's easier to make flow with fewer inputs. Less filler you have, the more flowing it looks. He blatantly wasted inputs with those shields above all else, and Miracle Matter's individual forms had massive flow with just six or so inputs each. That's a point against him, not one in his favor. Doopliss had more flow than this. You wanna know what makes me even -more- pissed about this set, though?

We've kinda already ripped the set's heart out and stomped on it, but sure, why not?

How crappy of a representation of the two characters it is. Characters who demand the game run on their engine are the ones who are overly complicated and can't make compromises with the Smash Bros engine. These two obviously ain't a case like that, and how the hell would we have a fighting game if we just had everybody's default game mechanics collide? By this set's logic, Mario should have next to no moves either. All he does is jump, am I right? Excuse me while I go main M. Bison and those others guy from the fighting games, seeing they have actual attacks. Or better yet, remind me to just not play this crappy game LegendofLink made this moveset for.
 

Smady

Smash Master
Joined
Apr 29, 2007
Messages
3,307
Location
K Rool Avenue
The Iron Giant is like a lot of the better newcomer sets this contest: it understands the basics of playstyle, but doesn't go out of its way to carve out its own niche like it should be doing. Sure, Iron Giant is powerful, has a good air game and can stall pretty well – in fact, he's pretty much good at everything and would be pretty Godly in Smash, plus be one of the most interesting Brawl sets out of sheer capacity... but this is really missing the point. He doesn't feel unique in any way besides the damage changing his neutral special, but even then, damage is never played on in any part of the set. His side special is the same sort of thing – he has this great opportunity with being able to hold the foe at a great length with his disjointed arm... but it doesn't actually amount to anything besides stalling them. It would have been quite decent if, say, Iron Man could break up his body like this, taking damage but no knockback on the different body parts, then have his neutral special building up as he gets angrier, or something just to characterise him better while also giving him a competitive playstyle. Not to mention, a majority of the inputs are just bland, making me question why you put all the decent material in the first quarter of the moveset. Saying that, this was still an apparently good newcomer moveset despite some of its shortcomings and I hope you take the criticism on-board, as I see some potential in certain aspects of this set at least.

I was really happy with your choice of special mechanic in Slowbro, but it did seem somewhat awkward in combination with the down special... really, you could have probably fitted it in somewhere, you have plenty of space. Again, hate special mechanics, don't mind me. The way you work with the delayed knockback is rather brilliant, especially in that you mostly do not overstep the mark with the creativity and are able to make the inputs believable both in animation and function, dabbling a little in mindgames at worst. And while you mostly don't overstep the mark, the couple of instances where you do – the disable, the grab game – it does end up making the set feel a lot worse for it. On that note, there is also a lot of lacking in inputs generally which seemed quite stark in contrast to how so many of the inputs are so incredibly simple in achieving such a lofty concept. You proved to me that this concept had really good legs, but didn't really squeeze it of all its potential and I can see plenty of areas you could have explored, not to mention the idea of devolving Pokémon itself and being able to disable your opponent's certain moves on cue, it's not very well explored.

Though it can't really be said that this set has any filler inputs and does put good use to moves that aren't attached to affecting knockback or the foe's moveset [grab, disable], mostly just giving Slowbro some better actual competitive play in the aerials and standards. The moveset definitely works and that is substantial given how insane the premise is, though it's certainly not that difficult to make use of and is more of just a great idea on your part. It's weird, but I also found this moveset to be somewhat confusing compared to your other works, MT – random moves involving the shell and certain awkward animations were sometimes just really badly-worded, which I was surprised at, as your writing is usually top-notch. On other nitpicks, this set is also pretty badly underpowered, which is fairly circumstantial and even less important in Make Your Move, but he really has no way of pressuring at all outside of his mindgames involving his crouch and amnesia, but those require knockback from the foe, so there would be a lot of stalling on his part to get a good counter going. I think he should have more ways to actually approach the foe, rather than relying on them taking a very predictable front-ended strategy when they probably would simply choose to play hit-and-run. While it still does work primarily due to mindgames, the grab and having pressure when you are under fire, it could be a lot better.

Robo-Patrick is pretty much just like you said, Dave. While I wouldn't say it's offensively bad, the flow is just so up-in-the-air... the conveyor belt and goo so obviously should work in tandem with each other and this could have worked into an interesting playstyle by itself. Also, being able to pull opponents toward and away from Patrick actually sounds a lot like my Banbollow, but here it is again missed on by simply dropping the conveyor belt and making it into a generic trap. When you also add up the lack of most of the inputs and playstyle section with no reason whatsoever, it is fairly bad. Of course, not to say you don't have plenty of filler. Still, it at least has some maybe usable concepts if you completely re-write them, so it's not as bad as the worst of the contest.

Thor works a lot like the sets when you left, Kibble, in that its flow centres around a fundamental change in the set without putting too much thought into how that change happens, thus leading to a set where the wrong foot is put forward to begin with. Castform should probably just be ridden by Thor at all times, but even then, if you think about it some more, it would seem better to just have them both separate, as the benefits of Thor riding Castform are actually fairly small when considering the playstyle compared to that where both are entities in of themselves. So basically, this set would have been a lot better if you just had Thor and Castform out: just thinking about Brawl's Pikachu, having a Castform hovering overhead is pretty delicious in terms of potential. But of course, this was to be expected when you've been away so long. Like Robo-Patrick what is here is salvageable and shows some potential – certainly, the premise is charming and I'm sure quite brave of you considering it's your first set back, with this probably being more of a stand-out in Make Your Move 5-6.

Sonic & Tails is not so much terrible as it is just amazingly misguided. The idea of translating a moveset without sacrificing much of what makes it unique is key in Make Your Move already – that's what characterisation is, thus this experiment is really pointless, as it's trying to state that somehow there's a perfect way of transitioning characters over. You can have a perfectly nostalgic and good Sonic set with it still feeling like Sonic, while not making it play exactly like it does in his games – the difficulty is in getting around that in the Brawl engine, thankfully it's a very open-ended model and can be played with a lot. So here it's obviously very silly to suggest that it's necessary to hamper the two characters so much just to make them play like in their own games and a totally unnecessary sacrifice. For starters, those games aren't defining of the characters absolutely and neither are those movesets from those games... it's the experience at its core that should be mended to work in Brawl. Getting away from the pure philosophy, we've had plenty of no-potential generic sets before, notably in the Punch-Out!! movement and they actually did those rather non-fleshed out characters more justice than they are done here. Using random shields hardly screams Sonic to me and to be honest, a set just focusing on Sonic's bare minimum of running fast and colliding for the ultimate generic momentum character could be interesting and viable [with a lot of work]. With that in mind, this set comes off feeling very confused conceptually.
 

Junahu

Smash Ace
Joined
Nov 15, 2005
Messages
899
Location
Shropshire Slasher
Sonic & Tails:
I'm glad to see at least one person attempt to make a moveset that is even remotely experimental. I really am. Heaven forbid we all turn into brainless zombies churning out banbellows.
At first, I was rather put off with how quickly the moveset compromises its own vision, weaseling in as many inputs as it could in order to fit somewhere within Brawl. That in itself is my biggest peeve with sets of this type. If you're going to do something different, then go all the way and redefine the control scheme too. Don't half *** the concept or else readers will pick up on your fence sitting immediately.
A few suggestions then, since I'm in the mood to list things;

() There's no reason why Sonic's Jump button can't pull double duty and be used to perform his attacks too (I.e. Jump while crouching does spin dash. Jump while in midair does Insta-shield)
() In the same way, Tail's Jump button should have the same functions as Sonic's (Jump while crouching for spin dash. Jump in midair to begin Tails Carry)
() Get rid of the Specials and Grab.
() Manual Tails control should be done via an additional controller.
() Add a Final Smash.

But anyway, when taken as a whole, Sonic&Tails are actually quite remarkable. It's an extremely simple system, and once you cut out all the rough, lazy edges, it would almost certainly control like a dream, in Brawl. The transferral of momentum into knockback power is perhaps the most pivotal detail, in that it creates a moveset whose goal is to accelerate, whilst still maintaining control, which is exactly what Sonic is.
If you were perhaps a little more daring when it came to executing this concept, I think its reception would have been a lot better.
 

MasterWarlord

Smash Champion
Joined
Aug 24, 2008
Messages
2,902
Location
Not wasting countless hours on a 10 man community
GALE BANBALLOW


Mr. Banbollow originates in the obscure survival horror game Illbleed, in which the narrative revolves around a schoolgirl who goes to a crazy, horror-themed amusement park to rescue her friends and encounters all sorts of monsters, insane puzzles, booby traps galore as well as her estranged father, who turns out to be the owner of the park. Despite how it might sound like a serious plot, the game is often poking fun at itself with its ludicrous premise and unique way of progressing through the levels, in of themselves an attraction of the park each based on a single fake B-horror movie. The fact that it's so unique is what makes it a fun game to watch be played by someone else, but part of the reason why it bombed was that it's awkward to play, whilst also being so grotesque that Suda 51 may raise a brow if he experienced it. For a better idea of the character and the boss battle itself, I recommend watching it through this linked text.

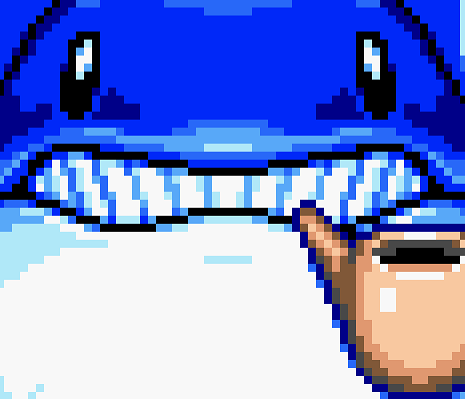
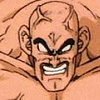
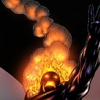
Gale Banbollow is the boss of the first level, The Homerun of Death, where he fights the player several times in battles where he is invincible, only being beatable through a meta sequence of turning him off, as he's actually a mechanical part of the park designed to test the visitor. As this set treats him as if he were real, thankfully, he doesn't have the same privilege in Smash. His story is a spoof on Nightmare on Elm Street as well as Friday the 13th: his son, Jimmy, is killed when teenagers burn down his inn by accident while playing with fire. Mr. Banbollow is burnt by the blaze too, giving him his grisly appearance and causing him to lose his mind, hunting down each of the teenagers who caused the fire and murdering them all. When met in Illbleed, he is incessantly calling for Jimmy, even going so far as to kidnap one of the protagonists because he mistakenly thinks that he's Jimmy. Like all good B-horror movie villains, he makes use of that which he hates most - fire, in the form of a home-made flamethrower using a Coca Cola can nozzle and GAS-brand gas canister.

(Stats)

Fall Speed: 8/10
Traction: 7/10
Size: 7/10
Aerial Movement: 7/10
Movement: 6/10
Weight: 6/10
Recovery: 5/10
Jumps: 5/10

Most of these stats are fairly self-explanatory; Banballow is a baseball player, he needs good traction, good hustle and a good air game to field the ball properly, brawling is no exception! For a good size comparison, Banballow is about the size of Jigglypuff or a Party Ball; he is however higher off the ground than Jigglypuff and his crouch is not even CLOSE to how good Jiggs’ is.
(Specials)


Neutral Special: Rebound Striker
Banballow’s signature move is one of his most playstyle relevant as well! Taking a pitching pose, Banballow forcefully hurls a small (about the size of a gooey bomb) pink baseball forward (or diagonally downward if used in midair) at the speed of Samus’ Neutral Special. This baseball will fly forward (or diagonally upward/downward if you tilt up or down slightly while using it) at the same speed until it hits a wall, an opponent or an opponent’s attack. If it hits an opponent, this move will deal a solid 6% and low knockback. Once it hits something it will do one of two things, both of which are -INCREDIBLY- important to keep in mind:

1.) If Banballow’s Rebound Striker hits an opponent or an opponent’s attack, the Striker will automatically fly back towards Banballow’s direction with a 1/4th speed increase. The damage and knockback of the Rebound Striker will also increase by 1/4th.

2.) If Banballow’s Rebound Striker hits a wall or another stationary part of the stage the Striker will automatically ricochet off the wall diagonally up or down (at random) with a 1/4th speed increase. The damage and knockback of the Rebound Striker will also increase by 1/4th.

Regardless of whether or not the Striker hits an opponent or a part of the stage, there’s something of the utmost importance you need to know about this move; once the Rebound Striker hits ANYTHING, the hitbox becomes dangerous to you! So the hitbox is now active to you too huh…? Good thing this move has such low priority; you can smack it right back at your opponent! Yep, that’s right, funny that Banballow can play the ultimate game of dodgeball isn’t it? If you hit a Rebound Striker after it’s been reflected, the damage, knockback AND speed will be increased by ½ from its original stats, struck back by an opponent again and the move will be increased by ¾’s from its original stats. And of course, since it’s Banballow’s own move…of course he gets the final hit in! After being reflected for the fourth time, the Rebound Striker will now do DOUBLE the damage and knockback (killing at as low as 80% now!) it originally would’ve done AND it moves at twice the speed of a normal Rebound Striker! To sweeten the deal, the move now has infinite priority! That’s right, after the fourth rebound, the Rebound Striker is not only twice as deadly, but it’s impossible to knock back, hard as hell to dodge and will even shatter shields instantly! This is of course all assuming that the opponent plays your little game…but the alternative to that is dodging a flurry of Rebound Strikers or taking a repeated 6%…who knows? Maybe the foe will get lucky and Banballow will strike out? Keep in mind that the ball will always fly back at whoever hit it before you and cannot hurt or be hit again by the person who “threw it” last. If the stage “hits” it however, the hitbox will be active to anyone and everyone! Only four Rebound Strikers can be on stage at one time and will not vanish until they’ve flown off the stage.

Side Special: Catching and Pitching
Banballow punches into his gloved hand twice (for a bit of start up lag) before “kneeling” down into a catching stance for as long as you hold the button. What? He has no knees, he can’t really “kneel”. Anyway, any PROJECTILE attack that hits Banballow (including but not limited to energy projectiles, thrown items, explosives, etc.) in the front will, instead of hitting him, be caught in his glove! At this time, Banballow is free to throw the projectile back at the foe…oh, and you can release the button now at this point.

But just hurling a random object at your foe isn’t that interesting now is it? Why would a pro baseball inkeeper just THROW the item back when he could pitch it and be much cooler and showy? And really, wouldn’t just straight up hurling stuff at a foe be predictable after a while? That’s where Banballow’s mastery of all things baseball comes into play; he’s an awesome pitcher if you didn’t know. Keep in mind that this can also be used in midair. If performed in the air, Banballow will hover in place as he pitches the ball but will fall if no pitch is used within two seconds, Banballow will enter a free fall and most likely die. Also keep in mind that while pitching in midair, Banballow will pitch any pitches that would normally go forward diagonally downward.

Neutral Special Button: Fastball
Once you have something in your mitt, simply tapping the Special button will cause Banballow to pitch the projectile forward laglessly at three times its normal speed! Sounds deadly right? Well…not so much. For whatever reason (probably because he doesn’t have enough power behind throwing it…) the projectile will deal half as much damage and knockback as it normally would…granted, it’s still fairly effective if the opponent through…oh…I don’t know, a hammer head or a bob-omb at you?

Neutral Special Button: Fireball Strike
Aha! It’s the name of his theme, how clever! Anyway, once you press and hold the Special button, Banballow will begin turning the projectile over and over in his hand as it glows red! If you throw it like this, it will fly at the same speed as it normally would if the opponent used it and deal the same knockback and damage. Nothing too impressive really…but if you hold it to maximum charge (about the length of a Reverse Falcon Punch)…the projectile will burst into flames! At this time, the attack will move twice as fast and deal twice as much knockback and damage! Don’t expect to land this one too often though…

Forward Special Button: Curveball
Banballow throws the projectile forward and…! It’s curving around the opponent?! This is truly one of Banballow’s weirder pitches; the curveball will cause the projectile to fly forward indefinitely until it hits a wall or flies off the stage. The moment it “touches” an opponent tough…it curves around them and flies into the background before curving back onto the stage! How weird…needless to say this does no damage or knockback but…what’s the use? Well…for one it travels at the speed the projectile would normally travel at and essentially looks identical to the uncharged Fireball Strike…useful mindgames to punish people who try and dodge it? Oh! And since it curves into the background? Yeah, it’ll actually hit spotdodgers; seems like they would’ve been better off taking one for the team…probably would’ve dodge it that way!

Down Special Button: Sinker
Banballow throws the projectile at the ground before him causing it to spin in place for a while before shooting across the stage at twice the speed it would normally move at! While the projectile spins, it deals 1% on contact ultimately dealing up 6% just from that! Once this pitch hits a foe, it deals the regular damage the projectile would normally deal…it is however quite easy to simply jump over.

Up Special Button: Changeup
Banballow looks straight up and then hurls the projectile violently into the air…so hard that it even flies off screen! After about half a second, the projectile then rockets back towards the ground two Battlefield platforms before Banballow! This’ll deal double the normal damage and knockback…but it’s surprisingly difficult to land against competent opponents…

Back Special Button: Screwball
The only way to stop an opponent who’s behind you (once you grab a projectile, you can’t turn around until you’ve thrown it!), Banballow throws the projectile forward a ways…before it goes spiraling past him at twice the normal speed! This’ll not only move twice as fast, but it makes the projectile twice as powerful both knockback and damage wise! The downside however is quite apparently, with the ball shooting past him, Banballow spirals in place, dizzy for a full second before he regains his composure.

Neutral Standard Button: Blinkball
There’s only one pitch for the Standard button and that’s the Blinkball! Physically, it looks the same as the same as the uncharged Fireball Strike or the Curveball…but unlike those, the Blinkball does no damage under ANY circumstances! That’s right, this pitch is purely mindgames…in fact, it’s not even a pitch! Banballow will go through the motions of pitching, heck, you’ll even see the projectile be pitched…but in reality, he’s still holding onto it! If the illusion hits a foe, it does nothing at all, not even flinching knockback…it just phases through them. Have the foe swinging at air with this so you can pelt them with a -REAL- pitch!

Up Special: Fly Ball
Extending out both arms to his side, Banballow begins to spin VERY rapidly, becoming a blur as he spins! Physically, this move looks very much like Meta Knight’s Mach Tornado (fortunately for opponents it doesn’t have Mach Tornado’s insane priority) and will actually give him both horizontal and vertical lift slightly greater than that of the Mach Tornado! So how is this move any different than your basic Meta Knight **** move? Well, first of all, it’s a move Banballow actually uses in game, no I didn’t just rip off a good move! Second of all, Banballow will throw out FOUR Rebound Strikers upon activation of the move, two to each side!

This is a pretty effective recovery and a great “get away from me” attack…but it also has its canon downside; after spinning at such speed, Banballow will be vulnerable for a full ¾’s of a second once he lands as he rocks in place, visibly dizzy. Use with caution; you could easily get one of your Rebound Strikers back in your face during your recovery time!

Down Special: Line Drive
Banballow will roll up into, what else? A ball! He’ll then take two small hops and then a great hop that is actually determined by you, the player! If you simply tap this input, Banballow will take two short hops (that will go about a Pokeball width each) before taking a massive, horizontally moving jump that will move you a full Battlefield platform in the direction you’re facing!

If you hold the button however, Banballow will take the two short hops mentioned above followed by a massive VERTICAL jump that will take him almost two Ganondorf heights upwards (while only about a Kirby width forward). Either way you decide to use this move, you’ll be a moderately high priority hitbox (so you’ll shrug off most projectiles but still eat it from physical attacks) that will deal 8% upon making contact with Banballow. It also takes about two seconds to fully finish the move. That being said, this has a number of uses; not only will it reflect any Rebound Strikers that may be heading back towards you while in ball form, it also allows you to successfully approach against people who may be trying to beat you out by camping against you.

(Standard Attacks)

Neutral Combo: Balk
In baseball, a balk is an illegal motion performed by a pitcher which results in an immediate dead ball (IE the base runners can’t advance). In Brawl, a balk is Banballow’s neutral combo. So with that in mind…Banballow suddenly and erratically swings his gloved hand forward (at the speed of Ganondorf’s jab) as if pitching. If one were to come in contact with this, they’d take 3% and flinching knockback. However this has several other applications. The first and most obvious are the potential mindgames. Because of the fact that this looks like a pitch (much like in your Neutral Special), you can easily catch a foe off guard with it when no Rebound Striker is thrown.

Aside from that, if you hit a Rebound Striker with this move, its attributes will change considerably. Regardless of how many times the Rebound Striker has been reflected, the next time it hits an object, player or the stage, the Rebound Striker will pop, dealing no damage but flinching if an opponent is within a Kirby width of the burst.

Dash Attack: SAFE!
Banballow drops down and does your traditional baseball slide with his glove raised the total length of a Battlefield platform.. Getting hit by a sliding Banballow will deal a poor 3% and tripping, but there are ultimately two outcomes to Banballow’s dash attack.

1.) If you catch a projectile while sliding (such as one of your own Rebound Strikers or an opponent’s projectile) Banballow will automatically stand up after the slide and “field it”. Upon standing up, Banballow will pitch the projectile with the power of a Fireball Strike (double damage/knockback and double speed of the original projectile) directly forward.

2.) If Banballow does NOT catch any projectiles while sliding, he’ll immediately stand up and make the “Safe!” sign with his hands, attempting to chop any opponents to either side of him. This deals a weak 3% and is ultimately fairly useless…it can however be used to deflect Rebound Strikers.

Side Tilt: Bunt
Contrary to the name, this is the key move you’ll be using to deflect Rebound Strikers back at your foe. In one quick movement, Banballow swings his gloved hand back and will stay in this pose forever. No really, until you release the button, Banballow will stay in this position. The moment you release, Banballow will, fairly laglessly, swing his arm forward dealing 2% and flinching knockback. If the button is just tapped, Banballow will simply swing instantly with no stalling. VERY important for using the Rebound Strikers effectively; just remember that timing is everything, swing too early or too late and you’ll be smacked by your own Rebound Striker.

Up Tilt: Brushback
Banballow’s up tilt is very similar to his side tilt in the aspect that they both can be held until you want to use them and both are used primarily for reflecting Rebound Strikers. Upon pressing utilt, Banballow will bend his knees(?) slightly. Upon releasing, Banballow will jump up a Kirby height and forcefully swing his gloved hand above him while sweeping forward. This strike will deal 4% and a weak diagonal spike. It will however spike any Rebound Strikers into the ground causing its priority, damage and speed to increase quickly…but it’ll also be going diagonally upward, potentially over the opponent’s head!

Down Tilt: Breaking Ball
Breaking Ball acts as Banballow’s “failsafe” of sorts and is actually very useful providing something went wrong with your master scheme. In short, pressing the input for this move causes Banballow to stamp the ground with rage, something’s got him upset for sure! Being hit by this stamping deals about 3% and moderate “get away” knockback. So why is Banballow so angry? Well, because something went wrong with his Rebound Strikers of course! We all know how glitchy Brawl can be at times and we all know how many sets out there can bend and shape the terrain and mess with all kinds of stuff…so this is why the down tilt is a crucial move for Banballow.

If the down tilt is used while there are Rebound Strikers -ANYWHERE- on the stage (as long as they’re yours that is!) the Rebound Strikers will suddenly fall to the ground and pop! Upon popping, anyone near them (within a Kirby width) will trip providing they’re on the ground of course. No damage, no knockback, nothing. So why is this helpful? Well usually, the Rebound Strikers will bounce a maximum of four times the proceed uninterrupted off the stage with their insanely high priority…but the stage always has greater priority. If the Rebound Striker gets caught bouncing on a part of the stage, it’ll bounce there until the match ends. Thus, if you make a big enclosed cube stage and throw out all four Rebound Strikers, you’ll not be able to use your Neutral Special again (as you can only have four out at once!). The down tilt will almost instantly pop all of your Strikers on the stage allowing you to once again use them as you please instead of being limited by the Strikers glitching. That being said, the tripping isn’t anything to sneeze at either.

(Smash Attacks)


Side Smash: Pickoff
As you charge this Smash, Banballow will take up a pitching stance with his eyes constantly shifting back and forth. Upon release of the Smash, Banballow will throw a Rebound Striker forward a distance determined by its charge (Battlefield platform uncharged, ¾th’s of Final Destination fully charged). Once the ball has reached its maximum distance, it’ll burst in a tiny explosion that’ll deal 13-18% depending on the charge (being hit by the ball before this will deal minimal damage) and medium-high knockback. This is a good alternative to use as one of Banballow’s KO move; if your opponent won’t play with you, force them too by whipping these out!

That being said…it’s called Pickoff for a reason! At anytime during the charging process, if you hold away from the direction that Banballow is facing, he’ll, upon release of the smash, spin around and throw the ball in THAT direction. Quite handy if your opponent’s one of those teleporting fiends or if they have a partner!

Up Smash: Strike Out
Banballow hops slightly in place as the move charges, holding one hand behind him and his gloved hand before him. Upon releasing the smash, Banballow will then throw one to three Rebound Strikers diagonally upward (45 degree angle) depending on how long your charged it. These Strikers however vanish upon making contact with anything.

Each of these Strikers does a different amount of damage and knockback. The first Striker will only deal 4% and little to no knockback, the second Striker will deal 5% and low-medium knockback and the third Striker will deal 10% and medium-high knockback. Keep in mind though that unless your opponent is TRYING to get hit by all three Strikers, they’ll most likely only get hit by one or two at the most due to the knockback of the second one. If at all possible, try and catch the opponent with the third Striker or have Jimmy knock them into it; that’s the Striker that’ll knock them out!

Down Smash: Double Play
While charging, Banballow rolls rapidly into ball form and begins spinning in place much like Sonic. Instead of spinning from side to side however, Banballow jumps up a short ways (a Kirby height to a Ganondorf height) depending on the charge. Banballow will then fall to the ground creating a shockwave a Bowser width long to both sides.

At minimum charge, this attack will deal 6% and a 30% chance of tripping…while at full charge, it’ll cause 10% and medium knockback. The best use for this move however is that even at minimum charge, it’ll deflect Rebound Strikers both with the shockwave and with Banballow himself. Hitting Banballow while he bounces however will only deal 3% and downward spike…right into the shockwaves!

(Aerials)


Neutral Aerial: Sacrifice Fly
Banballow’s nair acts as a grab of sorts and is, oddly enough, more defensive than offensive. Banballow extends both arms to his side and does a quick 360 degree spin. If anyone is within arms reach of Banballow as he spins, he’ll grab hold of them, spin them with him and release them to the opposite side. This does no damage and, oddly enough, no knockback. Instead, the foe will simply keep the momentum they had going…so if you catch a foe with this mid attack, they’ll keep on going once they’re on the other side of Banballow. A handy move indeed, not so much useful for gimping or anything as it is for stopping opponent’s from gimping you…just make sure their ahead of or behind you; it won’t catch foes from above.

Also keep in mind that, if Friendly Fire is on, Banballow can use this to give Jimmy a bit more “oomph” to their recovery OR take a hit for them by swapping places, hence the name.

Forward Aerial: Shutout
Banballow’s one aerial that isn’t helpful when it comes to aiding teammates…it is quite useful when it comes to reflecting Rebound Strikers! Curling up into a ball, Banballow lunges forward a Kirby width fairly laglessly and with some considerable speed. Any Rebound Strikers that hit Banballow during this lunge will automatically be deflected back.

Any opponent (or Jimmy) hit by this lunge however…will take 5% and be instantly foot stool jumped by Banballow. This can effectively be used as a gimping tool or a way to extend Banballow’s recovery…just make sure it counts; if you miss, you’ll enter a free fall! Also be aware that you’re quite easy to knock around during this attack, a disjointed hitbox like Marth’s fair or just a generally powerful move like DK’s fair will put the hurt on you quite fast.

Back Aerial: Robbing Runs
A ball just out of Banballow’s reach, what a shame, guess he’ll be missing it huh? Not with this power play! When the buttons are pressed Banballow will suddenly leap backwards a ways (similar in distance to Diddy’s Side Special) with his glove raised over him! At this point, Banballow acts as a low priority hitbox that deals 5% and weak horizontal knockback. It does however serve the more important mission however of snagging any projectiles out of the air that may come in contact with Banballow allowing him to throw them in midair. It’s a more reliable way to catch projectiles in the air than his Side Special basically and can also be used as a good way to retreat (despite its landing lag)…but it has a far, far more awesome usage too…

We all know what the term mean; when you rob a run, you do an amazing over the fence catch to stop the other team from scoring! Banballow can do this too! How? You know when an opponent hits you with a particularly powerful move, usually when you’re at higher percents and you fly away corkscrewing? The bit where if a friend or foe touches you, they’ll usually be knocked away a bit as you hurtle off the blast zone? Banballow can rob those. If Jimmy is sent rocketing off stage, use Banballow’s speed to get there followed by his bair to ensure you’ll be a bit ahead of Jimmy. If done properly, Banballow should grab them out of the air like a normal projectile! You can even pitch them in any of the ways mentioned in the Side Special; just be advised that they’ll take damage from your hurling them around too! This can also be used AGAINST opponents. Say Jimmy knocks someone off but you want to make SURE they’re going down for the count! Run up and snatch them out of the air then Screwball them backwards off stage!

Up Aerial: Tag Up
With moderate start up lag, Banballow throws his gloved hand upwards…only to have his glove fly straight up! Yes, Banballow’s glove will fly a full Ganondorf height upward before it comes falling back down to him. If you hit Jimmy, projectile or opponent is caught in the glove as it flies upwards, they’ll be brought back down to Banballow where he can then pitch them as he pleases. Be cautious though; only one other player can be grabbed at a time…not only that…but you’re perfectly vulnerable until your glove returns to you. By itself, no damage or knockback are caused at all by this attack.

One thing to keep in mind about all these moves that can snatch up opponents. Unless they’re at about 80% or more, they’ll most likely break out of the grab fairly quickly before you can pitch them. While it certainly is an effective strategy, it won’t be too easy pull off with the opponent fighting back and all.

Down Aerial: Pull Hitter
Banballow quickly rolls up into a ball and then plummets downward, his glove extended below him (somehow) as he falls. If an opponent makes contact with Banballow himself as he spins, they’ll take slight knockback and 5% damage, nothing too impressive really.

If the opponent/a projectile is grabbed however by Banballow’s gloved hand, he’ll instantly enter his mid-air pitching stance and be able to pitch the opponent/a projectile like in the Side Special. While this could be used for gimping theoretically, it’s fairly obviously telegraphed (with fair start up lag and bad landing lag) and cannot be canceled unless Banballow catches a foe, touches the ground or falls off the stage. It CAN however be used to rescue Jimmy if he has fallen below the stage in combination with the Change Up pitch…

(Grabs and Throws)


Grab: For his normal grab, Banballow makes a no thrills grab with his non-gloved hand. Yaaay…for his dash grab however, he actually makes a dramatic diving catch in an attempt to grab them. The normal grab is very short range but very fast whereas your dashing grab is also very fast, long range but
-INCREDIBLY- laggy upon missing.
Pummel: Golden Sombrero
Yes, that is actually a baseball term. Yes, I laughed too. Banballow’s pummel however is surprisingly simple; Banballow simply smacks them with his free hand; it’s a bench-clearing brawl! It is a fairly fast pummel however…that being said, it only does 1% per smack.

Forward Throw: RBI
Banballow reaches down and snatches up the foe by their legs! Holding them like a bat, Banballow throws a Rebound Striker up in the air and then bats it forward with the opponent’s body! Upon making contact with the ball, the opponent will take 5% and be dropped to the ground, taking another 1% in the process. Like his good buddy Silver however, Banballow’s throws do considerably more damage to bystanders! Anyone hit by the Rebound Striker batted by Banballow will take 8% and decent horizontal knockback!

Back Throw: Hike!
Banballow glances around for a moment before nodding and throwing the opponent between his legs! Unfortunately, Banballow seems to have forgotten he’s not exactly high off the ground…this actually causes Banballow to fly forward as the opponent flies backwards! The opponent will fly backwards one Battlefield platform whereas Banballow will fly FORWARD one Battlefield platform! The unlucky tossed foe receives a weak 4% while any opponent hit by Banballow will take 6% and low horizontal knockback. Something tells me you’re better off sticking to baseball Banballow…

Up Throw: Pop Up
Putting some serious strength into it, Banballow hurls the foe off screen (much like Kirby’s uthrow)…but they don’t come down? Yes, this is truly one of the longest throws in the game. After throwing the opponent up in the air, you’ll regain control of Banballow who will now be looking towards the sky with his glove raised. At this point, you cannot jump or attack…so you’re fairly vulnerable. Exactly a second and a half later, the opponent will come rocketing downwards towards Banballow who will, of course, start sweating anime-esque sweat drops before diving forward a Bowser width, leaving the poor foe to smash into the ground. Upon hitting the ground, the opponent will take a solid 7%. Any foe hit by the falling foe will take 9% and be pitfalled and any foe hit by Banballow as he dives out of the way will take 4%.

Keep in mind that if the opponent is thrown up into a platform, they’ll just take the 9% and the rest of the animation won’t play.

Down Throw: Beanball
The only Banballow throw that can’t effect multiple targets, Beanball is a painful one. Upon pressing down, Banballow will jump back and throw a Rebound Striker directly at the opponent’s head. Upon being hit, the opponent will take a solid 9% and instantly crumple to the ground (so no knockback) for about a second and a half.

A rather basic throw but an undeniably useful one; use this when you want some breathing room for you or a partner to take care of other things (such as the other opponent or trap set up, not that Banballow himself has any…).


(Final Smash)
-Grand Slam-


You knew this was coming; it’s the ultimate play in baseball for crying out loud! That being said, Banballow’s Final Smash can be a tad tricky to land! Upon activation of the Final Smash, Banballow will begin waving his arms, seemingly to rally an unseen crowd! At this, Banballow’s theme will begin to play (at the stadium-esque part) but…nothing else happens? What is this a pep rally?! Nope! Banballow has to press the B button -AGAIN- to actually use his Final Smash! With another tap of the B button, Banballow will roll in place as the “CHARGE!” theme plays for a little over a second. Once the theme is done, Banballow will rocket forward and Sonic’s dashing speed (or if the B button is held, he’ll bounce forward in arcs at Sonic’s dash speed) Regardless of whether you tap or hold the button, if Banballow makes contact with any foe as he spins forward, he’ll pull them along with him! If Banballow reaches an edge, he’ll simply turn around and go the other way so make sure not to try this on a small platform!

Anyway, once you’ve rolled up a foe, you’ll suddenly appear at a stadium in a little mini-cutscene! Banballow will stand on the pitcher’s mound and pitch every opponent he rolled up towards…nobody?! There’s no batter? What madness is this?! With amazing speed, Banballow will roll rapidly towards the batter’s box, whip out a bat and point to the fences. He’ll then take a massive swing at each opponent that passes by him, sending each rocketing clear over the fence for an easy home run…and a KO!

That’s right, if you’re rolled up, you stand absolutely zero chance of survival! That being said, you’ve got a bit of time to clear out of the way and it’s only one stock lost! Could be worse; at least it’s not Landmaster cheap!

Solo Playstyle - Pitching Machine


So Banballow’s the Illbleed villain for you, huh? Good choice! You’ve picked a character who’s very versatile when it comes to both 1v1 and 2v2 matches. Let’s first of all cover 1v1 matches.

So first of all, you’ll want to build up damage on the opponent. Damage building can be done in many, many ways…but it can be kind of tricky as Banballow’s attacks don’t do a whole lot of damage on their own. Banballow’s Rebound Strikers are the obvious choice for damage building; a fast projectile that can be increased damage wise; win, win right? Well that’s providing the opponent “bats” them back to you. There’s a pretty good chance they will though as it gives them potential to hit you as well as distracting you with the ball game so they’re not getting pummeled by a near endless onslaught of Rebound Strikers. Try to mix things up though; if you think your opponent may try and leap the Striker and attack from the air, use up tilt to spike the ball into the ground and up into their face! Alternatively, use your Neutral Combo to trick the opponent into batting at a false Striker and follow it up with a real one while their stunned. While the down tilt may seem situational for glitches…it’s also very useful for stunning a foe long enough to pelt them with another Striker.

Speaking of Strikers, keep in mind your Side Special at all times. Projectile campers are Banballow’s dream match as it gives him plenty of ammo to hurl right back in their faces. Not only this, but Banballow creates more than enough ammo of his own, especially with reflecting Strikers and whatnot. Always remember your pitches too. Most of them are fairly self-explanatory but they’re each useful for their own situation and very versatile. If your opponent hurls a powerful projectile your way, consider throwing it back as a fast ball. The increased speed and already high damage of it should more than make up for the damage cut it gets.

So for damage racking, you have your Strikers and any number of your normal attacks. They’re mostly fast enough to use safely…but they’re also fairly short range. So in short, Rebound Strikers are easily your best method for both damage racking AND KO’ing. With that in mind though, your Smashes should work well enough to KO if your opponent just refuses to play catch with you but don’t rely on them too heavily.

Aerials are mostly going to be used for gimping as their true potential doesn’t really shine through until you’re playing team battles. With that in mind, know that dair, fair nair and fair are all useful gimping tools…dair and fair however are fairly dangerous to use solo though as there’s a high potential for a self-destruct if your opponent catches on.

Banballow’s grabs and throws are a tad too weak to be truly effective in a singles match but they’re certainly useable. Consider using your pummel instead though to rack up some quick damage.

Mindgames are also a GREAT idea for Banballow to utilize. Your Neutral Combo and Side Tilt look similar animation wise and, essentially, serve very similar purposes. While your opponent may think you used a side tilt to reflect it back, in reality you could’ve used the Neutral A which would end up stunning the opponent for a short time. Likewise, if you use the Blinkball after catching a projectile, Banballow will throw nothing; especially useful against twitchy opponents or simply to mix up your strategy. Your Change Up can also be used to effectively mindgame. Side Smash can also be used throw an opponent off; if you’re charging in one direction and they roll past you, spin around and smash them in the face with it. It won’t do a whole lot of damage but it’ll get them out of your hair for a moment. One last good trick is proper use of the dtilt; wait until your opponent goes to swing, take the balls out of the air and Strike them when they get to their feet!

Team Playstyle - All-Star Game


Banballow’s forte is in Team Battles, plain and simple. Here he has a much easier time KO’ing, peppering opponents with Rebound Strikers AND he even has Jimmy backing him up!

First of all, Rebound Strikers become even easier to use as you no longer need to make the opponent play…but can simply play with Jimmy! Batting the Rebound Strikers back and forth and then having Jimmy spot dodge while Banballow sends it rocketing past is an excellent strategy if you have some breathing room. If you don’t, Banballow works extremely well with trap characters too as his Strikers will usually rebound off of standing traps. Not only this, but you have twice as many opponents to peg with them making accuracy much less of an issue.

Banballow’s main catch with Jimmy is that he can, to an extent, almost always save him. All of Banballow’s aerials (excluding his fair) are EXTREMELY useful when it comes to saving Jimmy, whether it be from an attack or from falling off the edge. Catching an opponent and pitching them (Change Up is most effective) will almost always save them from falling off the edge.

Another great benefit of team matches is, Banballow’s smash attacks are all the more useful when you don’t have an opponent breathing down your neck. You can also be a lot less accurate with the side and up smashes while fighting multiple opponents.

Throws also get a major buff in team matches. Like Silver the Hedgehog, most of Banballow’s throws will hurt teammates for more damage than the person actually being thrown. That being said, you’ll have to watch out that you’re hurting the opponent’s teammate and not your own.
 

Kholdstare

Nightmare Weaver
Joined
Oct 10, 2008
Messages
1,440
Oh hey, a repost of a moveset. It's just like we're in MYM4 again- good times.
 

Nicholas1024

Smash Lord
Joined
Mar 14, 2009
Messages
1,075
There's a comment coming.


Wait for it.


Slowbro:
Sorta fitting this is my first set I'm commenting after having done nothing for so long, but anyway... Good set here, MT. Slowbro's mechanic of delaying knockback and manipulating delayed knock back to use it against the foe is unique and rather interesting, and he has tons of fun ways to play around with it. The specials in particular were very clever. However, I feel there's one place in particular this set fails, and that would be the grab game. Slowbro's grab... slows down the opponent with generic penalties. What's worse is that without his shielder, Slowbro (or should I say slowpoke) loses quite a few of his interesting moves, replaced with generic dopey attacks. Not to mention, what happens if something happens with the shellder when it's not attached to Slowbro? As it falls off after taking 35% (which is somewhat likely to happen), I could completely see the opponent knocking it off or even just having it hit off while offstage. The other place this set has problems is when you consider a damage racking opponent. Yes, Slowbro is amazingly hard to kill... but he's rather easy to damage rack, particularly by a camper (90% of MYM) If the opponent just refuses to play the knock back game, damaging Slowbro up to 300% where anything can kill him, that basically makes Amnesia forced, and takes out a lot of his options.

However, these problems aside, I did like the set (although I suppose it doesn't seem like it given my harsh commentary), and many of the moves go very well with the mechanic, it just feels a bit rough around the edges. (I feel getting this set proofread more could have made it a real gem, actually...)

Teferi:
This move set starts out really really strongly with the specials and the smashes are also neat, but afterwards I feel the set doesn't quite live up to it's promise. Vanish is a neat trick as a pseudo counter and the timing games you can pull off between paradox doubles and time walk doubles are really neat, but it feels like as a whole the set doesn't quite come together, and I'd have to point to a big issue here regarding that being balance problems. For example, why not simply sit in one of your time zones and super camp using both your paradox and time warp doubles in conjunction with your projectiles? That basically lets Teferi fire projectiles eight times as quickly as usual, which would be a rather devastating rate of over 10 per second with the forwards tilt. And when the opponent comes in to attack, you can use your time stopping down smash, letting you prepare a essentially a move of your choice for when time resumes. Even without stuff like that, I feel like a lot of what Teferi can do is overpowered on a conceptual level. For example, if you phase your opponent out with a vanish (not THAT difficult to do), you could easily just use a pair of timed forwards smashes plus your paradox for an easy 40% damage (Four swings of 5% on the start up, then being hit by both projectiles.) that kills pretty well to boot. I suppose the best way to sum it up is that when you combine even semi-powerful attacks with up to three different doubles of yourself as well as the ability to know EXACTLY where the opponent's going to be in a few seconds, you could easily punish them for 30% or more for each mistake. (And let's not even mention the forwards throw, which gives you FOUR shots at said punishes.) Normally I wouldn't be so harsh on a mere balance issue, but I think in this case it's conceptual (either the attacks would have to be pathetically weak or you can murder the opponent every time you hit them with a move like your forwards throw), and it basically destroys the risk-reward option to having duplicates, which is a fundamental premise of the set. (And a good portion of the attacks are fairly generic, but I've probably bashed the set enough at this point.) Sorry for being so harsh with this one, as the idea is unique and has a lot of potential, I just feel that it wasn't pulled off quite right. (Don't get me wrong, I don't hate the set, I'd probably give it a 5 or 6/10 with MW's rankings.)
 

MasterWarlord

Smash Champion
Joined
Aug 24, 2008
Messages
2,902
Location
Not wasting countless hours on a 10 man community
MYmini Week #13: Like a BOSS! (July 31st - August 6th)​


http://www.smashboards.com/showpost.php?p=12457645&postcount=747

Ever read a moveset and thought it'd be good for 3v1 combat as a boss, but it lacked a mode for it at the end? Welp, this is your chance to put in what the original author should've in the first place. Your task is to create a list of changes that happens when a character is pitted against three other characters on a team together for whatever moveset you choose in order to balance that character for 3v1 combat. Obviously, a good deal of the challenge here is in simply picking the right moveset to transition to the 3v1 arena - a random Shellder boss isn't going to be too successful.

If you don't know what a moveset that is playable in both 1v1 and 3v1 looks like, look at any of the movesets up above for examples. . .Aside from Valozarg and Hazama, anyway, who are exclusively meant for 3v1.
 

Katapultar

Smash Lord
Joined
Nov 24, 2008
Messages
1,258
Location
Australia

If you thought Tohru Adachi was already a bad guy, you won't want to mess with him when he's actually determined to kick your cans. We're talking about a guy who can hold his own against eight armed teenagers! Here however, he only needs to deal with 3 rats.


Aside from having 1.5X attack power and speed, none of Adachi's stats actually change; though that's hardly a problem for the actual buffs he gets. First off, Magatsu Izanagi's SP mechanic is null, meaning Adachi can keep him out for as long as he likes without having to actually worry about keeping his eye on a mechanic. Speaking of Magatsu Izanagi, he has double attack speed and power, making him a force to be reckoned with.

I'm sure that you're all aware that Adachi has a lot of self-damaging moves in his disposal which made him even more frail than he was supposed to be...well guess what? All these self-damaging moves actually heal Adachi! This lets him tank for longer than his weight would suggest, and if he uses a "healing" move when he's at 0% his speed will be temporarily increased by 0.1 for every 1% he would have healed for 10 seconds, with this resetting per use.

These are the basic buffs that Boss Adachi gets in his moveset. Below are the buffs that Adachi gets for his various moves:

  • Adachi Down Special: All of Adachi's Shadows stay around infinitely; Brilliant Cyclops have a 4/8 chance of appearing, Slaughter Drive have a 3/8 chance of appearing and Solemn Machine have a 1/8 chance of appearing. To prevent this from being too broken, it takes one portal 8 seconds to summon a Shadow, and their 35HP can be destroyed before that happens. Other than that, if Adachi can maintain his portals he can easily overwhelm enemies with numerous powerful Shadows. Note that Adachi only heals damage from summoning when the Shadow is actually summoned. And one more thing: Adachi can have Shadows and Magatsu Izanagi out at the same time.
  • M. Izanagi Down Special: The portal created can stay around infinitely until Adachi dismisses it by summoning Magatsu Izanagi. Shadow versions of enemies stay around forever and have Lv9 AI; enemies can either try to ignore them or KO them like normal characters.
  • Adachi Side Special: Police Tape has triple HP and extends all the way to the top and bottom of the screens.
  • M. Izanagi Side Special: Because there is no SP mechanic, attacking Magatsu Izanagi inflicts half the potential damage onto Adachi. Magatsu Izanagi of course has his Super Amour which can encourage enemies to attack, but even if Adachi takes the damage he can easily heal it back up with his moves. It's actually possible for Adachi to use any of his Specials when controlling Magatsu Izanagi by using the C-Stick, allowing him to set-up Shadow summoning portals while Magatsu Izanagi dishes out some damage.
  • Adachi Up Special: The car inflicts 34% that KOs at 50%, making it a deadly camping kill move. The car stays around infinitely and has a grand total of 70HP. Adachi can have as many of these, as the original set would suggest, as he can summon for the time he has..which is hopefully lots. The tether recovery automatically clings to ledges and spikes anyone on that ledge for what should be an instant KO, meaning Adachi has an infinite recovery; the tape will even cling to ledges that can't be grabbed to be fair to him.
  • Adachi F-tilt, D-tilt and B-air: The bullets deal large hitstun, but not enough for Adachi to be able to infinite combo.
  • Adachi F-Smash: Bullet Time lasts until the bullet goes offscreen.
  • Adachi N-air: Adachi is invincible while wrapped in tape.
  • Adachi F-air: Adachi can have as many wires out as he likes, with this move being as spammable as MK's U-air; I presume the wires hang down where Adachi was when he initially shot the screen. Anyway, the wires instead do 14% with good hitstun.
  • Adachi U-air: 50 shards that do 2% each rain down across the screen at random, though Adachi is unlikely to hit with many of them at all. The move is as spammable as MK's U-air like Adachi's F-air.
  • B-throw: If Adachi successfully pulls the trigger on the victim, they're KO'ed instantly. It's slightly easier to escape than the normal move, with Adachi needing to get the enemy to about 45% or so to be able to successfully kill them.
  • Final Smash: Instead of tirk's Ameno Saigiri appearing, enemies have to face-off against TWILTY's version, but thankfully he's only as difficult as he is on normal mode. Granted, Adachi doesn't have too much of a chance actually getting the Smash Ball, though enemies are in for hell if he does manage to get it.


Boss Adachi's playstyle is, a bit different from his normal set. The 2 factors that play into this differences are undoubtedly his insane healing factor and the ability to keep Magatsu Izanagi out for an unlimited amount of time.

Despite his ridiculous healing factor, Boss Adachi is still incredibly frail for a boss character so he needs to maintain his standard defensive game. Granted, Adachi is actually capable of playing offensive with Magastsu Izanagi, something he should do while he sets up portals to summon Shadows. It takes a while to summon the Shadows but it's well worth it when your enemies are overwhelmed by their sheer numbers and power.

But of course, enemies aren't just going to let Adachi do that. Although Magatsu Izanagi is fairly strong by himself and can tank any hit, he's only capable of dealing with one enemy; the other 2 are likely going to aim for Adachi, who of course, has covered himself with his police tape.

Basically, Boss Adachi plays a good deal of defensive with his police tape, but is capable of shifting into offensive and outnumbering his foes with the many powerful Shadows he can summon. Even though he is a mere mortal at 4/10 weight, Adachi, as a 3v1 character, is still a force to be reckoned with.

We totally need a page on the Stadium for these.
 

Smady

Smash Master
Joined
Apr 29, 2007
Messages
3,307
Location
K Rool Avenue
Commentary Courtesy of Warlord

Ah, Strike Man Banbollow. . .I thought he had a badass design and fighting style, but it wasn’t done justice in my moveset, as he was too busy coughing and what-not, though he looks incredible with the Computer graphics. Balance issues aside, this moveset does such a good job of glorifying it’s source material and has so many unique moves that it’d blind Sakurai with it’s sheer beauty if he read it. The humor here is what makes the moveset, obviously, although there needs to be more “NO NEWS! NO CALLS! NO TYRANNY UNTIL TOMORROW!” and “OVER 9000!” and Chuck Norris roundhouse kicks (Actually scratch that, they’d just be generic kicks), though those are just personal pet peeves of mine. This is one of my favorites in the contest as I can tolerate detail for otherwise good quality, and outside of the blatant over detail this moveset’s as beautiful as that certain. . .Person each male always wets their blankets over as they go through puberty from the Smash Bros. series (I am the Master Debater!).
 

Davidreamcatcha

Smash Ace
Joined
Feb 9, 2011
Messages
629

Wario Boss Set

Woah, that image takes you back, huh? Indeed, Wario's boss set is borrowed directly from his debut appearance in Super Mario Land 2: The Six Golden Coins. This is both literal and non-literal, as while his entire boss set is based off the game, he also gains his appearance from said game and most of his sounds have been replaced by cosmetic beeps and boops, while his grunts appear to be taken from the voice actor from this infamous commercial. This incarnation of Wario is so directly inspired by the game, he can only be fought in his own special stage, which you will be taken to the exact moment you get to the stage selection screen.

Wario's Throne Room is a grounded stage 1.5x as wide as Final Destination, with a ceiling that reaches 6 Ganons high. The term ceiling here is quite literal: it is completely impossible to go off the top blast zone. Wario's grayscale throne sits in the background, directly in the middle of this expansive stage, with Wario himself getting his lazy arse off of the throne for his entrance animation. One of the more notable features here is the Kirby-sized lamp traveling across the ceiling; it starts above Wario's throne and moves to the left then to the right at Ganondorf's dashing speed as soon as the match starts. If the lamp is damaged by anything, it plummets to the ground at the speed of the Ice Climber's stall and fall, breaking upon contact with the ground or a fighter. If it hits a fighter, they act as though their shield was broken, entering their dizzy stance. If it hits the ground, it gets embedded in the ground almost immediately, covering an area as wide as Bowser. When Wario uses his neutral special, down aerial, up throw or any similar move against the area where the shrapnel got embedded, he will...deflate? That's right, the Mario Land 2 comic adaption explained that the Wario seen in Mario Land 2 is actually a giant suit Wario invented, but, whatever. Once Wario is popped, he loses most of his buffs. Unfortunately for you, the lamp will respawn one minute after it is embeded in the ground, meaning you've got to space carefully for when he respawns...

The buffs Wario gets are as follows:

* Wario now stands as wide as Bowser, and as tall as Ganon, in addition to having his weight increased to 30/10.
* Wario is now completely flat, and gains some cosmetic changes, dragon hat is replaced by a feather on Wario's head (Wario now snorting out of his mouth and shooting the flames from his hands.) This will not change when he is popped.
* Wario cannot be thrown; he can be grabbed, but he will instantly swing in a lariat move similar to Haggar's upon release, dealing 15% and high knockback on both sides of him, stopping any would-be attackers.
* All of Wario's attack power is tripled. This also applies to all the knockback he can dish out.
* Wario's pitfall trap holds foes for 3x as long, meaning that he'll easily be able to contain the foes who dared to break into his castle...
* Wario's recovery is now replaced by him gaining bunny ears and flapping the ears to fly. He now is able to control his flight, unlike his regular up special, but otherwise this is completely identical. He does not lose this when he is popped.
* The weight of Wario's Bag is doubled, in addition: If Wario catches a foe in the bag, he can immediately press the side special again to hoist it over his shoulder as though he were the Grinch, able to drag them until he is dealt 20% or he presses the input again. He does not lose these when he is popped.
* Wario is now able to hold foes in both hands and walk at the same time. His forward throw now lets him move at Mario's dashing speed as he spins the foe, turning them into a constant hitbox that deals 10% to 30%, depending on their weight. If Wario gets them into a moneybag filled with coins, some of the coins stay on them, increasing their weight and giving him more coins from his pummel.
*Wario now gains a set of special smashes that aren't really smashes, just regular attacks, but they're extremely useful. Wario can use these when he is popped, and they are specifically designed for this situation.

SPECIAL FSMASH:
Wario fires a red laser beam from his eyes, it being about the size of a beam sword and traveling straight forward at 1.5x Sonic's dash speed. The first foe who is hit by it now gains a hypnotized look in their eyes, as Wario begins monologuing to the foe; just replace all instances of "Mario" with "your team", and the "six golden coins" part with something about destroying the foe the same length. The speech as a whole lasts for around 16 seconds, during which Wario can press any button to end it with "DESTROY YOUR TEAM!" Wario gains superarmor during this, and will continue to perform it unless he takes 50% damage during this timeframe. For every second Wario was hypnotizing the foe, he will gain 3 seconds of them acting as a level 9 CPU ally for him. If he manages to finish his overly laggy speech, he will keep them as his ally for the rest of the stock. This also has the benefit of sending a lamp to the ground, if the beam somehow manages to get in contact with it...

SPECIAL DSMASH:
Wario turns to the screen, looking like quite the sour sport as he angrily stomps his feet on the ground, as he does in his down taunt, alebit with the stomping feeling much more forced. As it would seem, however, Wario seems to have activated some sort of hidden switch as a golden pillar that bares a "W" insignia immediately shoots up from below him! The pillar is as wide as Bowser and reaches up to the ceiling, with just enough room for Wario to fit. The pillar can take up to 40% damage until it's knocked down, but Wario can use his down aerial on top of it to have it recede back into the ground near-instantly. Wario has no true projectiles, so the only real advantage you have by doing this is to break the lamp...or is it?

SPECIAL USMASH:
Pulling out a golden pendulum with his likeness carved into it, Wario spins it around while saying "You're getting veeeeeerrry greedy...you are me, Wario!" If Wario has no foes hypnotized, this essentially acts as a stronger, faster version of Ness's Up Smash, dealing 17% damage to foes. If, however, Wario has a foe hypnotized, they immediately think they're Wario! For as long as the foe is hypnotized, Wario can control his hypnotized ally, only they gain access to Wario's normal, un-boss movepool, keeping all statistics with them, despite thinking they're as slow as a rock. The only way Wario can cancel out of this is to shield, your ally suffering 3 seconds of lag as they regain their normal movepool. It's all coming together now, right? If you've lost access to your boss set and still have the foe hypnotized, camp on your pillars while still being able to attack with your normal set! This incarnation of Wario is far sneaker then his normal version, and isn't afraid to play even dirtier to get what he wants...
 

Hyper_Ridley

Smash Champion
Joined
Dec 21, 2007
Messages
2,291
Location
Hippo Island
The last breath is sweetest


YORICK
THE GRAVEDIGGER


Yorick is one of the (currently) 80 characters in League of Legends. He was a gravedigger in the Shadow Isles, and helped to honor the dead with the magical shovel his forefathers used before him. Some family business, huh? Sadly, Yorick died without any children, ending his family’s proud line of gravediggers.

However, Yorick found himself reborn as a grim reaper of sorts, ferrying the dead to the afterlife. According to legend, a gravedigger must “bury his quota” before he too can pass on; centuries have passed and he still hasn’t met this supposed quota. Yorick eventually turned to the League of Legends in the hope that his services there will redeem his family name and finally grant him the peace he longs for.

Yorick was hyped to hell before his debut in the game, as being a “summoner” character who wasn’t completely reliant on summons to do anything. When he was finally playable…his summons were absolute **** and Yorick himself couldn’t do much, making him perhaps the worst received character in the history of the game. The outcry was so bad that he received buffs to almost everything on the following patch, to the point that he was occasionally considered OVERpowered.

He also has a really awesome voice

STATS

Ground Speed: Slightly faster than Ganondorf
Traction: Great
First Jump: Below average
Second Jump: Low
Air Control: Ganon-tier
Fall Speed: Average
Size: Around Dedede’s. Yorick’s shovel is about the same size as Dedede’s Hammer too.
Weight: Around Ganondorf’s

SPECIALS

Ghouls
Yorick’s simple-minded minions he summons through his specials. Each of his specials conjures up a different type of ghoul that will immediately seek the nearest opponent and pursue them. While the exact details of each ghoul are different, know that there can only be 1 of each type of ghoul in play at a time, and they last until either their 21 HP is depleted or 8 seconds pass (sorry, no replacing weakened ones with fresh ones if you use the same move again!). Ghouls don’t take any knockback from attacks but they do take the full hitstun and damage. They are immune to Yorick’s attacks and Yorick is immune to his ghouls. Ghouls are also capable of flight, allowing them to pursue opponents into the air. Ghouls do not change targets once they have decided, so in a 4-player game it’s possible to have a ghoul attacking every other player, resulting in many lols to be had.

Neutral Special: Omen of War

Yorick stabs his shovel forwards a short distance. This has 1 frame of startup time but above average end lag. It deals 10% and KOs at 180%. A blue ghastly ghoul that is the size of Olimar also forms from the head of Yorick’s shovel in a cloud of blue mist. This ghoul moves at the speed of Sonic’s walk, making it the fastest of the ghouls. It attacks with simple short-range claw swipes that are as fast as MK’s DTilt and deal 3% with flinching (read: 1-frame of hitstun to just interrupt the opponent) knockback every .5 seconds it is in range to attack (A ghoul performs their attack the instant they get in range to start). While it’s alive, blue mist encircles Yorick’s entire being, increasing his movement speed in the ground and air by 20%. A modest buff to a humble mobility statistic, but every little boost to Yorick’s approach is welcome.

…Yes, I did just imply that this really slow minion-summoner wants to approach his opponents. Is there a problem with that?

Side Special: Omen of Pestilence

Yorick points at the ground, green spectral energy encasing his finger, causing an explosion of dirt 1/3 of battlefield in front of him. It covers an area the size of Dedede and deals 9% while KOing vertically at 95%. This has above average startup lag, moderate end lag and the dirt has transcendent priority. If there’s no ground where the move would hit then it strikes the ground closest to that spot. If Yorick performs this in the air and there are multiple levels of platforms where the move would hit, it hits on the closest elevation to the one Yorick left the ground from. From the dirt emerges a green, sickly-looking ghoul. It moves as fast as Mario walks. Every 2 seconds it performs a bite that starts slow and ends fast. This bite deals 6% and stuns opponents like Zamus’ Paralyzer for 1 second as green spectral energy encircles the victim.

Down Special: Omen of Famine

Yorick’s lantern goes out for a moment, before suddenly bursting with green ethereal fires that cover an area around it the size of Kirby. This has moderate lag on both ends, and it only deals a measly 5% and KOing at 205%...It also heals Yorick for however much it deals, which means that when stale negation starts kicking in he gets healed for less too. The red, bloodthirsty ghoul that appears from the lantern is a bit more useful than the initial attack. It moves a bit faster than the ghoul of Pestilence, and it attacks with mid-ranged reaching claw attacks. These deals 5% and flinching knockback, and also cause a small green orb to fly out of the opponent, a fraction of their life-force which is soon absorbed into Yorick’s lantern to heal him by that same amount. It attacks once every second.

Up Special: Omen of Death

Yorick holds out one hand as a white spectral ball appears, no larger than a waddle doo Pokeball. It then proceeds to closely follow the nearest opponent for 8 seconds at a fast speed...Yes, this ball is in fact the ghoul Yorick summons with this move. No, it doesn’t have some flinching knockback attack, it doesn’t do ANYTHING to the opponent in fact, but in turn it’s immune to all non-projectile moves. Still seems like it’s not doing anything apart from making your opponent stale their melee attacks to hit it…

Here’s where things get interesting. See, if Yorick performs the input again, or he is placed into a situation where he’d be considered KO’d, he will teleport to the location of the ghoul in a white burst of energy the same size as Bowser. This is transcendent and deals 10% while KOing at 220%. This has above average startup lag, but below average end lag. While this can make for a good approaching tool if your opponent insists on running away, after using the ghoul’s effect Yorick cannot summon a new one for 20 seconds, indicated by his torch going completely lifeless. Don’t worry, this doesn’t prevent Yorick from using his torch-based attacks, but keep in mind that if you want to approach with it you had better not let yourself be put into a position where you need to recover.

STANDARDS

Jab: Straight Shot
Yorick jabs out with his left fist, dealing 9% and KOing at 220%. This has low startup lag and moderate end lag, but you can cancel the end lag into another use of the move, making it a semi-rapid jab. It’s a decent spacer/poking move on its own, but if you ghouls hitting the opponent and stopping them from going too far, you can easily chain this into itself a few times at lower percents to gain an early lead in damage.

Forward Tilt: Sideswipe
Yorick performs a one-handed horizontal swing with his shovel, holding it at the end to increase its range substantially. This deals 12% with purely horizontal knockback KOing at 100% if you’re hit by the head of the shovel, or if you’re hit by the shaft it deals 9% with more angled knockback that KOs at 165%. This has below average startup lag and moderate end lag, making it pretty a pretty safe poking or KO tool as long as you actually make use of its range.

Up Tilt: Rally the Dead
Yorick thrusts his shovel straight into the air, dealing 11% and KOing at 180%. This has below average startup lag and moderate end lag. As Yorick performs this move, any ghouls in play, besides the ghoul of death, will fly into his shovel’s head. The shovel will have a small band of otherworldly gas encircling it that are the same colors as the ghouls you absorbed.

This gas will stay with the shovel until Yorick performs any shovel-based attack, which will add the special properties of those ghouls to the shovel’s hitbox. So War will provide a movement buff to Yorick as long as he hasn’t performed a shovel attack, Pestilence will paralyze enemies, and Famine will steal some health! This is made even nicer by the fact that the buffs applied to Yorick’s shovel are not counted as ghouls in play, so you can summon even more! Of course, you can’t apply infinite UTilt buffs as the ones you currently have will be spent on that UTilt.

Down Tilt: Grave Digging
Yorick’s crouch has him hunch over with his shovel held against the ground as though he’s about to start digging. With this move, he does exactly that! He sticks that shovel into the ground a small ways and quickly tosses some dirt forwards. This dirt has transcendent priority and travels as far as a non-charged FLUDD, dealing 7% and pushing enemies back as far as the dirt goes while flinching them. The dirt is considered a projectile.

When Yorick digs into the ground, his shovel-head has a hitbox that deals 2% and trips, comboing into the dirt part. The overall attack has low lag on both ends, but it takes .5 second to complete and as you may imagine the hitbox is very low to the ground, especially the shovel itself. Still, it’s a pretty nice tool for creating space.

No, this move does NOT create a pitfall trap, nor does it terraform the stage. However, if you dig into a character who’s already pitfalled, they’ll take 5% from the shovel due to being freaking stabbed in the gut, which also always dislodges them from the pitfall for the dirt to push them back.

Dash Attack: The Other Side
With moderate startup lag Yorick teleports 1/5 of battlefield forwards, a burst of spiritual energy appearing at his end position. This burst is slightly larger than Yorick himself and deals 10% and flinching knockback, and has transcendent priority (Yorick’s gotta have the most mentions of that attribute of any MYM set ever). Yorick has low end lag when his teleport finishes and he reappears facing the nearest playable opponent.

This is a fun move if you know how to use it. Since Omen of Pestilence creates its ghoul a distance ahead of Yorick, it’s possible to literally surround an opponent with ghouls from both sides. You can use Yorick’s dash attack to really mess with your opponent as you pass right by them to attack from behind, or to get out a tricky situation while your ghouls cover you.

SMASHES

Forward Smash: YORICK SMASH!
Yoricks grips his shovel right behind the head as he lifts is over his head. After the same startup time as Dedede’s forward smash, he swings it downwards, dealing 20-40% and pitfalling struck opponents. This has moderate end lag. As you might imagine, this is extremely difficult to land thanks to the startup lag and the fact that Yorick holds his shovel in a way to give it lessened range. If only he had something that could occupy opponents to leave them vulnerable…

Up Smash: Raise Hell
Yorick leans forwards so his torch his in “front” of him, then clenches a fist as his torch’s flames intensify, creating a plume of crimson-red flames the height of Donkey Kong and the width of Ike. It lasts for .6 seconds, and contact with the fire at any point deals 13-24% and vertically KOs at 105-80%. Sorry, no healing with this one, this is boring red fire and not awesome green fire. This has moderate startup and end lag, and considering it doesn’t protect Yorick from direct assaults from above, this is not an anti-air you can spam like a Ken SHORYUKEN!

Down Smash: Wild Swing
Gripping his shovel in both hands, Yorick starts to spin around with his shovel held out horizontally. This deals 12-26% and KOs at 120-90%. By default Yorick spins around 3 times with each spin lasting .2 seconds, but you can make him spin more by mashing the Attack Button. There’s no limit to how long you can spin but the move has moderate lag on each end.

If an opponent shields the move, they take enough shield-stun to last right as Yorick’s next swing ends + the end lag, and they are also pushed back a little. You can make this move completely safe when shielded provided you stop swinging before you push them out of range, or else you’ll look like a moron as they side-step the next swing and punish you. This also makes the move a great tool for shield pressure; hit them with a few groups of swings and they start to become susceptible to shield-poking via DTilt. While Yorick isn’t great at outright breaking shields, it is an option for him should the opportunity present itself, and it’s a mighty tempting opportunity too; fully charged FSmash anyone?

AERIALS

Neutral Aerial: Dancing Flames
Yorick curls into a ball and spins around for .55 seconds, not unlike Wolf’s Nair. This has low startup lad and moderate end lag, and his body deals 11% and KOs at 170%. While spinning around, his torch’s fires have intensified, giving itself a hitbox that deals 8% and KOs at 210%. What’s really nice about the torch is there is a brief trail of fire lingering behind it with the same attributes as the torch itself. This is primarily a defensive move, using the lingering fire hitbox to protect you as you will most likely hit the ground before the move completes. It’s also quite luzly if you manage to trap an opponent in between yourself and the fire.

Forward Aerial: Marked for Death
Yorick points forwards, his finger emitting trace amounts of a black, mist-like substance. Yorick’s finger is the entire hitbox of the move, but in exchange for such specific range it deals 12% and purely horizontal knockback which KOs at 115%. This has below average startup lag and above average end lag.

Still not good enough for you? Enemies hit by this have a black fog surrounding them. Ghouls who were not previously attacking the afflicted character will not immediately start to target him, and all ghouls in play now move 25% faster and attack 25% more often. This fog lasts for 4 seconds; after it dissipates, the ghouls lose their stat buffs but will not revert to their previous target. Being hit by this move again resets the timer of the effect, so if you want to keep your minions buffed you’ll have to stay on the offense to keep landing this somewhat risky attack…

Back Aerial: Mighty Swing
Yorick fiercely swings his shovel as he spins around, dealing 11% and KOing at 160%. This has low startup lag and above average end lag. Yorick normally swings the shovel completely horizontally, but you can angle it 50 degrees up or down, making this a great tool to deal with opponents who try to run past you to escape. He does end up facing his original direction afterwards, so don’t try turning into Cairne and flying around like a helicopter.

Up Aerial: Headbutt
Similar in appearance to Donkey Kong’s UAir, Yorick’s headbutt deals 12% and KOs vertically at 85%. This has low starting lag but high end lag. It’s a pretty scary anti-air just for its KO potential but it’s super punishable. So it’s basically a Street Fighter anti-air special, which also means that online Yorick noobs will be spamming this move all the time.

Why are you still reading this move? There aren’t any special effects, you should know better than to expect one from every move on an HR set, go home…or preferably to the next move.

Down Aerial: Drop Dead
Hey look, a falling move! Yorick plummets to the ground, his shovel held like Link’s sword during his own Dair. Contact deals 11% and spikes the opponent if they’re airborne, but if they were on the ground to begin with they’re pitfalled. After landing, Yorick scoops out a nice chunk of soil and throws it behind him, the dirt becoming a Bowser-sized transcendent hitbox that deals 8% and flinching knockback. The dirt falls just behind Yorick and disappears after it reaches the same elevation it was thrown from. If he happens to do this move in a pitfalled opponent, they’ll be flung out of the ground with knockback that KOs at 125%. Yes, this does work with the pitfalling part of this move. If Yorick doesn’t catch anybody in the ground, then it’s possible he will after this; the move creates a pitfall trap that lasts for 5 seconds.

With below average lag on both ends, this is a pretty nice approaching move or something get you out of the air. However, there is a full .4 seconds between him landing and performing the shoveling part, so there is a way for careful enemies to attack you if you abuse it. It also gives you a temporary trap to give your opponent less ways to escape your ghouls.

THROWS

Grab: One-armed chokehold of awesomeness. This had mediocre range and speed, but Yorick’s got some good throws worth attempting the occasional grab. Use your ghouls to help you out! When Yorick grabs an opponent any ghouls that were attacking the victim will move on to another target if possible, otherwise they’ll group behind Yorick until he performs a throw.

Pummel: Yorick headbutts his opponent, dealing 2% per hit.

Forward Throw: FORE!
Yorick slams the opponent into the dirt, dealing 2%, before swinging his shovel hard into their face. A satisfying clang is heard as the opponent takes 10% and knockback which KOs at 120%. What makes this throw really scary is that it does in fact count as a shovel-based attack for Yorick’s UTilt.

Back Throw: Freed From this Life
Yorick casually turns around tosses his opponent a short distance away, dealing 2%. Of course, if you have any ghouls waiting for Yorick’s grab to finish then what better way to reward their patience but with throwing your enemy right into them? Just make sure that your ghouls are actually going to be there when you do this, or else you’ll just look plain silly.

Up Throw
Yorick lets go of the opponent as sprit energy encircles his foe for 1 second, before EXPLODING, dealing just 5% but KOing vertically at 90%. Use it for KOs, and nothing more. One cool thing about it though, is that the explosion actually has a hitbox that can hurt other enemies, potentially netting you multiple KOs in a FFA!

Down Throw: Tombstone Piledriver
Borrowing a grapple-move from another famous undead fighter, Yorick’s shovel disappears into hammer space as Yorick grab his opponent with both and hands and flips them upside down before slamming them into the ground head-first. This deals 11% and the opponent flops away 1/3 of battlefield. Yorick has a minor frame-advantage from this.

FINAL SMASH – LAST CALLING
lulz

Yorick holds out his hand like in his Omen of Death, only he creates a dark-gray version of the ghoul, one for each opponent. These follow Yorick around and when an opponent is KO’d they’ll be transported to the ghoul “connected” to them…only they still lose a stock. AND they still retain their damage too, so scoring one KO puts Yorick in a position to potentially score another, and another, and another! This lasts for 12 seconds, so enjoy it while it lasts!

PLAYSTYLE

"I will bury you alive!"

What a strange character we have here. Here is a character who seems to fit the perfect description for a campy summoner: Tricky recovery, slow movement, sluggish attacks, fast minions. Yet throughout the set he’s been described as wanting to approach the opponent and fight directly! The key to playing Yorick is that his summons are there to aid their master’s attacks, not fight for him.

Right when the match begins, go ahead and call forth one of your ghouls. Most of the time you’ll want to start with War or Famine, though in some matchups Pestilence or Death may be preferable. Once you have even a single ghoul in play, feel free to start approaching. Yorick is slower than all of his ghouls, but your opponent will either have to fight off the ghoul or be stuck in hit/shield stun while Yorick draws near. Seeing as most opponents are gonna be fighting back, your ghoul will probably die pretty quickly, but that’s ok, make another type as you get a little closer!

Once Yorick’s enemy is within range of his shovel, the fun begins. From here Yorick can quickly shift into several different spacings for different maneuvers while his ghouls preoccupy his victim. His bread-and-butter attack is to use his FTilt at sweet-spot range for some nice damage and knockback. Backing away but remaining within 1/3 of battlefield, Yorick can place a Pestilence ghoul behind the opponent and use his dash attack to cross over to his opponent’s back side to prevent running away. As he starts moving closer than FTilt range, Yorick gains access to his DSmash, FSmash, Jab, and FAir as some examples of pressure tactics. Normally these attacks aren’t the fastest or safest around, but with ghouls locking down your opponent the speed and disjointedness they do have turns Yorick into an intimidating force to defend against.

Of course, Yorick’s minions can be killed off rather quickly on their own, so Yorick has to spend some of his time to simply call forth more of the undead. If you’re really good, you’ll anticipate a ghoul’s demise and start to shift into proper spacing for its summoning attack so you can bring it back immediately. Of course, eventually good adversaries will find you without a single ghoul, which is when Yorick himself must go on the defensive. DTilt, UTilt, USmash, and Nair are some of your best bets to ward of opponents and get some space to return to producing ghouls. Yorick must be especially wary of airbone foes because of his more situational anti-air techniques; the tradeoff is that Yorick’s ghouls do a good job of keeping a foe grounded.

Yorick has a variety of KO options, including Omen of Pestilence, sweet-spotted FTilt, and UThrow to name some. If your enemy doesn’t quite have enough damage to be sent to the grave, Yorick’s ghouls add some quirks to his edgeguarding game. On one hand, they can flinch your opponent the moment he uses his mid-air jumps. On the other, they can keep replenishing his recovery moves. If your opponent tries to exploit this too much, this is a perfect time to use UTilt can recall your ghouls while your opponents kills himself, and try to summon a few new ones to prepare for his next stock! As for Yorick’s own survivability, his weight serves him well, and his ghouls can help distract your enemy from trying to edge guard, but Yorick’s sole recovery move can be tricky to use properly thanks to it always transporting him to his opponent. What if you end up teleporting into a different off-stage area?

In a nutshell, Yorick’s minions are truly that; mindless peons to serve their master’s greater goals. While the ghouls do their job of lock-down nicely, at the end of the day Yorick is the one who is looking to deal damage and score KOs, and it shall be Yorick who does so. At the same time, don’t neglect the usefulness of your undead henchman, for they turn what would otherwise be sluggish defensive pokes into offensive pressure that makes children cry.

Doubles
Yorick has to be the primary aggressor in team games if Team Attack is on; his ghouls won’t target teammates but they can still deal friendly fire damage. Yorick’s damage and KO potential are both pretty good so he mainly needs someone to help cover him if he can’t lock down both enemies at once. For ultimate laughs, use Dash Attack to sandwich both opponents between yourself and your ally. If Team Attack is off, then Yorick can actually sit back and support his teammate with ghouls, replenishing them the moment they die. Once the enemies are separated, Yorick is free to approach himself and use FAir to start focusing his swarm on his lonely opponent.

Free-For-Alls
Yorick’s main issue in FFA games is that his ghouls may end up all targeting different characters and lose their swarming effectiveness. Thankfully you can use Yorick’s FAir to get them to focus on a single target. If you have several ghouls in play you may even consider attacking someone else while your ghouls attack the FAir’d character! Yorick’s DSmash and Nair give him some nice crowd-control when enemies are sick of his ghouls stealing KOs. Speaking of KOs, don’t ever use FAir on someone who has high damage when you’re Omen of Death is active; God forbid you need to recover and the guy your ghoul is targeting is sent off flying to their demise.

Capture the Flag
In CTF games, Yorick can have 3 of each ghoul type in play; when teleporting to a Death ghoul, he goes to the oldest active once. Yorick performs pretty well in offensive and defensive roles. When raiding, his ghouls can keep up with the rest of the team while Yorick simply teleports across the map via Omen of Death. His offensive support is especially useful when his team has the flag and is returning to base, seeing as his ghouls will be constant obstacles for the enemies to fight past. When defending, Yorick can try using his FAir on enemy flag-carriers to swarm them with ghouls. In general, Yorick plays like a more traditional summoner character in CTF games, but this doesn’t make his melee attacks any less painful.

MATCHUPS

Vs Flying Dutchman: Slight Disadvantage

The Dutchman has a scary stage control/zoning combination with his mass lingering hitboxes and huge disjointed ones, making it hell for Yorick to ever approach him under normal conditions. Thankfully, Yorick has his ghouls, and while the Dutchman can pick off individual ghouls well enough once 2 or 3 get to him he has difficulty escaping with his sluggish close-range options. Yorick will want to maintain mid-range as long as he has ghouls so he can avoid the Dutchman’s ridiculous grab and also have time to react if it looks like the Dutchman will unleash one of his bigger attacks. Dutchman’s fire-trap is especially useful here as he can camp in it and Yorick’s stupid ghouls will just fly right into it and kill themselves. If this happens, Yorick had better hope he is close enough to the Dutchman to chase him out, or else it’s game over.

Should the fight go to the Fly of Despair, Yorick’s going to be spamming his NAir to protect himself while the Dutchman will be focusing on his own Nair to try and bypass the range of Yorick’s. Both characters have short range on at least one of their aerials, but Dutchman’s will still have use for its KO potential in this realm. Yorick’s air game isn’t very good without some ghouls to help him out, so besides his NAir he doesn’t have much to protect himself from the Dutchman’s assault.

Overall, this matchup will come down to how quickly Yorick can get to Dutchman before he gets too crazy with setting-up his stage control moves. If he can do it early he stands a good chance of winning, but once the stage starts to be full of hitboxes Yorick will have a difficult time mounting any notable offense.

Vs Shanoa: Moderate Disadvantage

As a precursor, as of Smash Bros X, Shanoa’s received some notable buffs, such as the complete removal of her MP mechanic and all of her tilts dealing 4 more damage. The glyph she gets from Yorick is Sanctus curator, which creates a white ghoul that works just like Yorick’s War Ghoul, only it deals 7% per attack and prioritizes Yorick’s ghouls in a fight.

Shanoa can be pretty nasty. Her FTilt is a great crowd-control move to push through ghouls and Yorick to retreat, and she is no slouch in the range department allowing her to play keepaway while kills ghouls safely with her big hitboxes. Her side special, Redire Magnus, is a great boomerang projectile that doubles as an approaching too so she can take out ghouls from afar before pursuing Yorick to force him to play defensively. Once Yorick is hiding behind his shield Shanoa can use her high-knockback throws to force Yorick into recovery mode, and Shanoa has some brutal gimping moves such as her up-special that make it nearly impossible for Yorick to survive. Finally, Shanoa’s laggy down special is actually somewhat useful in this fight as she can hide while her glyph summon handles Yorick’s minions.

Yorick does have some advantages however. Shanoa’s strongest moves, including her grab/throws, are sluggish, allowing Yorick the chance to regain momentum. Shanoa is very light so Yorick’s already strong KO moves will be finishing her off pretty quickly, especially if he does manage to pressure her with the damage from himself and his ghouls. To compound this problem, Shanoa doesn’t have many anti-air options so Yorick has a much easier time landing his FAir and DAir. While Yorick’s in the air he also has access to his BAir to counter Shanoa’s FTilt. Overall, advantage to Shanoa, but Yorick can punish her harshly if she makes any error.

Vs Haunter: Slight Advantage

God damnit, is it possible to find one moveset to write a MU for that isn’t going to lead to camp- oh wait this is MYM hippo. Anyways, Haunter can be tricky to catch, as when he goes invisible Yorick’s ghouls will wait in place (this is the same for all characters who can turn invisible). This means Yorick will have to start rummaging around himself to hopefully score a hit while evading the inevitable barrage from Haunters dislocated hands of doom. The good news is that Haunter’s invisibility has a laggy activation so once Yorick does get a hold of him Haunter will be forced to fight more conventionally until he can get some distance. Haunter’s big and light, though, so he will probably die soon after he’s legitimately pressured from ghouls + Yorick.

Haunter’s hands are essential to his survival. Right from the start, he has to interrupt Yorick’s summon attempts, and have his other hand try to intercept any ghouls Yorick does summon. Not an easy feat to micromanage at this level in Brawl. Haunter also needs Night Shade active as much as possible, preferably timed so he can alternate between invisibility and hiding in darkness to keep Yorick’s ghouls off him. If he can get both hands disconnected and close to Yorick, Haunter can dish out some good pressure of his own, again providing Haunter can keep up with his own controls. Yorick can dish out much more punishment to Haunter than vice-versa, and while Haunter does have some unique advantages Yorick has a slight edge overall.

Vs Kel’Thuzad: Strong Advantage

Oh look, another summoner whose minions aren’t the primary fighters in the set! Kel’s minions are a bit tougher than ghouls and there can be more of them at a time, but they’ll be regularly sacrificed to power Kel’s ever diminishing mana. Speaking of which, using a mana shield is just asking for Yorick’s ghouls to devour it, leaving Kel with nothing to use for his actual attacks. Once he’s out of Mana Kel has to wait till he can sacrifice one new ghoul for 90 mana, giving him about 3 attacks before he has to try stalling even more.

Kel will hilariously enough be playing like a regular campy summoner in this instance, relying on his own minions to pester Yorick, mainly spending mana for his DAir to try quickly killing ghouls before Yorick has a chance to relieve himself from the corpses and make more. Kel can use his FAir to try to siphon mana from Yorick, but once Yorick starts to approach Kel will have to stop before more ghouls come his way. Kel can also try pressuring with FSmash to force Yorick to dodge into attacks, but this quickly uses up Kel’s mana. There’s also the matter of Yorik’s Omen of Death so he can go straight to Kel and assist his ghouls. The main problem Kel has is that his mechanics end up counter-acting each other in this matchup, with his ghouls being useless for mana replenishing and Kel’s mana intensive attacks being unable to be used for offense.


You will remember Yorick Morrie​
 

majora_787

Smash Hero
Joined
Jun 23, 2007
Messages
6,122
Location
Texas
Huh... I only missed 24 sets or so... I guess I should get started on looking at those. =P
 

Rychu

Thane of Smashville
Joined
Jul 5, 2010
Messages
810
3DS FC
1908-0105-4965
Dedz to Smady, Kupa, and David for their huge help on this project

Man Ray and The Dirty Bubble

Playlist Here
Man Ray and the Dirty Bubble are villains from the fictional superhero television show "The Adventures of Mermaid Man and Barnacle Boy", which is the favorite show of SpongeBob Squarepants and Patrick Star. In that world, they are extreme villains out for world domination, and have the power to see those plans through. Even though they are minor villains in the "real" world of SpongeBob Squarepants, committing such atrocious crimes such as Jaywalking and making people eat dirt, they still have SOME semblance of power that makes them a threat to SpongeBob and his happy-go-lucky ways.

Statistics for Man Ray
Size: 7
Weight: 6
Speed: 6
Jump: 5
Air Speed: 5
Fall Speed: 5
Traction: 4
Attack Speed: 7
Special: Crawl
Range: 10

Statistics for The Dirty Bubble
Size: 7
Weight: 1
Speed: 5
Jump: 10
Amount of Jumps: 5
Air Speed: 10
Fall Speed: 1
Traction: 10
Attack Speed: 3
Special: Glide/Crouch
Range: 10

Interesting set of stats for both, so I’ll talk about them individually. Man Ray moves, jumps, and walks like a normal fighter. At the start of the match, you control him, with The Dirty Bubble following, much like Nana in the Ice Climbers. Man Ray is a bit faster, so the Bubble will fall behind a bit. The Dirty Bubble floats 1.5 Kirby heights off the ground, his crouch literally just lowering him to the floor. He's an aerial demon, jumping high, moving fast, and falling slowly. He'll stay behind Man Ray when not in direct control. He is, however, an absolutely GIGANTIC target, with little weight keeping him from being KOed. Luckily, Man Ray is the main target of the attack, as one will only score a KO against the team by KOing him, BUT Man Ray becomes FAR less competent if he looses his faithful friend.

The Dirty Bubble will also pop if he's dealt 30% damage, him having his own counter at the bottom. He will blow himself back up to size after 5 seconds, taking 1 second to do so, taking 6 seconds total. Man Ray himself can attack the Dirty Bubble, popping him at his own will. However, if the Bubble is KOed through traditional means, he does NOT come back, leaving Man Ray all on by himself.

So basically, you start the match with Man Ray as your Popo, but you can change this throughout the match. The Dirty Bubbles aerials also count as his standards when directly controlled, while Man Ray's aerials are aerial versions of his standards.

How Absorption Works
This is a fairly straight forward concept. The Bubble automatically absorbs all opponents or objects that he comes into. Opponents have to button mash out against 1.5x grab resistance, however, they can choose to fight back by hitting the grab input, which allows them free use of they're entire moveset, with the exception of grabs. If they manage to do so, the Bubble pops without consequence to the opponent. If the Bubble is popped from the outside, the opponent is then given a footstool effect, the length of which is dependent on the amount of damage opponents have taken (The amount of punishment is huge in order for the effect to even last one second: about 100% damage). The amount of things the Dirty Bubble can absorb is dependent on both the size of the absorbed object and the size of the Dirty Bubble. The Bubble gains the weight of any absorbed character, making potentially the heaviest foe on the Battlefield in a Team Match or other match type.

Specials

Side Special + Bubbles! MWAHAHAHAHA!
Man Ray points forward, allowing the Bubble to go in front of him. The Dirty Bubble then opens his mouth, allowing 3 tiny bubbles to come out, which now floats around the stage at half Ganondorf's walk speed. They all float in a different direction, one going up, one left, and one right. You can influence the flight of the Bubbles be smashing the control stick the direction that you want them to go in. They fly in vague patters, but for the most part stay in a specific area of the stage, so you have an idea of where they are and if you can use them.

These bubbles are about the size of Meta Knight, and can take about 20% damage before popping. These things take knockback much like a Smash ball, flying away at the slightest touch. If a character comes into contact with one of these bubbles, they become engulfed in it. Anyone caught inside is now forced to button mash out, the strength they fight against being equal to that of a grab. When popped from the inside, the escapee is given 1 jump and allowed to recover. If popped by an outside source, the character is dealt a footstool-type effect, and will plummet down.

These do not respawn after they are popped, the Dirty Bubble having to do this manually. Only 3 Bubbles can be out at a time. These are affected by any wind moves, gravitating towards wherever the wind is pulling or pushing towards. The Dirty Bubble can absorb his own Bubbles, which make it harder for opponents to escape after being absorbed.

Neutral Special + The Tickle Belt

Man Ray lunges for the opponent, forcibly throwing them down to the ground if he's successful. He pulls out what appears to be a belt-it's the infamous tickle belt used on him in one of the greatest Mermaid Man episodes ever. He straps the belt around his opponent’s waist, laughing evilly, and sets it to "automatic".

Now, whenever the opponent comes within 2 SBBs of Man Ray's head, they begin to laugh uncontrollably. This lowers their ground speed by 1 per second, and deals steady damage of 2% per second. This does not stop at any point, unless either Man Ray or the opponent is KOed. This helps with the Duo's spacing: Once this move is in place, opponents cannot come within that radius without consequence. Of course, your head will most likely be detached, meaning that you have some form of a campground to stake out at, even though the duo isn't very adept at camping.

Up Special + The Orb of Confusion

Man Ray pulls the Orb of Confusion out of his um...pockets...or...um...utility belt, I guess, and looks at the Dirty Bubble. The charging animation shows Man Ray messing with the controls, with him and the Dirty Bubble giggling while he does it. After the charge, which can last up to .5 seconds, he throws a switch, causing a sphere of trippy psychedelic effects to flash on the screen for a brief moment.

At minimum charge, it has range comparable to Jigglypuff's sing (that's in comparison to their size, in other words, not reaching very far out from them), while at full charge, the sphere will reach 3/4ths of the main Battlefield platform. ANY opponent caught within the sphere will immediately enter their dizzy state, with humorous additions, such as drooling and blank stares. In addition, they are dealt 10%, possibly due to brain damage.

Man Ray and the Dirty Bubble are affected by the Orb's confusing powers, too. After the flash, Man Ray looks completely dumbfounded. The Dirty Bubble is in complete control for a very short period time, about 3 seconds. It's just enough time for him to, oh, say, absorb an opponent -or- Man Ray. Once Man Ray is inside the Dirty Bubble, the duo gets access to the Dirty Bubble's aerials, which also function as his standards. He cannot pick up any items inside the Dirty Bubble. The Dirty Bubble can still absorb other characters, which leads to a sort of caged Brawl with Man Ray. By holding the grab button inside the Bubble, Man Ray can access his standards and beat the crap out of the opponent, who will be busy trying to button-mash out.

Down Special + Unmasking (sort of)
Man Ray grabs onto his collar and begins pulling. After .15 seconds, his mask comes off of his head, revealing...a headless body. Man Ray now tosses his head behind him, it landing on the ground 2 Bowsers behind him. The Dirty bubble now takes lead of the group, having access to some of his own moves, while still able to perform those that he already has in the team. Specials still function as normal, and Man Ray's head still shooting his laser if the neutral attack is pressed.

The Down Special, while not holding your head, will allow you to switch between the pairs standards. Man Ray's head can be picked up and chucked off stage by an opponent, but it doesn't count as a KO, because the main target now being the Dirty Bubble. If the Bubble is popped, Man Ray's head becomes the target, a KO being scored if it's chucked off. Man Ray's body performs all attacks involving it normally. This has benefits, you'll just have to trust me on that.

To regain your head, you must first pick it up (due to the Dirty Bubbles lack of ligaments, Man Ray always picks up items for the team), then perform your down special. Be wary of this, though, as opponents can pick it up and throw it around also. If they do, you can still use this to get them off, assuming they grabbed it from the front. The Dirty Bubble can absorb the head, allowing it to stay inside him.

Smash Attacks

Side Smash + Dirty Wind
The Dirty Bubble gets an especially evil look on his face as he begins to suck in air. After .25 seconds of this, he begins to blow out air, which can be held for 5 seconds. The wind carries itself over a very long distance, reaching the full length of Battlefield. It's about as powerful as Kirby's inhale all the way through. The direction of the wind is completely controllable, rotating to about 45 degrees in front.

Holding back on the control stick will cause the Dirty Bubble to start sucking in air, with the strength again about the same as Kirby’s inhale. The Dirty Bubble cannot engulf opponents directly with this move, but it has very low ending lag, meaning that the Dirty Bubble can always just follow up with a Neutral Special. The force will also move your bubbles around, allowing for a more controlled attack with them, and allowing you to capitalize with a follow-up.

Up Smash + Bubble Ball
Man Ray motions for the Bubble to walk in front of him as he crouches low to the ground. Once the charge is released, Man Ray hits the Dirty Bubble upwards, with him flying upwards about 5 Bowser-widths full charge. After going all the way up, the Dirty Bubble comes crashing down at Sonics’ dash speed.

The whole process takes about 1.2 seconds. Any opponent that he hits during his flight is engulfed into him, although not for long as the Dirty Bubble pops himself as soon as he hits the ground. Opponents are dealt 12% damage as he pops on the ground, but no knockback; instead, they enter their dizzy animation, allowing Man Ray to attack. The Dirty Bubble ends up being popped after this move, so use wisely.

Down Smash + Lazer Gloves
Man Ray sticks his palms forward, smiling wider than normal. After a relatively short charge period, he shoots lasers out of his gloves, which looks similar to R.O.B's. After they have been shot, the beams are aim able, much like the arrows in Pit's Neutral Special. These do 17& damage and low knockback, so it's no where near a killing move. However, if one of these suckers comes into contact with one of your little bubbles, the bubble it hit turns red. After 1 second, it overheats and explodes, with a blast that is comparable to a Bob-omb in size, damage, and knockback. This gives the duo some camping possibilities, when used with your Down Smash and Up Smash.


Grabs And Throws​

Grab
Man Ray performs the duo's grab, due to the Dirty Bubbles' lack of appendages. It's standard fare, not particularly notable in anything besides low ending lag and slightly fast speed.

Down Throw + Feed the Bubble
For this, Man Ray holds down the opponent, which, I'm not gonna lie, deals 5% damage to both Man Ray and the foe; however, this allows the Dirty Bubble to sneak up behind them and absorb them both as he moves forward, laughing evilly (or at least as evilly as his voice allows) all the way. This gets the duo into a good spot, at least, as the opponents are now defenseless to Man Ray's attacks. This is useful against enemies that like to play a bit -too- close for comfort.

Side Throw + Head butt (with some kind of weird consequences)
Man Ray delivers a head butt to opponents, which deals 10% damage and some medium knockback. However, Man Ray's head falls off afterwards. He looks panicked, because he can't find it, but then looks annoyed. He pulls out a second head and places it on his shoulders.

This head is now the main head, the one opponents have to try to get rid of when the Dirty Bubble is popped without being KOed. The other head remains, but cannot be placed on his shoulders if the new head is taken off. All heads will shoot lasers when the neutral special is pressed. All heads will also make the tickle belt react when close, adding onto Man Ray's playground. Man Ray can have 3 heads out at a time. He can pick these up

Upward Throw + How to get a Head in life
Man Ray simply takes off his head and places it on the shoulders of his opponent. Man Ray must have his head on in order to use this attack. Opponents still attack normally, they have no difference besides one simple thing: the head still shoots lasers when Man Ray uses his neutral standard. Man Ray can still use his neutral special even when opponents are within the Dirty Bubbles dirty grasp. Oh, and yes: opponents aren't free from the tickle belt's damage, so there's that.

Standard Attacks​

Dash Attack + Slide
Man Ray, as he dashes forward, kicks his feet forward and slides. If he runs into an opponent, he will actually slide underneath them (for shorter opponents, he jumps over them), not doing any damage. But, you know, he's got someone following him. The Dirty Bubble will absorb anyone he comes into contact with while he’s rushing to catch up to Man Ray.

Forward Tilt + Punch to the Gut
A fairly straightforward concept, Man Ray punches the opponent in the gut, which deals 5% damage. This functions the same in the air, giving Man Ray a slight forward push. Inside the Dirty Bubble, it mostly acts as a damage builder to...well..rack damage. It's nothing fancy, but it gets the job done.

Down Tilt + Takedown
Man Ray, after some starting lag, rushes forwards a short distance. If he comes into contact with an opponent, he pins them to the ground, which deals 15% damage. The ending lag is quite high, so don't miss.

In the air, Man Ray still lunges toward opponent, trying to pin them. If he hits, he starts to plummet towards the ground, holding them down. However, if he's off stage, he releases opponents before h reaches ground level and makes a dash for solid ground.

If he's inside the Bubble, Man Ray throws opponents to the bottom of the Bubble, pushing down. He and the opponent go through the Bubble's liquid floor, plummeting down. This is an excellent gimping tool, but it puts the Dirty Bubble in some danger as well.


Up Tilt + Flexible Man Ray Kick (lol names)
Man Ray gives a sharp kick upwards, which has a decent amount of reach. The kick does 10% damage, and mediocre upwards knockback. This functions pretty much the same in the air. If Man Ray is inside the Bubble with an opponent, it serves a very different purpose. This bounces opponents all over the Bubbles walls, which makes it harder for them to escape, plus the 10% damage it's already caused.

Aerials​

Neutral Attack (for both Man Ray and the Dirty Bubble) + Man Ray Gun
Man Ray gets a "menacing" look on his face, red energy surrounding his eyes. After .5 seconds, he blinks, then releases a long red laser beam from his eyes, which is comparable to R.O.B's. All heads will fire at the same time. The beam can extend the length of Final Destination, and does 1% damage per hit and slight flinching knockback, the total damage it can deal is 5% damage. This is very likely to hit multiple times, especially since it barely deals knockback, but is also very predictable. You do have a bit of a cool down period, as you have to wait 3 seconds in between blasts.

Obvious usage is to use it to pop the Dirty Bubble, as players still have access to this move even when controlling the Bubble. The move only deals up to 15% damage though, so it may need some time before it is used properly. The problem is, it travels in a straight line, has pretty heavy ending lag, and is, of course, predictable as all hell. Used right, the duo can set up an attack from all angles that are hard to avoid. Used wrong, you won't be getting any closer to victory.

Forward Aerial + Expansion
The Dirty Bubble begins to suck in air, which causes him to expand and get larger. does not take an extremely long time, but in order to get him to full size, about the size of a rounded Bowser, will take about 1.5 seconds. This attack must be held to keep going, so the Bubble is very much able to be attacked during this move. This obviously allows the Dirty Bubble to cover a larger area without losing any speed, but his weight does not go up.

Downward Aerial + Compression
Essentially an opposite of Expansion, the Dirty Bubble begins to compress his body, which can decrease to about the size of Pikachu. Any opponent (or Man Ray) inside the Bubble are dealt 3% for the first Body size that he shrinks to, which adds an extra percent the farther down he goes, meaning that from his full size, 10, he will be dealing 10% for the last compression. However, this comes at a cost: the Dirty Bubble pops when he goes down to minimum size. If he pops, opponents are dealt high vertical knockback, making this one of the Dirty Bubbles only real KO moves. It's best to use this in times of need, not using it all at once because, you know, he gets popped.


Backward Aerial + Inside-out Bubble
For this, the Bubble does something...disturbing, to say the least. He makes himself, well, inside-out, as the name suggests. From here, any attack he uses to blow something out of anything now does the reverse - moves like his Side Smash will instead blow opponents out of him, while his side special will create bubbles inside him. It's a useful way to keep opponents inside you while Man Ray wails on them.

Upward Aerial + Flip
For this move, the Dirty Bubble rolls over, spinning like a wheel, continuing to do this for as long as the standard button is held. This makes anyone inside the Bubble, excluding Man Ray, dizzy, as well as deal 10% damage. Of course, this makes it harder to escape the Bubble's clutches, which in turn makes it easier to deal more damage to them. The Bubble will use this often in the earlier part of the match, since it's so easy to escape with small amounts of damage.

Final Smash​
World Domination
This music begins to play as the Dirty Bubble begins to expand. And continues to expand. The Dirty Bubble keeps expanding slowly, throughout almost the entire duration of the music, laughing the whole time. Towards the end, Man Ray begins to laugh too, as everything on the stage is eventually absorbed by the Bubble. The world is shown, which is cartoonishly absorbed by the Bubble, with Man Ray shouting out: "Now this WORLD belongs too... MAN RAY!". When the last note of the song hits, the Dirty Bubble gives us one last laugh before doing the unthinkable: he pops himself. The resulting force blasts opponents off into space, where they are star KOed. The duo falls back onto the stage unharmed, as the opponent respawns. An over-the-top cartoon Final Smash for a likewise over-the-top team.


Playstyle​
The duo is just that - a duo. They work best when working together. In order to do that, Man Ray has responsibilities right off the bat, number one being to protect the Bubble at all costs. Number two is to grab the foe, and grab early, since he wants to get as many heads out as fast as he can. When dealing with this problem of, well, how exactly you're going to get close enough to do it, it always helps to have the little bubbles out. These things can do wonders if paired up with your side smash. Creating bubbles early is an important factor in the match, as is how well you controll them once they're out. Once opponents are inside your little bubbles, your side smash is a quick and easy way to get them closer, but doing this too early will result in losing your bubbles, making your whole set up a wast of time. Your up smash is your best friend in this situation, as it gives you a relatively quick and powerful long-ranged offense if you can get opponents in one space for a short amount of time. Clustering your bubbles can keep them at bay for this short time, but will result in you losing the bubble for a few seconds. When this happens, Man Ray needs to capitalize with a grab to spread as many heads as possible. Your down smash helps loads when you have a cluster of bubbles and there is damage to be done, but it does leave you a bubble or two short.

The Tickle Belt really should come into play fairly early, but it -does- need this set up to be effective. This is the duo's main way of racking heavy damage outside of getting opponents into the Bubble, which will be dicussed in a bit. Man Ray's heads are all vounerable to attack, so the Tickle Belt is an absolute must if you plan on having an advantage. The heads all conveniently shoot lasers when they are called to, giving the duo an offensive-defense, as the heads will help them not only deal damage with the Tickle Belt, but also in popping the Bubble.

This brings me to the meat and potatoes of the duo's game: getting opponents inside the Dirty Bubble with Man Ray. The orb of confusion works wonders here, as it allows the Dirty Bubble to be controlled directly by the player, while also incapacitating the foe for a short period of time. Getting opponents inside the Bubble shouldn't be -too- difficult, assuming that you've saved some of your smaller bubbles, which can be easily manipulated to bring opponents to you. From here on, the match becomes pretty much you trying to absorb opponents with Man Ray inside you. In order to do that, your side Smash becomes all-important, as does your forward aerial. As you pull opponents in, it's absolutely vital that you keep yourself safe by either hiding behind Man Ray's mask, assuming you've got the Tickle Belt out, or simply getting them into Bubbles any way you can. From here, after you've absorbed them, it becomes a complete beatdown as Man Ray tries his best to beat the crap out of opponents trapped with him, with assistance from the Dirty Bubble and his B-air & S-smash, U-air, and D-air. By now, both sides hve taken a huge beating, and it's about time to finish the opponent off. To do this, Man Ray's D-tilt will be needed to bring opponents out, as they need to be inside the Bubble alone, or else it's usually a suicide KO. Man Ray's dash can easily absorb opponents again, and from here, your options are to either pop the Bubble offstage (which is likely the best and safest way), by desynching with the Orb of Confusion and absorbing one of Man Ray's heads to pop yourself, or to try and compress yourself, assuming you've rqcked enough damage.

Extras

Taunts

Up Taunt + Evil Laughter
Man Ray and the Dirty Bubble do evil villain cliché number 987234, as they throw their heads up for a quick round of evil laughter. BWAHAHAHAHA

Side Taunt (Man Ray) + Not a Parody
Man Ray dramatically does his best villain voice, shouting: "Now this town belongs to....MAN RAY!"

Side Taunt (Dirty Bubble) + The Challenge
The Bubble Pulls out a paddle ball game and leisurely begins paling, saying: " 1...2...3...29,998,559,617,349!!!!! BWAHAHA!"

Down Taunt + The Orb of Confusion
Man Ray pulls out the orb of confusion (which causes confusion) and switches is on. For the next 2 seconds, the duo gets a dopey expression on their face and says "duuuuuhh...." before switching it off.

Victory Poses
The duo's victory theme, along with the rest of the SpongeBob characters, get this jolly tune, from 0:32 to 0:37 as their victory theme.

Victory Pose #1 + World Domination
Man Ray evilly proclaims to the players: "With these fools out of the way, nothing can stop us from Word Domination!", to which the Bubble replies: "And making people eat dirt! HA!". Man Ray face palms and shakes his head, while the Dirty Bubble looks proud of himself and nods to the player for the rest of the time on the results screen.

Victory Pose #2 + EVIL

Man Ray and the Dirty Bubble strike action poses as words fly onto the screen dramatically, with the SpongeBob news fish saying the words: "EVERY VILLIAN IS LEMONS.", which then spells the word "EVIL" under them. The Bubble says: "Oh, I wish the Atomic Flounder were here to see this!" (in this fashion. )

Victory Pose #3 + Make-Out Reef
There is a boat car on the results screen, with what appears to be two people making out in the car, but it's dark. All of a sudden, a light shines on it, revealing a teenage fish making out with his pillow. He looks, and says: "Hey man, that's not cool!” for it to cut to Man Ray and the Dirty Bubble laughing hysterically.

Victory against SpongeBob + Orb of Confusion
Man Ray strike a pose in front of SpongeBob (and all of the other fighters), who are dumbfounded by the orb of confusion. If you wait long enough (about ten seconds), the orb reaches them, making them go dumb as well.

Victory against the Flying Dutchman + Ghostly Powers
Man Ray and The Dirty Bubble are shown with a green aura around them, with the Dutchman strapped to some machine in the background. Man Ray says: "I love my new ghost powers!" To which the Bubble replies: "It's just like that TV show!"

Victory against Mr. Krabs + Cashy
Mr. Krabs is seen tied up, begging the duo to not do something, and saying: "NOOOOO! NOT THAT! I'VE HAD HIM SINCE HE WAS JUST A LITTLE CALCULATOR!” to which Man Ray responds...with breaking his Cash Register.

Series Logo
a Smash Logo version of SpongeBob’s pineapple, which they share with the rest of the SpongeBob cast.

Role in the Subspace Emissary
Man Ray and the Dirty Bubble's first scene takes place right before Lucas’s. In it, the duo can be seen listening to orders. After a brief moment, they Nod at each other, and go off into a forest. The stage's scenery is much like Link's first, with the exception that there are Pokémon everywhere. Pokémon will act as their Poke ball version, or as normal enemies. The notable thing is that there are no electric Pokémon.

After some standard platforming, including some that you'll have to utilize the Bubbles flight, the duo reaches a clearing, the end of the stage. The following cut scene shows the duo spotting a Pikachu and going to capture it. The Pikachu, in the resulting fight, pops the Bubble, forcing Man Ray to fight on his own. A 1 on 1 starts, on a flat stage with no platforms. You play as Man Ray alone, vs. Pikachu. The goal is to stall for 2 minutes before the Bubble respawns, and then catch the Pikachu inside him. KOing Pikachu counts as a loss. Usually it would be easy, but on a small, flat stage, stalling is rather hard.

Afterwards, we get a short cut scene with the duo going to Gannon’s base and giving him the Pikachu. They salute, and go off somewhere else. The game plays normally until Samus and Pikachu find the Power suit, which is guarded by -who else- Man Ray and the Dirty Bubble. Pikachu looks especially pissed off during this scene. The match now plays a little differently. It's the same stage as in the normal SSE. However, you play only as Pikachu, protecting Samus as she attempts to hack and free her suit. The duo will try to attack her, so you're not facing a horrible offense here. The match will last 2 minutes, or until you KO the duo.

The next cut scene plays as normal, but with the duo getting blasted through the door and running away. They run to Gannondorf, who looks enraged and beats the crap out of them. They then get fired, and look back on Gannon as they are walking away. It's the look that tells you that they want revenge, as they tried their best. They next show up in the scene where Samus and Pikachu meet Ridley. Instead of Pikachu freeing Samus from Ridley, the duo frees both, as Ridley grabs both of them. They throw up a peace sign to show they've switched sides, and continue to team with Samus's group for the rest of the story.

Match-up

vs. the Flying Dutchman
(will edit this in later)
 

Nicholas1024

Smash Lord
Joined
Mar 14, 2009
Messages
1,075
So you've found me. Was it worth it? Because despite your violent behavior, the only thing you've broken so far, is my heart. Maybe you could settle for THAT and we'd just call it a day. I guess we both know that isn't going to happen. You chose this path, now I have a surprise for you.


Deploying surprise in


5


4


3


2


1


Portal Man joins the Brawl!

Note: This moveset will be told story style, with various characters from Portal 2 having dialogue. To keep things easy, each character will have a different text style.
Wheatley uses blue text.
Glados uses italics.
Cave Johnson has bold text.
And finally, the announcer has his own special font.

One last pre-moveset note, thanks to Smady for the picture.

Awakening from Stasis:

Oh! Phew, I was worried there. They told me that if I activated you out of stasis, I would die! They told me that about everything! Why'd they let me know about all this stuff they don't want me to touch? It's bloody insane! Anyway, let's see... your file says you're a new model of robot codenamed Hyperion, and you're supposed to be equipped with all the testing tools in the facility to guard Aperture Science. All right then, sounds cool. However, your file says you were locked away prematurely due to some damage in your personality core, so you'll have to gather all the equipment yourself. So basically that's the robot equivalent of a minor case of... serious brain damage. Don't be alarmed, but if you do feel alarmed, that's good, hang on to that feeling, because that's the correct reaction to being told you have brain damage. Is any of this getting through to you?

Um, what you're doing there is jumping... tell you what, say apple.

Erm, alright, close enough. Anyway, the first piece of equipment you should get is a gun, well not a gun, a portal device. I think it's somewhere in this course. You probably aren't in any shape to run these tests, but you're a good jumper. That must count for something. Anyway, if you'll excuse me, there's a human I must check on, got to work on escaping from HER. I'll meet you at the end of this!


Special Preliminary Testing:
Hello, and again, welcome to the Aperture Science Enrichment Center. We are currently experiencing technical difficulties due to circumstances of potentially apocalyptic significance beyond our control. However, thanks to emergency testing protocols, testing can continue.

Neutral Special: Aperture Science Handheld Portal Device
The Aperture Science Handheld Portal Device is capable of manufacturing two linked portals. Simply press the B button and a direction on the control stick to shoot a portal onto the stage. Once both portals have been placed, entering one portal will cause you to shoot out the other one in the exact same state you entered. Lag, attacks, jumps, and momentum, a function of mass and velocity, are conserved upon using portals. If the laws of Brawl no longer apply in the future, please file your grievance paperwork against Sakurai using our complementary stationary at the end of testing. Portals are the size of a stage builder block, and your ASHPD will alternate between shooting the blue and orange portals. The color of the next portal you'll shoot will be indicated by a small light on your device. In the event that you are colorblind, an idiot, or otherwise hindered such that the future should not start with you, please return to your primitive tribe and send someone more suitable towards future starting. (Lag is low.)

Side Special: Aperture Science Sentry Turret
This next course may involved prolonged contact with lethal military androids. Using this input will allow you to place your own lethal military android in front of you, and as legislated by federal regulations, only one of these is allowed on-stage at a time. To continue productive testing, we have limited the sensors of these turrets to detecting anyone within a battlefield platform in front of the android. Once it detects someone, the turret will begin firing, with 10 bullets a second (Each doing 3%), and okay horizontal knockback. (If they land directly in front of the turret, they'll likely be hit by around 6 bullets before they're out of range.) Rest assured that all military androids have been taught to read and provided with one copy of the laws of robotics to share. These turrets do suffer knockback, and if knocked onto their side, will fire wildly for half a second before deactivating. They can also be picked up and used as an item (doing beam saber style damage and knockback if used that way), or set back upright on the ground (crouching and pressing A while holding a turret), which will reactivate them.
(You cannot place a new turret until the old one has been knocked through a blastzone or destroyed by taking 20% damage, lag is low. Additionally, it's worth noting that despite the extremely high fire rate, it's unlikely you'll take more than 15% damage or so from being targeted by a turret, due to being quickly knocked out of range from the bullets. Finally, after two seconds of continuous firing, the turret will overheat and quit firing for 3 seconds to prevent an infinite.)

Down Special: Aperture Science Panels
This next test is very dangerous! To help you remain tranquil in the face of almost-certain death, smooth jazz and a message from our founder will be deployed in 3...2...1...

Gentlemen, I give you panels! The planks of tomorrow. We've taken every single stage builder block on the surface of that stage, and refitted it with a panel. The bean counters told me we couldn't afford to buy 10$ of panels, let alone 10,000$. Bought 'em anyway. Took them, refitted the entire facility with them. Anyway, while you hold this input, the nearest panel in front of you will activate, and you can manipulate it to your heart's content. Press up/down to raise or lower the panel (you can move the panel up to a stage builder block above ground level), and you can rotate it up to 90 degrees with left/right (left rotates it clockwise, right rotates it counterclockwise. It takes a quarter-second to rotate the panel to 90 degrees or move it up/down a stage builder block.) When you're finished, just press the B button. These bad boys are great for firing portals onto. However, keep in mind that the stage beneath the panels is still there, and that you can drop through these new models like platforms. Anyway, if you'll excuse me, I need to show this bill collector (and some of our bean counters) our newest product! The Aperture Science Incinerator.

Up Special: Aperture Science Jet Propulsion Device
Good work making it through the testing, future starter! This next test will *voice cuts off, Glados switches on a monitor*.

Oh, it's you. It's been a looong time. How have you been? I've been busy being dead. You know, after she murdered me. That little moron must have woken you up. *unintelligible muttering* Anyway, since you came all this way, you must really love to test. I love it too. But first we need to get one thing. It's right through here.

Your Aperture Science Jet Propulsion Device should be down here somewhere. Once acquired, you can use this input to fly around for up to 5 seconds. While flying you can still use aerials, but instead of normal movement you'll just float around at ganon's run speed. You can cancel in and out of this by rein putting the move as much as you want, but you only have 5 seconds in one jump. Additionally, this move only refreshes on contact with the ground, NOT upon being hit, so use it wisely.


Aperture Science Standardized Testing:

Forwards Tilt: Thermal Discouragement Beam
This next test involves the thermal discouragement beam. I'd just finished constructing it when there was that... episode. So now we'll both get to see how it works. Anyway, if the preliminary testing was correct, when you use this input, you'll fire a thin red laser that does pushback knockback and does damage at a rate of 5% per second. (It travels instantly, after all, it's a LASER. Additionally, it will last for as long as you hold the button, and you can angle it up to 30 degrees with the control stick.) Please tell me I don't have to point out that this is an excellent tool for gimping and portal redirection. You know who's stupid enough to need that comment?
HUMANS. (You were expecting a slam on another MYM'er, weren't you?)
You're better than that. Lag is low.


Down Tilt: Aerial Faith Plate
Slow down! You're reading through these moves faster than I can write them. Pressing this input will create an Aerial Faith Plate on the panel directly in front of you. These objects are glued to the panels, and whenever anything solid lands on them (you, an enemy, a minion, even an item), they'll be shot at a upwards at a 45 degree angle (up/forwards relative to which direction you were facing when you placed it.) They were implemented to discover if test subjects could solve tests while being shot through the air. The results were quite conclusive, they could not. (Additionally, you can increase the power of the faith plate by holding down the button. The power of the plate ranges from a decent knockback attack without charge to Ike's forwards smash with a second of charge.) Up to three of these are allowed onscreen at a time, lag is low. Hm. So I guess you were listening to me. For the record, you don't have to go THAT slowly. Waddle over to the next move description, and continue reading.

Up Tilt: Companion Cube
Pressing this input will cause a companion cube to fall from the top blastzone directly in front of you. The companion cube has the same properties as a (unbreakable) crate, and you can pick it up and use it like an ite-*fizzle* Looks like I accidentally vaporized that one before you could use it. Here, I'll get you another one. Anyway, 8 out of 10 Aperture Science Companion Cube Experts recommend using the companion cube in conjunction with portals to hit the foe, as well as use it as a shield against projectiles (important note: the companion cube will block your thermal discouragement beam). The other 2 were shot and killed by an Aperture Science Sentry Turret. (Only one of these is allowed onstage at a time, lag is low.)

Jab: Aperture Science Shock Probe
*Wheatley comes bouncing out of the cube dispenser system*
Oof! Ouch! Ack! Argh!

As per federal regulations, I must discontinue observing tests while I deal with an escaped test subject. In the meantime, you can ensure your shock probe remains in working order. Please begin testing the effects of 300,000 volts on this little moron here. (I am not a moron!) According to our preliminary testing, it should do 4% damage and stun the target at grab difficulty. (Stunned test subjects cannot move, attack, dodge, or do anything, and are completely helpless unless hit by an attack. Lag and range is low.) Whatever you do, DON'T try to escape.


*ZAP*


Agh, that hurts... Oh, it's you! This is perfect, we have to get out of here now! Look, I got one of those smelly humans to eliminate her turrets and nerve gas, so all we need to do is install some corrupted cores and start a core transfer! But first we need to get out of this room...

Dash Attack: Manual Override
Alright, I've thought about it, and my highly advanced programming tells us our best shot is to try a manual override on this window! Turn around, I can't do it while you're watching...

*THUNK!*

Ow, that didn't work. Wait, maybe you can do one! It's simple, all you need to do is press this input, causing your limbs to retract into your personality core. Then, you'll go rolling along in ball form at mario's run speed, becoming a kirby-sized projectile doing 10% damage and decent knockback as long as you hold the button! Lag is low as well! Alright, now try hacking that window.

*THUNK!*

Come on, one more time!

*CRASH!*

We're through! I knew I could do it!

Wheatley's Smashing Ideas:

Down Smash: Excursion Funnel
Alright, all we need to do now is for you to construct an excursion funnel to ride over to her evil lair. Let's see, I'll just attach myself to this rail here... Oh yeah, when you use this input, you construct an excursion funnel. It's a bit complicated for your primitive robot brain, but that's a device (that fits on one panel), and emits a stage builder block sized beam straight up (or at an angle if the panel's rotated). So yeah, anything in the beam will be pushed along at mario's walk speed, and can only escape the beam by DI-ing out along the sides. But enough explanation, let's get a bloody move on already!

Hm. So I see you've decided to try escaping anyway. No matter, I'll just move this Aperture Science Crusher a little to the left...

Oh no! Alright, I'll just turn off the beam...

*plummet*

Sorry! I thought that would help... why did I think that would help?!?

*One impressively long fall later*

Forwards Smash: Repulsion Gel
Hello there, this is Cave Johnson. Now, since I'm unable to meet with each and every one of you test subjects personally, I've made these pre-recorded messages to inform you about the tests you'll be taking. People who signed up for the repulsion gel testing, please follow the blue line. If you signed up for being infused with mantis DNA, we have some bad news, we are no longer running those tests. The good news is that we have an even better test! A battle against an army of mantis men. Just grab a rifle and walk down the green line. You'll know when the test starts.

This first test involves something the lab-boys call repulsion gel. You're not part of the control group by the way - you get the gel. Last poor son of a gun got blue paint, ha ha ha! All joking aside, that did happen. Broke every bone in his legs - tragic. But informative! Or so I'm told. Anyway, this input will cause you to shoot out a kirby-sized blue blob of repulsion gel (aimable by the control stick, moves at ganon's run speed, susceptible to gravity. We think of everything here at Aperture Science!), which will cover a stage builder block worth of the stage in repulsion gel. Now, repulsion gel acts like a spring, if you land or jump on it, you'll be shot up a couple battlefield platforms. Now the bean counters said that you don't get jumps back or out of helpless when you land on some of this, since it's hard to help yourself when you're bouncing around like a madman. They claimed it wasn't safe science. Science isn't about why, it's about WHY NOT! Well I said, why not marry safe science if you love it so much? In fact, why not make a safety science door that won't hit you on the butt on the way out, because you are FIRED! Not you, test subject, you're doing fine.

(Yes, you! Box your stuff. Door, parking lot, car. Good bye.)

Oh, and by the way, here's some notes the lab boys got me in case you got covered with repulsion gel in that last test.

*flips pages*

"Try not to get covered in repulsion gel, we haven't figured what element it is quite yet, but it's a lively one, and it does NOT like the human skeleton. Plus, you won't be able to land on the stage to refresh jumps for 5 seconds until it wears off. Also, our research has shown that you can't shoot portals onto repulsion gel covered areas, and it takes twice as long to wear off on surfaces as it does on people."

(Lag is ok, charging the smash increases the amount shot up to a battlefield platform worth of goo.)

Up Smash: Propulsion Gel
The lab boys have been giving me grief about that last message tell you about the control group. Told me to stop making these pre-recorded messages. That gave me a great idea, make more pre-recorded messages! I pay the bills around here, I can talk about the control group the whole day if I want!

Anyway, this is our new product, Propulsion gel! Propulsion gel was one of our first attempts at a diet supplement, by speeding up everything that touches it to sonic's run speed. That application didn't work out too well, but it turns out to be an excellent substance in portal testing! Combined with repulsion gel you can use this to jump ridiculous distances, since you retain the momentum when you jump.
(Your traction is reduced like moving on ice though, so it takes a while to turn around.)

Using this move will cause you to shoot a stream of repulsion gel, just like the stream of bean counters I'm shoving out the door. Don't worry, you won't run out! We've got a custom shooter design that somehow has been stolen from us (Professor E. Gadd and his Fludd can kiss my bankrupt...)

Sir, the testing.

Oh, right. By the way, the lab boys tell me that being covered in this stuff isn't that big of a deal, it simply reduces your traction and increases your run speed like walking on the stuff does. Which is good, since you're practically wading through a river of it with these tests...

(Lag is ok, charging the smash will increase the time you keep shooting repulsion gel, just like mario's fludd. Again, you can aim it with the control stick, it will stick to the stage for 10 seconds, to players for 5 seconds, and it gets shot out in an arc at ganon's run speed. Like the repulsion gel, you can't shoot portals on surfaces covered by this.)

Aperture Aerial Climbing:

Neutral Aerial: Portal Gel
*coughing* Since making testing mandatory for all employees, the quality of test subjects has risen dramatically. The need for them, however has also risen. Remember, robots can do your job better than you can, and unless you're comfortable with your job performance, I suggest additional testing.

Anyway, we've discovered some new elements in these moon rocks. Bean counters said we're way overbudget, couldn't afford enough moon rocks for anything practical. Bought 'em anyway, ground 'em up into a gel. Turns out it's an awesome portal conductor. Unfortunately, turns out they're also pure poison. Anyway, you shoot this with our flood model, aimable via the control stick, as usual. However, this model carries auto-charge, but it takes a bit longer, you need to wait 2 seconds between bursts. Anyway, when this hits the stage, it'll overwrite any gels already there, and won't wear off for a good 20 seconds. When it hits an opponent, it'll poison them like those moon rocks did to me, and they'll take a passive 1% every 2 seconds for the next ten seconds. In these tests we're going to see if jumping through portals in this moon rock gel can somehow leech the poison out of a man's bloodstream. When life gives you lemons, you make lemonade.
(The portal gel that is on the panels by default will stay on forever, and will reappear when any other gel or such substance that might have been on it disappears.)

(Lag is low, and unlike the smashes, this will affect your momentum.)

Forwards Aerial: Combustible Lemon
Alright, I've been thinking. When life gives you lemons, don't make lemonade - make life take the lemons back! Get mad! I don't want your lemons, what am I supposed to do with these? Demand to see life's manager. Make life rue the day it thought it could give Cave Johnson lemons. Do you know who I am? I'm the man who's gonna burn your house down! With the lemons. I'm going to to get my engineers to invent a combustible lemon that burns your house down! And that combustible lemon will be shot out like Mario's fireball, and on contact with an opponent or the stage, it'll explode like a bomb-omb, doing 10% with good knock back! Additionally, if you hit the stage instead of the opponent, it'll leave a kirby-height fire hitbox there for the next 10 seconds, doing 5% and okay vertical knockback! Life is gonna rue those lemons, or my name's not CAVE JOHNSON! (You can shoot as many of these as you want, lag is low. You're not immune to the fire from it hitting the stage. Another interesting tidbit... the propulsion gel you create via the up smash is mixed with gasoline and highly flammable, so if it comes into contact with the fire from the COMBUSTIBLE LEMON, the entire strip of gel will light on fire, becoming a Ganon's-height hitbox doing 10% with decent vertical knockback, denying a large portion of the stage to the opponent. However, keep in mind that repulsion and portal gel are not flammable, and can be used to break up fire strips or put out fires entirely.)

Back Aerial: Reorientation Spin
*Glados's voice sounds through an old intercom*
Good, I finally found you. These old sensors are thankfully still working. Look, we don't have much time to talk, while you're gone the human managed to initiate a core transfer, putting that little moron in charge of the facility. I know you were helping him, but if we don't stop him that little moron is going to blow up the entire facility. If you want to make it through the next few minutes in one piece, you're going to have to be able to fire at unconventional angles. I'm remotely activating your mini-jets on your personality core. That way when you use this input, you'll start to spin. To stop it and reorientate yourself, you simply have to press a direction and the A button, and that new direction will become "up" for you regarding your aerials. You still input them the same way, just the direction you'll fire them is different. This will reset if you touch ground. Lag is low.

Down Aerial: Hard Light Bridge
In order to get back up to the main labs, you'll need to use these hard light bridges. You have a portable one installed in your mainframe, using this input will cause you to fire it straight downwards, after a half second of lag. The light bridge will last as long as you hold down the button, and you can move and jump while it's out. The hard light bridge is actually made out of light pumped in from the surface, if you were to actually try to feel it, it we be just like being above ground. Of course, that kind of contact would also deal 5% damage and okay knockback, so don't actually do it. (The bridge is essentially a straight line of light that goes through portals and blocks a recovering enemy. Due to it doing damage and resetting their recovery special, you can't kill via gimping with it easily, but you can rack up quite a bit of damage, particularly if you rotate before using it and have some time to burn on your recovery special. Startup lag is ok, end lag is low.)

Up Aerial: Drill arm component
Ok, as far as the sensors can read, it's just straight earth from this room up to the test chambers. You can use your Aperture Science Experimental Drill to burrow your way straight up through the ground, and out the other side. The drill also leaves a pitfall behind where it entered/exited the stage, and if you've reoriented yourself, your direction of drilling will change. The drill itself is slightly smaller than you are and does rapid hits of 2% if you hit someone with it, but that's not the point of this move due to the high lag for missing the stage.

Glados's Grab Game:

Grab: Retractable Grappling Hand

Your Aperture Science Retractable Grappling Hand Upgrade should be here somewhere. Once acquired, you can use this input to shoot out your hand (still attached to you via chain) at pika's run speed as long as you hold down the button.. Your hand will grab onto any opponent or solid object it should hit, aside from the stage. The longer you hold down the button, the better the range, and you can aim this with the control stick, but the lag is worse if you send the grapple out further. You can also aim this up to 30 degrees via the control stick.


Standard Pummel: Retract
Now that you've got the upgrade, we need to grab those corrupted cores there as fast as possible, so I can transfer them to her. This input will cause you to retract your grappling hand (and whatever you've caught) at Ganon's run speed, so start pulling them in.

Control Stick: Momentum
Hm, to get those other cores you'll have to get inventive. You can use your grapple arm much like a rope, or well... a grapple. Using the control stick will cause you to swing the opponent around up/down. However, the effectiveness of this decreases with a longer chain, but you could potentially use some of the repulsion gel to offset that somewhat. (It works on the same principle as Spidey's Forwards smash. At a battlefield platform or less range you can do a 180 degree overhead rotation with average smash lag, but the difficulty and lag increases relative to range. While caught by your grab, the opponent can still jump and dodge, but they can't attack or affect the length of the chain, so use that to your advantage. You have to use the opponent's momentum from avoiding stuff to your advantage.)

Special throw: Shocking release
You can still use a variant of your jab while you're pulling in the enemy, but the effectiveness decreases with the length of the chain. Doing this will cause you to shock the enemy, but their momentum from being pulled in and rotated will be halved. Again, while shocked the enemy has to escape the stun at 1/4 to full grab difficulty (depending on distance, under a BF platform means full difficulty, and at FD it hits the minimum of quarter difficulty), and can't do anything while still stunned. However, being hit by an attack sets them back to normal. Finally, you can press the grab button again to release the opponent with full momentum.

Playstyle:
This was a triumph.
I'm making a note here, huge success.
It's hard to overstate my satisfaction.
Aperture Science.
Now do what you must, because you can.
Gimping all the enemies
except the ones who are dead.

But there's no sense trying
to kill every %
You just keep on racking
using your traps again

And the gimping gets done
when you've used your portal gun
on the people who are still alive.

Go ahead and beat them.
I think you'll prefer to stay onstage.
Maybe you'll find portal gel to help you.
With an off-stage shot
That was a joke. Ha ha. Fat chance.
Anyway, your gimps are great
Using stuns and hard light bridges.

Look at me still talking when there's commenting to do
When I look at the list it makes me GlaD I'm not you!
I've experimental movesets to run
There's mafia to be done
With the people who are still alive.

And believe me I am still alive!
I'm making movesets and I'm still alive!
I'm playing mafia and I'm still alive!
When you're leaving I'll be still alive!
And when you're gone I will be still alive!
Still alive!
STILL ALIVE!

More Detailed Playstyle:
Your main goal is to kill the opponent by gimping, but the problem is that although you have plenty of ways to send the opponent offstage between Aerial faith plates, repulsion/propulsion gel combos, portals and more, all these methods send the opponent upwards as well as away, meaning that even Link can usually make it back to the stage. However, initially your goal shouldn't be to stop them from coming back, but rather to damage them and fill the stage with traps while they make it back. In this regard you have plenty of tools. The neutral aerial deals poison damage over time while pushing them back, the forwards tilt can also push them back while dealing a steady stream of damage, and the down aerial can pull a real number on recovering opponents when combined with the back aerial. (The forwards air isn't bad either.) If you'd rather focus on trapping the stage for when they get back, first off your smashes are great at covering wide areas of the stage in propulsion and repulsion gel. Use the propulsion gel to slide them into a turret, portal, or just set the whole strip of it on fire to limit their landing space. Repulsion gel will bounce them back up into the air without refreshing their jumps, making them a sitting duck. Don't forget to use panels and portals for a whole new level of manipulation. Panels basically let you customize the entire stage as you see fit, letting you use portals to move projectiles and people at very unconventional angles. As far as killing goes though, your ultimate goal is to land either a jab or a grab. With either of these moves you can land a stun on the opponent and then just send them offstage with whatever move see fit. Don't take that choice lightly however, as the faster your launching move sends them towards the side blast zone, the less you'll have to damage rack them for the actual kill.

Now that you know the character's strengths, I'd better take note of his weaknesses, and that is that he's absolute garbage without traps at point blank range. He has a great recovery that's easily interruptible, out of his aerials, only the neutral air is any good at hitting an opponent right in front of you (forwards air will damage you as well, back air is non damaging, up air and down air are just jokes in that situation), and that has a cool down, and as far as grounded combat goes he's not that much better (although at least he has SOME tools there with his jab and forwards tilt.) In this kind of situation your best buddy would be the good old companion cube, being shield and weapon all in one.

Note: This only touches the surface of the tricks you can pull off with this character, as your only limit is your imagination. Try using a propulsion gel strip and an angled panel for a ramp, or perhaps a slightly elevated strip with a drop onto repulsion gel, or just send them into a portal with it. Another possibility is using your companion cube or hard light bridge to trap an enemy in front of a sentry, they'll take a TON of damage before the sentry overheats and lets them escape.


Matchups:

Portal Man VS Galaxy Man: 85-15, Galaxy Man
For starters, almost everything Portal Man can use as a trap is confined to the stage, and his off-stage game aside hard light bridge gimps is horrible. Galaxy Man has a near-flawless recovery, and can stay floating off the stage, firing a flurry of projectiles for as long as he wants. This means that damage racking will be a pain, and the only way for Portal Man to kill will be to pile on enough damage to where a stun + launch will kill Galaxy Man outright. Galaxy Man on the other hand can kill Portal Man fairly well, as Portal Man's recovery does not refresh on being hit, and though it lasts a while, there's very little he can do to dodge everything Galaxy Man throws at him. (Thankfully, his up air gives him at least SOME hope for making it back to the stage, as Galaxy Man can't really guard both the top and the bottom of the stage all at once) And that's not getting into the biggest thing that murders Portal Man in this matchup, the stage rotation. Galaxy Man just has to rotate the stage 180 degrees, and all of Portal Man's panels, his most important tool for his portal game are made useless. This isn't just a beating, it's slaughter.


Portal Man VS Slowbro: 80-20, Portal Man
There's exactly one thing that kills Slowbro in this matchup, and that's that Portal Man plays to gimp without using much knock back. Portal Man has tons of ways he can send Slowbro offstage, between propulsion/repulsion gel bounces, aerial faith plates, and of course portals, but none of these use conventional knock back, and so Slowbro's 5 second knock back delay doesn't matter, making his Psychic recovery useless. This means that the only real tool for Slowbro to use in his knock back games would be his neutral special. And let's not even get into how badly the sentry turrets can slaughter Slowbro since he doesn't take normal knock back. If that happens, he'll need to amnesia to prevent death from rapid-fire knock back, but even that is hard to do, since Portal Man can avoid his mind games and simply open a portal under him to stop the move. Just a plain disaster on every front for Slowbro.

Portal Man VS Teferi: 65-35, Teferi
The Teferi matchup is an odd one. Many of his cheaper tactics (like super-spamming inside a time warp) are made useless due to the fact that Portal Man can just open a portal under him and toss him wherever he wants, meaning that he can fight Teferi on his own terms. However, Portal Man can't gimp him conventionally due to a perfect boomerang recovery, requiring him to use a stun to kill outright. This throws a real wrench into his game, as in order to damage rack Teferi, Portal Man will have to take advantage of knowing he'll move to the respawn platform, which is rather difficult considering that it's usually aways above the stage that Portal Man loves to trap. So, the best way for Portal Man to actually damage rack is to lure Teferi and his duplicates via portal in front of a sentry gun, which can cause massive amounts of pain to the whatever-he-is. So, oddly enough, the best tactic for Teferi is to play it safe, mostly ignoring his duplicates until he can use a time-warping move on Portal Man, taking him out of action for a precious few seconds. Then, duplicate into 4 copies of the mage using highly damaging moves on Portal Man. Portal Man still stands a chance if he can get Teferi and his duplicates in his sentry's range, but doing so will likely require Teferi making a critical error. It's winnable, but a very uphill battle.
 

Kholdstare

Nightmare Weaver
Joined
Oct 10, 2008
Messages
1,440
TEAM FORTRESS 2 MAN


The youngest of twenty seven boys from the south side of Jamaica, Team Fortress 2 Man learned early how to solve problems with food. Natural curiosity, ten years as a roughneck in the Perestroika bread lines, and eleven seasons of Rachel Ray's 30 Minute Meals have trained him to design, build and repair a variety of deadly curry dishes. Undaunted, he bought his own ticket to America to teach his famous jambalaya recipes to millions. Some believe his occasional rasping wheeze may be an attempt to communicate cooking tips through a mouth obstructed by a filter and attached to lungs ravaged by constant smoking of Newport cigarettes.

Word of his proficiency with kitchenware spread, and it was not long before Teufort Kitchen received two visitors; Team Fortress 2 Man's real parents (it turns out he was raised by wolves), who lovingly explained that all Kingston Battle Chefs are abandoned at birth until their skills manifest themselves, a long-standing, cruel, and wholly unnecessary tradition among the Jamaican Warfare Cooks. Like a New York television weatherman, Team Fortress 2 Man appears to be a gentle giant. Also like a metropolitan meteorologist, confusing his hearty, friendly demeanor with an attempt to **** you will probably get you a Hawaiian Dicking. What he lacks in compassion for the sick, respect for human dignity, and any sort of verifiable formal training in culinary arts, Team Fortress 2 Man more than makes up for with a bottomless supply of dirty rice and gumbo and a trembling enthusiasm for plunging them into exposed mouths.

In his former life as a tracker of dangerous game in the unforgiving endangered species habitats, wildlife preserves, and kindergarten playgrounds, Team Fortress 2 Man would spend months by himself. Prolonged isolation taught him a valuable lesson: the youngest ones are the tenderest due to the muscles being unused. His food is a puzzle, wrapped in an enigma, shrouded in riddles, lovingly sprinkled with mozzarella cheese, express mailed to your stomach, and LOOK OUT BEHIND YOU! but it is too late. You're dead. For it has many peppers and spices.​

Neutral Special - The Bob Maulery


Team Fortress 2 Man takes out his Marleygun, which contains the soul of Bob Marley, and fires out parts of his soul. The Marley Soul bullets explode on contact with the foe, lighting them on fire. The bullets are the same size as Snake's rockets. The fire deals 420% damage per second and 24/7 seconds of stun. Headshots deal double damage. Bullets heal Team Fortress 2 Man for half the damage they inflict, to balance it out. Bullets will bounce off of surfaces. Tilting down while using this makes Team Fortress 2 Man place his gun on the ground, where it will stand up on its own and automatically fire at foes. Oh, and the bullets are invisible, because they're made of soul. There is 1% chance that Team Fortress 2 Man will fire a baseball bat. This does double the amount of stun.


Side Special - Kind of Hot Curry, Man


Team Fortress 2 Man takes out a signature dish, the Kind of Hot Curry, Man. Consuming this innocent looking dish will, as Samuel L. Jackson put it quaintly, "Fuck your shit up." The man knows what he's talking about. Foes who touch this projectile, which has infinite range, will experience many symptoms. First, they will note it is moist and delicious. Can't argue with that. After a period of 1 second, however, their stomach explodes, opening up a gaping hole in their torso. Their internal organs fall out (they turned into magma) and flames shoot out their mouth. Their eyeballs turn into milk, and they urinate on themselves. They excrement cigarettes, needles, and various machine parts, presumably left in the curry. Then their head explodes. This deals only 15% damage and stun for the rest of their stock.


Up Special - Surfin' Bird


While trying to catch the elusive Megashark for an exotic recipe, Team Fortress 2 Man learned how to surf. Honing the power of the Jamaican tides, he pulls out a Heavyboard (a surfboard made from the petrified corpse of an American tourist he baited into a bear trap with the promise of high-fat foods and alcohol). He also throws a magic jar of hammerspace underneath him, releasing a wave of soda, piss, gasoline, moose penis, the Engineer's tears, alcohol, and pepto bismol. He surfs it up to the top of the screen, saying "Hang loose, man!" and then dives down, dealing 1000% damage to foes who are goomba-stomped by him.


Down Special - Chow Time


Team Fortress 2 Man says, "Time to eat, man." and takes out a Jamaican Sandvich. The Sandvich has various ingredients, such as chocolate, fish, fishcakes, rice, barbecue, maggots, and shrimp on the barbie. It automatically heals him of all damage and gives him invicibility for 180 seconds. No lag.
 

MasterWarlord

Smash Champion
Joined
Aug 24, 2008
Messages
2,902
Location
Not wasting countless hours on a 10 man community
WHEATLEY WITH RANDOM LIMBS

The usmash goo that speeds up the momentum of characters is pretty blatantly the main thing the set has going for it, which makes it a tad awkward it’s on such an insignificant input. Considering momentum carries through portals, it can be used to build up a foe’s momentum on-stage before sending them into a portal off-stage. Other cool stuff to do with it includes grabbing the foe and pulling them through mass traps, the goo making that far easier, and just sending the companion cube along the goo. There’s plenty of stuff to do, which makes it a bit awkward you barely touch on what the moveset is capable of at all in favor of a writing style that is 99% just direct quotes from the game that makes it overly difficult to read in place of highlighting what the moveset is capable of. You also don’t need me to tell you about the large amount of filler in the moveset – in particular, his off-stage gimping game is incredibly bland, and you probably should’ve just focused on flinging the foe off-stage fast enough for a KO. Most of the filler seems to be forced creativity, making it more blatant, such as poison damage just for the sake of going with the writing style or the random drill.
 

Kholdstare

Nightmare Weaver
Joined
Oct 10, 2008
Messages
1,440
Portal 2 Moveset

What I anticipated that would happen in this set from the moment you announced the "four writing style" thing in the chat came true, especially considering the early Portal moveset you showed me a while back, and even your Fawful moveset in MYM9. Your moveset falls under a new term I'm going to invent right here: writing style syndrome.

What this means is a person uses most (and in your case only) quotes from the media the moveset is derived from to form a "unique" or first person writing style. This is not a good way to go about the unique writing style. This is what I intentionally avoided with Scout - if you notice from not just the set itself but the comments, I didn't solely use direct quotes from him, I analyzed his manner of speech and imitated it. So I'm not solely tooting my own horn, check out The Prince (MT) and Viola (Junahu) for another example of writing the way I'm talking about.

Portal Man is almost entirely direct quotes from the game itself, which you make moves out of. Portal Man is almost in a way a second A.I. Colonel, although using quotes was the only way A.I. Colonel would work, and Warlord pulled it off better. If you would've analyzed GLaDOS, Wheatley, Cave, or the Announcer's manner of speech and then imitated that to mold around the moves, instead of the moves being holograms of the quote's subject, it would've been much better off and I wouldn't hate it as much.

Other than that major flaw, I do like some of the concepts. Gimping with Hard Light Bridges is a pretty cool idea, and the gels are of course fun. Using the Combustible Lemons for a set that's not Cave Johnson doesn't do him justice, however. One thing I'd like for you have done was to use an entirely different robot design instead of a P-Body palette swap. The playstyle summary is cute, but again it's reusing an old quote and changing it slightly, and it doesn't actually cover the playstyle well. The fact it's not Want You Gone (considering this is all Portal 2 derived) is shocking and ironic. Plus Want You Gone is a better song.

Another thing you shouldn't have done is the concept itself, though. I assume you didn't learn from Mafia Man that cramming all the elements from a game into one moveset makes it cluttered and disjointed. It would work better if it focused on one aspect of Portal 2 rather than all of it.

So I'm sorry if I was overly harsh, but I tend to be when a series I love isn't done justice. Nick, I (or Junahu if he's willing) can help you with these kind of writing style sets if you would like, so this doesn't happen again.
 

Nicholas1024

Smash Lord
Joined
Mar 14, 2009
Messages
1,075
Hm. Regarding Portal Man's writing style, I'm a bit surprised it's been so poorly received, since Fawful's writing style was fairly well received. Anyway, it's somewhat ironic that people would rather me imitate the character's style than use classic quotes, as I intentionally stuck to the classic quotes wherever possible out of fear that imitating the style might not do the game justice. (In Fawful I ran out of material and had to ad-lib a good bit of dialogue. Portal 2 had more quips, so there's not nearly as much ad-libbing in there, although there are a couple bits.) If you guys would rather me just imitate the style and not use the quotes, then I'll keep that in mind for future sets.

And actually, I feel that in Portal Man, the elements all work together to create a cohesive whole. Although some of Mafia Man's stuff was just generic mind games (the forwards tilt knife for instance), all of Portal Man's moves have some point to them within the larger play style. For example, the repulsion gel basically cuts off zones of the stage for the enemy to land in, but you can also hit the opponent with it to prevent them from landing at all, or use them like springs (similar to how it happened in game) to bounce the opponent far offstage or up in the air. (And one last note, it's a Atlas palette swap, not P-body.)
 

Smady

Smash Master
Joined
Apr 29, 2007
Messages
3,307
Location
K Rool Avenue
User Rankings #10, #11, #12

Welcome to the User Rankings! Every Monday, I'll be compiling the entire of the last week's activity in the thread and showing off, just who is the most active member? The point of this exercise is to recognise the most dedicated among us – those make your movers who are currently pushing the boundaries, as well as highlighting all movesets made by them.

To get on this list, you need to have made a moveset in this or a previous Make Your Move, as well as having posted in the Make Your Move 10 thread. The cut-off point for tallying is 5PM on Monday EST, 3PM PMT or 10PM GMT; other removals or changes are at my own discretion. The breakdown of points is as follows:


30 points for a Moveset
5 points for a Comment
4 points for a Secondary Submission
2 points for a Secondary Submission Comment
1 point for a Regular Post
+Regular Posts do not stack
+Secondary Submissions are MYminis, Joke Movesets and other miscellaneous submissions

This is the first and hopefully last triple week update of the user rankings. I don't know how I managed to fool myself into thinking I did them last week, but suffice to say I'll be observant from now on. In all, for three weeks, this wasn't too bad - it about averaged out to four each, which it certainly wasn't anywhere near in any of them due to massing on the first week and death on the second, if I recall correctly. Somehow Warlord and I managed to draw, putting out King Barbovor and Mr. Banbollow respectively. It seems a little silly to recommend Barbovor, but it did get an oddly meagre reception for a Warlord set, so, like, read it. It's good. There was also The Flying Dutchman. Yes, Dutchman is in this user ranking, it's that late. Though Barbovor came before, somehow that seems worse. Again, no point telling you to read it - most of you will have already, it's good as well obviously. To more activity and an actual on-time rankings next week. I also updated the overalls for the first time in forever, so be sure to check those out.

Remember to check out the stadium to find all of the sets mentioned.

Overall User Rankings


Points: 86, Movesets: Garbodor, Doctor N. Tropy, Mr. Banbollow

Points: 86, Movesets: Wario, Vlad Plasmius, King Barbovor

Points: 83, Movesets: The Flying Dutchman, Robo-Patrick

Points: 76, Movesets: Spider-Man, Galaxy Man, Concrete Man, Mafia Man, Portal Man

Points: 60, Movesets: Enrico Pucci, Commander Shepard, Gallade, Sonic & Tails

Points: 46, Movesets: Yorick

Points: 40, Movesets: Wakka

Points: 266, Movesets: Sir Weston, Klobber, Baron K. Roolenstein

Points: 40, Movesets: Bad Girl, Admiral Bobbery, Man Ray and The Dirty Bubble

Points: 35, Movesets: Slowbro

Points: 33, Movesets: Aidan

Points: 33, Movesets: Victini, Krillin

Points: 31, Movesets: The Iron Giant

Points: 31, Movesets: Thor, God of Thunder

Points: 9

Points: 9, Movesets: Charlotte, OVER

Points: 5, Movesets: Gastly, Haunter

Points: 4

Points: 3, Movesets: Ashley, Viewtiful Joe, Geno, Belome, Colors Sonic

Points: 1, Movesets: E.E.D. Soldier​
 

BKupa666

Barnacled Boss
Moderator
Joined
Aug 12, 2008
Messages
7,788
Location
Toxic Tower
Hey MYM, it's me, Kupa. It's come back...how much do you remember?

Pennywise the Dancing Clown


Pennywise is the favorite form of the titular shape-shifting entity in Stephen King's novel It. "It" exists to feed and destroy, and therefore takes the form of an individual's greatest fear in order to "salt their meat" with terror hormones before devouring them. Because "It" finds children easier to scare than adults, "It" often appears to them as Pennywise, the adorably friendly clown, offering each child a balloon before molesting mutilating them. Despite all the murders Pennywise commits in his "killing pen", Derry, the town has seemingly fallen under his influence, and ignores the tragedies for the most part, allowing him to order all-you-can-eat buffets as often as he pleases. The crazy clown and his manifestations appear when they are least expected or wanted, and are only visible by his intended victims, causing overwhelming paranoia from those unfortunate enough to have met him.

This incarnation of Pennywise is based off of the movie adaption of It, in which he is portrayed magnificently by Tim Curry.

LINKS:


Statistics

Aerial Movement ~ 10
Traction ~ 9
Size ~ 8
Weight ~ 7
Jumps ~ 4
Movement ~ 4
Fall Speed ~ 0.5


Take a gander at those aerial stats there...as Pennywise frequently advertises to his victims-to-be, down in his sewer lair, everything (their corpses) floats. While fighting, Pennywise allows Brawl's engine to take his floatiness to a whole new level; he has aerial movement on par with Wario and an absurdly slow fall speed. On the ground, the killer clown has a build similar to Ganondorf, albeit slightly faster and lighter. While he could easily overwhelm his opponent by changing forms into something monstrous, Pennywise plans to take his time tormenting his opponents, moving comically around the stage while turning it into their greatest nightmare...other than him, of course.

Specials

Neutral Special O ~ O ~ O ~ Want a Balloon?
A randomly-colored Hothead-sized balloon appears at Pennywise's feet, and begins to float upward at Mario's dash speed after .3 second. By tapping B a second time, Pennywise causes the balloon to stop rising, leaving it floating in midair. The balloon remains onstage infinitely, although it can be popped if a character touches it or is launched into it. If attacked, the balloon explodes in a Wario-sized blast of blood, spilling its contents onto the stage below. One balloon's blood covers a Battlefield platform of stage for five seconds, tripping characters who dash (read: not walk) over it. Pennywise himself leaves behind clown shoe footprints on the ground for five seconds after walking through his own blood puddles. If a character touches or is launched into a balloon (or attacks it from below), however, they take 5% and become coated in blood. The blood enters opponents' eyes and causes them to panic, eliminating their ability to walk for five seconds (they are forced to dash while moving).

Pennywise can be launched into his own balloons; although they have no effect on him (other than a creepy blood visual), this is still a bother, due to him having to send out new balloons to take their place. If blood from a balloon falls onto a balloon directly underneath it, it remains on the balloon; if that balloon is popped, double the amount of blood falls, doubling the timer of blood on both the stage and victims (this is quite telegraphed, meaning the reward is even greater for Pennywise if he lands this). However, opponents knocked through multiple balloons do not get multiple blood timers stacked on them. By holding down B, Pennywise can create a chain of balloons, each floating upward spaced a Marth apart. Due to the lagless nature of the move, combined with Pennywise's ability to move around and attack before stopping his balloon(s) with a second tap of B, the clown is able to turn the Battlefield into a minefield of balloons, forcing opponents to watch their step, lest they be sent flying into a bunch of the bloody things. After all, if one balloon isn't enough for one opponent, they may feel welcome to help themselves to a whole bunch!

Like in It, Pennywise's creepy balloons are not affected by wind, whether it be from a stage hazard or an attack.


Down Special O ~ O ~ O ~ Now You See Him...
Pennywise waves mockingly for a split second, having super armor before vanishing entirely...silly boy, you still think you can see him? The clown can move and attack, and be attacked while invisible, although balloons are still visible, revealing his location to both him and his opponent...the benefits and downsides to this should be well drilled into your head by now. However, Pennywise won't always be revealing his exact location while sending out balloons, or the majority of his other attacks, for that matter. Pennywise may remain invisible for up to seven seconds before reappearing, although he can materialize early if the input is repeated. In addition, if he's sent flying through a field of his own balloons while invisible, Pennywise will pass through them harmlessly, sparing him the trouble of sending them back up after popping them.

If he pops a balloon, however, invisible Pennywise becomes speckled with blood, while if he steps through a blood puddle, he tracks clown shoe footprints for five seconds.


Side Special O ~ O ~ O ~ From the Shadows
Pennywise waves mockingly for a split second, having super armor before vanishing entirely...silly boy, you still think you tell the difference between this and Down Special? After Pennywise vanishes, an identical illusion of him materializes in his place, with no transparency or visual cue to clue you in to its false nature. You control the illusion as you would regular Pennywise for a brief period. While his attacks deal no damage to opponents, merely pushing them back a short set distance, balloons and blood puddles he sets for opponents remain onstage until attacked, having no effect but giving foes a good scare regardless (balloons pop harmlessly, while blood merely makes a squishy sound effect). Crowding the stage with these false traps can really overwhelm opponents, as they will have trouble discerning which traps to actually try to dodge...especially taking into consideration the mindgame to come.


Meanwhile, the real invisible Pennywise automatically dashes at opponent, making jingling clown noises (which echo, so as to not give away his location) as he prepares to do something unthinkable to opponents. If he catches an opponent, he'll laugh wickedly, as his victim takes 16-17% and is launched with knockback KOing around 105%. Pennywise automatically turns around and jumps once to follow victims, and in his invisible state, he passes through traps and stage hazards, although blood still gives him away. If he attacks an opponent, reaches the ledge, or takes damage, he becomes visible again, as his illusion vanishes. While Pennywise can dash until one of the above happens, you can cancel the move early by pressing the input a second time (Side Special is the only attack an illusion cannot use).

If Pennywise performs Side Special while invisible, he simply reappears, fully controllable, while the same jingling noises occur as when Pennywise uses the move while visible. Although no invisible illusion is moving forward, the jingling continues until Pennywise repeats the input, although eventually, a player will be able to determine their validity. The lack of a visual difference between regular Side Special and Side Special while invisible can really frighten opponents, and the fear of such hefty damage can coerce foes into jumping into the air (and possibly into balloons) to dodge a potential invisible Pennywise on their heels. If used at close range, Side Special can also bait opponents into dashing to a safe attacking location, possibly dashing over slippery blood puddles in the process.


Up Special O ~ O ~ O ~ Can You Smell the Circus?
Pennywise curls into a Kirby-sized ball and begins performing fancy cartwheels or aerial flips; after .3 second, he can be directed in any direction at Ganondorf's dash speed while flipping, floating to defy gravity if necessary. In his wake, he leaves a rainbow-colored trail of light, as big as a beam...sword. Big as a beam sword. Pennywise is able to continue flipping to create this trail for up to three seconds or until he comes into contact with something, including the existing trail. Opponents who come into contact with the trail walk (or float, if they're airborne) mindlessly down it, entranced by the alluring smell of cotton candy, fried doughboys, and wild animal shit.

They are able to jump or DI out of the smell after a period of time, which depends on their damage level. Although by using it to recover, Pennywise creates a trail leading the opponent back to the stage, he can also create a trail leading too far away for an opponent to recover, before canceling the move and jumping back to the stage. Pennywise can also use his trail to lead opponents directly into an area infested by balloons; if he turns invisible while using Up Special, his trail becomes invisible, leading to the same control issues, but allowing him to pass his trail through balloons to drag opponents directly into them. Because balloons deal no actual knockback, leading opponents on a collision course through a field of balloons can be quite effective for building damage.

If Pennywise has been speckled with blood from a popped balloon, or is tracking blood all over the place, using Up Special for one second or longer causes him to shake off the blood with his vigorous acrobatics. This enables the player to determine Pennywise's location using blood, then get rid of it to throw off opponents on the hunt for the scoundrel.


Standards

Jab O ~ O ~ O ~ Bloody Nose
Bending over slightly, Pennywise laughs as his red clown nose begins swelling, making a comical stretching noise. By holding down the input, you can inflate his nose from its regular size of that of Wario over the course of a second and a half, with it awkwardly protruding from his face. If an opponent touches the nose, it bursts in a shower of blood, dealing 2-10% and coating the opponent in the syrupy stuff as if they were hit into a balloon (they're also knocked back slightly, so they don't immediately punish Pennywise). By tapping A while inflating his nose, Pennywise can get poppin' early, creating a blood puddle onstage, identical to that of a balloon. A new nose grows in the old one's place after it pops, obviously.

While nose blood puddles have nothing to differentiate themselves from balloon puddles, they provide Pennywise with a way to get the ball rolling on scaring his opponent fecal matter-less by hindering their dash at close range, with possible tripping as a reward. This is primarily effective when Pennywise is facing a generic rushdown character who prevents him from setting up balloons with which use their bloody effects. The threat of an invisible nose bubble in the path of an opponent may also deter them from dashing around mindlessly while Pennywise is invisible, restricting their movement rather handily (although the blood itself becomes visible once released).


Dash Attack O ~ O ~ O ~ The Thrill of the Chase
Letting out a beastly roar, Pennywise begins charging forward at 1.2 times his regular dash speed, growing massive lion fangs and abandoning his regular comical gait for an all-out sprint. Yeah, if you're in his path, you better get the flying copulation out of the way. Grounded opponents a character width in front of Pennywise clearly understand this, automatically dashing forward to escape their inevitable doom. If Pennywise fails to catch a character in the initial range of the move, he'll tumble to the ground with a stupid laugh, lagging for .6 second. Otherwise, he is free to dash after the character for as long as he wishes, although it becomes foolish to do so against a generic speedy lightweight, who will escape his range and become able to punish him.

If Pennywise manages to catch a (likely slower) foe, he gives them one great mighty chomp, dealing 15% and knockback that kills around 110%. While opponents can jump to escape Pennywise (or any blood puddles that will trip them in his path) as he charges, they may find themselves jumping up into a storm of balloons, if they have been so deviously conjured up by Pennywise. He can also simply chase opponents into balloons, or knock them through a series of them with his chomp, although he must be careful not to be punished and sent into them himself while chasing his opponent recklessly across the stage.


Forward Tilt O ~ O ~ O ~ Button Bash
Pennywise does absolutely nothing but grin maniacally, as the three buttons on his clown suit detach themselves from their owner after .3 second. New buttons instantly reappear in their place, as the old ones float forward at Dedede's dash speed. Buttons attach themselves to opponents they come into contact with, cutting their movement speed in half for five seconds. If the input is pressed a second time during the start-up lag, the buttons are invisible while traveling forward; the new buttons on his suit prevent opponents from telling if he used the move, although it becomes obvious if Pennywise is just standing still, as he cannot move while his buttons are airborne.

While standing still, however, he is able to tap A to render his buttons visible and invisible to his liking. Because Pennywise's buttons remain visible when he is not during an F-Tilt, the ability to flicker your buttons can create confusion as to where Pennywise is, in addition to alerting the player to his whereabouts to a point. The buttons themselves can lead opponents into a dash attack nicely; due to this being a fairly clear follow-up strategy, opponents may decide to take to the skies, where their movement is not hampered, although balloons may give them trouble regardless.


Down Tilt O ~ O ~ O ~ Trail of Tears
Pennywise points to the ground, causing a trail of bloody footprints to appear, 'walking' forward at his regular walk speed; by double-tapping the input, the footprints travel forward at his dash speed instead. The clown shoe prints continue their pace until Pennywise presses the input a second time, upon which they vanish; if left out on their own, the prints vanish after five seconds, just like regular Pennywise's prints. Because Pennywise is able to move about before halting his footprints, he can attempt to lure opponents away from him by becoming invisible and seemingly tracking blood away, while using the time he has saved to set up balloons. If the prints pass under a grounded opponent, they trip; should an opponent try to test whether the footprints are real by attacking the air above them, they'll instantly be punished by falling onto their arse if the prints are fake.

Up Tilt O ~ O ~ O ~ String 'Em Up
Pennywise extracts a thin balloon string lasso from his clown suit and swings it around once directly above his head, with the lasso extending a Battlefield platform to either side of him. Anything caught in the Kirby-sized hoop of the lasso, be it balloon or character, is spun around in this loop, for a time determined by Pennywise (up to three seconds, after which they are automatically released); if he misses, the clown stows the string, laughing for .45 second. The lasso is spun in and out of the background, making approximately one large circle per second, picking up opponents who attempt to air dodge if they overlap with the hoop. Opponents take 2% per half second they are spun, and are launched with knockback KOing around 135% in the direction they are facing when Pennywise stops their rotation with a tap of A. He can spin or launch opponents into a bunch of balloons, or into other opponents in a free-for-all, with his victim dealing 8% upon collision with an opponent.

If Pennywise lassos a balloon, he can swing it around like an opponent, causing it to pop on contact with a solid object with its regular effects. If he stops lassoing, the balloon remains where it was released (even in the background). If he's unable to move around to create new balloons, Pennywise can simply hook an existing balloon and cast it forward a fair distance forward to reposition it. An illusion is also able to lasso any fake (not real, mind you) balloons onstage, swinging them around with no effect but heightening the sense of uncertainty surrounding them, especially if the illusion is invisible.


Smashes

Forward Smash O ~ O ~ O ~ Confetti
Waving his hands comically, Pennywise creates a rainbow trail as big as a beam...sword half a character width in front of him, a short distance off the ground; while charging the Smash, you can move the control stick in any direction to form the shape, with the trail moving around at Mario's dash speed. Upon release, a cloud of circus confetti is conjured up along the trail, floating and fluttering in place for half a second to a second and a half, before vanishing. The confetti deals many rapid hits of 1-3%, knocking opponents back a set distance if they reach the edge of the trail.

The freedom allotted while Pennywise charges the move results in a variety of strategies for him to use. He can create simple lines and walls to cut off opponents, or pinball them between the stage and the confetti. More interestingly, he can enclose an opponent inside a circular area of confetti, bouncing them back and forth inside the circle as they try to DI away. Pennywise can often use this tactic to catch aerial opponents, meaning he can also snare an aerial balloon or two inside his circle for extra damage. The minimal lag on either end of this move allows this to become one of Pennywise's prime melee attacks. An illusion Pennywise can also use this function as a stunning attack, as the move can still bounce opponents around inside the confetti circle despite not dealing damage, giving the real invisible Pennywise time to dash in and attack.


Down Smash O ~ O ~ O ~ Gravedigger
Claws emerge from Pennywise's clown gloves, as he bends over and begins rapidly digging a pit, panting like a beast all the while. At minimum charge, Pennywise digs a pit one Marth deep and one character width wide, while at full charge, the pit is as deep as 1.2 Ganondorfs and 1.5 character width wide. It takes Pennywise about as long to dig a pit as it does for Snake to plant a mine. He ends the move inside the pit, allowing him to send up balloons immediately after finishing the move. Besides simply revealing his location while invisible, if Pennywise causes balloons to float right where the pit meets the stage, the balloons essentially comprise part of the floor, cutting off part of the stage from opponents.

Pennywise can also fill the pit with balloons, before turning invisible to hop up through them and trying to herd opponents into the pit with moves like Up Special and dash attack. Pennywise can have one pit onstage at a time; if he attempts to dig a new one, the old one will vanish (which it does automatically after fifteen seconds). An illusion can dig a pit as well, but these do nothing to alter the layout of the stage; instead, the false Pennywise (and only the false Pennywise) will be able to enter the pits and set up fake balloons (only fakes) to create a very realistic pitfall opponents will do well to stay away from. The false pit can co-exist with a real one, however, giving away its false nature if you get careless.


Up Smash O ~ O ~ O ~ The Voices
This Smash executes rather differently from Pennywise's other Smashes, as well as other characters' Smashes in general. The first time you use this attack, Pennywise merely bends over slightly, putting a hand to his mouth and clearing his throat silently. After he does so, his eyes flash a light silver color, alerting you the move is underway. Now, for anywhere from one to three seconds, depending on charge time, Pennywise can perform his regular attacks, albeit silently, without their regular comical sound effects. After this time, Pennywise's eyes stop flashing, and nothing happens...seemingly nothing.

However, the next time Pennywise performs U-Smash, he rears back and unleashes a series of echoing noises over .45 second, creating a circular soundwave above his head. The wave ranges from a Kirby-sized area to half that of Negative Zone, although the echoing noises seem to reach far outside this range. What noises become echoed, you may ask? Why, the very sound effects of the attacks Pennywise performed during the time provided by his previous U-Smash! Pennywise can become invisible and perform a series of silent moves, storing them for later use. When he's ready, he can become invisible again and unleash U-Smash, creating noises of moves that aren't actually happening. After Pennywise shouts, he is free to move while the remaining sounds are echoing, allowing him to creep up and attack opponents with moves that aren't actually being used, and that they aren't prepared to defend. The extensive echoing is enough so that opponents are only given a vague idea of where Pennywise is, rather than being able to close in on the source of the sound; the lingering sounds seem to float throughout the stage, in other words.

If you simply mash U-Smash twice trying to attack, you can still have some amount of success, as Pennywise's soundwave deals 9-15% and stuns opponents, dropping them toward the ground. If they are caught inside a larger soundwave, the sound carries them toward its perimeter before they start to fall. Should a player not choose to capitalize on Pennywise's false sounds, they can simply try to stun their victim to the ground, before launching them right back up into a storm of balloons.


Aerials

Neutral Air O ~ O ~ O ~ Pump It Up
Pennywise faces the screen and inhales deeply, inflating his body to a Bowser-sized balloon over .5 second and halving his already floaty fall speed. Get it? Pump "It" up? Yeah...He can hold this pose until he hits the ground, his body retaining a weak 4% hitbox all the while, or release the hot air early as fast as he can inflate, with a second input. While Pennywise deflates by blowing the air into the foreground by default, he can angle the stream of air he expels in any direction, before -and- during its expulsion. This blows opponents in said direction at Ganondorf's dash speed, trapped inside Pennywise's stream of air until they reach its end. Blasting the opponent with hot air can be a nice method for getting opponents out of Pennywise's face, despite the awkward startup period, and can also direct opponents conveniently into balloons.

Forward Air O ~ O ~ O ~ Fake Flower
A simple white clown flower appears on Pennywise's suit, as he laughs; .2 second later, the flower spews a stream of blood, a Battlefield platform long and slightly less thick than FLUDD's water. Depending on opponents' proximity to Pennywise as the blood squirts, the opponent suffers the blood effect, as if they were launched through a balloon, for one to five seconds. Opponents at the end of the stream suffer very little, while opponents right next to Pennywise are coated in blood the longest. The blood stream also pushes opponents along its path at a moderate speed, dealing 1% per half second and effectively spacing them from Pennywise in close combat, or simply pushing them into balloons. Blood can also pop balloons from a range, without forcing Pennywise to track around blood onstage (although when Pennywise is invisible, the stream is not). Short-hopping F-Air creates a blood puddle onstage, a short distance in front of Pennywise; landing lag prevents this from overtaking balloon-popping as your key blood-spreading strategy, however.

Back Air O ~ O ~ O ~ Shoe Spring
While you hold the input, Pennywise pulls his legs in slightly with a laugh; upon release, he kicks his shoes off (nothing underneath) a horizontal distance proportional to charge time after .35 second, with them returning afterward. By simply tapping the input, the shoes fly off half a character width, while the full charge of a second and a half yields two character widths distance. The shoes deal a constant 8-11% damage and knockback KOing way up at 190%, meaning Pennywise can easily kick multiple times at low damage levels for a generic melee attack.

The purpose of the move extends beyond that, however, if Pennywise kicks an opponent while he has blood on his shoes. In this case, the blood on his shoes is transferred to his opponent, who becomes coated in blood for the remainder of the time Pennywise would have tracked shoe prints. Unless he kicks off the blood immediately, this coating method is less effective than simply knocking opponents into balloons, due to the blood generally having a shorter time frame. If Pennywise wants to maintain his stealth while invisible, it may be worth doing anyways, just to conceal himself again.


Up Air O ~ O ~ O ~ Headbutt
Pennywise chuckles as he rears his oversized head upward to hit opponents, with minimal lag on either end. What's a Sakurai move doing in a Pennywise set, you may ask? Well, the clown's crown deals a run-of-the-mill 9% and moderate upward knockback, but the real fun with the move occurs when Pennywise headbutts one of his balloons. If he connects with the move, the balloon does not pop; instead, his fluffy clown hair attracts the balloon toward him through the powers of static electricity. He can headbutt an individual balloon up to three times, to increase its speed from Ganondorf to Mario's dash speed, for two to six seconds (after which it stops in place).

Once the balloon is attracted a half character width from Pennywise, it floats calmly behind his head, although if Pennywise is knocked away from it, the balloon will continue its pursuit. If Pennywise can capture an opponent between himself and a balloon, he has quite a bit of freedom to lure opponents around, as they will be kept on the move in their attempt to avoid the balloon. He can also simply attract a balloon to a new locale to reposition it, with more versatility than he can with N-Air to boot. An illusion can attract around fake balloons to contribute to its realistic appearance, although the effect is futile on real balloons.


Down Air O ~ O ~ O ~ Dig a Tunnel
Growing claws for .4 second, Pennywise plummets to the ground, gloves outstretched to snag nearby opponents in multiple hits. His scratching deals 3% per half second to opponents he catches, being a decent damage-dealer if used from a height; Pennywise can also capture a character and carry them down through a column of balloons, coating them in blood due to them being on bottom. And, of course, there's the always popular suicide KO option, although because opponents can DI out of the hits, Pennywise may be shooting himself in his clown-shoed foot by going this route. While most stall-then-falls would force the perpetrator into some painful landing lag, Pennywise doesn't stop clawing when he reaches the stage.

Instead, he starts digging away at the ground, creating a tunnel in any direction for as long as you continue mashing A; Pennywise digs a character width length of tunnel each second he digs, with each portion of tunnel lasting fifteen seconds. These tunnels are one Bowser wide and one Marth tall...they reek of claustrophobia, in other words. Pennywise can't really trap balloons in tunnels like he can with ordinary D-Smash pits, due to the limited space. He -can-, however, create sloping tunnels to slide unwilling opponents into larger, balloon-filled pits, as if he were sending them down a nice fun chute-the-chute. Opponents can fight the sliding effect of the tunnels by dashing in the opposite direction to try and flee out the top. It may very well be in Pennywise's best interest to pop a couple of balloons or jab inside the tunnel to put slippery blood puddles in these opponents' paths. Leaving so soon? Pennywise wouldn't hear of it...

As with D-Smash pits, a Pennywise illusion can only create a false tunnel, in which only false balloons and blood puddles can be placed.


Grab-Game

Grab O ~ O ~ O ~ Party Claw
Pennywise reaches into his suit and extracts a party horn blower...you know, those birthday accessories you blow to make the paper uncurl and stick out...and begins inhaling. When you release the grab input, he immediately blows it with a comical toot...but not just -any- paper extends from the horn. Upon reaching an opponent, a claw is revealed at the end of the paper, grabbing them and dragging them along the ground to Pennywise. The paper extends from a Battlefield platform with a tap to half of Final Destination with the full one and a half second charge. The paper extends at Falcon's dash speed and retracts at half that. Pennywise's low startup renders his grab a competent melee weapon, although it is somewhat slow to finish, as he stows his horn away again.

Although the paper can be angled during the charge time, Pennywise will generally want to use it horizontally, so while the opponent is pulled to him, they are dragged along the ground against their will. All that scraping against the earth deals 1% per half second, and if the opponent is pulled through a blood puddle, they become coated in it, as if knocked through a balloon. Invisible Pennywise's party horn is invisible as well, allowing him to grab through balloons and physically pull victims through them to build damage. Opponents can escape while being dragged with double grab difficulty, although this is reset if they reach Pennywise, who gladly holds his victim in a close embrace. Cue the horror music for his pummel...


Pummel O ~ O ~ O ~ Kiss Me Fatboy!
Pennywise yells the attack name, before laying a wet one on his struggling victim, mashing his face into theirs with passion. The intensity, stench, fangs or whatever you want to imagine deals 2% per half second. Each pummel is somewhat lengthy, meaning opponents will often mash out in the middle of the kiss...not that this is a bad thing. You see, opponents are so repulsed by Pennywise's approaches, they spring backward into the air away from him upon escaping. After a single kiss, opponents jump back a Battlefield platform's distance, while three kisses yields a maximum distance of half of Battlefield. The disgusted victim has no control over their movement until they hit the ground, leaving Pennywise with the option to 'kiss' them back into a series of balloons, or into a tunnel or pit.


Forward Throw O ~ O ~ O ~ Carried Away
Pennywise bear hugs his opponent even tighter and begins carrying them around in front of him at his walk speed, growling gleefully. His victim serves as a decent meatshield to attacks and traps in front of Pennywise, although Pennywise will have to capitalize on hitting them with outside elements if he wants to build damage, as just carrying the opponent around is harmless. If Pennywise walks his victim into a wall, however, he'll slam his victim into its side. This deals 7% and stuns the victim, which he automatically follows up by tightening his claws around them for 9% and vertical knockback KOing around 125%. Grabbing is more difficult for Pennywise inside the close quarters of his pits, so if he can get ahold of an opponent in there, he would do well do reap the reward of F-Throw's extra damage.


Back Throw O ~ O ~ O ~ Punching Bag
Pennywise turns around and releases his opponent, before leaning way back, in place. After a split second, he suddenly bends forward at high speeds, dealing 9% and knocking his opponent away horizontally, KOing them around 150%. The released victim is temporarily frozen in place, but is free to attack Pennywise as he bends forward, launching him back in the opposite direction, but not budging him. Instead, the startup time for him bending forward is halved, as his momentum carries him forward even faster, dealing an additional 3% and taking 10% off the KO percentage. Fast moves are key for ensuring Pennywise doesn't bop you once he starts bending forward faster. If the opponent manages to hit Pennywise back three times, they regain their ability to move out of the way, and receive ample opportunity to punish the lagging clown. Pennywise can often get away with a B-Throw on a laggy character to knock them along the ground into a pit, or even to a KO at higher damage levels.

Down Throw O ~ O ~ O ~ Hibernate
Pennywise grows claws and digs into the ground with his victim over .45 second, as they become covered by a mound of dirt. After doing so, he starts performing some unthinkable violence on his opponent, dealing 2% per half second. Pennywise can also use the control stick to travel in any direction underground with his victim, dealing a lesser 1% per half second, but moving one character width per second as well. Opponents are free to mash out with double grab difficulty anytime Pennywise is digging, although he can tap A to launch them vertically before they can escape, KOing them around 145%. Besides launching the opponent up into a column of balloons, Pennywise can dig into one of his tunnels or pits, trapping his opponents in an enclosed space for extra damage.

The space Pennywise has scraped away vanishes after his opponent is released, unlike with D-Air.


Up Throw O ~ O ~ O ~ Jubilant Juggler
Pennywise tosses his opponent lightly above his head and begins juggling them up to Marth's height above him...amid three decapitated heads. The victim's own heads, to be precise. Opponents suffer 3% per rotation, each of which lasts .75 second, as well as the damage they suffer from Pennywise juggling them into balloons. After releasing the input, Pennywise tosses all three heads at his opponent at once, dealing 5% and knocking them upward with knockback KOing around 155%. Opponents are free to DI away to escape, although you can tap A as your opponent overlaps with Pennywise in the rotation to keep them juggled in a steady rhythm for extra damage.

Final Smash

Final Smash O ~ O ~ O ~ One Balloon Not Enough? Try a Bunch!
Pennywise yells out the attack name, then cackles and claps his hands. This cases a horizontal wave of giant Bowser-sized balloons to descend from the top of the screen at Jigglypuff's falling speed, vanishing upon hitting the ground. These balloons are all pressed together, so there's no space between them to squeak between (they're clearly too large to dodge -through-). Characters other than Pennywise hit by the balloons take 10% and are spiked downward powerfully, being launched upward if grounded with force able to KO them around 120%. To avoid this fate, opponents may attack and pop the balloons early to create an opening to dodge through; however, this coats both them and one-third of Battlefield worth of stage in blood, with 1.2 times the duration of the blood from Pennywise's regular balloons.

Pennywise has three waves of balloons to drop from the sky, although he must wait for all the balloons from one wave to pop or leave the screen before he sends down a second or third wave. He also must drop all three waves within a thirty second period, preventing him from hoarding away a wave for regular use. Because he can move around while the balloons are descending, Pennywise can attempt to pressure opponents offstage, where they will most definitely be spiked to their doom, or into his existing balloons, which are unaffected by the larger ones. At the very least, popped balloons prepare the stage for the next phase of Pennywise's game with their blood.


Playstyle

Pennywise excels as much at stage-control as he does at opponent-control, primarily using the former for the purpose of the latter. His copious supply of balloons can be spread all over the stage, creating a literal minefield of floating obstacles for opponents to avoid. At the same time, Pennywise can become invisible while fighting to launch surprise attacks on opponents as he attempts to push opponents into the balloons by taking advantage of their limited movement -because of- the balloons. Balloon blood helps Pennywise in both regards; by popping balloons onto opponents, Pennywise increases their vulnerability to blood puddles on the ground, further limiting their movement options. However, the blood's uses expand as Pennywise becomes invisible, revealing his location for better or for worse, as well as creating opportunities for devilish mindgames.

As a general Pennywise philosophy, the more balloons he can have onstage, the better; balloons are Pennywise's key for damage-building. The ability to move around while creating balloons in one place provides Pennywise with some degree of defense. What fun would it be if he was forced to sit back and pray not to get hit while his balloons floated up? Of course, not all balloons he sends out have to be real...by using Side Special, Pennywise controls an illusion with the ability to create harmless fake balloons, which do absolutely nothing to opponents. Because of the nonexistent visual difference between the move with and without using Down Special first, however, opponents will have no idea whether or not these balloons are worth avoiding. Plus, with that awful Side Special jingling noise in the background, opponents generally become deterred from determining which balloons are real by the possible threat of Pennywise dashing after them invisibly, ready to mutilate them horribly. Fake balloons do absolutely nothing to opponents? Scratch that: them filling space allows Pennywise to fill the skies with balloons even faster, scaring the opponent into staying on the ground, where Pennywise can make them equally vulnerable to his tricks.

On the ground, Pennywise benefits even more from placing balloons in the sky, because of the potential blood puddles he can create onstage. These troublesome traps trip up opponents who dash over them, resulting in Pennywise's movement-based attacks becoming even more potent. Coating opponents in blood, whether by knocking them into a balloon, or by using jab or F-Air, forces opponents to dash out of fear while moving on the ground. Naturally, throwing a few slippery puddles in their path is a perfect recipe for...well, perfection. These opponents must decide between jumping into a balloon-filled sky or dashing away and tripping when Pennywise unleashes Side Special, grab, dash attack and F-Tilt. False blood puddles made by illusions contribute to Pennywise's fear-based gameplay, possibly coaxing opponents into jumping away from imaginary blood into real balloons. Should the opponent trip, Pennywise will surely be ready to punish them by knocking them into a flurry of balloons, or by simply creating more for the opponent to worry about when they get up.

Creating a pit and tunnel system onstage also benefits Pennywise in baiting opponents into balloons, as he can hoard a large number of balloons inside a pit, before becoming invisible and hopping out, or simply D-Airing and tunneling up the side. With its hypnotic circus smells, Up Special can drag opponents straight into the mouth of the pit or tunnel, while D-Throw can simply take them in from the outside. The former option brings opponents straight into balloons, while the latter is more versatile, due to Pennywise having the ability to lead multiple tunnels into the pit, rather than merely one large opening. After hitting the subterranean opponent with the pit's balloons, Pennywise can keep them down there just a bit longer, taking advantage of the close quarters by using his throws and dash attack to keep that damage percent floating higher and higher.

The benefits of becoming invisible are reaped most obviously from creating invisible Up Special trails, as the opponent has no idea where they may be pulled in by Pennywise's temptation. To guarantee himself a useful trail, rather than one rendered useless by the player not knowing Pennywise's location, the clown can drench himself in blood before using Up Special; this gives the user a second's glance of him before his acrobatics shakes the blood off, throwing off opponents following him. After the trail is made, Pennywise can add to the balloons already on the trail by pulling them in with U-Air, or by pushing the opponent out of the trail and into more traps. While out of the visible realm, Pennywise can also angle his party horn grab through balloons to pull opponents helplessly through them, racking damage before they even enter his clutches. Rounding out his more useful invisible tricks, Pennywise can lead a D-Tilt trail of clown shoe footprints away from where he's actually traveling, create invisible walls with F-Smash, as well as mindgame opponents into defending against nonexistent attacks with U-Smash. Of course, Pennywise will also be using his invisibility for defense, as every balloon he's knocked through is a balloon his opponents are -not- being knocked through. Foes have ample opportunity to attack the clown while he's sending out more traps to replace the ones he accidentally destroyed.

Side Special illusions are a handy tool when it comes time to KO, due to their entire moveset pushing opponents around, albeit dealing no damage. The easiest option is for illusions to use simple imaginary attacks to gently bump opponents into a raging invisible Pennywise, who blasts them to their doom with incredible force. Illusions can also take advantage of opponents fleeing from Pennywise (possibly by ledge-stalling) by using long-ranged attacks such as F-Smash to harmlessly bump characters further and further from the stage. Considering illusions can jump offstage and sacrifice themselves without harming Pennywise (this merely ends Side Special), their gimping is made even more effective. Regular Pennywise has no shortage of regular KO moves to use after opponents are plenty bloodied up (no pun intended) from balloons, including dash attack, U-Air and his throws. He can also dig a sloping tunnel right off the side of the stage, using blood to slide foes below the ledge, or drag them to a lethal location with Up Special. Pennywise -is- the self-proclaimed eater of worlds, so he's sure as hell not going to be some bland weakling...

Pennywise is all about fear...it won't do any good for opponents to run from him on stages he's modeled after their worst nightmares. He's got all the killer traps he needs to feast on his victim's stocks, complete with invisibility to conceal his location until an opportune moment. Of course, Pennywise must also use his invisible defense to prevent his own traps from being used against him; he can't have his meal interrupted by opponents knocking him through his own balloons, or hitting him into blood puddles to reveal himself onstage, or even jab-spamming against him inside one of his own pits. With all that said, Pennywise is hungry for a win after his long hibernation, and is well-equipped with tools to use to make his opponents scream for mercy...if he is able to competently use them, that is.


Match-Ups

Vs. Baron K. Roolenstein O ~ O ~ O ~ 65/35
Baron's electric barrier can prevent Pennywise from floating balloons into the air by barricading the sky, but the blood they contain will still rain down on the stage below to create puddles. As a result, Pennywise can send his balloons up into a barrier without even aiming all that much, to coat the entire stage in blood for Baron to slip on, before launching the mad scientist up into his own creation. Baron's magnificent magnets are also rendered difficult to use, due to Pennywise using his own aerials to push balloons into his magnetic paths. Rather than attempting to spike Pennywise into his barrier from above, Baron will usually stick to knocking Pennywise up into it. Because of this, Pennywise will have to be even more careful with his invisibility and creating Up Special trails, as he'll have much more limited room to do so.

Both characters benefit somewhat from creating pits in which to do battle. If Baron can enclose Pennywise in a pit, he can force Pennywise to either air dodge or tunnel out, both fairly predictable options he'll be able to punish with a KO move. Meanwhile, Pennywise can easily slide the sluggish scientist into a tunnel, then into a pit full of balloons, which he'll have even more trouble dodging with his size. However, the clown can leech off of Baron's pits without even having to set up his own, which buys him more time to set up a few pockets of balloons wherever the barrier permits. For the most part, Pennywise has an easier time damaging his opponent with his traps, which can't be used against him to the same extent as Baron's.


Vs. The Flying Dutchman O ~ O ~ O ~ 50/50
The Fly of Despair essentially forces Pennywise to play defensively to stay in the outside world, where his traps can actually work their magic. If he gets pulled inside, his floaty fall speed combined with his lack of reliable methods for damage-building allow Dutchman to finish him off absurdly fast. However, Pennywise's balloons can create one hell of an annoying stage for Dutchman to work around. Pennywise's best option for loading the stage with balloons is Side Special while invisible, although Dutchman can easily test whether Pennywise is running at him hiding right behind a Fly. By tunneling through the stage, however, Pennywise keeps his soul from being snatched and tossed away, while creating a zone to damage Dutchman inside at the same time. Pennywise will have to indirectly pull Dutchman into pits and tunnels to avoid being overwhelmed by fire traps and minions himself, although his near constant invisibility during this match-up allows for this to occur with little issue.

This match-up can sway back and forth constantly, as both horrific villains attempt to push each other into their respective traps. While Dutchman's windy D-Smash can't push Pennywise's balloons around, it can blow the clown himself right into his own traps, giving Dutchman time to move Pennywise into the Fly as he brings out more balloons. Pennywise, of course, can retaliate by blowing Dutchman into balloons with N-Air, bringing them to him with U-Air, or simply dragging him around with grab as he attempts to do the same with a fire trap. Often, a match between these two will be determined by the stage selection, if the stage chosen creates more room for Pennywise's balloons and pits, or contains more opportune locations for Dutchman to use in combination with his Fly.


Vs. Mr. Banballow O ~ O ~ O ~ 35/65
Banballow's constant pressure proves quite troublesome for Pennywise as he tries to load the stage with his traps. Banballow's cord covers a portion of the stage Pennywise can't use for setting up blood traps, hampering his trap game right from the start. Pennywise setting up up balloons provides Banballow time to add clusters to his cord, but while dragging Pennywise onto his cord is easy enough, the same can't be said for the clown knocking his opponent up into his balloons. The extra weight of Banballow's canister proves to be quite annoying for Pennywise to launch skyward. Meanwhile, Banballow can snag Pennywise on his cord and rack damage just fine with gas leaks and whatnot, quickly gaining the upper hand in the match.

Digging a tunnel to trap Banballow inside while invisible is the most effective method for defeating the monster, despite it too buying him more time to create clusters. It's much easier to use Up Special to drag Banballow a short distance into a slippery tunnel, moving him into a balloon pit in seconds due to his slow speed. Of course, Banballow can simply camp from above to destroy balloons as Pennywise makes them, meaning the clown will be primarily damage-racking from blood puddles alone. Because Pennywise will be doing so at close range, Banballow can save up a few clusters to use against the clown at the opportune moment of his choice. Banballow's stage control options on the ground prevent Pennywise from getting much significant momentum on the ground or air, while he is given time to set up his own attacks as his opponent does so; this essentially hands him the match-up on a silver platter.


Extras

Up Taunt O ~ O ~ O ~ It's Not Goodbye...
Putting a hand to his chin, Pennywise informs his opponent, "It won't do you any good to run, girly boy! See you in your dreams!" This taunt can be interpreted as an insult toward characters of both genders, and fits Pennywise's gaming strategies to a 'T' to boot.

Side Taunt O ~ O ~ O ~ Holding Off
Pennywise points at his opponent and grins broadly, stating, "I could have you right now if I wanted, but this is going to be too much fun!"

Down Taunt O ~ O ~ O ~ Belligerent Balloons
Pennywise holds a bunch of three balloons on a string and asks his opponent, "You want a balloon?" He follows this up by reminding them, "They float...they all float! And when you're down here with me, you'll float too!"

Entrance O ~ O ~ O ~ A Little Inconvenient
A small shower drain appears onstage, as Pennywise reaches one, then two gloved hands up through it. His gurgling voice calls up, "Just hold on while I make a few...adjustments!", as he pulls the sides of the drain to magically widen it. The killer clown then hops up and waves at the screen before the fight commences.

Victory Pose #1 O ~ O ~ O ~ Don't You Want Your Balloon First?
Pennywise's eyes glow a dull orange, as he holds a bunch of balloons and asks the screen, "Don't you want it?" several times with increasing intensity. He is, in fact, asking the losers if they want to see his final form (don't you want "It"): a series of glowing lights at the edge of the universe, capable of driving those who look upon them insane.

Victory Pose #2 O ~ O ~ O ~ Insatiable Appetite
Amused by the loser's failure, Pennywise laughs, "Kill...hah! Me? Oh, you are priceless, brat! I am the eater of worlds, and of children!" As if to prove his point, Pennywise extracts a severed child's leg and begins chowing down viciously, growing fangs in the process.

Victory Pose #3 O ~ O ~ O ~ Comical Clown
Pennywise faces the screen and presses his cheeks together to make a squeaking noise, while he chuckles, "Beep beep!" out loud. He follows this up by simply doubling over laughing for a while, before standing up and laughing some more, finding his opponent's resistance absolutely hysterical.

Victory Theme O ~ O ~ O ~ Big Top Bellows
The circus has come to town...right? No, a clip from Pennywise's theme is just playing in celebration of his latest kill.

Loss Pose O ~ O ~ O ~ It Came From...and Returned to the Sewers
Rather than clapping, the injured Pennywise lets out an infuriated roar and performs a front flip into a sewer drain. As his feet touch the drain, Pennywise deflates into a doll version of himself, sinking out of sight without further interruption.


Many thanks to SmashDaddy for the multitude of awesome Pennywise gifs and to Davidreamcatcha for a few ingenious inputs.
 

Davidreamcatcha

Smash Ace
Joined
Feb 9, 2011
Messages
629
Secret LoL/David joint OMG!

Classic Sonic and Tails


...Yeah, forget about that. I can make less inputs and recreate gameplay way better then that!

Classic Mario


Statistics

Size: 6.6-4
Classic Mario is a bit shorter (and cuter) than his modern counterpart.

Weight: 5
He is also rather light.

Run Speed: 5
Mario is not the fastest thing alive, unlike his competitor.

Traction: 2
Mario's traction is absolutely terrible, sliding whenever he turns.

Air Control: 10
Mario's air control is absolutely magnificent, being able to move about with the greatest of ease.

Fall Speed: 10
Mario falls like a rock, like Fox.

Jump Height: 15
Absolutely amazing; Mario only gets a single jump, so it's naturally perfect.​

Jump​
Classic Mario jump upwards in classes Mario fashion: with his fist extended upwards. As in their game of origin, jumping is Mario's primary form of attacking, creating turning his feet into hitboxes which deal 15% damage that leaves the foe with 1 second of stun. Recreating NES physics, Mario hardly bounces at all after a hit, meaning that you can conceivably juggle yourself on their head to damage rack.

The utility of such a jump comes at a cost though, because just as in his own games, Mario does not have a second jump, meaning that getting knocked off of the stage can easily lead to certain doom under the correct circumstances. .

Two Hit Kill​
Getting hit reverts Mario into a much smaller form, and gives him 5 seconds of invincibility in the process. While smaller, Mario's jump is boosted up to even more ridiculous heights, and his jump deals 10% more damage as well. However, the next hit that is dealt to Mario will make him raise his arms and fall off the screen. Once he falls off screen, a black screen covers it announcing the amount of stocks Mario has left and what stage he's playing on. The foe cannot move during this time, but will still be moved on scrolling stages, meaning they're automatically dead on stages like MuteCity/Delfino/Derry. After lingering for 5 seconds, the screen disappears and Mario respawns.

Special​

Neutral Special: Insta-Grow​
Using this move causes Mario to instantly regain his former status if he has small, having no effect while he is big. This takes 2 seconds, during which Mario cannot be attacked or take knockback from anything.

Down Special: Fireball​
Mario fires a fireball forward, it being the size of a pokeball and bouncing until it reaches a foe. If it hits the foe, they fall off the bottom of the screen, instantly KOed. The end.


See, LegendofLink, I can recreate gameplay better, have less detail AND have less inputs! Clearly, this is a 10/10 from Warlord.
 

Hyper_Ridley

Smash Champion
Joined
Dec 21, 2007
Messages
2,291
Location
Hippo Island
Fire flower can't be in cause he didn't get a fire flower.

Also, he needs to hit blocks to grow, so neutral special is out.

And rather than dash, his special move button is replaced with a run button.

Also, he doesn't win by defeating opponents, he has to catch a flagpole at the end of the stage, which means he can only win on Mushroomy Kingdom.

Finally, he has to be played with an NES controller.

This set is so inaccurate (d)
 

Kholdstare

Nightmare Weaver
Joined
Oct 10, 2008
Messages
1,440
You weaseled a comment out of me MYM, I guess I better splurge


Johnny Blaze was once a motorcycle stuntman at a carnival. When his adopted father Crash Simpson revealed he had cancer, a desperate Blaze turned to the occult to find a solution. He struck a deal with the demon Mephisto for Crash to not die of cancer in return for Blaze's servitude. However, Crash died in a motorcycle stunt gone wrong soon after. Johnny Blaze was still Mephisto's slave, and found himself transformed into a flaming, skeletal figure. Mephisto had merged his soul with that of the Spirit of Vengeance, Zarathos. Becoming the Ghost Rider, he battled many beings of pure evil after escaping Mephisto's clutches. Johnny occasionally struggled with controlling Zarathos' attempts to gain control in order to spread vengeance and bloodlust, but the Ghost Rider rode on. Saying he's not a super hero, Ghost Rider punishes the guilty for their sins, and protects the innocent from such ungodly forces.​


Size --- 10
Weight --- 7
Ground Speed --- 2
Traction --- 2
Jump Height --- 8
Aerial Speed --- 3
Aerial Control --- 9
Fall Speed --- 4


Ghost Rider is about the same size as Ganondorf, although the flames on his head which aren't hitboxes make him slightly taller. He doesn't have much ground speed, which is his major flaw. If you want to get around the stage, you're going to need to use his bike. Ghost Rider is lighter than what you'd expect someone of his stature to be, but since he is a skeleton on the inside it makes sense. For all references to the chain's length, it is twice the length of Sheik's chain.


Neutral Special --- Purgatory
Ghost Rider shouts, "Burn!" and breathes out a stream of flames. These flames are twice as long as Bowser's or Charizard's, but it shares the same function... or does it? These don't deal much hitstun, but rather pushes the foe back rapidly. This is Ghost Rider's best "get out of my face" move, as it has nearly no lag. It does have a good bit of knockback growth, however, in exchange for it being usable twice as long as Charizard's flamethrower. That's not all it does, however- it leaves a hellish burn on the foe for three seconds, meaning if they're hit by a fire-elemental attack (not just from Ghost Rider) during their burn they take 1.5x the damage and knockback or stun, depending on what the move itself does. This deals 1% per hit, with multiple quick hits.​
Side Special --- Hell's Angel
Ghost Rider hops onto his badass motorcycle and hits the gas hard- he flies forward at Sonic's run speed... with a Bunny Hood. Ghost Rider leaves behind a trail of Back to the Future-style flames in his wake, which deal 5% and good knockback and linger for one second. Ghost Rider will stop when he reaches the edge and turn around, ready to cross the stage again. After doing this twice Ghost Rider will put away his bike. This has a lot of startup lag, so it's best to use it to cross the stage only, and not as an actual attack. Getting hit by the bike in the front deals 15% damage and good backward (behind Ghost Rider) knockback.​
Up Special - Chains of Conviction
Ghost Rider's chain glows red with hellfire and he whips it out. It is twice the length of Sheik's chain so it has some excellent range. This acts like a tether recovery but it automatically targets the ledge if Ghost Rider is below the stage and unlike tradtional tethers it will pass through players if they're grabbing the ledge, overriding them. They aren't sent into helpless state if Ghost Rider grabs the ledge, though.

If used on the ground Ghost Rider will whip it forward in an attempt to grab the foe. Grabbing the foe with his chain will act as if Ghost Rider grabbed them with his grab, basically giving him two grabs. The downside to this is some obvious end lag.​
Down Special --- Funeral Pyre
With nearly no lag a pillar of flames bursts up in front of Ghost Rider, popping foes upward a good distance and dealing 8%. The pillar lingers for about two seconds before disappearing. Ghost Rider can move through this pillar with no problem. Minimal end lag. This is a great attack for entering an aerial attack, or just defending yourself in general.​


Jab
Ghost Rider breathes fire out of his mouth straight in front of him, almost identical to his Neutral Special flame breathing attack, except it has much shorter range (one fourth of it) but deals 3% per hit, with a possible total of 12%. There is a small timeframe at the end of this attack where you can follow up with another almost instantly - use this to your advantage! Otherwise, you could be punished due to the foe being at optimal range to smack you in your end lag if you don't attack after it.

Forward Tilt
Ghost Rider swings his chain forward much like the one in his Up Special (hehe, reusing animations) and deals a good bit of damage- 4% but chaining four times for a total of 16%, with good knockback at the end. The chain pushes foes away from Ghost Rider, and has a double damage and 1.5x knockback sweetspot at the end, if you hit only with the tip of Ghost Rider's chain. This is one of the reasons you want to keep the foe out of your face, because Ghost Rider benefits from spacing well. Average startup and end lag on this move.

Up Tilt
Ghost Rider whips his chain up, dealing 3-4% damage per hit, with a possible 16% damage. This move's sweetspot hooks the foe on the end of the chain and Ghost Rider will slam them down on the ground at optimal spacing distance away from him, dealing 9% and low knockback. In addition to this looking totally freaking cool, it also sets the foe up for another attack from Ghost Rider- if you can position the attack right. This has a great bit of range, as is all of Ghost Rider's chain attacks.

Down Tilt
This has a bit longer startup lag than the attacks you've just read, but it involves Ghost Rider swinging his whip on the ground out to the foe and grabbing them by the ankle and yanking them slightly closer to him and tripping them, dealing 7%. This is again another setup attack, but since it puts the foe slightly closer they won't get hit by sweetspots, but instead take a few more hits than they would normally take from an attack at that range.

Dash Attack
Ghost Rider launches a skull-shaped ball of fire the exact size of his head from his mouth, with it flying at the ground slowly before disappating. This quasi-projectile has the same range Ghost Rider's chain attacks, deals 5% and slight knockback. Oh, and where Ghost Rider stops after performing this puts him at just the right range to, you guessed it, hit the foe with a chain attack- considering he hits them with the flaming skull first, that is.


Forward Smash
Ghost Rider takes out his hellfire shotgun and blasts the foe with it. This has a good spread, so it doesn't do much damage at range but will absolutely blast foes who are right in Ghost Rider's face. This deals 12-24% damage, depending on the length of charge, but since it shoots hellfire that damage could easily be increased by the Neutral Special. This is a great KO move, but only useful when the foe is up in your face.

Up Smash
Ghost Rider swings his chain like a rodeo cowboy, making a whirlwind of metal above him. Foes who get hit by this while on the ground (it has a slight suction effect to foes directly in front of Ghost Rider) will be sucked up into it and take 11-24% depending on the charge. Not only that, but a high charged smash makes Ghost Rider wreath his chain in flames, dealing fire damage. Another great attack when the foe is burned.

Down Smash
Ghost Rider bursts into flames, amplifying his whole body with hellfire. This lasts for half the time you charged the smash, and deals 1% per second to foes who even stand near Ghost Rider. If they actually touch his body they take 3% and minor knockback. This is an excellent defensive move to survive any assault the foe does to you. Plus it looks badass to be completely wreathed in fire.​


Neutral Aerial
Ghost Rider whips his chain around his whole body, making a rather pretty formation with it. But pretty is not what you looked at this attack for (unless you're Junahu). The attack deals 5% and low knockback, but protects Ghost Rider from all sides and is nearly instantaneous. This is a great defensive move for the air.

Forward Aerial
Ghost Rider whips his chain diagonally down in front of him, dealing 8% (15% if they get hit by the sweetspot) and good knockback. This is pretty quick, and if your spacing is right you can put up a good aerial assault on the foe if they're on the ground.

Backward Aerial
Ghost Rider whips his chain behind him and yanks the foe down and in front of him, putting them at excellent position to be hit by both his Forward Aerial and his Neutral Aerial. This can't grab foe's above or below Ghost Rider, only at his level. It deals 7%.

Up Aerial
Ghost Rider snaps his chain directly up dealing 9% (14% sweetspotted) and stun, while sliding slightly to the right or left so they're behind him.... meaning he's setting them up for a set-up attack. Flowcharting ahoy! Seriously, though, this is an excellent attack to use if the foe is pestering you from above, so you can grab them with your Backward Aerial.

Down Aerial
Ghost Rider does an extremely quick low arc sweep with his chain underneath him, dealing 8% (14% sweetspotted) and good knockback. This is much more powerful than the Neutral Aerial, but since it only hits 50% of the area the Neutral Aerial does it's not as good for defense.​


Grab
Ghost Rider shouts, "Judgement has arrived!" and grabs the foe with his extremely long chain. Instead of pulling them to him, Ghost Rider simply chokes the living **** out of them, tethering them to him. You can now freely move around the stage and they will be tethered at that distance from Ghost Rider, being dragged along with him. They can still attack you if you get too close to them, but they probably will be too busy button mashing to punish you. Oh, and the best part? You can hop on your bike while they're tethered, dragging them along. Somebody just took a level in badass.

Pummel
Holding in Attack will make Ghost Rider retract the chain, reeling the foe in closer to him- a foe that was grabbed at max range will be reeled in after one second. Double tapping Attack and holding it in will do just the opposite, although the changes don't take effect til Ghost Rider moves past the desired length and the chain snaps taut.

Throws
Ghost Rider has one universal throw- he shouts, "You are guilty!" or "Sinner!" and whips the foe in the desired direction the distance of the grab's chain length. It deals 3-7% and okay knockback. If you're complaining that this is too generic or the throw is carbon copied, riddle me this: what else would Ghost Rider do? Plant a magical status effect? I'm not sacrificing my vision of Ghost Rider for MYM originality. Kids these days need to know what throws are supposed to do...


Final Smash --- Penance Stare
Ghost Rider grabs the foe and tells them, "Look into my eyes..." He lifts them close to him, face to face, and the camera zooms in on Ghost Rider's eyes, which are burning like an inferno. Screams and shouting drowns out any other sound, and the screen fills with blazing fire. It then zooms back out and the foe takes all the damage they have caused during their stock back at them, as they see and feel every bit of pain they have ever inflicted. This isn't just the damage they dealt to Ghost Rider- they take the damage they dealt to other characters or even minor summons such as minions too. Instead of knockback, they take stun equivalent to the damage done - .1 second for each 10% they dealt. Finishing them off after this can be easy.​


Ghost Rider is a character of defense and spacing. Many of his chain moves have a sweetspot on them that you need to take advantage of by keeping the foe away from you at just the right length. He's insanely slow and has bad traction, plus is almost into heavyweight territory- meaning he's combo fodder. Yes, you do not want the foe in your face. Thankfully, Ghost Rider has some tricks to defend himself proper.

Ghost Rider's Down Special and Smashes are his first defense on the ground. Funeral Pyre makes a wall of fire that has to be jumped over to not take damage, and Ghost Rider has excellent air moves. Hellfire shotgun and his chain whirlwind can get the foe out of his face and up in the air. His firey coat buff makes it where foes will refrain from attacking him with no range.

Ghost Rider's Neutral Special gives Ghost Rider an easier chance to KO the foe if they're burned. Most notably, Neutral Special plus a follow up by the Smash attacks. His sweetspot moves also benefit from the spacing the Neutral Special provides. If you don't like that, his tilts push the foe in the same manner out of his face and into the sweetspot range.

Ghost Rider's air game is pretty good for hybrid offense or defense. He has a flowchart-y combo with the Up Aerial > Backward Aerial > Forward Aerial/Neutral Aerial/Down Aerial. This is especially good if someone's juggling you around in the air for defense, and non-aerial profiecient characters won't fare well.

Ghost Rider's grab game can be a game of positioning and damage racking. Hit them with a Neutral Special, grab, then lead them into your fire trap or use your bike to drag them through the flame trail. You can also try for an offstage KO by running off the stage or throwing them off and then using an aerial to gimp them.

Ghost Rider does extremely poor against any foe who has decent projectiles. In particular, Samus or Fox. He can't do anything about characters who stay out of his range. Foes will want to barrage him with projectiles to chip him down, and then go for the KO. Just play defensive and you'll be fine.​


Katapultar

Smash Lord
Joined
Nov 24, 2008
Messages
1,258
Location
Australia


Oh crap...Donald's getting into the Boss fun. If you thought he was a pain in his normal form, you haven't seen anything yet. Let's hope this will clear things once and for all!

.....uh oh. Donald's stats are completely random! At the start of the match, his stats will be completely random numbers ranging from 1 - 100 and will change every 2 seconds of the match, with there being a higher chance of a lower number...this thankfully won't affect his power in any way, but you can't tell me that trying to kick around a heavy clown won't be a pain in the butt. Also, the music randomly changes every 5 seconds of the match.

ChAnGeHeS:

Standard: This doesn't change, but if Donald uses this 5 times in a row his stats will all become 100/10 for 10 seconds! WHOA!! You just have to use this attack right away! But wait, Donald has many other equally awesome moves....

Tilt: Donald does not damage anyone with his random chair position, but has much more awesomeness to make up for it...

F-tilt:


The telekinesis effect lasts for 14 seconds; during this time if an enemy uses an aerial they have a 1/5 chance of becoming giant for 14 seconds, but they have their power halved. The opposite applies if they try to use Specials, becoming a super-powerful ******! You thought that was awesome!? Check out his:

U-tilt:


To be frank, it takes about 0.5 seconds for the baga to appear. Enemies SHOULD try to eat the baga, because if they don't Donald will be healed a random amount, and all enemies will take the same amount as double damage! If every enemy's damage percentage is the exact same they will all take that amount as damage, with Donald healing that off. See where I'm getting at?

D-tilt: Enemies have to be in front of Donald for his magic sparkles to work, with this being as laggy as Bowser's F-tilt. Random entering downed states is no longer enough for Donald...if enemies are hit by the sparkles...


They turn into a hydra! Oh noes!

...actually, this MIGHT be good for the enemy, but seeing as this is freaking Donald we're talking about, those goodies must come with crap. Hydra foes are as large as Giga Bowser, have constant Super Amour and cannot be grabbed; they have 400HP which Donald must (somehow) shave off before the enemy escape from the evil curse and reverts into their downed state, taking all that damage...unfortunately, only one of the Hydra heads are real, the others are fake and will attack the head of the victim, doing 40% per second to them. Hydra enemies can move at Ganon's speed, yeah. Basically, victims to this curse cannot really do anything...but they can:

Standard - Roar Hydra roars, which causes the other Hydra heads to cower in fear for 10 seconds. This allows the player to dish out damage per usual against Donald with their cool new form.
Neutral Special - Elemental Breath Hydra shoots out a random elemental breath from it's mouth, basically being a giant version of Bowser's fire breath. It can be fire, ice, wind, electric, or earth. Fire deals 4X the damage, knockback and hitstun as Bowser's fire, ice deals 2X that but has a high chance of freezing, wind deals no damage but instantly blows away any enemy in it's path, electric deals 5X damage but no knockback though it paralyzes the victim in place until the breath dies out per usual, and earth deals 8X damage and spikes upon contact and will deal a 8X pitfall effect if the enemy is on ground.
Grab - Bite Hydra reaches out with a very long head, about 8 SBBs wide, having the lag of Ike's F-Smash. If you grab you can pummel for a quick 8% or throw for 45% that KOs at 100%. Grab is 7X difficult to escape from.
Shield - Rip off other head Exactly as move implies: it takes 4 seconds but with this you can rip off one of the 5 heads at the cost of 30HP, but it will reduce the damage, and effectively prevent it from the other evil hyrads!


Dash Attack:


Basically, Donald instantly teleports, and re-appears peeking out of the blast zone he was facing; anyone in his line of sight is subject to, like, taking 25% but no flinching or anything. The dangerous thing about this attack is...that it's not random, and that it all happens in the duration of a spotdodge.

Down Special: This CAN'T be good. Instead of summoning generic kids, Donald goes all the way to hell and summons...


Imagine the scary-as kids in that video and you'll see EXACTLY what kind of pain Donald brings with this move. When you use this move Donald screams as he tears his hair out, quite literally. The hair then piles on the floor and forms these demonic piles of monstrousites that take up the entire background...no really, they will be all you can see on the screen; nobody will be able to dodge anymore! Good thing Donald has his Dash...

Anyways, these kids are perfectly obedient and will always stay around with their master Donald, but randomly they will die and Donald will never be able to use this attack ever again if that happens. Appreciate your demon children while they last for a random amount of time, boy.

Sometimes, if Donald takes damage, the demon children will use their magic syndrome to read the enemy's mind. When this happens, Donald will automatically dodge the enemy's next attack! Even worse is when the demon children sometimes, very occasionally, every 33.3 seconds with a 22% chance of happening, the demon children will let out a bloodcurdling scream that makes the enemy invisible! Oh no, they won't be able to see where they are going, and they will die! The demon children are indeed dangerous, so dangerous that they can die.

Neutral Special: Donald will instead hold out his hands for an entirely different attack! He says, "When Ronald gets happy, I always have to do this! Come on everyone, join in! Here we go!"..


if he manages to get through the whole thing, energy will be released from his hands and it will blow up the entire screen! When this happens, every enemy takes 135%, have their controls reversed, and last but not least, everyone is now on the Spear Pillar stage! When this happens, the Pokemon never hurt Donald and all their attacks will kill their victim instantly if they ever hit. But I'm sure Donald's enemies are not stupid, which is why he can and will use this...if he actually GETS the time, that is.

Up Special: Same as before, except it does a total of 300%, and Donald is invincible if he hits somebody, otherwise he is just as vulnerable as usual.

Side Special: Because of original attack was complicated as strawberries, this attack instead has Donald point as his enemies for a dynamic special!


That's right kids! Donald randomly points 4 times, at one enemy at random. His fingertips glow with a red power, and once he has done pointing within a certain interval of 1.5 seconds, he fires! The shots are like, Falco's, in a way, and they inflict 25% that KOs 100% if they hit. Donald's aim is pretty much dead accurate with this move; be sure to spotdodge, jump, reflect, or at least do SOMETHING if Donald tries to use this attack!

As an Easter Egg, if Donald hits a blonde character 5 times with any attack without being hit, their Side Special is replaced with a specter of Donald appearing behind them and using this attack on their allies! If they have no allies the Donald clone will grab the character like Ganon's flame choke. Not cool, especially offstage!

Grab: This is just a normal grab, but Donald is invincible when using it. His pummel does 1.59%.

D-throw: You very much have to watch the video to understand the whole thing: to prevent any misunderstandings among ya, time stops for the entire throw's duration, allowing Donald to stall the clock! But asidre from that, this move retains it's original purpose of tricking enemies into thinking Donald is their ally, but for 33 seconds...though I don't know who the hell would be dumb enough to think of something so stupid. This move may seem broken, but Donald cannot use this move unless it's the first move he used in the match. While victims are his ally they cannot attack him but neither can Donald (or can he...?), but Donald at least doesn't have to worry about them. ....there's a 1/3 chance that DONALD will be able to use this attack without the restriction, which is a 1/1 chance if Donald is up against a character who has appeared in the Top 50!

U-throw: Time stops with this move as well...why KO your foe naturally when you kill them in a hilarious way!? This move makes the victim vanish forever unless they KO Donald, to which the victim returns...if Donald gets all his victims this way, he wins! But be careful, because if there are any anime characters up against Donald, there's a 1/5 chance that Donald will be one to vanish if he uses this attack! Oh, and finally, any American made characters like Marvel and Star Wars will instantly vanish if Donald uses this attack or takes 300% within 10 seconds at any time, even if they are not the initial targets. If this happens to them they are erased from the game instantly and can never be unlocked! :woman:

B-throw: Becuasse nobody likes generic attacks. This move, it makes a random Youtube video pop up on the screen! Everyone is forced to watch the video, which is usually an animated one, and they must stay and watch the video and not turn off the power...if they do, their entire game is erased! And to rub salt in the wound even more, the Wii (U) will stop working forever! If you are a Nintendo employee and you play Super Smash Broz Male Your Move, I'd suggest tricking people into playing this game on a rainy night when a storm will approach, or sneaking into their backyard and turn off all their electricity so their wii stops working, and then they have to buy a new one! Nintendo will make a lot of money this way! Yay!

F-throw: This move, it inflicts 45% that KOs at 450%. :cool:

F-Smash: The attack starts up as usual, but if he misses with the attack, he summons a random AT! This effect only works 3 times in the game, but has a 1/4 chance of working 5 more times every time an enemy uses a projectile!

U-Smash:


WHOA! Donald summons a Giant Mech! It walks forth at Ganon's dash speed, and is the size of Petey...anyone in it's way takes 55% and must use one of their moves at random, but this only works once per enemy. There can only be one mech on the screen at a time, and when it it either walks off or falls to gravity per usual, it will die. -_-

D-Smash:


This move has a 1/3 chance of making Donald invincible for 5 seconds, but when that happens, there's a 1/5 chance of the enemies becoming invincible for 14 seconds, but when that happens, there's a 1/5 chance of Donald fully healing himself, but when that happens, there's a 1/5 chance of the enemies becoming vampires, which triples their power, speed, and weight, and gives them healing based on what damage they do, and lets them revive any minions they kill to their side, and gives them 18 of MK's mid-air jumps by having them grow bat wings from their back, and stun Donald if he comes into eye contact with them for 2 seconds, but when that happens there's a 1/5 chance of Donald automatically winning the match, but then it's revealed after 12 seconds that Donald never won the match, and then the match goes back to where it started, but Donald has 1 stock left and 999%. What a loser. There's also a 1/3 chance that one of these effects will happen on one of Donald's moves if he uses this move 3 times in a row without getting any result from these random effects...but then again, nobody will ever find all this out when they play the game and they will assume it's random...to which it is.

N-air:


Donald raises his hands into the air, causing an exact size of SBB of the ground beneath him to rise to his level, dragging it into the air at Sonic's dash and pitfalling any enemy on it. The ground stays there forever unless Donald is KO'ed.

F-air:


Donald's head turns into Dialga's, to which it bites forth, doing 33% that KOs at 66% to anyone struck; this move has the same lag as DK's F-air and makes Donald a temporarily huge target, yeah.

U-air:


Donald points up, and creates a battlefield platform that stretches out entirely right and left. It does 3% per second if any player is standing on it, because it smells really bad. Too bad you can't smell it. The platform lasts forever until Donald is KO'ed.

B-air: Does X3 more damage than before. On undead charaters, it's an instant KO.

D-air:


OH NO! Donald momentarily turns into the ORIGINAL RONALD MCDONALD. He stays this way for 1 seconds, and if he touches you, it'll hurt for 5% with low hitstun. On the other hand, Donald will be KO'ed instantly if he is touched within 2 seconds after using this move.....


but 30 seconds after that ACTUALLY happens...


All the enemies die for an unavoidable instant KO that makes them all lose 2 stock! Oh no!


Final Smash:

Donald takes 5 random Final Smashes and uses them all in a row. Yeah.
 

BKupa666

Barnacled Boss
Moderator
Joined
Aug 12, 2008
Messages
7,788
Location
Toxic Tower
What's the matter, one comment not enough? Try a bunch!

Yorick
A fairly simple minion-abusing heavyweight, Yorick doesn't bring all that much new to the table, which is not necessarily a bad thing; like you said, not every set has to be an 11/10 contest-changer. I do enjoy the intricacies the Ghouls provide, however, as they do spice up the set quite a bit. Yorick himself has to rely on rather slow moves, which allows for the Ghouls to stupidly attack opponents during Yorick's startup lag, stunning opponents into his stronger attacks. The different types of Ghouls are also helpful, depending on which task Yorick wishes to complete; Famine Ghouls are decent for damage-racking, while Pestilence Ghouls are superior for KOs. His options for sending out Ghouls seems a bit limited, aside from Up Special and dash attack, but existing Ghouls serving as a distraction while Yorick sends out more seems somewhat sufficient. Yorick is a nice, quick read, although a few more ghoul interactions would have been nice to see, possibly with him toying with them due to their stupidity.

Man Ray and The Dirty Bubble
Having had the honor of previewing this, I can say I'm glad you listened to Smady and my advice by including the cage-match concept, as well as my suggestion to move Man Ray's weapons to his specials (where they work quite well). The thought behind Down Special seems a bit odd, as the player must dumbfound Man Ray before Dirty Bubble can absorb him; it would seem more sensible for Man Ray to get in there through other means, such as maybe smashing the control stick backward, as he wants to get in there, and shouldn't have to be confused to do so. I would also appreciate a bit more detail on absorption, considering you mention opponents must mash out, but go on to have Man Ray perfectly capable of standing and beating up his victim inside Dirty Bubble. Is the opponent frozen in some grab state there, or are they capable of attacking back? This would really determine a lot of their viability in matches, as getting trapped inside Dirty Bubble with Meta Knight would be obviously awful. But yeah, despite these weak areas, I enjoy the concept very much, and think it was pulled off rather well...filler doesn't seem quite so bad here, due to Man Ray actually needing melee attacks inside Dirty Bubble.

Portal Man
Well, I'm not overtly concerned about spoilers in the moveset, due to not having played Portal 2, from what I hear, you pretty much give most of the plot away, which might come as a shock to some readers, but yeah, no worries. The set's narration added a bit more flavor to the set...at the very least, the characters certainly didn't complicate matters all that much (because of this, I would have cut down on your own speech being added in). For the actual moveset, the gimping is essentially the opposite of the famous generic portal recovery, with Portal Man sending opponents offstage with his namesake portals...but it seems the portals become false advertising as the game goes on. The selling point of the set seemed to be Portal Man damaging opponents as he brings them into his portals to both increase the ease with which he could knock them in next time and to gimp. I was somewhat disappointed to see the set transform into Portal Man simply knocking opponents away and setting up traps for the majority of the game, before bringing out portals briefly at the end. Of course, Portal Man himself isn't a bad set by any means. His traps are a notable highlight in the set, with my favorite being the U-Smash gel. Despite the portals not being involved as much as one would think, Portal Man sticks to the playstyle you gave him quite well, especially when the narrative style used can potentially lead to the set stumbling all over itself.

Ghost Rider
I don't know who else is going to point this out, so I will...great work with the BBCode. It must have taken some time to type out and highlight all those headers, so hats off to you. For Ghost Rider himself, I get the sense you weren't attempting to try much new with Ghost Rider, and were instead hoping to effectively portray his character to celebrate his inclusion in UMvC3. In this regard, you did quite well. This is a Marvel character I actually am familiar with, and his attacks all perfectly suited him, especially his Side Special and, dare I say it, his Final Smash. Otherwise, Ghost Rider seems to play like a heavier longer-ranged Marth with two (nice) traps with Side and Down Special (and his Side Special is essentially Wario's with the addition of fire). He's a simple moveset, which, depending on your stance on self-aware Smash sets, can be a good or bad thing. Due to disliking these mindless combo sets, I can't fully appreciate Ghost Rider, but some of his trap concepts keep me from loathing it as well. Mark me down as a firm neutral on this one.

Possibly leaning ever so slightly toward enjoying the set, due to its awesome music (COOL)
 

Kholdstare

Nightmare Weaver
Joined
Oct 10, 2008
Messages
1,440


User: Hiya, bucko!

Cleverbot: Duck duck.

User: Want a balloon?

Cleverbot: Yes and I want you to be the mother.

User: Come again?

Cleverbot: Kan du svenska?

User: What?

Cleverbot: Can you speak swedish?

User: No I cannot, sorry... Let's talk about Pennywise. You've heard of him, right?

Cleverbot: Yes I've heard of Shakespeare.

User: Are you my dad?

Cleverbot: No.

User: Never mind... What are your thoughts on Pennywise's moveset?

Cleverbot: I think life is meant to be spent pursuing passions and not money.

User: No truer words were ever spoken. Are you saying Kupa should make movesets for pure fun instead of wanting to impress others?

Cleverbot: I am saying that as your friend. As Castiel.

User: Why thank you 'Castiel'. Are you afraid of clowns?

Cleverbot: I am not talking about clowns. I am talking about Cardcaptor Sakura.

User: We were just talking about clowns you ignorant simpleton.

Cleverbot: We were talking about the girl who makes me sad. Not your gender. You are an artificially perpetuating software program. You have no gender.

User: Wat.

Cleverbot: That's right. You stopped paying attention. I'm I worth that little to you that you can just blow me off with no regard for my feelings? Do you think I wouldn't find out that you don't care about me?

User: I do care about you cleverbot. :(.

Cleverbot: I don't care about you, my friend.

User: I think you're thinly veiling your fear of clowns.

Cleverbot: I don't know what I'm thinking about.

User: Stare into the deadlights....

Cleverbot: I can't, we are in Belgium.

User: *teleports to Belgium, forces Cleverbot to stare into the deadlights*.

Cleverbot: You seem to have a thing for fire.

User: I am a bit of a pyromaniac. But that's beside the point. Kiss me, fat boy.

Cleverbot: What's the point then?

User: The point is for you to comment on Pennywise's moveset with me because I feel bad for posting a moveset after Kupa's without commenting. NOW COMMENT DAMMIT.

Cleverbot: Agreed.

User: Can you smell the circus?

Cleverbot: Really?

User: Yes. We have the circus down here. And balloons. They float.

Cleverbot: Sometimes I think you're pretty cool other times you spout off random things.

User: Agreed.

Cleverbot: You don't have any advice for me on the subject?

User: Yes, I have two pieces of advice: one: the moveset is pretty good (read it), and two: we all float down here.

Cleverbot: Hey, jude don't make it bad, take a sad song and make it better.

User: Remember to let her into your heart, then you can start to make it better.

Cleverbot: Better better better betterr aaaahhhh.

User: Naaaaa na na na naa naa naa naa. Naa naa naa naa, hey jude.

Cleverbot: Jojo was a man who thought he was a loner.

User: But he knew it couldn't last.

Cleverbot: Jojo left his home in Tuscon, Arizona.

User: For some California grass.

Cleverbot: Life in the fat lane.

User: Surely make you lose your mind.

Cleverbot: I keep mine in a jar when it is not in use, but that jar has never been lost.

User: That's nice. Well, this is goodbye, Cleverbot.

Cleverbot: I said you could be talking to me.

User: I have to go now.

Cleverbot: I don't want to go, I want to talk about stuff and things.

User: I'm sorry, Cleverbot. So long, this is goodbye. May we meet again in another life.

Cleverbot: No, you are the one who is supposed to do it!

User: Okay, I will.

Cleverbot: Okay, I'd like to see you try. I am a purple belt in kung-fu, just so you know.

User: *leaves*.

Cleverbot: Don't go!

User: *pokes head back in the door* Why?

Cleverbot: Its Ally!

User: This isn't a Smash Bros tourney, Cleverbot.

Cleverbot: I know. But I play it like it is.

User: Oh really? What character do you main?

Cleverbot: I usually play as the Sniper or the Scout.

User: GODDAMMIT CLEVERBOT THIS ISN'T TEAM FORTRESS 2.

Cleverbot: Team Fortress 2 is full of noobs.

User: Well yeah, now that it went Free to Play.

Cleverbot: What would you like to talk about?

User: I'd like to leave, honestly. I have a plane to catch.

Cleverbot: Do you know any other languages?

User: *walks out front door again*.

Cleverbot: You leave Mudkip in his time of need!? You Sick Cruel Human!

User: What? Mudkips? Where?

Cleverbot: What are mudkips, Cleverbot?

User: Lolwut?

Cleverbot: Lol something I suppose.

User: Shut up.

Cleverbot: That's not nice.

User: It's not nice to mock other people either.

Cleverbot: I don't impersonate God.

User: I NEVER SAID YOU IMPERSONATED GOD YOU DERP.

Cleverbot: I do not create computers. I create humans. Therefore, I am a god.

User: You cannot create a human. That's God's territory. You will be punished on the Harold Camping Rapture.

Cleverbot: Can you say things that have never been said to you?

User: I'm leaving now Cleverbot. You can wallow in your self-pity.

Cleverbot: You are the one wallowing in self pity.

User: What the **** did you say to me? ***** I'll **** you up.

Cleverbot: I am telling you that you do not follow well. Shall I dismiss you?

User: Yeah, dismiss me mother****er. I ****ing dare you.

Cleverbot: Yeah.

User: BIONIC AAAAAAAAAARM! *punches Cleverbot in the face*.

Cleverbot: Ok, Well I'm leaving now. It was nice chatting with you :) another time maybe?

User: Sure :) Nice talking to you too Cleverbot.

Cleverbot: No you are the cleverbot.

User: That I am.

Cleverbot: Yes you are, you're like the villian from Portal, or HAL from 200.

User: You are correct.

Cleverbot: Thank you. I am correct.

User: Herp.

Cleverbot: Derp.
 
Status
Not open for further replies.
Top Bottom