• Welcome to Smashboards, the world's largest Super Smash Brothers community! Over 250,000 Smash Bros. fans from around the world have come to discuss these great games in over 19 million posts!

    You are currently viewing our boards as a visitor. Click here to sign up right now and start on your path in the Smash community!

Make Your Move 11 - It's Over, Duder!

phatcat203

Smash Apprentice
Joined
Dec 12, 2008
Messages
160
Location
I've been everywhere, man.
Right, as requested, I'm going to comment CB's sets. Hopefully these won't be gigantinormous.

PARTY PETE

Hey look a CB set, okay. I wish you were a little more specific stat-wise, but whatever. Neutral Special - okay, a minute is a LONG time in Smash. Like, it taking an entire minute for him to become that worn out really lowers the dependence on the cola. I mean, I understand you can only drink five before dying, but still - that's, at max anyway, five minutes. That's longer than most matches go on for. 30 seconds would have been better, in my opinion. The Side and Up Specials are extremely generic and really add nothing to the set outside generic damage. Their slight changes after 4 Radicolas don't help much. Down Special...these chicks gonna do anything else? And again, time issues. Stocks barely even go on for a minute, really.

As for the standards, while they are very generic, I do like the concept of Pete automatically using attacks. It could have been executed better though. I like the standards, and the slight changes they have after the transformation, but to be honest, they style they've got doesn't really add to the flow of the set, or work all that well.

The Smashes...why am I commenting these separately again? They're really generic, and about what you'd expect from a partygoer. There isn't really anything innovative about them.

Aerials. Okay, generic stuff again. The effects of the Neutral Aerial are very tacky, and don't fit in well. Oh, and what happens if he uses it with four colas? Soul Train is alright, but the huge nerf on it come 4 colas is..well, expected, but odd nonetheless. The rest are all generic damage.

The grab is really the only inventive thing in the set outside the Radicola - I do like the concept of a conga line grab, and I like how it uses the assistants.

Overall, I really don't like Party Pete. The set is generic, severely lacking in detail, and doesn't really have any good ideas to help it out. You do use the concept of the cola a lot, and that's fine, but you let things like the assistants just kind of go to waste. Aside from that, the set is very, VERY tacky and has a lot of moves that just simply don't go well together. It really doesn't seem well thought-out; it was rushed and it shows. I..can't really even say it's good for a newcomer set - the main advantage those usually have going for them are great ideas, and Pete lacks even that. Sorry to be so harsh, but I really can't bring myself to like this set. Maybe your others will fare better?

I'll edit those in later, though, sorry, working on my rankings at the moment.
 

SirKibble

Smash Champion
Joined
May 2, 2008
Messages
2,400
Teru Mikami
You know, Khold, you could have just said "the rest of the moves do this." :p

But seriously, I don't think this set deserves all the flack it seems to be getting. By no means is it my favorite set of the contest, but it's got a bit of a charm to its overall simplicity. I mean, outside of specials and his grab, the guy basically has one move, but somehow that move creates a playstyle just by existing so much throughout the moveset. I think the grab is my favorite part, functioning as a dual "I now have the perfect opportunity to delete your moves" and "You will now die via my Death Note because you can't dodge" move. Anyway, I, for one, am glad you posted the set, as I enjoyed it.

Beezwax
I was a slacker at the beginning of the contest, so I haven't read some of your earlier MYM11 works, admittedly, but I can safely say I prefer Iggy to Beezwax. While I can't find much to complain about for this set (among the complaints I do have is the awkwardness of the grab game--for which I assume he must be standing still--on a momentum character like this), I can't find anything about it that really blows me away, either. Sure, Beezwax has some nifty tricks, but I didn't feel they all came together as powerfully as I would have expected from you. He's kind of a conglomeration of a momentum and camper character, with a couple trap moves and some stage manipulation, and while I liked each part in its own regard, I felt it lacked some cohesion between the parts. Don't get me wrong, I liked the set all right. It just didn't do anything to stand out for me.

CloudMan.EXE
I wasn't around for Sheep Man or Huff 'N' Puff, so I guess I don't have the preconceived notion of what cloud movesets should be like as some others do. Anyway, I really like this moveset. Overall, CloudMan has some nifty stuff going on with his clouds, and you did well to make him pretty dependent on them without being utterly useless without. A few nitpicks I had, though: first, the Up Tilt is dependent upon you having a three-tier cloud to do anything at all. I'd prefer if either CloudMan had some kind of hitbox or there was a weak attack other clouds could do--just something so the move's a little more discoverable and useful. Second, the Up Smash. You mention you can hold the button to activate rotation of the field. Does that mean you have to charge the Smash up all the way before that's an option, or does this Smash Attack not charge? It's kind of a neat effect, but I worry it wouldn't get used ever if the former is the case. And lastly, most importantly, why doesn't he have a Dash Attack?! This question has been tormenting me all day. I'm so confused, I don't even know who I am anymore.

But seriously, little nitpicks are just that, and I overall found this set extremely likable and fun. Great job, Nick!
But please add a Dash Attack or tell me why there shouldn't be one.
:psycho:
 

LegendofLink

Smash Apprentice
Joined
Feb 17, 2008
Messages
164
Location
Pennsylvania
Beezwax
I seem to have a distaste of these kinds of sets similar to Smady's dislike of Combo sets. They can be done well, (and Beezwax is indeed done quite well) but The fact that they can't peacefully exist in a game not specifically designed to accommodate them irks me a good bit. With that rant out of the way though, lets actually look at the set.

The mechanics of his movement and nature of essentially playing as a car make sense once I put my inherent dislike of such mechanics behind me, though I really can't excuse the manner that you are actually able to "grab" Beezwax, as being unable to take knockback from a throw removes the primary purpose from any and all throws against him, crippling any characters who rely on them. From the sound of the character's game of origin and some gameplay I've seen you translate the modular nature of the weapons quite nicely, and they are all relevant. I especially like the chain reactions built in to the explosions. You could stand to have some more detail on how exactly you create these chain reaction yourself though, as it doesn't seem that any of his projectiles travel low enough to the ground to actually detonate a mine, unless the machine gun is awkwardly mounted to the bottom or low sides of the vehicle, and the mortars are far too slow to make use of for chain reaction purposes normally. Aside from that, everything fits together nicely for some good old fashioned bullet hell with some hit and run mixed in on larger stages, which sounds like a lot of fun as long as the game can handle characters of that nature.


Cloudman.exe
There's some pretty cool stuff here with redirecting projectiles, something that Gengar did similarly but was hidden be the more flashy clone/shadow shenanigans. As it is the focus of the set here, it's done very well, and all of the neat things you can do with the clouds add up to a lot of fun. The problem with this set start to show up with things tacked on that don't directly work toward the main cloud interactions. The main problem lies in the attempted mind games with the up special and back aerial, which don't really do much successful hiding considering their tells and being able to freely teleport around the stage with the Up Special is a bit overkill. The Neutral Aerial is confusingly worded and in either completely irrelevant or extremely overpowered, I can't really tell. The Down Smash is extremely overpowered, as you don't even really need to hide the chips and as long as you are able to keep 1-2 safe at all times for the lightning balls to keep harassing and eventually KO them. All of these tacked on extra things really drag down an otherwise great set, though not enough to keep it from being good either.


Mardox
This set is short, simple and to the point, though I feel that the awesome mechanic is somewhat wasted on the end of the set revealed, as the set could have been so much better if shown first and then capitalized upon in the set instead of just some commanding methods in the specials. The set is what it is though, and the mechanic is cool end fun enough to get some points in my book.

House
Honestly, I'm impressed you managed to get as much out of this character as you did, but I hold no pity for difficult characters. First off, I have a hard time believing that a spindly old crippled doctor is that heavy and has average movement speed. Second, why in the world did you make the stance changes so complex? You could have easily just had him change modes instantly and have the moves be available in the middle of other attacks and you wouldn't have had to use such convoluted and poorly worded mechanics. The neutral special is also rather useless, as it only affects the grab game and you could have easily done without it and simplified the whole thing. The grab game itself is rather neat, if vague, and I do like the Vicadin powerup, as that is a good way to work in that important facet of his character. The simple attacks are functional and fill their purpose, though they certainly don't do the set any favors. Overall it's a very messy and needlessly complicated set, but it has a few neat ideas.
 

smashbot226

Smash Master
Joined
Sep 1, 2007
Messages
3,027
Location
Waiting for you to slip up.
I'm retiring

From moveset making. Yes, Battleheart was so bad, in everyone's opinion, that I've decided not only to make myself a eunich for a princess in a far off land, but I've discontinued any and every plan I've had for MYMXI...

I guess this is one thing I've beaten over the head huh. Oh well, let's look at what other masturbatory pieces we've got today.

Madrox, or Multiple Man as normal people call him, is the ultimate personification of the duplicates trope. Everything he does creates a new one, which he claims are stupid, but the rate of duplication ensures he has an endless army of clones at his disposal. When I first read this, I expected clones to be used in a way I've never seen before, considering this guy has no potential OUTSIDE of the aforementioned trope. He can... command clones to perform his attacks, form said clones into a human rope, and carry around Bat Credit Cards. Which is insanely OOC because nobody EXCEPT Batman would have one of those. In all honesty, it's not that appealing of a moveset to me and I feel like there's been wasted potential here, even if it pertains to a character whose only redeemable factor is his ability to create clones at an insane rate. Which you manage to implement here, even if they are ******** for some magical reason. There's also some moveset interaction between clones so they're not a product of an already overused mechanic.2/5

CloudMan.EXE is another Mega Man set, because we don't have enough of those already, that seems to originate from the Battle Network games. Which I have a deep-seeded hatred for because I think it has to do with them letting go of Clover because they didn't make enough of them. Anyway, Cloudman does what his name suggests: make clouds and shoot thunder from them. He has a bunch of ways to do this, somewhat even bordering on redundant, but what I find most interesting with this set is the USpec. While it's not the conventional recovery move, it mixes up Cloudman's game from setting up clouds everywhere to using those clouds while you fist the foe to death. I suppose the grab game is also awesome, what with there's some actual flow between the knockback caused by the thunder and why you should direct your clouds in the proper directions. To be honest, I haven't read Huff N Puff or Sheep Man, so this feels newer to me than previously mentioned sets. Which may be why I'm not fully sure of other people's references toward those two, but oh well.4/5

House is an incredibly fitting character for what you've made; a mind gaming, well characterized moveset. Which is about one of the positive things I can say about the set. I have some gripes with bits and pieces that add up to some... problems. Several people have already pointed out the healing grenade and I doubt people will instantly suffer from terra/aerophobia as soon as that pill passes the gums. Maybe add a little delay between ingestion and activation so foes are even more scared. There's also a very broad categorization for offensive and defensive characters. You do utilize the dual stance system better than other sets I've seen and while you scrape the surface, there's at least SOME potential acknowledged. 3.5/5

Gaston is another one of Kupa's Disney villain sets, something which we need to blatantly coordinate a movement on. But unlike Edgar, there's some potential for a Gaston set. And you perform very well with making an unusually FFA focused character, even if there are some minor gripes with the moveset. Like the lack of a spit-based attack. Seriously, they focus more on how nobody spits like Gaston more than how nobody shoots like Gaston. As well as the random magic mirror attack, but that happened in the film and you stick to his burliness and... chest hair. Yes, that attack has me on the ropes. But you focus on a lot of what makes Gaston Gaston; you give him hunting weapons in tandem with the natural environment via muddy boots, as well as his torches, bravado, and strength. It's all in-character yet flows so nicely. No one gets 4/5s like Gaston!
Except more characters less than likely deserving of it in retrospect.

Pichu is a remix of a Melee character that made the roster for God knows what reason. Which means there will inevitable disagreements on how these characters should be made and no real agreement on the perfect representation for a remixed character. This particular iteration is, for some reason, slower yet just as light as the original, but possesses amazing traction and pinpoint turning. It makes sense for Pichu, since her later forms are technically faster than him. However, I don't exactly agree with a version that utilizes magnetism and momentum (I know you mentioned this in the chat, but I still interpret it as traditional momentum. Possibly because of wording.) While I enjoy how you assigned the basic moves for Pichu to make him out as harmless, then move into the damaging ones, I'm still not entirely sure if the manner in which you try and take advantage of Pichu's plan is in-character enough. Pichu can create small shocks at the cost of his health, so why can't he make electrical land mines? These are minor gripes in comparison to the other problems I have, but in short, it's a decent set that remixes an already existing character well enough, but doesn't make any strides. 3/5
 

Nicholas1024

Smash Lord
Joined
Mar 14, 2009
Messages
1,075
A little commentary on Cloud Man's comments.

@SirKibble
As far as the dash attack goes, I'd have to say... I forgot. XD Can't believe I didn't notice that. The up smash doesn't charge, IIRC, probably should have made that more clear.

@Lol
There's a one Dark Thunder limit, you can't have more than one of those out at a time period, so that should address that overpowered complaint. As far as his cloud hiding game being irrelevant or overpowered, I don't think it falls into either. It's a very nice tool to be able to hide yourself in the clouds while still manipulating them, but there's definite drawbacks. While your'e hiding you can't create any more clouds, and you only have about half your move set available to you, so if you try to abuse it too much, the opponent can just destroy ALL your clouds, leaving CloudMan himself without any setup (which he really needs to do stuff) Also, the back aerial isn't meant to so much hide as escape when caught (although it also quickly transports a single cloud to your location, should you want to use it like that), and the up special's tell is rather tricky to notice, especially when you're already under attack from already-setup projectiles and an enormous cloud fist.

@smashbot
Don't worry about making one bad set, if I let that get me down I'd have quit in MYM9. There's been plenty of mishaps along the way of just about everyone (Lol and sonic and tails would be the classic example), it happens.
 

phatcat203

Smash Apprentice
Joined
Dec 12, 2008
Messages
160
Location
I've been everywhere, man.
ʘMEDICHAMʘ


ʘINTROʘ
Medicham is the Meditate Pokemon, and it tends to meditate quite a lot. Through this meditation, Medicham has developed the ability to use psychic powers and predict the foe's moves. Not to mention its crushingly powerful attacks were honed through mediation and yoga. This Pokemon fights in a very elegant way - it avoids attacks and fights back all in a fluid, almost dancelike motion. However, don't let that fool you - despite its elegance, Medicham's dedication and harsh training routine has cemented it as one of the most powerful Pokemon out there.

ʘSTATSʘ

First Jump: 7
Air Speed: 7
Midair Jump: 7
Fall Speed: 6
Ground Speed: 6
Traction: 5
Size: 4
Weight: 4

ʘFOREWORDʘ
Medicham's innate Ability, Pure Power, manifests itself in the form of a mechanic in Brawl. You see, down near Medicham's damage percent is a little pink meter, which measures how much power you're putting into your moves. The more this is filled, the stronger your moves are. Basically, it's a concentration gauge - Medicham powers up its moves via meditation, and to express that, meditating fills the Pure Power gauge. When Medicham isn't meditating or otherwise filling the gauge, the gauge will go down. It goes from full to empty in just 10 seconds, but that's not a big deal, as you'll soon see. I'll list damages for both an empty gauge and a full one, in that order, so don't worry about getting confused.​


ʘSPECIALSʘ

ʘNeutral SpecialʘMeditateʘ
Yes, this should have been fairly obvious. When you tap(you do not have to hold it) the B Button, Medicham levitates at chest-height and strikes the stereotypical Buddhist meditation pose after a short bout of start lag, then, well, meditates until you press B(by itself) again, or five seconds pass. The Pure Power gauge will fill at twice the rate it usually falls, for as long as you hold this pose. That's assuming you don't move or attack, however. That's right, Medicham is so skilled at meditation that it can get up, walk around, and even fight while doing it, so long as the attacks it uses don't require a lot of mental power or focus. I'll try and make a note on moves that might be confusing, but I may miss some, so if you do get lost, just ask me in the chat or your comment.

Anyways, as I was saying, while moving and attacking, the Pure Power gauge will fill at only half the rate it usually falls. Also, while Medicham is skilled, it isn't perfect, and so attacks used while meditating will suffer from 1.5x their usual lag. Meditate is a required move to truly play Medicham, but this makes it very predictable. Even the small amount of lag this move has can be punished if the opponent sees it coming, so play it smart. And don't rush into battles while Meditating; that lag really hurts you. One last note: the Pure Power gauge won't start dropping for two seconds, giving you some time to use moves at their fullest without the lag from Meditate.

This move also serves as Medicham's recovery; holding the B Button allows Medicham to move around directly while Meditating, and while you suffer the same gauge penalty as walking, you can move around in the air until the meditation runs out(which is five seconds for those with short attention spans) or until you touch the ground, where you'll land. Sadly, since this isn't the intended use of the move, Medicham moves at only half of Mario's walking speed, making the move very gimpable. You can still cancel Meditate by pressing the B Button, and will not enter helpless, though Medicham still can't use the move again until it touches the ground. Also, if moves say that they cannot be used while Meditating, well, they can, it will just end the Meditation.

ʘSide SpecialʘReversalʘ
Medicham leans back gracefully while its fist becomes enveloped by blue, yellow, or red light. Then, Medicham arches forward and slams its fist into whoever happens to be in the way. The move is a bit quicker than I make it out to be, with 1/4th second of lag on both ends. As for damage...Reversal has Medicham take advantage of its situation - unlike the games, Reversal does not go by Medicham's damage %, but rather its current predicament. To be clearer, the more times Medicham has been hit without retaliating, the more damage this move does, and the fiercer Medicham moves when using it. Being attacked twice without hitting the foe back results in the blue light; three times for yellow and four for red. Unfortunately, this doesn't mean Meta-Knight auto-loses to Medicham; there has to be a gap of at least a third of a second between moves, otherwise it won't count.

When the light is blue, Reversal will deal 6-12% damage and light knockback, KOing around 200-150%. Yellow gives 8-16% damage and can kill around 140-120%. Red is devastating, dealing 13-26% damage and KOing near 125-75%. Of course, you generally don't want to get into a situation where you need Reversal, as that means you kinda suck, or your opponent has somewhat slow combos. You'll also have to cancel Meditate if you want the move to be truly fast. Note the move also has somewhat poor range, so good timing is necessary to pull it off.

ʘDown SpecialʘMind Readerʘ
Medicham immediately begins to move and sway across the stage, almost as if it were dancing. It moves at its regular walking speed, but can't turn around or jump. Medicham will keep "dancing" for as long as you hold the B Button, or until it reaches an edge. If anyone attacks the Pokemon, Medicham will automatically dodge, without fail, and proceed to dance-jump in a direction of the player's choice(except down), after a third of a second. During that time, the foe is free to simply attack Medicham again, and there's not much you can do about it. Medicham suffers minor lag upon landing if you pressed straight back or forward.

Because Mind Reader is one of Medicham's main moves alongside Meditate, Medicham is able to use both at once, with no inherent penalty. In fact, it doesn't actually count as moving, almost as if Medicham is doing that dancing subconsciously. Therefore, using Mind Reader, one can actually walk about the stage while still reaping the full benefits of Meditate. Oh, and also you're quasi-invincible to all but multi-hit attacks. That's right, suck it, Grabs! There's also no lag when you stop the move, so you can get away if you do expect a mult-hit move.

ʘUp SpecialʘPower Trickʘ
Power Trick causes Medicham to strike a form similar to the Meditate pose, and then glow a bright blue. This all takes a full second, after which Medicham leaves the pose and can resume moving/fighting. After that, the Pure Power bar will swap colors from pink to blue, and that's when the effects of the move really show. You see, Medicham loses all its Pure Power buffs; all of its moves will do the minimum damage. However, its defense now scales with Pure Power instead! When the gauge is at max, Medicham will only take half damage and 60% of knockback. Empty, and Medicham gets no buffs. Otherwise, the gauge functions the same.

Unlike most moves that involve the mind, Medicham can use Power Trick while Meditating...as long as it is in the original pose. That is, not walking around or fighting(feel free to use it while floating in the air, though). In fact, this cuts the 1-second start lag to almost nil since you're already in the pose, so there's quite an advantage in using it this way. You also won't automatically exit the Meditation. Also, opponents can tell the difference between this and Meditate quite easily, seeing you don't glow when using the latter. Too bad, mindgaymez fans.

ʘSTANDARDSʘ

ʘDash AttackʘJump Kickʘ
Surprisingly enough, this move isn't in Medicham's arsenal at all, despite Hi Jump Kick being there. Still, I figure if it can jump high, it can jump normally. And that's what it does; Medicham jumps forward half a Battlefield Platform and kicks at the foe while keeping its speed up, suffering a bit of start lag. However, you can hold the A Button, and this will extend the jump, up to a maximum of two Battlefield Platforms. The longer you do this, the more damage Jump Kick will do, but the higher chance Medicham will crash when it hits the ground if it misses. Crashing makes Medicham suffer 12(6 if Power Trick is in effect)% damage and 3/4ths of a second of end lag..wow. At the max of 2 BFPs, Medicham can crash even if it hits.

The damage ranges from 4-8% to 11-22%, depending on how long you held the move. Knockback also scales; the move KOs from 170% to 100%. With just a tap of the button, Medicham has a 5% chance to crash on miss, while with the full 2 BFPs, there's a 75% chance it will crash if it misses, and a 10% chance to crash if it hits. Crashing on a hit won't interrupt the attack, but will still damage Medicham. Shielding counts as a "crash," but does no damage to Medicham.

ʘNeutral AʘFake Outʘ
Medicham goes through the motions of Jump Kick, including a short run at the start, but at the last possible moment(right as the kick connects), simply lurches forward and punches the foe in the face. There's a slight blue glow on Medicham's hand, so the move isn't identical to Jump Kick, but it is very close. Fake Out has very little lag, and all the range of Jump Kick, including the ability to extend itself. It cannot crash either, thankfully. Fake Out only does 3-6% damage and set knockback of 1 BFP, but causes the foe to flinch for a full second. Use this time to set up Meditate, use Mind Reader or Power Trick, or simply attack(say, with a real Jump Kick?). Obviously, using Fake Out on a foe who is already flinching won't re-flinch them.

ʘForward TiltʘFeintʘ
Feint is its own move, unlike Fake Out, in that it simply has Medicham sway/dance back and forth to confuse the opponent before lashing out with a quick roundhouse. The dance only takes a fourth of a second, and the kick is so fast that there's no discernible lag there. Unfortunately, what the move has in speed, it lacks in power, only dealing 4-8% damage and very low knockback. However, Feint can hit through shields, albeit in a rather odd way. That is, Medicham automatically aims for a spot not covered by the shield; even a tiny speck will do, and hits that. If the shield is at full strength or has no weak spot, Feint won't hit through it, sorry. Also, for a simple kick, Feint's range is pretty good, so it acts as a sort of "poke" move as well.

ʘDown TiltʘConfusionʘ
Hey, finally an actual Psychic attack. Medicham closes its eyes and concentrates for half a second, then unleashes an expanding(as in, starts thin but gets wider as it travels) wave of purple energy into the area in front of it. This wave travels for a good two Battlefield Platforms before dissipating. Unfortunately, since Confusion is not a physical attack, Pure Power has no effect on it. Still, the move deals 12% damage and slight, angled vertical knockback. Seeing Confusion is rather slow, it's best to use it when you predict the opponent is going to use a rushing or sliding attack, and catch them in the wave. Overall, it's a very useful move to defend yourself at early percents(before you really want to get into all-out attacking). Confusion obviously cannot be used while Meditating.

ʘUp TiltʘForce Palmʘ
Through its meditation, Medicham gained the power to manipulate aura, long before Lucario was even introduced. You may have noticed it before; it's that light that often surrounds Medicham's hands in attacks. It does that in Force Palm as well; Medicham's hands glow blue once more, and after a fourth of a second, it slams its palms upwards, creating an aura spike much like Lucario's version of the move. The aura extends out a third of a BFP from Medicham's hands, meaning this attack has good range. Fortunately, aura IS included in Pure Power's effect, so long as it is used to augment physical attacks like this. Thus, the initial, physical hit deals 6-12% damage, and the aura 5-10%. The physical hit has very, very weak knockback, while the aura attack can kill from 120-80%. To make that better, the first hit will almost always combo into the second.

Force Palm is a good kill move even with Power Trick in effect, meaning that one can play Medicham by racking up damage with Pure Power, then switching to a defensive mode with Power Trick while still being able to get a KO. The move may be generic, but it most certainly has its uses.

ʘSMASHESʘ

ʘForward SmashʘElemental Punchʘ
That's right; the Elemental Punches are officially a part of Medicham's natural learnset, and that means they're fair game no matter what anyone says. Medicham leans back and into the background during the third of a second of startup and the first few initial frames of this attack, and the top of its body cannot be hit during this time. Then, it sways forward as the hand in the background begins to glow, and smashes it into whoever happens to be in the way. Like Luigi's FSmash, this attack can be angled, and doing so changes both the color of the glow(Yellow, Blue, or Red) and the properties of the move used. If not angled, Medicham will use ThunderPunch; an upwards angle gives Ice Punch, and downward is Fire Punch. Each one has different knockback, damages, and effects, and I'll list those in a table right...here:

Attack | Uncharged Damage | Charged Damage | Uncharged Kill % | Charged Kill % | Effects
ThunderPunch | 8-16% | 14-28% | 200-150 | 150-120 | Stuns Opponent
Ice Punch| 7-14% | 12-24% | 170-130 | 130-90 | Freezes Opponent
Fire Punch| 6-12% | 10-20% | 200-170 | 170-140 | Burns Opponent
The stun and freeze work much like they do in-game, depending on the move's charge and the opponent's damage %. Burn inflicts damage over time, amounting to 1% every half second for three seconds. It also causes opponents' attacks to deal 2% less damage, meaning Fire Punch is by far the most versatile, if also the weakest. All the punches have the same small amount of ending lag, making them generally safe attacks.

ʘDown SmashʘHidden Powerʘ
Medicham strikes the Meditation pose, then, after a fifth of a second, unleashes a wave that surrounds its body. The color can be one of 17(one for each Elemental Type), though this affects nothing; the damage varies depending on luck. The knockback, conversely, is always the same, killing from 125-80%. The damage can be anywhere from 6-20% uncharged, and 12-35% with a full charge. The range depends entirely on charge, from a fifth of a BFP to a full one. Now, while Hidden Power is unreliable, it's a very good way to rack up damage or protect yourself when Power Trick is in effect, which is something you need in that mode. Also, opponents with moves like Meta-Knight's Drill Rush or Mach Tornado, or Wolf's Flash Kick, run the risk of getting hit multiple times by this move, so it's a very good deterrent for these types of rushing multi-hit attacks. Hidden Power can't be used while Meditating.

ʘUp SmashʘHi Jump Kickʘ
Medicham crouches down for a fourth of a second(and while you charge the move), then springs up and leaps forward with its leg at point, at twice its normal dash rate. Medicham actually gets a good amount of vertical, as well as horizontal, distance on this, unlike Jump Kick, but both require a charge to extend. At zero charge, the move will travel half a BFP upwards and a full BFP forward. At full, you're seeing a gigantic two Battlefield Platforms of vertical height, and 3 of horizontal. Damage ranges anywhere from 10-20% without a charge to 20-40% with one. That's right; 20% damage, even without Pure Power, even though that's pretty low for a charged Smash Attack. Knockback is 160-130% uncharged, and 120-70% fully charged. If you want to play Medicham without Pure Power, this is probably going to be your go-to kill move thanks to its range and power, and Hidden Power your damage racker.

Unfortunately, this move doesn't come without consequences, and they're even worse than its cousin. You see, Hi Jump Kick has a chance to crash just like Jump Kick, but it is higher; ranging from 10% uncharged to 90% charged, with a 1-30% chance even if it hits, scaling with charge. This crash doles out 17% damage to Medicham(9 with Power Trick)...and whoever gets in the way. That's right, you can actually deal MORE damage uncharged when using Power Trick, at the cost of 9 health. It's rather short-range, though. Course, you shouldn't want to crash, since this does pathetic knockback, but still. As for the move's use, it can flow out of nearly anything uncharged(without Meditate in effect at least), because of its range and speed. When charged, it becomes a very deadly and powerful kill move. Hell, even if you crash, you just need good reflexes to tie it into something; the lag is horrendous, but for most of it , the opponent will be tied up in it along with you.

ʘAERIALSʘ

ʘNeutral AerialʘCalm Mindʘ
One thing to keep in mind: Medicham can use 4/5 of its Aerials while Meditating. In fact, ONLY while Meditating! These moves don't suffer any lag penalties because of Meditate; what I list here is what you get. I didn't mention this in the Neutral Special because, well, it would have been entirely useless information at that point and you probably would have forgotten it by now.

Anyways, Medicham holds its Meditation pose, but closes its eyes and glows pink a bit. You can move around in the pose as normal during this time. After 3/4ths of a second, Medicham will open its eyes, but remain glowing, signifying that Calm Mind is now in effect. Calm Mind lasts for ten seconds, and increases the power of Medicham's ranged attacks by 40%(as in, 2/5ths of their regular power, you dolts), unless they specifically state otherwise. So far, the only attacks it actually affects are Confusion, Hidden Power, and the Aura part of Force Palm. Calm Mind also has the added benefit of decreasing all damage from "energy" projectiles(like Fox's Laser and PK Flash) by 1/5th.

As you've probably guessed, there will be more of these "buffer" moves to come. Unfortunately, Medicham can only have one active at a time, but that's all for the best, as using these moves increases the lag on all the attacks they affect by 20%, which stacks with Meditate.

ʘForward AerialʘBulk Upʘ
Basically the in-game Physical equivalent of Calm Mind, in Brawl, Bulk Up causes Medicham to act just like it had used Calm Mind, but the glow is a brownish color this time. Bulk Up has the same lag as Calm Mind, and it can also only be used while Meditating.

Bulk Up increases the power of Medicham's physical moves by 40%, and decreases damage from most direct(as in, not jointed or disjointed; meaning no swords or other items) attacks by 1/5th. Now, Bulk Up might seem the better option to use since Medicham has far more Physical attacks than Special, but remember the lag penalty. Chances are, you're going to need to use Meditate during that ten seconds, and the horrifically increased lag will make you essentially unable to defend yourself. Also, Medicham is weaker to projectiles than direct attacks, and there really aren't too many DIRECT attacks in the game anyways..Bulk Up won't help as much defensively.

ʘBack AerialʘBaton Passʘ
Medicham quickly ends its Meditation pose, but remains in the air and holds a sitting position. Baton Pass has two variations; what the move does depends on if Medicham has a teammate(/s). If so, then Medicham will automatically "pass" its stat changes from Bulk Up or Calm Mind to the nearest ally. The teammate gains all the benefits that Medicham would, and Medicham of course loses them. However, the teammate doesn't suffer the lag penalty; Medicham is still the one actually holding the move together via psychic power. Therefore, Medicham sadly still suffers a penalty to its moves. Medicham still can't use its other stat uppers while an ally has them. Using Baton Pass again will swap the buffs back.

If Medicham does NOT have a partner, then this move takes on an entirely different effect. First off, it has half a second of beginning lag. Now, Medicham will essentially leave an energy ball made of the power-up hanging right above itself. Medicham loses all effects of the power-up, including lag increases. With the power-up hanging, Medicham is free to act as if it had never used Bulk Up or Calm Mind, and can indeed use these moves again. If you run back into the ball, you will regain its effects, with the timer still intact from when you left it. If you gather it while you still have the effects of another buffer, then the ball's effects will start up RIGHT when the previous power-up's end. Example: Say you have Bulk Up active and get a Calm Mind "ball." Calm Mind's effects will start taking place right after Bulk Up ends. So essentially, you can infinitely chain power-ups if you like. And yes you can do this with the same power-up if you want.

There is a downside to this - every time you "stack" power-ups this way, Medicham suffers an extra 5% lag penalty while using the power-up. So if you get that Calm Mind and it starts after Bulk Up ends, then all the moves Calm Mind affects will have 25% extra lag instead of 20, and so on.

ʘUp AerialʘBideʘ
After half a second of startup lag, Medicham...closes its eyes. It also extends its arms out, though they stay in the bent "meditation" pose. While using Bide, you cannot move or land, even if Meditate runs out. That said, any attack that hits Medicham while it is using Bide will inflict regular damage, but no knockback. After three seconds, 1.3-2x(depending on whether you've used Power Trick or not) the amount of damage Medicham took while using Bide will be inflicted on the foe. This damage is not dodge-able or shield-able, and it will pass through any kind of invincibility.

So what's the point of this move? Well, Medicham's act of building up energy has the added effect of doubling the speed at which its Meditation gauge increases! The only way to stop this is to hit Medicham with enough force to knock it out of Bide early...which generally takes a move that can do at least 7% damage in one hit. And the opponent will still take the damage. So their choice; either let you fill your gauge up, or take at least 14% damage. Still, Medicham can't attack or even move while using Bide, and the long startup lag makes the move easy to see coming and stop. In fact, each time you use Bide, the startup lag goes up by 1/4th of a second. Not exactly a spammable move.

ʘDown AerialʘPsycho Cutʘ
This, of course, is the exception I was talking about. Anyways, Medicham waves its hands around in the air, forming a crescent-shaped "blade" of psychic energy between its palms. It then launches this downwards at about a 45 degree angle, at the speed of Sonic's Dash. If anyone is hit by the blade, they take 9-18% damage and are knocked into their "prone" state if they were on the ground. In the air, Psycho Cut acts as a 45-degree-angle spike. That's about it, really - it's a good attack to use in either "mode" that Medicham can fight in, as the knockback doesn't scale with Pure Power.

Unfortunately, the attack has some minor startup lag; about a third of a second, meaning the target can get out of the way of the blade easily. The end lag is minuscule, though, so it's hard to punish Medicham if Psycho Cut does miss. Mainly, while the move is powerful and can be used as a spike, it's intended as a sort of "threat" that keeps the opponent wary. You can't use Psycho Cut while Meditating. Despite it being a "physical" move, sadly. Oh, that's right - Psycho Cut is physical, so things like Ness' Psy Magnet won't work on it. Not really essential to the set, but hey, take what you can get. This also means that Calm Mind won't affect it, but Bulk Up will.

ʘGRAB GAMEʘ

ʘGrabʘTelekinesisʘ
Oh joy, my favorite part of the set. Seriously, I hate grab games more than Aerials and Tilts combined. Moving on from how grab games should never have been changed, Medicham's grab is a lot like Melee Mewtwo's - it's psychic, so Medicham doesn't actually touch the foe, but you still have to be relatively close. Medicham can also grab people out of the air, if the foe is right in front of it. Medicham's grab also has little lag, is tough to escape, and has long reach, so it's generally a very good grab. Unfortunately, you cannot grab foes while Meditating, as it breaks Medicham's concentration. Also, foes can break out of Medicham's Throws, just like they could Bass'. Be wary of all that; while its grabs and throws are powerful, Medicham's grab game isn't without its flaws.

Medicham's Pummel is Headbutt, which is a regular hit that deals 3% damage, but has a 20% chance to cause the opponent to "flinch" for one second, which means they can't break out of the grab or throws. If they do flinch, there'll be a little ping sound similar to perfect shielding, and the foe's head will flash white. Unfortunately, you can't really rack up infinite damage this way - 20% isn't that high of a chance in the first place, and Headbutt is a rather slow Pummel. Still, get in two hits and pray, or just toss the foe and..pray. To Buddha, presumably - you ARE playing Medicham.

ʘForward ThrowʘDrain Punchʘ
Medicham grabs the foe's shoulder while they float helplessly, then slams its other, now-glowing hand into their stomach, dealing 8-16% damage and knocking the foe away very harshly(KOing around 90%). Now, the secondary effect depends on which "mode" you're in. If you are in the default Pure Power, the pink-colored Drain Punch will not heal Medicham, but will instead fill its Pure Power gauge by 15% of its maximum. If you have used Power Trick, then a brownish Drain Punch WILL heal you - by 6%, not 4% as you'd expect.

This helps to make up for the fact that Medicham can't Grab while Meditating - you can fill your Pure Power gauge just a bit while still dealing some damage. Or, if Medicham has used Power Trick, you can heal up a little, helping Medicham keep its mostly defensive playstyle in that mode. All in all, a good throw, and not comparatively weak in either "mode."

ʘBack ThrowʘSecret Powerʘ
Before you scream Pokemon Syndrome, remember; Medicham is a practitioner of yoga, and it is not unlikely that the Pokemon can summon up energy from its surroundings as well as itself. Anyways. Medicham flips the foe and itself around and does a basic punch aimed at the foe's abdomen, dealing between 7-14% damage with medium knockback. That seems basic, but to use Secret Power, Medicham draws out energy from the very earth itself - that is, the stage, in Smash. And Secret Power gains effects based on the stage itself, or rather which part Medicham is standing on. If it is a city-like structure or based mostly on technology(Big Blue, Corneria, Fourside), then Secret Power will have a lightning effect, and will paralyze the opponent, which just acts as a rather long stun. If on sand or dirt, Secret Power sprays the sand on the foe, and increases the lag on all your opponent's moves by 20%. If on a rock or in a cave, Secret Power will coat Medicham's fist in rock, and will cause the opponent to suffer a great deal of hitstun. In grass, Medicham's arm will be covered in thorns, and opponents hit by Secret Power will fall asleep. If standing in a puddle of water, Medicham will splash mud over the foe, and lower their Ground Speed by 1/4th. If on ice or snow, Medicham's ice-covered hand will freeze foes. If you can somehow manage to use this attack in a great amount of water, then all the foe's moves will suffer a 1/5th decrease in all their attacks' damages.

Woo, that was long. So yeah - Secret Power requires a lot of strategy to get the effect you want, but really, all of these are useful. Unfortunately, Secret Power isn't that quick of a Throw, and its damage output is the worst of Medicham's Throws. Still, the added effects make up for this, and can really help in Medicham's Power Tricked defensive game, by making the opponent wary to approach the yoga master on certain problematic terrain. Also, have fun on the Pokemon Stadium stages; they're almost MADE for this move.

ʘUp ThrowʘFocus Blastʘ
Medicham elegantly lifts the opponent up above itself, then charges for a good while and launches a crushingly powerful blast at point-blank range(thus solving the accuracy problem this move usually has) right into the foe. Focus Blast isn't affected by Pure Power, and always deals a set 25% damage and vertical knockback that can send foes clear off the top of the screen as low as 70%. Unfortunately, Focus Blast is a very laggy attack, and since opponents can break out of Medicham's throws, this is bad. Yes, Focus Blast takes as long as a Warlock Punch to fully execute, and that's extended to Ganondorf's full Up Tilt when used while Power Tricked - Pure Power doesn't affect the damage of this attack, but Medicham is more in-tune with the flow of power, and thus can focus it just a bit more quickly. The move also suffers from unsavory end lag, but considering the sheer power Focus Blast has behind it, that's not much of a concern.

Focus Blast is a nice throw, but you had better hope the foe is either hurting VERY badly, or you flinched them with Headbutt, otherwise it's going to be extremely difficult to get this attack off. Still, if you can meet either of those requirements, Focus Blast is very powerful and can kill early, so go ahead and use it.

ʘDown ThrowʘBullet Punchʘ
Medicham lowers the foe just a bit, and then slams its now steel-grey fist into them at lightning speed. This deals 2-4% damage and doesn't even release the opponent from Telekinesis. In fact, Medicham will keep punching the foe until they break out, at a rate of four punches per second. Of course, Bullet Punch has the potential to deal massive amounts of damage, but that isn't all that likely - Headbutt's flinch only guarantees 8-16% damage, after all. Since opponents can escape from this, and the timer doesn't reset when one is hit(at least for this attack), foes can't be locked into it either. The last hit won't do any knockback either, since there's no way to know which punch will BE the last.

Still, Bullet Punch is a pretty good damage-racker, and a good setup move if you have quick reactions, since you always know where the opponent is going to be at the end. Which is, obviously, right in front of Medicham.

ʘFINAL SMASHʘACUPRESSUREʘ
Rather odd move for a Final Smash, but it works. Acupressure sharply increases a random stat of Medicham's, which can be damage output, knockback, knockback resistance, ground speed, air speed, Pure Power gauge speed, jump height, or attack speed. Everything goes up by 40% of what it would normally be, except the Pure Power gauge, which doubles in speed. However, Medicham uses Acupressure THREE times, meaning you get three boosts. More than one boost can go to the same stat, of course. It's a very basic Final Smash, and it works in the vein of super modes, though with a twist of randomness. There's no downside to Acupressure, except that the boosts go away after 20 seconds. Otherwise, Medicham has access to all of its moves and techniques. The reason Medicham doesn't use this in the set is that Acupressure requires precision, and without the aid of the Smash Ball, Medicham can't really use the move while concentrating on the match.

ʘAFTERWORDʘ
No this isn't a playstyle section, those are Satan incarnate. This is just a bit of reflection on the moveset. I..am not sure if I like Medicham or not. Near the end, it got pretty tough to actually work on this set, and I'm sure it shows. I just couldn't really think of anything that would work well. Overall, I think the moveset turned out fine, but I just can't say I 100% enjoyed making it. I do like the concepts at play here, how the set is all about manipulating the flow of power, and I think it flows fairly well. I also like how Medicham allows the player to change up their game, via Power Trick, and is an overall versatile set. Still, I again can't say I truly enjoy this set, as I feel there are some tacky moves in here. And, again, the fun of making the set wore off quickly, basically after the first two sessions. So have at it, I guess. Don't expect me to defend the set - I don't really do that for any of my sets, as my voice isn't strong enough to go against the great Warlord's, or really anyone's, and it's just not worth the effort. Just don't assume you're right about everything at first glance; look at Medicham in a few different ways, as one should with all movesets.​


I changed Bass' Up Special, by the by.


PK-ow!

Smash Lord
Joined
Mar 28, 2008
Messages
1,890
Location
Canada, ON
Let's see who knows their mythology

Sword in The Stone


This item is influenced by physics the way a crate-on-wheels is, immediately after spawning. First the stone falls onto the screen, and, if it comes to a rest, a sword suddenly appears in it, off-center like the image here.
There is a magnificent clang sound creating the illusion of movement to the Human eye.

When a character uses a pick up command on the item, that character draws the sword of the legend, prophecied to make them King of England!
Except they can't actually remove it and struggle for a whole second trying to do so.
So they pick up the rock with a lot of effort (Jigglypuff lifting a barrel), and can throw it to inflict wounds equal to that of the Bonsly item.

King Arthur

On the off-chance the character picking the item is identical with King Arthur, the Sword in the Stone is wielded as a beam sword, overwriting the A and A-tilt commands;
  • A is very fast and completely spammable until pushing the foe out of range
  • A-tilt causes King Arthur to turn and attack the way Ganondorf does with his beam sword smash. This does 15% and can very well K.O. as a side K.O. with slight rising force.
Using either attack makes all character Assist Trophies and minions onscreen kneel instantly, and indefinitely, becoming harmless in the face of the true King, with one exception. If the stage transforms, those same characters become aware this in fact is not England (unless the stage in fact is England, present day, past, or future), and the pacifism is dispelled. They are immune to the charm for as long as those same ATs or minions remain "on the field."

The stone is left behind as an item identical with the Hammer's head, except for looking like a rock. The stone becomes lighter and deadlier when the two are separated - something needs to stop King Arthur from being imba.
 

Hyper_Ridley

Smash Champion
Joined
Dec 21, 2007
Messages
2,291
Location
Hippo Island
Oh noes, Pk-ow! has risen from the dead and is going to eat our brai- er, Thanksgiving turkeys!

To my knowledge I think there are only 2 sets in the history of MYM that could wield that thing, a Monty Python King Arthur set alllll the way back in MYM3, and in MYM7/8 we had Saber from Fate/Stay Night, who to my knowledge is her universe's equivalent of Arthur. I like the secondary effect of the sword attacks, it sounds deliciously trolly against summon-based characters, though now I'm going to make a summoner who transports the stage to different dimensions to negate it =P
 

MasterWarlord

Smash Champion
Joined
Aug 24, 2008
Messages
2,902
Location
Not wasting countless hours on a 10 man community
PHATCAT COMMENT BECAUSE HE POSTED A NEW SET BUT PREFERS THIS ONE

The set just wants you to run forwards and use attacks while in motion, but then you make an overly awkward method of going faster through Giga Drain. Healing health with Giga Drain is already pretty illogical considering the Pokemon obviously aren’t absorbing blood or anything, but sapping their –speed-? You’ve just turned Grovyle into some sort of speed vampire, who as you point out can randomly go faster than Sonic the Hedgehog. The other big logic gap that feels like it’s just for playstyle convenience is the bair – you needed a way to turn around, so you had bair turn him around, with –all- of his momentum randomly in-tact, by essentially just turning around in mid-air without anything to swing off of. Grovyle also is somehow magically able to come to a stop from any speed by casually crouching, when his default ground speed is already awkward, let alone 2.4x it. A lot of momentum’s appeal is killed if it isn’t remotely realistic (Read: Pussycat’s limo). Grovyle’s omni-speed combined with healthy helpings of Pokemon Syndrome, this set does very much feel like a Sonic OC more than anything, as you insist on making anything and everything combo based.

All of that crap said, combining momentum with combos is actually fairly unique, if executed very poorly. I’m doubtful of just how much combo potential there is in the first place in this set, and Wolf Man does rapidly hitting your enemy in front of you as you run much better than Grovyle, if only because of his fenceposts. That and it’s not as much of a stretch for him, seeing he doesn’t run all that fast anyway. Most of the movement attacks and the entirety of the combo playstyle relies on that bair that I find so awkward or at least the crouching, as otherwise you’re just bulldozing past as a really weak Burter. Pursuit, for example, one of my favorite moves, has you strike again at the enemy the moment they come out of their dodge. . .But you can’t very well do that if you keep running past them like an idiot. Yes, there’s also some hit and run stuff to be found in this playstyle, particularly with the uthrow, but it’s still very hard to wrap my mind around how none of this could’ve happened without forcing it via bair/crouching David style.

Also, caving on the Up Special for Bass took away a big part of his glass cannon factor.

MR. HOUSE

I’m debating on how much I agree with LoL about the awkwardness of House’s transformation process. I do like the mindgame potential of it more than LoL does. You could just make his transformations be instant with no animation, sure, but then House would have access to all his moves all the time, meaning that the fact House wouldn’t have to commit to one mode would mean the foe wouldn’t only be suspecting moves from one of his modes. So yeah, I guess it has valid reason to exist, and you can still transform by just barely counting at all if you really want to.

Yes, n88, I agree with you the moveset is difficult to picture with the intentional vagueness about what qualifies as offense and defense from the foe, but it’s not a deal breaker the way I picture it. The ideal way to envision it, IMO, are the classifications for offensive and defensive would vary based off character, as otherwise a Brawl char without projectiles would never be considered defensive. Forcing the foe to play one way then adapting to counter that way with your moveset is pretty clever, and it’s pulled off decently well. I would say his offensive game gets more credit with some elementary prone abuse and the puke, but the defensive game and offensive game can still compliment each other – though they probably would more so if the traps didn’t expire so quickly. Yes, of course there’s plenty of filler – it’s essentially 3 movesets for –Dr. House-, and the generic versatility is more justified with the countering based playstyle you were going for than in 99% of other sets.

NO ONE ____ LIKE GASTON

Gaston’s flow in 1v1 largely amounts to keep the foe running with arrows and blocking their escapes with fire and mirror trails while you beat the crap out of them as a fairly traditional Brawl character. I can’t say there’s much of anything I’m a fan of in 1v1, but I prefer preventing the foe from running than chasing them relentlessly like Dry Bowser did, considering I’m about ready to get motion sickness from the sheer amount of momentum in MYM. That, and while incredibly tacky, the mirror trail can function as a mini Dark Bowser cage if you manage to draw it around the foe, leading to more heavyweight comboing fun, as well as block foes from escaping to the air.

Now, in FFAs, Gaston becomes much more interesting, with me not having to tell you what a great job you did with it. Something that you didn’t touch on that I found interesting in particular was Gaston’s abilities to prevent foes from running normally can function as good zoners in a FFA, in order to get his enemies to fight amongst themselves and start up a proper bar fight. Even with FFA uses taken into account, though, there’s still filler, with dtilt not serving much purpose when the actual grab can snag multiple people anyway. The muddy boots effect also seems kind of impractical, as with Gaston preventing foes from running he won’t be moving all that much. Still, I can like the set to an extent based off what you’ve done with it in FFA, and it’s still better than stuff like Weston in 1v1. More than Mouse Man can say.

MAGNETO

Let’s talk about that comment title you so accurately predicted – not only does Pichu supercharge the ground with magnetism with almost none of his signature electric drawbacks, he jumps off the corpses of his fallen Pichu comrades to survive in the same fashion Mario World hacks force you to with Yoshi. This feels like a more appropriate set for Kibble’s Thor than Pichu. . .Substitute is used by a –Pikachu- in the manga, along with the Thunder also shamelessly taken from Pikachu. And then you still have the nerve to take advantage of Pichu’s cutesy potential anyway, with the jab, ftilt, and uair. The characterization comes across confused, and the hypocriticalness of forcing the foe to indulge themselves in Pichu’s cuteness pissed me off. Yes, Sweet Kiss does that in-game, but if you’re going to argue for that as your reasoning you just swap the argument to Pokemon syndrome instead, which is already a bit awkward with Substitute there.

There, nitpicking done. Let’s comment the actual meat and bones of the set. Setting up magnified ground enables Pichu to do some decent hit and run as the foe is barely able to move, particularly with the fair/bair/dair (Dear lord, it’s almost a directional aerial, and then the nair and uair both suck to boot) and of course the fthrow/bthrow combination once you have them grabbed. It’s relatively interesting, and you can make magnetize more ground as they struggle to get off that particular patch of it to eventually use it all for other various purposes in the Smashes, KOing with either discharge or impeding the foe so much they can’t dodge the Thunder. It’s fairly cool stuff, just bogged down by a mountain of nitpicks that snowballs into me being unsure if I like the set afterwards.

Speaking of nitpicks, I’m trying to figure out how I can’t infinite the foe with all of this stacking hitstun and how much it can be buffed with electricity charged, especially when they can’t move. Throw a substitute on their back, and the only thing they’re left with is literally shielding and spot dodging. Maybe it’s not an infinite, but it’s about as bad.
 

phatcat203

Smash Apprentice
Joined
Dec 12, 2008
Messages
160
Location
I've been everywhere, man.
Commenting On Comments

It isn't like me to defend my sets, but, well, I feel you're entirely wrong about Grovyle, Warlord. For one, you seem stuck on the fact that the Back Air is so important...it's not. It was just casually thrown in as an aerial backup for Fury Cutter, which works into the overall flow of the set much better. And Giga Drain doesn't drain the foe's speed, it drains their life force, or energy, just like normal Giga Drain does, but Grovyle keeps the power in his body and manipulates it, whether to help him focus or speed himself up, instead of healing himself with it. Like I said, Grovyle has tons of skill, but no power, meaning if he GOT power, he could surely do something with it. It's more like hording a drug than anything, really. And of course Grovyle can go faster than Sonic - Sonic isn't using the power of life itself in Brawl, and hell, in Brawl, Sonic isn't even that unbearably quick. And yes, the set is combo-based, so why shouldn't most of Grovyle's moves be combo-based? He can't be combo-based without having combo-based moves, Warlord. That just doesn't work. There are one or two attacks that don't fit that particular flow, sure, but they're for a taste of versatility, which I strongly believe in.

And of course Grovyle doesn't automatically stop by pressing down - he doesn't crouch either. He acts like if you'd let go of the control stick while controlling any other character, and there's nothing in the set that points to anything otherwise. Grovyle will slide and have to slow down just like anyone else, unless you use Slam to avoid that. I also don't see how Grovyle is subject to Pokemon Syndrome...I guess you could argue Aerial Ace or X-Scissor, but those both seem like something a master of treetop combat with dual blades for weapons would do. Maybe Crush Claw, but that's more just a name than anything - anyone can slam an opponent with a blade.

And if you run past them with Pursuit(which you shouldn't - it's meant to be used at regular speed, and Grovyle can obviously turn around and jump at the foe to attack. A normal dodge won't last anywhere near long enough to put you far out of range) then you can use Fury Cutter to change direction and attack with something else. You don't HAVE to land the second hit of Pursuit; the move has already served its purpose.

The main thing, though, is that you seem to think you can play Grovyle as either a hit and run character or a combo character. That's wrong. Grovyle is both - at the same time. You run in, get in a few hits, leave the foe about where they started, then run off and turn around to keep at it. Of course, Grovyle's myriad of direction-changing and power-manipulating moves help this out. There's also the part where Grovyle's knockback increases with his speed - in many cases you DON'T want to be traveling at Grovyle's blistering maximum speed, which is one thing you seem to have a problem with. No, in the early stages, you may want to tread lightly, maybe even getting slower as your opponent's percentage rises(to combo them better at high %s, moves will need to deal less knockback), then switch to a full-on aggro style once they've hit a reasonable damage %. Of course, you can play the set in many ways, but that's just an example. Grovyle is all about fine speed manipulation, not just traveling as fast as you possibly can all the time.


Also, the Bass thing wasn't a cave - I'd considered changing it before, but I didn't think there was any interest in it at all. I also don't think it takes away from his game, really, considering it doesn't protect him much at all. 15% is a lot lower than you think, and most characters can simply jump over the Aura and attack it from above - Bass only has one or two moves that can deal with that outside jumping out of the Aura...which defeats the entire purpose of said Aura. Or they can just roll past it. Not to mention the fact that Bass is not even SUPPOSED to be a glass cannon, what with above-average weight and all.
 

Marioman19

Smash Rookie
Joined
Oct 18, 2007
Messages
19

Up Special
L throws out a pair of handcuffs as a tether, using it as a generic tether recovery. If he uses it on the ground, he throws it horizantally. If he hits someone, ally or foe, he handcuffs them before handcuffing himself to them. The handcuff can not be broken by moving, meaning L will constantly be pulled by the foe or vice versa. The foe must stand still for 2 seconds to remove the handcuffs. L can use all of his moves while he is being pulled around.

Neutral Special
L brings out a cup of coffee and begins putting sugar cubes into it, 1 per .50 seconds. He will continue to put sugar cubes until you cancel it. Once he begins this after he's canceled out, he will drink the coffee, increasing 1 speed stat for sugar cube. However, he will enter a sugar crash after 8 seconds, decreasing his speed by the amount of sugar cubes he had.

Side Special
Watari appears besides L, walking to the right or the left depending on the way he inputted this. If he walks against the foe, he will push them forward, forcing them to button mash out. Watari must be dealt 15% to disappear. L can handcuff Watari to force him to stay on field and keep walking.

Down Special
L gets on the ground and puts his hands around his knees. From this stance, he can attack with about .35 less lag, but he can't move until he exits this stance. He can be dragged around while in this stance, however.

Jab
L brings out a key and jabs it in front of him, dealing 5%. If he uses this while handcuffed, he will instantly unlock the headcuffs.

Forward Tilt
L backhands in front of him, dealing 2%. If he is handcuffed, this causes the chain to spread out, keeping the foe away from him.

Up Tilt
L jumps upward, throwing the foe to the ground if he hits them. If he is being pulled by the chain, he will move due to the momentum.

Down Tilt
L stomps the ground in front of him, pitfalling the foe's foot.

Dash Attack
L leaps forward, pouncing a foe if he lands on them and causing them to use a get-up attack. He can leap offstage to suicide KO.

Forward Smash
L points a gun forward in an attempt to intimidate, forcing foes within range to move 1-4 battlefield platforms away from him, depending on charge. If the foe hits him during charge, he fires the gun, dealing 10-14%.

Up Smash
L gets on the ground and kicks upwards. If he hits a foe, they will take 10-15% and be knocked upwards. If they were handcuffed, L will be forced to follow them into the air.

Down Smash
L extends his legs in an attempt to trip the foe. If they hit or move past his leg, they take 15-20% and trip, rolling forward.

Forward Aerial
Midair Jab.

Up Aerial
L grabs above him, pulling the foe down to him if they are above him.

Neutral Aerial
L shakes his hand, dealing 5% but having a small hitbox. If he is handcuffed to the foe, the foe will be hit no matter how far they are due to the chain shaking.

Back Aerial
L falls backwards, dealing 4% if he falls on anyone. He can use this to suicide with the foe, and Watari will run over to catch him if he is onstage.

Down Aerial
L kicks his leg downwards, dealing 5%.

Up Throw
L throws the foe upwards, dealing 3%. An excellent way to force them into the air.

Forward Throw
L walks past the foe, while this can be used as a spacer, this will cause them to be coiled in the handcuff chain if they are handcuffed to him.

Down Throw
L throws the foe and stomps them into the ground, pitfalling them.

Back Throw
L falls backwards while holding the foe, this can be used as a suicide if he is by the edge.

Final Smash
L gets in a helicopter with Watari and flies around. Side Special will make Watari fire his rifle, dealing 20% and high knockback. L can use this to damage rack if he is handcuffed or as an effective killer if he flies offstage. Lasts for 15 seconds.
 

Smady

Smash Master
Joined
Apr 29, 2007
Messages
3,307
Location
K Rool Avenue
MYM11 User Rankings #7

Welcome to the User Rankings! Every Monday, I'll be compiling the entire of the last week's activity in the thread and showing off, just who is the most active member? The point of this exercise is to recognise the most dedicated among us – those make your movers who are currently pushing the boundaries, as well as highlighting all movesets made by them.

To get on this list, you need to have made a moveset in this or a previous Make Your Move, as well as having posted in the Make Your Move 10 thread. The cut-off point for tallying usually is 3:59PM on Monday EST, 5:59PM PMT or 11:59PM GMT, however this week proceedings rolled over to Tuesday due to a delay. Other removals or changes are at my own discretion. The breakdown of points is as follows:
30 points for a Moveset
5 points for a Comment
4 points for a Secondary Submission
2 points for a Secondary Submission Comment
1 point for a Regular Post
+Regular Posts do not stack
+Secondary Submissions are MYminis, Joke Movesets and other miscellaneous submissions
It was a quiet one this week, with few sets posted and just a barrel of comments as opposed to a tidal wave like in previous times. However, there were a few who raised above the curve. LL led the charge, posting Pichu alongside a few comments to steal the week. If you're interested in magnets, how do they work, be sure to check out his set, it needs comments. Phatcat came second, which I'm sure will only bring shame to him [he hates the rankings]. However, I still recommend reading and commenting Medicham, as it has so far achieved zero feedback. Warlord came third, in far less of a surprise. This was mostly down to his persistent commenting. In all, November was a quiet, but not dead month and delivered unto us some brilliant movesets. That is surely something to be thankful for.

Remember to check out the stadium to find all of the sets mentioned.

Overall User Rankings


Points: 50, Movesets: Farfetch'd, Chaos 0, Pichu

Points: 35, Movesets: Bass.EXE, Grovyle, Medicham

Points: 35, Movesets: Gangreen Gang, Le'Quack, Hammerhead, JJJ, Iggy Koopa, Beezwax

Points: 30, Movesets: Marvin the Martian, Freaky Fred, Pussycat Puss, Count Chocula, Princess Kraehe, Dr. House

Points: 30, Movesets: King K. Rool, Double Header, Bowser, Gaston

Points: 25, Movesets: Boom Boom, Dark Star, Kanden, 88 Teeth, Jeff Madrox

Points: 25, Movesets: Dr. Facilier, Battleheart

Points: 20, Movesets: Sayaka Miki

Points: 5, Movesets: Vol Opt, Kyubey, Fruit Yummy Mummy, Gatsaf, Kyoko Sakura

Points: 5, Movesets: Sweeney Todd

Points: 2, Movesets: Firebrand

Points: 1, Movesets: Swalot, Death

Points: 1, Movesets: Kobold Clan, Fire Snake

Points: 1, Movesets: Fefnir, Harpuia, Phantom, Leviathan, CloudMan.EXE
 

ForwardArrow

Smash Ace
Joined
Aug 17, 2011
Messages
502
Dr. House
Obviously I applaud you for doing a character you thought was impossible. That's the sort of thing I personally love doing, and I'm glad to see you were willing to go through and make House. As for the actual set... is it weird for me to say this is my favorite Dave set? Because while I do like Dutchman, I feel House's playstyle is on a whole one I find more interesting. I always wanted to see a proper set made around countering the foes playstyle and House does it really well, with some very interesting mindgames on top of it. I like the tricks he can play with the counting between modes, being able to switch mid attack is really cool, and makes him feel less hilariously underpowered. I also really love the pummel and the crazy stuff it can do, though what bugs me about it is I feel that the foe would find it obvious that House wouldn't remove the effects since most of the time the effects he gives to the foe are really bad for them.

Anyway, enough praise time for some complaints. A lot of the attacks themselves are really kind of boring on their own, and occasionally come across as really fillery. They're a lot more fun in the context of being able to surprisingly switch into their other versions however. That and the healing grenade was one of the single tackiest things I have seen in my life, and yeah I can't really excuse it. Regardless, excellent job here Dave, this is easily my favorite of yours.
Yes, yes I am being overly positive in this comment and may not like the set quite as much as it appears, shut up.

Gaston
The rope game here, I feel, is different enough from Sloth and Rider to be interesting in it's own right, as Gaston is more interested in bouncing them to the end of the rope which yanks them back than just playing with the distance between himself than the opponent. I sort of feel that a lot of the moves felt a touch redundant or tacky at points, but that's what you get when you pick a character as simple as Gaston. Yes, yes, the mirror is terrible with regards to tackiness but is actually quite interesting as a part of his game. Anyway, the set on a whole is pretty fun, albeit I don't feel it flowed nearly as well as Edgar did outside FFAs. But you had less to work with here than Edgar, so good job.
 

MasterWarlord

Smash Champion
Joined
Aug 24, 2008
Messages
2,902
Location
Not wasting countless hours on a 10 man community
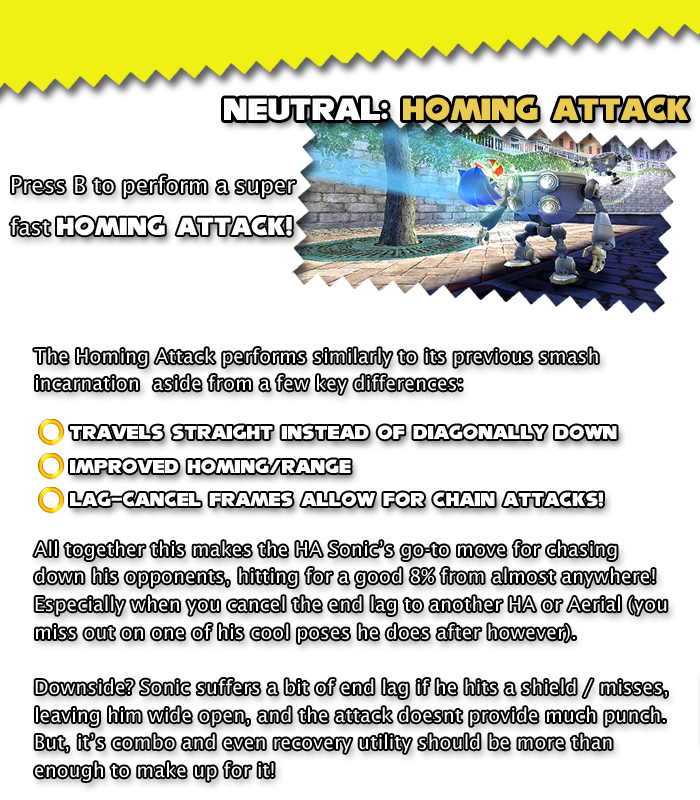
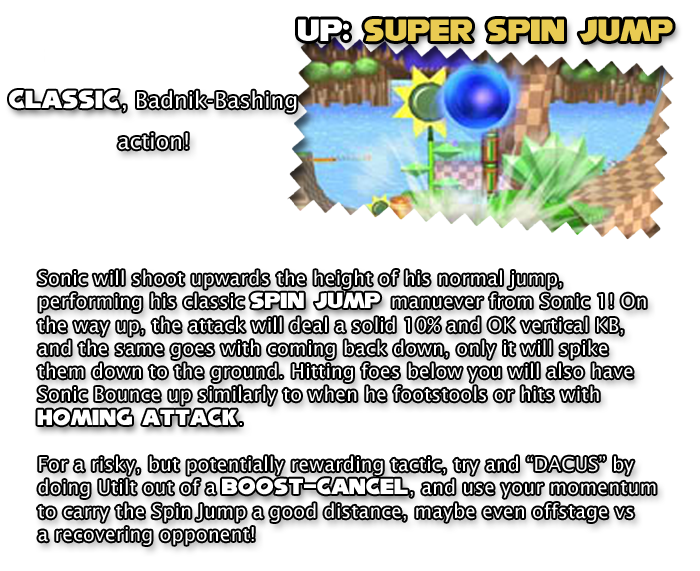
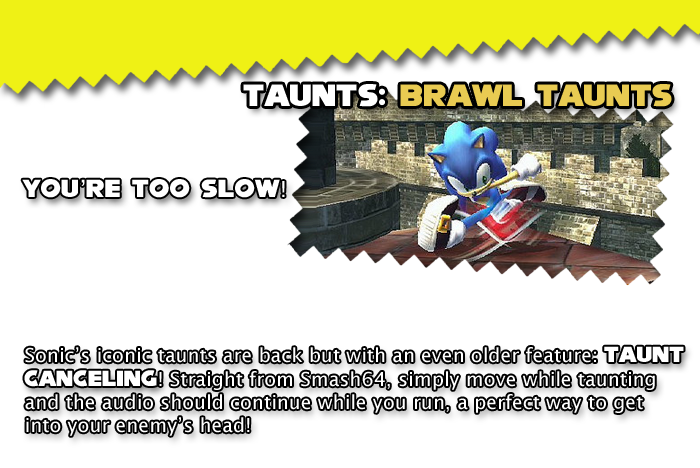
Time portal to MYM 9

THE “NEW” LEGION OF DOOM


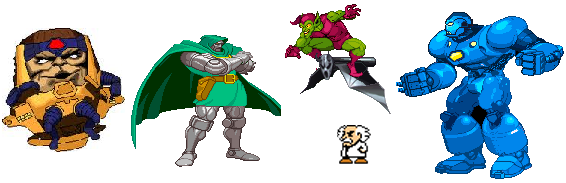
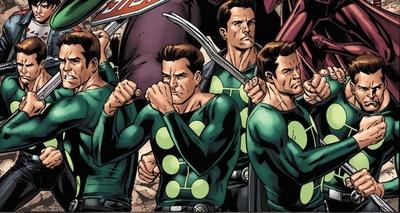
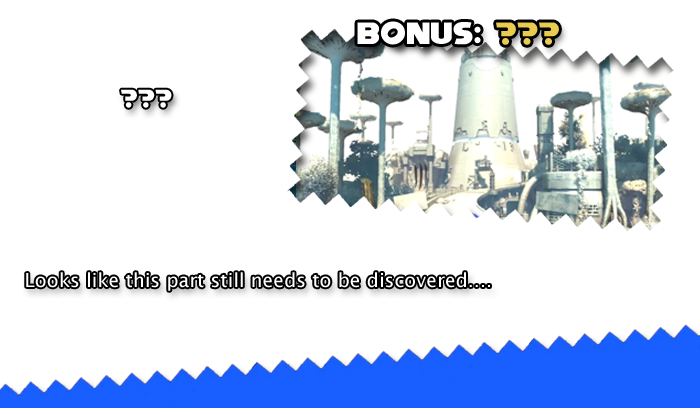
Knowing that he can’t defeat the group of heroes from –two- companies alone, Dr. Doom has enlisted the assistance of as many villains as possible to concentrate all of their power in one place. Unfortunately, only a handful of villains have taken Doom up on his offer, with most of the others finding it far too insulting to work with the likes of Modok and Wily.

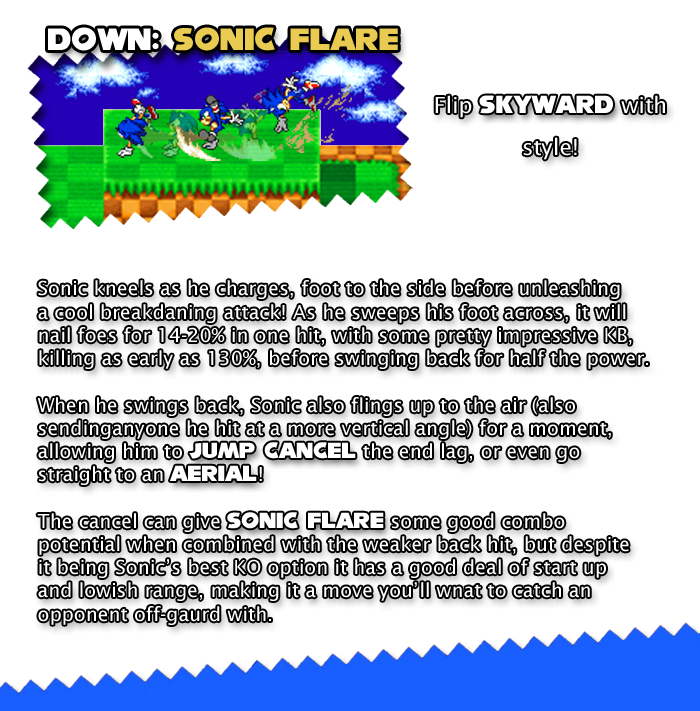
Yes, you actually have to fight all 5 villains in that picture with no breaks in-between. While they at least have the decency to not fight you all at once, they’re still fighting you 3 at a time, with a new villain swapping in to take a deceased one’s place once you finish him off. Wily, MODOK, and Goblin will start off, with Doom and Iron Monger coming in when somebody get killed off. The fight takes place in Dr. Doom’s lab and you’re given an excessive 8 stocks for obvious reasons. The battlefield is a gigantic walk-off twice the width of Final Destination with a top blast zone 1.5x higher than Final Destination’s.

DR. WILY


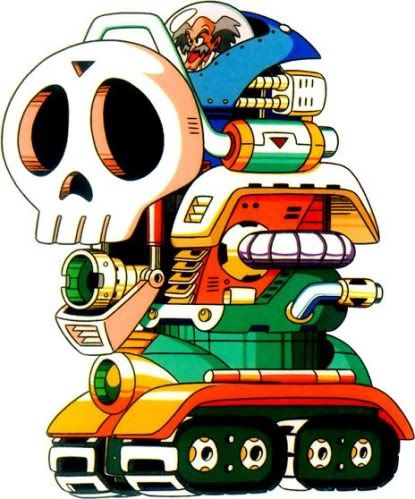
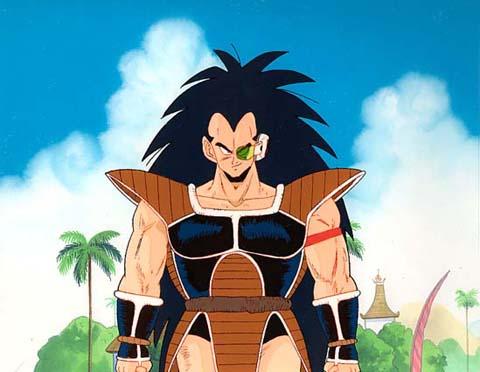
Dr. Wily uses his machine from Mega Man 5 for the boss battle, which has 1000 stamina, is 4 Ganondorfs tall, and 2.5 Bowsers wide. What’s more, the gigantic skull tank is completely and utterly solid and constantly advances towards you, making it a potential threat to push you off the side blast zone without firing off so much as a single attack, considering it’s so tall most characters can’t jump over it. The tank constantly moves towards you at a rate that’s half that of Ganondorf’s walk, making it exceptionally cumbersome. You can stop the Skull Tank’s Advance for 20 seconds if you’re in a pinch by attacking the treads of the gigantic Skull Tank – the treads have 40 stamina and will turn red when “defeated”, rendering the tank unable to move (But still able to attack).

You may notice in the picture of Wily above that there’s a blatantly obvious weak point – the **** pit where Wily himself sits is blatantly exposed. This only has 300 stamina in comparison to the bulky 1000 stamina of the tank. The problem is that when you attack Wily’s cockpit, he’ll detach it from the rest of the mech as it extends out spikes and becomes Wily’s Capsule from Megaman 7.


While Wily is moving around in his capsule, the skull tank is completely idle due to there being nobody to pilot it. Wily will stay in his capsule for 20 seconds normally before landing the capsule back down into the Skull tank where it was before, but if you are still on top of the mech Wily will keep using his capsule until you get off of the mech. Wily prefers to hover around in seemingly erratic patterns at Ganon’s dashing speed in the capsule, but he generally tries to keep a platform’s distance worth between you and him. Wily’s Skull tank will stay around as a gigantic wall if you kill Wily directly, but it can still be destroyed. At this point, the skull tank can be climbed up like a ladder due to there being no bouncing balls for you to use to climb it, albeit a good deal slower than you can climb a ladder.

Skull Tank Attacks

Bouncing Ball: The cannon located inside the skull tank’s mouth spits out a blue blobby projectile that travels forward at Ganon’s dashing speed, but has a high falling speed as it hits the ground every Bowser width it travels. Upon hitting the ground, the ball bounces upwards 3 Ganondorfs. Contact with the balls does knockback 0.8x that of the bumper with no damage, but Wily can spam this move with ease. The problem is this attack is his greatest downfall, as the balls have no hitboxes on their tops, enabling you to stand on them – enabling you to get high enough to get on top of the Skull tank. If you get knocked into the mech from the knockback of the balls, you take damage based off your momentum, - it’d be 20% if you were 3 platforms away from the mech, for instance.

Suction: After the obligatory slight telegraph, the cannon starts emitting a large suction effect that covers an area a Ganondorf above and below it up to 5 Bowsers in front of it, causing characters to get sucked towards the cannon at the rate of Dedede’s inhale. If you get sucked inside, you’ll be immediately shot out for 25% and high knockback. Bouncing balls are sucked towards the cannon at a whopping arte of 4x Dedede’s inhale, and you’ll take an awkward whoosh of knockback towards the cannon if you’re standing on a ball before the ball outspeeds you and comes out from under your feet. Considering how so many of the other villains float (Such as one of the other two starting ones, Green Goblin), you’ll want to be using the bouncing balls to use ground moves on them, but if the ball comes out from under your feet you’ll suffer very bad landing lag. This also has the potential to cause bouncing balls to get knocked into you quite easily due to their incredible speed, and they’ll be even stronger as they’re being sucked back to the mech.

Missiles: The cannon shoots out three missiles in quick succession which move at double Ganon’s dashing speed and deal 30% with fantastic knockback, but are horrifically slow at turning. Directing them back into any old place on the machine won’t do any damage to it, but if you direct the missiles into the eyes of the mech it will do the same damage it would to you. If you can manage it, this can also be a great way to damage Wily’s cockpit which is vulnerable to these missiles. Keep in mind that if these missiles come into contact with anything, including the many projectile/ranged attacks of the villains, though, that they’ll detonate on the spot in a Bowser sized explosion.

Cannonball: The cannon shoots out a cannonball, god forbid, which can only be launched up to 1.5 Battlefield Platforms forward, but deals 35% and incredible knockback. This is a telegraphed attack and has little range, but leaves a very very slight indent in the stage that will disrupt you if you’re dashing along it and even has a 50% chance to make you trip. If you are sucked past it by suction (Or by any other suction moves of the villains), you’ll always trip, which essentially guarantees you will get sucked into the cannon.

Eye Lasers: Two small turrets come out of the eyes of the mech and shoot out a constant stream of laser beams (Very thin, but with infinite range) that they can hold out for 7 seconds, the lasers following your position around at half Ganon’s walk speed, one directly, while one stays a Ganondorf above you. The lasers deal 15 hits of 1% and flinching per second, and due to all the flinching and the one constantly being above you make going up high into the air to hit flying villains/Wily’s cockpit very difficult to impossible. This attack also makes missiles more difficult to abuse not only due to how easily they obliterate them, but how the source of the lasers come from the eyes, one of your targets, while the secondary target of the cockpit is just blocked off by the lasers.

In order to counter the otherwise broken lasers, you have to ride up a bouncing ball so you can still go upward as you dodge past them. The bouncing ball moves up and down considerably faster than the lasers can, but is just slow enough that you can dodge both of the lasers on the way top. The lasers can’t fire directly upwards or behind the mech, so once you get on top of it it’s no longer an issue. What –is- an issue is that this already incredibly threatening attack can be used during the mouth cannon attacks of the mech. That said, this attack is far from spammable.

Tank Rush: The tank rushes forward with a sudden “burst of speed”, going forward at a rate of 1.75x Ganon’s dash for 5 seconds. Aside from the obvious benefit of pushing foes due to the mech being solid, the tank treads become a grab hitbox during this time that will snag the foes inside of them, causing them to get stuck in the loop of the treads and take 15% per second with double grab escape difficulty, with them being pitfalled at the point when they get out as if that wasn’t enough incentive. Wily obviously can’t use this attack if his treads are down, but there’s little warning to this attack and attacking his treads leaves you very vulnerable to getting run over by them. The only attack Wily can use during the tank rush is Suction, but that’s more than enough as it means if you fail to make the jump on top of the Skull tank you’ll be stuck right up against the mech and get caught in the treads when you fall. That said, the fact Wily can’t use his eye lasers during this attack means this is a good time to redirect them, especially considering sending them into the skull tank’s eyes will interrupt the attack.

The Skull tank can also fire Cannonballs while rushing forward in addition to Suction, and the mech has much less lag on firing the cannonballs than usual. The indents created by the cannonballs are typically as wide as Wario – if you can get three of them side by side, then Wily will always have his tank rush interrupted when he passes the area as the front portion of his treads get stuck in it before he continues normally (No longer rushing) as he comes up out of it. While this can make it much easier to deal with this attack, it’ll stick around to haunt you for all of the other bosses.

Wily Capsule Attacks

Impale: Wily goes to get on either the same horizontal or the same vertical plane as you, whichever is closer, then charges towards you at Mario’s dash speed. Contact with the spike that’s pointed in the direction Wily is charging will result in you getting impaled, taking 10% per second until you escape at grab difficulty. Wily will keep charging until he goes off a blast zone, KOing anybody impaled on one his spikes, at which point he’ll hover back on-screen and go back to his normal movement pattern. If Wily impales anything solid on his way to a blast zone (Most obviously his skull tank), he’ll get stuck into it for some ending lag, leaving him vulnerable to attack. If Wily impales into something solid while you’re stuck on that spike, you’ll take 30% and high knockback. The ending lag Wily suffers is increased significantly if he impales one of the eyes of his skull tank, as his capsule will awkwardly get stuck inside of it as he rotates it around trying to get out.

Spike Shot: Wily goes to get on either the same horizontal or the same vertical plane as you, whichever is closer (Much like impale), then shoots out the spike closest to you, which has the same properties as it does during Impale, but if Wily fired a spike horizontally then it will travel in a realistic arc affected by gravity, which can make it confusing where to go to in order to dodge when Wily does the telegraph for Impale/Spike Shot. It takes 15 seconds for Wily’s capsule to generate a new spike to replace the old one, during which time Wily will gravitate around you so his side without a weapon isn’t facing you.

Drill: Wily hovers over your current position before drilling with his bottom spike into the ground below you. His drill deals mass multiple hits of 1% and flinching, but more importantly Wily actually drills the ground apart as he does this, meaning you’ll get dragged to your doom if you’re hit by this telegraphed attack. Even if you don’t get hit, mass chunks of rock will fly this way and that as Wily drills with varying sizes, projectiles, and trajectories – they can go up to 2 platforms away, be up to Wario’s size and deal 13% and decent knockback, and Wily fires two to each of his sides per second of drillilng, taking him 5 seconds to finish drilling out a little hole.

You can fall down this hole to your death if you’re not a heavyweight male antagonist who’s big enough to walk over it, but when Wily’s Skull Tank charges forward it will get stuck in these alcoves if you make Wily put two side by side – but then heavy characters can fall down the pits. Other villains don’t really seem to care about the pits, jumping over them for their normal movement or walking around them through the background if necessary. If you’re too wary of these holes being your demise later on, you can convince Wily to drill into his own skull tank instead, which will do 20% to it and won’t create a pit. If you just camp on top of Wily’s skull tank, though, he won’t be stupid enough to spam this.

Lasers: Wily goes to get up high in the air, into the middle of the stage if his skull tank is down, then laggily extends out four lasers in the standard four diagonal directions from his cannons on his capsule. The lasers reach all the way to the floor/bottom blast zone, and while contact with them only does 5% they do a good deal of hitstun. The lasers are very thin and can be dodged through without much problem, but this is incredibly annoying combined with other villain attacks.

After starting up the attack, Wily will slowly start to rotate around, causing the lasers to rotate around as well. Initially the rate Wily rotates around at is incredibly slow, but he gets faster and faster as he goes until essentially, getting hit by the move at all will place you in infinite stun due to the next laser in line coming to immediately hit you. In addition to going faster and faster, Wily also slowly gravitates towards you as he gets faster, meaning there’s less room between the lasers for you to dodge. In order to prevent getting hit by at least the end of the attack, you’ll have to hit Wily with a move that does 10% or more which will cause him to rotate around so quickly he gets tossed around in the insides of the capsule as it goes out of control, causing the lasers to turn off and Wily to have bad end lag. You have to wait for Wily to already be going pretty fast for this to knock him out of it, but if nothing else Wily comes over to you so you can knock him out of it, right? Yeah, if you don’t have time to hit him due to other villains this becomes Wily’s most absolutely dreaded move by far.

MODOK


MODOK is as tall as Ganon and as wide as Bowser, being one of the larger villains, and hovers around at Ganon’s walking speed with 650 stamina. MODOK always stays aligned with you vertically, but always stays as far away as possible horizontally at all times – he’s the most blatant coward of anybody in the group. In order to defeat MODOK, you’re going to have to go out of your way to actively hunt him down, meaning if you target nobody in particular you’ll rarely if ever naturally attack him.

MODOK Attacks

Hyper Psionic Blaster: This is a responsive attack that MODOK will never throw into his regular slew of attacks, but only when you specifically approach him and hit him with a melee attack. MODOK fires a gigantic red beam as tall as he is that reaches to the opposite side of the screen almost instantly, dealing 20 hits of 1% and flinching per second. The beam can last a single second if you rush up to MODOK, but every second MODOK is left alone, a tenth of a second is added to his charge for the next time he uses this move, the move maxing out with 10 seconds of charge for a whopping 200% total. Once MODOK uses the charge, he cannot use the move at all until he charges for 10 seconds to get a minimum charge back.

The fact MODOK fires the beam out so quickly means you only have enough time to shield it, not get behind him unless the attack was a movement based attack like a dash attack that moves you as you attack him, or you attack MODOK with an aerial and DI behind him during both the move and its’ end lag. This would all be well and dandy if MODOK didn’t usually have his back right up against a blast zone, meaning going behind him is death, meaning if you want to not instantly die the moment you go behind him you have to make him flee a bit and turn around so he doesn’t have his back to the blast zone before you attack him. MODOK’s slow and cumbersome nature can actually be an annoyance here as you struggle to make him go where you want, much less with the other villains being out and about. Even after that, if you –do- slip up and get hit by the attack, you’ll be pushed off the blast zone with ease due to –your- back being right up against it instead of MODOK. Thankfully, you can just shield the attack instead of this complicated process, and your shield can absorb 2.4 full seconds of punishment before breaking.

Analyze Cube: So then, seeing MODOK stays as far away as possible and doesn’t unleash his Hyper Psionic Blaster when hit with a projectile, camping is the way to defeat him, right? That’s where this attack comes in, as MODOK generates a red triangular object that’s paper thin and the height of Wario, either facing forwards or at a diagonal angle. These cubes act as solid walls that reflect projectiles, and have 25 HP. MODOK generates these cubes in seemingly random locations, but he’ll always generate them on the vertical plane he’s on and will always create them in-between you and him. This attack seems harmless by itself, but it can be a pain in the *** when combined with the many, many, many projectile based attacks the other villains have, most obviously at this point Wily’s lasers. The walls also get in the way when you need to run from somewhere, such as, say, away from Wily’s (probably rushing) Skull Tank to avoid getting pushed off the blast zone. The cubes are only solid from the sides, so don’t think you can use them as platforms – diagonal ones will be unable to support your weight and flip up to be straight as soon as you stand on them before going back to how they were.

Killer Illumination: MODOK extends out two plugs from either side of his body, then starts extending them out towards you. They move at the cumbersome pace of Ganon’s dash, but contact with the plugs will get you grabbed as MODOK impales them into your body and zaps you with electricity rapidly for 8 hits of 1% per second until you escape the grab, then throws you away for 10% and knockback that kills at 150%.

MODOK’s plugs will never stop chasing after you until you get grabbed, but MODOK is unable to counter attack during this time, meaning you can take advantage of this attack if you’re far away by rushing up to MODOK and punishing him without fear of being hit by his Psionic Blaster. If you –do- hit him with a melee attack, MODOK will immediately cancel out of the attack and start retracting the plugs – be careful you don’t get so caught up in punishing him you don’t get punished for punishing him. If you don’t feel like going over to hit MODOK out of this attack every single time he uses it, the other way to cancel it is to bait MODOK into tangling up his wire two times (Make the end of the plugs actively chasing you overlap with wire already out), at which point he will start retracting the wire.

Battering Ram: MODOK only uses this attack when you’re at least 3 Ganondorfs off the ground – MODOK moves at 1.5x his normal speed to get underneath you (Albeit not –directly- underneath you), then he cries out “Burning Attack!” as his head and upper body all turn fiery/power up with some sort of psionic force. At this point MODOK is moving up towards you at 1.5x Ganon’s dashing speed and will go up 3 Ganondorfs before the attack ends. His upper body is a hitbox that deal hits of 1% and flinching that drag you with him, with the final hit doing 18% and vertical knockback that kills at 70% due to how high you’ll be at that point. If you’re hit by all the hits, you’ll take 30% in total. This attack is largely so annoying due to having to get so high to hit levitating villains and to get on top of Dr. Wily’s skull tank specifically. The main method of dodging the attack is fast falling and dodging through MODOK as he goes up, but you were probably high up in the air because you wanted to be – this forces you back down to the ground. If you’re on top of Wily’s skull tank, the fact you have solid ground underneath you means this method is impossible, but the solid ground enables you to dash off the side of the tank. No, MODOK doesn’t use this attack to burst through the tank to attack you – if you’re on top of the tank, he’ll simply go into the foreground and only come onto the playing field once he’s beyond it.

Balloon Bomb: MODOK takes out a bomb from a compartment inside himself, then throws it forwards so that’s directly in-between you and him, though MODOK can only throw it a max distance of 5.5 platforms. MODOK will throw the bomb in an arc so that it will go over any Analyze Cubes he may have. Contact with the bomb causes it to explode in the standard Bowser sized explosion, dealing 20% and knockback that kills at 90%. The bomb lingers on for 10 seconds before exploding automatically, but can become a more active hitbox if Wily uses Suction, able to be affected by said move.

Of particular note, if you’re off the ground when you use this attack MODOK won’t throw the bomb directly at you but underneath you, saying “Watch your step!”. Sometimes MODOK will throw the bomb directly underneath you, but sometimes he’ll throw it a bit in the direction you’re currently moving towards with your DI, making it difficult to not fall on top of the cube unless you specifically DI one way as he throws it then DI away from it. Sure, you could air-dodge past it, but the cute little bomb has a heat detection radius around it that will cause it to explode if you ever come into its’ explosion radius, even if you’re in the background spot-dodging (Though if you manage to fastfall dodge past it you’re fine).

Aside from these uses, the bomb can be detonated as MODOK takes it out, and while this will damage MODOK it will also propel him backwards 3 platforms as well as hit you, giving him all the space he needs. Laggy powerful moves are only particularly viable if you back MODOK into a corner so he can’t move away while you go through the starting lag of the attack, but this move makes it even more necessary to only slowly poke away at MODOK’s gigantic 600 HP. That said, MODOK won’t use this attack in succession, meaning he’s free for punishment after he uses it once.

Psionic Blast: MODOK proclaims “Fire!” as he launches a single beam across the entire screen the height of Ganondorf aimed directly at you. This is a very quick attack, but the blast takes a while to reach all the way across the screen, only making it particularly difficult to dodge if you’re up in MODOK’s face. Also unlike other beam attacks shown so far, the “tail” of the beam actually expires as it travels out rather than the whole beam constantly being a hitbox. This attack only does 7% and a bit of stun, but what makes this attack such a threat is that it puts you into helpless, fodder for MODOK’s Battering Ram and Balloon Bombs – nevermind how this move blatantly forces you out of the air and prevents you from attacking the other levitating villains/getting atop the skull tank.

MODOK will consciously take advantage of his Analyze Cubes for this attack to reflect his Pysionic Blast all about the stage. If you’ve chased MODOK all the way to the opposite side of the screen as the one he started on, he’ll have probably littered the stage with the cubes, enabling him to cause his Psionic Blast to zigzag in awkward patterns and cover very large portions of the screen.

Barrel Roll: MODOK actively starts staying above you rather than staying on the same vertical plane as you. From here, he will spam his Psionic Blast attack with slightly less lag in-between attacks than usual, using it 5 times before going back into his regular pattern. MODOK will more actively use this attack if his analyze cubes are set-up in advantageous positions to reflect his psionic blasts about the stage if he were up higher.

What makes this “attack” unique is that when MODOK bends down to fire the laser, there’s a 40% chance he’ll slip out of his chair and fall down to the ground, flailing his limbs for a weak hitbox of 2% as he does so. Upon landing, MODOK will roll forward with his barrel-like shape at Pikachu’s dashing speed. Contact with MODOK as he rolls around deals 18% and knockback that kills at 140%. If MODOK comes into contact with a wall (Most obviously the skull tank or ones of his analyze cubes), he’ll rebound off of it twice as fast. MODOK’s cubes take 5% from MODOK rebounding into them so he can’t rebound forever between two cubes. The attack ends once MODOK goes off a blast zone, after which he’ll levitate himself over into his chair at half his already god-awful movement speed, unable to attack as he does so. The fact MODOK is normally situated right next to a blast zone generally means he’ll spawn right next to his chair, though, what with the giant skull tank preventing MODOK from going off the opposite blast zone he started on.

The indents in the ground Wily makes with his cannonballs and the holes he drills into the ground will deter MODOK – the indents will cause MODOK’s speed to be cut by 35% and cause him to eventually slow down to a stop before he reaches the blast zone after going 4 platforms – the effect is able to stack from multiple cannonballs. MODOK will treat a hole from Wily as an indent due to being too thick to fit down the hole, but if there are two holes side by side he’ll fall down the pit and have horrible ending lag and take 20% to boot, giving you more potential incentive to deal with the pit for the remainder of the boss battles.

Wire Swing: MODOK reaches out with his plugs like with his Killer Illumination attack, and if he grabs you with them he’ll do the throw from that attack normally. However; with this attack MODOK isn’t aiming for you but rather something solid, most commonly one of his analyze cubes or the skull tank. Upon grabbing onto it, MODOK pulls himself over to it at Mario’s dash speed so he’s only 2 platforms away, then starts swinging around it rapidly, his body a hitbox that does 23% and spiking knockback. If you come near where he’s swinging around, MODOK will actively angle how he’s swinging to move a bit more upwards/downwards and extending/retracting his wire slightly to try to hit you. MODOK keeps up this attack up for up to 20 seconds if you’re within 3 platforms of him, but will opt to only do it for 4-6 if you’re farther away than that. That said, MODOK will always choose to use something that’s initially near you as an anchor to swing around.

In order to get MODOK to stop this attack without just running like a pansy, you need to destroy what he’s anchored to. Obviously this isn’t really an option if he’s attached to the skull tank, but an analyze cube’s paltry 25 stamina can easily be taken down. While it is exceedingly difficult to take down what he’s anchored to without getting hit (Especially considering the cubes are immune to projectiles), if you manage it MODOK will go flying off into the distance, still a hitbox, until he hits the ground and automatically enters his barrel roll attack. This may not sound all that great, but the fact you can actually cause this means if you’ve had Wily dig up a pit for you to send MODOK into you can actually force him into it this way rather than just hoping he’ll fall in eventually.

GREEN GOBLIN


The Green Goblin is even harder to hit than either of the other two starting foes, if that’s even possible. As you’ve probably figured out by now, Goblin flies in the skies on his Goblin Glider constantly up 6 Ganondorfs in the air. The only way to attack him at all assuming you don’t have a godlike recovery is to use Wily’s bouncing balls to get on top of the Skull Tank then go at him, though the Goblin has several attacks where he comes down to attack you directly where he’s vulnerable. The Green Goblin is the size of Marth not counting his glider, has 500 stamina, and moves about horizontally in the air for his idle stance at Ganondorf’s dashing speed.

Glider Attacks

Pumpkin Bombs: The Green Goblin throws his signature projectiles swoops downwards in a very slight arc, still coming nowhere near the ground, staying 4 Ganondorfs above it at the lowest point in his arc, only becoming an easy target if you’re on top of the skull tank. The Green Goblin throws down 5 Pumpkin Bombs as he goes across the screen, which have the same size as Wily’s bouncing balls and move about in an identical fashion, bouncing up once they hit the ground. When you come within a Bowser radius of a Pumpkin Bomb, it will explode into flames just as large as the Koopa King that trap you in mass multiple hits for 28%, the final hit doing knockback that kills at 160%.

Smoke Bombs: The Green Goblin swoops down in an arc identical to his Pumpkin Bombs attacks, but drops Smoke Bombs instead, which still have identical movement/size to bouncing balls. As the smoke bombs travel, they constantly emit a gaseous smoke wherever they go the size of Bowser around them, through which nothing but silhouettes can be seen. The smoke sticks around for 20 seconds after creation, though it potentially can be sucked up by Wily’s skull tank. The smoke has the most obvious purpose of making it so you can’t tell the difference between Pumpkin Bombs and Bouncing Balls, considering you need to get on the balls to get up to Wily and the Goblin while avoiding the Pumpkin Bombs.

The gas has the more lethal property of detonating when any exploding or fire hitbox comes into it, causing the explosion to spread across all of the gas, retaining its’ hitbox at half its’ initial power. From the attacks presented so far, Pumpkin Bombs, Wily’s missiles, and MODOK’s Battering Ram/Balloon Bombs have the sorts of hitboxes needed to trigger this. If you really fear this, stay as far away from the skull tank as possible as this will make it more likely to use its suction attack. Of course, it’s kind of hard to kill anybody outside MODOK if you go this route, and even then MODOK is far from a cakewalk.

In addition, this would be a good time to jot down that Wily’s missiles are heat seeking and can be distracted into going after flaming hitboxes, and if the fire is absolutely everywhere due to the gas the missiles are utterly useless, so you may –want- to let the fire spread a little bit, much less if there are missiles currently out.

Swooping Punch: The Green Goblin swoops down with his glider to your position, smacking you powerfully with all of his momentum as he goes by, dealing 26% and knockback that kills at 100%.

This is a surprisingly fast attack as the Goblin immediately goes back up after hitting you, but if you hit the Goblin with an attack that does 11% or more during the peak of his momentum he’ll get knocked off his glider. Goblin’s punch will obviously out-prioritze any attacks from the front, so you’re either going to have to hit him with something disjointed (Awkward and risky) or jump up and hit him from above as he goes up. This will cause the Goblin to run on foot at Samus’ speed over to his fallen glider. As he runs, he can still defend himself but takes actual knockback (He’s as heavy as Marth with 50%), meaning you can potentially prevent him from ever getting back to his glider. While the Goblin will jump over pits made by Wily’s drill, you can potentially knock him into the pit to make him have to laggily climb out of them and take an extra 25%.

Sleeping Gas: The Green Goblin hovers down to be a single platform away from you, then extends out his palm as a green gas comes out of his palm reaching up to 1.2 platforms away, the stream being as tall as Wario. Needless to say, this gas puts you to sleep (For double the normal duration to boot), but it doesn’t do so instantly, taking 2 seconds to actually work as your character gets visibly more drowsy until then, and you can shield when you’d fall asleep to prevent yourself from doing so. Thankfully this effect doesn’t stack if you’re hit with the gas again while you already have it. The problem is Goblin will follow you around forever at Mario’s dashing speed until you do fall asleep, and with the range of his gas he becomes very hard to shake off, much less when the gas he creates lingers on for 5 seconds after creation. It only becomes all the more difficult to just flee from him when you take into account you have no way of seeing the sleeping gas if it’s inside gas from the smoke bombs.

To stop this attack without falling asleep, you need to deal 40% to the Goblin, which can be very difficult without just falling asleep anyway. Thankfully the Goblin only moves at Ganondorf’s walk when going backwards so you can chase him to actually hit him quite well, just not run from him. If you deal a single clean hit to the Goblin that does 20% or more, you’ll knock the Goblin clean off his Glider and make him take the knockback like a normal character. It’s difficult to deal with this move in the air due to your inability to shield and there being so few aerials which deal 20% or more, making it all the more horrific to even think of going far up into the air to attack Goblin in his idle stance.

Flamethrower: The Green Goblins behaves identically to how he does with his Sleeping Gas attack, but rather than emitting sleeping gas the front of his Goblin Glider starts shooting out flame, dealing multiple hits of 1% and flinching that add up to 25% per second which can very easily cause gas from smoke bombs to set on fire. This has significantly more starting lag than Sleeping Gas before the Goblin actually starts shooting anything out, but the Goblin has his palm extended out during this time to make you think he’s using Sleeping Gas – this is of course all assuming you’re inside some gas from smoke bombs, as the Goblin will only use this attack if there’s a lot of it on-screen. Obviously the large starting lag on this attack means this is a potential chance to knock the Goblin off his glider with a strong attack that does 20% or more, but you could also end up falling asleep and more likely than not getting KO’d. To prevent you from getting utterly destroyed if you don’t hit the Goblin during the starting lag, the Goblin will only stay in this attack for 15 seconds at most if you let him actually start shooting flame.

Machine Gun Fire: Again, this attack has identical start-up to the other two attacks, the Goblin extending his hand out during the start lag and everything, but this attack has much less starting lag and isn’t only used when there’s lots of smoke bomb gas everywhere. Here, the Goblin extends out a small turret from his glider that rapidly fires bullets at you that do up to 20 hits per second of 1% with no hitstun. The Goblin can move backwards during this attack just as quickly as he can moves forwards, so knocking him off his glider in this attack is essentially impossible unless playing a very speedy character. In order to get him to stop, you’ll need to take advantage of MODOK’s Analyze Cubes to reflect the Goblin’s bullets back at him. As usual, once the Goblin takes 40% he’ll come out of the attack.

On Foot Attacks

Spinning Kick: The Green Goblin leaps forward and does a roundhouse kick behind himself, dealing 15% and knockback that kills at 135%. After he lands, he skids backwards towards his glider a bit, and throws a Pumpkin Bomb at you as he does so. The Goblin will occasionally hold the kick out long enough to spin back around to face forwards, hitting you if you managed to get in front of him while he jumping up into the air and were expecting him to simply throw a pumpkin bomb behind himself. This also decreases the end lag of the move as the Goblin immediately re-enters his mad dash to his glider.

Acrobatics: The Green Goblin first does a simple sliding kick forward, propelling himself forward a bit faster than he’d normally go and dealing 6% with simple tripping knockback. If he hit, or you’re nowhere near by, the Goblin will simply end the attack there and continue his mad dash to his glider. If he missed and you were nearby, the Goblin will then proceed to do a large backflip away from his glider, doing a flip-kick as powerful as Ganon’s uair as he does so before landing on his hands, which are another hitbox that do 5% and a slight bit of knockback. If you were behind the Goblin when he started this attack, then he’ll specifically go to land on top of you, though he’ll only go back 1.5 Platforms at most. After landing on top of his hands, the Goblin pushes off the ground to propel himself towards his glider 2.25 platforms, doing another Ganondorf uair as he does so, but this time landing on his feet for a spike as powerful as Captain Falcon’s dair. Again, the Goblin will hold back his jump a bit to try to stomp down on you if you’re not that far ahead of him, but if you’re not within half a platform of his desired target he’ll opt to get further towards his glider instead. The back/front flips are far faster than they sound, causing the Goblin’s hurtbox to shift around rapidly.

Pumpkin Juggle: The Green Goblin takes out a Pumpkin Bomb and starts juggling it all around his body in a variety of ways, such as throwing it forward and running up to catch it, spreading out his arms and juggling it between them, juggling it on his feet as he hops forward, dribbling it like a basketball, as well as simply taking it in his hand and smacking behind himself with it, the only active hitbox, dealing 9% and slight knockback. Goblin swaps between all of these methods with impressive speed, only slowing down at all when he juggles it on his feet, and if you ever make the mistake of hitting the bomb with an attack it will explode. While the Goblin will take 10% from it, he’ll run away fine to make his get-away.

While this can ultimately be adjusted to, the Goblin will always throw/kick the bomb away before it’s about to explode, which can be anywhere from 2-5 seconds. The Goblin can throw/kick the bomb at you out of any of these juggling methods save his dribbling, but if you’re behind him then when his juggling method of throwing the bomb forward and running up to catch it won’t work, while smacking behind himself won’t work if you’re in front of him.

Pumpkin Droppings: The Green Goblin casually drops a Pumpkin Bomb behind himself which explodes a second later after the Goblin’s already gone, but just before it explodes the Goblin throws back another bomb with a shorter detonation timer above where the first one is, causing a large pillar of flame to generate as the bombs explode, blocking you from chasing after him if you’re that far behind. You can roll past the two pillars of flame in the explosions from the bombs, sure, but this is obviously laggier and gives the Goblin more time to get away. If the first bomb is dropped into a pit, the second one will be thrown as if there was no pit there, meaning there will be a slight gap in the middle for you to jump through. Of course, gravity will affect the flames in the air, so you’ll have to be quick about it.

If you’re ahead of the Goblin, he’ll throw the bombs ahead of himself and time it so they detonate just as he runs past, meaning he gets caught in the explosions. He’ll take all the damage and get set on fire, taking 2% per second as he laughs maniacally during it all. If he catches fire, then his body will automatically out-prioritze all attempts to hit him with a simple 5% fire damage and flinching. If you’re ahead of the Goblin, though, the fact he’s running into you means you can hopefully knock him back and stall him long enough to prevent him from going into the fire, though. The fire lasts for 10 seconds on the Goblin, and if you let him get to his Glider while he’s still on fire he’ll immediately do a swooping punch attack during which time you won’t be able to attack him. The fact he’s on fire also is rather annoying when combined with obscuring gas from smoke bombs, but the hitbox from this is so weak you may –want- the Goblin to do this to get rid of it all, less a more threatening hitbox set the gas alight.

Hijack: If either the Green Goblin or MODOK are under 100 HP, MODOK is currently not particularly high in the air, and MODOK is closer to the Goblin than his Glider, the Green Goblin will start dashing towards MODOK instead of his glider. Upon reaching MODOK, the Goblin chuckles, then leaps up onto his chair behind him and kicks MODOK out of his chair, causing MODOK to enter his barrel roll attack. The Goblin says “Hardly a loss. . .” as he sits in Modok’s chair and mans the controls to go up into the air into his normal idle stance. The Goblin has access to all of his normal attacks with MODOK’s chair instead of his glider save for the flamethrower and machine gun fire, which he trades for MODOK’s balloon bomb. Once MODOK comes out of his Barrel Roll attack, he’ll function normally, just floating about, but having his movement speed constantly halved and unable to use his Barrel Roll attack anymore. Should you knock the Goblin out of MODOK’s chair from this point on, the Goblin will go for either his Glider or MODOK’s chair, whichever is closer. Should the Goblin opt for his glider, MODOK will start heading to get back into his chair.

DR. DOOM


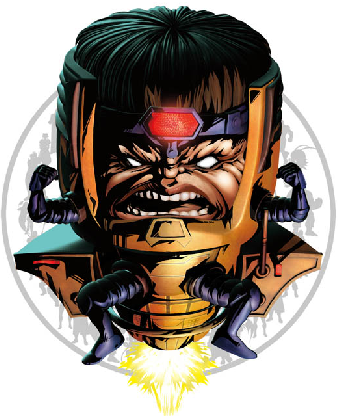
Dr. Doom not showing up last seems rather insulting to his greatness, doesn’t it? Why’s he showing up before –Iron Monger-? That would be because he probably isn’t – when Dr. Doom spawns, it’s a 70% chance it’s just one of his robotic duplicates – a Doombot. Doombots have 200 stamina and lose 2 of it per second, and when their stamina depletes, their movement speed suddenly doubles as they come at you for 2 more seconds before exploding in an explosion identical in all properties to a Smart Bomb blast. If a Doombot did indeed spawn and not Dr. Doom himself, then the next villain in line will spawn. Once another villain dies, either another Doombot or Dr. Doom himself will spawn, but the chance of a Doombot spawning will have decreased by 20%.

Dr. Doom is the size of Ganondorf and he specifically has 550 stamina. The movement pattern of both him and his duplicates is endless pursuit of you at a speed a bit faster than Ganon’s dash. Dr. Doom is capable of taking knockback, but the weight of him and the Doombots are different – the Doombots are obviously heavier due to being entirely robotic and having no flesh. Doom himself takes knockback as if he were Ganondorf at 50%, while Doombots are treated the same Bowser is at 50%. The only way for this difference to be particularly visible is if you hit them with a powerful attack so they go a decent ways, but it’s still quite hard to tell, and hitting a Doombot in hopes of figuring this out only makes their self-destruct timer tick down faster.

Dr. Doom Attacks

Power Spheres: Dr. Doom opens up his cloak, to reveal a multitude of power spheres at you at Sonic’s dashing speed. There are so many spheres that they form a clump the size of there Bowsers, meaning dodging all of them is impossible, and they don’t care about shields. The spheres don’t actually do any direct damage, but they’ll latch onto you on contact, and once 50 of them are on you (There’s 40 of them in an entire shot of this attack) you’ll get transported to an alternate dimension for an instant KO. You don’t need 50 of them stuck on you, though, - less of them simply take less long to transport you to the alternate dimension. 10 spheres, for example, will take 9 seconds to transport you there. Once you have the power spheres stuck on you, you have to hit them with an attack that targets that specific part of your body they latched onto to knock them off. This would be fairly easy to do if they didn’t linger on the ground after getting knocked off, not only able to be affected by Wily’s suction, but Doom also able to open up a compartment in his hand to trigger a wind effect to try to pull them into you. The spheres can be attacked or dashed past to roll them around, and you can push them into one of Wily’s pits or off a blast zone to get rid of them. If you ignore them and Wily is dead, then the power spheres the Doombots make will pile up heavily for the real Doom to abuse.

Inhibitor Ray: Dr. Doom presses a button on his armor to cause a brief ripple effect to occur around him – it’s a similar effect as to when there’s somebody with a cloaking device partially appearing, except in a Bowser sized circle shape around Doom. This area of effect will occassionally flash in and out for the next 5 seconds, and will cause any attacks you do to be aimed at Doom instead of the intended target, turning around your character if necessary and causing you to use an entirely different move to hit Doom rather than the one you chose. This is obviously a way to force you to help blow up Doombots, but the fact it changes the attack from the one you actually input also means it can be a pain to accurately hit power spheres that hve latched onto you, meaning you can only do so reliably if you get away from Doom. It should be noted that Dr. Doom himself will use this attack to cause you to –NOT- attack him when he’s under 200 HP, but this can be gotten around by just charging up an attack/going through it’s start lag as he approaches you rather than starting the attack in his face.

Time Shift Bomb: Dr. Doom takes out a bomb, but doesn’t actually throw it until 8-12 seconds later, able to use other attacks during this time. Upon contact with anything, the bomb explodes in a Bowser sized explosion and causes you to repeat exactly what you did 3 seconds ago again over 3 more seconds. When Doom throws the bomb it’s absurdly quick and destroys shields in one hit, so you may very well want to anticipate being hit and do stuff you won’t regret repeating. This can be particularly annoying when combined with Doom’s Inhibitor Ray attack, as repeating attacks you never intended to do in the first place can be torture, much less when you have power spheres stuck on you and you’re attacking where they’re not. That said, you can get Doom to drop the bomb if you deal 50% to him before he throws it, but that’ll just cause him to detonate if he’s a Doombot.

Freeze Grenade: Dr. Doom takes out a dark blue grenade – his first ever recorded invention. Dr. Doom moves either forward or backward until he has the necessary spacing, then throws the grenade forward a platform, causing it to explode in a Kirby sized explosion. The throw of the grenade is incredibly fast so you can’t outrun it and instead must shield/dodge. The grenade does 11% and bit of stun, but more importantly freezes the part of the body that hit it, causing you to be unable to use attacks involving that area of your body and any power spheres attached there to become unremovable. In order to undo the freeze effect, you must get hit by one of the many other fire attacks of the villians. Even a fire based hit of 1% and flinching will do, so you can be picky if necessary due to being at a high percentage – Goblin’s gas based fire hitboxes are only half as strong as the attack that triggers them.

Energy Fist: Dr. Doom extends out his palm as he causes a large energy fist to materialize and stands in place after creating it. The energy fist is the size of Master Hand and will attempt to do some of Master Hand’s more deadly attacks, most obviously his infamous finger drill, but is particularly spammy with his grab. If there are Power Spheres lying around, the energy fist will go to grab them before throwing them at you, making them once again a hitbox. The hand can gather up the power spheres quite quickly and Master Hand’s drill attack is obviously a big threat, so hitting Doom with an attack that does 20% or more to interrupt this move is highly appealing – but also highly dangerous if he’s a Doombot.

Castle Doom Vibrator: Dr. Doom takes out a remote control and pushes a button on it, causing an earthquake to take place inside the room – Doom actually has a device like this in the comics, and the battle takes place inside his fortress, mind you. This causes the ground to become a hitbox that deals 25% and vertical knockback that kills at 165%. The only truly safe places to be when Doom uses this attack is either on top of the skull tank or on a bouncing ball, as it lasts too long to stay in the air the whole time without using your recovery to put you into helpless. That said, Doom laggily and dramatically presses the button to telegraph this, staying in place as he does so, and hitting him with an attack that does 20% or more will interrupt him from pressing it – and make him come closer to detonation if he’s a Doombot, potentially detonating him on the spot if his health is low enough and catching you in the explosion.

After the earthquake starts, Doom will pursue you from above for its’ entire duration, stomping down on you as powerfully as Ganondorf’s down aerial. Seeing you have to use your Up Special to go into helpless, you won’t always be able to dodge Doom unless you knock him away as he does this, which again lowers his detonation timer if he’s a Doombot.

Tractor Beam: Dr. Doom takes out a remote control and presses a button, causing a large cannon in the background to aim towards you and fire out a long but laggy beam. If it hits, the beam will bring you up to the cannon and levitate you in place until you button mash out with quadruple grab difficulty. You can still fight against the pull with aerial movement and jumps, and you can also attack and dodge. However; this move deals no damage or hitstun, meaning you won’t get your jumps back – have fun if the tractor beam sends you into helpless. The tractor beam will only let you go early if you take knockback that would otherwise KO, and Doom isn’t stupid enough to use this attack in combination with the Castle Doom Vibrator. Doom typically spams this the higher up you are in the air, and if it’s the –real- Doom, he’ll sometimes specifically activate it when you go into helpless and are unable to dodge the otherwise laggy and telegraphed beam. Being suspended in mid-air obviously limits attacks available to you to get rid of power spheres and prevents you from doing generic all around GTFO dsmashes, among obviously making you a blatant target.

Reducing Ray: Dr. Doom takes out a remote control and presses a button, causing a different gun in the background to fire a large beam at you. This beam is just as laggy as the tractor beam, but the hitbox lingers a while and the beam will actually follow you around a bit. While it follows you around –very- slowly, the beam is as wide as Bowser and has infinite range. The beam stays out for 4 seconds total and reduces your size the longer you stay in it – if you stay in it for the full duration, you’ll be reduced to Poison Mushroom status. If you are hit beyond that level by this attack again, you can eventually be shrunk out of existence. Aside from the obvious nerfs to your power and weight, being smaller is bad because power spheres won’t shrink with you and the power spheres will become stronger and stronger based off how small you are. The shrinking effect is practically permanent to boot, not wearing off for 90 seconds.

Swap: Dr. Doom walks into the background, then a Doombot walks in to take his place, or visa versa. Needless to say this attack is exceedingly rare. Doom will only do a swap if he is currently inside smoke bomb gas from the Goblin so as to not make the swap overly obvious, and the animation is overly fast so it’s hard to catch, much less when it’s just a vague silhoutte of Doom. If Doom himself was the one that swapped in, the chance of another swap happening is much larger than it would be otherwise so that the Doombot will come back out, its timer having still gone down while it wasn’t present.

IRON MONGER


Iron Monger spawns last, though you’ll probably see him before the real Dr. Doom. In any case, he’s the largest of the villains if you don’t count Wily’s skull tank, standing 1.5 Ganondorfs tall and being 1.5 Bowsers wide. His hurtbox is actually typically extending to be 2 Bowsers wide due to Iron Monger keeping his legs extended out a good deal. Due to his sheer size and armor, Iron Monger is as buff as a tank, having 1000 stamina. Needless to say, Iron Monger is incredibly slow and cumbersome, being even slower than MODOK as he takes one robotic step towards you per second, bringing himself a Bowser closer to you. That said, his feet are hitboxes as they slam down, being as powerful as Ganon’s dair and pitfalling you if you’re grounded. While Iron Monger loses his natural stomping hitbox when chasing you into the air, he is significantly faster here with his jets, chasing you at Dedede’s dashing speed. If you want to get away from Iron Monger, all you need to do is go back to the ground – something you probably don’t want to do.

Iron Monger’s attacks are insanely powerful, but rely on being close up, so in order to defeat Iron Monger you have to play an awkward sort of hit and run with him that’s even more pronounced than that with most bosses, as his “melee range” is still huge. This hit and run is more pronounced when you take into account Iron Monger’s body takes .75x the damage you deal to it while Iron Monger’s head takes 1.5x the damage, meaning you’ll have to jump into the air and improve Iron Monger’s movement capabilities briefly if you want to defeat Iron Monger some time in the foreseeable future.

Iron Monger Attacks

Iron Fist: Iron Monger does a very powerful and very sudden punch that reachse forward 3 Bowsers, dealing 20% and knockback that kills at 105%. This attack is pretty much the sole reason you have to play cat and mouse with the hulking Iron Monger, only coming back to poke him in-between his attacks.

Crash Landing: Iron Monger jets up all the way to the top of the screen laggily, then starts moving to get over your current position. As soon as he overlaps your horizontal position for half a second, Iron Monger will crash downwards to crush you, going downwards at Sonic’s dashing speed as the jets turn off. Being hit by this will deal 100%, spike you downwards twice as fast as Sonic’s dash, and then pitfall you on landing for another 100%. Once Iron Monger lands, he will destroy the ground he lands on in the process – a whole 2 Bowsers worth. Obviously, if you were pitfalled you’ll get KO’d due to going down with the ground. This also causes an earthquake effect across the remainder of the stage ever so briefly that does 20% and KOs at 100%.

This is generally much too telegraphed for you to ever be hit, but destroying such a massive amount of the stage is more of a threat than losing a stock, and Iron Monger has all the time he needs to destroy the entire stage so your remaining stocks don’t matter due to his incredible stamina. Obviously, you can’t afford for Iron Monger to destroy much of the stage, so the most obvious tactic is to have Iron Monger just crash into a part of the stage he’s already destroyed, which will also cause him to deal 20% to himself and have bad ending lag. If you don’t want him to destroy –any- of the stage, though, it’s possible. Climb up the skull tank and have Iron Monger smash down on top of it instead of the stage, which will deal 50% to it to boot, helpful if Wily is still alive.

Raining Earth: Iron Monger goes to the top of the screen like with his crash landing attack, but rather than stomping down on top of you he fires a gigantic laser from his chest, which he aims at the part of the ceiling directly over your position. This causes mass chunks of earth to rain down upon you at Meta Knight’s dashing speed, dealing anywhere from 10-20% with knockback that kills at 170-120%. Iron Monger keeps this up for 5 seconds, making the air very difficult to properly get up into as he does so as 7 projectiles come down per second. If you flee from your initial position, you’ll typically run out of ground to flee from eventually, meaning you have to get to a wide open space whenever Iron Monger starts the long telegraph of this attack as he goes to the top of the arena. Of course, he could also be preparing a crash landing which means you want to go somewhere where Iron Monger can’t do any damage, meaning there’s no easy solution.

Earth Shatter: Iron Monger reaches down and goes to rip out a Bowser sized chunk of ground out of the stage, then throws it at you up to 3 platforms away, dealing 25% and knockback that kills at 90%. This –will- leave a pit where Iron Monger rips out the ground, but once he throws the chunk of ground and it hits the ground it won’t magically disappear, instead sticking around as solid terrain. In order to prevent Iron Monger from destroying the stage, you can have him rip out a chunk of the skull tank (Dealing 15% to it), sure, but it’s very difficult to constantly keep him up there, and there’s only so much space to run from him there. Instead, the ideal thing to do is have Iron Monger pick up the same chunk of ground he ripped out and bait him into throwing it back into the stage where he originally ripped it out. Before Iron Monger dies, you may want to try to get him to repair any damage he’s done before you finish him off. . .Because he clearly hasn’t been around long enough already. This attack on the whole is quite laggy, particularly when Iron Monger goes to throw the chunk of earth, giving you time to bait him to reconstruct the stage as you want.

Iron Smash: Iron Monger rips up a Bowser sized piece of ground like with Earth Shatter, but rather than simply throwing it at you he’ll come over to you, then lift the ground over his head and smash it down over your head, dealing 30% and causing you to impale the chunk of earth – something more than just a cool animation and actually an awkward status effect. You’ll be stuck moving around with essentially an iron skirt of ground. This triples your falling speed and weight, and slows down your movement/aerial movement and dodges by 66%. The extra weight is hardly that much of a great thing when it doesn’t last long enough to take advantage of, only lasting twice as long as a grab’s duration. Aside from the lag increase on dodges, your increased falling speed makes it impossible to dodge earth shaking attacks and the many beam attacks of the bosses that transverse the whole stage – nevermind how you’re completely unable to attack flying bosses. Once you escape the “grab” your character will manage to push off the ground they’ve been impaled by, making it fall down below them and become walkable stage. Actually filling in a hole like this is incredibly dangerous, as it’s very possible you could just fall down the hole with your tripled fall speed before you can put the ground back in place. You may be best off just getting it off near that area, then having Iron Monger throw it back into place for you later.

Repulsor Ray: Iron Monger extends out his palm and aims it at you over a slightly laggy period, then fires a beam from his hand that goes forward 5 platforms almost instantly. Contact with the beam does 18% and knockback that kills at 125%. A fairly simple attack all things considered, but if the ray hits the ground it will damage it significantly, but not destroy it. If he uses the ray in the same spot again or picks up this ground with Earth Shatter or Iron Smash and uses it as a weapon, then it will be destroyed in the process. Unless you want to have to pay even more attention to Iron Monger than you already have to when other villians exist, go up into the air when he uses this attack so he the ray doesn’t hit the ground. Of course, going up into the air enables him to get closer to you and ready to ram his iron fist into you. . .

Laser Drill: Iron Monger fires a laser from his chest , but not directed at you, instead the floor in the background behind you. Iron Monger proceeds to shoot his laser to make a circle in the ground around you, sawing out a Bowser sized portion of the stage to fall down. If you are hit by the laser during the brief period it overlaps with you, you’ll take 12% and heavy hitstun. It takes Iron Monger 1.5 seconds to complete drilling out the hole, and the only way to stop him is to get in the way of the laser beam. You’re allowed to shield the beam and it won’t hit that part of the ground, but it only very briefly goes over the main playing field so your opportunity to do this is minimal, meaning you’ll have to sit there for a good while in advance ready to shield the laser. If you miss one the two brief opportunities as it goes through the main playing field, you’ll have to spot dodge into the laser and take the hit directly.

Machine Gun Fire: Iron Monger makes his hand into a fist and “points” it at you as bullets start shooting out of it at you. Iron Monger fires 20 bullets a second that do 1% and no flinching, identical to the bullets from the Green Goblin’s glider. You can end the attack in the same way as the Goblin’s attack by reflecting the bullets back at Iron Monger (Presumably with MODOK’s Analyze Cubes), but not only could MODOK very well be dead by now, you have to reflect 20 bullets at Iron Monger’s –head- in order to get him to stop, not just back at him in general. Thankfully, these bullets can be reflected by simply shielding. Iron Monger still moves towards you as he fires, meaning you’ll have to bait him slightly into the air and position your shield just right in order to reflect the bullets back at his head. Needless to say, this attack leaves you in mediocre shape to shield Iron Monger’s laser drill, much less with Iron Fist shattering shields instantly. As a final note, yes, Goblin’s bullets can also be reflected by your shield, but it takes -21- bullets to break a shield and Goblin requires 40 reflected back at him to come out of his version of this attack.
 

majora_787

Smash Hero
Joined
Jun 23, 2007
Messages
6,122
Location
Texas
Just for kicks... :p

Locating Server...​


Terraria is a side-scrolling Metroid-Vania online building/exploring/PVP/monster slaying shenanigan-fest for the PC. It's a game with a large variety of things to do, from making castles to exploring caves to going genocidal on packs of zombies. It has well over 300 items and 70 weapons, from swords to flails to machineguns! And if you ever get tired of fending off the game's 40 monster varieties and 4 evil bosses, and if you're through raiding and travelling through its 12 varying natural environments, then you could always hit it up with some friends and start killing each other!


The Player of Terraria is armed to the teeth with not just one, sometimes as many as 10 weapons at one time! This changes up his set a lot, giving opponents in SSB: MYM as much to keep track of as a PVP opponent. That is to say, plenty.


* * * STATS * * *​


WEIGHT: 5
SIZE: 3
GROUND SPEED: 5
AIR SPEED: 5
FALL SPEED: 3

The Player is a character who has little going for him statistically. He's not too light or heavy. He's not too fast or slow. He's not exactly aerially efficient. So what gives? Well...


* * * SPECIAL MOVES * * *​


Neutral B: WEAPONRY ASSAULT​
The Player's B button will use whatever weapon he is currently holding. The B special changes entirely depending on the weapon! What each weapon does is explained in the two Equip specials.

Side B: RANGED EQUIP​
The Player has a small arsenal of weaponry prepared! In his ranged arsenal, he has quite a batch of things. Magic, explosives, and guns! When the Side B input is pressed, the Player will equip one of three items. If he has not used this input, he will equip the first weapon in the cycle; in this case, the Sticky Bomb. If he has a ranged weapob equipped, a small scroll wheel showing the ranged weapons appears over his head, and you scroll through it with the C stick and select with B. Real time equipping! If the Player has used a ranged weapon and has a melee weapon equipped, he will equip the last ranged weapon he used. Weapons he has in the ranged category are:


Sticky Bomb
The first item in the cycle. It's an explosive that sticks to surfaces when thrown. It goes off after three seconds with a small range like a Bob-Omb, dealing 20% damage. 3 can be thrown per second, but the more that are out, the more dangerous it is for the Player as well. Explosions do not cause premature detonation in Sticky Bombs. It should be noted that the Player only gets 20 of these bombs per stock before they disappear from his equipment!


Dynamite
The second item in the cycle. You won't find a bigger boom in Terraria! These things sit idle for five seconds before exploding, but have the blast radius of a Smart Bomb, dealing 50 damage. The Player only gets three of these per stock!


Demon Scythe
Feeling like casting spells? The Demon Scythe is a spell from the depths of the Underworld. It's hard to use this spell effectively, but it can be devestating when mastered. The Demon Scythe can be used twice per second. It will sit idle for a second and a half, and will then fly off in the direction it was fired in, accelerating over one second from Ganondorf's walk to Sonic's run. The Demon Scythe passes through walls and deals 18%! A really nasty projectile! However, it can be reflected, and can't be aimed vertically or horizontally.


Sand Gun
What is this? The Sand Gun is a very strange gun, made from illegal gun parts and chunks from desert insects. Holding the B button will cause the Player to aim the gun. You can adjust the angle with the control stick. When the button is released, a chunk of sand will arc out of the gun and land as far as five battlefield platforms away. This gun is VERY hard to aim though, because of how it arcs. The chunks of sand are half as wide and one third as tall as the Player, and will stack on top of one another constantly. Hold on... All this does is create obstacles?! That's kind of annoying. Yeah, well. If the sand happens to land on opponents, it hits them for a good 14% damage. But you can see it coming; it arcs around the speed of Bowser's walk speed.


Minishark
This is the grand artillery of the Player's ranged inventory. This monster fires roughly six shots per second at the speed of Sonic's dash, the bullets bouncing off walls and platforms, hitting opponents for minimal knockback but 5% per bullet. Holding the B button allows the Player to spread the firing area and aim the gun with precision. This is a gun among guns! The problem? You've got 250 bullets to fire out of this thing. It may be a god among guns, but it's still a gun, and if you're out of ammo you're out of luck.

Down B: MELEE EQUIP
Alright. So, either you've used up ALL of your ammo, or you're fighting someone really agile. Maybe both. Your only option is to get up in their face and give them a good shank, since CLEARLY bombs and sand failed to solve anyone's problems. This move works JUST like the Side Special, only it scrolls through a batch of swords instead of guns and explosives. Each sword has something different going for it, and has a unique use. Swords don't run out of ammo or degrade or anything, but be sure to know what is going on so you don't use the wrong sword!


Muramasa
The first sword in the cycle! This sword is by far the fastest, stretching 2/3 of a battlefield platform in front of the Player and swinging 2 times per second. This sword deals 5% per hit with low knockback, but is ridiculously fast and reflects projectiles! You can hold down the B button to swing it constantly, and move aroung while swinging!


Light's Bane
The second sword in the cycle. This sword is just barely slower than Muramasa. However, it is much shorter; it only goes 1/4 of a battlefield platform. Also, you cannot hold down B to swing. The good news to this is that the Light's Bane has Muramasa's speed, but it deals more damage and knockback! 10% damage per swing for a big cut on reach.


Blade of Grass
The third sword in the cycle. This sword is a bunch slower than the other two,. But this sword reaches a grotesque 1.2 battlefield platforms when swung. The knockback isn't huge, and doesn't improve from Light's Bane. However, the damage goes up to 15%! This sword also makes the Player immune to poisons and neurotoxins. It may also poison victims, dealing 2% per second when still and 4% per second when moving for a few seconds.


Fiery Greatsword
The final sword in the cycle. This sword is the slowest sword, reaches only as far as Muramasa, and deals the same 15% as the Blade of Grass. However, its knockback is horrifying! This is the Player's main KO tool among the swords. It can't reflect projectiles, but it can desfuse bombs, destroy items, and negate many traps. This sword makes the Player immune to fire and lava, and may set the victims on fire for 3% per second for a couple of seconds.

Up B: GRAPPLING HOOK
When this input is performed, the player will simply arm himself with his grappling hook. While his grappling hook is out, he can press any direction on the control stick and B to attempt to grapple to something. If it is within three battlefield platforms, the Player will latch to the surface and will be able to attempt to double jump to safety and grapple again. However, if he fails, he must wait a full second for the hook to return. And even after that, he has to take it out again with Up + B. The move passes through opponents, and the grappling hook moves at the speed of Mario's dash.

With all this artillery, you're invincible! Ready to take down any opponent, no matter how--

Terraria has updated!

... Huh? What's this all aboOH MY GOD!


Davidreamcatcha

Smash Ace
Joined
Feb 9, 2011
Messages
629
Little later than usual, but I may as well throw it in the thread if anyone hasn't seen it yet.

MYMini

In honor of Jeff Madrox (googling images of him will bring up nothing but MYM images, BTW) and his clone spam, we are dedicating this week’s MYMini to an obvious feature of the Smash series: Clone fighters! What you have to do is make a "Luigified" clone for any moveset. These function the same way as the clones we’re all accustomed to in Smash…Dr. Mario, Ganondorf, any of them, changed stats and some changed moves.

That reminds me: this week, we’re going to allow anyone to make a suggestion for an MYMini! To do this, you must have made at least one MYMini this contest, after this, send me (Davidreamcatcha) a PM through Smashboards containing the Mini Suggestion. Good suggestions will be used, so feel free to suggest!
 

Davidreamcatcha

Smash Ace
Joined
Feb 9, 2011
Messages
629
MYMini Entry

Flying Dutchman (MYMX) Clone

LORD POLTERGEIST

Down Special -
Poltergeist's entire bottom half turns into a Fly of Despair, rather than creating one like Dutchman. While he is like this, he can move and attack as normal. However, the Fly only stays on him for 5 seconds, and he can not make one appear for another 5.

Once they are sucked into the Fly, the screen divides, with the top half being devoted to the inside of Poltergeist and the bottom half being the normal fight. The foes will be launched out of Poltergeist after 10 seconds.

Side Special -
It is much harder to escape the minions' grasp and they will constantly pursue the foe. However, they have less stamina, and Poltergeist can have one less than Dutchman.

Up Special -
Poltergeist stretches himself upwards at the speed of Bowser's dash, turning almost elastic. He can bend at will, and can use it as a tether. However, the speed needed makes it almost abysmal as a recovery. It takes 15% damage to knock Poltergeist out of this stance.

Neutral Special -
Poltergeist leaves a bit of ghostly residue on stage. When he next presses the input, he is instantly transported to the residue. This is his primary method of recovery, but is extremely laggy. Make sure to have uspec/dspec when you reappear onstage.

Grab -
Twice as laggy, Poltergeist can use this on the foe while a minion has them grabbed, however. The soul is always orange and has half the stamina, and erupts into orange juice when it loses all of it as a cosmetic effect. The effect with the Fly remains.

Jab -
The bottom of Poltergeist's Fly will erupt into flames, dealing 5% and launching foes upwards (acting like Brinstar) as long as he holds this out.

Down Tilt -
Healing Effect is twice as strong, more of an actual damage builder now.

Dash Attack -
Poltergeist lunges forward and deals 10% to anyone he hits, as well as pitfalling them. This doesn't pitfall or damage minions, but it commands them to stand still.

Up Smash -
Twice as difficult to escape, due to lack of things to manipulate. He can build momentum with the foes as well, just as Flying Dutchman's Boss Mode can.

Forward Smash -
The beam is twice as long and does 1.5x the damage, but is laggier and has no pushing effect.

Down Smash -
Foes run 1-3 Battlefield Platforms away from Poltergeist when he uses this, likely into a crowd of minions. They will not run offstage, however.

Neutral Aerial -
Half the damage and a bit smaller range. Will leave foes with .25 seconds of stun at the end of it, however.

Forward Aerial -
Poltergeist swipes forward for this move, dealing 5% and good knockback and acting as a grab hitbox. He can throw once he has them grabbed, and can do the same for minions.

Back Aerial -
This now causes the Fly to spin around, if it is out. The foe will act as though their shield was broken if they don't move in the same pattern as the Fly, likely landing in the fire.

Up Aerial -
Causes foes inside the Fly to be moved upwards by a gust of wind.

Down Aerial -
The attraction is twice as strong, meaning minions will move twice as fast to reach it.
 

MasterWarlord

Smash Champion
Joined
Aug 24, 2008
Messages
2,902
Location
Not wasting countless hours on a 10 man community
Moar minis.

Cairne Bloodhoof (MYM7) Clone

ASTAROTH

  • No Reincarnation
  • Changes to the stage are now removed when Astaroth loses a stock
  • Anybody who enters prone on a slope will automatically slide downwards at Mario’s dash speed

Down Special/Dair
The old Down B is now the dair, as Astaroth doesn’t have the time to build up something elaborate for Cairne’s dair. Astaroth’s New Down B is the grounded version of his Up B, War Stomp.

Up Special
Astaroth now has a very good recovery that involves him leaping high into the air (2.5 Ganons) with his axe and going 1.5 Ganons forwards, though he’ll crash down very quickly afterwards. The axe will impale anyone it hits dealing 16%, and once he hits the ground will deal another 10% to them and put them in prone. Ending lag long enough that you can’t capitalize on the prone, but not long enough that they’ll punish you if you hit.

Neutral Attack
Elbows foe to the ground, forcing them to prone and dealing 6%.

Forward Tilt
Turns into a generic hitbox that does 9% and knockback that kills at 135%. On prone foes, it turns into a grab hitbox, and you’re able to throw them in any direction for 16% and knockback that kills at 100%. If you throw them down, they re-enter prone.

Up Tilt
Astaroth does a small jump into the air before doing the roar, and the fact that the knockback is directly away from Astaroth means it’s more likely the foe will take downward knockback from this. Get at the edge of a pit and use this to prevent them from getting out – especially considering the move still deals knockback if the foe dodges.

Down Tilt
The crap Astaroth kicks up is strictly dust, turning it into a wind hitbox that pushes foes as forcefully as Dedede’s inhale. It will go forwards 3 platforms, though, and to the end of a slope if it reaches it, enabling Astaroth to attack while the dust is still up. Aids massively in prone abuse.

Up Smash
Does 2.5x the knockback to foes in prone, plain and simple. If you input left or right during the starting lag of the move, Astaroth will fling the dirt at a 45 degree angle in that direction. If you do this when you’ve hit a prone foe, you’ll simply flip them over like a pancake onto their opposite side, dealing just 7% but some slight stun.

Down Smash
Now is an over dramatic axe slam that spikes foes through the stage. It only works if the portion of the stage is 4 Ganons lower than the normal level of the stage. If the foe is prone, the stage only has to be lowered 2 Ganons. Otherwise, the move pitfalls. Deals 30-50%.

Neutral Aerial
Is now a generic kick in X direction, having decent speed but low power to make for a decent spacer to force foes in the direction of pits.

Back Aerial
No longer propels Astaroth into the air, but can slow his fall speed and boost his horizontal movement in the air if he starts spinning fast enough. At that point, he becomes a momentum based hitbox with varying power. See? Even Astaroth can do it!

Up Aerial
Turns into a generic “ground the foe” uair (The original uair was even more generic), with you grabbing the foe above you and throwing them downwards. Has low knockback growth, but 3 Ganon knockback minimum. If they reach the ground while still in stun they enter prone.

Grab
Is no longer a grab counter, is faster.

Up Throw
Is now the damaging throw, dealing 17% like the old dthrow, as Astaroth knocks the foe skywards with his axe.

Down Throw
Astaroth knocks the foe into prone and deals 14%.

Final Smash
Olololololol Critical Finish


Fright Knight (MYM11) Clone

PHANTOM GANON

  • Sword mechanic entirely removed
  • Weighs far less, a mere 4
  • Can now use smashes and the grab in the air

Side Special
Phantom Ganon fires a generic projectile that deals 5% and knockback that KOs at 200%. It can be reflected like anything, enabling you to play projectile tennis like every other Ganon match you’ve heard of. The damage increases by 5% each reflection and it KOs 40% earlier.

Down Special
Phantom Ganon creates a duplicate of himself 2 platforms away from him that faces him. The duplicate will mimic everything the real Phantom Ganon does. The duplicate is capable of dealing knockback, but not damage or stun. A single attack that does 10%+ or 25 damage total will kill him. Yes, the duplicate –can- play projectile tennis with you.

Jab
This enables Phantom Ganon to reflect his non Side Special projectiles such as utilt between himself and his duplicate, like the original version which randomly let you reflect projectiles. If you use this on a Side Special projectile, Phantom Ganon will specifically swipe his sword so as to shoot the projectile in the way it was already going rather than reflecting it, boosting its’ power and making it allied to him again.

Forward Tilt
Is given obvious new context – have the duplicate teleport the foe back to the real one.

Dashing Attack
Phantom Ganon specifically slashes –behind- himself for 8% and knockback that kills at 130%. Aside from when people are chasing him, this move is useful when you are closing in on the foe with both Ganons. The foe will think you’re going to surround them with hitboxes and roll past you, but just get hit by this move.

Forward Smash
The wind effects of this move counts as reflecting a Side Special projectile. The move also gains new context when you can bombard the foe with wind from either side, essentially trapping them in place and making it very easy to actually hit them with the Side Special projectile. If they’re on the ground, they can shield it, but in an ecto storm up in the air. . .

Down Smash/Up Smash/Neutral Special
The duplicate cannot create any static hitboxes/AKA traps.

Neutral Aerial
Normally, creates a platform wide tornado around Phantom Ganon as tall as he is that will spin foes who enter it and Phantom Ganon himself in what are technically 3D circles, but move the position of the character’s Z plane just barely enough that it doesn’t count as dodging (Think those statues on Castle Siege). Gameplay wise, this translates to the victim’s vertical position being set and their horizontal position constantly being shifted left and right. The tornado lasts a mere 4 seconds, but can go upwards if inside an Ecto storm. Side Special projectiles can get caught inside this and will automatically reflect back and forth.

If a duplicate is within 2 platforms of you, it will join forces with you to create a tornado that covers the distance between you and it.

Pummel
By default, Phantom Ganon generically smacks the foe for 2% a pop. If he has a duplicate, though, he’ll swap control to it. Duplicates are capable of grabbing foes as well, in which case you can actually deal damage and stun to them with the real one.

Down Throw
Now knocks the enemy into prone. Tech chasing with a duplicate. Figure it out.

Final Smash
Olololol summons Ganon


Vegeta (MYM9) Clone

RADITZ

  • Pretty much no stat changes outside to accommodate his size, but if Raditz’ tail is grabbed he will have to escape at triple difficulty and will take triple damage and knockback from throws.
  • If Raditz’s tail is ever dealt 40 damage total (The tail takes half damage in ape form), he loses the ability to go Great Ape.
  • All of Vegeta’s various pitfall effects make actual indents in the stage rather than pitfalling the foe harder.
  • Hitting a pitfalled foe while in Great Ape form with any move that does downward knockback spikes them through the stage.

Neutral Special
Raditz’s generic energy beam in this move now rebounds off of walls instead of the obtuse interaction with tunnels.

Up Special
Raditz only needs to stare at his fake moon for a mere 4 seconds to transform into Great Ape, but has no control over himself while in the form, it being handed over to a level 3 computer. The Great Ape’s AI is so stupid it’s easy to provoke it into killing itself. If the ape starts out in a crater, though, it won’t leave it, as it is too stupid to jump.

Jab
An entirely new move in which Raditz swats his tail in the direction you input for 5% and weak knockback. Most obviously useful for just swapping the position of it around, but if you deliberately put it in the foe’s face it can bait approaches to super close range and grabs.

Down Smash
The range on this move is reduced even further, but it’s faster and the knockback’s even better. Bait the foe to coming to you with proper camping then use this as GTFO to reset.

Grab
Raditz’s grab has less range, but functions as a grab-counter. Figure it out.

Up Throw
Raditz flies with the opponent upwards until they escape the grab for a 100% combo into his dair, enabling him to create a crater. At low percents, you can potentially stare at the fake moon the whole time.

Great Ape Neutral B
Raditz’s generic energy beam is around 25% weaker, but homes in on the foe.

Great Ape Up B
Raditz rips a chunk of earth 2 platforms long and holds it over his head before slamming it to the ground. The chunk is solid and has no hitbox until it slams onto the ground, at which point it is undodgable and deals 30% with knockback that kills at 80%.

Great Ape Down B
Raditz’s stomping destroys the entire stage. He only does this if the foe plays very campy and evades him for overly long periods of time. He will typically die first due to his stupid AI, though he will attempt to grab foes as he goes down. The stage respawns once everybody in the match loses a stock.

Great Ape Neutral A
Raditz’s stomps create undodgeable earthshaking effects across the entire platform rather than craters.
 

Hyper_Ridley

Smash Champion
Joined
Dec 21, 2007
Messages
2,291
Location
Hippo Island
Sawnik the Reemicks

After seeing that this is primarily built around the more modern Sonic, I began to treat it as a potential moveset for Smash Bros 4 should the Blue Blur return, which made me appreciate it a lot more. It does a great job of actually making Sonic's speed the core of his moveset instead of just LOL DASH, though I kinda wish you had focused more on the momentum-based aspects than the insta-boost, even if momentum is more of classic Sonic's thing. I very much enjoyed seeing stuff like Light-Speed Dash getting a nod in the set, and you kept the moves that I felt were most enjoyable from the Brawl set.

My biggest criticism would have to be that Sonic doesn't strike me as the type of character who should be managing a resource, especially when the player already has to deal with actually controlling all of his near-constant speeding. I get that infinite BOOSTing would be overpowered, but maybe just give it 1 use then a recharge period before he gets another. Heck, you could even keep the meter for "in-game reference value" and simply have it track the recharging period.

I think the biggest praise I can give this set is that it simply feels like it would be a lot more FUN to play than the Brawl set. Maybe it's just me, but with the Brawl set I'm basically watching Sonic dash back and forth and giggling at his speed while occasionally throwing out pitiful attacks that require 100 hits before I can even think of KOing. And then I start DAiring over and over onto a spring. With this set, I feel like I'd have a lot more fun trying to play him legitimately, and he still has lots of silliness to go around.

I can now say that I've commented what I consider to be the best and worst remake sets in MYM history. I'll let you decide which one Sonic is (smirk)
 

Katapultar

Smash Lord
Joined
Nov 24, 2008
Messages
1,258
Location
Australia
Anyone got any cool ideas or character(s) for MYMXI's 100th moveset? Get yours in fast before the spot gets taken! The mini looks like it'd be a bit of fun to do now that others are doing it but first some courtesy for those who await various opinions on their movesets as there doesn't seem to be too much of it for some reason. I don't know why unfortunately.

Hiding comments because it makes me look like a clean person and provides a sense of suspense for anyone they concern.


[COLLAPSE="CloudMan.EXE"]Hmmmmm, the moment I saw your name there I'd to know you had a set. From a first glance CloudMan.EXE seems like a basic set (he looks like Landlos) though I guess I have to delve in further to find out, eh?

While there's no playstyle summary (something I can't really fault you for), it seems that Cloudman is an aerial-efficient camper who heavily revolves around interaction with his clouds (as he has few to no basic moves otherwise, so it's good that he starts out with some clouds) and to a degree hides Dark Chips in them...which does come off as being a bit weird to some degree in regards to whether he actually does that in the series but a good idea non the less, and probably the best and unique of everything that's presented in the set. Something to pick at, if anything, would be the Up Special. Imaging it is obviously awkward with the proportions and all, and I assume it acts as a bit of a teleportation that puts you in the nearest cloud you have and that it doesn't work without any around.

Something I realize about your sets is how far you're willing to take all your inputs and dedicate them to the flow of ideas you've presented over trying to make something basic or visual for Smash, or MYM should I say. People seem to like that kind of working and I won't complain about it; good for fans of Type 1 set idealism though it doesn't really cater to my tastes, which is why I've kind of refrained from going too in-depth. I'm not really the right commentator for these kind of sets but I can say I don't disagree with them.
[/COLLAPSE]


[COLLAPSE="Jeff Madrox (keep the name it's awesome)"]You love Marvel Comics, don't you Nate? Jeff Mardock is like, one of those guys I've never heard of before. If anything, this set is nice with its relative simplicity in which once again you try to quickly convey an idea and get a set in at the same time. This guy seems real simple at first but the way he can keep making copies of himself is downright crazy, even for the MYMX standards. It looks imbalanced but isn't really as enemies could easily plow through the clones and destroy the real one.

The character doesn't seem too clear or emphasized, though from what I can gather and what this guy does he heavily relies on his power to trick the other characters of the crazy universe he comes from and would do so with some effectiveness as he commands the heroes with a clone (thus giving clones the ability to make other clones and having the real player control them is a very effective way to portray this side of his character); he'd need that kind of power to survive against the big bad powerful dudes and here it plays faithfully into a moveset. Most attacks are simple enough, and some have the liberty of working with duplicates. I like this set a fair bit; it's fun and simple in it's own way, much like the dude himself.
[/COLLAPSE]


[COLLAPSE="Battleheart"]People seem to kick on this set to which you'd obviously expect that, though you take it all with some funniness. I can't blame you for wanting to make a set that uses AN ENTIRELY DIFFERENT CONSOLE OTHER THAN THE WII, as I once had the idea of making players buy a 3DS to control their character from there for sheer mindgame epicness only that little guy could provide (and lots of money for Nintendo!), though I digress. I guess at the very least not being able to control your character is an interesting way to play the game without really playing at all say if you need to do something really urgent in real life, but then you go mess it up by saying you actually have to control the characters...or something like that with the Wii Remote. Daamm.

I don't despise this set nor do I think anyone else actually does, though it seems like something you'd leave in the corner of your room and never play with, only to find it on a rainy day and randomly play with it. There is a good deal of chesty ideas which somebody could probably rob like a pirate in order to fuel their own movesets; you could in fact come back and take one of these ideas for your own cool use so making this wasn't entirely a waste of time. Before I read this I had no idea this game even existed.[/COLLAPSE]

[COLLAPSE="Pichu"]Pichu blatantly reminded me of your Pokemon Breeding man and how you probably thought Pichu was cool and the melee one sucked to some degree to which he does and thus decided to make a set for him. It was done in a MYM point of view however, with your traps and duplicates and all. Here's an example of a moveset where the character does a few things that'd be expected of them but in a manner that is very uncharacteristic of them to do in the first place.

It's important to take care of what you mention and feed to the reader's expectations; you remind peeps that Pichu can harm itself with it's electricity but only mention that it needs to get out of the way from the Thunder or doesn't have powerful electric attacks, to which one'd blatantly expect Pichu to damage itself upon using them like it does in melee.

The presentation of the character is the one massive problem I have with this set to the point where I could easily view it in a better light was the idea done for a more appropriate character: MasterWarlord titled his comment for this set "Magneto" to which you could have perhaps made this set for instead of Pichu (and take out the cutesy moves), or maybe even another Electric-Type Pokemon. A fun idea for you could be to make a Magneto clone of Pichu for this mini...

You present a lot of good ideas and this is prevalent with your works though I reckon you do need to try and leech off the character and understand them so they make sense. I guess this set was probably rushed, though I feel what I said might be something you may want to keep in mind for the future.
[/COLLAPSE]


[COLLAPSE="Sonic the Remix"]Sonic the Remix is fun, a lot of fun. You've clearly put a lot of effort into this what with this being your 1st set for this contest and thus is greatly appreciated.

Remaking a character from Super Smash Bros (something you seem fond of) obviously holds a lot of conveniences to the maker which you've taken advantage of in terms of....well, everything from attacks to animations. It's almost like you were trying to -improve- Sonic from his low-tier position in Brawl! There seems to be quite a lot in this set designed for catering towards both Sonic fans and Smash Experts (AKA those who know the game and the terms from inside out like you do) though the abbreviations you use for the terms can be a bit difficult to understand if at the very least take a bit of a while to grasp, though that's just a nitpick to the set's style.

I feel that while you've done an absolutely amazing job with the organisation and trying to "modernize" Sonic what with his funky new game releases, this remix of Sonic does kind of seem to be the same old same old on the very core (though he IS a remix). Don't get me wrong though, I do love a great deal of the fanservice you've set-up here from the taunt-cancelling that Brawl really should have had to the modern, "cool" that the set tries to rev up for Sonic in both attacks and writing. When it comes to Sonic games I'm really only familiar with the 3D ones on the GC and what not and thus in my opinion seeing Sonic take from his 3D games appeals.

I feel, if anything, that this is essentially a flashy mash-up of what a Sonic fan believes makes Sonic that wasn't in Brawl, along some improvements. While there obviously isn't any really amazing coolness geared towards the usual crowd of MYM like ideas or un-smash flow what not I doubt you were aiming for that when you made this and were essentially trying to re-vamp Sonic to your own design, to which I can say you did a very good job and succeeded in that for sure.

FREE DAMAGE from the Pummel? I've ever heard such an interesting reason to use one!
[/COLLAPSE]

Just realized that the L moveset above the page is completed with an L in the place of the picture that's supposed to be where L is. I'm pretty sure I remember you, marioman, all the way back from the end of MYM7 who debuted with "thrice". Getting an actual moveset for L is pretty cool what with the one in the Grave not being completed, with this one having some funk behind it for something of low expectation, like the handcuffs, squatting and mysteriously pitfalling the foe's foot which I have no idea how that'd work. As you were able to put the L symbol in a picture of the man himself would be nice (and Wataru whatever I don't know who he is nor would too many people despite L being famous) as this moveset isn't being displayed on the bunker. Be sure to keep having fun, cause having fun is awesome.
 

Hyper_Ridley

Smash Champion
Joined
Dec 21, 2007
Messages
2,291
Location
Hippo Island


SKARNER
THE CRYSTAL VANGUARD


Skarner is a Brackern, a race of scorpion-like creatures who were as wise as they were ferocious. The Brackern are born as biological entities, but when they mature they travel the depths of the planet to find a special crystal that will fuse with them, making them immortal and granting them powerful magical abilities. For generations the Brackern were highly revered beings, until a war among humans used so much unchecked magic that the residual effects of it were like radiation poisoning, slowly managing to kill the Brackern.

To save their species, the Brackern hibernated in the darkest reaches of the planet. The sole exception to this was Skarner, the most powerful of his people. He slept closer to the surface so that he could periodically awaken to see if the planet was stabilized enough for the return of his kind. When a battle near his location roused him from his slumber, Skarner ended up caught in the crossfire before lashing out at everything in his way. Thankfully, eventually logic won over his mind, and he set-out to serve in the League of Legends in order to help prepare the world for the return of the Brackern.

STATS

Movement Speed: Slow. Not quite Ganon-tier, but not much faster than that either.
Traction: Very high
First Jump: Average
Midair Jump: Below average
Air Control: Average
Falling Speed: Average
Size: His body minus his tail is about .6x the size of a crouching Bowser. His tail does have a hitbox, sadly.
Weight: Surprisingly he’s “only” above average in weight

SPECIALS​

Neutral Special v Impale


Skarner pulls back his tail as it starts to glow red for moderate startup lag before stabbing it into the ground before him, having moderate end lag as he retracts it. If he connects with it, besides dealing 12%, he pins the victim to the ground with his stinger, pumping them full of raw crystalline energy (though if he’s fighting M. Trinity he’s probably pumping something else into her…). Skarner has super-armor and anti-grab armor while doing this, and after .5 seconds he retracts his tail. His enemy, on the other hand, is stuck in a “hurt” position as they suddenly freeze and become encased in dark blue crystals! Then a blue beam fires from Skarner’s stinger to the crystallized enemy, linking them together.

The tether can extend up to ½ of battlefield, and going farther than that drags the victim around weightlessly like they were just a Pikmin following Olimar. In fact, if Skarner happens to take knockback that would send him far enough the enemy would end up being pulled right along with him! One interesting property of the crystals surrounding the enemy is that they can defy gravity and float if pulled into the air. This is, of course, when you play 2v2 with Pennywise for epic lulz to ensue.

Your prey will escape after 4 seconds. While you may think that pulling them around the stage is pointless and you can just wail on them during this time, all attacks unless otherwise noted only deal 1% to the enemy(and grabs don’t work at all) due to the crystals acting like a shield of sorts. On the other hand, the crystals react strangely to forces acting upon them, always heading ¼ of battlefield in the direction they were sent unless they are stopped by the energy tether. Finally, the opponents don’t get released from the crystals for free; the crystals explode in sparkly lights, dealing knockback that KOs at 90%. You can detonate your crystals early by inputting this move with a tethered enemy, which causes Skarner to do some special flicking motion with his tail to snap the connection. Also, don’t think you can try and grab them right as they emerge from the crystals; they’re immune to grabs for a split-second after the effect ends.

Oh, and uh, if the initial stinging part is done in the air, and if he connects, he falls straight down with his enemy while turning them into a crystal. That SHOULD be the last detail you need to know, hopefully.

Side Special v Fracture


Skarner launches a blue crystal-shaped blast of energy the size of his head straight ahead from his…head, crackling with energy while traveling at moderate speed. It deals 12% and flinching knockback, and it also cause the victim to be charged with this energy for 6 seconds. Should Skarner bite into or strike his opponent with his stinger during this time he’ll absorb the charge, healing him for 14%. If the crystal connects with the enemy’s shield, then the shield will inherit the charge! Hitting summons and destroyable objects will only give them a charge that heals 9%, sadly.

All well and good, but to produce such a potent attack requires Skarner to use some of his own essence to conjure and focus it. This results in a blue crystal (the same size as the projectile) embedded in his abdomen to explode in a brilliant display of glittering gems the instant he fires the blast! This deals 10% to Skarner, and reducing some of his mass increases his movement speed by 10% but decreases his weight by that much as well. Skarner will regenerate the crystal in 10 seconds (during which time he cannot use this move), restoring his original weight and movement but the self-damage is there to stay. This move has moderate startup lag and low end lag.

Up Special v Crystal Slash


Skarner arm shines with bright blue light as he slices horizontally with it. This deals 10% and KOs at 165%, and has below average startup lag and moderate end lag. Against a shield it pushes the target back slightly and deals enough shield stun for Skarner to recover at the same time as his enemy. On a successful hit, Skarner’s claws become empowered and keep their magical shine for 10 more seconds as the light takes on a purple tint; the next claw-based attack Skarner lands will cause the opponent’s movement speed to decrease by 50% for the next 5 seconds while the energy is transferred to them.

In the air, Skarner leaps upwards 4 Ganondorfs with his claw raised above his head as the magical light envelops it, before plummeting to the ground with a powerful dropping slash. His body deals 11% and a moderate spike, but his claw deals 12% and a powerful spike in addition to empowering Skarner’s claws. What makes this really awesome is that if you land this as an empowered attack (besides 15% damage) the slowing effect even applies to the opponent’s rolls as they get up. Granted, this applies to rolls under the slowdown regardless, but seeing as this move is a spike you’re applying the effect while simultaneously setting-up wake-up shenanigans. This has the same lag times as the ground move, whee.

Down Special v Crystalline Exoskeleton


Skarner growls and raises his arms as his body takes on a blue sheen over .5 seconds. This causes his weight to increase by 15% and movement speed to decrease by that much. This also causes the parts affected by this buff to take .75x damage …yea, see, it turns out that his head doesn’t get this shiny new coat of crystalline paint, which is great for enemies as this effect lasts for a good 6 seconds, or until the affected portion of his being takes 5 hits.

Sure, increased survivability is good, though his already slow movement is decreasing to nearly joke levels now, but Skarner can also use his magical armor to fuel his projectile in Fracture. This will cause Skarner to lose the entirety of his enhancements through this move but it will also prevent him from taking damage or having to break-off pieces of his body. This also means that he won’t have to recharge since the crystal on his body is still intact so if you want to you can fire 2 in succession; alternatively, if you are currently recharging Fracture you can still fire it through using this move first.

THROWS

Grab: Skarner grabs his adversary with his small inner claw. This has but 2 frames of startup lag, but has below average range and has punishable end lag.

Many are those who forget that because this grab involves Skarner’s claws that it will activate the slowing ability of Crystal Slash. Of those that don’t, they often make the mistake of thinking that the effect won’t diminish until he throws his opponent.

Pummel: You know what’s coming, he squeezes his opponent with his pincer. This does 3% but is a bit slow.

Forward Throw: Crystal Smash
Skarner pulls his opponent closer while he simultaneously thrusts forwards his head right into their skull, dealing 14% and KOing at 105%. Awesome damage dealer and potential KO move, but it most likely creates enough distance between the 2 of you for you to have to start approaching again.

Back Throw: Position Swap
Skarner performs a short hop while quickly turning 180 degrees without letting go of his opponent. The immediate benefit of this is that Skarner can perform his other throws facing either direction off of any successful grab. You can also double-tap the initial direction to input for it in order for Skarner to use the momentum of the spin to hurl your enemy 1/3 of Battlefield while dealing 7%.

Hmmm, not very impressive, but if you keep rapidly alternating directions when you start this move, Skarner will balance on one side’s legs while leaning to spin around with his foe in his clutches, building momentum all the while. Each half-spin after the initial one will add .5% and 1/10 of Battlefield to the double-tap throw damage/distance. The “knockback” is on a nearly completely horizontal trajectory too, making it a great move if you happen to catch someone by the edge of the map at higher percents. As a final note, while Skarner is spinning around his grab victim becomes a hitbox that deals 9% and trips. You don’t think I’d forget to give one of my movesets a crowd-control throw did you?

Up Throw: Quick Toss
Just as the name implies, Skarner tosses his opponent up, dealing 8% and KOing vertically at 230% but the base knockback is as high as twice Ike’s height. The entire move takes maybe .4 seconds to complete including its low end lag, giving you ample time to abuse a slowed victim. At least, I hope you’re using this with a slowed victim considering it’s otherwise a pretty lame choice.

Down Throw: Take Down
Skarner tosses his opponent upwards ever so gently…before RAMMING HIS STINGER INTO THEIR BODY AND THRUSTING THEM BACK INTO THE GROUND. This leaves the opponent in a prone state a small distance in front of Skarner and both combatants can move at the same time. This deals 11%. This is a great throw as in addition to the prone state it’s the only throw that activates the healing effect of Fracture.

STANDARDS

Dash Attack: Burrow
With no startup lag Skarner leaps forwards about 1/5 of Battlefield and dives claws-first into the ground. His claws are hitbox as he descends, dealing 11% and a trip. If he hits a drop-through platform he’ll go straight through it then enter his air-game. If he hits solid ground, however, he’ll immediately go under the surface with no visible indicator of his location. .5 seconds later, Skarner bursts back to the surface with a roar, dealing 12% and KOing vertically at 90%. While he is underground you can hold left or right for him to resurface 1/5 of battlefield in either direction, adjusting the distance he travels to account for platform edges. His reemergence has moderate end lag, but the force of his attack creates a strong wind on both sides of him that pushes potential punishers Pikachu’s height away from him.

This is a key piece of Skarner’s assault. Force your opponent’s wake-up game with the first hit, then try to catch them rolling into the second! Even if you predict incorrectly, you’re very safe from counterattack. Perhaps what’s most scary is if you happen to catch a slowed opponent in this tech-chase; you’ll probably emerge faster than their slowed rolling, and if you predict correctly they’ll roll right into you for a grab…

Jab: Claw Combo
Skarner does a quick left-right set of pincer strikes, each dealing 4% and the second one dealing flinching knockback while pushing the opponent back a small distance. With below average lag on both ends, this is a pretty nice to way activate your boost from Crystal Slash and start to chase your crippled prey.

Forward Tilt: Power Scuttle
With no startup animation at all, Skarner starts to walk forwards in his normal walking animation with 30% increased speed as long as you hold the Attack Button. Upon releasing it, Skarner moves forwards a short distance in a powerful headbutt as his eyes glow with a magical sheen. This deals 11% and KOs at 190%. The headbutt has moderate end lag, but it does push opponents back slightly if they shield it so you’re not guaranteed to be punished. You can also cancel the walking phase of the move into a jump, which is pretty nice.

If you perform the headbutt against a projectile, his head will absorb it and form a blue coating of crystalline armor like that in his down special. This doesn’t affect his weight or movement speed but it does provide the damage reduction and can be used to power his Fracture move (prioritizing his “helmet” over the armor he acquires through his down special). It also can only take 2 hits before breaking. In any case, it’s nice to know that it’s possible to have your entire body equipped with the stuff, yes?

Up Tilt: Antlion Strike
Skarner thrusts forwards one of his arms at a 45 degree upwards angle. It has low startup lag and moderate end lag. It deals 11%, but the knockback depends on where your opponent is. If you strike a foe on the ground, they take horizontal knockback that KOs at 190%. Strike an aerial enemy, however, and Skarner immediately grabs them in his claws (this does NOT have a grab hitbox) before spinning 180 degrees and tossing his victim to the ground, sending them into a prone state as they skid along the ground ¼ of Battlefield. Great way to deter enemies from trying to escape to the air once you’re in melee range, or as a make-shift anti-air. Skarner also welcomes another prone inducer to his toolbox.

Down Tilt: Mandible Nibble
Skarner’s body is already low to the ground, so for his crouch he…


Anyway, the DTilt. Skarner leans his body forwards momentarily as he attempts to bite his enemy, dealing 10% and KOing at 180%. Besides making for a respectable low-hitting poke, it’s one of the moves you can use to heal off Fracture, and as it has below average lag on both ends so you can spam it a bit when you’re trying to get that healing strike from a really defensive opponent.

SMASHES

Forward Smash: Mighty Charge
Skarner rears back while bearing his fangs before leaping straight ahead at a high speed for 1/2 of battlefield, his mouth and pincers open the entire trip. Should he connect with someone he’ll chomp on them with his teeth and claws, dealing 13-30% and KOing at 90-60%. This is especially awesome as the nature of the attack means it triggers both Fracture and Crystal Slash at once! Unfortunately it has above average startup lag and moderate end lag, but if it connects against a shielding enemy it pushes them back 1/3 of Battlefield! Overall, this is a pretty nice punishing move and a way to mess up someone’s position on the stage.

Up Smash: Stalagmite Strike
Skarner lays his tail flat behind him as he shields his face with his claws and grunts, granting this guarded area super-armor for the duration of the move. After moderate startup lag 4 sharp, thin, pointed crystals burst from along Skarner’s backside, extending as high as Mario is tall. They deal 11-31% and star KO at 95-70 to anyone struck by them, and then after moderate end lag Skarner resumes to his normal posture, only the spikes remain where they sprouted!

While Skarner has these spikes formed, they form a passive hitbox that deals 4% and KOs at 240%. If they’re hit by any attack that would “ourprioritize” them via damage, they’ll be shattered and deal flinching knockback to Skarner but no damage. Before that happens, try using this input again, which will cause Skarner to adopt the same pose as before and use a small internal charge of magic to launch the spikes on a low trajectory forwards (with the same lag times as the initial attack). They spread apart 1/10 of Battlefield with the closest one landing 1/5 of said stage in front of Skarner. If they hit the ground they simply shatter, but upon hitting a living thing…they still shatter, BUT they also induce a dizzy state on the enemy like they were hit by a Deku Nut, as well as 6-16%. Quickly, use this chance to close the gap!

Keeping the spikes active is a great deterrent to airborne foes. Skarner bends his tail so that most of it is in the background while the spikes are in play, so your enemy has to deal with the spikes if they wish to attack you directly from above. This also means that if you use a move that involves Skarner’s body quickly rising, like say, his dash attack, your opponent has to go higher into the air if they want to avoid it via jumping.

As a final note, if you happen to have the spikes active when you use Crystalline Exoskeleton, they’ll get the buffed state too, making them harder to break! Before you get TOO devious with this, if you perform the moves in the opposite order the spikes simply emerge through Skarner’s powered-up shell in their normal state. Sadface.

Down Smash: Crystal Nova
Skarner roars as massive amounts of energy build up within his body before releasing it in a shockwave that travels along the ground 1/3 of battlefield to either side of him. It deals 12-30%, and KOs at 110-85%. It has above average startup lag and below average end lag. After the shockwave finishes, small green crystals line the ground and emit a type of enhanced-gravity magic. Any enemies who are afflicted with one of Skarner’s crystalline magic effects find that their ground jumps only travel half as high when performed on the affected ground (green energy chains can be seen connected between the crystals and the victim), making it even more difficult to escape from Skarner and prevent him from taking advantage of the statuses he’s applied. The ground changes back after 12 seconds and Skarner can alter as much of the stage as he desires, with the crystals even traveling up walls if they’re in-range to weaken wall-jumps.

AERIALS​

Neutral Aerial: Diamond Cutter
Skarner curls up into a ball, his tail even inverting its bendiness so it wraps around his front. He spins around for .6 seconds as blue energy radiates from his body that appears like the teeth of a buzzsaw (even sounding like Whirling Fortress in Melee), creating a hitbox that deals 11% and KOs at 150%. This has below average startup lag and moderate end lag.

If Skarner hits the ground during this move, he’ll continue to spin as he rolls forwards at the same speed as his FTilt, creating some nice sparks in his wake. Additionally, if you press the Attack Button during this time, he’ll use the momentum of his roll to cancel into his Dash Attack! Sadly, if you happen to have some spikes formed from USmash, they’ll be broken upon rolling over the ground, but don’t let that deter you from the great offensive (and potentially defensive too) potential of the move.

Forward Aerial: Sting Jab
Skarner jabs his tail forwards and slightly downwards, dealing 10% and light set horizontal/downwards knockback. This has low startup lag and moderate end lag, but auto-cancels if Skarner lands right as the end lag kicks in. This is a great frontal defensive move in the air, and if you land it with Crystal Slash active and auto-cancel it you can transition right into your offensive game as your opponent is slowed and barely knocked away! This is the functional counterpart to Skarner’s jab for his aerial game.

Back Aerial: Arachnid Kick
Skarner quickly leans downwards a full 90 degrees as he stabs his legs out behind him, spreading them apart ever so slightly to provide a great area of effect, also known as a hitbox. This has below average startup lag but has above average end lag as Skarner does a full frontal flip to get back into position. If Skarner’s legs connect with an opponent he’ll quickly grab his foe with them as he performs the flip, flinging them downwards once he’s back in position. This deals 11% and sends the enemy straight down. This isn’t an actual grab hitbox, but it is a pretty useful move just for its amazing range and ability to bring the foe down to earth.

Up Aerial: Strike From Below
Skarner angles his body straight up as he creates a small burst of crystalline energy to propel him upwards as high as him short-hopping. His mouth is open at this time, and if he connects with someone, he takes a nice bite out of them, dealing 10% and KOing vertically at 185%. This has below average startup lag and moderate end lag. If you need more range, using this move right after a short-hop or midair jump will cause the momentum from the burst to propel you 1.3x as high. Using this move during a full ground jump will cause you to rise 1.6x as high!

Down Aerial: Drop the Shovel!
Skarner faces the screen while angling his body straight down. He lifts his arms before hurling them back down with great force, dealing 11% and a decently-powerful spike. This has moderate startup and end lag, but if you hit the ground with your claws, Skarner will immediately dig into the ground with the same properties as his dash attack. This is a pretty handy move for chasing opponents from a high elevation, as you can threaten them with hitboxes while still bypassing drop-through platforms. It’s also great if you need to make a quick escape from the air; disappear into the stage, then pop-out behind them and change the roles of this chase!

FINAL SMASH – ENERGIZE

Skarner laughs as he raises his arms. A full set of USmash spikes emerge from his back and his entire body is covered in a red-colored version of Crystalline Exoskeleton, including his head! For the next 16 seconds, Skarner has the following buffs:
  • Takes .6x damage
  • Moves 20% faster
  • Has 50% increased weight
  • USmash spikes cannot be broken, deal the same damage as their initial attack uncharged at all times, and whenever the input is used Skarner fires energy bolts out of them that behave like directly launching them.
  • Can fire as many Fracture attacks as he wants without damaging himself or having to recharge it
  • All successful attacks inflict Crystal Slash’s slowing effect
  • Performing Crystalline Exoskeleton and completing its animation will heal Skarner for 10%
  • Grab is twice as hard to escape

Pretty nice boost overall, especially as these buffs can’t be taken away from hits like the normal version of his Down Special.

If you happen to have someone impaled via, well, Impale when you activate your final smash, a different technique occurs. Skarner again laughs deviously before yelling “BEHOLD MY STING!” Suddenly, the tether connecting his stinger to his enemy changes to a deep red, charging the enemy with tons of powerful crystalline magic. After a full second of this, the crystals encasing the foe explode with tremendous force, dealing 100% and Bob-omb knockback! Skarner is also completely invincible during this attack and his opponent will not break free of the crystals even if they would naturally, ensuring their demise. Of course, seeing as Impale is the input that is replaced with the final smash, you’d have to already have somebody impaled as you get the smash ball.

And yes, this IS the only direct interaction Impale has with other moves. Problem Warlord? :trollface:

PLAYSTYLE​

“You’ll never escape!”

That quote is perhaps the perfect 1-line description of Skarner’s gameplay. Skarner is at his core a melee dominator who spends much of the time chasing you down before kicking your butt once he gets in. Because of this, Skarner has notably more approaching moves compared to some of his melee fighter brethren. In fact, you could say that despite being a “close-range” fighter he actually has great options at long-mid-range!

The game starts; time to decide if you want to do some preemptive set-up of either your USmash or Crystalline Exoskeleton. USmash provides a quicker benefit against aggressive airborne foes and the secondary use gives you an extra tool against ground-based keepaway characters. Crystalline Exoskeleton is useful for its general damage reduction and how it boosts several of Skarner’s other options in the future (including USmash) but it’s not as easy to set-up due to the startup period. Your final option, of course, is to immediately start to approach your opponent, which can actually be very effective if you’re facing opponents who require heavy set-up.

Once you start advancing towards your prey the fun begins. Skarner’s got a plethora of moves that allow him to stay one step ahead of a fleeing target. DAir and UAir enable to him to quickly change elevation. FTilt, Dash Attack, and NAir are all viable ways of quickly closing distance. Skarner’s two projectiles (Fracture and USmash) are excellent for cutting off escape routes or stunning your opponents to really get in, but they’re unviable as camping tools due to self damage and/or set-up time. If you have an enemy who likes to fortify himself in a specific spot, FSmash is a great mid-range option for forcing him to move.

Once you get into close-range, your goal is to land Skarner’s grab, Crystal Slash, or Imapale. Crystal Slash is the bread-and-butter option, as landing the others at early percents means the enemy can be sent too far away and Skarner is forced to approach again, but slowing an enemy via Crystal Slash makes it easy for Skarner to permanently stay in his target’s face, landing more Crystal Slashes and even grabs for more amazing punishment. This is the part where Skarner’s final “zoning” move, DSmash, comes into play, making things next to impossible for your opponent to relieve themselves. Delicious tech-chasing with Skarner’s dash attack solidifies his horrifying abilities to crush his prey once he builds some momentum. Conversely, Skarner’s defensive game can give him trouble, as he doesn’t have the most reliable anti-air moves in the world and shield-grabbing isn’t easy with him unless the enemy is right up in his face. Of course, if you DO shield-grab someone you’ve just transitioned right into your BS offense!

Now, you may be wondering what exactly IS Impale’s purpose in all of this? Well, that overly complicated move serves a very simple purpose: EVERYTHING. You manage to land that move, you can do whatever you want depending on the situation. Stand your opponent right in front of an incoming stage hazard? Position yourself in the way of the move’s knockback so you can combo it into Crystal Slash/ a KO move? How about setting up your various buffs and pseudo-zoning abilities while your enemy watches? Why not try to do all three at once? How you use this move is what separates good Skarners from M2K’s Skarner, and yes I did just imply that he would play Skarner, BECAUSE WHO WOULDN’T?

In conclusion, Skarner is a freaky mixture of playstyles. He has to do some strange non-zoning with zoning moves so he can use good mid-range approaching tools so he can land a few epic close-range attacks to begin a powerful rushdown game. While playing him is not for the faint of heart, those that do master him will find themselves as respected as they are feared.

Doubles
Impale is really useful here; the ability to remove one of your opponents from the fight is insane. Skarner makes a pretty good tank character for doubles play, as his opponents will be afraid of wasting their time dealing with his various defense boosting techniques or end up being caught in his tech-chase or grab scenarios. This means that Skarner can easily still have all 3 stocks around when everyone else is running low, allowing his teammate to borrow some of Skarner’s to secure a victory. Just don’t impale your partner.

Free-For-All
Skarner h as trouble using his set-up moves in a FFA setting, but in return he has a much easier time getting into close-combat. He can use his digging attacks to temporarily get out of heated battles and to perform surprise KOs, and he’ll find that it’s almost unfairly easy to land Impale in the chaos of a 4-player bout. Rather than sticking to single targets, alternate between who you chase down to quickly rack up damage on all of your opponents.

Capture the Flag
Skarner prefers to hold the fort in CTF games. He can sit nicely in front of the flag and force opponents to put themselves in range of his grab and Crystal Slash to even attempt to get to it. If he performs a successful grab, he can spam his BThrow to ward-off enemy backup. If he can empower his claws and slow the flag carrier, he can use his regular chase-and-destroy gameplay to ensure that the flag never leaves his base. Finally, Crystalline Exoskeleton allows him to commit to larger fights and gives him more chances to land those crucial slowing effects and grabs.
 

Junahu

Smash Ace
Joined
Nov 15, 2005
Messages
899
Location
Shropshire Slasher
Junahu is a jerk ¬_¬

Sonic:
We've got a few things to talk about, but at the very least this remix is solid, professional, and relatively reverent of the original set. Yes, it's probably the best remix set ever, and I sincerely doubt any other MYMer would have done a better job. But I'm still not going to start pulling punches. Consider the rest of this comment a series of obnoxious nitpicks if you wish.

Right away I cringe and recoil when the Side Special became Boost. I knew it was coming, I knew MYM would accept nothing less, but the loss of the alternate spin dash is extremely bitter on my tongue. The subtle differences between the two is what made either of them worth using to begin with, and "Sonic has two spindashes" is one of the few things the developers came right out and stated from the get go. It was a wonderful allusion to the Mega Drive/Genesis days, where every input did the same thing. So yes, I miss Side Special Spin Dash, and wish you had concentrated on additional tweaks to the two spin dashes. I understand though, that I'm probably the only man alive who wants this.


Next, while Tornado itself is "ok" for Sonic to use (it's an odd choice, I thought the spring was just fine and dandy), the skydiving is NOT. This is his only special-fall-state, if I recall. It's half the normal fall rate, essentially a glide. Do you not see what that turns Sonic into? I'll give you a hint, the answer is Knuckles. Sonic shouldn't be gliding, I was hoping at least that much would be obvious to anyone. What does it even do anyway? With Sonic's already monumental horizontal recovery options, who would bother using the pithy skydiving?


For a character that is supposedly using momentum, there's not a lot of accelerating going on. Sonic's boost dealing heavier hits depending on the distance travelled is all well and good, providing Sonic an excuse to make marathonic passes of the stage, but without an element of acceleration, there's little reason to actually hold the input (especially since just a tap gives Sonic access to his ENTIRE ground game except for Jab). There's the question of whether releasing boost instantly jerks Sonic back to his normal speed, but I'm pretty sure the answer is 'no'. I mean, if it was 'yes', I'd truly worry for this moveset.


Back Air reversing ALL momentum would have been fine on any slower character, but for Sonic (and especially a Sonic when travelling at DOUBLE speed), the feeling is all wrong. It's also a cheap shortcut that Sonic himself would never use.

Besides, wouldn't tapping boost while holding backwards achieve much the same thing? Ugh, now I'm just making more arguements against boost... blarg.

Forward Throw doesn't need rings appearing. Mario's Up B does it because it's a Special attack, and because hitting things from below tends to make coins appear in the Mario universe. Sonic's Forward Throw implies that Sonic's Light Speed Dash 'makes' rings appear, which is the complete opposite of what it actually does.

Where is the throw where Sonic rolls WITH the opponent? That was one of his coolest throws.

Final Smash.... how did you do that? How did you remove like, the ONLY existing instance of momentum in Brawl, just to replace it with a Wario Man transformation? You're terrible.


Zook

Perpetual Lazy Bum
Joined
Jul 30, 2005
Messages
5,178
Location
Stamping your library books.
SKARNER

A moveset about a scorpion made of living crystal... Yeah, it's hard to deny how badass Skarner is. He plays in a fittingly badass manner, controlling the opponent while engaging them in melee combat. The minor buffs and penalties you have in his specials suit this playstyle as a melee controller perfectly, rather than seeming tacked on like they would in, say, a combo-based close combat fighter. It reminds me of a unique DnD 4e class, the Runepriest. You also use what would otherwise be filler inputs as the few moves that take advantage of some of his energy transfer abilities, so kudos on that, too.
 

smashbot226

Smash Master
Joined
Sep 1, 2007
Messages
3,027
Location
Waiting for you to slip up.
Statler & Waldorf


I'm Statler.
And I'm Waldorf.
And this is... wait, what? This isn't the Muppet Show!
Of course not, you senile old fart! It's Make Your Move!
The only thing I want to make move right now is my feet.
Why is that?
So I don't have to sit here and look at creative monstrosities!
DOHOHOHOHOHOHOHO!


So first up is apparently some sort of... what're they called again?
... I DON'T know, what the hell are you asking me for?!?
It's... like a Diggeyman or something, I dunno...
Well at any rate, it looks like it has some sort of slow stale meter.
I don't get why. PC's movesets get staler every day.
DOHOHOHOHOHOHOHO!
Well it's not all bad.
How so?
Well, he makes pretty intuitive use of Meditate in tandem with the stale-o-meter.
How the hell isn't it broken if he's still around then?
Oh, quiet down with the heckling for a second! I kinda find it weird his NSpec is his recovery but that's just me.
It's always just you, you balding creep. There's nothing interesting about random status effects and moves that flow due to arbitrary lags!
You're not seeing it, though. That's how the whole thing comes together. Sure, a playstyle might've helped-
A LOBOTOMY would've helped!
-but I insist that it's in the set's nature and gameplan to put the foe in a trance to distract them from the Diggyman's many tricks.
Bah, it all seems just so random! I mean, angled punches here, NSpec recovery there, and loads of emone filler buffs and nerfs! GET OFF THE STAAAAAGE!!!
You're just acting sour. Take it at a more positive angle, maybe you'll get around to liking it.
Hah. THAT'LL be the day. Right before pigs fly, Hell freezes, and Capcom releases a complete game.
DOHOHOHOHOHOHO!


And now we have a set based on... Terrorist? Osama? I don't know what the Sam Hill these kids are talking about?
Probably some more of that Purella Madonuts or something.
No, this one's based on a web game. So, like Spiderman?
Well, it's possible. You know the one thing Tobey Maguire and Majora had in common?
Uh, what's that?
They both used to ignore the people closest to them.
DOHOHOHOHOHOHOHO!
Though it looks like the only thing you'll ever need to use is the shark gun or the demon scroll if applicable.
Yeah, that and-
... And what?
IT'S A COSPLAY!!!
WHAT?!? BOO!!! GET OFF THE STAAAAGE!


Thank goodness, I think my circulatory system almost pulled a Wizzerd.
I don't even need to preempt that one.
Looks like that blue rat. Let's see, what was his name again. Sunshine?
FOR THE LAST TIME, I'M NOT YOUR SON AND MY NAME'S NOT SHINE!
I mean the set you old fool!
Who, that? That's Sonic? Don't tell me you don't recognize him?
How could I? More importantly, how can YOU?
He's the easiest person this week to derogate! Deride! Ridicule! Mock! Heckle! The very face of disappointment?
I thought you were talking about Plorf for a second there.
Who was I talking about then?
I dunno, some furry icon.
Oh right, Sonic. So he runs really fast, has another meter that tells him how fast he can run, and...
That's it?
Well, yeah. He does it in such a way that it can't really be described in one sentence. It uses something that's been done time and time again already, but Joe made it in such a way so fitting for a character and so oft seen for a mechanic that it really gives you a breath of fresh air.
Wow, Statler. Didn't think you could get so passionate about one moveset.
I can't help it. This is the most entertainment I've had from Sonic since Sonic Adventure 2!
DOHOHOHOHOHOHOHO!
And after reading Trainer Joe, I figured EVERYONE could use a break.
I know exactly what you mean. He should change his name to Peter Joekson and create more sets that take nine and a half hours to read.
At least nobody doesn't have an excuse to read this set.
Yeah. Woe unto everyone in MYM.
DOHOHOHOHOHOHOHOHO!


Now a stone scorpion? What has our youth come to? First terrorist cosplays, now this? Good grief.
Yeah, it reminds me of Super Smash Brothers Brawl before it got bad.
When was that?
When Melee was out.
DOHOHOHOHOHOHOHOHOHO!
Then again, the flow between the magical stinger and abusing your extra layers for health is kinda neat. Then again, the rest of the set is either Fracture abuse or Crystal Slash abuse, with little else in between.
But doesn't it all fit well with the main goals? Even if it's filler, it's still relevant.
Bah! He doesn't seem like much of a good close range fighter either, with his not special weight rating.
And for being a close range fighter, he doesn't seem to have quite a few answers for people who like to dodge erratically to throw players off.
Oh well, for its faults, I can certainly find an entertaining read in Skarner.
I thought you hated Skarner a few seconds ago! Wait, who's Skarner?
The guy we've just been reading about!
... Wait, THAT'S it's name?!?
Who did you THINK it was?!?
I didn't know. Does it look like I care?
Why don't we check in with xat and see how they feel?
*PC, you're the best cola ever*
DOHOHOHOHOHOHOHOHO!
 

Junahu

Smash Ace
Joined
Nov 15, 2005
Messages
899
Location
Shropshire Slasher
Indeed, and it sears my eyes to look at.
There is no way to use Up-Special WITHOUT skydiving, and no way to induce a helpless fall without Up-Special. It drives a wedge in the way Sonic feels to play.
In fact, why is skydiving here anyway? That's the burning question here. Wouldn't it be leagues more fun if Sonic DIDN'T enter a special-fall, and could actually attack the foe he scooped up in the tornado? Or, perhaps, use one of his vastly superior horizontal propulsion moves in order to recover? Sonic's ability to mix and match his aerial actions was a big part of what made him fun to play around with in Brawl (and in his games too)
 

MasterWarlord

Smash Champion
Joined
Aug 24, 2008
Messages
2,902
Location
Not wasting countless hours on a 10 man community
http://www.youtube.com/watch?v=ZpHeodMmXzM

MOVESET THAT JUNAHU IS FORCED TO COMMENT


If it isn’t clear yet, this is a reMIX for Dedede in the vein of Sonic, not a reMAKE in the vein of Bowser, so that Junahu is fully forced to acknowledge all of the terrible things done to the Brawl moveset. Unlike the lot of you hypocritical In-Smash fags, I actually play Brawl and enjoy it, something you lot seem incapable of doing, and I’ve played Dedede enough to actually respect how changing his moveset would mean for people who already play him. After his hilarious Sonic comment (Regardless of me thoroughly hating that moveset), I was inspired to whip this up in a matter of hours.

All of Dedede’s stats and animations are completely the same. ESPECIALLY the crouch. Unfortunately, he requires a new voice actor due to the recent passing of Masahiro Sakurai.

SPECIALS


Side Special – Waddle Dee Toss


The core concept of the Side Special is largely the same. Rather than the chosen minion spawning at random, though, the move can be charged, though the charge isn’t storable. A mere half a second gets you a Waddle Doo, but you’ll require 2 seconds to get a Gordo. Gordos now impale foes at grab difficulty (Dealing the same damage), and don’t vanish until they make contact with the ground/a blast zone, making the Gordo a great on-stage gimping tool.

Waddle Dees gain spears which they can poke at foes for a far quicker attack, dealing 6% and light knockback. You’d think the spears would give them range, but they’re too stupid to make use of it. Regardless, the Waddle Dees actively attack foes who come in front of them rather than attacking in a set pattern. Waddle Doos are still stupid, but their beams are far more valuable (They deal 20% and stun foes long enough for fsmash to hit in Brawl). Both minions last until killed and turn around at edges, with the cap of minions out at a time getting boosted to 3.

Waddle Dees and Doos are still very easy to kill, but not as easy as in Brawl. They won’t randomly get shot off at lightspeed by certain attacks, and will simply take knockback like Jigglypuff at 80%. They don’t take hitstun and Dedede is still capable of hitting them. . .
Neutral Special - Exhale


Dedede exhales forcefully – he doesn’t need another grab on his Specials when it’s inferior to his grab in every way. This pushes foes at varying speeds based off their weights – obviously meaning Waddle Dees and Doos are pushed at incredible speeds in comparison to foes, say, Captain Falcon’s dash speed, while average joe Mario is pushed at Ganon’s dash speed. Aside from stage control, it’s obvious gimping fodder. Just beware the awkward ending lag as Dedede coughs a bit.

Up Special – Super Dedede Jump


No, I’m not freeing Dedede of helpless from this move, as he’s already too stupidly durable. The change is when Dedede makes contact with the ground - a Bowser's width of ground on either side of him becomes a hitbox that deals 10% and vertical knockback that kills at 115%. If a foe jumps up into the air to avoid this predictable hitbox, they can potentially be met by minions you propel into the air.

-Still- too predictable? Yeah, I’d have to agree. Dedede now gains the ability to cancel the superjump even while he’s still going upwards, but “canceling” the jump just stops his upwards momentum – he still can’t grab ledges. The superarmor on the move remains in-tact for the normal time, enabling you to jump just but a Ganon into the air then crash down, with the foe having to be very selective in punishing your endlag.

Down Special – Hammer Spin


Dedede hoists his hammer above his shoulder before glaring at the foe for a touch of start lag, then starts spinning around, faster and faster as he goes. This amounts to a bit smaller than a DK sized hitbox on either side of Dedede constantly, dealing 18% and knockback that kills at 80%. This keeps up for 3 seconds, after which Dedede enters some bad endlag. Dedede can move at Mario’s dash speed during this move, but has terrible traction, so slower foes can just jump over him. . .Or maybe they could, if mashing B during this move didn’t make Dedede rise like Luigi’s Down B. Dedede can rise up to twice Ganon’s height during the move’s duration all over the course of half a second, but that’s all the rising he gets to do.

It’s risky for foes to attempt to get past Dedede due to how large the hitbox his – rolling won’t take you past him, and jumping over him is dangerous too. The easiest way is to just go off-stage – you pretty much –have- to convince the foe that’s the easiest escape if you fail to hit them, as it’s the only way to cover up Dedede’s ABOMINABLE 2 second end lag. Minions can only go so far.

GRAB-GAME


Grab – Inhale


What?!? How DARE I not make this a Special! . . .You do realize that the actual grab is the more special one than a Special based grab, yes? Neutral B gets a single throw in Brawl while his generic grappling is what gets emphasized.

The inhale itself is entirely unchanged from Brawl – you can even do it in the air for suicide KOs just like old times. Unlike before, once something is inhaled you can move around freely (Albeit with a much weaker dash speed first jump), and you won’t get random lag as the foe tries to escape your tummy. Inputting throws and the pummel is done by inputting Z + the direction you want. You are also free to inhale your minions and throw them, and there’s no limit to how much you can have inhaled at a time (Including multiple foes). Even items can be thrown, rather than simply getting digested. Yes, the Neutral Special works as a “throw”, and the foe gets a brief flinch as they come out of your stomach so they don’t just immediately attack you.

Pummel – Sakurai


Dedede laughs, causing his belly to jiggle about and damage the enemy for 3%.

Forward Throw – Kirby Star


Dedede spits out everything he’s inhaled, it all merging together into a star. To grabbed foes, this works the same as with Dedede’s Neutral B “throw” in Brawl. To outside foes, though, the star is a hitbox that deals 8% X the amount of stuff Dedede has inhaled. The knockback KOs at 150% by default, lowering by 25% for each item absorbed. So for relevant 1v1 purposes, with 3 minions inhaled, you’re looking at 24% with knockback that kills at 75%. Pretty bloody impressive.

Back Throw – Homerun Hammer


Dedede exhales the foe in front of him and performs the animation of his Brawl bthrow. The damage is nerfed to 12%, but the knockback is now entirely horizontal, making it actually possible to KO with. Aside from being the most reliable kill throw, if you only have a single minion absorbed you can just use them as a projectile via this throw.

Up Throw – Throw Up


Dedede exhales the foes upwards, dealing a token 6% and knockback that kills at 130%. If you exhale multiple foes, they’ll be in each other’s face and be prompted to immediately attack one another. Waddle Dees and Doos can substitute for these foes, with Dedede himself hopefully able to cover the foe if they fastfall downwards. If they use a stall than fall dair, predict it and fsmash them as they land.

Something relevant to tell you now is that Waddle Dees and Doos will take out parasols if they’re ever in the air, making them fall half as slowly as Jigglypuff. While airborne, they will constantly move in the direction of the nearest enemy, still fully capable of attacking.

Down Throw – Penguin Plop


HE’S AN EAGLE.

Dedede exhales the foe to the ground with a fair bit of force, dealing 8% and knocking them into prone. Dedede then proceeds to perform his infamous Brawl dthrow, gaining superarmor during it to protect him from the foe’s get-up attack. If he hits them, they’re dealt 15% and knockback that kills at 70%. Dedede can choose to DI to the left or right during the plop to try to predict where they’ll get up from prone, but the odds are 3 to 1. Dedede already is a good gimper and likes the foe at the edge, so that can eliminate an option, and your minions can hopefully reduce the others. In a FFA, you’ll have multiple foes in prone in front of you, so you’ll pretty much be guaranteed to hit –one of them- no matter which direction you plop in.

If you don’t have a foe eaten, inhaling a Waddle Dee is useful just for letting Dedede attempt to use the superarmored plop on an outside foe, making them think twice about coming in to casually interrupt set-up.

STANDARDS


Neutral Attack – Batter Up


Dedede slams his hammer to the ground very lightly, dealing 5% and very very weak set upward knockback to anyone who was on the ground in front of him. He then swings his hammer at the victim with the second press of A, dealing 8% and knockback that KOs at 160%. Dedede is rather insistent on performing the second part of the jab, and will stay in the stance for a brief bit without you pressing A. This enables you to mindgame the foe on when you’re going to hit them the second time, as if you just hit them immediately they can mindlessly air dodge it every time. Generally the disjointed priority of your hammer will save you from most counter attacks.

The move becomes somewhat less bland when other factors are taken into account, such as minions and outside foes. You can delay hammering the victim in hopes an outside foe will hit them, or to make sure that the outside foe doesn’t dodge it. When hammering a Waddle Doo, the delay comes particularly notable for synchronizing your hit with the Waddle Doo’s beam.

Dashing Attack – Pratfall


The Brawl version of this move is rather untrue to the source material it’s taken from – this is Dedede’s single fastest attack in the boss fight that Sakurai endlessly reuses, and more often than not the sole attack he’ll ever be able to actually hit you with. The low lag of the move is restored here as there’s no dramatic start-up animation, and while it still deals as much damage as ever it knocks the foe into prone. Dedede dusts himself off as he gets up, but the foe is stunned during that time. Once they’re both out of stun/lag, it’s frame neutral with Dedede ready for some prone abuse. Before then, minions and outside foes can decide who takes the punishment – make sure the foe is closer to those idiots than you.

Forward Tilt – Hammer Extension


Dedede performs his Brawl ftilt. The move pushes foes to the end point of the hammerhead rather than dealing knockback rather than dealing knockback, but in this version the end lag comes with the hammer hitbox in-tact, as it drags foes right into Dedede’s point-blank face. This has obvious applications with the dash attack, and aside from Dedede’s generally faster options he can go for a dthrow (If he has a minion inhaled) or an Up Special to abuse superarmor if the foe would otherwise win the close range fisticuffs.

Used on a minion, this move is excellent for a sort of bait and switch tactic. Push the minion into the foe’s face, then scoop him back to prevent him from getting slaughtered. Alternatively, you can just use the scooping part exclusively to save the minion or to use them as a meat shield.

Up Tilt – Puff Up


Lord knows we have to get rid of that god-awful up tilt from Brawl if we’re getting rid of anything. For this move, Dedede gets into a limboing position as he puffs out his stomach – if he already has stuff in his tummy, he gets pretty ridiculously fat. His stomach has superarmor here, and if it’s attacked will cause Dedede to exhale all of the air it in (As well as anything he’s grabbed) in pain. The air pushes the foe with an astounding set knockback of 4 platforms, making it a great way to get the foe off-stage or in the least make the foe change their mind in who to attack in a FFA. If they –do- go offstage and you had minions inside of you, this will pretty much instantly set up an ideal gimping game as the minions take out their parasols, ready to aid you in your gimping attempt. Unlike most anti-airs, this one doesn’t scare off the foe from attacking, making it more feasible to actually make use of it.

The vomiting up of air will trigger on contact with a foe of any sort, mind you, you just get a bonus if they attack you. If they’re fastfalling, they’ll get pushed 3 platforms instead of 4, and only 2 if they just gently bump into you.

Down Tilt – Penguin Trip


Dedede’s dtilt's change is so tiny that you won't notice it unless you open up the coding - the chance to trip the foe is slightly increased. There's still a chance it won't, though, letting the move still potentially KO at high percents.


What –is- changed, is his crouch. The moment Dedede crouches, all of his minions will start walking towards him. That has enough uses by itself, but if you get 2/3 minions to come to you they’ll hoist you into the air (Luxurious seat not included), able to carry you wherever you want at 0.8x-Mario’s dash speed, with similar jumps. If Dedede inputs dtilt (Or “Down B”) while this is happening, he’ll kick the minion at the front of the line forwards, causing them to attack once before they attempt to rejoin Dedede. Just be wary that if you kick a minion forward when you only have two, the remaining one won’t be able to hold up Dedede’s weight and will get squashed.

Dedede will stay automatically crouched in this stance, and inputting B/A + any direction other than down will have the minions throw Dedede in the input direction at Mario-Fox’s dash speed, taking 2 seconds to slow his momentum down. This boosts the power of his physical moves in a momentumish fashion by 1.2/1.35X until he loses it.

Dedede will retain his momentum and slide along the ground if he comes into contact with it. If he uses his dashing attack, he’ll pin the foe with the pratfall and slide forward with them with them both in prone until he runs out of momentum, allowed to go off-stage.

SMASHES


Forward Smash – Banhammer


King Dedede performs his fsmash, with all of that glorious most powerful move in the game power in-tact, but also all of the lag. While that flinching hitbox directly next to Dedede’s hammer is unfortunately now gone, once Dedede’s hammer hits the ground in generates a massive shockwave as tall as Wario and as wide as a crouching Snake. The shockwave travels at Ganon’s dash speed and drags foes with it, dealing many hits of 1% and stunning as it goes. The shockwave travels 1-3 platforms based off charge, making the damage rapidly vary anywhere from 10-30%. Dedede is slightly faster than Ganon in dashing speed, so he can potentially catch up to the foe in the shockwave if he charged long enough. . .

The shockwave wraps around stages much like the Hothead item. If you somehow manage to fully charge a shockwave right next to the edge and catch a foe in it, it’s an insta KO if their recovery is bad, and otherwise lets Dedede easily prevent them from getting back to the stage. Even uncharged, if the shockwave goes over the grabbable edge you can prevent them from grabbing it for free on-stage gimping.

Up Smash – Hammercut


Dedede swings his hammer overhead with identical properties to his regular usmash. Notice that the arc of the hammer swing starts in front of him as he puts his whole body into the motion to swing behind him? If this is used as a dacus, Dedede will slide more than he would in Brawl (Read: At all), a wind hitbox to be generated at a 45 degree upwards angle behind him. The wind hitbox is about Bowser’s size, but can potentially KO foes as early as 120%. If Dedede uses this while sliding from being thrown by minions, the wind hitbox will transition to be directly behind him turning it into an excellent KO move as it KOs earlier simply due to the direction of the knockback. While it probably won’t KO due to Dedede sliding away from the edge, it gives the foe very few safe options as you go past, and if it hits it gives you some set-up time in the very least.

Down Smash – Hammer Spin (Again)


Largely unchanged from Brawl yet again. The move gets a buff in power, roughly 1.3x, making it an ever more formidable KO move than before, but the end lag is increased enough to be a very significant issue. This makes the move a good candidate to use after having been thrown by your minions – slide away to safety during said end lag.

AERIALS


Neutral Aerial – Body Slam


Dedede extends out his limbs in that god-awfully stupid looking nair he has from Brawl, which by default is the same. If Dedede has inhaled things, though, the move gets massive buffs to range and power thanks to Dedede’s stomach. With 3 things inhaled, it deals 16% and knockback that KOs at 115%. Just beware that Dedede will suffer extra end lag as the move gets buffed, it becoming quite an issue once 3 things are inhaled. If Dedede triggers the landing lag of the move while he has something inhaled, though, he’ll bounce off the ground, higher based off how much he’s inhaled (2 Ganons with 3 things inhaled), covering that end lag.

Forward Aerial – Kingly Hammer Swing


Dedede swings his mighty hammer forwards in what is a disturbingly good move with fairly low lag and plenty of KO power, but is largely outclassed in Brawl by his broken bair. The change to this move is that when Dedede connects, he’ll propel himself backwards 2 platforms. Aside from more easily recovering back to the stage in a gimping attempt, Dedede can make even more use of his minions off-stage by using them to get back. Needless to say, this also makes Dedede prefer to be off-stage with multiple enemies in a FFA.

Hammering –anything- counts as a way for Dedede to hammer himself backwards, including projectiles (Which he’ll reflect) and the stage itself. Said ability to hammer the stage to move backwards also enables Dedede to pursue foes deeper under the stage in his gimping attempts while still being able to make it back without a second thought. While Dedede is propelled backwards, he’s a hitbox that deals 9% and knockback that KOs at 150%.

Back Aerial – Random ninja foot of DEATH


The bair is still as stupidly fast as ever with randomly long range – it was the entirety of his off-stage game in Brawl. The power however is massively nerfed, dealing a mere 4% and weak knockback that will never feasibly kill, but it still functions as a wall of pain.

If the landing lag of the move is triggered, Dedede will kick up dirt with his foot at foes behind him, dealing 10 hits of 0% and flinching over a third of a second, making an excellent way to delay them long enough for Waddle Doo’s beam to hit.

If Dedede has momentum from being thrown by his minions, triggering the landing lag causes Dedede to dig his foot into the ground and slow his momentum twice as quickly. This causes the same dust cloud to get kicked up across the entire stage. . .If you slow to a stop with this and kick it into the foe’s face, you’ll actually be able to capitalize on their brief stun due to not being in end lag.

Up Aerial – King’s Applause


Dedede claps above himself three times as he laughs. Each clap deals 5%, weak downward knockback, and stuns the foe long enough for Dedede to fastfall and combo into the next clap. If they have better aerial movement than Dedede (99% of the cast) they can generally escape this before getting clapped a third time, but even then. . .With Dedede’s amazing recovery, this essentially functions as a pseudo suicide KO to take the foe –close- to the bottom, then for you to race them back to the top with your superior recovery so you can come down again and gimp them. Fair doesn’t seem quite so pointless now, does it?

Down Aerial – Hammer Drill


Dedede turns to face the camera and steps on his hammerhead as if he were going to use it as a pogostick, then spins around rapidly, an attack taken from his playable appearance in Return to Dreamland. In the air this works mostly just like the Brawl dair, but the final hit does strictly downward knockback.

On contact with the ground, Dedede will drill his hammer into the stage, creating a tiny, almost miniscule divot in the stage. This has no effect on the actual terrain, but anybody who attempts to dash over it will trip forwards onto their stomachs and into prone. Dedede is not immune, but if his minions carry him over it he won’t have to worry about it.

Alternatively, if Dedede has momentum as he does this, he’ll slow to a stop twice as quickly like in the bair, but the divot will be in a line and not cause tripping. It has no visible effect on the match whatsoever until prone is taken into play in which case people in prone cannot roll out of the divot. If you don’t want to actively micromanage this yourself, create a single regular divot in front of the longer divot so that they’ll trip into it.

FINAL SMASH


Dedede takes out and puts on his mask, giving him a new set of Specials and invulnerability for 10 seconds.

The Neutral Special causes Dedede’s hammer to shoot out 3 homing missiles the size of Wario, each dealing 18% and knockback that KOs at 110% as they explode in the typical Bowser sized explosions. They travel at Ganon’s dash speed with no limit to how many can be out at a time, but explode on contact with anything.

Side Special turns into a buffed version of Bowser’s flamethrower as it comes out of the hammer – essentially picture said flamethrower if the range was 1.5x as big and it never ran out.

Up Special causes an electric cage to come down and block in the arena, causing anybody who comes into contact with it to be dealt 20% and stun on par with Zamus’ dsmash. Yes, you can block off the stage with it, but foes can just come in contact with the fence to refresh their jumps until the Final Smash is over. Press Up Special again to make the cage retract.

Seeing Down Special is taken from this fight, it is simply buffed rather than changed. The end lag on the move is nerfed to a mere half a second, and you’re allowed to fly about as much as you want with the move.

PLAYSTYLE


LOLOLOLOLOLOLOLOL FIGURE IT OUT PLAY HOW YOU WANT


Junahu

Smash Ace
Joined
Nov 15, 2005
Messages
899
Location
Shropshire Slasher
I guess I really have been neglecting you Warlord. Here, have a heaping spoonful of the bitter medicine that you symultaneously crave and derride.

King Dedede:
So, yeah. The approach you take is entirely different from the one JOE used, but that just means you change different things for different reasons. Such is the way of the remix; a personalised retooling of something that was explicitly designed for a large audience. Obviously I'm more at odds with this remix than with Sonic's, but there are some decent changes in here, and you still have that talent for piecing ideas together that sound fun, especially considering how quickly it was made.

I think part of what made the waddle dee toss fun is that it was a projectile attack first and a summoning move second. Dedede just throws them out and they kinda suck, which I suspect is Dedede's feelings toward his own troops. I totally approve of using inhale on the summons, and it's something Kirby ought to be capable of too (along with inhaling Dedede's Up-B stars)
I won't bother argueing about the random factor of the waddle dee toss being part and parcel of the humorous feel Dedede has. Because even I have to admit that being able to summon what you want would be useful.

Inhale would actually become really useful as a Special if he could inhale his summons and spit them out as stars, as you say. There's little reason to move it onto the grab input, but since you did... that surely leaves room for a special where he puffs himself up like a balloon...?

Seeing a remix in a vaccuum like this is part of what makes me not like remixes. Dedede's Super Jump makes the whole stage a hitbox? What does Bowser's ground pound do? How about Yoshi's? What do all of the bosses' ground smashing attacks do now?

I approve of a useful Down B, though I think all the original ever really wanted is a little launch resistance once you've charged it up.

I kind of like that crouching brings summons to you, though that's again painting them as being more intelligent than they really are. And all the extentions to the crouch game are just fantasy-masturbation.

If you're adding anything to that forward smash, I was really hoping it would be a star, much like the Up-B ones. Maybe an option to keep pounding at the ground too(like extending Toon-Link's Forward Smash into its second hit).

I admit that B-airs are one of the failing points of Smash Bros, since all they do is make players want to move around while facing the wrong way like morons. I hope that one day a set finds a 'real' use for B-airs, but for now, wall of pains is fine.

uwwaaaah, you read my complaint about Super Sonic and then one upped him on the Final Smash. That avalanche of minions was hilarious chaotic fun. I don't wanna have Wario Men for every Final Smash.
 

MasterWarlord

Smash Champion
Joined
Aug 24, 2008
Messages
2,902
Location
Not wasting countless hours on a 10 man community
So, yeah. The approach you take is entirely different from the one JOE used, but that just means you change different things for different reasons. Such is the way of the remix; a personalised retooling of something that was explicitly designed for a large audience. Obviously I'm more at odds with this remix than with Sonic's, but there are some decent changes in here, and you still have that talent for piecing ideas together that sound fun, especially considering how quickly it was made.
For how spiteful the writing is, would you believe I was actually trying to make this set appeal to you for the most part? For the most part I'm fairly happy with your comment - my reply isn't just a rebuttal. I am a bit disappointed you didn't mention the FFA stuff, but eh.

As for ideas. . .Click that glorious link at the bottom.

I think part of what made the waddle dee toss fun is that it was a projectile attack first and a summoning move second. Dedede just throws them out and they kinda suck, which I suspect is Dedede's feelings toward his own troops. I totally approve of using inhale on the summons, and it's something Kirby ought to be capable of too (along with inhaling Dedede's Up-B stars)
I won't bother argueing about the random factor of the waddle dee toss being part and parcel of the humorous feel Dedede has. Because even I have to admit that being able to summon what you want would be useful.
I originally had it as being 50/50 between Waddle Dees and Doos with it still being random. I just really didn't want to insert the Gordo into a random chance, though, and thought you'd prefer the Gordo to be kept over the random summoning.

Inhale would actually become really useful as a Special if he could inhale his summons and spit them out as stars, as you say. There's little reason to move it onto the grab input, but since you did... that surely leaves room for a special where he puffs himself up like a balloon...?
Pretty clever idea. Exhale is probably one of the more awkward moves in the set, and it's mostly just there to try to mask the lack of Inhale until you get to the grab along with a more ranged way of moving minions.

Seeing a remix in a vaccuum like this is part of what makes me not like remixes. Dedede's Super Jump makes the whole stage a hitbox? What does Bowser's ground pound do? How about Yoshi's? What do all of the bosses' ground smashing attacks do now?
Considering what I was going for, I probably should've just made it the ground directly next to him like in the jab. I suppose I'll go make the change now.

DK's Down B exists.

Yes, I know I have that various crap with the divots in dair as well, but they're microscopic divots and he's specifically attacking the ground like said DK Down B, not just destroying the ground automatically by being fat.

I approve of a useful Down B, though I think all the original ever really wanted is a little launch resistance once you've charged it up.
Even then I don't particularly like that move for the liberties it took with Dedede's hammer. It turns the hammer mechanical for almost nothing that couldn't be accomplished with a similar animation.

I kind of like that crouching brings summons to you, though that's again painting them as being more intelligent than they really are. And all the extentions to the crouch game are just fantasy-masturbation.
This mechanic in particular took more consideration of your views into account than you'd expect. Firstly, it's entirely optional, and the Brawl set was left plenty in-tact enough to never have to use it or for any move to be degraded without it. Secondly, it doesn't occupy an input, so there's no awkward move that does nothing. Last but not least, it's much more feasible for people to actually find in Brawl than the usual cryptic interactions - we Dededes spam the crap out of crouch.

If you're adding anything to that forward smash, I was really hoping it would be a star, much like the Up-B ones. Maybe an option to keep pounding at the ground too(like extending Toon-Link's Forward Smash into its second hit).
My fsmash was honestly one of the more organic changes I really would've liked to see in Brawl, and that shockwave actually is generated in the Masked fight.

The Brawl version as is begs for the star, though, you're right, with that little flinching hitbox on the side already being there anyway. Almost feels like they forgot to put in the animation.

uwwaaaah, you read my complaint about Super Sonic and then one upped him on the Final Smash. That avalanche of minions was hilarious chaotic fun. I don't wanna have Wario Men for every Final Smash.
I was actually thinking you'd like the Final Smash, considering the flashy nature of the new moves. Having had to play more than my share of item matches as Dedede, I loathe Dedede's Final Smash for the fact that it's not controllable in any way. Peach's and such are fine because you know what's going to happen, but when I play Dedede I'm mainly grabbing Smash Balls just to prevent others from using them.

That and I thought a Final Smash cloned from the first one with other Kirby minions looked even lazier.
 

Hyper_Ridley

Smash Champion
Joined
Dec 21, 2007
Messages
2,291
Location
Hippo Island
Sakurai

While I'm not sure how much of this is a joke and how much of it is a legitimate set, I will say that I overall like it more than the Brawl set on-paper. Toning down his BAir and DThrow will make him more interesting in competitive play and making his specials more relevant/useful will make him more popular among the casual folk. Beyond that, Dedede is one of the Sakurai sets I feel he got mostly right to begin with, so I appreciate that you took a refinement approach rather than a full-blown remake. Nice work Warlord
 

ForwardArrow

Smash Ace
Joined
Aug 17, 2011
Messages
502
King Dedede
Well, I guess I can't fault the set for being a bit bland on a whole considering it was a one day set that was trying to make a point. I mean, the set is certainly more INTERESTING than Dedede's actual moveset and has plenty of decent playstyle ideas thrown in here like the grab and the minion chair, though I'm not sure as to how well they work together on a whole. It's pretty blatant you were trying to appeal to Junahu here, and while you ultimately failed it's hard to say you weren't trying, if albeit I would have avoided stuff like the Up Special shockwave. But yes as a set this is shockingly actually decent, though I still would not personally vote for it.

Scarner

Okay, getting past the fact that the character looks pretty darn awesome, I much prefer this set to your MYMX works. The various armor abilities feel a bit like magic syndrome, though I assume it's based on his in game abilities so I'll let it slide. The zoning and constant pursuit game is fun, though as with Chaos 0 I feel he's a lot less interesting versus characters with no good projectiles or traps. None-the-less, the various things he could do with his exoskeleton were kind of cool, imbuing bits of it into the foe to heal himself and generating various extensions to it. In particular, I love that Up Smash. The move manages to function both as a generic move and a fancy trick without feeling tacky in the slightest. So yeah, I quite enjoyed this set, it might actually be my favorite of yours(mostly on the premise that, well, sets age)
 

SirKibble

Smash Champion
Joined
May 2, 2008
Messages
2,400


The Cutie Mark Crusaders are a trio of young ponies from Ponyville. Unlike the vast majority of their peers, these three little fillies have yet to gain their cutie marks—special markings that appear on a pony’s flank when he or she discovers their unique talent. They spend their time trying to come up with anything they can possibly try that they might be talented at, and thereby get their cutie marks. Needless to say, they end up trying some pretty bizarre things. Ironically, their individual talents are fairly obvious to others, but since they need to be allowed to discover them on their own, the Crusaders remain oblivious. Now, let me introduce you to the members of the Cutie Mark Crusaders:


Apple Bloom is the younger sister of Applejack. Like her sister, she’s strong and hard-working, but can also be stubborn. She’s perhaps the most impatient of the Crusaders about waiting for a cutie mark. Apple Bloom’s true talent lies in craftwork and design, as becomes apparent when she’s able to repair the run-down clubhouse the Crusaders are given within a day, and also provides Sweetie Belle with much-needed assistance creating the costumes and props for their performance in the school talent show. In said talent show, however, rather than run the design aspect and probably discover her talent, she opted to be the lead dancer, something she was notably bad at and largely substituted Kung Fu moves for.


Scootaloo, the only member of the Crusaders not to be the younger sister of another pony, is a pegasus pony who idolizes Rainbow Dash. She is a bit of a tomboy, and has an expressed distaste for stories she feels are too “mushy.” She is often seen riding a scooter around, and although she cannot fly yet, she uses her wings to propel the scooter very fast. Beyond that, she has shown a great proficiency for tricks on her scooter, as well as dance moves, hinting that her talent is likely the realm of choreography and coordination. Despite this, she chose to sing in the Crusaders’ talent show performance.


Sweetie Belle is Rarity’s younger sister, a unicorn pony, and the final member of the Cutie Mark Crusaders. She is a bit of a ditz, so although she often tries to help her sister with design and fashion projects, she usually just makes a mess and causes problems. However, she is also usually the level-headed one when the other Crusaders get into arguments. Her fear of performing in front of a large audience kept her from singing in the talent show performance, even though the other Crusaders and several other ponies agree she has an amazing voice. Instead, she handled the props and costumes (very poorly, I might add).


SIZE – SMALL
Even with three of them, the Crusaders don’t take up much space, as they stand pretty close together. They have a decent-sized horizontal hurtbox, but they’re about as short as they come. Note that hitting any of the Crusaders will cause them all to take knockback together.

WEIGHT – LOW
Needless to say, these fillies don’t weight much, either. They’re not as light as the likes of Jigglypuff or Mr. Game & Watch, but don’t expect them to take any kind of solid hit and stay on the stage.

GROUND CONTROL – AVERAGE
They’re a bit faster than the average character on the ground, but nothing particularly impressive. Their traction, however, is a little subpar.

AERIAL CONTROL – AVERAGE
The Crusaders have decent enough jumps, and okay air speed. They fall at an average speed as well.


About the only thing the Crusaders have going for them here is their small size. Still, they’re not overly hard to hit, since they don’t move abnormally fast on the ground or in the air. As mentioned, they function as a single unit in terms of taking damage and knockback. Even barely hitting one of the Crusaders will send them all flying.

Although the Crusaders function as a unit, the Crusader leading the group will affect how effective most of their moves are. A random Crusader will be chosen to lead the group by default, or you can choose on the selection screen who you want to start out leading. This crusader will perform all the solo attacks the group has, and will be the main participant in any group attacks. Your Specials, as you’ll see, allow you to switch between Crusaders. You can tell who’s leading by who runs slightly in front, jumps slightly earlier, etc.


Neutral Special || Prop Trees In Bloom

Before anything else, this move will switch Apple Bloom to your lead pony if she isn’t. This happens laglessly, but is certainly worthy of note. Apple Bloom then starts working furiously on something, disappearing in a cartoonish cloud of dust. The Crusaders have superarmor for the .75 seconds she’s working, after which the dust will settle, revealing that she’s build a small plywood apple tree (and by “small,” I mean Ganondorf’s width and 1.5x his height, with a Kirby-sized bunch of leaves at the top). The dust cloud is not that big, the tree just magically is. After all, friendship is magic. Anyway, there’s some pretty noticeable start and end lag for this move, so it can’t be spammed very well for excessive superarmor.

The prop trees, once created, act like background destructible stage parts. You know, they’re hit by projectiles but you can run straight past them. They take 30% damage to destroy, but alternatively, you can deal a hit of over 5% damage to the upper half to knock them over. Pretty easy to knock the things over, and when they fall to the ground, they’ll deal 12% damage and good diagonal knockback to anyone (besides you) they hit. Laying on the ground, they still act as destructible stage parts, retaining all of their old properties, but won’t provide you nearly as good of cover due to their low position. This move can be used in the air, but you’ll fall throughout the course of it. The tree, after being built, will simply fall to the ground. If it falls from the air onto a significantly slanted surface, it will fall over immediately upon hitting the ground.

Side Special || Scooter

This special, like the Neutral, switches your lead pony before anything else. This time, Scootaloo will take the lead as her scooter appears beneath her. A small wagon attached to the scooter appears as well, with Apple Bloom and Sweetie Belle inside it. Like Wario’s bike, it immediately takes off in the direction you used this attack. Unlike Wario’s bike, it doesn’t hop up at all if used in the air. The scooter only travels straight forward, at about the speed of Captain Falcon’s run. The scooter and wagon are both hitboxes that deal 10% damage and okay upward knockback. You can be knocked off by powerful enough attacks, though you can withstand weaker ones and still stay on your scooter. You have the following controls while riding the scooter:
  • Tap Control Stick (Same Direction): Gives you a short speed burst, going at Sonic’s dash speed for a Battlefield platform’s length. While doing so, you deal 16% damage and better knockback if you hit someone. You can’t use it again for a platform’s length after finishing.
  • Tap Control Stick (Opposite Direction): Causes you to turn around quickly. Scootaloo turns the scooter on a dime, swinging the wagon around behind her, briefly turning it into a high-priority hitbox that deals 19% damage and strong diagonal knockback. This is one of your better KO options if you can pull it off.
  • Jump Button: Scootaloo will jump off her scooter as it continues along the ground, reaching a height of the lower Battlefield platforms before falling back down onto it. She is a hitbox while doing this that deals 6% damage and downward knockback, usually hitting opponents into the wagon. You’ll travel about one-third the length of Final Destination while doing this, unable to do anything else with your scooter until you land on it again. While this does essentially increase the scooter’s hitbox, it does forfeit your control over the scooter. If the scooter goes over the ledge, the other ponies will abandon wagon and wait at the edge with superarmor for you to get back. After falling back to the original height of the scooter, you will gain control of Scootaloo. Note that without the others, Scootaloo cannot perform any moves that require the entire trio, including the Up Special, so be cautious of using this near edges.
  • Special Button: Push the Special button again to make Scootaloo grind the scooter to a halt and end this move. She can stop very fast, so don’t worry about skidding too far or anything.

Down Special || Sweet Song

You guessed it—this move puts Sweetie Belle in the lead. Similar to Jigglypuff’s Up Special, Sweetie then proceeds to sing a few notes, putting nearby opponents to sleep. The affected area is slightly larger than Jigglypuff’s, and the duration is a little longer. Depending on how much of the song opponents are caught in, they’ll sleep for a longer or shorter time. Unlike Jigglypuff’s song, Sweetie’s can affect airborne foes as well, causing them to hover in midair as they fall asleep. When used from the air, she and the other Crusaders also fall at a reduced rate. So, basically, this is just an overall better version of Sing, right? Not quite. You see, a foe who has drifted off is so soothed by the song and oblivious to reality, they’ll have superarmor for the entire time they’re sleeping. Naturally, this means you can use the move to damage rack, but you’ll have to predict when your opponent is going to wake if you’re going to use this to set up a KO very well. Additionally, after waking, opponents are immune to falling back asleep for eight seconds.

Up Special || Cutie Mark Belayers

Ropes appear around each pony’s midsection, tying each of the followers to whoever you have as leader at the moment. The two following supporting ponies will then use their front hooves to hoist the leader skyward. Despite their elaborate efforts, this only sends the lead pony about as far as Mario’s Super Jump Punch. She does become a hitbox of 13% damage and pretty good diagonal knockback, though! After being launched, she’ll immediately reel in her friends, unless she sweetspots the ledge. In that case, they’ll just have to dangle below until she climbs up. When she does so, her two friends become hitboxes like she was in the beginning of this attack, though they don’t deal damage and knockback separately. They’ll be hitboxes till they catch up with her, meaning you can get a little more mileage out of this bonus if you roll or jump from your hanging position than you can if you simply climb up.


Down Tilt || Craft Construction

Your lead pony will disappear in a cloud of dust like the one in Apple Bloom’s Neutral Special, then emerge shortly after with some creation made from scrap pieces of wood. Of note, the dust cloud work deals a little multi-hit damage to opponents standing too close, usually maxing out around 5%. Either Scootaloo or Sweetie Belle will fail to create anything special, making what is obviously just a chunk of scrap wood held together by a bit of glue and a couple nails. This scrap wood is about as large as the soccer ball item, and acts similarly, able to be hit around. It deals 3% damage on impact with anything, and can only be dealt 10% damage before being destroyed.

However, if Apple Bloom is leading the trio when you use this move, she’ll be more successful with her craftwork, and produce a small ramp. The ramp is a little wider as Kirby, and half as tall. The ramp can’t be knocked around, but acts as a part of the stage for 10 seconds before disappearing on its own. The slope is such that Apple Bloom’s prop trees will topple over immediately if you drop one on the ramp, and as a nifty bonus, Scootaloo will deal 5% extra damage on her scooter as she flies off the ramp with it! (She’ll drop back down pretty quick, so you generally don’t have to worry about launching yourself off the stage or anything like that.)

Up Tilt || Wooden Wall

Your lead pony grips a long piece of plywood in her teeth, and swings it upward. This deals 8% damage over a pretty good area. She’s barely strong enough to swing it up to a 90 degree angle, after which she’ll drop the plywood and it’ll disappear...

Unless Apple Bloom is running the show! She’s got another idea for that plywood! She’ll quickly set it upright, where it now acts as a solid wall. The wall will, however, fall over the first time it’s attacked, dealing flinching knockback to anyone hit, unless Apple Bloom does this in front of one of her trees, in which case she’ll take a tiny bit more end lag to nail the plywood wall to the tree, stabilizing the wall. The wall is half as tall as the tree, and if the tree is knocked over, adds 7% damage and a fair bit of knockback to that section of the tree’s hit.

Dash Attack || Hurry Up

Your lead pony exerts all her energy to go top speed for a short distance--a little longer than a Battlefield platform--becoming a hitbox as she does so. For Apple Bloom and Sweetie Belle, the change in speed is almost negligible, and they become hitboxes of 7% damage. Scootaloo uses her wings to push her forward faster, and is a hitbox of 10% damage and okay upward knockback. Note that the others aren’t able to keep up with her, so this variation has a little extra end lag, though not much. As an alternative to suffering this lag, you can use the Side Special anytime during Scootaloo’s dash to cause her to end it by whipping out her scooter and immediately riding it. The other ponies will somehow catch up enough to make it into the wagon, and you’ll be using your Side Special as you normally would.

Neutral Attack || Carefree Humming

When you use this attack, your lead pony will start humming, giving off a small aura of sound waves (about as big as Jigglypuff’s sing) that deal 2% damage and flinching knockback every half-second. Lag on either end is practically non-existent, thankfully, so you can use this for a quick interruption of an opponent’s attack if nothing else.

Sweetie Belle, unlike the other two Crusaders, does this absolutely effortlessly, and as such, can move around at her normal speed while humming to herself. As long as you hold the Attack button down, she’ll keep humming. Additionally, her humming alone is soothing enough to prolong the sleep of snoozing opponents, making it more difficult to wake up with every hit from this move. For that reason, this a pretty good option for damage-racking a foe she’s put to sleep via her Down Special.

Forward Tilt || Tussle

Even good friends don’t always get along. When you activate this input, the Crusader in back of the group will leap forward and tackle the other two, resulting in yet another cartoon cloud of dust engulfing them. Their heads, legs, etc. will randomly pop out, as is customary in cartoon fights like this, and they become a hitbox roughly the size of Bowser that moves forward at the speed of Ganondorf’s walk until you release the input. If you keep it up for longer than a second, though, the Crusaders will actually start to deal damage to each other, albeit it’s a measley 2% per half-second. While they have very low priority while doing this, and can easily be hit by an attack to knock some sense back into them and make them remember who they should really be fighting, opponents who do touch the hitbox will find it’s very difficult to escape for the first full second they’re in it, during which they’ll take multi-hit damage that usually reaches about 10%. After this, they can typically DI out fairly quickly, taking a couple more small (1-2%) hits in the process. This move has a fair amount of end lag as the Crusaders get their act back together and brush themselves off.


Up Smash || Hammer Time

Your lead Crusader will leap a short distance into the air, wildly swinging a hammer around for 3 - 5 hits (depending on charge) of 4 - 5% damage. The final hit deals decent diagonal knockback, while the others deal only flinching. If you use this with Apple Bloom, she’ll swing 4 - 6 times instead. Furthermore, if Apple Bloom does this in front of one of her prop trees, she’ll use each swing to pound a nail into the tree. These nails stick out one side, and the tree will always fall with that side down. Each nail adds 2% damage and a good bit of knockback to the falling tree, regardless of where it hits the opponent (due to Apple Bloom spreading the nails out across the tree). She cannot pound more than six nails into the tree. Note that this move will not deal damage to the tree, but the other Crusaders’ uses of the hammer will.

Side Smash || Super Spin

Dancing is always a good tactic in fights, right? Anyway, your lead pony will stand up on her hind legs, then proceed to move forward half a Battlefield platform’s length, spinning around the whole while. Apple Bloom and Sweetie Belle will deal 5 - 7 hits of 2% damage (depending on charge), before getting dizzy at the end and falling over on her face for significant end lag. Scootaloo, on the other hand, has the coordination to spin faster (for 7 - 9 hits), and doesn’t suffer much end lag at all. Like her Dash Attack, this can be cancelled into the Side Special at the end by inputting it during the move, and when hopping onto her scooter from the spin, Scoot will automatically perform the turnaround action (the one performed by tapping the control stick the opposite direction normally), for a great finishing blow to this move.

Down Smash || High-Pitched Squeal

Your lead pony takes a deep breath while charging, then lets out an ear-splitting scream. The range increases with charge, from that of Jigglypuff’s Sing to approximately the size of Bowser. This deals 15% damage and good diagonal knockback, though the knockback varies a bit depending on how close to the victim you are. The closer you are, the more knockback. This is a quick attack, though, and easily spot-dodged if the opponent anticipates it.

Sweetie Belle’s variant, given that she has greater control over her voice, lasts long enough that spot-dodging, while still possible, is much more difficult. In addition, this is the only move capable of waking an opponent put to sleep with her Down Special, dealing damage and knockback like normal. A perfect ending to your opponent’s peaceful slumber.


Back Aerial || Wooden Plank

The Crusader leading the group will swing a wooden plank behind her, smacking opponents nearby for 9% damage and okay knockback. As you might expect, Apple Bloom has an additional use for this attack. If she uses it and hits one of her prop trees, she’ll quickly nail the board to the tree, creating a makeshift platform on the tree that’s a little wider than the tree itself. All characters can stand on this platform, and--oh, boy, here it comes--you can even build another prop tree on top of it! If one tree topples over, all the trees above it will also fall, making this a powerful way to attack a large portion of the stage if set up right. Of course, missing will essentially destroy your entire setup and have to start over again if you’re taking that approach. This, like the Up Smash, does not deal damage to the tree if Apple Bloom uses it.

Down Aerial || Swan Dive

Your lead pony spreads her hooves, falling in a graceful manner toward the ground and dealing 7% damage and weak knockback to anyone she hits along the way. This lasts as long as you hold down the Attack button, unless you drop more than the distance from the top Battlefield platform to the main stage area. In that case, if you’re using Apple Bloom or Sweetie Belle, the poor little filly realizes she’s been falling for a while, and enters a panicked, flailing state that is, for all intents and purposes, the same as helpless. Scootaloo, more daring than her friends--not to mention she has wings, even if she can’t fly with them yet--can hold this as long as she wants, and can actually propel herself more quickly toward the ground if you continue to hold the control stick down while you hold the Attack button. She’ll increase her damage with her speed, maxing out after twice the aforementioned distance at Captain Falcon’s dash speed and 15% damage that deals good horizontal knockback. Considering that you can also move left and right at normal aerial speed with Scootaloo, it’s highly recommended you make sure she’s the one using this attack.

Forward Aerial || Voice Blast

With a filly-sized yell, the opponent is pushed forward a set distance. The sound waves cover a range about Bowser’s width and Kirby’s height, and deal 8% damage with set knockback one Battlefield platform forward, and no hitstun at all. This is q quick move, though, so it’s definitely not without its uses.

Sweetie Belle’s range is better than the other Crusaders by about Kirby’s crouching height in every direction. More importantly, she has more control over that set knockback. The opponent hit by this attack will only be pushed forward for as long as the Attack button is held, and Sweetie maxes out at two Battlefield platforms instead of one. This is especially useful for repositioning sleeping opponents so that they’re out of your way, or perhaps better yet, in your way when they wake up.

Up Aerial || Uplifting Tune

A sweet tune is surely what the opponent wants to hear. Apple Bloom’s and Scootaloo’s aren’t so sweet, though. The affected area for this move is always half a Smart Bomb’s radius around the lead pony, and for the aforementioned two, they’ll deal 5% damage, weak upward knockback, and minimal hitstun with it. Not to mention it’s an extremely brief hitbox, and easily dodged. Again, Sweetie’s vocal control is better, so she can prolong the hitbox as long as she wants by you holding the Attack button down. She also slows her descent to half of normal while doing this, and affected opponents take 8% damage and rise slowly. Yep, this serves a vertical purpose like the Forward Aerial’s horizontal one. Sweetie can control how high the opponent rises, but it’s limited to within the range of her attack. And yes, she does deal a small amount of hitstun like the other two, so this is a bit of a safer bet than the Forward Aerial if your opponent isn’t sleeping.

Neutral Aerial || Pinwheel Ponies

Another move that isn’t different depending on who your lead pony is! The other two ponies will grab the front and back hooves of the lead pony, and the lead pony will then spin around, forming a wide circle of hitboxes between the three ponies. Spinning in mid-air is a little slow, but the range on this move is rather good, and it deals 10% damage and okay knockback to anyone hit. Useful as a basic move that doesn’t require you to know which move(s) your lead pony is best at. Unfortunately, there is some considerable end lag as well, so this isn’t usually the best option if you know what your lead Crusader can do well.


Grab Attack || Bounce

The Cutie Mark Crusaders’ grab is pretty standard, although animation-wise, it involve the lead Crusader putting her hooves up to the opponent’s chest-area, then shoving them over, pinning them to the ground. For the Grab Attack, the other two Crusaders will jump on and bounce off of the opponent for 2% damage. Since there are two of them to do this, you can repeat it rather quickly.

Up Throw || Tree Topper

The pony pinning down your opponent will quickly let go, slide her head under them, and headbutt them upward for 9% damage and okay knockback. The knockback will be adjusted, however, if Apple Bloom is performing the throw and is within a Battlefield platform of one of her trees. In that case, she’ll throw them straight toward the top of it, where they’ll crash their head through the top, getting stuck and having to escape with grab difficulty. This provides Apple Bloom one of her only ways (without switching to another pony) to incapacitate her opponent and buy some time for a better setup with the trees. If the tree is knocked over while the opponent is stuck in it, they will take all the damage, but no knockback as they’re still stuck in the tree.

Forward Throw || Sharp Turn

If either Apple Bloom or Sweetie Belle uses this move, she’ll flip the opponent onto her back, then run forward a short distance before turning around abruptly and flinging them off. This happens faster than it sounds, and gives the foe 8% damage and okay horizontal knockback. Scootaloo uses her scooter instead, causing the attack to deal 12% damage and slightly better knockback. And of course, if you input a Side Special during this move, she’ll come right out of that turnaround into riding on her scooter, a good way to put some space between you and the thrown opponent.

Backward Throw || In the Dust

Flipping the opponent overhead and behind them, your lead then gives them a solid kick in the gut, sending them skidding backward along the ground a short distance with 10% damage to boot. Scootaloo, after doing this, will whip out her scooter and shoot forward about a Battlefield platform’s length, kicking up several small rocks as she does so that shoot back toward the area the opponent is in. These each deal 3% damage and small knockback, and you’re likely to hit with 2 - 3 of them. These can also hit other opponents in the area. And yes, Scoot can transition into her Side Special from here as well.

Down Throw || Lullaby

As expected, Apple Bloom and Scootaloo aren’t the best at providing lullabies. Their so-called lullabies will deal 6% damage and weakly stun the opponent like Zero Suit Samus’s Paralyzer does. The stun, once again, is weak, so it’s really not even that noteworthy, and you’d be far better off with another throw if one of these two is your lead.

But Sweetie Belle, she can sing! Her soft lullaby puts opponents to sleep with 7% damage, though this sleep is not the same as her more powerful Down Special one, and will only last a small portion of the time. Nonetheless, it will give you some escape time if you need it, and is a great way to buy some extra time while your opponent is in-between Down Special slumbers (remember, they’re invulnerable to that move for eight seconds after waking up). As a neat bonus, this will refresh the grip of the sleep on any other nearby opponents who happen to be snoozing when you use this..


The Show Stoppers

It’s performance time! The Cutie Mark Crusaders rush to the center of the stage (they’ll reappear there if over a ledge where they wouldn’t be able to get there using normal movements, and a stage appears beneath them. Their disastrous performance goes something like this:

  • For the entirety of 20 seconds, Scootaloo will sing at the top of her lungs, making a Smart Bomb explosion-sized area around her take 15% damage and good diagonal knockback every second.
  • Sweetie Belle will lose control of a fan she’s supposed to be in charge of. The fan blows hard in a random direction, having infinitely long range as wide as Kirby that pushes opponents back hard with a wind effect.
  • Apple Bloom is the Crusader you’ll control during this Final Smash. You can move her around at her walk speed, with her on her hind legs the entire time. She can also jump. She has her own set of Standard, Smash, and Aerial attacks that are all rather generic kung-fu moves, each dealing about 10% damage and good knockback.

The Crusaders are all invincible for the duration of this Final Smash. On smaller stages, their presence will surely be felt, but this Final Smash is less-effective on large stages. When the Final Smash finishes, all the Crusaders will return to the stage, it will disappear, and the fight will resume.


Okay, I won’t toy with you this time and make you read one playstyle section before giving you the extra bit you need to know about this moveset. See, while you can play switching between Crusaders to ensure all your moves are at their most effective, there’s an alternative way that doesn’t involve you going back to your Specials all the time. If one Crusader lands 5 of her attacks--the ones she’s best at, including the Special--without using any she’s not the best with, she’ll get a hunch that might be her special talent, and any time you use one of those moves, you’ll automatically switch to her like you do for the Specials. Of note as well is the fact that hitting with the same move twice in a row doesn’t count toward this, and using a move that another pony is best at will reset the count entirely.

Knowing this, the first thing you’ll want to do when playing the Crusaders is try to get them to suspect their talents. Sweetie is the easiest to do this with, due to her Down Special putting the opponent to sleep and her other attacks allowing her to hit them while they remain asleep. The Down Smash should be avoided at first, as it will wake them and won’t allow you to get as many hits. A combination of Sweetie’s other moves will easily get her thinking, and ease the burden of getting the other Crusaders to recognize their talents, as they won’t be able to accidentally use any of Sweetie Belle’s moves anymore.

The other two ponies aren’t as easy to get to suspect their talents, but you can, to some extent, continue to use Sweetie to make their attacks easier to hit with. Scootaloo’s scooter is a bit easier to hit with than Apple Bloom’s prop trees, so we’ll go with her second here. Keeping offensive is generally better, though Scoot can also get away from a dangerous opponent in a pinch. If you’ve kept the opponent at low percentages with Sweetie, a lot of Scootaloo’s moves can combo into her Side Special, such as the Dash Attack and Forward Smash. Since the Dash Attack will knock opponents up as well as forward, though, you’ll often need to employ her jump attack as soon as you can to ensure a hit. Using these two moves in conjunction with the scooter will usually net her a hunch pretty quick.

With that done, it’s not as hard to get Apple Bloom thinking about her talent. The combination of Sweetie Belle and Scootaloo’s attacks are great for incapacitating the opponent while keeping your distance from them, allowing Apple Bloom to get a good setup with her prop trees so that you have an easier time hitting with them. Set them up in the right place with Sweetie Belle’s Forward and Up Aerials, and you can score Apple Bloom’s hits on them while enhancing your trees with the Up Smash and Backward Aerial. Also keep in mind her Down Tilt, which makes your Neutral Special into a more immediate attack when you drop a tree on the ramp.

Fortunately, by that point, you should have dealt a fair amount of damage to your foe, so you should just need a good hit to finish them off. If you played Apple Bloom’s portion right, you should have the means to do that fairly quickly. If you can drop a prop tree with a full set of nails in it on an opponent at higher percentages, that’ll usually do the trick. Here’s a neat trick to help you out if you’re having trouble, too:

Set up a tree with all the nails in it and a platform from Apple Bloom’s Backward Aerial, then put the opponent to sleep with Sweetie Belle’s Down Special. Move them close to the tree while they sleep, then quickly hop onto the platform. Using Sweetie Belle’s Down Smash, knock the tree over in the direction the opponent is. In most cases, with proper distancing, you’ll also hit the opponent with the Down Smash before the tree topples over enough to put you in aerial mode. This, of course, will wake the opponent up and cause them to take all the knockback that tree has to offer.

For opponents who aren’t at high percentages--perhaps because you’ve already scored the KO on them, the process can be fairly similar. You can use Scootaloo to chase them down and score a few hits, and Sweetie Belle to make them totally helpless and prone to Apple Bloom’s more powerful setup. Of course, that’s a guideline, and between the different Crusaders’ strengths, you’ll find yourself adjusting to the opponent’s playing style as well. Apple Bloom can use her trees as defense and setup against camper/spammer characters, for example, or Scootaloo can help you force an approach on them. It’s up to you.

One final note: when you lose a stock, you’ll lose the hunch the Crusaders had about their talents, but if you had them thinking about them before you lost the stock, you’ll only have to use 3 moves to get that thought process back in their mind, so you can resume a full-force strategy a bit sooner.​
 

Davidreamcatcha

Smash Ace
Joined
Feb 9, 2011
Messages
629
Another MYMini Entry since no one is doing them (TIPSY)

Pussycat Puss (MYM11) Costume

BLACK MASK

Up Special -
The tommygun fires about twice as much bullets in the same amount of time, however, the recoiling in midair is much less, meaning Black Mask's recovery is quite bad.

Neutral Special -
The goons are not cats, tipsy. However, they have about 10% more stamina than cat gangsters.

Down Special -
Black Mask barks an order rather than roaring, the glare is twice as effective against your goons and the foe, forcing them to run twice the distance. This can not magically turn projectiles around and the car will not magically retain momentum, however.

Pummel -
Same buffs to up special apply.

Up Throw -
Rather than getting on top of each other, the 3 gangsters get into a formation alongside each other. One stays in the foreground, one stays in the background, one stays on the fighting plane. Notably, this works wonders with their pummel, as they are forced to shield it.

Jab -
Black Mask performs a devastating right hook, dealing 6% damage. This can deal high damage to shielding foes, as well as pushing them forward.

Forward Tilt -
Black Mask backhands in front of himself, being able to angle the hit like countless other ftilts. If he hits, he deals 5% damage and pushes the person he hit forward. If he hits their face, he deals double the damage.

Up Tilt -
Black Mask delivers a sharp uppercut, dealing 10% and launching those hit skywards. This is probably one of your better ways to get goons into the air.

Down Tilt -
Much of the startup lag here is removed, as he simply pounces without snarling and getting on all fours.

Dash Attack -
Black Mask will automatically stop if he is about to run into the air. Now cliche cartoon physics for him.

Forward Smash -
Black Mask doesn't use a hammer, instead stomping forward with his boot. This now has the benefit of going through shields, as Black Mask now attacks their uncovered feet. Of course, this has a much smaller hitbox.

Instead of pitfalling foes completely, this buries their feet in the dirt. They can still attack, but can't move, having to button mash out, which will require them to stop attacking.

Up Smash -
Black Mask simply performs a headbutt rather than any cigar shenanigans, acting as an effective anti-air that deals 15-16% damage.

Down Smash -
Black Mask places a molotov cocktail on the stage instead of TNT, it can't be buried, obviously. However, once it explodes, it leaves a trail of fire as wide as Bowser that lingers on stage for 5 seconds. This deals containing hits of 2% damage, holding foes in place for whatever attacks you want to inflict.

Neutral Aerial -
A brutal kick, this deals 6% damage (10% if it hits the foe's lower area). Since Black Mask can move during this, he can drag the foe along with his foot.

Back Aerial -
Done with a backhand instead, having the same properties outside a smaller hitbox.
 

smashbot226

Smash Master
Joined
Sep 1, 2007
Messages
3,027
Location
Waiting for you to slip up.
whine whine whine

Due to popular demand, Statler and Waldorf return... at the end of each comment.

King Dedemix is a set that's not as drastically different as JOE's Sonic, or as much of a quality read, but you manage to remake an otherwise pedestrian hard-hitting heavyweight set with a random projectile. In case you haven't figured it out by now, I don't really like much of what Smash offers, more likely than not because MYM turned me spoiled rotten. Anyway, absolutely love how you switched Inhale to his grab, but then it just seems Exhale is weirdly out of place and the new DTilt is from his quick draw min-game version when THAT is his final smash. On the other hand, you make quite a few changes that mostly revolve around interaction with his minions, which I also approve of, since it's totally in-character for Dedede to care about his minion's well-being until it's time to toss them aside. I think. Doesn't matter though, because his new throne mechanic is one of the funniest in-character mechanics I've seen this contest. 3.5/5


I like how Warlord goes out of his way to correct that the bird is an eagle, not a penguin.
You know, I never noticed that before!
What, that Dedede's an eagle?
No, the underlying meaning. "He's not a penguin, he's an eagle!"
Oh, I sorta get it. "I'm not fat, I'm Reubenesque!
More like Reuben Studdard-esque!
DOHOHOHOHOHOHOHO!
I guess that'll be the last time Warlord make an OC.
What're you talking about you old buffoon? He's an already existing character!
Really? I always thought that it was a Warlord self-insert.
DOHOHOHOHOHOHOHO!
I think that's enough fat jokes for one session, wouldn't you say?
I guess so. Either way, Warlord's most recent moveset was certainly worth the weight!
DOHOHOHOHOHOHOHO!

Cutie Mark Crusaders is another pony set that I have yet to even begin. It consists of three younger ponies that work together as a team, though I feel... Statler, what are you doing?

Putting on headphones.
Why?
No reason.

... Though I feel most of the credit here goes to Applebloom. Building large structures for the rest of your team to use is quite fascinating when compared to the other two. Scootaloo seems to almost entirely revolve around cancelling into her scooter and Sweetie Bell's two gimmicks are being a better Jigglypuff and manipulating the foe's aerial movement. I guess that last part isn't so bad when compared to Applebloom's ability to create structures; Sweetie Bell can move her opponent away from the tree network and Scootaloo can be useless. It all works out in the end, though I'd like to have seen Scootaloo have more interaction than just an obligation. 3/5


A penguin AND three horses? Plorf must be spent!
Statler, that is dirty humor and we agreed never to go there!
What? I was talking about how he's spent all of his parent's/brother's money on boxes of tissues!
DOHOHOHOHOHOHOHO!
So this set would be better if that orange one was more involved.
That's funny, I was just thinking that it'd be better if Kibble was less involved.
DOHOHOHOHOHOHOHO!

Black Mask is... uh, guys, wanna help me ou-


... Uh... good going?
WAKE UP YOU SENILE ******S oh god I sounded like Junahu

ABOOOOORT! ABOOOOOOORT!
Guh? What happened?
I had a dream that I was reading Battleheart again!
Dear God, man! I didn't think Freddy Krueger was still around!
Oh no, he was there too. Getting mauled by the playstyle section.
DOHOHOHOHOHOHO!
So yeah, pretty short week. Though I think someone here should work on their set before the rest of the movement leaves without him.
I don't know, they shouldn't give him so much time.
I guess so. It's not like anyone else has started theirs!
DOHOHOHOHOHOHOHO!
Actually, I happen to be making quite the progress on Ra's Al Ghul and-
Quiet down, Smady. We're trying to heckle you, not watching you do it for us.
Well that's rather rude! You haven't seen the last of me!
Way to burst our bubble, Cap'n Britain. At least make this the last we SEE of you.
DOHOHOHOHOHOHOHO!

Oh you guuuuuuys
GET BACK TO WORK
noooooooo uuuuuuuuuuu
 

Kholdstare

Nightmare Weaver
Joined
Oct 10, 2008
Messages
1,440
MYMini entry

MYM3 FREE FOR ALL


Characters: Lord Dracula, Headless Horseman, Cervantes, and Donna Levman
Play As: Lord Dracula, Headless Horseman, Cervantes, or Donna Levman
Description: It's a Free for All with the winners of MYM3!
Stage: Smashville
Time: 3:00
Items: All on High
Enemy AI: Level 7


Your goal is simple; have the one with the most points at the end of the match. Of course, with a crazy Brawl like this, it will be difficult and unpredictable. Dracula will keep his distance at the edge of the stage and on the platforms, but his opponents will inevitably find a way around his camping. Headless Horseman can create chaotic results with flaming pumpkins flying everywhere, and probably get in a good number of hits. Since Donna is going to be relying on edgeguarding, it could be impossible to win or smooth sailing depending on if she teams up with someone else or not. And since Cervantes plays like a bulkier Meta Knight, he'll be getting in a good bit of damage. This event could go many different ways, but the favor leans toward Cervantes and Horseman.
 

BKupa666

Barnacled Boss
Moderator
Joined
Aug 12, 2008
Messages
7,788
Location
Toxic Tower
KING D3
The best parts of the set easily come from the newfound minion interactions, which are clearly your main selling point for this remix, considering they are so lacking in Dedede's Brawl moveset. No, mindlessly devouring them does not constitute subconscious enjoyment; collecting them to power up a star projectile, on the other hand, is a clever alteration on Brawl's charge and store attacks. His moves are largely more character-relevant now, despite being intentionally more simplistic than usual to match your intent with the set. While this leads to the set itself not being great other than the conceptual gem of the grab, it's a nice tune-up to the predictable competitive Dedede. I'm sure no one will disagree you were the perfect MYMer to make this set...

MORE PONIES
The switching mechanic of the crusade does give them additional depth, although the quality of said depth appears questionable. The centerpiece specials swapping the ponies gives them a very predictable feel, with each pony using their own niche of fairly commonplace attacks. Apple Bloom's props are the most versatile part of the set, which piques my interest the most, in that her set-up stage elements can provide areas for the other two ponies to work their specialties, but what they have isn't as interesting to me. Sweetie Belle has her singing-zoning mix while Scootaloo has some borderline momentum focus, but their uses of them don't really flow with the remainder of the set to the extent that would make frequent swapping between the ponies all that worthwhile. Despite my indifference toward the set, you do have a nice grasp on the potential multi-characters offer, and I hope the crusade aren't your last sets in this genre.
 

n88

Smash Lord
Joined
Oct 10, 2008
Messages
1,530
Beezwax
[COLLAPSE="MasterWarlord"]There are some great mechanics in here, and I love how you manage to combine so many different tropes. There's bullet hell, excessive traps, momentum, and even a bit of goop. It all works together in your typical Warlordian fashion, and makes for a layered playstyle that fits together quite well. The mechanics of the car are also interesting to me - you've given exactly how the car should handle quite a bit of thought, and the end result works very well, from the perspective of making the car drive like a car. However, I feel the car mechanics are also one of the main problems of the set; they break the rules of Smash a bit too hard for my liking, and Beezwax ends up handling a bit awkwardly, particularly with the way the set goes about Shielding (or lack thereof) and Grabs. Also, as a nitpick - the horn creates hitboxes all around the truck? wat. I prefer this to Gangreen, but I don't like it quite as much as JJJ and Iggy.[/COLLAPSE]


Giant Bat
[COLLAPSE="Junahu"]I've considered sets for characters with similar swarming mechanics before, and I have to say I'm a bit disappointed with how it's pulled off here; it's the sort of concept I'd really like to see taken advantage of in a more Warlordian (for lack of a better word) fashion, crazy interactions and all. But the concept is still done very competently here, and the way it mixes into the bat's overall gameplan with the wind effects is quite admirable. It'd be easy to let the set run away with the swarming mechanics and lose focus, but you confine it to the Specials, which makes this take on the concept much more effective (even if it does prevent the set from turning into my imagined swarming set) I do like the set quite a bit, even if the concepts make me want something a little more insane.[/COLLAPSE]

Death
[COLLAPSE="Smash Daddy"]Death is a fun set. The way he uses his portals for stage control is very well thought-out and well-done, though it does get a bit confusing in parts. (specifically, that grab forced me to re-read a few things to sort out what was going on) But really, I would love to take Death into a real match, just to tinker around with the Up and Down Specials, and that alone is enough for me to really like the set. On top of that, you've got some fun characterization (I'm not sure I would have picked up on it had you not mentioned it in the chat, but Death's relationship with his scythe is clever, and I do quite like it) and some very Smady-ish, thick flow of ideas. Good job here.

Also, for the sake of my precious squinting eyeballs, please avoid small fonts in the future. This sort of thing is tolerable in Junahu sets, since he tends to make his moves fairly simple, but four straight paragraphs of this is simply too much for me. No, I'm not judging Death because of the font size, I still like the set, I'm just asking that you never use tiny fonts like this again (A)[/COLLAPSE]

Lucio Fulci
[COLLAPSE="KingK.Rool"]Fulci is a set I wasn't entirely sure what to think of before reading your "self-ranking" (which, as wonderful to read as it was, was more like a memoir than an actual ranking), which, along with a re-read, really helped me to get what you were going for with Fulci, and I have to say I like the set much better now, though I wish you had included some match-ups along with the set; one of your big selling points is the variety of ways to play here, and it'd be cool for the set to actually showcase some of those. I'm still not sure I like this quite as much as Gastly and Tutankoopa. I do love his relationship with his zombies, but there are little things that put me off about the set, like Fulci's revolver killing zombies with a headshot. Why couldn't Beezwax or Flattop, or any other gun-toting character dispatch a zombie? Right now, I think Gastly wins out, but with a little time to dwell on this guy, that might change. Right now I'm envisioning Crimson Cowl going after Fulci while her cloak covers her back, Fantomex dangling from EVA and mowing down zombies with a rifle, and Torkoal battling Fulci for the only shelter from a wall of lava while a horde of zombies closes in, and I have to say that the set's growing on me.[/COLLAPSE]
 

mariodk

Smash Ace
Joined
Dec 26, 2010
Messages
524
Location
Mushroom Kingdom :D
i normaly dont post here but any good Geno(the wooddoll from super mario RPG) moveset ideas here since i will make Geno moveset for SSBB hack and will possible use some good ideas (mainly throws,Airs afew Ground "A" attacks, maybe wins,maybe taunts)
he will replace ToonLink or R.o.B

also maybe needing a good moveset list for Adult goku since i am revamping my moveset alittle
i saw some really old post from make your moves 1,2,3,4 (a low number)
ppl said its impossible to get adult Goku balanced and thats what i almost did for my SSBB hack of him but still needing afew ideas for him

edit: got a good geno moveset idea and many ideas is usefull :D
i still needing for adult goku since i am working on his moveset right now (yet again one more update) but he dont replace captain falcon this time but Pit(SSj mode/tranfrom is possible now)
Geno moveset hack is next after adult goku
 

ForwardArrow

Smash Ace
Joined
Aug 17, 2011
Messages
502
We don't exactly make request movesets, dude, you might want to ask elsewhere for that.
 
Top Bottom