• Welcome to Smashboards, the world's largest Super Smash Brothers community! Over 250,000 Smash Bros. fans from around the world have come to discuss these great games in over 19 million posts!

    You are currently viewing our boards as a visitor. Click here to sign up right now and start on your path in the Smash community!

Make Your Move! Super Smash Boards Brawl - And the winners are...

El_Duderino

Smash Apprentice
Joined
Nov 9, 2007
Messages
160
Location
NE
Luggage

*~~~~~~~~~~~~~~~~~~~~~~~~~~~~~~~~~~~~~~~~~~~~~~~~~~~~~~~~~~~~~~~~~*​

Description

The Luggage is possibly the most belligerent, bad-tempered travel accessory in the universe. Its primary abode is the Discworld, a flat planet carried on the backs of four elephants who themselves stand on the shell of a celestial turtle, and it's best not to ask what the turtle stands on. However, the Luggage has seen more exotic locales, including both the beginning and end of the universe and the inside of a commercial airliner on Earth. It was originally owned by Twoflower, the Discworld's first tourist, but he bought it from the sort of shop that isn't there when you turn around after you leave, so its true origins will probably never be known. What is known is that it's made of that rarest of wood, Sapient Pearwood, which has a mind of its own. After his travels with the wizzzard Rincewind, Twoflower gave the Luggage to him, and when a chunk of Sapient Pearwood is owned by someone it will loyally follow them literally wherever they go. If Rincewind were to die he would inevitably see the bulk of the Luggage ambling toward him at speed in the afterlife. Rincewind is a coward, and totally incompetent as a wizard, but Fate and Luck constantly fight over him, and he's always saving the world when he'd really rather be sitting on a beach somewhere eating potatoes. Unfortunately this involves a lot of involuntary inter-dimensional travel and being chased by horrible Things behind the curtain of reality, so the Luggage often has quite a lot of catching up to do, which irritates it. And when the Luggage is irritated, it turns into a homicidal madman.


The aspect of the Luggage is that of a huge treasure chest, bound with brass. It has a keyhole in front, handles on the sides, and countless little feet bristling from its underside. It has no face, but that just means it can outstare a gorgon. When stationary, it masquerades its true nature by drawing in all of its legs and staying still, but even then it exudes pure malevolence from every knot and grain. When it opens its lid, it reveals it has huge white wooden teeth, and it can and will eat potential thieves of its contents, as well as anything else that just catches it in a bad mood. Where all these meals go, none can say. The space inside the Luggage is multi-dimensioned; every time it opens up it can have something different inside, and that something can very well be larger than the actual volume of the Luggage. Mounds of treasure, clean underwear, rock-hard biscuits, 50 gallons of seawater, dead alligators with surprised looks on their faces; anything, really.


The Luggage is the creation of the author Terry Pratchett and has appeared in several books in his fantasy-humor Discworld series, as well as in three computer games based on the series.

Wikipedia Reference

*~~~~~~~~~~~~~~~~~~~~~~~~~~~~~~~~~~~~~~~~~~~~~~~~~~~~~~~~~~~~~~~~~*​

Notes

The Luggage is not tall, and since it mostly fights facing its enemies it isn't terribly wide either. However, it is very heavy and very strong. If it wants to go somewhere, it goes there. If there happens to be a wall of solid diamond in the way, or a swarm of vicious sharks, or an entire tower full of wizards, they are obstacles to be crushed, trampled and bitten in short order. It can run at a good clip, but needs time to accelerate and is fairly slow to start since it needs to get all its legs pointing the right way first. It has bad traction, however, because when it tries to turn around it has to convince all of its legs to change direction as well.

The default fighting position of the Luggage is to have its front end, with its mouth and keyhole, facing its opponents. When it is described as "turning sideways" in this moveset, that means that it turns so that its mouth and keyhole are facing the player.
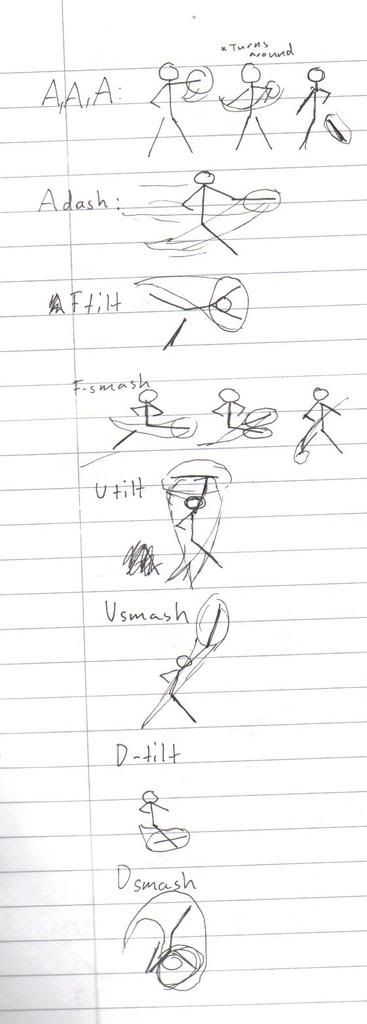
*~~~~~~~~~~~~~~~~~~~~~~~~~~~~~~~~~~~~~~~~~~~~~~~~~~~~~~~~~~~~~~~~~*​

A Attacks

Neutral A:

The Luggage quickly rotates on its axis slightly, slamming a corner into the shins of its enemies. This attack does not chain.

Dash A:

The Luggage tips forward and rolls onto its lid, then back onto its feet. Multiple hits.

> Tilt A:

The Luggage rotates on its axis slightly and steps forward, carrying out a slower, more powerful and longer range version of its neutral A attack.

^ Tilt A:

The Luggage snaps its lid open, striking opponents with it.

V Tilt A:

The Luggage quickly turns sideways and retracts its legs, dropping heavily on the feet of those around it.

> Smash A:

The Luggage makes a short leap forward and leans into it, so that the top of its lid slams into opponents in front of it.

^ Smash A:

The Luggage flips onto its lid, then snaps the lid open so that its hundreds of feet are propelled into a single kick straight up. Opponents are struck many, many times before finally being sent flying, much like Mewtwo's ^ Smash.

V Smash A:

The Luggage quickly spins a full 360 degrees on its axis in a seriously shin-bruising attack.
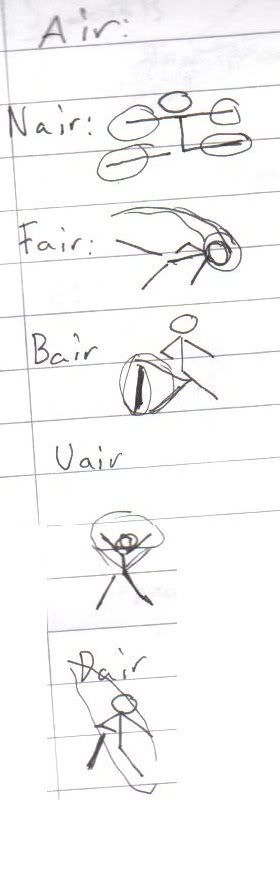
*~~~~~~~~~~~~~~~~~~~~~~~~~~~~~~~~~~~~~~~~~~~~~~~~~~~~~~~~~~~~~~~~~*​

Aerial Attacks

Neutral A:

The Luggage tilts slightly forward and laterally spins 360 degrees, catching enemies on both sides of it.

> A:

The Luggage rotates so that it lashes out in front of it with its full length.

< A:

The Luggage tips backwards until it is on its back. Enemies struck by the top of the lid as it descends are spiked.

^ A:

The Luggage twists in midair so that it is upside down and kicks upwards with its legs. Multiple weak hits.

V A:

The Luggage motors its hundreds of little legs, striking enemies directly below it for multiple weak hits.
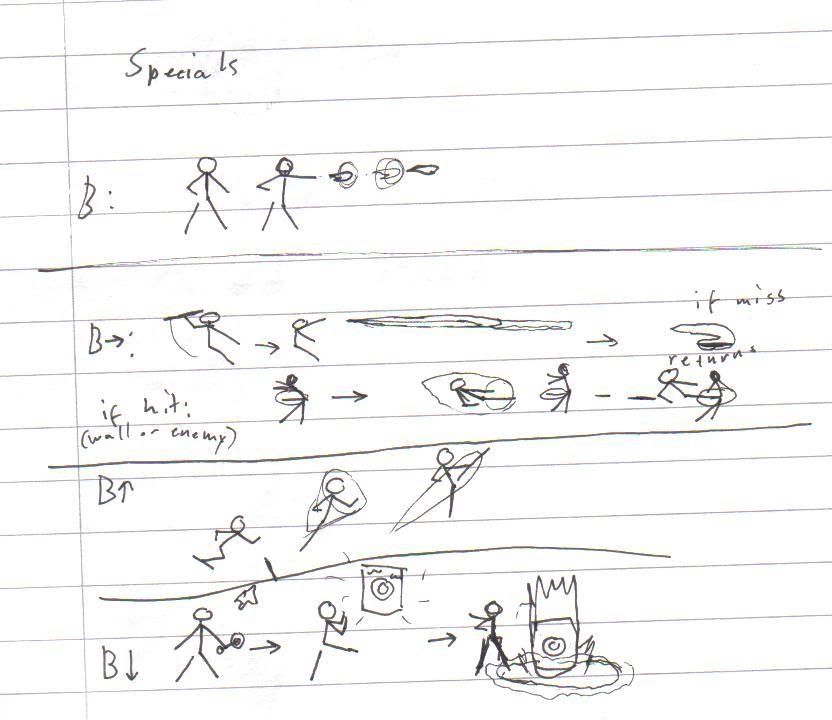
*~~~~~~~~~~~~~~~~~~~~~~~~~~~~~~~~~~~~~~~~~~~~~~~~~~~~~~~~~~~~~~~~~*​

B Attacks

Neutral B: Bite

The Luggage leans forward, lid open, and quickly snaps it shut, chomping down on anyone in close range.

> B: Trample

The Luggage turns sideways, gathers itself and leaps forward. If anyone is caught in its trajectory, it stops, and they are dragged underneath it and stomped on repeatedly. If this is done in the air, it acts as a meteor smash. In both cases, the Luggage will vault off of its opponent once it's done with them, making this attack its best recovery move.

^ B: Travel

The Luggage disappears into a dimensional portal of its own making and reappears a short distance away in the direction the control stick is held. If it lands on top of an enemy, that enemy is sent back through the portal to where the Luggage originally was.

V B: Rummage

The Luggage turns sideways and snaps open its lid, and something random is spat out. They are as follows.

Live Shark: 20% appearance rate, thrashes about for a short time and does damage.

Dead Gorgon: 20% appearance rate, turns surrounding enemies to stone for 2 seconds.

The Archchancellor's Hat: 10% appearance rate, a rather ornate and pointy hat which floats in the air and periodically freezes surrounding enemies.

Biscuits: 10% appearance rate, three biscuits pop out which each heal 5% damage and have the potential to break one's teeth.

Quezovercoatl: 5% appearance rate, a seven inch tall imp who timidly asks everyone to stop fighting and is immediately squashed by the Luggage. The Luggage's attack does a lot of damage in a very small range.

Random Item: 35% appearance rate, can be any normal item in the game
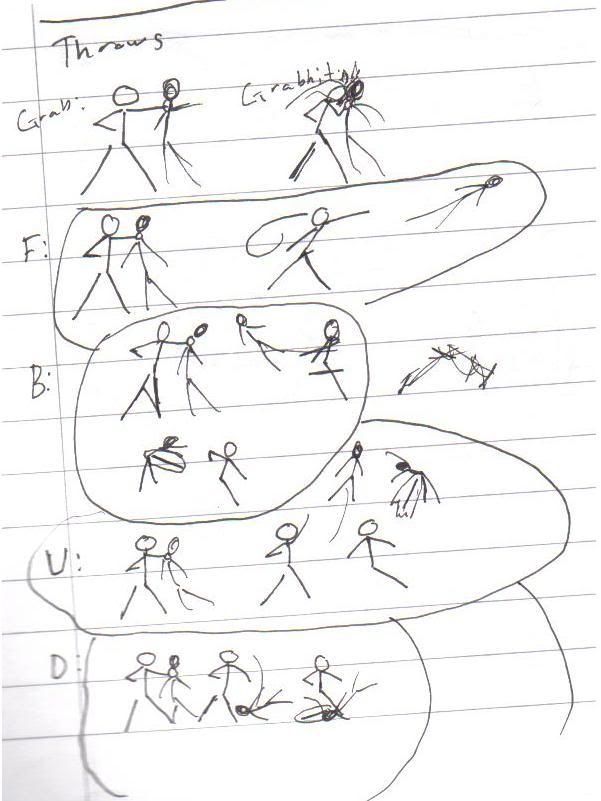
*~~~~~~~~~~~~~~~~~~~~~~~~~~~~~~~~~~~~~~~~~~~~~~~~~~~~~~~~~~~~~~~~~*​

Grabs and Throws

Grab:

The Luggage opens and snaps shut on an opponent's arm.

Dash Grab:

The Luggage does a flying tackle and comes up with its opponent's arm locked in a vise-like grip.

Grab Attack:

The Luggage...squeezes...

> Throw:

The Luggage whirls in a full circle and releases its opponent at maximum velocity.

< Throw:

The Luggage tosses its opponent into the air over its lid, then snaps the lid open again as they descend, catching them in its backwards movement.

^ Throw:

The Luggage jumps into the air in a front flip, throwing its opponent to the ground and then landing heavily, feet first, on its enemy's back, which bounces them upwards.

V Throw:

The Luggage rolls forward on top of its enemy and rocks back and forth on its lid on top of them before snapping it open and vaulting off.
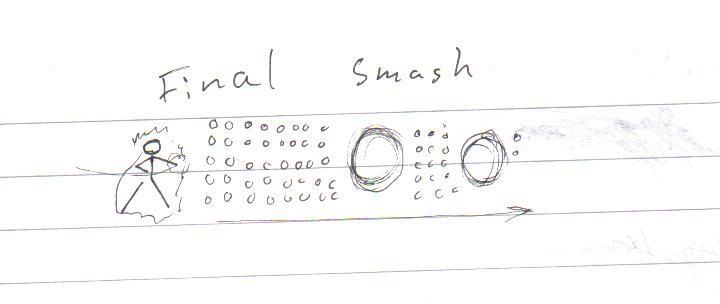
*~~~~~~~~~~~~~~~~~~~~~~~~~~~~~~~~~~~~~~~~~~~~~~~~~~~~~~~~~~~~~~~~~*​

Final Smash

Bait and Switch

What's this? The Luggage is rumbling! It turns sideways, retracts its legs and snaps open, and what is inside? Gold. Masses of it. Crowns and scepters encrusted with jewels. It shines like only gold can. Everyone on the field is drawn to it, eyes opened wide in wonder. They creep up. Maybe the awful thing is asleep? For gold, it's worth the risk. They put their hands in. SNAP! SLUUUURP!! The chest shakes and bounces, then flies open again, and all of its captured prey are sent flying, heavily damaged.

*~~~~~~~~~~~~~~~~~~~~~~~~~~~~~~~~~~~~~~~~~~~~~~~~~~~~~~~~~~~~~~~~~*​

Kirby Hat

Kirby has the Luggage's toothy oblong lid balanced on his head. It hinges at the back when he imitates the Luggage's Bite.

*~~~~~~~~~~~~~~~~~~~~~~~~~~~~~~~~~~~~~~~~~~~~~~~~~~~~~~~~~~~~~~~~~*​

Entrance

A disembodied scream grows louder and then fainter as the Luggage drops from an inter-dimensional portal and looks from side to side for signs of its master. No such luck, just some people who want to fight. It will happily oblige.

*~~~~~~~~~~~~~~~~~~~~~~~~~~~~~~~~~~~~~~~~~~~~~~~~~~~~~~~~~~~~~~~~~*​

Taunts

Taunt 1:

The Luggage turns slightly toward the camera and slightly opens its lid as a huge mahogany tongue comes out and licks its lips.

Taunt 2:

The Luggage turns sideways and does a brief, complicated tap dance.

Taunt 3:

The Luggage turns sideways and yawns lazily. It is a horrible sight.

*~~~~~~~~~~~~~~~~~~~~~~~~~~~~~~~~~~~~~~~~~~~~~~~~~~~~~~~~~~~~~~~~~*​

Victory Poses

Victory Pose 1:

The Luggage rapidly snaps its lid in three different directions before settling down.

Victory Pose 2:

The Luggage slowly opens its lid, revealing a trove of gold coins and treasure.

Victory Pose 3:

The Luggage has its legs retracted and its lid closed, and is overall quite still, but it gives the distinct impression that it's staring evilly at you.

*~~~~~~~~~~~~~~~~~~~~~~~~~~~~~~~~~~~~~~~~~~~~~~~~~~~~~~~~~~~~~~~~~*​

Stage

Discworld: Tower of Art

Arguably the oldest known structure on the Discworld, the Tower of Art is an 800 foot-high stone tower that forms the center of Unseen University and defines the skyline of the ancient, bustling, mud-choked and hero-visited city of Ankh-Morpork. UU is the premier wizards' college on the Disc, and its multi-dimensioned campus is so infused with old magic that strange effects grip it on a nearly daily basis. The Tower of Art is no exception to this rule. The gargoyles gripping its edges take great delight in devouring passing pigeons, the rats in its worn walls wear clothes, the ravens talk (usually about the joys of eyeballs) and the bedbugs carry their mattresses with them. Its ancient moss-covered stones are in such disrepair that it sways precipitously in the slightest of wind, but through the various ravages of fires, floods, dragons, sourcerors, and eldritch Things from the lower plane, it has never toppled.


Wikipedia Reference

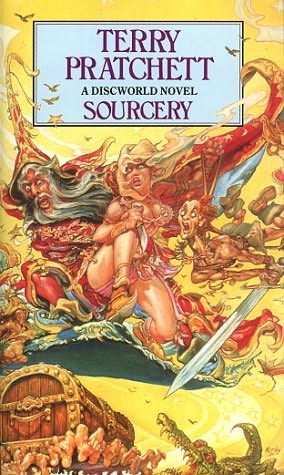
The stage comes in the form described at the climax of the novel Sourcery. Fighting takes place on the wide, flat roof of the tower, separated into two level turrets connected by a short bridge, which slowly and rhythmically sways back and forth like a ship at sea. This changes the angle of the ground fairly significantly, and causes Brawlers who tend to spend more time in the air to have to worry about where the edge of the stage is from moment to moment. The KO barriers to the left and right of the stage can either be medium range to long range from the Tower's edge, depending on where it is currently swaying, and recovery can be rendered easier or more difficult based on the direction of its movement. At each end of the platform are two very low walls, just high enough that a player can't run straight off the edge. In addition to the main platform, a magic carpet can appear at random times in the areas to the sides of the stage. It moves fast, making it difficult to land on, and it moves off-screen quickly, but when the wind is against you it might be your best hope of recovery.


Behind the stage, the view is a panorama of the city of Ankh-Morpork extending off into the horizon, with a mountain range featuring a single white peak soaring high above the horizon in the center of the vista. All of this is for decorative purposes only, none of this view interacts with the players.

This form of the stage takes place during the night. The sky roils with dark clouds. A huge glowing white tower made of solidified magic is positioned behind the Tower of Art and to its right, blocking that side of the backdrop view. From the top of this tower, the Tower of Sourcery, enormous spells are cast at rival wizard towers in distant places of the world. The bolts of magic are like ICBMs whizzing through the sky, and as the Tower of Sourcery attacks, the other towers retaliate with their own massive bolts. The Tower of Art is caught in the crossfire. A spell aimed at the Tower of Sourcery from beyond the horizon can have one of two effects. It can hit the Tower of Sourcery and rebound off into the city below, in which case all that happens is fireworks. Or it can hit the Tower of Art and explode. The explosion is about the size of a Smart Bomb and, in addition to severe damage and knockback, it has the effects of a stat-changing item on everyone caught in the blast. That is to say, everyone who gets struck by a spell gains a bunny hood, metal box, mushroom, poison mushroom, etc. It's all random. Such is the nature of magic.

*~~~~~~~~~~~~~~~~~~~~~~~~~~~~~~~~~~~~~~~~~~~~~~~~~~~~~~~~~~~~~~~~~*​

Stage Music

Theme from the Discworld animated series

Introduction from Discworld II (game)

The Hedgehog Song

Ankh-Morpork Anthem - BBC Scottish Symphony Orchestra
 

RWB

Smash Ace
Joined
Jan 28, 2006
Messages
969


Farthing Fox


Background:
I think Wikipedia are way better than me at this...
http://en.wikipedia.org/wiki/The_Animals_of_Farthing_Wood_(TV_series)
http://en.wikipedia.org/wiki/Fox_(Farthing_Wood)
http://en.wikipedia.org/wiki/List_of_Animals_of_Farthing_Wood_characters

-----------------------------
Stats:

Size: **
He's a rather well-grown fox.

Weight: **
As such, he isn't exactly heavy.

Speed: *****
However, as a fox, he is of course very quick.

Power: ***
He doesn't really have that much power compared to other characters, after all, he's just a wild fox.

Range: ***
Although he seems pretty small, his tail and his moveset makes him have a lot of range in some attacks.

Fall Speed: ***
He's pretty normal here.

Traction: ****
As a forest animal, I doubt he'll slip that easily.

Jumps: ****
He is very agile, thus jumping isn't exactly hard.

--------------------------------------------
Moveset:

Standard Combo (A, A, A):
Fox pokes his leg in front of him thrice. Not continous. Attacks have almost no knockback at all, do regular damage, and very quick they are too.

Dash Attack:
Like the predator he is, he pounces forward. Pretty quick, rather weak, but launches enemy upward, so it's a combo starter.

Tilt Attacks:

(Up) Fox does a backward flip, using his tail as a weapon. It's pretty soft, so knockback is very low, damage low, but the move speed and combo properties make it hard to pass this one up.

(Forward) Fox quickly sweeps his tail in front of him. Pretty weak, but a very quick strong attack. Good for interrupting enemy attacks, as the range is great.

(Down) Fox swipes with the claws on one of his hind legs. While it's a very awkward attack to hit with, it does good damage, has really good knockback for this character. It's a quick move.

Smash Attacks:]

(Up) To hit with this, your enemy must either be VERY close to you, or airborne(the hitbox is VERY small). Fox does a short leap upwards(nose pointing into the sky, so it's a straight jump upwards) and bites. This is one of Fox' killer moves, as it has MAJOR knockback. It's very quick for it's power.

(Forward) Fox does two quick swipes in front of him with his front legs. First hit only stuns, next knocks away. Propably quickest Smash attack there ever was, but as such, it has pathetic killing power. Damage is still decent, though.

(Down) Fox jumps, then stomps down with all four legs. It's hard to hit with, but pretty powerful(although not U-smash class) and quick.

Aerial Attacks:

(Neutral) Fox Rolls himself into a ball, and hits enemies on the way down, much like Pikachu. the attack is weaker than the Zapper-rat's, but it has a lot less lag on landing.

(Up) Much like his U-smash, Fox bites above him. This move has pretty much equal stats to the U-smash, but is easier to possibly weave into combo's. Best killing move Fox has? I think so.

(Forward) Fox makes a very quick swipe in front of him. Does moderate knockback, decent damage.

(Down) Fox stomps down with his front paws. There is a slight delay before the attack hits(making this one of the slowest attacks fox has... even though it's still not that slow), but it's a somewhat strong meteor, and even on stage, it does above average damage.

(Back) Fox waves his tail rapidly behind him. The hits from this have very minor knockback, but damage wise, it's quite similar to another tail-wag; Yoshi's. Again a very quick move.

Special Attacks:

(Neutral): Snarling Strike
Fox starts to snarl and growl, while looking grim. He goes into a "Ready to strike" animation. A chargeable attack, you can let go at any time. A fully charged Snarling Strike is the most powerful attack Fox has, with Knockback and damage superior to a fully charged marth tipper F-smash, however, charging it for that Long will likely give the enemy far to much time to escape. A thing to remember is that it is a stationary charge(Marths Shieldbreaker is, DKs Giant Punch is not.). The attack itself is a rather short lunge(although not that short, as it makes the actual attack have about the same attack range as Marths F-smash). This move could be used to help recovery, I think.

(Up) Somersault
Fox does a big leap, rising quite a bit through the air. However, it has no attack phase, but can be canceled at any time to do an aerial attack or a special. You can only use it once before landing again, but it does not put you in free-fall animation.
TRY A SOMERSAULT- Peppy Hare :p

(Forward) Chase
Fox does a quick rush straight forward, Distance covered being pretty good. If he hits anyone, he enter an animation much like Bowsers Koopa Klaw. However, he cannot hold on for long, and you have to either have Fox Bite down and let go(by pressing any direction but forward), which deals a lot more damage but meager knockback, in comparison to the flip throw(press forward) where Fox does a quick forward flip and sends the enemy flying quite a bit. This attack makes fox go into Free-fall animation, so that it cannot be abused.

USE THE BOOST TO CHASE- Peppy Hare :p

(Down) Barrel Roll(Until I come up with a better name...)
DO A BARREL ROLL- Peppy Hare XD

Throws:

(Grab): Fox bites and to grab you and then holds you(His jaw is around your neck, if you're not tall as building). as he jumps forward a little when he does, he has great range. Damage is done by him biting down.

(Up): Fox quickly throws you upwards. weak damage, combo starter.

(Forward) Fox rolls, taking you along, and then lets go during the roll, sending you flying. Damage is measly, but knockback is pretty good.

(Back) Fox does a quick twist with his head, throwing the enemy backward. decent damage, knockback is lacking.

(Down) Fox presses the enemy to the ground, biting down on them. This deals good damage and has good knockback.

Final Smash: Heed the Oath!

Some of the big animals that are bound to the oath comes out to protect and help Fox.
They are:

Badger- Badger is an old guy, but he packs a punch. the other animals will actively try to bring you close to him(he moves a little slow)

Vixen- Vixen is fox on Speed. While lacking a lot of power(incapable of KO's), she easily builds up your damage(She's just that quick that you pretty much are done for if she manages to catch you with an attack, at least if the time for the FS doen't run out before badger can hit you), and she will push you toward Badger.

Whistler the Heron and Speedy the heron- Those two fly around dropping Pinecones like Bombs. while they do not do much damage, they are a bit hard to avoid, and if you are unlucky Vixen or Badger gets a hold of you.

Taunts:

1. Fox puts his nose into the air proudly.

2. Fox gives out a short "Warf!".

3. Fox shouts: "Farthing Woods Forever!"

Victory pose:

1. Fox sweeps the ground with his tail, having a cocky grin on his face.

2. Fox howls several times.

3. Fox growls, then spins in a circle, having a content expression.

Stage: White Deer Park, Farthing Land- By the stream

This is a very nice looking place near the stream, where some of the Farthing Animals spend their time. The stage rather small, though. And it has walk-off edges.

Music:
Show intro- Original: http://www.youtube.com/watch?v=sPz1Zy98bJw
Show Intro- New: http://www.youtube.com/watch?v=Vv7zcXRB_EM
Show Outro- Original: http://www.youtube.com/watch?v=9Wi2U5agc2U
Show Outro- German : http://www.youtube.com/watch?v=I0VBQ9oFdbw
Show Outro- Swedish: http://www.youtube.com/watch?v=-HsMXqCJcWk

Entrance: Fox jumps onto the stage.

Costumes and Colors:
Fox has the colors Red, Blue, Green, White, Grey(wolfish eh?) available. He also has a number of alternative costumes(who has the same color changes)...

Scarface. The fact that you can make him red is rather fitting, as that was his color in the book the tv series were based on. He looks a bit more built than Fox, but he has the same size as for hitbox(Area where he is hit)


Whisper. She had a rather unique look for a fox, so I decided to include her. She shares Fox size if you choose this costume, something she didn't in the series, she was smaller.


Ranger. Looks like Scarface a lot, but without the scar. Also, he looks the same size as Fox.


And finally...

Bold, the son of Fox. As he was propably the most popular fox in the series, he deserves it(he was also the one who got the most development). Of course, He won't be halt while fighting, but the injured eye, he'll keep that. He shares Fox size if you choose this costume, something he didn't do in the series, he was smaller due to age.


Boss: Scarface(This is actually just an alternate costume, Fox has multiple. However, in the boss fight, this one has been slowed down a bit, but is now a lot stronger).

Scarface was the one who held the power in White Deer Park(Although he seemed to have respect for the Great White Stag, who was, in title, the highest in command) before Farthing Fox came with his group. They are now lethal enemies.


Moon/Sun

Smash Apprentice
Joined
Nov 23, 2007
Messages
123

The crazy and fearless bandicoot joins the fray of brawl!
Crash has a distinct play style similar to Mario being a balanced character, only at a higher level. He'll prove to be a worthy opponet in the smash arena.

-Classification} Middleweight. A couragious Bandicoot with a high offense and defense.
Size= Taller than Mario but shorter than Luigi
Speed= Average
Strength= High
Power= Low
Recovery(Floatyness)= Average
Attributes= Walljump, Crawl, Damaging Animation
Tier= 5th place
-Brief History}
Crash was once a regular bandicoot who was exposed to Dr. Cortex's evol-O-ray. Since then he has thwarted the evil genious's plans around the world, across time, and even on the race track. At one point he had to team up with Cortex to save their Island and has worked with Spyro the Dragon. His sister Coco is the brains of the family and keeps Crash in check when not on an adventure. Aku Aku helps the two protect the world with his powers as a witch doctor. Crash can often be found on the beach of N Sanity Island doing what he does best... ... ... dancing and sleeping.
Debuted in "Crash Bandicoot", 1996
-Entrance} A warp portal opens up and Crash leaps out, grins at the screen, tightens his gloves, and gets into his fighting stance.
-Fighter stance} The same breathing animation fans have known since the 2nd game.
-Stance Interactions} If left alone Crash begins looking around like in the 1st game. Exhale deeply and look at the ground. In rarer cases he'll play with his yo-yo, get tangled, and spin out of it (this animation does 1% damage and has poor knockback). These are derived from his classic games.
-Audience Cheer} "WHOAH CRASH!! WHOAH CRASH!! WHOAH CRASH!!"
-Movement} Tilt the control stck slightly and Crash will tippy toe as seen in "Wrath of Cortex" where one of his abilities allowed him to tippy toe over nitro crates. Tilt further to make Crash walk the same way he did in "Twinsanity". Tap and his well known running will take place. Animation used is from "Twinsanity". In a crouched position Crash will be on his knees with a serious look on his face. When crawling he will sniff at the ground like he's always done before.
-Helpless Animation} Shield broken has our hero twisting about in place with eyes spinning about. When he has no more jumps he will be covering his eyes and have his ears down in fear.
-Lifting Items} A small detail is that he lifts crates and throws them the same way he does so in "Crash Bash"
-Jumps} His first jump has him lift his arms up as seen in his games. Second jump lift his legs sideways, one fist up, another fist by his stomach, and head arched forward. Just like in his games. When jumping backwards he does a backward summersault all the while grinning his famous teeth out. Doublejump makes him spin backwards.
-Grabs} He lunges toward the opponet with his arms out, plain and simple. When he does, he holds them by their arms. Regular attacks are Crash smashing his face to his opponet. Upwards throw has Crash on his back and (kangaroo style) springs his foes up. Forward throws make him grab his foes by their arm and tossing them very far as he did to Cortex in "Twinsanity". During back throws Crash falls on his back and with his arms he flings away whomever hes holding. Downthrows involve Crash grabbing opponets arm with both hands and smashing them headfirst to the ground to the point that Crash himself hops a little.
-Receiving damage} Crash is unique in that he will display diffirent reactions to diffirent assaults. Such as turning charcoal colored when attacked with fire, deflating like a ballon when KOed by a sharp point, or shivering when hit by ice. Many animations are derived from his games. His fanfavirote WHOAH! soundclip plays often along with other variations like UWAH! from "Crash Bash"
A} Fast punch
AA} Fast uppercut with other hand
AAA} Strong downward handsmash with both hands.
Dash Attack} Slides the ground like Mario only more knockback.
Strong <-A->} Sideways jab, weak but stuns
Smash <-A->} Drop kick, good for a finisher
Strong Up A} Punches up, good juggler
Smash Up A} Backflipkick, can barely KO but opponet flies diagonaly upwards
Strong Down A} Handslap, foes flie backwards of Crash
Smash Down A} Legs spin but Crash's upper body remains still with arms out as well as tounge. Knockback the same as Fox's down smash.
Nair} backhand fist with right, then soccer kick with left leg. Little knockback
Fair} Spins side ways like Kirby's Nair only it will either send foes up, down, or away. Depending on the sweetspot that connects.
Dair} The same effect as Sheik's dair except Crash's sends opponets diagonally up very powerfully. Crash uses both of his heels.
Bair} 5 karate chops
Uair} Bashes enemies with his smiling teeth for a juggle.
-B Special}(Wumpa Bazooka) Crash pulls out his pocket Bazooka from "Crash Warped". Hold and aim anywhere to fire a fruit from afar, powerful. Press quickly to autofire at closest enemy
-Side B}(Crash Dash) Crash runs twice as fast for a moment as he wears Aku Aku's mask. He runs the same way as in the 3rd game with body leaning forward and arms and legs moving more focused. This attack is strong, does decent damage, and can be used to recover in the air. However it goes little distance and not as strong while airborn. When in the air Crash goes against the natural law and runs as if hes on the ground. Also the famous Aku Aku soundclip [whatdowegot!} plays in this attack.
-Down B}(Super Body Slam) On the ground Crash springs up, arms and legs out, eyes crossed, smile on, and twirls as he punds the ground with himself. In the air he stops all vertical movement and progressively speeds up the bellyflop depending on airtime. This attack greatly stuns opponets. In addition to that its chargable for about 2 second both on ground and air. Can also cancel attacks such as Samus's charged shot or Marth's Counter. Low damage.
-Up B}(Death Tornado Spin) His signature ability. Press once for a regular spin with outstanding knockback and damage. Press repeatedly [4 and a half seconds] to start afloat and glide around the arena. Sort of a mix of Link's N64 aireal Spin attack and the Luigi Cyclone. When used in the air, Crash with suddenly spring upwards and spin. If you continue to button mash, he can glide across many distances in many diffirent directions. The drawback is that he looses momentium the more often you change direction. Classic soundclip is used for standard spin, "Crash Warped" death tornado soundclip is used on ground. In air the soundclip from where Crash steps on a green fan plays.
-Up Taunt} Rubs his head in a way to express confusion or uncertainty as seen in the games.
-Left Taunt} Gets in a boxing stance and throws a few jabs as seen in "Twinsanity".
-Right Taunt} Acts like a chicken, mocking the opponet as done in "Crash Bash" as well as the sounclip from said source.
-Down Taunt}The Crash Dance. Other than a long taunt, nuff said.
-Victory Music} Short version of the BONUS STAGE music from the classic games.
Y Victory} Falls asleep... ... ...
B Victory} Rides onto the screen in his "CTR" cart and holds out a trophy. The ending soundclip is his "HI HI HA HA!" soundclip from "Crash Bash".
X Victory} Dead animation from the first game in which he spins in a twitched pose, then falls stiffly with a loud clunk.
Mario Victory} Grabs a fireflower and spins with flames, ending with a pose.(from above picture)
Sonic Victory} Attempts running like Sonic with his Crash Dash only to tire out quickly.
Snake Victory} Exclamation mark appears on his head, along with the famous alert tune, and he hides under Snake's box. You can see his eyes looking left and right in paranoia.
Kirby Victory} Does a variation of both the Crash Dance and Kirby's Dance, finishes with eyes crossed and tounge with smile.
Pikachu Victory} Mistakes a pokeball for wumpa fruit and attempts to bite it open, becoming captured in the process. The pokeball's light is red and the ball struggles a bit before stoping.
Samus/ZSSamus Victory} Reacts the Zero Laser with his bazooka and instead has his jeans blown off. Leaves him with a dumbfounded expression and his pink heart filled boxers from "Crash 2" are exposed as he yelps his famous WHOAH.
Zelda/Sheik Victory} Tries their Transform technique and ends up with his shoes on hands, gloves on feet, and jeans atop his head.
-Costumes}
1st} Default is his "Twinsanity" appearence with knee plates and converse, etc.
2nd} Dark outfit is NegaCrash from "CTTR" but with the torn shoes from the "Twinsanity" design.
3rd} Green Team colors changes him into Fake Crash
4th} Blue Team is classic Crash from the Naughty Dog games with his classic shoes and plain jeans.
5th} Red Team give him red fur, crimson jeans, dark ruby gloves, and a black mohawk.
6th} Wears Jak's outfit from "Jak 3"
7th} Wears his biker outfit from "Crash Warped"
-Final Smash(Invinsibility) Three crates spawn from nowhere and break revealing Aku Aku masks within them. They one-by-one plant themeselves on Crash's face as he jumps up from the sudden burst of power. This functions as a variation from the "Crash Warped" game's final battle where Aku Aku displayed some fighting abilities. When moving about, anything/anyone that toutches Crash is knocked away far and fast. When players use the B Special, Aku Aku will emit a blue beam from his face that has high damage but almost no knockback. This is from the 1st battle phase from the 3rd games final battle. The Up B also lasts much longer depending on how long the button is mashed and the hitbox increases but the knockback decreases, damage is the same. This is from the 3rd battle phase in which Aku Aku rapidly fought his twin, Uka Uka, in a dangerous magic vortex. The enhancement even looks similar. The Down B takes longer to charge but the hitbox and damage increase a lot. Again this is seen in the 2nd battlephase where Aku Aku and his twin charged at eatchothor and caused explosions. Finally his Side B is unlimited with stronger knockback and lowered damage, pretty much and alternate use of running. Damage graphics are sparkles and recycled sounds from the games are used. Other details are Aku Aku in his "Twinsanity" appearence but gold colored as seen in the classic Crash games. They also leave behind a spectrecal trail like in "Twinsanity". Last detail is when the transformation (which lasts as long as the classic games) ends, the mask dissapears in a puff of feathers and the same soundclip of Aku Aku having been used plays.
-Role in Subspace Emissary} While sleeping at his house, his younger sister Coco looks up from her labtop and notices the Halberd approaching. Aku Aku and Crunch look on from their activities with a perplexed expression as the Primid gather and the Prime minister prepares the bomb. In a moment in need of a brave and reliable hero, the Bandicoots sent Crash instead. At the same time Cortex sees what's going on from his fortress and leaves to take control of the situation for his own use. Along the way Crash and Cortex meet and attempt to reach the bomb zone before the other does. The player goes through the island alongside Cortex all the while racing to reach the destination before him. Tha stage is a simple jungle with the Cortex Castle in the background. At the end, Cortex decides to fight Crash to rid himself of him. To do so he assaults Crash from his hoverboard using his plasma gun the same way he did in "Twinsanity". Once defeated a cutscene will play with an outcold Cortex lying on the floor and Crash slowly approaching what turns out to be the Ancient Minister. At first he walks by the area as if he's one of them, deemed harmless from his innocent and kind nature. It's only when he begins tampering with the bomb does the Minister notice his presence. The R.O.B.s begin preparing the bomb and Crash knows what's about to happen. In a comical way he hangs on to the Ministers platform to escape and watches helplessly as his home jungle is sent into subspace. Later he is shown to have been thrown into the Halberd as a trophy. From there he is saved by Aku Aku as they make their way out of the ship in hopes of restoring their home.
-Related Items}
Aku Aku/ Uka Uka Mask= Will either protect from a Final Smash or force you to fumble the Smash Ball. Not available with the Smash Ball turned OFF.
Angel Flute= Pick up and play to make your foes into angels and leave them with no second jump. The range is long and is a reference to Crash's angel death animation. Same song is even used.
JetPack= From"Crash 2", players can fly freely for a short duration as their 3rd jump. Details even aloow them the headgear and goggles
Warp Portal= Targets and zeroes in on the lead player to knock them high into the air in a helpless tumble. Strong and uses their second jump.
Wumpa Fruit= Open up the crate with the question mark and you're able to throw about 25 (7% damage low knockback don't cause flinch) fruits that go straight. Wumpa also appear alongside the FOOD items and heal 7% damage.
-Home Stage}(N. Sanity Island)
The Bandicoot's home with lush surroundings. The visuals are taken from "Twinsanity" but also feature details from many games. Think of it as Final Destination but with 3 flat platforms and a few hazards and no way for KO'ing people downward. The island is simply huge and perfect for a true fight. The bottom half is the beach with soccerball, waterfall, tiki statues, plant life, and other details seen. The middle platform is the aztec styled pit where Crash fought the Mecha-Bandicoot. Top Half is a bundle of tree truncks and metal crates. Background hosts many references to the games. Such as the Cortex Vortex's crashing (again, pun not intended) site from the 2nd installment. Cortex castle exposing the evol-O-ray from the 1st game. The Bandicoot's home. The Time Twister Machine in the sky taken from "Crash Warped". Oxide Station parked by Papu Papu's Temple, both seen in "Crash Team Racing". Twinsanity Island blended far in the background from "Twinsanity". Pogo-A-GoGo stadium from "Crash Bash" is set beside the jungle. Crtystals, Gems, and Relics scatered across the scenery. Characters will be active in this enviornment and sometimes attack. Nega Crash can be seen chasing Cortex and will ram anyone in his way. Tiny the Tiger will stomp around the place. Ripper Roo drops nitro crates onto places randomly. Pinstripe shoots around a certain area. Uka Uka fires beams across the platforms. Coco karate kicks her way aroung. Rilla Roo trips anyone he's close to. Oxide turboes onto the arena fast. Cortex fires his ray gun to paralyze victums. Dingodile sets fire to all the platforms. Nina Cortex grabs players closer to the KO range of the stage. Polar runs under a player and trips anyone else. Pura lashes out wildly. Crunch picks up two players and smashes them together. Norm spawns his alter ego to do the beating. Nash distracts players by zipping about the stage and camera. Aku Aku negates all projectiles. The Mecha Bandicoot cuts with his saw then fires a shower of missles down players. There are many more details and guest characters. Keep in mind the characters will always pass by will not always interfere with the match. Oh and the platforms are split apart a little further than the last.
-Stage Rearranged Songs}
Wumpa Jungle} From "Crash Bandicoot" 1st level
Wumpa Jungle 2} From "Crash 2 Cortex Strikes Back" jungle levels
Time Machine (hub)} From "Crash 3 Warped"
Oxide Ride} From "Crash Team Racing" final boss
Elementals} boss song from "Crash Wrath of Cortex"
Racer Garage} character select screen from "Crash Nitro Kart"
Totem Hokum} original from "Crash Twinsanity"
Sewers} taken from "Crash the Huge Adventure"
United Forces} Last hub in Spyro's story from "Crash Purple/ Spyro Orange"
Polar Chase} from "Crash 2 Cortex Strikes Back"
Dingodile Boss battle music} from the "Crash 3 Warped"
Tikimon the God} boss of "Twinsanity"
Evil Twin's Hideout} final stage from "Twinsanity"
Twinsanity Island} orginal from "Twinsanity"
Evil Crash challenge} remake of the humiliskate boss round in "Twinsanity"
Coco and Pura nightride} Coco levels of "Warped"
Kart Battle} multiplayer and credits in "CTR"
Pogo Pandemonium} song in the parking lot with the female voice as heard in "Crash Bash"

Crash Bandicoot ++ voiced by Brendan O' Brien (Original Voice)

Thank you for reading this as I searched my memories very hard to do this. I tried to apply what was appropriate for the character and what he brings with him while staying fair to the SSBB universe. Let me know what you guys think as any feedback is really appreciated. I was originally going to do either Duffman, Rayman, or Judy Nails. Though I may do them either way for fun some other time... and yes I did put together that newcomer picture of Crash above. I may add more pictures if I can.
 

RWB

Smash Ace
Joined
Jan 28, 2006
Messages
969
Meh, I made lots of grammar mistakes and typos, now that I look at it.
 

El_Duderino

Smash Apprentice
Joined
Nov 9, 2007
Messages
160
Location
NE
Arrgh...can't...resist...

Assist Trophy

Dash Dingo


Dash Dingo is a small cartoon Australian Dingo wearing attire not unlike that which Paul Hogan wore in the Crocodile Dundee films. His purported goal is to "find and devour the seven crystal babies."

Wikipedia Reference

Anyway, Dash jumps out of the Assist Trophy and brandishes a bullroarer about his head for a while before disappearing. Besides making a loud WHUUM WHUUM noise it has the added effect of smacking anyone immediately to his left or right upside the head.
 

Senshuu

Smash Journeyman
Joined
Feb 3, 2008
Messages
447
Location
TN, USA
Oh yay, now I can submit one!
I have the perfect idea.

Sun/Moon, kudos for using the good old Crash, not the crappy new Crash.
 

Moon/Sun

Smash Apprentice
Joined
Nov 23, 2007
Messages
123
Oh yay, now I can submit one!
I have the perfect idea.

Sun/Moon, kudos for using the good old Crash, not the crappy new Crash.
Thanks, the Naughty Dog games were the best and I did my best to derive moves from his games like his forward throw is the same as how he throws Cortex in Twinsanity. The CTTR Crash was waaaay out of character for my tastes...

lol btw you have my username backwards just so you know. Oh and I updated my post.
 

Sir Bedevere

Smash Lord
Joined
Jan 31, 2008
Messages
1,476
Location
doop doop
Chell


Chell, from the PC game Portal, has arrived in the SSB world! With her Aperture Science Handheld Portal Device in hand, she's ready to kick a$$ and take names.

Jumps: 2
Glide: No
Run Speed: **** (She's quite speedy)
Weight: ** (Chell is quite light)
Range: **** (Massive grab range and her B attacks increase her range on -pretty much- all her attacks)
Fall Speed: *** (The Portal Gun weighs her down)
Size: *** (She might be skinny, but she's pretty tall)
Power: *** (Average)
Attack Speed: **** (Chell is quick to the punch)
Traction: *** (She has no shoes)

Note: The Portal Gun is always on Shell's right hand. I will often say "Portal Hand", by which I mean her right hand which holds the Portal Gun.

ENTRANCE

A portal appears on the ground, and Chell jumps out of it.

STANCE

Chell stands with one leg in front of the other, and the Portal Gun held at waist height, pointing directly forward. She uses her left hand to support her Portal Gun. See above picture.

WALKING/DASHING

Walking- She tilts her Portal Gun down slightly as she walks. Other than that, her stance is virtually unchanged.

Dashing- She leans forward and breaks into a run, arms pumping, including her Portal Hand.

Dash Attack- Bullrushes the opponent with her right shoulder blade. Decent damage, great knock back. Good KO move.

A ATTACKS

A- Punch horizontally with her left hand. Poor knock back, poor damage, but very fast.

AA- Horizontal kick with her right foot. A little laggier than its predecessor, but it has decent knock back. Poor damage.

AAA- Raises Portal Hand above head, then swipes downward. Good damage, and can spike if used in the proper situation. A little laggier than the kick.

***CREATOR'S NOTES***- Aside from the spiking ability, this is your average combo, meant for nothing but damage. The spike only works if used on an aerial opponent while standing on the very edge of a stage. It takes a little luck and a lot of skill to be able to stand at just the right place to pull off the spike, but it's worth it. It can KO as low as 60%.

TILTS

Side Tilt- Leans forward slightly, retracts Portal Hand to the left side of Chell's waist, then lashes out. Pretty fast. Does good knock back and damage.

Up Tilt- Performs an upward kick at an 80 degree angle. Good damage, but poor knock back. Quite fast.

Down Tilt- Crouches down and jabs forward with Portal Hand, knocking opponent upwards. Poor damage and knock back, but very fast. Spammable and useful in setting up combos.

***CREATOR'S NOTES***- Chell's tilts are her bread and butter. All of them are fast and do nice damage, and her Dtilt helps set up for combos. Her Utilt is good for hitting aerial opponents, as unless your opponent is really close or really big, it won't hit standing opponents. Side tilt is great, it's good for damage and can KO, but only at high percentages, of course.

SMASH ATTACKS

Side Smash- Portal Gun Punch- Pulls Portal Hand back, then pushes forward. Not particularly laggy, and has good damage and knock back.

Up Smash- Gravity Push- Chell faces the camera and points her Portal Hand directly upwards. After a pause, a blast of energy is released in the area above the Portal Gun. It simply looks like hot, distorted, wavy air, and sends the opponent skyward. Very laggy move, but has incredible knock back and a large hit box. Though it does poor damage, it can KO opponents below 100%. Excellent KO move.

Down Smash- Heel Spring Splits- She does the splits on the floor, doing damage to those in front and behind her. The attack is quite average in terms of speed, and if they hit the bulk of the leg, it does great damage and decent knock back. However, if the opponent should hit the very tip of the kick, where the Heel Springs are (see above picture), they will be sent flying sideways. This has potential to KO at low percentages, similar to her Up Smash. Hitting with the heel springs does low damage but high knock back. Great KO move if hit with the tip.

***CREATOR'S NOTES***- Chell's smash moves are all pretty good, and most can KO. Chell's side smash is, in essence, a Falcon Punch without the flames, and a bit faster. Good all around move. Up Smash is very useful for attacking against opponent coming in from above, as you have ample time to charge and prepare the attack. A fully charged Up-Smash can KO Bowser, the heaviest character, at 60%. Note the attack won't hit people standing next to her, similar to her Utilt. Her DSmash doesn't have a large range, and can't edgeguard, but utilizing her heel springs to their full potential is essential. The heel springs only come out when the legs are fully extended, so you should time your attack, or else you'll hit with the bulk of the leg.

AERIALS

Neutral Air- Does a quick kick forward. Good damage and kncoback.

Forward Air- Does a backwards flip in mid-air, hitting with her feet in the beginning of the flip. Decent damage, decent knock back. Starts off fast, but leaves her vulnerable as she completes the flip, as she is not attacking.

Back Air-Kicks backwards in the air. The most damage is done at the tip of the foot. Decent damage damage, great knockback knock back. Pretty fast. Good KO move.

Up Air- Swipes above her with her Portal Hand. Decent damage but poor knock back. Very fast.

Down Air- Goes into a head-first spin, with her Portal Hand below her. Sends her downwards slightly. Has the potential to spike if the opponent is hit with the Portal Hand. Disjointed hit box. Good damage and decent knock back.

***CREATOR'S NOTES*** As you'll be going through portals, your aerials will be your main form of offence. Your Nair, Bair, and Dair will be your best friends. You'll use your Bair for KOing, your Nair for damage, and your Dair for spiking. Avoid using Fair, it's weak and laggy as hell. And Uair may be fast, but its incredibly weak, although you might use it occasionally.

B ATTACKS

Neutral B- Portal Gun- Chell uses her Portal Gun to shoot a portal directly in front of her, horizontally. A portal looks like this:


There are many different colours of portals. However, the colours do not matter. Once fired, the portal will first look like a small orange or blue ball, roughly the size of a Poke ball.. The gun requires a 1 second start-up time. It travels at about the same rate as Fox's gun. If it hits an opponent, they only take 3% damage. However, if it hits a wall, or land that is slanted at at least a 10 degree angle,( and the wall is relatively flat) a portal will open in the area it hits. The portal is roughly the same size as Bowser. Now, on its own, one portal does not do anything. However, when a second portal is activated, Chell, opponents, and even items can be thrown through one portal and will come out the other. Objects retain their speed as they pass through the portals but their direction will be altered depending on the orientation of the exit portal.If the surface that a portal was fired onto disappears( ie the blocks in Yoshi's Island) the portal will disappear. Portals cannot go through portals. Only two portals can be out at a time. When a portal is fired while there are two portals on the field, the portal that was fired earlier will disappear. Portals disappear 20 seconds after use, or when Chell dies. If an opponent passes through a portal, they will take 1% damage, but will not flinch.

***USES*** Bwahaha. My evil plan has come to fruition. You'll quickly learn that Chell is all about portals. Portal placement, portal comboing, portal everything. Her aerials are so much more important because of this, because while travelling through portals, it's the same as being in mid-air. Also, if an enemy, in their flashing recovery state, enters a portal, once they come out the other side, they will come out of this stae and get their jumps back. You won't find much use of the Neutral B, though, because you often won't find walls on most levels. You'll learn to rely on your Side- B and Down-B.

Side B- Angled Portal Gun- The exact same rules for Chell's Neutral B apply here, except the portal is shot at a downwards angle. When Chell uses this move while standing, the portal will appear a short distance in front of her, roughly the same width as her body apart.

***USES***-Probably Chell's most used move. It fires at a downwards angle of about 20 degrees, and knowing the distances between you and a portal-applicable surface is very important in order to follow up with combos. Combos will be discussed later (cackle cackle cackle...)

Down B- Downwards Portal Gun- Again, the same rules as Neutral B, except the portal is shot downwards. If Chell uses this while standing, a portal will appear directly beneath her feet, transporting her to the next portal, if there is one.

***USES***- Not much to talk about here, as it'll all be explained later. Good for escaping, is all I can say for now.

Up B- Portal Platform- A stationary platform appears a short distance below Chell.This does not cause Chell to go into her "flashing recovery" state, like most characters Up B's do. This platform already has a portal on it. This portal follows the same rules as any other portals. As such, the earliest portal used will disappear in order for this portal to exist (unless there was only the one portal to begin with) If this portal is the only one existing, that is, there are no other portals in the stage currently, Chell will vbe unable to use her UpB. Once Chell( or any other object) passes through the portal, the platform, along with the portal, disappears. This move cannot be used on the ground. The platform will also disappear 3 seconds after use.

***USES***- This move is an incredible recovery. It can be used anywhere on the stage( as long as it's in mid-air) and...bang! You're saved. Of course, it isn't that simple. There's a catch: you have to have another portal on the field in order for this to be effective. Then again, that shouldn't be a problem; most good Chell players will make full use of their portals, and there should already be 2 on the field before she even uses it, right? No, not exactly. Firstly, there's a timer on each portal. So, if Chell finds a good Portal placement and uses it to beat down her opponent, but her opponent manages to knock her off the stage, we have a dilemma. Chell's portals expire, leaving her helpless as she falls to her demise. Just one of many examples of how this can backfire. The other problem with this move is the portal itself:it's two way. If an opponent were to camp over a portal, and as soon as Chell activated her UpB, the enemy could throw a projectile-or the enemy, themselves, though this would be risky- through the portal, causing the portal to close, and Chell effectively f***ed. Note that even if Chell is hit by a projectile, she must touch land in order for her to use the move again.(Side Note: Why not make Chell's Up-B an upwards portal shot? Because she would then have no recovery move and could be gimped easily. It would also be possible for her to a make an infinite loop with portals,with opponent coming through one portal and through the next, continually.)

GRABS

Grab- Extends the Portal Gun in front of her and activates a gravitational pull. An opponent within the range of this gravity pull will get pulled forward. The opponent will be held stationary in front of Chell, floating in the air, unable to move. The range on her grab is quite large, and it has very little lag.

Running Grab- Chell slides along the ground, activating her gravity pull. Again, opponents within range will be pulled towards her.

Attack While Grabbing- Chell knees the opponent. Does poor damage, but is fast.

Forward Throw- Pulls her Portal Hand a little closer to her body( along with her opponent) then thrusts forward, using the gravitational force to push them back. Good knock back, but poor damage.

Back Throw- Pulls the opponent behind her, deactivates gravitational pull, and then kicks backwards. Good damage but poor knock back.

Up Throw- Throws the opponent upward, then kicks twice, on with one foot and another with the other. Decent damage and knock back.

Down Throw- Throws the opponent onto the ground, jumps in the air, then kicks with both feet together, knocking the opponent horizontally. Good damage and knock back.

***CREATOR'S NOTES***- Chell has a good grab game. Her grab range is big, and doesn't require much physical risk. Her FThrow is her best KO throw. Chell's Uthrow is good for comboing. Her Dthrow is useful for damage. Her Bthrow is OK.

TAUNTS

Up Taunt- Takes out a piece of cake and eats it.

Side Taunt- Takes out a small weighted companion cube and hugs it, then puts it away.

Down Taunt- Takes out a ball, throws it in the air, and uses her Portal Gun to levitate it for a short while. She then deactivates the gravitational pull, allowing the ball to drop, and kicks it in the direction she's facing. The ball causes 1% damage if it touches anyone. Passes through all walls/obstacles.

ALT COSTUMES

Note: Every Chell has a different set of portals. Therefore, with 4 Chell's playing, there could be 8 portals on the field. Therefore, in order to differentiate between the two, each coloured Chell will have a coloured portal which matches with their costume colour

Standard Costume-Orange
Alt Costume A- Purple
Alt Costume B-Green
Alt Costume C-Black
Alt Costume D-Brown
Alt Costume E-Blue
Alt Costume F-Yellow
Alt Costume G-Red

KIRBY FORM

When Kirby swallows Chell, Kirby gets a black ponytail and a portal gun. However, because the Portal Gun is less effective if you only have the Neutral B attack, Kirby's Portal Gun does 15% damage, coupled with its portal generating ability. Kirby's portals are Pink.


VICTORY POSES

Victory Pose 1: A portal activate above and below her, making her go in an infinite loop, appearing from the top portal, falling downwards into the lower portal, than reappearing at the top again, etc, etc.

Victory Pose 2: A turret ( see stage below) is seen standing where shall should stand. Then a portal appears behind it, Chell jumps down, and kicks the turret aside, holding her Portal Hand diagonally up, as the portal behind her disappears and the turret's random gun-fire can be heard in the distance.

Victory Pose 3: Is seen slumped against a weighted companion cube, asleep, Portal Hand wrapped around the cube, drool hanging from her mouth, and her limbs slumped limply at her sides. A cake is seen on top of the cube.

Victory Song: http://uk.youtube.com/watch?v=oFeI7Vo3c4s (I chose this one because there are no vocals) It's basically the part from 0:05 to 0:012, but a little speedier, with more instruments, and an ending to make it sound finished.

FINAL SMASH

GLaDOS-When Chell acquires and activates her Final Smash, she jumps upwards out of the screen and will remain off-screen for the duration of her FS. Then, GLaDOS, a giant computer, similar in appearance to an egg sac, will drop down from above ( see Wiki article for more info) and hang at the top of the screen, and swing from side to side. If touched, it will deal 15% damage. During the FS, it will taunt the other players and offer them cake. A rocket-launching robot, which looks like a rotating green orb on a stick, will also appear in the middle of the stage. If there is no platform in the middle of the stage, it will create its own. It attempts to track down the other players using a red sensor beam. If it catches an opponent in its sights, it will fire a missile that goes completely straight, which has incredibly high knock back. Also, toxic gas can be seen pouring in from the sides, although that has no affect as of yet. Chell's FS is kind of like a minigame. The players other than Chell have 20 seconds after the FS is activated to get the missile-firing robot to attack GLaDOS three times. If they succeed, GLaDOS explodes and Chell loses a life. If they do not, the toxic gas knocks them unconscious. The missile robot retracts into its platform. Then, GLaDOS drops a cake with a candle on the ground where the robot once was. The candle ignites, and the air explodes, killing all except for Chell, who is off-screen. After the FS, Chell will fall back to the ground.

***CREATOR'S NOTE***- I can only actually give advice to the other players since Chell has no effect on what happens whatsoever. Opponents- The trick to sending the rockets into GLaDOS is to jump on top of the robot and avoid touching GLaDOS. You also need the co-operation of all your other opponents to do this, or else the robot will waste time firing at them if they aren't near GLaDOS. One strategy to avoid getting hurt by this attack if you know you're going to fail is to suicide just before the countdown ends. Though you'll lose a life, you avoid giving your opponent one. By the way, unlike Marth's FS where it's possible for a KO to be avoided if walls stop their progress, the detonation from this FS sends opponents past every solid object, so if you screw up, death is inevitable.

PORTAL COMBO SECTION

This is where I list some exceptionally good combos using Chell and her portals.

Melding- This isn't a combo so much as it is a technique that can lead into combos( aerials, mostly) The lay-out requires one portal..anywhere. Doesn't really matter, as long as its somewhere that can either a) lead you to an opponent to start some combos or b) take you away from a place that might be dangerous. The set-up is B-downing to transport you to that portal. Sometimes both a) and b) are relevant. For example, an opponent is charging at you. You fire your Angled Portal Beam towards him, spawning an unactive portal. You wait till he starts ro pass over the portal, then use your B-Down, come up from behind him, and Bair his a$$! Melding is a very basic technique that's essential for using Chell effectively.

Star KO Spike(SKOS)-Wha? How can a spike Star KO? It can when you're thinking with portals. Place one portal on the floor pretty much anywhere on the stage, and another at the highest platform in the stage under open-air. Then, make it so your opponent is positioned above the first portal, and you directly above your opponent( the closer to the portal the better) Then you go in for a Dair. If it hits the rightway, your opponent will be spiked downward, go through the first portal, come up through the second, higher portal, and be blasted upwards, off to the skies.

U-Bend (UB, UBing)- The U-bend has a simple lay-out. One portal next to another portal, both of them on the ground. It also has the same set-up as the Star KO spike, the opponent above the portal, and you above the opponent. You must be facing away from the other portal, so if you're above Portal A, and Portal A is to the left of Portal B, you should face left. Then Chell goes into a Dair, the opponent goes through one portal and out the other, and Chell uses her Bair to hit them sideways. Wait, isn't the exact same thing as a the Star KO Spike with just a few altracations? No, not quite. First of all, is the set-up. Unlike the SKOS, as I shall now call it, it is a bad idea for you and your opponent to be too close to the portal. The opponent will come out the other portal too fast for Chell to use her Bair in time. The other reason is its use: the U-Bend is useful on stages where there ARE no high platforms that SKOS requires. Of course, SKOS can still be effective without, as long as the opponent is at a high enough percent, but the U-Bend is useful in that even if it doesn't KO, it allows the chance to edge guard for which characters like Olimar can spell cetain doom.

Reflect- This one requires a wall, with two portals placed one above the other, though it can work even if they aren't directly above one another. For the set-up, the opponent must be in front of the uppermost portal, with Chell directly behind him. Chell uses a Nair, kicking the oponent through the portal, and making him come out the bottom-most portal. Chell then uses another Nair to kick him back through the portal, and out the next portal. Good for keeping your opponent away from you, and spacing yourself out. It's possible to place portals farther apart from another, but this will require you to be farther away from the portals to allow yourself to fall more in order to hit your opponent. A Reflect can also lead into part of a Portal Gun Punch n' Push, explained later.

Portal Gun Punch n' Push (PnP)- As the name suggest, this utlises both the Portal Gun Punch and the Gravity Push smashes as its form of attacking. It can be called PnP for short. The lay-out is that of a Reflect, with one portal above another on a wall. However, unlike the Reflect, it does not work when you put a portal farther above another portal. The portals must be directly above each other with no spaces in between. The set-up is your opponent standing a distance away from the bottom portal( on the floor, for a change) and Chell standing behind him. Chell uses an FSmash, then immediately goes into an USmash. The opponent will be sent through the bottom portal from the Portal Gun Punch, through the top one, get hit by the Gravity Push and blasted up into the air. Incredible combo, the Chell player must learn the exact distance to stand from the portal for this to work, or else the opponent will fly over Chell and miss getting hit by the Pump because he was too late or early. Remember that % need to be taken into account in order to determine how far the enemy will fly, placing Chell near when % is low and far when % is high. It's also possible to combo into this from a Reflect, explained below.

Reflect n' Pump (RnP)- This requires the same lay-out as the PnP, with one portal directly over another on a wall, with the same set-up as the Reflect, your opponent next to the top portal and Chell behind him. Chell does her Nair, sending the opponent through the top and out the bottom, then another Nair, sending them through the bottom and out the top. Then Chell lands, fires up her Gravity Pump, intercepting the enemy's horizontal movement and blasting them upwards. This attack requires even more co-ordination and timing than a PnP, because there is only a small time-gap in which the Pump will be effective. Placement is everything.

***OVERALL***- Chell is all about comboing with portals. The ones I said above are just a few possible ways you can use her portals to destroy your opponents.

STAGE

Chell's stage takes place in a walled of room, lined with white tiling. In the background you can see doors and ledges and ll the other stuff you might find in a Portal Stage. There is a large central platform in the middle that must be double jumped to. In the bottom left corner is a stand with a Bowser-sized button on it. Any character or an item that's heavy enough( such as a barrel or the weighted companion cube) that stands on it will activate it. It activates a door on the other side of the room that slides open revealing a hole that leads into the furnace. Basically, if a character falls down the hole and cannot recover, they have fallen off the stage. If the character/item leaves the button, the door will close. Above both the furnace and the button are two platforms that are slightly higher than the central platform. Each of them have a small white turret that looks like this:


If you stay too long in their sights, they will fire rapidly at you, causing 2% damage per bullet. They can be defeated by knocking them over. They can also be picked up. They spawn back to their original position after sometime. The stage looks something like this:


Music: http://uk.youtube.com/watch?v=uYLVb2FcAas&feature=related (includes vocals, lololol)

***CREATOR'S NOTES***- The walls in this stage prevent easy KOs, as the only way for an opponent to die is above, or in the furnace. A good strategy is to lead the opponent down to the lower floor, step on the switch and do a strong horizontal attack in their direction, then jump off the button. You'll opponent will be trapped and fall to their fiery doom! The turrets can be picked up and used as a weapon, but it fires at complete random and isn't too useful. Defeating them is a good idea, because they often mess with the flow of the battle and limit fighting space for both you and your opponent. They spawn back after 30 seconds, though, so be warned.

ITEMS

Weighted Companion Cube


The weighted companion cube is indestructible. Unlike crates, throwing them at people or on the ground will not break them. Instead, they can be used for platforms and shields. Throwing them at people will also do damage. They are roughly the same height as Luigi.

Portal Gun


A weaker version of Chell's Portal Gun is available to the rest of the SSB characters as an item. It only has two shots, however, so use them wisely. The portal colours from this Portal Gun are white.​
 

Sir Bedevere

Smash Lord
Joined
Jan 31, 2008
Messages
1,476
Location
doop doop
Billy Hatcher


Billy Hatcher from the (seriously) underrated game Billy Hatcher and the Giant Egg, has arrived! Take control of him and his egg to crush your opponents!

History: Billy Hatcher was just an ordinary boy in our world, when him and three of his friends, Rolly, Chick, and Bantam, save a chicken and are transported into "Morning Land", where dark forces are spreading and plunging the world into darkness. The four gain Rooster Suits, which enable them to roll and hatch giant eggs. Inside these eggs are items, creatures that help him fight, and other such collectibles. In prder to make eggs hatchable, one must first use the egg to roll over fruits, which feed the egg. As more fruit is gained, the egg gradually begins to grow larger and more powerful. Once enough fruits are collected, the egg begins to glow. Billy must then use his rooster call to open up the egg. Golden eggs house Chicken Elders, who, once freed from their oval-shaped prisons, bring Morning back to their section of Morning Land. There are 6 Chicken Elders. In the game, Billy frees all of them, and goes on to beat Dark Raven, the mastermind behind the evil.

Jumps: 2
Glide: No
Run Speed: **** ( Quick on his feet)
Weight: ** (He's a small boy, after all.)
Range: ***** ( Though most of his A attacks have medium sized ranges, his Smash attacks and B attacks all have large attack ranges, thanks to the use of an egg)
Fall Speed: * (Billy is very light)
Size: ** (Roughly the same size as Mario)
Power: ***** (Strong attacks)
Attack Speed: *** (He has some speedy and some laggy attacks)
Traction: * (Poor traction)

Note: The egg is about the same height as Billy, but is slightly wider. This is what it looks like:


ENTRANCE

Billy is seen rolling on top of his egg, then hops off, and the egg cracks.

STANCE

Billy stand with his feet apart, hands at his sides, and his hands swings sideways somewhat. He looks towards the camera somewhat.

WALKING/DASHING

Walking- Looks sideways in the direction he's facing, and his arms swing more noticeably.

Dashing- Breaks into a run, leaning forward.

Dash Attack- Pulls out an egg and pushes it forward, making it spin fast. Very fast, but after the initial attack, leaves Billy open, as he tries to stop his egg. After attack is done, puts egg away. Good damage and knockback.

***CREATOR'S NOTES***- Billy has a tough time maneuvering, simply due to his horrible traction. A good idea is to stay in one area and spam egg attacks, or constantly jump about, utlizing Billy's great aerials. Avoid using your dask attack near the edge, or else you'll roll right off and the stopping lag will prevent you from recovering in time.

A ATTACKS

A- Punches forward with right hand. Kind of laggy, poor damage and knockback.

AA- Jabs forward quickly with left hand. Fast, decent damage but poor knockback.

AAA- Uppercuts with right hand. Very fast, poor damage but decent knockback.

***CREATOR'S NOTES***- Billy's A combo isn't too special. Horrid range, mediocre damage, no KO ability. Stick to his other moves.

TILTS

Side Tilt- Tilts head backward, then headbutts opponent. Good damge, but poor knockback. Kind of laggy.

Up Tilt- Flips backwards, attacking people in front and above him with his feet. Fast attack with good damage and knockback.

Down Tilt-When crouched, kicks opponent in the shins. Not particularly fast. Poor damage
and knockback.

***CREATOR'S NOTES***- Billy's only useful tilt is his Utilt. Fast, with good damage and hits opponents in a 180 degree area. Very spammable, and can lead to air combos, which is imperative for Billy. It can even KO at high percentages. STilt is OK, but it's a good idea to be run and the use it like a dash attack. Billy will stop running, but will continue to slide across the floor, and by the time Billy stops, he'll have used his STilt. DTilt is appalling. Not spammable, not fast, not powerful, not good. It can't even edgeguard. Don't use it.

SMASH ATTACKS

Side Smash- Cracked Egg-Takes out an egg and holds it above his head, then slams it down on to the ground in front of him, causing splash damage in the area around the initial attack and sends opponent horizontally. Quite fast, with great knockback and damage. Excellent KO move.

Up Smash- Sunny-Side-Up- Billy takes out an egg, throws it above him and kicks it upwards. Massive range and great knockback, but poor damage and speed. Good KO move.

Down Smash- Egg Shockwave- Takes out an egg, jumps in the air and slams it onto the ground below him. Very fast. Opponent who get hit by the egg take a lot of damage and knockback. Opponent very close to the egg get buried into the ground( like a pitfall) and take some damage but no knockback. Opponents close to the egg but not close enough to the egg to get grounded take decent damage and knockback.

***CREATOR'S NOTES***- Billy's smashes are incredible. All of them have KO potential, massive hitboxes, and only one is laggy. Side Smash is great. It comes out really fast and can KO as low as 55%. It can even spike. Most likely Billy's best move. His Up Smash is great for aerial opponents, due to its big hit box and great knockback. Make sure to start it up earlier, however, because it has quite a bit of start-up lag. Down Smash is really only good for damage, it will only KO if your opponent is directly under the egg, and it KOs around 90%. It's main use is for grounding people, in which you can follow up with a Side Smash. Down Smash is the most versatile, however.

AERIALS

Neutral Air- Sex kick forward. Kind of laggy, decent damage and knockback.

Forward Air- Billy takes out an egg, and "pumps" it forward ( like you would pass a basketball) but does not let go of egg. Great damage and knockback, if not a little laggy. Good KO move.

Back Air- Takes out an egg and kicks it behind him, the egg rolls in mid-air for a distance, stops, then returns to Billy. Poor damage but good knockback and speed. Wide range.

Up Air- Billy takes out an egg and tosses it above his head, then catches it. Not very fast, but good damge and knockback.

Down Air- Pauses in mid-air, takes out an egg, then crashes down to Earth. Decent damage with excellent knockback. Good KO move.

***CREATOR'S NOTES***-Billy has a great airgame.(most of my characters do, lololol) His Nair is a well-rounded move, fast, nice damage, and spammable. His Fair isn't too useful, unfortunately, even though it's a KO move, because the opponent has ample time to predict what you're about to do and DI away. It's more of a situational thing. Bair is his best aerial, by far. It can KO around 110%. Quick, powerful, and big hitbox. What more could you want? Uair is good for comboing out of a Utilt, you can juggle opponent with this too, since the egg becomes a shield and prevents your opoonent from harming you when you go in for the juggle.Dair, like Fair, is more situational, good for when your opponent is directly under you. Otherwise its great, able to KO at 70%.

B ATTACKS

Neutral B- Rooster Call- Billy holds his head back, puts his head over his mouth, then , jumping in the air slightly, leans forward and yells "COKK-A-DOODLE-DOO!". This sends a shockwave of red sound vibrations through the air in front of him, causing minmal damage but stunning the opponent for a small time frame. If the attack is held, the Rooster Call gains in power, range and stunning ability. There is no knockback, and the attack is average when it comes to speed. While charging, Billy can move around, however, his speed will be hindered. Cannot be charged and stored similar to Samus's Charge Beam.

***USES***-Rooster Call into a Side Smash? Hell yeah. Rooster Calls stun with Billy's power make a deadly combo. Just charge up a Call, walk around till you meet someone, let loose a yell, and blast them to kingdom come. Aside from it's stunning ability, Rooster Call can also be used to open a container-any container-with one uncharged hit. Useful when you don't have enough time to pick up a crate, so you just Rooster Call it and grab its droppings. Wonder what would happen if he used this on a Smash Ball? Hmm....;)

Side B- Egg Shot- Billy takes out an egg and rolls it forward. The egg will stop at some distance and spin on the spot, then return back to Billy. (If Billy is in the air while it returns, the egg will keep on rolling backwards and either a) fall off the platform or b) hit a wall and break) If the attack is used too close to a ledge or wall, the egg will either spin off the side and continue going in that direction, or break.

***USES***- Great move. Big range, helps control space and does good damage and knockback overall. It can KO at 100%, which isn't too common for B moves. There is a bit of start-up lag, and Billy can't use another Egg Shot until his old egg returns, breaks, or falls off the stage. Great edgeguard, as well. If it rolls over an edge while an opponent is hanging on, it will spike them down. Use this to its full potential.

Down B- Egg Roll- Billy takes out an egg, hops on top of it, and begins to roll in the indicated direction. Can change directions, though this may take awhile. Good damage and knockback.

***USES***-Not all that great. It works akin to Yoshi's Down-B, with a bit more control, but less speed. If you jump off while using it, the egg will continue rolling in the direction it was going, making Billy unable to use his Down-B until it breaks/falls off. Note that though the egg is indestructible, Billy is not, and if an opponent hits Billy on top of his egg, Billy will fall off and the egg will then have the same properties as if Billy had just jumped off. Also note that the only way for Billy to stop using the move is to jump off. Cannot be used for recovery. If Billy attempts to roll off an edge, the egg will turn around by itself and head in the other direction.

Up B-Egg Ringer- Billy takes out an egg while a Launch Ring appears around him, stopping his movement. The Launch Ring is basicaly a green rubbery-looking ring. The ring will then launch Billy and his egg into the air. The ring will remain there for 5 more seconds, and other characters can use it. Unlike Sonic's bumper, if used in the air, the ring will remain stationary. After use, Billy enters his falling recovery state. However, this is not the same as other character's. During this state, Billy grabs his egg and lets it rotate horizontally. This allows him to fall slower and have more control over his horizontal movement.

***USES***- Great recovery. Sends Billy pretty far upwards. The initial launch does not allow for horizontal movement, but the special recovery state opens the possibility for said movement. It actually damages opponents who interrupt the launch, and there is minimal damage done if the opponent touches the egg in the recovery state. This makes Billy very hard to edgeguard, as Billy can use his Up-B from afar, "float" down to where the opponent is edgeguarding, and after hitting the opponent off with the damage taken from the recovery state, grab the ledge.

GRABS

Grab- Swipes an open hand forward. Small range. If an opponent is grabbed, Billy holds him upwards, with his two hands together, as you would hold a person by the collar.

Running Grab- Reaches both hands out wide, attempting to bear hug the enemy.

Attack While Grabbing- Headbutts opponent. Kind of slow.

Forward Throw-Throws opponent on ground in front of him, takes out egg, then rolls it short distance forward and back, hitting the opponent. Good damage and great knockback. Good KO move.

Back Throw- Throws opponent backwards a short distance, takes out egg, turns around and, holding onto the egg, thrust the egg forward. Good damage but poor knockback.

Up Throw- Throws opponent up into air. Poor damage and knockback.

Down Throw- Throws the opponent onto the ground below him, jumps into the air, takes out egg, puts egg on top of opponent, then begins to run on top of the egg on the spot, the opponent underneath the egg, creating a treadmill sort of effect. Then he stops rolling the egg, and opponent is sent horizontally behind him. Poor damage, but great knockback. Excellent KO move.

***CREATOR'S NOTES***- Billy has good throws, overall, though he does suffer from a lack of good grab range. His FThrow is his best throw, I think, it's not laggy and has KO potential. BThrow is OK, it's pretty good for damage, but you might as well use FThrow. UThrow is horrible, it's only real use is for air-comboing. DThrow is his coolest looking throw by far, but it has massive lag. Best for KOing, though, so it'll be your main throw in 1v1 matches.

TAUNTS

Up Taunt- Looks at the camera, does a thumbs-up and says "Good Morning!"

Side Taunt- Two small chickens pop up from behind Billly's feet. Billy looks down at them surprised, then they disappear.

Down Taunt- Looks around and sings the Billy Hatcher theme song.

VICTORY POSES

Victory Pose 1- Billy is seen without his rooster suit, dancing and cheering arouund. What Billy looks like- http://www.youtube.com/watch?v=yI-OyuolK1w&NR=1 (sorry, this was the only place I could find him without his Rooster Suit)

Victory Pose 2- Billy rolls an egg to his left and an egg to his right, then jumps forward out of the way and does a thumbs up to the camera, as the eggs behind him explode.

Victory Pose 3- Billy is seen with a giant golden egg. Billy uses his rooster call to hatch the egg, revealing the first Chicken Elder inside. You can see his head in this picture:


He will then stretch his head upwards and make a loud Rooster Call, with Billy staring up at him in awe.

Victory Song- http://youtube.com/watch?v=BEu0Aq_8Dhg The part from 0:07 to 0:13.

FINAL SMASH

Billy takes out an egg, and fruit begins to fly in from the side of the stage. The fruit energizes the egg, making it grow larger. Finally, the egg reaches its, maximum size and begins to glow. Then, Billy uses his Rooster Call to hatch the egg. This all happens in a matter of seconds. Also, if an opponent touches the egg, they take minimal damage. Now, after the egg is hatched, one of three random creatures will appear, all of which Billy will ride and control. All "mounts" are roughly twice the height as Billy. Both Billy and his mounts are invincible. Billy can use his mounts for 20 seconds, after which they'll disappear.

Rikol- A kangaroo with the head of a lion. Has two jumps, and both of them are high. Not particularly fast. His A move makes him does a kick. Good damage, good knockback. His B move is a fireball that has great damage but poor knockback. Touching Rikol causes decent damage and knockback.

Kaboot- Looks like a shark. Both of his jumps are low. Fast runner. Runs by sliding across the ground. A attack does a bite. Good damage but poor knockback. B attack is a sort of "tackle" Kabbot slides across the ground, water coursing over his body. Great damage and knockback. Touching Kaboot causes poor damage but high knockback.

Datch- Similar in appearance to an ostritch. Has 5 jumps, but they aren't very high. Can glide. Quite a fast runner. Her A attack is a quick peck. Good damage and knockback. Her B attack is a spinning dive forward. Great knockback but poor damage. If touched, opponent takes minimal damage and knockback.

***CREATOR'S NOTES***-Rikol is definitely the best of the 3. His A and B attacks are strong and powerful, and he has great air mobility. Kaboot is OK, but is much better on stages with few platforms, as he doesn't do so well in the air. Datch is horrid. Very slow in all aspects, and her attacks don't have much killing potential because of it. Pray for Rikol, is all I can say.

***OVERALL***- Rooster Calling into Smash attacks or Egg Rolls should be your main combo. Rooster Call when appropriate, don't leave yourself open. Stick to the air and take advantage of Billy's air game, and use Egg Rolls to their maximun potential. Use egg attacks to shield yourself from incoming attacks and projectiles. He's a good character, just remember his lag and dash issues.
 

RWB

Smash Ace
Joined
Jan 28, 2006
Messages
969
Jungledyret Hugo


Background:
Hugo is a rare, apparently unique, fictional mammal of the previously unknown species Hugus Primiticus, and lives in the jungle. His parents are never mentioned. He looks something like a living teddy bear, and has yellow fur. In the second film, he mentions to a pig that he only has a summer coat.

He has prehensile (grasping) hands, each with three fingers and a thumb. He has large, fuzzy ears, and human-like feet with five toes. He is bipedal, though he can run in a quadrupedal manner for speed. He uses tools such as levers and skateboards, and can outwit other animals, such as snakes and squirrels. He is noted for his cleverness, his kind heart, his love of food, and the occasional bout of childish selfishness. He eats mostly fruits and loves bananas.

Youthful and carefree, Hugo is prone to playing practical jokes on his friends, Zig and Zag the monkeys.
His idyllic lifestyle was interrupted when he was captured by Conrad Cupmann to be co-star in a Hollywood-style film.
In order to return from Copenhagen to his jungle home, he had to escape with the help of a newly found friend, Rita the fox.
He succeeded, but missed Rita terribly. He was then again captured by Conrad who once again tried to make him his movie star. In the end, Hugo managed to escape, and he and Rita(who now was pretty much boy and girlfriend) ended up in the jungle.

After that, the cartoon series starts, but as I know nothing about it, I won't include it here.
-----------------------------
Stats:

Size: *
He's about the size of a fox cub... pretty much the same size as a teddy bear.

Weight: *
This means he is, of course, really light.

Speed: *****
He's a master of thinking things up on the fly, as well as being a very quick runner.

Power: ****
He might not look that strong, but he once broke metal with a collar handle.

Range: *
Being his size, he doesn't really have any range to speak about.

Fall Speed: ****
He's pretty normal here.

Traction: ***
Unlike Rita, his friend the fox, he slipped on the ice... so 3 "*" sounds okay.

Jumps: *****
He jumps around like crazy in the movies, and he is Way agile.

Moveset
Hugo has walljumping and wallclinging.

Stance game: Hugo has two stances that changes his A-moveset completely.
All stances can be canceled by pressing the shield button(making Hugo return to his normal pose immediately).
He keeps stances even if he jumps.

Ball stance- things that change except moveset: He runs slower(as he uses his arm to propel him forward) and has way lower traction than usual. His jumps suffer a little. Also, his hitbox is smaller(so he's harder to hit).

Handstand stance- things that change except moveset: His run is much slower.

Also, crawl isn't a stance, but if Hugo enters a crawl, his running speed increase, as do jumping distance. Traction is increased too.

Remember, specials and grabbing cancel stances too...
Thus I'll start the moveset of with those.


This stance game makes Hugo have a lot of way to trick the enemy, but only when you can truly use him effectively.

Special Attacks:

(Neutral): Mango Mayhem!
Hugo throws a mango, and he throws it hard. if it is blocked or hits the ground, it will become eatable for anyone. To remember is the fact that if it bounces off a shield, it bounces pretty far. pretty good knockback and damaging. Think SSBM Samus' super missiles... both the launching speed and strength is very similar. This move can be done from any stance.

(Up) Clobber!
Hugo extends his hand, and a clobbering weapon appears in it.
There are two unique ones he can get somewhat often:

Rotten log: Packs somewhat of a punch, but breaks upon impact. (Hence, better as a throwing weapon)

Stick: Doesn't break until after you've used it a while, but has pretty weak power.

Then he can also get the other clobbering weapons, like beam sword or the homerun bat. He cannot get the hammers though.
To mention is that holding an item makes Hugo not enter stances after attacks. Basically, he becomes unable to enter any stance when using a weapon.
Can be used in any stance.

(Forward) Whiplash!
Hugo takes out a thin vine, then makes a quick lash forward. It's not chargeable, but still pretty powerful and damaging with good range. can be used for tether. Decently fast all around.
Can be used out of any stance.

(Down) Dig!
Hugo digs into the ground, then pops up elsewhere, damaging the enemy a bit, and knocking them away a bit. Occasionally, an item surface along with him(throwing item). If in the air, Hugo rockets downwards, striking any enemy in the way with a powerful hit, then begins digging on landing. Can be used out of any stance.

Throws:

(Grab): Hugo grabs you with both hands, then damages you by biting.

(Up): Hugo spins, then throws the enemy upwards. Pretty good distance, but damage is lacking. Can KO at decent %s.

(Forward) Hugo kicks the enemy away. Good damage, but knockback is unimpressive.

(Back) Hugo does a judo roll backwards, throwing the enemy as he does. Good damage, and decent knockback.

(Down) Hugo throws the enemy to the ground, then jumps on him. this causes pretty minor knockback upwards, making this a combo starter. Pretty damaging for one, too.

-------------
A-moveset:
-------------

-----------------
Default stance:
-----------------


Standard Combo (A, A):
Hugo does a swipe with his right hand(doing normal damage for a weak attack), then flips(doing little damage). The flip makes him go into handstand stance.

Dash Attack:
Hugo curls into a ball and crashes into the enemy. He enter ball stance, and keeps it after the attack.

Tilt Attacks:

(Up) Hugo does a quick back flip, hitting people in the process. The weak knockback makes this a good combo move. It makes him enter handstand stance.

(Forward) Hugo's F-tilt is a little weird, He jumps a little bit forward into the air, swiping. This attack is one of his few with good range. It's very quick, deals decent damage, but lacks knockback.

(Down) Hugo performs a low sweep with his left arm. this does decent damage and knockback.

Smash Attacks:

(Up) Hugo makes a quick handstand and kicks upward. Rather strong, very quick, a bit hard to hit with. Makes Hugo enter Handstand stance.

(Forward) Hugo jumps forward, anger clearly visible on his face, and the performs a double-footed kick(drop kick). No stance. Pretty powerful, quick, and above average range. One of Hugo's better killing moves.

(Down) Hugo strikes the ground with both fists, causing a minor quake(enemy are sent up in a small area outside Hugo, but with no damage). The attack in itself is a little slower than his other smashes, but more powerful.

Aerial Attacks:

(Neutral) Much like Farthing Fox/Pikachu, he curls into a ball and falls onto his enemy. He does however stay curled up after, making him enter Ball stance. Very quick but not that powerful.

(Up) Hugo strikes upwards with his hands, putting so much effort in it, he flips backwards, and then enters ball stance. Pretty powerful, but not that quick.

(Forward) Hugo swipes with both arms before him consecutively. First hit mostly just holds the enemy in place for the second to hit. A quick but powerful move.

(Down) strikes downward with his palms. Meteor with decent damage output. Enters handstand stance.

(Back) Kicks backward with his legs. Rather quick, could be compared with Mario's in all but range(lesser than Marios's seeing Hugo's size).

-------------
Ball stance:
-------------


Standard Combo (A, A):
Hugo performs a swipe while still curled up, then flips and hits the enemy during it, returning to default stance. Damage and knockback is what you would expect from a weak attack.

Dash Attack:
Hugo throws himself forward, straightening out while doing so, and lands on his hands, entering Handstand stance. If he hits anyone while throwing himself forward, he does a good bit of knockback and damage. Decently quick.

Tilt Attacks:

(Up) Hugo performs an uppercut. He goes back to Default stance. pretty powerful, and still quick.

(Forward) Hugo rolls a little bit forward, hitting the enemy. pretty weak, but fast. Keeps his Ball stance.

(Down) Hugo bounces a little bit into the air, then hits the ground, making a small quake. pretty strong for a tilt, and can meteor airborne enemies. not the quickest move. Stays in ball stance.

Smash Attacks:

(Up) Hugo uncurls quickly and does what looks like a short shoryuken. Very powerful and damaging, but also a little slow. Default stance.

(Forward) Hugo rolls forward and performs a rolling kick. Default stance. The move is strong and quick, but might be a bit awkward to hit with.

(Down) Spins in place. This move is mostly like bowsers D-smash in that it sucks the enemy in and deal several hits. pretty damaging, and good upward knockback. stays in ball stance.

Aerial Attacks:

(Neutral) Straightens out and performs a body splash. pretty strong, and decently quick. default stance.

(Up) Hugo kicks upward. Default stance. the attack is pretty weak, but is good to juggle with.

(Forward) Hugo uncurls and does a spinning drop kick forward. this is a drill attack, and it does nice damage if you score a full hit. Default stance.

(Down) Uncurls and performs what looks mostly like an upside down mario tornado. Damaging drill attack, which makes Hugo enter handstand stance.

(Back) Does a backward kick in typical samus style... although he cannot even get close to matching her range. Default stance. Pretty weak, but quick.
--------------------
Handstand stance:
--------------------


Standard Combo (A, A): Kicks with each foot consecutively while standing on his hands. Continous. rather good knockback for a weak attack. Keeps his handstand stance.

Dash Attack: He falls, Landing with his back on the enemy. Pretty strong, not that slow. Default stance.

Tilt Attacks:

(Up) Hugo performs a small jump and curls into a ball. decently powerful, pretty quick. Ball stance.

(Forward) Hugo performs a cartwheel. drill function. Decently damaging with each hit. He keeps his stance.

(Down) Hugo performs a breakdancing move, much like Sheiks D-smash, but his hits two times. Functions a bit like Links F-smash, but doesn't do as much damage or knockback.

Smash Attacks:

(Up) Hugo presses down to the ground, still in a handstand, then pushes the ground with a lot of force, sending him a good bit into the air. A bit awkward to hit with, but VERY powerful, likely Hugo's strongest move, and not exactly slow. Default stance upon landing.

(Forward) Hugo throws himself forward in a very odd way, from a handstand he attacks face first, flailing, so he looks really awkward doing this attack. This attack works like Bowsers D-smash, with several hits. Strong upward knockback, and lovely damage. Default stance.

(Down) Hugo goes capoeira! He performs two low sweeps with both legs in what seem to be a brekdancing style. Fast, pretty powerful, although you will likely just hit with one of the sweeps. The trajectory this sends you at is about the same as the KNEEEE!!!

Aerial Attacks:

(Neutral) Hugo straightens out and performs a sex kick. very quick, as sex kicks usually are. pretty strong for one, though. Default stance.

(Up) Hugo retracts his legs, the kicks upward. pretty strong, decently quick. stays in handstand stance.

(Forward) Rolls into a ball and shoots forward a little. Drill effect, pretty damaging. Ball stance.

(Down) Flips in midair and performs a stomp with both feet. Rather slow for being Hugo, but this is a strong SPIKE. Does good damage. Default stance.

(Back) Hugo performs a backflip. pretty weak, but very fast. Default stance.

--------------------------------
--------------------------------
Final Smash: Call of the Wild
--------------------------------
--------------------------------

Hugo breathes in, then roars, and what a roar!
THe soundwaves pushes the enemy away as well as causing heavy damage! With the right positioning, this is one mean FS!

Taunts:

1.(Up) Hugo flips into a handstand while sticking his tongue out. quick, easy way to enter handstand stance.

2.(Down) Hugo gives a big smile as he curls into a ball. quick, easy way to enter ball stance.

3. Hugo gives a big, cocky grin and says "Watch this, Rita!"

Victory pose:

1. Hugo performs a weird looking dance along with Rita.


2. Hugo roars (not as loud as the FS) with a cocky expression on his face. Rita just shakes her head in the background, smiling.

3. Hugo tickles Rita, and she bops him on the head with her tail.


Stage: Great Jungle- Waterfall Rock
Seen at 0:49 in the "Wulle Wulle Wap"-song, this is a stage with little usual ground. If you fall into the water, you'll have to get up quick, or you'll get sent down the waterfall(KO'd)

Music:
Hulesangen- Original
Hulesangen- English
Watarama- Original
Watarama- English
Series Opening
Wulle Wulle Wap
Movie 2 Slutsang- Original
Movie 2 Slutsang- English

Entrance: Hugo enters by swinging from a wine like Tarzan.

Costumes and Colors:
Hugo has the colors Yellow(his normal, default one), Red(Gives him fox colors), Blue, Green, White(with red eyes, albino), and Black available.

AT- Rita the Fox

Seen a bit into the background.
Rita runs around the stage picking up any item she comes across(She can pick up 2 at the most) and then gives it to your character(following you around with number two until you rid yourself of the first). She can be hit and sent flying, but who would be that cruel to a cute little fox cub?

Boss: Conrad Cupmann
He appears at 4:45...
http://www.youtube.com/watch?v=C6_RPKZQt8I

Conrad is the main villain in both films. He owns a movie studio in Copenhagen, and dreams of making lots of money(though he already is a millionaire). He is morally bankrupt, willing to slash and burn the jungle to capture Hugo.

On the 2005 Miramax release, Conrad was voiced by Mark Camacho.
Conrad is strictly a ranged fighter, with only two close combat moves: Swinging his rifle, and a throw (with good range on the grab). These moves both hit you back quite a bit even on low damage, but they don't really scale correctly, so they're unlikely to KO at high %s.
To make him less of a possible pushover, he has super armor. I gave him two extra guns to make him a little tougher, too.

His ranged moves are:
Sleeping Syringe shot: A shot which damages a bit, and puts non-airborne chars to sleep. airborne characters instead is knocked back.
Shotgun: This is powerful, with a big hitbox. Cannot shoot fast consecutively.
Half-automatic gun: To up your %s, he might pull this out and unleash a small bullet rain.
 

cdilink

Smash Apprentice
Joined
Feb 10, 2008
Messages
83
EDIT: Changed some moves


Link

No, not this one.

This one

This is the CD-i Link. Actually it's a loose representation of Link from Zelda: A Link To The Past, but he became his own character after the popularity of Youtube Poops.
The main differences are that he looks different, he's right handed and instead of Master Sword he has some random sword.

Here are the moves:

Grab - Cd-i Link doesn't have the hookshot so he uses his sword to grab people (?)

A moves:

Normal: He swings his sword forward.
F-Tilt: He launches magical blasts like in the games when he had full health.
U-Tilt: Up sword thrust. Nothing much creative.
D-Tilt: Link sweeps with his sword. Also nothing creative.
Crouch A: Same as normal, except crouching.
F-Smash - Swings his arm like when he says "Great! I can't wait to bomb some dodongos!

Let's move to the more interesting part, the B moves:
B - Snowball. Does little damage and knockback, but it's fast and good as a spam.
F-B - Win. Yells "I won!" forward. The shockwave stuns and damages opponents alittle.
U-B - Dinner. Link throws up in the air a random piece of food. He then jumps to eat it. It doesn't heal him however, and it's only useful as a recovery move. However, if he manages to hit an opponent with food, it does inflict minimal damage.
D-B - Book of Koridai. Link plucks it from the ground. The book's heavy, and does random type of damage.

FINAL SMASH - Squadilah. Link calls Gwonam (the carpet guy), and hops on the carpet. The birds appear and damage enemies. Now Link can fly freely (like yoshi's final smash) and damage enemies using his new B move, stuff. When stuff is used, Link throws a random item (even including character-exclusive items, like Link's bombs). It isn't a very fast move. He can also damage enemies by flying into them.

Taunts:
Up - he flails his arms wildly and says "Gee! It sure is boring around here!"
Side - Eats an octorok.
Down - Says "How about a kiss? For luck!"

ALTERNATE OUTFITS:
Since Cd-i Link hasn't got too many alt. outfits, he would have his goron, zora, etc. like normal Link. However, I have some ideas:
TOON LINK - His model is replaced by Link from the Zelda cartoon. His d-taunt is replaced by "Ohh excuuuse me princess!"
LIVE ACTION LINK - The one seen at the ending of a very obscure game, Zelda's Adventure, also for CD-i.

That's all.

BONUS - Assist trophies.

King Harkirian. When he spawns, he raises his finger and says "MAH BOI", which makes a shockwave, which damages everyone, Occasionally, he uses dinner attack (shoots beams from his mouth)

Morshu the shopkeeper - The one who makes bombs. He either spills lamp oil, which damages everyone except the one who spawned him, or throws bombs.
Edit: Changed some moves
 

Fawriel

Smash Master
Joined
Apr 2, 2007
Messages
4,245
Location
oblivion~
A work in progress.

The world of anime.

Fictional universes constructed on a ground of Eastern idealism.

Universes in which the power of love prevails, hope is the last thing to die, and the good guys always have the stronger kung fu in the end.

Truly, these universes tell stories that could only be meant for children or an older audience desiring some comfortable escape from our sad, grey real world.

Or do they?

What if there was a man living in our world who embraces these ideals, living a life in which the power of love prevails, hope is the last thing to die, and in which his kung fu is always stronger in the end?
But surely, that cannot be real, can it?


Challenger approaching...!

Ike


http://chaos.foxmage.com/ikecoloredlineart.png


Ike is the protagonist of “Demon Days – a divine comedy”, a webcomic planned to be illustrated by me and written by Drascin and myself.

An otaku and videogame freak with an attitude like a hurricane personified, he receives an extraordinary task that will shape his fate in ways in ways that no human would dare to dream...
What is this fate?
Well, if I just told you, this wouldn't be shameless advertisement anymore, now would it?


[table of content goes here]


Stats:

Strength:
4/10 – Ike isn't brawny at all, but what he lacks in mass, he makes up for in skill.
Weight:
3.5/10 – He's very tall, but also mildly underweight.
Attack speed:
5/10 – His moves all have a balanced amount of lag either before, during or after the attack.
Range:
7.5/10 – But he kinda makes up for that in attack range thanks to his long limbs.
Ground speed:
7.5/10 – He could dash faster than almost anyone else, but prefers not to for the ability to come to a stop.
Jump:
7/10 – He can also jump pretty high.
Aerial speed:
3/10 – Jumping on the spot makes him unable to gain a lot of horizontal distance, though.
Fall speed:
7.5/10 – Especially because he also falls more quickly than others. However...
Dashing jump speed:
7.5/10 – Jumping out of a dash makes him fly like a bird!

Judging by these, he appears to be somewhat average. However, he also has a bunch of

Quirks:

1.Parcour

Ike has a history of getting himself in trouble ever since he could walk. After getting involved with the underground scene of his home city, his penchant for mischief skyrocketed, and he soon turned escaping from disgruntled elders into an art form. The name of the art he has learned is “parcour”, along with its close brother “free-running”.
Mastery of these skills makes him quite the agile fighter. While his speed is well below the true speedsters of the game, he has a few very unique tricks up his sleeve.
Ike suffers practically no lag after any of his aerials as he always manages to land right on his feet.
He gets up insanely quickly from the ledge or from a knocked down position.
Performing ukemi/teching will immediately cause Ike to land on his feet, without a get-up animation or roll.
While he's quite light and rather easy to hit, these skills make him impossibly hard to combo.


2. Helper
You're probably wondering who is accompanying Ike in that picture. Well, it's none other than the great Babbit from Kodomo no Omocha! Wait, what's he doing here?
Since Ike is a “normal” human being, he's not normally at home in a computer game.
Playing Subspace Emissary will reveal that a strange being with the power to manipulate transfers of data on the internet has allowed him to digitalize and enter Brawl to join the common cause our heroes are fighting for – whatever that may be!
In battle, this creature, whom I will call a “helper” for the purposes of the moveset, constantly follows Ike around as well as it can to try and assist him!
What you are seeing is not the creature's true form – it's just shape it took to be able to fly and fit into the environment. It also possesses two other standard forms.
One such form is that of Navi from Legend of Zelda: Ocarina of Time, except without the obnoxiousness. The elusive third form evokes the image of a beautiful white dove named Tiqvah, who originates from a story nobody has read yet...
But what determines which form the helper takes?

3. Moods
Unlike any other character, Ike shows some real emotion on the battlefield!
Depending on his surroundings, he will eagerly show his mood in his entrance, idle stance, taunts, victory pose and of course his face. His helper also changes form depending on how Ike feels. Their ability to fight remains perfectly unchanged in any case, so this is quirk is really just there to be awesome.
The main factor determining his moods is the music, and of course the stage the battle takes place on.

I. Happiness
Depending on what you like to play Brawl like, this might be the mood you'll encounter Ike in most often; and that can't be a bad thing, can it?
Happy, funny or just plain weird music is obviously the main thing that makes Ike act happy. However, it's also greatly influenced by the number of enemies he has to face, as well as the item settings. A 4-way FFA with items on is quite certain to give you one cheerful Ike no matter what the music or stage are.
The helper takes on his Babbit form. Perfect for sarcastic commentary!

II. Pluckiness
While it's similar to happiness, this mood shows just how much Ike has been craving for adventure all his life. His eyes are filled with determination!
Most songs that don't fall under the categories above are likely to make him feel plucky. Rock, metal, heavy metal, even some death metal will fire up his fighting spirit!
This mood is also more likely to show up during duels or in team battles in which Ike is outnumbered.
The helper shows up in Navi form. Triforce of Pluckiness!

III. Seriousness
Ike is concentrated fully on the battle. He breathes calmly and wastes not a single motion. His determined eyes observe his opponent's every movement, waiting for his chance to strike. This sudden seriousness... is there more to this boy than one would expect at first?
This is a rare mood to find Ike in, and so it is in the game. Only few songs and environments will trigger this in him, and even then, having a single item turned on will be enough to ruin the sinister solemn dignity that is required to encounter this young hero in his most purely badass form.
The helper shows up as Tiqvah, the white dove of hope.


Now let's get to the meat of the moveset.


Battle Stuff!

First off, let's deal with all the aspects that are affected by Ike's moods.

[ insert said stuff here :( ]


The moves:

Ike has not only learned parcour and free-running. He actually earns some pocket-money by participating in a small breakdance crew, which is reflected in many of his moves. And you want to tell me that this guy is obsessed with comics, cartoons, videogames and music? Why can't I do those things?!


Specials:

[insert specials here plz]


A Moves:

JAB
Right Hook, Left Hook:
Ike quickly jabs his right hand in front of himself. If you press A again, a left hook follows. He moves his whole body with the attack, so it looks very fluid. Unfortunately it deals only minimal damage and low knockback.

DASH ATTACK
Pistolwhip:
As he dashes, pressing A makes Ike place a foot firmly on the ground to come to a sudden halt. In a spinning motion, he directs the momentum of the run into his other leg, which he quickly stretches out for a mean kick. He then quickly finishes the spin, plants the foot back on the ground and proceeds to combo his opponent.
This attack is rather similar to Sheik's infamous ftilt from Melee, as it is perfect for setting up a combo. It's not quite as hellishly fast, but the range makes up for that.

Tilts:

FORWARD
Strong Right:
Taking a quick, fierce step forward with his right foot, Ike puts his whole body into a blindingly fast punch with his right fist! BAM! Breakdancing is fine and all, but every moveset needs a few plain and simple asskicking attacks like this one!
This move is really quite average all around, although it does have quite nice range. KOs at rather high percents.

UP
One-handed kick:
As seen in the photo, Ike gets on his hand and kicks upwards with both legs. This attack covers a nice range in all directions around Ike except below, and as most of his moves, has some good comboing potential.

DOWN
Coffee Grinder:
As it shows in the video, this move makes Ike sweep his foot along the ground to trip his foes.
Tapping A will cause a brief tripping move with little lag, good for setups. Keep A held a little longer will cause him to complete the circle to attack behind him as well. If you keep holding A down after this, the move will keep going on and increase in momentum. By the third full circle, it has reached its maximum power, giving it some good damage-dealing properties and actual potential for KOs. “Charging” it long enough for that to happen, though, takes about as long as a Warlock punch, so you can't count really on it in a duel.

Smashes

FORWARD
Baby Swipe
Watch the video! Ike gets on his hands and quickly kicks out his legs in a horizontally spinning motion! It's amazing how fluid he can make it look! He's probably helped by being inside a game, though...
This move has two attack phases: The initial kick, which does some rather low damage, but pretty good and very horizontal knockback, and the spin, which does okay damage and has the same knockback, but less horizontal, making it worse for KOs. You can pretty easily combo from the first phase into the next for some good damage. The hitbox for the first one comes out quickly, so it's actually a good KO move, but you have to space it very carefully so as to not let the second phase interrupt your opponent's trajectory. Master this move well!

UP
2000
It's a... reverse drillkick? Ike gets on both of his hands and uses his momentum to spin quickly!
The hitbox for this move covers his whole body. Being touched by any part of his body below his feet will cause opponents to be sucked up into the motion thanks to the wonderful magic of cartoon physics! As the move continuously deals little damage, they are forced upwards until they meet the sweetspot at his feet. Said sweetspot deals relatively low damage, but some respectable vertical knockback!

DOWN
Flare to Windmill combo
Seriously? Watch the video. I cannot do it justice with words.
Using a down-smash will first make Ike perform a Flare, the part of the combo where he stands on his arms and whirls his legs around himself. The attack has a sweetspot at the side of the foot that stretches out the farthest during the kicks, which will cause the enemy it hits to suffer pretty hard knockback. The other, much larger part of the attack, however, deals low-to-medium damage and actually combos into itself, much like Ganondorf's down-smash in Melee. The first part of the attack flings the opponent into the second. If you keep A held, you can keep doing this for a while, but your opponents will probably catch on and quickly DI out of the attack, which lets them punish you.
Once Ike stops with the Flare, he goes into a Windmill. He gets onto his back and uses the momentum he gained during the flare to kick out hard all around him. His legs deal good damage and some good knockback, both of which become excellent depending on how much momentum he gained.
This is Ike's flashiest move, and also the riskiest thanks to its complicated hitboxes and long duration. However, it also has the potential to be his most powerful. It can really turn the tide in a cluttered 4-way FFA!


[stay tuned for not only aerials, throws, and all that jazz, but also the most epic stage ever to be associated with the Smash series!]


That said, I'm going to bed.


I have to apologize sincerely to everyone who's been waiting for feedback from me lately. As you can see, I could barely even get myself to work on my own "ultimate" submission, so the WOW factor is pretty much gone now, I suppose.


Now. Remember, as soon as the next Dojo! update is up, submissions for the contest are closed.

No exceptions this time.
I stayed up so long and posted this moveset in such a half-arsed state because I don't want to risk having to submit it a few minutes too late.
You don't have to wait for my announcement. As soon as the update's there, it's over.
 

S0crat3s

Smash Apprentice
Joined
Jan 3, 2008
Messages
158
Location
Mushroom Kingdom
CHARACTER APPROACHING!!

S0crat3s

On-Stage Appearance: S0crat3s rides a Bullet Bill into the stage, which explodes upon impact.

Neutral Stance- He just stands there with his hands curled into fists at his sides. He sways a bit, in time to the background music.

Walking Animation- He shoves his hands in his pockets, leans back a bit, and half-waddles forwards.

Running Animation- Think Mario from Super Mario Galaxy.

Crouching Animation- He crouches close to the ground and readies his hands in a guarding position.

Crawling Animation- Think Mario from Super Mario 64.


Stats
Power: 3/5
He has much vigor, and it shows in his attacks (average damage, high knockback).

Speed: 4/5
S0crat3s is blessed with the quickness of youth! Very useful for stealing snacks from the pantry.

Jump: 3/5
His jumping rivals that of his idol, Mario, but he is plagued by shortness.

Height: 2/5
He's a bit on the tiny side, but on the field of battle, what does size matter...Right?

Weight: 2/5
He's light on his feet, but he can be sent flying at low percents.

Range: 3/5
His feet and fists can reach a good distance, considering how short he is.

Fall Speed: 2/5
His light weight and floatiness make him seem like an easy character to juggle, but his midair attacks beg to differ.

Traction: 1/5
S0crat3s is a slippery youth--he can slip out of grapples easily, and slides like the 'Weej.

Appearance-
(face)
Hair- Never seen, because it’s always under his Mario-esque yellow “S” hat.
Eyes- Cartoony and oval-shaped. They are void of pupils (or anything else that might be found in an eye that isn’t white) and have dark circles, due to an excess of video game playing.
Nose- Nonexistent. However, there is a darker, horizontal zigzag going across where the bridge of his nose should be, again, due to an excess of video game playing.
Eyebrows- Black and usually furrowed in concentration, frustration, or for making silly faces.

(body)
Proportion- Equal to that of the Mario Brothers (but a bit taller than Mario, but shorter than Luigi).
Skin- Brownish.
Hands- Proportionally equal to those of Mario.
Body- Slimmer than Mario, but leaner than Luigi.
Feet- Perfect size for stomping.

(clothes)
Hat- Yellow with an (S) on the front (a la Mario).
Shirt- Has a Mushroom on it.
Shoes- Similar to the ones Mario wears.
Pants- Go down to cover the tops of his shoes.
Socks- Go up to his knees.

Backstory-
(interesting bits)
-Brought to the US by a lost and very confused stork
-Made his pilgrimage to the Mushroom Kingdom at the lucky age of 3
-Started meditating in the Mushroom Forest at 7, where he befriended (and later ruled over) the creatures that lived there
-Mastered the ancient Mushroom fighting arts of Item-Fu, Power-Up-Do, and Vigor-Boxing
-Was reunited with his long-lost younger brother, Chris, when the same tired, lost, and incredibly drunk stork dropped him on S0crat3s' head
-Three years later, the evil Princess Magdalena kidnapped Chris for the first time, when S0crat3s promptly kicked her spoiled, evil butt and took Chris back
-Princess Mag now kidnaps Chris regularly, usually most Wednesdays from 12pm-3pm
-He was first introduced to Smash Bros. when Chris, Mag, and himself went out for Sunday brunch one day at the Smash Colosseum to watch a match between Mario and Fox. He thought the match was so cool that he trained with even more vigor to become part of it
-Seeing this opportunity, Mag kidnapped Chris, then had her butt kicked by S0crat3s (again)
-S0crat3s is now 13 years old, and is applying for Smash. Bros, which is why this is being typed

A- Punch --A standard punch
AA- One-Two Punch –A left jab followed by a right jab
AAA- Punch, Punch, KICK! --One-Two Punch combo followed by a barrel-roll sidekick
A (hold)- VIGOR BARRAGE!! –A forward barrage of flailing punches
Side Tilt- Roundhouse –A pivoted roundhouse kick
Side Smash- Falcon…Punch!! –A powerful thrust punch, yells “Falcon PAWNCH!!”
Down Tilt- Ankle Grab –Grabs at the opponents ankle, tripping them and doing little damage
Down Smash- Double Flail –Crouches and flail-punches to both sides (lasts longer when charged longer)
Up Tilt- Coward Swipe –Swipes one hand in an ark above him while covering his eyes with his other arm
Up Smash- …Reach!! –Hops while wiggling his outstretched arms above him
Running Attack- DeDeDe Bellyflop --Trips and slides on his tum with his hands reaching forwards, like King DeDeDe in the Kirby games

Neutral Air- Be A Starman!! –Thrusts arms, legs, and head in a five-pronged star shape
Back Air- Reverse Barrage Kicks –Alternates kicks repeatedly, only stops upon initiating another move, hitting the ground, or being hit (invulnerable to projectiles from kicking side)
Forward Air- Grab The Ledge!! –Flails arms forwards as if reaching for a ledge. Combos opponents
Up Air- Hat Swipe –Swipes his hat in an ark above him
Down Air- Meteor Kick –Charges, then thrusts both legs down. As the name implies, it is a meteor smash

Grab- Octopus Cling –Clings onto the opponent
Grab Attack- Headbutt –Bashes his skull into the opponent
Forward Throw- Shove –Shoves the opponent in the faced direction
Up Throw- Mario Jump –Throws the opponent upwards, then jumps and hits with his fist (like Mario would do to a brick)
Down Throw- Stomp, Stomp, Stomp!! –Throws the enemy and stomps with both feet 5 times
Back Throw- Trip Thrust –Throws the opponent backwards at the ground (a la Marth), then pounds them with both legs when they ricochet

Neutral B- Wand Shot –Twirls a Magikoopa wand behind him and lets fly with a Triangle, Square, Circle shot. If it hits the ground, it creates either a Koopa, Goomba, Parakoopa, or Shy Guy
Side B- Shell Slide –Slides across the stage on a Koopa shell, can attack by spinning. Cancelled by crouching, getting hit, or losing/gaining too much speed (resulting in a trip)
Up B- Mushroom Leap –Leaps high into the air, does a footstool jump if contact with an enemy is made during the ascent
Down B- Heroic Pose --S0crat3s thrusts his arm towards the screen (alternates between an index finger point, a thumbs-up, a “Show Me Your Moves!” salute, or a “V for Victory” sign) for 2.8 seconds. If the opponent attacks during this time, he/she is too stupid to respect the Heroic Pose, and as a result, S0crat3s takes no damage, winds up, and punches said opponent in the groin (for ladies and things like Kirby, he punches them in the face).

Final Smash- Angry S0crat3s –S0crat3s becomes enraged by something (crowd booing, getting a brick thrown at him, having his picture taken, or getting hugged). His skin turns red and steam billows from his ears, where his nose should be, and his mouth. He then launches himself at the nearest enemy (where a dust cloud surrounds S0crat3s, the initial opponent, and anyone else near enough to be caught in it), and attacks all in the dust cloud. After 65% damage has been done (to the initial opponent, not total), he then explodes, causing 10% damage to everybody (even if they weren’t in the dust cloud, in which case, he will put some of the explosion in a box, wrap it up, and then explode it in their face).

(taunts)
-Sits down and starts playing his DS (lasts until cancelled or hit)
-Does a Mario jump (complete with “boing” sound)
-Poses with his Wiimote

Victory pose- Sits down and plays his DS; Turns around, half-crouches, points his finger at the losers, and laughs at them; Does Link's victory pose (where he swipes twice, then raises his sword in the air), except for with his Wiimote+Nunchuck

Losing pose- Looks at the victor spitefully while clapping his hands

Character Theme- An NES version of Brawl's main theme, but to the rhythm of the Super Mario NES theme.

Home Stage: Mushroom Forest

The forest where S0crat3s meditated and trained for years, the Mushroom Forest is filled with danger and obstacles.

(layout)
The main platform is completely flat, with no way to be KO'd by falling. There are huge leaves that can be used as platforms (similar to Distant Planet), and small saplings scattered throughout the terrain can be cut down.

(obstacles)
-Piranha Plants hang from the above canopy, and occasionally lower themselves down to chomp on the players
-Shy Guys, Goombas, Koopas, and various other Mario critters sometimes wander onto the field, causing damage to those in their way

(SSE Story Bit)

S0crat3s and Chris are relaxing in the woods, playing video games, eating junk food, and whatnot. The bushes behind them rustle with a spoiled, perfume-ish, snickering jolt, and Princess Magdalena jumps out, grabs Chris, and skips sinisterly off into the distance.

Gameplay Bit- You control S0crat3s as you go through the woods in pursuit of the Princess, defeating enemies, crossing obstacles, and avoiding dangers along the way. You stop to fight a bunch of Ptooie Piranhas, Gloombas, and Sinister Guys, and then pass through a clearing in the greenery.

S0crat3s finally catches up with Princess Mag, where he continues to chase after her in an attempt to kick her but and take Chris back. Something particularly shiny catches his eye, diverting his attention from Mag and Chris. Magdalena, knowing that not much will distract S0crat3s from something he's intent on (like taking back Chris and kicking her butt), so she drops Chris on the ground and turns to see a very, very shiny treasure chest. S0crat3s makes a move for it, but Mag (that spoiled brat) pushes him out of the way, grabs it, and starts to make her escape. Chris is preoccupied with a silly-looking baby Wiggler.

Gameplay Bit- Another chase scene. This time, the stage is scrolling, and spikes are everywhere. Go on for a bit and meet up with Magdalena.

S0crat3s and Magdalena (Chris nowhere to be seen), both out of breath, have arrived on a flat plateau. Mag opens the chest (with much struggling and frustration) and takes out a...Mega Mushroom! S0crat3s, knowing that these power-ups are bad news in the hands of villains (or villainesses, in this case), runs at Mag--but too late! Mag has already eaten the Mega Mushroom. With green-faced discomfort, Magdalena gags, crouches, and (with a breath of releif) transforms into Mega Magdalena! She throws a punch at S0crat3s, he dodges, and the battle commences!


Subspace Boss: Mega Magdalena

A bossfight similar to the Master Hand/Crazy Hand battles in Melee, Princess Mag has undergone a transformation brought on by stealing a Mega Mushroom (a la New Super Mario Brothers) from a very shiny treasure chest. Her hands and head stay in the foreground while the rest of her is in the background. You fight her on a Final Destination-esque platform, and need to defeat her left hand, right hand, and head (which becomes vulnerable after her hands are defeated).

(attacks)
Left Hand:
Point-Blank -- Fires a magic bullet from her finger at close range.
Mega Smack -- A smack that travels across the stage.
Finger Jab -- An attack similar to Master Hand's Poke, but only attacks once.
Facepalm -- She curls her hand up, palm forward, and shoves it halfway across the stage.
Thumbs-Up -- Her hand curls up, thumb exposed, and tries to push S0crat3s into the ground with it (similar to DK's >B).

Right Hand:
Rock -- Curls her hand into a fist and slams it into the ground.
Paper -- Flattens her hand, and slaps repeatedly with a fan-like effect.
Scissors -- Extends her forefinger and middle finger and snips away (has the cutting effect).
Mag Magnum -- Similar to Point Blank, but stronger.
Walk -- Similar to Master Hand's Walk, but jabs into the ground.

Head:
Apply Directly to the Forehead -- She slams her forehead into the ground repeatedly, followed by a stun.
Blow -- Mag inhales quickly, then blows. Doesn't do damage, but pushes you off the stage.
Inhale -- She inhales longer, and aimed at S0crat3s. If you don't escape, she'll catch you in her mouth. Button mash to get out, but if you stay idle for 5 seconds, she'll use--
Swallow -- This happens if you stay idle too long after she uses Inhale. She deals 50% digestion damage over 15 seconds, then spits you back up, doing 5% damage.
Hyperbeam -- Charges for a bit, then fires a giant laser onto the stage. Easy to dodge, but does Massive Damage.
Ridiculous amount of text, yay!

I added a ton of stuff, so I hope to get at least ** rank...
 

RWB

Smash Ace
Joined
Jan 28, 2006
Messages
969
I've decided to put all my AT's in one post, as well as finally adding descriptions to them! Expect to see me doing the same with my bosses!


Chatu Ranga's assist trophies.

AT- Shatranj.
Prince Shatranj Olorus laughs as he is activated from the trophy. Then he attacks like a regular computer (with unusually good AI)... He moves at lightning melee-speed, with wide, powerful arcs with his sword, as well as power bursts shot now and then.
He can fly and throw, so he is relly hard to escape.
A very destructive AT. All his attacks has electrical effect. He has a 15 second duration.

AT- Makruk.
Ogare member Makruk smiles deviously, then either:
1. drives her fist into the ground(very quickly). everyone that is touching ground somewhere are now stuck, except for the AT grabber.

2. extends her arm upwards, creating a big thunderbolt. Think of this as a weaker zapdos bolt with more range and shorter duration.

3. extends her arm forward, and shoots a thin red beam. This beam explodes if it hits, and is very powerful in both knockback and damage.

4. Heals the user of this AT for 40%, but only if he is close enough, as she grabs said char by the arm(or whatever they have instead. XD).

She uses 3 out of these 4 in fast succession when she is used, and one of them will always be number 4.

-------------------------------------------------------
ATs from the world of Viqkc(World of Temali and Fuego)

AT- Kumblans:
A hero who died after a battle for the well-being of the Icaeros due to severe burns, but fighted off the Delirian invasion single-handedly pretty much.
Kumblans tower above just about anybody at the stage, being almost 15 feet tall! Add the fact that he wields a blade sligthly taller than he is, and you got one heck of a good reach. Kumblans doesn't really do much, he first strikes the ground with his fist, This ending characters flying, or in case they're shielding, breaks their shields. Then he instantly follows this up with a 360 degrees arc sword slash, which are capable of KOing just about any character off the top. Propably one of the very best ATs available.

AT- Eidolon III
Called the world ender, this man carries within him the power to shatter what we see as reality. When he appears, he smirks, the entire screen goes white, all characters are KO'd(even the AT user), and then it seems like the screen shatters, and the respawning characters fight on the glass shards for the rest of the match. Not your best friend, exactly.
BTW, the white screen means the entire stage becomes a KOzone like the sides of the screen, and thus no invincibility frames in the world can save you.

-------------------------
Scrooge McDuck ATs

AT- Hortense
Hortense walks across the stage, huffing and puffing. As soon as she comes into a certain distance from a character(much farther than you would expect), she pounces at them, performs some wrestling grabs, releases some punches, sending enemy flying. A very powerful AT.

AT- Glittering Goldie
Glittering Goldie dances, and like Peach's FS she causes characters to sleep(But only within a certain radius). When she stops dancing, she quickly draws one of those puny pistols you can hide anywhere out. She empties a magazine, each shot being very powerful in knockback. Another powerful AT.
--------------------------------------------------------
ATs from Lucky star!

Kagami, Tsukasa and Miyuki!:
This AT makes these three characters appear, and offer homemade sweets. These work the same as food, and you pick them right off the plate! ...Except for Miyuki who falls over(Does 2% damage if she falls on you), and the cookies that fall on you does 1% on impact, but can be eaten while on the ground. However, among the cookies are those that Kagami made, and those do 10% damage and causes "shield-broken status"(Yes, I exaggerated her suckage at baking). These Cookies also have major knockback if they are among the ones Miyuki drops.
Note: This AT damages AT user as well as the others.

Patricia, Hiyoru, Yutaka and Minami!
This AT makes these four appear. Patricia runs around all hyper flailing with her arms, and does decent damage if she runs into you. She does not actively try t hurt you.
Yutaka runs around and follows closest character (except AT user). She does not do anything else.
However, Minami will do you in if you hurt Yutaka(Even if you are the user), with a single dodgeball throw(Equally powerful with Roys Flare blade at full charge, but Minami fires it instantly, and it can't miss, nor be blocked or reflected). If you don't hurt Yutaka, she just stands there... and occasionally does some hand movement in front of her(those who watched the series know what she's doing).
Hiyoru is a Doujin artist. she stands and sketches, and is harmless. However, she might just have a complete breakdown(causes an explosion with a lot of Knockback) at any moment(Hits user too.).

Akira and Minoru
Akira first stands around trying to act cute, but then picks up Minoru, and runs around using him as a clobbering weapon, having quite some power.

Misao and Ayano:
Ayano offers cookies to the AT user, but if anyone else steals one, she hits them with a powerful punch. Misao runs around at high speeds doing bogus martial arts, doing little damage and knockback, but she does attack at an alarmingly fast rate.

Soujiro, Kuroi and Yui:
The main adult chars of Lucky Star, these three join the battle!
Soujiro is Konatas dad. He runs around with a Camera, taking pictures(if there are any cute young girls(ATs count, hence the Final smash makes him very effective!) on screen, otherwise he leaves, doing nothing at all), he rockets around with a camera, taking pictures (of said girls). If he rams into anyone during his pursuit, he send them flying with major knockback and damage.
Kuroi is Konatas teacher. She walks around at a leisurely pace, but if anyone is close enough for her to punch, she punches them(AT user too), dealing mad Knockback. She is very easy to avoid getting close to... so don't get there! O_o
Yui is Konatas older cousin and a cop. She is drunk and stumbles around while shooting with her gun. Attack rate is quick, damage decent, but knockback are weak.

Anime Tenchou, Anizawa Meito! -

Straight out of the OAV Captain Animate/Anime Tenchou, Anizawa Meito! Making several appearances in the Lucky Star anime, this overly zealous anime store manager is all but normal! He rushes around the stage at crazy speed(Sonic, here's your equal >_>), jumps around just as fast, and can deliver those attacks:

Tornado! - Meito spins so fast he turns into a whirlwind. He draws characters in, does damage, the releases at the end of the spin with major knockback.
Fierce Spirit! - Meito catches on fire, and merely getting touched by him sends you flying and damages you quite a bit.
Power Rush! - Meito turns into a shape made out of light and moves twice as fast as he already did, now having major knockback on touch!
Punisher! - Meito does a powerful punch, which(if it connects) bursts with lightning, does crazy amount of damage, holds the enemy in place for a while, and then the enemy is sent flying(most likely to die).
Explosion! - A great explosion with Bob-omb esque power erupts around Meito.
More to be added.

Meito does not actively try to attack anyone, he just rushes around attacking, but due to him attackinging at such a speed, having no lag between the movements... It's almost impossible for him to not hit you at some time. Also, his order of using attacks is completely random. He is ALWAYS attacking(as when he runs around, the Fierce spirit is activated).
Here are some vids with this Nutcase!

http://www.youtube.com/watch?v=LisJ94LNJ_c
http://www.youtube.com/watch?v=MwTJBX1XV38
http://www.youtube.com/watch?v=IFxnDh58my0
http://www.youtube.com/watch?v=aoHD8WiIDWc

Meito does not hit the AT user.
--------------------------------------------
Porkman ATs

Polka:
Polka rushes across the stage cutting at the enemy. She basically works like a marill, only Polka does about 15% a hit, and still has the same "I'm stuck(you know, when Marill hits you several times)" animation as Marill. He can however be thwarted with a single attack, which makes her fall apart and die.

Jungledyret Hugo ATs:

AT- Rita the Fox

Seen a bit into the background.
Rita runs around the stage picking up any item she comes across(She can pick up 2 at the most) and then gives it to your character(following you around with number two until you rid yourself of the first). She can be hit and sent flying, but who would be that cruel to a cute little fox cub?
 

Fawriel

Smash Master
Joined
Apr 2, 2007
Messages
4,245
Location
oblivion~
Aaaaaand the deadline has passed!


That said, irony strikes back once again!
I actually planned to use this whole day to work for this thread. Except I couldn't log in because I kept getting "Database Errors", so now half the day has passed already. Durrh.


I've come up with a new rule system for the voting based on the three-point rating idea.

1. Everyone can choose 50 characters out of the available ones. Standard votes count as 2 points.
2. You are able to give a more powerful rating to characters you think deserve it, but the requirement is that you have to write a review of at the very least three lines, including some actual arguments. No generic "I like it because it's awesome" and absolutely no "I didn't read the post but I like the character". If your review is okay, the vote counts as 3 points.
3. If there are still characters left you want to give an honorable mention to after you chose your 50 favourites, you can still list the runners-up, giving them 1 point each.


I think everyone should be able to agree to that system, right?


Well, I guess I'll start working now... that is, if SWF lets me. Looks like I'm still getting Database Errors now.
 

Fawriel

Smash Master
Joined
Apr 2, 2007
Messages
4,245
Location
oblivion~
Great! so now we wait to see which characters submitted just before the deadline make it and then we vote! . . . ?
And then we vote indeed. Except it'll take some time to go through those pages, note everything down, update the images, and so on...

So, wait...did the deadline end when you posted? Because if so, I think the links and stuff on the front page need to be updated.
It ended when today's Dojo! update went up.
You mean I still need to add the new characters? Yeah, I know. As I said, I would've liked to be half-done by now, but Database Errors got in the way of that.
 

Fawriel

Smash Master
Joined
Apr 2, 2007
Messages
4,245
Location
oblivion~
We won't vote on ATs and such... in fact, I'm not sure whether they will be implemented in the interactive select screen in the first place. They might be put into a list of items that can be turned off and on or something like that.

And if I/we write a SSE plot with all the winning characters in the end, their respective allies and opponents will probably make it there, too.
 

RWB

Smash Ace
Joined
Jan 28, 2006
Messages
969
A character from a game a friend of mine made(or rather, are making)!
His name is...


Background:

All inhabitants of Streckgubbe had been turned into Meatface's slaves when she took over the land.
Streckgubbe is her domain now, and somene has to stop her reign of terror. But noone is brave enough, except Porkman(and his sister Polka, but she is under hypnosis from Meatface).
He is a smart and rather skinny guy with a lions heart... But a pigeons ribcage.
Relying on his quick wits and agility, Porkman storms off to defeat the terrible tyrant Meatface, and liberate his home.
But with armies of Zombie Meatballs and even rabid dogs at her side, Meatface might prove more than Porkman can handle.
-----------------------------
Stats:

Size: ***
Porkman is pretty much the same lentgh as Mario, perhaps a little taller. However, as his hitbox is as thin as he is, he is somewhat hard to hit at times. Not to mention his jump animations are non-existent, he just kind of soars.

Weight:*
He's the very epitome of skinny and lightweightyness, a stickman! He will be the lightest character in the game, so... don't get hit. Too much.

Speed: *****
In movement speed, I know only one character that's in brawl(or in this voting) that can beat him; Sonic. As for move execution speed, he is unmatched. afterlag from attacks are also VERY minor. This insane speed is Porkmans forte, he has to build damage through pressure.

Power: *
Porkman is horribly weak, and has to rely on his speed and some mindgames to build up damage and KO.

Range: ***
His range is average, maybe a little better. After all, it's about the same as Marios...

Fall Speed: *
This guy falls extremely slow, and is easier to control while airborne than jigglypuff was in melee. His fastfall however, is pretty fast.

Traction: *****
Porkman stops on a cent.

Jumps: *****
He is remarkably good at jumping, and will gain great height by doing it.

--------------------------------------------
Moveset:

Grounded A moves


Standard Combo (A, A, A ):
Porkman raises his straight arm, hitting the enemy, then quickly turns around, hitting the enemy with his elbow, and finally kicks the enemy by pretty much shooting his loose leg out a bit. Not continueos. Does standard damage and knockback for a weak attack combo.

Dash Attack:
Porkman grabs his loose leg and thrusts it in front of him like a rapier. Speedy, decent damage, patetic knockback, although upward, good as a combo starter.

Tilt Attacks:

(Forward)
Porkmans entire body besides the loose leg falls forward a bit. this attack is very quick, has reasonable damage... Spammable.

(Up)
Porkman grabs his leg and strkes upward while holding it like a staff. quick, low damage, combo material.

(Down)
Porkmans leg falls off forward. best damage output out of his tilts, and knockback is very nice for a tilt. also very quick, but hitting can be a bit hard.

Smash Attacks:

(Forward)
Porkman kicks hard in front of him, then hits the enemy again with his loose leg. Damage is nice, knockback is decent for a smash. Quick.

(Up)
Uses his loose leg as a sword and stabs above him. damage is decent at best, knockback is kinda low, but the nearly non existent afterlag make it very easy to juggle from!

(Down)
Porkmans body bar the loose leg seems to completely fall off. This is a fast smash with kinda low damage, but spike properties. otherwise, it bounces enemies into the air.

Aerial Attacks:


(Neutral)
Porkman sticks his arms and legs out in all directions for a short moment. weak damage, but only send the enemy a small distance, so you can propably keep comboing. EXTREMELY quick.

(Forward)
Porkman falls forward. this is a meteor, but it does LOUSY low damage.

(Back)
Porkman send his loose leg flying a bit backwards, doing pretty average damage. Low lag... a good move.

(Up)
Porkman strikes both arms into the air, hitting eneies straight up. Damage is semi-decent, and attack is great for continued juggling.

(Down)
Porkmans body somewhat slides off the loose leg downwards. this "kick" has decent knockback, okay damage, but sends the enemy away at worse trajectories than the KNEE!!!

Special Attacks:


(Neutral): Flame o' justice!
Porkmans shoots small fireballs at a fast rate(like an automatic rifle), each one dealing 1%. Like fox blaster, no knockback at all.

(Up) Spring Kick!
Using his own leg as a trampoline, Porkman shoots upwards(Dealing minor knockback if hitting an enemy on the way), and the leg in question quickly follows, and deals a powerful kick. Distance covred is rather good, and the kick packs bot a good deal of knockback and does a good deal of damage.

(Forward) Leg Javelin!
Porkman throws his loose leg as a javelin. If it doesn't hit ANYTHING, it comes back(almost instantly when it has flown as far as it can go), but if it hits a wall or an enemy(if it hit it will stun them), Porkman comes flying with a strong kick, sending the character flying! Could be likened to some kind of tethering, but its not a tether. Not quite as powerful as the Spring Kick, but still strong.

(Down) Wash-machine Drop!
Porkman pulls a lever, and a wash machine pops out of nowhere. has a great deal of startup lag(similar to Falcon Punch...), but is by far the strongest attack Porkman has, with striking power comparable to the Warlock Punch. In the Porkman game, dropping a Wash-machine on Rabbid was the only way to defeat him.

Throws:


(Grab)
Porkman grabs pretty much the same as he performs his first weak attack. he hits you with his head for damage.

(Forward)
leans back a little, then throws you like a javelin. Damage is subpar, knockback decent.

(Back)
Throws the enemy backwards, then sends the loose leg like torpedo, doing decent damage and knockback.

(Up)
Throws the enemy up, then sends the loose leg like torpedo, doing decent damage and knockback.

(Down)
Porkman throws the enemy below him, then hits them with what seems to be a D-tilt, although this isn't as strong. good for comboing.

Final Smash: Brutal Barrage


Porkman unleashes a swarm of green balls, which each deals 3%, with some Orange ones mixed in, who do 10%. It's a long ongoing rain with a total of 40 green balls, and 3 Orange. All of these won't hit the enemy, but the majority will, making this a royal damaging FS.

Taunts:

1. Porkman flails his arms up and down.

2. Porkman does a very stale cartwheel.

3. Porkman spins rapidly in place.

Victory pose:

1. Porkman holds up a sign where there's written "OST"(Swedish for cheese). Inside Joke.

2. Porkman lets out the only sound you will hear him utter. He says "Polka..." in a deep bass voice(O_o).

3. Porkman runs back and forth.

Costume colors:


Stage: Sky of Blue:


This was a part of the first stage in the "Porkman" game.

And Sea of Green(SSE stage)

http://i200.photobucket.com/albums/aa79/RWB89/KopiaavOLLucy_Star-1.jpg

This is a stage I customised for SSE use. the actual game isn't nearly finished, and Meatface doesn't really appear until just before the end. Rabbid is the boss of stage 2.

Music:
Since I gave Porkmans stages names from the Beatles song "Yellow submarine", I might just as well go ahead and make that Porkmans music.

http://www.youtube.com/watch?v=mdeHYlfnd_g

Items:

At- Polka:
Polka rushes across the stage cutting at the enemy. She basically works like a marill, only Polka does about 15% a hit, and still has the same "I'm stuck(you know, when Marill hits you several times)" animation as Marill. He can however be thwarted with a single attack, which makes her fall apart and die.

SSE enemies:

Meatballs-


These two enemy kinds act the same, 'cept Zombos can shoot fireballs. They run at high speeds, and does damage and knockback at impact. Zombies lacks strength, but Zomboses pack quite a punch. A Zombos was the boss of stage one of the Porkman game.
Zomboses can take a number of hits, while Zombies are just as easy to defeat as goombas.

Bosses:


Meatface:
Meatface is tough. She has 300HP. She is a powerhouse of Ike's magnitude, only she has a lot of super armor.
She can, except slicing and dicing you with her knife, use these moves:

Bad Breath:
A cloud of smoke bursts out from Meatface's mouth. It has the dizzying effect, so be careful.

Food throw:
She throws food at you in a downward arc. Has MAJOR Knockback and damage on knockback on impact, but once it hits the ground, it's edible.

Tool throw:
She might throw things like rolling pins and pans at you. This does quite a bit of damage and has good knockback, although if you manage to get hoöd of one(picking it up from the ground before it disappears, which it does very quickly). These can be thrown at Meatface to interrupt an attack, they will work while you usually would have been stopped by super armor. Make sure to hold on to one of these until the "OST" attack is gonna be used.

Butt bump:
She jumps into the air, then crashes down, making anyone who is on the ground get stuck there when she lands. She does insane knockback and damage if she lands on you, but you really have to be really clumsy to run under her when she does this.

"OST!!!":
The word "OST!"(CHEESE!!!) flashes across the screen once. Then, Meatface plucks out a cheese. She then tries to eat it. before she does, throw a tool on her, then grab the cheese. Getting the cheese gets you a final smash(lolwut?), which you can then kick meatfaces *** with. If you don't have a tool, attack the cheese while it is in Meatface's hands to destroy it. If Meatface gets to eat it she starts spewing out what seems like green gas, which quickly covers the whole screen. It quickly rakes up your damage to 999% and then sends you flying with the power of a roy countered Oil panic with three full charge shots. This attack has some things stopping it from being cheap: Meatface take a lot of time before she starts eating the cheese(on harder levels the time shortens), and the fact that you can either destroy it or get a way powerful attack yourself!

Rabbid:
Rabbid the rabid dog has a rather simplistic moment style, he just runs back and forth in his confined area, although he throws in a jump now and then. He runs rather fast. He has complete super armor all the time, but only 100HP, so pick away at him when you feel you can.


Updated Porkman!
 

RWB

Smash Ace
Joined
Jan 28, 2006
Messages
969
Fuego


Pretty sketchy XD...

Back Story:

- Fuego is a creature from the from the world of Viqkc.
Viqck hosts more than 20 different species of human (or beyond) intellect, with the most prominent being the Waterians, Fiammanias, Bombastians, Draqs and Delirians.

- The Waterians have limited control over the element of power, Water, as well as inhuman strength. They tend to be a bit duller than the average human. They look almost the same as humans, but are much taller and more muscular.

Fiammanians have limited control over the element of deception, Fire, and are inhumanly quick. They are all pretty intelligent, most of them far beyond the average human. However, they are not that technologically advanced, surprisingly.

The Bombastians are insanely tough, the lesser ones capable of taking a cannonball to the face and shrug it off. This country hasn't got the magical affinity that the others have, but they are very advanced in technology and Science (moreso than we humans).

The Draqs are drifters, nomads. They are led by their chief Zeriquel. They are capable of transforming into dragons, but seldom do this. They are looked upon with scorn by many, who mistake them for the vicious delirians (While they do not look alike, most people haven't seen the Delirians, thus assuming these "dragonshifters" must be them).

The empire of Dresjiev are the realm of the Delirians. They are isolated from the rest of the countries by a high mountain range. The Delirians are a somewhat demonic tribe, they live for extreme amounts of years, possess a lot of magic power, and thrive on blood and meat from all other tribes. They are feared far and wide.

(reason I bring these peeps up is that they might have a role in the Subspace.)

The world is mostly at peace, the only war being a civil war inside the Bombastian state.
The Wateranian state is allied with the Bombastian, which is the only thing preventing it from being attacked by Fiammanians. It's a shaky peace.


Now for the more important facts:

The world of Viqkc was in the beginning of time inhabited by the Lia, also called the Ancients.
The Lia where created by Deqa, a "goddess"(The gods where actually genderless, yet some would be called gods and some goddesses anyway).

The Lia where few, but thrived, and they had great powers, which grew with the years. The gods started to fear the Lia, as they would, eventually surpass the gods themselves in power. So to stop this, the "goddess" of wisdom, Uryan, demanded the death of the Lia. And the Lia was thus slaughtered. Desperate from grief, Deqa stood against the gods, pleading them to stop. However, she was the cut down by Kiran, the ruler of the gods.
The Gods sighed in relief when the slaugter was over, and then instead created weaker and simpler beings than the Lia, and these creatures would evolve over time.

As both Gods and Lias where basically materialized spirits, they would have no afterlives.
Deqa lay, defeated and dying, when four Lia that had survived appeared(However, about six more Lia lived). Two of them seemed to be a couple, and they awaited a child which would change the world, but that is another story. The third was Folien, a previously very caring and forgiving soul, now forever scarred by the betrayal of the Gods. He would make it his mission to destroy the gods, and he cast a spell. The day Folien would be powerful enough to end them, he would be accompanied by a boy born as an adult, who would be the ender of the world. Folien had been one of Deqa's most beloved children, and it pained her to see him decide to do this. Folien changed his name from Folien(meaning "calm") to Adlez Shariez(meaning apocalypse's shadow).
The fourth was Zqyta(meaning "brave") who, knowing Deqa's situation, assimilated her into himself, becoming a kind of strange being... Fuego.
However, Adlez Shariez saw this, and sealed Deqa's power while they were still within his capacity to do so, as he doubted his way would be the one she would choose, espescially now that Zqyta was half of her.

The joined being, Fuego, now seeks to prevent Adlez Shariez apocalyptic curse from working, but he is too weak to do so as long as the seal is intact.

To keep an eye on things, he took a position as a spy for Fiammanias lord, Saidre the Second.
He has become a very influential character, and are starting to forget the past. Only the memory of Adlez Shariez and the curse is still there, as well as the seal, but there is no memory of how he got it. Fuego can sense the power within himself, and now desires to awaken it to bring Fiammania to power, but without it, he cannot overpower such people as Jon Sterke Stroom of Waterania, Eidolon the Second, Bombo and Rá***aion of Bombastia, and least of all Dresjiev's divinely powerful Emperor, Ferezo the Crystal Emperor, who all are of Lia heritage, with powers perhaps even more impressive than the Lia themselves.

-----------------------------
Stats:

Size: *****
As Fuegos body is Zqyta's, and Zqyta was built like a strong warrior, Fuego is rather big.

Weight: ****
While the Lia are much lighter for their size than humans, the armor Fuego carries isn't exactly light.

Speed: ****
Despite what he looks like, Fuego is deceptively fast. He has, while he is a Lia, picked up on the speedy fighting the Fiammanians use.
Movement speed is rather high.

Power: ***
While he looks exceedingly strong, he relies more on a quick magically based fighting style(thus rather weak), as his magic reserves are about endless.

Range: ****
His size talks for itself, and the magic attacks help his range even more.

Fall Speed: **
Knowing that you always have the advantage of higher ground, Fuego stays up for a while.

Traction: ***
Traction is normal.

Jumps: ****+glide
With the agileness of the Lia, jumping high is a piece of cake. Also, Using magic, Fuego can glide.

--------------------------------------------
Moveset:

Special ability: Cancel.
The move descriptions will explain how they work.
A special cancel means a move can be canceled by doing a special move.
An Any Cancel means it can be canceled by any move.
Far from all Fuego's moves have cancels.


Standard Combo (A, A ):
Fuego makes a very small hand movement, and a small flame appears in front of him. Second press makes him deliver a light palm thrust. The flame does decent damage, and the thrust has decent knockback(no damage tho')

Dash Attack: Fuego turns into a spiral of flames, and drills through the opponent. He hits several times, with decent damage, but lousy knockback.
Cancel-possibility: Special. When: When he starts to burst into flames(you gotta be really quick!).

Tilt Attacks:

(Up) Fuego hoists his hand upwards, and a piece of rock shoots up through the floor, damaging and setting up the enemy for combos.
Cancel-possibility: Special. When: Before the rock appears. Again, you gotta be really quick!

(Forward) Fuego turns his arm into a big flame. This move has similar effects to bowsers Special, but is not aimable, and lasts much lesser time. Damage is low.
Cancel-possibility: Any. When: Anytime during the attack, making this a perfect set-up move.

(Down) Fuego stomps down, causing a light quake. this move knocks enemies into the air, damaging them lightly, and setting up comboes. Really quick move.

Smash Attacks:

(Up) A great pike made of earth shoots out of the ground and hits the enemy upwards. This does quite some damage and has good knockback.
Cancel-possibility: Special. When: Anytime during the attack.

(Forward) The startup of this move is a bit longer than most of his moves. His palm turns blue, and he reaches out and touches the enemy lightly. If he hits, the enemy reacts as if they got hit by a freezie, but the freezed status doesn't last as long. Damages i average.

(Down) This is a strange smash. Fuego just puts his hands together calmly. However, this doesn't affect enemies, but any enemy touching ground close to Fuego gets "grounded"(DK headbutt effect). This move does no damage, but is an excellent set-up, as it's one of Fuego's quickest moves, and Fuego is already very speedy.

Aerial Attacks:

(Neutral) Fuego turns rockcolored, freezes into whatever postion he was in, and falls very fast. if he falls on anyone, thy get meteor'd. Attack does good damage.
Cancel-possibility: Special. When: during fall.

(Up) Creates an orb of water and throws it a short distance upwards. Damage is nearly non-existant, but knockback is crazy. This is one of fuego's killers, as it is also quite fast and has very good range.

(Forward) Jabs forward quickly with his left hand, launching enemies almost straight sideways, covered in purple fire. Not as strong as the falcon knee, but still a very good aerial with a low trajectory.

(Down) Creates a wind below him. worthless if the enemy is on ground, but if they are in air, it's a very powerful spike. No damage, but pushes the enemy down a lot!

(Back) Fuego spins and kicks in midair. An explosion is caused if he hits. A bit slow, but it could be likened to Zeldas lightning kick, both in damage and knockback.

Special Attacks:

(Neutral): Thunder Fist.
Lightning hits his hand from the side of the screen, much like pikas Down B does from the top. he then makes a quick punch with his electrically charged hand, causing great knockback and damage.

(Up) Cyclone.
Fuego turns into a small cyclone and rises a bit into the air. While he cannot hurt anyone, anyone caught in the whirlwind are thrown a small bit upwards. He has a bit of lag before and after the attack, but he cannot be hit during it.

(Forward) Fireblast.
Fuego shoots a fireblast. Chargeable, but not carry-around able. If fully charged, it's slighly more powerful than Samus Charge shot was in melee.

(Down) Metalsuit.
Fuego turns into metal. Unusable in mid-air. This attack gives him super armor for as long as he holds it while on the ground. He cannot move while having this activated.
This is basically just a defense against projectiles when you have high %s.


Throws:

(Grab): Fuego extends his arm to grab you. He damages you through poking you.

(Up): Shoots enemy upward through the push of a rock coming out of the ground. Damage is decent, as is knockback.

(Forward) Shoots enemy away forward with a waterpulse. Damage is low, knockback good.

(Back) Turns into a whirlwind and throws the enemy in a backward direction with quite some power. Knockback is GREAT, but damage = 0%.

(Down) Fuego turns into rock, and the falls on the enemy. Damage is good, and this is his only throw with any actual combo capacity.

Final Smash: Unleashed!

Deqa's sealed powers surface, and Fuego is now, as he should be, a god-powerful being!

While he is in this state, you can just choose what element he will use(at the beginning of the move, you do this).

Element choice:

B: Plunder like Fire
Fuego releases great amounts of fire around himself. This could very well be used to push enemies down, as well as do obscene amounts of damage.

side B: When you want power...use Water
Fuego starts to shoot water in front of him, pushing the enemy. While this does no damage, a KO is almost impossible to avoid. Best used if all enemies are in front of you.

Down B: Immovable as the mountain
All characters get stuck in the ground(If airborne, they are sent flying downwards, and gets stuck in the ground on impact, meaning enemies in the air outside if the stage gets spiked), and then Fuego rams them once for 60% worth of damage. He hits every character, but they are still stuck. After doing this attack, the FS end, leaving the enemies stuck in the ground, ready to be given a piece of your mind.

Up B: Swift as the wind.
Fuego turns into a great whirlwind.
If enemies are damaged more than 45% and gets hit, they are toast. They are thrown upwards much like how the Tornado on Hyrule castle did in SSB64. However, this attack may not cover the entire stage, depending on the size.

Taunts:

1. Creates a small flame in his left palm.

2. Stands straight and says: "For lord Saidre!"

3. Sneers and gives you a thumb down.

Victory pose:

1. Breathes fire like a dragon, then says: "My powers are sealed, yet you couldn't even put up decent fight?"
*Big win*

2. Laughs heartily, then says: "This time, I actually had to fight the seal to win. I'm impressed."
*Tough battle*

3. He sets himself ablaze, then says: "I'm Fuego, and I will see to it that the apocalypse will be prevented!"
*Random*


Stage: Fiammania Fortress-
Will write more info later.

Music: Hmm. Hard to do these for original characters...

Items:

AT- Eidolon the Third, World Ender.


Called the world ender, this man carries within him the power to shatter what we see as reality. When he appears, he smirks, the entire screen goes white, all characters are KO'd(even the AT user), and then it seems like the screen shatters, and the respawning characters fight on the glass shards for the rest of the match. Not your best friend, exactly.
BTW, the white screen means the entire stage becomes a KOzone like the sides of the screen, and thus no invincibility frames in the world can save you.

Eidolon is part Draq, if you wonder about his strange looks.

AT- Kumblans:
A hero who died after a battle for the well-being of the Icaeros due to severe burns and poisoning, but fighted off the Delirian invasion single-handedly pretty much.
Kumblans tower above just about anybody at the stage, being almost 15 feet tall! Add the fact that he wields a blade sligthly taller than he is, and you got one heck of a good reach. Kumblans doesn't really do much, he first strikes the ground with his fist, This ending characters flying, or in case they're shielding, breaks their shields. Then he instantly follows this up with a 360 degrees arc sword slash, which are capable of KOing just about any character off the top. Propably one of the very best ATs available.
Pretty self-explanatory, he is an Icaero.

Boss: Adlez Shariez


Adlez Shariez is the vengeful Lia that seeks to take revenge on the Gods.
He is himself a being of nearly divine power, and his power will only grow during time.

Shariez Warps around a lot, and sinks into shadows. He also creates clones of the player for them to fight(Only one at a time). He dislikes Violence, and only launches attacks now and then, but when he does, WATCH OUT! He has some spells that can easily bring your damage sky high or One-hit KO you, but if you just keep in check the look of his attacks, you should be able to make it.
However, don't let him get a Smash Ball(yes, he can use them, but luckely, they are very rare on his stage). Not only does he start to attack at a much faster rate, but also, Eidolon the Third, World ender appears and does his thing... Kills you off(Your % doesn't matter) and leaves the stage shattered.
Updated Fuego's with pictures!
 

fums63

Smash Apprentice
Joined
May 28, 2007
Messages
187
Location
IN
Alien Guy
http://i119.photobucket.com/albums/o146/fum_63/alienscan.jpg
appearance: hes a green stick figure alien with one mechanical arm. i'll upload a picture later. all of his moves using his arm use his mechanical arm
series: sticktown
symbol: weird looking "s"
entrance: crashes in in his pod
costumes: normal (green), red, blue, purple, black, white
weight: 2/5
height: 3/5
strength: 4/5
speed: 3/5
jump: 3/5
special effect: trips often, but becomes stronger whenever he recovers from being knocked away
a: punch
a repeatedly: punch, punch, energy punch continuously
a >: two hand shove
a ^: jumping headbutt
a V: stomps
dash a: does a rapid slap thing
smash >: lightning punch
smash ^: makes two beams come out of his antannae and swirl above his head.
smash V: spins around while covered in energy
nair: makes a sphere of energy around himself
fair: shoves an open hand filled with energy in the opponents face
bair: takes out a weird looking gun and tases the enemy
uair: pushes upward
dair: like marths dair with his mechanical arm. gives electric effect
grab: normal
grab attack: electrocutes
throw >: pushes forward
throw <: throws back and shoots a blast
throw ^: throws up and follows with a weak tornado
throw V: throws down and freezes
b: mechanical arm blast: tap b repeatedly to attack like the super scope, but the blasts have little tails at the end. or charge and it works like samus'
b >: energy sword: slices quickly while stepping forward with a sword made of energy. sometimes its huge and has a lot of knockback.
b V: tornado: makes a horizontal tornado that damages the opponent repeatedly and then knocks them away. you can move it to be above you or diagonal or whatever
b ^: jetpack: hold b to charge. he then shoots himself up in a fiery explosion.
FS: transformation:alien guy says, "nah not now" and turns purple and gets a cape and hat. he becomes much faster and more powerful. if you hold b all the way now, he will make a HUGE ball of electricity, but after you use it you're paralyzed for a while
taunt 1: strikes an odd pose and yells, "YAY!"
taunt 2: eats pie
taunt 3: dances around

assist trophy: blade
appearance: pacman like head, red body, no legs. instead he has wheels
attack: rides around the screen quickly, shooting gas behind him and slicing with his gigantic stick blade. occasionally jumps on peoples heads and grinds on them.
I gave alien guy a special effect.
 

RWB

Smash Ace
Joined
Jan 28, 2006
Messages
969
okay, can we vote for our own characters?

i'm assimilating my massive lists of votes so i need to know.

As Fawriel told me per MSN...


"You can! However, you can't review your own characters, so you can only give them normal votes."
 

S0crat3s

Smash Apprentice
Joined
Jan 3, 2008
Messages
158
Location
Mushroom Kingdom
Aaaaaand the deadline has passed!


That said, irony strikes back once again!
I actually planned to use this whole day to work for this thread. Except I couldn't log in because I kept getting "Database Errors", so now half the day has passed already. Durrh.


I've come up with a new rule system for the voting based on the three-point rating idea.

1. Everyone can choose 50 characters out of the available ones. Standard votes count as 2 points.
2. You are able to give a more powerful rating to characters you think deserve it, but the requirement is that you have to write a review of at the very least three lines, including some actual arguments. No generic "I like it because it's awesome" and absolutely no "I didn't read the post but I like the character". If your review is okay, the vote counts as 3 points.
3. If there are still characters left you want to give an honorable mention to after you chose your 50 favourites, you can still list the runners-up, giving them 1 point each.


I think everyone should be able to agree to that system, right?


Well, I guess I'll start working now... that is, if SWF lets me. Looks like I'm still getting Database Errors now.
Does that mean my OC is going up?
 

PolarisJunkie

Smash Apprentice
Joined
Feb 17, 2007
Messages
171
Location
California
NNID
PolarisJunkie
3DS FC
0361-7305-7321
Ooohhh...good luck everybody!

And vote for Eye-Scream/Polaris/Metapod*Kakuna! See sig! w00t!
 

OddCrow

Smash Ace
Joined
Sep 20, 2007
Messages
628
3DS FC
1676-3709-1310
can we still update stuff? I was going to add some better descriptions to Etheream's attacks and background/extra info. if that ok?
 
Top Bottom