• Welcome to Smashboards, the world's largest Super Smash Brothers community! Over 250,000 Smash Bros. fans from around the world have come to discuss these great games in over 19 million posts!

    You are currently viewing our boards as a visitor. Click here to sign up right now and start on your path in the Smash community!

Make Your Move 3.0: It's over, it's done, moving on.

Status
Not open for further replies.

Chief Mendez

Smash Master
Joined
Mar 25, 2007
Messages
3,161
Location
Somewhere
If you can view flash videos, then go here. If not, you can look up Teen Girl Squad on YouTube.
Darkurai said:
No one cares that I'm going to make The Kid from I Wanna Be The Guy? Okay then.
Once again, external links plz. Most everyone knows who Gray Fox is, and even then I wrote up a little summary, and even threw in some YouTube linkage.

But "The Kid" sounds really boring. But then, I have no idea what "I Wanna Be The Guy" is, and as a person on the interent, I'm a selfish b*stard who has much better things to do than Wikipedia that sh*t. :p

peeup said:
I was extremely dissapointed when I heard that Plusle and Minun almost made it...but alas, didn't. I trust you'll give them a respectable moveset (not iceclimber+pikachu). I look forward to seeing it!
Seconded. :bee:

Roy-Kun said:
I really want Ganondorf with freaking magic and a sword.
Oh man. If you're allowed to do that, then I want to make a Ganondorf with the Trident of Power.

As long as that's alright with you, as you called the guy first (to my knowledge).
 

Iron Thorn

Smash Lord
Joined
Jun 26, 2008
Messages
1,097
Location
Going to Gamelon. I'm taking the Triforce of Spag
Here we goooo!


Froslass, the Snow Land Pokemon, has joined the Brawl!

Stats:


Power: 4/10
Range: 8/10
Height: Froslass herself is about Luigi's height, but floats above the ground (see below)
Weight: 2/10 (same as Meta Knight)
Walking[s/] Normal Floating Speed: 3.6/10 (slow)
Dash Fast floating speed: 5.8/10 (passable)
Fall Speed: 1.2/10 (floatiest character next to Jigglypuff)
Jumping: 7.7/10 (very good)
Crouch: 4/10
Traction: 3/10 (she isn't even touching the ground, guys)
Number of jumps: 4
Wall-jump: No
Wall Cling: Yes
Crawl: No
Glide: Yes
Tether: No

I got very sidetracked, so I'll work on this more later.

Exclusive Attributes:


Froslass is different from other fighters because she floats high up off the ground. The distance between the hem of her "kimono" and the ground is about 80% the height of Kirby. Any attacks that pass under this interval will not harm Froslass UNLESS their hitbox extends upward far enough to catch at least the hem of her "kimono". Thus, some attacks, such as Zelda's down tilt, are useless against Froslass. However, many projectiles that would ordinarily pass underneath Froslass can be aimed upward to hit her. Some such profiles are R.O.B.'s laser, Snake's Nikita, and Zelda's Din's Fire.

A Attacks:

A: Snowflake - similar to Zelda's neutral A, Froslass extends her arm out in front of her to make a puff of snow. It hits once and has medium knockback but low damage.

A Twice: Double Snowflake - Froslass makes a larger snowy puff with both arms, dealing medium knockback, medium-low damage, and a 1% chance of freezing.

Forward Tilt: Ice Shard - She thrusts her arms out straight forward and a spike of ice pierces the opponent. The attack is laggy on both ends, but the good range, decent power, and 5% change of freezing more than make up for it.

Up Tilt: Crystalline Horns - An upward headbutt, this move's sweetspot is the very tip of the horns. It has no chance of freezing, but does more than solid damage and its knockback is not bad, in addition to being relatively fast to execute.

Down Tilt: Kimono Swipe - Froslass flutters her kimono edges that she has laced with sharp ice shards, juggling opponents a bit. A negligible move, as it can largely be avoided by crouching.

Forward Smash: Astonish - Froslass claps her hand(type appendages) loudly in front of her enemy, stunning them. Thus, it does no knockback, though the damage is moderate. However, it's great for charging up a Shadow Ball to unleash when they come to.

Up Smash: Powder Snow - Froslass raises both her hands, palms upward and perpendicular to her arms, as if gesturing for someone to rise from their seats. However, she shrouds her hands in bitter cold. Although laggy on both ends, it has acceptable damage and knockback with a nice 10% chance of freezing.

Down Smash: Misty Breath - Opening her mouth, she exhales a frigid mist below her. The mist does damage in multiple hits and can tie up an opponent for an appreciable time if fully charged. Unlike Kimono Swipe, Mist Breath goes all the way to the ground and can't be avoided by crouching.

Neutral Air: Icy Wind - Froslass does a spin in the air, creating a VERY chilly breeze around her. Functionally this attack is similar to Zelda's neutral aerial, except with a 5% chance of freezing.

Forward Air: Ice Fang - Leaning her head forward, she lunges at the enemy, and if it connects - CHOMP! If less than half of her jaws close on the enemy, it gets poor knockback and damage and no chance of freezing. BUT if 50% or more of her jaws sink into the target, it does 20% damage and high knockback, with a 1% chance of freezing.

Back Air: Obi Stab - The sharp fins on Froslass' back jab into the enemy. This attack cannot freeze, nor is its power anything special. Her only really not-good-for-much air move.

Up Air: Thunderbolt - Anyone who's played Smash Brothers knows about Pikachu's obnoxious Thunder spam. Froslass' up aerial is basically a powered down version of this detested attack, wth power more similar to Pikachu's Thunder Jolt and a smaller horizontal range. However, unlike Thunder, Thunderbolt goes through platforms.

Down Air: Avalanche - MAKE IT RAIN SNOW! Froslass ruffles her kimono hem and blobs of snow rain on the opponent. This does multiple low-damage hits, juggling the opponent against the ground for a bit causing medium-high damage. If the foe has landed a hit on Froslass within the 8 seconds before she starts the attack, the damage is 50% higher. The knockback, however, remains low, though the attack is quick to execute.

Throws

Grab attack: Froslass breathes a cold mist onto her target.

Forward throw: Shivery Shove - Froslass pushes her opponent straight forward. Good for horizontal KOs (i.e. on Bridge of Eldin) but not much else.

Back Throw: Bow Beater - A less useless version of Obi Stab, this throw has high knockback and a 45-degree angle upward trajectory. One of her best KO moves.

Up Throw: Two-Hand Toss - As the name implies, she tosses the opponent above her with two hands. The opponent flies about two Marios into the air before coming down, allowing a juggle to be set up.

Down Throw: Snow Drop - Froslass gingerly sets the opponent below her and they get pummeled a bit. This attack's weakness, lag, and overall inferiority make it one of those useless filler-type moves.

Specials

Neutral B: Shadow Ball - This attack will bring back memories for Mewtwo lovers and ring a bell in the minds of Lucario mains. It works the same as Mewtwo's atack did in Melee; it can be charged and stored for later, has a slightly bouncy trajectory, and can be reflected by Nayru's Love, Mirror Shield, etc. BUT! There is one small difference. Since Froslass receives Same Type Attack Boost (STAB for anyone out there who knows anything about competitive Pokemon) on Shadow Ball, hers is slightly stronger.

Forward B: Ice Beam - Froslass shoots an icy beam straight across, which travels about the length of Final Destination. At first glance it seems useless against small opponents like Olimar and Toon Link. However! Like R.O.B.'s laser, it can be aimed up or down. Unlike R.O.B.'s laser, it has a 10% chance to freeze but does not bounce off walls or floors.

Up B: Ominous Wind - No, it's not a fart! Gossamer, dark-purplish-gray energy begins to swirl around Froslass, giving her license to float around the stage as she may. The energy swirls do minimal damage to enemies, but the main purpose of Ominous Wind is to give her a far-reaching and easy to use recovery that lasts as long as Pit's wings.

Down B: Water Pulse - Froslass expels water...blobby...things from her mouth, doing medium damage and little knockback. The lack of knockback is not an issue, however, because Water Pulse also knock the opponent into a daze the way a Deku Nut would. This makes it best as a set-up move, allowing you to do your strongest attacks before they recover.

Final Smash

Blizzard: Froslass emits an eerie cry and it begins to snow hard...very hard. The howling winds and blinding snow do on average 60% damage and have a 75% chance to freeze. However, they don't do much knockback, so this Smash doesn't score too many KOs in itself. Instead, it "tenderizes" the opponents so that Froslass can swoop in for the kill immediately afterward. The Final Smash lasts around as long as Link's Triforce Slash.

Extras:

Logo: Pokeball

Stage Entrance: Pops out of a Pokeball.

Kirby Hat: Kirby gets Froslass' "helmet", minus the attached arms.

Alternates:

Normal
Shiny - Froslass' Purple turns a bit more bluish and her obi becomes magenta

Red Team - Froslass turns pale pink all over and her obi turns blood red
Blue Team - Froslass is baby blue all over, her purple becomes dark blue, and her obi turns lavender.

Green Team - Froslass becomes pale aqua all over, and her purple turns to jade green.


Wii Mote Sound: A sparkling sound, then Froslass' cry from the Pokemon games.

To Unlock: Collect both Classic and Final Smash trophies for Zelda (Sheik doesn't count) and the Ice Climbers.

Taunts:

Up: Forms a mist of little ice crystals around her.
Down: Froslass delicately holds her right hand to her face, lowers her head a bit, and blushes with closed eyes.
Side: Folds arms loosely across her chest and looks diagonally down.


End-battle poses:

Win Pose 1: Spins joyfully, holds her hand to her cheek, and blushes.
Win Pose 2: Bows deeply.
Win Pose 3: Creates a mist and disappears.
Loss Pose: Floats with her head hung in shame and back to the camera, not clapping.

Subspace Emissary Role: Froslass is with Lucario on the Glacial Peak, meditating with him. She joins him in a 2-on-1 fight against Meta Knight. When Meta Knight wins and restores them, she rather hesitantly joins him, mostly because Lucario is going too.

Snake Codec:

Snake: Look at this flimsy thing! It looks like it'd blow away in a light breeze, like those cheesy Halloween ghosts.
Mei Ling: That IS a ghost...type Pokemon. It's Froslass, a female only evolution of Snorunt.
Snake: Snorunt evolve into Glalie, don't they? What's the difference? Besides the appearance, of course.
Mei Ling: For once, Froslass is ghost type as well, allowing her to use a much wider variety of moves, such as Thunderbolt and Ominous Wind. Also, she's far lighter and faster. And Watch out for her ice moves - they'll freeze you!
Snake: She still looks fragile to me. Well, my weapons produce heat, and that melts ice, right?
Mei Ling: You're a smart cookie, Snake.

Credits to the Commander for whipping up the alt sprites.
 

Jiggy37

Smash Apprentice
Joined
Aug 26, 2007
Messages
89
Hey half_silver28, did you want to post your Colette before mine? >_> I'm okay with it either way, but I won't be able to put her up until later tonight, so thought I'd ask...
 

Roy-Kun

Smash Ace
Joined
Oct 21, 2007
Messages
945
3DS FC
2337-4154-9016
Oh man. If you're allowed to do that, then I want to make a Ganondorf with the Trident of Power.

As long as that's alright with you, as you called the guy first (to my knowledge).
I'll pass then, I hate being first.

However... I also worked on a Felix moveset, gonna post it here someday.
 

PKSkyler

Smash Lord
Joined
Apr 25, 2008
Messages
1,566
Location
San Diego
whats up guys? PKSkyler is here at last! Not that I have anything to contribute at the moment...but ummm...hi!
 

Darkurai

Smash Master
Joined
Aug 20, 2007
Messages
3,012
But "The Kid" sounds really boring. But then, I have no idea what "I Wanna Be The Guy" is, and as a person on the interent, I'm a selfish b*stard who has much better things to do than Wikipedia that sh*t. :p
I Wanna Be The Guy is widely considered as the hardest game ever bar none.

No one will ever ever ever finish this game without dying at least once.
 

Agi

Smash Lord
Joined
Jul 27, 2008
Messages
1,120
Location
SE Washington
EDIT:...Darkrai Already said it... O_o

Once again, external links plz. Most everyone knows who Gray Fox is, and even then I wrote up a little summary, and even threw in some YouTube linkage.

But "The Kid" sounds really boring. But then, I have no idea what "I Wanna Be The Guy" is, and as a person on the interent, I'm a selfish b*stard who has much better things to do than Wikipedia that sh*t. :p
I know that I probably should have left this for darkrai to say, but here goes...

(link if you're to bored to read what I have to say)

I wanna be the guy is an evily difficult platformer game, parodying dozens of old nes/snes games. The Kid is the game's protagonist. The Guy is the game's ANtagonist. The Kid wants to be The Guy. To become the guy, he must first collect the 8 units, given ti the 8 non-robot masters. The Kid has a gun pass handed down from Former Grandfather The Guy. (Breaking off from engrish) Considering that all the kid can do is jump and shoot bullets, I don't see how he can make a moveset. Also, the kid is ridiculously tiny (smaller than a Shy Guy... by 4x.) But I will be interested to see what he comes up with! (At least he has one thing going... He can wallcling/walljump.)

BTW, Darkrai, how far have you gotten in that game? I beat it in two hours on Hard. The Guy is a Beast...
 

Chief Mendez

Smash Master
Joined
Mar 25, 2007
Messages
3,161
Location
Somewhere
I'll pass then, I hate being first.

However... I also worked on a Felix moveset, gonna post it here someday.
Sweet!

So my list is now as follows...

Grey Fox (Metal Gear Solid)
Simon Belmont (Castlevania)
Astro Boy (Astro Boy)
Richter Belmont (Castlevania)
Viewtiful Joe (Viewtiful Joe)
Alastor (Viewtiful Joe)
Bill Rizer & Lance Bean (Contra)
Lord Yamanouchi Nobutada (Odama)
vanessa Z. Schneider (P.N.03)
Elite Beat Agents/Ouendan Troop (Elite Beat Agents/Osu! Tatakae! Ouendan!)
Metamo Ark (Meteos)
Phoenix Wright (Ace Attorney)
King Mickey (Kingdom Hearts)
Aleister Crowley (D.gray-Man)
Ganondorf w/Trident of Power (Legend of Zelda)

This will go on forever. :psycho:

EDIT - I Wanna Be The Guy looks ridiculous. Good luck with that moveset then, Darkurai.
 
D

Deleted member

Guest
I've updated Teen Girl Squad with links to the sources of the attacks (and Assist Trophy).
 

Harkness

Smash Apprentice
Joined
Jun 20, 2008
Messages
100
Location
Delaware
Runaru Warrior of Space

Finally i have completed it!

Ranaru, Darenguan Warrior of Space


Background info: Runarú is the second youngest (14) of 11 elemental warriors from the planet Eruthia. Born a “half blood” Drajjin, a powerful nation of people possessing the ferocity in battle, strong physiology, and the exceptional powers of dragons (such as winged flight), Runarú was often bullied and picked on, and was friendless until his strong elemental powers developed. That coupled with the death of his mother and father and the capture of his younger brother, drove him to become a loner, depending on no one but himself, and to become strong enough to protect that which he holds dear. As such, he is the most skilled warrior (and ninja) on the planet, responding to each situation with such a calm and calculating response that many refer to him as “The Silent Warrior.” He does try to be humorous at times, but in battle becomes very serious.

Statistics
Size: Lower Tall (around the height of the pokemon trainer)
Weight: Light (Drajjin bones are hollow).
Jump1: High
Jump2: High
FallSpeed: Average
RunSpeed: Above average (shiek speed)
Power: A bit below average
Jumps: 2
Wall-Kick: Yes
Wall-Cling: Yes
Glide: No
Crawl: Yes

Special ability: Runarú being half blooded, his physical strength is good but not up to par with most brawlers. As such his attacks, though not lacking in speed, have low knockback and attack power. However, to compensate for the low knockback, his spacial powers allow him an extended “Wind push” effect similar to Latios and Latias’ push effect when they appear. This extends further then his hitbox (lucario’s F-smash is the constant length) allowing him to not only hold enemies, and uncharged projectiles back but increase the knockback of his moves significantly, or with certain moves, draw enemies in, increasing his combo potential. When the space push is in effect, the jewels on his gloves flash green.

Ground Attacks
Standing A – Crisis thrusts - Thrusts twice with his palms, spins with a spin kick to knock enemies away, then draws them into a series of finger thrusts (similar to shiek’s Neutral a combo). Good damage racker, but low damage and reverse knockback.

F/B-Tilt A – Quick fists – Jabs his fist forward twice. 4% damage. Space effect (SE): Double push effect.

U-Tilt A – Super back flip – Runarú jumps and back-flips twice in the same spot before landing. Most powerful tilt (6%). SE: Pulls enemies into the hit, with a small knockback.

D-Tilt A – Spin stomp – Lifts his leg and stomps with his heel (similar to C. Falcon and Ganon’s U-tilt). 3% damage. SE: Spikes aerial opponents, trips ground opponents.

Dash A – Slide flip – Slides under the enemy (like Mario’s), then flips back and lands on his feet (like Wolf’s). 4% damage (both hits). SE: sends aerial enemies behind him (Flip). Trips enemies (Slide).

Smash Attacks
Side Smash – Duo Fist – Runarú thrusts forward with both fists. Damage is at a constant of 5%. Charging increases both the range and power of the Space effect. SE: Launches enemies at the same level as Latios/Latias.

Up Smash – Double spear hand - Puts his hands together as in prayer and thrusts them high. His only physical attack where he attacks with space. Anyone near the tip of his palm, when he strikes receives a whopping 10-16% damage, plus a powerful, knockback from his SE. all others are knocked to either side from these and Receive no damage.

Down Smash – By far the coolest (and his most damaging overall) smash ever! Runarú stand on one hand and does a break dance spin, kicking in front and behind, before finally spinning on his head. The final spin has an SE that draws them into his final 2 hits, racking up the damage from 9% to 17% total damage.

Aerial Attacks
N-Air – Spin vortex – Spins once with his hands in fists. 2% damage. SE: Gathers enemies close.

U-Air – Does a flip in midair. 3% damage. SE: Knocks enemies above behind him, and those in front above him.

D-Air – Space Decend – A risky move which could potentially be used as a “Runicide”. Runarú stops for a second in midair, spins with his feet tight together, and dives directly downwards, hitting all those near with his spin attack. 3% damage, 3 attacks. SE: Sends those in close proximity in the same direction. If canceled soon enough, this could count as a spike.

F-Air – Spin kick – Spins around and does a crescent kick. 4% damage. SE: This move has such a powerful reverse knockback effect that it actually sends the opponent behind you.

B-Air – Spike kick – Thrusts one foot out back wars in a side kick (similar to Zelda). 6% damage. Has a sweetspot(9%) at the tip of his foot. SE: In the sweetspot alone there is a powerful SE that becomes a guaranteed KO at damages exceeding 80%. With enough skill a person can use a F-air to set up for a B-Air KO.

Grab/Throw Attacks
Grab: Grabs directly in front of him. No extension.

Pummel: Chop -- Runarú chop the opponent with a knife hand on the neck. 3% damage.

Forward Throw – Suspension kick – He holds them in front of him with space, then sends a powerful kick at their stomach area. 8% damage.

Backward Throw – Spacial pierce – throws them behind him and thrusts his right finger forward, causing a powerful SE. 4% damage.

Up Throw – Space Hold – Holds them above his head with space and punches them. 5% damage.

Down Throw – Foot slam – Throws them on the ground and slams them with his foot (similar to shiek)

Ledge animations
Get Up (Under 100%): Runarú climbs up quickly.
Get Up (Over 100%): Runarú crawls up slower.

Attack (Under 100%): Runarú leaps up and slams his foot against the ground. Does 3% damage.
Attack (Over 100%): Runarú climbs up slowly, and does a leg sweep. 5% damage, and trips.

Dodge (Under 100%): Leaps into the air and lands ninja style.
Dodge (Over 100%): Pushes himself up into a standing position.

Jump (Under 100%): Does two flips in midair.
Jump (Over 100%): Let’s go of the ledge, stands horizontally, then does a backward flip onto the stage.

Miscellaneous Animations
Dizzy: Since Runarú cannot be off balance (drajjin ability), he kneels with a hand on his foreheadhead.

Sleep: Runarú stands with his head bowed, snoring.

Sidestep Dodge: scoots sideways (similar to Marth).

Forward Rolling Dodge: Leaps over them and lands facing them.

Backward Rolling Dodge: Leaps backward, with his heels forward.

Air Dodge: Disappears, similar to Mewtwo.

Special Attacks
Standard B – Vortex ball – places both hands in front of him and charges. This attach is keep able and is a good KO move. Similar to Lucario and Mewtwo, he damages enemies who approach him in the area where the ball is, receiving 2% every second. When released, the ball flies at the speed of Mewtwo’s shadow ball, but in a straight line like Lucario’s, dealing 5-10% damage when it strikes and sending the enemy away in a spinning animation.

Side B – Follow-through – similar to Marth’s Dolphin slash, this attack requires player input. Runarú first kicks the enemy which is set to knock them a distance away. When the player presses B and a direction again one of the following will happen:
U-B: Runarú will fly below them in a blur and kick them up.
D-B: Runarú will fly above them and slam them down to the ground or off the stage. (only a spike at 100+% damage)
F-B: Runarú will fly forward and kick them forward again.
B-B: Runarú will fly in front of them, and back kick them.
N-B: Runarú will release a flurry of punches (5) at the enemy.

This combination can continue up to a total of 3 times, with a set damage of 5% (save for N-B which is set at 2, and the final hit, which is double the knockback), but is limited to within the range of a circle around the diameter of the negative zone. N-B will always end this combo. Once this attack is through, Runarú cannot perform any jumps or special moves besides Up B. This launch effect will not work if the initial kick missed.

Up B – Space Dash – this attack is almost identical in appearance with extreme speed with two key differences. First, it is not bendable, making it more easily edgehogged. Secondly, it has damaging effect and sends opponents in the opposite direction he flies, making it a great reversing move for those using the “wall of pain”.

Down B -- Reversal – Runarú spreads his arms and throws up a transparent shield that lasts for a few seconds. If he is hit by any physical attack while in this state, the screen doubles the knockback of the attack and sends it in every direction, along with 6% damage. However, the lag from the reversal attack makes this an ineffective counter against projectiles unless he is at close range for the initial blast.

Final Smash
Final Smash – Demi-Black hole – Runarú flies towards the middle of the stage and raises his hands. A black dot appears between them end everything, and everyone (save for Runarú), within the range of Final Destination flies towards it in a spiral pattern. Enemies within the hole get a constant 5% damage every second, as well as a 2% for every object within, after a few seconds of holding them within the spacial whirlpool, Runarú, releases it, sending the enemies, and items flying in every direction.

Taunts
Up Taunt – Runarú looks around warily.

Down Taunt – Stands on his hands saying “This is easier then I thought”.

Side Taunt – Shakes his head, saying “You can’t really be serious”.

Items
None.

Stage
Trials of the Warriors - This stages is made up of the different Trial Arenas of all the Eruthian Warriors. It is where they undergo a test of their powers in order to obtain their armor. It works similarly to the castle siege stage, cycling through several stages endlessly. However there are three different loops that the stage can go through:

Loop 1 - Fire, Water, Earth, Air
(Note: Each element has a color theme)

Fire stage (Red) - In this stage, there is a flat, rocky platform in the center of a pool of lava. (All of the stages are around medium size btw) Occasionaly, flaming pyrolclasts arc over the stage, exploding in contact with any brawler. The explosions are highly damaging, but have little knockback.

Water stage (Dark Blue) - In this stage there is a pool of water in the center with two platforms on either side. Above the pool is a platform which rises and falls. Occasionaly, The water rises up and flows over the sideways platforms, with enough force for a highly damaged enemy to be pushed off the stage. the only save area is the floating platform.

Earth stage(Brown) - This stage is a completely flat and earthy landscape. At one point the earth in the center wil rise to form a hill. It is not advisable to brawl on top of it, as eventually the hill will shatter and rise into the air (causing heavy damage and multiple hits) and fall back down (knocking enemies off the field), refoming the stage.

Air stage (White) - This stage is simply a series of platforms spread out in a hectagonal fashon. occasionally, the wind will pick upforcing arial players off the stage if they are not careful.

Loop 2 - Light, Darkness, Lightning, Sound

Light stage (Yellow) - Three suspended platforms forming giant "steps" to the upper right corner of the stage. Light beams similar in animation to Dialga and Palakias can appear here horizontally, vertically, even diagonally.

Darkness stage (Black) - Same stage setup as Light, except in the opposite direction. The stage occasionally gets pitch black, causing confusion.

Lightning stage (Light blue) - Simply one platform with a lightning rod in the center. Occasionally, or more often if, say, pikachu was a contestant, lightning will strike the lightning rod and travel throught the stage in a wave, landing mutiple hits on contestants.

Sound stage (Orange) - Similar to the lightning stage, except three rods are on either edge and in the center. It is advisable that contestants not attack these rods or knock opponents into them, as they will vibrate to produce powerful soundwaves for multiple hits. if the attack/launch is stron enough, all three sets will be activated, knocking everyone off the stage.

Loop 3 - Time, Space, Gravity

Time stage (Grey) - similar in format to Air stage, but time is slowed down and sped up.

Space stage (Green) - similar in fomant to Skyworld, however platforms may suddenly teleport and the stage may turn upside-down (for real. not an illusion and not quickly), and players my find themselves transported to random (visible) spots in the stage.

Gravity stage (Purple) - A simple stage similar to Final Destination. Gravity an go haywire here, causing contestants to float, be heavy and sluggish, or even force contestants into the ground.

Victory/Loss Poses
Up Victory Pose – Inspects his glove then crosses the arm at his side.

Side Victory Pose – “Some more training would be helpful” he says as he does a flip onto the stage and bows.

Down Victory Pose – “Oh well, Better luck next time!” He says spinning and making a thumbs up to the screen.

Loss Pose -- Runarú stands and claps, with his eyes closed. Standard.

Extras
Symbol: Symbol on the back of his shirt.

Kirby Hat: Kirby gains a variation of his gloves and hair.

Entrance: He flies in from the foreground, skids to a stop, and stands in his pose.

Colors: Green (default), white, black, blue, red, yellow.

Wii Remote Sound: Says “Get ready!”.

SSE Role: Runarú is trapped on Metaknight’s ship. Before Shiek and Peach reach the top of the ship and meet Fox, they free Runarú from his imprisoned trophy state. Wary of their allegiance (especially shiek’s), he tests them in battle. When he loses, and they restore him, he agrees to assist them. He participates in all of their battles from then on and is one of the few who withstood Tabuu’s blast for a time (eventually it broke through his space shield).

To Unlock: Defeat 50 enemies in cruel brawl, or have him join you in subspace emissary or complete 100 man melee on hard.

Unlock Message: "Runarú, the ever-calm Warrior of Space, has joined the Brawl!"

Solid Snake Codec Conversation
Mei Ling: "Oh dear. You’re fighting Runarú, Snake?"
Snake: "What’s with this little guy Mei Ling? I just can’t seem to land a solid hit on him."
Mei Ling: (whispering) “Do not underestimate this boy, Snake. Runarú is a full fledged warrior and ninja, and he is very skilful at adapting to his opponent.”
Snake: “Like me, huh?”
Mei Ling: (whispering) “Correct. He had a rough childhood due to his mixed heritage, and that solidified his desire to be strong. Once he determines his powers he trained hard to become what he is today.”
Snake: “So how are his powers keeping me away.”
Mei Ling: (whispering) “He can manipulate the empty space between molecules to add a powerful push effect to his attacks, and increase his attack speed. You’d best use projectiles to throw him off.
Snake: “Thanks Mei ling, but why are you whispering?”
Mei Ling: (whispering) “He has super-hearing! Be careful when you contact us when he’s here ok?”
Snake: “…I’ll keep that in mind…”

Oh, one more thing....

PLEASE Give Me feedback. Is he too strong? (i have a habit of doing that :()
 

PKSkyler

Smash Lord
Joined
Apr 25, 2008
Messages
1,566
Location
San Diego
Looked at the various movesets...very nice! Grey Fox is especially cool.

Ummm...Ed?? Ok its a little weird.
 

Red Arremer

Smash Legend
Joined
Nov 27, 2005
Messages
11,437
Location
Vienna
Okay, I've changed the Final Smash of Lip and added damage indicators to her throws. Thanks again, Mendez! ^_^
 

majora_787

Smash Hero
Joined
Jun 23, 2007
Messages
6,122
Location
Texas
Okay, it took a little bit of last second work...but now I have my moveset for...

Skull Kid, the Sacred Grove Guardian

"Hee hee, that was fun..."
========================================
Bio
Skull Kid? Really? Skull Kid from LoZ: Twilight Princess found his way into Super Smash Brothers. In Twilight Princess, he defended the sacred grove from the outside by making foreigners play a “game” where he would hide and summon puppets to fight. When he was defeated, he would open the door to the Sacred Grove where the Temple of Time slept.

========================================
Stats

Power: 2/5. Skull Kid isn’t a very powerful character.
Speed: 3/5. Average speed.
Jump: 3/5.
Recovery: 4/5. Skull Kid’s recovery is one of the better tethers in the game.
Control: 4/5. Skull Kid is a very mobile character, both in the air and on the ground.

========================================
Weak Attacks

A: Skull Kid punches whatever is directly in front of him. Low damage and no knockback, but has similar effects to a fan.

Up Tilt: Skull Kid swings his lantern over his head. Low damage and knockback.

Forward Tilt: Skull Kid swings his head forward at opponents. Low damage and knockback.

Down Tilt: Skull Kid attempts to trip opponents by kicking them in the shin. This attack has low damage and knockback, and may cause tripping.

Dash Attack: Skull Kid jabs his trumpet forward as he skids to a stop.

========================================
Smash Attacks

Up Smash: Skull Kid blows his trumpet up, making leaves shoot out and injuring people directly above him. Medium damage, low knockback.

Forward Smash: Skull Kid swings his lantern forward, striking it on the ground. Medium damage, medium knockback.

Down Smash: Skull Kid lashes piano strings around his ankles, hitting nearby foes. Medium damage, low knockback, may cause tripping.

========================================
Special Attacks

^B: Piano Strings
Skull Kid does a tether recovery with some of his puppet strings. In the air, eight strings shoot from Skull Kid’s hands in an arc in the direction he’s facing. On the ground, he shoots eight strings in a fan pattern over his head, and anyone who gets hit is pulled toward Skull Kid like a grab. No damage, no knockback.

>B: Puppet
Similar to snake's missile. Skull kid plays his horn and a puppet appears next to him. He controls the puppet, which has its own small moveset and final smash, but it cannot move too far away from Skull Kid. If it leaves the set distance, it falls apart and Skull Kid becomes vulnerable. You can press shield to drop control of the puppet, and you can pick it up and carry it to another location and reuse it in another spot. Skull Kid can use another Skull Kid's puppet, just like Wario with bikes. Skull Kid is always vulnerable during this attack as well, and the puppet has no ranged attacks. It does, however, save him from a potential knockout if he has high damage and gets knocked out of control, which negates the knockback. Only one puppet can be out at a time. The puppet moves quickly, can only jump once, and only has three attacks. It cannot shield. But it can grab someone and become inactive for Skull Kid to get a hit in. This would only work if the target is very close to Skull Kid and has very high damage.

VB: Forest Siren
Skull Kid plays his horn and a small barricade of leaves forms around him. This is the exact opposite of a reflector that StarFox reps use, as direct attacks will cause damage to the attacker. However, throwing a projectile at Skull Kid during this attack will disrupt the attack and damage him. Low damage, medium knockback. The Forest Siren cannot be held for too long, and leaves Skull Kid vulnerable and out of breath. If you try to abuse the Forest Siren, it will actually shrink until it is unable to work at all.

B: Trumpet
Skull Kid blows on his trumpet and makes a small shockwave go forward. It's similar to Zamus's paralyzer, in the sense that it goes forward and stuns whoever it hits. It doesn’t go far, has no knockback, and doesn’t leave Skull Kid vulnerable.

Final Smash: Purple Mist / Puppet Swarm
The screen gets covered in purple mist for about 15-20 seconds. Everyone becomes invisible except for their tag, and Skull Kid is invincible. However, opponents in the mist don't fly as far and fall more slowly due do the density of the fog. After the time is up, the fog fades and everyone is visible and vulnerable again. So it doesn't do anything for him other than buy him some time on racking up damage. The mist also makes all explosives duds. Bob ombs vanish instead of exploding, and explosive crates never break.

Puppet's FS: If a puppet gets a smash ball, then two other puppets appear. Skull Kid vanishes, and the player is in complete control over the original puppet. The other two are computer controlled, always level three. Every time a puppet is destroyed, it gets respawned. The effects last for 10-15 seconds. They contain the same properties as Skull Kid’s puppets, except they can go anywhere in the arena they want. The puppets are destroyed as easily as a mid-weight character with 100 damage.

========================================
Aerials

Up Aerial: Skull Kid swings his trumpet over his head. Low knockback and damage.

Forward Aerial: Skull Kid kicks forward. Low knockback and damage.

Back Aerial: Skull Kid swings his lantern over his shoulder. Medium knockback and damage.

Down Aerial: Skull Kid blows his trumpet straight down. This attack is similar to ROB’s down aerial. High damage, low knockback, meteor smash.

Neutral Aerial: Skull Kid swings his lantern around him with one hand. Low knockback and damage.

========================================
Throws

Grab: Skull Kid grabs onto the opponent with a piano string.

Grab Attack: The strings tighten around the opponent.

Up Throw: Skull Kid throws the opponent up and blasts them into the air with his horn. High knockback, medium damage.

Forward Throw: Skull Kid releases his enemy and head butts them. Medium damage, low knockback.

Back Throw: Skull Kid wraps his opponent in puppet strings, spins them around behind him, and then hits them away with his trumpet. Medium damage and knockback.

Down Throw: Skull Kid throws his opponent down on the ground and slams his lantern on them. Low knockback, medium damage.

========================================
Taunts + Victory Poses

Up Taunt: Skull Kid blows a war cry on his horn.

Side Taunt: Skull Kid holds his lantern up and stares into it intently.

Down Taunt: Skull Kid drops his lantern and laughs maniacally, then picks it up again.

Victory 1: Skull Kid drops down out of nowhere in a blast of leaves and laughs.

Victory 2: Skull Kid blows on his trumpet to summon a puppet, looks around, and runs off screen.

Victory 3: Skull Kid holds his lantern to the runners up and laughs.

========================================
Other

Idle Pose: Skull Kid holds his trumpet in his right hand, his lantern in his left hand. He stands looking straight ahead, but with his body facing to his left slightly. When left Idle for extended periods, he will laugh, polish his lantern, and make faces.

Losing Pose: Skull Kid faces away from the screen, hunched over with his lantern and trumpet on the ground while shaking his head.

Shield: Skull Kid holds his trumpet in front of him in defense.

Forward Roll: Skull Kid does a roll around his opponent and faces them.

Back Roll: Skull Kid does a small backflip away from his opponent.

Dodge: Skull Kid jumps into the back-foreground and steps back.

Air Dodge: Skull Kid vanishes in a flash of leaves, then appears again.

Dizzy: Skull Kid laughs weakly and stumbles around in place.

Sleep: Skull Kid sits with his hat over his eyes, and slumps with his head on his right shoulder.

Stage Entry: Skull Kid drops onto the stage from nowhere in a burst of leaves.

Select Screen: Skull Kid’s trumpet is heard, followed by rustling leaves.

========================================
Misc.

Codec:
Snake: What’s with the creepy looking kid?
Otacon: That’s the Skull Kid. He guards the Temple of Time.
Snake: That’s…weird. He doesn't look all that strong..
Otacon: Be careful, Snake, just because he’s a kid doesn’t mean he doesn’t pack a punch. His puppets can pose a real threat.
Snake: Okay, I’m on it.

Kirby Hat: Kirby gets Skull Kid’s hat and a white patch around his left eye.

Alternate Costumes: Red, Blue, Black, Green, Yellow, Default. Colors are applied to the eyes and clothes. The black outfit has red eyes.

Assist Trophy: None

========================================
Stage

Sacred Grove

The stage takes place in the circular arena where you fight Skull Kid. The ground extends off stage in both directions, and is dotted with three patches of raised ground. The middle is a small pillar. There are two small stone slabs, one on each side of the pillar. There is a tree on the left side of the stage with a branch that extends all the way to the pillar. Sometimes, inactive puppets will fall from the tree and vanish. You can tell when one is about to fall when the tree shakes, and a shadow appears on the ground.

Music:
http://www.youtube.com/watch?v=LBCu4boRj7U (Armogohma fight)
http://www.youtube.com/watch?v=xJkFMHKxruo (Majora’s Wrath)
http://www.youtube.com/watch?v=sLbQpePp-MQ (Majora’s Incarnation)
http://www.youtube.com/watch?v=5JQllobJgj8 (TP Trailer Theme)
http://www.youtube.com/watch?v=TfI4aDnY92k&feature=related (Sacred Grove)
http://www.youtube.com/watch?v=36oHW1DG_LI (Lost Woods)

========================================
Supspace Emissary

Skull Kid follows link out of the forest, and jumps him almost immediately. Link wins, and Skull Kid runs away into the trees. He doesn’t show up until subspace where he is being held captive by primids. Kirby rescues him on his run through subspace, and they go through the subspace and Great Maze as a team. Skull Kid leaves when Sonic stops Tabuu’s attack, and is later found in The Wilds like Wolf, Toon Link and Jigglypuff.

Unlock:
500 versus matches
Beat Skull Kid in The Wilds after beating the SSE
Get classic and all-star trophies for all LoZ characters.
 

Chief Mendez

Smash Master
Joined
Mar 25, 2007
Messages
3,161
Location
Somewhere
To Chris Mendez: Are you reading my posts in MYM 2.0? You taken Phoenix Wright and Elite Beat Agents, which I reserved MYM 2.0!!

It's okay, though. I'll Just do Franziska von Karma and Elite Beat Divas then. (If you wouldn't mind)
Yeah, I know they were already done, but Blitzkrieg's rules for MYM 3.0 say that it's alright to redo movesets as long as they're not similar.

And I checked, and mine aren't that similar to yours.

But yeah, definitely do Franziska. MarthTrinity's doing Miles Edgeworth, so we'll have ourselves a bonafide trifecta! The Elite Beat Divas would also be awesome, though quick suggestion: make it Commander Kahn and the two backup Divas instead. :chuckle:

EDIT - @Spadefox: now THAT'S what I'm talking about. It's original, true-to-form, and just generally fun to use. Awesome job.

EDIT 2: @majora 787: though I really didn't care for the Skull Kid in TP, that is one righteous moveset. Or rather, that's one awesome Side Special. But...you said the puppet has it's own FS, right? Cuz' I didn't see it up there...
 
D

Deleted member

Guest
Yeah, and I still don't have a proper review for Teen Girl Squad on Page 9.
 

kitsuneko345

Smash Ace
Joined
Dec 20, 2007
Messages
562
Location
*sending Sundance lots of apple pies on Pi Day, as
The Elite Beat Divas would also be awesome, though quick suggestion: make it Commander Kahn and the two backup Divas instead. :chuckle:.
I'm planning on using Commander Kahn, Agent Spin, and Agent Chieftain as an Assist Trophy.

Also, My computer is getting tired (like me), so expect the specials of Plusle and Minun either tonight or tomorrow.
 

Chief Mendez

Smash Master
Joined
Mar 25, 2007
Messages
3,161
Location
Somewhere
Haha, thanks. Sticking with the attributes of my Panels, tho. And I dunno if it's not a bit overkill. XD
Well, once the blocks come up, if an enemy lands on one, it just turns into a blank block, that's then safe to stand on. Which would mean that every player should get hit at least once, but more if they keep fighting and getting hit around the stage.

And the finishing comet should have a small range, near the middle of the stage. If it's like that, it should be pretty even. Though it would be great if Lip can move around while the wall is up, though she'd be unaffected by the effects--she could take damage though, similar to Pit's FS.

EDIT - Oh, oh, oh--and since Lip's running around on the field while the blocks are there, Cordelia's comet would, when it hits, blow all the blocks of the stage, away into the foreground!
 

Red Arremer

Smash Legend
Joined
Nov 27, 2005
Messages
11,437
Location
Vienna
Yeah, and I still don't have a proper review for Teen Girl Squad on Page 9.
I think the moveset is done pretty well, but I don't now the Squad and can't relate to them. ._.

Edit:
@ Mendez: Yeah, I will add that Lip can move on her panels all through the time. And the explosion wouldn't reach Smart Bomb size, that's fer sure. ^^
 

majora_787

Smash Hero
Joined
Jun 23, 2007
Messages
6,122
Location
Texas
Yeah, I know they were already done, but Blitzkrieg's rules for MYM 3.0 say that it's alright to redo movesets as long as they're not similar.

And I checked, and mine aren't that similar to yours.

But yeah, definitely do Franziska. MarthTrinity's doing Miles Edgeworth, so we'll have ourselves a bonafide trifecta! The Elite Beat Divas would also be awesome, though quick suggestion: make it Commander Kahn and the two backup Divas instead. :chuckle:

EDIT - @Spadefox: now THAT'S what I'm talking about. It's original, true-to-form, and just generally fun to use. Awesome job.

EDIT 2: @majora 787: though I really didn't care for the Skull Kid in TP, that is one righteous moveset. Or rather, that's one awesome Side Special. But...you said the puppet has it's own FS, right? Cuz' I didn't see it up there...
The Final Smash entry is two paragraphs. The first paragraph is Skull Kid. Then the second paragraph is the puppet, because it starts with "If a puppet gets the smash ball..."

And thanks, this took about two weeks to do. And another week to organize.
 
D

Deleted member

Guest
I think the moveset is done pretty well, but I don't now the Squad and can't relate to them. ._.
There are multiple links throughout the moveset to Teen Girl Squad episodes containing some of the moves used in the set.
 

Chief Mendez

Smash Master
Joined
Mar 25, 2007
Messages
3,161
Location
Somewhere
The Final Smash entry is two paragraphs. The first paragraph is Skull Kid. Then the second paragraph is the puppet, because it starts with "If a puppet gets the smash ball..."

And thanks, this took about two weeks to do. And another week to organize.
Oooooooooo. Silly me for not using my eyes to read/ :psycho:

EDIT - Okay, I like Skull Kid's, but I think the Puppet Swarm CPUs should at least be level 3. Even better, they'd be random levels, and would be as easy to KO as an enemy with 100% damage...

So if you fight them, you run the risk of having to fight a tougher one, despite how easy they are to KO.
 

Harkness

Smash Apprentice
Joined
Jun 20, 2008
Messages
100
Location
Delaware
um, can someone please rate my character? I mean, i know it's long and all but seriously, i want to be critiqued.
 

cheap_josh

Smash Ace
Joined
Mar 24, 2008
Messages
914
Location
Northern Virginia
I've made some changes to my moveset as well, it's on Page four. I added an item, tweaked some moves, and did some color changes in the text because everyone loves that.
 

KoJ

Smash Journeyman
Joined
Aug 16, 2008
Messages
317
Big Daddy (Bouncer) and Little Sister


Origin: The Big Daddy and Little Sister combo is one of Bioshock's greatest symbols. Both twisted by the greed of Rapture's citizens, the two groups band together to survive in a cruel world. The Little Sisters were implanted with a slug that produces ADAM, a substance that allows for genetic manipulation. To protect the girls, the titanic genetically engineered Big Daddies were created. Both seek to survive in the living hell of Rapture.

Feature: The Big Daddy and Little Sister is a two in one character that is completely unique. Like the Ice Climbers, you have both on the field at the same time. Unlike the Ice Climbers, you primarily fight with the Big Daddy, but you lose a life only when the Little Sister is knocked off the screen.

If the Big Daddy damaged and knocked around enough, the Little Sister falls off and you must get her back to the safety of Mr. Bubbles. Getting hit by a very powerful attack or getting comboed with several medium hits usually will do this. The Big Daddy is computer controlled, but does not try to fight or run back to his friend, while the Little Sister is off his back. Instead, he just stays in place, sometimes moving to get onto the next platform on moving stages. You must try to protect yourself and get back to the Big Daddy using a very weak character. If the Little Sister dies, the Big Daddy disappears if it's on the screen and respawns with it. If the Little Sister is on the Big Daddy's back, she'll die if he dies. Damage is shared if it hits the Little Sister, while the Big Daddy, when not player controlled, is invulnerable to damage.


Pros/Cons

Big Daddy

Pros

-Heavy
-Powerful
-Range
-Priority
-Lots of superarmor
-Mines
-Scary Smashes
-A pseudo recovery that lets you live a little longer (B-Down)
-Good Recovery Move

Cons

-Big
-Mediocre Running
-Below-Average Attack-Speed
-You sometimes have to play as his little friend.

Little Sister

Pros

-Small
-Good Running Speed
-Quick Attacks
-Able to Heal

Cons

-Incredibly Light
-Weakest Knockback in the Game
-Awful Damage Dealing
-Pathetic Recovery Move
-Pathetic Attack Range
-Pathetic Grab Range
-Awful Specials
-You Have to Play as Her

Alternate colors

Normal bronze Big Daddy and a Little Sister with a pink dress. Normal colors.

Dark green Big Daddy and a Little Sister with a green dress and a little hat. Green Team.

Silver Big Daddy and a Little Sister with a white dress, blonde hair, little angel wings affixed to the back of her dress, and a halo. Angel colors.

Copper Big Daddy and a Little Sister with a red dress and ginger hair. Red Team.

Black Big Daddy and a Little Sister with a blue dress. Blue Team.

Big Daddy

Size: **** VERY VERY VERY BIG. They deserve their name. Dedede size.
Weight: ***** That diving gear has to weigh a ton.
Running Speed: ** Okay speed for such a large character.
Falling Speed: *** All that metal weighs him down.
First Jump: **
Second Jump: *
Attack Power: **** EXTREMELY POWERFUL!!!
Attack Speed: ** Pretty fast for a character that's so powerful.
Duck: The Big Daddy goes on all fours. He's about as tall as Dedede when ducking. The Little Sister on his back makes him a bit taller, however, so he's about six inches above Dedede level in reality.
Crawl: Yep, he has a crawl.
Wall jump: Nope.
Wall cling: Double nope.

Jab, Dash, and Tilts: Big Daddy

Drill Combo, AA: The first hit is an overhead punch from the Big Daddy, which has minimal knockback, while the second is a drill spin where the Big Daddy jabs his drill and rotates it. As long as you hold down the second jab, the drill will keep spinning. It has much more range than most other jabs. Good for damage racking. First hit-4%, Repeated hits-2% each.

Skull Smash, Dash Attack: The Big Daddy leaps forward and slams down on an opponent's head with the drill's side. Shoots opponents straight up with lots of force. Some ending lag IF it doesn't connect. 16%

Blood Stab, F-tilt: The Big Daddy jabs the drill forward without spinning. Shoots opponents straight back a medium distance. Very little lag. Lots of range, like most attacks using the drill. 16%

Clear the Way: D-tilt: The Big Daddy sweeps its arm, knocking any opponents it hits slightly upwards. 10%

Fist of the Machine, U-tilt: The Big Daddy slams its drill in an uppercut. If it connects before the drill gets to its full height, the drill starts spinning, damaging the opponent even more. Spinning Drill hits 4 times in addition to its initial hit. If the initial hit is the only part that connects, the enemy will merely be thrown upwards a bit, while he will be thrown upwards an even smaller distance with the additional damage. Initial hit-8% Repeated hits-2%, 2%, 1%, 1%

Smashes: Big Daddy

Charging Fury of the Monster, F-Smash: BRUTALIZE THEM, MR. B!!! You know Charizard's forward smash? This is like that, only there's a massive spinning drill that hits at the end, shooting the opponent upwards. Brutal range, brutal concept, brutal knockback... The only bad part is brutal lag after the attack. By the way, the Big Daddy lets out a really awesome roar when it does this. 21-34%

Rock the Boat, D-Smash: WHAM! The Big Daddy does a little hop and then slams the ground with his boots. Opponents hit by this attack are sent sideways at a slight downwards angle. This attack is great, as it has very little start-up lag. It's also a good ledge-guarder. Unfortunately, the finishing lag might put you off. 18-27%

From Rapture to the Sky, U-Smash: The Big Daddy thrusts his spinning drill upwards, slamming into an opponent and blasting them sky high. Kills at VERY low percentages, but it has crippling startup lag. 21-30%

Aerials: Big Daddy

Steel Razor, N-air: Mr. Bubbles spins vertically in midair, sending anyone he hits back in the opposite direction of the part of him they got hit by. 12%

Heart Spike, F-air: Lots of starting lag with a big reward. The Big Daddy pulls back his drill, and then slams it forward. WHAM! If hit by the drill, you experience knockback like that of the Knee of Justice. 17%

Bronze Knuckles, B-air: The Big Daddy slams his fist backwards, knocking opponents slightly back. It's like a sex kick in that he keeps his fist back, and it continues to damage and knockback for the duration of the attack. 9%

Helmet Whack, U-air: Mr. Bubbles slams the opponent upwards with his diving helmet. Great for juggling, and fun to boot. 13%

Bloody Meteor, D-air: The Big Daddy turns upside down and points its spinning drill downwards for the next 2 seconds. Any opponent caught by the drill will be sucked into it as it repeatedly hits. If the Big Daddy hits the ground and the opponent at the same time, the opponent will be blasted to the side. If you hit the ground during this attack, you will get your drill stuck in the ground and experience a LOT of ending lag while you try to pull it out. Repeated Hits: 3%, 2%, 2%, 1%, 1%... Ground Hit: 11%

Throws: Mr. Bubbles

Grab: The Big Daddy grabs an opponent with his big fist. Decent range and normal speed. Not much else to say here.

Kiss of the Angel, A while grabbing: Now this is interesting. This is an amazing slap. The Little Sister jabs an opponent with her syringe... FOR FIVE DAMAGE. 5%

Pin to the Ground, D-throw: Brutal. The Big Daddy slams the opponent into the ground, jabs the drill into into his body... And spins the drill. He then kicks the body of your opponent slightly away. Ouch. 13%

0-G Slam, U-throw: SUPLEX MOVE!!! The Big Daddy jumps, flips in midair, and slams his enemy into the ground headfirst. Very good vertical knockback. 11%

Monstrous Bash, F-throw: The Big Daddy tosses the opponent just a bit in front of him and does a shoulder barge. Lots and lots and LOTS of horizontal knockback. 10%

Toss Away, B-throw: The Big Daddy slams his victim against the ground, and then carelessly tosses him over his shoulder. It goes just enough so that you can start an aerial combo from there. 12%

Specials: Big Daddy

Drill Rush, Neutral-B: Drill time! The monster charges the attack, rams forward until it hits an opponent or travels a set distance, then slams forward its drill. If it hits a character, the character is immobilized and repeatedly takes hits from the drill until it stops and deals a final hit, blasting the enemy away. Ouch. The longer it's charged, the longer the distance that the Big Daddy can travel without hitting an opponent and the more times the drill damages the opponent before the final hit. This attack can be used like the green missle and skull bash for recovery. The charge time is up to 4 seconds. Repeated hits: 2%, 2%, 2%... Final Hit: 6%-25%

Proximity Mine, B-Forward: The Big Daddy throws a mine forward at an angle that is determined by the direction of the control stick. Only one mine can be on the screen at a time. Any time ANYONE goes near the mine, it explodes violently with medium knockback. The mine will only explode after it lands on the ground, so don't expect to throw these at unfortunates and have them explode on contact. There is a 2 second timer after the attack hits the ground before it explodes. Projectile: 5% Explosion: 10%

Save Her!, B-Down: Save the Little Sister! The Big Daddy pulls his little friend off his back and lets her down. If used while off the stage, she will be instead tossed with extreme power onto the stage or at the ledge. If anyone gets hit by the Little Sister, they are damaged as if they got hit by a Ness/Lucas PKT2. This technique is useful for saving the Little Sister if you are out of range of the ledge, you can instead save the Little Sister, prolonging your life some. It can also be used to gimp opponents, as it spikes them downwards. 15%

Diving Jump-Pack, B-Up: The Daddy uses the thing on its back as a jumppack, giving him a sudden extreme boost in horizontal recovery. Anyone hit by the attack will be in a world of hurt, as it has a LOT of knockback. 12%

Other: Big Daddy

Attack from lying down: Flips on his feet and swing his fist. 6%

Ledge attack 1, Retaliation: Rolls onto the stage and then slams his drill TOWARDS the ledge. The cool thing about this attack is if it lands, it knocks the opponent off the stage, putting them in the same situation you were in.8%

Ledge attack 2, Feeble Swipe: Swings the drill, and then pulls himself up. 4%

Little Sister

Size: * Very small, smaller than even squirtle.
Weight: * Only a bit heavier than Game and Watch.
Running Speed: *** To get away from enemy splicers, she can run fast on those little legs.
Falling Speed: ** Like a little fairy (Or angel.:chuckle:), she doesn't fall fast.
First Jump: **
Second Jump: ***
Attack Power: * Weakest Character.
Attack Speed: **** Very fast to make up for lost power. Very little lag.
Duck: Goes on all fours. Can avoid most projectiles this way.
Crawl: A great crawl that can pass projectiles.
Wall jump: Nope.
Wall cling: Yep.

Jabs, dash, and tilts: Little Sister

A Little Slap, AA: The Little Sister slaps the opponent once, and then slaps him again. Use the first hit to set up a grab. First hit: 3% Second hit: 2%

Get Down!, Dash Attack: The Little Sister's dash attack involves throwing herself forward into a crawl. It knocks opponents behind her, and is useful as an approach to get back to her protector. Like most of her attacks, it deals very little damage. 5%

Ankle Tap, F-tilt: The Little Sister swings her foot forward in a move that looks like dancing. Okay, one thing; It's a good idea to use this move a lot. It has much more range than you'd expect, and it also does a good job of repelling opponents, which is what the Little Sister excels at. 8%

Cat Slap, D-tilt: The Little Sister swings her hand forward out of her crawl, slapping anyone in her way straight up a short distance. It has very little range. 4%

Dancer's Leg, U-tilt: The Little Sister bends back and kicks up with one dainty little foot, knocking the opponent BEHIND HER. Remember to use this to clear the way. It might not have much damage or knockback, but it has priority out the Wazoo. It also has very little lag, of course. 5%


Smashes: Little Sister

The Little Sister has VERY BAD SMASHES, because her point is to be a burden.

Take His Life!, F-Smash: The girl jumps forward and swings her syringe over her head. If it hits, she stabs the opponent with the syringe, latching on for a moment, before then jumping away. The syringe gets filled with some more liquid as it damages. This attack shoots the opponent slightly forward. 8-14%

Angel Dance, D-Smash: The Little Sister sticks out a foot and twirls like a ballerina. "Wheee!!!" If she hits someone with this, she'll instantly kick up, sending them into the air. 5-15%

Air Drain, U-Smash: The Little Sister stabs the air with her syringe. If it hits an opponent, she'll throw that opponent back up after filling up her syringe and causing the opponent damage. There is a bit of lag if you miss while the Little Sister is still holding her syringe up. 6-16%

Aerials: Little Sister

Fairy Spin, N-air: The Little Sister twirls around with her arms, sending the opponent slightly to the side. Great for throwing away opponents when you're approaching the Big Daddy, or comboing if your using the Little Sister for damage racking after you've lost your protector. 8%

Little Stomp, D-air: The Little Sister lifts a leg, and then swings it down. Small beginning lag. This is a weak spike, and can be used to gimp opponents approaching the stage. 7%

Get Away!, F-air: The Little Sister pulls out the wrench and swings it in front of her up once, down once, up again, and then down again. Each hit does very little damage and knockback, and will most likely push the opponent out of the way of the next hit. Disjointed hitbox. Each hit: 4%

Lamb Kick, B-air: The Little Sister pulls out a wrench and swings it behind her in an upwards arc. Disjointed hitbox, decent range, and quick. Unfortunately, it's weak. 5%

Fairy Circle, U-air: The little girl twirls her finger up in the air, dealing three repeated damage before knocking the opponent slightly up. Repeated hits-!% each, Final hit-5%

Grabs and throws: Little Sister

Grab: The Little Sister has the grab range of a Tyrannosaurus Rex. Shield grabbing is a must if you really want to grab opponents.

Dainty Jab, Press A while grabbing:, The Little Sister's slap isn't nearly as nasty when she's not with her big friend. She merely does a little punch with her hand for a single point of damage. 1%

Away He Goes, F-throw: The Little Sister throws the opponent slightly forward. Pathetic range, but it opens up combo potential. 8%

Some More ADAM, D-Throw: The Little Sister stabs her syringe into her victim, draws some liquid (And deals some damage), and then throws the enemy on the ground in front of her. Damage racker and not much else. Oh, and it does fill your syringe with liquid, so that's always good. 12%

Toss, U-throw: The Little Sister throws her opponent slightly in the air. Not very creative, but good for comboing setup. 10%

Ring Around the Rosies..., B-throw: The Little Sister starts dancing with her opponent, swinging him/her round and round. "Ring around the rosies..." She then throws him back a little bit. 12%

Special Moves: Little Sister

Get on Mr. Bubbles, B-Down: The Little Sister mounts her Big Daddy protector if he's next to her. Use this to get back on. There is a lot of lag when you're getting on, so be careful to do it when an opponent won't stop you.

Wrench Drop, B-Up: The Little Sister jumps and twirls a little bit in midair. At the same time, she pulls out a wrench and drops it downwards. Not a good recovery. About 5 feet of vertical distance, and 3 feet of horizontal distance. It deals no damage or knockback. The wrench has unlimited downwards range, but it moves slowly. It's a physical projectile, and does medium damage and knockback. 8%

The Angel Death, B-Forward: The Little Sister sticks a syringe in her opponent, and starts absorbing health into the syringe. As the opponents health goes down, the liquid in the syringe rises. This is a grab b move, and the time you can use it is relative to the opponents damage. If you stab a person with 999%, he's going to be immobilized for a whole ten seconds. 4% per second.

ADAM Production, Neutral-B: The Little Sister swallows the liquid from the syringe and gains health equal to the amount of damage dealt with it.

What? I'm sure that confused you, so let me put it this way. When the Little Sister stabs someone with the syringe, it's fill up with liquid. That liquid is relative to the amount of damage dealt by her attack. If the Little Sister deals 5 damage, for instance, her syringe will fill slightly. The damage healed by swallowing the liquid is 75% the amount absorbed, rounded down. There is no limit to the amount of damage that can be absorbed. Even when the syringe looks like it's full and cannot absorb any more, it will still do the same amount of damage in attacks and add some more healing in the next neutral-B. However, ONLY syringe attacks will fill it up.

This attack takes about 1 1/2 seconds to perform. There are no super-armor frames.

Other: Little Sister

Ledge Attack, Crawling Wrench: The Little Sister pulls out the wrench and slams it on the very edge of the ledge, and then summersaults on. It has very little range, damage, and knockback, but it has almost no startup lag. The finishing lag is normal for a ledge attack. 4%

Lying Down Attack: The Little Sister flips up and jumps on an opponent with her syringe, filling it up a bit. Does quite a bit of damage. 6%

FINAL SMASH FOR BOTH

Final Smash: The Wrath of the Little Sisters:
The Little Sister on the Big Daddy's back jumps at the enemy. If it hits the opponent, a bunch of other Little Sisters will appear and swarm the person, repeatedly attacking with their syringe guns. After a while, all except for the one you're controlling will disappear, and that one will jump back on the Big Daddy's back. By the end of the attack, the enemy will have 40% more, and will be STUNNED. This allows for easy KO's. Also, this attack will respawn your Big Daddy if you lack one. 40%

Big Daddy extras

Standing animation: Spins the drill around. Moans like a whale.
Standing animation of Little Sister on back: Yawns and covers her mouth.

Taunt 1: The Little Sister on its back starts crying, the Big Daddy's lights turn red, it roars, and then they both stop.
Taunt 2: The Big Daddy starts spinning its drill. When it stops, the Little Sister on its back says, "Do it more, Mr. Bubbles."
Taunt 3: The Big Daddy moans, and the Little Sister pats its back. "There, there, Mr. B."

The computer controlled Big Daddy without a Little Sister does not taunt.

Kirby hat: The Kirby gains a fullbody diving helmet and a little arm drill. His Drill Rush has much less range, since his drill is much smaller. Other than that, identical.

Little Sister extras

Standing animation: Looks around furtively, and then does a little skip in place.

Taunt 1: The Little Sister sits down, looks around in wonder, and then gets back up.
Taunt 2: The Little Sister starts crying and screams, "Come back, Mr. B!"
Taunt 3: The Little Sister looks at her syringe, shakes it, and then smiles.

Kirby hat: Gains a little ponytail and creepy eyes. His B-attack will not work, since he cannot suck liquid into the syringe. If he tries to do so, he pulls out the syringe, tries to drink some liquid, fails to do so, and says a little "Awwww..." He then puts it away.

Extras for both of them

Wii Sound: The Little Sister says, "Okay!" while the Big Daddy just moans like a whale.

Symbol


Entrance: A bathysphere rises up to the stage and opens, letting out the Big Daddy with his little friend on top.

Victory music:http://www.youtube.com/watch?v=nlu2z2gkhhI&feature=related
I chose this music because its jaunty feel suits the feeling of victory.

Victory 1: The Little Sister walks on the screen and the Big Daddy follows her on. She points to the screen and says, "Look, an angel!"
Victory 2: The Big Daddy cradles a sleeping Little Sister in his arms.
Victory 3: The Big Daddy stomps and roars while the Little Sister on his back screams, "WE DID IT MR. B!" As she does so, she pulls out the wrench and shakes it in the air.

Losing Pose: The Big Daddy lies on the ground, possibly dead. The Little Sister cries over his body.


Codec Entry

Snake: Otagon, why am I fighting a little girl? What's next, killing babies?
Otagon: That's no little girl, Snake. That is a Little Sister, a genetically engineered ADAM producing monster. They use their syringes to obtain liquid from their victims.
Snake: Right. And the diving man?
Otagon: That's a Big Daddy.
Snake: A what?
Otagon: A Big Daddy. It was genetically engineered and trained to protect the Little Sister with its immense strength and vicious drill. Try attacking the little girl instead if she falls off his back.
Snake: First animals, now family members. What next?

"STRATERGY"

PROTECT THE LITTLE SISTER

This strategy involves using only the superior character of the pair, the Big Daddy. Use the Big Daddy's proximity mines to stop approaching people. Remember, proximity mines can explode in your face too! Use attacks using the spinning drill to rack up high damage. The Big Daddy has great grab, slap, and throwing game, so use that a lot to allow you to rack up damage. Remember, space yourself wisely, since getting hit too many times can knock the Little Sister.

Once you get the opponent up to the 70's, 80's, or 90's, go for the kill. Your Smash moves are very, very, very powerful. Use the f-air to surprise opponents with a devastating strike.

If the Little Sister gets knocked off and forces you to play as her, use shields, dodges, and rolls to move closer to your savior. There's quite a bit of lag when she jumps on his back, so make sure your opponent won't slam you. Use the f-tilt and n-air the most, as those attacks are good for repelling.

The Drill Rush is a powerful attack, and it also is a great way to recover horizontally. Just remember to watch out for edge hogging. If there's no chance of recovery, use your down-special so that you can live a bit longer as a Little Sister.

While playing as a Little Sister, play defensively. Use tilts and aerials. Use your syringe to get more liquid to heal yourself. Try to do as much damage as possible.


Assist Trophy: Jack

Jack, the hero of Bioshock, does not appear as a playable character in this game, but as an assist trophy. Jack's face does not appear, since you never saw it in Bioshock. Instead, his hands appear in the foreground, making it look like you're playing a first person shooter. To add to the effect, a target reticule will appear on the screen and will track opponents (Think of the laser on the Halberd). Jack will cast 4 random plasmids at opponents, who will have to move around to avoid them. These plasmids can be any one of the below...

Electro-bolt: The first plasmid in Bioshock. When Jack casts this, he gestures with one of his hands forward as it glows with electrical energy. A long tendril of electricity strikes where he was aiming. If it strikes an opponent, if will repeatedly damage and immobilize the enemy for the next 4 seconds, during which it racks up 2% per hit.
Picture: http://images.wikia.com/bioshock/images//1/14/Bioshock2_qjgenth.jpg

Incinerate: Jack snaps his fingers as glowing red lines sear his hands. This attack will make an explosion appear right where the target reticule is. There is no lag for this move. The explosion has knockback similar to a bob-bomb. 15%
Picture: http://images.wikia.com/bioshock/images//f/f7/Bshock_incinerate.jpg

Telekinesis: Jack gestures with his hand, and immobilizes anyone who the target reticule is touching for 2-3 seconds. If it hits a person in midair, that enemy will be held there. It causes no damage or knockback.
Picture: http://i190.photobucket.com/albums/z157/cafenetlandd/bioshock-20070817060730284.jpg

Insect Swarm:
Several bugs start crawling in and out of Jack's skin. He then casts forward the insects, which swarm the place where the reticule was for 7 seconds. During that time, touching the swarm will do damage and minute knockback. If it is casted on an enemy while it's in the reticule, the bugs will surround the enemy for the next 7 seconds instead, doing no knockback but constant damage. Regular damage: 4%, When cast on an opponent: 2% per second.
Picture: http://i203.photobucket.com/albums/aa288/TehOne07/nick4_2.jpg

Winter Blast: Jack clenches one of his fists as it freezes and spikes of ice start poking out. He then gestures his hand, unleashing the blast of ice forward and freezing anyone that the reticule is touching instantly. 15%
Picture: http://images.wikia.com/bioshock/images//9/94/Winter_Blast.jpg

Crossbow: Jack pulls out a crossbow, aims, and fires a steel tipped bolt. This is his only non-plasmid attack, and he only has a 1/30 chance of unleashing it each time he uses a move. The steel tipped bolt has knockback similar to that of the home-run bat, meaning it's a OHKO. 25%
Picture: http://images.wikia.com/bioshock/images//4/48/Bshock_xbow.jpg
[/COLOR]
 

majora_787

Smash Hero
Joined
Jun 23, 2007
Messages
6,122
Location
Texas
Big Daddy (Bouncer) and little sister


Origin: The Big Daddy and Little Sister combo is one of Bioshock's greatest symbols. Both twisted by the greed of Rapture's citizens, the two groups band together to survive in a cruel world. The Little Sisters were implanted with a slug that produces Adam, a substance that allows for genetic manipulation. To protect the girls, the titanic genetically engineered Big Daddies were created. Both seek to survive in the living hell of Rapture.

Feature: The Big Daddy and Little Sister is a two in one character that is completely unique. Like the Ice Climbers, you have both on the field at the same time. Unlike the Ice Climbers, you primarily fight with the Big Daddy, but you lose a life only when the Little Sister is knocked off the screen. If the Big Daddy damaged and knocked around enough, the Little Sister falls off and you must get her back to the safety of Mr. Bubbles., AND you must try to protect yourself using a very weak character. If the Little Sister dies, the Big Daddy disappears if it's on the screen and respawns with it. If the Little Sister is on the Big Daddy's back, she'll die if he dies.
That actually looks pretty awesome.

All we need now is a Ghor moveset and a Death Sword moveset and we'd be good to go. XD

No full quote due to anti-screen stretch.
 

Chief Mendez

Smash Master
Joined
Mar 25, 2007
Messages
3,161
Location
Somewhere
Yeah, and I still don't have a proper review for Teen Girl Squad on Page 9.
AND I DON'T HAVE A PROPER REVIEW FOR GRAY FOX WTF SMASHBOARDS!?

You did post a quite obscure character, you know. I've never actually watched much Homestar Runner, and so have room to judge those characters.

Same goes for you, Harkness. Posting 'sets of original characters is fine and all, but in that case, none of us has anything to judge it on.

@kitsuneko345: Actually I'm thinking about dropping the Ouendan/EBA thing, after this little foil's made me consider it more. I really have no concrete thoughts about the idea anyway, so...
 

Harkness

Smash Apprentice
Joined
Jun 20, 2008
Messages
100
Location
Delaware
Same goes for you, Harkness. Posting 'sets of original characters is fine and all, but in that case, none of us has anything to judge it on.
What do you have to judge with other characters that you can't judge in mine besides the accturacy of the character in relation to the game they came from? (just curious)
 

Iron Thorn

Smash Lord
Joined
Jun 26, 2008
Messages
1,097
Location
Going to Gamelon. I'm taking the Triforce of Spag
Well, you could have like little color swatches with the appropriate part of the design typed next to it. For example, with |||| standing for the color swatch:

|||| Hair
|||| Eyes
|||| Outside of outfit
|||| Inside of Outfit
|||| Hair tie
|||| Skin

would be an approximate color swatch set for Zero Suit Samus. I say approximate because the font-color palette didn't have the exact hues. In the paint program, you replace |||| with dots or boxes of the color.

And it's a very nice moveset, I like to see original characters. Runaru looks like a pretty cool dude.
 

half_silver28

Smash Ace
Joined
Apr 25, 2008
Messages
862
Location
MYM, Ohio
ok... so, once again, here are Lloyd & Colette. If they are still too similar to my previous attempt in the last contest, Commander Blitzkrieg, just tell me & I'll do a MASSIVE OVERHAUL on them lol.


Lloyd Irving ~ the young swordsman from tales of symphonia joins the brawl!

Stats

Power: 7/10
Height: 8/10
Weight: 6/10
Walk speed: 3.5/10
Run speed: 6.5/10
Jump power: 6/10
Drop speed: 7/10
Lloyd is able to wall jump

Basic Attacks

AAA attack: Lloyd attacks wildly with 3 vertical sword swipes using one of his swords, moving forward slightly w/ each one. (3, 3, 4%)

Dash attack: Lloyd quickly thrusts his swords in front of him as he runs. It has decent forward knockback, but quite a bit of ending lag. (7%)

Tilts

>tilt – Sonic Thrust: Lloyd moves forward a bit as he stabs horizontally with his sword. Little knockback. Lloyd will also usually yell out ‘sonic thrust!’ as he attacks. (7%)

^tilt – Lloyd quickly swings his sword above his head. It has semi-decent knockback, but not enough to KO. (7%)

vtilt – Lloyd stabs in front of him with one of his swords, and quickly follows up with another stab near his opponent's leg with his other one. There is a bit of starting lag, but no end lag. This attack hits twice, but does very little knockback. (4, 4%)

Smashes

fsmash – Beast: Lloyd delivers a swift diagonal sword swing that creates a blue semi-transparent lion head that is about as big as Lloyd himself (the sword swing is what damages enemies, not the lion head). Knockback is pretty much the same as falco’s fsmash. However, Lloyd swings so & fast that he spins 360 degrees after attacking, creating a large amount of ending lag. Lloyd yells out ‘Beast’ as he uses the move. (12% uncharged, 24% fully charged)

^smash – Tiger Blade : Lloyd delivers a quick and powerful vertical sword swipe as he jumps upward, and another as he goes back to the ground. The first hit stuns the opponent, while the second has decent upwards knockback (not enough to KO well). Lloyd yells out ‘tiger blade’ as he uses this move. (6, 8% uncharged, 10, 11% fully charged)

vsmash – Sword Rain : Lloyd quickly delivers four sword thrusts directly in front of him, 2 with each sword. He then delivers fifth, slightly stronger sword thrust that has good knockback, equal to that of ganondorf's >tilt. Lloyd yells out ‘sword rain!’ as he attacks. (3, 3, 3, 3, 4% uncharged; 4, 4, 4, 4, 6% fully charged)

Aerials

nair – Tempest: Lloyd spins in the air quickly (kind of like wolf) while holding his swords in front of him. (6%)

fair – Lightning Thrust: Lloyd stabs his sword in front of him as if he were using 'sonic thrust', only downwards at a 45 degree angle. Whether he hits someone or not, his blade is immediately struck by purple lightning out of nowhere when he stabs it in front of him, damaging opponents further and spiking them downwards. There is a bit of starting lag on the attack, and a large amount of end lag. Lloyd yells out 'Lightning Thrust!' as he attacks. (4%, 5)

bair – Grave Blade: Lloyd quickly turns around in the air and slashes vertically behind him, with the same white energy that is used with 'demon fang' surrounding his blade as he does so. Opponents can be hit up to 3 times by this attack, with the last hit dealing decent knockback. The blade makes a sound similar to that of a rock breaking when it hits someone, and small pieces of rock fly from the blade for effect. The He yells 'Grave Blade!' as he attacks. (3, 3, 4%)

uair – Rising Phoenix : Lloyd seemingly floats in the air for half a second, putting his blades as his sides as if he were about to use 'rising falcon'. He then does exactly that; he flies about 1 stage builder block upwards with his swords in front of him. Instead of surrounding himself with wind, however, Lloyd is surrounded in flames as he does this. He is able to hit opponents up to 4 times, with each hit dealing fire damage, and the final hit dealing decent upwards knockback. This attack has some starting lag, and A TON of end lag. He yells out 'Rising Phoenix!' as he does this as well. (3, 2, 3, 4%)

dair – Demonic Chaos: Lloyd flips in the air so that he is practically falling face first. He then immediately swings each of his swords once, one right after the other, and fires 2 'demon fangs' downward. They damage and stun opponents who get hit, and disappear once they travel 6 stage builder blocks downwards or hit the ground. Lloyd then takes about half a second to ready his blades, and then fires a larger demon fang downwards, which doesn't disappear until it hits the ground. This demon fang can hit opponents up to 3 times & still stuns them. This attack, as excepted, has a pretty big amount of starting & ending lag. Lloyd yells out 'Demonic Chaos!' as he attacks too. (3% small demon fang; 3, 3, 3% large demon fang)

Grabs

grab: A normal grab

grab attack: Lloyd hits the opponent with the handle of one of his swords (1-2%)

fthrow: Lloyd punches the opponent in the gut, sending them forward. Decent knockback (6-7%)

bthrow: Lloyd flips onto his back & flings the opponent backwards before quickly getting up (think Ryu & Ken from street fighter). Knockback isn’t that good. (8%)

uthrow: Lloyd simply tosses his opponent above him at a slight forward angle. Little knockback. (5-6%)

dthrow: Lloyd tosses his opponent to the ground and quickly follows them to hit them in the stomach with his elbow. Slightly better upward knockback than his uthrow. (7%)

Specials

B: Demon Fang/Fierce Demon Fang – Lloyd swings his sword diagonally, creating a shockwave that moves along the ground and goes about as far as link’s boomerang (unless it hits a wall, in which case it will disappear). He yells out ‘Demon Fang’ as he does this. If the button is held down, Lloyd will instead slam his sword vertically in front of him, hitting the ground. Multiple shockwaves are created by this, but they only hit an opponent who is hit by Lloyd’s sword. Multiple hits are scored, with the last hit having great forward knockback. Lloyd yells out ‘Fierce Demon Fang’ as he uses this. Both attacks have a bit of lag, with fierce demon fang having more. (5% unheld, 2, 3, 2, 2, 5% held)

>B: Rising Falcon – Lloyd jumps fairly high into the air & slightly backwards. He remains there for a second, then shoots downwards diagonally with both swords held directly in front of him. When he reaches the height he was at when he first used the move, he will continue moving at the same speed straight forward. Lloyd creates a slight wind tunnel as he shoots forward, surrounding himself briefly with wind force. Any opponent he passes will be damaged & stunned for about a second. This attack can be used in the air, and has quite a bit of ending lag. Lloyd yells out ‘rising falcon’ as he attacks as well. (9-11%)

^B: Omega Tempest – Lloyd jumps diagonally and spins like he does while using his nair, only this time creating circular wind blades around himself to damage opponents more. After going the same distance as ganondorf’s up B, he will stop moving forward then move straight upwards a bit, the same distance sheik jumps up with her up B before she teleports. Lloyd, of course, yells out ‘omega tempest!’ as he uses this move. (8-9%)

vB: Raging Beast – Lloyd jumps up slightly as he does a 360 spin with his swords out, creating a circular shockwave that pulls in and damages opponents. This is followed by an extremely quick diagonal sword swing which creates a blue semi-transparent after image which looks like a snarling lion that is as tall as Lloyd himself (this is purely for effect). It deals quite a bit of damage, but typically sends the opponent sliding along the ground, making it a tough move to KO with. It comes out pretty quickly, but has a lot of ending lag. Additionally, any projectiles that hit Lloyd up until he creates the lion head will instantly disappear. He will also yell out the name of the attack as he does it. (5%, 12)

Final Smash

Falcon Cresthttp://www.youtube.com/watch?v=_Xhtmpw_L_c – Lloyd creates a circle of bluish energy about half the size of FD under him as seen in the the vid, which radiates to trap and hits anyone unlucky enough to be caught in it multiple times. He holds his swords out in front of him while he does this, which fuse into the single purple sword seen in the vid (the eternal sword). He then jumps into the air, with any trapped opponents automatically flying up with him. He holds his sword above his head, which radiates with energy. Time then freezes for a second, while an image of Lloyd’s head shifts onto the screen and stays there for about a second like in the vid. He then slams his opponent(s) to the ground with his sword, creating another huge circle of energy to damage the opponent. The last hit has ungodly knockback, which is almost certain to KO the opponent. This attack is slightly hindered by the fact that it can only be used on the ground. As he performs this move, he yells ‘I’ll show you… divine justice!!’ (3, 3, 3, 4, 3, 4, 3, 3, 4% first attack; 5, 4, 6, 5, 4, 6, 10% second attack – 70% total)

Taunts & Victory Animations

^taunt: Lloyd throws one of his swords up in the air and catches it quickly.

<>taunt: Lloyd holds his swords in front of him in and crosses them in an X shape.

vtaunt: Lloyd puts his hands at his sides confidently & looks towards an opponent, and says ‘Give me your name & I shall give you mine.’


victory animations

1- Lloyd throws both his swords up into the air and says ‘Just as I expected’ while he catches each one & quickly puts it back in its sheath. He then stands there triumphantly.

2- Lloyd puts his hand over the exsphere on his hand, and it glows with bluish light as he whispers “I did it…” He continues to look down at the exsphere, which continues to glow.

3- Basically the same thing as the first one, but Lloyd says ‘You picked the wrong guy to mess with’ instead.

victory theme: http://www.youtube.com/watch?v=4N5wfDSdZD8 – from :13 to :21

Other Stuff

Entrance: Lloyd jumps to his spot from the front of the screen while using 'tempest'.

Idle stance – Lloyd rests one of his blades on his shoulder and looks at the screen for a second.

Roll dodge – Lloyd quickly jumps in the direction, quicker than anyone else can dodge, but it takes him a few extra frames to get back in position. Overall its about as fast as link’s.

alt. costumes:

Any part of Lloyd’s clothing that is red changes color – blue, green, yellow, tan, black. He also has 2 other costumes:

Nobleman – http://www.creativeuncut.com/gallery-03/art/tos-lloyd-nobleman.jpg

Pirate – http://www.creativeuncut.com/gallery-03/art/tos-lloyd-arrgh-me-hearties.jpg

icon: A white outline of an exsphere. Colette & Sheena have this one as well.

Wiimote sound – Lloyd says ‘demon fang!’

Kirby hat: Kirby gains lloyd’s hair.

Snake codec:

Snake – Otacon, who’s this kid with the two swords?
Otacon - That’s Lloyd, snake. He and his companions traveled the world, seeking a way to defeat the threat of the evil Desians.
Snake – Sounds like the plot of one of your anime shows…
Otacon – Maybe. Lloyd ends up making many rash decisions early on, but he later realizes this and repents for his mistakes. He is even called a ‘gentle idealist’ later on in his journey.
Snake – A gentle idealist? He doesn’t seem gentle when he’s swinging those swords around like that.
Otacon - His fighting style, however, is still pretty aggressive, so I’d look out if I were you.
Snake – Got it.


Stage & SSE Related Stuff

Stage:

Torent Forest ~ no pic… just a vid: http://www.youtube.com/watch?v=V9ylxzPPAkw
This is a fairly simplistic stage; being set in the middle of a clearing in the forest. The fighting platform is about the same size as FD, with the left side being a walk-off edge & the right side being a cliff. The seal of the king of the summon spirits, Origin, is visible in the direct background. Occasionally, yuan or kratos will appear in the background to observe the battle (they will be there for the whole match). Yuan stands near the seal, and Kratos will be crouched near the edge of the clearing, watching the battle intently. It is rare, but the two can appear at the same time.

Music:

End of a thought(plays in the above vid as well)
End of a thought version 2(remix)
Torrent Forest(could be remixed)
Full Force(TOS: dawn of the new world version)
Deepest Forest

Like a Glint of Light/Won the Battle (it would have about 20 seconds of Won the Battle added onto the end.)

Tales of Symphonia Title/Credits ~ this consists of 5 different parts:
Opening Theme
Title(only the first 20 seconds or so would be used)
Prologue
Harmony
Credit Roll(it would be heavily remixed to fit time constraints, or only use the last minute or so)
obviously, this song would be a bit longer than the typical brawl song lulz

SSE role/unlock:

Lloyd himself is available from the start, as is Torrent Forest. In SSE, both Lloyd and Colette are first seen in the wilds, where they spot Galleom speeding across the desert in tank form. They attempt to follow it, but are ambushed by primids, who they manage to defeat. Afterwards, they are not seen again until the scene where lucas and the pokemon trainer spot charizard flying into a cave. They meet up with the two and join them in pursuing charizard. After they encounter and defeat wario, wario attempts to run, but Yggdrasil appears behind him and pounds the ground to create a huge explosion of blue energy that turns wario into a trophy. He then fights everyone. When Yggdrasil is defeated, he collapses and disappears in a flash of white light. Lloyd and Colette then simply follow the same path as Lucas and PT.

Boss:


Yggdrasil(grown form) – He pretty much teleports around the stage and uses various attacks and spells, all of which are listed here. His ‘normal’ attacks consist of white glowing energy waves that travel a short distance on the ground, but he will only use those if he happens to teleport right next to you or if your right by him after he uses another attack or spell. During this fight the song ‘It can Waver and Fight’, which plays on the Tower of Salvation, plays.

Attacks:

Death Eater – Yggdrasil puts his hand on the ground and says ‘death eater!’, causing four concentrated light beams to rain down around you, followed by one in the middle. (16% per hit normal, 23% per hit intense)

Outrage – Yggdrasil floats for a second as he pounds the ground, creating a huge explosion of blue energy which takes up about a third of the stage. This move comes out quickly and has great knockback, but it can be avoided with a well-timed standing dodge. (25% normal, 35% intense)

Spells: Yggdrasil almost appears to write in the air with one hand while casting, also being surrounded by white glowing feathers for effect.

Holy Lance – Yggdrasil yells out ‘Holy Lance!’ as a large square of rainbow colored magic appears on the ground under you. 3 large swords of rainbow colored energy then shoot in diagonally from both sides, landing on the end of each side of the square. These cause good damage and stun. Then a large lance shoots into the middle of the square, destroying it and causing major damage and knockback. (swords 10% normal, 16% intense; lance 16% normal, 24% intense)

Thunder Arrow – Yggdrasil says ‘perish!’ as a large triangle of blue electricity appears under you. Blue lightning then strikes the triangle for a couple seconds, causing great damage. (22% normal, 30% intense)

Ray – Yggdrasil again yells out ‘perish!’ as a small circle of blue energy appears near you on the ground, as well as directly above that about 2/3rds of the way to the top of screen. The circle in the air will shoot out about 10 concentrated beams of blue light all around where the one on the ground is. Not much knockback. (16-18% per hit normal, 23-25% per hit intense)

Ground dasher – Yet again, Yggdrasil yells ‘perish!’ as a huge crack that takes up about a third of the screen appears on the ground. The ground then starts shaking for a few seconds, trapping anyone standing on the crack for great damage. (28% normal, 36% intense)

prism sword – Yggdrasil yells out ‘prism sword!’ as a huge circle of rainbow colored energy that takes up nearly half the screen appears by you. 6 large swords of energy rain down in that area, which cause good damage and stun. Then a HUGE sword of energy falls down into the middle of the circle, causing great damage and knockback to anyone standing in the circle. (swords 10% normal, 16% intense; huge sword 18% normal, 26% intense)

judgement – Yggdrasil yells out ‘judgement!’ as many concentrated beams of white light rain down from the sky. Little knockback is caused, but the damage can add up. (16% per hit normal, 24% per hit intense)

Trophies: Lloyd Irving, Colette Brunel, Sheena Fujibayashi, Raine Sage, Genis Sage, Kratos Aurion, Zelos Wilder, Presea Combatir, Regal Bryant, Yuan, Mithos(boy form), Yggdrasill(grown form), exsphere, Tower of Salvation, Corrine, Emil Castagnier, Falcon Crest(FS), Judgement(FS), Summon Spirits.

Stickers: Lloyd, Colette, Sheena, Raine, Genis, Zelos, Presea, Regal, Yuan (all have forms from the first and second Tales of Symphonia games), Kratos, Kratos(armored form), Mithos(boy form), Yggdrasill(grown form), Lloyd(pirate costume), Altessa, Kuchinawa, Seles, Noishe, Dirk, Remiel, Pronyma, Forcystus, Magnius, Kvar, Rodyle, Rodyle(monster form), Martel, Abyssion, Botta, exsphere, eternal sword, Volt, Undine, Corrine, Origin, Emil Castagnier, Marta Lualdi, Richter Abend, Tenebrae, Alice, Decus

Assist trophies & Items

Assist Trophies:


Raine Sage – Raine is primarily a user of support spells, but will also occasionally cast offensive spells. When casting, raine closes her eyes and holds her staff horizontally in front of her. The spells that she can use are listed her:

First Aid – Raine says ‘Help is on the way. First Aid!’ Whoever summoned her flashes green for a moment and has up to 50% damage healed.

Photon – Raine yells out ‘Light! Photon!’ A random enemy is suddenly engulfed in a large circle of yellow energy, which hits them twice before disappearing with a small explosion. The second hit has decent knockback, but not good enough to kill until 130%. (14% first hit, 16% second hit)

Sharpness – Raine says ‘I’ll help. Sharpness!’ Whoever summoned her briefly flashes red. For one minute, their attacks will do 2 to 3% more damage.

Healing Circle – Raine says ‘Help is on the way. Healing Circle!’ A circle of blue energy about the size of a battlefield platform appears under whoever summoned Raine, which stays there for about 5 seconds and heals 20% damage for any character standing on hit each second. Any person on their team in team battle can be healed by standing there as well.


Genis Sage – Genis is a user of offensive spells, some of which are more powerful than others. Therefore his attacks will be divided in 2 categories. When casting, he holds his kendama above him and moves it up and down

Normal spells:

Ice Tornado - Genis says ‘Cool off! Ice Tornado!’ An icy blue whirlwind appears around an opponent, which traps them and does good damage, hitting them up to a max 8 times. (8-9% per hit)

Grave - Genis yells out ‘Pancake time! Grave!’ A gray spike of rock shoots out from the ground near an opponent, which damages and stuns them, followed by 4 more spikes shooting out from each direction around the first one. Little knockback. (first hit does 12%, the others do 8-10%)

Eruption - Genis says ‘Burn! Eruption!’ A circle of orange lava about half the size of the main battlefield platform appears near an opponent, which shoots bursts of lava upwards 3 times to damage opponents Little knockback. (12-14% per hit)

Air Thrust– Genis yells out ‘Come get some! Air Thrust!’ Many small blades of wind suddenly surround a opponent and hit them up to a max 7 times. The last hit usually knocks them onto the ground. (7-9% per hit)

Thunder Blade – Genis says ‘Wanna Charge? Thunder Blade!’ A large blade of purple energy falls from the sky near an opponent, which damages anyone nearby and stuns them. Forming a circle of purple energy where it lands, purple electricity surges out from under it, hitting opponents 3 times and causing further damage. (14% initial hit, 8% per hit afterwards)

Aqua Laser - Genis yells out ‘Drown! Aqua Laser!’ Genis fires a fast moving laser of water at an opponent which can travel through any platform. It hits opponents a maximum of 4 times and causes decent knockback. (10% per hit)

‘Advanced’ spells:

Explosion - Genis says ‘Reduce These evil souls to ashes. Explosion!’ A small orange circle appears on the ground under an opponent. 2 seconds later a fireball flies down from the sky and hits that spot, causing a huge explosion that takes up about half of the main battlefield platform. Anyone who gets hit by it is probably going to be KOed. (50%)

Indignation - Genis says ‘I call upon thee in the land of the dead to unleash thy fury of thunder. Indignation!’ A circle of purple energy about a third of the size of FD appears on the ground, and is covered by a transparent dome a ways above it. 4 seconds later, a huge bolt of purple lightning strikes the circle, which causes an explosion of electricity and is almost certain to KO anyone within the dome. (50%)

Absolute - Genis says ‘May the merciless embrace of frost take thee. Absolute!’ A few shards of ice begin to congregate around an opponent, and within a second a small glacier about the size of Bowser appears next to them, which damages and stuns them. The glacier then shatters, causing more damage and good knockback. (20% first hit, 25% second hit)

Meteor Storm - Genis only has a 10% chance of using this attack. He says ‘Infinite Powers, grant me thy strength… Meteor Storm!’ TONS of orange meteors rain down on the field, causing great damage and good knockback to anyone they hit. However, they cannot go through platforms. Its like PK starstorm, only the meteors come down quicker. (25-30% per hit)

Items:

Gels – a healing item that is a staple of the ‘Tales’ series. This item looks exactly how you would expect, like a pile of jell-o. The come in several different ‘flavors’:
Apple Gel: This red gel recovers up to 30% of a characters health.
Lemon Gel: This yellow gel recovers up to 60% health.
Orange Gel: This orange (O_o) gel recovers tech points in the game, so it has a slightly different use in smash. This powers up a characters moves by about 2% for 30 seconds.
Miracle Gel: This rare blue gel recovers up to 60% health AND powers up a characters moves.


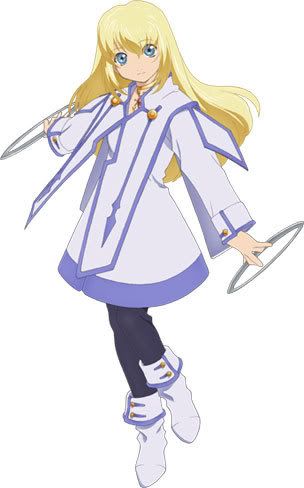
Colette Brunel ~ the young angel from the world of sylvarant joins the brawl!

Stats

Power: 5/10 (her range more than makes up for it lol)
Height: 7/10 (she floats slightly above the ground like mewtwo)
Weight: 4/10
Walk speed: 2.5/10
Run speed: 6/10
Jump power: 8/10 (she has 3 jumps)
Drop speed: 4/10
Colette is able to glide using her angel wings, as well as float in the air for a short time like peach (keeping the same posture as if she were on the ground). Colette has one of the best recoveries in the game.

Basic Attacks

AA attack: Colette slashes vertically with one of her chakram, then slashes diagonally with the other one. It’s kind of slow for a neutral A move, & doesn’t cause much damage or knockback. (3, 4%)

Dash attack - Item thief: Colette dashes forward a bit, then trips onto the ground, damaging anyone she hits. Additionally, if the opponent she hits is carrying an item, Colette will automatically swipe it from them. She will yell out ‘Item thief’ if a nearby opponent is holding an item. (6-7%)

Tilts

>tilt – Ray Satellite: Colette throws a chakram out in front of her, which travels about the same distance as toon link’s boomerang. Once it reaches its maximum distance, it will remain in the air and spin for a second before disappearing. It causes minor damage and stun to anyone it hits, and Colette suffers a bit of ending lag. She will usually yell ‘ray satellite!’ as she does this move. This move, as well as others that involve throwing chakram, does not cause either of the chakram Colette holds to actually move… lol. (5%)

^tilt – Pow Hammer: Colette tosses a red hammer up into the air, which then falls down in front of her and will damage and briefly stun any opponent that it hits. Occasionally, Colette will throw a green hammer, which has a 50% chance of making a flower grow on the opponent’s head. Colette, of course, yells ‘pow hammer’ as she does this move. (8%)

vtilt – Ring Whirlwind: Colette holds her arms out and spins around in place quickly, hitting enemies up to 3 times with her held chakram. Each hit briefly stuns the opponent, and the last hit knocks them back a bit (it doesn't deal actual knockback, it just makes them slide back a character length while keeping them on their feet). Colette yells 'ring whirlwind' as she does this. (3, 3, 3%)

Smashes

fsmash – Triple Ray Satellite: similar to her >tilt, Colette throws three chakram out in front of her, which travel only about half the distance that one thrown using her >tilt. They too remain in the air for a second after reaching their max range before they disappear. The last hit has decent knockback, but can’t really KO. Colette yells out ‘triple ray satellite’ as she attacks. (5, 5, 6% uncharged, 8, 8, 9% fully charged)

^smash – Stardust Cross: Colette tosses a star (basically a shining ball of green energy) about 2 stage builder blocks above her head and slightly forward. The ball of energy takes about half a second to reach that height. It then suddenly splits into a bunch of smaller 'star' shaped energy particles, which rain down exactly one character length in front of Colette and cover 3 stage builder blocks worth of range. These are able to score up to 4 hits on opponents, and stun them briefly as well. This move, of course, has quite a bit of starting and end lag. Colette yells out 'stardust cross' as she attacks as well. Also, you can see how she uses it in the game in the first minute of this vid(you can see that I tweaked it a little): http://www.youtube.com/watch?v=ty8ttCyaXd0

vsmash – Ring Cyclone: Colette holds her arms out and spins around in place quickly, trapping and scoring multiple hits with her held chakram. This move deals great knockback and is Colette's best KO move. Colette yells out the attack name as she uses it. (16-17% uncharged, 25% fully charged)

Aerials

nair – Colette throws one of her chakram downwards at a 45% angle. It travels down about 5 stage builder blocks before it disappears, and is able to briefly stun anyone it hits. This move does have a bit of starting lag, though. (4%)

fair – Colette slashes horizontally in front of her. This attack is fairly quick, and deals decent knockback. (7%)

bair – Colette leans back and stretches her body out, awkwardly reaching behind her with her chakram. She'll stay in that position for a second, damaging anyone she touches Opponents will only take a little bit of damage and not suffer any knockback if they touch her body, but will suffer decent damage & knockback if they touch her chakram. (3% body hit, 6% chakram hit)

uair – Ice Hammer – Colette throws a blue hammer up above her, hitting opponents for decent ice damage but little knockback. There's a 20% chance that the opponent will be frozen by this attack, in which case they will suffer good upwards knockback. Colette yells out 'ice hammer' when she uses this. (8%)

dair – Colette briefly floats on her back & flaps her wings powerfully to knock the opponent downwards. This will always meteor smash the opponent, but has a bit of starting lag like ROB’s dair. (8%)

Grabs

grab: a normal grab

grab attack: Colette smacks the opponent with her elbow (1-2%)

fthrow: Colette flips the opponent onto the ground in front of her and sends them flying. Its similar to snake’s (7%)

bthrow: Colette tosses the opponent behind her and sends them back by flapping her wings powerfully. Good knockback. (8%)

uthrow: Colette simply throws her opponent up in the air, getting decent knockback. She then throws a chakram up at them for additional damage, but barely any knockback. (5, 4%)

dthrow: Colette lifts the opponent over her head (with ONE hand O_o) and throws them to the ground to ultimately cause decent upwards knockback (not enough to KO). She says ‘sorry!’ as she tosses them down. (9%)

Specials

B: Para Ball – Colette tosses 2 spiked balls out in front of her, which bounce along the ground; ultimately traveling the same distance IC’s mini glacier move does. When one of them hits an opponent, it damages them and causes stun, and then zaps them with purple lightning to add additional damage and stun them for a second. Colette suffers a bit of starting lag upon using the move, and must wait a few seconds between uses, preventing it from being spammed. Colette yells out ‘para ball!’ as she uses the move. (ball does 4%, lightning does 3)

>B: Ray Thrust/Grand Chariot – Colette throws a chakram out in front of her, which travels about the distance of samus’ >B before disappearing. Like Colette’s ftilt, opponents will suffer a bit of damage and be stunned if the attack hits. Colette suffers a bit of ending lag after using the attack, but not as much as after her ftilt. When used without a smash, the single chakram can be thrown at an angle and even bounced off the ground like ROB’s laser. She yells out ‘ray thrust!’ when using the move. This move is also similar to samus’ >B in that performing it with a smash changes the move. If used as a smash, Colette flings two chakram in a crossing pattern in front of her. They directly contact each other when they travel about two body lengths, at which point lightning strikes the spot. Enemies who are near that spot take great damage and suffer good knockback. However, it will barely damage or knock back an opponent in Colette’s face. The chakram continue to fly the same distance that the one Colette uses for her ftilt does before disappearing, but cannot hit opponents. This move has a tiny bit of starting lag and a lot of ending lag, so it’s very punishable. Colette also yells ‘grant chariot!’ as she does this. (5-6% unsmashed; 10% up close, 20% directly when smashed)

^B: Angel’s Wings - Colette becomes able to move freely in the air for a short time; nearly as long as ROB can with his ^B. Colette doesn’t flap her wings or anything while performing this move, she simply floats in whichever direction is pressed. This move causes no damage.

vB: Angel Feathers – Colette begins an incantation, closing her eyes and repeatedly signing a ‘cross’ in front of her as a small circle of white light appears on the ground under her and glowing white feathers surround her for effect. This is a chargeable projectile, with the damage amount, knockback & speed of the attack depending on how long it’s charged. When the attack is actually used, Colette quickly raises one arm in the air as she briefly radiates with white light and fires 3 pink rings of energy from her wings which travel about the distance of a fully charged aura sphere. At full power, the attack causes great damage and decent knockback, and travels as fast as a ROB laser. When Colette starts the incantation without having any initial charge on the attack, she will say ‘holy wings… I beg of you to reveal thy glory…’ The attack will be fully charged once she finishes saying this. Also, she will yell out ‘angel feathers!’ when the move is unleashed. (3-4% per hit uncharged, 6-8% per hit fully charged)

Final Smash

Judgement/ Holy Judgementhttp://www.youtube.com/watch?v=3nEjTJ2VQ4w Colette begins an incantation, using the same stance as her vB. She says ‘Oh holy one, cast thy purifying light upon this corrupt soul. Light of judgement… Judgement!’ When she finishes saying this, she raises one of her arms in the air as many concentrated beams of light rain down from the sky, which do between 20 & 25% damage with no knockback. They are able to pass through any platform as well.

There is also a small chance that she will ‘mess up’, causing her to accidentally use a different attack (Holy Judgement). You can tell when she’s going to do this because she says a different incantation: ‘Thy thankful servant, ask us for thy blessing. Honor us with the special… uh… whoops! Heh, I messed up! Hehe… wha?’ When she says ‘uh…’ she raises an arm in the air as if she is about to unleash the attack, but it doesn’t happen immediately. She stays in that pose for a second, as a image of Colette’s head (with her tongue sticking out) shifts onto the screen and stays there for a couple seconds. When Colette says ‘wha?’, a circle of white light about half the size of FD appears around her, with a triangle pattern forming on the ground directly under her. The circle then retracts, disappearing under Colette for a second as she radiates with white light, and then flies back out over the entire stage. Once it gets past its initial length, the light turns pink and becomes a bit feathery. In addition, the same concentrated light beams that make up the regular FS will rain down at this point. The additional effect this special FS causes is to increase the attack power and defense of Colette and anyone on her team in team battle for about a minute. Basically, their attacks would do 2 to 3% more damage, and they would get a slight increase in weight (it doesn’t effect their recovery or anything else).

Taunts & Victory Animations

Taunts:

^taunt: Colette looks at the screen and cutely waves her finger at it (think classic sonic). She says ‘good job everyone!’ as she does this.

<>taunt: Colette faces the screen and closes her eyes, then quickly flaps her wings a couple times.

vtaunt: Colette puts her hands together, almost as if she were praying, and says her most repeated phrase from Tales of Symphonia, ‘I’m sorry…’

victory animations:

1- Colette puts her hands over her mouth and laughs softly. She then says ‘pretty good, right?’ as she takes her hands off her mouth and poses as if she is about to fire an arrow at the screen. All this is done while she is floating a couple feet in the air.

2- Basically the same as the first one, but Colette says ‘that was easy!’ instead.

3- Colette is actually on the ground this time, as she throws a chakram high up into the air. She spins and catches it on her arm. She says ‘there!’ as she throws it into the air, followed by a soft laugh as she catches it and spins it on her arm. However, there is a chance that she will fail to catch it. If this is the case, she will say ‘whoops’ as the chakram falls to the ground. She will awkwardly look at the chakram for a second before picking it up quickly and softly laughing.

victory theme: http://www.youtube.com/watch?v=4N5wfDSdZD8 – from :13 to :21


Other Stuff

entrance: Colette flies in from the front of the screen and, trips & falls on her *** as she attempts to land (she will also say ‘whoops’ as she does this). She quickly recovers & gets up as the battle starts.

Idle stance – She quickly tosses one of her chakram into the air twice & quickly catches it.

Roll dodge – she floats across the back of the stage. Her dodge is about as fast as zelda’s, but covers a tiny bit more ground.

alt. costumes:

Any part of Colette’s clothing that is white will change to the alt. color: red, blue, green, light blue, pink. She also has 2 other costumes:

Fair Lady – http://www.creativeuncut.com/gallery-03/art/tos-colette-fair-lady.jpg

Maid – http://www.creativeuncut.com/gallery-03/art/tos-colette-maid.jpg

wiimote sound – Colette says ‘sorry!’

Kirby hat: Kirby gains Colette’s yellow hair, although shorter of course.

Snake codec:

Snake – Mei ling, this girl seems a bit out of place… and what’s with the angel wings?
Mei ling – You must be fighting Colette then. Believe it or not, she actually is an angel.
Snake – You’re kidding, right?
Mei ling – Unfortunately, I’m not. Her strength and senses are far beyond those of a normal human, so I’d watch yourself if I were you.
Snake – She seems way too kind and cheerful to be on the battlefield… I should be able to take advantage of that.
Mei ling – Her kindness also causes her to keep things to herself, to avoid worrying her friends. Even when she’s in pain, she never lets it bother her. Colette always manages to find strength through weakness.
Snake – I see… so I guess we have more in common then I… she just tripped.
Mei ling – yeah, she’ll do that.

Stage & SSE Related Stuff

Stage:

tower of salvation – of course, there are no pics. Here’s a vid (Beware of spoilers): http://www.youtube.com/watch?v=Jknbbv-_r7s
You get a good view of what would be the fighting area at :32, and also during the battle featured in the vid. It would basically be final destination with more flair. There wouldn’t be those short walls around the stage like there are in this vid, just your average ledge, which would be the only change made to it. The pillars, the stairs and upper level, and the blue circle where the eternal sword would normally sit would all be intact, although none of the characters will be able to interact with them.

Music:

Beat the Angel
It can Waver and Fight
The Final Destination
The Law of Battle
Derris Kharlan (Appear)
Vanguard Battle(from dawn of the new world)

Symphonia Medley – this consists of the themes of the 8 main party members from the game, each of which would play for about 30 seconds:
Regal’s Theme(dawn of the new world version)
Sheena’s Theme
Genis’ Theme
Presea’s Theme(this may need a bit of remixing, since it takes more than a minute to get to a stopping point)
Zelo’s Theme(dawn of the new world version)
Raine’s Theme(dawn of the new world version)
Colette’s Theme(dawn of the new world version)
Lloyd’s Theme

SSE role/unlock: Colette’s role in SSE is pretty much the same as Lloyd’s. She is unlocked when she joins your party, or when you have beaten all of the co-op event matches, or when 700 brawls have been played. In order to unlock the tower of salvation, you have to win 10 matches with her.

Assist trophies:


Mithos(boy form) – Mithos immediately floats above where he is summoned with rainbow colored angel wings and uses one of 3 different moves:

Judgement – Mithos briefly begins casting a spell in the same manner as his counterpart Yggdrasil and says ‘Goodbye…’ He then yells ‘Judgement!’ … and you know whats coming. Many white beams of concentrated light rain down from the sky, which are able to go through any platform. (20-25% per hit)

Rejection – Mithos says ‘get away…’ as he radiates with white energy to hit nearby opponents multiple times. They can be hit up to 8 times, but this attack deals little knockback. (9-10% per hit)
Retribution – a circle of energy forms around Mithos, which moves in close to him and then quickly spreads out across the entire stage. When opponents are hit by it, random effects are inflicted on them, including sleep, dizziness, flower head, stopwatch effect or even reduced size. Opponents can even end up with 2 at the same time, such as dizziness and flower head or stopwatch effect and reduced size (really bad lol). However, Mithos will rarely use this attack.
 
Status
Not open for further replies.
Top Bottom