• Welcome to Smashboards, the world's largest Super Smash Brothers community! Over 250,000 Smash Bros. fans from around the world have come to discuss these great games in over 19 million posts!

    You are currently viewing our boards as a visitor. Click here to sign up right now and start on your path in the Smash community!

Make Your Move 3.0: It's over, it's done, moving on.

Status
Not open for further replies.

smashbot226

Smash Master
Joined
Sep 1, 2007
Messages
3,027
Location
Waiting for you to slip up.
THAT'S IT.

sCREW EVERYTHING THAT HAS BEEN DONE BEFORE AND LATER ON THAT I'VE SAID.

Reserved for:


CEL-LINK: A.K.A. Toon Link remastered!

"EYAHH!!!"

Unlock Message: The sailor of the Great Sea, Cel Link, has joined the Brawl!

Wait, don't we already have him?

ALAS, No. Not the REAL one anyway.

Instead of being a waste of space clone, we've rebuilt him to be more original. He'll have moves incorporated from Wind Waker, Minish Cap, Phantom Hourglass, and Four Swords, giving him a wide range of possible attacks. He'll still be fast, weak; he'll still be the same old Toon Link, statwise. Prepare to be shocked; Here There Be Cel Link!

STRENGTH: 2- Cel Link hasn't changed much from the strength department. He's still got his Master Sword.

SPEED: 4- He's also JUST as fast, making him one of the swifter competitors.

JUMP: 3- Toon Link's jump height should've gone to Regular Link. NERFED.

SIZE: 2- Being a head taller than Kirby, Cel Link is a small fry.

WEIGHT: 2.5- Toon Link was WAY to light for my liking. CT will be mid-low.

FALL SPEED: 2- Cel Link won't fall back to Earth very quickly. Another returning Toon Link quality.

PRIORITY: 4- Toon Link had high priority, right? So will Cel Link.

RANGE: 4- Ce Link has new equipment; say goodbye to that gay little Boomerang!

TRACTION: 3- Cel Link is an average tractioneer. YES I MADE UP A WORD, SCREW YOU.

GLIDE: Using the Roc's Cape, yes.

CRAWL: Uh- DUH. Of course he'll have it, although it'll be SLOW.
-----------

A & TILTS:

A,A,A,A- CL slashes his sword from right to left twice, then left to right, then finally slashes downwards across the foe's stomach. Each individual slash does small damage, causing up to 11% total and the last slash dealing small knockback. However, the range on the slashes are decent enough. (PS This move is based on WW 4 Slash Combo.)

A>- CL smashes his shield into the foe's face with a horizontal swipe, dealing a large amount of damage (13%) but also stunning the foe. This move also has low starting lag and ending lag, but the range is short and the priority is lame.

A^- CL swipes upwards with his Mole Mitts from Minish Cap , dealing medium (8%) damage but causing high knockback. Quick move, albeit with small range, and has high priority.

AV- CL quickly opens up his Jar of Winds from Minish Cap as a gust shoots out from leg level, dealing small damage (4%) but trips the foe or at LEAST deals high knockback. The gust range is great as well, and has the hidden effect of blowing away slow or medium moving projectiles, but has large ending lag, as CL would need to quickly plug the jar.
SMASHES & DASH:
Dash: CL performs a forward roll, dealing 7%, then ends with a quick stab, doing 6% damage and covering quite the range for a petty blade, as well as having high knockback.

Fsmash: CL crouches down, as he jumps forward and performs a giant slash. This is his Jump Attack from most Zelda games, which Link strangely doesn't have. Does the largest damage in CL's moveset (Other than his Final Smash, of course.), dealing 22% uncharged, and covers a long range, with the initial leap covering a whole character distance, and the blade covering one more. Keep in mind the leap does no damage nor knockback, but instead pushes the foe back for the actual attack. Has large ending lag, however, but large knockback.

Usmash: CL spins his Fire Rod from Four Swords into the air clockwise, while leaving a trail of fire in its path. Deals multiple shots of small damage, but overall, its rather average (13%) as well as dealing fire damage and has good vertical knockback. However, CL takes a BIT too much time to put away his rod... wherever he keeps his things.

Dsmash: CL shoots his Hookshot at the ground diagonally, dealing medium damage (16%) and having small knockback. However, this attack covers a lot of range, two character spaces, and has enough priority to beat out a few projectile moves. However, the Hookshot will go UNDER projectiles if used far away enough.

AAERIALS:

Nair: CL performs a spin attack in midair as he falls. HAs the same properties as Toon Link's Spin Attack. This move also sends you slightly into the air.

Fair: CL pulls out a cannon from Phantom Hourglass and fires it in front of him, dealing medium damage (14%) while doing amazing knockback, killing at 100%. However, it's hard to land as it has a narrow range and the ending lag is horrid if you land on the ground mid-attack.

Bair: CL swipes his Wind Wand downwards behind him to push enemies and small projectiles away with a gust of wind. This attack is great due to very low starting/ending lag, the ability to spike with a large range, and can "block" projectiles. What more do you need? Unfortunately, this move deals only 2% damage.

Uair: CL releases and swings his Grappling Hook in a wide arc before returning it to Link's Bottomless Tool Bag. This move deals light damage (7%) but has unusually high knockback for such a move. The range on both axis are good too.

Dair: CL performs his aerial downward slash with his Roc's Cape. Basically the same move as Toon Link's Dair, although CL falls to earth MUCH less faste

GRAB GAME:

Grab: CL traps his wind with a quick Command Melody, encasing them in a "Wind Prison".

Pummel: CL spins the foe around in his little trap for 4% damage.

Fthrow: CL keeps spinning the foe rapidly in the air as he pulls out his Deku Leaf and whacks some air at the foe, knocking him back. Deals small damage (6%) but deals amazing knockback, killing at 80%.

Bthrow: CL, with a quick Wind's Requiem, spins the foe to the opposite position he was in, as CL quickly draws his Megaton Hammer from WW, and smacks the foe for huge damage (17%) but HIGH ending lag and only medium knockback.

Uthrow: CL tosses the foe into the air as CL tosses his Bait Bag into the air, causing seagulls to ram into the tossed foe for the bag, causing him to fly up higher.

Dthrow: CL swipes at the foe using the Cane of Pacci, which flips the foe onto the ground for small damage.

SPECIALS (AKA THE REASON EVERYONE IS READING THIS):

B: Fire Rod Lvl. 2- For those that have played Four Swords, let us rejoice: CL summons a large red block that can be carried like a crate, thrown like a crate, and can be split into four separate fireballs each going STRAIGHT into a different direction; left, right, down, and up. Each fireball does 15% damage and deals relatively high knockback. It'll also explode if it makes contact with a foe or a damage dealing item.

B^: Deku Leaf- The one that has been hankering for a spot, yesh? CL pulls out his Deku Leaf as a convenient northern wind blows by, shooting CL upwards for about the same distance as Peach's second jump in Melee combined with her second jump in Brawl. Anyone in the leaf's way is battered aside for light damage (4%) and is given high knockback; wind and all...

BV: Hammer- The one from Phantom Hourglass, much to everyone' chagrin, because I want EQUAL representation. CL summons a hammer that floats over his head and pounds enemies for heavy damage (15%). You can charge this hammer for more range and power (25%), but the starting lag and actual animation of attack is sluggish, but the hit is tremendous. It can kill at 50% fully charged.

B>: Pegasus Boots- An old faithful in Minish Cap, eh? CL begins to sprint in place, as he shoots forward across small gaps and pits for three seconds, before coming to a stop. The startup is slow and easy to see coming, but he'll run as fast as Sonic with those boots. Also, anybody in this guy's warpath is knocked aside and given 17% damage and medium knockback. You can cancel this attack mid-move by pressing B, but you cannot change direction afterwards. This move can traverse ALL of Final Destination in one attack, from edge to edge.

FINAL SMASH: Ballad of Gales- Yes, the most popular Celda game is represented as the great Ballad of Gales!

CL pulls out his Wind Wand as he plays his four notes, as Cyclos hovers down to the stage chuckling like the (now) jovial frog god he is, and summons massive winds that carry the foes in random, but rapid, directions, often causing kills in three gusts out of the eight summoned. The gusts push the enemies with TREMENDOUS knockback in random directions, so on open or smaller stages like New Pork City or Final Destination, they're deathtraps. This continues for seven gusts in total before Cyclops floats back up to the skies and leaves Link to fend for himself once more.

TAUNTS/POST-VICTORY ANIMATIONS:

Taunt 1: CL pulls out his Telescope and looks left, then right, then to the screen, then puts it away.

Taunt 2: CL performs a quick melody with his wand, then puts it away as the Selection Sound from WW chimes.

Taunt 3: CL's cap turns to life as the Minish Cap chirps, "You're no match for US!" As an annoyed CL pushes the cap down.

Victory 1: CL runs around trying to catch a pig, WW style.

Victory 2: CL is jumping for joy when Linebeck's ship bursts in, knocking CL over as a confused Linebeck climbs out of the ship and looks around, confused.

Victory 3: CL pumps a fist into the air, as the Four Sword hovers above CL's head, as he teleports away.

Loss: CL keeps Toon Link's loss style.

ALT COSTUMES:

CL keeps Toon Link's Alternate costumes, but trades Dark Toon Link for Early WW Link's Sleeping Outfit. He'll still keep the hat...

SSE Role:

Unfortunately, CL will still keep Toon Link's role of doing ABSOLUTELY NOTHING.

ETC:

Wiimote Noise: A quick gust of wind is heard, as CL yells, "HYA-SKRAA!!!"

Entrance: The King of Red Lions lies by on wind, as CL hops off of him and King flies away.

Symbol: The King of Red Lions.

CODEC:
Snake: Pffft great, Toon Link again?

Otacon: That's not Toon Link! That's Cel Link! He's completely different from TOON Link! He's got aa completely new set.

Snake: Huh, so it's a new kid eh? Points for originality...

Otacon: Good Luck Snake!
-------

Aaaaaaand... done.
 

SirKibble

Smash Champion
Joined
May 2, 2008
Messages
2,400
But he's the swordsman of the Great Sea! Can it at least be called a Seamaster, and just do everything that a Landmaster does... I mean, wait, all the Landmasters are different. Sakurai said so...
 

Chief Mendez

Smash Master
Joined
Mar 25, 2007
Messages
3,161
Location
Somewhere
I've never even played a castlevania game or even seen a picture of him (If there was a picture you posted, doesn't work on my cpu), but I'm just picturing him as a generic vampire and the moveset's just beautiful.
WHA-!?

For shame, for shame. There are tons of them out there, on practically every system. Most feature Dracula as a final boss, or the equivalent of.

And I do have...three pics in the moveset, but you say you can't see them...? In your User CP, go to Edit Options in the toolbar to the left, then scroll waaay down and make sure "Show Images" under Thread Display Options is checked. That could be it.

Also the YouTube links I've got posted in the moveset adequately exhibit the basic idea behind Drac's moveset.

@smashbot226: Yay for the best Link ever Cel-Link. His Final Smash should split him into four parts, which would make him play like the Ice Climbers...only there's four of them. Also, you can use the c-stick to put them into formations, one of which will enable the Great Spin!
 

Chief Mendez

Smash Master
Joined
Mar 25, 2007
Messages
3,161
Location
Somewhere
Stop spreading lies, Chief, you know his FS will be a landmaster.
It'll be him splitting into four, at which time each one will fly up into the sky.

Then there'll be an animated cutscene where each Link boards a Seamaster, and they all combine together to create one giant Seamaster.

"Eeyaaah! Ha-Aaaah! Skraaaa!" translates directly to "And I'll form the head!". Little known fact, that. :lick:
 

KoJ

Smash Journeyman
Joined
Aug 16, 2008
Messages
317
LANDMASTER
LANDMASTER
Landmaster
landmaster
LaNdMaStEr
lAnDmAsTeR
LAndMASter
lANDMASTer
LaNDmaSTer
Retsamdnal
Landmaster
Landmaster
LANDMASTER

Anyway, any ideas on my next real moveset (Progression with the Regis is going very slowly)?

Dracula's beautiful. Just beautiful.

Noxus is nice, but Omega Cannon is overpowered (The entire size of FD for each blast? Do you mean the stage Final Destination?).
 

smashbot226

Smash Master
Joined
Sep 1, 2007
Messages
3,027
Location
Waiting for you to slip up.
Actually, THIS is his Final Smash:


King of Red Lions-Master!

When it lands, you can control it with the control stick, and by pressing the A or B buttons, you can fire its cannons!

You can also use the Winds to hover into the air by pressing up, and can even:


By pressing down! Soon, after the time is up, K.R.L-M. turns to a strange cybernetic outline as Cel Link hops out of it...

-------
IT WAS A JOKE.


IDK what the Final Smash should be.

SHOULD IT BE FROM:

1. Wind Waker

2. Minish Cap

3. Phantom Hourglass

4. Four Swords

Order is completely random, and not by preference.

THIS TIME: YOU DECIDE.

I've got the perfect ones from either series, rest assured.
 

Chief Mendez

Smash Master
Joined
Mar 25, 2007
Messages
3,161
Location
Somewhere
IDK what the Final Smash should be.

SHOULD IT BE FROM:

1. Wind Waker

2. Minish Cap

3. Phantom Hourglass

4. Four Swords

Order is completely random, and not by preference.

THIS TIME: YOU DECIDE.

I've got the perfect ones from either series, rest assured.
I think it depends on where the rest of his moves come from.

For instance, if all of his Specials are from Windwaker, let his FS be from Four Swords.

Also...just, don't include Phantom Hourglass at all. It's not even a Zelda game, in the main sense of the word. And there's really not much to use from it besides the actual Hourglass, which didn't even do anything of use.

Ooooh, but his Dash Attack could be the Rolling Stab from Minish Cap! He rolls, and then stabs forward as he comes out of it. I loved that attack in the game. :bee:
 

SirKibble

Smash Champion
Joined
May 2, 2008
Messages
2,400
That was also in Twilight Princess.

I think I'm gonna do a Four Swords FS.

I think you all know what it's gonna be...
Um... Um... Wait, I know this one... Four Swords...

TRI-SWORD SLASH!!

Cel Link throws three swords forward, in a triangle, and if they hit anybody, they trap them where they are, then Cel Link rushes forward and slashes with the fourth sword repeatedly, then does a massive SKRAAAAHH! final slash and the other three swords vanish into thin air.

I'm so good at this.
 

smashbot226

Smash Master
Joined
Sep 1, 2007
Messages
3,027
Location
Waiting for you to slip up.
Um... Um... Wait, I know this one... Four Swords...

TRI-SWORD SLASH!!

Cel Link throws three swords forward, in a triangle, and if they hit anybody, they trap them where they are, then Cel Link rushes forward and slashes with the fourth sword repeatedly, then does a massive SKRAAAAHH! final slash and the other three swords vanish into thin air.

I'm so good at this.
:(

I'll need a new one...

SECOND THOUGHT: Actually, I think I'll stick with a WW Final Smash.

Depends on when I get to specials. Ground attacks are up right now though.
 

Chief Mendez

Smash Master
Joined
Mar 25, 2007
Messages
3,161
Location
Somewhere
That was also in Twilight Princess.
...Yeah, but it wasn't as cool then. :p

Also...was...was your plan actually to do "Tri-Sword Slash"? O.o

ANYWAY

Dracula's DONE! Happy freaking day. This took forEVER, I tell you what. But I really think I've outdone myself this time...:chuckle:

Link for great justice!

For those not interested: some facts about Dracula that should pique your interest:

1. He doesn't run.
2. He can travel from one end of Hyrule Temple to the other with one move.
3. He's a giant douchebag. :bee:
4. He has the coolest Bair ever.
5. I LOVE HIM
 

Evilgidgit

Smash Apprentice
Joined
Oct 10, 2007
Messages
166
Location
England
Here is my next moveset, an OC:

Olympic Man

Description:
A unique fan of the Olympic Games, Olympic Man (name unknown) is a crazy fanatic and has tried to enter the Olypmics for the past ten games (since 1972) but has been thrown out, quite literally, every time, due to his general wacky antics. A master in all forms of Olympic sports, Olympic Man strives to be the greatest athlete in the world and will not let anything, even death, stop him from accomplishing his dream. He even has made himself a special flag, and a medal made of plastic. All of Olympic Man's attacks use various equipment or techniques from sports of the Olympics.

Alternate Costumes:

Stats
Height: 2/5
Weight: 3/5
Movement Speed: 4/5
Jump: 3/5
Fall Speed: 5/5

Entrance: Olympic Man dashes in, skids to a halt and pulls out a large flag with the Olympics and Super Smash Bros. symbol on it before withdrawing the flag and going into a battle stance.
Walking: Olmypic Man doesn't walk, but lightly jogs.
Running: Olympic Man races along like a trained athlete.
Waiting Movements: Olympic Man examines his fake medal, or shakes his head to remove sweat.
Sleeping: Olympic Man collapses onto his back and sleeps rather heavily, snoring loudly.
Stunned: Olympic Man wobbles about on a podium looking shocked and dazed, as if he just won a medal.
Smashed Off-Screen: Olympic Man, unlike others when they are smashed off and scream, laughs and says "I will return!". Since he's been thrown out of countless stadiums, sports courts and gyms, he takes each blast off in his stride.

Moveset
A: Punch-Out - Olympic Man punches an opponent hard with a boxing glove.
A,A,A: Kick-Boxing - Olympic Man boxes an opponent twice, then trades the gloves in for a kickboxing move, involving a spinning kick.
Dash Attack: Rowboat - Olympic Man sprints at an opponent, then suddenly pops up in a rowing boat which is slanted when it appears and slams down on an opponent's head.
Side A: Table Tennis - Olympic Man hits a ping pong ball with a table tennis racket and smacks an opponent in the head with it.
Up A: Weightlifting - Olympic Man tosses a medium-sized set of dumbbells into the air which crash down onto the ground, hitting an opponent if they are in the way. The weights remain on the stage for five seconds as a throwable object.
Down A: Golf Swing - Olympic Man spins around a golf club and then swings it at an opponent.

Side Smash: Javelin Throw - Olympic Man throws a javelin across the stage. To avoid fatal injuries, Olympic Man made the javelin blunt.
Up Smash: Rocket Football - Olympic Man rocket kicks a football which blasts off into the air. If it hits an object in its path, it will bounce around until it vanishes off-screen.
Down Smash: Hurdle - Olympic Man tosses a hurdle out into the stage. This object cannot be passed and characters must either jump over it to pass or knock it away. This attack works best when an opponent is running at Olympic Man.

Aerial Attack: Slamdunk - Olympic Man brings out a basketball and smashes it into an opponent's head.
Side Aerial: Paragliding - While never been an official Olympic sport, Olympic Man glides across the air using a paraglider, hitting anyone in the way.
Back Aerial: Cricket Bat - Olympic Man smashes an opponent backwards with a cricket bat.
Up Aerial: Archery - Olympic Man aims and fires an arrow upwards into the air.
Down Aerial: Air Dive - Olympic Man performs an aerial dive downwards, spinning in the process.

Grab Attack: Manhug - Olympic Man laughs madly, seizes an opponent and brutally manhugs them.
Forward Throw: Super Throw - Olympic Man grabs an opponent and spins them around about his head before launching them away.
Backward Throw: Log Throwing - Olympic Man dresses in traditional Scottish wear, releases an opponent, and then tosses a large log at them.
Up Throw: Shotput - Olympic Man throws an opponent into the air and then hits them with a shotput ball.
Down Throw: Bicycling - Olympic Man throws an opponent to the ground and then cycles over them with a bicycle.

B: Discus - Olympic Man tosses a large discus across the stage. The discus is rather heavy and crashes to the ground quickly. However, this attack works best when attacking an opponent who is on a stage's edge or returning to the stage. The discus can smack into an opponent and "drag" them down to their demise (as the discus has spikes on it and can attach to an opponent).
B Side: Jetski - Olympic Man boards a jetski and races across the stage, riding a miniature tidal wave. The tidal wave only lasts for the first attack and the jetski become useless when the water disperses, but it can be picked up and thrown by anyone.
B Up: Pole Vault - Olympic Man grabs onto a long pole and is launched into the air. The pole can bend at a rather far angle and can launch Olympic Man right up and off-screen. The pole then collapses and will give an opponent a bonk on the head if they are in its path.
B Down: 100 Metre Run - Olympic Man dashes across the stage in a blurr of movements.

Final Smash: The Olympic Flame
Olympic Man laughs triumphantly as he produces the small Olympic Torch and it vanishes in a flash, rising behind him as a massive Olympic Torch. The Olympic Flame explodes out of it and massive fireballs rain down upon the stage, the ground is set on fire and opponents are burnt. In a final attack, Olympic Man raises both arm and laughs insanely and controls the flames, extinguishing them, although they still damage opponents. The large torch vanishes as Olympic Man continues to cackle. He realises his Final Smash is over and coughs lightly before returning to battle.

Shield: Olympic Man protects himself using a sphere of fire produced from the Olympic Torch.

Taunts
Taunt 1 (Up): Olympic Man brings out his flag, spins it about and then sets it beside him.
Taunt 2 (Side): Olympic Man blows a whistle.
Taunt 3 (Down): Olympic Man leaps up and down and laughs.

Victory Pose
Pose 1: Olympic Man runs around, cheering and kisses his medal lovingly.
Pose 2: Olympic Man waves his flag around.
Pose 3: Olympic Man produces the Olympic Torch and holds it up proudly.
Losing Pose: Olympic Man prepares himself as he is booted off-screen into the distance.

Kirby Hat: Kirby gains Olympic Man's sweatband and the Olympic symbol on his back.
Symbol: The Olympics Logo
Wii Remote Chime: A brief trumpet solo plays.

Snake Codec:
Snake: Hey, Otacon, there's some weird-looking guy dressed like an Olympic athlete here. I watched the Beijing Olympics and I don't remember him.
Otacon: That's because he's barred from the Olympics. He's Olympic Man. He's been trying to get into the Olympics since 1972.
Snake: Wow, that's rough. Is he dangerous?
Otacon: Considering he is a fanatic of the games and all his attacks involve various sports...yeah, I think he is.
Snake: Well, I'm the one who is going to get gold.
Otacon: Wow!
Snake: What's wrong, Otacon?
Otacon: I think you actually have a sense of humour.
Snake: What?
Otacon: Eh, maybe not...

Please give comments!!! :psycho:
 

Chief Mendez

Smash Master
Joined
Mar 25, 2007
Messages
3,161
Location
Somewhere
Olympic Man: He really needs more details for his attacks, especially his special attacks.

Also, his Final Smash is broken. Badly. The falling flames and ground-being-on-fire is okay, but a wall of flame that always hits everyone? And always KOs them!?

...Yeah. But other than that, it seems pretty solid. Although the term "manhug" is one I'd like to never hear again. -_-
 

Iron Thorn

Smash Lord
Joined
Jun 26, 2008
Messages
1,097
Location
Going to Gamelon. I'm taking the Triforce of Spag
Moved here for easier editing access.


Teigen Kalos (that's a long I on the first syllable, folks!)

Character Synopsis:
Unlike Erutashi, who has a well-defined role within a fairly coherent and tangible universe, Teigen's existence is far less clear - heck, she's the only part of her universe I've drawn or written about. What is known is that she's one of the werewolf race called Verim (Veren is the singular), which is the target of unrelenting imperialism by the technologically advanced High Elves. The High-Elven leader is Lord Anzrylt, who is actually a Veren that was taken in by the elven ideology and, mutilating his nose and chopping off his tail, worked his way up through the enemy's ranks.

Teigen herself was the fourth of five siblings and the only female cub in her family, that of a lesser Verenic nobleman. Anzrylt was a childhood friend of hers; due to his dark skin, pale blond hair, and turquoise eyes, he was hailed as a chosen one - a blessed and special cub, a direct descendant of the Verenic goddess Halyune. Teigen, because of being partially albino, was kept inside to shield her from the burning power of the sun, even as her family instructed her in the ways of the sword. Young Anzrylt, always a rebellious child, insisted on finding out who this shut-up cub was, and thus they met.

At the age of 42 (17 in Veren years) Teigen finally had enough of that crap and left home with only her sword and few other things, becoming a wandering swordswoman in training. After human years (or when 17 in Verenic years) she reunited with Anzrylt and entered a toxic and tumultuous relationship (think lots of f*ck-fighting, screaming, and make-up sex); he is the father of her cub.

As a fighter, Teigen is unusual among female Brawlers in that she ranks among the heavyweights not by virtue of armor or equipment, but because of her own flesh, blood, and bone. Though puny compared to such behemoths as Bowser and Donkey Kong, she fights in typical heavyweight fashion: slow and strong attacks, tempered by the long reach of her samurai-style sword. Most of her attacks require good timing, as they have high ending lag, a sweetspot, or leave her open for a counter if they miss. Though Wolf's modus operandi has been described as "downright feral", Teigen's savage style makes him look like a housedog; the Veren uses her fangs, talons, and even the claws of her bare feet in conjunction with her sword. Beware if this mother werewolf suddenly screeches to a halt and whistles; her raptorine companion, Tsaa, is about to join the fray.

VITAL STATS:

Name: Teigen Kalos
Sex: Female
Race: Veren
Height: 5'10"
Weight: That's a rude question to ask a lady.
Eyes: Red
Hair: Purple...y
Skin: Albino
Personality: Moody, aloof, sagacious, independent, secretive, quiet, suprisingly cultured, intolerant of disloyal people (you get the idea, she's not a people person)
Weapon: Katana-style sword


Stats:


Height: 8/10 Teigen is tall for a woman, being half a head above Zelda.
Weight: 7/10 You *do* tend to gain some weight when you're pregnant. Teigen weighs in at a hair lighter than Ike.
Power: 7/10 That's a big sword she's got, no?
Walking Speed: 3.5/10 Teigen walks upright, striding forward with her hand on her sheathed sword.
Dash Speed: 4/10 Carrying around all that extra weight slows Teigen down considerably.
First Jump: 2.4/10 Personally, Teigen prefers the ground. Her first jump is an unimpressive hop.
Second Jump: 3.6/10 Teigen fluffs out her tail for lift. Though better than her first jump, it's still nothing special.
Range: 6/10 Like I said, that's a big sword she's got.
Fall Speed: 5/10 Between her heavy belly and the lift of her outer gamrent, she's moderately floaty.
Traction: 8.4/10 Those toeclaws grip the ground like nobody's business.
Crouch: 6/10 Teigen's crouch has her squatted on the ground, legs apart for comfort. The crouch is quite low, but the laggiest in the game.
Wall-kick: No
Wall Cling: Nope
Tether: Negatron
Crawl: Not that either.


Ground Attacks:


A: Stab - Teigen extends her sword in front of her for minimal knockback and damage. However, its range makes playing keepaway with it a possibility if your opponent is stupid, a CPU, or a stupid CPU (although CPUs are stupid by default, no?)

Dash attack: Lunge - Like the irate canine she is, Teigen lunges wildly at the opponent and bites them. The attack is strong, and quick to start up, but the hitbox is small (only about the size of a soccer ball) and there is high recovery lag and low knockback.

Supine Rising Attack: Pommel Sneak - Teigen unsheathes her sword a teeny bit as she rolls back up and rams its pommel into anyone a Mario away from her. Whoever gets sucker-punched by this attack receives respectable knockback but little damage.

Prone Rising Attack: Teigen's rounded and rather incompressible belly prevents her from being knocked face-down on any stage; if an attack normally lands opponents on their stomachs, she will do a barrel roll over to more comfortably lie on her back. Thus, she has no attack for getting up from a prone position.

Ledge Attack: Clawed Reprisal - The Verenic warrior hefts herself back on the stage with a furious slash of her claws. There is little to say about this move, other than everything about it is poor, other than its average range. Don't use this one.

Ledge Attack Over 100%: Leg Trap - after forcing herself back on stage and panting visibly for a full second, Teigen sinks her teeth into anything in front of her. Although this has one of the longest startup lags of any move in the game, it's strong for a ledge attack, doing up to 10%.

~~~~~

Forward Tilt: Tachi Slash - Teigen does a two-handed sideways sword slash with power and knockback similar to that of Zelda's forward tilt. Not only does Teigen's move lack magic (doing Slash damage if you're into stickers, which you're probably not), but it's got 1.5 times the range. However, it's the laggiest of all forward tilts below the super-heavyweight class.

Up Tilt: Pommel Strike - Holding the hilt with both hands, she strikes upward with the pommel of her sword (which could be likened to three wallets stacked on top of each other, then the stack of wallets being encased in metal. I thnk.) Unlike most of her moves, the range is rather pathetic, about a third of Jigglypuff's height. However, if one does manage to connect the move, the high damage makes it worth it. Pommel Strike is one of her faster attacks, so it can catch enemies off guard.

Down Tilt: Blade Sweep - Teigen goes through the generic leg sweep...However, it's not a leg sweep at all! Her legs stay beneath her, and she uses her sword instead. At the VERY tip of her blade (which covers about two Marios on either side) is a sweetspot. Most of the blade gives moderate damage and knockback, but the sweetspot increases both to medium-high. The sweetspot is hard to land though, due to the disjointed hitbox, so it takes luck and/or spacing to land it.

Forward Smash: Guillotine - Teigen readies her blade, holding it at a 135-degree angle with her body...then brings it down. Fast and hard. It is similar in execution to Ike's dreaded forward smash, and also in sheer power. However, it is not without drawbacks: aside from obvious lack of t3h ph1re, Teigen takes five whole seconds to get back up and compose herself afterward, leaving her wide open for an attack. That makes this attack all the more frustrating to trip into.

Up Smash: Rising Crescent - Teigen thrusts her sword straight up - her body, arm, and sword are all in a straight line. This has pretty wicked range, reaching as far as one Luigi-height, and decent knockback, but it is one of her weaker attacks, dealing below-average damage.

Down Smash: Keepaway - Sheathing her sword and getting down on one knee, Teigen claws away any enemies within two Mario' distance of her on either side. The attack's only real virtue is its high knockback and thus crowd-control possibilities. The damage is unremarkable, and Teigen struggles to accommodate her swollen abdomen, adding a good deal of lag to both ends.


Aerial Attacks:

Neutral Air: Tether Sting - Teigen grabs the cord on her collar and swings it around her. It reaches about a Squirtle on each side of her, covering her chin-to-sternum area, and has a disjointed hitbox. This is her weakest move of all, as the opponent's merely getting whipped a bit by a thin fiber-and-wire cable that's only about half a centimeter in diameter. However, the tether flails around very quickly, so Tiegen is almost guaranteed two or three hits on the target if she manages to connect.

Forward Air: Skewer - She thrusts out her sword perpendicular to her body. High damage and knockback, but it leaves Teigen falling defenselessly until she touches the ground again. Don't miss with this one.

Back Air: Reverse Claws - Teigen does two back kicks, one with each nasty little clawed foot.They each do low damage, and if both kicks connect the total damage is only average. Add that to the range, which is uncharacteristically low for Teigen, and this move isn't completely useful.

Up Air: Flask Toss - Taking the ceramic flash (filled with normal water, mind you) at her side, the Veren woman lifts her face to the sky and tosses it upward about an Olimar high. Though it only hits coming up and the hitbox is rather small, the stoneware missile deals decent damage and knockback. It comes out quickly, but the ending lag is high: as Teigen needs to put her drinking vessel back into place, you probably won't get any more aerials from that jump.

Down Air: Talon Snag - At first glance, this looks similar to Sheik/Zamus/Sonic's down aerial...if it misses. If it connects, she digs her hindclaws into some hapless character's scalp. OUCH! The attack is quick to execute and moderately strong, but it has no knockback whatsoever and cannot spike.


Throws:

Grab attack: Pommel Pummel - Teigen strikes her opponent with the large pommel of her sword.

Forward Throw: Sabrefang - Teigen grabs her opponent with her sharp teeth as well as her clawed hands, slams them on the ground a few times, then launches them forward. Massive damage, but little knockback, it's good for building up damage - be sure not to miss, for the recovery lag is high.

Back Throw: Reverse Sabre - Identical to Sabrefang, except it launches the opponent backwards.

Up Throw: Blade Rider - Teigen holds out her sword sideways and bounces her victim on it a few times as if s/he were a (large and rather uncooperative) ping-pong ball, then launches then sky-high. This is one of the easiest throws to button-mash/DI out of, but if she can hold them long enough for the final launch, the high knockback straight up will often score her a Star KO. The damage is low, but if the enemy doesn't DI out before the final launch, they were probably pretty beat-up anyway and didn't need the extra damage.

Down Throw: Tachi Tamp - Standing on her victim, she stabs her blade several times into their abdomen (lucky thing it's Smash Bros. and nobody really dies, because that's about four ruptured viscera right there), then jumps off screen with them for a split second before coming back down and slamming them onto the ground. A powerful throw, it takes a long time to use because Teigen takes her sweet time ramming her sword into her helpless enemy.


Special Attacks:


Neutral B: Lunar Eclipse - Teigen does a mighty, MIGHTY sword swing with both hands. This attack is unique in its ability to daze the opponent: however, the stun duration depends on how long B is held down. A "fresh" Eclipse will not daze the opponent at all; however, if fully charged (which takes a while), the stun lasts as long as if the enemy just broke their shield and does a hefty lot of damage too. This attack's charge cannot be stored.

Forward B: Feral Crescent - Teigen slashes her opponent up and then down, doing damage on each hit (think of the move "Tiger Blade" from the Tales series) and when the opponent hits the ground. Each sword slash does medium-low damage, with the slamming-on-the-ground doing 5% at most. The overall power of the attack is a little bit above average. Though quick enough to execute, Feral Crescent can be DI'd out of on the upgoing slash or the first half of the downgoing slash.

Up B: Raptor Leap - Teigen climbs on Tsaa's back, and the raptor leaps an impressive distance (about 1/2 the length of Final Destination) into the air. This recovery has a parabolic trajectory: It goes diagonally up, reaches a peak, and then goes diagonally down. However, Teigen has no offensive options until she touches the ground; the move does no damage and she cannot get dismount until she touches earth, when Tsaa disappears automatically. She also becomes a bigger target. This is a use to move with care, as it leaves Teigen VERY vulnerable (read: gimpable).

Down B: Tsaa - Teigen whistles for and mounts her feathery steed, Tsaa, becoming faster (about the same speed as Toon Link) and improving her already high traction. Whilst on Tsaa's back, Teigen can perform a mounted sword attack by pressing A or command her to bite by using B. Both raptor-back moves do average knockback and damage. However, Teigen cannot jump or shield, and takes half of the damage inflicted on Tsaa. After Tsaa takes 35% damage, the player presses down B again, or 45 seconds pass, Teigen dismounts. Another 45 seconds must pass before Teigen can use her down-B again (she can still use Tsaa for recovery)

Final Smash:


Full Moon: The stage grows dark and a great full moon rises in the sky. Teigen lets loose with an unearthly howl (Wolf has nothing on it) and transforms into...her full-wolf form. As a four-legged beast Teigen is not only invulverable (as is the case with all final smashes) but faster (again, Toon Link speed). Pressing A or B allows her to attack with, respectively, a claw or biting attack, both being about as powerful as Yoshi's Super-Dragon fireballs. However, Teigen only has one short jump in this form, so the entire Final Smash could technically be avoided by standing on a high platform. After twenty seconds, the moon sets, light returns to the arena, and Teigen goes back to normal.


Extras:


Logo: The funky looking ankh thing on this picture.

Stage Entrance: Teigen rides in on Tsaa's back, dismounts, and shoos Tsaa away.

Kirby Hat: Kirby gets Teigen's hair, ears, and scar, and the Lunar Eclipse move.

Alternates:

Default: Teigen appears as in the reference above.

Green Team: Main garment changes to dark green with iron-gray trim and a dusty violet obi. Straps and collar are mousy brown.
Red Team: Blood red main garment with gold trim and royal blue obi. Straps, collar, and flask are gold, and her sheath is pure gold.
Blue Team: Midnight blue main garment with powder blue trim and sky blue obi. Undersuit takes on a bluish cast. All leather turns silver.
Dark/Gothic: Black main garment with silver trim and blood red obi. Undersuit is dark violet and sheer with no bandages on the front. Collar is black with silver spikes. All gold turns to iron gray and all brown to silver (save for the collar which of course is black).
Paladin: White main garment with gold trim and lilac obi. Brown of sheath turns to silver, as does the undersuit. Collar and straps become gold, and the claw in her ear is replaced with a gold earring.


Wii Mote sound: "Very well then. Shall we begin?"

To Unlock: Clear Boss Battles with Wolf, Meta Knight, King Dedede, Bowser, Wario, and Ganondorf OR clear Classic Mode with all characters that have a black alt, using said alt. (i.e. For Pit to count you would have to use "Emo Pit".)

Unlock Message: Teigen Kalos, Verenic wanderer, has joined the Brawl!

~~~~~

Idle Animation:
#1: Teigen lightly places her hand on her stomach and glances at it, her expression softening.
#2: Teigen's ears prick up as she sniffs the air with furrowed brows and curled lip.

Taunts:

Up: Closes her eyes, tilts her head back, and howls. Teigen's vocalization is lower and sadder than Wolf's howl.
Down: Crosses hands protectively over her abdomen and hunches over, snarling "You! Out of my sight."
Side: Jabs with her sword and hisses "It ends now!"

Crowd Cheer: "TEI~GEN! TEI~GEN!"

End-battle poses:

Win Pose 1: Sits with her back to the camera and head down, softly murmuring "Forgive me."
Win Pose 2: Smirking, Teigen folds her arms and proclaims "A worthy adversary, but no match for me."
Win Pose 3: High atop her mount, Teigen gets off and hugs Tsaa's neck affectionately. Instead of her usual solemn aspect, she is wearing a rare and genuine smile, though it shows her fangs.
Loss Pose: Teigen claps reluctantly with bowed head.

~~~~~

Subspace Emissary: When Link and Yoshi clear the Forest level, they are greeted coldly by a strange woman mounted on a feathered creature (Teigen, duh) who attacks them. After Teigen is defeated, Link, since he is an honorable hero, revives her, only for Teigen to hop onto Tsaa's back again and ride out of sight, leaving behind two very confused green fellows with boots. She is not again seen until Marth appears; having tried to destroy the R.O.B.s trying to set off the Subspace Bomb, Primids spawn and beset her. Marth, being the chivalrous gentleman he is (and perhaps not liking Subspace beasties in general), rushes to her aid; the player picks between Teigen and Marth and fights off 30 Primids of various types. Afterwards, Teigen bows in gratitude and introduces herself (of course, by way of gestures and maybe a grunt or two), and Marth does likewise. Then the Veren woman does Marth a favor in turn; she whistles for Tsaa and offers him a ride to his castle. Teigen's subsequent appearances are with Ike, Marth, and Meta Knight. She only rides Tsaa in that one scene where they're all running really fast.

Snake Codec:

Snake: I'm sorry, but I refuse. Normally I don't turn down a challenge, but this is crossing the line.

Colonel: I'd assume you're fighting Teigen.
Snake: Actually, I'm trying not to fight her. This is no place for a pregnant woman!

Colonel: She's surprisingly resilient, Snake. She has to be, living as a solitary wanderer. Do you see that big sword? She doesn't carry it around for ornamentation.
Snake: That's all? I suppose she never heard that you're not supposed to bring a sword to a gun fight.

Colonel: Well, Teigen doesn't exactly travel alone. Watch out if she calls for her raptor mount. It's fast - and it's got nasty teeth!
Snake: Yeah, that's great and all, but I don't feel any better.

Colonel: This is Smash Brothers, Snake. It's not like anyone actually dies or gets hurt.

Snake: Touche, Colonel.
 

Chief Mendez

Smash Master
Joined
Mar 25, 2007
Messages
3,161
Location
Somewhere
Iron Thorn said:
Holy hell, her last two tilts are killing me. I don't know what do do with them! Also, I wants the feedbacks for what little I've got done.
It's never a good idea to call one of your moves "boring". So fix that first.

For her Up Tilt: as she fights with a samurai sword, there's not really any sword attack that goes upward she can use. I'd suggest using the butt of the handle, or simply punching upwards with the crossbit, rather than a forced "vertical sword sweep". You can give it unusual knockback or really high damage to compensate for the smaller-than-normal range.

Down Tilt: The generic leg sweep movement, only her legs stay under her, and she spins her sword around instead. It woudn't trip, but wouldn't be a boring ol' "stabs sword at opponent's feet".

Anyways, that's all I've got for now. Hope it helps.
 

Iron Thorn

Smash Lord
Joined
Jun 26, 2008
Messages
1,097
Location
Going to Gamelon. I'm taking the Triforce of Spag
Ah, I was thinking about the dtilt as being something like that. And the butt of her sword is rather big (think three wallets stacked on top of each other), so that works.

And I changed "boring" to "simple". Which is kind of a euphemism for boring, but hey, whatever works ;P Thanks man.
 

Evilgidgit

Smash Apprentice
Joined
Oct 10, 2007
Messages
166
Location
England
I edited my moveset per your advice, Chief Mandez.

I'm not really sure who my next moveset is going to be on, but I have got several candidates:

*The Mad Hatter (from American McGee's Alice)
*Jabberwock (from American McGee's Alice)
*Kroenen (from Hellboy)
*The Angry Video Game Nerd
*Latias
 

TWILTHERO

Smash Lord
Joined
Aug 19, 2007
Messages
1,880
Location
Canada
Lol, at the sakurai moveset. And Chief, your dracula moveset was awesome.

And yes, you must the AVGN Evilgidgit.
 
D

Deleted member

Guest
Disclaimer: This is a joke moveset.

Pikafan8269297 join teh barwl!!!!11!!

Pikafan iz a pikuchu main who hab a lot off valib ponts on wyh pikuchu iz teh best charatr in barwl evar.

Stats (Out of 5):
Power: 5/5
Walking Speed: 5/5
Dash speed: 5/5
Range: 5/5
Projectile distance: 5/5
Drop speed/weight: 5/5
Size: 2/5
1st jump: 5/5
2nd Jump: 5/5
Crouch: 5/5
Traction: 5/5
Combo: 5/5
Wall jump: Yes
Wall cling: no
Crawling: Yes
Glide: no
Tether: no

A Attacks

A--Thunder: Maeks oponetn ded

A Combo--Thunder: Maeks oponetn ded

Side A--Thunder: Maeks oponetn ded

Up A--Thunder: Maeks oponetn ded

Down A--Thunder: Maeks oponetn ded

Smash Attacks

Side Smash--Thunder: Maeks oponetn ded

Up Smash--Thunder: Maeks oponetn ded

Down Smash--Thunder: Maeks oponetn ded

Air Attacks

Neutral Air--Thunder: Maeks oponetn ded

Foward Air--Thunder: Maeks oponetn ded

Back Air--Thunder: Maeks oponetn ded

Up Air--Thunder: Maeks oponetn ded

Down Air--Thunder: Maeks oponetn ded

Situational Attacks

Dash--Thunder: Maeks oponetn ded

Get-Up--Thunder: Maeks oponetn ded

Ledge--Thunder: Maeks oponetn ded

Grab and Throws

Grab Attacks--Thunder: Maeks oponetn ded

Foward Throw--Thunder: Maeks oponetn ded

Back Throw--Thunder: Maeks oponetn ded

Up Throw--Thunder: Maeks oponetn ded

Down Throw--Thunder: Maeks oponetn ded

Special Moves

B--Thunder: Maeks oponetn ded

Side B--Thunder: Maeks oponetn ded

Up B--Thunder: Maeks oponetn ded

Down B--Thunder: Maeks oponetn ded

FINAL SMASH--Thunder: Maeks oponetn ded
 

SirKibble

Smash Champion
Joined
May 2, 2008
Messages
2,400
Baron, I actually lol'd when I read that. I remember that little twerp... He had that really valib thred with all those valib ponts.
 

KoJ

Smash Journeyman
Joined
Aug 16, 2008
Messages
317
Dracula... It's the best moveset in the contest. Now I don't like to brag (:laugh:), but I think some of my movesets are very good (Big Daddy/Little Sister, Dalek, Zombie). Your movesets, on the other hand, flat out destroy the competition. Gray Fox and Dracula both show amazing detail, time and creativity.

Dracula is perhaps one of the worst characters in terms of power level I've seen in this contest... And that's a good thing. He's actually balanced. His special moves are literally terrifying, with his Bat recovery being my fave. His aerials are all very nice, and his smashes and tilts are appropriately awesome and (somewhat, due to your intentions)usable at the same time. F-tilt's one of my favorites. It's like a Fox Phantom in its description.

You win, Mendez. Here's your crown.
|_|_|
^_^_^
:chuckle:

Oh, and Pikafan needs D-smash, F-smash, and Neutral B spamming too.
 

mantlecore77

Smash Journeyman
Joined
Jul 17, 2008
Messages
440
Location
Ohio


Curse you, SirKibble! I was considering Frog. Oh well. Maybe I'll do Robo.
You better make Crono & Frog epic!

Olympic Man: He really needs more details for his attacks, especially his special attacks.
I have the same criticism as Chief here, but you had good, not-boring move ideas for the man.

Disclaimer: This is a joke moveset.

Pikafan iz a pikuchu main who hab a lot off valib ponts on wyh pikuchu iz teh best charatr in barwl evar.
O ya well if pikafanz gets close to pikachu he wil juzt use teh thunder and hez will be ded.
 

TWILTHERO

Smash Lord
Joined
Aug 19, 2007
Messages
1,880
Location
Canada
Ah, Pikafan. I remember that kid.

You for got this line:
"but pikuchu has super gud b dawn attack and den metnite gets rly rly pwned and then pikchu maks him ded"
 

killori

Smash Cadet
Joined
Aug 3, 2008
Messages
35
Location
Over there
http://en.wikipedia.org/wiki/agumon
This is just a patent I'll edit this a lot until it's finished.

Agumon, Greymon, and Metalgreymon


Agumon

Stats
Speed: medium
Power: low-medium
Attack speed: medium
Air speed: Medium

Pros
Great throws and quick pummel
Good range
Small
Can crawl
Can wall jump

Cons
Light
Speed isn't great
Bad tilts

A: swipes his claw 3%
AA: swipes his other claw 4%
AAA: headbutts in front of him 5% and little knockback
Dash attack, dives forward doing 6%

Aerials
Nair, shoots sparks around him doing 4%
Dair, stomps his feet spiking opponents and doing 9%
Fair, slashes in front of him doing 6%
Bair, kicks behind him like DK doing 7%
Uair, bites above him and then spits the person below him doing 8%

Tilts
Forward tilt, jabs his claw forward doing 3%
Up tilt, swipes his claw above him doing 6%
Down tilt, spins his claws around him doing 7%

Smashes
Forward smash, breathes fire on his claw and swings it doing 14-32% depending on how much you charge it.
Up smash, does a back flip with his body as a hitbox doing 9-22%
Down smash, shoots fire downwards on both sides of him simultaneously doing 7-18%

Specials
Neutral special, shoots a fireball which you can charge forever but can't move with. You can control what direction he shoots it. It gains strength, speed, and size with charging and does 4-11%

Up special, shoots fire below him getting thinner to his mouth propelling him upwards and doing 14%

Side special, same as Charizard and Bowser's neutral special doing 7-1%

Down special, shoots fire around him like a fountain doing 4% and there's a one tenth chance that it will be lava that can seep across the map trapping people like Piplup and doing 7%. Holding b keeps the move going.

Throws
Pummel, scratches opponent for two damage.
Up throw, throws opponent above head and jabs upward doing 12%
Forward throw, pushes opponent forward, jumps up, and does something similar to Falco's fair while breathing fire doing 17%
Back throw, headbutts opponent backward doing 13%
Down throw, bites opponent and jumps up spitting opponent down doing 15%

Features
Wall jump: Yes
Wall cling: No
Tether:No
Glide:No
Crawl:Yes

Taunts
Up, Bites rapidly before falling down
Side, Says now you see me vanishes in smoke and says now you don't
Down, Puts one paw forward and unenthusiastically says Roar

Victory Poses
Says your lucky you didn't meet Metalgreymon
Laughs and says pathetic
Breathes smoke surrounding him, says to easy and when smoke clears is gone
Music: Agumon Dance

Snake Codec Message

Snake: Mei Ling is that another pokemon
Mei Ling: No it's a digimon
Snake: Well whatever a digimon is he looks puny
Mei Ling: He may be small but he's bigger than the "pink marshmallows" and can use fire and claws.
He also comes with a surprise.
Snake: What is it
END TRANSMISSION

Costumes
Changes color

Kirby hat
Gains snout and turns orange

Map
Pier 42 or oil panic from digimon rumble arena 2

Final Smash
Makes a large amount of area around him blast fire upward doing 25% and good knockback and digivolves to greymon.


Greymon
Size of bowser with tail just longer than Charizard's tail

Stats
Speed: Medium
Power: High
Attack Speed: Medium
Air Speed: Low

A: slashes doing 4%
AA: slashes other claw doing 4%
AAA: Hits with horn doing 7% and decent knockback
Dash Attack, hits horn forward doing 8%

Aerials
Nair does something similar to meta knight's tornado except with fire dealing 5% and good knockback
Fair hits with his horn in front of him dealing 7% and good knockback
Bair hits back with his tail dealing 9% and great knockback
Dair jabs tail below him doing 8% and spiking opponent
Uair claps hands above him doing 2% and and grabbing them. Every time they try to escape he squeezes them for 3% and can do a greycide!!!!!

Tilts
Up tilt, hits upward with his horn doing 5% and little knockback
Side tilt, scratches in front of him doing 4% and little knockback
Down tilt, stretches forward doing 7% and decent kockback

Smashes
Up Smash, jumps upward with his horn doing 11-22% and very good knockback
Side smash, range of peach bomber, hits with his horn and when fully charged doing great knocback or breaking shields, doing 22-37% but with bad starting lag
Down smash, hits both sides of him simultaneously with fire claws doing 14-27%

Specials
Neutral special, bites like Wario's special doing 3% then shooting fire getting the person out of his mouth and doing 6% and ok knockback

Up special, like a fire version of Wario's up b except at the end he hits his horn upward doing 5% and doing decent knockback

Side special, dives claw first with no starting lag and does 11% and great knockback but bad ending lag if it misses

Down special, shoots a blast of fire the range of wolf's laser doing a constant 5% and virtually no knockback making it possible to wall of pain

Throws
Pummel, scratches opponent for 3%
Up throw, hits opponent upward with horn for 9%
Forward throw, fire punches opponent forward doing 12%
Down throw, jumps up and comes down hard on opponent for 14%
Back throw, hits opponent back with tail for 15%

Features
Wall Jump: No
Wall Cling: Yes
Glide: No
Tether: No
Crawl: No

Taunts
Up, pats his belly
Side, Roars
Down, makes a huge ball of fire in his mouth, but he then coughs up smoke

Victory Poses
Stomps on the ground shaking the screen
Growls while clenching his fists and showing his teeth
Jumps up, losing his helmet and quickly puts it back on

Snake Codec Message
Snake: Mei Ling, this is the surprise isn't it
Mei Ling: Yes
Snake: Lemme outta here
Mei Ling: Snake don't whine you remember that blue tabuu thing don't you
Snake: Yes, anything else I should know
Mei Ling: He comes with a surprise
Snake: NOOOOOOOOOOOOOOOOOOOOOOOOOOOOOOOOOOOOOOOOOOO
END TRANSMISSION

Costumes
Changes color

Kirby hat
Gets weird helmet and teeth

Final Smash
Shoots 8 tornadoes the directions on the compass trapping people in them doing 5% per second and travelling through walls. Digivolves to Metal Greymon.


Metal Greymon
Size of Greymon

Stats
Speed: Medium
Power: Great
Attack speed: Low medium
Air speed: Very low

A: Slashes normal claw doing 4%
AA: Jabs metal claw doing 6% and good knockback
Dash attack same as Greymon's

Aerials
Nair, spreads wings doing great knockback but no damage
Uair, shoots sparks upwards doing 4% and little knockback
Fair, hits forward with his metal claw doing 6% and good knockback
Dair, dangles his metal claw under him off his arm doing 6% and no knockback, lasts for 1 second
Bair shoots fireball behind him doing 11% and great knockback

Tilts
Up tilt, extends metal claw above him doing 5%
Side tilt, hits with his normal claw doing 6% and little knockback
Down tilt, headbutts doing 11% and pretty good knockback

Smashes
Up smash, glides upward hitting with his horn doing 16-37%
Side smash, hits horn forward doing 19-41%
Down smash, shoots missiles on both sides of him at a 45 degree angle doing 20-44%

Specials
Neutral B, Like Agumon's b except doing 9-23%

Side B, shoots a missile that gets stronger the further it goes doing 9-17%

Up B, missiles drop under him while he breathes fire on his horn. Missile explosion spikes doing 16%, good vertical knockback, and propelling him upward, and horn does 11 damage with good vertical knockback

Down B, like a fire version of Meta Knight's tornado except at the end sparks fly out doing 1% each

Throws
Pummel, Scratches with metal claw doing 3%
Up throw, bites opponent and spits them upward for 6%
Forward throw, headbutts forward for 7%
Down throw, bounces opponent downward for 7%
Back throw, brings opponent back but pulls the claw extension back doin 11%

Features
Wall Jump: No
Wall Cling: No
Tether: Yes, Length of 4 pikmin
Crawl: No
Glide: Yes

Taunts
Takes off his metal helmet, scratches his head, and puts it back on
Wiggles his tail and laughs
Starts to de-volve then stops and says psyche

Victory poses
Says did you think you had a shot
Shoots his missiles at the camera
Throws away his metal helmet saying I'll save that for people who can scratch it

Snake Codec Message
Mei Ling: Snake don't quit now Snake Snaaaaaaaaaaaaaake
Snake: Mei Ling I'm fine
Mei Ling: It's metal greymon!!
Snake: Shhhhhh just ignore him omg he sees me
Mei Ling: Dont' worry Snake next time he devolves into Agumon after a really good final smash but still Agumon
Snake: NOOOOOOOOOO I mean
END TRANSMISSION

Kirby hat
Gets the metal helmet with the horn

Costumes
Changes color

Final Smash
Lava geysers raise from the ground doing 40% burning opponents for 5 more% and making damage ratio and knockback on them 2.0, if Metal Greymon gets hit by a geyser he does .5 more for his attacks. He then de-volves into agumon.


That's it now give me feedback!!!!!!!!!!!!!!!!!!!!!!!!!!!!!
 

BKupa666

Barnacled Boss
Moderator
Joined
Aug 12, 2008
Messages
7,788
Location
Toxic Tower
Andy's Toys


An inseparable quartet with conflicting personalties. Straight out of the toy chest, Andy's Toys have joined the Brawl!

These four toys swap with their Down Special, similar to Pokemon Trainer's Pokemon and Zelda / Sheik. However, there is a twist to allow you to change between the four much more freely and easily in matches, explained at the bottom of the four characters' movesets.


Mr. Potato Head:


Mr. Potato Head is known for his acidic witty attitude, as well as his sarcastic commentary. In Smash, Potato Head is the most balanced member of Andy's Toys. He has above average speed and power, and average weight, as well as a mix of close range and projectile attacks.

STATS

Power: 6/10: Above average, he has some killing moves, although Smash novices might complain that he doesn't.

Walking Speed: 4/10: A slow, yet determined walk of sorts.

Dash Speed: 7/10: He dashes fiercely, pumping his bendable arms.

Weight: 5.5/10: Only slightly above average, Potato Head isn't easy or difficult to KO.

Range: 6/10: As mentioned earlier, he has a good balance between close and longer ranged attacks.

Projectile Distance: 7/10: When he gets lucky, his projectile can go pretty impressive distances; otherwise, the range is only average.

Fall Speed: 6.5/10: Potato Head falls at an above average speed.

Size: 6.5/10: About Mario's height at the top of his bowler hat.

First Jump: 5/10: An average jump; his first jump is mostly vertical.

Second Jump: 6.5/10: This jump is above average, and can be maneuvered a lot more easily.

Crouch: 5/10: Potato Head bends down a bit and covers his hat with both hands.

Traction: 7/10: Despite being a wobbly toy, he doesn't slide around too much.

Combo: 6.5/10: Above average, he can definitely combo, but not as well as some other characters.

Wall Jump: Yes, holding his hat to his head with one hand, Potato Head kicks off the wall to bound away.

Wall Cling: No

Glide: No

Crawl:
No

Tether: No

BASIC

A: Glove Slap: Potato Head extends his bendable arms and slaps the foe with his right hand. 2%

AA: Glove Backhand: After he slaps, he quickly slaps back in reverse, backhanding the foe. 5%

AAA: Spud Kicks: After the above two attacks, Potato Head lies down on his back and kicks out at the foe, four times rapidly, with his blue shoes, alternating each kick. Slight ending lag, and cannot be continued, but if you are caught with the first kick, you're pretty much guaranteed to be hit with the following three. The last kick does below average knockback. 7-15%

TILTS

Side A: Bowler Bash: He pulls his black bowler hat off his head and twirls it in front of him, letting go of the hat. The hat spins in place, like a frisbee, directly in front of Potato Head, for about .5 second before he puts it back on. This has a bit of ending lag, but does multiple light hits while spinning. Foes get the most knockback if they are hit with the hat as it is being released. 1-7%

Down A: Card Deck: Potato Head holds out a deck of playing cards (Buzz Lightyear cards, to be precise) and spins them 180 degrees in front of him on the floor. As he spins them, they come out of deck formation and form into an arc on the floor. Foes are given the most knockback if they hit the first card as it comes out. This move can be used many times in a row rapidly, and can trip foes 25% of the time. 4-6%

Up Tilt: Pizza Push: Potato Head pulls out a cardboard box of Pizza Planet pizza in front of him, then thrusts it up powerfully. The pizza flies a bit out of the box to hit foes, then falls back into the box, which Potato Head then stows. This has slight startup and ending lag, but can still juggle foes effectively. The pizza hits the strongest just as it comes out of the box, and can kill foes with high damage levels off the top. 7-8%

SMASHES

Side Smash: Arm Chop: Potato Head pulls one of his arms out of its socket and karate chops it down in front of him rapidly. This Smash has very little lag; only a tiny bit at the end, when Potato Head sticks his arm back into its socket. Because of this, it can be used regularly in combos. The arm has average range, and does the most damage if you hit with the hand as opposed to the arm part. If used repeatedly in a row, Potato Head will walk forward while chopping, yelling out, "Back! Back, you imbeciles!" 9-17%

Down Smash: Alien Antics: When charging, Potato Head looks around, uneasily. When released, Potato Head jumps up in shock a bit, then groans in annoyance, as the three green aliens that he "adopted" appear around him, saying, "Daaaaaddddyyy!" in their odd voices, and circling around him rapidly to knock nearby foes away. This is a close range Smash, but does decent horizontal knockback to the foes it hits. The aliens teleport away when the Smash end, or if Potato Head is attacked. 7-21%

Up Smash: Mr. Potato Headbutt: Potato Head leans to the right, charging, then headbutts up and left, in a powerful arc. This is pretty close range, but can kill off the top at relatively high percents, despite being weaker than his Down Smash. Slight ending lag as he recovers his balance. 12-20%

AERIALS

Air A: Split Kick: Potato Head pulls his shoes out of their sockets and holds them out sideways (where his arms are), in a unique kick of sorts. Slight ending lag as he puts them back in, but a great move for combos that can kill at higher percents. 6-7%

Forward Air A: Sketch Slap: Pulling out the Etch-A-Sketch, he slams it forward in a faster version of Game & Watch's F-Air. This makes it a great combo move, although it doesn't kill that well. 8%

Back Air A: Mouth Chomp: Potato Head pulls his mouth out of its socket, holds it back, and chomps angrily at foes. This move can hit up to five times; the last hit giving the most knockback. 3-12%

Up Air A: Arm Drill: Potato Head reaches up with both arms and spins them rapidly around in their sockets. Multiple hits, with the most knockback on the last hit. 2-10%

Down Air A: Potato Mash: Potato Head reaches down, pulls his shoes out of their sockets, then spins his arms (holding the shoes) completely around his body. The hitbox is both shoes, but only when they are below his body (not above); if you hit foes with the bottom of the shoes, they are spiked. There is ending lag as he puts his shoes back on, but this is quite handy for edgeguarding if done correctly. 11%

OTHER ATTACKS


Facedown A: Belly Spin: Potato Head spins 360 degrees around on his belly (or face?) very rapidly before getting back up. The hitboxes are his feet and hands. 3-5%

Faceup A: Arm Jab: Potato Head pulls one arm out of its socket and jabs it forward accusatorily as he gets back to his feet. 5%

Tripped A: Shoe Spiral: From his tripped position (sitting on his butt), Potato Head rapidly takes out both shoes and spins around once on his now-bare underside, knocking away foes with them, before hopping up and putting the shoes back in. 6-7%

Ledge A: Card Shuffle: Potato Head pulls out the same Buzz Lightyear playing cards from his D-Tilt and shuffles them hand to hand as he recovers. The cards are the hitbox. 4%

Ledge A (over 100%): Potato Roll: He struggles onto the stage, rolling over once, moaning, as he gets up. 2-3%

Dash A: Sketch Slide: Potato Head pulls out the Etch-A-Sketch again, hops onto it (as if he were riding a sled), and slides forward a bit on top of it, before hopping off. This is a quick Dash Attack, but doesn't knock foes back very far. It also has slight ending lag. Because of this, it is best to use if you know your foes will not recover and punish you for it. 7%

GRAB


He pulls out one arm and swipes forward with it. Average range; with slightly more range from a standstill than from dashing. Once the foe is grabbed, he puts his arm back in, while holding him or her with the other arm.​

Z: Conk: He does a karate-chop type motion onto their head. Can be done fairly quickly. 2%

Side Throw: Shoe Kick: Potato Head pulls one shoe off and thrusts it forward into the victim's face, in a kicking motion. Below average knockback. 7%

Back Throw: Eye Pop: One of his eyes pop out and knock the foe backwards. Potato Head then scrambles to put it back in. Slight ending lag, but the best knockback of his grabs. 6%

Down Throw: Block Crush: He releases the foe (who cannot move yet) and pulls out an armful of building blocks, struggling. The weight is too much for him, and his arms fall off, dropping the blocks on the helpless victim. The most damaging, but the least knockback. Afterwards, Potato Head sticks his arms back in. 12%

Up Throw: Ball Bounce: Potato Head pulls a colorful bouncy ball out of nowhere and throws it to the ground between him and the victim. The ball then quickly bounces up to hit the foe, giving low knockback, but decent damage. 9%

SPECIALS


B: Potato Compartment: Potato Head opens up the compartment on his back and pulls a random helpful item out of his body, like seen throughout this movie.

Cheese Puffs: He throws these at foes, who get minor damage and knockback. 8-11% 30% chance of getting these.

Golf Ball: He tosses a slowly bouncing golf ball at foes, who get moderate damage and knockback. 16-17%
30% chance of getting this.

Chattering Teeth: He throws a windup set of chattering teeth that trap foes in a 'Piplup' effect with their chattering and chomping. 3-25%
20% chance of getting these.

Monkey Chow: He throws pieces of monkey chow (looks like dog kibble) at foes. If this connects, monkeys attach to foes for 10 seconds (unless shaken off by attacks) and give poison damage. Up to 30%
15% chance of getting this.

Play-Doh: He bowls a ball of blue Play-Doh across the stage. This can cover up to half of Final Destination. It grows the longer it rolls, bursting at maximum range. The ball of Play-Doh can be destroyed with a barrage of attacks. Odds are, foes won't have the chance. But odds are, you won't get this in the first place. Up to 30%
5% chance of getting this.

For all items except Play-Doh (which is automatically bowled), Potato Head can move around before throwing the item received in any direction, like a normal item. Foes can also intercept the item to throw at any other foes, including Potato Head.

Side B: Mr. Angry Eyes: Potato Head tries to pull his "angry eyes" out of his rear compartment, but in his rush, he accidentally puts on his extra pair of blue shoes. Putting the shoes on over his regular eyes, (seen from 4:53 - 5:00), he then jogs in place, charging. When he releases, he dashes forward in a blind rampage, hitting foes with his new "eyes". The charge changes this move from barely knocking you anywhere, to hard horizontal hits. To cancel the charge, hold down on the control stick; his regular eyes will push out the shoes and the charge will instantly halt. This can be powered-up in midair, but is very poor for horizontal recovery, since he falls while powering up and charging. He is left in a freefall if this finishes in midair. 4-18%

Up B: Firetruck Spring: Potato Head sits in the lift part of a Little Tikes Fire Truck, complete with smiling Tike Firemen. The lift then launches him up, Potato Head doing one aerial flip. Above average recovery. The truck vanishes after the launch. Potato Head hits foes while launching / flipping, as does the truck during launch time, before it disappears. 4-9%


TAUNTS AND VICTORY / LOSS POSES


Up Taunt: He jerks one thumb at the closest foe, then pulls his mouth out, leans over, and taps the mouth against his rear end.

Side Taunt: He pulls out the Etch-A-Sketch, which rapidly and independently draws a noose. He then points at the foe with an angry look on his face.

Down Taunt: He changes his facial parts so they are entirely wrong, and jokes, "Hey, look! I'm Picasso!" A small hockey puck with arms and legs appears in front of him while he changes, then shrugs after he talks, not understanding the joke.

Victory Pose #1: He says in delight, "Gee! I gotta shave!" and pulls off his mustache part, grinning as he tosses it away. Mrs. Potato Head then walks onstage, and the two kiss playfully.

Victory Pose #2: He backs away from thethree green aliens he adopted, in annoyance. The aliens repeatedly chant, "You have saved our lives! We are eternally grateful!" Irate Mr. Potato Head replies, "Will you just leave me alone?!"

Victory Pose #3: He holds up one arm, grinning a haughty grin and waving, slightly obnoxiously.

Loss: He claps, a sore, angry expression on his face.

Rex:


Rex is a kindhearted, although cowardly and unstable, T-Rex toy. He is the powerhouse of the four toys, as well as the heaviest. However, he also is the slowest. Many of his attacks are finishers, using his massive tail and head (because of his diminutive limbs).

STATS

Power: 8/10: Rex is the strongest out of the four toys.

Walking Speed: 3.5/10: Rex walks awkwardly and slowly.

Dash Speed: 4.5/10: To compensate for his power, Rex is the slowest runner of the four toys.

Weight: 8/10: As is expected from his size, Rex is a heavy character, and the heaviest of the four.

Range: 7.5/10: Good; his tail and prop attacks have decent reach.

Projectile Distance: 0/10: Rex has no projectiles.

Fall Speed: 6/10: Rex falls at above average speed.

Size: 6/10: He's about as long as Bowser (counting his tail), and as tall as Donkey Kong .

First Jump: 3.5/10: Not a great jump; real dinos can't jump at all because of their weight.

Second Jump: 4/10: Not much better; below average.

Crouch: 5/10: Rex tries to get low to the ground, but it's difficult with his size.

Traction: 4/10:Rex slides a lot in his uneasiness.

Combo: 3.5/10: Rex does not combo very well.

Wall Jump: No

Wall Cling: No

Glide: No

Crawl: Yes, but very awkwardly.

Tether: Yes

BASIC

A: Head Swing: Rex clumsily leans forward, swinging his large head. 4%

AA: Head Pivot: After his first move, Rex pivots his head all the way around (he's a poseable toy; he can do this). Hold the A Button to keep his head spinning. However, this is a slow-ish combo, so it's hard to use effectively on good opponents. 3% per each hit.

TILTS

Side A: Doodle Pad Swing: Rex pulls out the doodle pad he stole from Woody and swings it 180 degrees in front of him. Slight ending lag, but a good move for building damage from average range. 8%

Down A: Dino Foot: Rex extends a foot at foes in a cowardly manner (like Luigi's D-Tilt, but stronger). This can trip foes 30% of the time. Comes out quickly as well, so it can be used easily to start combos. 7%

Up A: Controller Spin: Rex takes a video game controller (I believe it is for an SNES) from his favorite Buzz Lightyear game and spins it in an arc over his head. Good range for a tilt. Can be used to juggle foes effectively. 6%

SMASHES

Side Smash: Cowardly Spin: Rex cries out and spins around, whacking foes with his mighty tail. Starts up slow, but ends pretty quickly. Great knockback and range. This is the same move he used to defeat Emperor Zurg in Toy Story 2, seen here (8:03 - 8:21). 12-26%

Down Smash: Ring Rumpus: Rex pulls out a set of rings similar to these and whirls around once. This is mainly for building damage, as the knockback is only average, and the move has a lot of startup lag. However, if fully charged, the rings will fly off to damage foes from above average range. The hitbox is the peg of the ring set, and the rings when they fly off. The flying rings disappear when they hit a foe or the ground. 9-21%

Up Smash: Dominant Predator: Rex leans his head up and chomps four times in an "OHM NOM NOM NOM!" fashion. This is his fastest and most effective smash, although it only has average range. The knockback is best on the last chomp. 8-29% from all four chomps.

AERIALS

Air A: Dizzy Dino: Rex spins 360 degrees around, flailing slightly, and slamming foes with his powerful tail. Average range, since the hitbox is his entire tail. This is a good combo move. 6-13%

Forward Air A: Snout Dip: Rex leans forward and hits foes with his snout in a 'pecking' motion. This is his fastest aerial, so it is best to use in combos. 8-9%

Back Air A: Fear Fall: Rex screams and does a backwards flip, hitting foes with his head as he does so. Lots of ending lag, but his strongest aerial overall, knockback wise. 9-12%

Up Air A: Use Your Head!: Rex swings his head upwards, pivoting it slightly. This is like a multiple hit version of Bowser's U-Air, except faster and not nearly as powerful. Rex has about the same range as well. This can do up to four hits, the first and last ones doing the most knockback. 4-16%

Down Air A: Tail Pogo: Rex leans down on his tail as if it was a pogo stick and plummets down. Foes take the most knockback if they are on the ground. This move can spike foes if they are hit just as Rex is coming down. Rex lags a lot if it hits the ground before it's finished, getting stuck on his tail a bit before rolling to his feet. 10-14%

OTHER ATTACKS

Facedown A: Rex Wham: Rex leans up, hitting foes in front of him with his snout, while kicking foes behind him with one leg. 5-6%

Faceup A: Tail Roll: Leaning on his tail to gain momentum, Rex rolls onto his feet from the ground, kicking foes away with both feet as he does so. 4-5%

Tripped A: T-Rex Tickle: From his tripped position (sitting flat on his butt), Rex leans forward and tickles nearby foes with a weak laugh. 3-6%

Ledge A: Snout Thrust: Rex leans forward as he gets up and nudges foes aside with his snout. 4%

Ledge A (over 100%): Slow Whip: Rex struggles onto the edge (it's a miracle he can hold on with such little arms!) and slowly turns, hitting foes with his tail. 3%

Dash A: Stego-Stumble: Rex yells out and stumbles, sliding forward on the ground for about .5 second before getting up. Unlike Dedede's Dash Attack (which it may seem to mimic), Rex's looks much more accidental. Starts up quickly, but has a good deal of ending lag. 9%

GRAB


Rex leans forward and tries to grab foes in a hug of sorts. Not very good range (running or from a standstill) because of Rex's tiny arms.​

Z: Squeeze: Rex squeezes the grabbed character tight against his hard body. This can be done surprisingly quickly. 4%

Side Throw: Super Shake: Rex holds up the foe and shakes them up and down three times vigorously. Good damage, but low knockback. 14%

Back Throw: Tail Smack: Rex throws the foe backwards, then turns in their direction, unknowingly hitting them with his tail. Good knockback, although rarely foes with high damage can escape the tail smack with DI. 11-12%

Down Throw: Dino Faint: Rex drops the foe and does a comical sideways 'fainting' motion onto them. Good knockback, but not a great move to use in FFA's, where foes can hit Rex as he's lying down. 11-13%

Up Throw: Tail Toss: Rex throws the foe up, and bends up his tail to hit them up. This has good vertical knockback, but a foe at low damage can quickly use an aerial and hit Rex before he's finished. 8-11%

SPECIALS

B: T-Rex Roar: Rex leans back, charging a powerful roar. Press the button again to release it. If you don't charge it, Rex will only let out a feeble roar, speaking the word 'roar'. This only trips foes and gives them 1%. However, fully charged, Rex will let out a fierce realistic dino roar, giving foes hard horizontal hits. 9-18% If spammed too much (more than 4 times per 15 seconds, Rex will cough and collapse to the ground for about 1.5 seconds. Then, he must use at least 10 other moves or be KOed, before the roar reaches full potential again. The charge can be held after canceling it with L/R. Shown here (4:03 - 4:10).

Side B: Terror Charge: Rex screams and dashes forward, plowing through foes in his path. The longer you refrain from using the move, the stronger it becomes. If not charged, Rex only jumps forward in a panic. At maximum potential, Rex dashes forward (faster than his normal dash) and gives foes hard vertical hits. You can cancel the charge by tilting back on the control stick (Rex will land on his behind, stopping the charge). He is left in a freefall if he finishes the charge off the edge. 5-21% Seen here (0:34 - 0:42)

Up B: Monkey Toss: Rex pulls out a barrel of monkeys and gives it a little upwards thrust (not letting go of the barrel). 5 monkeys, all linked together, reach up in a diagonal line (while laughing an annoying monkey laugh) and grab the edge for a handy tether recovery. It also does very minute damage. 1-3%


TAUNTS AND VICTORY / LOSS POSES

Up Taunt: Rex leans up and yells, "I don't like confrontations!", flailing his little arms slightly.

Side Taunt: Rex leans forward and asks curiously, "Did I scare you?"

Down Taunt: Rex holds up his video game strategy guide and proclaims excitedly, "I know how to defeat Zurg!"

Victory Pose #1: Rex roars happily, then stares nervously at the screen.

Victory Pose #2: Rex holds up his doodle pad and asks, "How do you spell FBI?"

Victory Pose #3: Rex jumps about, clumsily and happily, yelling, "Hooray!". When he reaches center stage, he trips, but still laughs, unfazed, from his position on the floor.

Loss: Rex claps sadly with his tiny arms

Hamm:


Hamm is one piggy bank who's not about to be left on the shelf! Hamm is a fairly balanced character as well, but he has a few more extremes than Mr. Potato Head, the other balanced character; Hamm is stronger, heavier, and slower than his comedic soulmate. Hamm also tends to fight at long(er) range, making coin-jingling noises whenever he moves or attacks.

STATS

Power: 6.5/10: Hamm is above average when it comes to killing power; he's the second strongest in the quartet, after Rex.

Walking Speed: 3.5/10: A slow amble.

Dash Speed: 6/10: Above average, but not too fast. Hamm must rely on his quick mouth and mind rather than agility.

Weight: 6.5/10: Hamm is decently heavy, but isn't difficult to kill.

Range: 5.5/10: Slightly above average, Hamm's physical attacks aren't really his bread and butter.

Projectile Range: 7/10: Hamm has great projectile abilities; his projectile goes a good distance.

Fall Speed: 6/10: Above average, Hamm doesn't fall too fast.

Size: 6.5/10: He's a bit taller than Ivysaur, but not as long.

First Jump: 3.5/10: A below average jump from all four legs.

Second Jump: 5.5/10: Hamm has average jumping abilities.

Crouch: 7.5/10: Hamm naturally stands on all fours, so he can duck very well.

Traction: 7.5/10: Since he's made of pink plastic, he tends to stick to the ground instead of slide.

Combo: 5.5/10: Only slightly above average, Hamm can put a few attacks together, but after that, he may find it challenging, although possible.

Wall Jump: No

Wall Cling: No

Glide: No

Crawl: Yes

Tether: Yes

BASIC

A: Hoof Jab: Hamm sits up, extends his left front hoof and jabs foes. 3%

AA: Double Hoof Jab: After his first jab, Hamm quickly does a second one, this time with his right hoof. 5%

TILTS

Side A: Bank Crank: Hamm spins around once in a quick circle, keeping his front side grounded, and hitting foes with his round bank area. This can be done many times in a row; if the button is tapped, Hamm will not stop spinning after the first attack. 7%

Down A: Snout Nudge: From his crouching position, Hamm lunges forward with a snort, hitting foes with his large snout. He gets a lot of forward momentum, so this move can be done many times rapidly to move Hamm forwards. There is a 45% chance that this will cause foes to trip. 6%

Up A: Pog Launch: A single pog (which is a cardboard circle) with a picture of Buzz Lightyear on it shoots a up a bit from Hamm's slot, hitting foes, then falls back in. Can be used to juggle, but be careful, as Hamm cannot move until the pog is back in the slot. 8%

SMASHES

Side Smash: Cork Gun: Hamm gets into a sitting position and clenches his belly button up, tightening the pressure on his cork. When released, the cork launches out of his belly button at foes like a pop gun. This has good knockback and range. The cork disappears and reappears back in Hamm's belly button after it hits a foe or the ground. 11-22%

Down Smash: Army Men Assault: When charging, Hamm pulls out a striped bucket of green toy soldiers (which were his minions when he was portrayed as "Evil Dr. Pork Chop"), and dumps them in a circle around him. When he releases, Hamm puts away the bucket as the soldiers attack fiercely, by moving in formation around him and holding up their plastic bayonets. While they attack, their commander, Sarge stands on Hamm's back and yells for them to, "Move, move, move, move, MOVE!" Average knockback and below average range. The soldiers disappear if Hamm is hit, or when the Smash is finished. 3-24%

Up Smash: Tinker Weight Swing: Hamm pulls out a weight made out of Tinker Toys (as seen here, from 4:20 - 4:24), pulls it back, swings it 180 degrees above his head with both arms, then reverses the swing. This has the best knockback of all of Hamm's smashes, but also has the most ending lag (it's a heavy weight). Average range. 13-25%

AERIALS

Air A: Swine Spin: Hamm extends all four feet and spins around once. This looks a bit similar to the beginning part of Pikachu's B-Air, but does more knockback. 8-9%

Forward Air A: Rump Bump: Hamm bends his bank area under him and slams foes in front of him. He finishes with a flip back into normal position. If you are close enough to Hamm, this is a powerful spike if you can overcome the slight startup lag. This is a great edge-guarding technique, since it will probably kill foes with higher damage off the side, even if you don't spike them. 9-13%

Back Air A: Battleship Bash: Hamm swings the board from his favorite board game, Battleship, backwards; 180 degrees horizontally. Good knockback and range. This is a good combo move, and the fastest of Hamm's aerials. 9%

Up Air A: Underside Kick: Hamm flips so his legs are facing up, then kicks out with all four legs. This is a good juggling move, and it can kill foes off the top if they have high enough damage. 10%

Down Air A: Present Plummet: Hamm pulls out a tall but thin red birthday present (from Andy's 8th birthday) and plummets downwards. This move is done in a similar manner to Game & Watch's D-Air, but with many differences. Hamm's attack is slightly slower starting up and ending, but stronger, and with a broader hitbox that G&W's key. Hamm also holds the present beneath him instead of to the side, like G&W. This has the best knockback of Hamm's aerials. 11-12%

OTHER ATTACKS

Downed A: Two-Sided Kick: Hamm jumps back to his feet, kicking out with one front foot and one hind foot. 2-5%

Flipped A: Double Coin Spin: Hamm spins back to his feet. As he does so, two coins fly out of his slot (one flying forwards, one flying backwards) to hit foes. 2-4%

Tripped A: Piggy Pivot: From his tripped position (sitting up), Hamm spins around on his butt twice, rapidly, to through off nearby attackers. 5-8%

Ledge A: Hammbutt: Hamm jumps up quickly and rams his large head into foes. 4%

Ledge A (over 100%): Slow Slide: Hamm struggles to pull himself up with his awkward hooves. When he recovers, he slides forward a bit, on all four hooves, hitting foes with his frontside. 3%

Dash A: Hamm Roll: From dashing, Hamm flies forward a bit (as if he accidentally tripped), then does a somersault sheepishly back to his feet, to make it look purposeful. This has a good deal of startup lag, but enough knockback to compensate. 7%

GRAB


Hamm pulls out Mr. Mike (a loudmouthed walking microphone), who shoots his microphone out of its holder, attached to a cord, to grab foes and pull them in. Once the victim is close enough, Hamm grabs them himself with one hoof, as Mr. Mike disappears. This grab can be used in the air to damage foes (like Samus' Grapple Beam), and is a decent tether recovery as well. 4-6% Seen here, 1:50 - 2:08.​

Z: Sharkbite: Hamm pulls out Mr. Shark (a toy-chest dwelling, humorous rubber shark), who bites foes. This can be done repeatedly fairly quickly (about as fast as multiple Wario Chomps). 3%

Side Throw: Mr. Spell Smack: Hamm pulls out Mr. Spell and swings him 180 degrees horizontally at foes. Average knockback. 7%

Back Throw: Wind-Up Rage: Hamm holds Lenny, the wind-up binoculars on legs, at the foe. Lenny does four rapid kicks with his windup legs before vanishing; the last kick does average knockback, although it is possible to Smash DI from the first three kicks. 2-9%

Down Throw: Robot Treadmill: Hamm pulls out Robot (a pro-learning, colorfully-lighted robot), who picks up the foe similarly to ROB and slams them to the ground. Low knockback, but higher damage than Hamm's other throws. 10%

Up Throw: Rocky Spin: Hamm summons Rocky Gibraltar, the mute muscle man of the toys, who picks the foe up and spins them like this (6:02 - 6:04) before throwing them horizontally. This is Hamm's strongest throw, knockback-wise. 9%

SPECIALS

B: Freeze Flash: Hamm pulls out a camera with a powerful flash and takes a picture of whatever is directly in front of him. If they are in front of Hamm, he shot gives the foe 7%, and if they are directly next to him, stuns them as if their shield broke (they are stunned longer if they have higher damage). From there, Hamm can either attack the helpless victim, or he can keep tapping the B button to snap several more rapid shots of the foe, giving them 5% per shot. If the main shot is spammed more than 5 times per 20 seconds, the film runs out, and Hamm must either use 10 different moves, or be KOed, to reset the camera. Seen here, 8:15 - 8:22

Side B: Slot Shot: Hamm stands on his head (his bank area aimed forward) and begins to shoot various American coins, rapid-fire style, out of his slot, horizontally. The first coin will usually knock foes back, but if foes aren't knocked back, they will usually get trapped in the barrage, although you can Smash DI out quite easily. This move can be held for up to 5 seconds. If it is held that long, Hamm will fall clumsily onto his back, tired, before getting up. This is a good move to use at the beginning of a match, or when a foe has low damage, and won't be knocked back by the first coin. 2-35%, but only if you are trapped in the spray for the full 5 seconds.

Up B: Pork Pound: Hamm leans down onto his bottom, jumps a good distance up, yelling, and slams back to the ground powerfully. This can be aimed horizontally or vertically; if aimed horizontally, you get little vertical distance; if aimed vertically, the horizontal distance is negligible. When you land, Hamm will lag for a moderate amount of time (longer than Yoshi's Down B, but shorter than Bowser's, both of which this move seems similar to). This move can be trapped under stage edges easily, so unless you are sure you will land on the stage safely, it may be best to rely on Hamm's tether recovery in his grab, Mr. Mike. Foes are spiked if they are hit with the initial jump motion. If Hamm is close to an edge, this move will sweetspot it. 5-13% Seen here, 6:07 - 6:09.


TAUNTS AND VICTORY / LOSS POSES


Up Taunt: Hamm tilts his head towards the ground and says, contemptuously, "I despise that chicken!"

Side Taunt: Hamm stands on his hind legs and says, "Alright, everybody, it's showtime!"

Down Taunt: Hamm's cork falls out, spilling several various coins in front of him, and he turns away, saying in an embarrassed way, "Alright, nobody look till I get my cork back in!"

Victory Pose #1: Hamm flicks three coins from the ground into his slot, then grins contentedly at the screen.

Victory Pose #2: Hamm sits, reading a car manual, and mutters, "Woah, I seriously doubt he's getting this kind of mileage!"

Victory Pose #3: Hamm faces the clapping losers, and jokes, "Why did the toys cross the road? To get to the chicken...on the other side!" He then faces the screen and laughs happily.

Loss: Hamm sits on his behind, clapping, regretful about his loss.

Slinky:


Slinky is the lovable, loyal dog toy with a slinky for a middle. In Smash, he is (as those of you who have read the previous three may have deduced) the fastest character in Andy's Toys, and one of the fastest in the game. However, this comes at a price: Slinky Dog is the lightest character in Andy's Toys as well. He's not the weakest, either, but some of his moves are nowhere near as strong as some of the other toys'. He attacks mainly with his mouth and body, as well as a few extras.


STATS

Power: 4/10: Slinky is, overall, the weakest of the four toys.

Walking Speed: 5/10: An average doggy trot.

Dash Speed: 8.5/10: A bouncy bound; definitely the fastest of the toys, and one of the fastest characters in the game.

Weight: 4/10: Slinky has the least body mass of the toys, and is therefore the lightest.

Range: 9/10: Excellent, Slinky uses his best asset to full potential in Smash.

Projectile Distance: 4/10: Not very great, his projectile goes about as far as a Pikmin in Olimar's F-Smash.

Fall Speed: 8/10: Slinky is quite a fast-faller.

Size: 3.5/10: He is about as tall as Diddy, at the top of his head, but as long as Bowser, and still scrunched up a bit.

First Jump: 5/10: An average bound, Slinky jumps from all four legs.

Second Jump: 7/10: An above average spring, Slinky has good jumping abilities.

Crouch: 9.5/10: The best crouch in the game. He's already so low to the ground, he can get even lower to dodge almost all tilts and projectiles.

Traction: 4/10: Not too good, if he builds up momentum, the wheels on his back feet will roll him forward a bit.

Combo: 7/10: He can combo the best out of the four toys.

Wall Jump: No

Wall Cling: No

Glide: No

Crawl: Yes, and a fast crawl, too

Tether: Yes

BASIC

A: Snap: Slinky leans forward and does a snapping motion with his mouth. 3%

AA: Double Snap: Slinky snaps twice, at different angles. 5%

AAA: Snap Combo: Slinky snaps as many times as you want, as long as you keep holding down the A button. This is a fast combo. Slinky barks aggressively, speaking the word 'bark' each time he snaps. 2% per each snap.

TILTS

Side A: Hound-Five: Slinky jumps up a bit, keeping his hindquarters on the ground, and slaps the foe with both paws in a high-five motion. Good knockback and range, but slight startup lag. 6%

Down A: Stretch Lunge:
From his ducking position, Slinky lunges forward aggressively, jabbing foes with his pointed nose. This has good range, but low knockback. However, this is one of his best combo moves. Has a 15% chance of tripping the foe. 8%

Up A: Spring Arch: Slinky lowers himself, and arches the middle of his spring up to hit foes. The motion look a bit like it does here, 5:05 - 5:08, except more range. This move can be done rapidly in succession, making it a great juggling move. 6-7%

SMASHES

Side Smash: Hindquarters Launch: Slinky's hindquarters pull back on their own (they think for themselves sometimes) and stretch Slinky's spring out a bit (but not far). When released, the hindquarters launch forward, hitting foes, then spring back to Slinky. The longer you charge, the longer the range is (up to 1/3 of Final Destination), however, if you do this, Slinky will be launched backwards (like Mewtwo or Diddy's B move) when his hindquarters return. Above average knockback. 11-20%

Down Smash: Rolling Clown: Slinky pulls out a Rolling Clown toy (a large colorful ball with a clown's head on top) and places it on the floor, where it spins in place. When you release, the clown rolls a clumsy but powerful circle around Slinky, making comical jingling noises as it goes. This has the best knockback of Slinky's smashes, but still is not that powerful. 9-21%

Up Smash: Slinky Spring: Slinky moves his mid-section (or spring) close to the ground, charging. When he releases, the spring moves up and down rapidly (however, it only hits when it goes up, not down). This is his fastest Smash, but also his weakest. The first hit is the most powerful. Also, the longer the charge, the more vertical range it has. 7-19%

AERIALS

Air A: Cannonslinky: Slinky makes a motion like this 6:01 - 6:03, except he doesn't plummet. This is a fast aerial and a great combo move. 8-9%

Forward Air A: Wheezy: Slinky pulls out the forgotten squeaky penguin, Wheezy, and holds him forward. Wheezy lets out a few feeble squeaks, and hits foes multiple times in a similar manner to Game & Watch's B-Air. However, Wheezy stays out shorter, and doesn't give as much knockback. However, this increases its combo-ability. The last hit does the most knockback. 7-13%

Back Air A: Tail Wag: Slinky leans back a bit and wags his tail (which is a small spring with a brown ball on the end) five times rapidly. If you hit foes with this, they will likely be trapped for all the remaining hits (the last one does the most knockback), but if you miss, you are left vulnerable until all wags are finished. 2-11%

Up Air A: Ear Swing: Slinky bends his head down a bit, and his droopy vinyl ears fly up and hit foes. This has very low knockback, and will almost never kill, but it is one of Slinky's best combo moves, because he can juggle foes so well with it. 6-9%

Down Air A: Troikas: Slinky pulls out the round Troika dolls, which are supposed to go inside each other, one being the smallest, the others growing in size until the biggest, which they all go inside of. From smallest to largest, they are painted to look like a bug, fish, bird, cat, and dog. Here, the bug comes out first, then each bigger one comes out and covers up the smaller one until the dog finishes it, then they disappear. The Troikas can hit foes the entire time they're out, but they're easy to Smash DI out of. If you are hit with the dog when it comes out, you are spiked. If you miss the foe with the first doll, the others won't come, and if you attacked out of it, the dolls disappear. This move is highly effective on large characters. 1-15%

OTHER ATTACKS

Downed A: Extension Kicks: Slinky pulls himself back up, stretching himself out a bit to kick foes behind him with one leg and in front of him with another. 7-9%

Flipped A: Tail Spring:
Slinky does a quick backflip to his feet, hitting foes around him with his springy tail. 3-6%

Tripped A: Doggy Shake: From his tripped position (a sitting position, like a real dog), Slinky rears back a bit and shakes his head side to side, to fend off nearby foes. 4-6%

Ledge A: Sideways Spring:
Slinky jumps onto the stage sideways, and uses the momentum he has to throw his spring out horizontally a bit to hit foes. 5%

Ledge A (over 100%): Nose Nudge: Slinky struggles onto the stage, and thrusts out his pointed nose to move foes weakly aside. 3%

Dash A: Roll Over:
Slinky lies down on the ground and rolls over once like a real dog would do. The hitbox is low to the ground, so foes can jump and dodge very easily, but if used on an unaware foe, this is a great move to build damage with. 8%

GRAB

Slinky tosses out the Christmas lights that Woody stole from Sid's house to grab foes, then wraps them up like this (5:08 - 5:10) when he's close enough. This has good range (more from running than from a standstill), and can be used as a handy tether recovery. It can also hit foes in the air, like Samus' grapple beam. 6-7%

Z: Spring Bounce:
With the foe all wrapped up, Slinky bounces his spring up once to hurt the grabbed foe. This can be done very quickly multiple times, but does minute damage. 2%

Side Throw: Snake Toss: Slinky pulls out Snake (who looks like this, except green and with more comical eyes), who grabs the victim in his mouth, spins once, then throws them forward. This has below average knockback, but there is a 50% chance that the victim will take poison damage for up to 5 seconds. 8%

Back Throw: RC Ram: Slinky pulls out a green remote control and drives RC, the toy car, who appears from nowhere, around his side to hit foes out of his springs. Average knockback and good damage. 13%

Down Throw: Animal Spinner:
Slinky places the Animal Spinner (which is a circular toy, with a wheel that you spin around to different animal pictures, making that animal's noise when you release) next to the foe, and spins it. Depending on what animal he stops on, foes get different effects with the sound. Each one of the three appears randomly.

Horse: Foes get hit horizontally. 8%

Rooster:
Foes get a good vertical hit. 5%

Cow: Foes get 11% and trip.

Up Throw: Troll: Slinky takes out the Troll doll, whose pink hair hits foes upwards similar to Sonic's Up Throw, except with worse knockback. 6%

SPECIALS

B: Tike Chuck: Slinky pulls out one of hisLittle Tike friends (in the movies, they look like this, except rounder, shorter, and less detailed), and tosses it gently forward a bit (about as far as a Pikmin in Olimar's Forward Smash). There are four different types of Tikes, each with a different effect. They appear randomly. Slinky can have up to two Tikes out at a time. Tikes can be attacked to be knocked back, but not killed (like Olimar's Pikmin) Here are their effects:

Normal Tike: These guys wear a red shirt with a baseball cap. When thrown, they do 3% on impact, then wander about the stage, doing spinning jump attacks at foes. 6-7%

Painter Tike: These guys wear an apron, an artist's cap, and wield a paintbrush and pallet. They do 2% on impact, then wander about the stage. If they get close enough to a foe, they will swipe out with their paintbrush, giving the foe the same type of Paint Element introduced with Bowser Jr. (gives foes poison damage, slows them down, and increases their rate of tripping). The victim gets poison damage for 5 seconds here.

Hunter Tike: This Tike appears in a brown coat and a green muffler hat, wielding a little toy rifle. He does 5% on impact, then walks about the stage, occasionally firing three small bullets at foes. Each bullet does 3% but no knockback, similar to the Scope Primid.

Doc Tike: The last type of Tike, the Doc is also the only female variety of Tike. They appear in standard doctor garb, and wield stethoscopes. They do 4% on impact, then wander about the stage. If they gets close to a foe, they will extend their stethoscopes to hit foes and give them electric damage. 6-11%

Side B: Checkerboard Counter: Slinky pulls out the board from his favorite board game, Checkers (the board even has checkers on it). He then holds out the board below him (on the ground) for 1 second, panting happily, tongue out. If foes attack the board (and only the board), Slinky will let out a short laugh, then move a checker back to counter the foe, giving them 1.5 times the damage of the attack. However, if you want to counter a move that isn't low to the ground, you must jump so the foe hits the board. Also, like the counter moves in Brawl, to activate the counter here, foes must attack the board during the beginning of the move, otherwise Slinky will be hit as normal. This move should be used with caution; Slinky is highly vulnerable if he misses.

Up B: Stretch Leap: Slinky jumps out, stretching out his spring a good distance with a loud 'twang' (like here, 7:41 - 7:45, except upwards instead of downwards, and not nearly as long). After he reaches maximum range, his hindquarters jump up independently to join his upper half, and if there is no ledge to grab or ground to land on, he enters a freefall. This move can be gimped under stages easily if timed wrong, but otherwise, it's a great recovery move. Slinky has a hitbox on his feet while he's jumping. You can angle the move slightly, up or down. 9-11%

TAUNTS AND VICTORY / LOSS POSES

Up Taunt: Slinky laughs and says his famous quote (here, 3:09 - 3:11, I have no idea how to spell that, and I'm not going to make a fool of myself trying).

Side Taunt: Slinky barks ferally seven times, like he did from his hiding spot inside a pet carrier at the airport in Toy Story 2.

Down Taunt: Slinky's hindquarters drop to the ground, then hop back up enthusiastically on their own. Slinky turns and looks at them curiously.

Victory Pose #1: Slinky howls like a real dog, then turns and grins at the screen.

Victory Pose #2: Slinky sits down, smiling a happy dog smile, tongue hanging out, and patting his hindquarters, on which his tail wags happily.

Victory Pose #3:
Slinky's top half dangles in from the ceiling. He looks up, and his entire body falls and lands onscreen. Slinky then looks up from the floor and grins at the screen.

Loss:
Slinky lies, coiled up on the floor, peering unhappily at the winner.

DOWN B

Seeing as how there are a whopping four toys to choose from, when it is barely possible to switch between Pokemon Trainer's Pokemon, you may think that swapping toys during a match would be a pain in the bum, right? Well, Andy's Toys have a way of swapping that allows you to freely choose the toy you call onto the battlefield, like a child deciding what toy to play with. However, the toys swap in a set order after they are KOed: Mr. Potato Head, Rex, Hamm, Slinky, then back to the start again.

Down B: Toy Chest Rotation: The toy you are controlling hops backwards into Andy's Toy Chest (which is painted to look like an old-fashioned Western wagon). They stay in the chest for just a bit longer than it takes to switch between Zelda and Sheik in Melee. You determine the toy that you call out next by the move that you last performed before using this Special. To call out Mr. Potato Head, you must use a Basic Combo move. To summon Rex, you must use a Smash Attack. To bring out Hamm, you must perform a Tilt. And to call out Slinky, you must perform an Aerial. If you tap the B Button once during the swap, you will swap in the order listed above. Also, if you do not select a specific toy to start the match with, the toy that appears is random. This is a manageable way to select your character, and can be completely usable in an intense match, although it still may be advantageous to wait until you KO your opponent. The rotation can be used 3 times to avoid attacks, such as Tabuu's Red Rings of Death; however, if the Toy Chest is hit with more than three attacks, it weakens dramatically, and the toys can be hit out of it, until they either use ten different moves, or are KOed.

FINAL SMASH

NOTE: The Final Smash is the same for all four toys:

Mutant Toys: The toy you are controlling will yell out in disgust and horror, then jump back into their toy chest. A moment later, Sid's Mutant Toys will materialize on the stage to attack foes. They stay out for 15 seconds, and each have different effects. This is a great Final Smash on small stages (almost guaranteed to get one KO), but can be avoided on larger ones. All of the Mutants can be attacked to knock them back (but not out, unless you knock them off a ledge), but unless you're in a FFA, they are likely to overwhelm you. Here are the different toys and their effects:

Baby Face: A bald head of a decapitated baby doll placed on parts of a building set rearranged to look like a spider's legs. He wanders around the stage, dealing good damage to foes with his metal legs.

Legs and Hand-in-the-Box: A fishing rod with lady's legs attached, and a jack-in-the-box with a green hand instead of Jack. These two wander about the stage and grab foes (with their rod or hand) to trap them so that the other Mutants can attack.

Ducky and Rockmobile: A duck toy attached to a spring, and a insect-headed doll placed in a muscle-man doll's body, respectively. These two wander the stage and clobber the foes that Legs and Hand-in-the-Box have grabbed. The foes get heavy damage, but no knockback out of the toys' grasp.

Jingle Joe, Frog, and RollerBob: The head of a male doll attached to a cylindrical wheel, a frog with one and a half wheels, and a doll's upper torso attached to a skateboard, respectively. These three roll / ride around the stage, ramming into foes for heavy knockback.

Janie Doll, Pterodactyl, and Mutant Car: A normal girl doll, a normal pterodactyl toy, and a car with feet and arms where its wheels should be. These three speedily run around the stage and latch onto foes, slowing them way down and giving them good poison damage.

After the Final Smash is over, the Mutant Toys disappear and the toy you were previously controlling will hop out of their Toy Chest to continue the fight, with a relieved look on his face.

MISC.

Icon: The famous starred ball from Toy Story.

Alt. Costumes: Normal, red tint, green tint, blue tint, black tint, pink tint

Entrance: Each toy jumps out of Andy's Toy Chest, each doing a different pose:
Mr. Potato Head: Does a fist pump as he lands.
Rex: Holds his tiny hands together nervously.
Hamm: Shakes his head, making coin-jingling sounds, and snorts like a pig.
Slinky: Yawns a bit and shakes his floppy ears.

Kirby Hat: Kirby gets a different feature for each toy he inhales:
Mr. Potato Head: Kirby gets Mr. Potato Head's ears, bowler hat, and nose, plus a little opening on his behind, for his inherited Special, Potato Compartment..
Rex: Like Yoshi, Kirby gets a hat that looks like the top of Rex's head, as well as a tiny green tail.
Hamm: Kirby gets a hat that looks like the top of Hamm's head, plus his eyebrows, ears, and belly cork.
Slinky: Kirby gets Slinky's floppy vinyl ears, pointed nose, green collar, and springy tail.

Wiimote Sound: If you don't choose a certain toy to start with, you will only hear the sound of a door closing and Andy's Toy Chest squeaking open. However, if you DO choose one:
Mr. Potato Head: "What're you looking at there, you hockey puck?!"
Rex: "But I don't wanna use my head!"
Hamm: "Something's screwy here!"
Slinky: "Take your paws off my pal!"

Unlocked By: Get Andy's Toys to join your team in SSE, play 650 vs. matches, clear Classic and All-Star Mode with ROB.

Shield: Each toy uses a different item as their shield. It vanishes when released or broken.
Mr. Potato Head: He ducks under an orange traffic cone from Toy Story 2. The cone changes from orange to black as it takes hits.
Rex: He hides in a leafy bush disguise. The disguise loses leaves as it absorbs attacks.
Hamm: He covers himself with a space-themed cardboards chicken nuggets box from Pizza Planet. The box shows signs of wear and tear as it is damaged.
Slinky: He hops into a pet carrier from Toy Story 2. The carrier takes noticeable dents as it weakens.

Idle Pose:
Mr. Potato Head: He puts his hands on his hips, faces the screen, and taps one foot impatiently.
Rex: He pulls out his video game strategy guide and starts to read.
Hamm: He sits on his butt and makes stretching motions with his arms.
Slinky: He sits down and scratches a droopy ear with one hind leg, like a real dog.

Forward Roll:
Mr. Potato Head: Rolls over once, on his side (or face?), then hops up.
Rex: He slowly turns around, moaning nervously.
Hamm: Hamm sits down and spins forward.
Slinky: Slinky whirls his hindquarters forwards, then jumps forward to meet them.

Back Roll:
Mr. Potato Head: Same as his Forward Roll, but backwards.
Rex: He trips, then quickly turns the trip into a backwards roll, stop, drop, and roll-style.
Hamm: Same as his forward roll, but backwards.
Slinky: Slinky quickly rolls backwards, all feet on the ground (he has wheels in his hind legs to move more smoothly in the movies)

Spot Dodge:
Mr. Potato Head: He leans backwards, holding up both arms, on one shoe, an annoyed expression on his face.
Rex: Rex yells out as he leans back. flailing his arms.
Hamm: Hamm leans back, lifting one front and hind leg on the same side, keeping the other two on the ground.
Slinky: He gets on the ground and rolls over once in place.

Air Dodge:
Mr. Potato Head: He spins around once.
Rex: He does a clumsy flip.
Hamm: He holds his feet up, like he's doing a cannonball.
Slinky: Leans back, stretching out his spring a bit, his ears flopping.

Dizzy:
Mr. Potato Head: He puts his hands to his forehead and moans.
Rex: He lies on his back, his head pivoting around in place slowly, crying out, dizzily.
Hamm: He slumps to the ground, his head moving in circular motions, and jingling of coins is heard with his groaning.
Slinky: He stumbles from side to side, eyes rolling as he dizzily whines, like a real dog.
Sleep: Each character lies on the ground, motionless, as if humans have entered the room.
Mr. Potato Head: He stays in a sitting position.
Rex: He lies on his back, his head twisted in an awkward position.
Hamm: He lies on his side, a few coins falling out of his slot.
Slinky: He lies flat on his belly, stretched out, like a real dog.

Victory Theme: The opening clip from the musical score, Andy's Birthday, which later became the opening clip to all Pixar films. 0:13 - 0:25

Credits Theme: You've Got a Friend in Me

CODEC

Snake: Otacon! There's a quartet of walking, talking toys on the battlefield!

Otacon: These four toys belong to an eight-year-old boy named Andy. Out here are Mr. Potato Head, Rex, Hamm, and Slinky.

Snake: How are they...alive? Are they robots?

Otacon: They aren't robots; somehow, they are able to come to life when no one is watching. However, they seem to be able to break this rule to help others in need.

Snake: Even so, am I really supposed to waste my time fighting four toys?!

Otacon: Don't take Andy's Toys so lightly, Snake! They've teamed up before to accomplish missions way outside their league!

ASSIST TROPHY:
Bo Peep


The porcelain shepherdess, and a voice of calm authority over the toys, Bo Peep appears gracefully, and whistles to call her flock of three sheep (who are all clustered together). The sheep run around the confines of the stage, chewing and gnawing to deal multiple hits, but low knockback to foes, making sheep sounds the whole time. Bo herself serenely observes the fight, occasionally pacing about and using her hooked cane to pull foes to her. From there, she emits a simple, music-box-esque lullaby to lull the opponent to sleep, so they are vulnerable to other opponents or her flock. Bo Peep doesn't often kill foes; she is better for simply building damage. After about 20 seconds of assisting, she will whistle to call back her sheep, then vanish. She is a fairly common Assist Trophy.

STAGE:
Al's Toy Barn


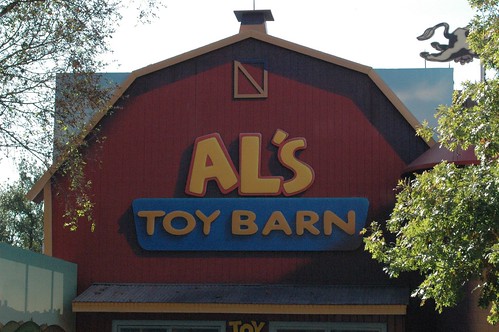
This was the toys' first destination when they were rescuing Woody in Toy Story 2. Owned by the greedy toy collector, Al, this toy store has a farm motif, with a giant chicken statue at the entrance, as well as cow-shaped shopping carts. In Smash, it is the home stage of Andy's Toys, and a unique scrolling stage at that. Instead of the horizontal and vertical scrollers currently in Brawl, Al's Toy Barn is a 'depth scroller'. You fight inside the store (which is closed at the time, so there is no human interference), scrolling down the toy store's many aisles in a cow-shaped shopping cart. The cart has two platforms, one over another; in the low-to-the-ground basket area and the upper area, used for an infant seat. Characters can either ride the cart, or jump off and fight on the colorfully-tiled floor. Your characters are shrunk down so as to to the store from a toy's point of view. The aisles have unbreakable shelf walls on either side, loaded with toys, so it gives a kind of caged match feel, although the walls are far enough apart so they are not a constant thorn in your side. While scrolling, you may see some familiar toys on the shelves, including boxed Buzz Lightyears, partying Barbies, and fiery-colored Hot Wheels cars. There are a few hazards here. Some aisles have bouncy ball machines on the sides. If you attack these too much, they will break, spilling their bouncy contents onto the stage for a few seconds, causing moderate, knockback-less damage, and an increased likelihood of slipping. Also, in the Buzz Lightyear aisle, Utility Belt Buzz may hop off his display and attack. He uses laser shots, karate chop actions, and basic grab attacks, declaring, "All space rangers are to be in hyper sleep, until awakened by authorized personnel," or "You're breaking ranks, ranger!" He cannot be killed, but he can be knocked back with several attacks ("Has your mind been melted?! You could've killed me, space ranger!") Once you scroll to the end of an aisle, the stage turns for a few seconds, until you enter another aisle; during this period, foes can be KOed off the sides. Occasionally, at the end of an aisle, you will enter Al's office for about 30 seconds. In here, there is a walk-off edge to the left and a metal desk leg to the right. If you attack the leg too much, business papers and photos of the Woody's Roundup Gang will spill off, burying foes for constant damage, until they escape by wiggling the Control Stick.

MUSIC

Woody's Roundup
When She Loved Me
You've Got a Friend in Me (Wheezy's Version)
Zurg's Planet
Let's Save Woody
Al's Toy Barn
The Cleaner
Ride Like the Wind
 

LUVTOY77-ROGUE WIREFRAME

Smash Champion
Joined
Jul 26, 2006
Messages
2,372
Banjo-Kazooie

"Hide your Jiggies, Banjo and Kazooie have joined the fight!"--Unlock message.

Character Info

Banjo
Banjo is a rare anthropomorphic brown honey[1] bear who is one of the two main characters of the series. He is always seen wearing yellow shorts with a belt, a shark tooth necklace, and a bright blue backpack...


Kazooie
Kazooie is a rare Red Crested Breegull. She is one of the two title characters in the series. At the beginning of the first game, she resides in Banjo's backpack, in his home in Spiral Mountain...


Stats

Walking Speed: 5/10

Running Speed: 6/10

Primary Jump: 6/10

Secondary (double) Jump: 4/10

Size: 5/10

Range: 7/10

Weight: 6/10

Power: 6/10

Final Smash: 4/10

Abilities

Wall-Jump: No

Wall-Cling: No

Footstool Jump: Yes

Glide: No

MOVESET

Specials

Neutral Special--Pack Wack

-This move was originally only used by Banjo, when Kazooie was not present. But over the years Banjo has gotten stronger, and is now able to heave the back around even with the breegull within! Banjo swings his back pack in a full circle.

This move is kinda slow, but packs a punch.... a small punch, but a punch! It will lift him off the ground slightlly and give him a small boost when in the air (not enough to cout as a recovery though), about as much as Popo alone gets.

Banjo's Pack Wack has relatively high priority, and hitting his back pack won't stop the move. However, if you smack him, the move will seece (sp?). Pack Wack does 11-13% damage.

Side Special--Beak Barge

-Banjo ducks and tilts his shoulders so that his backpack is angled forward. Kazooie shoots her head out of it with her beak pointed fowards. This move moves Banjo forward a little. This attack will send an opponent flying upwards away from Kazooie, and does 13-16 % damage.

Down Special--Beak Buster/Bill Drill

-Kazooie slams her beak hard onto the ground like Yoshi's down special, bringing Banjo down with her. Kazooie's neck is the only part of her (and her head) to leave the backpack.

The beak buster does 13-15% damage. If you hold down B (other special), Kazooie and Banjo spin in the air. This is the Bill Drill. They rotate for about 2 seconds before slamming onto the ground at the same speed. This move does 14-17% damage.

Up Special--Leg Spring

-Kazooie hops out of Banjo's backpack and springs upwards quite forcefully, while Banjo grabs her legs on the way up and hangs on for the ride. At the heightof the tall leap, Banjo does a flip, pulling Kazooie's legs as he goes, and when is uprightagain, Kazooie shoots into his back pack.

This flip is the only damaging part of the move, has poor-ish knockback, and does about 8% damage. This jump, however, is close to Sonic's in height (not quite though). When Banjo is grabbng kazooie's legs at the beginning of the move, he is invincible (still takes damage).

Standard Attacks
Standard A: Banjo makes one swiping motion with his paw. This standard has low priority, bad knockback even for a standard, and does 2% to 5% damage.

Standard A, A, A: If you hold down A (the usual standard attack button), or press it consecutively three times, Banjo will make three swips with his paws. The second two swipes have slightly more knockback and priority, and increase from 5% damage to 8% (most) damage.

Tilts

Forwrd Tilt--Egg Shoot

-Banjo crouches, and Kazooie leans over his head, firing off a blue egg. The egg does 12 % damage, but that's not all.

Occasionally a grenade egg will be fired, doing 25% damage! The grenade egg has whopping knockback as well, but it doesn't appear THAT often. However if you fire eggs in rapid succession, it's bound to turn up before too long.

To make it fair, the grenade egg decreases by 2% every time you use it, until you're stuck at 15%, and also has half the range as a blue egg (so it doesn't have much range). However if you stop using it for a while (like a minute and a half or so), the damage % done will start to rise back up.

Down Tilt--Stiff Leg

-Banjo sticks one leg out as he drops to the gound, supporting himself with one arm s the other stays aloft. His leg will trip foes from 12 to 20% damage, and the attack does 6 to 12% damage.

Up Tilt--Wing Wack

-Kazooie slaps with her wings at an upwards angle three times relatively quickly. Kazooie does not slap that fast, making this last a bit longer than most Up Tilts.

This move is great for juggling at higher percentages due to not much knockback. It doesn't have kill potential, and does 9 to 14% damage.

Smash Attacks

Forward Smash--Bird Bash

-Banjo reaches behind him and grabs Kazooie by theneck. When you commence with the smashing, he yanks Kazooie out of the back pack and slams her down in front of him. Don't worry, she's okay, but your opponent might not be! It does 19% damage at best, and 12% damage at least, with stale moves tooken into consideration. The Bird Bash has great knockback as well, but lag pursues as Banjo stuffs Kazooie back into his backpack.

Down Smash--Sweep

-Banjo sweeps the ground on all sides of him in a circular motion with one foot. This move knocks opponents more horizontal than vertically, and does 12-19% damage. It has K.O. potential at around 120% damage on medium-sized characters.

Up Smash--Flap-Flip

-I forgot what this move was called in Banjo-Kazooie/Tooie, but it's the move you use to get up higher. anyways, Banjo does a large back flip, and Kazooie spreads her wings around him. This move will send the foe in whatever direction Banjo is turning in. This move has really high priority and does 14-26% damage.This move K.O.'s relatively early due to great knockback diagonally upwards.

Aerials

Nair--Kopter

-Kazooie spreads her wings and flutters them akwardly, causing the duo to spin in a fast circle. This move has almost no knockback and does 8-12% damage.

Fair--Rat-A-Tat Rap

-Kazooie extends her head over banjo's while in mid-air and pecks three times. This move has mediocre knockback but isn't that good for edgeguarding. It does 9-14% damage.

Bair--Egg shoot

-As Kazooie faces her rear end out of Banjo's backpack, you'll hear a quiet fart sound as a blue egg falls. The egg bounces a few times along the ground before breaking. In the air the egg does 4% damage, while on the ground bouncing it does 6%. The catch is that this can be fired off in rapid succession, making up for the low damage. The stale moves system is nonexistant in this case.

Uair--Fire Egg

-Kazooie shoots a fire egg up shortly into the air. The egg does 9-14% damage and has mediocre knock back when the foe is around 50% and higher.

Dair--Taxi Pack

-Banjo leaps into his backpack, cramming in next to Kazooie, and falls towrds ground. This is NOT a fast-fall move. When in the back pack, Banjo suffers less knockback from attacks.

Throws

Attack--Peck

-Kazooie pecks the foe from behind Banjo's head.

Up Throw

-Banjo tosses the foe behind his head, where Kazooie intercepts the toss with her beak. Shethen spreads her arms and spins herself and Banjo around very quickly, racking up damage (resembles ROB's Dsmash), before shooting the opponent into the air at a slight diagonal angle. This move does 5-9% damage.

Forward Throw

-Banjo punches the foe. This move has mediocre knockback, and does 6-10% damage.

Down Throw

-Banjo slams the foe to the ground, and preforms the Beak Buster on them. This throw does 9-13% damage, but with poor knockback.

Back Throw

-Banjo tosses his opponent behind him, and Kazooie hops out of his backpack, and preforms the Talon Trot, slamming into her opponent. This move has mediocre knockback, and does 7-11% damage.

Final Smash
Advanced Techniques

-This move temporarily changes Banjo and Kazooie's moveset, while making them invulnerable as well. Banjo holds Kazooie like a rifle.
Specials: Only tilts remain he same. Smashes are disabled.
A button: Press A to launch into the air using the flight pad. Press A or the jump button while in the air to fly higher.

Specials

Standard--Machine Gun egg

-Banjo Kazooie like a rifle. Hold B to rapid-fire bronze eggs that do 1 % a piece. While holding down B, Banjo is stationary, so rotate the control stick to angle the shots.

Side Special--Beak Bayonet

-Banjo stabs with Kazooie like a soldier would a rifle. This move does 15% damage, no stale-move effects.

Down Special--Egg Switch

-This switches the type of egg you will fire using moves. Standard is machine gun egg. Here are the others:

Fire Egg: Causes foes to be temporarily on fire, the fire does 3 % per second, but only lasts a few seconds (1 to 3 seconds).
Grenade Egg: Does 25 % damage per shot, but doesn't have very good range, and arcs downwards.

Ice Egg: Has really good range and freezes if the opponent is hit with three consecutive eggs (all within about two seconds). Itdoes only 5% per shot, but the opponent is frozen for 10 secodns when frozen, regardless of attacks aganst them.

Clock-work Kazooie Egg: Only 8 of these canbe used. However, when fired, they seek out the nearest opponent, AVOIDING hazards. However, tehy have very weak jumping abilities, and explode after 15 seconds. Three can be on-screen at the same time.

Up Special--WonderWing

-Kazooie guards banjo's face with her wings as he runs, crashing into foes, with high knockback, doing 8% per hit.

Stage(s)
Spiral Mountain

http://xblog360.es/wp-content/uploads/2008/04/spiral_mountain.png

Here's something that I had in mind, and happened to find a picture of:

http://underground.bananachan.net/worms/maps/spiralmountain.png

The stage will pretty much be the picture directly above this text, but with a left border a reasonable distance away fromthe mountain top, and the bottom border a bit below the first 'spiral' (first being top). The bridge will extend to Grunty's castle. If you get knocked into the entrance too far, you will be K.O.'d. You can get on top of her witches hat, but the pointy top goes off-screen, and you'll get K.O.'d before you see the top.

Stage Hazards: One. Sometimes, the bridge leading inbetween the mountian and grunty's lair will collapse, leaving some characters with poor recovery partially stranded. However, after about 15 seconds, the bridge is magically re-tethered to the other side. Also, when the bridge is broken, it hangs from Grunty's lair, and can be used as a ladder.
Walk-offs: One.

Stage Music:

http://http://www.youtube.com/watch?v=b1cRQRdg62E--Spiral Mountain-Banjo-Kazooie

http://www.youtube.com/watch?v=sbl6OgExQus&feature=related--Gloomy Spiral Mountain-Banjo-Tooie

http://www.youtube.com/watch?v=yiTOqFWF1E8--Grunty's Furnace Fun-Banjo-Kazooie

http://www.youtube.com/watch?v=HRrvkV69JZw--Nutty Acres-Banjo-Kazooie: Nuts N' Bolts

http://www.youtube.com/watch?v=eLOQy86sbmA--Nuts N' Bolts-Banjo-Kazooie: Nuts N' Bolts

http://www.youtube.com/watch?v=IMyEExnCf40--Mumbo Mountain REMIX-Banjo-Kazooie: Nuts N' Bolts

http://www.youtube.com/watch?v=O7jJH1Dpiw8--BubbleGloops Swamp-Banjo-Kazooie

http://www.youtube.com/watch?v=nkN3zZ-WEYo--Cloud Cuckoo Land-Banjo-Tooie

http://www.youtube.com/watch?v=gxTiL_RL-VA--Isle O' Hags-Banjo-Tooie

http://www.youtube.com/watch?v=XfgZOTuu6J0--Rusty Bucket Bay-Banjo-Kazooie

http://www.youtube.com/watch?v=lVYWpZANlqI--Clanker's Cavern-Banjo-Kazooie

http://www.youtube.com/watch?v=msgO1PcCD1M--Jinjo Village-Banjo-Tooie

http://www.youtube.com/watch?v=fmTyTF1vUTw--Jiggoseum-Banjo-Kazooie: Nuts N' Bolts

http://www.youtube.com/watch?v=T81cuL7OPbA--Hailfire Peaks (Fire Side)-Banjo-Tooie

http://www.youtube.com/watch?v=9Cws3qjFU94--Hailfire Peaks (Icy Side)-Banjo-Tooie

http://www.youtube.com/watch?v=VDJxRJF5N9c--Mr. Patches-Banjo-Tooie

http://www.youtube.com/watch?v=yn3Fl-om6y0--Old King Coal-Banjo-Tooie

http://www.youtube.com/watch?v=LKqN-ShvVv8--Terry-Banjo-Tooie

Color Variations/Alt. Costumes

*Pressing on Kazooie on the character select menu will change her into Dragon Kazooie

1) The bear and bird exchange colors, the back pack remains the same *Red team

2) Banjo is yellow, and Kazooie is black

3) Banjo is black, and Kazooie is green

4) Banjo is purple, and Kazooie is normal *Blue team

5) Banjo is lime green, and Kazooie is bright yellow (go sprite) *Green team

--Banjo and Kazooie have two models to choose from. The two models are Banjo-Tooie models and Nuts N' Bolts models. Color schemes are the same.

Taunts and poses

In-game taunts:

Up Taunt: Banjo grabs a Jiggy flying bye, and Kazooie swallows it

Side Taunts: Banjo does the dance he does when you open a note door (a sort of tap dance with hands waving at the finish), but shortened up a bit

Down Taunt: Kazooie plays her Kazoo for a brief time

Winning Poses:

Victory Pose 1: Banjo, holding Kazooie like a rifle, fires two blue eggs left and right, and then aims slighty left of the screen, then pauses

Victory Pose 2: A huge exploding spell is shot at Banjo, but Kazooie uses her wings as a shield, and they evade the spell, a golden feather falling to the ground

Victory Pose 3: Banjo and Kazooie are standing side-by-side on split-up pads, Banjo with one arm over Kazooie

Losing Pose: Banjo is lying on the ground, knocked out, and kazooie pops out of his backpack. She looks around, and then faints.

Winning Theme: The tune that plays when Banjo/Kazooie collects a jiggy in Banjo-Tooie.

Miscellaneous

Snake's Codec

Snake: Hey, Otacon, whose this bear with the backpack and shorts?
Otacon: That's Banjo, Snake! And in his backpack is Kazooie!
Snake: Are they a travelng folk song group or something? ... or are they with the circus?
Otacon: No, Snake! They traveled from Spiral Mountain, that's a long ways away!
Snake: Never heard of it..
Otacon: Not a lot of people have! Banjo and his friend Kazooie stopped Gruntilda the Witch from using her life-force sucking machine from taking over the Isle O' Hags, and eventually the world! But the first time Banjo met the witch was when she kidnapped his little sister!
Snake: Well it's good he tought her a lesson then huh?
Otacon: That's right. Banjo is strong, but Kazooie's eggs are even stronger! Be careful!
Kazooie: Hey, are you gonna yap all day or what, four eyes?
Otacon: W-what? How'd you year me?
Kazooie: Worm over here's got his headset turned up!
Snake: Hey, it's Snake, get it right!
Kazooie: Yes sir, leutenant Dan!
Banjo: Kazooie!
*end codec*
 

truendymion

Smash Cadet
Joined
Aug 23, 2008
Messages
37
Ah I think Gray Fox needs some sword attacks! His neutral A should be a sword attack, and he should be able to deflect bullets with his sword somehow, maybe as a normal or special attack idk.

BTW that Banjo moveset is kinda hard to read, you should make space between each chunk of text or underline the attack names or something.
 
Status
Not open for further replies.
Top Bottom