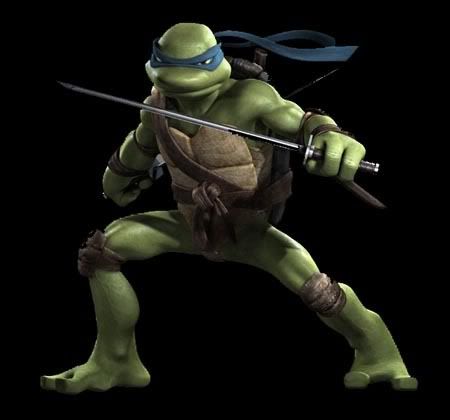
<Cowabunga!!!!!!!>
Leonardo, of the Teenage Mutant Ninja Turtles, joins the Brawl. With his 2 katana blades and his ninja reflexes, he can take down almost anyone.
The Description:
Leonardo is the leader of 4 turtles that you and I should know as TMNT AKA Teenage Mutant Ninja Turtles. He was mutated by slime, that turn him and his brothers from regular turtles into what they are now. He is still quite popular, if you know him back than in the 1990s or right now. He's the most serious of the 4 turtles with his leadership and devoted into fighting for what's right. He gets along with his brothers pretty well, but is also fully capable for fighting for himself. He was taught under Master Splinter, a very intelligent rat. He has taken down enimies like the imfamous Shredder, Rozar, and Tokan, Baxter Stockmen and other sorts of enimies with his team. Today, he's going to enter the battlefield alone and he's going to do that...........with honor. Could he be one of the best fighters around?
Stats:
Power: 3 (He's well rounded in this stat. He attacks with 2 swords. He can take down opponents at 90-150% if use his more powerful attacks.)
Running speed: 3.5 (For a turtle, he runs pretty fast. Than again, he's a ninja so what do you expect? I would also be flamed by a thousand Tmnt fans if i didn't make him somewhat fast. He's "Marth" fast.)
Weight: 2 (For a turtle carrying a shell, he's pretty light. Because of this, he can be easily knocked out.)
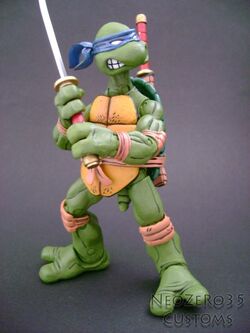
Height: 3.5 (What do you expect? Look at the picture. He's going to fight in that pose. He's a bit smaller than Marth)
Falling speed: 2 (He's a ninja alright. He has a pretty impressive air game because of this. Use it wisely, as because of this, Leo could be an easy target)
Attack speed: 3.5 (Not bad at all. There are a couple of attacks that do have a slight bit of lag though,)
First Jump: 3 (He's a little hampered in this one, so to avoid being killed, he has ok recovery)
Second Jump: 2 (Whoa, a second jump lower from the first one. Maybe his Up B recovery will save him? We'll see.)
Range: 2.5 (Considering his katana's are kinda short, his range has to be small. You'll have to get pretty close to attack your opponent. Not bad though.)
Wall Climb: Yes (Ninjas HAVE to wall climb)
Wall Cling: Yes (Ninjas HAVE to wall cling)
Crawl: Yes (You can't sneak around if you couldn't)
Glide: No (Ninjas HAVE to gli- i mean, not fly)
Unlock message:
Master Splinter has taught you well. The honarable turtle joins the Brawl!
Wii Remote Message:
"I'll do it for honor."
Animation:
Standard: ^He poses like the pic i just showed.
Animation pose: He occasionally swings his right hand slowly and then he motions his left hand to look at his katana.
Dodge: He sidesteps out of the way.
Roll: He backflips.

Air Dodge: He puts his 2 swords together and moves towards the background.
First jump: Leonardo leaps into the air like a regular person.
Second jump: Leonardo Spins in the air to get another air jump.
Running: He dives in with his head, not caring what happens to him.
Shield: He puts his 2 swords together to block. Leonardo is struggling it seems.
Other Animations:
Sleeping: Leonardo sticks his 2 katanas into the ground sleeps quietly sitting down. Wow. He looks serious even when he's sleeping.
Dizzy: Leo spins his head around in pain while also hopelessly hands are down, so he can't exactly swing his sword to defend himself.
How to unlock:
1. Get him to join party in subspace emissary.
2. Beat 220 matches
3. Beat classic mode with ten characters where there has to be at least 3 of them sword users.
Play Style:
Leonardo is a fast turtle. He needs to rack up damage before K.O. someone. He needs to be all over the place confusing the opponent maybe, and act like a true ninja. Attacking head straight on is not wise. Use his quick attacks to surround the opponent, and after the damage is high enough, KNOCK HIM OUT!!! Using his projectiles and staying from afar also works.
Of course he needs to take care of himself too. Use Leo's fast movements to get around, avoiding a lot of the opponents attacks. This means dodging has to be a second nature for Leo. Use all of Leo's recovery options. It might just save your butt.
All i can say know is don't abuse ledge guarding TOO much, as you might not be able to recover safely. GOOD LUCK!!!! NEW YORK IS COUNTING ON YOU!!!
Basic A attacks:
Standard A: Booyah Heahbutt: Leonardo sends his head straight towards his opponent. Since his head is rather small, its really weak. This header does absolutely no knockback. The target has to be right in front of Leonardo in order to attack as Leo only uses his head to attack plus the range/hitbox is really short and small. It is really fast though. (3%) This attack is part of an "AAA" combo. (No pic is availible )
)
AA: Shoulder punch: Its basically a punch to the chin. This attack has even SHORTER range/hitbox from the last attack. It means you must have landed the first hit in order to hit with this attack. It's also not exactly worth it as Leonardo's attack does very little knockback, regardless of the percentage of the opponent. It also excels in speed too, thus good for racking up damage. (4%) This attack is also part of an "AAA" combo. There should be a pic below:

AAA: Turtle stab: You all saw this coming now, didn't you? Leonardo stabs his opponent forward. He struggles a bit to pull his sword out, so Leo suffers from a slight bit of lag at the end of the combo. Luckly, if you failed to attack with the previous attacks, you can still attack with this one, as it has some very nice range (about a character and a half size.) The hitbox is where the sword stabbing is, so not below or above it (although, it can hit by the top or the bottem of the sword. This attack does little knockback and 5% damage. There should be a pic below:

Side Tilt: Sword upper: Why is Leo crouching for this attack? Its beyond me. Anyway, Leonardo attacks upward while crouching to avoid this attack from being an upwards attack. This attack starts off fast, but end with a slight bit of lag. The hitbox is where Leonardo's sword is tipping at and the sword's side as well. The range is pretty nice, but since he's attacking while crouching, Leo suffers from being unable to attack more sideways. The knockback is Ok while the damage is 6%. There should be a pic below:

Up Tilt: High Kick: Leonardo kicks his opponent by the face to the air. This is suprisingly one of Leonardo's stronger attacks as it does some decent damage. The knockback radius is little knockback and it sends you slightly upwards while the damage is (7%). Since it looks like Leo is kicking to the face rather than the side (see pic below), the hitbox is where Leo's leg and feet is. The range is about 7/8ths of a character. The downside to this attack is that Leo suffers from a bit of lag at the end (it has no trouble attacking from the beginning though). There should be a pic below:

Down Tilt: Leg sweeper: Leonardo obviously leg sweeps his opponent and he does it rather heavily too. This is Leonardo worst tilt in the game, but thats not saying its bad. In fact, its pretty useful. It has a very small slow startup and ends with a also very small lag at the end. The hitbox is practically where Leo sweeps is leg in, and it only attacks the ground. It's range is pretty nice (Like 3 fourths of a character). The knockback is very little and the damage overall is (5%). There should be a pic below:

Dash attack: Elegant spin: Leonardo attacks his opponent...by spinning? Actually he lets his katanas out in order to attack the opponent. This attack is a multiple hitter. It does 2% for each hit and Leonardo does 5 of them. There is small knockback on the last hit. The hitbox is the size and tip of Leonardo's sword. Range is kinda small, but since he moves around while doing this attack, it makes up for it. Attack stops after Leo moves for a small 2 seconds. Leo suffers a slight bit of lag at the end.

SMASHES:
Side Smash: Sword blast: Leonardo lets out a "Raining puddle!!" What th-? Is that a projectile? You can't have a projectile in a smash!! You can't!!!!!! ......And I don't care Seriously though, Leonardo tucks his sword to the side of him preparing to charge up for his smash attack (this is Leonardo's side smash charge). Leonardo then releases the attack, slashing with his 2 swords together, towards his opponent. If the opponent is directly in front of Leonardo when Leo does this attack, it does nice knockback uncharged (13%) and to good knockback fully charged (16%.) Since there is a small projectile that comes out, the blast does little knockback uncharged (7%) and ok knockback fully charged (10%). The projectile only goes as far as one fourth of the stage battlefield before fading out. So basically, it goes about 3 character spaces in front of Leo, the projectile does. The projectile can easily be stopped by having another projectile being intercept it. Bit of lag at the end. There should be a pic:

Up Smash: Leonardo katana spin kick: Personally my favourite smash attack. Leonardo sticks his katanas into the ground. Then he grabs on to the katana, starts moving with his katana and kicks all around him. Since his swords are stuck to the ground and Leonardo is using them to spin his body around, he is in the air. The hitbox are his legs and feet, around and on top of them. Since Leonardo's body is somewhat long, the range is pretty good. If this attack manages to hit the opponent, it does Ok knockback uncharged (10%) to nice knockback fully charged (14%). The downside to this attack is that Leonardo suffers from a bit of lag at the end of the smash.

Down Smash: Double slasher: Leonardo feriously slashes once straight forward, and then again a second time very powerfully. Leonardo is crouching when he does this attack. The hitbox is pretty small this time around as the katana, as mentioned before, are pretty short (though not dagger short). Therefore, the opponent has to be right in front of Leonardo for this attack to work (like in the size of 7 eighths of a character). The first slash this attack does is no knockback what so ever, but 10% uncharged and 12% fully charged. The second slash of this attack does OK knockback with 8% damage uncharged and Nice knockback with 10% fully charged. The range is about a whole character size. Use it to rack up damage. There should be a pic:

Aerials:
Neutral: Cresent slash: Leonardo slashes at his opponent apprantly attacking downwards. The range is pretty short as the sword is practically near and next to him. The hitbox is where his sword is. The knockback detail is little, where as the direction forces the opponent to go forward, and it does 6%. Try using it to send opponents forward and KOing them. There should be a pic:

Forward: Leonardo Swing: A swing forward from his sword to you. One of Leonardo's attacks that do have good range. It sends you forward with some ok knockback and 8%. The hitbox is where Leo is swinging his sword. The downside to this aerial is that it suffers a bit of lag at the end. Not to mention Lag from the beginning as well. This is one of Leo's "Meh, its not bad" aerials. Pic is down below:

Backwards: Suprise slash: It looks like Leonardo was going to slice and dice forward, but he feints and quickly turns around to attack his opponent with the mighty katanas. It does some Ok knockback, sending the opponent backwards and it does about 8%. There is a very slight bit of lag at the beginning, but no end lag. Arguble one of Leonardo's best aerials. The hitbox is where the sword lands. The range is not bad at all. There is a pic below, but ignore the flashy effects.

Downwards: Party Kick: Leonardo kicks his opponent downwards to the ground. This attack can meteor the opponent, HOWEVER, the attack has to be sweetspotted before using this attack. If this kicker touches by the side or otherwise known as NOT on the foot, this attack does 4% and very little knockback. If this attack is sweet spotted, it instead does 7% and the opponent has a hard time to escape from the meteor. There is a slight bit of lag at the end, but no lag at the beginning.

Upwards: Cresent spin: Leonardo lets out a "HYAH!!!," when he does this attack. Leonardo spins upwards in the air, attacking upwards with his katanas. The range is rather short though (not that short however). It's really quick and covers all around Leonardo, but its only highly effective a top of the spin. Anywhere other than that, it only does very little knockback and 3% damage. If it does right on the top however, it does nice knockback and 8% damage. My vote for Leonardo's best Aerial. Abuse and use it.

Grabs:
Beat down: Leonardo uses the hilt/handle of one of his swords to beat the opponent down. It goes at regular speed.
Forward: Turtle's headsmash: Leonardo lets goes of his opponent for a second and then goes straight in for a huge headbutt. Arguble the best of Leonardo's throws as it does nice knockback, sending the opponent forward obviously, and and it does a nice (8%) damage. Leonardo lets out a "HYAH!!!!," when he does this throw.
Backwards: Lay down throw: Leonardo is not going to use his swords for this attack. Instead, he throws his opponent while laying down on his back and kicking the opponent backwards. This attack has some little knockback backwards and does (7%) damage. Leonardo quickly recovers to avoid from getting hit from other attackers. He quickly pulls out his katanas again.
Downwards: Spare your life: Leonardo throws his opponent to the ground. Leonardo was going to finish his opponent off, but he has a sense of honor with him. Instead, he spares his opponent and lets them rest on the ground. Not one of Leonardo's wisest decisions, but still noble though. This unique down throw does absolutely no knockback what so ever other than throw his opponent to the floor, but it does 9% damage.
Upwards: Turtle Barrage: Leonardo throws his opponent in the air. As the opponent falls down, Leonardo dashes and throws in a barrage of punches towards his opponent. Leonardo then finishes his opponent off with a huge uppercut. The barrage is a multiple hitter, and when all the punches land, they do 1% each and Leonardo does 9% of them. All the punches should land on the opponent. The uppercut at the end also does 1% damage, for a grand total of 10% damage, but the knockback is nice upwards. Coolest throwing attack ever. Leonardo suffers a bit of lag at the end. Uppercut pic is not availible

B ATTACKS:
Standard B: Shuriken thrower: An obvious, but must have in a ninja's arsenal. Leonardo throws one shuriken towards you. He suffers from a bit of lag at the end (like a slight second, but thats about it). If it hits, the opponent will suffer, very, very little knockback and 4% damage. The distance on how far the Shuriken goes is about half of the stage known as battle field before fading away. The shuriken, of course, is very small, so the hitbox is rather small.
However, this attack is chargable. If you decide to charge this, Leonardo will be in a ready position to throw the shuriken. It takes about 3 seconds to get it fully charged up. If Leonardo throws the charged up shuriken, the hitbox is bigger than before, making it a bit harder to get away from. This time though, it absolutle does no knockback, and it only does 6% damage. Instead of knockback, it stuns the opponent temporaly for 2 seconds, letting Leonardo go in for the kill. The range this time is doubled from the original range.
Now here's a twist!!!! Leonardo may occasionally throw fire or thunder shruiken!!!!! It doesn't matter if you charge it or leave it uncharged, the effects are still the same. If Leonardo throws fire shuriken, it does nice knockback and 7% damage!!!! It also leaves a fiery effect. If Leonardo throws thunder shuriken, it does okay knockback and 5% damage. The chances of these unique shuriken happening however is a very mesely 2 percent chance for each.
Side B: Brotherly assistance: Leonardo calls upon, on one of 3 of his brothers. He'll say, "Brothers, i need you!!!!" While Leonardo is calling his brothers, he must wait for 3 seconds, before his brothers come. If he is interrupted while doing this procedure, Leonardo must wait another 20 seconds before doing this attack again. There is a 25% chance to call one of his 3 brothers, so he has a 75% chance that a brother will come out to help Leonardo. There is a 25% however, where absolutely nothing happens and Leonardo is left defenseless. The brother calling are the following:
Rapheal!!!!!! The hot head of his brothers. Leonardo will use Rapheal as a projectile and throw him towards his opponent. He swings Rapheal around a bit to charge up (Leonardo has super armor when he does this), and throws Rapheal away. Rapheal travels pretty fast, so it makes him hard to avoid. If Rapheal hits you, he'll do some good knockback and 13% damage. Since Rapheal only travels in where Leo was facing when he called for his brothers, It makes this attack pretty hard to land. The hit box is the entire body of Rapheal. Rapheal charges straight forward, exiting the screen. There should be a pic:

Michealangelo!!!!!!!! The clown (and coolest) of his brothers. Leonardo will swing Michealangelo around and around and around, hitting anyone who dare comes near Leonardo. This attack lasts for about 10 seconds before Michealangelo dissapears. Leonardo can not jump when doing this attack, and he doesn't exactly travel fast (He's like "Ike" fast when he's doing this attack). However, Leonardo has super armor when this attack is performed. Range is pretty far, thanks to Mikey's rather long body. If Leonardo manages to hit you with Mikey, he does little knockback and 7% damage. The hitbox is Mikey's entire body.

Donetello!!!!! He's the brains of his brothers and the last of Leonardo's pontential attacks. Donetello spins his staff, charging up energy, while Leonardo stabs his 2 katanas to the ground, collecting the energy from Donetello, and lets out a huge burst of lightening, attacking anyone who is near. The range is about pretty far as 3/4ths of battle field. You get caught in the lightening, and you roast damage with 15%. This attack has no knockback however, other than stopping the opponent when they are caught in the strike. If Donetello and Leonardo fail to get anyone in range, they stop this attack after 3 seconds. WARNING!!!! THE FOLLOWING CONTAINS THE WORST PICTURE EDITED KNOWN TO MANKIND. YOU HAVE BEEN WARNED..........

Down B: Shockwave boom: Prepare yourself!!!! Leonardo brings his 2 Katana, swings them up them up in the air, knocking away anyone on top of him (by the way, it does 6% damage and little knockback upwards) and brings them both away, all the way to the ground, stabbing the ground for a short explosion. The range is about 2 character spaces away from Leonardo when the boom happens. If any one is near this attack when Leonardo does this attack, they suffer 14% damage and Nice knockback. Leonardo suffers from a bit of lag at the end, while trying to pull his swords out of the ground. This attack can also take down most projectiles (except for charged blast like Samus' fully charged blast.) If this attack is done on a platform, this attack can meteor anyone below the platform, but its very difficult to do.

Up B: Brotherly throw: I know another brother attack, but just wait listen for a second. Obviously, one of Leonardo's brothers, will throw Leonardo upwards towards the sky. It's Leonardo's chance of recovery. It's about as good as Ike's aether, but only SLIGHTLY better. If Leonardo is thrown to a wall and something is blocking Leonardo from going upwards, this attack is cancelled and Leonardo falls straight down. This time however, the brother who throws Leonardo isn't random. Leonardo's recovery can be interruped. The order goes like this: Michealangelo---------->Rapheal---------->Donetello. Here's a pic:

Michealangelo is the well rounded recovery option of the three brothers as it goes about as far Ike's aether, only slightly better. Michealangelo then magically dissapears. This can also beused as a attack. Since Mikey is the one throwing Leonardo, Leo is the projectile. If Leo hits some one, it does 8% damage, with some Ok knockback. The hitbox is Leonardo's entire body.
Rapheal is the more powerful of Leonardo's brothers. The recovery option is now a little shorter now (like the recovery of Falco's but only slightly shorter), but a bit more damaging. If this attack his you, It will do good knockback and 13% damage. Rapheal also magically dissapears. The hitbox is Leonardo's entire body.
Donetello has the highest recovering throw. It goes about as far as Zelda's up B recovery. Man that's pretty darn good, but there's a catch though. It absolutely does no damage or knockback. Use this move only if your desperate to recover. The hitbox is Leonardo's entire body.
FINAL SMASH: THE SWORD OF TENGU =O
Best sword blade evar. Leonardo puts on the glove of protection, to prevent his hands from getting burnt. Then Leonardo whips out the sword of tengu. Electric energy surround Leonardo when doing this attack. Leonardo is invincible when he holds the blade, so opponents can't really do anything. Leonardo now gets an all new moveset. No matter what button you press however, A or B button, the attacks will exactly be the same. His grabs and aerials are all the same as Leonardo's old moveset. (although they got a bit stronger knockback wise and the attacks get 5% plus.) The final smash lasts for 25 seconds total. The sword will explode in Leonardo's hand when the final smash is over, so he suffers 15% damage when its over. Here's we go:

Standard: Energy blade: Leonardo stabs the opponent right in the gut. Leonardo's strongest Tengu blade attack. If this attack hits the opponent, this attack does great knockback and 18% damage. The range is rather short though considering how short the tengu blade is. The hit box is the blade of the sword. Leonardo has to be right in front of his opponent for this attack to even hit. It has a 2 second lag at the beginning and ends with a 0.8 second lag.
Side B/A: Tengu blast: Leonardo motions the sword a bit (this by the way, is a slight bit of lag). Leonardo then quickly swipes his sword at the opponent to release a huge electric shook towards his opponent. This travels all the way off the screen, although it can only go forward where Leonardo is facing. If anyone is hit by the energy wave, the attack deals with Nice knockback and 12% damage. The shockwave is about as big as Zelda's Dins fire. This attack is chargeble however. It takes about 4 seconds to charge it all the way in order to release the attack. If this charged shook wave hits, it deals with good knockback and 18% damage. The shockwave now is as big as a fully charged Samus blast.
Down B/A: Energy wave: Leonardo uses the sword of tengu to stab the ground, releasing large amounts of electric shooks. It covers pretty much everywhere on the platform Leonardo is standing on (You are screwed if the stage is final destination). If this electric shook hits you, the damage to the opponent will be 20% damage and Ok knockback. Leonardo suffers a slight bit of lag at the end, but he's invinceble, so who cares?  . To avoid this attack from being spammed, you must only use this attack once. If you use it more than once, Leonardo will suffer 10% damage, due to the electric shook towards his arm.
Upwards B/A: Energy uppercut: Leonardo's chance to recover in his final smash if you accidently mess up and start falling towards your doom. Leonardo swings his sword upwards and he follows the sword, sending him upwards. There is an electric current surrounding it. It goes about as far as Marth's Up B. This can also be used as an attack of course. This attack is a multiple hitter. There are 10 hits in all and they all do 2% damage. So thats 20% in all with the very last hit resulting in good knockback. You should use this attack as an easy damage racker.
Taunts:
Up taunt: Leonardo puts his katanas away for a second, and then randomly pulls out from his pocket.......a PIZZA!!!!
Side taunt: Leonardo acts all confused and stuff.

Down taunt: Leonardo points his sword forward and say, "I want a fair fight."
Victory
Victory music (like at the very end of it): http://www.youtube.com/watch?v=eik4qeEtEE8
Classic mode victory: http://www.youtube.com/watch?v=90Tueundpyk
Victory pose 1: Leonardo swings his swords around him and puts them in front of him only to say, "You need to get a lot better."
Victory pose 2: Leonardo sheathes his swords and poses towards the background.
Victory pose 3: Leonardo points his sword in front of him and says, "I did it for honor."
Lose pose: Leonardo sits down and claps, but he's not angry. He's smiling that he got to fight an honarable fight. Weird.
Snake Codec:
Snake: Hey colonel, who's the freak in the costume?
Colonel: He's not wearing one Snake. That's Leonardo, the leader of TMNT.
Snake: Well if's hes not wearing a costume, what is he?
Colonel: He's a mutated turtle Snake. He was taught by Master Splinter along with his 3 younger brothers.
Snake: Well he doesn't look like much.
Colonel: Don't underestimate him Snake. Show some respect for him. He's not attacking you right now.
Snake: Why is that? He has a perfect opportunity to take me down.
Colonel: That's because he fights with honor. He would never do a dirty tactic like you would.
Snake: HEY!!
Subspace role: Diddy Kong was just recently blasted away by Donkey Kong. Diddy Kong seemed injured. Leonardo then comes out of nowhere, to assist Diddy Kong in his time of need. Leonardo and Diddy Kong then team up to get through the forest.
Once they reach the lake, Rayquaza will obviously attack Diddy Kong, like he did last time. He grabs Diddy Kong, and Diddy is absolutely helpless. Leonardo brings his 2 katanas out, but Leonardo won't be able to make in time to reach Diddy. Then Fox does the usually save on Diddy Kong and all 3 of them will fight Rayquaza. After they defeat him, they all traval together.
They were all walking when suddenly a blast comes out of nowhere to trophizize Diddy Kong. It was Bowser that did the blast!!!! He then shadow corrupts Diddy Kong, and then makes a giant replica Diddy Kong. Fox then turns around to get ready to fight the monster and Leonardo runs towards Bowser. Bowser blocks Leonardo's kick. Then Falco come in to the save the day, destroying the trophy machine and the restore Diddy. Bowser tries to escape, But Leonardo chases after him, leaving Fox, Falco and Diddy.
Leonardo then is found on top of a moutain top, looking at the Metaknight ship. He sees Metaknight and Lucario below him. Metaknight then assumes Leonardos an enemy and challenges him. After Leonardo defeats Metaknight, Lucario says they should all work together. So all 3 of them enter the battleship.
They then run towards a hallway, seeing a Box that Snake is in. Lucario discovers Snake and all 4 of them work together. They all rescue the princesses, and head outside. While Lucario, Metaknight, Snake, Peach, Fox, and Zelda are on one side of the ship, Leonardo is on the other side, defending the ship from loads of subspace baddies, with himself and Falco. After they finish protecting the Metaknight ship, they enter the subspace world.
Everything continues as normal from here on.
Trophies:
Leonardo: "The leader of the Teenage Mutant Ninja Turtles. He was raised by a wise rat known as 'Master Splinter.' He's the most quicking thinking of his 3 brothers, and the most well trained of them all, but he takes care of all of them and leads them with smart leadership. He has lead them to take down numerous foes." [Pose: Leonardo has his 2 katanas out posing]

Leonardo (Sword of Tengu): "Leonardo's final smash. This sword gives Leonardo amazing power of energy waves, but it comes with a price. Leonardo's arm will have stress and hurt Leonardo the longer he uses it. In the TV show, Leonardo uses it to finish off his enemy known as the 'Shredder.'" [Pose: Leonardo is holding the sword of Tengu up]
*See Final smash pic*
Rapheal: "The most arrogent of the 4 turtles. He prefers to fight his own way and not listen to reason. His anger is his weakness, all 3 of his brothers tell Raph. However, Rapheal cares all about his 3 brothers and he fights like a true family with them....when he listens. [Pose: Rapheal's jumping, ready to attack his opponent.]

Michealangelo: "The wise cracking funny guy of the 4 brothers. He is the most laid back of them, doing the most fun stuff, like skateboarding, eating junk 24 hours a day, and all the stuff you regularly do. He, of course, however cares about his 3 brothers as well, and will defend any of them." [Pose: Michealangelo is getting ready to attack with his nunchaku.]

Donetello: The smart one of the four turtles. He can usally be found in his lab, working on new inventions that will assist his brothers. He does get a bit tired of fixing his brothers stupidity actions all the time though. He, of course, will die for his 3 brothers, if he needs to, in order to care for all of them." [Pose: Donetello is using his staff to attack his enemies.]

Spilinter: The teacher of Leonardo and his four brothers. Master Splinter has taught the turtles all he knows so far. However, since the turtles are just beginning to mature, Master Splinter believes that they are not ready to live off on there own. He cares about his family that he bonded with since the turtles where still little, and will stop at nothing to take care of all of them. [Pose: Master Splinter is on his standing stick smiling.]

Assist Trophy:
VANILLA ICE

Go Ninja!! Go Ninja Go!!!!!! Vanilla Ice makes a appearence in "Teenage Mutant Ninja Turtles 2: the secret of the ooze" and he's here to make an appearence here. He's in the background, so you or the opponent can't really attack him. This effects mostly the opponents, but strangely effects you too!!! If Vanilla Ice comes out to the fray, he sings the "Ninja rap" and causes everyone to dance in there own unique way as long at there just standing there doing nothing. You AND the opponent (imagine a dancing Marth ). What makes it effect the opponent is that the opponent is mezmorized by the music, there attacks are a little slower. This does not effect the opponents running speed or any other move or stat. Use that to your advantage. The assist trophy ends after 30 seconds when Michealangelo comes out of nowhere and kicks Vanilla Ice off the stage in the background. This assist trophy works no matter where you are. It continues to work till it ends. Here's the song that he'll be performing: http://www.youtube.com/watch?v=PDU7HsdCotE
There, i'm officially done
Reviews:
Chris Lionheart: 113%
Chief Mendez: 27/40
Warlord: "Easily above average and just barely below the top movesets in this contest."
Leonardo, of the Teenage Mutant Ninja Turtles, joins the Brawl. With his 2 katana blades and his ninja reflexes, he can take down almost anyone.
The Description:
Leonardo is the leader of 4 turtles that you and I should know as TMNT AKA Teenage Mutant Ninja Turtles. He was mutated by slime, that turn him and his brothers from regular turtles into what they are now. He is still quite popular, if you know him back than in the 1990s or right now. He's the most serious of the 4 turtles with his leadership and devoted into fighting for what's right. He gets along with his brothers pretty well, but is also fully capable for fighting for himself. He was taught under Master Splinter, a very intelligent rat. He has taken down enimies like the imfamous Shredder, Rozar, and Tokan, Baxter Stockmen and other sorts of enimies with his team. Today, he's going to enter the battlefield alone and he's going to do that...........with honor. Could he be one of the best fighters around?
Stats:
Power: 3 (He's well rounded in this stat. He attacks with 2 swords. He can take down opponents at 90-150% if use his more powerful attacks.)
Running speed: 3.5 (For a turtle, he runs pretty fast. Than again, he's a ninja so what do you expect? I would also be flamed by a thousand Tmnt fans if i didn't make him somewhat fast. He's "Marth" fast.)
Weight: 2 (For a turtle carrying a shell, he's pretty light. Because of this, he can be easily knocked out.)
Height: 3.5 (What do you expect? Look at the picture. He's going to fight in that pose. He's a bit smaller than Marth)
Falling speed: 2 (He's a ninja alright. He has a pretty impressive air game because of this. Use it wisely, as because of this, Leo could be an easy target)
Attack speed: 3.5 (Not bad at all. There are a couple of attacks that do have a slight bit of lag though,)
First Jump: 3 (He's a little hampered in this one, so to avoid being killed, he has ok recovery)
Second Jump: 2 (Whoa, a second jump lower from the first one. Maybe his Up B recovery will save him? We'll see.)
Range: 2.5 (Considering his katana's are kinda short, his range has to be small. You'll have to get pretty close to attack your opponent. Not bad though.)
Wall Climb: Yes (Ninjas HAVE to wall climb)
Wall Cling: Yes (Ninjas HAVE to wall cling)
Crawl: Yes (You can't sneak around if you couldn't)
Glide: No (Ninjas HAVE to gli- i mean, not fly)
Unlock message:
Master Splinter has taught you well. The honarable turtle joins the Brawl!
Wii Remote Message:
"I'll do it for honor."
Animation:
Standard: ^He poses like the pic i just showed.
Animation pose: He occasionally swings his right hand slowly and then he motions his left hand to look at his katana.
Dodge: He sidesteps out of the way.
Roll: He backflips.
Air Dodge: He puts his 2 swords together and moves towards the background.
First jump: Leonardo leaps into the air like a regular person.
Second jump: Leonardo Spins in the air to get another air jump.
Running: He dives in with his head, not caring what happens to him.
Shield: He puts his 2 swords together to block. Leonardo is struggling it seems.
Other Animations:
Sleeping: Leonardo sticks his 2 katanas into the ground sleeps quietly sitting down. Wow. He looks serious even when he's sleeping.
Dizzy: Leo spins his head around in pain while also hopelessly hands are down, so he can't exactly swing his sword to defend himself.
How to unlock:
1. Get him to join party in subspace emissary.
2. Beat 220 matches
3. Beat classic mode with ten characters where there has to be at least 3 of them sword users.
Play Style:
Leonardo is a fast turtle. He needs to rack up damage before K.O. someone. He needs to be all over the place confusing the opponent maybe, and act like a true ninja. Attacking head straight on is not wise. Use his quick attacks to surround the opponent, and after the damage is high enough, KNOCK HIM OUT!!! Using his projectiles and staying from afar also works.
Of course he needs to take care of himself too. Use Leo's fast movements to get around, avoiding a lot of the opponents attacks. This means dodging has to be a second nature for Leo. Use all of Leo's recovery options. It might just save your butt.
All i can say know is don't abuse ledge guarding TOO much, as you might not be able to recover safely. GOOD LUCK!!!! NEW YORK IS COUNTING ON YOU!!!
Basic A attacks:
Standard A: Booyah Heahbutt: Leonardo sends his head straight towards his opponent. Since his head is rather small, its really weak. This header does absolutely no knockback. The target has to be right in front of Leonardo in order to attack as Leo only uses his head to attack plus the range/hitbox is really short and small. It is really fast though. (3%) This attack is part of an "AAA" combo. (No pic is availible
)AA: Shoulder punch: Its basically a punch to the chin. This attack has even SHORTER range/hitbox from the last attack. It means you must have landed the first hit in order to hit with this attack. It's also not exactly worth it as Leonardo's attack does very little knockback, regardless of the percentage of the opponent. It also excels in speed too, thus good for racking up damage. (4%) This attack is also part of an "AAA" combo. There should be a pic below:
AAA: Turtle stab: You all saw this coming now, didn't you? Leonardo stabs his opponent forward. He struggles a bit to pull his sword out, so Leo suffers from a slight bit of lag at the end of the combo. Luckly, if you failed to attack with the previous attacks, you can still attack with this one, as it has some very nice range (about a character and a half size.) The hitbox is where the sword stabbing is, so not below or above it (although, it can hit by the top or the bottem of the sword. This attack does little knockback and 5% damage. There should be a pic below:
Side Tilt: Sword upper: Why is Leo crouching for this attack? Its beyond me. Anyway, Leonardo attacks upward while crouching to avoid this attack from being an upwards attack. This attack starts off fast, but end with a slight bit of lag. The hitbox is where Leonardo's sword is tipping at and the sword's side as well. The range is pretty nice, but since he's attacking while crouching, Leo suffers from being unable to attack more sideways. The knockback is Ok while the damage is 6%. There should be a pic below:
Up Tilt: High Kick: Leonardo kicks his opponent by the face to the air. This is suprisingly one of Leonardo's stronger attacks as it does some decent damage. The knockback radius is little knockback and it sends you slightly upwards while the damage is (7%). Since it looks like Leo is kicking to the face rather than the side (see pic below), the hitbox is where Leo's leg and feet is. The range is about 7/8ths of a character. The downside to this attack is that Leo suffers from a bit of lag at the end (it has no trouble attacking from the beginning though). There should be a pic below:
Down Tilt: Leg sweeper: Leonardo obviously leg sweeps his opponent and he does it rather heavily too. This is Leonardo worst tilt in the game, but thats not saying its bad. In fact, its pretty useful. It has a very small slow startup and ends with a also very small lag at the end. The hitbox is practically where Leo sweeps is leg in, and it only attacks the ground. It's range is pretty nice (Like 3 fourths of a character). The knockback is very little and the damage overall is (5%). There should be a pic below:
Dash attack: Elegant spin: Leonardo attacks his opponent...by spinning? Actually he lets his katanas out in order to attack the opponent. This attack is a multiple hitter. It does 2% for each hit and Leonardo does 5 of them. There is small knockback on the last hit. The hitbox is the size and tip of Leonardo's sword. Range is kinda small, but since he moves around while doing this attack, it makes up for it. Attack stops after Leo moves for a small 2 seconds. Leo suffers a slight bit of lag at the end.
SMASHES:
Side Smash: Sword blast: Leonardo lets out a "Raining puddle!!" What th-? Is that a projectile? You can't have a projectile in a smash!! You can't!!!!!! ......And I don't care
Seriously though, Leonardo tucks his sword to the side of him preparing to charge up for his smash attack (this is Leonardo's side smash charge). Leonardo then releases the attack, slashing with his 2 swords together, towards his opponent. If the opponent is directly in front of Leonardo when Leo does this attack, it does nice knockback uncharged (13%) and to good knockback fully charged (16%.) Since there is a small projectile that comes out, the blast does little knockback uncharged (7%) and ok knockback fully charged (10%). The projectile only goes as far as one fourth of the stage battlefield before fading out. So basically, it goes about 3 character spaces in front of Leo, the projectile does. The projectile can easily be stopped by having another projectile being intercept it. Bit of lag at the end. There should be a pic:
Up Smash: Leonardo katana spin kick: Personally my favourite smash attack. Leonardo sticks his katanas into the ground. Then he grabs on to the katana, starts moving with his katana and kicks all around him. Since his swords are stuck to the ground and Leonardo is using them to spin his body around, he is in the air. The hitbox are his legs and feet, around and on top of them. Since Leonardo's body is somewhat long, the range is pretty good. If this attack manages to hit the opponent, it does Ok knockback uncharged (10%) to nice knockback fully charged (14%). The downside to this attack is that Leonardo suffers from a bit of lag at the end of the smash.
Down Smash: Double slasher: Leonardo feriously slashes once straight forward, and then again a second time very powerfully. Leonardo is crouching when he does this attack. The hitbox is pretty small this time around as the katana, as mentioned before, are pretty short (though not dagger short). Therefore, the opponent has to be right in front of Leonardo for this attack to work (like in the size of 7 eighths of a character). The first slash this attack does is no knockback what so ever, but 10% uncharged and 12% fully charged. The second slash of this attack does OK knockback with 8% damage uncharged and Nice knockback with 10% fully charged. The range is about a whole character size. Use it to rack up damage. There should be a pic:
Aerials:
Neutral: Cresent slash: Leonardo slashes at his opponent apprantly attacking downwards. The range is pretty short as the sword is practically near and next to him. The hitbox is where his sword is. The knockback detail is little, where as the direction forces the opponent to go forward, and it does 6%. Try using it to send opponents forward and KOing them. There should be a pic:
Forward: Leonardo Swing: A swing forward from his sword to you. One of Leonardo's attacks that do have good range. It sends you forward with some ok knockback and 8%. The hitbox is where Leo is swinging his sword. The downside to this aerial is that it suffers a bit of lag at the end. Not to mention Lag from the beginning as well. This is one of Leo's "Meh, its not bad" aerials. Pic is down below:
Backwards: Suprise slash: It looks like Leonardo was going to slice and dice forward, but he feints and quickly turns around to attack his opponent with the mighty katanas. It does some Ok knockback, sending the opponent backwards and it does about 8%. There is a very slight bit of lag at the beginning, but no end lag. Arguble one of Leonardo's best aerials. The hitbox is where the sword lands. The range is not bad at all. There is a pic below, but ignore the flashy effects.
Downwards: Party Kick: Leonardo kicks his opponent downwards to the ground. This attack can meteor the opponent, HOWEVER, the attack has to be sweetspotted before using this attack. If this kicker touches by the side or otherwise known as NOT on the foot, this attack does 4% and very little knockback. If this attack is sweet spotted, it instead does 7% and the opponent has a hard time to escape from the meteor. There is a slight bit of lag at the end, but no lag at the beginning.
Upwards: Cresent spin: Leonardo lets out a "HYAH!!!," when he does this attack. Leonardo spins upwards in the air, attacking upwards with his katanas. The range is rather short though (not that short however). It's really quick and covers all around Leonardo, but its only highly effective a top of the spin. Anywhere other than that, it only does very little knockback and 3% damage. If it does right on the top however, it does nice knockback and 8% damage. My vote for Leonardo's best Aerial. Abuse and use it.
Grabs:
Beat down: Leonardo uses the hilt/handle of one of his swords to beat the opponent down. It goes at regular speed.
Forward: Turtle's headsmash: Leonardo lets goes of his opponent for a second and then goes straight in for a huge headbutt. Arguble the best of Leonardo's throws as it does nice knockback, sending the opponent forward obviously, and and it does a nice (8%) damage. Leonardo lets out a "HYAH!!!!," when he does this throw.
Backwards: Lay down throw: Leonardo is not going to use his swords for this attack. Instead, he throws his opponent while laying down on his back and kicking the opponent backwards. This attack has some little knockback backwards and does (7%) damage. Leonardo quickly recovers to avoid from getting hit from other attackers. He quickly pulls out his katanas again.
Downwards: Spare your life: Leonardo throws his opponent to the ground. Leonardo was going to finish his opponent off, but he has a sense of honor with him. Instead, he spares his opponent and lets them rest on the ground. Not one of Leonardo's wisest decisions, but still noble though. This unique down throw does absolutely no knockback what so ever other than throw his opponent to the floor, but it does 9% damage.
Upwards: Turtle Barrage: Leonardo throws his opponent in the air. As the opponent falls down, Leonardo dashes and throws in a barrage of punches towards his opponent. Leonardo then finishes his opponent off with a huge uppercut. The barrage is a multiple hitter, and when all the punches land, they do 1% each and Leonardo does 9% of them. All the punches should land on the opponent. The uppercut at the end also does 1% damage, for a grand total of 10% damage, but the knockback is nice upwards. Coolest throwing attack ever. Leonardo suffers a bit of lag at the end. Uppercut pic is not availible
B ATTACKS:
Standard B: Shuriken thrower: An obvious, but must have in a ninja's arsenal. Leonardo throws one shuriken towards you. He suffers from a bit of lag at the end (like a slight second, but thats about it). If it hits, the opponent will suffer, very, very little knockback and 4% damage. The distance on how far the Shuriken goes is about half of the stage known as battle field before fading away. The shuriken, of course, is very small, so the hitbox is rather small.
However, this attack is chargable. If you decide to charge this, Leonardo will be in a ready position to throw the shuriken. It takes about 3 seconds to get it fully charged up. If Leonardo throws the charged up shuriken, the hitbox is bigger than before, making it a bit harder to get away from. This time though, it absolutle does no knockback, and it only does 6% damage. Instead of knockback, it stuns the opponent temporaly for 2 seconds, letting Leonardo go in for the kill. The range this time is doubled from the original range.
Now here's a twist!!!! Leonardo may occasionally throw fire or thunder shruiken!!!!! It doesn't matter if you charge it or leave it uncharged, the effects are still the same. If Leonardo throws fire shuriken, it does nice knockback and 7% damage!!!! It also leaves a fiery effect. If Leonardo throws thunder shuriken, it does okay knockback and 5% damage. The chances of these unique shuriken happening however is a very mesely 2 percent chance for each.
Side B: Brotherly assistance: Leonardo calls upon, on one of 3 of his brothers. He'll say, "Brothers, i need you!!!!" While Leonardo is calling his brothers, he must wait for 3 seconds, before his brothers come. If he is interrupted while doing this procedure, Leonardo must wait another 20 seconds before doing this attack again. There is a 25% chance to call one of his 3 brothers, so he has a 75% chance that a brother will come out to help Leonardo. There is a 25% however, where absolutely nothing happens and Leonardo is left defenseless. The brother calling are the following:
Rapheal!!!!!! The hot head of his brothers. Leonardo will use Rapheal as a projectile and throw him towards his opponent. He swings Rapheal around a bit to charge up (Leonardo has super armor when he does this), and throws Rapheal away. Rapheal travels pretty fast, so it makes him hard to avoid. If Rapheal hits you, he'll do some good knockback and 13% damage. Since Rapheal only travels in where Leo was facing when he called for his brothers, It makes this attack pretty hard to land. The hit box is the entire body of Rapheal. Rapheal charges straight forward, exiting the screen. There should be a pic:
Michealangelo!!!!!!!! The clown (and coolest
) of his brothers. Leonardo will swing Michealangelo around and around and around, hitting anyone who dare comes near Leonardo. This attack lasts for about 10 seconds before Michealangelo dissapears. Leonardo can not jump when doing this attack, and he doesn't exactly travel fast (He's like "Ike" fast when he's doing this attack). However, Leonardo has super armor when this attack is performed. Range is pretty far, thanks to Mikey's rather long body. If Leonardo manages to hit you with Mikey, he does little knockback and 7% damage. The hitbox is Mikey's entire body.
Donetello!!!!! He's the brains of his brothers and the last of Leonardo's pontential attacks. Donetello spins his staff, charging up energy, while Leonardo stabs his 2 katanas to the ground, collecting the energy from Donetello, and lets out a huge burst of lightening, attacking anyone who is near. The range is about pretty far as 3/4ths of battle field. You get caught in the lightening, and you roast damage with 15%. This attack has no knockback however, other than stopping the opponent when they are caught in the strike. If Donetello and Leonardo fail to get anyone in range, they stop this attack after 3 seconds. WARNING!!!! THE FOLLOWING CONTAINS THE WORST PICTURE EDITED KNOWN TO MANKIND. YOU HAVE BEEN WARNED..........
Down B: Shockwave boom: Prepare yourself!!!! Leonardo brings his 2 Katana, swings them up them up in the air, knocking away anyone on top of him (by the way, it does 6% damage and little knockback upwards) and brings them both away, all the way to the ground, stabbing the ground for a short explosion. The range is about 2 character spaces away from Leonardo when the boom happens. If any one is near this attack when Leonardo does this attack, they suffer 14% damage and Nice knockback. Leonardo suffers from a bit of lag at the end, while trying to pull his swords out of the ground. This attack can also take down most projectiles (except for charged blast like Samus' fully charged blast.) If this attack is done on a platform, this attack can meteor anyone below the platform, but its very difficult to do.
Up B: Brotherly throw: I know another brother attack, but just wait listen for a second. Obviously, one of Leonardo's brothers, will throw Leonardo upwards towards the sky. It's Leonardo's chance of recovery. It's about as good as Ike's aether, but only SLIGHTLY better. If Leonardo is thrown to a wall and something is blocking Leonardo from going upwards, this attack is cancelled and Leonardo falls straight down. This time however, the brother who throws Leonardo isn't random. Leonardo's recovery can be interruped. The order goes like this: Michealangelo---------->Rapheal---------->Donetello. Here's a pic:
Michealangelo is the well rounded recovery option of the three brothers as it goes about as far Ike's aether, only slightly better. Michealangelo then magically dissapears. This can also beused as a attack. Since Mikey is the one throwing Leonardo, Leo is the projectile. If Leo hits some one, it does 8% damage, with some Ok knockback. The hitbox is Leonardo's entire body.
Rapheal is the more powerful of Leonardo's brothers. The recovery option is now a little shorter now (like the recovery of Falco's but only slightly shorter), but a bit more damaging. If this attack his you, It will do good knockback and 13% damage. Rapheal also magically dissapears.
The hitbox is Leonardo's entire body.Donetello has the highest recovering throw. It goes about as far as Zelda's up B recovery. Man that's pretty darn good, but there's a catch though. It absolutely does no damage or knockback. Use this move only if your desperate to recover. The hitbox is Leonardo's entire body.
FINAL SMASH: THE SWORD OF TENGU =O
Best sword blade evar. Leonardo puts on the glove of protection, to prevent his hands from getting burnt. Then Leonardo whips out the sword of tengu. Electric energy surround Leonardo when doing this attack. Leonardo is invincible when he holds the blade, so opponents can't really do anything. Leonardo now gets an all new moveset. No matter what button you press however, A or B button, the attacks will exactly be the same. His grabs and aerials are all the same as Leonardo's old moveset. (although they got a bit stronger knockback wise and the attacks get 5% plus.) The final smash lasts for 25 seconds total. The sword will explode in Leonardo's hand when the final smash is over, so he suffers 15% damage when its over. Here's we go:
Standard: Energy blade: Leonardo stabs the opponent right in the gut. Leonardo's strongest Tengu blade attack. If this attack hits the opponent, this attack does great knockback and 18% damage. The range is rather short though considering how short the tengu blade is. The hit box is the blade of the sword. Leonardo has to be right in front of his opponent for this attack to even hit. It has a 2 second lag at the beginning and ends with a 0.8 second lag.
Side B/A: Tengu blast: Leonardo motions the sword a bit (this by the way, is a slight bit of lag). Leonardo then quickly swipes his sword at the opponent to release a huge electric shook towards his opponent. This travels all the way off the screen, although it can only go forward where Leonardo is facing. If anyone is hit by the energy wave, the attack deals with Nice knockback and 12% damage. The shockwave is about as big as Zelda's Dins fire. This attack is chargeble however. It takes about 4 seconds to charge it all the way in order to release the attack. If this charged shook wave hits, it deals with good knockback and 18% damage. The shockwave now is as big as a fully charged Samus blast.
Down B/A: Energy wave: Leonardo uses the sword of tengu to stab the ground, releasing large amounts of electric shooks. It covers pretty much everywhere on the platform Leonardo is standing on (You are screwed if the stage is final destination
). If this electric shook hits you, the damage to the opponent will be 20% damage and Ok knockback. Leonardo suffers a slight bit of lag at the end, but he's invinceble, so who cares? . To avoid this attack from being spammed, you must only use this attack once. If you use it more than once, Leonardo will suffer 10% damage, due to the electric shook towards his arm. Upwards B/A: Energy uppercut: Leonardo's chance to recover in his final smash if you accidently mess up and start falling towards your doom. Leonardo swings his sword upwards and he follows the sword, sending him upwards. There is an electric current surrounding it. It goes about as far as Marth's Up B. This can also be used as an attack of course. This attack is a multiple hitter. There are 10 hits in all and they all do 2% damage. So thats 20% in all with the very last hit resulting in good knockback. You should use this attack as an easy damage racker.
Taunts:
Up taunt: Leonardo puts his katanas away for a second, and then randomly pulls out from his pocket.......a PIZZA!!!!
Side taunt: Leonardo acts all confused and stuff.
Down taunt: Leonardo points his sword forward and say, "I want a fair fight."
Victory
Victory music (like at the very end of it): http://www.youtube.com/watch?v=eik4qeEtEE8
Classic mode victory: http://www.youtube.com/watch?v=90Tueundpyk
Victory pose 1: Leonardo swings his swords around him and puts them in front of him only to say, "You need to get a lot better."
Victory pose 2: Leonardo sheathes his swords and poses towards the background.
Victory pose 3: Leonardo points his sword in front of him and says, "I did it for honor."
Lose pose: Leonardo sits down and claps, but he's not angry. He's smiling that he got to fight an honarable fight. Weird.
Snake Codec:
Snake: Hey colonel, who's the freak in the costume?
Colonel: He's not wearing one Snake. That's Leonardo, the leader of TMNT.
Snake: Well if's hes not wearing a costume, what is he?
Colonel: He's a mutated turtle Snake. He was taught by Master Splinter along with his 3 younger brothers.
Snake: Well he doesn't look like much.
Colonel: Don't underestimate him Snake. Show some respect for him. He's not attacking you right now.
Snake: Why is that? He has a perfect opportunity to take me down.
Colonel: That's because he fights with honor. He would never do a dirty tactic like you would.
Snake: HEY!!
Subspace role: Diddy Kong was just recently blasted away by Donkey Kong. Diddy Kong seemed injured. Leonardo then comes out of nowhere, to assist Diddy Kong in his time of need. Leonardo and Diddy Kong then team up to get through the forest.
Once they reach the lake, Rayquaza will obviously attack Diddy Kong, like he did last time. He grabs Diddy Kong, and Diddy is absolutely helpless. Leonardo brings his 2 katanas out, but Leonardo won't be able to make in time to reach Diddy. Then Fox does the usually save on Diddy Kong and all 3 of them will fight Rayquaza. After they defeat him, they all traval together.
They were all walking when suddenly a blast comes out of nowhere to trophizize Diddy Kong. It was Bowser that did the blast!!!! He then shadow corrupts Diddy Kong, and then makes a giant replica Diddy Kong. Fox then turns around to get ready to fight the monster and Leonardo runs towards Bowser. Bowser blocks Leonardo's kick. Then Falco come in to the save the day, destroying the trophy machine and the restore Diddy. Bowser tries to escape, But Leonardo chases after him, leaving Fox, Falco and Diddy.
Leonardo then is found on top of a moutain top, looking at the Metaknight ship. He sees Metaknight and Lucario below him. Metaknight then assumes Leonardos an enemy and challenges him. After Leonardo defeats Metaknight, Lucario says they should all work together. So all 3 of them enter the battleship.
They then run towards a hallway, seeing a Box that Snake is in. Lucario discovers Snake and all 4 of them work together. They all rescue the princesses, and head outside. While Lucario, Metaknight, Snake, Peach, Fox, and Zelda are on one side of the ship, Leonardo is on the other side, defending the ship from loads of subspace baddies, with himself and Falco. After they finish protecting the Metaknight ship, they enter the subspace world.
Everything continues as normal from here on.
Trophies:
Leonardo: "The leader of the Teenage Mutant Ninja Turtles. He was raised by a wise rat known as 'Master Splinter.' He's the most quicking thinking of his 3 brothers, and the most well trained of them all, but he takes care of all of them and leads them with smart leadership. He has lead them to take down numerous foes." [Pose: Leonardo has his 2 katanas out posing]
Leonardo (Sword of Tengu): "Leonardo's final smash. This sword gives Leonardo amazing power of energy waves, but it comes with a price. Leonardo's arm will have stress and hurt Leonardo the longer he uses it. In the TV show, Leonardo uses it to finish off his enemy known as the 'Shredder.'" [Pose: Leonardo is holding the sword of Tengu up]
*See Final smash pic*
Rapheal: "The most arrogent of the 4 turtles. He prefers to fight his own way and not listen to reason. His anger is his weakness, all 3 of his brothers tell Raph. However, Rapheal cares all about his 3 brothers and he fights like a true family with them....when he listens. [Pose: Rapheal's jumping, ready to attack his opponent.]
Michealangelo: "The wise cracking funny guy of the 4 brothers. He is the most laid back of them, doing the most fun stuff, like skateboarding, eating junk 24 hours a day, and all the stuff you regularly do. He, of course, however cares about his 3 brothers as well, and will defend any of them." [Pose: Michealangelo is getting ready to attack with his nunchaku.]
Donetello: The smart one of the four turtles. He can usally be found in his lab, working on new inventions that will assist his brothers. He does get a bit tired of fixing his brothers stupidity actions all the time though. He, of course, will die for his 3 brothers, if he needs to, in order to care for all of them." [Pose: Donetello is using his staff to attack his enemies.]
Spilinter: The teacher of Leonardo and his four brothers. Master Splinter has taught the turtles all he knows so far. However, since the turtles are just beginning to mature, Master Splinter believes that they are not ready to live off on there own. He cares about his family that he bonded with since the turtles where still little, and will stop at nothing to take care of all of them. [Pose: Master Splinter is on his standing stick smiling.]
Assist Trophy:
VANILLA ICE
Go Ninja!! Go Ninja Go!!!!!! Vanilla Ice makes a appearence in "Teenage Mutant Ninja Turtles 2: the secret of the ooze" and he's here to make an appearence here. He's in the background, so you or the opponent can't really attack him. This effects mostly the opponents, but strangely effects you too!!! If Vanilla Ice comes out to the fray, he sings the "Ninja rap" and causes everyone to dance in there own unique way as long at there just standing there doing nothing. You AND the opponent (imagine a dancing Marth
). What makes it effect the opponent is that the opponent is mezmorized by the music, there attacks are a little slower. This does not effect the opponents running speed or any other move or stat. Use that to your advantage. The assist trophy ends after 30 seconds when Michealangelo comes out of nowhere and kicks Vanilla Ice off the stage in the background. This assist trophy works no matter where you are. It continues to work till it ends. Here's the song that he'll be performing: http://www.youtube.com/watch?v=PDU7HsdCotE There, i'm officially done
Reviews:
Chris Lionheart: 113%
Chief Mendez: 27/40
Warlord: "Easily above average and just barely below the top movesets in this contest."