• Welcome to Smashboards, the world's largest Super Smash Brothers community! Over 250,000 Smash Bros. fans from around the world have come to discuss these great games in over 19 million posts!

    You are currently viewing our boards as a visitor. Click here to sign up right now and start on your path in the Smash community!

Make Your Move 4

Status
Not open for further replies.

Pelikinesis

Smash Journeyman
Joined
Nov 11, 2008
Messages
365
Location
Somewhere in Nevada...
@Mendez

thanks much for the review, but could you give me your thoughts on the Mood mechanic? You didn't say much about it there and that's what I had to mess around with the most before completing it.
 

SirKibble

Smash Champion
Joined
May 2, 2008
Messages
2,400
I guess I'll tackle this one:

This is my first time actually trying to do something for the MYM project.

Is there any real big things the Sandbags look for (and or appeals to them)?

I've read through the requirements but I want to overshoot to leave a good impression.

I apologize for the nubinezz. Thanks in advance dood.
Ooh, you even bolded Sandbags. Maybe we should make that a rule from now on, eh, guys? ;)

Anyway, glad to hear MYM's got your attention, and that you're looking to do well. Here are a few key points to consider while making a moveset:

Detail - When you write out a character's attacks, make sure you put in all the functionality details. If you're looking to overshoot, you'll want to be including damage (with percentages), knockback, range, lag times (for before and after the attack), priority, etc. If there's anything you think we might want to know, go ahead and put it.

Creativity - We like to see some variety in the attacks for a character. One of the most disappointing things in an MYM entry is a large number of basic punches and kicks (sometimes referred to by us as "PPK [Punch Punch Kick] Syndrome"). We'd much rather you think outside the box, giving your character more interesting and fun attacks that offer something more original.

Organization - If an entry isn't well-organized, it can be very difficult to read through, and by that token, won't get very many fans. Proper use of basic BBcode like bolding and underlining, as well as others like the color, size, and center tags, is essential. Take a look at some of the movesets in the thread for possible ideas of what's easy to read.

Balance - Naturally, it's most desirable for a character entry to be as balanced as possible. Not overpowered, and not underpowered. Keep that in mind while giving moves damage percentages, knockback, range, etc. It's more common for a moveset to end up overpowered than underpowered, and that's generally worse for the moveset, anyway, so aiming weak is usually more beneficial than aiming strong, if you're not sure where you're at. If you think you can judge it well enough on your own, the most-liked characters tend to fall somewhere around High Tier.

Playstyle - This can often be one of the most difficult, but rewarding, points of moveset creation. A central playstyle component is heavily favored in MYM. Whether the character is focused around a central mechanic (a switching mechanic, a PP system, or anything else you can think of), or if they're just focused around a strong point like gimping or projectiles, having a central point to base your character's moveset around is always a good idea.


You can get a feel for most of this by just reading over some of the movesets for the regulars in this thread. Most of us have links in our signatures to our movesets, whether through actual links to them there or to a "link-up space" where we keep links to all of our movesets.
 

SirKibble

Smash Champion
Joined
May 2, 2008
Messages
2,400
Ah. Thanks so much, Sir Kibble!

I will be re-routing all of my work into the favorable conditions!
You're quite welcome. I look forward to seeing what you come up with! :)

There are more points, but I figured I'd land the five that we Sandbags seem to take most into consideration, each of us at different levels.

Me, myself, I'm a stickler for creativity. PPK Syndrome really gets to me, and my favorite attacks are the crazy ones. MasterWarlord isn't called the Detail Nazi for no reason, and his movesets certainly show how much he loves good descriptions. I don't know if I can count the times I've heard Chief Mendez tell someone to use more BBcode for better organization, though he's also well-known for liking conciseness. Chris Lionheart has a good eye for balance issues, and won't hesitate to mention them. And KingK.Rool loves him a good playstyle, complete with comprehensive summary of it somewhere in the moveset.

In short, if you cover all those points, you'll be satisfying all of us in at least one way. :laugh:

now about my question, please, Kibble?
Oh, right. Let me see...

If i were to add some more detail to my Vexen moveset, would it be possible for him to be in at least the top 50?
There's no way to really tell. It's all up to the votes at the end. Any moveset could land a spot there if it's got enough detail (as well as all the other stuff I just told Emergency about).
 

dancingfrogman

Smash Ace
Joined
Jan 3, 2008
Messages
862
Location
United Kingdom, Birmingham
Switch FC
3133 8842 3910
Yeah, one way to make someone vote for it is A) improve it to meet the neccesary standards of ones large choice of 30 votes. And B) Advertise the set as much as possible, You can use a variety of ways of doing this, like making a button for the character, getting good reviews, and a trick everyone uses, which are previews, if you post a good move, people will have high hopes for it, and if you succed in making an individual enjoy it, that makes it more likely to be voted.

Another way of advertisement is to make it favoured for one thing, take K.rools Chef Kawaski for example, people actual made recipies for k.rools set, and that's one of the most important aspects of the set. Another example is my Robotnik set, people say it's the most over-detailed set in the contest, and they refer to it as an example of over-detail, and thats advertising.

and I love how each sandbag looks for something different the most in their reviews, I guess i'm more of liking original moves slightly more than the other 4 key aspects of "moveset making gold".
 

princesspeachluver13

Banned via Warnings
Joined
Nov 13, 2007
Messages
617
Location
Yep. I had it coming. Stupid apathy.
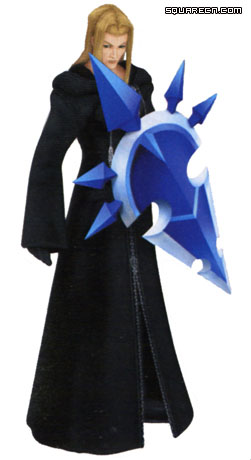
Vexen, the Chilly Academic has joined the Brawl!!


I'm a scientist. Experiments are what I do...yes.

Stats & Stuff

Vexen is a little taller than average height, 7/10

Vexen's height contributes to his weight, 7/10

Vexen's attack strength is better than dismal, 5/10

Magic is where Vexen excels...Ice magic, to be exact, 10/10

His attack range is even worse, 3/10

But, his attack speed is near perfection, 8/10

Magic speed, although laggy in startup is pretty decent

Vexen's Magic range is perfection, 10/10

Vexen walks in a slow and steady pace, 4/10

He runs at about the same, maybe a higher pace, 6/10

Vexen's first jump is pretty good, 5/10

His 2nd jump is the same, 5/10

Yes, Vexen floats

No, he neither crouches, crawls, wall jumps, wall clings, nor glides.


Playstyle Description

Vexen's playstyle is very unique. He uses a shield as his main weapon. We all know that Shields are mainly used for defense. Vexen uses his shield, Freeze Pride, along with his Ice Magic to create a very special style not used by anyone else. When he floats, he stands on his shield, and when he runs or walks, he hovers off of the ground on an invisible platform of magic. Vexen is known to have created replicas of himself in his spare time, to test out his scientific abilities. Maybe, these replicas will come in handy? Well, just read to find out.


Basic Moves - Standards

A: Vexen yells, "Ha!" and swings his shield to deal at least 4%. At sweet spot, the move deals about 7-8%. The move has very tiny lag, and is a basic move for n00bs and veterans alike!

A combo: Vexen yells, "Ha, "Hoo," "Hah!" during his swings of Freeze Pride. The first 2 hits are horizontal, quick and weak, and the last hit is vertical and slow, but strong, causing some knockback and 11% total. This is where the 2nd part of the "combo" jimnymebob posted comes in handy. After the opponent is knocked into the air, you can follow up with another smash, preferably his side smash. This move can actually be continued with Vexen's Down Air.

Side Smash: Vexen yells "Heyyah!" and stabs with Freeze Pride at an average speed, almost like if he were punching someone. It causes about 9-10% with minimal knockback, but when sweet-spotted, this move can be a *****. When sweet-spotted it can cause up t0 13%. When at high percentages(when not sweet-spotted), this move can cause very high horizontal knockback. The best choice when finishing the A combo, although it has some lag when starting. About Speed, the startup is slow, but the ending animation(the actual punch), is very fast and strong.

Down smash: Vexen Yells, "Freeze!" and positions both hands outwards and fires small icicles in either direction. While weak(only dealing 3% per icicle), this move creates good stun against grounded opponents. But if an opponent is falling, it is not the best choice. The move has some starting lag, which means you would have to have very precise timing on when to perform the move. If the move connects, however, it renders the falling opponent helpless. Only a good choice if you know whento use it. About speed, the icicles are fired .5 seconds apart.

Up Smash: Vexen yells, "Below zero!" and causes a flurry of snowflakes to propel upwards. It has a seconds worth of lag, due to the phrase, and is only a good choice after Vexen's Up Throw. It can cause only up to 14%, making it a weak move, but can become dangerous as it has the potential for KO at high percentages due to its high knock back. It is also good for a team juggle, since a team member can jump in while the target is falling, and can use a move with good knockback.


Basic Moves--Specials

B: Blizzard/Blizzara/Blizzaga: Vexen cackles and sends a flurry of light blue snowflakes forward. This move can be held, hence the name, causing a stronger, more volatile attack. Blizzard occurs when B is tapped, Blizzara is cast when B is held for 3-5 seconds, and Blizzaga is caused when B is held 6-10 seconds. Blizzard causes 5% damage with minimal knockback and 10% chance of the Freeze condition. Blizzara causes 10% damage with medium knockback and 30% chance of the Freeze condition, and Blizzaga causes 15% damage with medium-high knockback, and 50% chance of the Freeze condition. Note that Vexen is highly vulnerable when charging this move, and any damage caused to Vexen while he is charging instantly ends the charge. About speed, the flurry of snowflakes are shot at extremely high speeds when in blizzard form, medium speed when in Blizzara form, and extremely slow speeds when in Blizzaga form.

Side Special: Ice Pinwheel: Vexen yells, "You're just an experiment!" and commands shuriken-esque objects forward. This move, too, can be charged, but only to the extent of the number of pinwheels dealt. 1-3 sec. = 2 pinwheels 4-6 sec. = 3 Pinwheels and 7-9 sec. = 4 pinwheels. But, to keep the percentage from getting too high, the percentage goes down as the number of wheels goes up. If the move is used with out holding, 1 pinwheel with 10% is thrown. All other numbers of pinwheels subtract 5%. Regardless of the number of pinwheels, the knockback remains the same--medium. Note that the pinwheels seek the closest character to Vexen, and they gain speed while chasing the target.

Down Special: Ice Typhoon: Vexen yells, "Taste frost!" and creates a small whirlwind full of icicles and shrapnel around himself. Although the move itself doesn't cause any damage, and the winds only push opponents backwards, the bits of ice and shrapnel that shoot out of the winds at high speeds are dangerous. Despite this, they can be deflected if caught at the right time. The icicles cause twice their normal damage, and the bits of rock and steel cause 5% each. The move lasts about 6-8 sec., giving about an average 18% damage. While the barrier of wind is indestructible, and it is dangerous to approach, attacks such as Pit's Light Arrow and Zamus' paralyzer can pass through the wind, being that they are not actually tangible, can pass through the winds and hit Vexen, thus stopping the attack short.

Up Special: Ice Cloud 9: Vexen smugly says, "Toys." and surrounds himself with a shower of ice crystals and disappears. He reappears 10 feet away in the direction the control stick was tilted in another cloud of ice crystals, although these are just aesthetic. The ice crystals left behind have a 70% chance of becoming a veil of ice that increases the chances of tripping and a 30% chance of becoming spikes that injure anyone who touches them. If the spikes appear, each touch causes 3% damage and medium vertical knockback, in an effort to not make the character too good. The startup with this move can easily confuse this move with Ice Typhoon.


Advanced Moves - Aerials

Nair: Vexen stands in midair while Freeze Pride spins around him at extreme speeds. Since Vexen only has one shield, he will seem somewhat vulnerable during this move. But, since the shield revolves him at high speeds, there is only a slim chance that you could get a hit on him. This move has considerable knock back and deals maybe around 7-8%.

Fair: Vexen positions Freeze Pride behind him, and creates an ice blade that he uses as some sort of sword. He somersaults 3 times in mid air, and after the 3rd spin, he slashes his blade vertically. It deals around 8% and has medium knockback.

Dair: Vexen swerves above the opponent in less than a second, and smashes them upside the head causing 9% damage and sending the target plummeting towards the ground. This move can be used as a continuation of the A combo, but it doesn't have to. Either way, Vexen will be above the opponent.

Bair: Freeze Pride appears behind Vexen and lurches forwards at a high speed, knocking any attacking opponent away. Creates medium knockback and around 7-8%. Useful on stages where there are walls, which could possibly cause an infinite, if not avoided.

Uair: Vexen creates the ice blade again, but this time, the blade grows extremely fast, and the fast growth is considered the actual move. If caught while the blade is growing, an opponent can receive up to 10% and suffers massive knockback. This is a good team battle move, as a team member can attack the knocked-away opponent as they fly helplessly through the air.


Advanced Moves - Grabs

Grab: Freeze Pride disappears, and vexen hold the opponent by their collar.

Pummel: Vexen gut-punches the opponent. The move, since the opponent is being grabbed, has no knockback, but deals 2% each punch.

Forward: Vexen lets go of the opponent, Freeze Pride reappears, and Vexen gets slammed in the face with Freeze Pride causing 8% and weak knockback at low percentages. But at high percentages, the move can cause medium, if not high, knockback, depending on the height of the percentage.

Down: Vexen pins the opponent to the ground with ice shards, appears on top of Freeze Pride and shoots downward, landing on top of the opponent. The opponent is gives 9% and medium knockback, due to the velocity of the move. At higher percentages, the opponent can be knocked around quite a bit.

Back: Vexen throws the enemy behind him, and Freeze Pride appears on his arm, before giving the opponent a substantial whack to the head. The hit slams the opponent downward and gives 10%.

Up: Vexen throws the opponent upward by the arm then tosses Freeze Pride upward to meet the opponent's back, go through the opponent, and comes back down to Vexen's arm. The move gives 3 hits, the throw, the pass-thru, and the comeback. The last hit deals the real damage though. You'd be wise to use his Up Smash after this.


FINAL SMASH - Snowboard Rush

Vexen shouts, "Know the true power of the cold!!" and freezes any opponent within a space the size of Battlefield. Then, Vexen replicas the number of frozen opponents come and grab the frozen opponents. Then the scene changes to a medium-sized, snowy mountain, and all the frozen characters are thawed, but are on the mountain. Then, the camera changes angles to see Vexen and his replicas charging down the mountain on Freeze Prides. Vexen and the replicas cackle while they slam into each character, making them all fly off screen as the stage returns to normal. Vexen high-fives each of the replicas before they disappear in a cloud of ice crystals.


Extras​

Victory Poses:

1. Vexen says, "Go inside, the cold is too much for you." while being showered with snowflakes

2. Vexen says, "Experimentation is what I live for." while he holds Freeze Pride on the ground in front of him

3. Vexen appears in a cloud of ice crystals and smugly says, "Experiment-Success."

Loss Pose: Vexen claps with an icy expression in his face.

Taunts:

Up: Vexen looks at a test tube.

Side: Vexen examines a snowflake and says, "Intriguing"

Down: Vexen takes out a notepad, reads it, and puts it away saying, "Fascinating."

Stage: Twilight Town Gate

Music: The 13th Struggle
 

Smady

Smash Master
Joined
Apr 29, 2007
Messages
3,307
Location
K Rool Avenue
Me, myself, I'm a stickler for creativity. PPK Syndrome really gets to me, and my favorite attacks are the crazy ones. MasterWarlord isn't called the Detail Nazi for no reason, and his movesets certainly show how much he loves good descriptions. I don't know if I can count the times I've heard Chief Mendez tell someone to use more BBcode for better organization, though he's also well-known for liking conciseness. Chris Lionheart has a good eye for balance issues, and won't hesitate to mention them. And KingK.Rool loves him a good playstyle, complete with comprehensive summary of it somewhere in the moveset.
Ah, I've not seen things like this before. How clever a way to put it.

@ Vexen, a LOT better than your past movesets. Will read for a better comment.
 

SirKibble

Smash Champion
Joined
May 2, 2008
Messages
2,400
Easily your best moveset yet, PPL. I'll have to give it a more in-depth read later.
 

Akiak

Smash Ace
Joined
Jul 28, 2007
Messages
820
Location
In my secret laboratory.
Well for organization, change the color of the move names and use spacing between the name and the description. Also, keep the description small and the title big.

I'll read it later.


EDIT: Wow I'm a Smash Apprentice and I didn't even notice lol
 

SirKibble

Smash Champion
Joined
May 2, 2008
Messages
2,400
*hopes there are not many simultaneous posts that put this on the next page*

EDIT: GOSH FREAKING DANGIT!!!!!
 

MasterWarlord

Smash Champion
Joined
Aug 24, 2008
Messages
2,902
Location
Not wasting countless hours on a 10 man community
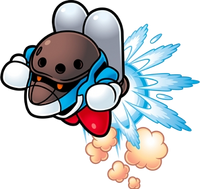
Out with the old and in with the new! Capsule J2 has joined the fray!


Stats

Size: 3/10 Capsule J2 is around the same size as Kirby, making him a small little target that’s hard to combo.
Weight: 4/10 J2 is without a doubt on the lighter side of the spectrum due to his size, but his gear prevents him from being knocked around too easily.
Walking Speed: 5/10 Nothing special.
Running Speed: 5/10 J2 is somewhat like Captain Falcon with awkward running speed that doesn’t match his other statistics. Yes, his run is faster then his walk.
Traction: 3/10 The guy skids a bit due to that jetpack on his back making movement more awkward.
Power: 3/10 J2 has very few moves with any possibility of KOing, being one of the weakest characters in the game. J2 relies on his gimping to finish his foes for the most part.
Attack Speed: 6.5/10 J2 is above average speed, but he still has his fair share of laggy attacks.
Range: 3.5/10 J2’s range is generally very poor except in the attacks where he zooms about with his jetpack, but these attacks last very briefly and require charging thus can’t be taken advantage of.
Priority: 6/10 J2 has a good share of disjointed hitboxes, but his moves that don’t use them are on the lower end of the spectrum. It evens out for the most part.
First Jump: 4/10 Below average due to his size.
Second Jump: You can’t really rate this statistic as it depends on how charged up J2 is. See the full explanation of the second jump for details.
Hover: No.
Fall Speed: 2/10 J2 is extremely floaty, on the same level as the aerials gods as Wario and Melee Jigglypuff.
Crouch: Yes.
Crawl: No.
Wall Jump: No.
Wall Cling: No.
Gliding: No.

Not so basic actions (You should actually read this one):

Jump 2: Blue flames emit from J2’s jetpack to propell him upwards. J2’s second jump functions somewhat more like a hover in that you have to hold the button down to go higher, although you can gain vertical distance with this, thankfully. If anything, this goes more vertical then horizontal, sending you upwards at high speeds while giving you limited horizontal DI.

Now, the important catch. You can only keep shooting up as long as you have your jets charged. However long you charged your neutral special is exactly how long you can hover in the air, so don’t use the extra charge any more then necessary. J2’s recovery with a full charge is astounding, but when he comes back to the stage after recovering he’ll be helpless and have no way to recover if he’s sent flying back out again by another big hit.


Special Attacks:

[]
[]
[]
[]
V
READ THIS


B – Charge Up: Capsule J2 hunches over and his jet starts charging up fuel. You can charge for a maximum of 5 seconds (Which is far longer then you’d think in Smash Bros., around twice that of DK’s neutral B), and you can hold the charge like the neutral specials of DK and Samus. J2 will flash white slightly to indicate when he’s fully charged, just like in the Kirby games. Pressing this button input when fully charged causes J2’s fuel tanks to explode and leave him with some black soot on his face, dealing 5% damage and destroying his charge. So what use is this move then? Nearly all of J2’s essentials moves use up jet fuel, so you’re gonna be charging up very regularly. You need the charge for pretty much everything, so always charge at every possible interval. You’ll want every last ounce of fuel you can get.

READ THIS
^
[]
[]
[]
[]


B Side – Jet Charge: No, this isn’t a alternate means of charging your fuel, instead J2 charges forwards with his jet. This move will use half a charge worth of fuel or all of it if you have less then that. The actual attack is that J2 hunches over like in his neutral special, but then rockets forwards at high speeds, that of Sonic’s run. J2’s whole body is a hitbox during this time, dealing 8% damage and average knockback. At the end of the charge, J2 kicks forwards, doing 14% damage and above average knockback, albeit this is hard to sweet spot. If you have no charge, J2 will only do the kick forwards. This has no starting lag but slight ending lag, and this ending lag is increased the smaller your charge. With a half full fuel tank, J2 goes half of Battlefield, the lower the amount of fuel making him go less far. A good way to recover is to use half of your fuel to go up with J2’s second jump, then use this for some good horizontal recovery.

B Up – Emergency Back-Up Fuel: This move has a charge that’s nearly identical to the Wario Waft, Wario’s down special. After 2 minutes it will be fully charged, although you aren’t given any indication that it is. When you input the move, J2 takes out a small canister of fuel and pours it into his jetpack then throws it away, the move having virtually no lag at all. If one minute has passed, you’ll gain 50% fuel, if 30 seconds have passed, 25% fuel, and so on. If you go over 100% with this, the same thing will happen as if you try to charge up with maxxed fuel, so be careful. You’ll prefer to play stock matches with a timer on just so you can see when this move is fully charged, more likely then not.

Yes, this move is not a recovery of any way, shape, or form, but J2 needs no up special recovery with his ridiculous second jump.

B Down – Rising Gas Prices: Capsule J2 takes out two canister of fuel, one quality, one a cheap alternate brand. Capsule J2 throws the canister he was using previously away and pockets the new one instead. By default, J2 uses the quality fuel. What’s the difference? With the cheap fuel J2’s jet charge time is reduced to 3 seconds from it’s previous 5, but there’s a 20% chance that whenever you do any attack that uses the fuel (Or your second jump) your jetpack will explode in your face, destroying your charge and doing 5% damage to you, putting you into your helpless state if you were in the air. Only use this if you’re desperate.

Basic Attacks:

A - 180 Spin: J2 spins around to hit his enemies with his jetpack. 2% damage with a brief flinch. Horrible range, tiny lag.

AA – Pack Whack: J2 takes his jetpack off his back and whacks his enemies with it for 3% with a brief flinch as he turns around to face them from his position of facing away from them in the previous part of the combo. Look out Banjo, you’ve got some competition! The jetpack is disjointed and has decent range for such a small character and it has slight starting lag, though will always hit if the first part of the combo hit.

AAA – Fuel Shower: Holding his jetpack up in front of him from the previous attack, he turns it upside down and shakes it for as long as you hold/mash A. You can do this for twice as long as you have charged up your fuel (10 seconds with a full charge), it using up a half a second’s worth of charged up fuel a second. Each second five droplets of fuel come out of the pack which each do 1% damage and a slight stun. This is powerful for a neutral combo and has good range, but wastes your precious fuel.

Forward Tilt – Jet Lock: Capsule J2 leaps forwards about the width of Bowser, and if he connects with anyone during this time, he’ll grab them with his fists, it counting as a standard grab. Both characters must then try to push each other over by mashing A, and the loser gets knocked down with a brief hit stun that could be followed up with another attack and 8% damage. The thing is J2 has to button mash harder since he has a handicap against him. . .Without fuel, that is. With fuel, J2 will use his jetpack to push forward harder, making the handicap in his favor. Every small nugget of time you’re in the lock takes away from your fuel, it going down at the same rate it goes up when you charge it.

Up Tilt – Inhuman Jet Fighter: J2 shakes a bit to cause a bit of fuel from his jet to spring up out of his jetpack. If it hits anyone during this time, it does 2% damage and tiny set knockback. J2 opens his mouth as the drop falls back down and catches it in his mouth, healing him for 2% (The guy ain’t human!). He above average start lag and slight ending lag as J2 rubs his tummy from drinking the fuel. This takes up a half a second’s charge worth of fuel. With no fuel, it does absolutely nothing, J2 just shaking his jetpack for nothing to come out.

Down Tilt – Pack Crush: J2 falls overbackwards to crush enemies with his jetpack for 11-12% and above average knockback, having impressive power for a tilt. Has above average end lag as J2 moves flails his limbs about like a flipped over turtle then gets up, but no starting lag. This causes a second’s worth of fuel to spill out accidentally as an additional penalty when J2 smacks it down. However, due to not actually using the fuel, J2 can still use this move with no penalty when he has no fuel.

Dashing Attack – Fuel Slide: J2 jumps very slightly and spins around in midair, then falls onto the ground and slides along it slightly, his body briefly being a hitbox. J2 goes his body length forwards, giving the move bad range, and it has average start up and ending lag as he jumps/pulls himself back up. What’s the point of this attack? If you have fuel, some of it will spill out of J2’s backpack as he falls to the ground (A half a second’s worth of charge) and it’ll make him slide forward the length of a batltefield platform at a high speed. Getting hit by J2 as he falls down to the ground does brief set downward knockback (Which hits them into the sliding part) and 6% while getting hit by J2 as he slides does another 6% and below average knockback. This can be used as a defensive measure as J2 has high priority as he falls to the ground, and is an okay damage racker.

Misc. Attacks:

Rising Attack (Front) - Wild Take-off: J2 ignites his jet and he flies forwards across the stage at a decent speed, sliding on his belly. He keeps going until he either reaches the edge of the platform he’s on or he hits a wall. If he goes off a platform, he will actually take off like an airplane and fly upwards at a 30 degree angle for 1 second. If he hits a wall, he will bounce off it a short distance and return to his standing position. Hitting CJ2’s body at any point during the move results in 6% with average knockback, and his body has low priority to offset its potentially absurd range. The move drains fuel at the rate of 5% a second. The fire from his thrusters is just a graphical effect and does not inflict any damage.

Rising Attack (Back) - Break-Dance Thruster: J2 spins around like a break-dancer on his back while firing his thruster, sweeping it to both sides 4 times, and the flames reach as far as Mario is tall. Each hit by the flames deals 2% and the final one deals low knockback, and the flame is disjointed. The move uses up 7% fuel.

Ledge Attack <100% - Letting Go: J2 lets go of the edge and leans back so that his legs are facing the platform. He then ignites his thruster and propels himself away from the edge for about 1/3 of battlefield’s distance before doing a half front flip and rocketing towards the platform at a fast speed, skidding to a stop at just the correct height to be back on solid ground. Hitting his body at any point during the move deals 8% with above average knockback, and the fire deals no damage, and the move has average priority. The move drains 8% fuel, and as you’d expect it should mainly be used for edge guarding considering he mainly covers space off the edge.

Ledge Attack 100% - Oh Shi…: J2 starts to perform the attack listed above, but as he goes to turn around to come back to the stage, his engine stalls and stops working. CJ2 starts to flail his arms around comically before falling off into the abyss. While this does in fact SD him, anybody he hits on the way down is spiked with 15% damage (and his falling body has great priority), making this essentially a Capsulecide move, though one that is hard to pull off correctly. Hitting his body as he does the beginning portion of the move deals the same damage and knockback as the “weaker” ledge attack. This move only costs 4% fuel, but why would it matter when 90% of the time you’ll end up KOing yourself? Unless of course your enemy is a moron and saves you.

Smash Attacks:​

Forward Smash – Black Gold: J2 takes out a pickaxe and lifts it over his head as you charge the smash attack, then swings it down in front of him when you release it. This does 8% damage with average knockback no matter what the charge, being rather weak. What’s the point of this move then? He wasn’t trying to hit you with the pickaxe, he was mining for fuel! Those oil prices are FAR too high.

After 3 seconds, the point on the ground J2 hit with the pickaxe will have oil shoot up out of it, doing 15% and above average knockback, being as tall and wide as Ganondorf. This is obviously disjointed. If J2 stands over the point he hit when the oil sprouts up, he’ll take off his jetpack to catch the oil in it as it sprays up out of the ground, increasing his fuel by 30%, but not being usable as an attack.


Up Smash – Remote Jetpack: J2 takes off his jetpack and takes out a remote control as it rockets about without him! You then control the jetpack directly in a fashion like Snake’s missiles in his side B, although you have far more control over the jet pack then Snake’s missiles, it having easy handeling. The jet pack lasts for as long as you had the fuel in it charged up. Contact with the jet pack causes it to explode in a radius the size of Wario for 13-18% damage and above-average-high knockback. This is one of J2’s main KO moves, but the catch is that unlike Snake’s you can’t end the move early, it leaving you horribly vulnerable. J2 takes out a new jetpack and straps it on after the attack is complete, giving it some ending lag, one just magically appearing on his back if he’s hit out of the move early. The safest time to use this move by far is to gimp enemies while you have your feet planted safely on the stage.

Down Smash – Fuel Tank Empty: Capsule J2 takes his jetpack off his back as he charges the smash attack and holds it upside down, shaking it to empty it of it’s fuel, and when you release the charge, absolutely nothing happens, J2 putting back on his jetpack. What the hell?!?

The actual effects of the move happen while you’re “charging” it. The fuel (Which looks like some sort of green liquid) poured out onto the ground can cause enemies to trip, and J2 pours out more and more fuel as you “charge” the attack. The percentage of time you “charge” the smash attack is the percentage of likelihood one will trip over the spot when they pass over it. A full “charge” will completely empty your fuel tank. . .Seems like sort of a waste for what’s essentially a long start up lag version of Diddy’s down special.

This would be true, but J2’s slippery spot covers three times as much ground as Diddy’s banana peel, is completely invisible so your enemy will likely forget of it’s existence, and you can make as many of them as you want. The slippery spots last a good long 30 seconds, although if the timer expires and nobody has tripped over it, they’ll continue to live on until they trip up at least one victim. This may sound slightly overpowered, but considering it takes a full charge of both the neutral b and the dsmash for this, this will be used rarely, and is only recommended for those who are master players of J2.


Aerial Attacks:

Neutral Aerial – Suicide Bomber: You can hold down the button to delay the attack as long as you like, but instead of having DI to move about, you instead angle about which angle J2 is facing which is the direction he’ll shoot out when you release the button, so get into position. When the button is released, J2 will blast forward using up all of his fuel at the speed of Sonic’s run, him going farther depending on how much fuel he has. A full tank of fuel will make J2 go the entire length of Battlefield. If J2 runs into anyone, he’ll grab them and then go straight down with any of his remaining fuel, changing his course, it all happening in the blink of an eye. Once his fuel runs out, J2 will let his grip on the target go and go into a helpless state, although if he’s already brought the foe low enough with him they’ll still get KOd anyway. If you crash into the ground with a foe like this, they’ll take 15-16% damage and above average knockback. This move is a decent idea for Jcides, but nothing else is worth mentioning as far as uses go, as it’s rather hard to use and uses up a full fuel tank.

Forward Aerial – Loop De Loop: J2 puts his arms to his side and glides forward with his jet, doing a loop de loop. During this time, J2 is being propelled by his jetpack, blue flames coming out of it. Contact with these flames does 5-6% damage and a flinch, while contact with J2 himself does 8-9% damage and below average knockback. This his a wide hitbox and J2 travels very fast, making this a good multi purpose move. This uses up a third of J2’s fuel. If you have less, J2 stops the attack early, not completing the loop de loop. If you have no fuel, the attack does nothing and forces J2 into his helpless state as you hear his jetpack go “Ka-put”.

Back Aerial – Fuel Splatter: Capsule J2 suddenly goes on his back in midair in a fashion nearly identical to Wario’s bair. His body is briefly a hitbox during this time that does 7% with below average knockback, and the move is slightly laggy, more then Wario’s bair, while being weaker at the same time. What’s the point of it then?

If you have fuel, it’ll splatter out the jetpack behind J2. The move will use up to half of a full charge, using all your fuel if you have less then that. At a half charge, the amount of fuel that spills out is equal to that of Mario’s FLUDD, it becoming lower and lower with less fuel. This can be used to gimp foes away and push them away with knockback like FLUDD.


Up Aerial – Wild Pack: J2’s jetpack rockets off his back directly upwards, doing 14-15% damage and above average knockback to anything it connects with. The more fuel the jetpack has, the farther the jetpack will go, it going up the height of 4 Ganondorfs with a full tank of fuel. J2 takes out another jetpack and equips it the moment he launches off his old one with no fuel in it. The wild pack is disjointed. This is one of J2’s better KO moves. With no fuel, the move does nothing, just giving J2 some annoying to deal with lag.

Down Aerial – Stall then Rise: Kind of ironic, isn’t it? Upon pressing this button input and holding it down, J2 will start charging up fuel, although he won’t be in his normal charging position, instead facing the camera and looking upwards. It takes twice as long to charge up in this fashion and you’ll still get the usual 5% penalty if you overcharge. The main point of this is to keep your enemies guessing as to when you’ll release A and do the attack.

Once you release A, J2 rockets upwards, going up the height of 3 Ganondorfs at full charge. This uses up all of J2’s fuel. The hitbox is J2’s body as he rockets up and a slight radius around him as a blast comes out of his jetpack when he first shoots up, somewhat like Wario’s fart as he rockets upwards. This does 15% damage and above average upward knockback to anyone hit, and J2 goes up at the same speed as Wario’s fully charged fart. This attack leaves J2 in a helpless state once used. This is a good move for gimping enemies with high percents if you can KO them off the top with this, but otherwise you’re just helping them recover.


Grabs and Throws:​

Grab: J2 reaches out with both of his stubby little arms. Bad range and laggy for a grab. J2 doesn’t have a notable grab game.

Pummel - Bite: J2 opens up his jaw of sorts and bites the enemy, dealing 2% damage. Average pummel speed.

Forward Throw - Hitchhike: The foe regains control of their character as J2 hops onto the character’s back and latches on, biting at them once every half a second for 2% damage. They have to do an attack that hits around their body to knock J2 off, although he’ll take no damage from this attack, just knockback. This is J2’s only throw that has no reliance on his fuel.

Back Throw – Fuel Choke: J2 reaches into his jetpack to get it covered in fuel, then forces it down the enemy’s throat for 5% damage. J2 then runs around to the opposite side of the enemy while they’re stunned and kicks them away for another 6% and decent knockback for a throw. This uses up a second of fuel charge, and if you have less then that, J2 will look shocked as he takes his hand out of his jetpack to see it normal, freeing the enemy from the grab and enabling them to punish him.

Down Throw – Living Fuel: J2 keeps his hold on his enemy with one hand and takes off his jet pack with the other, emptying it. J2 then stuffs his foe into his jetpack! You can do any attacks as if you had full fuel with the enemy characters in the jetpack, them taking 2% damage per second while inside. They can escape the jetpack through button mashing in the same way as a grab, so if your enemy has any competence you won’t be using them as a fuel source for long.

Up Throw – Extermination Pack: The throw works like J2’s down throw at first, but instead of using them as fuel J2 takes out a remote like in his up smash and can move the pack around with the same controls with the foe in it, them once again taking 2% damage per second while inside. You won’t be able to move them far while they’re inside, but if they’re at a high percentage you might be able to take the jetpack under the stage before they can bust out so they can’t recover. Once the throw is complete, J2 takes out another jetpack and equips it.

Final Smash – Jet Booster:​

J2’s jetpack turns gold and he smacks his fists together, smirking. For the next 30 seconds, you have a completely full tank to use at your leisure, it never emptying. Anything that would normally charge it won’t blow up in your face either. Unlike the average final smash, this doesn’t make you invulnerable, so some actual thought is required to make good use of this. Abuse your second jump heavily to dodge attacks and use your more powerful ones that require bigger charges to good effect, and your enemies will start cowering from you like any other final smash and wish they could deal with Giga Bowser rather then your mad jet skills.

Overall Play Style – Jet Fighter:​

Newcomers may be slightly scared by J2 due to his awkward specials (Only one being an actual attack) and heavy reliance on his fuel, but those who stick him out will have an excellent aerial combatant at their disposal.

J2 will want to keep charging at all times possible, and if by some miracle he has spare time he could be using his dsmash, so there’s generally always something he could be doing. You’ll want to use your fuel guzzling attacks more sparingly at the start when you’re just damaging your enemy to save it for when you need to recover or KO your enemy. J2 isn’t particularly exceptional in damaging or KOing, his KO options being quite scarce and his attacks not being particularly fast. While J2’s recovery is very good, at least if you’re at all decent with charging fuel, J2 requires precision to go with that much for the most part. J2 is a god at gimping with his insane DI, good gimping moves and, if used correctly, good recovery. This is how J2 will be getting most of his kills in higher level play.

J2 is a beast in free for alls and team matches where he’s not paid much attention, as then he can easily abuse his attacks that require a more heavy charge. In any case, just make sure you do indeed hit with your better attacks, as you generally don’t have that much shots to use them thanks to having to charge up. If you have trouble charging up, you can play more defensively. Use your fsmash to hit your enemy with the pickaxe to get them away, do some charging while you wait and dodge your foe more, then go over and pick the oil up when it shoots out of the ground. Playing with J2 requires that you don’t go all out and be reckless and actually think about each attack you use. While it’s not really a strategic playstyle, J2 requires considerable thought, and you’ll develop a play style of your own with him in how you decide which attacks are worth using fuel on.


Taunts:​

Up Taunt: J2 takes out a can of oil and a gold bar and looks between them, then throws the gold bar away and pockets the can of oil. Who needs that old fashioned gold anymore?

Side Taunt: J2 does a smug smile and does a “come on!” motion with his hand like Captain Falcon’s side taunt.

Down Taunt: J2 does the animation where his jetpack blows up in his face from where he overcharges, but it doesn’t hurt him or how much he’s charged up.

Entrance: J2 blasts in from the background in a dramatic entrance landing in a cool explosion. . .Using up all his fuel. Idiot.

Results Screen Poses:

Win 1: J2 hovers and waves to the camera then goes to fly off the top of the screen, but then runs out of fuel and falls on his rump. J2 takes off his jetpack and holds it over his head looking into it to try to see if any fuel is left in it, wondering why it’s not working for all the fuel to splatter over him.

Win 2: J2 uses the boost to get through a closing door in the background just as it closes, then does a barrel roll to avoid crashing into the losers. Looks like all J2’s training with Peppy finally paid off!

Win 3: J2 smacks his pickaxe into the ground to dig for oil like in his fsmash, but the head goes flying off to hit one of the losers (at random) in the face, knocking them over and KOing them. J2 rubs the back of his head and shrugs to the camera.

Loss: J2 is sitting on his jet pack as a small chair and clapping.

Kirby Hat – Jet Kirby:​


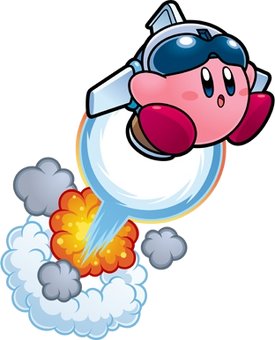
Kirby gets the usual jet helmet that he gets when copying Capsule J2 in the games. When you press B, Kirby charges up, but he can’t hold the charge. When you release B, he’ll do Capsule J’s side special without any hesitation.

Color Swaps: Blue (Standard), Green, Red, Gold, Silver, Bronze, Black, White

Snake Codec Conversation:

Mei Ling: That’s Agent J, Snake. He goes around with the other Elite Beat Agents to sing and dance people back into good spirits!
Snake: He doesn’t look like much of a dancer, Mei Ling. . .He looks more robotic. Are you sure you’re looking up the right guy?
Mei Ling: Oh. . .Sorry. Here’s the right one. That’s XJ9, a teenage robot who tries to regularly save the world while-
Snake: I don’t know what that thing is, but it’s not a robot. . .Got anything else?
Mei Ling: Uhhhh. . .Try this. Capsule J. He’s short’s and relies on his jets to move around, doing all sorts of fancy manuevers.
Snake: I guess that’d fit. . .What’s he look like?
Mei Ling: He’s short, round, blue, and has a green visor for a face. Fit the bill?
Snake: Just forget it. . .This guy is way too obscure.
 

Chris Lionheart

Smash Champion
Joined
Apr 6, 2008
Messages
2,076
Location
Make Your Move
Of course... the one day I decide to play Warcraft for a few hours... I get tons of great movesets...

And that codec is pretty funny Warlord.


Welcome to the competition, emergency. If you want to get into this competition, I suggest that you take a look at some of the better movesets on the Stadium. I would recommend movesets by Mendez, SirKibble, or King K. Rool as they are top contenders, but don't add insane amounts of detail to everything (MasterWarlord, for example, might overwhelm you with a lot of his sets.)
 

Hyper_Ridley

Smash Champion
Joined
Dec 21, 2007
Messages
2,291
Location
Hippo Island
J2 was awesome and another great move set from you, Warlord.

The fuel mechanic was cool, as were some of the move names. LOL at Down-Special
 

SirKibble

Smash Champion
Joined
May 2, 2008
Messages
2,400
Do mine eyes deceive me? No, I think not. Truly, Warlord hath made us a Kirby 'set.

The epic nature of such a moveset is beyond the human tongue to speak of and properly do justice, and so, I will not speak of it, but simply acknowledge said epic nature as the epic nature that it is.
 

Kholdstare

Nightmare Weaver
Joined
Oct 10, 2008
Messages
1,440
HOLY ****ING ****

HOLY MOTHER****ING ****

THAT MOVESET IS FREAKING AWESOME.

I LOVE IT. I ABSOLUTELY LOVE IT.

It looks like all of my super votes will go to Kirby characters.
 
Status
Not open for further replies.
Top Bottom