• Welcome to Smashboards, the world's largest Super Smash Brothers community! Over 250,000 Smash Bros. fans from around the world have come to discuss these great games in over 19 million posts!

    You are currently viewing our boards as a visitor. Click here to sign up right now and start on your path in the Smash community!

Make Your Move 4

Status
Not open for further replies.
D

Deleted member

Guest
She posted Breloom, and that was her last moveset.

Come to think of it, Blitzkreig cancelling the Penguin might be a problem for those of us who put him in our SMs. :confused:
 

Collective of Bears

King of Hug Style
Joined
Nov 10, 2007
Messages
6,507
Location
North Carolina
NNID
Gark430
3DS FC
1805-3069-0371
Yeah I know it sucks, but really, I have no choice. I can't do it anymore. I don't have the time or the patience to make movesets like they are now.

EDIT: @StB: Does it really matter? You don't need an actual moveset for it to be in an SSE. Just keep him in memory of me. Pretty please?
 
D

Deleted member

Guest
I understand. The only problem is that the Penguin is a major villain in my SM. :ohwell: Oh well, I'll just keep him there.

Either way, nice to see you again, Blitzkrieg. :)
 
D

Deleted member

Guest
Even those take a while, dude. I'm only about half-done with Yosemite Sam.
 

MarthTrinity

Smash Lord
Joined
Aug 9, 2007
Messages
1,954
Location
The Cosmos Beneath Rosalina's Skirt
Hi guys...

I know I've been gone for a really long time, but I just wanted to drop in to give the real scoop. I'm done with MYM. The game has gone too fast for me, and I've been left in the dust. The movesets are advancing faster than I can make them. In MYM2, my Yoshimitsu was considered one of the best. Now, it wouldn't even be looked at. This has just gone too fast for me, and I just can't do it. My movesets will never happen, my SSE is no more, it's over for good. I'm sorry.
Commander Blitzkrieg's Leaving :cry: Click that link by the way =)

EDIT: Dropped Yumi until MYM5 and took up Odysseus, also known as TOP SECRET.
 

Smady

Smash Master
Joined
Apr 29, 2007
Messages
3,307
Location
K Rool Avenue
Blitzkrieg, I don't know you at all, but you have left your mark on this thread in a big way. You'll be remembered well.

Why must this be a sad occasion? He's still 'dropping in', he just isn't making movesets anymore. All good things must come to an end.
 

goldwyvern

Smash Ace
Joined
Nov 25, 2008
Messages
519
Location
Holy keys locked in the jet, Batman!
NPKE preview!

prank's vB:thanks, sakurai!
prank resorts to the old-fashioned way with help of sakurai. he flinches for a split second and twinkle appears right in front of him. when an opponent touches that spot, they will trip and take 4%. this also releive a character of any abilties gained from another character, mainfully kirby's. great for mind games and that sence of oldskool komedy in us all.

bomber's ^B:the cliff
a cliff the length of 2 battlefield platforms diagonally appears that also has a small flat area the length of bomber at the top. bomber slowly waddles/scuffles up over two seconds. when gets to the edge of the flat plain, we see his on-ledge animation for a half second before he falls headfirst (head?) downward. now, when he falls more than half of a stage builder block, that's when the fun begins. if bomber hits the ground or an enemy on his freefall, he explodes in a radius of bowser inside his shell, doing a hefty 12% and high knockback while giving 6% to bomber. an effective recovery and KO attack, this is a very fun move. plus, if you hit something in midair, you regain your jumps.
 

KingK.Rool

Smash Lord
Joined
Nov 26, 2005
Messages
1,810
So sick that you can't...type? Dear lord that's a frightening illness.
Being bedridden kiiinda limits my computer access. :bee:

That sucks. I've been bolnoy for a while now too. Well, Georgie, it seems as though we need to peet some more moloko, eh? After all, health is a dorogoy thing, Droogie....
Right right! Can't filly about with one's health, droogy.

Hi guys...

I know I've been gone for a really long time, but I just wanted to drop in to give the real scoop. I'm done with MYM. The game has gone too fast for me, and I've been left in the dust. The movesets are advancing faster than I can make them. In MYM2, my Yoshimitsu was considered one of the best. Now, it wouldn't even be looked at. This has just gone too fast for me, and I just can't do it. My movesets will never happen, my SSE is no more, it's over for good. I'm sorry.
:( I'm really sorry to hear that. But it's good that you'll still be hanging around, Blitzkrieg, even if you aren't making any more movesets.
 

flyinfilipino

Smash Master
Joined
Sep 11, 2007
Messages
4,319
Location
North Carolina
NPKE preview!
What's NPKE?

Attacks sound interesting, although I'm not really getting how The Cliff is an effective recovery.

Also, let it be known that the day after I posted Chilly, it started snowing in central NC (this never happens) and now all classes are cancelled. Going back to bed!
 

Collective of Bears

King of Hug Style
Joined
Nov 10, 2007
Messages
6,507
Location
North Carolina
NNID
Gark430
3DS FC
1805-3069-0371
What's NPKE?

Attacks sound interesting, although I'm not really getting how The Cliff is an effective recovery.

Also, let it be known that the day after I posted Chilly, it started snowing in central NC (this never happens) and now all classes are cancelled. Going back to bed!
What the... I wish I knew you were in central NC earlier! I am too. Concord, to be more precise.
 

Collective of Bears

King of Hug Style
Joined
Nov 10, 2007
Messages
6,507
Location
North Carolina
NNID
Gark430
3DS FC
1805-3069-0371
Cool! I passed through there recently, I believe. I'm in Raleigh at the moment.

AND IT'S STILL FREAKING SNOWING I'M GONNA GO OUTSIDE AFTER THE INAUGURATION
My grandma lives in Raliegh! :D

Now, back to reality: Since I'm still going to be around but not making movesets, I figure I could help others with movesets. Since I'm good at making Kirby Hats, costumes, and stuff like that, I can make them for people who couldn't get an image otherwise.
 

MarthTrinity

Smash Lord
Joined
Aug 9, 2007
Messages
1,954
Location
The Cosmos Beneath Rosalina's Skirt
I live in Minne"snow"ta for a reason....you guys want some of our snow?

And I'm also unsure of who NPKE are...the moves look unique but I'd also put something in about him only being able to put down one of those "trip sparkles" at one time or else that could be incredibly broken littering them about the stage.
 

SirKibble

Smash Champion
Joined
May 2, 2008
Messages
2,400
Yes, Iron Thorn died. It was horrible. She tripped into Guntz FSmash and got knocked out of SWF. D:
That was only after her mother was put in the hospital after she tripped down the stairs. Sakurai and IT just never got along...

SMILEY enters the fray!
I laughed. I cried. I even took a chainsaw to some guy I passed on campus today. :psycho:

Smiley is just so inspiring. :grin:

*facepalms*

You guys never should have put in stuff for him.

Ugh. Now we're gonna hear about this octopus suit for weeeeks.
Lol. Some of us have already been hearing about it for weeks. :rolleyes:

Hi guys...

I know I've been gone for a really long time, but I just wanted to drop in to give the real scoop. I'm done with MYM. The game has gone too fast for me, and I've been left in the dust. The movesets are advancing faster than I can make them. In MYM2, my Yoshimitsu was considered one of the best. Now, it wouldn't even be looked at. This has just gone too fast for me, and I just can't do it. My movesets will never happen, my SSE is no more, it's over for good. I'm sorry.
Very sorry to hear that, Commander. Your work will be missed, though I hope we'll still see you posting often enough despite not actively participating.
 

The Trophy Master

Smash Journeyman
Joined
Dec 27, 2008
Messages
272
Location
*Sends Sundance an orange elephant on Chirstmas, a
I felt I had to post a last preview, in which I'd put the Neutral B!


Neutral B - One More Ball
The basic Pokey move. This is really easy to understand, he simply gains one more body ball. The ball will come from the ground, with a little bit of sand. He can have 4 balls + the head, maximum. Even more, this move can damage people. If somebody is touching Pokey's body, h'll recieve 5% damage with low knockback. If somebody is over Pokey's head and is touched by Pokey's new height, he'll recieve 7% damage with mid-low knockback. If Pokey already has 4 body balls and he uses this move, you'll only see sand coming out of the ground. This can be used in air. However, if thi is used in air, the ball will come from ground, or offscreen. If somebody is touched by the new ball, he'll recieve 10% damage with medium knockback.
 

SirKibble

Smash Champion
Joined
May 2, 2008
Messages
2,400
Honestly, I'm not much of one for previews. Unless you're looking for help with a move, I usually try not to read too much of a moveset before I can read the whole thing. ;)
 

Akiak

Smash Ace
Joined
Jul 28, 2007
Messages
820
Location
In my secret laboratory.
First things first:

Although I probably never talked to you, you've always been a divinity for me. A mysterious master of MYMing...:(
/beautiful poetry

DFM will I ever be included in that story? If so tell me.
 

majora_787

Smash Hero
Joined
Jun 23, 2007
Messages
6,122
Location
Texas
=P It might be a couple weeks before Ghor is finished...And I'm not starting 02 until Ghor is done. Sorry guys.
 

Mardyke

Smash Journeyman
Joined
Sep 8, 2008
Messages
289
Location
Ireland
It snowed last night in some of Ireland, but we didn't get any actual snow, just frost.

So much frost that when I left the house this morning on my bike, my gears stopped, I fell off the bike and injured my leg. :V

Bit busy right now, but I'm looking for the right time to improve Micaiah's layout and finish up Ed. New moveset on the way, and I have one more idea I really do like, but think I'll save for Make Your Move 5.

That was only after her mother was put in the hospital after she tripped down the stairs. Sakurai and IT just never got along...
Why can't sigs be larger? :(
 

BKupa666

Barnacled Boss
Moderator
Joined
Aug 12, 2008
Messages
7,788
Location
Toxic Tower
How sentimental. You know, I haven't been this choked up since I got a hunk of moussaka caught in my throat...


HADES

Hades, voiced by James Woods, is the villain in the 1997 movie Hercules, based on the Greek god Hades. Unlike the mythological Hades, who is for the most part a relatively passive deity doing a sometimes nasty job, this version is a fast-talking, evil deity, reminiscent of Satan. The character's mannerisms were due to James Woods ending up using a "car-dealer"-style voice while the movie was being made. His hair is blue fire, and whenever he gets upset, it flares and becomes red. His hair-flame has also been shown to flare when he grows particularly excited (when the Fates tell him he will overthrow Zeus), although in this case it remains blue. Apparently the rest of the Olympian gods don't care for Hades, per the reaction glare they give him when he comes to view Hercules for the first time, sans Zeus, who basically treats him as a little brother.

Hades is the only main Disney villain who provides comic-relief throughout the film.

Hades later reappeared in Hercules: The Animated Series and the Kingdom Hearts series. In all of his appearances he was voiced by James Woods.


STATS

Power: 8/10: He's lord of the underworld, so it's only natural he'd be a powerhouse. Although he has a certain finesse with his power that Bowser, King Dedede, and Ike lack.

Walking Speed: 2.5/10: Hades doesn't run (he's an evil deity, why should he?); the bottom of his robe simply turns to smoke and he glides forward slowly.

Dashing Speed: 4/10: He leans forward a bit more and glides along a bit faster.

Weight: 7.5/10: Although Hades is a character with a relatively light feel, he can stand up to a good deal of damage before getting KOed.

Range: 7/10: Hades' dark and fiery power can hit foes from a good distance away.

Projectile Distance: Varies: With all of the projectiles he can use, Hades can hit foes from a variety of ranges, from right next to him to across the stage.

Attack Speed: 6/10: Despite being fast for a heavier character, Hades needs some time to set up his attacks.

Priority: 8/10: Hades' attacks generally have great priority.

Size: 8/10: Hades is slightly shorter than Ganondorf, and a fairly wide character because of his billowing black robe.

First Jump: 3/10: With an evil grin, Hades floats up eerily, boosted by a small pillar of smoke.

Second Jump: 5/10: The pillar of smoke bursts lightly, sending Hades up an average distance.

Fall Speed: 4/10: Hades is quite floaty for a heavyweight, being comprised of dark matter.

Recovery: 7.5/10: Although his jumps are nothing special, Hades can recovery quite well with his Up Special.

Traction: 9.5/10: Excellent, the lord of the underworld doesn't stumble and slide around.

Crouch: 0/10: Awful, Hades simply leans backwards, as a dark throne materializes behind him, and he sips an alcoholic beverage. This is simply a pose, not a crouch, since he can't dodge anything with it. Upon releasing the crouch, the throne and beverage vanish into smoke. If Hades is attacked, however, he spits out the beverage in shock, as the glass shatters on the floor and the throne vanishes. 5:19 - 5:27

Comboability: 6/10: Hades can combo foes well for a heavyweight, although a good deal of his focus is still on one-hit power moves.

Wall Jump: No

Wall Cling: No

Glide: No

Crawl: No

Tether: Yes

ANIMATIONS

Entrance: Hades flies in on his chariot and exits, saying, "Get ready to RUMBLE!" in an echoing voice.

Walking: Hades doesn't run (he's an evil deity, why should he?); the bottom of his robe simply turns to smoke and he glides forward slowly.

Running: He leans forward and glides forward slightly faster.

Dashing: He leans forward a bit more and glides along a bit faster.

Jump #1: With an evil grin, Hades floats up eerily, boosted by a small pillar of smoke.

Jump #2: The pillar of smoke bursts lightly, sending Hades up an average distance.

Crouching: Hades simply leans backwards, as a dark throne materializes behind him, and he sips an alcoholic beverage. Upon releasing the crouch, the throne and beverage vanish into smoke. If Hades is attacked, however, he spits out the beverage in shock, as the glass shatters on the floor and the throne vanishes.

Idle Animation: Hades stands in place, his hair flaming and his smokey robe smoking. If left alone too long, his face turns slightly red as he pulls out a dark-looking sundial to check the time.

Forward Roll: Hades' entire body turns into smoke, which vanishes with a poof, then materializes a few feet forward.

Backward Roll: The bottom of Hades' cloak turns to smoke, as he glides a few feet backwards.

Spot Dodge: Hades glides backwards, turning red and covered in flame, before cooling down and gliding back.

Air Dodge: Hades vanishes briefly in a cloud of smoke, which forms into a black skull, before reappearing.

Shield: Hades simply forms a small blue fiery dome around him for protection. The dome gets red as it takes hits, and hisses out when broken or released.

Tripped: Hades falls on the part of his cloak where his rear end should be. This is an awkward pose, as evil lords don't generally trip. As an Easter Egg, there is a 5% chance that Hades will catch on fire and scream, "SAKURAAAAAIIII!" when he trips.

Dizzy: His yellow eyes spin comically, as he holds his head, groaning in place.

Sleep:
Hades hunches over slightly, eyes closing, simply dozing off in place quietly.

Other: Whenever Hades lands in water, or is hit with a water attack (e.g. FLUDD, Water Gun, or several of Squirtle's Smashes), his hair goes out, relighting after a few seconds, or whenever Hades jumps out of the water he is in.

SPECIALS

Neutral Special: Hellish Hot-Head: With a snarl and a wicked face, Hades' flaming hair turns red and he begins growing. If foes hit the hair during this charge, they take 5% and low vertical knockback. You can charge this move for 5 seconds before the charge stops and the effects are saved, carried around by Hades in an angry red aura. Although you can't move while charging, pressing left or right on the Control Stick to "roll" forward (float forward or back smokily) and stop the charge, while still retaining the effects. Tapping the attack button does nothing; a charge is required for any effect.

Upon pressing the B Button again, Hades screams out in his wrath and rage, creating one of five effects, depending on the charge time (from 1 to 5 seconds).

1 Second: Pyro Push: Hades lowers his arms lightly, a single small fireball appearing in each hand. Each fireball does 3% and light knockback to foes. This is a close range attack, and has average ending lag. This is not a powerful attack, due to the low charge.

2 Seconds: Savage Steam: Hades conjures up a cloud of fiery red steam out of his robe. This does multiple light fire damaging hits, knocking the foe away with moderate power on the last hit. This can be useful to trap foes, setting them up for a grab. However, the priority is not that good. This attack can do up to 15% to foes.

3 Seconds: Floor of Flame: Hades lowers his arms powerfully, creating three flaming shockwaves on the floor around him. They extend to average range, and have decent priority. The first two shockwaves do 4% and no knockback, while the last wave does 6% and good knockback. The waves come fairly fast; about the speed of Link's Up Smash. Hades is fairly safe while using this move, although foes can Smash DI out of the first two waves and retaliate with an aerial.

4 Seconds: Blackhearted Blast: With a snap of his fingers, a powerful cloud of black smoke explodes behind him, dealing good knockback to the foe, in a fashion similar to a weaker Lucas Up-Smash. It also has great priority, although the range is below average. This attack is fairly quick, but still has moderate ending lag, due to its power. The blast does 14-15% to foes.

5 Seconds: Heated Confrontation: In his rage, Hades' entire body turns red, as he lowers his arms, shooting out a pillar of flame, in a 'SHOOP DA WOOP' fashion. These do one powerful hit each, although foes can only be hit with one per each attack. This has godly priority and average range. Foes take the most knockback if they are standing on the ground where the pillar hits. This has high ending lag, on par with Ike's Forward Smash. Each pillar does 18%.

Side Special: Painful, Panicky Patronage: For this Special, Hades summons one of his bumbling, morphing minions, Pain and Panic, to assist him. Depending on how long you hold the Side Special input, a different effect is caused. There are three effects for this move; only one can be out at a time, and Hades must wait 5 seconds in between uses.

1 Second: Fearful Fire: With a chuckle, Hades pulls Panic out of his cloak and hurls him forward like a dart, Panic screaming all the way. He flies about as far as the maximum range of Mario's F.L.U.D.D., hitting the ground headfirst and scurrying back to his master's cloak upon landing. Foes who are hit by Panic receive 8-9% and decent knockback, courtesy of his sharp horns. Hades has slight ending lag when throwing Panic, but almost none ending the move.


2 Seconds: Painful Potion: Hades motions for Pain to attack, and he does so, running forward with an ominous-looking pink potion in a vial. If he hits a foe, he slams the potion onto their head, causing the potion to land on them. With the potion effect on them, the foe's standard attack power is cut down by half for 5 seconds, or for 2 standard attacks. Foes with powerful Specials or quick standards are not effected much, although it can be useful for foes like Ganondorf, who have slow standards and hard-to-hit Specials. Pain runs forward about the distance of one-third of Final Destination, before running back into Hades' cloak.


3 Seconds: Cobra Comeback: Hades summons both Pain and Panic, and they morph into purple and green cobras, slithering forward, hissing. If they come into contact with a foe, snake Panic will coil around the foe, while snake Pain bites the foe. A foe who is caught stays trapped for three seconds, taking three bites in that time period. Each bite deals 5%. Foes can escape the coiled grab by shaking the Control Stick. The snakes travel forward about half the length of Final Destination before returning to Hades.

Down Special: Helm of Darkness: Hades takes out his helmet, the Helm of Darkness, from Greek mythology. The helmet is made of pure dogskin, with a pair of wings on top. This helmet turns Hades invisible for two seconds. For this time period, Hades can run through foes. However, he still takes damage (unlike with the Cloaking Device, where characters only take knockback). If the foe has a projectile, Hades gains limited possession of it (he used this to steal arms to assist him and his siblings in battle). By pressing the Down Special input again, Hades uses the weapon (it can be charged/manipulated like its standard use). He only can steal from foes with weapon projectiles, not personal projectiles (e.g. Samus' Charge Shots, R.O.B.'s Gyro).

Here is a list of what he inherits with each character (this move is defunct on bosses):


Link: Hades can use one Arrow and one Bomb. By pressing the Down Special input and a direction, Hades throws the Bomb, while by simply holding the Down Special input, Hades charges the bow to shoot an Arrow.

Yoshi: Hades can toss two Eggs. By tapping the Down Special input and aiming, Hades throws the egg.

Fox: Hades can shoot five Blaster shots. By tapping the Down Special input, Hades can fire the shots.

Peach: Hades can toss two Veggies. Because they are both Down Specials, Hades uses the move in the exact same way. He can pull up items on occasion, too.

Sheik: Hades gains possession of one Needle Throw. By holding the Down Special input, he charges the needles, and throws them with another press of the input.

Mr. Game and Watch: Hades gains possession of five Served food items. By tapping the Down Special input, Hades serves up the food with the 2-D pan.

Falco: Hades can shoot 3 Blaster shots. By tapping the Down Special input, Hades can fire the shots.

Pit: Hades gains the ability to shoot two Light Arrows. By holding the Down Special input, Hades charges the shot, before firing upon release.

Snake: Hades can throw one grenade and use one Nikita. By pressing the Down Special input and forward, Hades throws the grenade, while by simply pressing the input alone, he starts controlling the Nikita, which he can control with the Control Stick.

Diddy Kong: Hades gains the ability to shoot two peanuts. By pressing the Down Special input, Hades begins charging the popgun, shooting upon release. If held two long, the gun still explodes.

Toon Link: Same as Link's, which is above. The effects are Toony, though.

Wolf: Hades can shoot two Blaster shots. By tapping the Down Special input, Hades can fire the shots. The gun still stuns foes at close range.

King K.Rool: Hades can shoot two Blunderbuss shots. By holding the Down Special input, Hades charges the shot, firing upon release. The gun still backfires if charged too long.

Krystal: Hades can shoot two blasts from her staff. By holding the Down Special input, he charges the elemental blast, firing upon release.

Bowser Jr.: Hades gains possession of his Magic Paintbrush. Tapping the Down Special input allows Hades to fire three paintballs out in rapid succession. He can fire two rounds like this.

Hades remains invisible until all of his gained projectile is used up. Hades can only carry one projectile at a time, and must wait five seconds in between thefts. Foes can still use their projectile while Hades has it himself. If Hades is hit while in possession of a projectile, he loses it. He must also use up the projectile in a time period of twenty seconds, or else the power vanishes. Used well and sneakily, this leads to great Hades combos.

Up Special: Catastrophic Chariot: Hades' personal dark chariot, pulled by a thestral, materializes smokily, and Hades hops in with a laugh. For one second, you get a free ride with controllable recovery. The chariot is fairly fast, but lasts for only a short period of time, before dissolving and leaving Hades in a freefall. The thestral pulling the chariot does a light 6-7% and low knockback, slicing through foes in front of it. This is a decent recovery, although it is a bit difficult to maneuver. It is seen here (although the Brawl version is a good bit smaller), from 0:39 - 0:50.

BASIC ATTACKS

Basic Combo: Steamy Singe: Hades points a finger to the ground, and a small pillar of steam shoots out, going to the ground directly in front of him. He can hold the pillar out for as long as he wants. The steam sizzles, and deals one hit to foes. If one of Hades' enemies hits the steam as it appears, they take 6% and average knockback. However, if they hit it while it is held, they only take 4% and light knockback. This starts up quickly, and only has minor ending lag. If held over an edge, it only goes down a little bit, instead of until it hits the floor; this can edgeguard decently, but foes with a bit of priority in their recovery can easily halt the smoke.

Dash Attack: Swirling Scorch: In Hades' hands, a swirling red fireball appears. For a split second, Hades glides forward, swirling the fireball, before hurling it to the ground to blast foes away. The knockback is above average, but the startup and ending lag prevents this move from being useful against speedy opponents. Thankfully, this move has good priority and range to keep foes from defending against it after it's lengthy startup time. This can easily KO any foe with high damage, but the chance to do it is rare. This move deals 9% to foes.

TILTS

Forward Tilt: Smokey Swarm: Hades sweeps his arm forward, and a small smokey bunch of birds/bats materializes and flaps in place directly in front of him, before vanishing. The smokey forms last for about .5 second. They do multiple lights hits on foes; four hits that do 1% and trap foes, and one final hit that does 3% and knocks them away with below average force. If foes are nearby the birds/bats, they are given a slight suction force to pull them into the swarm, although foes can Smash DI out fairly easily. This Tilt is decent for building damage, but is a bit awkward to use in combos.

Down Tilt: Deathly Darkness: From his crouching pose on his throne, Hades snaps his fingers, causing a single black shadow to come out of the bottom of the throne, extending a few feet in front of him. The shadow does one solid hit to foes who hit it. The shadow stays out as long as Ganondorf's Down Tilt, and can be used to knock foes into combos, as the shadow hits foes up over Hades, leaving him ready to continue the combo with an Aerial. However, the foe can retaliate in this manner as well. The shadow has low priority, and has a one in three chance of tripping your foe. It hits foes in a dark purple magic effect, like the attacks of Ganondorf and Mewtwo. It does 8% to foes.

Up Tilt: Ember of Enragement: Hades nonchalantly thrusts his flaming head up, releasing a single small burning blue ember into the air above him. The ember stays airborne for a split second before falling back onto its owner's head. This is fairly close range (about as close as Olimar's Up Smash, but shorter range, as Hades is much taller), and does average vertical knockback. The ember has fair priority as well. However, Hades must wait until the ember is back in his hair before moving, leaving him slightly vulnerable. The ember does 6-7% of fire damage to foes.


SMASHES

Forward Smash: Flaming Fury: Hades' Forward Smash is unique in the way that he doesn't charge it; he simply aims it. When the input is first pressed, Hades tosses up a Grecian urn (with Hercules' face painted on it) directly in front of him. The urn rises and falls, shattering upon hitting the floor, or being attacked. Hold the F-Smash input until the urn's arc matches your target, then release. Releasing the button causes Hades to angrily pull a red fireball out of his hair and hurl it at the urn, shattering it with a flaming blast. The blast does 11-16% and good knockback. Using this on foes diagonally in the air in front of Hades is very beneficial due to the low startup time. However, if the urn is shattered from an attack, Hades lags for a second, not getting a chance to attack. The urn does no damage by itself. This Smash is a decent edgeguard, although foes can overcome it with an Aerial or Up Special.


Down Special: Skeletal Swirl:
With a sweeping gesture, Hades uses dark magic to conjure two skeletons out of the ground beneath him, smashing them together with said magic. This causes them to shatter on contact with each other, dealing multiple damaging hits to nearby foes. The priority of the skeletons is quite low, as they are just bones, but the hits they do can easily build damage, the last hit dealing decent knockback. The ending lag is similar to that of Bowser's Down Smash. Although this covers Hades well from the sides, he is rather vulnerable from above. The skeletons can do anywhere between 4-25%.

Up Smash: Geyser of Gloom: Hades points at the ground at his feet with both hands, causing a geyser of red steam to fire out of the ground, peaking over his head, dealing two solid hits to foes. The first hit occurs to foes who hit the geyser, simply trapping them in the spray for the next hit, which knocks them away with above average power. Although the geyser appears in front of the lord of the dead (shielding most of his body), he can still be nicked from the side with enemy attacks. The geyser has surprising priority for red steam. It does 12-21% to foes.

AERIALS

Neutral Air: Fire Wall: Hades spreads out his arms slightly, as his hands catch on fire. He then spins around quickly, a bit like Zelda's N-Air. The fire burns foes in three multiple hits. The first two trap the foe and do 4%, while the last hit does average knockback and 5%, as Hades returns to normal aerial position and the fire goes out, for a maximum of 13%. Although Hades lags a good deal if he hits the ground while the move not finished, this is still a viable move for combos. While he spins, he asks comically, "Havin' fun yet?", like he does in Kingdom Hearts.

Forward Air: Crown of Shame: Hades conjures up a circular crown of thorns, and with a wave of his hand, spins it up and down once in front of him before the thorns vanish. The crown has great priority for an aerial, but is fairly close range. The knockback is average. This move can be used multiple times in a row as a Wall of Pain on a foe. However, it doesn't kill until foes reach high percentages. Hades lags a good deal if he hits the ground before the move finishes. This move deals 11-12% to foes.

Back Air: Chimera Chomp: Hades snaps his fingers, causing a smaller, fiery image of a chimera (similar looking to the Ultimate Chimera) to appear behind him and chomp down once, before vanishing. This deals average knockback, and is the best of Hades' aerials in terms of killing power. The range and priority are average as well. The move hits the hardest as the chimera first chomps, but foes hit by the chimera after it chomps but before it vanishes can receive knockback as well. If Hades used this move to hit offstage foes, it is almost certain to KO them off the side if they have relatively high damage levels. This move deals 9-11% to foes.

Up Air: Double Dragon: With an evil grin, Hades points both thumbs upwards, causing two thin flames to erupt out, with a dragon head at the top of the flames. The hitbox of the flames is at the top of the dragon heads. The flames quickly travel up twice as far as a Pikmin in Olimar's U-Smash before vanishing. This move knocks foes vertically in one solid hit, and can be used to KO off the top if a foe has a high damage level. The priority is somewhat less that Hades' other Aerials, but this doesn't limit the use of it too much. Hades lags if he hits the ground before the move is finished. This move deals 8% per dragon, but only giant foes can hit both dragons at the same time and receive 16%.

Down Air: Teeming Tendrils: From the bottom of his billowing robe, five smokey tendrils extend slowly downwards, then back up quickly, hitting foes up to five multiple times. The first four hits trap foes, while the last hit spikes the foe powerfully. This is a great spike, but the first four hits last a second before this can happen, leaving the foe open to DI or Hades open to be attacked. The priority is pretty poor here, due to this move using smoke, rather than fire or thorns. The tendrils extend down about three-fourths the distance as R.O.B.'s flames do with his D-Air. Used carefully, this helps Hades' air game. Just be careful of foes with high-priority Aerials. This move deals 3% per hit, for a maximum of 15%.

OTHER ATTACKS

Downed Attack: Two Thumbs Way Up: Hades quickly hops (or floats, more like) back upright, jerking both thumbs up on fire. This deals below average knockback to throw off nearby foes. The priority and range are below average as well. This move deals 3-6% to foes.

Flipped Attack: Brushed Bats: As Hades floats upright, he brushes his cloak off, sending several of the smokey bats from his F-Tilt out of either side of him. This has decent range, but low priority. The knockback is below average. This move deals 1-7% to foes, in multiple light hits.

Tripped Attack: Dreaded Darkness: As Hades stands up, he gestures around in front of him, causing a small thin shadow to appear on either side of him, knocking nearby foes away lightly. This is a fairly close range, low priority attack. It hits foes with dark purple magic, like his D-Tilt. This move deals 4-8% to foes, in two hits.

Ledge Attack: Flare Gun: Hades angrily pulls himself onto the stage, extending a long flaming finger as he does so. This jabs foes away with slightly below average power. This has decent priority and below average range. It deals 7% to foes.

Ledge Attack (over 100%): Wicked Warp:
Hades chuckles evilly to himself, as he vanishes briefly in a cloud of smoke, then reappears on the ledge suddenly, knocking any nearby foes backwards over the ledge with below average power. Because it knocks foes backwards off the stage, Hades can then try to gimp foes with aerials. This has low priority and is close range, though, as it is a desperate move to make. It deals 4% to foes.

GRAB AND THROWS

Grab: Smokey Snare: Hades has a unique grab. When the grab input is pressed, Hades' arms turn to smoke and begin reaching forward menacingly. By holding down the grab button, Hades can extend his arms infinitely to grab a foe; the arms traveling at the speed of Ganondorf's run. If a foe hits the hand part of the smoke (not the arms), they are quickly reeled back to Hades, who holds them by the throat. An endless reach sounds broken, right? The catch? Hades is completely vulnerable while reaching out, and unlike Snake's Nikita, Hades can't simply cancel the grab. The player must release the grab button, and wait for the arms to reel back in themselves, at the speed of Ganondorf's run. This leaves Hades completely vulnerable, so you can't abuse this. Foes can also attack the smokey arms to cause them to reel back in on their own. Hades has an awkward shield-grab, as it takes a split second for his arms to dematerialize and begin snaking forward. Use with caution. Grabs are not one of Hades' strong points, but he does have some powerful throws. It's extremely high risk, high reward.

Grab Attack: Flame Choke: Hades holds the foe by the neck and squeezes hard, his hand catching on fire for maximum torture. This deals a whopping 5% for a Grab Attack, but it is very slow. In most cases, Hades will only have time to use this once before the grabbed foe escapes. This is not a great option, as Hades has more powerful, more damaging throws to use. Plus, the grabbed foe can retaliate with an Aerial if they are quick.

Forward Throw: Smokey Snake: Hades simply drops the foe, around which a coil of smoke is binding rapidly. The foe remains immobile for about 1.5 second (longer if they have high damage), giving Hades time to punish them, although the foe can lessen this time by button mashing. To compensate for this, however, this only deals 4% to the foe, and no knockback at all. Unless your foe has a lot of damage and will remain bound longer, a more powerful throw is recommended.

Back Throw: Dark Cannon: Hades turns around and clenches the foe tightly by the throat. Hades' hands glow dark with shadow as a loud boom is heard and the foe is sent flying backwards, with above average horizontal knockback. This is Hades' best throw by far. It deals the most knockback, the most damage, and can easily kill foes off the side on walk-off stages. However, Hades lags a tiny bit after this grab, so it can't be abused heavily. This throw deals 10% to foes.

Down Throw: Belligerent Blast: Hades reaches up holding the foe by the throat. His hands then glow with fire (similar to the fire from Mario's F-Smash, but a lot smaller), as the foes are sent rocketing to the ground, then bouncing back up with below average knockback. This is Hades' best throw to combo from, but not the best for knockback by any means. With excellent timing, a foe can also learn to Floor Tech and avoid any knockback, as well as be able to punish Hades for using the throw. However, it takes a lot of timing to master, making it fairly safe to use. This throw deals 6% to foes.

Up Throw: Hair Grill: Hades reaches up with an evil grin, releasing the foe, but allowing his flaming blue hair to expand slightly, hitting the foe multiple times, with average vertical knockback on the last hit. This is a decent grab to use, as the knockback allows Hades to recover before the victim can retaliate. It takes a while for the move to KO any foe off the top, however. This throw deals 9% to foes.

FINAL SMASH

Terrorific Titans: Hades hops up into his chariot, calling in an echoing voice, "Now that I set you free, what is the first thing you are going to do?" Four evil voices respond, "DESTROY THEM!" Hades flies offscreen, answering, "Good answer."

Then, one of the four monstrous Titans appear onstage to attack Hades' foes for him (they are seen in this part of the movie). The Titan that appears is random. Although they are all different in proportions, they are all scaled down to the size of Giga Bowser (they'd be TOO BIG otherwise). Each has different effects on foes.


Rock Titan: This two-faced Titan appears with a roar, and proceeds to wander about the stage, slowly stomping over all in its path. You can control it with the Control Stick, and make it heavily jump with any jump button. It won't fall off the stage or out of the stage boundaries on walk-off ledges. Touching the beast at all deals 10% and average knockback to foes. Getting stomped on deals 20% and high knockback. You can't control how fast or often the Titan stomps, however. Also, foes can leap up and attack the faces of the Titan. They each have 30% before they break off. If one breaks off, the Titan's controls are reversed. If both are destroyed, the Titan vanishes, Hades reappears in his chariot (which vanishes), saying, "Oooh, cha-wowa!", and the fight resumes. Take care to guard the faces when using the Rock Titan. After 15 seconds, Hades reappears in his chariot (which vanishes), saying, "Boom-bada-boom-boom-boom!" and you commence controlling him again.

Ice Titan: This delicate brute appears in a blast of ice, and begins blowing freezing breath about the stage. This Titan stays grounded in place, but its freezing breath can be directed about the stage. The breath has the range of half of Final Destination, and deals multiple hits of 4%, occasionally freezing hit foes in a block of ice. On large stages, this can be dodged fairly easily. However, it can't be destroyed, like the Rock Titan, so you are safe during this Final Smash. After 15 seconds, Hades reappears in his chariot (which vanishes), saying, "Boom-bada-boom-boom-boom!" and you commence controlling him again, the Titan vanishing in an icy blast again.

Lava Titan: This molten Titan appears with a fiery blast, and begins oozing in place, taking up about one-third of Final Destination. You can use the Control Stick to slowly direct the oozing beast around, causing hit foes to be damaged 15% and knocked upwards, as if they hit the lava on Norfair. Although this may seem broken, this lasts 10 seconds, which is the shortest time for a Titan to stay onstage. Plus, foes with good recovery can float over the beast's lava, and any foe can Floor Tech and use the invincibility frames to jump up and avoid the lava. Overall, this is not the most helpful Titan for KOing foes, but can be the best to efficiently build damage. After 15 seconds, Hades reappears in his chariot (which vanishes), saying, "Boom-bada-boom-boom-boom!" and you commence controlling him again, the Titan vanishing in a fiery blast again.

Tornado Titan: The final Titan appears in a roar of wind. You can control this Titan around for 15 seconds. The Tornado Titan travels faster than the other controllable Titans as well; it travels at Mario's running speed, while the other two moveable ones travel at Ganondorf's walking speed. If a foe hits the Tornado Titan, they spin around for a second, then are thrown out powerfully in a random direction, with random knockback and 10%. Close to a stage boundary, this can be a deadly attack. However, if you are unlucky, the Titan may just weakly throw a foe at the ground, where they can run away. The Tornado can hold multiple foes at once. After 15 seconds, Hades reappears in his chariot (which vanishes), saying, "Boom-bada-boom-boom-boom!" and you commence controlling him again, the Titan vanishing in a gust of wind again.

TAUNTS AND VICTORY / LOSS POSES

Up Taunt: Hades' entire body catches on fire, as he leans forward slightly and screams in intense wrath, "I OWN YOU!" A truly epic taunt to use after an epic combo.

Side Taunt: Smoke radiates from Hades' cloak, as he evilly chuckles and says in a quiet, vehement voice, "My favorite part of the game...sudden death!"

Down Taunt: Hades' hair flows all over his body; however, it is not the red hair he gets upon being angry, it is the blue kind he gets when he is excited. He does a double fist-pump and flexes, saying successfully, "Yes! Hades rules!"

Victory Pose #1: Hades stands, chuckling evilly, as his blue hair grows with excitement over his victory. Pain and Panic fly with their short devilish wings over the loser(s) and chant, "A hero's a zero!", pouring Gatorade over them. After a while, Hades summons his chariot, and he, along with his minions, hop in and ride off. Hades yells out as he rides away, "So much for the preliminaries, now onto the main event!"

Victory Pose #2: Hades reclines in his smokey thrown, used in his crouching animation, slurping up wormy spaghetti from a bowl, and says tauntingly, "I think I'm gonna like it here..."

Victory Pose #3: Hades calmly and slowly says, "Game...set...match!" He then conjures up a cigar and lights it with his thumb, and smokes it in place, nonchalantly.

Victory Theme: A dark, intense, and lyric-less remix of the main Hercules theme, Go the Distance.

Loss Pose: Hades screams in wrath, his entire body catching on red fire, and he struggles to maintain his temper, clenching his fists and yelling rather than clapping. Meanwhile, Pain and Panic sit comically behind him, Pain wearing sandals and Panic sipping Gatorade from a bottle...both of which are emblazoned with icons of the winning character. Hades doesn't notice them until he calms down slightly, upon which he loses control again and blasts them offscreen, and maintains his red flaming anger.

EXTRAS

Icon: Like Bowser, Hades is a villain who has his own icon, but is forced to share his series icon in Smash. He uses the main Hercules icon, which is the Symbol of the Gods; a medallion emblazoned with a cloud and a thunderbolt.


Alt. Costumes:

Normal
Red-Hair
Dark Blue Hair
Lime Green Hair
Purple Hair
Pink Hair

Wiimote Sound: Hades speaks rapidly, "Name is Hades, lord of the dead. Good night, how ya doin'?"

CODEC CONVERSATION

Snake: Colonel! There's a fiery deity on the battlefield!

Colonel: That's Hades, ruler of the underworld.

Snake: He looks like a comical hothead to me.

Colonel: That may be so, but beware! Hades is in the middle of a hostile bid for world takeover. He's got two morphing morons to help him. It will take a real powerhouse to bring him down.

Snake: Looks like I've got my work cut out for me...

Colonel: I know you can go the distance, Snake. Good luck...you'll need it.

ASSIST TROPHY


The Three Fates: The three Fates are in control of how long each mortal lives. They also know everything: past, present, and future. Here, all three of them appear at the same time, and state, "We know everything! Past, present, and future!" The tallest Fate then takes out the mystical eye that the three share, and holds it above her head. The eye spins rapidly, then vanishes with a pop, the Fates cackling as they fade away with it. As soon as the eye vanishes, any foe on the battlefield repeats whatever actions they were doing as the Fates were talking, whether it be running, jumping, dodging, or attacking. This can cause characters to self-destruct, or leave them vulnerable to attacks from the summoner. However, a competent opponent will learn to dodge constantly to avoid this. This is a very situational AT in terms of usefulness. It is somewhat rare to appear.

STAGE

The Underworld: This is the dark, gloomy underground realm that Hades is the ruler of. Characters begin the stage on a small boat, the size of half of Final Destination, rowed slowly along by a skeleton in the background of the boat. The boat travels over the River Styx, which is filled with souls. There are no hazards here, although the small stage size can be dangerous to fight on. Characters who fall in the water can still swim, but the souls may grab onto the character and slow them down, vanishing when the character hops out of the water. This phase lasts for 30 seconds. Around the 15 second mark, the boat passes through a gate of jagged rocks. In the background here, Ceberus, the three-headed dog snarls and chomps wildly as the boat passes. However, he is just there for effect, like Kraid in Melee.

After 30 seconds, the boat reaches a rocky isle the size of Smashville. You fight there for 30 more seconds. This is a standard arena, with the soul-infested water of the river on either side of the battlefield. The boat stays on the left of the isle, serving as an additional platform.

After this phase, the boat teleports in a cloud of smoke to the opposite side of the isle and keeps rowing. You must jump on to continue the fight. After a brief 15 seconds, the boat reaches a rocky cliff. This is the size of Final Destination, but is sloped upwards. The boat remains on the left side, still a platform. However, on the opposite side is the green Pit of Souls, a vast whirlpool filled with *gasp* souls. Fall in there, and the souls swarm you and try to pull you under. Quoting MasterWarlord, you must button mash like a monkey on crack to escape. This phase lasts for 40 seconds. The boat then rows back to the left. You must hop on to continue the fight. The stage now travels back through the stage in reverse. When you reach the beginning of the stage again, the boat simply turns around and begins the cycle again.


MUSIC

A full instrumental remix of Go the Distance, remixed dark and evilly to suit the stage better.
The Prophecy
Speak of the Devil
The Hydra Battle
Cutting the Thread

(Sorry, there were no videos of these scores. Look up the Hercules soundtrack to hear samples of the music).


SSE ROLE

Hades' first appearance is before the second Fox/Diddy level. He is seen in his boat, rowed by a skeleton, on the River Styx in the Underworld. Unlike in the movie, the souls are all dead video game enemies. Several Koopas, Goombas, Kritters, Moblins, and so on are seen as souls, floating in the river. Hades observes more souls floating into the river from above, and opens a small portal to see Diddy and Fox killing more enemies in their level. He shuts it after he sees the origin of the souls. Several souls try to climb onto the boat with Hades, but he ruthlessly blasts them away with fire, blowing the smoke off his finger. As he passes his pet Ceberus, he tosses it a piece of meat, which the beast's three heads fight over viciously. When he gets to the main isle of the Underworld, Hades stops and ponders his responsibility as ruler of this dark, miserable realm. His hair turns red with anger as he gets a thought bubble of him before Master Hand, who points to Hades, then points to the floor to indicate where he wants him to go. Hades snarls and turns redder, thinking of the tedious and boring task that Master Hand so charitably and regrettably bestowed on him. Hades gets another thought bubble of him defeating Master Hand and becoming the ruler of the main World of Trophies. Hades chuckles evilly at the idea, and the screen fades out in dark smoke. You then play Diddy and Fox's level as normal.

Hades isn't seen again until after the Great Invasion cutscene. Through a portal of the future made by the Three Fates, Hades, as well as Pain and Panic, watch clips of the destruction of the Ganon Cannon, watch a clip of the characters entering Subspace on their flying vehicles, and watches Ganondorf betray Bowser and present himself to Master Hand. With a wicked laugh, Hades closes the portal, motions for his two minions to come along, and summons his personal chariot, pulled by a thestral as usual. However, since he closed the portal early, he is unaware of Tabuu's control over Master Hand...

The regular cutscene of Ganondorf betraying Bowser and Tabuu emerging and using the Off Waves is shown. Hades arrives in Subspace just in time to see Tabuu defeat Master Hand and trophify everyone. Pain and Panic are turned into trophies, but Hades, invisible under his Helm of Darkness, is a god, and is therefore unable to be trophified. He revives Pain and Panic quietly, grabbing them by the necks to keep them quiet. Hades snickers evilly to himself, prepared to enter the Great Maze and take on Tabuu. He sees a great amount of Subspace enemies around, and is about to sneak through them while invisible, but Pain and Panic cower and morph into squawking chickens, causing their presence to be known. Hades throws the chickens aside, where they turn back into their regular forms, then he throws a fiery blast at the enemies. Before the regular King Dedede/Luigi/Ness level, you play as Hades in a Subspace level, started by a battle against the Subspace enemies.

No cutscene is shown after the level, and you play Dedede's and Kirby's levels as usual. However, at the end of Kirby's level, Bowser is seen attacking Ganondorf's trophy as usual. Hades observes and sees that Bowser could defeat Ganondorf one on one with no trouble, knowing how Ganondorf previously defeated Bowser by sneaking up on him when he was unaware. Hades sees Bowser as the only other true powerhouse threat to his path to ruler of the World of Trophies besides Tabuu, now that Master Hand is out of the way. Hades jumps in front of Bowser as he's walking away and throws out a blast of fire. Bowser dodges and retaliates with his own fire breath. Pain and Panic shriek in shock of the intensity of the fiery battle. You play as Bowser for the first time in a one on one battle vs. Hades.

Upon his defeat, Bowser roars his victory over the ruler of the underworld and proceeds up the stairs to the Great Maze. However, he is quickly overtaken by Hades in his chariot; Hades wanting to reach Tabuu first and be the first to take control. Bowser continues on his path, not desiring to rule the world, solely seeking to get even with the one who killed his boss, Master Hand.

Hades is not fought in the Great Maze, nor is he playable yet. At the final cutscene, he appears a good deal away from Tabuu, and begins to run up and face the ruler of Subspace, but a blue blur overtakes him and destroys Tabuu's Wing. Hades goes red all over with fury, but then sees the other characters catching up to him. With a sigh, he masters his temper, telling himself that there will be other opportunities for hostile takeover later. For now, Hades solely seeks to prove his power to all. Along with Sonic, he is finally selectable for the Final Battle. No further personal cutscenes take place.


PLAY STYLE

Much of Hades' game is about fiery power. However, he has a balance between power and trickery that is lacking in most other heavyweights. Mastering Hades is a matter of what trickery to use in what situation.

Generally, you'll want to charge your Neutral Special, Hellish Hot-Head as soon as possible. It will help you to have an extra move to throw into your string of attacks; especially the ones that require a longer charge. Many tactics can stem from using Pain and Panic with Hades' Side Special. For example, you may wish to start combos by throwing Panic to knock foes off an edge, then try to gimp the foe or spike them with a D-Air. Using Pain to weaken foes for a few attacks may also allow you to follow through with more reckless attacks. Finally, using them both as snakes is an easy way to build damage quickly.

Many of Hades' matchups depend on whether they have a projectile Hades can steal with his Helm of Darkness. Not all projectiles can be stolen, either. If Hades can acquire a useful projectile, he can easily become deadly in the hands of a good player. However, most characters have easy ways to avoid their own projectile, so this is not always a huge advantage.

Hades has some rather fancy-looking Tilts, which may throw some players off at first, but they quickly become easy to use when you learn their properties and hitboxes. They are generally decent for combos, and can kill as well at higher percentages, so use them often to build damage. Hades' unique F-Smash can be angled, but not charged. This makes it easier to hit with, but harder to KO with. It isn't the quickest attack either, so don't become too reliant on it. Hades' other Smashes are fairly useful, as long as you use them when your foe doesn't expect it; otherwise, they could punish you for using a laggy attack.

Hades has a decent air-game for a heavyweight. Most of his Aerials look fancy, but hit in fairly standard ways that can be picked up fairly well. The exception is his D-Air, which is a very unique, yet slightly awkward spike. Its multiple hits make it somewhat easy to escape from, but if used so that a foe only hits the last hit (the one that spikes), it can be a great offensive tool.

Finally, onto Grabs. Hades' unique grabbing mechanic can allow you to grab and build damage on foes who are far away, but you suffer from horrible lag if you miss. The best use of this is to grab a recovering foe, then throw them right back off with more knockback. Grabbing at close range is awkward for Hades', and shield-grabbing is almost useless due to the punishment foes can dish out to you as you stretch out your grab. This is a low point for Hades.

Overall, Hades is a good character if you know how to use him. He has several intricacies that most heavyweights lack, and this may turn off new players who simply grab the strongest, simplest characters. However, learn to turn these differences into strengths, and you will be very dangerous as a good player. Players at higher levels may not be comfortable with Hades as they would with a smaller character, due to Hades' large size, but if you learn Hades' longer ranged techniques, he can be used, even in upper levels of play. Master this deity, and you have all the strength in the Underworld! Your foes will really have to go the distance to defeat the great Hades!


Now you know how it feels to be just like everybody else. Isn't it just...peachy?
 

Kholdstare

Nightmare Weaver
Joined
Oct 10, 2008
Messages
1,440
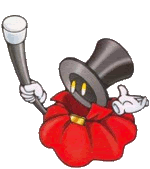
This magician can pull more than rabbits out of his hat!

"Gather round and look closely! Nothing in my hand! Nothing in my sleeve!"


Wiz has joined the Brawl!

Wiz is the boss of the Peppermint Palace in Kirby and the Amazing Mirror.

<<~~{{Stats}}~~>>

Power ~ 5/10 ~ Wiz is well balanced in strength, having both very strong moves and moves that do no damage at all.
Attack Speed ~ 8/10 ~ Wiz needs to have some quick hands to pull of his magic tricks.
Speed ~ 7/10 ~ Wiz is faster than many fighters, but he cannot run.
Weight ~ 3/10 ~ Wiz is composed of just a cloak, hat, and gloves, so of course he is lightweight. The hat, and the things inside of it, weigh him down some.
Fall Speed ~ 2/10 ~ Wiz falls slow, his cloak acting as a drag chute.
Traction ~ 8/10 ~ Wiz hovers slightly above the ground, so he has excellent traction. He can not turn on a dime, though, but pretty close.
Jump ~ 9/10 ~ Wiz has a good first jump. The best thing is that he has four more jumps after the first, like Kirby.
Range ~ 10/10 ~ The very best aspect of Wiz is his insane range.
Height ~ 6/10 ~ Wiz is a little bigger than Kirby.

<<~~{{Specials}}~~>>

Neutral Special ~> Magician's Hat of Tricks ~> Wiz disappears inside his prominent top hat, as if he were sucked inside of it. Only his gloves remain outside the hat. The hat turns upside down, and Wiz taps on the brim of it with his magic wand. One of several random items or enemies will pop out of the hat, before Wiz recedes from his hat. There can be two different things per Wiz on the stage at one time. This move takes a total of two seconds. The random items/enemies are:

  • Car ~ A small red car pops out of Wiz's hat, and speeds off (at the speed of a running Sonic) in the direction that Wiz was facing. Whenever it hits a wall, it will bounce off of it and take off in the opposite direction. It deals 10% and good knockback. Basically, a psycho Gordo. After five seconds, it will disappear.
  • Nimbus ~ A small cloud comes out of Wiz's hat and floats around the screen. Whenever it gets near an enemy, it will fire a lightning bolt that does 12% if it touches them. This does no knockback, but instead one second hitstun.
  • Football ~ A football bounces out, and rests on the floor. This can be picked up and thrown like an item, or attacked. If thrown, it will act exactly like Mr. Saturn. If hit, it will act exactly like a Soccer Ball.
  • Bronto Burt ~ A small pink Bronto Burt flies out, and will fly around the stage, ramming into foes. It does 5% and okay knockback.
  • Bomb ~ This item appears the rarest. A bomb the size of a Waddle Dee bounces out, and rests on the ground. The bomb flashes red rapidly, for 3 seconds, and the bomb explodes, with the force of an Electrode. 25%
I'll add more later.

Side Special ~> 52 Pickup/Exploding Snap ~> Wiz takes out a deck of cards, and flips them at the opponent so that they hit them and scatter around them. The enemy will bend down and pick up the cards leaving them vulnerable and susceptible to attack for two seconds. There is a 10% chance that the cards will explode like a Bomb-Omb when they get hit by the cards. The exploding cards deal 11% and good knockback. The non exploding cards do no damage or knockback. You or your opponent won't know if the cards will explode or not. This is good for mindgames, but if you get to close, you might get hit by the explosion if it's a deadly deck. This move goes about two crates' distance before the deck drops to the floor and disappears.

Up Special ~> Magic Balloons ~> Wiz disappears inside his hat and taps it with his magic wand, exactly like his Neutral Special. Instead of an item of enemy coming out of it, three large red balloons inflate out of it, strings coming from the hat. They all have a golden star on them. They will float around the stage, carrying Wiz up. These can be guided from left to right with the control stick, but not down. They will pop after four seconds, and Wiz will enter his helpless animation. Now, these can be popped by an enemy attack, but they won't make Wiz helpless, so he can use all five of his jumps and this attack again! This will be effective in discouraging opponents who try to gimp your recovery. Wiz is vulnerable to damage, but they will not cancel him out of this recovery. Only when all three balloons are popped will he be forced out of this special. Wiz can pop them automatically by pressing up and B. Manually popping them will send Wiz into a helpless state.

Down Special ~> Magical Hats ~> Wiz disappears inside his hat and taps it with his magic wand, exactly like his Neutral Special. Two hats identical to Wiz's slide out, one on each side, and hover beside him. One of these hats is the real Wiz, and the others are fakes. The only way to tell which one is real is if the foe attacks one of the hats. If they attack a fake hat, then it will explode in their face, dealing 13% and better-than-good knockback. If they attack the real Wiz, then he you will suffer the same effect as if they had attacked Wiz normally. You can cancel out of this move anytime by pressing down and B again. This move is perfect for mindgames, and it gives you some cover as well. You can't move while you're in this state.

<<~~{{Tilts}}~~>>

Neutral A ~> Wizard's Wand ~> Wiz flourishes his long magic wand, and waves it quickly in front of him, like a Simirror attacking. Instead of firing the mirror magic, Wiz's wand sparkles and glows. It leaves a trail of silver magic in its wake that disappears after half a second. This deals 5% for a single swipe, or 1% per swipe if you continuously tap the A button. It does insignificant knockback. The two good points to this attack is that it is quick and the wand is long, so the hitbox is large.

Side Tilt ~> Magic Shock ~> Wiz points his wand in the direction that you use this attack. It glows yellow, and a circle of sparks dance one crate's distance away from the tip of the wand. Those touching the ring of lightning will just suffer 7% and weak knockback. The unlucky fellow who gets caught inside the ring, however, will suffer 14%, but no knockback. This can be shielded and dodged, but it happens so fast that you can catch the enemy off guard. It's easy to miss hitting the enemy.

Down Tilt ~> Spellbinding Circle ~> Without disappearing inside his hat, Wiz taps his crimson cloak, and glows brightly. When Wiz taps his cloak, a ring of red magic flashes around him in a perfect circle. This attack is quick and covers every side of him. The hitbox doesn't extend out (lengthwise), but is exactly that of his Neutral A. This is a good attack to follow up with after you use his Side Smash. It does 7% and flinching knockback.

Up Tilt ~> Wind Waker ~> Wiz sticks his wand straight up in the air above his hat and twirls it rapidly. A tornado is summoned there, exactly the same size as Wiz. It will stay there as long as you hold down this attack, and it will exert a pull on the enemy. Those that are caught in it will be trapped inside the tornado, unless they continuously tap A, in which they can get out of this easily. If they don't break out after 7 seconds, however, the twister will turn bright silver. This tornado will seal the foe inside, and Wiz can control it for 3.5 seconds. You can use this moment to send the enemy to their doom, or run them into a stage hazard, or simply just get them away from you. The sky's the limit, unless you plan on sending them flying off the top of the screen.

<<~~{{Smashes}}~~>>

Side Smash ~> Stunning Performance ~> Wiz puts his middle finger and thumb together in the hand that is not wielding the wand and holds it towards the direction that you are doing the smash in. This is the charging animation. When you release the smash (or it's fully charged), Wiz will snap his fingers and his hand will flash brightly. Those next to Wiz's hand will be stunned as if a Deku Nut hat hit them. The hitbox of this move is very small. It's almost useless if not even halfway charged. When it's not charged, you have to be exactly beside the enemy for it to work, if halfway charged, then you can be a stage builder block next away from them, and if fully charged, then you can be a whole stage builder block's distance from them. The more you charge this move, the bigger the hitbox extends and the longer they will be stunned. This move is possibly Wiz's quickest, because it is almost instant. If the foe is over 100%, then the length that they're stunned is doubled. (0.5 seconds uncharged, 1 second halfway charged, 1.5 seconds fully charged)

Up Smash ~> Flock of Doves ~> One Kirby's Magic Copy Ability attacks in Kirby Squeak Squad, this attack functions differently in Smash Bros. Wiz disappears inside his hat yet again, and holds his wand just above the brim of it. This is the charging animation. Wiz will then tap on his hat with his wand, and a dove will fly out for each tap. These doves will spiral up into the sky, going straight up. Each dove will do 8% and good knockback, bumping the enemy who gets in their way to the sky, before disappearing into thin air. It's easy to K.O. an enemy when you're high up on the stage, even at lower percentages, but that won't happen on stages like Final Destination or Battlefield until higher percentages. They will only fly about half of Final Destination's length into the sky, unless they are going to juggle/combo, in which the other birds will pursue the victim. (1 dove uncharged, 2 doves halfway charged, 3 doves fully charged)

Down Smash ~> Jack-in-the-Box ~> Wiz's hat turns upside down beside him, and he reaches in and pulls out a small box. He winds it up using a small crank on the side of it. This is the charging animation. After you get through winding it, Wiz will place the box on the ground, where it will mysteriously disappear! If anyone steps on the place where you put the box, then they will get a surprise! A large and sinister clown with sharp teeth pops out of it! It has a rather broad head, and will bounce the victim with the force of a spring. It does no damage when doing this, but excellent knockback. there's a 5% chance that it will breathe a stream of fire, which does 15% and good knockback. The hitbox of this move is also large. The longer you charge this move, the longer it will stay hidden before vanishing.

<<~~{{Aerials}}~~>>

Neutral Aerial ~> Triple Star ~> Every time you press the A button, Wiz will wave his wand and a gold star will come out of it. This star will orbit Wiz until it hits a foe. If a star hits an enemy, then they will take 5% and okay knockback. Up to three stars can orbit Wiz at a time.

Forward Aerial ~> Chain Explosion ~> Wiz disappears inside his hat and taps it with his wand, again. A small bomb comes flying out of it and the bomb explodes in mid-air. It does good knockback and 11% damage. It flies about two crates' distance before exploding. If it hits an enemy before detonation, then it will explode normally, but send four bombs exactly like it out of the explosion! This can keep on going, like dominoes, causing much chaos.

Backward Aerial ~> Crude Oil ~> Wiz disappears inside his hat and taps it with his wand, again. A gout of oil will spray out, more akin to F.L.U.D.D. than Game and Watch's Oil Spill. This does exactly the same amount of knockback as F.L.U.D.D., and coats the foe in black oil. This oil is highly flammable, and should be followed up with Chain Explosion. Any fire damage to the enemy coated in oil does double the damage. This oil also drastically reduces the enemy's traction. It will disappear after 5 seconds, but can be washed off instantly with water. If this oil touches the stage, it will remain there for 10 seconds, it still having the ability to reduce traction and be flammable.

Down Aerial ~> Anvil Drop ~> Wiz disappears inside his hat yet again, and taps it with his wand, again. A medium-sized iron anvil drops out of it, and drops as fast as Stone Kirby. It deals a hefty 15% to the cursed ones who get hit by it, and vertical knockback. It only disappears when it hits the stage. This is an excellent projectile and spike, and should be used high up in the air, since it will catch those underneath Wiz all the way down.

Up Aerial ~> Flame Pyre ~> Wiz disappears inside his hat and taps it with his wand, again. A large column of fire shoots up to the sky, before disappearing. This fire is a little narrower than Wiz, but 1.5x his height. It will deal 9% and good knockback. If it hits the enemy in the butt, then they will clutch their rear and jump and howl in pain for a second. It looks quite funny. This attack should follow up Crude Oil for best results.

<<~~{{Throws}}~~>>

Grab ~> Closet Trap ~> Wiz does his favorite animation, going inside his hat and tapping it with his wand, and the foe is suddenly encased in a large wooden box with a heavy iron padlock on it! It has 40% HP, and can be destroyed by other fighters. Since it's stationary, on moving stages this box can trap an enemy inside and score a K.O., if the enemy doesn't tap like a monkey on crack to get out of it.

Pummel ~> Piercing Swords ~> Wiz's hat floats off of his "head" and hovers beside him, upside down. He taps it with his wand, and pulls out a long sword. He then sticks the sword into the box, and the end of the blade is seen coming out the other side. Wiz will then stick more swords into the box every time you press A, with up to four swords. This attack is dreadfully slow, and the box is very large. (8% per sword)

Forward Throw ~> Spit Up ~> Wiz waves his wand at the box, and the other side of it grows a giant mouth with two large red lips. The box spits the enemy out. This does no damage and doesn't even throw them far, but it coats them in saliva. For five seconds, the victim's chance of tripping is doubled, and their traction is cut in half. This is a very useful throw.

Backward Throw ~> POW! Right in the kisser! ~> Wiz waves his wand at the box, and ducks down low. A large boxing glove sends the opponent flying out of the box. This does some good knockback, and okay damage (6%).

Down Throw ~> Not-so-safe Safe ~> Wiz disappears inside his hat (again!?!) and taps it. Something zooms out of his hat at a high speed and goes offscreen. A large black safe comes falling down, landing right on the box, smashing it. The foe inside flies away from the box at a diagonal angle, but not very far. The safe does an astounding 18% damage.

Up Throw ~> Thinking with Portals ~> Wiz waves his wand at the box. An orange portal appears on the roof of the box, and the enemy comes flying out of it, upside down. This move doesn't do much knockback, and no damage. Use it sparingly.

<<~~{{Finish}}~~>>

Final Smash ~> Magic Show ~> This is a cinematic Final Smash. Wiz holds his hand out, as if to say, "An assistant, please." Wiz then claps twice, and a large red curtain covers the screen. The curtains then part, and the opponent closest to Wiz has been chosen to take part in the act. One of several Final Smashes will happen:

  • Disappearing Act ~> Wiz puts his volunteer in a large black box with a crimson door on it. There are several gold stars on the box. He wiggles his fingers, and taps the box three times with his wand. The door opens, and there's nothing inside of the box! The enemy has disappeared, and lost a stock in the process.
  • Swimming with the Fishes ~> The unlucky volunteer has been trapped inside a glass box, filled with water! That's not the worst part. The aquarium has sharks in it! Gobblers, to be exact. Wiz takes a bow, as the Gobblers rip the foe apart, and the water turns bloody.
  • Hacksaw Halfbox ~> Wiz traps the foe inside another box, this time a long wooden box. He taps his hat, and pulls out a rusty hacksaw. He holds it up for the crowd to see, and saws the box in half, the opponent screaming in agony. The hacksaw disappears, an he taps the box with his wand. It slides apart, revealing that he completely sawed through the foe. It's also seen that blood is all over the inside of the box. Looking nervous, Wiz waves his wand and the box explodes into flames.
Note that all of these Final Smashes kill the enemy.

<<~~{{Act}}~~>>

Entrance ~> Hat Emergence ~> Wiz's hat floats down to the stage, and he appears out of it with a flush of his cloak.

Taunt 1 ~> White Rabbit ~> Wiz's hat suddenly appears beside him and he reaches inside... and pulls out a white rabbit! The classic hat trick. Wiz drops it back inside and his hat returns to his head.

Taunt 2 ~> Shuffle ~> Wiz takes out a deck of cards and shuffles them with his hand.

Taunt 3 ~> Fashion Sense ~> Wiz taps his hat with his wand and it turns into a fedora, before tapping it again to change it back.

Win Pose 1 ~> Magician's Pride ~> Wiz takes several bows toward the screen. A couple of roses are thrown from off screen onto the ground in front of Wiz.

Win Pose 2 ~> Vanishing Act ~> Wiz vanishes inside his hat, and it falls to the ground, still.

Win Pose 3 ~>
Rabbit Magic ~> Wiz waves his wand and the losers are all turned into white rabbits. He giggles creepily, with a high pitched voice.

Loss Pose ~> Bad Performance ~> Wiz claps like the other losers, but every few seconds a tomato will be thrown at him and he ducks to dodge it.

<<~~{{Costumes}}~~>>

Standard Costume/Red ~> Wiz has two white gloves, a crimson cloak, a large black top hat, and a long magic stick. He has no body, apparently, but two floating yellow eyes.

Black ~> Wiz's cloak and gloves turn black.

White ~> Wiz's cloak and hat turn white.

Gold ~> Wiz's cloak turns gold and his hat gains a gold band around it.

Blue ~> Wiz's cloak turns blue.

Green ~> Wiz's cloak turns green.


<<~~{{Extras}}~~>>


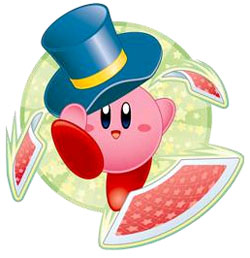
Kirby Hat ~> Magic Kirby ~>


Kirby gains the Magic hat exactly like the one in Squeak Squad. Instead of gaining his B attack, Kirby gets an actual ability in the game, in which he throws three razor sharp cards. These each do 2%, can go the distance of Final Destination, and can be spammed.

<<~~{{Magical Playstyle}}~~>>

So, you've read the moveset, so you're probably wondering how this wacky character plays. Wiz has many wacky attacks. Most of them are ranged, most of are quick, and many of them do no damage. To use Wiz well, you need to make use of his excellent range. Magician's Hat, Flock of Doves, Magic Shock, and 52 Pickup are some of the best. Keeping the enemy at bay can ensure Wiz a solid victory. The second best attribute to Wiz is his potential for mindgames. Most of his attacks use the same animation the he uses in Amazing Mirror- going inside his hat and tapping it with his wand. This looks exactly the same every time, so your enemy doesn't know what's coming. Magical Hats can either hurt you or give you an edge over your opponent. This should be used like crazy when you have a low percentage, so being damaged won't K.O. you or put you in jeopardy as much. 52 Pickup/Exploding Snap is great for mindgames, because the opponent might not be expecting an explosion. Note that Wiz cannot be damaged by any explosions that are effects of his attacks. If you have an opponent who likes to gimp your recovery, then use Magic Balloons as much as you can. In a small space, Magician's Hat of Tricks should be spammed, since this offers no risk to you and can rack up damage fairly fast. Magic Shock should be used to stop Side B spammers like Fox, Sonic, and Yoshi, as it destroys their approach. Using Jack-in-the-box on an edge can gimp an opponent that lands on it, landing out of their recovery. On stages with moving platforms like Smashville and high platforms like Hyrule Temple, Jack-in-the-box might score you a K.O! You should always follow up Stunning Performance with an attack, such as Wizard's Wand or Spellbinding Circle, but not Magic Shock, as it will miss the foe. Side Smash > Down Tilt > Side Smash > Down Tilt. Rather rinse and repeat. Those that do no damage are mainly for incapacitating the enemy, like his Side Smash and Up Tilt. Use these a lot, too, for they will ensure that the enemy takes damage from another attacks.

TL;DR: Wiz is a ranged character with a plethora of mindgames.

Special Thanks: SirKibble, who provided the Wiz image.
 
Status
Not open for further replies.
Top Bottom