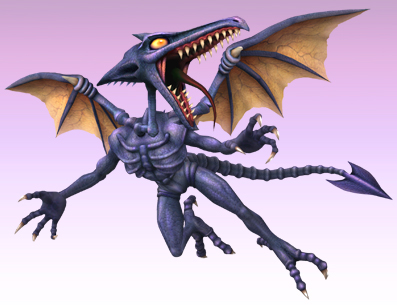
• Welcome to Smashboards, the world's largest Super Smash Brothers community! Over 250,000 Smash Bros. fans from around the world have come to discuss these great games in over 19 million posts!

    You are currently viewing our boards as a visitor. Click here to sign up right now and start on your path in the Smash community!

Make Your Move 5

Status
Not open for further replies.

Heartz♥

Smash Legend
Joined
May 18, 2008
Messages
10,443
Location
Virginia
Generally said it's best if you say whom you want to do so others don't steal your thunder. Any regular with common sense (I'm looking at YOU, Mythic) will stay away from doing that character. ;3
...Her name is "Lightning"... >_>

(jk I got the gist. lolololol)

People actually steal others' move plans on purpose? Too funny

btw, Lightning is from a game that hasnt been released or barely has any open info on it. Can she still count? I was gonna base her moves off of videos and stuff
 

Red Arremer

Smash Legend
Joined
Nov 27, 2005
Messages
11,437
Location
Vienna
'course you can. lulz

I made a character in MYM4 based on videos, and the game wasn't released at that point - in Europe at least. I think Chris Lionheart is doing a character of a game who hasn't been released yet, as well. And I'm pretty much famous for doing some of the most obscure characters ever... BlazBlue (Rachel's game) is only out on Arcade, and Monster (Rail's game) is a Doujin fighter in development. You can do characters from games, books, TV shows, movies, real people, yourself... There is no limitation but yourself in MYM. ;3
 

Heartz♥

Smash Legend
Joined
May 18, 2008
Messages
10,443
Location
Virginia
'course you can. lulz

I made a character in MYM4 based on videos, and the game wasn't released at that point - in Europe at least. I think Chris Lionheart is doing a character of a game who hasn't been released yet, as well. And I'm pretty much famous for doing some of the most obscure characters ever... BlazBlue (Rachel's game) is only out on Arcade, and Monster (Rail's game) is a Doujin fighter in development. You can do characters from games, books, TV shows, movies, real people, yourself... There is no limitation but yourself in MYM. ;3
Yea that long list on that link you gave me, I probably only got 9% of the characters on it. Glad there arent alot of rules. Kinda scared to post my first one after you mentioned CRUH-TEEK. :laugh:
 

SkylerOcon

Tiny Dancer
Joined
Mar 21, 2008
Messages
5,216
Location
ATX
Ema Skye
Don't know why this hasn't gotten any comments yet... I absolutely loved this set. The adaptation mechanic is too cool and a lot of the attacks are pretty nice as well... it's really a shame that the joke set under yours stole the spotlight.
 

Shake~

Smash Journeyman
Joined
May 29, 2008
Messages
332
@Kitsuneko345

I'm liking the moveset. Seems like she will have a bit of trouble knocking them away, as a lot of moves are devoted to the printing process. I like the mechanic she has, seems like it'd take a while to use her as well as others.
 

Heartz♥

Smash Legend
Joined
May 18, 2008
Messages
10,443
Location
Virginia
Woo hoo. Got my buttons done. A bit bigger though. I **** Cruxis in imaging. Student surpasses master. Think Orichimaru. I sooo got that fire

Edit: Ok so its not showing my siggy. That sucks. It did it when I posted before....
 

Akiak

Smash Ace
Joined
Jul 28, 2007
Messages
820
Location
In my secret laboratory.
@Ema Skye - I love it. Big improvement over the previous 2, and the usual weapon mechanic never gets boring. Each move is original and detailed. Not to mention another big success with the color and font choices. Very creative and stylish. Marvelous.

Emerge, make sure you use Dio Brando's sprites from Jump! Ultimate Stars here:
http://sdb.drshnaps.com/sheets/Media/Other/JumpSuperstars/JUS/DioBrando.png
 

dancingfrogman

Smash Ace
Joined
Jan 3, 2008
Messages
862
Location
United Kingdom, Birmingham
Switch FC
3133 8842 3910
@Heartz: Welcome to MYM, while Cruxis/Gryphon hasn't returned, It's great to have the Fiancee of the MYMer here (Hopefully this is correct, otherwise I'll get Manly pawnched). One reason that your siggy not showing is because your sig is bigger than your post, and I think that when you quote a post, your sig automatically appears.

@Ema: I like the mechanic of the 3 weapons which I'm sure other people have already commented, it makes the playstyle much more the intresting. They're SO many good sets that we have missed or haven't looked at, we always have a good start to a MYM, as we had the chance to look at the set longer and more time for creating creative moves.

Oh and BTW, I started on this character:


Yes, that's right, expect another mechanic for this character, and what's better is that I've continued my tradition of always making a Sonic character, while I announced that I was doing this in the chat, but now I've announced to the majourity. I'll be using some moves from Sonic battle, and various moves from the many forms that we see of Chaos in sonic adventure.
 

Jimnymebob

Smash Champion
Joined
Sep 26, 2008
Messages
2,020
NNID
Jimnymebob
Due to my super lurking status, and the fact I've missed 10 pages means that I'll have to look through the Abyss and find movesets.

However, I have read Ratchet and Clank and Shelder, and they were brilliant, Ratchet and Clank is one of your best H_R, and whilst Shelder isn't good as Electrode imo- unless you make another Pokemon set, that will be the best Pokemon set in the whole contest, hands down.

I'll read other movesets when I get the time, so if I have missed movesets out, which is probably the case, I'll make sure to give them a read at a later date.
Waits to be swarmed down with sets to read.....
 

KingK.Rool

Smash Lord
Joined
Nov 26, 2005
Messages
1,810
However, I have read Ratchet and Clank and Shelder, and they were brilliant, Ratchet and Clank is one of your best H_R, and whilst Shelder isn't good as Electrode imo- unless you make another Pokemon set, that will be the best Pokemon set in the whole contest, hands down.
Thanks very much, Jimny, although I wouldn't quite take that title yet. Not with agi making Mime, Tanookie making Hypno, MT making Azumarill, and Warlord making (already made) Missingno. It's gonna be a FINE contest for Pokesets! :bee:

Now, that promised commentary I owe you all...

Megaman.EXE (the real one this time): I'm impressed, honestly. Like Skyler, there's a very neat, fluid playstyle here. I'm not a fan of the borrowed attacks from Thunderman and who-have-you, but I'm aware that it's true to character. The organization which has been so panned, apparently, I really like, although it does make the moveset tricky to read. Strange how the animations are usually at the end of the attack. Oh, and Bubbleman made me laugh. A LOT.

TWILTHERO: What an odd little moveset. I noticed this... "*is looking at KingK.Rool to not make an idiotic pun >_>*"

Can't believe you'd SAY such a thing! I'm almost offended. :bee:

*resists temptation*

It's a neat little moveset. You used a bunch of different kinds of magic, detracting from the flow a bit, but at least all the individual attacks are cool. And by that I mean, ALL of them. Descriptions are shorter/more readable, too. Elemental swordsman moveset, eh? Sounds a bit like an earlier moveset of yours of which you are not a fanboy... :p

No comment on Ema, as I may wind up reviewing her, anyway.

Air Man (WILL NOT DIE!!!!): Now, THIS I've been looking forward to. Like, a lot. And it hasn't disappointed.

The simple two-tone organization works beautifully, with the contrasting colors. The headers are brilliant and the occasional sprite just adds to the airy feeling of it all.

As we all know, I am most definitely not a fan of putting the Specials at the end. It just winds up disorienting readers who are looking for the vital moves and don't get them.

But for the moveset itself? It blew me away. Attacks are all fresh and unique with the Torque to spruce them up. Very professional writing style, as with Simirror, but better formatting and moar detail. DSmash makes learning physics FUN! Also, Down Taunt is pretty much the greatest taunt ever.

So yeah, I love it. More than Simirror. Awesome, awesome set, agi. You have done him (and his incredibly random but win-filled theme) justice.
 

Kris121

Smash Journeyman
Joined
Nov 26, 2008
Messages
263
Location
THE INTERWEB
Wait What!!! Heartz you can't make Neku Sakuraba I'm Doing Neku Sakuraba. Oh well If you must may the best MYMer win. Maybe you maybe me. But I called him a while ago...
 

Agi

Smash Lord
Joined
Jul 27, 2008
Messages
1,120
Location
SE Washington
Air Man (WILL NOT DIE!!!!): Now, THIS I've been looking forward to. Like, a lot. And it hasn't disappointed.
A fan! /pun

The simple two-tone organization works beautifully, with the contrasting colors. The headers are brilliant and the occasional sprite just adds to the airy feeling of it all.
Good to hear, from the king of organization.

As we all know, I am most definitely not a fan of putting the Specials at the end. It just winds up disorienting readers who are looking for the vital moves and don't get them.
...ordinarily, I'd agree with you on this. However, I wouldn't consider Airman's specials the "meat and bones" of this particular set. I'll... "fix" it, but just because you asked me to.

But for the moveset itself? It blew me away. Attacks are all fresh and unique with the Torque to spruce them up. Very professional writing style, as with Simirror, but better formatting and moar detail. DSmash makes learning physics FUN! Also, Down Taunt is pretty much the greatest taunt ever.
What, physics wasn't fun to begin with? =P

Thanks!

So yeah, I love it. More than Simirror. Awesome, awesome set, agi. You have done him (and his incredibly random but win-filled theme) justice.
:bee:

Also, I'll be reading that there Story Mode of yours, H_R. I'm still hitting myself for not reading it beforehand.​
 

Mardyke

Smash Journeyman
Joined
Sep 8, 2008
Messages
289
Location
Ireland
Wait What!!! Heartz you can't make Neku Sakuraba I'm Doing Neku Sakuraba. Oh well If you must may the best MYMer win. Maybe you maybe me. But I called him a while ago...
You can both do him. At the moment we're not suffering a plague of same-character sets, so there's no problem with two people doing them.

Chapter 10 of Playing God: Preparing for One Final Push

Warning: Only 3 levels of the chapter are currently up, and it's already pretty freaking long. I would HIGHLY reccomend that you do not wait for the entire thing to be up at once before reading it, as you would be crushed under an omniverse of text.
Good as always. Comfortable to read (save for the text parts), I can understand what you're telling me about the mission flow, and the bosses keep up to notch.

But I'll be honest with you, if I please may; you say "Self/Friend-Insert" and I say "ASGEUHAIHGEWJGWELUIG NNNNOOOOOOOOOOOOOOOOOOOOOOOOOOO!!!"
 

dancingfrogman

Smash Ace
Joined
Jan 3, 2008
Messages
862
Location
United Kingdom, Birmingham
Switch FC
3133 8842 3910
Battalion Army


~~Background~~

Battalion Wars contains the elements of both a third-person shooter and a real-time tactics game. In the midst of battle, the player will have control over a variety of units, including infantry, tanks, and aircraft. Separate units or unit groups can be given commands. Units can be commanded to follow the player, hold their positions, man gun turrets, or attack certain targets. At any time, the player may transfer control from one unit to another. The Units have their individual strengths and weaknesses, which make up for looking a head, and seeing which units you’ll take up with you, and leave the weaker units behind. Battalion Wars was all about real time strategy, and being implemented into BRWAL is no different!

~~Stats~~

Power: 2/10
Walking Speed: 4.5/10
Running Speed: 5.5/10
Range: 7.5/10 (one move that doesn’t use a gun lol)
Projectile Distance: 9/10
Weight: 4/10
Drop Speed: 6.5/10
Size: 1.5/10 The Commander Grunt is about the size of Olimar
1st Jump: 5.5/10
2nd Jump: 5/10
Aerial Movement: 6/10
Crouch: 9.5/10
Traction: 8/10
Combo ability: 7/10
Grab Range: 4.5/10
Wall Jump: no
Wall Cling: no
Crawl: Yes (like Snakes)
Glide: no
Tether: no


~~Notes~~


The Leader grunt (who you control) has a blue helmet on instead of the normal all green rifle grunt costume, so you can tell the difference.


Depending on what Alternate costume you have, depends on what type of army you have, meaning that vehicles have different shapes and sizes:

Green: Western Frontier
Blue: Xlyvanian
Red: Tundran Territories
White: Solar Empire
Yellow: Anglo Isles
Dark Grey: Iron Legion

When Battalion Army enter the stage, A Facility/Building appears where Pokemon Trainers stand, and the infantry appear at this spot, and if the building if floating outside of the playing field (like on parts of Delfino, or Corneria etc), the troopers will appear on the closest not-fall-through platforms of the middle of the stage.

When you first enter the stage, you will have 2 other infantry with you, and they will be generated at the same ratio as how they appear in “Grunts Reinforcement”!

The infantry will attack the opponent if they come 4.5 stage builder blocks in their range, but Infantry like Mortar and Artillery attack from 3/5s of Final Destination or further away! Infantry that has chargeable weapons try and fully charge their weapons as much as possible. Infantry with weapons like a machine gun, they automatically use all their rounds, and Infantry also with Machine Guns do no hit-stun with their guns. If the opponent is getting close to an infantry, it will shoot whatever charge the weapons where, and if the opponents are in the soldiers face, soldiers with charging weapons (like bazooka veteran), they will only shoot 1 shot at a time.

Units attack in Canon; so that the opponent won’t be hit by 5 light tank shells in one go! That and the tanks shells are quite big, and have quite a bit of warning time (between each reload time). Units other than the Leader Grunt you control don't have the ability to jump, or able to jump off solid main platforms, but they can get knocked off the stage by some moves!

You can have 7 on foot soldiers on the screen at one time and no vehicles, or 4 foot soldiers and 2 vehicles, or 3 vehicles and 2 foot soldiers, or 5 Vehicles and no soldiers.

~~Key/Special moves~~

Neutral B: Grunts Reinforcements

Animation After every 7.5 seconds after getting a grunt is the time period before you can get another one. The leader grunt will use a “come over here” gesture with his arm, and then a Grunt comes out of the building or appear in the middle with 0.5 seconds of doing the action. Grunts take real knockback and hit-stun. Every veteran has the ability to crawl! These are the following Grunts, each of them have a different percent of appearing, although it’s nothing like Dededes Side-b

Rifle Grunt:


(From Battalion Wars stats on soldiers {this will be done for every unit}) Easily the weakest of any unit in the game, Rifle Grunts are used to tackle other Infantry units in the field. Their weapons fire in continuous streams of bullets, which will help them overcome their lack of stopping power, and they also boast a long range with their weapons, making them a great attacker for when large groups of Infantry lie ahead. However, they should never engage any vehicle in combat, as the vehicle's can use their HMGs to cut then down quickly.

  • Probability of getting: 19%
  • Health: 25%
  • Weapon: Rapid Fire machine gun
  • Range: 3/5s of Wolfs Blaster
  • Speed of fire: Very Quick
  • Reloading time: 0.5 secs
  • Time which round ends from start to finish: 3 secs
  • Total amount of damage with 1 round: 9% and no hit-stun
  • Speed: 6/10

Bazooka Veteran:


These slow of foot troops are tailor made to enter into battle as support against the armoured foes that will accost your forces. They will fire shots from their rocket-propelled launchers which move fairly slow with limited range, but it is possible to charge up the shot to increase both the range and the power of the projectile (just hold the A Button before firing). Although they can rip apart armoured vehicles with ease, they struggle against Infantry as they are too mobile to get an accurate lock on. In a pinch though, if they are in really close they may be able to hit Infantry, devastating the unamoured combatants.

  • Probability of getting: 15%
  • Health: 35%
  • Weapon: Bazooka
  • Range uncharged: 1/2 of Wolfs Blaster
  • Speed of fire uncharged: very slow
  • Total amount of damage with 1 shot uncharged: 5% and low knockback, which sends the opponent horizontally
  • Range charged: Size of Battlefield
  • Speed of fire charged: Very Quick
  • Total amount of damage with 1 shot charged: 12% and high-low knockback.
  • Length of charging: 2 seconds.
  • Reloading time: 0.4 – 2 seconds depending on charge
  • Speed: 5/10

Flame Veteran:


The pyromaniacs that populate the army are drawn to this job, using their Thermidor high-pressure incendiary projector (ie FLAMETHROWER) to absolutely destroy other Infantry. They have limited range though, so they will take heavy fire before they can return the favor. Also, their weapons can overheat, so do not constantly spew fire or risk being left undefended. As for vehicles, both Light and Heavy Recons will take damage from these troops (due to the open sides where the humans sit), but anything with heavier armor will ignore the attacks of these firebugs.

  • Probability of getting: 15%
  • Health: 25%
  • Weapon: Flamethrower
  • Range: 2 stage builder blocks forward
  • Speed of fire: medium speed
  • Reloading time (overheated): 2.2 seconds
  • Time which round ends from start to finish: 5 secs
  • Total amount of damage with start to finish: 12% and no hit-stun
  • Speed: 6/10

Missile Veteran:


These snipers will be able to use their eagle eyes and guidance systems to quickly lock onto and fire their packs of Silverfish Missiles into the sky, annihilating any flying force foolish enough to come into range. They also perform well versus elevated towers and machine gun positions. When it comes to ground units though, they are rather lacking in aim and will send a spread of missiles in every direction, the high percentage of which will never touch an enemy. They also are able to fire off additional missile units if you rapidly press the A Button when locked on to a foe.

  • Probability of getting: 14%
  • Health: 30%
  • Weapon: Anti-air weapon
  • Speed of fire: par
  • Range: About 6 stage builder blocks vertically, and about 4 stage builder blocks going either way. Missile Veteran can’t hit opponents on the ground. The shots home in to the nearest person in the air.
  • Speed of missiles: quick
  • Charging: 1 – 4 shots depending on how
  • Each shot damage: 4% and mid-low knockback, which sends the opponent diagonally upwards.
  • missiles disappear after 4 seconds if they never hit
  • Length of charging: 2.5 seconds.
  • Reloading time: 0.5 – 2.3 seconds depending on charge
  • Speed: 5.2/10

Mortar Veteran:


The beret sporting Mortar Veteran also carries an impressive 50mm Grenade Launcher, able to send explosive shells arcing through the air, passing over objects that are on the ground. They are a great unit for attacking long range with, particularly for hitting stationary or slow moving targets, meaning towers, machine guns, and ground vehicles. They are a great way to bounce groups of enemy Infantry apart, but they have to be fairly close to land the shot. Hold the A Button to charge up the power and range of the shot, making the unit that much more effective than before.

  • Probability of getting: 14%
  • Health: 30%
  • Weapon: Long Ranged
  • Range uncharged: half of final destination
  • Speed of fire uncharged: slow
  • Total amount of damage with 1 shot uncharged: 4% and low knockback, which sends the opponent horizontally
  • Range charged: one edge of Hyrule Temple, to slightly further than half way.
  • Speed of fire charged: Quick
  • Total amount of damage with 1 shot fully charged: 13% and mid-high knockback, touching on high-low knockback.
  • Length of charging: 2.5 seconds.
  • Reloading time: 0.6 – 2.5 seconds depending on charge
  • Speed: 5.5/10
  • The bullet travels in a downward arc.

Assault Veteran:


Perhaps the most versatile unit in the game, the belt fed M70 heavy caliber machine guns carried by these fellows are able to damage all units. They are most effective versus other Infantry, as their high impact shots will quickly rip the enemy apart, but they can also damage any armored target. Their downfall comes from their inaccuracy at long range, so use them in mid-range to short range firefights. Like the Flame Veterans, the Assault Veterans can suffer an overheated weapon, so tap the A Button to keep the gun humming, keeping the meter as close to the top as possible for maximum rate of fire.

  • Probability of getting: 9%
  • Health: 27%
  • Weapon: Mini Gun
  • Range: 4/5s of Wolfs Blaster
  • Speed of fire: Extremely Quick
  • Reloading time (overheated): 2.5 secs
  • Time which round ends from start to finish: 4 secs
  • Total amount of damage with from beginning to overheating: 14% and no hit-stun
  • Speed: 5/10


Uses Soldiers can support you very well, they have the quickest rates of fire out of every other vehicle, and don’t forget that since they are smaller, they are less likely to get hit by moves and projectile, and since they can move around easier, they can avoid damage much easier than a tank. BUT, since Vehicles don’t take any real knockback (compared to normal characters), the soldiers take real hit-stun and knockback, and since they take a while to get up, they can get defeated quicker as well. Each Soldier has their strengths and weaknesses, and that they can get deployed quicker than any other vehicle, they can be used for quick advances on the opponent, and attack in numbers.

Side B: Ground Vehicle Support

AnimationAfter every 20 seconds after getting a Ground vehicle is the time period before you can get another one. The leader grunt will clap briefly for a second, and then an Ground Vehicle comes out of the building or appear in the middle with 0.7 seconds of doing the action. Ground Vehicles will not get knocked around by weak moves, only the really strong moves knock the vehicles back, like Bowsers F-smash. Note: Rifle grunts, assault veterans, flamethrower veterans all do 0.7 times less damage to the vehicles, unless it’s stated otherwise.

These are the following ground vehicles, each of them have a different percent of appearing, yet again it’s nothing like Dededes Side-b in ratio of appearance difference.

Light Recon:


Designed with mobility and speed in mind, the Light Recon lacks both significant protective armor and weaponry, boasting one HMG. If the enemy are Rifle Grunts or Missile Veterans, feel free to get into the fray, but when faced with any other enemy unit, take off with the superior speed offered by this vehicle. Only really useful for one or two missions, this wild ride will usually be ignored in favor of other vehicles. To top it all of, the controls for this vehicle are particularly loose, making it easy to spin out or get turned sideways after landing from a large jump through the air, so use a deft touch to get it going in the right direction.

  • Probability of getting: 20%
  • Health: 45%
  • Weapon: Rapid Fire machine gun
  • Range: 3/5s of Wolfs Blaster
  • Speed of fire: Very Quick
  • Reloading time: 1.5 secs
  • Time which round ends from start to finish: 3.7 secs
  • Total amount of damage with 1 round: 14% and no hit-stun
  • Speed: 9.9/10, almost as fast as Sonic
  • Manoeuvring: 0.8/10
  • Running over people does 12% and mid knockback, which sends the enemies Diagonally upwards
  • Size: About Bowsers size, maybe a bit smaller
  • Getting hit by a move like Ganondorfs F-smash will make the Recon go back and flip over, and it stays on it’s back for 1.5 seconds before going back to its 4 wheels.
  • The flamethrower veteran does normal amount of damage to the Light Recon

Heavy Recon:


Similar to the Light Recon, the Heavy Recon is designed with speed in mind, but it has sacrificed some of that moving ability to become better armored and armed, boasting a second HMG machine gun. The "Humbug" is still vulnerable in the same manner as the Light Recon, but it is able to take somewhat of a pounding before succumbing, so it is useful for going after solo Infantry Unit (barring Bazooka Veterans, they can do too much damage). Thankfully the Heavy Recon also boasts an improved steering and handling ability, not being quite so touchy on the movements to the side like the Light Recon.

  • Probability of getting: 18%
  • Health: 50%
  • Weapon: Rapid Fire machine gun (and a slightly worse machine gun on the side)
  • Range: 4/5s of Wolfs Blaster (3/5s for secondary gun)
  • Speed of fire: Very Quick for both
  • Reloading time: 1.5 secs for both guns
  • Time which round ends from start to finish: 3.9 secs for both guns
  • Total amount of damage with 1 round: 14% and no hit-stun (9% for side gun)
  • Speed: 9.5/10, slightly slower than Sonic
  • Manoeuvring: 2/10
  • Running over people does 15% and mid knockback, which sends the enemies Diagonally upwards
  • Size: slightly bigger than the light recon
  • Getting hit by a move like Ganondorfs F-smash will make the Recon go back and flip over, and it stays on its back for 1.5 seconds before going back to its 4 wheels. This doesn’t flip as much as the light recon, but it can still flip over.
  • The flamethrower veteran does normal amount of damage to the Heavy Recon

Anti Air Vehicle:


The Prometheus AIM-9RR mobile missile platform is capable of bringing down entire squadrons of enemy air force in seconds, delivering lethal barrages of Silverfish Missiles. As great as it is in taking down the aerial threats to the Western Frontier, it is completely incapable of defeating any Infantry or Ground Vehicles, so keep it well protected (in particular from explosive weaponry). Slow on the treads; do not leave it by itself or it will soon be scrap metal, taking down your anti-air capabilities by a large degree.

  • Probability of getting: 16%
  • Health: 60%
  • Weapon: Anti-air weapons (and a machine gun on the side)
  • Range: Same as “Missile Veteran”
  • Speed of fire: average (very quick)
  • Reloading time (once all the rounds {which is 4 missiles} been used): 2 seconds
  • Time which round ends from start to finish: 3 seconds
  • Total amount of damage with each bullet: 6% and mid-low knockback, which sends the opponent diagonally upwards (9% for side gun)
  • Speed: 3.9/10
  • Manoeuvring: 4.6/10
  • Size: about 1.8 stage builder blocks going horizontally, and 2 stage builder blocks upwards.
  • Can only get pushed back by a move like Ganons F-smash fully charged or 4/5s filled.

Artillery:


Much like the AA Vehicle, this slow moving treaded monstrosity is vulnerable to explosive weaponry. However, the Preacher Pk-772 artillery piece is a long ranged attacker that can absolutely devastate ground troops long before they can even take aim at your units. They are best used from a defensive position, delivering hammering blows into the enemy from behind your own lines, opening large holes in enemy ranks. They should be protected at all costs, as they are essentially incapable of short range fighting (one HMG), and Air Vehicles can fire away without worry if they stay up out of the arcing range of the massive shells fired from the cannon on this artillery piece.

  • Probability of getting: 15%
  • Health: 65%
  • Weapon: Long Ranged
  • Range: 7/8s of Final Destination – 3/5s of Hyrule Temple.
  • Speed of fire: slow
  • Reloading time after use of shot: 2 seconds
  • Time which round ends from start to finish: 3 seconds
  • Total amount of damage with one shell: 14% and mid knockback, which sends the opponent horizontally.
  • Speed: 3.5/10
  • Manoeuvring: 4/10
  • Size: about 2.2 builder blocks wide, and about 1.5 stage builder blocks high
  • Can only get pushed back by a move like Ganons F-smash fully charged or 4/5s filled.

Light Tank:


A perfect combination of speed, armor, and power, the Herman Mk5 is a formidable vehicle that can reign supreme upon the battlefield, no matter what ground forces are after them. The biggest threat to these armored speedsters are the bigger tanks cannons and the explosive capabilities of the Mortar and Bazooka Veterans. However, if kept on the move while firing, the Light Tank is capable of bringing down even the most persistent Infantry, making it a great unit to control. Add onto that the superb handling it employs, and this is a unit you will be happy to have around.

  • Probability of getting: 20%
  • Health: 65%
  • Weapon: Cannon (side weapon of a machine gun)
  • Range: a bit more than half of Final Destination!
  • Speed of fire: average (very fast for machine gun)
  • Reloading time after use of shot: 2 seconds (2.5 secs)
  • Total amount of damage with one shell/round: 12% and mid knockback, which sends the opponent horizontally. (9% and no hit-stun)
  • Speed: 6.5/10
  • Manoeuvring: 6.5/10
  • Size: a bit bigger than Ganondorf length ways and Bowser width ways.
  • Can only get pushed back by a move like Ganons F-smash fully charged or 4/5s filled.

Heavy Tank:


Upgraded in both weaponry (an additional HMG and a more powerful cannon) and armor, it has the downside of reduced speed. However, the improvements make the Herman M1A5 Main Battle Tank a monster on the front, ripping apart vehicles and infantry with ease. They are even capable of greatly damaging low flying Gunships if they venture into a firefight without keeping mobile. The slight decrease in speed does make it vulnerable to group of Light Tanks and brazen Bazooka Veterans though, so be ready to retreat when the situation warrants. This is another great unit to have around, so it will rarely be deployed with Light Tanks, meaning that choosing between the two best vehicles will not be an issue.

  • Probability of getting: 10%
  • Health: 75%
  • Weapon: Double barrel Cannon which sends 2 shots (a side machine gun)
  • Range: a bit more than half of Final Destination!
  • Speed of fire: average (fast)
  • Reloading time after use of shot: 2 seconds
  • Total amount of damage with one shell: 8% and mid knockback, which sends the opponent horizontally, with both shells together doing 16%. (Machine gun does 10% and no hit-stun)
  • Speed: 4/10
  • Manoeuvring: 6/10
  • Size: about 2 stage builder blocks width ways and 2 stage builder blocks upwards
  • Can’t be knocked around


Uses The vehicles can deal a good amount of damage, but their fire are slow, and easily avoidable. These are hardier to manoeuvre than the Soldiers, but most of the vehicles are faster than them in general speed, and that they have greater range than them, and have more energy than the infantry. But also remember that the vehicles are huge targets, and that pretty much every move will most likely hit the vehicle, and at close ranges, and they can’t really run away from getting hit!

Down-B: Air Strike!

AnimationAfter every 15 seconds after getting a aerial vehicle is the time period before you can get another one. The leader grunt will get out a big green phone and says gibberish down the phone wile staring upwards into the sky, and then an Air Vehicle comes out above the building or appear in the middle of the air in the centre of the stage with 0.7 seconds of doing the action. Aerial Vehicles don’t take any knockback what-so-ever!

These are the following air vehicles, each of them have a different percent of appearing, once again it’s nothing like Dededes Side-b in ratio of appearance difference.

Gunship:


Designed to hammer down upon ground based foes with their AGM-115 Heckfire Missiles, delivering strong blasts to both Infantry and vehicles. They can also hover in place or move in sweeping motions, able to stop and concentrate fire, making them great for running attacks or for focusing their payload into the specific enemy targets below. They are absolutely devestated by anti-air fire, so steer clear of any area with Missile Veterans, AA Vehicles, and especially Fighters. Use as support for ground troops, scampering ahead to demolish Heavy Tanks and Battlestations, or maybe taking down towers and MG Nests to let the main force come in facing less armored positions.

  • Probability of getting: 30%
  • Health: 50%
  • Weapon: Rockets
  • Range: directly downwards, only disappears if it hits an obstacle
  • Floats above ground: 2.5 - 3 stage builder blocks
  • Staying still: It can stay in one spot
  • Speed of fire: above average
  • Reloading time: 2 seconds
  • Time which round ends from start to finish: 3.3 secs
  • (4 rockets overall) Each rocket damage: 3% and mid-low knockback, which sends the opponent horizontally.
  • Speed: 7/10
  • Manoeuvring: 8/10
  • Size: About Bowsers size or a tiny bit bigger

Fighter:


Designed solely with the intent of tackling other enemy aircraft, the fastest aircraft in the game is an unholy terror in the skies for other flyers. The F-19 Poltergeist can also perform as a ground attacker as well, though it requires low passes to blast the targets that have been locked onto. However, if the targets are incapable of matching the speed of the craft, then it will be a fine idea to attack in such a manner, as the Silverfish Missiles pack a wallop and can fly out in a fairly quick manner. The primary role of this versatile plane is to clear the skies, but blasting hapless ground forces is also a great idea for this vehicle.

  • Probability of getting: 20%
  • Health: 45%
  • Weapon: Heat Seeking Rockets
  • Range: Only horizontally, and it homes into the opponent, meaning it’s vulnerable from above or underneath, the rockets can go a maximum of a total of 8 stage builder blocks altogether.
  • Floats above ground: 2.5 – 3.5 stage builder blocks
  • Staying still: It has to carry on travelling around in a circle if it stays in one place
  • Speed of fire: above average
  • Reloading time: 2.5 seconds
  • Time which round ends from start to finish: 3.3 secs
  • (4 rockets overall) Each rocket damage: 4% and mid-low knockback, which sends the opponent horizontally.
  • Speed: 10/10
  • Manoeuvring: 9/10
  • Size: about 2 stage builder blocks wide, and 1 stage builder block vertically

Bomber:


The whine of the engines of the Valentine B-58 is enough to make any Infantry or ground vehicle operator drop their Gameboy Color in pure terror, as that sound will soon be followed by the devastating carpet bombing that this monster can deliver. If anything survives the barrage that lands in the area, they best locate cover or face the return of the soaring behemoth. However, despite that impressive flight range, height, and armor, anti-air units can rip massive holes in the sides of these things, so do not enter air cover or risk losing this expensive and deadly machine. Concentrate on armored foes to help the other forces advance with ease.

  • Probability of getting: 20%
  • Health: 70%
  • Weapon: Bombs
  • Range: Bombs only travel directly downwards, they explode on contact with any obstacle
  • Floats above ground: 3.5 - 4 stage builder blocks
  • Staying still: It has to carry on travelling around in a circle if it stays in one place
  • Speed of fire: very slow
  • Reloading time: 2.5 seconds
  • Time which round ends from start to finish: 4 secs
  • (Drops 6 bombs one after another in one sitting) Each bomb: 12% and mid knockback, which sends the opponent horizontally.
  • Speed: 3/10
  • Manoeuvring: 2/10 takes a long time to turn around.
  • Size: about 3.5 stage builder blocks wide, and 2 stage builder block vertically.

Strato Destroyer:


A mammoth entry into the sky, these prototype flying fortresses are the most feared and awe inspiring creations in the world of Battalion Wars, capable of using both Silverfish missiles to incapacitate flying vehicles and heavy bombs to destroy ground targets. They are a tad weak with their armor as it lightly protected on the rear, so head on battles will do little damage (try to get around back when engaging one). Provided you are able to keep the enemy off of your rear, the B-5000 Strato Destroyer will be nigh unstoppable as it brings death and destruction upon all who foolishly oppose it.

  • Probability of getting: 10%
  • Health: 80%
  • Weapon: Bombs and Rockets
  • Range: Bombs only travel directly downwards, they explode on contact with any obstacle, and the rockets travel horizontally and hone into aerial opponents online with the vehicle
  • Floats above ground: 3.5 - 4 stage builder blocks up
  • Staying still: It has to carry on travelling around in a circle if it stays in one place
  • Speed of fire: very slow
  • Reloading time: 2.3 seconds for rockets, 3 secs for bombs
  • Time which round ends from start to finish: 3 secs for missiles, 4 seconds for bombs
  • (Sends 4 missiles and drops 6 bombs one after another in one sitting) Each bomb: 13% and mid knockback, which sends the opponent horizontally. The missiles do 10% and mid-low knockback each, which sends the opponent horizontally.
  • Speed: 1/10
  • Manoeuvring: 2/10 takes a long time to turn around.
  • Size: about 4 stage builder blocks wide and 2 stage builder block vertically.
  • Takes 1.3 times damage from the back of the ship than any other parts of the aircraft


Uses The Aircraft are good at attacking the opponent in a safer place than any other infantry, but once the opponent has their eye on these, it’s hard for them to counter them and run away, well, maybe less so for the fighter, but it has the worst energy out of the aircraft, and the fact it only hits opponent in the air can be avoided if the opponent stay grounded. Also, if your opponent is Advance army, another Battalion Army, Snake or other characters with a vertical projectile(s) can really wreck the crafts down. They are generally in a more safer position than the other units, but they have little defence to counteract the opponent, and also most of the crafts are too slow to run away!

Up B: Transport Copter


Animation On the ground, when you press Up-B, A Cross Heir appears which is an orange circle, and the leader grunt gets a Walkie Talkie and mumbles gibberish down the phone, and while he does this for 1.5 seconds, you quickly move the cross heir over your troops (you only need to highlight your troops for this to work). Then the next 2.5 seconds, another cross heir, which is an green X, and you point it onto a specific place on the ground (if you point the cross heir in the air, the T-Copter will land the troops onto the nearest piece of solid land), you can stop this early by pressing A when you’re happy, and then as this happens, the troops selected goes into one place, and a transport copter comes in to the stage in a second from the back of the stage, picks the selected units up, and send them onto the designated place in about 4 or less seconds, varying from the stage size and how far you positioned it. The Cross heirs travel VERY fast, it takes about 0.4 seconds from one side to the other, but the less you tilt it, the slower it can travel, also you have all control of the cross heirs, there is no restrictions on turning back, or a curve etc!

In the air, a transport copter appears out of no where, as the leader grunt struggles to the half closed door on the back of the copter, it takes about 1 second for him to get up and into the transport copter, after travelling upwards for 3 seconds, the transport copter turns around and opens the door, which the Leader Grunt comically falls out of, after this, it will get a parachute out of the backpack (like his N-air) and will not enter free-fall, and slowly floats down to the ground! The Leader Grunt can use another attack and get out of this! This only works for the leader grunt, as the vehicles and grunts should be on the stage awaiting orders. You can issue orders in the middle of being the copter, with the leader grunt peering outside of a window (there would be a window in it), and it takes the infantry 0.5 seconds to realise and do the action, not like the troops doing it’s action upon input of the command. You can only have one transport copter on at one time, and if you want to use up-b to recover when the transport copter is still on screen, you simply can’t recover!


Properties Okay, the Transport Copter has 90% energy overall, and when the transport copter gets dealt that much, the transports copter and anything inside it will eplode and die! This does no damage what-so-ever! This has little start-up and ending lag on the ground, but the duration is a very long time. The leader grunt will have super armour frames from the start until the transport copter actually appears on screen, and by then, all of the commands for the transport copter has been done already. You can cancel this with the press of the R/L button, so if it’s a bad time, do it! In the air, it travels about 4.5 stage builder blocks in the air, and since the Parachute is floaty, you’ll have an easy time getting on to the stage, unless you’re on a windy stage like Green Greens, which will push the leader grunt far away the opposite direction! In the air, it has some start-up and ending lag, and the duration is about 2.5 seconds!

Uses While it’s not likely it will get destroyed when you use it once for a recovery, but it might have a chance of blowing up when your opponent specifically follows and attacks the transport copter from the start of this move. When it explodes before it deports it’s troops and have them in the transport copter while flying, if it explodes, ALL of the units inside will explode and die instantly, and lets say you sent all of your army into the transport copter, and that it explodes, you are left with NOTHING, making the poor leader defenceless and weak, so please be wise and keep some units of yours with you, so that your not entirely weak if the transport copter will get hit. Just remember it should be hard for the transport copter to explode, and that you should at least try to defend the transport copter when you send the troops. The transporting method is very useful for stages such as New pork city and Hyrule temple, but pretty much no point at all on some stages such as Final Destination!

Neutral A: Command your troops

Animation When you press A, the closest troop to you gets selected (they will have a white outline around them), and you can choose out of 2 moves (which are below). The soldier you’re commanding will look up with his right hand rubbing his chin. To get out of this, press A again. To scroll to another member of you’re army, press R/L and scroll to the infantry you want. (The tilts in this state change, but revert back to normal when you press A again.)

Properties This has NO lag what so ever, the action will happen instantly, the scrolling of the soldiers go to a different member of you’re battalion instantly! Also, you can make many commands as you want, and that the only ways that you get out of this state is either you press A again or you get hit.

Uses This is CRUCIAL to Battalion armies game, if you don’t know how to control you’re troops, you’re team will get slaughtered, and hopefully you will be able to know how to spawn infantry with his specials… oh I spoiled it!

CYT Move (Press Y): Advance!

Animation The Leader grunt will point forward the direction he’s looking at, and the selected unit will go and run towards the opponent and attack them. When you do this, and Yellow upward arrow will appear above the opponents head, and stays like this until the opponent dies, the unit dies, or you tell it to go back to you.

Properties As soon as you do this command, you can do another move or action straight off! It can also be used for any unit you have, whatever the distance!

Uses If you want to send your troops to attack your opponent to rack up damage, this is a good move, but don’t forget that when they attack, they are more vulnerable, and more likely to hit and die!

CYT Move (Press X): Wait/Place!

Animation The Leader grunt will look back/forward to the unit you selected, and holds his hand out forward which signalises “Stop”. The selected Unit will stay in one place, and when you move, he doesn’t follow you. When you do this, a green dot appears above the unit, and when you do this action again, the opponent will follow you again.

If you hold this button down, a small circle appears, and when you hover over a platform that the veteran can get too, the circle appears orange, and then the veteran towards to that spot!


Properties As soon as you do this command, you can do another move or action straight off! It can also be used for any unit you have, whatever the distance! The unit will attack the opponent if they come in within a 3 stage builder radius from either side of an enemy, and they return fire when they get hit by a projectile, but they don’t move much at all! The circle moves extremely quickly as well

Uses This move could be used to protect certain places, or leave an unit faraway and out of danger, or you place them all over a stage, and that every step the opponent does one of the units will strike, although this would be very hard to do, as the units would be behind you. This is most likely used to patrol a part of the stage, use the unit to edgeguard, or to place units such as the Mortar Veteran far away, and able to shoot shells at the opponent.

~~Tilts~~

Forward Tilt: MG Nest

Animation A small MG Nest surrounds where the Leader Grunt is standing, which is a small wall which is dark grey. In front of the grunt, a small HMG is very, and the leader grunt holds onto the HMG, and you can aim upwards a bit by moving the control stick upwards. You keep hold of this position forever, unless you jump out of this, or get hit out of this! The Leader Grunt is vulnerable from above, but if your opponent does enough damage to the MG Nest, it will explode and the leader grunt will take damage and knockback.

Properties The MG Nest has a total of 35%, and that the leader grunt will only take knockback from above. This has some start-up and ending lag as well. The range of the machine gun is about 4/5 of Fox’s blaster, and he can aim it about 45 degrees into the air. The movement of the HMG from up and down is below average. In one second (as this move is as continuous as long as you hold it), the small bullets will do 8% and no hit-stun. If you let the MG Nest to die, it will cost the leader grunt 26% and high-low knockback, which sends the grunt diagonally upwards. The jump from the MG Nest is about 2 stage builder blocks high.

Uses You can use this at long range’s, and when the opponent becomes really close, jump out of the MG Nest, as when the MG Nest does explode, it hurts the leader a lot, and also because of his light weight, it’s a move that could backfire if you don’t understand who to utilize it properly!

Up-Tilt: Grenade Juggle/ Soldier lift

Animation When you are not near any veterans, the leader grunt will get out a green grenade out from his back, and then looks up to the sky, and throws it upwards into the sky underarm, and as soon as it hits an obstacle or the ground, it explodes!

If you are near to a veteran, the leader grunt will crouch down, and have his hands out in a scoop. Then, the veteran step onto the hand, and the leader grunt will fling his hand upwards, and the grunt that interacted with you will go into the sky vertically, and the range of the throw depends on the unit!


Properties The grenade gets thrown 2.5 stage builder blocks into the air, and the grenade from the start of the throw to it hits the ground in 2 seconds. The explosion of the bomb is slightly smaller than Snakes grenade. This actually has small start-up and ending lag, enough to get away from the grenade, as the grenade also hurts members of the army as well as the opponent. This does 8% and mid-low knockback, which sends the opponent diagonally upwards.

You have to be at least 0.3 stage builder blocks away from an veteran to do the throw. This does no damage or knockback to the enemy and it’s just to push the veteran up into the air. Here’s the height which the Veterans get sent up, from the highest to the lowest:

  • 2.4 stage builder blocks: Rifle Grunts and Flame Vets
  • 2.1 stage builder blocks: Mortar vets and Assault Vets
  • 1.8 stage builder blocks: Bazooka vets and Missile vets


Uses The grenades can be used to edge guard, use this on the edge, and it could stage spike the opponent while they’re recovering, but remember to run away from a grenade, as you could blow up yourself – or one of your units.

The throw is the quicker way of pushing a veteran up onto an above floating platform without using a grounded Up-B, and is an effective way to place a unit in one place, and use to patrol an area, widening the range of your army at attacking the opponent, so that your opponent feels under pressure.


Down Tilt: Flamethrower Crawl

Animation The leader grunt will go into his crawl position, and gets a flamethrower like the flame vets weapon, and sends a orange flame out. You have to hold this down, but if it gets past 2.3 seconds of using this, you can’t use this for 3 seconds afterwards, as it overheats. You can move forward or backwards while doing this move, and if you have flame vets in your army, if they are near you (about 2 bowsers away from the leader), they will crouch down and use their flamethrower in the exact way you do it.

Properties The Flame will reach 2 stage builder blocks forward, and that the entire hit-box is the flame. This has very small start-up lag, and ending lag if you stop before 2.3 seconds. This is different to most flamethrowers, and the Flame vets flamethrower will act differently to normal (as in, when they attack the opponent while standing up), as it doesn’t do multiple hits. The flamethrower does 6% and low-high knockback, which sends the opponent horizontally (this is the same for the flame vets).

Uses If you have flame vets on your side, the hit-box of this move can cover a large area of the stage, which forces grounded opponents to go into the air. When you do hold it down, hold it down til when its 1.9 seconds odd, and keep tapping it very quickly, or letting it go back a bit, as when you don’t use this for a brief moment, you can use it again for another 0.5 seconds. This is used to rack up damage, as it’s not strong enough to be a KO move.

Dash Attack: Recon Rush

Animation The Leader grunt jumps into a Heavy Recon, and drives it for about a quarter of Final Destination forward. At the end of the driving (which it brakes a tilts it side at), the Leader grunt will go into the HMG seat, and you can shoot at the opponent behind him or in front of him to the ground. The Recon explodes when it takes 45% damage, and to get out of the vehicle, press the jump button.

Properties The hit-box of the Recon is the whole body of it. The range is as stated above. This has some quite a lot start-up and ending lag, and the duration of this move is very long. The height of the jump is about 2 stage builder blocks high. The explosion of the recon does 28% and high-high knockback, which sends the leader grunt diagonally upwards. The damage of the driving vehicle does 10% and mid-low knockback, which sends the opponent horizontally. The speed of the recon is also as slightly slower than the standard Heavy Recon.

The HMG can aim both sides of the vehicle with rotating the analog stick to the left/right. The range of this move is 3/4s of Wolf’s blaster at a speed as fast as Fox’s blaster. You can hold the A button down to continually shoot bullets. It takes 2.5 seconds from start to finish the ending of the barrage of bullets, and it then has 1.8 seconds of reloading time. From start to finish, you can deal 10% damage, and the bullets do no hit-stun.


Uses You will most likely want to use this for spacing, this move covers a large range of area in a sort time. But since this move has a large of lag in it, it’s very punishable. Also, if you don’t know how to jump out of it, you’ll will get punished harshly. Plus, if you use the HMG, the reloading time is long as well.

~~Smashes~~

Forward Smash: Advanced Bazooka

Animation The Leader Grunt gets out a light blue bazooka instead of the green bazookas that the normal Bazooka vets uses. The grunt holds it in the same way as the bazooka veteran in the same picture. The actual bullet is light grey and thin, and it spins around with wind going around it. It explodes on impact on any obstacle. If one of your units sends a bullet into the wind radius of the light grey bullet, it travels in the same direction and speed as the bullet, maximizing damage.

Properties The wind of the bullet is about a Kirby around the bullet. If any other bullet or weapon gets sucked into the wind, it still does the same damage as originally. When it’s uncharged, the speed of the bullet is about 1.3 times faster than wolf’s blaster and travels half of final destination, and when it’s fully charged, it goes about 1.8 times the speed of Wolfs Blaster and all the distance of Final Destination. This has quite a bit of start-up lag and ending lag. The damage doesn’t change the damage and knockback of the move. The rocket does 11% and mid knockback, which sends the opponent horizontally.

Uses It’s very hard to get your units to shoot at the same time as the rocket, as the rocket is much faster than most of the other units weapons, even at uncharged. But when your units do shoot in it the radius of the wind, and you do hit the opponent, it can deal A TON of damage at one go, and since the knockback would be stacked, it would make a good KO move. Even if you don’t get any bullets into the wind, it can be a great gimper while the opponents recovering from the side of the stage.

Up Smash: Missile Tracker

Animation The Leader Grunt puts some blue electronic glasses over his eyes, and gets a missile launcher out like the Missile vets, and when you charging this up, a very long blue thin (that reaches about 5 stage builder blocks vertically) line comes from the glasses, and with the line, you can move to the left/right, and when you hover other the opponent, an red circle is seen over them, and when you release the smash button, the missiles automatically fly towards the targeted opponent. If you don’t charge up, the missile will only travel vertically. The missiles automatically disappear in 4 seconds. The line only aims north-west to North-east direction, so this only hit’s opponent above you. The more you charge up, the more missiles you send.

Properties The range is amazingly big, and it’s pretty much the range of the line. The hit-box is only the missiles, and the speed of the missiles is about the speed of wolfs blaster. This has quite a bit of start-up and ending lag. Each missile does 5% and mid-low knockback, which sends the opponent upwards, but also slightly diagonally as well, whatever the charge. When uncharged, it just sends out one missile, but when it’s fully charged, it sends out 4 missiles out instead.

Uses Well, most of the time charging will get you punished, but charging this move, just enough to target the opponent, is really needed. When this is fully charged, this can rack up some great damage, and since you can aim a large area of space, this will most likely get you a Star KO when the opponent is falling down from the top boundary. This is really weak if you don’t charge it though. This is also takes down dittos with BA aircraft much much easier.

Down Smash: Supplying Medi-kits

Animation The leader grunt will place his bag pack down onto the ground, and opens it up, and throws medi-kits onto the ground behind him, and when there are veterans around, they instantly run towards the medi-kit, and if they are below half their energy, they automatically stop what they are doing and go towards the medi-kits. When you fully charge this, an oil tank comes from the bag pack last, which recovers the health of the vehicles. The medi-kits can’t be used by the Leader grunt however.

Properties The medi-kits and the fuel tank get thrown a stage builder block behind the leader grunt. This does no damage what so ever. Each medi-kit recovers 11% for the veterans, and the fuel tank recovers 30% of the vehicles health. This has some start-up and ending lag. When uncharged, the Leader grunt only throws one medi-kit behind. When fully charged, the leader grunt sends out 3 medi-kits and 2 fuel tanks.

Uses You should really use this when you know your team has been battered, and that your troopers can survive longer than before. Also use this while in the middle of the time which the units can be generated, so that your units you have now have similar health to the new unit you’re about to get!

~~Aerials~~

Neutral Air: Parachute

Animation The leader turns towards the camera, and the grunts backpack opens up, and a this bright very pale yellow parachute comes out of it. The parachute is about as big as Mr Game and Watches parachute as well. When you use this move, you become 1.4 times more floatiness, and have 1.4 times better aerial movement. If you fast fall before doing this move, you will propel yourself 3 stage builder blocks back into the sky upwards. However, if a character/stage uses a wind effect move, the grunt will be pushed in the way the wind blows much further away than normal, and can cause stupid self-destructs if you’re trying to recover whilst in this way. The parachute stays out forever (unless you touch the ground), but you become vulnerable after the 0.4 seconds this comes out (as the hit-box disappears), to let the parachute drop, just press down or any button to let it go.

Properties This has good range, and it reaches both sides of the grunt. The hit-box is also just the entire parachute. This has little start-up and since you can shut the parachute down after 0.6 seconds of this move, this has practically no ending lag, although the ending lag with the parachute up still is quite a lot. This deals 11% and mid knockback, which sends the opponent horizontally.

Uses This is very helpful move for recovering, as well as a good GTFO move as well. This move is quite hard to use to attack with, as you become much more floatier to normal, and that you have to be careful that you don’t land with the parachute still open, as this has punishable landing lag.

Forward-Air: Indirect Fire

Animation The leader grunt gets the weapon which the Mortar Veteran uses, and the grunt shoots it forward, which slightly pushes him back a bit. The bullet travels in a arc, and that dark red smoke follows the bullet behind it. The explosion is also dark red if it hits an obstacle.

Properties The mortar reaches 6 stage builder blocks in front of the grunt (which is when it disappears). The mortar is about 0.75s of Wolfs Blasters speed. This has a bit of start-up lag and ending lag, and quite a bit of landing lag. The push of the fire pushes you back half the distance of ROBs B-air. This does 10% and mid-low knockback, which sends the opponent horizontally.

Uses Another good move that can gimp the enemy, but since it travels in an arc, it might be hard to aim correctly. It also an aid in recovering, but not much considering (as neutral air is much better). You can probably tell that Battalion Army is a gimper, as he doesn’t have any useful KO moves thus far.

Back Air: Shotgun Press

Animation The Leader Grunt turns around with a bog-standard double barrelled shotgun, and shoots out the bullets, which spreads out like a normal shotgun. The shotgun is a dark brown colour and that the strongest part of the move is when you’re closer to the gun (he points the gun horizontally). The bullets are extremely small, and are grey! The grunt reloads the shot-gun, which is done during the ending lag.

Properties The speed of the shotgun bullets are half the speed of Fox’s blaster, and it reaches out 2.5 stage builder blocks horizontally. This has quite a bit of start-up lag, and also a bit of ending and landing lag as well. In the sweet-spot, it does 12% and mid knockback, which sends the opponent horizontally. In the weakest part of the move, it does 3%, and just a slight stun!

Uses This is one of The Leader Grunts stronger moves in knockback and percentage wise, but since the range is limited, as it’s only really strong if you do this right in front of the opponent, and since this has some start-up lag, you’ll probably got hit by the opponent first. Although a fast-felled double jump B-air certainly would be an unexpected trick done.

Up Air: Supply Fling

Animation The leader grunt tilts his body to the right slightly, and he takes of his backpack and looks inside it. When he opens it up, he’ll pick up a fuel tank, or a medi-kit, and flings it upwards into the sky, which will heal units you have on your team, while knocking back enemies as well. After flinging a recovery kit, the grunt puts the backpack back onto his back.

Properties With this move, the chance of getting a fuel tank to a Medi-kit is 7:3 ratio, as the down-smash should be used for Veterans, while this move is for the Air Craft. The range which the Leader throws a supply is 2 stage builder blocks upwards, and the speed of it is about the same speed as Luigis fireball. This disappears after 6 seconds, which it will most likely reach the ground for the grounded units to grab. This has a large amount of start-up lag (more than Bowsers u-air), and quite a bit of ending and landing lag. The supplies also have very high priority as well. The fuel tank does 9% and mid-low knockback, which sends the opponent diagonally upwards. The medi-kit does 10% and mid-low knockback, which sends the opponent upwards. The recovery the supplies recover is the same as the Down-smash.

Uses This should mostly be used to recover the aircraft on your army (as the aircraft won’t recover from ground supplies), but the timings tough to get right, and it’s harder to recover some energy depending on which aircraft. Fighters are very hard to recover, while Bombers are much, much easier. While this has a lot of the start-up lag and the damage is ridiculously low for such a move, but it has amazingly high priority, which can knock the likes of Metaknights Whorenado out of the skies

Down Air: Bazooka Crush

Animation The leader grunt looks down below, a pulls out a bazooka that looks the same as the Bazooka vets bazooka, and points the gun down slightly to the right/left, and shoots a rocket downwards. This can’t be charged up (unlike the Bazooka vets).

Properties The bazooka is as fast as Wolfs blaster, and it reaches about 3/4 of Final destination downwards. The force of the bazooka pushes the leader upwards a bit, about 1.7 times the distance of ROBs D-air. This has quite a bit of start-up lag and ending lag, and quite a lot of landing lag. This does 11% and mid-low knockback, which sends the opponent horizontally.

Uses You can probably work out that this is a great gimper for opponents below the edge of the stage. This is almost unusable for opponents on the ground, as this has punishable lag. This could be used when you’re recovering from below the stage (where if you fast-fall, you probably suicide for N-air), but all these moves all count to recovering back to the stage, every little bit helps, but N-air more so than all the others, since it recovers great upward recovery (when fast-falled), and makes horizontal recovery easier with it’s floaty physics.

~~Grabs (read below)~~

When the leader grunt grabs an opponent, NO units ATTACKS the grabbed opponent (as Battalion Army would be broken), and will just stand still, or if there is a recovery kit in a Bowser sized area away from both sides of a unit. However, if they’re more than 1 character in the match, some of the units will still attack the opponent that isn’t grabbed.

Grab Attack: Army Knife

Animation The leader grunt will get a small knife out from his pockets, and jabs the knife forward into the gut of the opponent. The knife is the traditional silver metal with black handle sort (but not plastic).

Properties The leader grunt stabs the opponent very quickly with the knife, about the same speed as Lucarios grab attack. This does 1% each time.

Uses This can rack up some good damage quickly if you rapidly press A, and because of the speed of the move, it unstales his other move quickly as well. Use this before throwing the opponent, every percentage helps.

Forward Throw: Assault Frenzy

Animation The leader grunt pushes the foe forward with his arms on the opponents soldiers, and pushes the opponent to the ground. After this, The leader grunt gets out the Mini-gun like in the Assault Vets gun, and shoots it diagonally downward with the bullets flying at extremely fast speeds.

Properties This happens quickly, and the bullets does a slight stun. The bullets go about the speed of Fox’s blaster, and the bullets go downwards 4 stage builder blocks to the right/left. The throw does 4% and low-high knockback, which sends the opponent horizontally. The total amount of damage you can do with the Mini-gun bullets is 9%. This has little ending lag.

Uses The opponent can DI away from the bullets, and at high percentages, the throw will push the opponent far a head of the bullets. Butt if the opponent doesn’t DI, it can rack some extra damage.

Back Throw: Shotgun Shells

Animation The leader grunt grapples the opponent around his body, and swings to the right and then flings the opponent away into the sky. After this, he gets out a shot-gun like in the B-air, and shoots the barrels diagonally upward into the sky.

Properties This happens quite quickly, but the grunt takes 0.6 seconds to pull out the shotgun and blast it after the throw. The bullets spread out horizontally to 2.5 stage builder blocks going diagonally upwards. The speeds of the bullets go about the speed of fox’s blaster. The sweet-spot of the shotgun is when the opponent right next to the weapon. The throw does 3% and low knockback, which sends the opponent diagonally upward. The sweet-spot of the shot-gun does 9% and mid knockback, which sends the enemy diagonally upwards. At the weakest point of the move (at the tip of the range), it only does 1% and a slight stun. This has a bit of ending lag.

Uses It takes a while for the shot-gun to be picked up and shot, so the opponent has quite a while to DI far away from the bullets. The throw at 0% - 30% at an opponent who doesn’t DI is placed near enough to the strongest part of the move, dealing maximum damage. This is very weak if your opponent has good DI ability.

Up Throw: Heat-Seeking Missile

Animation The leader grunt quickly gets his hands underneath the opponents feet, and flips them up into the air quickly, and then gets out the missiles like in his Up-smash, and shoots one missile that automatically seeks the opponent for 2 seconds before disappearing.

Properties If the opponent air dodges the incoming missile, it just carries on going up into the sky. The speed of the rocket is about as fast as Wolf’s blaster. This happens quite quickly. The throw does 3% and mid-low knockback, which sends the opponent upwards. The missile does 5% and mid-low knockback, which sends the opponent diagonally upwards. This has quite a bit of ending lag.

Uses This can be used to juggle opponents in the air. While this move can still be hit even with DI, a simple air-dodge avoids the missile, which makes this move extremely fail. If you have aircraft, hopefully one of them can follow up with their attacks.

Down Throw: Rifle Barrage

Animation The leader grunt pins the opponent onto the ground flat, and gets out a rifle like with the Rifle grunts, and shoots into the opponents gut, before they go upwards into the sky.

Properties This happens very quickly. This does 7% and mid knockback, which sends the opponent diagonally upwards. This has very little ending lag. This however gets stale quicker than the other throws.

Uses Since this is the most reliable throw, you should use this throw the most, as it also has the lowest ending lag, and that you have a chance of following it up with another attack.

~~Final Smash: Battlestation~~


The leader grunt grabs hold of the Smash ball!!! A transport copter appears, and a Battlestation will be placed onto the stage, and any ground vehicles will be taken away from the stage. The aircraft continually circling the stage, blasting enemies which are surrounding the massive Battlestation. The veterans of your team takes up the extra secondary weapons of the tank, while you control the main ones. Here are the properties of the secondary weapons:

HMGs (3)

  • The fire speed of Fox's Blaster
  • shoots out bullets about half of final destination away
  • From start to finish, it does 10% with no hit-stun
  • it takes 2.5 to end from start to end
  • It takes 2 seconds to reload

Cannons (2)

  • The speed is about the speed of Wolfs blaster
  • shoots out bullets about half of final destination away
  • Each shot does 11% and mid-low knockback, which sends enemy horizontally.
  • It takes 2.5 seconds to reload

The size of the Battlestation is 2.6 stage builder blocks upwards and 4 stage builder blocks horizontally. Depending on how many veterans you have depends how many of those secondary weapons are filled. The order of:

  • Veteran 1 goes to the HMG secondary weapon
  • Veteran 2 goes to the Cannom secondary weapon
  • Veteran 3 goes to the HMG secondary weapon
  • Veteran 4 goes to the Cannon secondary weapon
  • Veteran 5 goes to the HMG secondary weapon
  • Extra units go inside any way!

This final smash lasts 12 seconds. The shots you fire do 25% and mid knockback, which sends the opponent horizontally. The speed of the bullets is slightly faster than Wolfs blaster, and it shoots about 4/5s of Final Destination. The reload time of the rocket is 3 seconds. The Battlestation moves very slowly, just a bit faster than Ganondorfs run. If you run over someone, it does 9% and low-high knockback, which sends the opponent horizontally. At the 12 second, the Battlestation disappears, and the transport copter with the ground vehicles land onto the stage, and the units follows you as normal. The Battlestation can jump off platforms, but it can’t jump however.


~~Taunts~~

Up The leader grunts and fellow veterans jump up and down while pointing their gun in the air, and they shoot a few bullets into the sky (which does no damage btw).

Side The leader grunt sticks his left hand out while with his right hand doing a “come here” gesture. If you have veterans in your battalion, they will run past the leader, and clap his hand, and follows the leader behind him. They only run past and do this if they’re in front of the leader. Not only is this a fun taunt, but it helps calls back your team to come and follow behind you, and that the veteran isn’t by itself on in a dangerous position.

Down The leader grunt gets out a can of SPAM, and uses a can-opener to open it, but all the spam goes every where. If they’re near-by veterans near you, they will look down to the ground in a sad manner.

~~Victory Taunts~~

1 The leader grunt and 2 other Rifle grunts are sitting on the floor around a fire, and the leader grunt is strumming a guitar, and saying gibberish in a high pitched voice. The other grunts are rocking their head to it.

2 The leader grunt is in a light recon, and we see it jump onto the platform from the sky, but the recon lands upside down, and the leader grunt crawls out of the vehicle, and raises his rifle up into the air to show he’s still living.

3 We see random veterans running across to the right side of screen, and we hear gun shots going off. We then see the leader grunt walking across the platform shooting his gun in the air going “Move Move”.

~~Lost animation~~

We see the leader of the army, General Herman, looking back at the leader grunt, stomping up and down, flailing his arms up and down, while the leader grunt is looking at the ground, scratching his forehead.

~~Entrance~~

While 2 other veterans run onto the stage from further back of the stage, the leader grunt forward rolls into the starting position, and sticks his rifle up into the sky before the time ends.


~~Symbol ~~


Kris121

Smash Journeyman
Joined
Nov 26, 2008
Messages
263
Location
THE INTERWEB
A PTs perspective​


Wow. Battalion army is some good stuff. I like the use of all the different stuff but I haven't got the time yet to read it all. Looks akin to Cortiny so far. LOTS OF Good text.

However it gets a little hectic with all the things happening. And how would the jab work on a non gc controller?
Finally the mechanics look good.
I know though you were working on it before the advanced army was posted.
I gotta get mine done!
FRIENDSHIP!
 

drag0nscythe

Smash Master
Joined
Sep 2, 2007
Messages
3,268
Ridley

Ridley


~~~History:~~~
Ridley is the leader of the space pirates that Samus encounters in the Metroid series. He was the person who killed her parents and is the second most reoccurring character in the franchise. Ridley has made many different transformations, but was ultimately killed by samus in super metroid. His remains were modified in fusion by parasite X and he had his final fight with samus then, where his remains were potentially destroyed.

~~~Possible Story scenarios.~~~
-If he was playable in Brawl
If Ridley was in brawl, the way to make him playable would have been after the meta-ridley fight. We all saw how the shadow bugs created Giant Diddy and evil peach. Ridley’s statue should have been in those bugs the whole time and when Meta-ridley was defeated, Samus should have seen his statue fly away toward the ground. The statue should have been blown away into a swap where Wolf could have found it and resurrected Ridley. Wolf could use Ridleys hatred of Samus to go to the great maze and upon arriving get into a fight with her. The fight will get cut short by Dedede, who has a Cosgrove like power to get people to “cut it out”. He will then grudgingly join the cast to defeat Tabuu, but has complete intentions to kill samus the minute Tabuu falls.

-My own Story
Ridley would be in charge of the space pirate faction in the Great War between good and evil. He would go up against Fox and Captain Falcon as they tried to keep his army at bay while everyone was searching for a way to fix Samus’ suit and cure her from her wounds she obtained when fighting Ganondorf.

~~~Stats and Misc.~~~

Strengths
Ridley should be the fastest large character in the game (Large characters include DK, Bowser, etc.)
He should be difficult to put into stun, giving him a slight advantage for attacks.
Ridley should have combo potential, but only to the point of 4 or 5 hits. Nothing more.

Weakness
He should have weak power in his attacks (do little damage.)
Ridley should be easy to send flying, but not to the point of Mewtwo. Give him to about 90%.
His combos should be difficult to set up if possible.

Alternate costumes / Model swap / Mesh swap / Etc.
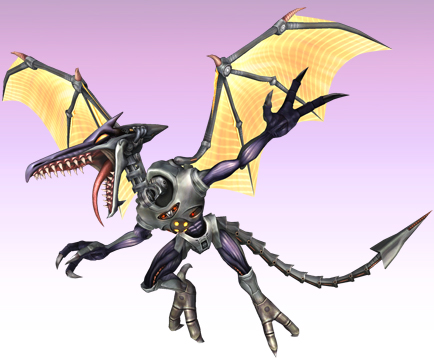
Meta-Ridley should be his alt costume, but with smaller wings.


Select image
His Brawl image would work for now.

Life Icon
A little 2D sprite version of his Super Metroid head.

Colors
Normal Purple Ridley
Dark Purple Ridley (almost blue) from Brawl – Team Blue
Red Ridley from Super Metroid cover. – Team Red
Green Ridley from Zero Mission – Team Green
Yellow Ridley when he is partially wounded in the 2D metroids – Team Yellow
Black Ridley like Omega Ridley color

Alternate Colors
Grey like purple Ridley from Brawl Meta-ridley
Grey parts with Dark blue skin Ridley – Team blue
Grey parts with Red skin Ridley – Team Red
Grey parts with Green skin Ridley – Team Green
Grey parts with Yellow skin Ridley – Team Yellow
Black parts with a grey shine with Black Skin Ridley

Stage
Norfair from Brawl.


Theme song
Boss Battle – Ridley.

Trophies
Ridley
FS – Dragon Rush
Meta-Ridley
Omega Ridley
Ridley X
Mecha Ridley

Ridley's Size compared to other characters


~~~Basic Animations~~~

Entrance animation:
The area where he would appear will be shrouded in a blanket of shadow (not THICK, but just to make that particular area dark and lacking light). From there you would see Ridley's eyes fade in, followed soon by the rest of Ridley as he roars out and enters his battle stance. (Thank you GigaRaver from gamefaqs.)

Idle animation:
Like most characters, his feet will be planted on the ground when in his idle stance. Ridley will be hunched over and his limbs will be close to his body. This will minimize surface area. While his normal Super metroid stance would be nice, the fact that this game needs a more natural feel prevents it from being the primary target. Think of this animation, but slightly modified to have a more natural feel (His body closer to the ground and not straight up as well as his feet being in a movable position and not like he is sitting on them.) His head will bob up and down, but only due to his breathing. His wings will be stretched behind him, and out of the way for when he is attacking. He will have a somewhat jagged appearance to him in this stance in an attempt to make him appear like a threat. His position and look should maximize his ferocity and he should look like a treat (or as much as a threat as possible given the bright backgrounds and jigglypuff.)

Getting bored Idle animation
Ridley will stand there for a short time and start getting bored. He will just look down at the ground and stair for a short time. He will then stretch slightly (with not real distance for the stretching) look at his hand and then go back into idle again.
Walking animation:
Ridley walks just like he does in the beginning of the omega Ridley fight in Metroid Prime 3. He should be slightly lower to the ground though, and his wings will be closer to his body.

jogging animation
Think of the way he ran in Metroid Prime. This would be his jogging animation, but slightly slower.

Running animation:
He should look like he is dashing/flying. He would be at full speed here for a fighting game and he should be flying. His wings will be extended, but back and going almost straight up with a slight curvature to them. (almost like a gliders wings with a lot of air pushing them up above the frame.)

Turning while walking animation:
He will pear around slightly and just turn his body. It should look like he did it quickly and with ease. Even though he is crouching and keeping himself small, his animation should look like he basically just flipped around. He has to look like he had no opening when he turned (no moment of weakness)

Ducking animation:
He will drop himself down like he released the wind out from under him and knell.

Sustained ducking animation:
You know the move in brawl where he comes down from the sky and smashes the ground. Dust goes everywhere and such. If you freeze frame it when he is on all fours, he is ducking. That will be his sustained ducking animation. Just give it some movement and make it a little lower to the ground.

Dodge
Ridley will jump aside very quickly (like he does in Metroid Prime 3 in the omega Ridley fight.) If anything, it should look like that animation, but be closer to a “lean to the side” animation.

Roll Turn
Ridley will dash forward and turn around very quickly (the turn should look like the Meta-Ridley turns in Metroid Prime.) He sill never leave the ground, and it should be seemless and very fast. I think his rear and tail should be more elevated than his head, giving him a pounce like look.

Roll Forward
Ridley will dash forward close to the ground. (Like his small dashes in Omega Ridley)

Roll Backward
He will throw himself backwards very quickly (like a reverse dash.) He will push himself backwards, crunching his body together. When he comes close to ending, he will skid along the ground for a short time before stepping back up to his idle stance.

Jumping animation:
You have two choices here; you can go with the classic ridley hop or a newer animation. I vote newer honestly. When he jumps, he will put his legs into it slightly, but very little. He will take his wings and use the. It should look like he entered the air with no problem and with little use of anything but his wings. This is there his normal super metroid animation will fit, bit but it needs to be slightly modified to look slightly less goofy. He will be tilted over more slightly (not so vertical) and his limbs should have the appearance that they are hanging under him (like he does not care they are there. You know when winged animals have all four limbs going straight down) but he has them close to his body like in super metroid.

Double Jump animation forward – and more jumps:
He should just give a huge push with his wings to downward. In Brawl he has shown how strong his wings can be when he moves, use that in a downward motion to give him great lift.

Double Jump animation backward:
Ridley will fly slightly upside down and turn right side up in the air in the new direction. I am thinking like the Star fox maneuver in N64 where the arwing does a 180 and turns right side up. Ridley will do this turn, with whole body almost appearing to go into the background and be upside down for a short time. He will then right himself and enter his falling animation.

Falling animation:
It looks like his jumping animation, but modified for falling. Wings are being pulled into the air instead of down because of gravity.

Wall cling animation:
This is a tough one. (but bowser was probably tough also.) He should show his length here, being larger than other characters but holding himself tight. He should hold the ledge like everyone else, but you will see how long he really is (if size is right, his tail should look like it is going of the screen.)

Standing on Ledge:
He should look like he has shifted all his weight away from the ledge with his head staring down into the abyss.

Tripping:
When he trips, he will look like his exploding animation from brawl (but going forward instead of backward), but with no explosion and he will hit the ground on his belly. He will look disoriented, but in a way that he could easily recover from the mistake. If things go right, the only way you know he tripped should be the flashing animation and the fact that you saw him trip. (with maybe a little more to really add emphasis.)

Foot Stool animation:
It should look like his double jump animation, but he uses the mighty power of his wings to push the enemy into the ground instead of his feet.

Being weak Hit animation:
He should flinch, but look not overly effected.

Being strong Hit animation:
He should real back, with his body getting a slight curvature to it (making a c like image), but he should look like he can easily recover from it. Looks like his damaged pose in Metroid Prime 3 when fighting Omega Ridley (before the grapple attack is used.)

Being sent flying:
Think Ridley’s explosion animation in brawl again, but this time definitely going back.

Being down attacked:
His being sent flying animation should be modified so his wings are flying up because of the force hitting him down and he should hit the ground and bounce on his back. When he rolls up to normal, he should quickly roll over to the right direction he should be facing and enter the idle stance.

Being grabbed:
Most characters are usually never grabbed. I think should be a little humorous. The foe will grab Ridley’s head, immobilizing him. When they let go, the being weak hit animation should be used. Being hit in this animation will be the same as the weak hit animation.

Star animation:
He should spin in a circle (a loop – de –loop) like animation with his head following his tail in an almost complete circle.

Hitting the screen animation:
He should hit the screen upside down like every other character. He should look really mad though instead of shocked or surprised.

Being electrocuted:
He will stand in place, his standing animation stopped to one frame. It will jitter around the screen slightly, but with the same animation as the lightning effects move through the body.

Being set on fire:
He has blown up plenty of times. Use one of his many death animations. If it is just fire hitting him, use the proper weak/strong animations in their place.

Shield Animation:
His wings will stretch around his body and cover his upper half. The shield ball will also appear. –OR-
He raises his front arm, with his hand in front of his face and that is what he uses to clock. The shield will still appear.

Broken Shield Animation / death animation:
He will lurch back in the c like shape and then collapse to the ground.

Being stuck in the ground – via Pitfall or a special move:
It will look like his dying animation, but stuck in the ground. Use all appropriate animations for the rest like the other characters.

~~~Item animations / Looks~~~

Holding an item
Ridley will be in his idle animation, but one of his hands will be on the ground to hold him up and the other hand will hold the weapon close to his body.

Throwing an item forward
He will drop the item and while it is still in the air, he will flap his wings sending it flying forward.

Throwing an item up
He will wrap his tale around the item and throw it into the air.

Throwing an item Down
Ridley will drop the item and stamp on it.

Throw away an item
He will toss it back over his shoulder like everyone else. The way this will look is he will hold his hand palm up with the item in it. He will then flick his wrist and throw it over his body.

Swinging an item
Ridley will thrust it forward with the arm on the ground moving slightly back, his body moving slightly forward and the bat being horizontal.

Power Swinging the Baseball Bat
Ridley will slowly lean back using his body to lift his front half up. He will then put both hands on the bat and thrust it forward with massive force. It should look like he is using his giant hands to thrust a spear into someone.

Swing an Item in the air
He lifts his hand slightly over his head and swings it downward in a bludgeoning motion.

Wearing the bunny hood
The bunny hood will go on his head like every other character. The ears will be slicked back though to look like it is on crocked.

Wearing any badge
Any badge should go right in the middle of his forehead.

Carrying a crate
He will grab hold of the crate and hold the edge of it with his arm lying on the top. When he moves back, he drags the crate back with him. When he moves forward, he will grip the crate and drag it forward from the front (showing off his strength)

Throwing a crate
To throw the crate in any direction, Ridley will stab his tail through the box and throw it in any direction. This will damage the crate slightly, but will never make it break / explode.

Using the Fire Flower
Ridley will bite down on the flower and hold it in his mouth. When he wants to shot fire, he will open his mouth and fire the flames. It should almost look like he is shooting the flames himself and not the fire flower.

Holding the Hammer/Golden Hammer
While holding the hammer in one of his hands, he will put one hand on the ground and his other hand will move in the way the Hammers are always used. His walk looks normal, except for his motions being in more tune with the hammer than normal.

Ridding the dragoon parts
Ridley will grab the top of the dragoon parts and hold tight. He will then ride them like he would if he was holding on Samus ship and trying to puncture it. He will rush and fall like all other characters after the parts have been used.

Being frozen by a freeze
Ridley is in his strong damaged pose while encased in a block of ice. The ice should make it look like he was frozen to death on a barren planet.

Riding the Warpstar
He will then ride them like he would if he was holding on Samus ship and trying to puncture it. He will grip for life all the way until it hits the ground, where he will push off backwards before it hits the ground and land in the normal places where everyone else lands.

Eating the super spicy curry
Ridley will flap his wings violently, keep his mouth open and shot fire out of it. It should look like the fire is really coming from him normally. He should also appear to have more control over the heat even though he will move and act like all the other characters.

Using the RayGun
He will hold the gun under his arm like he would when he is holding an item. When he fires the gun, it will light, a his body will leer backward slightly and the blast will come out from under his arm so to speak.

Using the super Scope
He will fire this in a similar fashion to how he uses the Raygun. He never twirls the Super Scope, he just fires it.

Using the cracker Launcher
He will wrap his tail around the launcher and use it to fire the weapon. The tail will give the ability to raise and lower it naturally.

Moving while Shooting
He will walk using one hand and his two feet, with the gun tucked under him with the other hand.

Throw Trophy Base
He will wind his arm around the stand, lift his body slightly so it look like he is knelling, but his body is in a vertical position, he will then snap his arm and wrist, throwing the stand in any direction needed.

~~~Attack animations – A Button~~~

Normal A
Ridley will first lean down slightly to the ground, compressing his idle animation. He will then lunge forward with a thrusting like motion (never leaving the spot he is in. His hands will move, no his back legs) and bite with his jaws like he does in Metroid Prime 3 when fighting Omega ridley. After the initial bite, he will slowly move back to his original idle position.
- Knockback - This move will stun the foe, but generally not phase him.
- Lag - This move is quick, but not to fast. The lag is small, with Ridley being able to repeat the move quickly.
- Damage - This move does standard damage for normal A moves. 4%-6%
- Priority - This move has medium priority. It can go either way, in favor for Ridley or the opponent.

Combo A
He repeats the Biting motions from above but it is in a fluid manor. This move will be repeated two more times giving him no continuous combo and just a three hit combo. This move is done like omega Ridley does in Metroid Prime 3, with the attacks being the initial attack, him leering back slightly and biting slightly higher in the air than the last bite, him leering back again and biting lower than the first bite.
- Knockback - The final attack in the three will send the opponent flying.
- Lag - It is two more fast bite animations. When he moves back to normal stance, it takes him slightly longer than just one attack.
- Damage - Bite 2 will give off 5%-7% damage with Bite 3 giving off 7%-9%.
- Priority - This move has medium priority, with the last attack of the three having low priority.

Running A
He will skid on the ground with his jaws open and dash to a halt. It looks similar to his smash Forward A attack, but there should be speed and running tendencies to the move. This move is done like Meta-Ridley in Metroid Prime 1.
- Knockback - This attack has medium horizontal Knockback, sending opponents mainly horizontal.
- Lag - Ridley can recover from this move about the same as his standard A attack, it is slightly slower than that though.
- Damage - 7% - 9%
- Priority - This move has low priority.

Tilt Forward A
Ridley will Thrust his head forward, hitting with his sharp teeth. This move is similar to his neutral A, but Ridley will have more reach, with his hands moving further than the neutral A and list legs being stretched out more. It will also flow with the movement of walking, having him move his back feet forward than with him moving back his hands to the original idle position.
- Knockback - This move will stun the foe, but generally not phase him.
- Lag - This move is quick, but not to fast. The lag is small.
- Damage - 9% - 11%
- Priority - This move has medium to low priority

Tilt Up A
Ridley will raise his body slightly in the air using his body as the attack. He should never have his feet leave the ground with this attack.
- Knockback - This move will stun the foe, but generally not phase him.
- Lag - This move is quick, but not to fast. The lag is small.
- Damage - 9% - 11%
- Priority - This move has medium to low priority

Tilt Down A
Ridley will plant his feet on the ground, lower his body for the attack, raise his claw into the air slightly above his head and then throw it forward with a powerful force, but it should look like it was simple and weak. The animation and look should be similar to how Mecha Ridley from Zero Mission does it when he attacks.
- Knockback - This move will stun the foe, but generally not phase him.
- Lag - This move slower than all the other Tilt attacks.
- Damage - 10% - 12%
- Priority - This move has medium to low priority

Smash Forward A
Ridley will charge up the attack with his hand raised in the air. When he attacks, he dashes forward with powerful force and uses his massive jaws as a weapon. This move is performed in Metroid Prime when Meta-Ridley is on the ground.
- Knockback - This move has large knockback potential.
- Lag - This move is fast in execution, but slow in recovery.
- Damage - 12% - 15%
- Priority - Because of its speed and power, This move has low priority to begin with, but near the end of the attack, it has medium priority.

Smash Up A
Ridley will swing his tail in the air, thrashing it violently. He will never really leave his idle position, only moving bis body to accommodate the attacking animation with his tail. This looks similar to what ridley would do in super metroid.
- Knockback - This move has low knock back for being a smash attack.
- Lag - This move is very fast and is easily recovered from.
- Damage - 12% - 15%
- Priority - This move has medium priority.

Smash Down A
Ridley will stand with arms slightly in the air and two green orbs will appear in his hands. He will then smash the ground making electric vertical lines with orbs on either side appear and shoot out from where he hit the ground. The electric attacks do not flow to far away. This move is done exactly like Omega Ridley in Metroid Prime 3 during the second phase of the fight when Omega Ridley makes armor appear to cover his chest.
- Knockback - This move has medium knockback potential and is better for keeping enemies away then sending them flying.
- Lag - This move is slow. It takes a while to charge and execute.
- Damage - 12% - 15%
- Priority - This move has high priority because the attack is carried out generally away from Ridley.

Duck A
While he is knelling down he should throw his hand forward like his “down tilt A” move. This move should also have the wings extend back slightly to add motion to the animation. This move differs slightly in look from the “down tilt A” by having Ridley’s wings move and by him having his body more compact, making him a smaller target.
- Knockback - This move has little knockback and is good for stunning an enemy.
- Lag - This move is fast.
- Damage - 4%-8%
- Priority - This move has medium priority.

Air Neutral A
Ridley will Use his wings to push himself downwards Very fast. It looks just like what Omega Ridley does in Metroid Prime 3 when he takes flight near the end of his life during the battle.
- Knockback - This move is good for a Meteor Strike.
- Lag - This move is quick, but not to fast. The lag is small.
- Damage - 6%-8%
- Priority - This move has medium priority.

Air Forward A
Ridley will spin in a circle with his wings appearing to wrap around him as he moves. Ridley performs this move in Metroid Prime.
- Knockback - This move has little knockback and is good for stunning an enemy. The enemy barely moves with this attack.
- Lag - This move is quick, but not to fast. The lag is small.
- Damage - 6%-8%
- Priority - This move has medium priority.

Air Down A
Ridley will fling his tail under himself and strike anyone there. It should look like how Ridley X throws his tail in Metroid Fusion.
- Knockback - This move has little knockback and is good for stunning an enemy.
- Lag - This move is quick, but not to fast. The lag is small.
- Damage - 6%-8%
- Priority - This move has medium priority.

Air Back A
He will throw his tail behind him violently like he does in Zero Mission.
- Knockback - This move has little knockback and is good for stunning an enemy.
- Lag - This move is quick, but not to fast. The lag is small.
- Damage - 6%-8%
- Priority - This move has medium priority.

Air Up A
He will dash upwards in the air with great force like he does in the Omega Ridley fight in Metroid Prime 3 when he begins his flying pattern when his health is low.
- Knockback - This move has little knockback and is good for stunning an enemy.
- Lag - This move is quick, but not to fast. The lag is small.
- Damage - 6%-8%
- Priority - This move has medium priority.

Ledge Attack
Ridley will pull himself up and dash forward like he does in Metroid Prime 3 when fighting Omega ridley.
- Knockback - This move can send opponents flying.
- Lag - This move is slow to begin with (with pulling himself up off the ledge), but fast when he attacks. The lag is small.
- Damage - 6%-8%
- Priority - This move has medium priority.

~~~Attack animations – B Button / FS~~~

Neutral B
Fire Blast: Ridley will fire a Huge blast if pressed. If held, he will stop in place (even in mid air) and Fire a continuous fire blast. It has large reach, but the farther an enemy is, the weaker the attack. While the move is being used, Moveing the Control stick will control the direction Ridley will move his head. The blast lasts for a short time and takes along time to recharge.
- Knockback - This move has large knockback
- Lag - The move is fast, but Ridley moves his head slowly (making it easy to dodge if the opponent knows what to do)
- Damage - 5%-7% (and this move can stack damage)
- Priority - This move has high priority

Forward B
Wing Flap: Ridley will flap his wings greatly, causing allot of wind to fly forward. This move does no damage, but it can keep foes away from him. It looks just like the wing attack Ridley uses in Super smash bros Brawl boss battle.
- Knockback - This move is good for sending people flying.
- Lag - It is very fast and can be done repeatedly
- Damage - 0%
- Priority - It has low priority until enemies have high percent damage

Down B
Rail Grind: He will fly back a bit and then stab his tail in the ground and drag it forward for a few steps. It looks just like the wing attack Ridley uses in Super smash bros Brawl boss battle.
- Knockback - Very little knockback.
- Lag - This move is fast in execution, but slow in beginning and ending.
- Damage - 5%-7% (Damage can be stacked)
- Priority - This move has low priority. Ridley can be easily hit out of it.

Up B
Loop Spin: He will perform a majestic loop like maneuver. He will perform it as a 360, but if B is pushed again, he will level out at the height he was at and enter into Glide mode.
- Knockback - This move has high knockback when Ridley is completely vertical.
- Lag - This move is fast.
- Damage - 3%-5%
- Priority - This move has high priority and while weak, is good for sending opponents flying.

Final Smash
Dragon Rush: Ridley will fly off the screen, damaging anyone in his path. He will then appear from behind and launch forward on a random enemy. If it connects, it is an instant KO. (Kind of like the dragoon parts.)
- Knockback - If this move connects, it is almost always an Instant kill.
- Lag - This move works like the dragoon parts.
- Damage - 50%
- Priority - This move has high priority and will almost always come out on top.

Visual representation of B moves


~~~Attack animations – Grabs~~~

Grab Animation
Ridley will lean back slightly moving more of his body off the ground. He will then thrust his arm forward with great speed and power grabbing the foe in front of him. The position of the hand is supposed to be the chest area. It looks like his claws have been impaled into the foes chest.

Running Grab animation
While he is flying forward, he will raise his arm and lunge it forward in a top-to forward roll like motion with it moving in the 3D plane. It will extend down to the strike where it will reach the same place as if he were standing.

Running Grab Missing animation
He will swing his hand and miss. Instead of rolling or looking like he messed up, Ridley will hit the ground and slide slightly. He will then recover back to his normal idle stance.

Pivot Grab
Ridley will stab his tail behind him turn around and pull the foe off his tail, thus entering his normal grabbing animations.

Hold Animation
The position of the hand is supposed to be the chest area. It looks like his claws have been impaled into the foes chest. He will breathe, but that motion is the only thing that will give him motion.

Attack Animation
Ridley will hit the captured enemy with his tail by spinning it like the old Metroid games.
- Lag - This move is fast and when the button is pressed quickly, can get 5 to 7 attacks off before the opponent breaks free.
- Damage - 4%-6%

Throw Forward
Ridley will real his arm back, pulling the foe closer to him. He will then turn his body slightly, whip his tail around and bash the captured opponent with his tail, sending them flying.

Throw Up
Ridley will stab his tail into the foe and start spinning his tail really fast. The speed will throw the enemy up into the air.

Throw Backward
Ridley will stab his tail into the person, pull them behind him and then use the strength of his tail to throw them away behind him.

Throw Down
Ridley will take the person he is holding and smash them into the ground he will then jump in the air and crush them, sending them flying away.

~~~Taunts / Win poses~~~

Up Taunt
Ridley will stand up showing of his entire size and stretch his wings showing how big he actually is.

Right Taunt
Ridley's tail will flicker, raise into the air and flicker again before resting down on the ground. His eyes will also glow like they do in his entrance animation.

Down Taunt
He will stomp his foot onto the ground and roar like he does in Brawl.

Left Taunt
He will stomp his foot onto the ground and roar like he does in Brawl.

Win pose 1
He will stomp his foot onto the ground and roar like he does in Brawl.

Win pose 2
He will fly in a loop, hover for a second and then fly away.

Win pose 3
He will hop with his tail like he does in the old 2D metroids.

Lose
He will put his hand over his face in a face palm like expression and just stand there with his head leaning towards the ground.
 

Heartz♥

Smash Legend
Joined
May 18, 2008
Messages
10,443
Location
Virginia
Wait What!!! Heartz you can't make Neku Sakuraba I'm Doing Neku Sakuraba. Oh well If you must may the best MYMer win. Maybe you maybe me. But I called him a while ago...
Awww man. You can have him. I will just do Beat then. Fair? :)

Whoa Ridley and the Battalion. FINALLY some entries I know, and good ones at that. I like how you used Ridley in the Brawl shots, and that Battalion one is HUGE. Do they HAVE to be that long???
 

princesspeachluver13

Banned via Warnings
Joined
Nov 13, 2007
Messages
617
Location
Yep. I had it coming. Stupid apathy.
Um...good, but could use more detail here and there.

Awww man. You can have him. I will just do Beat then. Fair? :)

Whoa Ridley and the Battalion. FINALLY some entries I know, and good ones at that. I like how you used Ridley in the Brawl shots, and that Battalion one is HUGE. Do they HAVE to be that long???
Sorry, I'm doing Beat. I need to put him up on my Link up, though.

And yes, yes they do.
 

SkylerOcon

Tiny Dancer
Joined
Mar 21, 2008
Messages
5,216
Location
ATX
Awww man. You can have him. I will just do Beat then. Fair? :)
Well, multiple entries of the same character ARE allowed (to my knowledge, at least) so you don't have to just not do Neku because Kris is doing him. You can do him if you want, just try to think up of some ideas that you don't think Kris will come up with if you do him.

Whoa Ridley and the Battalion. FINALLY some entries I know, and good ones at that. I like how you used Ridley in the Brawl shots, and that Battalion one is HUGE. Do they HAVE to be that long???
They don't have to be that long, but it's a good idea to make sure everything has a lot of detail. Having a full explanation of knockback, priority, lag, damage, and all of that sounds better than 'Generic Guy A does a strong punch with his hand dealing 15% and good knockback.'

So yeah, just try to be detailed.
 

dancingfrogman

Smash Ace
Joined
Jan 3, 2008
Messages
862
Location
United Kingdom, Birmingham
Switch FC
3133 8842 3910
Awww man. You can have him. I will just do Beat then. Fair? :)

Whoa Ridley and the Battalion. FINALLY some entries I know, and good ones at that. I like how you used Ridley in the Brawl shots, and that Battalion one is HUGE. Do they HAVE to be that long???
YESZ :falcon:

Well, ALL my sets are huge (sorry, I get carried away), and the 3 sections of the moves bulk it up a lot, also note that the Specials take up half the set! X.X

A PTs perspective​


Wow. Battalion army is some good stuff. I like the use of all the different stuff but I haven't got the time yet to read it all. Looks akin to Cortiny so far. LOTS OF Good text.

However it gets a little hectic with all the things happening. And how would the jab work on a non gc controller?
Finally the mechanics look good. Though it looks alot like the advanced army.
I know though you were working on it before the advanced army was posted.
I gotta get mine done!
FRIENDSHIP!
Wut?

Battalion Army work nothing like Advance Army, they work in unison, if one jumps they all jump, when they get dealt 50%, they lose one of their members, and that there is a the supply fuel mechanic and capturing of the bases (Battalion Army don't have these features)... Also, Advance Army TRANSFORM into the fighters and rockets with their moves, Battalion Army GENERATES units with his specials, and they follow him the leader, who tells them WHAT to do, and they move on or stay in one place, and the units themselves without the aid of a move like D-tilt, have only 1 move, each unit has there own health and weapon as well.
 

KingK.Rool

Smash Lord
Joined
Nov 26, 2005
Messages
1,810
...ordinarily, I'd agree with you on this. However, I wouldn't consider Airman's specials the "meat and bones" of this particular set. I'll... "fix" it, but just because you asked me to.
Hmm, yes, I see your point, but I still think they set the tone for the whole 'set and I like seeing that right off the bat. Not to mention that the rest of your attacks are interesting enough to keep some suspense in the reading process, if we're going by that argument.

Organization king?!? :bee:

Battalion Army is MASSIVE. A big, fat tl;dr. Seriously, I'll read it... eventually.

Ridley's very interesting. There's SO much detail on the animations and on what he'd look like in Brawl, but the attacks themselves are SO brief, there's nothing on how damage they do. It's an interesting style of moveset-making, and not a bad first entry. Welcome to MYM, drag0nscythe!
 

Heartz♥

Smash Legend
Joined
May 18, 2008
Messages
10,443
Location
Virginia
Argh. I just dont want to do what someone else did. Especially not in the same season. its fine. i can find another
 

drag0nscythe

Smash Master
Joined
Sep 2, 2007
Messages
3,268
Well, multiple entries of the same character ARE allowed (to my knowledge, at least) so you don't have to just not do Neku because Kris is doing him. You can do him if you want, just try to think up of some ideas that you don't think Kris will come up with if you do him.


They don't have to be that long, but it's a good idea to make sure everything has a lot of detail. Having a full explanation of knockback, priority, lag, damage, and all of that sounds better than 'Generic Guy A does a strong punch with his hand dealing 15% and good knockback.'

So yeah, just try to be detailed.
I see a point to having alot of detail, but I generally disagree with it because I believe that all the values we make up and all the effects we add are pointless until the point the characters are actually implemented. I could say a move has specific attributes, but it will be guaranteed that they will change or be over powered.

That being said, seeing the comments, I will try my best to add what is needed. Only problem is I have no clue how to define Knockback, Priority, lag and damage in writing (compare it to other characters?) and I do not know what Knockback is.

Ridley's very interesting. There's SO much detail on the animations and on what he'd look like in Brawl, but the attacks themselves are SO brief, there's nothing on how damage they do. It's an interesting style of moveset-making, and not a bad first entry. Welcome to MYM, drag0nscythe!
thanks. I will elaborate some more.
 

Tanookie

Smash Journeyman
Joined
Nov 17, 2008
Messages
436
Location
*sends Sundance a leather harness on Dragon Apprec
@ Airman: I don't think I've commented on him yet. Wonderufl work, agi. I'd love to review him, but Spade's already claimed him. :ohwell: Nevertheless, one of my favorites so far and I love all the little extras you put into it. Although I've never played Megaman, I can get a perfect feel for the character just by reading your set. Excellent job!

@ Batallion Army: So, my initial thought was "oh, DFM's just trying to be like the Advance Army and build of its success," so I'll admit I was skeptical at first. While there are some similarities, I do admit you did a great job. It's so massive that I haven't finished reading it, but I can say this: I'm not a fan of all the random effects your Specials have, as it put a character which (supposedly) is based around strategy at the mercy of luck. It's too soon for me to read another army moveset, so...yeah. How do you guys pump out movesets so fast?! Especially ones that long, geez...

@ Ridley: It's...good, but you spend more time detailing all those animations than you do the actual attacks. Plus, the moves themselves aren't that unique. A long moveset =/= a good moveset. But welcome aboard anyhow.

And knockback is how far you are knocked back when hit by a move. Hence the name. :p
 

Heartz♥

Smash Legend
Joined
May 18, 2008
Messages
10,443
Location
Virginia
I also saw things like taunts and Assist Trophies and that Snake chat. Are those required in character moves?
 

dancingfrogman

Smash Ace
Joined
Jan 3, 2008
Messages
862
Location
United Kingdom, Birmingham
Switch FC
3133 8842 3910
Organization king?!? :bee:

Battalion Army is MASSIVE. A big, fat tl;dr. Seriously, I'll read it... eventually.
We are the polar opposites, you are (VERY) organised, I'm very messy, You like briefness, I detail too much (noticed when I TRY to cut down on the detail, it's still too ****ING big!!!???)

I always had that worry, that why I warned people in the chat AND social group that it would be huge... sorry that I'm indifferent!

@ Batallion Army: So, my initial thought was "oh, DFM's just trying to be like the Advance Army and build of its success," Wasn't the plan :bee: so I'll admit I was skeptical at first. While there are some similarities Of course, and Army set wouldn't be an army if there wasn't more than one person, I do admit you did a great job Thanks. It's so massive that I haven't finished reading it, but I can say this: I'm not a fan of all the random effects your Specials have, as it put a character which (supposedly) is based around strategy at the mercy of luck. It's too soon for me to read another army moveset, so...yeah. How do you guys pump out movesets so fast?! Especially ones that long, geez...


I also saw things like taunts and Assist Trophies and that Snake chat. Are those required in character moves?
No they aren't, the things that are neccasary are 4 specials, 3 tilts, basic A combo and dash attack, 3 smashes, 5 aerials, 4 throws and a grab attack, and a Final smash, all other stuff is regarded as "Extras".
 

Scyphozoa

Smash Cadet
Joined
Feb 11, 2009
Messages
65
Location
Back from the grave.
drag0nscythe, knockback is a miserable little pile of secrets.

Enough talk, have at you.

Amaterasu is coming along well. Expect her sometime soon.

I'm glad Heartz is here, I'm sick of being the only girl.
 

Tanookie

Smash Journeyman
Joined
Nov 17, 2008
Messages
436
Location
*sends Sundance a leather harness on Dragon Apprec
I also saw things like taunts and Assist Trophies and that Snake chat. Are those required in character moves?
Those are known as Extras. They're...well, the extra stuff. You can put those kinds of things in if you want, but they're not required. IMO, Extras are always fun to have, as they make the moveset more interesting than just a bunch of percentages and such. I love 'em, but you don't have to have them if you don't want.
 

Heartz♥

Smash Legend
Joined
May 18, 2008
Messages
10,443
Location
Virginia
Wow thx guys. I didnt expect that much feedback in a short time. Good stuff. I'd ask Cru but he's at work. I dont suppose there is a specific layout for move list. That's great. This is pretty good thing on this site.
 

Darkslash

Smash Master
Joined
Feb 1, 2008
Messages
4,076
Location
Strangereal Equestria
http://www.smashboards.com/showpost.php?p=6973784&postcount=89

RX-78-2 is Hopefully done.. If any thing is missing tell me.

Also Bling Bling Delta Gundam is near completion.

They don't have to be that long, but it's a good idea to make sure everything has a lot of detail. Having a full explanation of knockback, priority, lag, damage, and all of that sounds better than 'Generic Guy A does a strong punch with his hand dealing 15% and good knockback.'
FFFFFFFFFF...thats like most of my movesets. -sigh- Looks like I have to do that In the Sets that will be v Gundam and the Sazabi. But then I'm relatively new at this :<
 

BKupa666

Barnacled Boss
Moderator
Joined
Aug 12, 2008
Messages
7,788
Location
Toxic Tower
Batallion Army was epic win. Seriously, seeing all the different types of possibilities from the Specials made me j**z in my pants. I'll read the full thing later.

Ridley was interesting. There was so much content in terms of the DOJO screens and animations, but there was much less content than necessary for a good moveset in the actual moves. Give it some work and it'll become a lot better.

*goes to review K.Rool for MW*
 

smashbot226

Smash Master
Joined
Sep 1, 2007
Messages
3,027
Location
Waiting for you to slip up.
drag0nscythe, knockback is a miserable little pile of secrets.

Enough talk, have at you.

Amaterasu is coming along well. Expect her sometime soon.

I'm glad Heartz is here, I'm sick of being the only girl.
AMMY? Please do your best with her. I planned doin' her, but whatever. Please do not disappoint, thought I expect you not to.

BTW, I plan on doing another moveset after Gharnef is done, following the FE Trend-


And don't worry, he won't have his God Armor with him.

EDIT: Can I join that chatbox too?

EDIT EDIT: BTW, Gharnef is on Pg. 11. Feel free to look if you want, but it's not quite finished yet.
 

BKupa666

Barnacled Boss
Moderator
Joined
Aug 12, 2008
Messages
7,788
Location
Toxic Tower
Wow. Even reviews are over the top. You guys scare me. USE OF ILLUSTRATIONS PLEASE
My reviews tend to be long; couple that with my favorite SSB4 character and that is the product. Illustrations are fun, especially hand-drawn ones. Welcome to MYM.
 
Status
Not open for further replies.
Top Bottom