Steal POKEMON for profit!
Exploit POKEMON for profit!
All POKEMON exist for the glory of TEAM ROCKET!
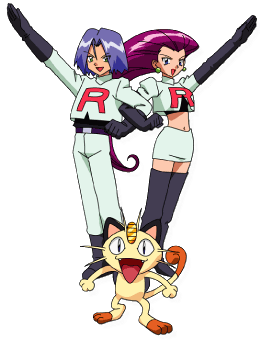
TEAM ROCKET
"To protect the world from devastation" "To unite all peoples within our nation"
"To denounce the evils of truth and love" "To extend our reach to the stars above"
"Jessie" "James"
"Team Rocket blast off at the speed of light" "surrender to us now or prepare to fight!"
"Meowth! That's right!"
Team Rocket are always chasing their dreams of fame and power, but they never get any closer to realising their ambitions. But still they soldier on, digging pits, nabbing Pikachus, and mail-ordering expensive mechas.
They bring their unique team spirit to brawl, which is good because they don't have much else going for them...
::Episode Playlist:
Training Daze
Pokemon Emergency!
Pokemon Shipwreck
Island of the Giant Pokemon
Dig Those Diglett
Holy Matrimony
The Ultimate Test
The Battle of the Badge
Pikachu Re-volts
Go West Young Meowth
Meowth Rules
Wobbu-Palooza!
Dues and Don'ts
A Poached Ego!
The Ole' Berate and Switch
Cacnea & Gardenia! Farewell is for Whom?
A Lean Mean Team Rocket Machine
::::IMPORTANT DETAILS::::
**Team Rocket is first and foremost, a TEAM**
How the team works (in a nutshell):::::
Don't underestimate the power of Teamwork! That's OUR job!
- The cornerstone of Team Rocket, is Meowth. When he is KO'd the entire team loses a stock. So, always put Meowth's needs first! Meowth will be joined in battle by Jessie and James (Jessie and James always operate as a single character). If Jessie/James get KO'd, Meowth will be left to fend for himself, a fate far worse than that of a single Ice-Climber.
- Meowth will start each fight piggybacking Jessie/James. Whilst on their back, the whole team counts as a single character. To seperate from one another Jessie/James must throw Meowth (with Z).
- After seperating Meowth and Jessie/James become two seperate characters. The player can only control one of these, leaving the other character standing helplessly in place. Under certain circumstances (or if Shield + B is pressed) the player will automatically switch control to the other character. Switching back and forth between Meowth and Jessie/James is the best way to overwhelm your opponent.
- In addition to this switching mechanic, the character you are not currently controlling can be commanded to attack with the C-Stick (Wiimote control schemes use movement gestures)
- The team can regroup if Jessie/James grabs Meowth (or vice-versa)
- Jessie/James and Meowth all have seperate damage-meters, although only Meowth's is displayed.
How the team works (Detailed):::::
There are 2 stances used to control Team Rocket..
: iggyBack:
This stance involves Meowth and Jessie and James in a piggyback formation. They move and attack as one in this stance. Damage incurred will be dealt to both Meowth and Jessie/James, so it's a bad idea to think this is a good defensive option. In the piggyback stance, Meowth and Jessie/James can shield and roll but cannot grab.
It is important to note that both Meowth and Jessie/James can hold items while piggybacking (Meowth will only pick up an item if Jessie/James' hands are already full). Jessie/James will not be able to throw Meowth while they have an item in their hands. Conversely, Meowth will not be able to throw his item while piggybacking. With this in mind, give Meowth an item he can use without throwing (like a fan).
::Seperate:
In this stance, Meowth and Jessie/James will seperate, becoming individual characters. The player can control either Meowth or Jessie/James, and switch between the two with Shield + B (shield+B switching can be performed at any time, even when the character the player is controlling is in the middle of an attack).
In certain circumstances the player will be forced to switch to the other character. These circumstances are;
- If the character the player IS controlling is hit by an attack dealing 15% damage or more
- If the character the player is NOT controlling is off-stage for more than 1.2 seconds. This doesn't apply if both characters are off-stage
- If the character the player IS controlling is put to sleep/stunned or otherwise forced out of the player's control (being grabbed does not count)
- If Meowth is NOT being controlled by the player and is dangerously close to being KO'd by a scrolling stage.
The character the player doesn't control will just sit there like a lemon, doing nothing to defend themselves from getting KO'd. That's bad of course, but the player can still tell the other character to attack. The exact method of doing so varies depending on the control scheme being used;
- Gamecube/Classic Controller: Attacks for the other character are inputted with the C-Stick. Depending on how quick the C-stick is moved, both tilts and Smash attacks can be used (As a special note; Neutral A is performed by tilting the C-stick in the opposite direction to the one the character is facing)
- Wiimote/Nunchuck: Attacks for the other character are inputted by sharply moving either the nunchuck or the wiimote in the direction of the attack. The nunchuck is used for Smash attacks and the Wiimote is used for tilts. To charge a smash attack, move both the nunchuck and Wiimote at the same time, then move the Wiimote back in the opposite direction when you want to release the attack.
- Wiimote: Smash attacks for the other character are inputted by sharply moving the wiimote in the opposite direction to the attack then moving the wiimote back when you want to release the attack. Tilts cannot be performed in this control scheme
Overview:::::
If at first you don't succeed..
Team Rocket is fairly unique as there is not really a "bad" way to play as them, other than completely ignoring one character or the other. There are many techniques and styles of play a Team Rocket player could use, but they all have one thing in common. Teamwork.
Individually, Meowth and Jessie/James are terrible characters with serious flaws. In a fair one-on-one fight, Meowth would never win and neither could Jessie/James. It is important to remember how vulnerable each character is seperately, and take every precaution to keep the Team together, where they are strongest.
Knowing when to switch in and out of the piggyback stance is another important point to keep in mind. In the piggyback stance, the team always sticks together, Jessie/James' attacks gain some boosts, the team can dual wield items, and you can always throw Meowth into the enemy as a quick attack. Of course, the piggyback stance sacrifices all the benefits of having two characters under your command.
Ironically, Meowth, the most important character and the one who needs protecting the most, is the one players will be putting on the front lines the most. This seemingly illogical, yet neccessary tactic is what keeps Team Rocket from winning every match by default. While Jessie/James make a better punching bag, their lack of quick attacks and Meowth's lack of projectiles means Jessie/James cannot work well in a direct fight with the opponent.
::::MOVESETS::::
**Good thing we ran into this sign**
**Yes, it is a good sign...**
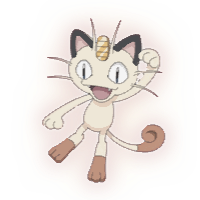
::::MEOWTH::::
**It looks like you two have been PUN-ished**
Maddie Blaustein
Meowth is the brains of this outfit, a real Top Cat. He can speak the tongues of both humans and Pokemon, he can even walk on two feet!
Meowth is a scrapper at heart, racking damage and slashing faces. Don't expect him to KO anyone though, he's seriously underlevelled.
Please note that the following moveset applies to Meowth when he is seperated from Jessie/James. To see how Meowth affects the piggyback stance, please read the Jessie/James moveset.
::Stats:
Size: 30/100
Meowth is relatively Pikachu's equal, size-wise. Of course, this Meowth stands on his hind legs, so he is taller and thinner than regular Meowths
Weight: 25/100
Constantly on the verge of starvation, Meowth has little mass to keep him from blasting off again
Walk: 20/100
Meowth walks on his hind legs, a veritable handicap for cat Pokemon
Run: 15/100
As hard as Meowth tries, he just can't run fast enough on his two stubby legs
Traction: 75/100
Meowth's paws lend him some decent grip, reverting to all fours if he really needs to keep his balance
Damage: 10/100
Though he'll fight tooth and nail, he won't even leave a dent in his opponents
Knockback: 5/100
Meowth has literally no traditional means of KOing foes
Start Lag: 10/100
Less lag, more haste. Meowth is quick to anger and quicker to attack.
End Lag: 40/100
Meowth tends to leave himself a little open at times
Range: 25/100
Meowth's stubby limbs are a difficult set back to overcome
Priority: 40/100
Meowth's attacks are quick enough to keep their lack of priority from being a problem
First Jump: 60/100
Meowth springboards of the ground with his hind legs
Second Jump: 50/100
Meowth struggles a little, like trying to climb an imaginary wall
Recovery: 90/100
Meowth's Vertical recovery is potentially limitless, and his horizontal options are strong too. They're easily intercepted though
Fall Speed: 45/100
Meowth is somewhat average for floatiness
Crouch: 30/100
Meowths bulbous head keeps him from perfecting the art of crouching
Hover: No
Crawl: Yes
Wall jump: No
Wall cling: Yes
Glide: No
::A-Button Attacks:
::Ground Attacks:
Rising Paw:
Neutral A (0%)
- Description: Meowth, leaps into the air, performing a short range, clawless uppercut.
[*]Unique Properties: Causes tripping/free-fall to whoever it hits. Continues onto Neutral AA if, between frames 5 and 10, the A button is pressed.
[*]Damage: It does not deal damage, due to Meowth's claws being retracted
[*]Knockback: No knockback
[*]Range: The attack barely reaches in front of Meowth, in fact, the opponent would actually have to be touching Meowth to risk getting hit. But since this is a jumping uppercut, Meowth manages to cover a decent vertical distance (as high as Ganondorf)
[*]Start Lag: 0.05 seconds. The attack comes out almost instantly
[*]End Lag: The attack can't be jab canceled, due to a severe 0.4 second end lag if Meowth tries to do so
Use:
Tripping your opponents is an excellent way to set them up for Jessie/James' Smash Attacks. Simply tap the C-stick to make Jessie/James perform a smash attack, then press A to make Meowth use Rising Paw
A Slice of Air:
Neutral AA (3%)
- Description: Meowth, still in midair, swipes his claws a short distance ahead of him from right to left
[*]Unique Properties: Regain control over Meowth while he is still in midair. Knockback does not increase with damage (actually it does, but it's hard to notice)
[*]Damage: 3%
[*]Knockback: Takes foes beyond the range of follow up attacks. But trying to KO with this will leave you dissapointed.
[*]Range: The attack reaches twice as far as Rising Paw, exchanging vertical coverage for horizontal range. It's still hard to land though, having the range of 2/3 of MetaKnight's sword. It can also miss ducking opponents
[*]Start Lag: 0.0 seconds The attack comes out on the first frame
[*]End Lag: 0.2 seconds. This is less than the lag that occurs if Meowth tries to jab cancel from Rising Paw.
Use:
There is no reason to not follow up Rising Paw with A Slice of Air (Unless there's a Jessie/James Smash attack on the way). The time it takes for the entire attack is actually less than the lag Meowth suffers if he tries to jab cancel from Rising Paw. A Slice of Air, is a great Get Off of Me attack, but it can be DI'd to reduce the knockback to almost nothing.
Night Slash:
Foreward A (5%)
- Description: Meowth suddenly gets the urge to twirl in place. He satisfies that urge for 0.3 seconds, before lunging foreward 1/2 a stagebuilder block and leaving a deep gash in the air behind him. The gash stays onscreen for 0.4 seconds.
[*]Unique Properties: Knockback only happens when the Wii's internal Clock is between 6pm and 6am. Meowth has dodge properties during the initial twirling animation. Meowth can cancel the inital animation into any other ground attack.
[*]Damage: 5%
[*]Knockback: There is no knockback during the day, and during the night the knockback is fairly underwhelming. At 0-15%, there is no difference between the two variatons. Exceeds the knockback of A Slice of Air at around 50% damage, but can only KO in exceptional cirumstances.
[*]Range: Meowth lunges foreward 2 stagebuilder blocks. Anyone between his starting point and his end point will be hit, once the gash appears.
[*]Start Lag: The gash appears at 0.4 seconds. Meowth has to perform his entire attack animation before the attack itself starts. Though relatively laggy, this is the closest thing Meowth has to a roll.
[*]End Lag: 0 seconds. Meowth regains control as soon as the gash appears.
Use:
The Wii's internal clock setting is actually an option for counterpicking. The version with knockback is considered superior, due to Meowth's relative lack of knockback attacks. Meowth can use this as a pseudo roll, although he remains vulnerable for the whole manouver. Meowth can cancel out of the twirl at the start of the attack, making it a good mindgaming trick.
A Weak Slash A Week's Lash:
Upward A (7x1%)
- Description: Meowth's hands move like a blur, wildly scratching the air above him seven times. The whole attack lasts 1.1 seconds
[*]Unique Properties: Of the 7 hits, 1 of them will have all the knockback. Which hit this exactly, depends on what day of the week it is;
- Sunday: Hit 1, very low knockback upwards. Foes may end up falling back into the remainder of Meowth's scratches
- Monday: Hit 2, medium knockback in the direction Meowth is facing. Leaves Meowth relatively safe from retaliation
- Tuesday: Hit 3, low knockback in the opposite direction to where Meowth is facing. Meowth can be left vulnerable if the foe has a quick aerial they can use
- Wednesday: Hit 4, low knockback towards the ground. Meowth can be left vulnerable if the foe has a quick get-up-attack the can use, or performs an ukimi.
- Thursday: Hit 5, very low knockback upwards. Meowth and foe regain control at the same time.
- Friday: Hit 6, medium knockback upwards. Can neither KO nor be followed up by Meowth.
- Saturday: No hit has the knockback. Meowth has a slight lag advantage over the opponent.
[*]Damage: 7 hits, each worth 1%
[*]Knockback: See above. Only 1 attack of the 7 has any knockback (except on Saturdays)
[*]Range: 1/2 of Meowth's height above him, which is pretty poor. Luckily this attack can sweep up foes next to him
[*]Start Lag:0.05 seconds This attack comes out almost instantly
[*]End Lag: Almost no end lag. Between Thursday and Saturday, Meowth will regain control around the same time as the opponent
Use:
The Wii's internal date setting is actually an option for counterpicking. Saturday is by far the best option, as it will hold the foe in place for the entire duration of the attack (1.1 seconds). Sunday is a close second, but can be escaped from after the first hit. Tuesday and Wednesday are the worst days, since Meowth can leave himself vulnerable to a counterattack. In any case, make a note of what day it is so that you can correctly place Jessie/James to follow up.
Snatch 'em:
Downward A(0%)
- Description: Meowth pretends to look at something interesting in his paws for 0.7 seconds
[*]Unique Properties: If Meowth is grabbed during the attack animation, Meowth will counter it and grab the opponent instead! If an item or physical projectile hits Meowth during the attack animation, he will snatch it out of the air, making the item his own. Meowth cannot snatch large items like Party Balls or Hammer Heads.
[*]Damage: N/A
[*]Knockback: N/A
[*]Range: Meowth's entire body is the range of this attack
[*]Start Lag: 0.15 seconds until the attack itself starts
[*]End Lag: No end lag if Meowth catches an item or opponent. Otherwise, the lag is 0.3 seconds while Meowth looks unhappy that he didn't get an item
Use:
The grab release from this psuedo grab, leaves Meowth at a distinct attacking advantage. And that's before you factor in Jessie/James who should be gearing up their most brutal attacks in preperation for the grab release. Unfortunately, this move is as situational as they come, and the item snatching properties don't do anything a well timed A button press doesn't already do. Meowth can mindgame this against chaingrabbers, but there's no point, since Jessie/James already rule out chain grabbers. Please note that this attack can backfire if Jessie/James themselves try to grab Meowth.
The Moment of Tooth:
Foreward Smash (10% uncharged, 17% charged. 4% per second until Meowth lets go)
- Description: He leaps foreward 1/3 of stagebuilder block, with his mouth agape. At the peak of this leap, he bites down, hopefully sinking his teeth into an enemy
[*]Unique Properties: Meowth sticks to the opponent for twice as long as the smash was charged. All damage/recovering that happens to the opponent during this time, goes to Meowth instead (the 4% damage per second caused by Meowth is the only exception to this rule). The opponent's dash speed and jump height are halved until Meowth lets go.
[*]Damage: 10% when completely uncharged. 17% at full charge. The opponent suffers an additional 4% damage for every second Meowth clings to them.
[*]Knockback: N/A
[*]Range: The opponent has to be physically touching Meowth's head at the peak of his jump for this move to connect
[*]Start Lag: 0.2 seconds until Meowth reaches the peak of his jump
[*]End Lag: 0.5 seconds if Meowth misses. If Meowth hits, the move ends with Meowth being released as if he had been grabbed.
Use:
This is certainly an oddball attack, but it's the most damaging attack Meowth has. The grab release at the end leaves the opponent wide open to one of Jessie/James' quicker attacks. This move has a situational use as a suicide KO, since it gimps the opponent's recovery.
Strike a pose:
Upward Smash A(0%)
- Description: Meowth leaps into the air, paws up, in a comical pose. Attack portion of the move lasts 0.6 seconds
[*]Unique Properties: Repels foes instead of dealing knockback. It repels foes who are shielding, without affecting their shield. If near to Jessie/James performing the same attack, the range of the attack triples. This move has no effect on projectiles or thrown items.
[*]Damage: N/A
[*]Knockback: Repel strength equivilent to an average character's walk speed. Charging the smash, results in a stronger push. At full charge, repels equivilent to an average character's dash speed.
[*]Range: Repels foes within 1/2 a stagebuilder block of Meowth. Range triples if Jessie/James join in on the attack
[*]Start Lag: 0.2 seconds while Meowth leaps up
[*]End Lag: 0.3 seconds while Moewth falls to the ground. Lag increases to 0.4 seconds if Jessie/James joined in on the attack
Use:
This is incredibly hard to use effectively, but it should nonetheless be a staple move in Meowth's roster. Use this to break apart an opponent's approach and buy time for whatever move Jessie/James are cooking up. Using both Meowth's and Jessie/James' Up Smash together is an unparalleled edgeguarding technique
A Cat Napped Pokemon:
Downward Smash A (0%)
- Description: For 5 times as long as the smash is charged, Meowth reclines on a deckchair that appears from nowhere.
[*]Unique Properties: Automatically switches player control to Jessie/James while Meowth reclines. Meowth has super armor properties until the end of the attack. If Meowth suffers no damage during the entire move, he will recover 1% for every second spent reclining.
[*]Damage: N/A
[*]Knockback: N/A
[*]Range: N/A (self inducing move)
[*]Start Lag: Super armor activates 0.2 seconds into the move
[*]End Lag: 0.4 seconds. Meowth has to climb up out of the deck chair.
Use:
Putting Meowth into a super armor state is best used as bait, but it's also a great way to protect him from stage hazards and Final Smashes. Never use this without Jessie/James around to cover for you, otherwise Meowth will be pun-ished.
::Aerial Attacks:
A water pokemon?!:
Neutral Aerial (0%)
- Description: Meowth hates water, especially wet water! Meowth suddenly takes two buckets of water from out of nowhere and sloshes the contents all around him. This sends plops of water flying in every direction. The attack lasts 1.3 seconds
[*]Unique Properties: Sends 13 gravity influenced drips of water in random directions. They appear 3 or 4 at a time and drips lightely repel foes in the direction they are heading
[*]Damage: N/A
[*]Knockback: Very light repel effect from each drip of water, barely phazes opponents on the ground.
[*]Range: The drips fall very quickly, but don't dissapear until they touch the ground. In general, each drip flies 2 stagebuilder blocks away from Meowth before falling.
[*]Start Lag: 0.4 seconds while Meowth magically becomes soaked
[*]End Lag: no end lag
Use:
Considering how long this attack takes, Meowth must choose his moments wisely. The drips reek havoc with aerial approaches and seriously reduce the jumping capabilities of anyone caught underneath Meowth. This is a great gimping move, and one of the only ways Meowth can ever get a KO. Misjudging this attack, is usually fatal for Meowth, so always have Jessie/James on standby to save him. As with many of Meowths better moves, this attack will affect Jessie/James too, so don't accidentally gimp your team mates!
X Scissor:
Foreward Aerial (2%)
- Description: Meowth swipes the air in front of him with both paws, leaving an X shaped gash in anyone he hits.
[*]Unique Properties: Knockback only happens 3 seconds after a foe is hit, as if they just forgot to do it earlier.
[*]Damage: 2%
[*]Knockback: Light knockback away from Meowth. This relates to where Meowth is when the attack first lands. The knockback is comparable to the finishing strike on most Neutral A combos.
[*]Range: Hits anyone within a full stagebuilder block in front of Meowth. Vertical range is a little less than Meowth's height
[*]Start Lag: 0.1 seconds while Meowth prepares the attack
[*]End Lag: 0.2 seconds while Meowth tumbles foreward slightely
Use:
The time delayed knockback is a great way to set up more attacks, or just mess with your opponent. Meowth is vulnerable for the entire attack, since it won't even cause flinching if it lands. It's best used to take advantage of the opponent's laggiest attacks. You can actually stack the effects of X-scissor, potentially leading to an X-Scissor infinite (although the opponent would have to basically do nothing for the 6 seconds this takes to set up)
Fury Kicks:
Backwards Aerial (4x1%)
- Description: Meowth, laying on his back, kicks the air in front of him multiple times
[*]Unique Properties: Hits foes in front of Meowth instead of behind him. Each hit has knockback, rather than just the last one. Meowth's hitbox becomes shorter during the attack due to him laying on his back. If Meowth lands in the middle of this attack, he assumes the prone position.
[*]Damage: 4 hits, each dealing 1%
[*]Knockback: Weak knockback up and away from Meowth. Each hit of the attack deals this knockback, so Meowth can only land multiple hits at extremely low percentages.
[*]Range: Hits anyone precisely 2/3 a stagebuilder block in front of Meowth. Vertical range is also limited
[*]Start Lag: 0.1 seconds while Meowth lays on his back
[*]End Lag: 0.3 seconds while Meowth calms down
Use:
This attack only has one real purpose; to repel foes after hitting them with X-Scissor (since both B-air and F-air hit in front of him, they make a natural combo). You can also use this short-hopped to force Meowth into the prone position. Depending on the sitiuation, this may be one of Meowth's only options for horizontal knockback, which is a shame because it's so hard to space the foe correctly for this.
Don't look down:
Down Aerial (4x1%)
- Description: Meowth furiously pumps his stubby legs back and forth, scared that he might fall. The attack lasts for 1.1 seconds
- Unique Properties: Meowth floats during the attack and can move left or right with ease. The move can be used more than once before touching the ground, but additional uses will not have the floating effect.
- Damage: 4 hits, each dealing 1% damage
- Knockback: first three hits drag the opponent with Meowth. The last hit launches foes a minimum of 1 and 1/2 stagebuilder blocks away
- Range: Meowth's flailing legs only hit foes directly below him, making this a tricky attack to hit with.
- Start Lag: 0.1 seconds before Meowth panics
- End Lag: 0.3 seconds while Meowth catches his breath
Use:
This is best used as a recovery, since Meowth's Up-B is so easy to punish. Pretty poor as an attack, but if you fall during it (using it more than once in midair for example) Meowth can drag opponents down with him
That's Right!:
Up Aerial (Damage Varies)
- Description: Meowth celebrates for some reason (possibly because he's in the air). He uses a party themed item for the attack, the exact item varies with the amount of damage Meowth has accumulated
- Unique Properties:The attack Meowth makes depends on the amount of damage he has suffered on his current stock;
- <20%: Meowth spins a rattler above his head. Short range, but stays out during the end lag
- <60%: Meowth pops a party popper above his head. 0.3 seconds additional start lag, but attack spreads out in a wide radius, and the streamers cause flinching as they fall slowely to the ground
- <100%: Meowth blows a party horn above his head. No damage or knockback, but causes medium hitstun and has a somewhat greater vertical range
- >100%: Meowth throws a Jelly doughnut (Rice ball) upwards. Nothing beats a jelly doughnut in terms of priority, but if doesn't hit anyone, it falls back into Meowth, spiking him.
- Damage: 8% (unless Meowth uses a Party Horn)
- Knockback: Fairly average knockback (unless Meowth uses a Party Horn). Knocks foes upwards with the same ferocity as an average Neutral air knocks foes away
- Range: Varies with the attack. Between 1/2 and 1.5 times Meowths height above him. Party popper has twice as wide a hitbox.
- Start Lag: 0.2 seconds while Meowth gets out his party gear
- End Lag: 0.4 seconds while Meowth continues to cheer
Use:
Noteworthy for not being as situational as Meowth's other attacks. The Rattler is the safest one to use, while the Party Popper can be spammed to fill the air with streamers. Jelly Doughnut is particularly good at swatting down foes approaching from above. That leaves Party Horn as the black sheep of the family. Try to control the amount of damage Meowth takes, and get the attack you want.
::Other Attacks:
Bread Winner:
Dash attack A (4%)
- Description: Meowth dashes foreward as fast as his stubby legs can carry him, while carrying a stolen baguette above his head. If he finishes the dash without hitting anything or being hit himself, Meowth eats the baguette. The dash lasts 1.2 seconds.
[*]Unique Properties: Meowth recovers 6% damage if he finishes the dash without hitting anything or being hit himself. Dash ends abruptly if the dash hits anything.
[*]Damage: 4%
[*]Knockback: Pretty low knockback into the ground. Leaves Meowth vulnerable to foes with a quick aerial
[*]Range: Meowth's entire body, including the baguette is the hitbox. As such, the hitbox actually has more vertical range than horizontal.
[*]Start Lag: 0.0 seconds. attack comes out instantly
[*]End Lag: 0.4 seconds if Meowth hits something. Meowth falls to the ground in pain and assumes the prone position (Meowth can Ukemi the fall)
Use:
Absolutely useless as an actual attack. Meowth should only use this for its healing properties. Consider using this while retreating behind Jessie/James
Feint Attack:
Prone Attack (3%)
- Description: Meowth continues to lay on the ground, feining injury. This lasts for 0.6 seconds. If attacked during this stance, Meowth dissapears, reappearing 2 stagebuilder blocks up in the air.
[*]Unique Properties: Unless hit by an attack, Meowth remains on the ground after the move finishes.
[*]Damage: 3%
[*]Knockback: Flinching knockback to anyone who attacks Meowth
[*]Range: N/A (counter move)
[*]Start Lag: 0.0 seconds. Counter status appears on first frame
[*]End Lag: 0.2 seconds
Use:
The animation while Meowth lays prone is identical to Meowth's prone attack, So the opponent has no way of telling whether or not Meowth will actually counter their attack. Decent for stalling, but 3% is hardly worth the effort if you want to use it for racking damage.
Kat-Chump:
Ledge Attack (7%)
- Description: Meowth throws an inoccent looking ketchup bottle into the air. It travels upwards 2/3 of a stagebuilder block before falling back down into Meowth, who drinks it. If the ketchup bottle is intercepted by an opponent or attack, Meowth leaps up onto the stage, shoulder barging anyone in his way.
[*]Unique Properties: Unless the ketchup is intercepted, Meowth remains hanging from the ledge. Drinking the ketchup restores 4% damage to Meowth, although anyone else who touches it will recover 7% damage (negated somewhat by the ensueing rebuttal from Meowth)
[*]Damage: 7%
[*]Knockback: Somewhat fierce for a ledge attack. Easily launches foes at least 5 stagebuilder blocks away, and can actually KO, albeit at very high percentages.
[*]Range: Ketchup bottle is rather small an travels slowely. The shoulder barge reaches 2/3 a stagebuilder block onto the stage, and 1/2 a stagebuilder block above the edge of the stage.
[*]Start Lag: 0.1 seconds before throwing the ketchup bottle. Shoulder barge is instantaneous.
[*]End Lag: 0.3 seconds while Meowth drinks the ketchup. No lag after a shoulder barge
Use:
Make the most of Meowth's hang time and spam this as much as you can. Meowth is vulnerable to Down tilts/Smashes when throwing the ketchup bottle, but it's hard to land an attack on Meowth while leaving the bottle intact. Most opponents will leap off the stage and attack Meowth's back instead, giving Meowth the perfect opportunity for a gimp KO. This is the easiest way to recover damage for Meowth, so keep the foe at bay with Jessie/James while you spam this.
::B-Button Attacks:
::Special Attacks:
Scavenger:
Neutral Special (No Damage)
Description:
Team Rocket certainly can't survive on dreams alone. Meowth starts to scratch around on the floor, looking for something of use. He will continue to do this until B is released, after which he will suddenly find a single item and bounce with glee with it in his hands. The item Meowth finds depends on how long B is held down
Details:
Meowth is quick to start his search, but wastes a good 0.5 seconds bouncing with glee afterwards. It also takes Meowth a long time to find the best items. After finding three items, Meowth cannot find another until the first item dissapears or is used up. The items Meowth can find are; (Also listed are the items that Jessie/James can create, with the items Meowth digs up)
-
0.0-0.3 seconds: PokeDoll: A cute little Clerfairy doll
Throwing item. Knockback comparable to Mr.Saturn
Jessie/James can use this item to create;
-
0.4-0.8 seconds: BrickPiece: A small artifact of little value
Throwing item. Knockback comparable to Pokeball
Jessie/James can use this item to create;
- Brick Piece
- Empty Masterball
-
0.9-1.2 seconds: Stick: A curiously inedible stick of leek
Battering item. Knockback comparable to Lips Stick
Jessie/James can use this item to create;
-
1.3-1.4 seconds: Wht Apricorn: Hollowed out, this nut can become a custom pokeball
Throwing item. Knockback comparable to Pokeball
Jessie/James can use this item to create;
- Gold Berry
- Empty Fastball
-
1.5-1.6 seconds: Pnk Apricorn: Hollowed out, this nut can become a custom pokeball
Throwing item. Knockback comparable to Smokeball
Jessie/James can use this item to create;
- Gold Berry
- Empty Loveball
-
1.7-1.8 seconds: Blk Apricorn: Hollowed out, this nut can become a custom pokeball
Throwing item. Knockback comparable to Spring
Jessie/James can use this item to create;
- Gold Berry
- Empty Heavyball
-
1.9-2.0 seconds: Ylw Apricorn: Hollowed out, this nut can become a custom pokeball
Throwing item. Knockback comparable to Smokeball
Jessie/James can use this item to create;
- Gold Berry
- Empty Moonball
-
2.1-2.4 seconds: Empty Pokeball: A device used for capturing pokemon
Throwing item. See Jessie/James' Neutral Special for details
Jessie/James can use this item to create;
- Empty Greatball
- Empty Fastball
- Empty Loveball
- Empty Heavyball
- Empty Moonball
-
2.5-2.6 seconds: Squirt Bottle: A bottle of water with a cute Phanpy design
Usable item. Produces a stream of water comparable in form and function to Squirtle's Water Gun, when A is pressed. Single use.
Jessie/James can use this item to create;
-
2.7-2.9 seconds: Old Rod: A rod used for fishing. Seems quite beaten and worn
Hold item. Gives holder the ability to use a tether grab using the rod. Grab properties similar to Samus' Dash Grab. Can be thrown by pressing A.
Jessie/James can use this item to create;
-
3.0-3.5 seconds: Itemfinder: A strange radar device that can locate hidden items
Hold item for Meowth. allows Meowth to search twice as fast. Times required to get each item via Neutral B cut in half. Can be thrown by pressing A
This item will vanish if Jessie/James try to turn it into something else.
-
3.6-4.0 seconds: Secret Potion: The strongest potion that can heal any ailment. Only for truelly sick pokemon
Throwing item. Knockback comparable to Pokeball
Jessie/James can use this item to create;
- Everstone
- Sticky Barb
- Leftovers
- Rare Candy
-
4.1-4.3 seconds: Nugget: A rare chunk of unprocessed gold. Sell for a high price
Throwing item. Knockback comparable to BeamSword
Jessie/James can use this item to create;
- Amulet Coin
- Coin Case
- Bob-omb
-
4.4-4.7 seconds: Rocket Fan: A plain paper fan bearing the team rocket logo
Battering item (a fan with a red R painted on). Knockback 1.5 times stronger than regular fan, meaning it's much easier to DI out of.
Jessie/James can use this item to create;
-
4.8-4.9 seconds: Dubious Disk: Presumably the work of a jaded ex-silphco scientist. Do not run this program
Usable item. When A is pressed, anyone within 1 stagebuilder block of the user, who is in the middle of an attack, will have that attack backfire on them. This backfired attack has the same strength and properties as the attack that triggered it. Dissapears after 3rd use. Can be thrown with Z.
This item will vanish if Jessie/James try to turn it into something else.
-
5.0+ seconds: Mst Apricorn: Hollowed out, this nut can become a rare pokeball
Throwing item. Knockback comparable to Hammerhead
Jessie/James can use this item to create;
- Gold Berry
- Empty Masterball
Use:
Meowth's Neutral Special works well in conjunction with Jessie/James' equivilent, since Jessie and James can transform the junk Meowth finds into unique items. Finding the time to use this attack is somewhat tricky, so dig up the Itemfinder as soon as possible. The Apricorn items can be used to craft special pokeballs, which can be thrown to capture pokemon and other players alike.
Meowth Balloon:
Upward Special (No Damage)
Description:
Where would Team Rocket be without their Balloon? They'd be grounded, that's what! Meowth pulls an imaginary rip cord, causing a massive Meowth head balloon to inflate above him. The Meowth Baloon drifts slowely upwards, taking Meowth with it. The baloon drifts up until it either leaves the screen or is popped by an enemy attack, and it can be stood on like a platform. Meowth can detach himself from the baloon at any time, restoring his second jump, but he cannot summon another balloon until the first one leaves the screen.
Details:
The balloon inflates to the size of a battlefield platform in 1.25 seconds, pushing away anyone in its way. The baloon floats up slowely at a rate of 1 stagebuilder block every 1.4 seconds. The player can drift it left and right at will, and the balloon is doubley affected by "gust-of-wind" and "gush-of-water" style attacks. Popping the balloon causes it to rush upwards off the top of the stage, swiftly star KO'ing anyone standing on the balloon, and Meowth if he hasn't let go yet.
Use:
The Meowth balloon is a great way to save the whole team if they're knocked off-stage, since Jessie/James can stand on top of the balloon. The balloon is super fragile though, and any extra weight will weigh it down (if two or more characters stand on top of the balloon, it will actually descend)
Meowth's Party!:
Side Special (No Damage)
Description:
Meowth really gets into the spirit of cheering on his teammates. Meowth throws out his electric guitar and strums along to the beat of the stage's music. While B is held down, Meowth cannot move or use any other attacks. Meowth's peppy tune, invigorates Jessie/James, healing them 1% every 2 seconds. That's not all though! Any attacks Jessie/James perform while Meowth cheers will behave as if Meowth was piggybacking with them. So even if Meowth is far away, he will always be with Team Rocket in spirit.
Details:
There is an even 0.4 seconds of lag at either end of the move, but the move will continue for as long as B is held down. While Meowth rocks out, you can move Jessie/James using the analogue stick (If you play with it switched off, "tap-jump" will be turned on for the duration of the move).
Use:
This is a great defensive strategy, since it allows the use of the piggyback stance, without putting Meowth in any danger. Of course, you won't be able to use any of Jessie/James' Special Attacks or grabs while Meowth dances
Someone has to get his Claws Dirty:
Down Special (1%)
Description:
Even Meowth has to dig his way into trouble now and then! Meowth plunges his claws into the ground and tries/fails to dig a pit, for 0.8 seconds. Anyone who directly touches Meowth during his frantic digging will suffer 1% damage and low knockback into the air. If Meowth uses this attack over a pit Jessie/James dug, he will tunnel down into it, concealing himself. If there are multiple pits onstage, the player can then use Left/Right and A to select a pit for Meowth to appear out of. If not, or 3 seconds pass, Meowth simply pops out of the same pit.
Details:
There is only a short lag of 0.1 seconds before Meowth starts digging but a notable 0.4 seconds end lag when he gives up. The end lag is also 0.4 seconds if he successfully burrows into a pit and pops out of a different one. Meowth will be forcibly launched out of his pit, if an opponent attacks the pit. He will also take double the damage from that attack.
Use:
Using this without any pits to tunnel into would be foolish. Generally speaking, the more pits there are, the better this move is, since it lets Meowth warp from place to place with little room for punishment.
::R-Button Attacks:
::Grab & Throws:
Under Glass:
Grab (N/A)
- Description: Meowth certainly likes to play it safe! Meowth whips out a large bell jar (similar in appearance to an assist trophy) swinging it clumsily in front of him. If he captures a foe inside, he places the jar on the ground, otherwise he puts it away.
[*]Unique Properties:If Meowth grabs an opponent, he puts the jar on the ground and leaves it there, allowing him to resume play as normal. He can choose to attack the jar, racking up the damage and freeing the foe sooner, or he can pick the jar up (like an item). If he picks the jar up, Meowth will take the opponent out of the jar and perform a more traditional grab on them.
[*]Range: 2/3 stagebuilder block, which is pretty decent.
[*]Start Lag: 0.6 seconds while Meowth whips out the jar
[*]End Lag: 0.4 seconds while Meowth staggers from the inertia from swinging the jar
Use:
Leaving the opponent in the jar is a great way to buy Meowth some breathing room. Unlike other "trap enemy in an item" moves, you cannot pick up the jar and throw it off the stage, since picking up the jar initiates a regular grab (even if someone else picks up the jar)
A round of a-claws:
Pummel attack (1%)
- Description: Meowth digs his free hand into the opponent's gut/midsection. On especially tall characters, Meowth is forced to aim a little lower...
[*]Unique Properties: Small delay between hits when pummeling tall male characters
[*]Damage: 1%
[*]Start Lag: 0.05 seconds
[*]End Lag: 0.2 seconds. Meowth can rack up plenty of hits before he has to throw.
Use:
4% per second isn't very impressive, and it's even less against tall opponents. May as well just go straight for the throw you want.
Step on a few Toes:
Foreward Throw (6%)
- Description: Meowth stamps down hard on the enemy's toes (this throw fails if the enemy has no feet), then laughs as the enemy hops backwards soothing their foot.
[*]Unique Properties: The foe will hop back exactly 3 stagebuilder blocks over a period of 1.2 seconds, during which time they will be vulnerable to everything, except grabs. Meowth himself cannot capitalise on this, because he regains control at the same time as the opponent.
[*]Damage: 6%
[*]Knockback: 3 stagebuilder blocks, fixed "knockback".
[*]Start Lag: 0.5 seconds, Meowth is quite deliberate about stamping down on toes
[*]End Lag: 1.2 seconds. This leaves Meowth open in Free-For-All matches
Use:
Using this throw near the edge of the stage, will result in the opponent tumbling off, but doesn't equal an easy KO. The foe can still recover. This throw is a reliable spacing tool, and is extremely handy for setting up a powerful attack from Jessie/James
Brick Break:
Backward Throw (4% to Meowth)
- Description: Meowth attempts to mimmic the powerful strikes of the fighting/poison pokemon, Croagunk. He leaps up and karate chops the head of his enemy... and ends up breaking his hand in the process!
[*]Unique Properties: After breaking his paw, Meowth staggers backwards 3 stagebuilder blocks. The enemy remains stunned until Meowth stops staggering (after 1 second). Meowth only deals damage to himself with this attack
[*]Damage: 4% to Meowth
[*]Knockback: N/A since Meowth himself is the one who moves
[*]Start Lag: 0.8 seconds, Meowth is apprehensive about performing brick break
[*]End Lag: 1 second. Since Meowth staggers backwards, he can end up falling prey to all manner of traps
Use:
If Meowth falls off a ledge while staggering, he will grab the ledge and regain control immediately. After regaining control early the foe may still be stunned, but usually not long enough to regrab. If you can though, this can lead to an odd chaingrab, the only purpose of which is to stall for time. Other than that extremely situational use, there is usually no need to use this over Meowth's better throws
Pussyfooting around:
Downward Throw (6x2%)
- Description: Meowth knocks the enemy to the ground with a ball of yarn. The yarn rolls away and Meowth gives chase on all fours, trampling the foe in the process. Despite being a total lightweight, Meowth's claws make this a painful throw.
[*]Unique Properties: No knockback. Puts the foe in the prone position. Meowth ends up 1/2 a stagebuilder block behind the foe.
[*]Damage: 6 hits each dealing 2%
[*]Knockback: N/A
[*]Start Lag: 0.2 seconds. Meowth always keeps his yarn close at hand
[*]End Lag: 0.5 seconds. Meowth can barely avoid counterattack from the opponent
Use:
This is Meowth's shortest lasting throw, and one of Meowth's most damaging moves, full stop. Meowth is left pretty vulnerable though, even to the enemy he just threw, so having Jessie/James nearby is more or less a requirement for this attack
Bounce:
Upward Throw (3%)
- Description: Meowth seems to have gotten things the wrong way round! Meowth leaps onto the foe's head and springboards himself into the air, dealing a small amount of damage to the foe in the process.
[*]Unique Properties: The height Meowth leaps is linked to the amount of damage the opponent has taken. The leap is usually equal in distance to the finishing knockback from a heavyweight's neutral A combo. As such, Meowth can KO himself at percentages greater than 250%.
[*]Damage: 3%
[*]Knockback: N/A
[*]Start Lag: 0.3 seconds. This is relative to the opponent's height. Against short characters, the start lag is halved.
[*]End Lag: N/A. After springboarding off, Meowth behaves exactly as if he had footstool jumped someone.
Use:
At low percentages, this links directly into Meowth's D-air. At mid percentages, Meowth can use his N-air to aggravate the opponent further. This throw is surprisingly useful in free-for-all matches
::At first glance:
Meowth on his own is critically flawed (if Jessie/James are KO'd, Meowth will be left defenseless). Meowth has no KO moves, very few damage rackers, pretty pitiful range and a constant problem with end lag. Meowth's recovery options are so slow, they WILL be punished. Depending on the time of day and the day of the week, Meowth might not even have any proper knockback attacks! This is one bad character!
Meowth has a few saving graces however. His attacks are generally faster than average, and his prone attack is unreadable. He is one of the very few characters capable of reliably recovering damage and he has reasonable gimping attack. If you're stuck with Meowth on his own, the key to winning is to lure them offstage and to use his general unpredictability to your advantage.
::With practice:
Meowth really shines when properly teamed up with his pals Jessie and James. Every attack that seemed to be just a minor annoyance when Meowth was all alone, becomes a set up attack for Jessie/James' powerful strikes. Meowth still suffers from his lack of range, but everything else is balanced out by the addition of Jessie/James. And Meowth balances out all of Jessie/James' problems too. Meowth should cycle his duties between Point Man and Support Unit, since Jessie/James need both to function optimally. If Meowth isn't hassling the enemy, he should be helping the team by digging up items or boosting Jessie/James' abilities with a dance.
Meowth's moves can generally be defined as either Hassling or Stalling. This would make Meowth an excellent camper, if it wasn't for his poor range and lacking projectiles. Meowth is a poor fighter by most accounts, and so needs to rely on psyching out his opponent. Some of Meowth's moves are excellent demoralisers, and when you factor in the constant threat that is Jessie/James, only one opening is needed to win the match.
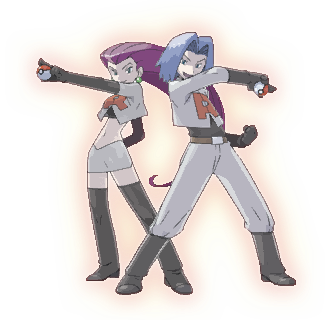
::::JESSIE & JAMES::::
**This couldn't have worked better if we'd planned it.**
**If we'd planned it, it wouldn't have worked at all!**
Racheal Lillis & Ted Lewis
Jessie is the self proclaimed leader of the trio. To an extent, her whims determine the actions of the Team. Jessie has the most enthusiasm for her position at Team Rocket, and a somewhat ruthless disposition towards those who would get in her way. Jessie's firey temperment gives her some powerful attacks. But, without outside interference, she will miss every time
James is the glue which holds the team together. Kind and eccentric in equal measures, he sees the good in Team Rocket's crusade. He is not above an occasional tantrum or sulk however, and abuses pokemon he dislikes. James has an odd glut of moves at his disposal, most requiring correct spacing and others taking a long time to finish. When the situation is right, Jame's true power comes to shine.
In Brawl, Jessie/James operate as single character. They maintain constant physical contact with one another, to reassure one another of their team spirit. Jessie always faces forewards and James always faces backwards, so whenever James attacks he always hits behind the duo. Many of their attacks involve complicated and essoteric poses, lending the duo some unfortunately large hitboxes.
Please note that the following moveset applies to both Jessie/James when they are seperated from Meowth, and also when all three are in the piggyback stance. Each move will detail any differences between the seperate and piggyback versions of the move.
::Stats:
Size: 90/100
Although they are individually average in size, Jessie/James form a huge target together, thanks to their bizarre poses and attack animations.
Weight: 65/100
Even together their weight is decidedly average. These two are certainly not piggles
Walk: 20/100
Jessie/James walk back-to-back, making movement quite difficult
Run: 10/100
There's very little difference between Jessie/James walking and running speeds
Traction: 30/100
Being two people makes it very easy for Jessie/James to lose their equilibrium
Damage: 60/100
They can certainly pack a punch, but can they deliver it?
Knockback: 85/100
When Jessie/James land a hit, it won't be them who blast off again..
Start Lag: 100/100
It's like having Dedede's foreward Smash replace all your moves.
End Lag: 70/100
And if the start lag wasn't bad enough..
Range: 85/100
Humungous hitboxes, and some tricky projectiles too!
Priority: 50/100
Considering the start lag, this level of priority is quite low
First Jump: 30/100
Jessie throws James upwards, who in turn drags Jessie up into the air. This makes for a rather large hitbox
Second Jump: 80/100
James throws Jessie upwards this time, who in turn drags James up. After the second jump, Jessie/James curl up into balls to reduce the size of their hitbox
Recovery: 30/100
Jessie/James' recovery involves blowing themselves up, which can KO them at high percentages.
Fall Speed: 50/100
This is something Jessie/James and Meowth have in common
Crouch: 90/100
Both Jessie/James lay flat on their stomachs. In the process, their hitbox becomes twice as wide
Hover: No
Crawl: Yes
Wall jump: No
Wall cling: No
Glide: Yes. Jessie uses James as a makeshift paraglider. This Glide is much much heavier than other glides, and doesn't have a Glide attack.
::A-Button Attacks:
::Ground Attacks:
On the Wind:
Neutral A (4%)
- Description: While standing back to back with James, Jessie delivers a brutal slap in front of her. The momentum of the attack spins the duo around, resulting in James facing forewards and Jessie facing backwards.
[*]Unique Properties: Spins the duo around so that they face the other way. Continues on to Neutral AA if A is pressed after frame 24 of the attack.
[*]Piggyback Version: Meowth yells "Go!", and almost falls off Jessie's shoulders as she attacks. The attack has 0.15 seconds less start lag with Meowth on board.
[*]Damage: 4%
[*]Knockback: Minimal knockback. typically less than 1/4 a stagebuilder block away from Jessie.
[*]Range: Jessie leans foreward to slap, so the attack actually reaches 1 and 1/4 stagebuilder blocks ahead of Jessie and can hit most ducking foes. The hitbox of the attack however, is only 1/2 a stagebuilder block wide, so Jessie won't hit small foes that are right in her face
[*]Start Lag: 0.4 seconds. one of the slowest jabs ever
[*]End Lag: 0.1 seconds, this can be jab cancelled
Use:
Jessie/James have the inimitable ability to have a laggy neutral A. It's still their quickest attack and the lack of end lag is particularly useful. It's nice to use this then flee, since the attack turns the duo around.
Past the Stars:
Neutral AA[AAA-etc] (1%)
- Description: James thrusts his rose out in front of him, hoping to nail the foe that was just victim to Jessie's slap. A single puff of darkness emenates from the rose. While A is continually pressed, James twirls the rose around by the stem while it continues to spew darkness (a motion similar to Mewtwo's A combo)
[*]Unique Properties: Darkness element. Every successful hit with the rose increases the knockback of the next attack that hits the foe by 5% (i.e. the foe would be knocked away as if they had 5% more damage than they actually have). This extra effect can stack on itself up to 25% but is lost after the foe is hit by an attack that causes any knockback other than 'flinching'.
[*]Piggyback Version: Meowth wildly scratches in time with the rose's twirling, though his enthusiams makes James stoop over and aim towards the floor slightely. Every scratch from Meowth adds 1% damage, and generally makes the combo harder to escape from
[*]Damage: 1%
[*]Knockback: Flinching knockback. Not hard to escape after 2 hits.
[*]Range: James has roughly the same horizontal range as Jessie, though slightely less since he doesn't lean foreward. The darkness that is the actual hitbox is only 1/3 a stagebuilder block in size, and it can be ducked under by most characters
[*]Start Lag: 0.1 seconds
[*]End Lag: 0.4 seconds, increases to 0.5 if A is continually pressed. James dramatically crouches and sheathes the rose back in his pocket as if it were a katana
Use:
This is a big pain to hit the opponent with and there are better ways to punish an opening. The additional pseudo damage only contributes to the knockback of the next hit that strikes the enemy, so it's almost impossible for Jessie/James to capitalise on that in any meaningful way
Rocket Punch:
Foreward A(14%)
- Description: With James on all fours behind her, Jessie arches herself backwards until the tip of her hair touches James' nose. Incidentally, their bodies form an R shape at this moment. James sneezes and Jessie throws a rather brutal looking punch in front of her
[*]Unique Properties:If Jessie/James are hit by any attack that does less than 7% damage, they will instantly unleash their attack with 1.2x the knockback. This attack puts the enemy in a special launch state called the "Rocket state". For the short amount of time they are in the rocket state, the foe leaves a trail of smoke in the air. Direction Influence is impossible when this attack connects.
[*]Piggyback Version: Meowth slides down off of Jessie just as the attack is unleashed and ends up getting caught up in it! Jessie punches Meowth so hard that he sticks to her hand, this sends a large circular shockwave out which, while only half as strong as the regular attack, travels 1 stagebuilder block in front of her
[*]Damage: 14%
[*]Knockback: Strong horizontal knockback. Bare minimum of 3 stagebuilder blocks due to the special launch state. Can easily KO at 80%
[*]Range: The punch reaches a full stagebuilder block and half in front of Jessie, but has little vertical range. The circular shockwave from the piggyback version is as tall and wide as Jessie, but there's a gap in the center, through which the smallest characters can jump unharmed.
[*]Start Lag: 1.5 seconds. Getting that R pose just right takes time
[*]End Lag: 0.7 seconds while James gets back up to his face. Jessie closes her eyes and sighs.
Use:
Similarities between this and Falcon Punch should be immediately apparent, but this move actually holds more in common with Marth's Counter. This pseudo counter activates only for attacks less that 7%, so timing this is vital. This is a tremendous KO tool against most damage rackers. Rocket Punch leaves Jessie/James wide open to Smash attacks, so having Meowth nearby to hassle the enemy is certainly useful
Bottlecap collection:
Upward A(9x1% may hit self)
- Description: When times get desperate, real sacrifices are called for. James grabs a handful of his precious bottlecaps from his pocket and both her and Jessie throw them up into the air.
[*]Unique Properties:The nine bottlecaps thrown scatter at the peak of the throw and then rain back down on Jessie/James. Any bottlecaps that don't hit a foe are likely to damage Jessie/James. Stale move negation affects the number of bottlcaps that are thrown
[*]Piggyback Version: Meowth catches any bottlecaps that come back down, and throws them up again, pretending to use Payday. Team Rocket can move again the instant Meowth throws the bottlecaps again
[*]Damage: 9 hits of 1%
[*]Knockback: Minimal knockback upwards. The cloud of bottlecaps certainly helps juggle the opponent
[*]Range: The bottlecaps are thrown bundled together, and scatter at the peak of the throw which is 1 and 1/3 stagebuilder blocks above Jessie/James. The way they scatter is random, but generally covers an area equivilent to 3/4 a stagebuilder block. This increases to a full stagebuilder block as they rain back down
[*]Start Lag: 0.4 seconds
[*]End Lag: 0.9 seconds after throwing the bottlecaps. Maybe longer if the bottlcaps end up hitting Jessie/James. The piggyback version of the attack has 1.2 seconds end lag, since Meowth has to throw any remaining bottlecaps a second time
Use:
This attack comes out rather quickly, when you consider the usual start lag Jessie/James suffer. The bottlecaps handily cover for the move's end lag too, since anyone trying to capitalise will be caught in the shower of bottlecaps. Generally a good move to use to shatter aerial approaches and throw the enemy off balance. The stale move negation affects this move much more than most however, as it actually reduces the number of bottlecaps thrown. The piggyback stance version of this attack is actually inferior, thanks to additional end lag.
I don't Want to be Your Master!:
Downward A(7%)
- Description: James rears his leg back, raises his arms and yells "I DON'T WANT TO BE YOUR MASTER!". He then heartlessly kicks whatever was in front of him at the time
[*]Unique Properties:Can hold A down to delay the actual kick itself by up to 1.3 seconds. If James hits an unevolved pokemon with this attack, it will evolve. This can be used against Pikachu, Jigglypuff, Squirtle and Ivysaur, as well as most pokemon that emerge from pokeballs, and even pokemon that appear as stage hazards. The evolved pokemon will remain evolved for the rest of the match, but cannot be made to evolve again (pokemon from pokeball items remain evolved until they leave the stage). Details on evolved pokemon can be found in the appendix of this moveset.
[*]Piggyback Version: Meowth interrupts James with "Would you quit yappin!", forcing him to kick as soon as possible. This version of the attack won't evolve pokemon.
[*]Damage: 7%
[*]Knockback: Surprisingly low. In most cases the enemy will land on the ground 4 stagebuilder blocks away. The trajectory is very close to the ground and may not actually knock foes away if used on a steep enough incline.
[*]Range: Hits foes up to 1 stagebuilder block in front of James (James faces backwards). Like other D-tilts, this hit is low to the ground
[*]Start Lag: 0.6 seconds minimum. Can be delayed up to 1.9 seconds
[*]End Lag: 0.3 seconds if it connects, 0.5 seconds if it doesn't. James calms down a bit after having kicked something.
Use:
This move alone is the reason why Team Rocket makes a good pokemon counter. Only Charizard and Lucario are immune to evolution. All evolutions trade speed for power, making them an easier target for Team Rocket. Pikachu in particular loses much of its agility when it is forced to evolve. Other than that, there's little need to use this move, other than when a relatively quick attack is needed. And yes, James can evolve ekans and koffing (see Neutral Special) by kicking them, but he can't evolve Meowth
Rocket's Rockets:
Foreward Smash(17-26%)
- Description: Now they mean business! Jessie props up a Team Rocket rocket launcher she got from... somewhere, and James loads it with a rocket he got from... somewhere. Jessie takes aim with the launcher while James scopes the area in from of her with his binocculars. Jessie then fires a horrendously strong missile.
[*]Unique Properties:The missile follows a Sine-wave curve unless fully charged. If fully charged, the force of the missile causes a misfire, making it follow a Tangental curve instead. If the game is paused when James looks through the binocculars, the binocculars become one of the selectable point-of-views on the pause menu.
[*]Piggyback Version: With Meowth around to help, the attack has 0.3 seconds less start lag. The missile fired will follow a CoSine-wave curve instead of its usual path. At a glance, it's hard to spot the difference between the two, making it much easier to catch players off guard
[*]Damage: 17-26%
[*]Knockback: Strong knockback in the direction the missile was currently moving. This is usually horizontal with a slight up or downward incline. Knockback strength when charged is about 1.5 times as strong as Samus' fully charged beam..
[*]Range: The missile will continue to fly until it leaves the stage. The exact path the missile takes depends on whether the missile was fully charged or not. At full charge, the missile arcs dramatically upwards, missing anyone standing 4 stagebuilder blocks or more in front of Jessie/James, but potentially nailing airborne foes. The uncharged version bobs up and down as it flys, at its highest point it can be ducked, at its lowest it can be shorthopped. The missile does not explode (but does dissapear once it hits something), so only by touching the missile itself can a player be damaged.
[*]Start Lag: 2 seconds. Operating a rocket launcher is a delicate procedure
[*]End Lag: 0.5 seconds while Jessie puts the rocket launcher away... somehow.
Use:
A trick to using this is to charge it for as long as possible, releasing it JUST before you reach full charge. The foe will expect the missile to arc upwards, and try to duck it, only to be wholloped by the more horizontal missile instead. There's no way you can get Jessie/James to use this while fighting in close quarters or even mid range. Jessie/James need to be far far away to use this, so you have to keep the foe busy with Meowth. Connecting with this powerful missile will lead to some very early KO's, but your opponent will almost certainly dodge it, unless Meowth specifically knocks them into it.
Strike a pose:
Upward Smash A(0%)
- Description: Jessie and James leap up into the air and strike one of their trademark poses. Attack portion of the move lasts 0.6 seconds
[*]Unique Properties: Almost identical to Meowth's Upsmash. Repels foes instead of dealing knockback. It repels foes who are shielding, without affecting their shield. If near to Meowth performing the same attack, the range of the attack triples. This move has no effect on projectiles or thrown items.
[*]Piggyback Version: When Meowth is onboard, he will join in on the action, boosting the range. This boost is identical to the boost recieved if both Jessie/James and Meowth's Up Smashes were used in tandem.
[*]Damage: N/A
[*]Knockback: Repel strength equivilent to an average character's walk speed. Charging the smash, results in a stronger push. At full charge, repels equivilent to an average character's dash speed.
[*]Range: Repels foes within 1/2 a stagebuilder block of Jessie/James. Range triples if Meowth join in on the attack
[*]Start Lag: 0.3 seconds while Jessie/James leap up
[*]End Lag: 0.4 seconds while Jessie/James fall to the ground. Lag increases to 0.5 seconds if Meowth joined in on the attack
Use:
This is the Jessie/James counterpart to Meowth's up Smash. Jessie/James' size gives the move greater range, but at the expense of extra lag at both ends of the attack. The only reason you would want to use this attack, is if Meowth was nearby to perform it too.
These are Ice-Packs We're Gunning!:
Downward Smash A(4-10x12%)
- Description: Jessie and James, back to back, wield some troublingly authentic looking weaponry. But, no need to worry, they're aren't real guns, they're ice guns! Jessie and James both aim their weapons at the ground in front of them (Jessie aims in front, James aims behind the duo) and shoot a salvo of 2 ice bullets each.
[*]Unique Properties: Each bullet freezes foes on contact, but won't do anything to an enemy who is already frozen. If the move is charged, Jessie and James will aim higher and shoot more bullets. But while shooting, the recoil will naturally make Jessie/James aim back at the ground. The bullets can be fired off stage, but dissapear after travelling 4 and 1/2 stagebuilder blocks.
[*]Piggyback Version: Meowth idiotically stands directly in front of Jessie, getting hit by the last ice bullet. Though this doesn't deal any damage or knockback, Meowth will be frozen in place during the attacks end lag. In frozen form, Meowth acts as a wall against projectiles and short ranged attacks.
[*]Damage: Between 4 and 10 bullets (this is the total number fired by Jessie/James) each dealing 12%. Only one bullet can deal damage to a given target.
[*]Knockback: Equivilent to 2/3 the knockback from being hit by a Mr Freezie.
[*]Range: Uncharged, hits foes standing within 1/2 a stagebuilder block of the duo. At full charge, the range is extended to 4 and 1/2 stagebuilder blocks. The attack can be easily jumped over, since the attack is only meant to pepper the floor with bullets.
[*]Start Lag: 1.0 seconds while James yells "These are ice packs we're gunning!"
[*]End Lag: 1.0 seconds while James mutters "I mean ice-guns we're packing.."
Use:
Freezing foes is a nice way to give Jessie/James a nice, albeit short reprieve from the action. It's certainly something the enemy has to keep in mind if they stray too close to Jessie/James while fighting Meowth. Of course, Team Rocket's usual lag problems rear their ugly heads again, but at least you can fire this off the edge of platforms(unlike Snake and his Foreward Smash)
::Aerial Attacks:
Liquiebrium:
Neutral Aerial (5x6%)
- Description: Jessie clambers onto James shoulders, standing on them. The duo then spin with their arms outstretched for 1.2 seconds
[*]Unique Properties: This huge attack has two seperate but similar hitboxes, one for Jessie's arms and one for James'. If Jessie/James land during this attack, they will continue the attack on the ground. This attack cannot be fastfalled, due to the helicopter like motion of Jessie/James
[*]Piggyback Version: Meowth can't be left out of something this cool! He stands on James' head and spins in the opposite direction. This causes a slight vortex affect to anyone who touches Meowth, and increases each individual hit of the attack by 1%
[*]Damage: 5 hits each dealing 6%. Both Jessie and James deal 5 hits each, but only the very tallest of characters can possibly be hit by all 10 hits (and even then, only if they were right in the middle of the attack to begin with.
[*]Knockback: The final hit launches foes away a moderate distance downwards. The minimum launch is 2 stagebuilder blocks, and this move can KO at higher percentages
[*]Range: Jessie/James' arms reach out 1 stagebuilder block either side of them, forming two seperate hitboxes. There is enough space between Jessie and James' hitboxes for most characters to fit comfortably, although anyone stuck in the middle will probably end up being caught by one attack or the other.
[*]Start Lag: 1.1 seconds while Jessie clambers onto James' shoulders
[*]End Lag: 0.6 seconds while Jessie jumps down off of James. This lag increases to 0.8 seconds if the move ends on the ground.
Use:
This is a huge multihit attack that is hard to avoid but easy to punish. Skilled players like to jump right through the gap between Jessie and James' arms, so you'll still need Meowth to guarantee some hits. The biggest characters can suffer an insane 60% damage from this attack, but only if they jump right into middle of it and forget to DI (It's not hard to see a N-air coming). Using this short-hopping works well with most of Meowth's hassling attacks.
A Nett e-Launcher:
Foreward Aerial (0%)
- Description: Jessie reveals a rather high end linear launcher she aquired... somehow. She and James aim it at a 45 degree angle downwards and fire out a small net weighted with iron balls.
[*]Unique Properties: If this attack hits someone or something, it will be trapped in the net as the net continues its descent. Any attack on the net will break it open, and players caught inside can also attack the net to break it open (anyone in the net suffers an additional 0.2 second start lag to all their attacks). The net will not dissapear on contact with the ground, only by attacking it can it be destroyed. Jessie/James cannot fire another net if the first one is still around.
[*]Piggyback Version: Oh dears! Meowth got caught in the net! This will, obviously, seperate Meowth from Jessie/James. Anyone else who gets trapped in the net will suffer 1% damage (flinching) every second as they scuffle. Meowth can still be controlled, and he can even attack (though this will break the net), but Meowth himself can also be attacked.
[*]Damage: 0%. The piggyback version of the attack deals 1% per second
[*]Knockback: Foes trapped in the net will be dragged along with it until the net is destroyed
[*]Range: The net is 3/4 a stagebuilder block in size and travels 5 stagebuilder blocks per second diagonally downwards.
[*]Start Lag: 0.9 seconds while Jessie and James marvel at their new toy
[*]End Lag: 1.2 seconds while Jessie packs it back into the box she got it from
Use:
This is an incredibly strong gimping technique, providing you predict your opponent correctly. Any attack, before or after being trapped in the net, will destroy the net, so it's best off used as a surprise. Characters like Ike are more or less screwed if caught in the net while off-stage.
The piggyback version of this move will prevent slower characters from getting out of the net, so long as Meowth stays in too.
Our last Morsel:
Backward Aerial (2x5%)
- Description: James rummages through his pockets and feebley tosses a morsel of food away in front of him. Quickly realising that's his only shred of food left, James hurriedly swipes the morsel back out of the air.
[*]Unique Properties: Although the morsel of food he throws counts as a projectile, James has super armor frames until he catches it again (it's impossible NOT to catch it), thus the morsel only travels for an instant. This attack will continue unhindered if Jessie/James land during it.
[*]Piggyback Version: Both Meowth and Jessie spot the scrap of food being discarded and make a heroic leap for it. Anyone caught by the three way scuffle will suffer twice as much knockback as normal. Meowth and Jessie/James suffer 3% damage each from this attack.
[*]Damage: 2 hits each dealing 5%. The morsel itself is the first attack, the swipe in midair is the second
[*]Knockback: The first hit deals only flinching knockback, the second strike sharply knocks the foe downwards. Nowhere near as strong as a spike, it certainly can't be expected to KO.
[*]Range: The morsel is tiny and only travels 1/2 a stagebuilder block in front of James. The swipe James makes reaches about 1 and 1/3 stagebuilder blocks and covers a total area of 1 and 1/2 stagebuilder blocks.
[*]Start Lag: 0.5 seconds until James throws the morsel. Another 0.5 seconds until he swipes the food back.
[*]End Lag: 0.4 seconds while James stashes the food back in his pocket
Use:
Even though this is Jessie/James' quickest aerial, you still need to commit yourself to this move, and it can be punished. The midair swipe aims slightely upwards, and is mainly intended to strike down people approaching from above. Only the piggyback version can be expected to KO, and neither version can be followed up.
A Rose by any Other Name is Just as Sweet:
Downward Aerial (15% or 7%)
- Description: Jessie somersauts above James then brutally slams both her feet into his face, launching him down at the ground. Upon hitting the ground, James shows that he harbors no ill will, by catching Jessie as she herself falls.
[*]Unique Properties: Until the attack ends in its entirety, neither Jessie nor James can be controlled. Although Jessie and James seperate during this move, this cannot ever result in the permanant seperation of the duo. James is super-armored until he captures Jessie, and will automatically run left and right to stay underneath her as she falls. Jessie though, highly vulnerable to attacks as she falls. James can miraculously jump as high as neccessary to clear an obstacle or pit in his way, but will fall if he needs to go off-stage to catch Jessie. If either Jessie or James are KO'd in the middle of this attack, the other is KO'd as well.
[*]Piggyback Version: If they have him with them, Meowth becomes the unwitting dupe of Jessie and James' attack. They both stamp on Meowth, launching him directly at the ground. This seperates Meowth from Jessie/James. Attack properties remain the same, but without the need to regroup before the move ends.
[*]Damage: If a foe is hit as Jessie kicks James, they take 15% damage. If they touch James as he plummets, they take 7% instead.
[*]Knockback: The knockback from Jessie's legs is a strong spike, and quite capable of early KO's. The knockback from James as he falls isn't as strong, knocking foes down and away from James, a minimum of 3 stagebuilder blocks
[*]Range: The strike from Jessie's legs is 3/4 a stagebuilder block wide and 1 and 1/3 stagebuilder blocks tall. After being kicked, James' entire body becomes the hitbox for the weaker attack, this attack remaining potent until James hits the ground.
[*]Start Lag: 0.5 seconds while Jessie somersaults in midair
[*]End Lag: Varies. The duo regain control 0.2 seconds after James catches Jessie. Obviously, the end lag increases when the attack is performed from higher up.
Use:
The actual attacks themselves are really strong, and surprisingly quick for Team Rocket. Sadly, if this is used off-stage, it will always result in a self destruct, and if this is used on-stage, the end lag will be punished severely, even if you hit the opponent. Opponents can lengthen the end lag by juggling Jessie in the air, and they can even KO James by knocking Jessie off-stage. Either use this off-stage as a last ditch attempt to spike the opponent, or use it close to the ground to keep the end lag low.
Captivate:
Upward Aerial (Heals 3%)
- Description: Noone can stand up the immeasurable charm of Jessie and James! They both reach out above them with their left hands while fillowing their hair with their right.
[*]Unique Properties: Heals foes on contact instead of damaging them. May induce free-fall depending on the gender of the foe and whether they hit Jessie's hand or James'. Essentially, if the enemy is female and is hit by James' hand, they will enter free-fall. The same occurs if a male character is hit by Jessie's hand. If the foe is hit by both hands, they do not enter free-fall and heal an additional 2% damage instead. Genderless foes cannot be made to free-fall with this attack, for obvious reasons. All pokemon are considered to be of a random gender, determined at the start of the match.
[*]Piggyback Version: Meowth feels the love too! He jumps up off of Jessie and James' shoulders with both his arms outstretched. Genderless foes who touch Meowth's arms will be put into free-fall. The other elements of the attack happen as usual.
[*]Damage: Heals opponent 3%
[*]Knockback: Flinching knockback (even though the attack itself heals). Can cause free-fall in certain circumstances.
[*]Range: Both Jessie and James' arms reach out one stagebuilder block above them, and there is 1/4 a stagebuilder block of horizontal space between the two hitboxes. It is pretty hard to land the attack you want, without landing the other one too.
[*]Start Lag: 0.7 seconds. Jessie and James perform the motion in a hazey slow-motion.
[*]End Lag: 0.6 seconds.
Use:
This is pretty slow and hard to hit, particularly against pokemon you don't know the gender of, but forcing the enemy into free-fall is definitely worth the hassle. This sets the opponent up very well for a F-Air off the stage. Depending on the opponent though, you may need the piggyback version.
::Other Attacks:
Rollin' Along:
Dash Attack(5x2%)
- Description: Both Jessie and James tuck themselves into tight balls and roll foreward along the ground for 1.2 seconds
[*]Unique Properties: Length of the roll is affected by the terrain. Steep inclines will reduce the length of the attack by 0.3 seconds, steep declines can increase the length by up to 0.8 seconds. Both Jessie and James count as seperate hitboxes. If Jessie is stopped by an attack, James will continue rolling along until either he too is stopped by an attack, or the move ends naturally. The further away from one another they are at the end of the move, the longer the end lag will be as they regroup.
[*]Piggyback Version: Meowth pushes Jessie along from behind, giving her super armor against a single attack. Meowth himself can be hit, causing seperation.
[*]Damage: Both Jessie and James hit up to 5 times (regardless of how long the attack itself is), each hit dealing 2% damage
[*]Knockback: Drags foe along. Final hit causes small-hitstun
[*]Range: The entirety of Jessie and James' bodies are the hitboxes. When tucked into a ball Jessie/James only cover an area of 3/4 a stagebuilder block
[*]Start Lag: 0.5 seconds. All they have to do is tuck and roll
[*]End Lag: 0.3 seconds. Increases if Jessie and James end the move further apart
Use:
It's hard for your opponent to flat out stop this attack, but they could just jump over it and wait for the move to end. This dash attack can easily overshoot and fall off the edge of the stage. It's quick to come out though (comparitively) and the dual hitboxes can really rack up the damage on wide opponents. The extra super armor on the piggyback version is very useful for rolling through an explosive item or charged smash attack.
Mondo, Team Rocket Special Delivery Member Trainee!:
Prone Attack(5x2%)
- Description: With a "Tan-Tan-TAN!" fanfare and appearing from a cloud of pink smoke, Mondo appears behind Jessie/James. After saluting them both he starts giving them food, like a good little Mondo.
[*]Unique Properties: Every 1.4 seconds after saluting, Mondo feeds Jessie/James a random food item (they all heal 4%). He will keep doing so until either Jessie/James is attacked, or the player manually stops the attack by pressing any button. Mondo himself appears slightely in the background and cannot be hit.
[*]Piggyback Version: Mondo works extra fast to appease the whole team, feeding them every 0.8 seconds. The food only heals 3%, but heals both Meowth and Jessie/James
[*]Damage: N/A
[*]Knockback: N/A
[*]Range: N/A
[*]Start Lag: 1.0 seconds. Mondo is pretty prompt
[*]End Lag: N/A. Although Mondo does dissapear back into a cloud of smoke when the attack ends
Use:
Jessie/James cannot manually enter the prone position, unlike Meowth, so you won't find much of an opportunity to actually use Mondo. If Jessie/James are knocked down, your opponent is probably breathing right down your neck. But if someone knocks you all the way to the opposite end of Hyrule Temple, then feel free to capitalise on their stupidity with some free healing.
Snowgasboard:
Ledge Attack(12%)
- Description: "snow food is low in fat!". While James hangs onto both the ledge and Jessie (by her hair), Jessie brandishes a tray piled with all kinds of snow dainties. She throws the tray up and over James while he crawls up onto the ledge.
[*]Unique Properties: The snowgasboard counts as a projectile, allowing it to be reflected. The attack freezes the foe on contact
[*]Piggyback Version:Meowth sweeps the top of the ledge with his paw, just as Jessie throws the snowgasboard. Meowth's sweep trips anyone standing within 3/4 a stagebuilder block from the edge
[*]Damage: 12%
[*]Knockback: None, the attack freezes the foe in place
[*]Range: The snowgasboard itself is rather hefty, covering an area of 5/6 a stagebuilder block. It travels in a dull arc, peaking 2 stagebuilder blocks above the edge of the stage and landing 1 and 1/2 stagebuilder blocks onto the stage.
[*]Start Lag: 0.5
[*]End Lag: 1.2 seconds after throwing the snowgasboard
Use:
It's hard to detail a situation in which this move would actually be useful, although freezing your opponent is always fun, regardless of how vulnerable you are to D-tilts while you do it
::B-Button Attacks:
::Special Attacks:
Craft:
Neutral Special (No Damage)
Description:
Say what you will about their fighting skills, but never ever diss Team Rocket's ingenuity and craftsmenship! Jessie and James both start tinkering with whatever item they are currently holding. If they aren't holding an item, they will take out one of their pokeballs and start shaking it.
Details:
This move is noticably different depending on whether or not Jessie/James are holding something.
If they are holding something, they will tinker with the item until B is released. Depending on how long you hold B, and what item you're using, a completely different (usually better) item will be created. Below is a full list of the items that can be created, what items can be used to create them, and the amount of time holding B that is required for that result
(times listed in seconds. "Any" means it doesn't matter how long B is pressed.)
-
Potion: (Capsule: 0-0.5, Stick: 1-1.5, Lips Stick: Any, Leftovers: 0-2.4, Pokedoll: 0-0.9)
recovers 5% when A is pressed. Single use. Can be thrown with Z
-
Gold Berry: (Capsule: 0.6-onwards, Stick: 0.5-0.9, Wht/Pnk/Blk/Ylw/Mst Apricorn: 0-0.5, Potion: 0-1.5)
When thrown, recovers 12% to whoever it hits. Vanishes when thrown. Can be thrown with A
-
Mint Berry: (Gold Berry: 0-0.5, Gooey Bomb: 0-0.6)
automatically prevents holder from sleeping. Vanishes after 1 attempt to make holder sleep or when thrown. Can be thrown with A
-
Bitter Berry: (Gold Berry: 1.5-onwards, Deku nut: Any, Pitfall: Any, Gooey Bomb: 0.7-onwards)
automatically prevents holder from being stunned after having their shield broken. Vanishes after holder's shield is broken or when thrown. Can be thrown with A
-
Ice Berry: (Gold Berry: 0.6-1, Bob-omb: 0-0.7, Fire Flower: Any, Freezie: Any)
Renders holder immune to a single fire based attack. Vanishes after 1 fire attack hits the holder or when thrown. Can be thrown with A
-
PRZcure Berry: (Gold Berry: 1-1.4, Motion sensor Bomb: Any, Super Scope: 0-1)
Renders holder immune to a single electric based attack. Vanishes after 1 electric attack hits the holder or when thrown. Can be thrown with A
-
Repel: (Ray Gun: Any, Super Scope: 1-onwards, Spring: Any, Bob-omb: 0.7-onwards, Cracker Launcher: Any, Pokedoll: 1-onwards, Stick: 1.6-onwards)
For 6 seconds after A is pressed, foes within 2 stagebuilder blocks of the user will be gently pushed away. Single use. Can be thrown with Z
-
Rare Candy: (Star Rod: 2.1-onwards, Leftovers: 2.5-onwards, Secret Potion: 1.6-onwards)
When thrown, if it hits a pokemon, that pokemon will do 1% more damage to all its attacks for the rest of their stock (in the case of pokemon from pokeball items, all pokemon of the same species will do 1% more damage, for the rest of the match). The effects can be stacked up to 5%. Can be thrown with A
-
Leftovers: (Rare Candy: Any, Team Healer: Any, Squirt Bottle: Any, Secret Potion: 1.1-1.5)
recovers 1% every second while held. Can be thrown with A
-
Sticky Barb: (Unira: Any, Hothead: Any, Bumper: Any, Old Rod: Any, Secret Potion: 0.7-1)
deals 2% damage every second while held. Anyone hit by it when thrown will automatically grab it and take 2%. Can be thrown with A
-
Everstone: (Star Rod: 0-2, Fan: Any, Beam Sword: 0-0.9, Home Run Bat: 0-0.9, Secret Potion: 0-0.6)
Any pokemon hit by it when thrown will be unable to evolve for 45 seconds. Vanishes when thrown. Can be thrown with A
-
Amulet Coin: (Wheel from Bike: 0-0.9, Green Shell: 1-onwards, Nugget: 0-0.5, Coin Case: 0.7-onwards)
Holder spews out twice as many coins when hit during a coin match. Anyone hit by it when thrown will automatically grab it and gain 5 coins. Can be thrown with A
-
Coin Case: (Wheel from Bike: 1-onwards, Green Shell: 0-0.9, Nugget: 0.6-1.2, Amulet Coin: 0.7-onwards)
Holder attracts coins from twice as far. No effect on notes. Can be thrown with A
- Wheel from Bike: (Amulet Coin: 0-0.6, Coin Case: 0-0.6)
Same properties as a loose wheel from Wario's bike
- Home Run Bat: (Beam Sword: 1-onwards)
Just the regular home run bat
- Beam Sword: (Home Run Bat: 1-onwards)
Just the regular beam sword
- Bob-omb: (Banana Peel: Any, Nugget: 1.3-onwards)
Just a regular bob-omb
-
empty Pokeball: (Smart Bomb: Any, Empty Greatball: 0-1, Pokeball[must be one that spawned ordinarily]: Any)
Any opponent hit by it when thrown will be trapped inside for 1 second. It has a 40% chance of capturing pokemon that came from pokeball items. Once captured, empty Pokeball behaves as a normal pokeball. Vanishes when thrown. Can be thrown with A
-
empty Greatball: (Empty Pokeball: 0.8-onwards)
Any opponent hit by it when thrown will be trapped inside for 1.25 seconds. It has a 50% chance of capturing pokemon that came from pokeball items. Once captured, empty Greatball behaves as a normal pokeball. Vanishes when thrown. Can be thrown with A
-
empty Ultraball: (Empty Greatball: 1-onwards)
Any opponent hit by it when thrown will be trapped inside for 1.5 seconds. It has a 65% chance of capturing pokemon that came from pokeball items. Once captured, empty Ultraball behaves as a normal pokeball. Vanishes when thrown. Can be thrown with A
-
empty Fastball: (Wht Apricorn: 0.6-onwards, Empty Ultraball: 0.4-0.7, Empty pokeball: 0-0.1)
Any opponent hit by it when thrown will be trapped inside for a maximum of 3 seconds (time spent trapped is related to how fast opponent was moving when hit). It has a 45% chance of capturing pokemon that came from pokeball items. It is guaranteed to capture Entei or Suicune. Once captured, empty Fastball behaves as a normal pokeball. Vanishes when thrown. Can be thrown with A
-
empty Loveball: (Pnk Apricorn: 0.6-onwards, Mr Saturn: 0-1, empty Ultraball: 0-0.3, Empty pokeball: 0.2-0.3)
Any opponent hit by it when thrown will be trapped inside for either 1 second or 3 seconds (opponent is trapped for longer if it is the opposite gender to the thrower. Jessie/James couunts as female because Jessie is the one who throws items). It has a 45% chance of capturing pokemon that came from pokeball items. It is guaranteed to capture Mew, Celebi or Chikorita. Once captured, empty Loveball behaves as a normal pokeball. Vanishes when thrown. Can be thrown with A
-
empty Heavyball: (Blk Apricorn: 0.6-onwards, Empty Ultraball: 0.8-1.1, Empty pokeball: 0.4-0.5)
Any opponent hit by it when thrown will be trapped inside for a maximum of 3 seconds (time spent trapped is related to the weight of the opponent compared to the weight of the thrower). It has a 45% chance of capturing pokemon that came from pokeball items. It is guaranteed to capture Groudon or Kyogre. Once captured, empty Heavyball behaves as a normal pokeball. Vanishes when thrown. Can be thrown with A
-
empty Moonball: (Ylw Apricorn: 0.6-onwards, Pokedoll: 2-onwards, Mr Saturn: 1.1-onwards, Empty Ultraball: 1.2-1.5, Empty pokeball: 0.6-0.7)
Any opponent hit by it when thrown will be trapped inside for a maximum of 3 seconds (time spent trapped is related to how high above the ground the opponent was when hit). It has a 45% chance of capturing pokemon that came from pokeball items. It is guaranteed to capture Manaphy, Ho-oh, Lugia or Togepi. Once captured, empty Moonball behaves as a normal pokeball. Vanishes when thrown. Can be thrown with A
-
empty Masterball: (Hammer Head: Any, Mst Apricorn: 0.6-onwards, Brick Piece: 6.1-onwards)
Any opponent hit by it when thrown will be trapped inside for 3.5 seconds. It is guaranteed to capture any pokemon that came from pokeball items. Once captured, empty Masterball behaves as a normal pokeball. Vanishes when thrown. Can be thrown with A
-
Brick Piece: (Brick Piece: 0-6)
The same as the item Meowth digs up
But something completely diferent happens if Jessie/James aren't holding any items. They will take out one of their pokeballs and start shaking it. They shake it twice each second, and each shake changes the pokemon that's inside. Once they're done shaking it, it will behave exactly like a regular pokeball, unleashing one of Team Rocket's pokemon when thrown;
-
0 shakes = Koffing!
Koffing appears and acts exactly as he did in Super Smash Bros 64, spewing puffs of smoke in random directions. Each puff deals 2% damage but doesn't extend far from Koffing. Koffing does not move until he's done spewing smog 2 seconds later, but since he hovers above the ground, he can appear to drift away from moving stages like Corneria. Koffing is great for blocking an opponent or ruining approaches.
-
1 shake = Ekans!
The slippery serpent, Ekans is more of a direct attack than his cohort and will actively seek out an opponent by slithering toward them. He travels as fast as Ganondorf's walk and he cannot jump, opting to turn around at edges and find a new target. If he gets within 3/4 a stagebuilder block of a foe (in any direction) he will pounce and bite them, dealing 8% damage. The knockback from this won't KO until around 200%, but it can still repel foes pretty well. Ekans stays out for 5 seconds before dissapearing. Ekans is well suited to chasing foes away, especially when they're in your face.
-
2 shakes = Wobbuffet!
Wobbuffet appears and acts exactly as he does in Brawl. Absolutely no change in behaviour.
-
3 shakes = Chimecho!
Look! A Chimecho! It drops a single sticker before floating up off the top of the screen.
-
4 shakes = Victreebell!
Victreebell hungry! Victreebell eat James! Yum!
Victreebell will float towards Jessie/James, whereever they are. If he catches them, or another player on the way, he will devour them, whereupon he will behave like a floating Gulpin (except without the constant damage) until he dissapears. Victreebell floats at a speed of 1 and 1/2 stagebuilder blocks a second and lasts for 7 seconds.
-
5 or more shakes = Magikarp!
Emerging from its golden pokeball is the king of all carp! The Magikarp!
Magikarp flops uselessly on the ground, unable to even move around like Goldeen can. This pokemon isn't even good for eating! It's best to evolve this feeble pokemon by kicking it with Jessie/james D-tilt.
Use:
Craft is certainly a move you should be using constantly. Some of the items you can get from it are incredibly useful, even if learning all the possible ways to make an item is a hassle. Even if you don't like the items, you should at least use craft to summon Team Rockets pokemon. They are ALL great spacing tools, and pretty reliable to boot, though you can only have one of Team Rocket's pokemon out at a time. The only downsides to this special are that the best items can take a really long time to make, and most items rely on Meowth's significantly more laggy Neutral Special to dig up the components to make them.
Rocket Bomb:
Up Special (15% [hits self aswell as opponent])
Description:
Jessie takes out a cute little bomb with the Team Rocket logo printed on it, and James lights the fuse. The duo will then carry the bomb around with them in a flustered panic, somehow incapable of throwing the bomb away, until it explodes 2 seconds later.
Details:
Ouch! This attack will deal 15% damage and strong (3/4 bob-omb strength) knockback to Jessie/James once the bomb explodes. If anyone else is close enough to the blast (blast radius equal to Link's bombs) they will take the full brunt of the blast aswell. If Jessie/James try to shield the explosion, their shield will be broken and the duo will be stunned (in the process, they avoid the damage and knockback from the explosion). This does not apply to anyone else who tries to shield the blast.
While moving around with the bomb, Jessie/James cannot attack, if the player presses A or B plus a direction, Jessie/James will swing the bomb in that direction. If the bomb explodes mid swing, the direction Jessie/James ae blasted will be affected (e.g. If Jessie/James swing the bomb left and it explodes, Jessie/James will be knocked to the right by the blast). The bomb can be made to detonate pre-maturely if it hits an object or player in midswing.
Use:
This is certainly a dangerous recovery move, especially if the explosion intended to save them ends up KO'ing Jessie/James. The long fuse-time, means you have to use it when you're first knocked off-stage, rather than when you need it. It takes 0.5 seconds to swing the bomb in any direction, so you won't be able to swing it more than twice before it explodes in your face. Unlike many Up-B recoveries, this one is useful on land too. The blast is pretty strong, and the bomb's volitile nature can be used to scare off your opponent. If Jessie/James are holding a Bitter Berry, they can shield the blast from the bomb without getting stunned. In addition, this Up-B can be used more than once in mid-air, since the explosion damages Jessie/James.
A bicycle built for Three:
Side Special (5%)
Description:
With a "ding!", Team Rocket's tandem bicycle appears from nowhere, right next to Jessie/James. This three seater, normally found powering the Gyrados and Magikarp Submarines, can fit all three members of Team Rocket on it. The bicycle is pedelled along by tapping A, and falls over if it tries to change direction or slows down too much.
Details:
This bicycle behaves almost identically to Wario's motorcycle in terms of max speed, attack power and range. It can also be ridden by Wario himself, and when destroyed, leaves behind two wheels just like Wario's version. The tandem bike, cannot pull wheelies however, nor can it change direction without everyone falling off. The tandem bike is powered along by tapping A (4 taps or more per second to speed up, 2 taps per second to maintain current speed) and its speed is greatly influenced by the shape of the terrain. If Meowth isn't already on the bike when the move starts, he'll jump on if the bike passes him slowely (half speed or less). If the bike is travelling too fast when it passes Meowth, the bike will crash painfully, dealing 6% damage to both Meowth and Jessie/James along with medium hitstun. If Meowth manages to get on the bike, he will join in on the pedalling, reducing by 1 the number of times A must be pressed per second to accelerate or maintain current speed. When the bike stops, and if Meowth was on it, Team Rocket will finish the move in the piggyback stance.
Use:
In general, the tandem bike is much more limited and stifling than Wario's version. Still, this is a good way to move around or collect Meowth from another part of the stage, and its one of very few Jessie/James attacks that come out quickly. It also, obviously enough, helps with Jessie/James' recovery, though the tandem bike is much heavier than Wario's motorbike, and falls like a brick.
Dig this!:
Down Special (0%)
Description:
Time to get to work! Jessie and James, donning hardhats and wielding shovels, start digging a pit in the ground, not stopping until B is pressed a second time. The pits Team Rocket dig, behave like pitfall traps when stood on, and can be made wider by digging for longer. If this move is used on a fall-through platform, Jessie/James and anyone else standing on that platform, will automatically fall through it.
Details:
Although the duo start digging immediately, it takes 0.8 seconds for a pit to actually appear where they are standing. Each pit they dig starts as the size of a standard pitfall trap and steadily widens as the digging continues. After 3 additional seconds of digging, the pit becomes 3 stagebuilder blocks wide (Team Rocket cannot dig a bigger pit than this). The pits that Team Rocket dig are very easily visible and are colour coded in case more than one player is using Team Rocket. Only the Team Rocket that dug a particular pit can stand on it without falling in. Each Team Rocket can dig up to 3 pits on-stage. To destroy a pit, either someone other than Team Rocket has to fall ito it, or Team Rocket must stand over the pit and use Down-B a second time (it takes 1.6 seconds to remove a pit). If, while digging, the pit ends up overlapping with another pit, they will fuse together to form a single, wider pit. If the second pit belongs to another Team Rocket, so will the new pit, meaning the Team Rocket digging the pit will automatically fall into it.
Use:
Other than finding the time to make them, there are no downsides to digging pits. More pits equals more places Meowth can use his own Down-B on. Bigger pits equals a larger area the opponent can't step on without getting buried. You'll find though, that many opponents will purposefully fall into your pits as you dig them, to prevent you from covering too much of the stage in pits. Combining pits with Jessie/James' other spacing tools can wreck havok with your opponent's playstyle.
::R-Button Attacks:
::Grab & Throws:
The Handy Andy:
Grab (N/A)
- Description: Otherwise known as a box with a hand on it! James wields this mechanically marvel (meaning the grab appears behind Jessie/James) and presses a button on the side. The metal tubing connecting the hand to the box begins to unwind, some gears whirr and churn, and the hand moves foreward slowely. The hand will extend until it leaves the stage area completely, or it grabs someone.
[*]Unique Properties:This grab has an infinite range, but moves so slow it can be easily avoided. The entire grab can be angled up or down by 10 degrees and the tubing connecting the hand to the box can be walked on. If that tubing is hit by any attack, the grab will end prematurely.
[*]Range: The hand moves at 3 stagebuilder blocks per second, until it touches a player or it leaves the stage area completely (i.e. it enters a blast zone)
[*]Start Lag: 0.5 seconds while James gloats
[*]End Lag: 0.0 seconds if the grab ends naturally. 1.3 seconds lag if the tubing is attacked.
Use:
Nothing says "hit me, I'm open!" like the Handy Andy. You cannot stop it until the hand leaves the stage or the tubing is attacked, so make sure you grab.. someone, even if it's Meowth. The grab works on foes who are in midair, and the fact that the grab comes from James is useful for catching those annoying foes who like to roll behind you. The tubing from the grab makes an excellent ad hoc platform for Meowth if he ends up off-stage.
Load up!:
Pummel attack (0%)
- Description: While Jessie holds out a large and threatening looking mortar cannon, James loads it using the grabbed character
[*]Unique Properties: Required action before any of Jessie/James' throws can be used. If the foe breaks free from the grab after being loaded in the mortar, the Up-throw will be used on them automatically.
[*]Damage: N/A
[*]Start Lag: 1.0 seconds
[*]End Lag: 0.0 seconds.
Use:
Since you have to use this before ANY throw, this pummel is absolutely neccessary. Annoying, but neccessary.
Bubblegum gun:
Foreward Throw (7%)
- Description: James fires the mortar at a 45 degree angle, shooting the character out along with a sticky mass of bubblegum
[*]Unique Properties: Once the foe hits, or lands on (if the foe recovers early from the throw), the ground, they will be stuck there for 1.2 seconds, vulnerable to everything except grabs.
[*]Damage: 7%
[*]Knockback: launches foes out weakly at a 45 degree upward angle. Without DI, most foes will land 4 stagebuilder blocks away
[*]Start Lag: 0.25 seconds
[*]End Lag: 1.0 seconds
Use:
The sticky properties from this throw cannot really be capitalised on by Jessie/James themselves, so Meowth should start one of his stronger attacks (like Moment of Tooth). This is a incredibly useful throw when used to throw opponents off-stage, since they'll end up stuck for 1.2 seconds the moment they land back on the stage.
Backfire:
Backward Throw (8% to both opponent and Jessie/James)
- Description: Something's wrong with the mortar. Jessie and James decide to take a look-see and angle the mortar down toward their faces. Of course, the mortar fires at this point, launching both the opponent and Jessie/James into the air.
[*]Unique Properties: Launches both the opoonent and Jessie/James
[*]Damage: 8% to both opponent and Jessie/James
[*]Knockback: Quite strong. Usually 4 or 5 stagebuilder blocks at a 45 degree angle backwards. If Jessie/James' damage is different to their opponent's, their knockback from this throw will obviously be different. May KO, at high percentages.
[*]Start Lag: 0.5 seconds while Jessie/James express their confusion
[*]End Lag: 0.0 seconds since they are launched along with the opponent.
Use:
Jessie/James' best KOing throw. There are many applications for this throw, depending on the amount of damage accumulated by both Jessie/James and the opponent. For example, if the foe has little damage and Jessie/James have a lot, Jessie/James will be launched further, setting things up nicely for a F-Air down at the opponent. Just try not to KO Jessie/James with this throw.
Muzzle Down:
Downward Throw (13% when opponent hits floor)
- Description: Jessie/James aim the mortar 45 degrees down at the ground and fire the opponent out.
[*]Unique Properties:Only damages the opponent if the hit the ground after being fired.
[*]Damage: 13%, but only if the opponent hits the ground after being fired out
[*]Knockback: foe is launched 45 degrees down at the ground. Knockback strength equal to Jessie/James' Foreward throw (i.e. fairly weak)
[*]Start Lag: 0.5 seconds while James angles the mortar down.
[*]End Lag: 0.3 seconds while Jessie/James high five each other
Use:
If you can grab the opponent while on the edge, this throw is excellent for blasting them back off-stage. Otherwise, best used to rack damage or keep the foe close-by.
Rubber Ball gun:
Upward Throw (9%)
- Description: What a creepy looking rubber ball! The mortar fires out the opponent straight up, and a large, red rubber ball creeps out of the mortar in pursuit.
[*]Unique Properties: The rubber ball, one stagebuilder block in size, floats up at a rate of 2 stagebuilder blocks a second. If it touches the opponent, or any other player, it will envelop them, capturing them inside. Once captured, the player inside is immune to damage, but the ball continues to float upwards, eventually taking them off the stage completely. To free the character within, 20% of damage must be done to the ball (the player inside can attack the ball)
[*]Damage: 9%
[*]Knockback: Fairly weak. Though the minimum knockback is 4 stagebuilder blocks, the knockback does not increase with damage at the same rate most other attacks do.
[*]Start Lag: 0.2 seconds before firing the opponent. An additional 0.3 seconds before the red ball squeezes out.
[*]End Lag: 0.5 seconds.
Use:
Not many opponents will be stupid enough to get hit by the rubber ball. But if they do, or if you knock them into it, you'll have a few seconds to yourself, which Jessie/James can definitely use to their advantage.
::At first glance:
Jessie/James have the critical problem of high start lag. Many opponents can simply spam their quickest attacks, knowing Jessie/James cannot attack back. Another serious problem with the duo is their huge hitbox, particularly during Aerial attacks and jumps. Any Jessie/James player needs to understand how easy a target they are for any stray projectile and any half-cocked anti-air attack. The iceing on this ugly looking cake is the fact that Jessie/James' Up-B does more harm than good, often leading to unintentional self desructs.
Unlike their partner Meowth however, Jessie/James are better suited to taking hits, and their own attacks are some of the strongest in the game. Given time to set up, Jessie/James have unparalleled spacing tools, and the duo have a decent gimping attack too.
::With practice:
Jessie/James can become real juggernauts if they have Meowth around to cover them during setup. In turn, Jessie/James can meat some attacks in place of Meowth to keep the team in the game. With all of Jessie/James' spacing and KOing attacks, Meowth finally has something to setup, and with Meowth's constant hassling, Jessie/James finally have some room to breath.
Craft should be used almost none stop, at least for the pokemon it can summon, while Rocket Bomb is a great deterrant against opponents who won't leave Jessie/James alone. Jessie/James' purpose is to do the actual KOing from afar, only advancing on the opponent when Meowth needs to take a break.
::::Final Smash::::
**That boy on the poster looks just like you, James**
**He does? I think he looks pathetic!**
**That's what she meant James.**
Team Rocket got the Smash Ball! The whole screen flashes bright white for an instant and... hey! Team Rocket are gone! The background looks all weird too, showing a view of a galaxy from outerspace.
After a couple of seconds of bemusement, the lights dim and two spot lights focus on the center of the stage (or the closest platform to the center of the stage). Hazy white smoke billows out from the center-stage and the stars of the show, Jessie and James rise up out of the ground, the two rendered pitchblack by the glare of the spotlights.
"PREPARE FOR TROUBLE!"
"MAKE IT DOUBLE!"
The spotlight on Jessie refocuses, allowing us to see her properly. She poses with her arms back.
"TO PROTECT THE WORLD FROM DEVASTATION!"
Now the spotlight on James refocuses and James poses over Jessie
"TO UNITE ALL PEOPLES WITHIN OUR NATION!"
Jessie and James suddenly jump foreward off the stage, appearing to fall off the bottom and KOing themselves (we see the blast of them getting KO'd). Then, right up against the screen, Jessie appears holding a microphone.
"TO DENOUNCE THE EVILS OF TRUTH AND LOVE!"
James himself shoves Jessie away as he leans in from the left hand side of the screen, also holding a microphone.
"TO ENTEND OUR REACH TO THE STARS ABOVE!"
Jessie Punches James down out of the way.
"JESSIE!"
James appears again, underneath Jessie, while rubbing his sore head
"james..."
The screen flashes white again, and now the entire stage and its characters are missing. Jessie and James appear over the galaxy in the background, forming a letter R with their bodies.
"TEAM ROCKET BLAST OFF AT THE SPEED OF LIGHT!"
"SURRENDER NOW, OR PREPARE TO FIGHT!"
Meowth somersaults in from the top of the screen, having been absent from the rest of the motto.
"MEOWTH! THAT'S RIGHT!"
The scene cuts back to the way it was before the Final Smash was actiavted, albeit with Team Rocket standing in the center of the stage. Jessie turns to Meowth.
"HURRY UP AND DO IT ALREADY!"
"OK JESS! ... LOOK OUT TWERPS! HERE COMES THE TOP CAT!"
Meowth leaps up dramatically, glowing bright orange. At the peak of his jump, he flashes white and transforms into...

Robotic Meowth
Details:
The Robotic Meowth is significant in size, equal to Giga-Bowser. It is also impervious to flinching, except by electric attacks. Movement and attacks remain very much the same as a 8x regular size Meowth, although attacks that didn't cause knockback now do so. Specials are impossible in this form, along with grabs. The following attacks are different during the Final Smash
- D-Tilt: Meowth stamps the ground with one foot, causing a tremor in the surrounding area. Hits anyone standing within 4 stagebuilder blocks of Robotic Meowth, straight up. Damage and knockback quadruple that of Donkey Kong's Down-B
- U-Smash: Move works as normal, but causes a tremor upon landing. This tremor affects the entire stage, hitting anyone on the ground. Damage and knockback double that of Donkey Kong's Down-B
- F-Smash: Meowth shoots two bubblegum balls out of his paws, straight foreward. They travel in a heavy arc, clearing 3/4 of Final Destination before landing. Anyone struck by the bubblegum will take 15% damage and will be stuck to the bubblegum as it continues to move. Escaping from the bubblegum is equivilent to escaping from a grab. Charging the attack increases the velocity at which the bubblegum balls are fired. Maximum charge results in bubblegum balls that do not fall as they travel
- D-Smash: Almost identical to the above, Meowth shoots one bubblegum out towards the ground either side of him. Charging this attack increases the damage dealt, up to double at full charge
This Final Smash lasts for a reasonable 13 seconds, allowing plenty of time for Robotic Meowth. Unfortunately, Jessie/James are vulnerable during Meowth's ramage, so you'll need to switch to them frequently to keep them safe... or just ignore them, it's your call. Robotic Meowth is not as imposing as Giga-Bowser, nor as quick as Wario-Man, but he stays out longer than both. Even better, while Robotic Meowth struts his stuff, Jessie/James have all the time they need to prepare their own attacks.
CONGRATULATIONS! You've reached the end of the moveset! You can stop reading here if you'd like
::::SubSpace Emmissary::::
**They'll be sorry they ever saw this handsome face**
**We're ALL sorry to see your face!**
The Team Rocket part of SSE starts after everyone first confronts Taboo and is trophified. In the "Crushing Defeat" scene, Lucas holds Pokemon Trainer trying to protect him, reulting in their trophies being fused together into one. We then zoom in on Pokemon Trainer's now lifeless eyes.
note*: The Lucas and Pokemon Trainer trophies no longer appear in the subspace stages, those trophies are instead replaced by Ivysaur's and Charizard's. Pokemon Trainer cannot use either of those pokemon until those trophies have been collected.
Team Rocket Stage 1:
Scene #1: We see Lucas and Pokemon Trainer walking along a idyllic route, pointing out pokemon and generally having a pleasant stroll. Suddenly, from some bushes to the left of them, Team Rocket slide out into the open, crossing our field of vision in a way reminiscent of how Enemy Trainers slide in the Pokemon Games. Jessie then points at the pokeball on Pokemon Trainer's belt while James holds up his own pokeball.
Boss: Team Rocket (Two Player version):
Lives: 2
Fight as (Pick 1): Pokemon Trainer, Lucas
Music: Vs Rocket Grunt [GAME](RMIX)
This is a 2vs2 (Pkm Trainer & Lucas Vs Jessie/James & Meowth) match without items. The two player version of Team Rocket is exactly how it sounds, the computer controls both Meowth and Jessie/James as if they were genuine seperate characters. This means you have to KO both to win, but the two player version of Team Rocket cannot enter the piggyback stance. This is actually a really easy battle, since the individual characters of Team Rocket are badly outmatched
Scene #2: We see Team Rocket "Blast off again" into the sky, and the scene then cuts to a mountainous region where we see Team Rocket fall back out of the sky toward the camera. Team Rocket land rather painfully in the dirt, sliding along on their faces. The camera then pans right to reveal a Wynaut in the background. Jessie jumps to her feet and points at the pokemon excitedly, causing the Wynaut to jump in surprise and run away.
Area #1:
Music: RSE Rival [GAME](RMIX)
A long winding dirt track along the mountainside. Hazards consist mainly of pits and a number of waterfalls that must be cleared. The waterfalls will push characters downward, making some jumps difficult. Although this is a straight A to B level, there is another objective Team Rocket should attempt.
In SSE, Team Rocket has no pokemon that they can summon with Craft. Instead, using Craft when not holding an item will create an empty Pokeball. Team Rocket needs to capture some of the pokemon littered throughout the level, using these empty pokeballs. After capturing one, Team Rocket can use Craft to summon it (or they can hold B for longer, to create another empty pokeball so they can capture another pokemon). They can capture up to 4 pokemon, capturing any more will get rid of the oldest pokemon caught.
The pokemon in this level perform the attack they would have done after emerging from a pokeball, and instead of dissapearing after their 'time' is up, they pause for 2 seconds before attacking again.
Common Pokemon in this level;
Munchlax: Waddling along the dirt track in packs of three
Piplup: Surfing back and forth along the top of waterfalls
Torchic: Sitting in dry twig nests, inside alcoves in the mountainside
Koffing: Floating over pits, making them harder to jump over.
Meowth: Sitting near cliff edges in the latter half of the level
Rare Pokemon in this level;
Chikorita: One is standing in a grass clearing with flowers found in the middle of the level
Ho-oh: If the player goes backwards from the start, they will reach a cliff edge with Ho-oh flying nearby. It dissapears after 5 seconds.
Staryu: Along the wall of the dark side of the mountain are red lights. In a particularly dark part, it is difficult to see much else. One of these lights is really a Staryu that will attack if the player attacks it.
Victreebel: If the player KOs more than ten pokemon during the level, Victreebel will appear and chase the player for the remainer of the level... or until caught
Togepi: If the player stands still in the grass clearing in the middle of the level for 20 seconds or more, without attacking or capturing the chikorita, Togepi will run out from behind some bushes and greet the player.
Scene #3: Team Rocket reaches the bottom of the mountain and corners Wynaut in a forest. Suddenly leaping out from the trees comes Breloom, eager to help the Wynaut.
Boss: Wynaut & Breloom:
Lives: 3
Fight as: Team Rocket
Music: Vs Mesprit [GAME](BEAT)
This is a 2vs1 match. The only items that appear are the varying berries Team Rocket can make with Craft. The Wynaut and Breloom work well as a team, so Team Rocket will have their hands full trying to survive. If the player loses this battle they will be sent back to the mid level checkpoint and have to finish the level again to rebattle Wynaut and Breloom. The key to this battle is to have caught/evolved good pokemon in the previous level. A Snorlax or Ho-oh would be incredibly useful.
Scene #4: Having beaten the pokemon, Jessie & James gloat over the inevitable capture, dancing and whatnot. A humungous thunderbolt pierces through the sky overhead, interrupting Team Rocket's celebration. They look on dumbfounded as the sky above the mountain they just descended tears open revealing a forboding void beyond. As the tear becomes bigger, the mountain and surrounding trees are pulled into it. Team Rocket awaken Wynaut and Breloom in a panic and start running from the tear in the sky. Wynaut and Breloom follow close behind
Area #2:
Music: Team Rocket Hideout [GAME](RMIX)
A long forest of pine trees, bathed in twilight. Though there is no timer, this level is a race against the clock. Lagging behind too long will reduce the level of gravity in the area, gradually pulling the player toward the upper blast zone. This gravity effect will lessen when the player makes some progress in the level. Most pokemon in this level do not attack, but rather run away, hoping to not get caught by the tear in the sky.
Common Pokemon in this level;
Bellossum: Usually found next to other types of pokemon on the forest floor
Bonsly: Waddling at the foot of trees
Munchlax: Waddling around on the forest floor
Ekans: Slithering around in leafy undergrowths. Can be difficult to spot at a glance.
Weavile: Darting between treetops, may inadvertantly attack the player.
Rare Pokemon in this level;
Suicune: At the halfway point in this stage, either Suicune or Entei will dart across the screen. They will only be on-screen for half a second, so they are tough to catch
Entei: See above.
Level complete!
Team Rocket Stage 2:
Scene #5: Lucas and Pokemon Trainer are sitting at the bank of an idyllic lake staring at the moonlight reflected in the water. Lucas throws a pebble in, which causes a ripple, distorting the reflection. When the water settles again, Lucas and Pokemon Trainer are standing to one side, preparing to fight Team Rocket, who are on the other side.
Boss: Team Rocket & Wynaut & Breloom Vs Pokemon Trainer & Lucas:
Lives: 1
Fight as (pick either): Team Rocket + Wynaut + Breloom or Pokemon Trainer + Lucas
Music: Route 1 [GAME](RMIX)
This is a great big 3vs2 battle with the player chosing either of the two teams (If two players are playing, the other player must play as the other team). The story continues on whether you win or lose. The stage is completely flat and entirely walk-off.
Scene #6: Both sides are getting exhausted from the fight, when Meowth intervenes by standing inbetween the two. He points to the Tear in the sky which is gradually getting bigger and bigger. Pokemon trainer points to the sihollette of a pokemon on a distant mountain top as being the cause, and everyone decides to work together
Area #1:
Music: Route 3 [ANIME](ALL)
A long stretch of land next to a sparkling lake on a clear night. The sky has become distorted by recent events and shapes resembling faces appear occasionally. The wind permenantly blows from right to left, making progress through this area slow. There are very few obstacles in this stage, mostly rocks and a few expanses of water. Towards the end of the level, the player can only progress by diving under the water's surface to enter a underwater cave.
Pokemon in this level attack as usual.
Common Pokemon in this level;
Bellossum: Dancing near the waters edge
Piplup: Surfing across expanses of water
Magikarp: Swimming underwater/flopping around at the water's edge.
Staryu: Attached to the surface of rocks. Only attack once attacked.
Wobbuffet: Randomly dotted around the level. Once one is caught, it will not appear for the rest of the level
Gulpin: Found behind the dark side of rocks.
Rare Pokemon in this level;
Chimecho: Appears for brief moments throughout the level, usually in out of the way corners of the screen.
Cresselia: At the halfway point in this stage, Cresselia will dart across the screen. It will only be on-screen for half a second, so it is tough to catch
Gardevior: Knock 3 or more pokemon into an expanse of water and Gardevior will appear, walking on the water's surface
Electrode: A quarter of the way through the level will be a brown patch of dirt, standing on it for more than 2 seconds will make Electrode jump out of it and explode.
Celebii: Alter the Wii's date settings to a time BEFORE Brawl was released, Celebii will apear in the sky halfway through the level.
Jirachi: Return to this level as Team Rocket after having caught both Groudon and Kyogre. Jirachi will appear next to you at the beginning of the level for a split second before darting off.
Mew: Return to this level as Lucario and Mew will appear at the level's end.
Manaphy: After catching Mew, Celebii and Jirachi, Manaphy will appear on the surface of the first expanse of water you have to cross.
Area #2:
Music: Game Corner DP [GAME](RMIX)
A barren snowcapped mountainside. This stage is almost completely vertical, and the screen scrolls automatically. Branches sticking out of the mountainside have to be used like springboards to progress.
Common Pokemon in this level;
Metagross: Found climbing up the mountain. You usually need to ride on top of these to make progress
Electrode: Found rolling down the mountain. If an electrode hits a Metagross, the Metagross will fall off the mountain
Gulpin: Found on some springboard branches. KOing them is the only way to avoid getting eaten.
Rare Pokemon in this level;
Latios/Latias: At the halfway point in this stage, Latios/Latias will dart across the screen in an X shape. They will only be on-screen for a split second, and deals damage too, so it is tough to catch
Groudon: Appears in a secret room, the door to which is hidden behind a destructable wall
Kyogre: Appears in a secret room, the door to which is hidden on a platform that is entirely obscured by a small cloud.
Lugia: Appears at the top of the mountain if no Metagross fell off during the stage.
Deoxys: Appears at the top of the mountain if EVERY Metagross fell off during the stage (sufficient damage from the player can force Metagross to fall off)
scene #7: Team Rocket, Lucas, Pokemon Tainer, Wynaut and Breloom reach the top of the moutain together, finding the cause of the disruption to be both Dialga and Palkia!
Boss: Dialga & Palkia:
Lives: 4
Fight as (pick 4): Team Rocket, Wynaut, Breloom, Pokemon Trainer, Lucas
Music: Whatever music the game decides to play for the Spear Pillar stage
This plays out much like the spear pillar stage (in fact, it IS the spear pillar stage). Both Dialga and Palkia sit in the middle of the stage (not in the background) and both work independantly, throwing out their individual moves. Dialga and Palkia use all the moves they normally use in brawl, though they tend to use more lasers than screen flips and they attack much faster than their stage hazard counterparts. Since Dialga and Palkia are seperate entities, they each have their own health bar and both must be KO'ed before the battle can end.
This "boss" is actually pretty easy, once you realise that Team Rocket can catch them in pokeballs, although their health must be lowered to the point a trophy stand would work on them. Alternatively, you could have Team Rocket just Craft two Master Balls instead...
scene #8: Victorious in their battle, Jessie and James jump around in jubilation. Meowth remains aprehensive and approaches the defeated legendaries. To the astonishment of everyone, Dialga and Palkia begin to disintegrate into subspace bugs. The bugs swirl and recombine to form...
...
Boss: Ash Trainer (Pikachu, Squirtle, Charizard, Snorlax):
Lives: 6
Fight as (pick 3): Team Rocket, Wynaut, Breloom, Pokemon Trainer, Lucas
Music: Vs Darkrai [GAME](RMIX)
The Ash trainer acts much like a regular pokemon trainer, except with more Pokemon. The Pokemon switch by spotdodging, which means Squirtle and Charizard now have a Down-B attack. Each pokemon has an individual %-meter and has to be KO'd to win this fight, but Ash can switch pokemon (And he will do this often when a pokemon gets over 100% damage).
Pokemon that aren't out recover 1% every second, so you have to beat them quickly to avoid a drawn out fight.
To make matters even WORSE, each pokemon recieves buffs to their attacks (Thanks to Ash, who is a twerp);
Pikachu:
Neutral-B: Travels 1.5x faster and stuns opponent for twice as long
Down-B: Bolt appears twice as fast and deals double knockback.
Up-B: Has 3 steps instead of 2
Side-B: Always fully charged. Doesn't result in free-fall afterwards.
Other buffs: Recieves a free Final Smash every time his %-meter reaches 150. Can't be evolved by kicking it as James.
Squirtle:
Neutral-B: Charges twice as fast. The jet of water is also twice as long
Down-B: New Attack.. Squirtle retreats into his shell, negating all Damage until he releases Down-B. He will still take knockback, and he cannot do anything else while in his shell. The lag at the end of this move is punishable
Side-B: Can change direction mid-attack. Deals triple knockback
Up-B: Can continue to rise until Up-B is released
Other buffs: Smash attacks charge 1.5x quicker. Can't be evolved by kicking it as james.
Charizard:
Neutral-B: Always stays at full power. Charizard can turn around mid-attack
Down-B: New Attack.. Charizard grabs opponents in front of him (more than one is possible) and plummets with them to the ground. Once they hit the ground the opponents are buried as if it by a pitfall. The damage this deals and the length of their burial is determined by how high they fell (from a height of 5 stagebuilder blocks, they will take 20% damage and be buried for 2 seconds). The range of the grab is the same as Charizard's Pivot Grab, but the attack has no effect unless he is airborne.
Side-B: Charizard throws the rock as a projectile, which shatters on contact with the ground or an opponent. The properties of the move are largely unchanged, except for its projectile nature.
Up-B: Charizard rises twice as high and automatically enters glide afterwards.
Other buffs: 2 additional midair jumps.
Snorlax:
Neutral-B: If hit by Snorlax's fall, the opponent will be buried there for the full duration of rest
Down-B: Snorlax has super armor between the 1st and 3rd hits of Belly Drum. The attack bonus can be stacked, but is lost if Snorlax is switched out.
Side-B: Both the size and travel speed of Yawn is doubled
Up-B: Snorlax doesn't fall asleep after the attack.
Other buffs: Recieves free Final Smash whenever opponent falls asleep
If you caught Dialga or Palkia during the previous boss fight, summoning it makes this battle significantly easier.
Level Complete!
Scene #10: Finally putting an end to the bugs, the tear in the sky clears up too. But for some reason the sky starts disintegrating. While Team Rocket, Wynaut and Breloom look on in fear, Lucas and Pokemon Trainer realise what is happening and close their eyes. The sky continues to disintigrate, and the mountain starts to too! Soon, the whole landscape, along with Team Rocket Wynaut and Breloom has disintegrated out of existance, leaving Lucas and Pokemon Trainer in the same place they were when they were trophified. Dedede waddles past and gives a little wave to the two, before walking toward the Bowser trophy...
CONGRATULATIONS! Team Rocket, Wynaut and Breloom have been unlocked in SSE!
::::Appendix::::
**Team Rocket's fading out again!**
There are a number of attacks which have effects that couldn't be explained in the moveset itself. The following appendices hope to explain in full, the effects of these attacks;
:okemon Evolution:
When Jessie/James hit an unevolved pokemon with thier down-tilt, it will usually evolve. This applies both to Player pokemon like Pikachu, and pokemon from pokeball items like Torchic. Even the pokemon Jessie/James can summon can be evolved.
Pokeball item evolutions:
When Jessie/James evolve a pokemon that came from a pokeball item, it will resent them for it. If the pokemon came from a pokeball Jessie/James threw, the pokemon will become neutral, attacking everyone. If the pokemon belonged to someone else, it will still belong to them after evolving. Evolution of pokemon like this only lasts for as long as that specific pokemon remains active.
Bonsly ----> Sudowoodo
Sudowoodo differs from Bonsly in that, in addition to being a throwable pokemon, it will occasionally attack players with Double Edge. When it decides to attack, it will double its speed, chasing the player until it hits, or until it has to change direction to continue chasing.
Chikorita ----> Bayleef
Bayleef is a much larger pokeon than chikorita and fires two razor leaves at a time, one above the other. This makes the attack harder to avoid and escape, and increases the amount of damage the player suffers.
Gulpin ----> Swalot
Swalot has plenty of room in his stomach! In addition to Jessie/James, who he'll automatically eat after evolving, he can eat one more player who approaches too close. Digestion damage is also doubled by the evolution.
Meowth ----> Persian
Persian is so much crueler than its prevolution. Persian will get up and stroll left and right on the ground or platform he evolved on. If anyone gets within 3 stagebuilder blocks of Persian, it will pounce suddenly and automatically strike that player, dealing 12% damage and knockback equal to that from the Lyn Assist Trophy.
Munchlax ----> Snorlax
Snorlax behaves... well.. like Snorlax. He jumps up off the top of the stage, then descends back down bigger than before.
Piplup ----> Prinplup
Prinplup behaves much like a bigger piplup, making it even harder to avoid an embarrassing doom. As a note, Prinplup will turn around after evolving, so Jessie/James avoid getting surfed into oblivion.
Staryu ----> Starmie
Starmie maybe just a bigger Staryu, but they certainly don't act the same! Starmie will use Rapid Spin, and swiftly home in on the nearest player. Starmie accelerates quickly, but has trouble changing direction. If Starmie manages to hit a player, that player will suffer a large number of light, flinching hits while Starmie continues to spin.
Togepi ----> Togetic
Togetic uses Metronome, just like Togepi, but the moves that can activate are different;
Explosion: Togetic explodes, like a weaker Electrode
Aeroblast: Togetic creates a whirlpool of air where it is standing, dealing many strong hits to anyone close enough.
Fire Spin: Togetic creates a pillar of fire, just like Entei
Thunder Wave: Togetic summons a large, sparse sphere of electricity to where it is standing, much like Raikou in Melee. Anyone within that sphere will occasional take electrical damage.
Torchic ----> Combuskin
Not only is this possibly the hardest pokemon to evolve (other than Staryu), evolving it grants no other bonuses than double range to its Overheat. This, of course, means that evolving it will assuredly trap Jessie/James in the bigger, post evolution attack. Ouch.
Team Rocket's Pokemon Evolutions:
When Jessie/James evolve one of their own pokemon, it remains loyal to them (usually). It will also remain evolved for the remainder of that stock. Unlike evolving the pokemon from pokeball items, not all of these evolutions are improvements.
Koffing ----> Weezing
Weezing differs from Koffing in that it aims its smog clouds towards the nearest opponent. This makes it easier to dart past Weezing without getting hit by any stray smog. However, once an opponent is hit, it is much harder to escape from the subsequent hits. If you want to use Koffing ofensively, then go ahead and evolve him. But if you want to keep using him as a wall, then don't.
Ekans ----> Arbok
Arbok will not move like Ekans does, and merely sits there looking up. If someone or something enters its range of attack, it will use Poison sting, a rapid flurry of needles that covers an area of 1 and 1/4 stagebuilder blocks, destroys projectiles and juggles opponents. Arbok attacks at a 45 degree angle upwards, making it an excellent anti-air defense. It's pretty easy to just roll past Arbok however, since he cannot turn around. Though not as effective against opponents as Koffing is, the fact it stops projectiles and other objects too is reason enough to consider using Arbok.
Magikarp ----> Gyrados
Gyrados is one fierce pokemon. It's gigantic (4/5 the size of Rayquaza) and acts as a wall against projectiles. 2 seconds after appearing, Gyrados will fire a Hyper Beam down at the ground at a 45 degree angle. Though the beam is fairly thin, and only lasts 1.4 seconds, getting hit by it is like getting hit by the laser on the Halberd stage. It's also at an awkward angle to avoid. And that's not all! All attacks that land while Gyarados is out will do 1% less damage. Unfortunately, Jessie/James and Meowth are also subsceptable to Gyrados' Hyper Beam. Gyrados is absolutely awsome as an edgeguard or as an intimidation tool.
Player Character Pokemon Evolutions:
When Jessie/James evolve a Pokemon like Pikachu or Jigglypuff it will permenantly evolve for the rest of that match. As a general rule of thumb, the evolved forms deal 10% (rounding up) more damage, have 20% greater range and 25% extra start and end lag over their prevolutions. More details about each evolution are below;
Pikachu ----> Raichu
Raichu is a slower, heavier, larger target, losing so much of what made Pikachu a good character. Raichu waddles along on its hind legs and cannot crouch. Its jumps are 4/5 as high as Pikachu's. In return for all these sacrifices, Raichu is much stronger, belting foes away with 40% extra knockback. The following moves have changed for Raichu
Up-B: Raichu's up-B is twice the length of Pikachu's, but he can only do it once, whereas Pikcahu can perform two steps to his Up-B.
Side-B: Raichu cannot use skull bash and uses Body Slam instead. Raichu cannot use his Side-B in the air, and once Raichu releases the attack, he charges foreward, following the shape of the terrain (falling down pits and crashing into walls if he approaches them). Though the knockback of the attack is far more impressive (Like Ike's Foreward Tilt) and the end lag is decreased, Raichu cannot use this move to recover.
Down-B: Raichu has to concentrate, adding 0.3 seconds to the existing start lag. In return, the thunder bolt is 1/3 wider, the knockback is 50% greater, and anyone within two stagebuilder blocks of Raichu when the bolt hits will be knock away and suffer 7% damage
Neutral-B: Raichu cannot shoot out sparks like Pikachu can. Instead, he sends his electricity into the ground, electrifying the area he is standing in (3 stagebuilder blocks wide). These electrified areas last for 10 seconds, and knock upwards anyone who steps on them. Raichu himself is immune to these areas
Foreward Tilt: Raichu flicks his long tail around in front of him, striking anyone within 1 and 1/2 stagebuilder blocks. In addition to 9% damage, this attack also guarantees tripping.
Jigglypuff ----> Wigglytuff
Oh dears! Wigglytuff is even worse than Jiiglypuff. The evolved form is so much bigger and slower, even in the air. Its weight is the same as before and some attacks have even LESS range and power than before. On the plus side, Wigglytuff has 3 extra jumps and is immune to d-tilts while hanging from ledges (Wigglytuff hangs from its ears, making it act as if were on a tether)
Up-B: Wigglytuffs sing is bigger, since Wigglytuff herself is bigger. She can also walk slowly left and right mid-song, and even cancel out of sing with B
Down-B: Rest no longer deals damage or knocks the foe away, but it does heal 12% damage if it finishes uninterrupted.
Side-B: Although Wigglytuff still punches the air, it is her ears that are the hitboxes, giving the attack as much as twice the range. The attack takes 0.1 second longer to come out, and no longer slows her descent
Neutral-B: Wigglytuff no longer has the body shape to use Rollout and must make due with Hyper voice instead. While charging up this move, Wigglytuff hops around in place, covering her mouth with her hands. She then shouts loudly, causing a visible shockwave to appear and expand in from of her. This shockwave, as tall and wide as Wigglytuff herself, acts much like Mario's cape, though it lingers for 0.4 seconds after Wigglytuff can move again.
Down-Throw: Again lacking the body shape to roll around, Wigglytuff simply sits there listlessly on the opponent, racking up 5% damage until the opponent breaks free from the grab.
Squirtle ----> Wartortle
Wartortle is the most subdued of the pokemon evolutions, and other than general size and weight changes, is very similar to its prevolution. The changes that have been made tend to hamper his nippy speed orientated playstyle. Wartortle also loses the ability to wallcling, but gains the ability to walk on top of water temporarily (1.3 seconds)
Up-B: Wartortle can alter the direction of surf, during the attack, but only travels 3/4 as ar as Squirtle could.
Side-B: Wartortle no longer withdraws into its shell and now uses surf much like piplup does (albeit marginally faster). Wartortle can cancel the move by holding the analogue stick in the opposite direction, but there is a 0.7 second lag before the move will actually end. With this, and a foe who doesn't DI, it is possible to "Tortle-cide" off stages with an opponent.
Neutral-B: Wartortle charges the attack for 0.3 seconds longer, but gains the ability to alter the tradjectory of the water to a much greater degree, almost to the point where he could aim it straight down. This extra aiming power only applies to fully charged Water Guns.
Up-Smash: Wartortle starts frothing at the mouth while looking straight up. Upon releasing the move, Wartortle unleases Water Spout, a move similar to Water Gun but with a shorter range and a greater pushback. Water Spout also deals 30% damage if Wartortle has not been damaged at all, weakening to 15% if he has.
Ivysaur ----> Venusaur
Like Jigglypuff, Ivysaur does not take well to evolution. Venusaur is humungous, and extremely heavy. Venusaur represents such a huge, wide target that it is impossible to avoid enemy attacks. The easiest parallel to draw would be to compare Venusaur to Bowser, with Ike's attacks. Venusaur can be WALKED on by foes. Venusaur even has TURNING lag, taking 0.4 seconds to turn around. ouch.
Up-B: Venusaur's vines are only 3/4 as long as Ivysaurs, to compensate for his new ungodly bulk. Venusaur can use these vines to grab foes out of midair, a technique that is vital when trying to keep opponents n front of you.
Side-B: If Venusaur has sufficient charge from his neutral B, he can use solarbeam, otherwise this attack does nothing. Solarbeam is similar to ROB's fully charged laser, albeit twice as strong and with twice the knockback. Venusaur cannot angle Solarbeam however, and there is some noticeable start lag before the beam is fired.
Neutral-B: Venusaur starts to gather sunlight through his flower, charging his Side-B attack in 2 seconds. If anyone strays within 1 stagebuilder block of Venusaur's flower, it will snap shut, trapping the foe inside. Not only does this fully charged Venusaur's Side-B but it also allows you to rack up some damage on your helpless foe by pummelling them with B. The foe can escape from this, just like escaping from a grab.
Up-Smash: Venusaur releases its current solarbeam charge up out of its flower. Since this charge is not actually a real solarbeam, it dissipates shortly after leaving the flower and spreads out wide like a shotgun blast. Depending on the charge, this up-smash can have decent range and incredible KO potential.
::Catching Pokemon:
By using Craft or Scavenge (Jessie/James and Meowth's Neutral-B's respectively) empty pokeball items can be created. These items, when thrown, can temporarily trap opponents. More importantly, they can also capture pokemon that come out of items and pokemon that appear as stage hazards. When you capture pokemon like this, you can pick up the pokeball and throw it again to re-release them. If the pokemon was your opponent's, the pokemon becomes neutral when caught, attacking everyone. If the pokemon was yours, it will remain loyal to you. If the pokemon was neutral, it will become loyal to you. All of this precludes that Jessie/James are the ones who threw the empty pokeball at the pokemon. Your opponents can also use these items to capture pokemon.
It is important to note that the existance of empty pokeballs changes the way some trophies are collected. To collect a trophy of a pokemon, you must capture it in a pokeball. Every time you capture a pokemon, you earn 1 trophy of it. This applies to Pokemon that evolve when Jessie/James hit them with their Down-Tilt (e.g. You have to capture a torchic, AND capture a Combuskin to complete the trophy collection).
Stage hazards like Dialga can also be caught, but only when they are physically on the stage (Palkia and Cresellia gain extra attacks that teleport them onto the stage physically, allowing them to be caught). Releasing the stage hazard puts them back where they were.
::Counterpicking for Meowth:
Since the Wii's internal settings are now counterpicking options, it can quite a hassle to switch these around between matches. This system also requires safety proofing against the eventuality that the Wii's internal clock dies. Luckily, whenever you view a notice in Brawl (via the Notices option in the menu) the date and time on that will be used instead of the real date and time (returning to the title screen erases this effect). The only dates people will pick anyway are Saturday night (good for Meowth) and Wednesday Morning (Bad for Meowth)
:iggyback Meowth items:
Meowth can hold items seperately to Jessie/James while piggybacking. He also cannot throw these items while in the piggyback stance. Meowth swings weapons and shoots guns at a slightly faster rate than Jessie/James, meaning effective item combos can have a large effect on battles. If meowth is holding a throw item, he will join in on piggyback attacks as usual. If not, he will use/swing/shoot that item while Jessie/James do their piggybackless varient on the attack. If Meowth has finished using/swinging/shooting and Jessie/James are still in the middle of a move, Meowth can use/swing/shoot the item again by pressing A.
Good things for Meowth to hold;
Battering items: these will help Jessie/James' Neutral A, Foreward Tilt and foreward Smash immensly, keeping the opponent off balance during Jessie/James' start lag.
Leftovers: Constant 1% healing to Meowth, with no negative consequences to the piggyback stance
Pokeballs containing good pokemon: It would be foolish to use a pokemon right after capturing it. Better to keep it safe with Meowth until you need it.
Berries: The effects of berries actually affect both Meowth and Jessie/James in the piggyback stance, even if only one of them is carrying it
Dubious Disc: Helps cover for Jessie/James' starting lag by countering any attack the enemy is currently in the middle of. The Squirt Bottle can also be used like this to a lesser extent.
Old Rod: Since it's used with A instead of Z, this grab can be used in the piggyback stance. Be warned, if the grab is successful, it will cancel any move Jessie/James are in the middle of.
Coin Case: Obviously applies only to Coin matches. Helps Jessie/James rake in more coins.
Playstyle:::::
Is it really as simple as "strength in numbers"?
As has been noted many times before, Team Rocket thrives on teamwork. Meowth and Jessie/James need eachother to work at even the most rudementary level. You can't just hide Meowth somewhere while you fight the battle with Jessie/James, that doesn't work and Meowth will soon find himself alone and helpless
Meowth always needs to be thinking about what Jessie/James could optimally be doing and work towards creating the opportunity for them to do that. If Jessie/James are trying to spam Past the Stars to rack up pseudo damage, and the foe DIs out, Meowth should be using his Foreward Throw to get them right back in there or his Foreward Smash to rack up more damage. If Jessie/James are offstage trying to edgeguard, Meowth should be using his Side-Special so they can safely use their Down-Air and still recover. If Jessie/James are getting combo'd, Meowth should be interrupting them. If Jessie/James knock the foe down towards the ground, Meowth should be waiting for them with an Up-tilt... And so on.. and so on.
Meowth is the enabler that lets Jessie/James do their job. But remember that keeping Meowth's hide away from real danger is important too.
Subsequently, Jessie/James are the payoff. Because of their heinous start lag, Jessie/James need to plan their actions well in advance and rely heavily on Meowth successfully setting up the foe. But you can't just wait for Meowth to give Jessie/James an opportunity to attack, you have to start the attack before you create the opportunity for it. However, it isn't all one-way traffic. Jessie/James have to do their fair share of helping out too. Digging pits around the stage for a quick escape plan, summoning pokemon to correctly space or repel the foe, Meowth needs these things even more than Jessie/James do.
Jessie/James can do almost anything, but they need plenty of time to do it. Bear in mind that Jessie/James are the heavier character, so although they need opportunities, they don't need protecting. At least not as much as Meowth does.
And all this is before we even take into account the relationship between Craft and Scavenge. With enough time, Team Rocket could create astonishingly powerful items. And thanks to their ability to piggyback, Team Rocket can even carry two of them at once, leading to interesting combinations such as Squirt Bottle and Dubious Disk. Of course, finding the time to do this is by far the biggest problem with Craft and Scavenge. Meowth can just about stave off the opponent while Jessie/James Craft the best items, but buying the time for Meowth to Scavenge the raw components is an insurmountable task for Jessie/James.
Team Rocket & other Movesets:::::
Because piggybacking off other people's work is what we do best!
Pokemon Movesets:-
The following Movesets can be evolved via Jessie/James' down-tilt; Shellder, Sandshrew, Ekans, Gligar.
Other Movesets:-
The following have some sort of unique interaction with Team Rocket;
Ryuk: Ryuk always writes Meowth's name in the Death Note. After the 40 seconds, if Meowth dodges the attack, Jessie/James will suffer the heartattack instead. The only way for all of Team Rocket to survive is if Jessie/James spot dodge while Meowth uses his Foreward-Tilt (the first few frames of which count as a dodge).
If Jessie/James hold a Death Note, their Side-Special is replaced. If Jessie/James try to use Craft on a death note, it will remain a death note. In contrast, if they use Craft on a fake death note, it will become a Gold Berry. Meowth cannot use the Death Note due to his stubby paws.
Ashe/Grey: If Ashe KOs Jessie/James, she'll be allowed to transform into Argoyle & Ugoyle. If Ashe KOs Meowth, she'll be allowed to transform into Hedgeshock. If she KOs Meowth without KOing Jessie/James first, she will not be allowed to transform into Argoyle & Ugoyle.
Mewthree: Although Mewthree cannot evolve, it is still effected by Jessie/James' down-tilt. When hit, Mewthree regresses into Umbreon form... permenantly. Pressing A will of course make the explosion as usual and turn him back to normal, but 10 seconds after that he'll turn right back into Umbreon form. In his normal form Mewthree can use down-smashes to keep himself from turning into Umbreon (each smash gives him 8-14 seconds of extra time as normal Mewthree).
RX-78-2 : If Jessie/James try to use Craft on RX-78-2's Beam Rifle, it will either become a Super Scope (0-1.2 seconds) or a Beam Sword(1.3 seconds onwards). If Jessie/James try to use Craft on his Shield, it will become a Dubious Disc.
Ema : If Jessie/James try to use Craft on a piece of Dried Cement, it will either become a Brick Piece (0-1.3 seconds) or a Blk Apricorn (1.4 second onwards)
Near: If Jessie/James pick up one of Near's incomplete puzzles, they can use Craft to complete it themselves. It takes them 50% longer to complete the puzzle, but unlike Near they don't have to complete it all in one go.
Bundt: If Jessie/James try to use Craft on Cake Mix, it will either dissapear (0-1.9 seconds) or become a piece of cake (2 seconds onwards). Pressing A with a piece of cake in hand will make them eat it and restore 20% damage. It can be thrown with Z, but splatters on the floor, becoming a tripping hazard.
Missingno: Jessie/James' down-tilt can evolve Missingno into Nidoking, though this change only lasts for the rest of that stock.
If Jessie/James try to use Craft on a Helix Fossil, Dome Fossil or Old Amber, it will become a Skull (from Zasalamel's moveset)
Zasalamel: If Jessie/James try to use Craft on a Skull, it will become either a Helix Fossil (0-0.4 seconds) Dome Fossil (0.5-0.9 seconds) or Old Amber (1 second onwards). The pokemon that are resurrected from these fossils are neutral and will attack anyone. If Team Rocket are in the piggyback stance with Meowth holding a loose cog, Jessie/James will be able to Craft items 33% faster. Trying to Craft the loose cog itself will just make it dissapear.
::::Extras::::
**My nose feels like it's on fire!**
**Meowth. You don't have a nose.**
::Entrance:
- Team Rocket slide in from the left hand side of the screen, all the way to their spawning point. They remain stock still in an elaborate pose until reaching the spawn point
::Taunts:
Meowth;
- Up-Taunt: Meowth playfully bats a ball of yarn in the air with his feet
- Down-Taunt: Meowth stand on one foot while pulling his right eylid down with his paw and sticking his togue out. "Nyahh nyah!"
- Side-Taunt: Meowth lays down on his back, relaxed, while teasing the enemy with "Well, crying ain't gonna help, I already tried that"
Jessie/James;
- Up-Taunt: Jessie blurts out "Prepare for Trouble!" before James covers her mouth, telling her "not yet!"
- Down-Taunt: Jessie turns her back and says "We may be mean and nasty, but we'd never turn our backs on a teammate in trouble" and James chimes in with "As long as we're not exposed to any actual physical danger"
- Side-Taunt: Jessie opens a bottle of soda and glugs away at it, throwing the bottlecap behind her. James clumsily dives to catch it, tripping Jessie in the process.
::Victories:
- Jessie/James try out their new motto "On the wind!" "past the stars".. Meowth jumps down from the top of the screen, slashing both their faces and yelling "Shaddup you clowns!"
- Team Rocket dig a pit so deep, the audience can no longer see them. Suddenly, all the losers fall down pits aswell.
- Team Rocket are floating away on the Meowth Balloon. "Bon Voyage!"
::Loss:
- Team Rocket lie in a charred heap on the ground, saying "That was quite.. a shock"
::Alternate Colours:
- Bikini Contest Team Rocket: James wears a magical bikini top that somehow inflates his cheast
- Cassidy & Biff: THE NAME IS BUTCH! (Meowth dresses up in a raticate costume)
- Ash & Misty as Team Rocket: "To denounce the beauty of truth and love!"
- Construction Worker Team Rocket: A fetching hardhat/boilersuit combo (Meowth dresses up as a Croagunk)
- Spirit Medium Team Rocket: To help ward away those evil spirits, Meowth dresses up as a Sneasel.
- Biker Gang Team Rocket: So what if James needs training wheels!? (Meowth wears sharp angled sunglasses)
::Unlocking Requirement:
If you win a brawl as Pokemon Trainer, there is a 20% chance that Team Rocket will challenge you. This chance increases to 30% if pokeballs are the only item switched on
::Kirby Hats:
- Meowth: Kirby dons 4 whiskers and Meowth's black tipped ears. Kirby gains the move Scavenge
- Jessie/James: Kirby dons Jessie's hair and carres James' rose around with him. Kirby gains the move Craft. Kirby cannot summon Team Rocket's pokemon with his version of Craft
::Codec Sequence:
Otacon: To infect the world with devastation
Snake: huh? oh, right! ..To blite all peoples within every nation
Otacon: To denounce the goodness of truth and love
Snake: To extend our wrath to the stars above
Otacon: Otacon!
Snake: Snaaaaaake!
Otacon: Team Rocket, circling earth all day and night
Snake: Surrender to us now or you'll surely lose the fight
Colonel: Colonel Campbell! That's right!
Otacon: ... That was fun!
Snake: Did we get it right?
Colonel: Hmm.. wasn't it supposed to have a part in it about the wind and stars or something?
Otacon: No, that's a different motto. This one's the classic.
Snake: .. I wonder.
::Stage:
Lake of Rage
The actual stage area of Lake of Rage is a simple 3 platform setup, with two fall-through platforms above a larger, solid platform. Like Delfino Plaza, the platforms in Lake of Rage fly around the lake, offering nice views and stopping briefly at various locations. The order it visits stops at is random, but all stops are flat, walk-off areas. The stops are;
- South of the lake: It is the lowest area the platform lands on so, other than the lake itself, its hard to see very far in any direction. There is an old man nearby, staring into the lake.
- North of the lake: This is the highest area the platform lands on, granting players a view of the entire lake, along with the surrounding forest and even Mahoggany Town way off in the distance. From here, the 2 story checkpoint controlling visitors to the lake is clearly visible, and part of the forest labyrinth from the western side of the lake can be seen too.
- East of the lake: This is right behind a small group of trees, meaning the view of the lake is somewhat impeded. The checkpoint is just visible on the far left of the screen
- West of the lake: From this bank, it is possible to see Mt Silver on the horizon, along with the sea of forest leading to it. A young lad is sitting on top of the ledge overlooking the lake
- Forest Labyrinth: A clearing in the trees to the West of the lake. The hidden house is visible only when landing or taking off from this location, not when fighting at it.
Other Johto landmarks are visible on the horizon as the platform zips from place to place. These landmarks include Bellsprout Tower, Tin Tower and Goldenrod's Radio Tower. The mountain region hiding the ruins of Alph is also visible.
Whenever battling on this stage, you will be constantly assaulted by a Red Gyarados living in the lake. If Team Rocket catches this stage hazard, it will be replaced by a Blue Gyarados in 15 seconds. Though the Gyarados will not follow the platform away from the lake, you are only really safe from it when the platform lands in the Forest Labyrinth area. If it lands in any other area, Gyarados will, in a manner similar to the Halberd, fire a hyper beam towards a random player.
When travelling over the lake, the Gyarados will directly attack the stage by biting it at least once. Yet again, this works in a manner similar to the halberd's claw. While biting, it is possible to attack/capture the Gyarados. Dealing more than 40% damage to it will make it retreat for 20 seconds.
::Assist Trophy:
After bursting from the assist trophy, Wild Professor Oak will stand there motionless. Pokeballs fall from his open book at a rate of 2 per second. These pokeballs activate automatically upon touching the ground, and appear regardless of whether the player has pokeball items switched on or not. After "throwing" 8 pokeballs, Wild Professor Oak makes a Charizard cry and flickers out of existance.
The pokeballs Wild Professor Oak uses, can contain any pokemon, including Team Rockets exclusive pokemon and a number of "glitch" pokemon;
-
LM4: LM4 is a volitile pokemon, and immediately evolves! It evolves into Clefairy, who uses Metronome (the attacks it can activate are the same as Togetic's). And then it evolves again into Nidoking! For 3 seconds, anyone within 1 stagebuilder block of Nidoking will be paunched by him and sent flying away with 30% damage and extreme knockback. LM4 then devolves back, makes its cry (Jigglypuff's sing from the original Gameboy games) then vanishes.
-
PkMn: PkMn is one of the fastest pokemon there is and will immediately dart back and forth across the screen faster than the eye can trace. Anyone it touches along the way will flinch, but take no damage. Though PkMn's movements appear to be random, it actually follows a strict algorythmn that ensures that every 5th pass of the screen will hit a player. After making 20 passes, PkMn turns into a Rhydon doll, which in turn vanishes.
-
Charizard 'M: Oh dear, NOW you're gonna get it! Charizard M looks innocent enough, until around 4 seconds later. Suddenly every player's damage % will skyrocket up to 9999% (though the game cannot display this, instead showing '#&9'%). If any player is damaged while Charizard M is out, they will be frozen in place while their % rolls back down all the way to 0%. Once that player is back to 0%, they are KO'd instantly. After 8 seconds of this chaos, Charizard M slinks away. It is interesting to note that Charizard M will transform any other pokemon that appears on stage into another Charizard M, effectively lengthening the amount of time the players will be OHKO subsceptable
::Strategies:
There are many many techniques, high level Team Rocket players employ, all of which abuse the Team's two character mechanic
- Jessie/James grab cancelling: Despite the name, this technique does not cancel the lag from Jessie/James' grab. Instead, by grabbing Meowth immediately after he has performed an attack, you cancel all the end lag from the attack. Snatching Meowth away mid-attack is great for avoiding a counterattack, especially if donw from a distance.
- Meowth grab cancelling: This is simply Meowth's version of the manouver, allowing the player to cancel lag from Jessie/James' attacks
- Shield Camping: Place both characters on top of one another (easiest done from Piggyback stance by throwing Meowth downwards) and shield. The character not shielding can still attack via the C-stick. Best done while the character shielding holds a Bitter Berry.
- Shield Countering: During the shield stun of one character, simply dash in as the other character and attack, grab or whatever
- Meowth summoning: If the player switches control after Meowth burrows into a pit, and then makes Jessie/James dig a new pit, Meowth will automatically hop out of the new pit
- L-bend throwing: A technique that effectively lets the player throw an item around corners quickly. When Meowth is holding an item and is in the piggyback stance, throw Meowth, then have Meowth throw his item in a different direction
::Additional Reading:
DancingFrogman's MYM3.0 Team Rocket!
WObuffet is super awsome hes blue ad he lieks to shot WOBBUFFET! This moveset is very defense like, maikng you think twice befoer attacking the blu wonder! He uses Cuonter and Magic Cote and his Final \Smahs is Destiny Bond (007 LOL!) Pleese read and tell me wht you think of him!
WOBBUFFFET!
Stats;
-__-------
Size= Pretty bigNot as big as Jessie or James but defenitly biggr than Mario andSonic!
Heaviness= rafher average weight but heavier than most ohter pokeman.. WOBBUFFET!
Attack=s Wobbuffet (WOBBUFFET!) attacks are mid rang and mid speed but fast lik Fox
Jumps= silly wobbyfett can't jump liek ofer characters but I tell you about that latr k?
Move
Speed= He caen nrun slowly an walks even slower. His tiptoe animaytion is hilarius!
Special Abilitys!'
-----=====-
Suktion CupS!: Wobbuffet cdoesnt move wehn you hold doun duck; so when bad charactr guy maeks you fly, you duck an wobbs goes noweher! Isnt thqt cool!
SMa
k Bac!k: Wehn hit wobbuffet flies his head backl ad forth and if it hits you you you get damge. wobby can stll atk when hs hed is all crazy but yu cant pguess where his attak will hurt!
WOBBUFET!
MoVEs?;
-p-p
[[=-------------
Regulr A attk: Wobuffet bonks you with hi hed an you get hurt
AA attack: Wobbufet noks you with his hdea the othr way for exra damage. This is god for raking up dmage and being quick
Sid A attack9moves woblfett foreard): Wobuffet falls over to reech further than AA. Good nockbak but slow move. maek advanc with this mov
Up A attck: Wobbuft jumps up an hits with his hed. can juggl abit but not muhc
Down A attkL good ol wobbs uses his tail thngy to sweap both sides. I knw he doesnt lik to use his tsil to attak, but when in smsh brael, you hav to fight with evrything yo have.
Sid A Smsh; "Mean Look" now you get stunned by his glair attack lik if you brok you're sheild. takes 5 secs to strt but high piroity
Up Smagh A: Wobbuffet hrts with pshcic power! A gloweynessz appears on his head an goes up a bit. Makes guys fly faar but you hav to rest for 2 secods aftr
Dow Snash A:: Wobbuftes fet kick out ether side of hm. Lik Jiggypuff dwn A but strnger and not pikn.
Regular Aireal attakc@ Wofbubet spins arownd lik a tornaedo. Lot of litel htis and last hit acan OK
Fouward aireal at: Wobbuffet fahls over in mid-air an stps you form falling some. Far rang and spik make ths a god attack
Bakwerds Aereal aTtack> Wobbeffet faalls over nbckwards in mid-air an stps you form falling some. Like forewrd but the other way an weaker fastr
Dnwn Airial: Wobbuft attacks below but no spiek (!!). Nostall adn fall etiher ()!!!
Upwards Areial atthk: Wbboffet uses magci power! Woo2ft maks the emeny apper below him. Gud for set up Down aer whitch is spike!
Grab: Wobbuffet uses its arms to grb and pommel. not qwik but slow..
Forwad Thrw:: knoks eneme away far, by slam duk!
Bkwrad throwL Wobbafft throws bad guy backwrds for big damge!
Downwrds trhoe: Wobbuffett juumps on the ememie and hurts cause supr heavy. Can Ko somteims
UPwaRD throw oponant gets hedbutted up. Greet juggle strter from evryone favowrate blue pkemon!
FINSAL SMASH! Destiny Blnd!
Wobbuffet glows pur;ple for 30 seconds. If sumone KOs him, they loos 2 lives! Wobuffet shoust WOBBUFFET! during Destiny Bnd
Spcials
-------
regouler B: savegard! Wobbuft glws green and cannt be knked away. Maeks Wobb like the pokrbaal version if yuo think abot it.
Side V: Conter! Wobbuffet entrs counter stats! he counter any reguler attack but not pecials
Down B! Magic caot: Wobbft entrs another status! He can conter stufs like missls and magc and reguler attack. basicly choos beween this and counter to bee unstoppable!
Up B: Recover! Lol he must recover! Wobbuffet glws green an goes up. he heals 30 damage
Wobbfurft is good tell me how to maek bettr
but be nice and dont shot at me for bei ng a n00B plese

WOBBUFFET!
 .
. .
.