• Welcome to Smashboards, the world's largest Super Smash Brothers community! Over 250,000 Smash Bros. fans from around the world have come to discuss these great games in over 19 million posts!

    You are currently viewing our boards as a visitor. Click here to sign up right now and start on your path in the Smash community!

Make Your Move 5

Status
Not open for further replies.

Wizzerd

Smash Ace
Joined
Feb 24, 2009
Messages
929
I correctly spelled withdrawal, as K. Rool pointed out. Anyway, thanks for the praise, Wizzerd. Indeed, god**** that Lego Rocker. . .Hope you’ll get to read the rest soon. You can get rid of the blasted image by viewing Ryuk’s post individually when you go back to read him. Here’s a link:

Ryuk
Given my reputation as a spelling guru, this is very embarrassing for me. Yu sa nuthong, akoy? And I can't believe I didn't think of viewing each individual post. Also, is there a reason for so many of the links in your link-up space going to your King K. Rool moveset?

In moveset-making news, don't expect the Shadow Sirens for quite a bit. I don't make movesets too quickly, and this one is a three-character one... sigh.
 

Plorf

Smash Apprentice
Joined
Jan 28, 2009
Messages
124
Location
Silver Spring, MD
Very nice Ekans set. Sorry for the late comment, I was interrupted due to real-life reasons. I love moves such as the forward tilt(I have always wanted to make a move like this), neutral aerial (can it reach airdodging/sidestepping characters?), the grab (manual grab? :bee: )... Really enjoyable all the way through. Definitely on par with Shellder, though I expect your next set to be a non-Pokemon one! :p
 

MasterWarlord

Smash Champion
Joined
Aug 24, 2008
Messages
2,902
Location
Not wasting countless hours on a 10 man community
Given my reputation as a spelling guru, this is very embarrassing for me. Yu sa nuthong, akoy? And I can't believe I didn't think of viewing each individual post. Also, is there a reason for so many of the links in your link-up space going to your King K. Rool moveset?

In moveset-making news, don't expect the Shadow Sirens for quite a bit. I don't make movesets too quickly, and this one is a three-character one... sigh.
. . .After checking my link up space links, Gluttony, Lust, and Fatman all go to K. Rool. Bah. Fixed. Thanks for notifying me.

Anyway, looking forward to the Shadow Sirens. They’ve always been some of the better Mario RPG characters, and they have far more potential then the characters you’ve been doing so far.
 

PK-ow!

Smash Lord
Joined
Mar 28, 2008
Messages
1,890
Location
Canada, ON
King K Rool said:
Forward Throw... Fake Out... At first glance, this throw looks exactly like the foe just escaped; they pop out, slide a short way away, and Ekans looks unhappy. However, directly following that, if the foe presses ANY button (or the control stick), Ekans will automatically home onto them with a powerful thrusting bite, dealing 11% and okay knockback. If they wait a mere one second, the throw will be cancelled. This is best used just before the foe WOULD break out, as they can never be sure whether or not it's a trick. Even if they get away, they still took the full Gastro Acid damage.
Holy crap.

If no one has done this before, this is the single reason why your move set is awesome. That is WOWcool.

While reading then the move set in scrutinising detail, when I got to uptilt, I realized "OMFG I want to use this character NAO." So I'm pretty sure you've succeeded. :bee:

Also, interesting formatting. Here, let me try it...
Hey! What colour is that yellow?

So, questions:


Shed Skin. Awesome cool but not sure I get it. You say you can use this during another action - even while you are attacking? What exactly can and cannot you interrupt with this move? Dizziness? Shielding? Grab release? You'd have to spell it all out since "in hit stun" doesn't work as a generalization anymore.
Also, what decides where the skin goes, and where Ekans goes?

It's a great idea and I like the touch of having Ekans' skin "slowly start to peel". I wonder if the healing might be too fast, though.
But lawl, I wonder how OP Kirby is with it. x_x


Double Team: Also super cool. How do the copies affect projectiles?
And, you say Ekans can footstool jump the copies. But you also say the three move in perfect unison. So how can he do that?​

Glare: So, it executes a time after you input down+special. Am I trying to aim Ekans' gaze at the opponent? Is that why I can move his head?

Forward air: Could you explain more what this looks like? Also, sou say that Ekans moves when he does it?
It is pretty cool how it works with feint.​
Bounce: ... er. See comments. For now, just question: the lag is until you get to full height off the bounce, either way?

up air: I don't have a clear picture how slow this actually is. I think it's slower than Zelda's uair.


Grabs: Basically, what do I need to do to grab? Is a grab input a stance change for Ekans? Then I need to walk through the opponent? Or do I need to do something more elaborate?


Throughout, I found many moves didn't explicitly describe the timing. You said some were lightning fast, some, like up air were slow, but others, though I felt like I could 'see' what you meant, it could just be my idea of the move.


Comments:

The physics look just right. It combines and works with your aerials, and 'trapsetter' concept, it's great.

I love the "standards" and tilts. Except for my belief that the creation of 'holes' is a bit of complexity creep with Acid, I really really like the way the 'poison' moves play and feel.​

Forward Smash though - is there lag on the cancel action? I'm quite sure that combining a smash attack - a power attack - with the properties of (a) being able to charge without having to time it (indefinite charge), and (b) being able to cancel it, avoiding end lag , makes for an extremely powerful move.​
Neutral aerial: Wow. Wow. Just wow.​
On Back air, I realized when I got to this that one thing seems to be missing. The 'rattle' Ekans has isn't involved in his moves. Sort of expecting that... but I guess it doesn't have to be used. And it is in a taunt. :dizzy:

However, it's moves like Gunk Shot, this move, and Upsmash that show holism in Ekans' set. Moves that communicate that character's wish and control of where things should be... it makes the set character translation, complete.


Okay, Bounce: lolwut? It's just... it looks so gimmicky. This for me is just so strange. It has a certain humourous character; Ekans really goes ramrod straight when he does this? As a separate issue, that doesn't feel natural, either.
Also, it appears you can gain arbitrary height with the attack. . . For me, it would be cool as just something like Toon Link's dair, with bad lag on hitting the ground. I dunno. This move comes out of left field in my reading.

Something I thought of: Side special looks a little odd... it's narrow, really - and yet I wouldn't wish the move gone. I was wondering if this could have been an aerial - an aerial whose properties come into play if you get the "landing lag" - and if you could have made Beat Up the side special. And have more properties then.​
I probably love the throws, but I need to know how grab works to be sure. :psycho:

The taunts and poses have a lot of character. That needs to be said. Stage entrance is sort of meh.

Great moveset! Loved it! You have truly discovered the essence of Ekans; and with this move set, you have put Ekans into this game.
 

Kholdstare

Nightmare Weaver
Joined
Oct 10, 2008
Messages
1,440
Holy crap. Two more awesome movesets, which I will read later, after drama club practice. I'm definitely going to review one of these (maybe both) too.

Expect a review of Medli up by, maybe Saturday.

Also, I was joking about you forcing me to do Greed. I want to do him.

Explanation about my location: I was searching for pics of Greed on Photobucket and found Greed and Kimbly Yaoi pics by the dozen. :bee:?
 

SirKibble

Smash Champion
Joined
May 2, 2008
Messages
2,400
Comments on Ryuk

Wow. This, ladies and gentlemen, is the Warlord masterpiece of MYM5 (that is, unless he's got another sick-awesome moveset up his sleeve). Chock-full of interesting, well-described (I expected nothing less) attacks, and with one defining factor: despite some moves being four or five paragraphs long, they're all still quite easy to digest. The description length appears painful at first, but it never drags. The whole thing's quite captivating. I really like the unique playstyle his Death Note fuels, and the alleviation of the weaknesses of it through the Final Smash.

The only big problem that stuck out to me, is Ryuk's punishment for KOing outside the Death Note. Even assuming Brawl's KO system wasn't so absolutely absurd, and we could speak in terms of Melee, it's quite easy to manipulate your own falls. If you score the first KO against Ryuk, all you have to do is force yourself past the blast zone after a decent hit from him, and get him punished until you win. :ohwell:

Comments on Ekans

To think, all those hints on the Abyss weren't about Grimer after all...
Another Pokemon, eh, Rool? Ekans is loaded with slithery mindgames like I'd expect, all well-implemented. I have to echo HR, though, that I think some of the attacks were a tad bit bland, though given the nature of the character, maybe it's more-or-less inevitable. Considering that we're talking about Ekans, I think you milked him for about as much as he's worth, though! All the specials were brilliant, and I also enjoyed a number of other attacks, such as the D-Air and F-Tilt (think what you will yourself, that's a freakin' cool effect!) Highly entertaining, for sure, but I have a feeling you've got more up your sleeve.
 

KingK.Rool

Smash Lord
Joined
Nov 26, 2005
Messages
1,810
Holy crap.

If no one has done this before, this is the single reason why your move set is awesome. That is WOWcool.
I was pretty happy with how that attack turned out, myself. Glad someone mentioned it.

While reading then the move set in scrutinising detail, when I got to uptilt, I realized "OMFG I want to use this character NAO." So I'm pretty sure you've succeeded. :bee:

Also, interesting formatting. Here, let me try it...
Hey! What colour is that yellow?
Hooray! :bee:

The yellow is FFFF99, which I dug up from this handy place.

Wish I got more comments about the organization, I think it's the most dynamic thing in the set...

Shed Skin. Awesome cool but not sure I get it. You say you can use this during another action - even while you are attacking? What exactly can and cannot you interrupt with this move? Dizziness? Shielding? Grab release? You'd have to spell it all out since "in hit stun" doesn't work as a generalization anymore.
Also, what decides where the skin goes, and where Ekans goes?

It's a great idea and I like the touch of having Ekans' skin "slowly start to peel". I wonder if the healing might be too fast, though.
But lawl, I wonder how OP Kirby is with it. x_x
Just for your own knowledge, Ekans slips out the front or mouth area of where he was before, leaving his skin exactly where he was a second earlier. Basically, if you have a Shed Skin in reserve, you can use it out of absolutely anything. As for the healing... well, it's not THAT much, considering most aerials can counter it in a single hit. Playing around with Ness the other day, I realized that you needed to absorb a LOT of projectiles to get a recognizable advantage. Maybe I did overdo it...

Double Team: Also super cool. How do the copies affect projectiles?
And, you say Ekans can footstool jump the copies. But you also say the three move in perfect unison. So how can he do that?​
Yeah, see, little things like that are what come of how I myself make sets; writing it down as I make up the ideas, rather than brainstorming and rough drafts and revisions and whatnot. Essentially, I'm saying that if you try to jump beyond your second jump while in the air with a copy nearby, you'll basically automatically footstool it. Overly convenient, I know, and it would probably be a good idea to mention it in the moveset proper, but it's mostly a visual thing, I think.

Glare: So, it executes a time after you input down+special. Am I trying to aim Ekans' gaze at the opponent? Is that why I can move his head?
[/INDENT​


Precisely.

Forward air: Could you explain more what this looks like? Also, sou say that Ekans moves when he does it?
It is pretty cool how it works with feint.​
He sort of lunges forward, slithers behind the airborne foe by moving through the background, then comes up behind them and deals his three-hit combo. It's sort of like Meta Knight, but reversing their positions before attacking. Also cooler. :bee:

up air: I don't have a clear picture how slow this actually is. I think it's slower than Zelda's uair.
It's slow. You've got a good picture of it, I think.


Grabs: Basically, what do I need to do to grab? Is a grab input a stance change for Ekans? Then I need to walk through the opponent? Or do I need to do something more elaborate?
Press Z, then basically, yeah, walk through the opponent.

Throughout, I found many moves didn't explicitly describe the timing. You said some were lightning fast, some, like up air were slow, but others, though I felt like I could 'see' what you meant, it could just be my idea of the move.
I was actually going for that with both this and Shellder; letting the reader at least partially draw their own conclusions as to how each attack looks. Obviously, enough detail to know what's going on, but I don't think I need to mention exactly how much of a second it takes to start up.

Comments:

The physics look just right. It combines and works with your aerials, and 'trapsetter' concept, it's great.

I love the "standards" and tilts. Except for my belief that the creation of 'holes' is a bit of complexity creep with Acid, I really really like the way the 'poison' moves play and feel.​
As I've mentioned, Acid is one of my least favorite attacks in the set, partially for precisely that reason. Ah, well. Forward Tilt is always a bit of a bummer of an attack.

Forward Smash though - is there lag on the cancel action? I'm quite sure that combining a smash attack - a power attack - with the properties of (a) being able to charge without having to time it (indefinite charge), and (b) being able to cancel it, avoiding end lag , makes for an extremely powerful move.​
You can always toss a projectile at Ekans while he's swaying there. And it's not a hugely powerful attack, I think. Still, when you put it that way, I agree. :ohwell:

Will think about nerfing.

Neutral aerial: Wow. Wow. Just wow.​
On Back air, I realized when I got to this that one thing seems to be missing. The 'rattle' Ekans has isn't involved in his moves. Sort of expecting that... but I guess it doesn't have to be used. And it is in a taunt. :dizzy:

However, it's moves like Gunk Shot, this move, and Upsmash that show holism in Ekans' set. Moves that communicate that character's wish and control of where things should be... it makes the set character translation, complete.
:bee:

Okay, Bounce: lolwut? It's just... it looks so gimmicky. This for me is just so strange. It has a certain humourous character; Ekans really goes ramrod straight when he does this? As a separate issue, that doesn't feel natural, either.
Also, it appears you can gain arbitrary height with the attack. . . For me, it would be cool as just something like Toon Link's dair, with bad lag on hitting the ground. I dunno. This move comes out of left field in my reading.
Bounce, I guess, is a bit out of character. It was a necessary evil to develop his playstyle and give him some aerial presence. And it would be so much fun to use! :bee:

Something I thought of: Side special looks a little odd... it's narrow, really - and yet I wouldn't wish the move gone. I was wondering if this could have been an aerial - an aerial whose properties come into play if you get the "landing lag" - and if you could have made Beat Up the side special. And have more properties then.​
I probably love the throws, but I need to know how grab works to be sure. :psycho:

The taunts and poses have a lot of character. That needs to be said. Stage entrance is sort of meh.

Great moveset! Loved it! You have truly discovered the essence of Ekans; and with this move set, you have put Ekans into this game.
Thank you very much for the lengthy and detailed critique, PK-ow!

Comments on Ekans

To think, all those hints on the Abyss weren't about Grimer after all...
Another Pokemon, eh, Rool? Ekans is loaded with slithery mindgames like I'd expect, all well-implemented. I have to echo HR, though, that I think some of the attacks were a tad bit bland, though given the nature of the character, maybe it's more-or-less inevitable. Considering that we're talking about Ekans, I think you milked him for about as much as he's worth, though! All the specials were brilliant, and I also enjoyed a number of other attacks, such as the D-Air and F-Tilt (think what you will yourself, that's a freakin' cool effect!) Highly entertaining, for sure, but I have a feeling you've got more up your sleeve.
I went for overall playstyle; it would have been easy to copy-paste his moveset from Serebii and have more creative attacks then my current Slam and Poison Sting, but I felt it was important to get a smooth playing experience - at least, in my mind. That's my justification, anyway.

Thanks, though, Kibble. Glad you liked it.​
 

SkylerOcon

Tiny Dancer
Joined
Mar 21, 2008
Messages
5,216
Location
ATX
This set is probably your best out of your MYM5 sets. Overall, his initial brokeness is offset by the weaknesses you gave him via the Death Note. Killing him off if he kills his opponent without the Death Note was an interesting addition, as well as the initial invisibility factor.

Though, perhaps 1.5 seconds is a bit too short for a name to be written down. I know it kills in 40 seconds... but its a guaranteed kill in 40 seconds. Perhaps increase it a bit?

Still love the down tilt.
 

Chris Lionheart

Smash Champion
Joined
Apr 6, 2008
Messages
2,076
Location
Make Your Move
This set is probably your best out of your MYM5 sets. Overall, his initial brokeness is offset by the weaknesses you gave him via the Death Note. Killing him off if he kills his opponent without the Death Note was an interesting addition, as well as the initial invisibility factor.

Though, perhaps 1.5 seconds is a bit too short for a name to be written down. I know it kills in 40 seconds... but its a guaranteed kill in 40 seconds. Perhaps increase it a bit?

Still love the down tilt.
It doesn't auto-kill in 40 seconds... It deals high vertical knockback and 28% that CAN be dodged at the end of 40 seconds. If anything, Ryuk is underpowered as his only viable killing option is the Death Note unless the foe is on their last stock or he is at high damage himself.
 

SkylerOcon

Tiny Dancer
Joined
Mar 21, 2008
Messages
5,216
Location
ATX
It doesn't auto-kill in 40 seconds... It deals high vertical knockback and 28% that CAN be dodged at the end of 40 seconds. If anything, Ryuk is underpowered as his only viable killing option is the Death Note unless the foe is on their last stock or he is at high damage himself.
That's pretty much an auto-kill at 30% plus, the way Warlord was describing it.

It wouldn't be hard for Ryuk to stay on-top of the opponent for a few seconds then hit or grab them so they can't dodge the attack.
 

SirKibble

Smash Champion
Joined
May 2, 2008
Messages
2,400
This is a follow-up joke moveset I promised a while ago.

alevel100femaleMudkipwithnolegs

...more readily known as...

Super Gimp Mudkip


Super Gimp Mudkip is Super Gimp Charizard's friend. Super Gimp Mudkip has no legs, but is still a Mudkipz, so u still leik her.

so i herd u liek basic animations

Standing
SGM doesn't stand, because she has no legs. Duh.

Not Moving
When SGM is just sitting there, she doesn't do anything. Not even blink. This is to intimidate opponents who want a staring contest.

Walk
SGM doesn't walk. She has no legs.

Hop Forward
To move forward slowly, SGM hops repeatedly, going short distances.

Dash
...

Hydraulic Propulsion
To move forward at high speed, SGM faces the opposite direction she is moving in and sprays an awesome stream of water from her mouth, moving her forward as she bounces up and down on the ground. This water is like Not-So-Super Normal Squirtle's Water Gun.

"Tripping"
When SGM "trips," she turns sideways and rolls along the ground, moving at twice her normal Hydraulic Propulsion speed and becoming a hitbox that deals 84% damage and no knockback at all to anyone she hits. This lasts forever, and she just rolls back and forth along the platform until the other player gives up.


so i herd u liek standard attacks

Not Moving Attack
SGM radiates with the pwnsome light of teh Mudkipz, dealing 10% damage to all who are looking toward her.

Forwart Tilt
SGM stares forward and doesn't blink, paralyzing teh opposition.

Up Tilt
SGM stares upward and doesn't blink, paralyzing teh opposition.

Down Tilt
SGM stares downward at her reflection on the ground, paralyzing herself.

Dash Attack
SGM does not attack and just keeps dashing for mindgamez.


so i herd u liek smash attacks

F-Smash
SGM spits muddykipz water at her opponent's face.

Upward Smash Attack
SGM turns upward and sprays water to disguise as a fountain so her opponents will be fooled.

Smash Down
Using this attack once will make SGM say "MUD" and the second time she will say "KIP." Once the second use is complete, SGM gains the advantage as her opponents realize she is teh mudkipz.


so i herd u liek aerials

N-Air
SGM makes a bubble for maximum protection

F-Air
SGM makes more bubbles for even moar maximum protection.

B-Air
SGM makes bubbles behind her for protecting her butt.

U-Air
SGM makes a bubble above her for EVEN MOAR maximum protection.

D-Air
SGM makes OVER 9000 bubbles for OVER 9000 MAXIMUM PROTECTION!


so i herd u liek throws

Grab
SGM grabs her opponent with her face, since she has no legs.

Pummel
SGM is teh cutest little mudkipz EVAR! 8% damage.

Throw
For all throws, SGM flops around on the ground, doing a cute little mudkipz dance for her victim. It maeks them happy so they won't hurt such a cute little mudkipz.


so i herd u liek specials

Neutral
SGM flexes her eyes. Charge this up for maximum staring contest winning ability.

Side Special
SGM opens her mouth and sprays an hydro pump forward to mak u ded.

U-Spec
SGM thinks fast, and tells her trainer to call her back and send her out again, this time on the stage. But her trainer is asleep. Too bad.

Dwon B
SGM switches places with SGC.


so i herd u liek teh final smash

Final Smash
SGM and SGC join powers to shot fire and water. This is a terrible final smash.


so i herd hr lieks situationals

Ledge Attack
SGM is hanging by her mouth from the ledge, so she sprays water all over it to make people slip if they get close. This doesn't make her get up.

Get-Up Attack (from back)
SGM flips over, making an whirlpool around her.

Get Up Attack (from face)
SGM is hurt when she falls on her face, so she will automatically become dizzy.

Tripped Attack
This attack was already told to u. dont u remember?


so i herd mw lieks extras

Assist Trophy
alevel100maleMudkipwithnolegs is teh assist Trophy. He is a pretty cool guy, eh lurvs SGM and doesn't afraid of anything. This AT only works for SGM, and she heals all her damage instantly because of teh powerz of luv.

SSE Role
SGM is in the arena where Mario and Kirby fight. When the ancient minister comes, she kills him with her pwnsomeness. This SSE ends earlier than the normal one. thanks, SGM!
 

Jimnymebob

Smash Champion
Joined
Sep 26, 2008
Messages
2,020
NNID
Jimnymebob
I'd like to echo what everyone has said about Ryuk and Ekans- they are great sets, and I really like Ekans' sprite evolution layout, that works great. The movesets themeslves are quality, and even though I know nothing about Death Note, Ryuk seems like a great character, and is easily one of your best (but my lack of knowledge hinders my ability to appreciate it more than some of your other sets. lolbias XD). Ekans is a unique set, and it fits the Pokemon well, possibly more so than Shelder's did.
Great job you guys.

Edit= I just remembered about Dr. Robotnik- that was a great set Spade, it combined unique attacks that were true to the character without ending up like Junahu's (apologies for probably spelling that wrong) MM9 set, with nostalgia. This is possibly one of my favourite sets from you, and it proves that with a bit of work you can make nearly anything fit into the world of Smash comfortably.

Grab
SGM grabs her opponent with her face, since she has no legs.
That is the best attack in the set, srsly.

so i herd mw lieks extras
I lol'd.
 

Baloo

Smash Ace
Joined
Nov 14, 2008
Messages
781
Ekans is great. The presentation is terrific. Looks like Ekans. (O RLY?) But all those Grimer hints in the Abyss... In Balooagia, as it's now called, since you and Kibble are separatists. :mad:

@alevel100femaleMudkipwithnolegs: so i heer u liek mudkipz.

That is a great set. 6 supervotes and 24 votes, definitely.
 

Junahu

Smash Ace
Joined
Nov 15, 2005
Messages
899
Location
Shropshire Slasher
That's pretty much an auto-kill at 30% plus, the way Warlord was describing it.

It wouldn't be hard for Ryuk to stay on-top of the opponent for a few seconds then hit or grab them so they can't dodge the attack.
Stages with ceilings for the counter-pick.
Also, Ryuk sounds like he'd have a tough time approaching and chasing, due to his huge hitbox (especially with wings). I doubt KO's are as simple as "run up to guy after 35 seconds and grab"

In terms of difficulty, its probably easier to use Dedede's chaingrab from 0-KO than it is to reliably use Ryuk's Death-note in competitive play.


Edit: I just realised how utterly boned Ryuk would be on WiFi "With Anyone". 2 minutes is at most, 2 Death-Note KO's.
 

Baloo

Smash Ace
Joined
Nov 14, 2008
Messages
781


Dimentio
Power: 4/5
Walking Speed: 3/5
Dash speed: 4.5/5
Range: 5/5
Projectile distance: 4/5
Drop speed/weight: 2/5
Size: 2/5
1st jump: 5/5
2-4 Jumps: 3/5
Crouch: 2/5
Traction: 5/5
Combo: 2/5
Wall jump: Yes
Wall cling: Yes
Crawling: Yes
Glide: No
Tether: Yes

Pros:
High power
Fast
Projectiles
Multiple jumps and great recovery
Can reflect all attacks with Down B

Cons:
Light
Bad combos

Dimentio is 2D, just like GaW. He hovers in the air, so very low attacks won't hurt him. He has many jumps, little lag, and powerful specials. All 4 of his specials are projectiles, and 2 his ariels spike. Mostly good matchups, but not broken.

Standard Attacks

A: Small magic burst, low knockback

A Combo: Two magic bursts and then he claps and there is a big magic burst, high knockback and range 12%

Side A: Kick, low range and knockback

Up A: Big burst of stars above head. medium knockback, very low range

Down A: Spins around. Huge range, low knockback. Small vacuum affect.

Smash Attacks

Side Smash: Slaps foward. High knockback, low range. 39%

Up Smash: Big magic burst upwards. Huge knockback, medium range. 29%

Down Smash: Does a ground pound. Distorts the ground around it. Low knockback, high range. 14%

Air Attacks

Neutral Air: Blasts dimensional magic out of his hands. High range, low knockback.

Foward Air: Kicks legs foward. low knockback, medium range.

Backwards Air: Spins and slashes one hand outward. High knockback, medium range. Spike

Up Air: Blasts dimensional magic out of hid hands upwards. High range, high knockback

Down Air: kicks downward, dimension magic bursts around his feet. Very strong spike if it connects. High range and knockback.

Situational Attacks

Dash: Spins foward, last hit he throws hid hands out and bursts dimenion magic out of them.

Get-Up: Flips in midair. huge knockback. KO's at 20 percent, does 50 damage.

Ledge: Does a cartwheel upward. very low knockback and range.

Grab and Throws

Grab attack: Slaps

Forward Throw: Pulls backward, then thrusts his hands foward and blasts energy rings out. High knockback

Back Throw: Spins quickly and throws the opponent backward. Low knockback

Up Throw: Throws opponent upward and claps his hands above him, blasting them upwards. High knockback

Down Throw: Jumps on opponent. Low knockback, but 42%

Special Attacks:

B--Dimensional Magic: Charges a star on dimension magic like the kid he used to kill Nastasia. Uncharged: 7% Charged: 19% Super Charged: 34% High Knockback

Side B--Floro Sprout: Throws Floro sprout. If it connects the opponent will have the flower effect, exept a floro sprount instwead of a flower will be on it's head. When it hits 10% is given. Up to 50% from the flower effect. No knockback.

Up B--Warp: Just like his teleportation from SPM, but when he appears again if he pressed B while invisible he will have a duplicate. 0%, but his duplicate will chase a random opponant and act like the Metroid assist trophy for 2 seconds. Up to 25%

Down B--Put You In A Box And Blow You Up: Creates a box and puts it infront of him. If a person is right there they will go in the box and get up to 60% If they are not there but attack Dimentio while the box is still there they go in the box for up to 30% While he does this attack he shouts "And so I strike, like an unseen dodgeball in an echoing gymnasium." If he is attacked from behind while the box is up the box shoots foward doing 5 damage to everyone in it's path.

FINAL SMASH—Super Dimentio: Dimentio shouts: "Now... Ladies and gentlemen, get ready for the greatest magic show you'll ever see!" There is a short animated scene with the Void, the Chaos Heart, Mr. L, and Dimentio warping together. After that you control Super Dimentio until time runs out. All of your B attacks get replaced. B: Those white square bombs that he shoots. B>: Super Punch B^: Ground Pound BV: Chaos Heart. It isn't a real attack in the game, but he shoots the chaos heart out of his mouth. Huge knockback on all 4 attacks.
 

Plorf

Smash Apprentice
Joined
Jan 28, 2009
Messages
124
Location
Silver Spring, MD
MAGMAN


INFORMATION

Magman is not a Mega Man character. He's the boss of Neo Star in Kirby 64, and is a giant blob of lava. Not much can be said about his character: in his boss fight he was either posessed by Dark Matter or simply really angry at Kirby. Either way, he's a heavyweight, male antagonist.

Magman deals constant damage to foes. It's about 4% per second, which sounds great. This buffs his physical attacks a bit, and grabs are boosted even more. The downside to this is that Magman, although he has a lot of physical moves, those same moves add to his hurtbox, meaning the foe has more opportunities to damage him.


STATISTICS

SIZE 11/10
Dude, Magman is huge.

WEIGHT 11/10
Naturally.

POWER 7/10
No surprise.

CROUCH 10/10
Easily the best crouch in the game. Level with the floor.

JUMPS 2/10
An okay first jump, bad second.

GROUND SPEED 2/10
Terrrible. He has a good crawl speed though.

AIR SPEED 2/10
Pretty awful.

FALLING SPEED 8/10
Magman likes the ground.

ATTACK SPEED 5/10
Not terrible, actually.

RANGE 7/10
Important, considering.

PRIORITY 5/10
Lots of physical moves. A few disjointed moves.

RECOVERY 8/10
As good as Dedede's, maybe.

SPECIALS

NEUTRAL SPECIAL VOLCANO
Think of fire+rock in Kirby 64. That's this move in a nutshell. If you're unfamiliar, Magman shoots fairly large rocks out of his head like Ivysaur, though this can be aimed by tilting left or right. It snaps back to its position, however. There's similar range to Bullet Seed. You can't aim down. Each rock deals 3% and upward flinch, meaning this is clearly a damage-racker and and anti-air move. Rocks come out more slowly than seeds. Some startup, but it's entirely avoidable. Simply cease holding B before it starts. Stops aerial approaches well.

SIDE SPECIAL CONSUME
Why would you want to approach Magman, though? This is exactly why you shouldn't. This seems to be a Dedede inhale clone. It's not. It doesn't do any direct damage, just the 4%/s contact damage. That's quite a lot if Magman's feeling hungry, but this isn't only a damage racker, you know. He inhales anything tangible, so that covers projectiles, items, traps, anything within reason. That includes his own. You're able to hold this to continuously eat objects.

UP SPECIAL PRESSURE
Magman appears to take the defensive. He hardens his lower body to form a rough rocky structure with ports at the bottom. Magman sits inside while these holes emit streaming fire that holds the entire package in place. You may also move the structure somewhat. That all happens while you hold B. Upon release, the lava monster rockets skyward, trailing heat and stone remnants of the platform. He'll give the foe quite a few hits like Lucas's PK Thunder 2, complete with good knockback at the end. Main difference is the lack of damage. You'll notice passive damage is prevalent in here. Comparable to the penguin king's recovery, with charge like the smaller Kong's.

DOWN SPECIAL ROCKFALL
Magman has a split personality. I told you he didn't like foes close up. Now he decides he wants them to come near. He summons a screenful of rocks that fall for a few seconds. They're tiny with terrible priority, but deal 5% each. Rocks fall everywhere but in Magman's area. Their worth lies in their volume. There's some lag. Magman's attacks break through rock, causing a blast that deals 15% and knockback that has moderate power. If the blob decides not to attack, he absorbs rocks into his body.

STANDARDS

NEUTRAL ATTACK SWEAT
Magman doesn't sweat literally. He expunges small boulders from his body in a flowing action. They offer good protection with their high priority. Damage is minimal, however, with 3% per hit and no auto-combo system. There's average lag on the attack, purposing this as a shield, since Magman's own is mediocre. He can inch left and right while purging himself.

FORWARD TILT UPPERCUT
Not exactly an uppercut. Magman uses his lower body to form a magma limb that shoots up in front if him. It's rather tall and rather quick, with some end lag. It's only out for a bit, though through holding A it can remain. The tentacle deals around 5% damage on its own. It has knockback that can realistically kill if you're patient. Priority is bad since it's a physical move, but its range is fine. If you want an opponent out of your face, this is a means to that end.

UPWARD TILT THRUST
A good surprise move. A tentacle sprouts from Magman's head without warning. On its top it carries a rock slab cooled from inside the monster. This translates into a platform being raised from Magman that does no damage or real knockback. It just pushes foes up without hitstun. That doesn't mean it won't KO, though. It has quite the push effect. The tentacle itself deals natural damage, but pulls foes up onto the platform due to lava flow. Harsh ending lag.

DOWNWARD TILT PHOENIX
From Magman's smoldering patch, a fiery bird rises and flies forward. This has no lag. If Magman has absorbed rocks, they get crumbled out to either side of him at the same time. They're the KO hitbox of the move, each rock doing around 7% and moderate knockback. They don't have a ton of range however. Birds do. They fly forever and drop rocks on foes, dealing 5% and enough knockback. Hold down A and make them fly higher up. Don't try launching more than three, though.

DASH ATTACK WAVE
Magman arches forward with lag of Dedede's dash attack. He turns into a lava wave with great range and power: roughly downwards knockback that has killing potential. This doesn't do damage, using Magman's natural hitbox. There's also some bad ending lag. This is subverted in that he has 10% super armor before the hitbox surfaces. You can make this a meteor smash.

SMASHES

FORWARD SMASH DEFLATE
While not exceptionally powerful, this smash boasts low lag and good priority. Drifblim simply deflates himself so that he's a thin little fellow, but the force of all the air rushing out makes him lose control. The attack covers a vague range within a Bowser in front of him, but his path is random. This means that this has multiple hits, each one doing anywhere from 5-8% (7-10% charged) and light to rather beefy knockback. There are about four hits.

Again, the order of these hits is entirely random, but you can DI yourself a bit to move the hitbox. If you fully charge the smash and manage to get weaker hits in first, you're looking at around 35% and knockback that kills at 100%. Low priority. It ends with Drifblim in the air. This is pretty comical, actually. Heh.


UPWARD SMASH AFTERMATH
With no discernible charging animation or lag, Drifblim stays in a basic pose and, upon charge completion, experiences some ending lag. Obviously, the cool stuff happens while he's charging? Quite right. If anyone attacks him during the charging, a huge explosion occurs inside Drifblim expanding him to around Dedede's size before retracting.

This has short duration and high priority, but the real boon is great knockback. It kills at like 90% under ideal circumstances. It doesn't do any damage, though. If your opponent is keen, though, they'll notice that you take on a slightly different pose than normal while charging. Considering that Drifblim is a good damage-racker, this should be a no-brainer kO move.


DOWNWARD SMASH PULSE
Remember the ethereal string that Drifblim used to stay on the ground? It plays an offensive role here, quickly growing into a blinding flash that takes on a vague "U" shape. The light dissipates into a batch of mist (purely visual) that's rather like a smoke ball. It obscures the immediate area for but a moment, but it's ample time for Drifblim to pull off another quick move, like an FTilt or an USmash. It also does about 10-17% and some mediocre knockback.

The best part is that Drifblim immediately turns invisible when he uses this, like he's an octopus or something. The effect goes away when he's hit or when he attacks, so that feature has limited use. Still though, it's so so handy for escapes and mindgames. This has some startup, but is lagless at the end.


AERIALS

NEUTRAL AERIAL PSYCHIC
Ah, another useful move! Here, Drifblim conjures a cool invisible aura around him, this coming out lightning-fast. The field lasts until you press A again, actually, with the max time being 6 seconds. The thing is, it gets weaker as you draw it out, with a more forceful push at the end of the attack. That means more things will bypass the shield.

The psychic aura repels projectiles and physical attacks quite well, but it has some bad ending lag just in case you really want to use it a lot. You'll find that, even though it doesn't do damage, the "knockback" it gives out is the #1 tool you'll use to stop people from hitting you. It also has a neat interaction with the next move...


FORWARD AERIAL WILL O WISP
From his , Drifblim fires out an eerie bluish flame thing that's about the size of two Olimars. This has average lag, but it's not a very strong attack. It only deals 6%, but has some knockback that can't kill... ever. I forgot to mention that this is basically a projectile: this has a range of up to a Bowser in front of you.

Speaking of forgetting, I told you that clouds couldn't be destroyed. Well, I lied. This move alone can destroy clouds in a fiery burst that deals 10% and the same knockback as the FAir itself. Oh yeah, and one more thing. When used while Psychic is active, the flames from this attack circle around Drifblim, acting as a barrier aainst anything, really. The ghost fire is a high-priority hitbox that does 4% and little knockback on contact. While the shield's active, the aura still decays, but since there's now an actual hitbox in here, you'll still cancel more attacks than otherwise. High priority.


BACKWARD AERIAL SWITCH
Without turning around, Drifblim phases out this carbon copy of him, only it's blurry like Lucario's counter. It's only meant to last a moment, and during that moment, you'll switch places with the copy, or tap back to stay where you are. That alone is good for mindgames, but this also does damage. It's not much, maybe 6% and minute knockback, but the point is it has no lag, and isn't punishable, really. It's also a substitute for an air dodge, if you really feel you can't live without one.

UPWARD AERIAL WEATHER BALL
Attacking again from the cloud on his head, Drifblim shoots out this weird little cloudy ball that quickly travels upwards with fairly little lag. Upon hitting an enemy, it explodes with, oddly enough, ice damage of 5% with slightly downwards knockback that, again, can't kill. It can travel a Ganondorf up.

This is boring unless you hit a cloud, in which case it'll start sleeting. Sleet goes down forever, dealing 2% per second in nonflinching hits. It lasts until the cloud disappears, so endless rain is indeed possible. If you grouped clouds, this gets you a huge area of affect and a very nice damage-racker. Combined with an Ominous Wind, you have a mobile hitbox, albeit an easy-to-escape one.


DOWNWARD AERIAL TETHER
Okay, so the down special is useful and all, but without this you'd be screwed in competitive play. Drifblim launches out a ghostly string downwards about one Snake height. This is kind of like Sheik's chain, there being a sweetspot at the tip that does more damage. The sweetspot deals 10% damage and set knockback downwards, whereas it does 6% and like, no knockback otherwise.

Anyway, if you're close enough to hit the ground with the tether, it'll stick to the stage, anchoring Drifblim in place. From here he can use his ground moveset, or his "KO" moveset. Yeah, these are the only moves of his powerful enough to knock someone off the stage. If you need a better angle to hit with something, hold down to move lower, and up for higher. To get back in the air, simply jump. It couldn't be easier. Very low starting lag, okay ending lag.


THROWS

GRAB PICKUP
Drifblim can only grab in the air, since he grabs from above. So what he does here is pick the foe up and carry them beneath him, but since he still has to float in place, Drifblim automatically lightens up to lift the enemy. The more the enemy weighs, the more weight he loses when picking them up. Drifblim also loves stealing from Arche, so he's going to be able to carry the foes freely, however slowly.

PUMMEL TWIRL
This is rather simple. Drifblim spins with the foe, doing 2% per hit. It's spammable, though. Spinning will increase the hitstun of each throw, since enemies need time to recuperate from being dizzy, yes?

THROW UNBURDEN
Now, Drifblim doesn't have four unique throws. Since he's in the air, it's be rather awkward anyway. Instead, each throw does 6% and some below average knockback. Hey, you can't expect much, anything more would permit spikes. Anyway, you can grab foes who've been hit by a NAir, which is basically Drifblim's take on shield grabbing. When the opponent is thrown, Drifblim suddenly springs upwards, due to the weight he had to lose to remain aloft. Extremely difficult to punish, this.

SUPER

SUPER ATTACK BEREFT
When Drifblim gets a Smash Ball, which is a pretty easy task mind you, he moves to the top of the stage and drifts far away. Must mean a storm's coming... Moments later, ghostly winds arrive on the stage that blow everything to the left at a pretty deadly rate, these being inescapable. To make matters worse, huge whirlwinds appear that are similar to the tornadoes on Hyrule Castle in SSB64. They'll spin you about and launch you upward for 40% and some awfully high knockback.

The tornadoes are not incdarkredibly common, but you'll want to avoid them for sure. This final smash lasts 17 seconds, which is either a waste or unbearably long, depending on existing environmental conditions. Either way, your foes will end up being windswept. This is actually a very loud, scary super attack.


PLAYSTYLE

Drifblim's game is hide and seek. Often times the opponent won't be able to hit him, and when they have the opportunity, he can take defensive measures. He's really annoying to fight, actually. Whether it be trying to penetrate Drifblim's Psychic shield or pdarkredicting where he'll appear next, it's a huge challenge to win against him, even though he's combo bait.

Drifblim's attack speed can get really annoying, especially when he's manipulating you so so easily with a down tilt or launching projectiles at you from above. Though if your Drifblim is really spammy, you can guarantee you'll be able to get past his attacks, since they have awful decay at times. Another weakness is his difficulty in getting to the ground. If Drifblim's foe can pressure them enough, he'll never have the opportunity to KO.

Speaking of KOs, there are a couple of tricks in landing them. Hypnotizing the enemy can either make them vulnerable to a Forward Smash, which is often the best move to use in this case. Though if your opponent decides to attack right after they wake up, An USmash is really great. If you don't want to rely on smashes, there's always a well-placed utilt or ftilt, and if you're desperate, neutral a.

You have a great grab game as Drifblim. It's good if you want to drag a foe into a raincloud, but it's ideal for setting up combos as well. DAir is a good move to use after this, considering it has a large hitbox, but any aerial will do. Up throw combos well into ground moves, since they space the foe, allowing a tether.

By the way, gameplay without your FSpec is awful. Drifblim can't solely rely on a down special to get him to ground anyway, so Ominous Wind is often a blessing... it can even gimp! However, if you hit a foe with it, they're more than likely to combo you half to hell if you don't bring protection. For such reasons the NAir, FAir, BAir, and DSmash exist. If you can't reliably "shield", try a "dodge", and if that doesn't work, just go invisible to plan your next move.

Drifblim is an odd specimen. He lives in the air, he's extraordinarily shy, he falls UP... Don't think he's god tier, though, since pressure can potentially shut Drifblim down. He's not underpowedarkred, either, he has far too many useful moves. He's just different is all. A bereft spirit.
 

Chris Lionheart

Smash Champion
Joined
Apr 6, 2008
Messages
2,076
Location
Make Your Move
Come on Baloo is that all you can do... Compared to your other sets this isn't the best.
I am pretty sure that this is a joke set, perhaps a copy paste from one of his first works or something that is purposely underdetailed.


SGM was awesome. Best joke moveset? I think so.
 

Jimnymebob

Smash Champion
Joined
Sep 26, 2008
Messages
2,020
NNID
Jimnymebob
Are you allowed to repost sets from MYM4? Because that is definitely were Baloo's Dimentio set is from.
 

dancingfrogman

Smash Ace
Joined
Jan 3, 2008
Messages
862
Location
United Kingdom, Birmingham
Switch FC
3133 8842 3910

Chaos 0


Backstory

Chaos is a Chao mutated by the Chaos Emeralds that acts as a guardian for its species, protects the Master Emerald, and provides clear water around the altar of the Master Emerald. He is a water-like being that can easily manipulate his own body, allowing him to stretch his limbs and liquefy himself. Without any Chaos Emeralds, he is known as Chaos 0, and as he absorbs the emeralds, he transforms into six more numbered forms, and eventually becomes the large "Perfect Chaos".

After the Echidna tribe attempts to steal the Chaos Emeralds, harming various Chao in the process, Chaos absorbs the negative energy of the Emeralds, becomes Perfect Chaos and causes chaos until being sealed inside the Master Emerald with Tikal. He is released thousands of years later in Sonic Adventure, so Dr. Eggman can use him to conquer the world. Chaos, still filled with negative energy, absorbs Chaos Emeralds given to him by Eggman, and after Eggman is defeated, Chaos absorbs the last emerald and becomes "Perfect Chaos." He is defeated by Sonic who has absorbed the positive power of the chaos emeralds, which purifies Chaos, and allows him to leave peacefully with the spirit of Tikal. He reappears in Sonic Adventure 2 as a bonus character and in Sonic Battle as a playable character.


The thing this moveset is revolved around: Mechanic: Water Content

This mechanic of Chaos 0 is that when Chaos 0 uses some moves of his or gets hit by the opponent; some of the water content of his body will spill out, making puddles that don't affect gameplay. When you lose some of its water, his range and strength will decline a lot, and that he will also become lighter and a tad smaller as well. However, he can absorb all his puddles up by WALKING/RUNNING/CRAWLING, also a good number of moves also suck Water Content as well, and that if some of its water goes of the stage; the water goes back into his body. The total amount of water which Chaos starts on is obviously 100%, but depending on what move of it, will delete a percentage of water it takes off, the amount of percentage it takes off will be underneath the PROPERTIES section, and you can see the amount of water content underneath the health percentage with the percentage of the water content smaller and in blue. When it reaches 0% this doesn't mean that all of that of Chaos is the brain, the 0% is shown for the weakest position that Chaos 0 can go in. The range changes and strength and the like will be shown in the moves themselves. The moves that can take of Water content is any move that does more than 12% in a space of 0.7 seconds, so that moves that do multiple hits like Sonics F-air can take off some of Chaos water content. The higher the damage, the higher the percentage of the water content gets knocked off, this also varies the size of the puddle as well.


Something you ought to know now: Crawl Attacks

Chaos 0 has an amazing crouch and crawl which reduces him into a puddle, When Chaos 0 got hit in Sonic Adventure, he would disintegrate into a puddle, and in various cut scenes in the game, we see Chaos 0 in the puddle form as an effective way to move around and gets away from danger. When Chaos enters the crouch, he stays in that form unless he gets HIT BY THE OPPONENT, or you can get out of it by JUMPING. Chaos 0 will have a few moves while in this state, one of his moves jumps out of the puddle form into the normal standing position for you. The crawl moves will be in the obvious CRAWL section. When you do the jump input, the puddle will jump into the air and reform back to normal in mid-air.


Stats

100% Water Content power: 8.5/10

At 100% Water Content, Chaos 0 is very strong, having a good amount of moves dealing high amounts of damage and knockback.

0% Water Content power: 6/10

While being weaker than normal, he has much less KO moves than normal, making his game much campier. He’s underpowered and needs to gets his water content back up.

Walking speed: 2/10

For his size, he is a very slow walker, only being a bit faster than the likes of Ganondorf and Jigglypuff

Running speed: 3/10

The run is hardly an improvement from his standard walk speed, and it’s still one of the slowest in the game.

100% Water Content range: 9.5/10

Many of Chaos moves makes him disjoint his moves quite far out, making his spacing game good.

0% Water Content range: 7/10

This is one of the things that Water Content hurts the most; his range gets hurt a lot. The general range of these moves are a bit bigger than Marios range.

Projectile Range: 7/10

The projectiles he do have do not have any super good range than some characters, but it’s above average.

100% Water Content weight: 8/10

Chaos 0 is quite heavy at 100% water content, being about a similar weight to charizard.

0% Water Content weight: 7/10

At the lowest water content, Chaos 0 is about the same weight as Yoshi or Samus.

Fall Speed: 7.5/10

Chaos 0 isn’t the floaty sort, and has quite a fast fall.

100% Water Content size: 8.5/10

Chaos 0 is quite bulky width ways, being a bit bigger than R.O.B, and being as wide as Yoshi.

0% Water Content size: 7.5/10

Chaos 0 also gets smaller by the Water Content, while being smaller is generally a good thing, Chaos 0 is still quite a big target.

1st Jump: 4.5/10

Chaos 0 has below average jumping skills, and along side his fast falling, he drops down in a short time.

2nd Jump: 4/10

Chaos 0’s second jump is slightly worse than his 1st jump, he doesn’t gain much height with his jumps compared to the majority of Brawls roster.

Aerial Movement: 6/10

Chaos 0 has average aerial movement, being about the same as Marios aerial movement.

Crouch: 10/10

This is amazing; Chaos 0 reduces to a puddle, being a few inches thick of the ground. The opponent will need to use their down-tilt to get him out of this.

Crawl Speed: 4.5 - 6.5/10

Chaos 0s Crawl speed is actually FASTER than his run and by a LARGE amount as well! If you want to move via the ground, use his crawl. As stated before, Chaos 0 also has a few CRAWL MOVES as well. The speed of the crawl depends if you tilted the control stick, or you tapped it, like how to perform the normal dash.

Crawl Jump: 3/10

The jump when Chaos 0 does in this form is very small! However, it has a very slow acceleration, where the puddle jumps about a few inches off the ground, before doing the whole jump. The frames where it’s a few inches of the ground is from 1 – 4 frames. Having source to this knowledge, we can exploit the low rising frames and use them for Chaos 0s players advantage… (Stated in the “Techniques” sections)

Traction: 5/10

Chaos 0 has below average traction when he turns around.

100% Water Content grab range: 9.5/10

Chaos 0 extends his arms out quite far outwards to hurl the opponent into his grasp at 100% Water Content.

0% Water Content grab range: 7.5/10

At 0% Water Content, Chaos 0s grab range will get smaller as well, and becomes just the average range grab that of the likes of Mario.

Wall Jump: No
Wall Cling: No
Glide: No
Tether: Yes (U-air)

Specials

Neutral Special: Chaos Ball


^ ^ That’s how the original looked! This one is slightly different

Animation: Chaos 0 shakes his whole body, and sticks his arms into the gut of his own body, and we see Chaos 0 gut area enlarging outwards when you charge this enough. When you unleash this move, Chaos will stick its hands into his gut, and holds a ball of water into his hands, and throws it underarm, so that the ball travels in a kind off arc direction. The ball is about 1.5 times the size of Marios fireball when uncharged, when it’s charged, it’s about the size of King Dededes head.

Properties: This is a storage type charge. This has a small amount of start-up and a bit of ending lag, and it takes 2.5 seconds to fully charge. When uncharged, this does 4% and travels at a similar speed to Luigis fireball, and it reaches a 1/3 of Battlefield, and it does very low knockback, which sends the opponent horizontally. When fully charged, the ball travels half of Final Destination at about the speed of Wolf’s blaster, and that this does 17% and mid-high knockback. When you’re below 75% Water Content, you can only charge this up 3/4 the length of the normal time, and that the move would be that level of strength, not the fully strength it would be. If you’re below 50% water content, you can only charge it up half-way. You get the gist of it hopefully.
<4% - 17%>

(When uncharged: takes off 4% of Water Content)
(When fully charged: takes off 10% of Water Content)


Frame Data:

Hit-box frames: 12 - 42

Ending frame: 43 - 48

Frame you can move/do something else: 29

Total frames: 48


Uses: This has enough power to be used as a gimping tool, but remember that if your Water Content is low enough, this move won’t be so useable, so you will have to keep an eye of your total Water Content percentage. 70% or more Water Content should be good enough for gimping.

Origin: Sonic Battle

Side Special: Shape-shifting Body


Animation: Chaos 0 sticks it’s arm into the air at first, then suddenly from the bottom of his foot upwards, he transforms into a sphere that is about 1.4 times the size of Bowser. The water ball jumps up and down when you use this, and opponents who walk into this will bounce back, but if they attack the ball, the ball will get pushed away.

There’s another twist with the move, if you press Side B again, the massive ball will split up into 10 very small balls about twice the size of Marios fireball, and that the balls will jump violently in a small space, doing constructive hits. The main ball is the biggest one with the pink brain in (about the size of Bowsers head), if the opponent hits the normal water balls, they will reduce to puddles, but if they hit the main one, ALL OF THE OTHER BALLS will fly of at the same time, and after a second, Chaos 0 will return back to normal form. You can end the massive ball by pressing any other attack input other than Side-b. The giant ball automatically ends after 6.5 seconds.


Properties: (In the massive ball form) The massive ball jumps about 1 stage builder blocks into the air with every bounce. The massive ball has a slow ascent and descent as well. The further the massive ball gets pushed back depends on the velocity of the attack, but you WON’T TAKE ANY DAMAGE. The force of the push you’ll give the opponent will bounce the opponent 4 stage builder blocks away horizontally downward. This has quite a bit of start-up lag, with surprisingly low ending lag, but if the opponent hit’s you, you can’t cancel this move out for a whole second (you can use this for a total of 4 seconds).
<0%>

Frame Data:

Hit-box frames (the first time the opponent can get pushed): 25 frames to a maximum of 265 frame

Ending frames: 27 frames after when it ends


Total frames: N frames (being from 25 – 265 frames) + 27 frames.

In the small water balls form, you’ll have limited movement going left to right for the short duration of this move, which is about the speed of Ganons walk. This lasts a total of 3.5 seconds, but you can end this move early if you press an attack input. When you use the bouncing balls, the balls will spread out about 2 Captain Falcons width ways. The bouncing balls around the main one jump up about half a stage builder block, and at the end of this move, the main pink water ball will jump up about a stage block high, dealing the damage and knockback. When the main pink water ball bounces up, it will have pink energy around the ball, which spreads out to the furthest water ball that’s bouncing in both directions. This does many multiple hits, so the damage is variable. This has quite a bit of ending lag however. From start to finish (At max water content), this can do a total of 25% (Final hit doing 7%) with the final hit doing mid-low knockback which sends the opponent diagonally upwards. At 0% Water Content, it will only do the final hit of this move. When the opponent hits the main ball, the knockback of the opponents move will be 1.2 TIMES STRONGER THAN NORMAL however. The lesser Water Content you have, the fewer amounts of Balls will appear when you use the second part, and the lower the Water Content you have for the normal form of this move makes the ball more smaller than normal as well.
<7% - 25% Variable damage>

(When the opponent hit one of the 9 balls, it will reduce the water content by 6%)

Frame Data:

Hit-box frames: 10 to a maximum of 215 (can end it earlier)

Ending frame: 232

Total frames: N frames (10 – 215) + 17 frames

Uses: (Massive ball form) This move can actually be used to gimp the opponent, but since of it’s slow ascent and descent, it’s quite hard to perfect, and with it’s surprisingly low ending lag, you should be able to make it back into the stage in one piece. While you can’t get hurt in this move, f the opponent predicts the move and you’re below the stage, you could get stage spiked and not be able to do anything about it. Water Content doesn’t harm this move as much as the other form of this move however.

(Multiple small balls form) At 100% water content, this can rack up lots and lots of damage, much more than the likes of the Mach Tornado and such. However, while this has some great damage racking qualities, this is harmed greatly by the Water Content mechanic! Another downfall of this move is that if you do hit the main pink ball, Chaos 0 becomes less resistant to knockback and cause of that be KO’d at an early percentage than normal, and not to mention that the Water Content mechanic also harms his weight as well. It’s a good thing that this is quite hard to DI out of.


Origin: Sonic Adventure Chaos 2 form

Up Special: Hydro Pressure

Animation: Chaos 0 first does a back-flip in the air while he tilted its body to the left a bit, and at the end of the back-flip, a massive beam of colourless water shoots chaos from below him, and depending how high Chaos 0s Water Content is, the bigger the water beam is, and the better the height of the recovery.

Properties: This does no damage/knockback at all. This has quite a bit of start-up lag, and quite a bit of landing lag as well. This recovery has a free-fall, which is average is moving around for a free-fall. At 100% Water Content, the water beam will push up to 3 stage builder blocks, with Chaos 0 being pushed an extra 1 stage blocks into the air (Total distance into the air = 4 stage builder blocks upwards) straight upwards into the air. At 0% Water Content, the water only becomes 1.5 stage builder blocks big, and leaps into the air 0.5 stage builder blocks (A total of 2 stage builder blocks). The recovery doesn’t auto-target the edge and grab it half way through the move, like Warios or Ike Up-B by itself.
<0%>

(This move doesn’t gain nor lose Water Content)

Frame Data:

Total frames: 48 frames

Important frames: frames 3- 8 have super armour

Uses: At 100% Water Content, the recovery is as good as King Dededes height wise. This by itself makes it a good recovery distance wise. However, there are many flaws in this recovery, as it doesn’t end as soon as you’re near the edge (unlike many recoveries), and since it also has quite long start-up lag, there is enough time for the opponent to edgehog Chaos 0, a plus this only travels vertically, only making this recovery below the stage and right next to the stage. Also, the height of this recovery is highly dependant on how high the Water Content is, so the recovery height can also be terrible as well. Overall, Chaos 0 has a hard time recovering back to the stage safely, which means he can gimped early and easier as well.

Down Special: Puddle Vortex

Animation: Chaos 0 will reduce to a puddle, and he will get larger and larger the longer you hold down. After a certain point (Specified in the below category), a whirlpool which sinks downwards into the ground will appear in the centre of it, and it will suck anyone into it from the air or the ground a certain point from it. This will also ABSORB THE PUDDLES ON THE STAGE AND RESTORE THE WATER CONTENT HIGHER , but also beaware that the puddle can’t get bigger than the platform, otherwise

Properties: THIS CAN’T BE USED MID-AIR! AND YOU CAN’T USE THIS MOVE IF YOU HAVE LESS THAN 30% WATER CONTENT The actual puddle itself doesn’t do any damage (but it does show a “splash” effect when someone walks on it), only the whirlpool does that. This has quite a bit of start up lag, and quite a lot of ending lag. The hit-box of this move is in the centre of the puddle (and gets bigger the more you hold this down). Chaos 0 When you first use this move, it’s only as big as the normal crawl. But since you can hold this down as long as you want, it takes about ½ of Battlefield before the whirlpool shows up (which takes about 4.5 seconds to do), and the hurt-box for Chaos 0 is still there, as the actual hit-box of the move is ONLY ON THE GROUND. The whirlpool always does 7 multiple hits, with the last one sending the opponent vertically upwards. This can do a total of 12% and low knockback.
(This move gains the Water Content on the platforms it’s on)
(This move also loses some Water Content if it’s held down so much that it’s going of the stage.)


Frame Data:

Hit-box frames: 108 frames onwards until you release the B button

Ending frames: 35 frames after releasing the B button

Total frames: N frames + 35 ending frames


Uses: Remember to use this move before you have 30% Water Content, as it won’t work otherwise. This move can still be hit rather easily, as it sucks the opponent towards it, and since the hurt-box of Chaos 0 is massive (considering its size height wise), this can be worked against him. And don’t bother with trying to use this move as an actual attack, as it’s easily Smash DI’d out of anyway. Plus, don’t use this on the edge or near it, as you’ll lose some water content. Best used when the opponents died and your on the stage already.

Origin: Sonic Adventure Chaos 2 form

Standards/Tilts

Neutral A: Liquid Expansion Twist


Animation: (Auto-release charge) Chaos 0 first crosses his arms vertically across each other, and at the hands, pink aura is seen glowing from it. After this, Chaos 0 will stick its arms wingspread, and spin around on a spot very quickly, and the pink aura spins around as well. The longer you hold down the A button, the more damage/knockback it will do.

Properties: This takes 2 seconds to fully charge. The hit-box is the entire arms. The hit-box of this move fades after 0.3 seconds of using it. At 100% Water Content, the range of this move is a 1/4 bigger than Links Up special on the ground. At 0% Water Content, this move is slightly smaller than Links Up special. The move has high priority for a joint move. The start-up lag is VERY SHORT, but the ending lag is HORRENDOUSLY LONG! At 100% Water Content, when uncharged, this does 15% and high-low knockback. When fully charged, this does 21% and high-high knockback. At 0% Water Content, when uncharged, this does 5% and mid-low knockback. When completely charged, this does 10% and mid-high knockback. This sends the opponent a low diagonal upwards direction.
<5% - 21%>

(This doesn’t gain nor lose Water Content, but it is affected by it!)

Frame Data:

Hit-box frames: 5 - 21

Ending frames: 22 - 71

Important frames: 3 – 6 frames have super armour

Total frames: 71


Uses: This is an excellent GTFO move, and can destroy approaches easily due to the very short start-up lag. This move can also be used as a good KO move as well at 70% Water Content and more. However, don’t spam this move, as the ending lag is horrible, and it you’ll get punished greatly because of it.

Origin: Sonic Adventure Chaos 0 form

Dash Attack: Flicking Water

Animation: Chaos 0 will lean back while sliding forward, and Chaos 0 will start kicking diagonally downward very quickly, which makes water splatter everywhere, producing puddles on the stage. Chaos 0 ends the momentum of the slide by putting his feet down on to the ground.

Properties: The hit-box of this move is the legs of Chaos 0. Chaos 0 slides about the same distance as Snakes dash attack. This has a small amount of start-up lag, but it has quite a bit of ending lag. This does 5 multiple hits, with the last hit doing knockback. This also has low priority as well. Water Content ONLY AFFECTS THE DAMAGE OF THIS MOVE, NOTHING ELSE! At 100% Water Content, this does a total of 13% and the final hit does mid-low knockback. At 0% Water Content, this does a total of 8%. This sends the opponent diagonally upwards.
<8% - 13% Variable damage>

(This loses 4% Water Content with every use! The damage it does is only effected)

Frame Data:

Hit-box frames: 15 - 34

Ending frame: 35 - 44

Total frames: 44

Uses: This can rack up good damage, and since it moves as well, it makes this move hard to DI out of. However, this can’t be spammed, as the ending lag can be punished, and plus you lose Water Content with this move, which also hurts the rest of his moves. Using this once won’t hurt you, but using this over and over again will make it noticeable that Chaos 0 is worse than normal.

Forward Tilt: Extended Arm

Animation: Chaos 0 takes a step back and crouches down a bit. Chaos 0 will then extends his right arm a far distance in front of itself while twirling its arm around. Chaos 0 will then pull back its right arm back into normal size, and he stays crouched down for a very brief moment.

Properties: The hit-box of this move is the entire arm. At 100% Water Content, the reach of this move is about the same size of King Dededes F-tilt. At 0% Water Content, the range of this move is about 1 stage builder block wide. This move has low priority, and it also does 5 constructive hits, and it also stuns the opponent above average length as well. This has a very small amount of start-up lag, and a small amount of ending lag. At 100% Water Content, this can do a total of 10% and the final hit does mid-low knockback. At 0% Water Content, this does 6% and the final hit does low knockback. This sends the opponent horizontally.
<6% - 10% Variable damage>

(This doesn’t lose nor gain Water Content, but it’s affected by it.)

Frame Data:

Hit-box frames: 7 – 19 (hit-lag makes it 7 - 32 frames)

Ending frames: 20 – 31 (33 – 44)

Total frames: 31/44

Uses: This move has huge range at 100% Water Content, so if you space this well, you can do multiple chains if the opponent has poor DI at early percentages. The percentage where you’ll most likely get more chains than normal is around about 60/70% Water Content, as you’ll still have good range, and since the knockback is low, you can chain it up more. However, this move is easy to DI out of, so if you hit the opponent on the tip of the move, they can get out of it from before the final hit.

Origin: Sonic Adventure Chaos 2 form

Up Tilt: Shockwave Travel


Animation: Chaos 0 spins around to its left, and while it’s spinning, he swings his right arm around anti-clockwise, and a red shockwave which grows outwards travels vertically.

Properties: THIS MOVE ISN’T AFFECTED BY WATER CONTENT! The hit-box of this move is only the red shockwave, the actual swing of the arm does no damage/knockback. This move has great range, it travels about 3 stage builder blocks upwards, and at the peak of the move, the shockwave is about 3.5 stage builder blocks wide. The shockwave travels as fast as Luigis Fireball as well. This move is classed as a projectile, but for a projectile, it has great priority. This has quite a bit of start-up and ending lag. This does 7% and mid-low knockback, which sends the opponent upwards.
<7%>

(This doesn’t lose nor gain Water Content, and ISN’T AFFECTED BY IT.)

Frame Data:

Hit-box frames: 24 - 63

Ending frame for Chaos 0: 46

Total frames: 63

Uses: This is a good Anti-air move, and can be used to destroy the opponents approach from the air well, but since this only has a vertical hot-box, this means that it can’t be used for anything else, and since this move has a bit of lag, you’ll have to just try and counter the opponents aerial tactics, as that is all you can really do.

Origin: Sonic Adventure Chaos 4 form

Down Tilt: Tentacle **** Trap


Animation: Chaos 0 (in puddle form) ripples its body up and down, and then when you move out of the spot you was in, you’ll see a small puddle left where Chaos 0 was at. When the opponent walks into it, a tentacle looking thing (pictured above) will swing up and down, and then the puddle will disappear. You can only have one attacking puddle on the stage, when you do this again, the other puddle will simply just stay there, but not actually attack.

Properties: The opponent has to have at least one part of it’s body touching the puddle. The puddle is also slightly bigger than Marios Fireball as well. This move has medium priority as well. This move has some start-up and ending lag. This does 7 multiple hits. This does a total of 12% and the final hit does mid-low knockback, which sends the opponent diagonally upwards. This stuns the opponent a lot, and is very difficult to DI out of.
<12% Variable damage>

(This loses 5% Water Content with every use; the actual move isn’t actually affected by Water Content)

Frame Data (when Chaos 0 plants it):

Start-up frames (when chaos 0 plants the puddle): 15

Ending frame (when Chao 0 is free to move): 23

Total frames: 23

Frame Data (When the opponent activates this move):

Start-up frames: 3 – 19 (when the opponent is hit by this move, it goes from 3 – 32 frames instead)

Ending frame (when Chao 0 plants this move): 19 – 24 (32 – 38)

Total frames: 24/38

Uses: This is a great move, because since the puddle looks like ANY OTHER puddle, it’s hard to tell which is real and which isn’t. However, it’s easy to tell if the puddle is the attacking one or not when you have 100% Water Content or a little less percentage. Plus, the puddle of this move is always the same size. The opponent can easily deactivate this move by rolling past it. This move can be used for trickery, mindgames and pressure, as well as being a good hit-stunner, which can lead up to many moves.

Origin: Sonic Battle

Crawl Attacks

Neutral Crawl A: Bubble Craze


I used Sonic Battle sprites to make this picture, this isn’t an actual move in Sonic battle

Animation: As Chaos 0 is in the puddle form, ripples are seen travelling across the puddle with some steam coming from it, and we see Bubbles floating up a small distance upwards into the air. The amount of bubbles is dependant on your Water Content. When you first does this move, you can hold it down, and you can move around as well when you hold it down

Properties: The Bubbles only go up a Ganondorf distance upwards, and the same size of the puddle horizontally. The bubbles are slightly smaller than Marios Fireball, and they travel upwards about the speed of Wolfs blaster. This has a small amount of start-up lag, but there is a bit of ending lag however. This has very low priority and the bubbles only deliver upwards hit-stun. At 100% Water Content, this does 9% damage per a second. At 0% Water Content, this does 5% damage per a second.
<5% - 9% per a sec>

(The lose Water Content you have, the less amount of bubbles show up per a sec)

Hit-box frames: 5 frames - until when you release the button

Ending frame: 6 frames after letting go of the button

Total frames: N frames + 6

Uses: This can rack up some good quick damage, and if you follow the opponents horizontal DI. When the opponents at the tip of the range, they can jump out of it, and when they jump out of it and you let go of the A button, they can hit you while your getting out of your ending lag.

Crawl Dash Attack (moving at fastest past): Chaos Dolphin.


Animation: Chaos 0 will leap out of the puddle form, leaving a little puddle on the floor. Chaos 0 has its body extended quite a bit when he jumps, and he lands on both feet.

Properties: The hit-box of this move is when Chaos 0 ascends from the puddle. This move has good range, at 100% Water Content, Chaos 0 jumps about 2 stage blocks forward, and when Chaos 0 has 0% Water Content, Chaos 0 travels about 1.25 stage builder blocks forward. This move has high priority, but it also has quite a bit of start-up and ending lag. At 100% Water Content, this does 14% and high-low knockback. At 0% Water Content, this does 9% and mid-low knockback. This sends the opponent horizontally, and GETS OUT OF THE PUDDLE FORM
<9% - 14%>

(This loses 7% Water Content when Chaos 0 jumps out of the puddle.)

Frame Data:

Hit-box frames: 24 - 33

Ending frame: 34 - 49

Important frames: frames 4 – 8 have super armour frames

Total frames: 49

Uses: This has great range and knockback, so this is a good KO move, however, this has punishable start-up and ending lag as well, so spacing this move is crucial. Not to forget that this loses Water Content with every use, so spamming this move is a big no no, plus this move is affected a lot by the Water Content mechanic.

Origin: Sonic Battle

Crawl Forward tilt: Water Gush

Animation: Chaos 0 will tilt it’s puddle 30 degrees upwards, with the puddle being in one piece (lol, physic fail). After this, water gushes from underneath the puddle a good distance in front of the puddle. The water is the same colour as Squirtles Up-b, and the water goes slightly into the air, and then slides on the platform. The distance which the water goes depends on the Water Content.

Properties: This does NO DAMAGE, however, it pushes the opponents similar to Piplups Surf or Marios F.L.U.D.D. The Water is about as thick as Piplups surf at 100% Water Content, and the water at 0% Water Content is about the same size of Chaos 0 in puddle form, and the water always travel at the same speed as Piplups Surf. The water has high priority (for what is a projectile). This move has some start-up and quite a bit of ending lag. At 100% Water Content, The water travels about a 1/3 of Final destination. At 0% Water Content, the water travels about a ¼ of Battlefield.
<0%>

(This loses 8% Water Content with each use, and the lower the Water Content, the lower the range this is)

Frame Data:

When the water appears/end: 13 – 42 (25 frames at 0% Water Content)

Ending frames: 14 - 24

Total frames: 42/25

Uses:This can be used as a good gimper, this works wonders against the likes who have only vertical OR horizontal recovery, so Ike is one of the most characters most hurt by this. This can also be used to destroy approaches as well, but really not for anything else.

Crawl Up tilt: Forceful Suction

Animation: The edges of Chaos 0s puddle will lift up and curve around a bit, and the whole puddle will ripple constantly. When you do this, you can see wind going towards the puddle, similar to Kirbys/ Dededes Inhale. This will pull any puddles into Chaos 0, and Gain more Water Content, but also, if the opponents is close enough to Chaos 0, the puddle will swallow the opponent, and it will look like a ball, and after a few moments, Chaos 0 will spit the opponent out upwards. You can hold this down as long as you like

Properties: The wind sucks opponents/puddles in from 2 stage builder blocks upwards, and it will also suck up any puddles which are a few inches away from Chaos 0 on the ground. The wind is as powerful as Kirby’s inhale. The opponent also has to be about the same distance away as you would be with Gulpin. This move has some start-up and ending lag, and quite a lot of ending lag if you grab the opponent. The grab is somewhat similar to Gulpins swallow as well. This can do a maximum of 14% (you can wiggle the control stick to get out of this earlier), and mid-low knockback. This will always do the same amount of knockback whatever the percentage, and the knockback sends the opponent upwards.
<14% or less>

(This gains Water Content, and the actual attack isn’t affected by Water Content.)

Frame Data:

Start-up frames: 7 – when you release the button

Ending frame: for 12 frames after the release of the button input.

Total frames: N time + 12 ending frames.

Uses: This can be used to set-up aerials when you catch the opponent. This can be a easier way of getting the puddles which are on a above platform, so you can use Down-b for puddles on the same ground as you, and use CUT for puddles on an above platform, and use aerials when you are in the air and nearby some puddles as well. Don’t use this in free-for-alls though.

Origin: A variation of Sonic Adventure Chaos 6 form

Crawl Down Tilt: Tentacle **** Trap

It’s the same as the normal Down Tilt, look at that for description, ta!

Smashes

Forward Smash: Chaos Double Stab


Animation: Choas 0 sticks it’s left arm into the ground, and then a big water-tentacle thing (I can’t describe it X.X), which swings around once before going back into the ground, and Chaos 0 takes his arm out of the ground. This move looks exactly like the above gif.

Properties: The hit-box of this move is the water tentacle thing. This move has great range at 100% Water Content, covering 1.5 Bowser distance in front of himself, while at 0% Water Content, it’s about 1.5 Metaknights big. This move also disjointed and has very high priority. This move, however, this has a MASSIVE AMOUNT of start-up and ending lag, and the duration of this move is also long as well. This move is strongest when it first comes out. At 100% Water Content, when you hit the opponent in the sweet-spot uncharged, it does 24% and high knockback. When you don’t hit the sweet-spot uncharged, it does 20% and high-low knockback. When you hit the sweet-spot fully charged, it does 33% and very high knockback. When you don’t hit the sweet-spot when fully charged, this does 27% and high-high knockback. At 0% Water Content, when you hit the sweet-spot uncharged, this does 18% and mid knockback. When you don’t hit the sweet-spot uncharged, this does 14% and mid-low knockback. When you hit the sweet-spot fully charged, this does 23% and high-low knockback. When you don’t hit the sweet-spot fully charged, this does 19% and mid-high knockback. This sends the opponent horizontally.
<14% - 33%>

(This doesn’t lose nor gain Water Content, but is affected by it.)

Frame Data:

Hit-box frames: 25 - 53

Ending frames: 54 - 72

Total frames: 72 frames

Uses: This is a great KO move, having range (Combine the range with this and his character specific technique… it’s going to be HUGE), massive priority and good damage and knockback, this seems like the perfect KO move. This move is very powerful, but it has horrendous lag, plus that Chaos 0 is defenceless from the back. This move is also a reliable killer at the tip of the move, just remember to use this move at high percentages, and you’ll bound to kill opponents about 70/80%.

Origin: Sonic Battle

Up Smash: Chaos Fountain


Animation: Chaos 0 sticks its arm into the ground (similar to Chaos Double Stab), and then a water pillar appears a few inches in front of chaos, flowing upwards and outwards. Chaos 0 ends this move by sticking its arm back out of the ground. This looks exactly like the above gif.

Properties: The hit-box of this move is the entire fountain. The fountain is about 4/5s of the size of Squitles up-smash at 100% Water Content, and is about ½ the size of Squirtles up smash at 0% Water Content. This move is also disjointed as well. This move also has quite a bit of start-up lag (not as bad as the Forward smash though) and ending lag, and the duration of this move is quite long as well. At 100% Water Content uncharged, this does 21% and high-low knockback. When fully charged, this does 28% high-high knockback. At 0% Water Content uncharged, this does 16% and mid knockback. When fully charged, this does 22% and high-low knockback. This sends the opponent upwards.
<16% - 28%>

(This doesn’t lose nor gain Water Content, but is affected by it.)

Frame Data:

Hit-box frames: 20 - 43

Ending frames: 44 - 59

Total frames: 59

Uses: This is a more reliable kill move than his F-smash, as it has lesser lag than it, but it’s still very punishable. This doesn’t really combo into anything else as it has far too much ending lag, and plus it’s very powerful. Since it’s start-up animation is so similar to its Forward smash, use this move for trickery between the 2 moves. This has some mindgamez wiv it lulz.

Origin: Sonic Battle

Down Smash: Hurricane Twist

Animation: Chaos 0 will turn to face the camera, and will then stick its right foot into the ground, and then Chaos 0 spins around to his right very quickly, you also see particles of water flying around Chaos 0 as well. As Chaos 0 is spinning, Chaos will have its arm wingspread, and near the end of the spin, it crosses its arm quickly, and then spreads its arm downwards at the end of the move.

Properties: The hit-box of this move is the entire body of Chaos 0. This move has the weakest range out of his smashes, and most of its moves as well (plus the range gets smaller as the Water content gets lower). This move also has the ability to gain nearby puddles around 1.5 stage builder outwards of all around the body of Chaos 0, and it also has medium priority for a joint type priority move. This has small start-up and ending lag, but the duration is a bit long as well however. This also does 7 multiple hits, with the last one doing knockback. At 100% Water Content uncharged, this can do a total of 17% with the final hit doing mid knockback. When fully charged, this can do a total of 23%, with the final hit doing high-low knockback. At 0% Water Content uncharged, this can do a total of 12% with the final hit doing low-high knockback. When fully charged, this can do a total of 17%, with the final hit doing mid knockback. This sends the opponent horizontally.
<12% - 23% Variable damage>

(This gains Water Content, and is also affected by the mechanic.)

Frame Data:

Hit-box frames: 13 – 29 (hit-lag makes it 13 – 42 frames)

Ending frame: 30 – 40 (43 – 53)

Total frames: 40/53

Uses: This has small start-uup lag, so it can be used as good damage dealer at earlier percentages, the knockback of this move, however, is very poor compared to his other smashes, plus, when it has lower WC, the knockback is even worse. You’ll most likely use this move to recover WC as well, as it can recover puddles from every direction.

Aerials

Neutral Air: Puddle Foamer

Animation: Chaos 0 turns to face the screen, and sticks its arms out outwards, and then Chaos 0 spins its hands very quickly. After a few moments, its hands will look like water balls. After this, chaos 0 will drops his arms down, and as it does this, the water balls drop straight downwards, and Chaos 0s hands will look back to normal.

Properties: The hit-boxes of the move is obviously when Chaos 0 drops the balls and spins it’s arm around. The arms have low priority (against grounded opponents), and the balls have high priority (for a projectile). The water balls are about the same size of Kirby at 100% Water Content, and about the size of Marios head at 0% Water Content. The balls always travel downwards, and it goes through characters, but when it hits an obstacle, it splats against the floor. The balls always travel at mid-slow speed downwards. This move has some start-up, but this move has a very small amount ending and landing lag. The spinning arm does 4 multiple hits as well. At 100% Water Content, the arms do a total of 8% (the arms do no knockback, the knockback is caused when the balls drop from Chaos 0s hand). The balls do 8% and low knockback. At 0% Water Content, the arms do 5%, and the balls do 6% and very low knockback. The balls send the opponent horizontally. If you use a water content gaining move, you can gain the Water Balls before they splat onto the ground
<5% - 16%>

(This loses 8% Water Content.)

Frame Data:

Hit-box frames: 8 - 33

Ending frame: 34 - 40

Total frames: 45

Uses: This can do a great deal of damage at 100% Water Content, and can also be used to gimp opponents who are below the stage. Not to mention, if you do 2 full jumps (on the rise of the second jump), do a N-air, and then do a fast falling B-air, you’ll combo them into each other, plus you gain the Water Content (at 100% Water Content, this can do lots of damage).

Forward Air: Shark Fangs

Animation: Chaos 0 sticks its body out horizontally, then he lifts its head upwards a bit, and his head and body will look like the head a shark, and then Chaos 0 will transform its arms into a jaw shape with teeth. Chaos 0 then bites, and then changes back to normal.

Properties: The hit-box of this move is only the teeth of the “shark”. The range of this move is very poor, due to the small hit-box. This move is also has high priority for a joint priority. This move has quite a bit of start-up, ending and landing lag. At 100% Water Content, this does 15% and high-low knockback. At 0% Water Content, this does 10% and mid knockback. This sends the opponent horizontally.
<10% - 15%>

(This doesn’t lose nor gain Water Content, but is affected by it.)

Frame Data:

Hit-box frames: 32 – 40

Ending frame: 41 - 59

Total frames: 59

Uses: This is a good KO move, but since of the start-up lag and the small hit-box, and the fact that Chaos 0 is a character who can’t take someone up his face, this is rather a dangerous move, but since of its high knockback, it could somewhat throw the opponent off guard with it.

Back Air: Drilling Water

Animation: Chaos 0 turns to look at its back a bit, and then rapidly spins it’s legs around until it looks like a drill shape pointing 45 degrees downwards. The drill spins anti-clockwise, and we can see what going towards and around the drill shape. Chaos 0s legs return back to normal at the end of this move.

Properties: This gains Water Content around a stage builder blocks around Chaos 0. The hit-box of this move is the entire drill shape (which is about the size of Yoshi btw). This has good range, and it also has mid priority for a joint priority. This has small start-up lag, but it has quite a bit of ending lag, however the landing lag is quite small. This does 6 multiple hits, with the last hit doing knockback. At 100% Water Content, this can do a total of 17% with the final hit doing mid knockback. At 0% Water Content, this can do a total of 10% with the final hit doing low-low knockback. This is a very weak meteor smash, similar strength to Fox’s D-air.
<10% - 17%>

(This gains Water Content, and is affected by it.)

Frame Data:

Hit-box frames: 8 – 31 (hit-lag makes it 8 – 52)

Ending frame: 32 – 42 (52 – 62)

Total frames: 42/62

Uses: As I said a bit before in the N-air, N-air links to B-air very well, due to the very low ending lag of the N-air and very small start-up lag of the B-air, and that the N-air also does low knockback as well, so the percentage this can be done can be about 0% - 40%. This can also be used to pick up puddles, not to mention that this has like the lowest start-up lag out of the Water Content gaining move.

Up Air: Hanging Vase


Animation: Chaos 0 turns into some sort of plant like the above (poor quality) picture. When Chaos does this, the bottom part of the shape lights up a bit, and long water tubes come from the bottom halve of the shape outwards. In the middle of that, the top of the shape flashes bright orange and swings around in the air like mad, when you’re close to the edge in the air, it latches onto the edge like a tether, plus, the shape spins around in mid air, boosting Chaos 0 up a stage builder block higher.

Properties: The hit-box of this move is the swinging axe, and the tubes that come from the bottom halve of the shape. At 100% Water Content, the tubes come out 2.5 stage builder blocks outwards, and the long axe thing is about 2 stage builder blocks high, and at 0% Water Content, the tubes come out 1.5 stage builder blocks, and the axe looking thing is about 1.5 stage builder blocks big. This move has quite a lot of start-up, ending and landing lag, plus, the duration of this move is incredibly long, at least it has mid-high priority. At the tip of the move (where it looks like an orange blade), it’s a meteor smash at the beginning 13 frames of this move. At 100% Water Content, the long tubes do 7% and mid-low knockback each. The swinging axe does 14% and mid-high knockback. The meteor smash does 16% and is quite powerful as well. At 0% Water Content, the long tubes do 4% and low knockback each. The swinging axe thing does 9% and mid-low knockback. The meteor smashes at 0% Water Content does 10% and below average strength for a meteor smash as well. The long tubes and swinging axe handle thing sends the opponent horizontally.
<4% - 16%>

(This doesn’t lose nor gain Water Content, but is affected by it.)

Frame Data:

Hit-box frames: 24 – 56

Ending frame: 56 - 73

Total frames: 73

Uses: This move can be used as a tether, as it has one of the biggest ranges for a tether (although it’s highly dependant on the Water Content mechanic). This move has a meteor smash in a place that seems weird, to using this move to fake people out. This move has a lot of lag in it, and therefore extremely punishable, but at least it aids recovering a tad bit.

Origin: Sonic Adventure Chaos 6

Down Air: Chaos Stretch


Animation: Chaos 0 looks downwards and sticks its belly out before sticking its belly back in again, and extends its arms far downwards, and pulls its arms back up to normal, just like the above gif. At 20 – 0% Water Content, Chaos 0 simply claps downwards.

Properties: The hit-box of this move is the entire arm. At 100% Water Content, this reaches about 2 stage builder blocks downwards, and at 20 - 0% Water Content, the range . This move has quite a bit of start-up and ending lag, with a small amount of landing lag, and this move has high priority on a grounded opponent. This move also makes Chaos 0 move slower than normal when it does this move. At 100% Water Content, this does 13% and mid knockback, which sends the opponent horizontally. At 0% Water Content, this does 9% and is a low/mid strength meteor smash.
<9% - 13%>

(This doesn’t lose nor gain Water Content, but is affected by it.)

Frame Data:

Hit-box frames: 19 – 25

Ending frame: 26 - 40

Total frames: 40

Uses: This move has great range, and can be used to gimp opponents rather easily from above, this also helps recover a bit, as it slows down the descent speed of falling down. This has far to much lag to approach with, and can be used when the opponents directly on the ground below Chaos.

Origin: Sonic Battle

Grabs

Chaos 0 extends its arms out a little bigger than normal straight forward. When Chaos dashes, it will do a hug like animation while sliding forwards a bit, and the pivot grab is just like the standard grab. The grab range is great (especially at 100% Water Content), but it has quite a bit of starting and ending lag however. Another thing to note, is that the amount of Grab release frames Chaos 0 has when the opponent does it to it is 34 frames, a tad bit longer than most of the cast, but not as bad as Lucas or Ness. However, Chaos 0 grabs releases the opponent, the amount of frames that Chaos 0 is stunned for before able to do something is 25 frames, a tad shorter than most of the brawl cast as well.

Pummel: Twisting arm

Animation: Chaos 0 will drill its arms around very quickly into the opponents shoulder, and you can hold this down as well.

Properties: This move has quite a bit of start-up lag, but the ending lag is very small. At 100% Water Content, every second it will deal 6%. At 0% Water Content, it will only do 3% every second.
<3%>

(This doesn’t lose nor gain Water Content, but is affected by it.)

Frame Data:

Hit-box frames: 7 – until you let go off the button

Ending frame: 9 frames from release of the button

Total frames: X frames + 9 frames

Uses: This is quite a strong pummel, and should be used to un-stale moves and should be used just a little bit with every throw.

Forward Throw: Tsunami Rush

Animation: Chaos 0 will shoot its hands forward, and a gush of water will fly out from the hands, and pushes the opponent away the same distance every time at the specific Water Content percentage.

Properties: THIS DOES NO DAMAGE, AND ONLY PUSHES THE OPPONENT THE SAME DISTANCE AT ANY PERCENTAGE!This move has a bit of start-up and ending lag. The Water goes at about the same speed as Wolfs blaster. At 100% Water Content, The Water goes about ½ the distance of Final destination, and at 0% Water Content, the water goes about a 1/3 of Battlefields main platform. The water is a bit stronger than FLUDD at full strength.
<0%>

(This loses 9% Water Content, and is also affected by the Water Content mechanic.)

Frame Data:

Hit-box frame of Water: 8

Ending frame (when Chaos 0 is free to move): 15

Total frames: 15

Uses: This can be used for an early KO on Walk Off stages when you use this near the blast zone. You can also use this on the edge of the stage, you can try to follow it up with an aerial, however that’s quite unreliable.

Back Throw: Long Arms

Animation: Chaos 0 spins around with the opponent around once, before flinging them in the opposite direction where Chaos 0 was facing. Chaos 0s arm limbs will extend out even further out, and Chaos 0 spins around to its right.

Properties: This has quite a bit of start-up lag, but with a very small amount of ending lag. At 100% Water Content, this does 8% and low-high knockback. At 0% Water Content, this does 4% and very low knockback.
<4% - 8%>

(This doesn’t lose nor gain Water Content, but is affected by it.)

Frame Data:

Starting frames (which is before the throw): 1 - 34

Ending frame (after the throw): 35 - 41

Total frames: 41

Uses: This can chain-grab at very early percentages. This can chain grab most characters at 100 – 82% Water Content and from 0% - 40%. This is a slightly harder Chain-grab to succeed, at it relies the weight of the character, the health of the opponent, and the percentage of the Water Content levels.

Up Throw: Freezer Badnik


Animation: Chaos 0 does… nothing, Chaos 0 still holds the opponent like the normal grab. But after a few moments of doing this input, an badnik like the above picture flies in with frost going around the base of it. You can have 2 of these at a time (nothing happens when you try to do it after the max amount of freezers). This move also INTERACTS WITH DR. ROBOTNIK when used on a team. When you have Robotnik on your team, he throws out 2 Freezers, also shouting out “AH HA” as he does this. Chaos 0 can still do any throw when you do this, and the opponent can break out of the grapple at the same amount of time. Robotnik can send out 3 freezers at a time (this eliminates Chaos 0s ability to use Up-throw as well). The Freezer Badnik also attacks as well, stated in the properties.

Properties: This move has pretty much no lag (as you can do any throw after you use the button input). Dr Robotnik has to be at least 1/3 of Final Destination away from Chaos 0 to do his interaction. The Freezer badnik gets knocked down (you can also damage it as well) to the ground after one hit, which both Chaos 0 and the opponent can grab, and when they throw it, it deals 12% and instant freeze as strong as the freezer item (lol, same name), which disappears after it’s been thrown. The freezer badnik also damages opponents who jump/walk into it, which does 5% and very light knockback, which sends the opponent horizontally. After every once and a while, the badnik will breath ice slightly smaller and foggier than ice Climbers Blizzard. It does continuous damage (a maximum of 12%), and at the end of it, the opponent will turn into an ice block.
(This isn’t affected by Water Content)

Frame Data:

Starting frames (when the Freezer appears): 84

Ending frame (when you can spawn another one after making one): 85 - 110

Total frames: 110

Uses: You can use this to follow up with a throw at a higher percentage, and you could try gimping the opponent by throwing it against the opponent. Can cause some havoc in free-for-alls, also you can spam it even more if you have PING – Robotnik on your side.

Down Throw: Tripping Puddle

Animation: Chaos 0 turns into a puddle, and it’s constantly shaking. After a brief moment, Chaos 0 travels past the opponents legs, making them trip, and then Chaos 0 will stand back into normal form as the opponents about to get up.

Properties: This has quite a bit of start-up and ending lag. This move makes the opponent trip over (no knockback, it’s 100% Guaranteed) and 8%. This move also sucks up puddles which are in the path of Chaos 0s travel.
(This move gains Water Content (very briefly though) .)

Frame Data:

starting frames: 1 – 20

Ending frame: 21 - 50

Important frames: frames 34 – 46 have super armour frames.

Total frames: 46

Uses: This move shouldn’t be used to get puddles (as the other moves which have puddle sucking abilities are vastly better), instead, you should trip them up, and try to PREDICT there move, and CONTER it by using D-throw AGAIN, although that is very hard, as you have to learn the frames of everyone’s roll and attack. It also sets up combos or KO moves for you.

Final Smash: Perfect Chaos


Chaos 0 grabs the Smash Ball, and it activates the final smash! The 7 Chaos Emeralds will go into Chaos 0, and Chaos 0 turns into a bundle of light, slowly getting bigger, and getting further out into the background. As this happens, Water will rise up until it’s underneath the edges of Final destination size across the whole of the bottom of the stage, bringing up 2 - 5 logs/rubble that are about 2 Bowsers wide. It takes about 5 seconds for the bundle of light to clear off and show the monster that is perfect Chaos. Perfect Chaos will then spit out the Chaos emeralds into the middle of the stage, and the Chaos Emeralds will be dimmer than normal (You can throw this to do 5% and low knockback, which sends the opponent horizontally). The Water will constantly shake, doing 7% damage per a second if the opponent stays in the water for that long, but it takes as long to drown as it does normally. Perfect Chaos is off the screen, but it has 4 moves to use in the 16 seconds it appears for:

Neutral B: Perfect Chaos Ball Perfect Chaos will look up into the sky, and the mouth will turn bright blue for a brief moment, and then we see light blue energy slowly going towards the mouth. At the end of this move, Perfect Chaos will send a massive Water Ball that is purple about the double the size of Bowser (Triple when you fully charge this move). This takes about 4 seconds to fully charge, and this move has a lot of start-up and ending lag. This will automatically aim at an opponent at random as well. When uncharged, this does 25% and high-low knockback. When fully charged, this does 45% and extremely high knockback. This sends the opponent horizontally.

Side B: Tidal Doom Perfect Chaos will shriek and laugh while sticking its arms into the air. From the back of the stage, about 3/5s of Norfairs lava wall, a Water Wall will appear and sweep to the front of the stage. It takes about 4 seconds for the wall to cross the platform. This move has a lot of lag on both sides of this move. This does 24% and high-low knockback which sends the opponent upwards. To avoid this you have to be higher than the wave

Up-B: Chaos Laser Beam Perfect Chaos will look up into the sky, and the mouth will turn bright blue for a brief moment, and then we see light blue energy going extremely fast towards the mouth. After this, (you can aim it with the analog stick) Chaos will send out a dark blue fuzzy line towards the screen about the size of Bowser x 1.75 time bigger, doing multiple hits with it. This move has a horrendously large amount of start-up and ending lag. This can do a maximum of 45%, with the final hit doing extremely high knockback. This takes like a total of 8 seconds to end. This sends the opponent horizontally.

Down B: Tentacle Whips Perfect Chaos will tilt its head downwards, and put its arms on each side of the beast, and will then point it’s right arm into the ground. This will then make tentacles shaped things go all across the surface of the stage, and covers about 3 areas of the stage full of flailing tentacles. The tentacles take up 3 stage builder blocks horizontally against the ground of the stage. This move still has quite a lot of start-up and ending lag, but it’s the shortest out of the moves (however, the range is shorter as well). The hit-box of the flailing also lingers for a fair while too. This does 20% and mid-high knockback, which sends the opponent diagonally upwards.

Techniques

Puddle Jump Cancelling (Dash)
Abbreviated: PJC(D)

Please refer back to the “Crawls” in the stats if you haven’t read it already.

How to do this: To do this, you must enter the “Puddle” mode, and when you jump, you notice it has a very slow acceleration at the start of the jump. During this time, perform Chaos 0s D-Air (as the D-air makes Chaos 0 goes downward a little bit, then goes back up slightly again). When you successfully do this, Chaos 0 will just appear on the ground as you would normally, with no landing lag at all. It’s even more difficult when you try a moving jump D-air, but when you successfully do it, THE MOMENTUM OF THE JUMP MAKES CHAOS 0 SLIDE A BIT FORWARD! (about a stage builder block forward) Like the “Dragonic Reverse” technique for Yoshi. Very hard to perfect!

How to use: With this slide, you’ll able to do a Tilt/Smash at the start of it. This makes Chaos 0s spacing game much better than any normal character. Also, you can reach ranges with this technique that wouldn’t be reachable before. Alongside Chaos 0s great range at 100% Water Content, this is the icing on the cake. Use this to its potential of easier KOs, mind games, keeping the pressure on the opponent etc.


Chain Tripping

Please refer back to the Down throw if you haven’t read it already.

How to do this: Simply do this throw, predict the move the opponent does, and grab them and do the same throw before they can retaliate. Very hard to do.

How to use: You can rack up some good damage with this, also letting go into a KO move or to combo someone.


Playstyle: Drowning the Sorrows of the enemy

You’ll probably get by now that the Water Content mechanic is key to Chaos 0s metagame. Chaos 0 is the typical heavyweight character who boosts large range and power, but lots of lag. Chaos 0 is pretty much no different from that, however, Chaos 0 has many twists and tweaks to make it a different class of its own. Chaos 0 is the first character to boost a faster crawl than its running and walking speed, and also hosting quite a few moves of it’s own as well, generally much more quicker than most of Chaos 0s other moves. The Water Content mechanic at 100% makes Chaos 0 a killing machine, on par with Donkey Kongs immense strength (with more lag and more range), however, if you lose Water Content and don’t use your Water sucking moves (Down-B, CUT, D-smash, B-air and D-throw), Chaos 0 will be very weak at dealing damage and knockback, and still contain the huge level of lag, making Chaos 0 the worst character going.

Chaos 0 is all about range and defence; many of Chaos 0s moves are disjointed, and host some of the biggest hit-boxes in the game. Chaos 0 has quite a hard time approaching the opponent, due to its ground and aerial slowness, plus the moves have lots of lag too. Chaos 0 is forced to be a defensive character cause of this. Chaos 0 has quite a large away of moves which can stop the opponents approaches, and when they do, Chaos 0 has an excellent GTFO move that is the Neutral A button. Chaos 0 also has 2 projectiles (Which Bowser should also have as well); although the Neutral Special is far move useable in a defensive game than its N-air.

Chaos 0 is more of a grounded character than an aerial, Chaos 0 does boost some quicker moves on the ground, but it does less damage to its power moves. Chao 0 also has some damage racking moves on the ground, like the Down-smash or Forward tilt. Chaos 0s ground game has mainly slow KO moves, which can kill characters at 80/90%, which also has huge disjointed hit-boxes, but are also very punishable as well.

One of Chaos 0s best moves is its Down tilt, this is because that it can camouflage with any other left over puddles on the stage, and can stun the character in place, ready to take advantage and use your move powerful and slower move to finish of the opponent. However, at a price this loses Water Content, and the puddles themselves are always the same size, and can easily be deactivated by rolling. This is one of the very few moves that benefit the loss of Water Content.

Chaos 0s has a horrible Aerial game, also pitted with its small height, movement and fast fall speed, it’s very hard to effectively use. Pretty much most of the aerial moves have lots of lag in it, which makes it predictable and punishable. Plus, since Chaos doesn’t jump high, and its main recovery is chronic, Chaos 0 is a character who is going to get gimped easily or edgehogged. The main moves for the aerials are the slightly less laggy moves that are the Neutral Air contenting to the B-air, which deals good damage. Most of these moves boost high range, but it’s risky trying to gimp opponents with this moves, as it has a chance of Back-firing. The Up-air can help in recoveries, although it’s very situational.

Chaos 0s Grab game is great, it sports an early chain-grab (Yet quite weak compared to the majority of Chain-grabs) if it meets the requirements to do so, and also Chain-tripping, pretty much Chaos 0s chain which is somewhat similar to Ganondorfs Chain-Choking. Forward throw can also gimp the opponent on Walk-off stages, but it decreases the Water Content, and the opponent can get back onto a stage quite easily from it as well. Chaos 0s Up-throw can also aid it very well, or can back-fire when the opponent knocks it and picks the freezers up and throw them at you. Dr. Robotnik is also a good team mate as well. The pummel is also good as well. Some of the throws are risky though, so be careful (as in, if you don’t time your grab correctly, you’ll get countered by the opponent with ease).

Overall, Chaos 0 has some killer pros to its side, and has some rather big flaws as well (pretty much the Water Content generally works against you rather than works with you), so Chaos 0 will have some bad match-ups because of this, more generally the faster characters. Chaos 0 has a killer ground and defensive game, and can also try and put up a good fight close up (but it’s somewhat worse than the majority of characters though). Use the character-specific techniques to help you, although it’s very extremely super hard to master. Chaos 0 is very weak in the air, attacking and getting back to the stage, which is a massive down-point for Chaos 0. Chaos 0 has lots of moves that have high priority, so the more distant you are to the opponent, the safer you are. Let the Water fly, Chaos 0 will make you fear the water for ever more!


Taunts

Up: Chaos 0 faces the camera, and its eyes shine brightly for a brief moment, and then Chaos 0 swings both of its arms down in an X motion. The arms extend a bit as well.

Side: Chaos 0 turns into a small ball, and starts rolling around a bit and bouncing up and down. After 2 seconds, Chaos 0 spins back to normal.

Down: Chaos 0 reduces to a puddle, then gets up and sticks its right arm out while its left arm on its side, and the hands will explode a very tiny bit

Victory Taunts

1: Chaos 0 will stand up from the puddle formation, and as it rises, it laughs a bit, when it’s fully standing up, it sticks its right arm out forward.

2: Some members of GUN are seen running away from Chaos 0 (who has some bullets in it), and Chaos 0 throws a Chaos Ball at the members of GUN, before pointing at the screen and laughs a tiny and quiet bit.

3: Chaos 0 makes some laughing type sounds, and has its arm folded until it goes into a puddle, a disappear to the right of the stage.

Losing Taunt

Chaos 0 will turn into a puddle whilst looking sad, and when its in the puddle form. Chaos 0 zips off to the left side of the stage.

Other Colours:


Hyper_Ridley

Smash Champion
Joined
Dec 21, 2007
Messages
2,291
Location
Hippo Island
Chaos 0 was an interesting move set.

The water mechanic was a good idea, but sometimes I had a problem trying to follow it. Though that may just be your writing style =/

Like Dr. Robotnik, I liked how you implemented moves from his actual boss fights into attacks, as well as moves from Sonic Battle. Chaos Double Stab FTW! =D
 

Junahu

Smash Ace
Joined
Nov 15, 2005
Messages
899
Location
Shropshire Slasher
My biggest problem I have with this moveset, and the only real thing stopping me from enjoying it, is its organisation and writing.
But from what I did read, I spotted a small mechanical annoyance in the moveset. Why can't Chaos simply walk over his puddles to collect them (or pick them up like items, or collect them automatically when crawling over them)?
 

Hyper_Ridley

Smash Champion
Joined
Dec 21, 2007
Messages
2,291
Location
Hippo Island
Was that really necessary Khold? To take away from Chaos 0 with a joke move set? (Yeah, to any newcomers, that was a repost of his MYM3 Fierce Diety Link)
 

Red Arremer

Smash Legend
Joined
Nov 27, 2005
Messages
11,437
Location
Vienna
Chaos is a great set. It has very unique mechanics (I love the idea of crawl attacks) and attacks, and those which are from games were nicely implemented, as well.
It just suffers from what every DFM set suffers: The writing style. DFM, you really have to improve your writing, the text was almost unbearable to read. >_<

I also suggest you to use PaleTurquoise for the normal text instead of DeeoSkyBlue, the latter starting to get uncomfortable to read in big chunks after a while.
 

dancingfrogman

Smash Ace
Joined
Jan 3, 2008
Messages
862
Location
United Kingdom, Birmingham
Switch FC
3133 8842 3910
Thanks guys, the Colour can be sorted easily, and I'll put the idea Junahu stated. Lol, ever since I started using the 3 sections back in MYM4, my movesets have been harder to decipher (Sp?) through, so from now on, I WON'T BE USING 3 SECTIONS ANYMORE! I'm sure this problem I have is due to the 3 sections, could everyone read my latter sets much, much easier than today.

Also, I also think that I have a hard time explaining my mechanics (which are complicated anyway), so instead of doing a moveset with an even MORE complicated mechanic, I'll take this chance to say I'm going to do a REMIXED BOWSER SET, which'll bring more attacks from the games his from instead of its current state. I've played quite a lot of Mario games, and researching his moves shouldn't be a trouble compared to Undead Hero or AOSTH Robotnik.
 

Red Arremer

Smash Legend
Joined
Nov 27, 2005
Messages
11,437
Location
Vienna
Well, to see what I exactly mean, I pointed at several things in my review for Undead Hero, there like here, you tend to repeat things, or describe how the move looks or works utterly complicated. That's your main problem: You make the sentences longer than they could be.

Anyway, yes, maybe not using the 3-section-part could work out, you should at least give it a try. If it doesn't help, you can use it (again, lol), since this is one of your individual twists.
 

Hyper_Ridley

Smash Champion
Joined
Dec 21, 2007
Messages
2,291
Location
Hippo Island
And the world was plunged into the dark of night. The dark of destruction. Oh, that it should come to this…


--- DARK GAIA ---


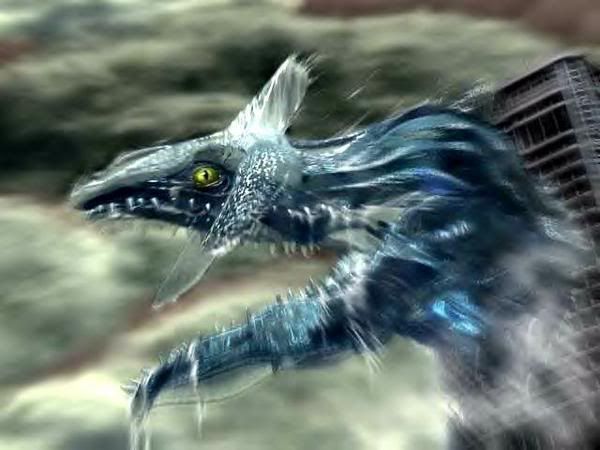
Game of origin: Sonic Unleashed

Dark Gaia is a hyper-energy organism that lives in the Earth’s core. He gains power over the eons in order to mature and destroy the Earth. He actually once succeeded, but his rival, Chip the Light Gaia, repaired the planet. Chip has successfully beaten Dark Gaia countless times over the history of the Earth, but in Sonic Unleashed, Dark Gaia was finally able to attain his fullest power, and it took the combined might of Chip and Sonic the Hedgehog to defeat him. Dark Gaia is possibly the strongest being in the Sonic universe, as he is able to hurt Super Sonic to the point of the formerly invincible character having a normal life bar in the final battle, and even when you win, Sonic is so worn out from the battle that he faints while still in his Super form.

--- OVERVIEW ---​

Dark Gaia, to put it simply, is the God of defense. While he has next to approaching options, he can stop an approach with ease and punish those who fall for his baiting tools. When a foe does get in close, Dark Gaia will have to rely on his excellent grab game to get the job done, including an additional special move that can only be performed from a grab!

--- HOW DOES THIS THING WORK? ---​

Dark Gaia was never intended to be anything other than a boss in Sonic Unleashed so some creative liberties are required to make him work as a playable character. First of all, here are some videos of his boss fight in both version of Sonic Unleashed. You may recognize some of his attacks in the actual move set.

Video I: 360/PS3 part 1
Video II: 360/PS3 part 2
Video III: Wii part 1
Video IV: Wii part 2

Now then, you are probably wondering how the heck a large snake-like creature that never leaves the lava is supposed to look in Smash Bros, especially trying to move around. You see those tentacles poking out of the lava in Video II? In Brawl, Dark Gaia has 8 of those as his legs. Yes, he is an octopus-dragon-snake-thing. They are all slightly longer than Ike’s sword. Dark Gaia moves by having those tentacles reach forwards and bite onto the ground and pulling Dark Gaia forwards…slowly, VERY slowly. In fact, due to Dark Gaia’s method of moving around he unfortunately has no way of dashing. This means that he has no dash attack. To make up for this, Dark Gaia can crawl, and his unique body structure of also having tentacles on his back means that he can perform a crawl attack!

As a second note, you may have noticed that Dark Gaia has 3 large green eyes on his head in his normal form in addition to his two regular eyes on his face. In Brawl, Dark Gaia starts out the match without the extra eyes, but he can acquire them with the help of his Grab-Special.

--- STATS ---​

Movement Speed: 1/10 (So bad that he doesn’t even have a dash!)
Traction: 10/10 (Moving so slowly means that he has nothing to decelerate from)
Attack Speed: 2/10 (The only thing stopping him from being a 1/10 is that he has a scant few faster moves.)
Attack Strength: 9/10 (Pretty much every move is either a great damager or a KO move, or both!)
Range: 9/10 (A decent selection of projectile-like moves mixed with his tentacles and arms for long range melee strikes)
Priority: 4/10 (Some disjointed moves, but for the most part he’s below average)
Weight: A little less than Bowser’s
Jump Strength: 5/10 (His first jump is actually decent)
Second Jump Strength: 4/10
Fall Speed: 9/10
Size: Bowser’s height, but somewhat thinner. His back tentacles have a hitbox, but his leg ones only have a hitbox when they are being used in attacks or in his movement animation.
Crawl: 7/10 (Dark Gaia’s serpentine body allows him to bend all the way to touching the floor while crouching, and his body is thin enough that he can duck under attacks that were aimed for his head in standing position. His crawl is also a little faster than his normal walk by using his claws to pull himself along in conjunction with his legs, making his crawl the closest thing he has to a dash.)

PROS
Unrivaled defensive options
Excellent power
Excellent range, including a decent projectile game
Heavy
Excellent grab game

CONS
Poor at approaching
Slow as heck in both movement and attack speed
Cannot dash
Mostly poor aerial game
Mostly poor recovery
Big target

--- MOVE SET ---​

STANDARD ATTACKS

Standard A [Shielding Slash]
Dark Gaia does a diagonal scratching motion with one of his claws as a purple streak of energy is left trailing behind it. The scratch has below average priority but deals a nice 11% and average knockback. Dark Gaia will keep alternating hands each time you press the attack button, but there is a bit of lag between each scratch.

The main purpose of this move is unleashed when you HOLD the attack button. If you do so, after Dark Gaia completes his current scratch, he will hold out both hands in front of his chest as a thin purple wall of energy emits from them that covers most of Dark Gaia’s front. This acts as an impenetrable shield against all forms of attack, and Dark Gaia can keep it held out forever. The shield inflicts set average knockback on opponents who physically touch it. However, it only protects him from the front, and there is average end lag when he stops using it.

Forward Tilt [Lava Wave]
Dark Gaia will lower one arm and perform an underhanded swipe with it along the ground. This creates a wave of lava to form in front of Dark Gaia that is the size of Kirby. The wave moves forwards slowly and goes as far as Ike’s sword is long before breaking. It is disjointed, deals up to ten hits of 2% each, and when it breaks, deals above average knockback. The lava has some realism to its physics, falling off platforms and smashing up against walls, though this doesn’t affect the wave beyond its movement path. Above average startup lag with low end lag.
Notes: Since the wave travels along the ground and is a good size, this could be a good way to force a ground-based opponent to try and approach from the air. It also has great damage potential and even some KO potential.

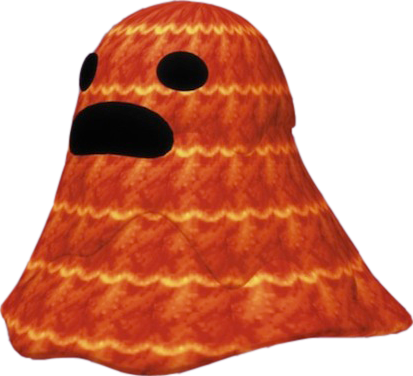
Down Tilt [Unholy Birth]


Dark Gaia will look downwards as he spews a cloud of purple air straight at the ground. After 1 second, he will stop as the purple air comes together and changes shape to form into the enemy in the picture, known as a Nightmare. These are in fact sentient pieces of Dark Gaia’s soul, so they are more than willing to serve the original one. It takes 1.4 seconds to summon a Nightmare, and then Dark Gaia himself can move around again.

A Nightmare can scurry around the map at a 6/10 movement speed, and can perform 2 jumps that are both a 4/10 in height. They are floaty creatures with a 3/10 fall speed. A Nightmare will pursue the nearest enemy and when they get close enough they will attack with a flurry of quick slashes that have low priority and deal 7% with low knockback, but the slashes can be performed as rapidly as Meta Knigh’s DTilt, making it a great harassment tool. A similar slash attack will be performed if the Nightmare is in midair. Nightmares have a measly 12 HP and only one can be on the stage at a time.

If you input for this move with a Nightmare summoned, Dark Gaia cross his arms and close his eyes as though he is resting, and the Nightmare will suddenly stop moving. This is because you are now in fact controlling the Nightmare! You can make it move and jump with standard controls, and perform the slash by pressing A. You will automatically regain control of Dark Gaia if the Nightmare dies, or you can press B to have the CPU resume controlling the Nightmare while you go back to the main body of Dark Gaia. Dark Gaia himself does not move and his completely defenseless while you are manually controlling the Nightmare, but thankfully the transition between controlling characters happens in a quick .3 seconds.

Up Tilt [Shock Roar]
Dark Gaia will defy common sense by performing a hand stand, using his mighty claws to hold up his large serpentine body. The 4 backmost leg tentacles will look at a 60 degree upwards angle and then they will screech, shooting ringed waves of sound energy that are as large as Wolf’s blaster, and travel at the same speed and distance too. Each sound ring deals 9% with average knockback and has good priority. Average lag on both ends of the move.
Notes: This is pretty much the opposite of the FTilt, being used to get aerial fighters to come to the ground. As an Easter egg, in wifi mode the mouths of the tentacles might emit a random taunt message as a “translation” of the screech.

Crawl Attack [Tentacle Impale]
From Dark Gaia’s crouching/crawling position, he will lash out with one of his back tentacles. It will deal 10% with average knockback, and it can reach a little further than Ike’s sword, making it an excellent spacing tool. However, the tentacle has low priority, and if it is out-prioritized, it is destroyed in a flash of blue smoke. The tentacle will regenerate after 30 seconds, but remember that Dark Gaia only has 6 back tentacles; if you manage to lose all 6 you are in fact unable to use this move. There is below average startup and end lag to this move.

SMASH ATTACKS

Forward Smash [Meteor Storm]
A small pool of lava appears in the background as Dark Gaia leans over and reaches into it with one hand. A fiery portal will appear if there is no ground in the background. After .75 seconds (For the record, that’s the startup lag of a Falcon Punch), he quickly pulls out and throws a large (the size of Kirby) flaming stone that looks like a meteorite. The meteorite moves at a slow speed and travels until it hits something. The meteorite deals 20% (33% charged!) and good knockback. There is above average end lag to this move. The primary benefit of this move is that during the startup lag, Dark Gaia has super-armor against all projectiles. The priority of the meteor is also very strange, being abysmal against non-projectiles, but infinite against other projectiles.
Notes: Say goodbye to campers with this attack! The startup bonus and the meteor’s projectile eating nature makes this the ultimate anti-projectile move, and this move is in fact a super-strong projectile! Now those pesky spammers will be forced to try and approach you, putting them in a bad spot. Be warned, however, that the meteor can be reflected just like any other projectile, so this isn’t fool-proof.

Down Smash [Hot Feet]
Dark Gaia will lift his hands while fiery energy gathers in them, and then he will plunge his hands into the ground, holding them in there for .6 seconds before pulling them out. We can see some molten rock be tossed out from the ground when his hands retract, but this is just a graphical effect. Once Dark Gaia retracts his hands, glowing cracks begin to form on the ground around him, covering an area from just past Dark Gaia to one DK’s width on both sides, depending on charge time. If the platform ends in that distance, then the area of effect just ends with the platform. Dark Gaia can move around while this is happening. .8 seconds after the ground starts to heat up, a wall of fire bursts from the heated ground, going as tall as Ganondorf before fizzling out and the ground returns to normal. The fire is disjointed and anybody who touches it takes 17% and high knockback. There is above average startup lag to perform the initial hand animation for the attack, but low end lag.

Now, the charging that I just described to you is in fact only half of the possible charging you can do. If you charge “all the way” for the previous effect, Dark Gaia begins to flash red instead of yellow and is actually performing a second loop of charging! If you complete the entire second loop, when Dark Gaia infuses his energy into the ground, the entire platform will heat up, no matter how large the platform is! Try this on a stage like Mushroomy Kingdom for fun times!
Notes: This is a move that you want to attempt the moment the opportunity presents itself. Having even the first charge loop in use is a great way to scare off enemies, not to mention to you could always walk out of the fire and throw enemies into it if you’re lucky.

Up Smash [Shield Clap]
Dark Gaia spread his arms wide and then he claps them above his head, creating a little burst of purple energy to form around his hands when he does so that goes out as far as Olimar’s height. In the few frames that Dark Gaia is swinging up his arms to clap them together, getting hit by an arm deals 10% with average knockback. Being hit by his hands as they clap deals a mighty 25% but only average knockback. Being hit by the energy burst deals 10% with below average knockback. Instead of increasing damage dealt, a thin purple platform of energy will appear over Dark Gaia’s head while he’s charging, which acts as a solid platform and even lingers for a moment during the end lag if its charged up at least halfway.. This effectively protects Dark Gaia from above, helping him deal with this move’s high startup lag. The swinging arms and clap have below average priority but the energy burst is disjointed. The move has average end lag.
Notes: Dark Gaia’s size means that the clap will not really hit low enough for grounded opponents. However, this is a great anti-air move, as the shield forces airborne opponents to move to the sides to attack, where they may be hit when Dark Gaia swings up his arms.

AERIAL ATTACKS

Neutral Aerial [Bad Hair Day]
Dark Gaia bends over forwards as the purple fiery hair on his back flashes orange. His entire back covered by the “fur” is a low priority hit during this flash-fire that deals 8% and average knockback. There is below average startup and end lag. The biggest flaw of this move, though, is that only really damages enemies above Dark Gaia, and his USmash is better at anti-air to begin with. There is one point to using this move however. If the move ends up clashing with a disjointed attack, the hair will suddenly travel along the disjointed weapon and hit the enemy who performed the attack. This property means that this is the one move that can “out-prioritize” a disjointed attack. So use it for that, and perhaps only for that.

Forward Aerial [Thunder Palms]
Dark Gaia will hold his open hands just in front of himself as electrical energy begins to build up around them. After 1.2 seconds, he will thrust forwards his hands as they surge with lightning, dealing 16% and good knockback to anyone they hit. They have below average priority. While the move does take awhile to come out, Dark Gaia continues the attack even if he lands. There is also average end lag.

But that’s only half of the story. If you hold the A button as the end lag ends, instead of attacking, Dark Gaia will clench his fists, causing the electricity to flow up his arms and into his body, creating a protective “coating” of electricity that lasts for the duration of the (still average) end lag. In addition to providing super armor, anybody who physically touches Dark Gaia while he has this coating will take 10% and be paralyzed for 1 second. Free grab anyone?

Back Aerial [Tentacle Stretch]
All of Dark Gaia’s back tentacles will lash out behind him and stretch out as far as they can, which is slightly longer than Ike’s sword. The tentacles all lash out in different directions to cover a good vertical space as well. Hitting any tentacle deals 6% with okay knockback. Like the Crawl Attack which also use the tentacles, this is a good move to throw out every once in a while for spacing, but the tentacles have low priority, and just like in the crawl attack they will be destroyed for 30 seconds if out-prioritized. Since Dark Gaia uses all his tentacles in this attack, the efficiency of the move decreases with each tentacle Dark Gaia loses. Low startup lag with average end lag.

Up Aerial [Lava Tsunami]
Dark Gaia will hold out one hand and do a “come here” motion with it. The screen suddenly turns darker as a HUGE wave of lava comes from the side of the stage that He was facing, going up almost to the top of the screen and very slowly moving the distance of 1/5 of Battlefield’s main platform. Yes, this does mean that on many stages the lava wave won’t even reach the stage itself before breaking apart. It is of course disjointed and anybody who hits it takes an amazing, astounding, destructive…10% and average set knockback. While there is above average startup lag to summoning the lava wave, there is low end lag, and Dark Gaia is free to move around once he completes the summoning animation.
Notes: For all its vertical range and disjointedness, this move is incredibly situational. Nobody would purposely jump out to hit the wave, and if you hit someone into it, the wave will just hit them back to the stage, possibly stopping a KO.

Down Aerial [Ground Clinger]
Dark Gaia extends his leg tentacles outwards to both sides and then he swings them downwards, clapping them together under the center of his body. While his leg tentacles are as long as his back tentacles and thus give the move great range, this move has some major issues. The attack only deals 6% with low knockback, and the tentacles have abysmal priority. Also, while the move has low startup lag, it has high end lag, and since Dark Gaia falls so fast he’ll probably end up having to deal with it as he lands, perhaps making him punished even when he hits his opponent. And then there’s the fact that under normal circumstances, the move hits in locations on the screen where Dark Gaia would be better off using his ground attacks…yikes.

There is however one saving grace. If Dark Gaia performs the move right as he’s about to hit the ground, the tentacles will latch onto the ground using their mouths and soften Dark Gaia’s landing, allowing him to almost immediately move again. If this function of the move is used, the attack has no hitbox. Still, Dark Gaia’s aerial game is inferior his ground game anyways, so you’d probably be better off pulling him to the ground to begin with.

SPECIAL MOVES

Neutral Special [Shocker Cannon]
Dark Gaia opens his mouth wide as his eyes begin to glow brighter and brighter. After the same amount of startup lag as a Warlock Punch, Dark Gaia screeches and fires a massive electrical beam from his mouth that travels infinitely and is as thick as to take up all of Dark Gaia’s mouth. He fires the beam for two seconds total, during which time it deals no hit stun or knockback but many hits of 2% each, dealing up to 20% if someone is dumb enough to not get out of the way. The beam is disjointed. The move has above average end lag as the beam fizzles out.

Now, at any point during the firing of the beam, you may press the attack button for Dark Gaia to instantly cancel the beam into a quick burst of energy that covers an area half the size of Donkey Kong. This burst deals 16% in electrical damage and good knockback, and is disjointed. The end lag is still the same as the normal beam.

Side Special [Shocker Balls]
Dark Gaia opens his mouth and rears back his head, pointing it straight up as electrical energy gathers in his jaw. After .6 seconds, Dark Gaia will lean put his head back down and lean forwards slightly as he spits out a ball of purple electricity that is the size of Kirby and moves at a below average speed. It travels until it hits something, and it deals 12% with 1 second of paralyzer properties upon impact. There is low end lag to shooting the ball. Besides using reflectors, the ball can also be reflected by being struck by any attack. But, this also applies to Dark Gaia when his shot is sent back to him, making this attack like playing the Ganondorf battle in Ocarina of Time.

Up Special [Lava Geyser]
Dark Gaia lifts his hands as the ground starts to bubble with lava underneath him, and then a geyser of lava shoots out from the ground and slowly lifts Dark Gaia. He goes as high as Sonic’s Spring and it takes him 2 seconds to reach that height before the geyser disappears and he enters freefall. The geyser is disjointed and foes who touch it take 12% with average knockback. The main benefit of this move is that Dark Gaia can actually perform his aerials while riding on the geyser, allowing him to actually reach the full height of the move. If he is in the middle of an aerial attack when the geyser ends, Dark Gaia will enter freefall after completing his current attack. There is average startup lag but thankfully low end lag (unless Dark Gaia decides to perform one of his laggy aerials of course.)

Down Special [Hyper-energy Shield]
Four of Dark Gaia’s leg tentacles, 2 in the front and 2 in the back, will arch upwards so that they’re heads are at the same height as the main head and positioned one character width away from the main body. They will open up their mouths as a large dome of shield energy surrounds Dark Gaia, going as far out horizontally as the leg tentacles, and slightly higher than the main head. The dome completely absorbs any and all attacks, and it acts as a wall for opponents. Enemies can even stand on top of it where the dome starts to be more rounded. Dark Gaia can move forwards and backwards while holding out the dome by simply using the remaining leg tentacles, and he moves at his regular (pathetic) movement speed. He can keep the shield out as long as you hold the B button, but there are two things to consider. First, the tentacles forming the shield can be struck in their exposed eyeballs while the shield is out. Each eye only has a measly 10HP, and upon loosing it will screech in pain and withdraw from holding up the shield. If you lose of the 4 tentacles, the shield is disabled and Dark Gaia will be stunned as though his regular shield was broken. Besides that, there is average end lag to stop using the shield. If performed in the air, the shield will extend to cover a small distance below Dark Gaia, and he can continue using it when he hits the ground. There is low startup lag to putting up the shield.
Notes: A fun use of this move is to have a teammate stand on top of it to get some extra height for their initial jump.

GRABS

[Grab Motion]
Dark Gaia will perform a bear-hug motion with his arms, holding into the opponent’s sides with his large claws if he connects. This has good range for a grab due to Dark Gaia’s size, and is very quick to come out, making a great choice for punishing a shielded attack. There is highly punishable ending lag, however.

If you tap the control stick forwards while pressing the grab button, one of Dark Gaia’s tentacles will arch back before lashing out as far as Ike’s sword. If the tentacle hits an opponent, it will wrap around him and pull him close to Dark Gaia’s body. This is called a “smash grab”. Throws performed from a smash grab have different effects from the standard grabs using Dark Gaia’s arms, mainly a damage bonus. The tentacle in a smash grab has some startup lag to it, so for the most part you’ll be sticking to normal throws, but there is literally no end lag as Dark Gaia can start to move once the tentacle begins to retract should it miss.

Grab Attack [Suck ‘em Dry]
Dark Gaia will squeeze the enemy in his grasp for 4%, and then he will shove them away for set below average knockback. Wait, he ends the grab after using this pummel? Yes, he does. However, after being chocked by a giant dragon, the enemy will have the wind knocked out of them, and their next move has slightly more startup lag due to difficulties in mustering the strength to use the move. For the smash grab, the tentacle will constrict the victim for only 2%, but the grab won’t end after using it, and the tired effect will still take place after the grab ends, whether the enemy escapes or Dark Gaia performs a throw.

Forward Throw [GTF Away from Me]
Dark Gaia will harshly shove his opponent away for a great 14%. However, the move deals set average knockback, so it can’t KO unless you managed to toss someone into a stage hazard. In the smash grab version, the tentacle will toss the opponent away for an amazing 18%, but with the same knockback. This is a great move for damage racking and getting some distance between Dark Gaia and his enemy.

Back Throw [Feral Thunder]
Dark Gaia will harshly turn around while tossing his opponent with both hands. This deals 12% and good knockback. For the smash grab, Dark Gaia will turn around while charging up electricity in his hands. He will then toss the enemy from the tentacle in the same direction that he normally does, but Dark Gaia will immediately fire a bolt of lightning from both hands at the enemy when they’re released, causing the enemy to be sent flying with 13% and high knockback. This is a good KO option no matter which variation of the move you use.

Up Throw [Heart Stopper]
Dark Gaia will lift his foe above his head and inject his enemy with a surge of lightning from his hands. This deals 8% and average vertical knockback. However, if the enemy was grabbed while under a paralysis effect, the move will deal an additional 6% for a total of 14% damage and good vertical knockback.

The smash grab version of the move is an almost entirely new move. The tentacle will lift the enemy into the air and then throw them forwards. The tentacle will then quickly lash out and strike the foe in midair and pierce straight through their body. This deals 10% and below average knockback. However, the enemy will have their movement speed reduced for 5 seconds due to their heart being damaged. This is one throw where the smash grab isn’t always better to use than the regular grab as both versions have their own benefits

Down Throw [Chokeslam]
Dark Gaia will lift the enemy while holding them firmly in his grasp, and then slam down his foe for 8% and low knockback. This also reduces the enemy’s shield strength by 25%. With the smash grab, the tentacle will do the slamming (no kidding!) for the same damage, but instead of shield reduction the enemy is simply bounced slightly upwards, allowing for Dark Gaia to perform a regular grab on the opponent for a 2-grab combo. Holy $#!7 Dark Gaia actually has a combo!

Grab Special [Stare Into the Abyss]
Dark Gaia opens his eyes wide as the enemy screams like when they are being star KOd. A trail of energy runs from their eyes into Dark Gaia’s, and then Dark Gaia throws the enemy away for no damage and high set knockback. After doing this, Dark Gaia growls as those 3 large green eyes form on his head in .5 seconds. Dark Gaia can then begin to move around again. As long as Dark Gaia has those special eyes, all of his non-grab attacks deal slightly buffed damage and knockback. Dark Gaia keeps his new eyes with no time restraints, however he will lose them after receiving 10% damage to the head. Considering Dark Gaia’s great defensive powers, it should be manageable to guard your head.

SITUATIONALS

Get-up Attack Front [Overpowered Slam]
Don’t worry, the move isn’t actually overpowered. Dark Gaia will lift his hands and slam them into the ground in order to push himself back to his feet. This creates a screen distortion around Dark Gaia’s hands where he slammed them into the ground from the sheer power he’s exerting. The screen distortion is a disjointed hitbox and it deals 9% with spiking knockback if the enemy is in the air or a pitfall effect if the enemy is on the ground.

Get-up Attack Back [Squid Bite]
Dark Gaia’s leg tentacles will all reach forwards as far as they can. They are collectively a single grab-hitbox, and if it catches someone they will be reeled into Dark Gaia as he pushes himself upright with his hands. When the enemy is close to Dark Gaia the tentacles will let go, but now there is enough hit stun from the move that Dark Gaia can perform his real grab. Enemies will have to take this move into account when knocking over Dark Gaia.

Ledge Attack < 100% [Nimble Flip]
Dark Gaia will bend his back so that his leg tentacles can reach the top of the platform and they will all lash out and grab onto it just past the edge. The tentacles are a single low priority hitbox that deals 6% and low knockback, and then Dark Gaia will perform a flip through the air as his tentacles pull him to solid ground. Show-off. Dark Gaia’s body is in fact a hitbox at this point while he is swinging through the air, and it has below average priority and deals 8% with average knockback. His body can only hit enemies while they’re off the stage, making this a potential edge guarding move.

Ledge Attack 100% [I See You]
Dark Gaia will pull his head over the ledge and gaze harshly at his enemies. If his enemy is facing him and is within one Dedede-width of him, the enemy will automatically turn around and dash away as far as ½ of battlefield due to being so scared of Dark Gaia. Connect or not, Dark Gaia will then scramble up to solid ground using his back tentacles to support himself.

--- FINAL SMASH - PERFECT DARK GAIA ---​

Upon acquiring the Smash Ball, Dark Gaia will roar as he undergoes a frightening tansformation. His head will begin to split apart vertically as his extra eyes appear. 2 more arms will sprout from each side of his body, giving him a total of 6 arms. From the newly created opening across Dark Gaia’s head, 3 more large eyes will form on each side, and then a really big eye will form inside his mouth, giving him a total of 12 eyes. Yikes!

Anyways, Dark Gaia’s final form is of course much more powerful than his basic appearance. Surprisingly, he can still take damage, but he makes up for that with various buffs to moves, as follows:

- All arm-based attacks such as the Jab or Fair will deal triple damage and knockback. This is because when Dark Gaia would use his left hand, he will now use all 3 of the arms on his left side, for example. Note that this doesn’t apply to throws using his arms.

- His tentacle-based attacks (Crawl Attack and Bair) now have above average priority and the tentacles will not be destroyed if the move is out-prioritized. And did I mention that his tentacles will be restored when he starts the final smash?

- The Nightmare summoned via his DTilt will be colored red and its slash attack will have good priority and deal 10% with above average knockback.

- When Dark Gaia uses Meteor Storm, he will telepathically lift 3 rocks from the ground in front of himself, and throw them all forwards in a tight spread.

- When Dark Gaia uses his Uair, the lava wave that’s summoned will change to come from the background like the lava wave in Norfair. It will cover the whole screen and deal 14% with good knockback. Of course, players can spotdodge with proper timing, but at least the move is usable now, right?

- Dark Gaia’s throws will now always use the Smash-Grab effect even if you connected with a normal grab. The most obvious use of this is to just chain DThrows together to KO percents and then perform a BThrow for a KO.

This Final Smash lasts for 16 seconds, and then Dark Gaia screeches as a bright flash of light covers the screen and when the screen returns to normal he is back to his regular form.

--- STRATEGY GUIDE ---​

So the first thing you’d notice about our dragon friend is that he has no movement speed or attack speed, nor does he have insane priority except for his disjointed moves. This means that he absolutely fails at approaching. What a useless character, right?

WRONG! Dark Gaia may not be able to approach, but that’s because he doesn’t need to! Dark Gaia is content to sit and wait for his opponents to come to him, all the while using his ranged moves such as Meteor Storm, Shocker Cannon, and Shocker Balls to damage enemies without having to budge an inch. When the enemy does decide to move in for the attack, Dark Gaia has plenty of ways to shut down an approach. Shielding Slash is a nice jab that has a shoving effect with its shield. Shield Clap is a great anti-air move. Hot Feet guards Dark Gaia on both sides. And while the enemy is on the way to approach, you have methods of disrupting that approach or placing the enemy into a bad position, such as Lava Wave forcing grounded characters into the air, or Sonic Roar forcing aerial fighters to the ground.

What happens if someone does get in close? Well, you’re kinda screwed. Dark Gaia is so big and falls so quickly that he’ll be eating combos to kingdom come. And once Dark Gaia is off the stage, even his high-reaching up special may not be enough to save him. This is when Dark Gaia’s grab game comes into play. All you have to do is predict one attack, spot dodge it, and you’ve just given your enemy a lot of damage, a stock loss, or other nasty side effects. Of course, even this is not without risks, as Dark Gaia’s grab animation is highly punishable should you botch it.

But of course, there will always be those stubborn fools who wish to try and outwait you. But even then, Dark Gaia has ways of forcing or encouraging an approach. See the enemy try to projectile camp, and use Meteor Storm to block off their weapons. Use Shocker Canon and Thunder Palms to bait enemies into attacking through your no hitstun or low priority, only for you to hit them with the second function of the two moves. In this case the below average priority of the attacking portion of Thunder Palms is kind of a good thing, as it give the enemy incentive to try and approach you. If Dark Gaia is feeling really lazy, he could simply summon a Nightmare and have that do the approaching for him, and you could even play as the Nightmare to make life more miserable for your enemy if Dark Gaia is in a safe position. If all else fails, and you have to attempt some sort of approach, it would be wise to remain crouched and use Dark Gaia’s crawl and his Crawl Attack to inch your way forwards, but even then you’re just trying to bait your enemy into coming after you.

And then we get to Dark Gaia’s aerial game. Wait, he has an aerial game? Yeah, other than Thunder Palms which has been mentioned several times in this section, there isn’t much reason to suggest leaving the ground. Sometimes Bad Hair Day could be used to counter a disjointed attack I suppose…

So overall, Dark Gaia embodies having a perfect defense as the best offense. He can’t pursue his foes, but why should he? He doesn’t need to honor you by facing you directly, he’d much rather watch you futilely try to amount an offense only to be smacked away the moment you think you have an opening.

--- OTHER ---​

Credits Song: Sonic Unleashed: Dark Gaia Phase 2

SPECIAL ANIMATIONS

Taunt 1: 0:18 to :25 of this video.
Taunt 2: Dark Gaia hold his hands in front of himself as an electric current runs between his fingers.
Taunt 3: Dark Gaia swipes at the air a few times.

Win 1: Dark Gaia roars loudly as the losers all hold their ears.
Win 2: Dark Gaia stabs his hands into the ground, and then he pulls out a large chunk of molten rock and throws it at the camera, causing the screen to turn to static and black out. You can still see the results tabs.
Win 3: Dark Gaia’s leg tentacles begin to argue with one another in growls and screeches. The main head then glares at the leg tentacles and they all quiet down.

ASSIST TROPHY - CHIP


Yes, the “Light Gaia” that regularly beats the crud out of Dark Gaia is a little fairy-dog. After being summoned, Chip will wave to the camera and then he will fly to the center of the highest platform in the stage and float in place, watching the battle. He is invincible. If a character passes by him, Chip will hold out a hand to motion for them to stop. After the character stops, Chip will pull out a candy bar and say, “Want some chocolate?” The character will then take the candy bar and Chip will wave again before disappearing. After Chip leaves, the character will eat the chocolate, and they will suddenly get a sugar-rush! They will run around as fast as having a bunny hood and all of their attacks have slightly reduced end lag. The sugar-rush lasts for 8 seconds, but when if ends the character crashes. Now they will spend the next 6 seconds with slower than normal movement and attack speed. When this is over, the character finally returns to normal. Note that once Chip is summoned, if nobody gets some chocolate from him after 7 seconds pass, he will once again wave to the camera and disappear.
 

PK-ow!

Smash Lord
Joined
Mar 28, 2008
Messages
1,890
Location
Canada, ON
Hey, dfrogman
They should call you Mario,
'cuz you just got ONE-UPPED. :mario:
lolololol; Boss characters. . .


Man, my own set is going so slow... I don't think I'll finish in time. I need to do this like Blizzard Entertainment if I want to be happy with the result, IYKWIM. Innovating for Freedan is pretty tough; I still haven't found his "thing" to set him truly apart. Just "spellcaster warrior" is all I got, plus a few new hitboxes I thought up in the first go.

... It's because so little is said about him in-game. D:

Also, it would help if I had ever played an MGS, to do a better Codec transmission.


On Chaos 0: Just a li'l too much to read. :( Mainly, I question if you had to include both the water content mechanic and the parallel 'crouching' moveset. These are two fairly thick pillars themselves, so seems gratuitous to use them both.

For the simple fact of that frame data though, I'll have to read it in full if I do end up voting this round.

:046:
 

KingK.Rool

Smash Lord
Joined
Nov 26, 2005
Messages
1,810
Not really sure why no one's replying, so I'll chip in a bit.

Fantastic moveset, HR. In a way, it feels like Black Doom, but your implementation is so downright unlike anything else I've seen that I can't help but be impressed. The attacks are incredibly unique, as we've all come to expect from you; crazy projectiles and disjointed attacks.

Great job. :bee:
 

SirKibble

Smash Champion
Joined
May 2, 2008
Messages
2,400
Comments on Sonic Movesets


Comments on Chaos 0

First, the good. This is a fun moveset, with plenty of entertaining attacks and pretty, sometimes animated, pictures to accompany a lot of them, making things a lot easier to visualize. The Water Content mechanic was cool, although it does seem that it would be a little awkward at times, having to use moves to regain it when it seems like he might be able to regain it just by touching the water. The Crawl Attacks, however, are just plain perfect. Awesome idea for the character, and really well done! I'm a definite fan.

As others have said, I think the only big thing hindering this moveset is that oft-awkward writing style of yours. Beautiful ideas sometimes suffer from an unnecessarily wordy explanation, which can be kind of a turn-off. Glad to hear you're planning to remedy that, though! :)

Comments on Dark Gaia

Wow, didn't see that one coming. So, HR's first secret 'set revealed, and it looks gooood. He's too big, n00b. The biggest thing I always appreciate about your movesets, HR, is how the moves are all interesting without being over-the-top insane. The Up Smash, for example, is very Up Smash-like, and is useful in the tradition sense of an Up Smash, but it's got that quirky little platform/shield addition to make it interesting. Nothing that takes five minutes to wrap your mind around and go back and read through a hundred times to understand, just a straight-up fun effect for the move. This moveset's full of stuff like that, and it's really a work of art. I still prefer Bass & Treble to this (perhaps, in part, due to series bias), but Dark Gaia is definitely a very strong entry.

PS: The picture is kind of big...
 
Status
Not open for further replies.
Top Bottom