• Welcome to Smashboards, the world's largest Super Smash Brothers community! Over 250,000 Smash Bros. fans from around the world have come to discuss these great games in over 19 million posts!

    You are currently viewing our boards as a visitor. Click here to sign up right now and start on your path in the Smash community!

Make Your Move 5

Status
Not open for further replies.

UserShadow7989

Smash Journeyman
Joined
Aug 13, 2007
Messages
306
Again, more high quality sets. I'll be quick, and simply point out what pops into my head.

Unknown: This set needs more comments. Seriously, guys. Why isn't anyone commenting?! I love Hidden Power's changing depending on which Unknown is using it. In fact, I like all of the moves you implemented. Nature Power, Mirror Coat, Trump Card... On top of that, you don't fall into the trap of just running down a list of attacks the Pokémon can use and tossing it all together. I really, really like this.

Cutesy: A very unique organization, to put it lightly. I love how you put this together, and I find how you kept the moves simple to allow Cutesy's mechanic and abilities to shine through an impressive twist. I admit it took me a while to figure out all the little details on how the mechanic worked, but I managed to figure it out after a couple of minutes. Good job.

Hero Prinny: Unfortunatly, I have to agree that this doesn't quite live up to your Plenair set, but I must say that there's several concepts that I liked (Down Special and Up Tilt leap to mind). I just want to point out the the Side Special doesn't list damage, knockback, or any actual effects other then the animation. Several grammer errors are scattered here and there that tripped me up slightly, and some attacks were slightly generic, but this was probably the result of having to rush and finish. I enjoyed going through this set, in any case, and I look forward to your set(s) in MYM6, where hopefully you'll have more time.

Wrath: I haven't had the time to give this a full read, but I did get through the Specials and stats, at least. Stats make him strong and fast, but pathetic priority and so-so weight. An intresting combination. I enjoyed all of the Specials. To be blunt, however, I feel that the Neutral Special is a bit generic in comparison to the rest of the Specials, but I think it's one of Wrath's trademark abilities, so I'm fine with it. Side Special makes me laugh, and it's both unique and useful. I've never seen anything like the Up Special before, and I like the way you excecuted it. The Down Special is really something; disabling his Smashes and enabling his Aerials, each with their own unique effects on his abilities? I think this is the first time I saw something like that, and it is beautiful...

Sorry for not giving any really usable feedback, but I just wanted to say I like your sets, and to draw attention to each of them. Good luck for all of you.
 

Baloo

Smash Ace
Joined
Nov 14, 2008
Messages
781
Wrath: I haven't had the time to give this a full read, but I did get through the Specials and stats, at least. Stats make him strong and fast, but pathetic priority and so-so weight. An intresting combination. I enjoyed all of the Specials. To be blunt, however, I feel that the Neutral Special is a bit generic in comparison to the rest of the Specials, but I think it's one of Wrath's trademark abilities, so I'm fine with it. Side Special makes me laugh, and it's both unique and useful. I've never seen anything like the Up Special before, and I like the way you executed it. The Down Special is really something; disabling his Smashes and enabling his Aerials, each with their own unique effects on his abilities? I think this is the first time I saw something like that, and it is beautiful...
Thanks! The B move is linked with the Dash Attack, so if you think about it, it's not to generic. :p I like the Up B too. And thanks about the mechanic.
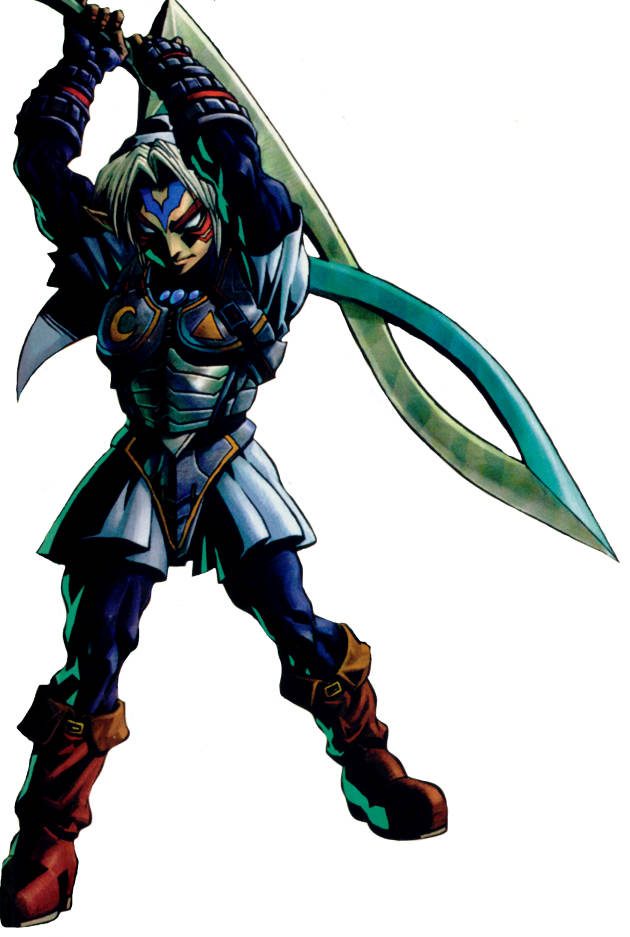
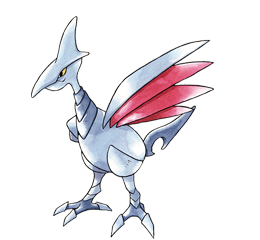
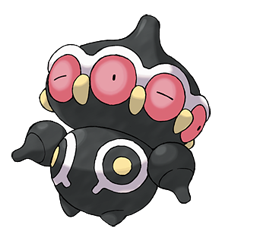
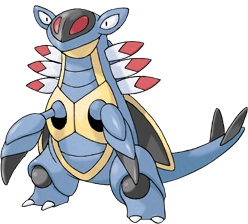
Wrath's Situationals have no names, lulz.
Of course.
 

Kris121

Smash Journeyman
Joined
Nov 26, 2008
Messages
263
Location
THE INTERWEB
Fierce Deity Link


he's pretty much like link but stronger and has different specials:chuckle::chuckle::chuckle:
________________________________
specials:

up B = great spin
just like links

B = fierce diety swings his sword and a dark wave is sent

Side B = he jumps sideways and stabs

down B = fierce diety strikes his sword on the ground and a dark wave circles him

finale smash = majora's incarnation
fierce deity turns into majora's incarnation and runs around the stage attacking any one


I hope you like it...
 

Kris121

Smash Journeyman
Joined
Nov 26, 2008
Messages
263
Location
THE INTERWEB
@baloo this is so that people who don't know what FDL is will know what it is! And what the heck Champ slayz! what is that!
 

emergency

Smash Journeyman
Joined
Dec 7, 2008
Messages
251
Location
Junahu's Box
Hero Prinny: Unfortunatly, I have to agree that this doesn't quite live up to your Plenair set, but I must say that there's several concepts that I liked (Down Special and Up Tilt leap to mind). I just want to point out the the Side Special doesn't list damage, knockback, or any actual effects other then the animation. Several grammer errors are scattered here and there that tripped me up slightly, and some attacks were slightly generic, but this was probably the result of having to rush and finish. I enjoyed going through this set, in any case, and I look forward to your set(s) in MYM6, where hopefully you'll have more time.
Thank you for taking the time, for reading my garbage set.

I have a question retaining to your first statement. Why is it that Pleiny is better than Hero Prinny. I've been asking this on the chat, and everyone has silenced the notion. Even on a personal account of asking.

Maybe I'm just a tad too bothersome. I'm sorry if I'm acting selfish in this regard than. My time was indeed rushed, and with K.Rool's kind comment. Yes, bits and pieces of this set started at the beginning of MYM5, which then progressed into busy lifetime and school situations. Then it started to fall apart, as I attempted to finish what I could today, with the limited resources that I have.

I surrender, the sets in this contest are so amazing, I've been re-reading them for almost the whole day yesterday. Then I noticed, I was absent from the voting list. I do deserve it though, for I was not active enough. Which I also apologize for.

I admire every soul in this contest, rather you be a beastly writer with imagination, or to the trolls that lurk every once in a while. I shall come into the next contest, full of hope and ideas, and more time.

Back to the subject of why Pleinair was better than Hero Prinny, still puzzles me. Would anyone like to shed their opinion on the possible reasons? I apologize again, for you. The people to read this long and boring statement. I apologize to you and the world, for the plaque I've done upon to this contest.

Good day.

Emergency.
 

Hyper_Ridley

Smash Champion
Joined
Dec 21, 2007
Messages
2,291
Location
Hippo Island
At the time of this posting, there is...

A little under 3 hours left for move set submissions

2 hours 45 minutes to be precise.

Any move set submitted after the deadline WILL NOT COUNT, so please don't try to post it on the literal last second, okay?
 

MarthTrinity

Smash Lord
Joined
Aug 9, 2007
Messages
1,954
Location
The Cosmos Beneath Rosalina's Skirt
"What has awoken in you? I want you to hit me with it all! Now, bring it!"

Steven Stone

Hoenn's strongest Pokemon Trainer; Steven Stone joins the Brawl!

-Information-

Steven Stone is (in Ruby and Sapphire) the Pokemon League Champion and hence, the strongest trainer in all of Hoenn. Steven specializes in Steel type Pokemon, Metagross and Aggron being the two most prominent members of his team. In Pokemon Emerald, Steven steps down from his position as Pokemon League Champion in order to continue his research.

In Smash, Steven acts much like Pokemon Trainer, but being the caring trainer he is, he uses all six of his Pokemon equally being able to switch them out via use of each Pokemon's Down Special while they’re standing directly before Steven. While standing directly in front of Steven and upon input of the Down B command, a small menu will pop open displaying Steven’s five other Pokemon. From this menu, you’re able to select which Pokemon to use via a cursor. Your current Pokemon also has super armor during this time…but the menu will only remain open for two seconds, so select quickly. Steven can also select which Pokemon he wishes to use from the character select screen as well.

Because they are a Pokemon League Champion's Pokemon, Steven's Pokemon are VERY well trained and do NOT have a stamina system like Pokemon Trainer does, rather Steven is allowed to use whichever Pokemon he pleases at any given situation. And with that…read below for all of the in-depth details about Steven’s trusted Pokemon friends; each one is unique in their own ways and fits a different situation…


SKARMORY

***

*** BACKGROUND ***

Skarmory is the only one of Steven’s Pokemon not from the 3rd generation of Pokemon, as well as the Hoenn Elite Four as a whole. Skarmory debuted in the 2nd generation as an exclusive Pokemon to the Silver version, players having to choose between it and Gligar when selecting the Silver and Gold versions.

Skarmory has never been all that notable in the mainstream eye of Pokemon, but Skarmory is about as close as one can get to the embodiment of competetive Pokemon. Skarmory is THE best physical wall in the game. Blissey is considered the best special wall, and when you bring them both together many consider the combination to be quite broken, “Skarmbliss”.

Skarmory revolves around taking hits and setting up traps for its opponent in the competitive environment. A Skarmory is far from capable of taking out six Pokemon on its own, requiring a good team to back it up. That said, Skarmory provides excellent support by setting up it’s many entry hazards, then by forcing the enemy to switch into them with Whirlwind/Roar. Skarmory plays much like it does in the competitive Pokemon enviornment in Smash Bros, having little power to KO foes, but extremely durable and great at setting up traps.

*** STATS ***

Size: 7/10
Skarmory stands around as tall as Bowser, but is only around as wide as Ganondorf. He’s big, but not huge.

Weight: 9/10
Skarmory’s always been a b*tch to take down since second gen, and it shows no signs of changing any time soon.

Walking Speed: 5/10
Nothing special.

Dashing Speed: 6.5/10
Decent, but not spectacular. Around the level of Charizard’s run in both stats and appearance.

Traction: 5/10
Skarmory is more graceful in his gliding around the ground then Charizard, but he’s far from amazing.

Power: 3/10
Skarmory is far from a heavy hitter, being one of Steven’s damage rackers. He only has one truly viable KO option.

Attack Speed: 5/10
Despite being rather weak, Skarmory isn’t all that fast either. He’s by no means slow, but his attack speed isn’t what makes him such an amazing damage racker, unlike most who specialize in the field.

Range: 7/10
While not a lot of Skarmory’s attacks have range above average, he has amazing stage control with his whirlwinds.

Priority: 5/10
Skarmory’s melee attacks aren’t all that impressive, but you’ll rarely actually be trying to hit the foes with those anyway. You’ll be relying on his disjointed hitboxes to get the job done, which means while Skarmory’s overall priority isn’t all that great, you’ll rarely have to worry about clashing with enemy attacks or being out prioritized.

First Jump: 3.5/10
Skarmory’s main jump isn’t anything notable at all, him struggling to use his short legs to boost up his heavy body.

Extra Jumps: 9/10
However; Skarmory has four extra jumps by flapping his wings on the level of Meta Knight’s.

Fall Speed: 7/10
Sadly, what could’ve been an absolutely killer aerial game is hurt by Skarmory’s heavyweight status which makes him fall faster then one would want.

Gliding: 7/10
Skarmory’s glide is a really mixed bag. On the plus side, it’s twice as long as Meta Knight’s and much easier to control. If you handle Skarmory well enough during the glide you could potentially even turn him around. On the downside, Skarmory moves very slowly during the glide and has a horrible glide attack, meaning he begs to be gimped.

Recovery: 8/10
Skarmory can always get back to the stage with his glide if he so chooses, and if he’s not knocked out particularly far he can use a less gimpable recovery with his up special. When all’s said and done, when combined with Skarmory’s massive weight, Skarmory simply refuses to die, surving to absolutely ridiculous percentages while racking up his enemy’s percentage along with him.

Crouch: 3/10
While this cuts Skarmory’s height in half, considering his already large height this won’t help him dodge much.

Crawl: None
Hover: None
Wall jump: None
Wall cling: None

*** ANIMATIONS***

Standard Pose
Skarmory stands tall with his wings up against his sides.

Idle Pose
Skarmory extends out his wings and strikes the pose you see on the headers.

Walking
Skarmory slowly puts one foot in front of the other, looking cautiously from side to side.

Running
Skarmory unfurls his wings and gets them out as he goes faster, getting ready for the next step up in the chain.

Dashing
Skarmory extends out his wings and glides along the ground like the dashes of Meta Knight and Charizard.

Crouching
Skarmoy sits on his legs and furls up his wings into his sides, looking like a bird sitting in a nest. Try using this on the tree in Onett or similar situations for nice screenshots.

First Jump
Skarmory gathers all the strength he can in his tiny legs as he jumps up.

Extra Jumps
Skarmory simply flaps his wings as he goes upwards, just like the extra jumps of Meta Knight, Pit, Charizard, etc.

Shield
Skarmory blocks his face with his wings as a bubble shield forms over himself.

Spot Dodge
Skarmory turns to face the camera and does his shield pose, but no bubble shield forms.

Roll
Skarmory either flaps in front of or behind himself to propel himself in the desired direction. This is somewhat laggy for a roll, but it goes as far as Mewtwo’s.

Air Dodge
Skarmory leans into the background, flapping frantically.

Asleep
Skarmory goes into his crouch pose, but closes his eyes and gets a typical anime snot bubble.

Dizzy
Skarmory flails about, flapping frantically.

***

*** MOVESET ***

*** SPECIALS ***

Down Special – Spikes
Skarmory looks to the ground as he stands on his legs, then suddenly lets out a cry as he rapidly flaps forwards a couple times, letting out one spike onto the ground with each flap of his wings. This has an above average duration, though the actual starting and ending lag are low. The spikes come out right in front of Skarmory, not even a stage builder block away. Each Spike only deals 1% and tiny hitstun with horrible disjointed priority as you shoot it out. . .This is an absolutely horrendous move.

However; whether or not the spikes hit anyone, they’ll fall onto the ground in front of Skarmory as he shoots them out. When foes walk over the spikes, they’ll take 3% damage with set small knockback away from the spikes. While you can only have one set of spikes out at a time, you can lay more spikes in the same area by using the move right at the same spot up to two more times to make the spike trap deal 9% damage when foes walk over it.

Neutral Special - Toxic
Skarmory looks upward as he opens his mouth wide and extends out his wings for average starting lag, then hurls out some toxic acid in an animation like when he uses this move in the Stadium games. The acid has infinite disjointed priority and goes up a battlefield platform, then, comes back down, dropping barely just in front of Skarmory at the same range as where spikes come out when Skarmory lays them. Skarmory cannot move until the acid hits the ground, though the acid goes through it’s arc quite quickly, thankfully, and the move has very little end lag.

If the acid hits anyone, they’ll take some brief hitstun and become poisoned, taking 1% per second for 10 seconds. Considering the lag of the move and the small horizontal range, this isn’t particularly good payoff, wouldn’t you agree? This isn’t the move’s primary function, though. Notice how the move has the same horizontal range as Spikes? If you use Toxic onto any spikes you’ve laid out, they’ll turn into toxic spikes. In addition to dealing the regular damage they would of before, the spikes will now poison the foe like the move does normally. You can stregnthen the poison on the spikes by using toxic on them by up to two more times, each use increasing the damage per second of the poison by 1%, meaning the spikes can potentially do up to a total of 39%, assuming you give the poison the time it needs to work.

Side Special - Whirlwind
Skarmory starts making a gust of wind, slowing flapping his wings behind himself then in front of himself, then picking up the pace as a whirlwind forms in front of him. This move is chargeable by holding B as Skarmory forms the whirlwind, but the charge can’t be saved. The longer the charge, the bigger the whirlwind. At minimum charge (.25 seconds), the whirlwind is only Mario’s size, but at max charge (1.5 seconds) the whirlwind is 1.5X Ganondorf’s height and Bowser’s width.

The whirlwind travels forward rather quickly at first at the speed of Meta Knight’s dash, but gradually slows down as it moves, losing 16.66% of it’s speed for second, meaning it lasts for 6 seconds. The whirlwind will suck foes within half a Battlefield platform’s distance away from it and carry them along with it, this being rather hard to DI out of. This move on it’s own is best used for gimping.

However; that’s not all this move has the potential to do. If the whirlwind goes over any spikes you’ve laid, it will suck them up and they’ll swirl around in the whirlwind. Anybody who’s trapped in the whirlwind will take half 1/2/3% damage per second depending on the level of the spikes, and they’ll also be poisoned for the full effect of the spikes if they’re toxic.

In addition, this move is quite notable in FFAs in that if you suck up two foes in the whirlwind, they’ll rapidly bump into each other, damaging each other. Bigger/heavier characters take less damage from this and deal more damage into those they bump into. Two Marios trapped in a whirlwind would deal 8% to each other per second. If Bowser and Jigglypuff were in the whirlwind together, though, Jigglypuff would be taking a massive 16% per second while Bowser would be taking a mere 4% per second.

If any non energy based projectiles are thrown into the tornado such as Dedede’s Waddle Dees or throwing items, they’ll start spinning around in the whirlwind, dealing the damage/knockback they normally would to anybody who gets caught in it. The projectile won’t vanish until the whirlwind does, meaning you can potentially prevent Dedede from using his side special due to having two Waddle Dees out that he can’t get rid of.

Up Special – Brave Bird
Skarmory lets out a screech and flies up double Ganondorf’s height, then starts going downwards at a 45 degree angle until he hits the ground, going at the speed of his run. Skarmory has super armor during this recovery and any foes hit by his beak take 10% and average knockback, though 3% is dealt to Skarmory in recoil damage.

This recovery isn’t controllable at all and doesn’t go nearly as far as Skarmory’s glide, but he’s completely immune to being gimped, though that doesn’t mean he can’t take some damage from a skilled foe as he comes to the stage. The move has above average start up lag but no end lag.

*** STANDARDS ***

Standard Attack – Drill Peck
Skarmory pecks into the ground upon the first press of A, doing 7% and below average knockback and priority with below average range in front of himself. Pressing A again will cause Skarmory to start drilling his beak about as it’s into the ground, his beak doing 5 hits of 1% and flinching per second, you having to mash/hold A to keep up the drilling. In addition to Skarmory’s drilling beak, small particles will fly about randomly the size of a Franklin Badge. Two particles come out per second and do 3% and flinching, one always coming out behind Skarm and the other in front of him, going out a max distance of a Battlefield platform.

This move has a more notable use, though. If you peck down onto a buried trap, on the second press of A Skarmory will dig into the ground and pick up the trap in his mouth, then throw it away. This has average lag. This can only dispose of traps literally within the ground, like Snake’s mines.

Dashing Attack – Living Storm
Skarmory continues dashing forwards, slightly increasing his speed by one level or so. This has below average lag to come in or out of and you can hold A for as long as you want. This has no hitbox whatsoever, but it helps Skarmory’s movement speed. If Skarmory moves into any whirlwinds along the way, the whirlwind will start swirling around him as he dashes forwards, covering him like a shield. Once Skarmory comes out of this attack, though, any whirlwinds swirling around him will instantly disperse, so use with care.

*** TILTS ***

Forward Tilt – Steel Wing
Skarmory swoops his wings forward for average starting and ending lag as he lets out a cry. Average priority and range, 7% and below average knockback. Too laggy and weak to be all that notable.

This is usually a quite generic and useless attack, but this has an extremely important use and is vital to using Skarmory. If you use this within half a Battlefield platform of a whirlwind, you’ll increase it’s speed back up to it’s max, which also in turn renews its 6 second duration. This only works if you use the move behind the whirlwind, as otherwise you’ll be blowing currents against it, slowing it down. If the whirlwind is on it’s last two seconds of life, though, you’ll renew it as starts going back in the other direction, the whirlwind too slow to put up much of a fight against you as you kick up currents.

Using this move allows you to have multiple whirlwinds up at once due to being able to renew them. If you can manage to get multiple whirlwinds set up and then use Steel Wing to gust them into each other, the whirlwinds will fuse together, merging their sizes though unable to go beyond the max size of a single whirlwind. The main motive in doing this is that the max speed of the combined whirlwind will increase by 1.5X, also increasing the duration of the whirlwind when left alone to 9 seconds.

Up Tilt – Headbutt
Skarmory headbutts upwards for low lag on either end, but below average range and priority. This does 6% and weak upward knockback, making this a rather generic and useless move. If you hit with it, the horn coming out of Skarmory’s head will glisten briefly, indicating it’s getting harder. This will occur if you ram your head into something other then a player such as a platform (Drop through platforms work too), although the ending lag will be increased to above average due to Skarmory’s head getting stuck in the object, him taking some time to take it out.

Down Tilt – Egg Bomb
Skarmory sits in its crouched position like a bird in its nest. . .What’s he doing? Nothing seems to really happen when you press A besides give you some average lag. . .Once you come up from your crouching position, though, you’ll find that you’ve laid an egg! Maybe he isn’t a he after all. . .? You can pick it up from your current position quite quickly and then throw it forward. It has a 50/50 chance of being either explosive or containing an item like Chansey’s eggs, though won’t contain items if items are turned off. Explosive eggs deal 12% with average knockback. Egg bombs will automatically explode after sticking around as long as Link’s bombs and you can only have one out at a time.

*** SMASHES ***

Forward Smash – Sand Attack
Skarmory kicks up sand from the ground up into his enemy’s face. The cloud of sandy particles stretches out about Bowser’s size in front of Skarmory with mass decent priority disjointed flinching hits. This move has average starting lag though little end lag. Foes take 15-22 hits of 1% from this attack based on the charge.

If you kick up some sand as a whirlwind is coming into you, the sand will be added to the whirlwind’s mix as it flies around, adding an extra 3% damage per second that foes will take upon entering the whirlwind. This on it’s own isn’t all that spectacular and is harder to add to the mix then some of the other ingredients, but it’s use lies elsewhere. . .

Up Smash - Sandstorm
Skarmory turns to face the camera as he fully extends out his wings and lets out a massive roar. This has no starting lag, though a long duration, as long as Wario’s dsmash. By default, this move does nothing but push foes within three Bowsers in any direction away from Skarmory at the level of FLUDD’s pushing power, making this an excellent GTFO move, but it deals no damage or hitstun at all, making it useful for little else.

If Skarmory has any whirlwinds up, they’ll instantly change the direction they’re going to fly directly towards Skarmory, though unable to go through obstacles. Foes can still be hit by the whirlwinds as normal while you do this, so this can be a great way to directly control the whirlwinds, though you’ll be sacrificing them to perform this move. Once the whirlwinds get to Skarmory, they swirl around him briefly, then fly up off the top of the screen.

If there was only one whirlwind or if none of the whirlwinds had sand particles flying around inside them from Sand Attack, the attack ends right there. However, if the criteria is met, then a sandstorm brews. The sandstorm lasts for the duration of Steven’s remaining stock, though it’s far from easy to set up. The sandstorm covers the entire screen, obscuring vision exceptionally. Foes will take 3% per second for the duration of the sandstorm and will be constantly pushed very slightly in the way the sandstorm is going, the way Skarmory was facing when he activated this attack. Any spikes you had going around in the sandstorms will come flying across the screen, one per second, an infinite amount of them coming for as long as the sandstorm lasts. While a sandstorm is up, Skarmory cannot brew any more whirlwinds due to the sandstorm being far stronger then any whirlwinds he can make. Once you have a sandstorm up, you have little reason to keep Skarmory out and should switch to another of Steven’s Pokemon, preferably Aggron or Metagross for the KO.

When Skarmory goes to activate this move, foes will want to punish him ASAP. If he’s interrupted during the move, any whirlwinds instantly vanish as well as all of their contents, undoing all of Skarmory’s hard work. The best way to actually get this move off is to make it so two whirlwinds are going to go into each other (One with sand particles inside it), then leap in the middle and use your usmash. This will leave you with minimal vulnerable time, as once the whirlwinds go to go off the top of the screen the move can no longer be interrupted. This still requires a lot of setting up, but you can hide behind your whirlwinds while doing so and not make yourself vulnerable, making it a far better option.

Down Smash – Stealth Rock
Skarmory goes through an animation identical to spikes, but only takes out a single large rock with average starting lag and below average end lag. The rock buries itself into the ground afterwards. Whenever somebody goes over the spot the stealth rock is buried, it will pop out and trip the foe before going back into the ground. If the rock is hit during this time, it’ll be destroyed. Skarmory can only have one stealth rock up at a time, and this is very easily negated by using a dashing attack when going over the spot the rock resides to destroy it as you pass by, the stealth rock having bad priority.

If a whirlwind goes by the rock, the rock won’t be added to the mass of junk flying around in the whirlwind, but it will be lifted up out of the ground and go flying triple Ganondorf’s height upwards before falling back down into the ground. While it’s going up it’s a extremely high priority hitbox that deals 20-30% with high-very high vertical knockback based on the charge. The stealth rock will hit any foes in the whirlwind, shooting up through it. This is Skarmory’s ONLY KO option, and it’s very hard to pull off due to how easy it is to destroy the stealth rock.

*** AERIALS ***

Neutral Aerial – Welcoming with Open Arms
Skarmory turns to face the camera and extends out his wings, holding them open for as long as you hold A, around one Skarmory distance on either side. Upon releasing A, Skarmory clamps his wings together, catching anything inbetween them during that time. Both opening out Skarmory’s wings and closing them has below average lag, so the whole move has average lag if you simply press A. This move has grab priority. Upon grabbing someone, Skarmory will throw them upwards for 10% and average knockback. While this prevents the move from being used for gimping of any sort, this means the move can be used to help allies recover.

That’s not the main purpose of the move though. You can grab throwing items as they’re thrown at you/non energy based projectiles, such as Waddle Dees, then throw them back at your enemy. This makes Skarmory all the more defensive, even against camping against certain characters. In addition to these sorts of items, Skarmory can grab whirlwinds and throw them triple Ganondorf’s height upwards, giving you all the more control over your spinning traps of doom.

Forward Aerial – Steel Wing
This is identical to the ftilt, allowing Skarmory to fan the whirlwind while in the air to help with gimping. There’s slightly less lag on the aerial version, but the move will be interrupted if you land on the ground with bad landing lag, so this is generally strictly only used for it’s intended purpose: gimping. Still, if the whirlwind goes a bit farther then you intended and goes off stage, you’ll need to chase after it and use your fair on it to get it back onto the stage.

Back Aerial - Screech
Skarmory turns his head around in mid-air, then lets out a loud screech with the classic Red/Blue sound effect for the move. The screech is an invisible projectile that can go up to a battlefield platform away at an average speed, and the move has below average start lag with no end lag. Being hit by the projectile infinite priority hitbox will cause the foe to hold their ears in pain for a brief stun around half that of ZSS’ dsmash, but the stun time increases as their percentage goes up.

This is Skarmory’s only stunner, but the stun time is too small to follow the move up for a combo until getting to very high percentages. This also can’t be used for gimping due to foes gaining their jumps/up special back after being hit by it. The practical use of this move is to stun foes so they’ll be sucked into a passing whirlwind.

Up Aerial – Double Edge
Skarmory headbutts upwards just like his utilt, going through an identical animation. This has the same bad range as the utilt, but the starting lag is increased to average, the ending lag still being brief. Unlike the utilt, this move has good priority with super armor frames. If Skarmory hits a foe with this move, he’ll deal an impressive 15% with above average vertical knockback to the foe for a potential KO at high percents, but he’ll also take 15% and be spiked downwards with above average knockback. This makes the move deadly to use when not over solid ground.

This is where the utilt begins to serve an actual purpose. If you cause the horn on Skarmory’s head to sharpen 5 times from hitting either foes or other various objects with it, Skarmory’s head will harden from having been forced around so much and he’ll gain the rock head ability. Rock Head prevents Skarmory from taking recoil damage which eliminates the downside of this move. This makes the uair a viable KO option on a stage like Battlefield where you can ram your utilt into the drop through platforms, but very awkward on Final Destination where Skarmory will have to land the utilt on a foe 5 times with all of it’s horrible range and priority. Skarmory loses Rock Head every time Steven loses a stock.

Down Aerial - Roost
Skarmory extends out its wings and legs fully, falling very quickly downwards. This won’t end until you touch the ground. However; this isn’t a stall then fall attack, as this attack has no hitbox whatsoever. This has no start-up lag, but average ending lag when Skarm slows down as he reaches the ground then goes into his crouching position and falls asleep.

While you’re asleep on the ground, you’ll heal 1% per second. From here you have three button inputs. Pressing shield or moving the control stick causes you to wake up with average lag. Pressing A causes Skarmory to snore, emitting a small high priority hitbox for 5% and weak knockback in front of it. Far from a good option to defend Skarm while he’s snoozing.

Pressing B will cause Skarmory to perform his dtilt, Egg Bomb. If you’re asleep when the bomb goes off, Skarmory will be shocked awake for 5% damage, going into his regular crouching pose, but this also causes an explosion the size of Bowser around Skarmory that does 15% with above average knockback. This is a great way to punish foes attempting to disturb Skarmory’s rest, but if foes predict it you’ll just negate any healing you managed to get.

*** THROWS ***

Grab – Iron Grasp
Skarmory reaches out with his wings like in his ftilt/fair. This is one of the faster grabs but doesn’t reach out nearly as far as one would like.

Pummel – Rapid Spin
This has nothing whatsoever to do with the Pokemon move of the same name, as Skarmory rapidly spins the foe around rather then spinning around himself. Skarmory releases the grip with one of his wings on the foe, then whacks the foe to cause them to start spinning around rapidly, taking 2% per second. This lasts until the foe escapes the grab, or until you input the pummel input again which has Skarmory catch the foe with both his wings again. If the foe is facing the opposite way they originally were, Skarmory will quickly move around to get on the other side of the foe.

It’s very hard to get down a consistent timing for changing which way you’re facing, but it can help considerably if you grab a foe right next to a stealth rock you want to push them into with your fthrow but are behind it.

Forward Throw – Eye of the Storm
Skarmory starts kicking up a whirlwind like in his side special, letting go of the foe but them getting trapped in the whirlwind. Foes can escape by button mashing like a regular grab before Skarm releases the whirlwind, so don’t get too greedy with making the whirlwind big before letting it go with your foe swirling inside it. This is a particularly good way to force foes into your Stealth Rock.

Back Throw – Gone with the Wind
Skarmory holds his foe out behind him, the throw lasting forever until the foe escapes, being as hard to escape as a regular grab. This does no damage to the foe. The most obvious use of this move is using your foe as a meat shield from enemy attacks, as Skarmory holds them a good way behind himself. Use them as a shield from foes, stage hazards, whatever floats your boat.

What makes this less situational is that if a whirlwind is passing by Skarmory while he’s holding a foe out, the whirlwind will sweep the foe he’s holding into itself as it passes by. In addition, if there was a foe already in the tornado, the foe coming into the tornado will bump the one that was originally in the tornado out of it for 8% damage right into Skarmory, who will automatically grab them. In team battles with two Skarmories, this can potentially lead to an infinite (There are a lot of infinites in team battles, particularly double Dededes, but you don’t see that dominating the metagame), if the other uses ftilt/fair to keep fanning the whirlwind back into the Skarmory doing the grabbing and bthrowing.

Up Throw – Air Bombing
Skarmory flies up double Ganondorf’s height off the ground, holding the foe against himself as he flies. From here you can fly left and right at the speed of Ganon’s walk (He’s being weighed down a lot) and foes can still escape out of the grab. Once you release A, Skarm will drop the foe, them being in a footstooled state for the distance Skarm is off the ground then regaining their jumps. This is mainly used for dropping foes into whirlwinds or spikes, though can also be used to gimp characters with horrendous vertical recoveries for an early kill. This throw happens quite quickly (Aside from Skarm’s flight speed) and any foes Skarmory throws down will deal 10% and average knockback to other foes, making this throw exceptional for FFAs.

Down Throw - Dig
Skarmory digs a whole in by drilling into the ground with his beak, throws the foe into the hole, then buries them within it, kicking the dirt back over them. Foes take 5% damage per second while underground until they button mash their way out, it being as hard to escape as any other grab.

If a whirlwind goes past the foe buried underground, they’ll be brought up out of ground and sucked into it. In addition, if Skarmory uses this move over a trap buried underground such as Snake’s mines, then the victim will suffer the effects of the trap when they get thrown underground. Why disable Snake’s mines when you can use them against him?

*** FINAL SMASH – AIR LOCK***
Skarmory’s got the smash ball! About time. Skarmory lets out a cry ripped straight from the Gameboy games as the screen zooms in on him. When the screen zooms out, he’ll have a sandstorm set up. The sandstorm will be treated as if it had maxxed out toxic spikes. Skarmory’s done his job. Time to switch out to somebody who can actually do something worth a d*mn in the sandstorm, seeing Skarmory can’t make whirlwinds when a sandstorm’s up. The sandstorm still lasts until Steven loses a stock, as always.

If the final smash is used when Skarmory already has a sandstorm up, though, the sandstorm will die down just enough so that Skarmory can still make whirlwinds, enabling him to actually continue playing in it. When able to make whirlwinds in a sandstorm, Skarmory functions exceptionally well due to the sandstorm helping him gimp foes, assuming he knocks them off the platform in the right direction, enabling him to get lots of early KOs. He also doesn’t have to worry about setting up more spikes to damage, as the sandstorm’s already taking care of all the damage racking. All Skarmory needs to focus on is gimping the foe to all hell and the occasional stealth rock.

*** SITUATIONALS ***

Ledge Attack - Rush Saw
Skarmory lets go of the ledge and flies from the edge, off the screen...Suddenly, *****, Skarmory comes back onto the screen from the same side he left, charging fowards at a high speed at a height that would place him just above the ground of the platform he left. He charges fowards until he reaches the platform and then he neatly lands on the ground. During the charge, Skarmory is a high-priority hitbox that deals 14% with above average knockback to anyone in his way. If there are any obstacles in his path during the move, or he is hit, the move will be instantly canceled.

Ledge Attack Over 100% - Mocking Bomb
Skarmory slowly climbs back onto the platform. As it does so, a farting noise is heard as a little white glop falls from his butt. EWWWWW! So, Skarmory's -ahem- dropping has no priority, and falls at quick speed. If it hits someone, they will enter freefall instantly from the foul smell. Since this is done over a pit where characters will be recovering, this can be a nasty edgeguarding move.

Rising Attack (On Stomach) - Buzz Dash
Skarmory starts to quicky beat its wings, slowly lifting itself off the ground as it remains in a flying postion. As it beats it wings, they are average priority hitboxes that deal 2% per hit, for a maximum of 6 hits. After it is off the ground, it will then dash fowards through the air as far as Luigi's dash attack at a similar speed. This part has below average piority and deals 7% with average knockback. Skarmory then neatly lands on its feet for low end lag, but it is able to dash off the edge of platforms.

Rising Attack (On Back) - Slight Readjustment
Skarmory will quickly flap its wings upwads once and then get back up to is feet. The wing flapping creates a very small gust of wind that pushed enemies away as far as Bowser is tall, and it can also slightly move any whirlwinds Skarmory has active. A simple move but it has its uses.

Tripped Attack - Fake Egg
Skarmory chirps for a moment, which is the only indication that it has done this move. After Skarmory moves away from the spot it tripped, you can see a little egg that Skarmory supposedly laid. Any character, including Skarmory itself, can pick up the egg and throw it at enemies for 6% and average knockback. Only one "egg" can be laid at a time, and yes, it is entirley possible for Skarm to simply stand up on the spot and immediatley pick up the false egg, but that would be very predicatble, wouldn't it?

*** OVERALL PLAYSTYLE – THE WIND WAKER***
Early on in a match, Skarmory will want to be setting up his toxic spikes while playing as defensively as he can. Skarmory is nothing if you don’t take your time to set up. While Skarmory is plenty good on defense, he’s more then likely to get behind in damage count at this point. After setting up the spikes, it’s finally time to start building up a whirlwind. Your foe probably won’t give you much time to make it too big, but don’t worry. So long as you have one up at all, setting up additional whirlwinds is much, much easier.

Once you have a whirlwind up, you’ll constantly want to be hiding behind it and fanning it, building it up by pushing additional whirlwinds into it until you max out it’s size and speed. Always keep the whirlwind between you and your foe so they have a bunch of swirling traps to go through to get to you. While you let your strong toxic spikes rack up damage on your foe, you can choose to either set up a stealth rock, or if you’re daring make another whirlwind with some sand in it and try for a sandstorm. It can be quite difficult to keep two whirlwinds going at once, so your best bet is to try to make the second one close to the first and use usmash in the middle of them ASAP so your foe has less time to interrupt you.

If you do get a sandstorm up, you’ll sacrifice your whirlwinds and thus lose your main way of KOing (Stealth Rock), but your foes will start racking up to insane damage percentages. Your best to KO from here would be uair, but why force poor Skarmory to KO someone when one of his good buddies like Aggron or Metagross could do it for him? The heavy hitters will love having a sandstorm set up for them, as all they have to do is sit and wait for the foe’s damage percentage to rack up before easily slaughtering them with their beastly KO moves. If you insist on using Skarmory for the KO, you could work on making your uair usable by spamming utilt, although this will only work all that well if there are platforms for you to use it on.

If you don’t go for a sandstorm, then Skarmory can far more easily KO the foe himself by setting up stealth rocks in the path of the whirlwinds. Still, stealth rocks can easily be destroyed by the foe, so the best time to set them up is in front of a whirlwind with your enemy trapped inside, so they’ll have no chance to disarm your trap. Using your fthrow to force foes into a stealth rock is also an excellent option.

Once the foe goes flying, Skarmory is an excellent gimper, assuming he has a whirlwind by his side. You can manipulate the whirlwind to your heart’s content with your nair and fair as you use it to push foes to prevent them from getting back to the stage. You may actually NOT want anything in your whirlwind when you use it for gimping purposes, as if they’re hit they’ll regain all their jumps, so making a new whirlwind when they first get knocked away is a good option. Don’t worry about Skarmory’s lack of a way to make the whirlwind to go downwards, as it slowly descends on it’s own.

Skarmory is rather complicated and will generally scare off newer players due to his heavy reliance on his whirlwinds and actually using his moves in unison, but those who have the patience to figure out how the steel bird works will find an excellent team player, just like in the Pokemon games. While Skarmory can be played alone, he works considerably better as a damage racking machine for the rest of Steven’s team.

***​

*** EXTRAS ***​

*** Extra Animations ***​

Up Taunt - Reflection
Skarmory suddenly starts reflecting light off his well polished steel, becoming very bright briefly and lets out a magestic cry.

Side Taunt - Quick Adjustment
Skarmory brushes the spike on the top of his head with his wings as if he were combing his hair, the spike shining briefly as he does so. Seems he's a bit too concerned with his looks.

Down Taunt - Itching for Battle
Steven extends out his hand with Skarmory's pokeball in it and a red beam shoots out from it to try to recall Skarmory, but Skarmory dodges it, squawking in annoyance, turning to glare at Steven as he furls up his wings and puts them on his hips. He clearly still has more fight left in him.

Win Pose 1 - Spotlight
Steven pumps his fist and lets out a satisfied grunt, smirking, but then Skarmory comes out in front of him and spreads out his wings and lets out a cry in the middle of it, letting out a cry.

Win Pose 2 - Hatchlings
Steven is nowhere to be seen as Skarmory is in his crouching pose, asleep. The sounds of eggs cracking open is suddenly heard underneath him, which causes Skarmory to stand up and back away to look at what was under him to reveal there baby Skarmories hatching from three eggs, letting out cries. Guess he's a she. . .

Win Pose 3 - Wrong Pokemon
Steven strikes the same pose as the first win pose, but instead sends out Aggron, who lets out a mighty roar. Suddenly, a whirlwind comes by and blows Aggron away, and Skarmory comes from the side of the screen, his wings furled up and put on his hips as he glares at Steven, who just shrugs.

Loss Pose - Steel Clap
Skarmory claps his wings alongside Steven, who also claps. Skarmory occassionally increases his clapping speed and starts making a whirlwind, but Steven glares at Skarmory, him hanging his head in shame and stopping.

*** Kirby Hat – Spiked Puffball***​
Unlike most other Pokemon kirby hats, Kirby simply gets Skarmory’s spike coming up out of his head. Kirby gains the ability to use spikes as his neutral special, spitting out the spikes, though he also gains Skarmory’s neutral A, drill peck. Instead of using a beak, Kirby uses the horn on the top of his head to do the drilling. Swallowing Skarmory (Or any of Steven’s Pokemon for that matter) also makes Kirby immune to the automatic 3% per second of sandstorm due to turning him into a steel type, making sandstorms less potent against the pink star warrior.


Cradily

Cradily is a strange Pokemon for Steven to have; instead of being a Steel type like many of Steven's other Pokemon, Cradily is a Grass/Rock type essentially being a living fossil. Living millions of years ago where it caught prey with its tentacles and then dissolved it using highly corrosive acids, Cradily is a fearsome Pokemon indeed.

While certainly being one of the more interesting Generation III Pokemon, Cradily is sadly very rarely used being incredibly weak to Ice type attacks. Fortunately this doesn’t care over to Smash so no advantage for the Ice Climbers there at least!

Stats

Size: 8/10
Cradily is a rather large target, being rather tall (about a head taller than Ganondorf when stretched out) but not particularly wide.

Weight: 6/10
Being essentially a living fossil adds some considerable girth to Cradily’s weight. Weighing 132 pounds, Cradily is about the weight of an average human.

Walking Speed: 2/10
Cradily was NOT built for speed clearly, his gameplay mostly revolves around planting oneself in a set location and weakening foes with his impressive range, not chasing them down. Cradily is only able to walk, albeit very, VERY slowly.

Running Speed: 0/10
Simply put, Cradily CAN’T run. His only form of movement is a very slow walk that has him inching his way forward very, very slowly. This also means that Cradily lacks a Dash Attack.

Traction: 10/10
Cradily will NEVER trip as he never builds up enough speed to even be able to trip.

Power: 5/10
Cradily’s attacks aren’t really the strongest, but they last a good deal of time making Cradily an excellent damage added. Unfortunately, he lacks any serious KO moves.

Attack Speed: 5/10
A real mixed pot of moves here, some of them are lightning quick (surprising considering his slow movement) but some of them are painfully slow.

Range: 8/10
This is where Cradily excels, with exceptional range and multiple projectiles, Cradily doesn’t NEED to move to take foes head on!

Priority: 6/10
Lots of projectiles and disjoined hitboxes make Cradily a dream to play when fighting foes from a distance. Some of his attacks even eat through shields.

First Jump: 0/10
You’re joking, right?

Second Jump: 0/10
Nope, not getting any better here.

Recovery: 0/10
What part of “Cradily can’t jump” can you not grasp? Cradily has next to NO chance for survival if he’s knocked off stage because he has no recovery move. Theoretically, he should have a one for recovery because he’s TECHNICALLY able to grab onto ledges, but seriously, if your opponent SOMEHOW manages to budge Cradily, he’s pretty much a goner.

Fall Speed: 7/10
He’s a relatively heavy/large plant fossil, he’s gonna fall quite fast.

Crouch: 4/10
He can pull his head down a fair bit, but nothing spectacular.

Crawl: No
Wall Jump: No
Wall Cling: No
Hover: No
Glide: No

Animations

Basic Pose
Cradily’s head slowly moves up and down a slight bit and the tentacles around its head quiver as it remains rather motionless otherwise.

Idle Pose
Cradily shakes his head causing the pink little tentacles to wave wildly as the apparent shiver goes down his neck, causing that to shake too.

Walking Pose
Cradily inches along using its roots, very slow movement…in fact, his head is still bobbing as if in a basic pose. Another thing to note is that even when walking, Cradily will occasionally enter his idle pose, seems his upper body didn’t get the message it was time to move!

Running Pose
Cradily doesn’t run. Pretty simple animation, no?

Dashing Pose
Cradily really picks up some speed here as he retains the same speed and animation from his walking pose.

Crouching
Cradily’s head ducks down like a snake, still bobbing up and down slightly like the basic animation.

Jump 1
Cradily appears as if he wants to jump….but just can’t.

Jump 2
Cradily falls like a rock, no second jump animation needed.

Shield
Cradily solidifies his body like a rock, standing perfectly motionless.

Forward Roll
No such luck here either, sorry.

Backward Roll
Nothin, nada, zip, zero, zilch.

Side-step Dodge
Cradily’s head dodges into the background, covering its eyes with its tentacles. Surprisingly, this also protects his body somehow…huh…

Air Dodge
Air dodge? What’s Cradily doing in the air in the first place…?

Swimming
Like Giga Bowser, Cradily falls straight down to the ocean floor when knocked into water.

Drowning
Cradily doesn’t drown; he sinks.

Dizzy
Cradily’s head extends outwards fully as he rotates his neck in a circle.

Asleep
Cradily’s head slumps forward, extending his neck fully along the ground.

Specials

Neutral B: AncientPower
Cradily shakes his head and then glares forward, a strange gray beam of energy coming out of his eyes the stretches a full Bowser width forward and a Mario height high. If a foe comes in contact with this beam for over one second, they solidify into stone for three seconds (although they take no damage or knockback).

While solidified, the opponents are (obviously) unable to move or attack. By wriggling the control stick, the opponent can break free of their petrifaction earlier. After breaking free, the opponent receives mild, set knockback so as to avoid being hit repeatedly with this attack.

This is another one of Cradily’s attacks that’s exceptional for slowing the opponent down so you can finish them off with a down smash!

Side B: Gastro Acid
Cradily rears back and then lunges forward (mindgame potential because it looks like some of his other attacks maybe?), spraying a shower of stomach acid forward in an arc that travels up to a Bowser width and a half before touching the ground. If the acid hits an opponent, they begin to take rapid damage, 1% per half a second for three seconds as the acid burns away at them. If it misses an opponent, the acid will stay on the ground for eight seconds before vanishing; any opponent who touches it while it’s on the ground takes the damage seen above so long as they're standing in the acid.

Now there are a few special properties to this attack. The biggest one is that if you hit an opponent who is shielding with Gastro Acid, their shield will begin to vanish at double the normal rate, effectively making an opponent drop their guard or risk taking a LOT of damage after their shield breaks.

This move can also be used to dissolve any items lying around the stage (with the exception of Pokeballs and Assist Trophies) including explosives and character specific items.

This move is great for taking out defensive players who like to hide behind their shields.

Up B: Ingrain
Almost unnoticeably, Cradily thrusts his roots into the ground planting him firmly in place. This reduces Cradily’s minimal walking speed to absolute zero but allows Cradily to rotate his neck to face either direction. This ALSO allows Cradily to use his side tilt (Root Slip) without turning to face his opponent making it excellent for mindgames.

With his roots in the ground, Cradily gains permanent super armor until he takes 20%. After taking 20%, Cradily will be stunned for a moment as if his shield just broke and will also be unable to use Ingrain again for eight seconds.

One final (albeit minor) benefit of Ingrain is that it heals Cradily for 1% every two seconds. While nothing game breaking, constant, although slight, healing is never a bad thing, is it?

Down B: Pokemon Switch
While standing in front of Steven, Cradily can activate his down special attack, causing a small window to pop up allowing him to switch out with any of Steven’s other Pokemon. Because Cradily won’t be or can’t move very far from directly in front of Steven, he has one of the easier times switching out…

However…if he gets knocked away from Steven, it can be a fight simply getting back over to him…

Because of the fact that Cradily is almost always in front of Steven, he doesn’t have an alternate Down B move.


Neutral Combo and Tilts

Neutral Combo: Lily Whip
With one tap of the A button, Cradily whips his head forward causing almost non-existent knockback and 3%. With another tap of the A button, Cradily begins to spin his head (not his neck too, his head alone) repeatedly striking the foe with the tentacles on its head. This acts as an infinite jab much like Captain Falcon’s and causes multiple tiny hits (1% each) with flinching knockback

Side Tilt: Root Slip
Cradily shakes his head as one of his roots stabs into the ground. A moment later about a Bowser width forward the root will shoot out of the ground about the height of a Pokeball. Any opponent that runs over said root will trip over it, landing before Cradily in their tripped stance and taking 8%. Obviously a very situational move, Root Slip is excellent for taking out characters too fast for their own good or characters with aggressive ground games. It also sets them up perfectly for some of Cradily’s close range, powerful attacks.

Up Tilt: Confuse Ray
Cradily’s head lurches back and down before suddenly shooting straight up. At the full extension of his neck, Cradily emits a cone shaped burst of purple energy that is Mario’s height and Bowser’s width. If an opponent touches this, they’ll take flinching knockback (great for stopping aerial attacks) and low damage (5%).

However, this is a CONFUSE Ray. Upon touching the ray, the opponent’s controls will be reversed for five seconds; up will be crouch, down will be jump, left will be right and vice versa. There is however one way to remedy this and it’s actually quite simple.

If you’re confused by Cradily’s attack, stand perfectly still for two seconds, this will allow your character to gather their bearings…unfortunately it also leaves you entirely open to a follow up attack by Cradily…

Down Tilt: Sticky Goo
Cradily fully stretches his neck upwards and then looks down. He then sprays a show of sticky fluid beneath him. Once it hits the ground, it spreads a short distance, going off a Kirby width to both sides. Initially, if this hits opponent’s before it touches the ground it causes 5% and medium horizontal knockback…however the real purpose of this move is to set up for Cradily’s better killing moves…

When an opponent touches the sticky fluid that’s on the ground, they instantly become stuck fast, unable to move or attack until they’ve broken free! If caught in the goo, wriggle the control stick rapidly to escape, obviously at higher percents it becomes harder to escape too. Upon escaping, your character will receive minor, set knockback so they don’t get trapped in the goo indefinitely. The goo will remain on the stage for ten seconds or until the opponent breaks free of it. Once the goo disappears, Cradily must wait three seconds before using it again so as to prevent cheap spamming of the attack.

This move is excellent for setting up Cradily’s more powerful killing moves and can easily be combo’d into via the help of Cradily’s side tilt. The root trip into sticky goo combo is an excellent set up for a killer finish as is the confuse ray into the sticky goo.

Smash Attacks​

Side Smash: Sludge Bomb
Cradily seems to take a deep breath as it rears backwards. When the smash is released, Cradily’s head lunges forward and sprays a blob of sludge at his opponent that flies forward about half of Final Destination! The sludge deals 13-20% depending on the charge and Cradily while lunging forward does 4% since he’s not really meant to hit opponents. Whichever part hits the opponent (which is usually the sludge bomb as even when Cradily hits, he usually follows up immediately with the sludge) deals moderate knockback. Either hit has moderate priority but the sludge bomb itself acts as a weird disjointed hit box.

However, there’s an extra little tidbit of information about this attack; when it hits an opponent, they become covered in nasty, sticky sludge! This reduces their movement speed by 1/6th for ten seconds.

Up Smash: Rock Slide
Cradily thrusts his head into the ground and violently tears it out, hurling a series of rocks upwards of various shapes and sizes. The rocks cause about 4-6% each depending on the charge but Cradily launches about five rocks at once, each one flying off in a separate direction. The rocks fly at a rather slow speed (about that of a melee weapon when tossed over a character’s shoulder) and disappear when they hit the ground.

This attack has mild start up lag but little end lag. While it has the potential to do insane amounts of damage, the chances of EVERY rock hitting are neigh impossible as they fly up to half of Final Destination away maximum. The rocks deal low knockback but also have great priority. Oddly enough, the easiest way to dodge this attack is by staying close to Cradily…which is probably where you want to be the least…

Down Smash: Solarbeam
Cradily extends his neck upward and aims towards the ground before him. A moment later he fires a powerful blast of solar energy from his mouth causing 16-25% depending on the charge and heavy knockback. Unfortunate it suffers from some noticeable start up and end lag and only strikes the area directly before Cradily, not to both sides.

However, if you use this in conjunction with Ingrain, Cradily roots himself in and rotates his neck as he fires Solarbeam, striking both sides with a slightly weakened version (14-22%) with medium-high knockback. The speed at which he rotates is about that of Captain Falcon’s down smash making this excellent move for catching opponents off guard.

This is Cradily’s prime KO move although it is a tad slow…if only there was a way to somehow stick your opponent in place before you…wait…

Aerials

Neutral Air: Protect
Cradily pulls his head in close to his body, covering his face with his tentacles. This attack does no damage or knockback, but instead negates any knockback from any attack that hits Cradily as he falls.

The animation lasts about a second and a half and has a bit of end lag, it’s really best used for when Cradily’s being juggled by an aggressive opponent’s attacks, keeping him from using his down air. This also effectively acts as Cradily’s air dodge considering he doesn’t have a REAL air dodge.

Forward Air: Seed Bomb
Cradily spits forward a seed that, if it hits an opponent, explodes upon contact dealing 13% and medium-high knockback. However, if the seed MISSES an opponent, it hits the ground and buries itself. If an opponent treads over a planted Seed Bomb, it explodes like one of Snake’s mines, dealing 14% and high knockback. This attack suffers from some above average end lag.

Only one Seed Bomb may be planted at one time. If Seed Bomb is used again while a Seed Bomb is already planted, the first one will vanish instantly.

Back Air: Sunny Day
Cradily’s head lurches backwards suddenly as it turns to face the camera. As his head goes backwards, the tentacles around it extend outward, giving Cradily the appearance of a sun. Cradily’s outstretched tentacles act as a low priority hitbox and deal 10% with low horizontal knockback.

Oddly enough this attack also causes fire damage for whatever reason…

Up Air: Amnesia
Cradily looks awkwardly towards the camera…it seems even HE’S confused about why or how he’s airborne. A moment later, a large question mark appears over his head acting as a high priority hitbox that deals 10%.

The real glory of Amnesia however is the knockback it causes; it’s randomized. When hit with the question mark, the opponent could fly in ANY direction with medium knockback…or if you’re lucky, you could spike them straight down too…

Down Air: Earthquake
Cradily trembles slightly before shooting straight down as a high priority, striking the ground beneath him with tremendous force! Any opponents caught under Cradily as he falls are spiked downward and receive 9%. When Cradily hits the ground, he creates a tremor, causing any opponents within one and a half Bowser distance from Cradily to enter their tripped state, it does, however, do no damage or knockback. This attacks suffers from some mild start up lag and above average end lag once Cradily hits the ground.

This move is EXCELLENT for returning Cradily to solid ground when an opponent tries to juggle him. Remember, the air is not Cradily’s friend, stay firmly planted and don’t get juggled!

Grabs and Throws​

Grab: Cradily lunges forward and clamps down on the opponent’s head with his jaws (face?). A grab with a surprisingly long range and speed.
Pummel: Giga Drain
Clamping down on the opponent harder, Cradily begins to siphon health from them, damaging the foe and restoring Cradily’s health! Tapping the A button rapidly siphons more health from your opponent for a maximum of up to 10% healed. Unfortunately, once you activate Cradily’s pummel you’re forced to use it; Cradily can’t throw an opponent after using Giga Drain until the next time he grabs them. Once the opponent manages to break away, they fly back slight farther than a normal grab release so as to avoid Cradily grabbing them against instantly with his ranged grab.

Forward Throw: Wring Out
Clamping down hard on the opponent’s head, Cradily begins to thrash violently around, the opponent struggling to break free of Cradily’s vice-esque grip. After spinning them around twice in a circle before him Cradily slams the foe against the ground twice before tossing them before him.

An excellent throw when it comes to damage, unfortunately it’s somewhat lacking when it comes to knockback. Dealing about 13% and set knockback of about 1/4th of Final Destination, this throw doesn’t have much KO potential…

Upward Throw: Constrict
A four of Cradily’s tentacles seize the opponent by their arms and legs, hoisting them into the air above Cradily about…a distance a tad bit higher than Ganondorf is tall. After leaving them dangling over Cradily’s head for a while, struggling the whole time, a fifth tentacle shoots out of the ground. This tentacle then shoots straight up, hitting the opponent in the stomach sending them airborne even further.

What? You say you thought something dirty was going to happen? Perv. Anyway, this attack deals some good damage (11%) and decent knockback…try following this throw up with a Confuse Ray or some of Cradily’s other little tricks and traps…

Downward Throw: Earth Power
Slamming the foe into the ground, Cradily causes a powerful tremor to shake the foe back and forth. After a moment, they opponent shoots out of the ground with medium diagonal knockback. Overall the opponent takes about 15%, unfortunately this move doesn’t set up for any good combos or anything so it’s usefulness is exclusively for damaging.

Back Throw: Double Team
Using Double Team, Cradily creates a replica of himself directly behind him. Spinning his neck around, he hurls the opponent backwards to the clone who in turn, snatches the opponent with his tentacles and slams the opponent head first into the ground before casually tossing him or her behind the replica. Once the throw is complete, the replica waves with one of its tentacles and vanishes. This is another one of Cradily’s throws best used for adding up damage rather than KO’ing.


Final Smash
Primal Vibes

Cradily grabs the Smash Ball (seriously, how’d he pull that one off?) and begins to glow! With a tap of the B button, he activates his Final Smash; Primal Vibes! Once activated, Cradily lets out a roar as the screen blurs signify that passing of a LOT of time. Once the screen stops blurring, it tints to a light brownish color like and old time photo.

Now…what good does this do besides make the screen look funky? Simply put; a lot. Because a lot of time has passed, the opponents have become old! This does no damage or knockback…but opens the door to a lot of both! By becoming so old, the Smashers have been slowed greatly, reduced to ½ of their normal speed. Not only this, but both their attack power and resistance to knockback have been reduced by ¼ !

Also…the one character to withstand the test of time and adapt to these harsh changes is, of course, Cradily! Having adapted over the years, Cradily is now VERY mobile, his speed increasing from the 0/10 stat it previously was to 5/10; he now moves at about Mario’s speed! Unfortunately he still can’t jump but…one step at a time, one step at a time…

After 15 seconds, the screen blurs again…it appears as if Cradily can’t control the Primal Vibes for too long; everyone’s back to their normal stats…Cradily included…

Taunts​

Up Taunt: Flower Power
A small patch of flowers grows around Cradily who looks down at them and begins bobbing his head as if pleased. If an opponent steps on the flowers, a black cloud will appear over Cradily's head.

Side Taunt: Shy Cradily
Two red lines appear under Cradily's eyes, apparently, he's actually quite shy! He then presses his head to the ground, looking away from the camera.

Down Taunt: Crydily
Cradily emits his cry from the Pokemon games as his body begins to sway left and right.

Victory Poses​

Victory Pose 1: Flower Garden
Cradily appears besides Steven on the win screen. Raising his head into the air Cradily begins to sway slightly as a large amount of flowers instantly grow beneath the contenders. Even after the flowers have grown Cradily continues to sway.

Victory Pose 2: Pokemon Praise
Steven exclaims, “Great job!” as he pats Cradily’s head. The excited Pokemon begins to bob its head as Steven laughs.

Victory Pose 3: Uplifting Victory
Cradily’s tentacles lift Steven into the air who exclaims slightly at the sudden loss of solid ground beneath him. After a moment, Cradily sets him back down and bobs his head as if laughing. Steven stares at the Pokemon sternly however…seems he didn’t think it was too funny…

Lose Pose: Steven looks visibly disappointed, as does Cradily. Steven however is a good loser and claps for his opponent.

Kirby Hat: Ancient Puffball​

After inhaling Cradily, Kirby gains the top portion of Cradily’s head, a few of his tentacles and, most importantly, the ability to use AncientPower.

Playstyle: Venus Smash Trap​
As soon as Cradily is set lose from the Pokeball, you’re going to want to activate Sticky Goo as a precaution against ground based opponents. Immediately afterwards, Ingrain is the way to go. With its potential to keep Cradily in the game even at insane percents, Ingrain is Cradily’s number one defensive tool; not only does it keep Cradily from being knocked off stage where his lack of recovery will destroy him, but it also helps keep him directly in front of Steven where he can easily switch out for another Pokemon without any notice.

Since Cradily can’t really move, his entire playstyle revolves around being defensive, defensive, defensive. With Ingrain holding him to the ground and Sticky Goo making ground approaches against Cradily difficult, Cradily is the absolute definition of a fortress-esque character in Smash.

An excellent combo to catch your opponents with can be the Root Slip -> Sticky Goo -> Solarbeam combo which is essentially Cradily’s prime KO option. When it comes to foes attacking from above, Confuse Ray is the way to take them out of the air as opposed to the damaging Rock Slide (which is simply too unreliable to use as a proper KO move).

If somehow Cradily is knocked airborne (of if you’re on a stage with only springs, you know you love that stage…) Cradily players will want to focus on one thing and one thing only; getting back to solid ground. While in the air, Cradily’s attacks aren’t so hot and he’ll easily get juggled by faster character or characters with great air games. When knocked into the air, try and use Earthquake as soon as possible to return to the ground so you can Ingrain again. If for whatever reason you’re unable to use Earthquake (which it’s somewhat laggy so if your opponent is being really aggressive that’s understandable…) Protect will be your best friend.

If an opponent is picking a ranged fight, use one of Cradily’s longer ranged attacks such as Rock Slide, Sludge Bomb or Gastro Acid, any mixture of these should lure an opponent into a fight. Also, don’t forget to use a mixture of AncientPower and Sticky Goo to keep your opponent up close once they’ve come near.

If an opponent is playing way too defensively, Cradily’s Gastro Acid should dissolve their shield in no time. If it doesn’t, use Cradily’s surprisingly lengthy grab to snatch them up and punish them with one of Cradily’s particularly damaging throws.

Overall, in order to play Cradily successfully, one must be a master of waiting. Wait for your opponent to get close, then trap them with an all out assault of Cradily’s fluently moving combo moves! Once they’re in your reach, there’s no escape! Also…make sure you NEVER use Cradily on a moving stage…


Claydol


Mechanics​

Levitate-
Claydol floats in the air roughly Pikachu's height above the stage, making him immune to low attacks. He is also unaffected by traction, making it very easy for him to turn and protecting him against tripping. His levitated state does make him rather susceptible to high attacks however. Claydol also has unlimited jumps, meaning he will always be in the air. His falling speed is very fast, however, keeping him from maintaining much height. Another interesting effect of this is that Claydol has no "ground" attacks. Rather all of his attacks are aerial. He has a Neutral A/Neutral Aerial, Dash Aerial, Tilt Aerials, and Smash Aerials. Naturally, he can also aerial grab. Another odd property of Claydol's levitation is that he cannot ledge grab or be knocked to the ground. In fact- the only time his body comes into contact with the ground is through the use of Claydol's Crouch and Dair.

Stats

Height- Somewhat Short
Not counting levitation, Claydol is about the same size as Mario.

Width- Average
Claydol is again roughly the size of Mario.

Weight- Heavy
Despite being rather small (4'11"), Claydol weighs 238.1 lbs, making him a real heavyweight. He also has a notably high defense stat. His weight in Smash would probably compare to Ike's.

"Walk" Speed- Slow
Claydol just floats around, not really trying to get anywhere quickly.

Dash Speed- Fast
Due to levitation, Claydol can move quite fast.

Jumps- Unlimited

First 5 Jumps- Medium
Claydol's first 5 jumps give him a great recovery and outweigh his huge falling speed.

All Additional Jumps- Mediocre
Each of Claydol's jumps after the fifth compares to Peach's second jump (what second jump). Basically, all they are good for is limited aerial stalling, as he falls very fast.

Falling Speed- Very Fast
Claydol's falling speed is so fast that it outweighs his unlimited jumps, making aerial camping impossible. Note that all attacks do provide an aerial stall however.

Traction- Unaffected
Claydol's Levitate ability renders him immune to tripping and allows him to move with ease on any surface.

Dodges- Average
Claydol isn't a particularly great dodger, more about confusing the opponent than direct defense.

Crouch- Yes, Great
Claydol's crouch does serve a useful purpose for him, as it allows him to bypass his own levitation ability, making him more susceptible to low attacks and less susceptible to high attacks.

Crawl- No

Wall Jump- No
Would it really make since for something that doesn't even touch surfaces to wall jump?

Glide- No
Again...

Animations

Standing Pose
Claydol isn't really a very interesting Pokemon in terms of stancing. It basically just floats there, not leaning in any direction.

Idle Pose
Claydol spins around a few times and randomly winks its many eyes.

"Walk" Pose
Claydol floats around, leaning in the direction he is going. His pace is slow and leasurely. The contended look in his eyes reflects blistful ignorance or innocence.

Dash Pose
Claydol starts floating faster, leaning forward a bit farther than his walk pose. He has sped up considerably, but he is still far from quick. His eyes reflects a more determined look, as they appear focused and perhaps even angry.

All Jumps
Claydol spins around several times, giving him some vertical lift and stalling him in the air for the duration. This is much like Peach's second jump in function.

Shield
Claydol surrounds itself with rocks all around. The rocks crack as more damage is dealt to the shield, eventually causing the rocks to split and break.

Sidestep
Claydol steps to the side, rapidly waving his arms around much like R.O.B. It tends to look pretty comical in Claydol's case. Average sidestep.

Roll
Claydol rolls much like Mewtwo, except being a bit slower.

Airdodge
Claydol moves to the side while opening one of it's beaks as if to say "Phew". It has a relieved look in it's eyes.

Specials​

Neutral Special- Subsitute
This move is by far the most important part of Claydol's game in Smash. Claydol takes 20% damage and creates an exact copy of himself that has 25% stamina. This has low lag on both ends. When a Substitute has been created, the player is able to control both Claydol and his Substitute to a limited extent. The main one is completely controllable, working like normal (except without use of the C-Stick or Motion Control Smashing). The secondary one is controlled with the C-Stick or with Motion controls and is unable to perform most moves. The secondary one does not have to be the Substitute (and the main does not have to be the original). By pressing Neutral Special when a Substitute is already created, the controls are switched, allowing the player to have full control of the other one. Switching between playing as the original and the fake is a lagless action. This is very useful, as it can be used to mindgame foes and perform normally dangerous attacks, such as Self Destruct, without harming the original. Mastery of Substitute is almost synonimous with mastery of Claydol- that is, you must master the Substitute to properly play Claydol on a competitive level.

Side Special- Reflect/Light Screen
The currently controlled Claydol's eyes shine bright purple/pink and a thin wall of light roughly as tall as a human character (like Marth) appears in front of it. If the currently controlled Claydol was the original, this move is Reflect. If the currently controlled Claydol was a substitute, this move is Light Screen. What do these walls of light do? Reflect causes all physical attacks launched at the wall to be nullified. Light Screen causes all non-physical (fire, water, energy, darkness, etc.) attacks launched at the wall to be nullified. The walls oddly have physical properties- they can be used to wall cling and wall jump (though not by Claydol). If an attack that the walls do not protect against hit them, they vanish. They also allow certain attacks and grabs to infinite against them (so definitely don't use this move against King Dedede.) This move has very low lag on both ends. While you can have several light walls up, each one disappears after 5 seconds.

Up Special- Teleport
When used without a Substitute, this move functions exactly like Mewtwo's Up Special. When used with a Substitute, this move will cause the original and the Substitute to disappear like in Mewtwo's Up Special and trade places when they reappear. When the latter effect is used as a recovery, the original can be saved from falling to its death at the cost of dooming his substitute (and thereby "wasting" 25% of his health). Both options produce only the same lag and duration as Mewtwo's Up Special. Aside from being used as a recovery, this can also be used to mindgame foe's into getting the two Claydol's confused.

Down Special (Away From Steven)- Self Destruct
The currently controlled Claydol self destructs, causing itself to be destroyed and creating a huge explosion, roughly the size of a Smart Bomb explosion. This explosion deals high upwards knockback (KO'ing Mario at roughly 75%) and 30% damage to all (friend or foe) who are struck by it. This move has low beginning lag (and of course there is nothing left to suffer ending lag). During this low ending lag, the exploding Claydol will flash red and release steam briefly. While the cost of this move could be high (as it could cause the original to be destroyed), having a Substitute destroy itself with this move is a great way to minimize the move's cost.

Down Special (In Front of Steven)- Switch
Claydol is called back into his Pokeball and a menu is brought up, allowing the player to choose the Pokemon that Steven summons. There is only a short amount of time to choose. There is no lag on either end. There are invinceability frames throughout. Only one switch can be performed every 20 seconds.

Normal Aerials

Neutral Aerial- Cosmic Power
Claydol's eyes glow pink as he fires two pink crescent moons forwards that zigzag as they travel roughly half the distance of Final Destination, even traveling through people, objects, and the stage. One crescent moon will be above and one will be below Claydol's height when he initiated this move, with the center area only being touched when the crescents zigzag inwards. The crescents travel at a fairly fast speed (just a bit slower than one of Pit's arrows). When the crescents strike anything, they release a burst of little stars that have a circumference of a bob omb explosion. All struck foes take 3% damage and low upwards knockback. This move has low beginning lag and some slight ending lag. No hitstun. The crescents have literally no priority at all- attacks and projectiles will go right through them, leaving the crescents unaffected. This makes attacks worthless for defending against the crescents.

Dash Aerial- Rapid Spin
Claydol seems to fall flat, as if he were a top that just stopped spinning, his "head" facing the screen and his feet facing the background. He begins rapidly spinning, his faces + eyes becoming a nice visual effect. While spinning, Claydol orbits his original location, never actually re-entering this spot until the move ends. He orbits roughly 3/4 of a Battlefield platform's width away from the original spot. Foes struck by Claydol take 4% damage and are bounced away as if they had run into a Bouncer item, though the power of this knockback is only 3/4 of the Bouncer. This move has fairly low lag on both ends and a duration of roughly 1 1/4 seconds. Great priority. No hitstun.

Tilt Aerials

Side Tilt Aerial- Zen Headbutt
Claydol tilts backwards very briefly and then slams its head(?) forwards. This move's only hitbox is Claydol's head. Struck foes take 10% and medium knockback (kills Mario at roughly 150%). This attack has low beginning lag and medium ending lag. Medium priority. No hitstun. An interesting property of this move is that, even if it misses, foes within Bowser's width in front of Claydol will flinch- the priority of this flinch auto-exceeding the priority of any move they are using. This naturally gives this move some use as a gimping and defensive tool.

Up Tilt Aerial- Rock Slide
Claydol's eyes glow brightly as several rocks are raised over its head, remain there briefly, and then suddenly slide diagonally downwards in the direction Claydol is facing. The hitbox of this move is a diagonal line starting roughly Claydol's height above Claydol and ending roughly Claydol's width in tront of Claydol. Struck foes take 7% and good forwards knockback (KOs Mario at roughly 110%). This move has medium beginning lag and low ending lag. This move has great priority, serving as a nice defensive wall. No hitstun.

Down Tilt Aerial- Stealth Rock
Claydol spins around one time and sends out a swarm of very small (and hard to see) but pointy rocks below him. They travel at a swift speed, covering their maximum distance of a Battlefield Platform under Claydol in about 1/10th of a second. Foes struck by the Stealth Rock flinch, but then realize that no harm has been dealt to them. Little does the foe know that they are covered in the tiny shards. When the foe attempts to shield, they take 2% damage per second that they do so. The stealth rocks disappear after 3 seconds. Using this move on the foe again while they are already under the effect of Stealth Rock simply renews the duration. This move has low beginning lag and no ending lag. The stealth rocks have no physical presense as far as priority is concerned, thus all attacks and projectiles will go right through them. Note that this move will also strike foes that are shielding, as the attack goes through shields- but the stones do no shield damage. This move can be fired while crouching. When this happens, the Stealth Rocks will be fired forwards.

Smash Aerials​

Side Smash Aerial- Psybeam
Claydol's eyes glow bright pink as he slams his head forward a bit and fires a bright pinkish purple beam of light with properties much like R.O.B.'s laser (minus the recharge time and the ability to aim). Struck foes take 10% damage and good horizontal knockback (KOs Mario at roughly 100%). In addition to this, the struck foe(s) are confused, reversing their controls for 1...4 seconds (+1 second for each second of charging, with a max charge of 3 seconds). While the foe is confused, they will imagine little cartoonish birds flying around their heads. This move has fairly high beginning lag and fairly low ending lag. No hitstun.

Up Smash Aerial- Sandstorm
A huge sandstorm is whipped up around Claydol. Use the control stick to have a limited control over where the wind blows (it will have a natural upwards arc). Claydol will become visible at the ending location of the storm, which would be roughly 3 of Claydol's heights above him at max duration. This move can be ended at any time by releasing the "charge" (releasing A) and it will reach max duration after about 2 seconds. Foes who are struck by the Sandstorm will take repeated hits of 1% damage (5 hits per second on average), though the hits are easy to DI away from. Claydol will be rapidly spinning when he becomes visible, striking foes at that location for 12% and good forwards knockback. This move has fairly low lag on both ends. Great priority. No hitstun on any hits.

Down Smash Aerial- Earthquake
Claydol starts rapidly spinning like a drill (a slight stall) and suddenly falls downwards very very fast. When/if Claydol hits the ground, it releases 1...4 large shockwaves that spread out the full length of the surface it is on. Struck foes will trip and take 5....20% damage (based on how close they are to the epicenter of the Earthquake, or Claydol). This move has medium lag on both ends and a short duration. No hitstun. Note that the hitbox of this move is only the ground, so foes who are not making contact with the ground will be unaffected. Also note that only (up to) two shockwaves are capable of hitting foes due to invinceability frames that appear while the foe trips (example- if the max number of shockwaves is used and the foe is struck by the first, they may be struck by the third, but not the second or fourth). This aerial can cause Claydol to suicide if used incorrectly.

Grabs/Throws

Grab- Power Trick
Claydol lifts the foe with psycic energy, much like with Mewtwo's Side Special in melee. Unlike that move however, the foe stays trapped in Claydol's grab. Claydol is able to freely move, jump, fall, etc. and the foe will be dragged with him. This only has 1.25x the average grab duration, so it can be difficult to escape. The reach and lag for this grab is basically identical to that of Mewtwo's Side Special. This move is named Power Trick because, unlike Claydol's other moves, the power and speed of his moves are basically swapped- his throws are slow but powerful, making them Claydol's best killing options other than Self-Destruct. Another odd property of Claydol's grab is that foes are capable of attacking Claydol while grabbed. Note that you must hold Z to keep the foe trapped. Releasing Z will cause Claydol to use the throw that corresponds to the direction the control stick is currently pressed in. This grab can be used at any elevation.

Pummel- Confusion
Claydol's grab attack can be described in two words- grab counter. That's right, if the grabbed foe attempts to attack Claydol, Claydol can use his grab attack to cause the foe to be confused and attack themselves instead!
Quit hitting yourself!
The foe will suffer all of the damage from their attack but no knockback. This allows Claydol to hit them with a throw. No lag at all. The animation for this move involves Claydol's eyes releasing a blinding pink light. The foe must actually be in the process of performing an attack for this to be successful. This grab attack is made even more unique in that it can be performed while throwing!

Neutral/Forward Throw- Psycic
It is only fitting that a psycic pokemon should have Psycic right? Claydol's eyes glow brightly and a pink psycic aura radiates from the grabbed foe. One second later, they are shot forwards for 10% and great forwards knockback (that KOs Mario at 80%). This throw has some slight beginning lag (not counting the 1 second duration) and a little ending lag. Claydol's best throw for KO'ing.

Back Throw- Rock Smash
Claydol causes the foe to be flipped into the air and throw just behind Claydol. The foe is slammed into the ground, breaking rocks with their body. This is naturally very painful for the foe, as they take 16% damage. This throw is completely incapable of chaining, as the foe has invinceabililty frames until they regain the ability to react. This throw has no lag on either end, but a duration of roughly 3/4 of a second. This throw is quite useful for its spiking potential.

Up Throw- Stone Edge
A sharp stone that looks like a sword appears below the grabbed foe. It slices upwards, dealing 11% and good upwards knockback to them (KO's Mario at 110%). With only a small amount of lag on either end and a duration of 1/2 of a second, this is Claydol's fastest and weakest throw.

Down Throw- Rock Tomb
Rocks appear and trap both Claydol and the grabbed foe become in a pyramid shaped clump of rocks. This causes them to rapidly plummet. There can only be two outcomes- either they are both dropped to their dooms, resulting in Clayside, or they hit the stage, causing the grabbed foe to be dealt 13% and good upwards knockback (KO's Mario at 105%). This move has medium beginning lag and a variable duration that (of course) depends on distance from the stage/death.

Final Smash- Ancient Power

In Pokemon, Ancient Power is a move that may raise all stats. This carries over to Smash as Claydol's Final Smash. For 30 seconds, or until Claydol loses a stock (whichever comes first), all of Claydol's stats are buffed. 3 damage is added to all attacks and +25% is added to Claydol's movement speeds, weight, and dealt knockback. In addition to this, Claydol's moves now have 25% less lag.

Taunts​

Up Taunt
Claydol spins like a top briefly and then becomes cartoonishly dizzy.

Side Taunt
Claydol lifts small rocks above its head and starts juggling them with psycic energy.

Down Taunt
The original Claydol controls the substitute Claydol to breakdance using psycic energy. This can be used if you forget which Claydol is the original. If used with no Substitute, Claydol will simply sigh.

Victory Poses​

Up Pose
Claydol's eyes all glow bright pink. He lifts the losers up into the air (as they humorously keep clapping) and throws them out of sight. Steven starts scolding Claydol, though it is obvious that he is choking back laughter.

Side Pose
Claydol starts spinning like a top, travelling in circels around Steven. Steven looks slightly confused (and somewhat dizzy).

Down Pose
Claydol sighs and falls down. The battle obviously exhausted him. Steven calls Claydol back into the Pokeball.

Pros​

Heavyweight.
Usually unhittable by low attacks.
Great recovery.
Unlimited jumps.
Can grab at any elevation.
Can rack up damage fairly well.
Many fast moves.
Grabs are good for KO'ing.
Unaffected by traction.
Substitute is very useful when used properly.
Can be great at mindgames with Neutral and Up Specials.
Defensively effective thanks to Neutral, Side, and Up Specials.
Good Final Smash.
Can switch to Skarmory, Aggron, Metagross, Armaldo, or Cradily.

Cons

High learning curve.
Very fast faller.
Especially susceptible to high attacks, aerials, and comboes.
Reliant on throws and self destruct to KO.
Cannot grab the edge.
Substitute damages Claydol for 20%, so it is harmful when not used to its fullest.
Throws are slow.
Lacks the ability to chain grab.
Can be attacked by grabbed foes.

Playstyle​

Claydol is a very interesting character to play as- and, against a master, Claydol can be an interesting opponent. One of the best, if not the best, damage rackers on Steven's team, thanks to his quick A attacks that can be used at any elevation. Claydol is equipped with a variety of defensive and offensive options.

Let's start with the most critical part of Claydol's game- mindgames. Claydol is exceptional at mindgaming foes thanks to his Neutral Special, which summons a fake Claydol. The player is able to switch between full control of the original and full control of the fake, with the other having only partial controlability. This is the ability that makes or breaks a Claydol player. The key to using this is being unpredictable. You do not want to build habits with this, because the foe may figure you out. The entire goal of the mindgame is to keep the foe from learning which Claydol is the real one and which is the fake. This can be accomplished through frequent switching of primary control between the original and the fake and through use of Teleport, which causes the Claydol's to switch places- especially confusing when they were already adjacent. Just be careful not to mindgame yourself. The last thing you want is to self-destruct the original Claydol! If you do happen to lose track of which Claydol is which, just use your down taunt (though this also ends the mindgame for your foe).

Now we move on to damage racking. Claydol is equipped with a number of quick moves. The most effective attacks for damage racking are Neutral A (a reliable projectile), Side Tilt, and Dash Attack. Neutral A is great for its quickness and projectile reach. Don't hesistate to spam it when necessary. Side Tilt is excellent for melee damage, as well as interrupting attacks with a high-priority flinch. Dash Attack is mainly for its great circumferential reach and defensive abilities, though as a dash attack, it can be predictable. None of Claydol's moves are particularly bad for damage racking, but they don't normally combo well. Down Tilt compliments all other forms of damage racking, as it punishes foes with some damage when they use their shield, as well as having the ability to flinch shielded opponents.

Claydol doesn't have a whole lot of KO'ing options. He is basically limited to Self-Destructing and his throws (fortunately, he can even grab and throw foes in midair). Both options have their downsides. Self-Destructing comes at one of two costs- the health that your Substitute currently has or an entire stock (depending on if you self-destruct the original or the copy). It is, however, a very powerful move with a great hitbox and quick activation... it shouldn't be a move that you will be using often, so it can be hard to see coming. As for your throws, they are slow but powerful- the most risky and powerful of all usually being the Forward Throw. Claydol does possess the ability to spike with his Back Throw and the ability to Clayside foes with the Down Throw.

Finally we arrive at defense. Claydol has a lot of defensive options- most of which are the spawn of his mindgames (so I will not bother restating much of that information). On top of his mindgames, Claydol also possesses a side special which can produce a wall of light that protects against physical (original) or non-physical attacks (substitute). These walls are incredibly useful when used at the proper time (or against the proper attacks). They can be used to counter projectile spam or even prevent a powerful attack or combo from happening.

Claydol does have other tactics at his disposal as well:
The player can switch primary control even while performing attacks or keeping a foe grabbed. For example, if the player simply holds Z and switches primary control with Neutral B, the Claydol that is not grabbing the foe can be made to attack the grabbed foe. This can be immensely useful, but Claydol is still incapable of chain grabbing foes.

Opponents of Claydol must keep calm and wary at all times (or atleast while Claydol has a Substitute on the field). Your eyes must discern the original from the copy. If you remove Claydol's ability to confuse you, Claydol becomes nearly useless.

Allies that Claydol players should consider are:
King Dedede- Benefits heavily from the ability to chain throw against light walls.
Another Claydol- With 2 originals and 2 copies, the mindgame potential is doubled!
Power Characters- Any character that can KO foes for Claydol.

Opponents Should Consider Using:
King Dedede- Claydol can be chained against light screens that are used on the ground.

Counter Stages:
Claydol performs badly on scrolling stages, as controlling both an original and a substitute Claydol can be difficult to impossible.

Armaldo


ARMALDO. A PLATE POKEMON.

ARMALDO'S TOUGH ARMOR MAKES ALL ATTACKS BOUNCE OFF. THIS POKEMON'S TWO ENORMOUS CLAWS CAN BE FREELY EXTENDED OR CONTRACTED. THEY HAVE THE POWER TO PUNCH RIGHT THROUGH A STEEL SLAB.

ARMALDO IS A POKEMON SPECIES THAT BECAME EXTINCT IN PREHISTORIC TIMES. THIS POKEMON IS SAID TO HAVE WALKED ON ITS HIND LEGS, WHICH WOULD HAVE BEEN MORE CONVENIENT FOR LIFE ON LAND.

ARMALDO USUALLY LIVES ON LAND. HOWEVER, WHEN IT HUNTS FOR PREY, IT DIVES BENEATH THE OCEAN. IT SWIMS AROUND USING ITS TWO LARGE WINGS.


As the Ruby, Sapphire, and Emerald Pokedex entries above state, Armaldo is a prehistoric Pokemon brought to life again. Its powerful claws and hard shell make it a predatory force to be reckoned with, but it lacks heavily in speed. Outside of its great physical attack power and defense, and its hindering speed, it has relatively average stats. Despite being a Rock- and Bug-typed Pokemon, it possesses worthwhile aerial and aquatic abilities due to the wings lining its back.


Statistics

Size > > 7/10
Armaldo stands at about Link's height and width.

Weight > > 9/10
Armaldo actually only weighs about 150 pounds, but his defensive strength makes him seem much heavier when taking hits.

Power > > 10/10
Armaldo's great Attack stat translates over very well.

Movement Speed > > 1/10
Armaldo is an absolute slug when moving around, whether on the ground or in the air.

Attack Speed > > 3/10
Armaldo is also quite slow about attacking, relying more on brute strength than speed.

Jump > > 7/10
Armaldo's ground jump is just okay, but his mid-air jump gets him some great distance upward.

Range > > 3/10
Armaldo isn't pathetic as far as range goes, but he's definitely subpar.

Priority > > 8/10
Armaldo's powerful moves boast an above-average priority, but nothing too extreme.

Falling Speed > > 8/10
Armaldo falls quickly, though not as fast as fastfallers like Fox and Sheik.

Traction > > 10/10
Moving slowly sometimes has its advantages.

Crouch > > 8/10
Armaldo bends all the way over, practically lying on his stomach. He's still a bit thick, but hey, you can't win 'em all.

Swim Time > > 10/10
Armaldo is an excellent swimmer, and can stay afloat for a very long time.

Abilities > > Crawl
Armaldo has the ability to crawl from his crouched position, and this is often a wise move, since he moves about as fast this way as any other.


Animations

Standing / Idle
Armaldo stands almost motionless, slightly shifting his feet for his idle animation once in a while.

Walking / Running
Armaldo trudges deliberately forward, somewhat like Bowser.

Dashing
Armaldo's dashing animation is similar to his walking/running one, albeit a bit quicker.

Jumping
Armaldo shoves off the ground with his feet slowly for his ground jump, not gaining more than an average amount of height. For his mid-air jump, he beats his wings at an alarming rate, rising high into the air.

Shielding
Armaldo stands tall while shielding, just like in his standing animation. That's all you have to do when you're covered in defensive plates.

Dodging
Armaldo leans back onto one foot, almost falling over backward, to sidestep dodge. For rolling dodges, he slithers slowly into the background on his stomach. For air dodges, Armaldo leans backward. All of Armaldo's dodges are slow to execute, but last longer than the average dodge.

Tripping
In the rare event that Armaldo does trip, he simply loses his footing and falls flat on his face. Because of this, Armaldo has no Tripped Attack, and will perform his Get-Up Attack from the front after tripping.

Swimming
Armaldo slithers like a snake through the water, moving at high speed. His wings can also be seen beating furiously as he moves.

Dizzy
Armaldo sways back and forth, although not much, still attempting to maintain a sturdy, defensive posture.

Asleep
Armaldo's limbs hang limp, and he closes his eyes as he sleeps peacefully.


Special Attacks

Neutral Special > > Harden
Armaldo quickly hardens his already tough outer layer. This happens almost instantly upon use, and lasts for three seconds. There is no visual indication that this has happened. During this entire time, Armaldo has superarmor, and is still able to attack. However, having hardened his joints, he is completely unable to move or jump in this state. Actions or attacks (such as his Up Special) that attempt to move him will profit him no movement, only the motion. After three seconds of superarmor, Armaldo's skin returns to normal, with little lag.

However, do not consider this any kind of ultimate shield. Armaldo has to wait 30 seconds between uses of this move, meaning at least 27 seconds will be spent without the powerful superarmor at your disposal. Aside from that, don't forget that superarmor may protect you from knockback, but you can still be damaged, and opponents with projectiles will relish those three seconds when you can't move. Use this wisely, though, and it's one of Armaldo's key abilities.

Side Special > > False Swipe
This is a powerful, but restrained technique, used to weaken, but never knock out, an opponent. Armaldo leans back, one claw extended into the air, then performs a powerful slash in front of him. This startup lag is similar to Bowser's Forward Smash if not charged at all, and hits over a similar, but slightly smaller, area. This is a powerful move that deals 25% damage, but the knockback is set, only knocking opponents away as far as a diagonally-aimed Fire Fox travels. For this reason, it's a powerful damager, but is virtually incapable of scoring KOs. This move has rather long ending lag after the swipe.

Up Special > > Aerial Ace
Upon this move being input, Armaldo will stall where he is for about a second, having superarmor. One of two things then happens, depending on if the Special button is still held.

If the button is released, this functions as a recovery move, with Armaldo vanishing quickly and reappearing in a flash of light in the direction the control stick is tilted, about the distance Lucario travels with his Extremespeed, as a loud slashing noise permeates the air. Armaldo will not sweetspot ledges with this, always attempting to travel the full distance, only stopped by solid platforms. While Armaldo is stopped by solid platforms, he'll pass straight through anything else without even touching it, including enemy attacks, projectiles, and traps. He enters a helpless state after the movement.

If the Special button is held while Armaldo stalls in the air, this becomes an attacking move rather than a recovery one, though it can still be used for recovery. Armaldo vanishes similarly to the way he does in his recovery version of this move, but reappears directly over the nearest opponent within about a Battlefield platform's length to any direction. If no one is within the area, Armaldo will reappear at the same location he used the move. He'll then perform a lightning-quick slash with one claw, which deals 18% damage and strong upward knockback. Essentially, this becomes an automatically-targetting version of Meta Knight's Dimensional Cape, but it has downsides as well...

For one, Armaldo enters a helpless state if he finishes this attack in the air. Additionally, Armaldo suffers a lot of ending lag after the slash, and even more if he doesn't find an opponent close enough to target. Finally, don't forget that if your opponent determines where you go, and they know you enter a helpless state if you end up in the air, they just may get themselves over a ledge as you use this move, as a well-timed dodge and edge-guard will secure them an easy KO. This is a powerful KO move if used right, but should be used sparingly to keep it from being predictable, and always used in safe locations.

Down Special > > Protect
Armaldo crosses his claws in front of him, as a hexagonal blue barrier forms around him. This takes about three-quarters of a second to do, during which time Armaldo is completely vulnerable. If he's hit during this time, the Protect will fail. If he succeeds, however, the Protect will block the next single hit to strike Armaldo completely, whether it's something weak like the spray a single drop from Squirtle's Water Gun, or even the push effect from Toon Link's Down Aerial when it strikes the ground near you, or a powerful attack like PK Flash or Falcon Punch. Armaldo won't suffer any damage, knockback, hitstun, or even shieldstun from the attack, it simply being absorbed effortlessly by his protective barrier, which dissolves quickly upon taking the hit. Of special note is the fact that this will even block a single attempt to grab Armaldo, whether it be from a standard grab or a special one like Lucario's Force Palm.

However, like Harden, this move can only be used so often. This one has a minute-long regeneration from the time of one use to the next available use. Of course, if you could theoretically go a full minute without having your Protect hit and destroyed, you would have another ready as soon as you took a hit, but a more realistic approach may be to alternate wisely between Harden and Protect, using them to deal with your foes most potent damagers and KO moves.


Standard Attacks

Neutral Attack > > Iron Jaw
Armaldo reaches forward in an attempt to grab a nearby victim, essentially "hugging" anyone within range with his large claws. This counts as a grab-type move, ignoring shields similarly. This is a slow grab, with only a moderate range, but Armaldo can grab multiple opponents, and the attack that follows is a powerful one. After grabbing a victim, Armaldo proceeds to sink his powerful teeth into them. This deals a painful 15% damage, after which Armaldo drops his opponent onto their back in front of him. While the grab is slow, the bit happens rather quickly, and Armaldo suffers only moderate ending lag after releasing his victim.

Forward Tilt > > Metal Claw
Armaldo's skin takes on a metallic appearance as he raises a claw skyward. This action takes about half a second, and no further action is taken automatically. Upon another press of the Attack button, Armaldo performs the powerful metallic slash, but is unable to move while waiting. The slash deals 15% damage, covering a short range, but since the actual slash is quick after setting up, this is easier than some of Armaldo's moves to hit with. Afterward, Armaldo suffers long ending lag comparable to Ike's Forward Smash.

Note that if Armaldo is hit while waiting to slash, he will end the move abruptly without executing the slash, but will retain the metallic skin for an additional five seconds, with the same effect as a Metal Box item has. This wears off effortlessly and laglessly, like the Metal Box's effect, so Armaldo doesn't have to worry about ending lag for this.

Up Tilt > > Rock Blast
Armaldo reaches down and breaks a chunk out of the floor, roughly half the size of Kirby, then heaves it upward. The boulder (not necessarily stone, but I'll refer to it as a boulder anyway) travels upward about the height of Luigi's Super Jump Punch, dealing 10% damage and okay upward knockback as it goes, shattering to dust when it strikes an opponent or reaches its peak height. Armaldo suffers a lot of startup and a fair amount of ending lag for this move, but its nice for him to have a projectile once in a while, even if it is only a decent one that fires upward.

Worthy of note is the fact that the ground Armaldo breaks will now have a small hold in it, which will heavily increase the chances of a character, including Armaldo, running over it to trip. Of course, with some characters having good Tripped Attacks, they may use this to their advantage. The stage heals itself after three seconds.

Down Tilt > > Endure
Armaldo, crouched low to the ground, spreads his limbs suddenly as an orange aura surrounds him. The spreading of the limbs is a quick gesture that turns Armaldo into an 8% damage-dealing hitbox for only a moment. The orange aura then takes about a second to fully surround Armaldo, after which he can move freely. If hit while creating the aura, he won't keep it, and he'll take the damage and knockback as usual. The aura remains for the next ten seconds, and will force Armaldo to respawn without losing a stock if he's knocked over the ledge, though he'll retain his damage.

This is obviously yet another defensive technique for Armaldo, and as such has a drawback, though this one is different from the others. Using this more than once in a stock decreases its chances of being successful at respawning Armaldo if he passes the blast zone. For example, on the second use of this during a particular stock, it has only a 50% chance of saving Armaldo each time he passes the edges of the screen, and so on and so forth for further uses. Note that the appearance of the orange aura remains the same, so you'll be relying strictly on luck to save you.

Dash Attack > > Fury Cutter
Armaldo stops abruptly, slashing one claw quickly. This is one of his only quick moves, but a very useful one. The slash has roughly the range of Bowser's Neutral Attack slashes, and is performed about as quickly. The trick is, Armaldo can hit the button again during the moderate ending lag of the first slash to perform another directly after it. He can repeat this for up to six slashes. The first deals 1% and flinching knockback, and subsequent slashes increase the damage by 1% each time, still with flinching knockback until the final slash. In other words, if you land all six slashes, and you probably will if you land the first one, you'll deal an impressive total of 21% damage. If Armaldo ends before the sixth slash, he'll suffer moderate ending lag, while ending after the sixth gives okay diagonal knockback, but also a lot more ending lag as Armaldo stops himself from going into a blind rage.


Smash Attacks

Forward Smash > > Brick Break
Armaldo charges up, then thrusts one of his claws forward in a powerful stab attack. This has about half the range of Marth's Shieldbreaker, with slightly longer startup lag, but the same devastating effect on shields, only to a greater degree. Yes, Brick Break is almost guaranteed to destroy shields it hits. However, as a direct hit, it deals only a pathetic 5 - 10% damage and flinching knockback, and has a lot of ending lag, so opponents wise enough not to shield will find Armaldo highly punishable.

Up Smash > > Predatory Instinct
Armaldo charges looking ready to pouncs, as a faint red sphere extends out from his center. Charging changes the size of the sphere, which is his target area. At smallest, it's only directly over him, but at largest, it can be the size of a Smart Bomb's explosion. When the charge is released, Armaldo will charge at the opponent closest to him within the target area, glowing a deep red and moving at about the speed of Pikachu's dash. He'll pass straight through them to the edge of his target area in that direction, so he's capable of hitting multiple opponents if they're close together or lined up, dealing 15% damage and okay diagonal knockback as he hits. If there is no one in the target area, he'll charge directly upward. Armaldo suffers a lot of ending lag after this move finishes, but it has less startup lag than most of his moves, something just a bit above average.

Down Smash > > X-Scissor
Armaldo holds one claw above its head and the other at its side while charging this move. When the charge is released, it slams them together in a powerful slash that forms an "X" shape. The hitbox for this move is very precise, being only directly in front of Armaldo and not large at all, but this attack deals an impressive 25 - 40% damage and great horizontal knockback. There's a lot of startup lag and ending lag, as well as a fair amount of lag between the release of the charge and the slamming together of the claws, so this is a painfully slow move, but it has the ability to KO the foe at surprisingly low damage due to its sheer power.


Aerial Attacks

Neutral Aerial > > Rapid Spin
Armaldo beats its wings rapidly, spinning horizontally in mid-air while remaining upright. This is a decently quick attack for Armaldo, having moderate startup and ending lag. The actual spin lasts for about a second, and Armaldo falls normally during this time. In addition to dealing multi-hit damage up to 12%, Armaldo reflects projectiles at twice the speed they hit him at as he spins, making this both an offensive and defensive tactic. The final hit of the multi-hit damage deals weak upward knockback.

Forward Aerial > > Air Cutter
Armaldo performs a slow and deliberate slash in front of him. This has range similar to a single hit of Marth's Neutral Aerial, with lots of lag on either end. The slash deals 14% damage and good horizontal knockback, but more important is the effect it has on the pocket of air Armaldo slashes.

The area around the center of the slash for about the size of King Dedede now experiences a strong outward push effect, somewhat like the water from F.L.U.D.D. or Water Gun, which lasts for three seconds. This affects both Armaldo and his opponents, pushing them away from the center of the air pocket with surprising force. This is a powerful gimping technique if used correctly, but in the hands of an uncontrolled player, can be a very suicidal technique. Suffice it to say, this should not be used to ward off opponents making an attempt to gimp Armaldo.

Backward Aerial > > Ironhide
Armaldo arches its back, letting out a cry. As it arches back, the plates on its back shift slightly and protrude out a short distance, dealing 10% damage and pretty good diagonal knockback. This has moderate startup and ending lag, making it another decent-speed attack for Armaldo, but lacks a bit in power. Luckily, it has another trait. The protruding plates protect Armaldo very well from the back, reflecting projectiles as well as cutting in half the damage and knockback from any physical or melee attacks Armaldo takes until the move finishes. After about a second of having his back plates sticking out, Armaldo leans forward as they slide into place again.

Up Aerial > > Shower of Stones
Armaldo pulls a rock from "hammerspace," about the size of Kirby, and proceeds to smash it over his head. The breaking of the rock, like Charizard's Rock Smash, deals great upward knockback accompanied by 20% damage, but this can be difficult to pull off while falling through the air. Fortunately, this attack has another use.

The smashed bits of the rock fall directly downward, covering an area about as wide as Donkey Kong. About 10 pieces fall in total, each over a random trajectory within the bounded area. If they hit the ground or an opponent, they'll disappear, in the latter case dealing 6% damage and flinching knockback as they do. This attack may have a lot of startup and ending lag, but it works wonders for approaching from above, being a high-priority interruption attack that you can use as you drop to your opponent's location.

Down Aerial > > Rock Slide
Armaldo stalls in the air and crosses his claws in front of his face as millions of dust particles surround him, forming a large boulder about the size of Bowser. This takes about a second to do, and Armaldo has superarmor during this time. After forming the boulder, Armaldo will begin to fall quickly, at about Fox's falling speed. Armaldo will not stop falling until he hits the ground, dealing 16% damage and strong downward knockback to anyone he hits along the way. As long as he falls from at least the height of the highest platform on Battlefield, the boulder will smash as it strikes the ground, ending the move as it deals another 16% hit and downward knockback to any opponents within a short distance.

However, if Armaldo uses this move from a lower distance, the massive boulder won't fall far enough to break apart. Armaldo, now stuck inside the boulder, can roll around at the speed of Jigglypuff's run, dealing 8% damage and weak upward knockback to anyone he runs into. He's a high-priority hitbox, and has superarmor while inside the boulder, taking the damage from attacks that hit the boulder. Fortunately for his opponents, the boulder is destructible, and will smash as if it had fallen from a higher height after taking 20 damage. Armaldo suffers moderate ending lag whenever the boulder smashes, whether it be from the fall or from an attack, but suffers none as a low-height boulder hits the ground.


Grab and Throws

Grab > > Sand Attack
Armaldo kicks sand up to blind the opponent and make them stay in place. This is a surprisingly strong grab, and has a range similar to that of a Fire Flower's flames, but is also a painfully slow and often predictable one.

Pummel > > Swords Dance
Armaldo performs part of a fierce-looking dance, which takes about half a second. This Pummel does no damage, but each use of it pumps the subsequent Throw (assuming the Pummel is successfully followed by a Throw) up, making it deal an extra 2% damage.

Forward Throw > > Shaping Stone
Armaldo kicks up a bit of sand and dust into his claws, and quickly forms a likeness of the character's head from it. He then smashes the stone sculpture in their face, dealing 12% damage and knocking the opponent directly to the ground. This Throw is slow to start up, as Armaldo has to sculpt the figure, and has a lot of ending lag as well, as Armaldo sort of chuckles at his cleverness.

Backward Throw > > Stuck In Steel
Armaldo sheds a steely plate from his back (a new one regrows instantly), picking it up hastily and then slamming it into his opponent. The hot steel quickly conforms to their body shape, encasing them in metal. They'll now have the same effect as a Metal Box item for the next five seconds (an additonal second is added for each use of Swords Dance before this Throw), and due to the body heat from Armaldo still making the metal fairly hot, they'll also take 2% damage per second for those five seconds. This is a slow Throw to begin, but ends quickly, without very noticeable ending lag.

Up Throw > > Knock Off
Armaldo creeps up to his opponent and delivers a mighty uppercut with one claw, sending them directly upward with 8% damage and okay knockback. On a more interesting note, any items the foe was carrying will drop from their grasp as they fly upward. This includes held items, collected items like the Dragoon Pieces, gear items like a Franklin Badge, and even Smash Balls. Yes, this is a technique guaranteed to get the power of the Smash Ball out of your opponent. Unfortunately, without items, it's just a simple uppercut attack, though it executes more quickly than any of Armaldo's other Throws.

Down Throw > > Lethal Grip
This is a very slow Throw, which is important, because it's also extremely powerful. Armaldo lumbers toward his opponent menacingly, then grips them between both claws. During this entire time, the opponent is still free to break the hold of the "grab" without any worry. Once Armaldo gets his claws around them, however, the fearsome part of this Throw begins. If an opponent is slow enough at button mashing, or at high enough damage to not have escaped by now, Armaldo will squeeze his claws tightly around the victim's chest, dealing constant damage at an insane 20% per second! Opponents can still break free of the grab while the damage is accumulating, at which point they'll collapse to the ground as if receiving downward knockback. If Armaldo's total damage from this Throw reaches 50%, he'll automatically toss his opponent to the ground for 5% more damage, though this scenario is extremely unlikely. As stated, this Throw is painfully slow to start, and also suffers a ton of ending lag, no matter when the opponent gets free. Swords Dance doesn't affect this Throw much, just adding to the 5%-dealing slam at the end, if you manage to reach that point.


Situationals

Ledge Attack (Under 100%) > > Rumble
Armaldo hangs from one claw and smacks the ledge hard with the other, tripping all opponents on the ground within about half of Battlefield's length. As this is happening, Armaldo climbs up surprisingly quickly, being up before a tripped opponent can stand. This starts somewhat slowly, but as mentioned, ends at an incredibly fast speed for Armaldo.

Ledge Attack (100% +) > > Spire
Armaldo lifts one claw and slams it down on the top of the ledge. At the very moment he slams the ground, a rock stalagmite stabs up through the ground about a Battlefield platform away, being about as wide as Ivysaur at the base and as tall as Marth. This shoots up quickly, dealing 12% damage and good upward knockback to those unfortunate enough to touch it, after which it quickly retracts. Armaldo is slow to start this action, and crawls up slowly afterward as well.

Get-Up Attack (From Front) > > Quake
Similar to his first Ledge Attack, Armaldo pounds the ground with all four limbs, causing a powerful earthquake that trips opponents as he stands up. This, though a little slower than the earlier quake, is more powerful, and will affect all opponents standing on the same platform as Armaldo, no matter how far they are from him. Again, he stands up quickly after causing the quake.

Get-Up Attack (From Back) > > Mud Sport
Armaldo rolls around quickly, covering himself in dust and mud, then stands up. This takes about a second to do, and if successfully completed, will cut the damage and knockback Armaldo takes from all attacks to 0.75X their normal damage and knockback for the next three seconds.


Final Smash

Final Smash > > Ancientpower
Armaldo calls forth the arcane powers of the earth, bellowing a fierce cry and stabbing his claws into the ground (in the air, he'll instead raise them skyward). As he does this, at three random locations on the field (always on solid platforms, though, not pass-through ones), the ground will separate, revealing crevices filled with boiling lava. These are about as wide as a Battlefield platform, and will spew fiery good upward over an infinite vertical area for about a second before dying down. They spew almost without warning, dealing multi-hit damage up to 40% and finishing with a strong upward blow of another 10% damage. All three volcanic crevices form and spew simultaenously, and after dying down shortly after, seal up. After this, Armaldo's Final Smash is finished. Though this is a powerful Final Smash, it's easily avoided by being over the ledge for a short time, as the magma pools only spew directly upward, and always appear on solid ground.


Taunts and Victory Poses

Up Taunt > > Battle Cry
Armaldo lets out his cry from the Pokemon games, banging his claws together twice as he does.

Side Taunt > > Shed Stone
Armaldo shakes about rapidly, and a few stony pebbles fall from his frame to the ground.

Down Taunt > > Stomp
Armaldo stomps once with each foot, then opens his mouth and bares his teeth forward, making the same cry he does for his Up Taunt.

Up Victory Pose > > Congratulations
Steven appears alongside Armaldo, looking pleased. Chuckling, Steven pats Armaldo on the back twice. Armaldo, in an effort to return the gesture of congratulations, smacks Steven on the back twice as well. Steven is visibly winded by the first "pat," and is knocked to his knees by the second. Armaldo, oblivious to Steven's plight, holds his head high, beaming. After a while, Steven will look up at Armaldo and force a smile, obviously still in a bit of pain and trying to recover from having the wind knocked out of him.

Side Victory Pose > > Leader of the Pack
Steven stands in the center of the screen, arms folded, smirking and shaking his head slightly as he looks off the left side of the screen, obviously amused by something he finds a bit ridiculous. After a moment, we see Armaldo march in proudly from that side of the screen, followed by three small Anoriths that crawl behind him. Steven watches them pass all the way past the screen, and then the cycle repeats, but from the right side this time.

Down Victory Pose > > Rock Steady
Armaldo appears alone for this Victory Pose, reaching down and breaking a piece of the ground out, then heaving the rock into the sky. He then stands upright, not moving a muscle. After a few seconds, the rock comes crashing down on Armaldo's head, smashing into a million pieces as the Plate Pokemon doesn't even blink.

Loss Pose > > A Sore Loser
Armaldo, enraged by his loss, can be seen in the background attempting to charge toward the winner. Steven stands beside him, struggling to hold Armaldo back by pushing the whole of his body against Armaldo's torso. Despite not being next to the winner, Armaldo will make the occasional slash behind Steven's back with his claws.


Playstyle

Playstyle > > Stand Your Ground Rock/Bug

Armaldo's playstyle has a heavy emphasis on proper defense and striking at unexpected times. Between Harden, Protect, Endure, and even moves like Rapid Spin and Ironhide, Armaldo's capability for taking hits, deflecting blows, and staying alive are many. Properly using all of these techniques makes Armaldo more than your regular "tank" characters like Bowser, able to survive to insane percentages.

Armaldo's moves are almost all powerful and damage-dealing, but beware of those with lower knockback when you're shooting for KOs, which Armaldo can do at lower percentages than the majority of the roster. Attacks like False Swipe and Iron Jaw should be used for damage-racking at setting up other attacks, but shouldn't be relied on for KOs. The majority of Armaldo's moves have at least average knockback, though, making even many of his defensive options powerful enough to KO, such as Ironhide, his Backward Aerial.

One of Armaldo's best abilities is that of edge-guarding. Without even jumping over the ledge to gimp or edge-hog, Armaldo is a threat to those over the ledge. By using Protect or Harden as an enemy approaches the ledge, Armaldo makes himself impervious to those attacks the opponent may use to return to the stage, and can punish those landing on the stage with a powerful blow from his Predatory Instinct or, more preferrably, X-Scissor attack. If an Armaldo player is daring enough to go over the ledge, they can use Air Cutter near the ledge to create a powerful push of air that keeps their opponents from it, though reckless use of this is fatal to Armaldo as well. Use it far enough away that you can recover to the edge safely, though, and you'll almost assuredly secure yourself a KO.

When it comes to standard battle on the main platform, Armaldo struggles, largely due to his incredibly low speed. His fastest and most reliable approaching options are his Predatory Instint and Aerial Ace, both of which can become predictable and easily dodged and punished. Armaldo players will often find themselves trying to grab their opponent and perform a Backward Throw, as encasing their opponent in steel often helps keep them closer to the ground and a bit less mobile, and Armaldo is powerful enough not to feel the added defense on them too heavily.

Keep in mind that among Armaldo's defensive options are a few offensive-defensive combinations, such as Rapid Spin, Metal Claw, and Rock Slide used from a low jump. All of these, when properly used, can be both powerful attacks meant to punish foes, or defensive moves that deflect projectiles, add to Armaldo's already-impressive weight, or encase Armaldo in superarmor as he rolls around the field of battle.

Forcing your opponents to approach is key, and the best way to do that is to block their projectile attacks and get them in close. Opponents with fast, spammable projectiles are Armaldo's biggest weakness, as they can maintain a good distance while racking up damage on this supertank Pokemon. Fortunately, Armaldo has a couple of reflective attacks to hopefully force an approach out of even these characters.

Characters who get in close simply need to have a bit of Armaldo's power unleashed on them. Use Armaldo's faster (not that any are particularly fast) attacks, as well as his higher-priority ones to deal heavy blows. Your goal should be a push over the ledge, especially considering Armaldo's powerful edge-guarding ability. Luckily, a large number of Armaldo's attacks have directly horizontal knockback, so learn those inside and out.

Armaldo becomes slow and predictable on his own, so he's best used as a survival option for Steven, trying to score that last necessary KO while surviving to insane damage percentages. Armaldo is likely to be one of the last Pokemon you employ during a particular stock, due to his defensive strength and heavy-hitting attack power.


--Lv. 20-->
--Lv. 45-->


METAGROSS


PokéDex Entry 376 - Metagross - Type Classification: Steel/Psychic

Metagross has four brains in total. Combined, the four brains can breeze through difficult calculations faster than a supercomputer. This Pokémon can float in the air by tucking in its four legs. When hunting, this Pokémon pins the prey to the ground under its massive body. It then eats the helpless victim using the large mouth on its stomach.

>>>Super Smash Brothers Restriction: All of Metagross's stat altering abilities will stack and can be used an unlimited amount of times unless stated differently. Stat alterations are signified by the opponent flashing blue.


SPECIALS


Psychic - Neutral Special – 15% - Metagross raises his upper right arm, and shoots out a slow moving disk, the size of Bowser height-wise, but nearly flat width-wise, directly forward. It travels at about the speed of Bowser’s walk at the slowest pace. The disk moves for one and a half seconds until disappearing. The entire disk is a single hitbox, which kills at 115%. Slightly above average start-up lag, average ending lag. Extremely high priority.

However, much like in the games, this attack has a chance of lowering your opponents ‘defense’. In other words, this move has a 10% chance of causing your opponent to get killed 15% earlier than normal by any attack, which is signified by the opponent flashing blue for two seconds after getting his by this attack. The opponents ‘defense’ is brought back to normal after losing a stock.

Meteor Mash – Side Special – 10% upwards hitbox, 12% falling hitbox, 16&%landing hitbox – Metagross angles his upper left arm towards the sky and shoots it. Yes, Metagross shoots his arm. It goes up straight in front of him, directly upwards, causing knockback equivalent to that of Mario’s Down Tilt to the side.

However, once it goes off into the blast zone, it comes crashing back down, about one stage builder block in front of Metagross. During it’s decent, it causes spiking knockback that would kill at about 70% off stage (to prevent constantly being hit by it at below 70%, you MUST DI the attack). If you’re under it when it lands, you take strong horizontal knockback, killing at 105%.

Above average start-up lag, low ending lag. Transcended priority.

Explosion – Up Special – 25% - Metagross brings all four of his arms together down below his body, and then suddenly, there is a massive explosion (about the size of two Bowser’s). Immediately upon using this attack, Metagross takes a whopping 30% damage. However, it propels Metagross the length of one and a half fully-charged Wario Wafts.

It should also be mentioned that both Metagross and the explosion cause 25% damage, but while the explosion causes knockback that would kill at 80% normally, Metagross causes surprisingly mediocre knockback – only usually killing around 120%.

Very high start-up lag, no ending lag due to you going into helpless after using the attack. Invincibility frames, so no priority is needed.

Iron Defense – Down Special – Metagross takes his two upper arms and jams them together. At first, it looks like nothing is happening, but suddenly, Metagross, let’s out a shout of “Gross!” and then his body suddenly flashes red. Metagross’ defense has been increased! In other words, he now dies 20% later than normal. This move can only be used three times during the entire match – any time after that will result in no effect. All effects of this move are erased after losing a stock.

Extremely high start-up and average ending lag. You are highly susceptible to get hit while using this move.


STANDARDS


Roar – Neutral Attack – 5% - Metagross pounds his forward fists down in front of him, and lets out an elongated, loud yell of “GROSS!”. This move lasts as long as Bowser’s Forward Smash and causes unpleasant specs of spit to shoot out about the length of ¾ of a stage builder block in front of him. If the opponent is directly in front of Metagross when the attack is used (as in, literally almost on top of Metagross), the opponent enters the dizzy state, due to the roar being so loud the opponent gets a headache.

Start-up and ending lag equivalent to that of Zelda's neutral attack. Below average priority.


TILTS


Metal Claw – Forward Tilt – 6%, 6% - Metagross swipes forward twice. First with his upper left hand, second with his upper right hand. Very, very basic move – if you’re hit by the first, you will also be hit by the second. Not much of a killer, but it can potentially start killing around 125%. This move has a 15% chance of decreasing your opponents defense, so that they will die 5% earlier than normal. This effect can only be had twice on the opponent, and the effect is taken away after the opponent loses a stock. Below average start-up and ending lag, average priority.

Flash Cannon – Upward Tilt – 13% - Metagross quickly drops onto his stomach and moves all four of his hands together, up over his head. A bright light suddenly appears, giving 13% damage and mediocre knockback to any opponent who touches it (killing about 160%). This move is quick, and good for stopping aerial approaches, due to its’ surprisingly high priority. This move also has defense lowering capabilities – a 15% chance to have the opponent die 5% earlier than normal. Low start-up and ending lag.

Mud-Slap – Downward Tilt – 8% - Metagross butts his head into the ground, and then jerks it back up, causing mud to fly up directly in front of him. It only reaches about half a stage builder block in front of him, but it does give your opponent flinching knockback, causing them to back off. Decent spacer, due to it having nearly no lag. It should also be noted, that if you get hit by this move, you are 10% more likely to trip for the next thirty seconds. Next to no lag on both ends. Low priority.


SMASHES


Scary Face – Forward Smash – 5% - Metagross swipes both of his upper arms together, directly in front of him (the width of a standing Mario is the farthest this move will reach), attempting to grab the opponent. If he is successful, he will hold the opponent and his eyes will flash a bright yellow color, and then let go of the opponents, having them go into their ground grab release animation.

After this, your opponent travels slower than their normal pace, going 15% less uncharged and 20% fully charged. This is a pretty big blow, but it can only be done twice per stock. This is to make up for Metagross’ poor speed. After a stock is lost, your opponent’s speed reverts back to normal.

However, while the attack is pretty quick to start-up, if you miss, it has terrible ending lag – about three quarters of a second! Metagross falls over on the ground and has to pick himself up, do to losing half of his support. Average priority.

Rock Smash – Upward Smash – 19% strong hitbox uncharged, 26% strong hitbxo fully charged, 7% weak hitbox uncharged, 10% weak hitbox fully charged – Metagross pulls a large rock out of the ground with his upper left leg and hoists it above his head. Giving a slight moment of hesitation, he then proceeds to break it by moving his… claw things… into a fist.

When the Rock is well, smashed, it delivers good knockback assuming your opponent was on or right next to the rock (killing at about 95%). However, this is highly predictable, so don’t count on landing the attack much. Smaller rocks will rain down on both sides of Metagross, though only extending about the length of one half of a stage builder block on either side. These cause flinching knockback.

Lag is equal to that of Charizard’s Rock Smash. High priority.

Thunder Punch – Down Smash – 17% uncharged, 25% fully charged – Metagross brings back his upper right hand, allowing electrical energy to begin to flow through it. Suddenly, her jerks it forward, attempting to hit the opponent with all of his might. The move barely reaches just in front of Metagross, giving it incredibly poor range.

If the opponent is hit, they take good horizontal knockback, getting killed at around 105%. That’s all there is on the face of this move – just a punch. However, if you notice, it’s not just a punch. It’s a mother ****ing thunder punch so you better respect it! Whenever you are hit by this move, you take a 10% chance of having your movement speed drop down to 65% that of your normal speed for five seconds. After five seconds, you return to whatever speed you were at before (this means that effects given by other moves, such as Scary Face, will remain after the attack).

Average lag on both ends. Slightly above average priority. It may seem like a harsh decrease, but the move has terrible range and isn’t exactly outstanding in the lag department, so that rare decrease in speed is payment enough for even landing this attack


AERIALS


Psych Balls – Neutral Aerial - 13% - Giving a grunt, Metagross swings his arms out and summons two purple balls, about the size of Mario, two stage builder blocks away from him on either side. They swirl around him, going into both the foreground and background (meaning that they will hit in the FG/BG) extremely quickly. They should rejoin with Metagross after about half a second of swirling. He is allowed to move while the move is out, but he’s not allowed to use any other moves. The balls deal mediocre knockback, killing at around 150%. Slightly above average start-up lag and no ending lag. Average priority. Another useful functions of this move is that it autocancels. Yay!

Light Screen – Forward Aerial – 8% - Swiping his two forward hands directly in front of him, Metagross summons a light screen. This is a convenient move, as it acts much like Mario’s cape. It will reflect projectiles, and any opponent unfortunate enough to touch the Light Screen or any projectile reflected by the Light Screen (which isn’t likely) will have a 30% change of their attacks causing 20% less damage for the remainder of the stock.

Of course, the move has below average start-up and ending lag, but pathetically low priority. If an opponent attacks through it, the Light Screen will make a satisfying shattering noise as it disappears. However, it should be noted that the light screen will stay up for about a quarter of a second and Metagross will be stuck right behind it (though, if it hits a projectile, it immediately disappears, regardless of how long it’s been out).

Iron Head – Backward Aerial – 16% - Giving a grunt, Metagross turns a steel color and turns around. He then proceeds to dash the length of one stage builder block backwards. After this, he turns back to the direction he was originally facing. Usually, the opponent is given notably strong knockback, which kills at around 100%. The move has lag equivalent of that to Wario’s Forward Smash, on both ends.

However, if you land the move on the opponent while they’re on the ground, they enter the pitfalled animation. Also, to prevent this move from being totally useless (due to massive ending lag), Iron Head autocancels, so you can pretty much follow up with anything. High priority.

Magnet Rise - Upward Aerial - 5% - Metagross swings his forward arms out in front of him, hoping to catch an opponent. If he does, he gives them a tight squeeze, causing electricity to pulse through their body. They then travel quickly upwards, about the distance of three stage builder blocks.

The question here is, why would you want to do that? Helping your opponent recover for 5% is a bit useless, no? Well, that's where you're wrong. You see, the point of this move is that it essentially gives Metagross an untechable stage spike. That's right, you cannot tech this attack, and landing it correctly means you get a free stage spike. Extremely useful for free K.O.'s, though the range is poor, and despite the below average start-up lag, it has surprisingly above average ending lag.

Bite - Downward Aerial - 3% per chew - You know the mouth on Metagross's stomach that the handy dandy PokeDex entry mentioned? This move puts it to use. The mouth opens, making any opponent that touches Metagross gets sucked into it (or any opponent that is unfortunate enough to travel between Metagross's arms).

After activating the move, the mouth will stay open for one second, and unless you pause and rotate the camera under Metagross, there is no visual indication of the move - only that Metagross cannot use any other move during this second. Once the opponent is sucked up, Metagross still has full aerial movement, as the mouth chews on the opponent on its own, damaging 3% per half a second. To escape, you have to button mash, so at lower percents, you'll usually only get about two chews in, but at hight percents you can get four or five.

If Metagross touches the ground while the opponent is being chewed, he'll merely angled his body so that he can spit the opponent about four stage builder blocks away from him, and then return to his normal upright position. Once the opponent escapes in the air, they travel about two stage builder blocks downwards.

The move also has absolutely zero priority. It doesn't hit through anything, so try to capitalize on a laggy attack that your opponent may throw out. Incredibly low start-up and ending lag.


THROWS


Animation - Metagross swipes his arms in front of him, in an attempt to grab the opponent. However, to avoid being generally bad due to poor range and boring because being boring sucks, Metagross extends his hand 1.5x their usual distance using psychic extensions (AKA purple hand-shaped things). It's still boring, but it looks cool!

Hammer Arm - Pummel - 3% - Metagross slams his upper right arm into the opponents head. It's a bit on the slow side, but for every five Hammer Arms you land (these can be spread across multiple grabs) your opponents speed goes down 5%. However, this can only be done to the opponent three times per stock.

Rain Dance - Forward Throw - 2% damage per second - Metagross tosses the opponent about two stage builder blocks forward and claps his forward hands together, causing a rain cloud to appear just above the opponent. It stays there for an incredibly long five seconds, causing 2% damage per second.

During this time, the opponent is 20% more likely to trip! Take advantage of it! And yes, I know I'm breaking the golden rule of Pokemon movesetting by having Metagross use a move that doesn't fit him very well at all. **** you, Rool.

Hyper Beam - Backward Throw - 18% - This move will be one of Metagross's main methods of scoring K.O.s. He gives the opponent a toss and then brings his two forward arms together. Suddenly, a beam of light shoots out from them going about the distance of half of FD and blasts into the opponent, causing great horizontal knockback, killing at 100%.

Now then, a throw this powerful and long ranged shouldn't be abused. It can be used only once per stock.

Chain Toss - Upward Throw - 8% - Anybody who's ever heard of King Dedede's infamous chain grab should have shivered at the name of this attack. Much like the name suggests, Metagross's up throw is a chain grab. If you'd notice, he doesn't have any other attacks that are particularly well suited for damage racking (the neutral special kind of counts), so this move is here to prevent him from essentially being a giant clump of status effects that can't get opponents to K.O. percentages in a reasonable time.

Metagross literally just tossed the opponent upward haphazardly into the air. The move has exceptionally long hitstun, so waiting for the opponent to come back down is all you have to do. This should last until about 50% on most characters, but give or take 10% for the floaty or fast-falling characters. Once the opponents are out of chain grabbing range, you can still abuse the long hitstun time to try and follow up with an aerial.

Earthquake - Downward Throw - 14% - Metagross pins the enemy to the ground with one of his arms and then bangs onto the ground with two of his other arms. This causes the opponent to slide forward on the ground for mediocre knockback (it barely starts killing around 150%). Aside from being a decent damager, the move also causes the ground to shake, meaning that the opponent runs a 5% risk per every step they take that might cause them to enter the pitfalled animation. The shaking lasts for three seconds.


FINAL SMASH


Split Up

Metagross suddenly explodes just like in his up special, doing the same damage/knockback as he does in it, but he doesn’t get propelled upwards and takes no damage. After the smoke clears, the main body of Metagross is laying on the ground lifelessly and his four Beldum legs, which contain his four brains, are hovering up alongside his body.

Metagross’ main body and the four Beldums are all invulnerable. You’re given one of the four Beldums to control at random while the others are computer controlled. You can switch which Beldum you control at any given time by pressing B, and your nametag will always be hovering above whichever Beldum you're in control in, to clear up confusion.

Essentially, you have five seconds to swarm about the enemy. Each time you hit them cause 5% damage and flinching knockback, though they are invunerable for a short while after getting hit (to prevent you from just sitting on top of them and dealing 300% in the short five seconds). At most, you can probably get in a good 50% to 60% with this attack, which greatly aids Metagross's lack of decent damaging attacks.

You travel quickly, about the speed of Sonic during his dash, and can move in all directions.


PLAYSTYLE


Metagross is a very unique character in the sense that he's good, but also very bad at the same time. He has good kill moves, a chain grab, a projectile, and even a move that can hit dodging opponents! However, his recovery does damage to himself, he's slow, he's heavy, and has generally poor range.

Ideally, you should start the match out by spacing with your neutral air, which very luckily, autocancels. Use this to keep your distance, and try to use it to approach your opponent. If your opponent is approaching you, using Psychic may help mess with their approach a bit, so try to mix that in along with your neutral airs.

Once you get a comfortable feel for the match, you can do either one of two things. You can try for the grab to begin damaging with the up throw, or you can try to stack your status effects, to force your opponent's character be less effective overall.

Once your opponent starts approaching kill percentages, attempting to land a thunder punch or a rock smash would be good. Your back air helps quite a bit here too. However, your back throw will usually be your best option, but don't abuse it! Opponents with good D.I. can also probably escape getting killed by it as early as usual, so be weary for that!

After you get the kill, ALWAYS go for the Iron Defense! This can be a life saver when you're in kill percentages at the end of the stock and your opponent isn't. However, it should be noted that since this is a weight increase, it also increased how easily you'll get combo'd, so be careful if you land an early kill and use this move!

Essentially, this is how Metagross works. Start off with neutral air/psychic spam, then move onto damaging/stat changing, go for the kill, and then use Iron Defense. It should be noted that Metagross is dependent on stat changes (particularly in the speed department) to help him K.O. opponents, so be sure to try and land those status-effecting moves often!


Final Smash – Split Up

Metagross suddenly explodes just like in his up special, doing the same damage/knockback as he does in it, but he doesn’t get propelled upwards and takes no damage. After the smoke clears, the main body of Metagross is laying on the ground lifelessly and his four Beldum legs, which contain his four brains, are hovering up alongside his body.

Metagross’ main body and the four Beldums are all invulnerable. You’re given one of the four Beldums to control at random while the others are computer controlled. Beldum has average movement and jumping powers. You can press A to dash forward and perform Beldum’s single attack (Whether on the ground or in the air), Take Down, which performs identically to Wolf’s fsmash, but each time you successfully hit with it Metagross takes 3%, so this final smash isn’t exactly ideal if you’re already bordering on a percent where you could get killed.

You can press B to switch your control to the next Beldum in sequence with no lag. Your name tag will constantly hover over the Beldum you’re controlling, so it’s difficult to lose track. If one of the Beldums falls off the stage (Most likely due to one of your cpu allies doing something stupid), they’ll respawn, so feel free to pursue your enemies off-stage.

After 15 seconds of playing with the four Beldums, they all hastily hover back to Metagross’ main body and reattach themselves to him, causing Metagross to get up and let out a mighty roar as his power is restored.

Situationals​

Rising Attack (Either Side): Vaccum Cyclone
Metagross tucks in his limbs and levitates just off the ground as he rapdily spins in place like a top. He spins around for a full second, dealing one hit of 1% for every tenth of a second. Enemeies within one the distance of DK from Metagross will be pulled towards him in a suction effect strong enough that it is impossible to DI out of it once you are caught in the hits.

Ledge Attack: Split Personality
The back half of Metagross that is not holding onto the ledge suddenly splits off, and Metagross is now two Metangs! The free-floating Metang will rise over the edge and dart fowards at a decent speed. It is incinvable and deals 12% with average knockback to anything it hits. After traveling across half of the platform it's over, it will stop moving as the other half lets go of the edge and does the same attack. Once it reaches the initially attacking half, the Metangs fuse together back into Metagross.

Tripped Attack: Psy Charge
Metagross concentrates as a green aura forms around him over 1 second and then he gets back up. He keeps this aura until his next attack or he loses a stock. His next attack will have infinite priority, even causing disjointed attacks to be brushed aside like nothing.

Taunts

Up Taunt
Metagross turns toward the screen and stomps each leg one time (front left, front right, back left, back right) one at a time saying "Meta Metagross!"

Side Taunt
Metagross splits into two Metangs and they start fighting briefly for no apparent reason before rejoining.

Down Taunt
Metagross falls on its backside and starts flailing its legs around in the air. It manages to pull itself up after a second.

Victory Poses

Up Pose
Metagross appears exhausted from the battle and Steven humorously uses him as as a table as he drinks a cup of SANTA... nah I'm kidding. It's tea.

Side Pose
Metagross is called back into Steven's Pokeball. Steven starts air guitaring randomly.

Down Pose
Metagross splits into two Metangs, both of which start breakdancing as Steven looks in awe.


AGGRON # 306


Aggron is known as the “Iron Armor” Pokemon. It gets its food by digging tunnels through bedrock with its horns made of steel. It is the third and final form of Aron and Lairon. Gameplay-wise, Aggron has a dual typing of Steel and Rock. This causes him to take quadruple damage from fighting and ground type moves, which are so prevalent in competitive play that Aggron is seldom used. A pity, as Aggron as an amazing defense stat combined with a great attack stat and nice move selection to back it up.

STATS

Movement Speed: 2/10

Traction: 8/10 (While he doesn’t have to decelerate much, his tail causes him to fumble around slightly. It still won’t be enough to really be noticeable)

Attack Speed: 3/10 (Pretty much every move has lag on one or both ends of the attack)

Attack Strength: 8/10 (Overall, a power/speed ratio comparable to Ike, though Aggron breaks the mold more often)

Range: 8/10 (Nice reach with his tail and arms, and he has a few attacks that move him around while performing them. While he does have some energy or elemental attacks, these tend to be ranged disjointed hitboxes rather than true projectiles. Take that as you will)

Priority: 7/10 (Mostly good, Aggron doesn’t have to worry too much about clashing with enemy attacks.)

Weight: A little lighter than Bowser. Aggron will stay on the stage for a while.

Jump Strength: 6/10 (His first jump is surprisingly above average)

Second Jump Strength: 5/10

Aerial Mobility: 6/10 (When you have to retreat, it is much better to do it by air than by the ground with Aggron)

Fall Speed: 8/10 (He’s gonna sink like the rock and steel and he’s made of)

Size: Similar in height to Charizard but wider. Aggron’s tail does in fact have a hurtbox.

Sturdy: This is an ability in Pokemon that makes OHKO moves not affect Aggron. He carries a version of this trait over to Brawl. In Brawl, any attacks that deal more than 15% in a single hit will deal .75x knockback against Aggron. This includes charged smashes, making it even harder to send the iron Pokemon off the stage. Of course, most moves that can deal this much damage won’t be seen very often in competitive play, so Aggron won’t be shooting up the tier list with this ability any time soon.

MOVE SET

STANDARD ATTACKS

Standard A: Bucking Bronco
Aggron lowers his head to the ground and then he swings it up like a bull bucking something with its horns, hence the name of the attack. This has below average startup lag and deals 7% with set average vertical knockback, and has below average priority.


Upon the second press of A, Aggron jumps upwards with its horns outstretched. He jumps high enough to hit his side horns against a victim of the first part of the attack, which is essentially the distance of Aggron’s short hop. This is a grab-hitbox that catches opponents on his horns as he falls down with them, dealing 5% as he does so.

When he catches someone on his horns, the victim stays stuck on his horns for half as long as they would remain in a grab. Aggron can move around like normal with the enemy in his horns, but in order to deal anymore damage he will have to press A again to swing them off with his head, dealing 5% and average knockback. This command will replace aerial attacks if Aggron jumps with the enemy on his horns. Aggron cannot perform this part of the move if he does not catch someone on his horns with the second part of the attack.

Forward Tilt: Anger Slash
Aggron does a simple swipe with a claw that has below average startup and end lag, good priority, and deals 2%...lol wut?

Well, you see, every 10% in damage Aggron takes, this move deals 2 more damage the next time he uses this attack. The power-up stops after taking 100% damage, at which point the attack would deal a whopping 22%, though the knockback is always average. Once Aggron performs the move, whether he connects or not, the damage is reset and it has to build up again. Graphics-wise, Aggron will have a more reddish “angry” tint as he performs stronger variations of the attack accompanied with some growling.

Down Tilt: Hot Steam
Aggron harshly blows a plume of steam from his mouth that covers an area the size of a crouching Dedede. The steam is in fact a mildly strong gust of wind that pushes enemies, and Aggron himself is even pushed backwards as far as 1/6 of battlefield. He will go off the edge if possible. There is average startup and end lag to the breath.

Up Tilt: Iron Tail
Aggron looks behind himself as he whips his tail upwards. This has virtually no startup lag, and covers a great area behind Aggron due to the length of his tail. His tail is the only hitbox of the move, and it has decent priority while dealing 12% with average vertical knockback. The tail ends up at an 80 degree upwards angle when this part of the move ends.

After Aggron lifts his tail, his tail will start to shine before Aggron harshly swings it back down. There is average startup lag between the two tail swings. This time the tail has good priority, and it deals 15% with high downwards knockback. The force of the knockback is so great that it implants enemies into the ground with a pitfall effect, even if they are in the air when they are struck by the move, they will be pitfalled when they hit the ground. There is average end lag after this part of the move is over.

Dash Attack: Iron Head
Aggron gets on all fours and quickly skid along the ground as far as ¼ of battlefield while sticking his head straight ahead. All of his horns will be shining brightly as he does this. If he hits someone with the middle horn, they will take 12% and above average knockback, and it has decent priority. The side horns have their own hitbox that deal 10% and average knockback, but have good priority. Low startup lag with average end lag.

Due to the way Aggron is positioned while he performs this attack, other characters can actually ride on top of him. If Aggron doesn’t like these hitchhikers, he can press A to immediately cancel out of his slide as he fiercely swings up his body back into an upright position. Enemies hit by his backside will take 14% and above average knockback, and he has super-armor in his back while he does this. Of course, he is still vulnerable in the front and on his tail, and this variation of the move has above average end lag as Aggron readjusts his balance after such a fierce attack.

SMASH ATTACKS

Forward Smash: Focus Punch
Aggron pulls back its arm and delivers a powerful fiery hook! Now, this move has low startup lag, but in order to actually unleash the attack, you have to charge up all the way. If you don’t, Aggron simply lowers his arm for below average end lag. When you do charge up all the way, Aggron delivers his mighty punch as stated, and it has above average priority. But the best part is the damage; 30% with Falcon Punch knockback. Yikes! However, besides having to charge up all the way to use it, the actual hook has above average end lag as Aggron recovers from the momentum of his punch. Still, this is a nice move for fake-outs when you consider its ability to be a smash attack that can cancel charging.

Down Smash: Metal Burst
Aggron gets down on all fours and roars fiercely. This has low startup lag, and above average end lag, and the roar does…absolutely nothing on first glance.

This is where charging the move comes into play. Aggron can charge this move for up to 3x as long as a normal smash attack, and he has super armor while he charges. When the charge is released, if Aggron has taken damage while he was charging, a silver-colored shockwave of energy will radiate outwards from his body as he roars, taking up an area the size of Bowser before fizzling out. This shockwave is disjointed, and deals 1.5x the total damage he took while charging, but will always deal overall average knockback. Due to the length of time you can stall before releasing the attack, this move is great for countering slower attacks from your opponent, and you could always delay releasing the charge for a few moments if your opponent attempts to power-shield the attack.

Up Smash: Hyper Beam
Aggron looks straight up as white lightning pulsate between all of his horns and energy gathers inside his mouth. After .7 seconds (that’s nearly as much startup lag as a Falcon Punch), Aggron opens his jaws wide as he fires a huge energy beam straight upwards. It is as thick as the beam in Lucario’s Aura Storm, and goes infinitely high, even passing through solid ground. The beam is disjointed and lasts for 2 seconds. It deals 2% for every tenth of a second an enemy is caught in the beam (for a total of 40% if all the hits connect), is impossible to DI out of, and ends with high knockback. There is average end lag as the beam fizzles out and Aggron returns to his basic stance.

Despite being a smash attack, you cannot charge when you input for the beam. However, after firing the beam, Aggron will have a new idle animation where he appears tired. This does not affect anything other than this move, but it gives you an idea as to what you now have to with this move. When you input for this move again, Aggron will start to concentrate as he begins to flash like a normally charging smash attack, with virtually no startup lag to initiate this. If you don’t charge up all the way, Aggron will simply exhale with no other effects but below average end lag. However, if you do charge up all the way, Aggron growls as white lightning pulsates over his entire body for a moment, signifying that he has “recharged”. This animation counts as average end lag, but if he hit out of the animation he is still recharged. Once Aggron is recharged, his idle animation will return to normal and the input for this move will go back to actually firing the hyper beam.

AERIAL ATTACKS

Neutral Aerial: Horn Drill
Aggron rotates his body so that his head is pointing straight down and he starts to spin around like he was doing an upside down Mach Tornado for .6 seconds. During this time his tail is outstretched, making him a VERY tall vertical hitbox. His entire body has average priority and deals up to 6 hits of 2% with the final one dealing above average knockback. There is low startup lag , and below average end lag if it ends in the air.

What happens if Aggron hits the ground while doing it? If he hits a drop-through platform with his horn, Aggron will stop his aerial movement as he drops straight down and actually drills a hole straight through it as wide as he is (or just chip off the side if that’s where he hit the platform), and then instantly end the move for the same end lag. The hole lasts for 5 seconds, and then the platform instantly repairs itself in a cloud of dust. If Aggron hits s solid platform, he will get his horn stuck in the ground and the move will have above average end lag as he pulls it out.

Forward Aerial: Avalanche
Aggron leans back slightly as he opens his jaws and icy energy begins to form inside. He then lurches his head forwards and looks slightly downwards as he spews a stream of icy breath from his mouth at a 40 degrees downwards angle. The stream of ice goes as far as a 65% charged Bowser fire-breath and is disjointed. Aggron fires the ice for 1 second, dealing 1% for every tenth of a second someone is caught in the ice (total of 10%), and it is moderately difficult to DI out of. There is above average startup lag to the move, but low end lag. If Aggron hits the ground before the move finishes, he will abruptly stop firing, making this move difficult to punish even if Aggron does not get to unleash the full attack.

If this is the next move Aggron uses after taking damage, the ice stream will be in a deeper shade of blue, and it will deal 2% each hit (for a total of 20% if all the hits connect). There is no time limit between taking damage and using this move for the bonus to take effect, but if Aggron uses a different move first, the effect will not take place, and Aggron will have to take damage again for another chance to use this special effect. You also cannot take advantage of this effect if you took damage through super-armor such as with Iron Head or Metal Burst. Shielding and dodging will not count against you.

Back Aerial: Stone Edge
Aggron will perform an x-slash with his arms that has infinite non-disjointed priority, below average startup and end lag, and deals 12% with average knockback…

Now, if any of Aggron’s moves are ever outprioritized, you will see a little blue glint in Aggron’s eyes. The glint remains until Aggron performs this move. The slash he performs will have bits of gravel falling off his claws as a graphical effect, and the slash will deal 15% with the same knockback.

If 2 moves of Aggron were outprioritized, he will have a red glint in his eyes. When he performs this move now, after doing the slash, Aggron will immediately lash out his tail as more gravel falls of it. This has nice horizontal range as you’d expect, and it deals 13% with good horizontal knockback and has good priority. However, if he connected with the first hit, they will not be hit by the second. There is below average end lag after the tail whip.

Up Aerial: Earthquake
Aggron stomps downwards with both of his feet. This has average startup and end lag, good priority, and the stomp will deal 14% and above average downwards knockback. ZOMG a UAir that spikes!

If you hit the ground right as Aggron performs the stomp, he will not just auto-cancel the move. The force of the stomp will actually propel Aggron back into the air as high as his first jump, and his midair jump will be reset, allowing Aggron to prolong his aerial game. The strength of the stomp will create an earthquake that shakes the screen slightly and affects the entire platform Aggron landed on. Anybody on that platform when the earthquake occurs will take set average vertical knockback, and the move deals great damage to shields. You can still roll or spotdodge the earthquake for some reason.

Down Aerial: Thunder Wave
Aggron will perform a half-flip through the air as he points straight downwards and his tail is wrapped around his body. Electricity begins to pulsate between Aggron’s horns as he plummets straight down until he hits the ground. Anybody who hits his horns while he falls will take 11% and average knockback, and his horns have good priority.

When Aggron hits the ground, his horns stick into the ground and discharge their electrical current. This creates a small wave of electrical energy to hit quickly radiate as far as ¼ of battlefield on both sides of Aggron, and it is as tall as a white Pikmin. The thunder wave will stop at the edge of platforms, is disjointed, and deals 7% with average knockback. However, the main threat of the electricity is that it creates a shocked effect in enemies hurt by it. Enemies who are shocked have small lightning bolts coursing over their body, and take 1.2x hitstun. This lasts for the rest of their current stock. While Aggron is too slow to really take advantage of this, more offensive teammates can use this for some combo-****. There is low startup lag to the move, but above average end lag as Aggron pulls his horns out from the ground.

SPECIAL MOVES

Neutral Special: Thunder
This is a move that Steven’s Aggron actually knows, via TM. When you input for this move, Aggron begins concentrating as electrical energy gathers in his middle horn before an electrical bolt fire out of it straight ahead. It goes as far as Ganondorf’s legs before separating from the horn and continuing onwards until it hits something, and it moves as fast as Wolf’s blaster shots. When it passes by an opponent on a different vertical level than itself, the bolt will actually bend in a 90 degree angle to aim at the enemy and the bolt will now follow this adjusted path, making it look like an L shape while it follows this new course. The bolt can only bend once. The bolt has above average priority and deals 8% with average knockback. Below average startup and end lag.

If you hold B when you input for this move, Aggron will begin to gather energy in his side horns as well. If you charge in this way for .6 seconds (starting after the initial startup lag), the energy will be fully formed in his side horns, and when you release, Aggron fires a second bolt of lightning straight upwards simultaneously with the regular horizontal bolt. This one has the same properties as the horizontal bolt except its moving vertically and it will bend when it passes by someone on a different horizontal level, essentially making it the inverse of the first bolt. What’s nice about the charging is that you can pre-emptively release the charge for just the first bolt if you wish, and you can also hold the charge as long as you’d like after it finished before releasing B and firing. These two nuances give this move some nice fake-out capabilities on top of its stage controlling function, making this move an integral part of Aggron’s game.

Side Special: Smelling Salt
Aggron leans forwards and does a fierce exhale/snort from his nose, which causes a small puff of white steam to shoot from his nostrils. This steam puff covers an area the size of Meta Knight before disappearing, and is disjointed. Enemies hit by the steam take 8% and average knockback. However, if they are under the shock effect caused by Thunder Wave, the attack deals double damage, though with the same overall knockback, and it will actually remove the shock effect from the enemy. Low startup lag with average end lag.

If this move is performed in the air, it works a bit differently. Rather than exhale from his nose, Aggron will open his mouth and exhale a larger cloud of vapor that ends up taking up an area the size of Bowser before disappearing. This one deals up to 8 hits of 1% each, with the final one dealing below average knockback. Each hit will deal double damage if the enemy is under a shock effect, and the final hit will deal double knockback as well, and once again the enemy will be cured of the shock. There is the same startup and end lag, but now the move lasts longer due to the size the cloud expands to before the move ends.

Up Special: Rock Slide
This move can only be performed in the air. Aggron’s aerial momentum stops as he looks upwards and roars. As he does this, a bunch of rocks fly upwards from the ground underneath him (or from the pit if he is over one) and come together to form a solid platform as wide as Bowser right underneath Aggron’s feet. This takes 1 second, and if Aggron is hit out of the animation the platform still comes together. The platform lasts for 5 seconds, during which time nothing happens with this move input. After the 5 seconds are up, the platform crumbles apart into dust. This is a great recovery since it pretty much returns all of Aggron’s jumps, but it is possible for the enemy to meet you on the platform and knock you off of it, where you would be closer to the blast zone.

Down Special: Stomp / Body Slam
Aggron lifts up one foot before harshly stomping the ground. There is below average startup lag and low end lag to the stomp. You can charge up the stomp by holding B, and Aggron’s foot will glow slightly before stomping to show that he is charging. It takes 1 second to fully charge a stomp and like a smash attack the charge auto-releases upon finishing. The stomp itself barley reaches ahead of Aggron, but it has high priority and deals 16-27% depending on how long you charge, with good knockback even without any charging. When Aggron stomps the ground, he also kicks up dust particles. The cloud of dust particles goes from Mario’s height to twice Bowser’s height vertically depending how long you charge, though it only reaches as far as Olimar’s height sideways no matter how much you charge. The dust particles are disjointed and deal 10% with average knockback.

If you use this move in the air, Aggron will perform a different move, Body Slam! He will stop his aerial momentum for a moment (which equates to average startup lag) spread his limbs and fall belly-first straight down at his regular fall speed (which is already really high to begin with). His entire body is a hit box of high priority that deals 16% and high downwards knockback. There is average end lag when Aggron hits the ground as he gets back up to his feet. Aggron can sweetspot ledges as he’s performing this move.

And now we connect the two! If you press B right as Aggron’s about to hit the ground, he will suddenly stop in midair as he curls into a ball and rolls around in place for a moment, and when he is aligned properly he will stomp onto the ground, striking a pose similar to Ganondorf when he hits the ground from an aerial Wizzerd’s Foot. This is the equivalent of a half-charged Stomp, including the low end lag. Of course, the time it takes for Aggron to roll into position means that the move actually a little longer to finish than just regularly landing from the Body Slam, but the stomp’s own unique properties makes this a viable secondary option and yet another fake-out opportunity for the iron dinosaur.

GRAB AND THROWS

Grab Animation

Aggron reaches fowards with both hand in an animation similar to Bowser's grab. It has mediocre range but decent speed.

Pummel: Curse
Aggron starts charging up as he holds the foe in his grasp, looking up to the sky and letting out a slight roar, pulsing with energy. This does no damage to the foe, but causes the next throw he does will gain 25% more knockback and 3% damage for every second Aggron charges like this. However; after the throw, Aggron’s attack lag will be increased by 30% for 15 seconds.

Aggron won’t get to use the attack bonus at all if the foe breaks out before he throws them, so don’t get too greedy unless the foe is at a high percentage and you’re beefing a throw up for a KO. This is best used for getting powerful enough to KO the foe and then switching to a damage racker, removing the after effect of curse.

Forward Throw: Double Edge
Aggron pushes the foe forwards and quickly headbutts them with all his might in an animation like Bowser’s fsmash. This does a nice 17% and above average knockback, but also deals 15% back to Aggron. This is best used if your percentage is already too high to really care about having additional damage.

Back Throw: Outrage
Aggron roars angrily and stamps his foot in an angry fashion, then swings the foe around behind him and claws them away for 5% and low knockback. A rather pathetic throw and it’s pretty slow to boot…

After doing this throw, Aggron’s idle animation becomes the same as the one when he performs this throw. If he grabs the foe again, he’ll automatically be forced to use this throw again, not even having time for a pummel. The second use has 10% and average knockback, but the third and final use is the big payoff, doing 17% and high knockback. After the third outrage, though, Aggron will become confused the next time he grabs the foe, them having a full 3 seconds to escape the grab before Aggron can do anything. After the fourth grab, Aggron is no longer outraged.

Up Throw: Dynamic Punch
Aggron lets go of the foe with one hand then prepares for a big wind up punch, his fist becoming engulfed in flame slightly, then smacks the foe upwards. This does 12% and above average upward knockback. In addition to the high damage, the foe will have their horizontal movement controls reversed until they hit the ground

Down Throw: Rock Polish
Aggron roars, summoning a rock formation in front of him. He throws the foe onto the rock formation for 4%, then slams onto the foe for an additional 7% and above average vertical knockback.

The rock formation sticks around for 10 seconds after being formed, acting as a wall against projectiles and being invulnerable. If you use your neutral A, Bucking Bronco, against the rock three times, Aggron’s head will sparkle slightly as he “polishes” it against the rock formation. This does nothing. . .Unless you’re under a curse, which will bring you back up to full speed hastily. This allows cursing to be used for potential damage racking in combination with this throw.

If you use your dash attack, Iron Head, against the rock, Aggron’s head will shine slightly as a metal sound effect is heard. This trades Aggron’s Sturdy ability for the Rock Head ability. Having Rock Head removes the large recoil damage of Aggron’s otherwise excellent fthrow, Double Edge, allowing you to use it much more freely.

SITUATIONALS

Lying Down Attack (Either Side): Glimmering Sheen
Aggron’s body suddenly shines brightly for .5 seconds before pulling himself to his feet over .8 seconds. If anybody touches him during this time, they will be dizzied for 1.4 seconds, long enough for Aggron to hit them with a quick attack if he dizzied them right as the move ends. Aggron has super armor during the entire move animation

Ledge Attack Under 100%: Horn Toss
Aggron pulls his head above the edge and then he lurches his head forwards a short distance. If he hits someone with his horn (this counts as a grab), he will swing his head backwards and toss them backwards over the edge for 12% and average knockback. Aggron does not pull himself up to solid ground after performing the move, making this a pretty nifty edgeguarding technique. The primary weakness of the move is that it only really reaches horizontally, so an enemy could simply jump off the stage and hit Aggron from above or behind.

Ledge Attack at 100%: Ground Shake
Aggron harshly slams his tail against the platform. This causes the entire platform to shake for a brief moment, tripping anybody who happens to be on it during that time. Aggron then scrambles to pull himself over the edge. This move happens relatively quickly with little startup lag and below average end lag, but it deals no damage and can be avoided by simply staying off the platform Aggron is holding onto.

Tripped Attack: Tail Slam
Aggron will simply smash his tail behind himself, dealing 14% and average knockback to anybody in his way. Not-so-simply, any characters who try to dodge it through rolling will find themselves pitfalled instead of taking damage.

FINAL SMASH - FISSURE​

Upon activating the smash ball, Aggron leaps straight upwards as high as Falco’s first jump, and then he crashes back down onto the stage at a high velocity. If he was over a pit, you just lost a stock, yay! If you were actually over a platform, you’re in for a treat. The platform Aggron lands on will get fiery cracks running along through it, and after 3 seconds (Aggron can move once he hits the platform)…it shatters apart into dust. No matter how big the platform is, it will be removed from play, even if it was a solid platform. This does in fact mean that using this move on Final Destination results in an empty void. The destroyed platform will reform after 10 seconds.

PLAYSTYLE​

To a casual player, Aggron would appear to play like a Bowser clone. They have similar body structures, they both tend to have a lot of power. The both have surprisingly good aerial mobility for their size, and both want to play defensively. But see, here’s where the differences start to creep in.

First, unlike Bowser who has average attack speed, Aggron could actually legitimately be called slow. Many of his moves have punishable startup or end lag. And Aggron also has a problem with moving on the ground. Not fun. So if Bowser is garbage tier, then Aggron must be “you’re a scrub for hovering your cursor over him” tier, right?

Not quite. Aggron has one huge advantage over Bowser that helps with his defensive playstyle; he can camp. Thunder is an amazing camping move. Just let loose with a bolt, and even if your opponent jumps over it, they can still be damaged as the bolt turns! Or they could shield it and come closer to being dizzied (and you do NOT want to be dizzied with Aggron on the field). Or they roll away so you can camp some more. Or they roll towards you so that you attack them as the roll ends. Seriously, forget Pit, Aggron is the spam king.

As said, Aggron has no shortage of powerful moves. He has a highly damaging jab combo, and moves like Earthquake and Stomp serve to severely punish enemies for mistakes. Iron Tail and Iron Head are more strong options, and Hyper Beam can completely demolish somebody who botches a recovery. Focus Punch is amazing for punishing a broken shield, and you could occasionally throw it out normally since you can cancel out of the move.

Another major part of Aggron is that he turns his good survivability into a real threat to characters who can’t finish him off quickly. Anger Slash, Metal Burst, Stone Edge, and Avalanche all wield stronger benefits as Aggron takes damage. You’ll probably want to take advantage of Avalanche whenever you take a hit and need to retreat, whereas with Anger Slash you should wait till you and your enemy are both in high percents from your battle then finish them off with a full-powered attack. Stone Edge won’t see a lot of action due to Aggron being a bit of a challenge to outprioritized, but it’s still there.

Aggron’s grab game is weird enough to warrant its own section. Curse is a high-risk/high-reward move that will be your undoing if you cannot KO the enemy with the throw tied to it. If you are good at landing Aggron’s grab, you should stick to Outrage so that you can build up to the powerful third throw. In matches where Aggron’s Sturdy ability won’t be of use, use Rock Polish and get the Rock Head ability asap so you can spam Double Edge.

Overall, Aggron is a character who takes the “tank” archetype to new levels. He wants to barrage his enemy with distanced attacks via thunder, and laugh as his enemy tries to move him even the slightest inch, only for that damage to come around and make Aggron even more powerful. His slowness will prevent him from truly dominating, but the amount of raw options Aggron has for wreaking havoc means that he can land hits when they matter.

EXTRAS​

Up Taunt: Aggron stomps the ground angrily. Run for your life!

Side Taunt: Aggron punches his fists together like Ganondorf, but he only does it once. As his fists hit each other, a small shockwave emits from the ground from the raw power. This does not affect gameplay, it just makes your enemy piss himself.

Down Taunt: Aggron lets out a mighty roar. The entire screen shakes slightly from this awesome display of might, but it probably won’t affect a good player.

Win Animation 1: All of the losers are seen running past the screen as Aggron chases them with his head lowered like an angry bull. If one player lost significantly (i.e being 3-stocked in a 2-player game), Aggron will catch them on his horns and fling them over his shoulders before stopping in place and snorting as steam comes out of his nose.

Win Animation 2: Aggron is seen stomping the ground in triumph as the losers clap like normal…Suddenly, Aggron jumps up and stomps the ground with both feet, causing a small earthquake that knocks over all of the losers.

Win Animation 3: Aggron is seen standing with Steven, who pats Aggron on the side and says “Ah, splendid work, Aggron!"


----------------------

And with this, the largest joint set in MYM history is finished.

I’d personally like to thank Chris Lionheart, MasterWarlord, SirKibble, Hyper_Ridley and SkylerOcon for their work on their respective parts.

I’d also like to thank you, the reader for reading this whole thing, I really hope you guys enjoyed it.

This is basically to represent MYM as a whole; all of us working together to create awesome stuff.

Enjoy!

~MT
 
D

Deleted member

Guest
At the time of this posting, there is...

A little under 3 hours left for move set submissions

2 hours 45 minutes to be precise.

Any move set submitted after the deadline WILL NOT COUNT, so please don't try to post it on the literal last second, okay?
:eek: (Link)

My MYM5 set is not ready yet! :'(

At least I have time to iron it out for MYM6...
 

majora_787

Smash Hero
Joined
Jun 23, 2007
Messages
6,122
Location
Texas
...Two things.

1. Steven Stone is one of the longest movesets I have ever seen.

2. Wow. Final submission timer? =P I procrastinated THAT MUCH?
 

Junahu

Smash Ace
Joined
Nov 15, 2005
Messages
899
Location
Shropshire Slasher
Since it's going to take a good few hours to read through this monster. I'll just state the obvious for now and add real commentry on the individual pokesets later;

As cool as 6 movesets mashed together is, and I cannot overstress how awsome it is that you guys managed to pull it off, this is unfortunately a case of the "whole being less than the sum of its parts". And with no attempt (or no time, as the case actually was) to bring everything together at the end, it does literally feel like 6 seperate movesets...
which it is
..and what it should probably have been to begin with.

Moveset #1: Skarmory;
Looks like you hit the nail on the head with how Skar should play. And He/She works obviously well as a trapsetter. Combinations such as Toxic and Spikes to make Toxic Spikes are obvious, simple, but most of all, ingenious. It's always great to see moves working together in logical ways.
My only sizable problem with Skarmory is how much focus was placed on Whirlwinds, where half the moveset was just there to feed the blighters and/or control them. As incredible as the whole concept sounds, it completely hogs the spotlight away from the simple things like Spikes. And spikes itself suddenly becomes less special, when its half-clone Stealth Rock made its appearance on Down-Smash.
Sandstorm felt like it should have been a Special, and his/her Final Smash (automatic Sandstorm) is about the most boring one since Cutesy's
I do have to restate though, that Whirlwind, and the many interactions Skar has with it, is incredibly deep and sounds like a rather neat twist on Trap setter movesets.
I would have probably left it at *blows wind and gimps*
edit: I do very much like Skarmory, and all the wonderful ways he can play with his/her whirlwinds.

Moveset #2: Cradilly;
This should have probably come later in the joint set, because Cradilly after Skarmory puts me in the wrong mindset of what to expect.
I would have appreciated it if Cradilly's inability to jump was stated somewhere where it wouldn't get skimmed over, because it's a really important detail.
Anyway, I'm surprised at how well you managed to differentiate Cradilly from Skarmory, because in pokemon, they pretty much had the same job. Your focus on spacing without moving yourself is a fantastic interpretation of Cradilly, and you did it without overengourging the moveset with traps and "special projectiles". Ingrain is sweeeet
But it's odd how weak his aerials are though. Since he can't jump, he can't pull out an aerial whenever he'd like, so I was expecting Cradilly to have some way of punishing the foe for trying to KO him the obvious way. Cradilly also lacks the means to counter, or even defend, against projectiles and trap setters, which is an easy no-brainer victory for them.

Moveset #3: Claydoll;
Claydoll has a number of similarities to the previous two movesets (mainly its defensiveness), but manages to be pokemon all in its own class (mainly due to its air-mind-game). I personally love aerial combat in Smash Brothers, so any moveset that sweeps away all that ugly ground crap under the carpet is already a winner in my book.
Substitute starts off with so much promise and potential, though it isn't taken advantage of his other moves nearly as much as with Skarmory's Whirlwinds. But the mindgame potential is still there and in that regard, the unreadable Claydoll was probably the perfect pokemon choice for you. It's always a pleasure to see what new methods of messing with opponents you come up with.
I don't think you mention how dashing in mid air works, and even if you did, you certainly didn't mention how crazy his approaches would be thanks to that. Also, for some reason, I ended up assuming Sandstorm here would have something to do with the Sandstorm from Skarmory's moveset, and got rather dissapointed when it didn't.. :dizzy:

Moveset #4: Armaldo;
I think I'll have to assume from here on, that every pokemon in this joint set is a tank or defensive wall of some description. While the previous three used special mechanics and interconnected moves to seperate themselves from one another, Armaldo was more of a straight up, normal tank.. which is actually a good thing. You have always understood the simple charms of Pokemon, and it shines through here with Armaldo.
It's nice to introduce a pokemon through its Pokedex entry, because it helps set the tone for those who aren't already intimately familiar with that particular pokemon, and it gives the reader a lot of confidence in how well researched the moveset will be. The organisation too, is the most relaxing of the six pokemon in this joint, and it really helped me through this moveset.
But some of the attacks (by "some", I of course mean "most") feel as if they had special effects retrofitted into them, rather than them being an inherant and relevant property of the attack. And I felt you overloaded Armaldo with defensive features, many of which sounded a little simlar to one another.
They're probably trivial concerns, but that's all I have for this one. It's a good pokemon set

Moveset #5: Metagross;
There's obviously some story behind this that I'm not fully aware of, so it wouldn't be fair to judge it like the previous movesets. But at least it isn't another tank (oh wait, yes it is).
The grab, and by proxy, the throws too, took me by surprise. It's really clever, and a nice way to incorperate the feeling of Metagross' Pokeball appearance into the moveset. Most of the attacks too had a lot of potential, which leaves me feeling more than a little sorry for how the moveset ended up.
From the sounds of it, Metagross has some mean aerial capabilities.. which is scary.

Moveset #6: Aggron;
I don't know why, but this seems to be my favourite moveset in Steven (even though it is the very embodiment of Tank). This one, more than any other, is capable of being a stand-alone moveset.
Sturdy, while simple, works very well here and gives Aggron a real physical presence. Aggron was also the easiest pokemon to envision in brawl, muchly thanks to your writing style, and the incredibly suitable, and flowing, moves you chose. I absolutely loved the Final Smash. It's always the simplest twists that make the best attacks.
And thanks for including some humour, seriously.
There were occasions where it seemed you were stretching to have something unique on every attack, to the point where about half of Aggron's moveset is on an on/off switch of some sort.
I also felt that the rocks that rise up during Aggron's Up-Special should have some sort of effect on any foes they pass on their way up.


And there we go! 6 movesets in 1. 6 lousy comments in 1. Sorry if the comments themselves sound a little disjointed when compared to one another, but then again... so were your movesets, so it all evens out.

Oh, and I'll have to vote for this, because there were some vote worthy movesets in that jumble.
 

UserShadow7989

Smash Journeyman
Joined
Aug 13, 2007
Messages
306
Thank you for taking the time, for reading my garbage set.

I have a question retaining to your first statement. Why is it that Pleiny is better than Hero Prinny. I've been asking this on the chat, and everyone has silenced the notion. Even on a personal account of asking.

...

Back to the subject of why Pleinair was better than Hero Prinny, still puzzles me. Would anyone like to shed their opinion on the possible reasons? I apologize again, for you. The people to read this long and boring statement. I apologize to you and the world, for the plaque I've done upon to this contest.

Good day.

Emergency.
Well... honestly, I can't figure out why I feel that way. Hero Prinny does have some really cool stuff, and it's much more detailed then Plenair. In fact, looking between the two again, Hero Prinny really is an improvement, and does have plenty of good merits.

I'm really not sure and don't have enough experience to pick out how thwy differ, but if I had to guess, I think it may be the writing style. Prinny and Plennair have similar writing styles, but Prinny is more detailed. This is normally a "So what?" deal, but you tend to write out details that really don't need to be elaborated on, which is much more noticable in a longer set then a short one. For example:

Jab - Slashin'

Prinny draws both of his unique blades, and aims them forward as he takes his stance. He will then swipe rapidly. Swinging each blade one at a time, one in front, one in back. Alternating, swiftly. Each blade does 1%, the attack has instant startup and no cooltime. This is probably the equivelent of Meta Knight. Each blade is swung, in accordance to who many times you mash the A button. These blades reach a Kirby away, with some small coverage behind him, when he alternates. This attack is an overall great starter for a combo, or ender. These blades go so fast, that you only see the swinging motion, these blades cut the air like butter. Creating a crisp sky blue aura. That shows the speed of the knives.
(Sorry for incorrect colors) Could be written as:

Jab - Slashin'

Prinny draws his twin knives from his pouch. He swings his blades back and forth rapidly, creating a blue blur as he alternates between left and right. The cuts have medium reach, but also hit any foes short distance behind Prinny. This attack continues as the player mashes the A button, each hit doing 1% and very light knockback. (Low/mid/high/???) priority, with no starting or ending lag. This attack is a very good combo starter or ender.
The latter is easier to read, and conveys the information needed to picture the attack. I'm not sure if that's really the reason or if I'm just imagining it, so I'd really ask for a review and let one of the Sins explain it, they'd have more luck. Maybe it's just that you got caught in this swarm of high quality movesets, so Hero Prinny just doesn't seem as special as it is.
 

KingK.Rool

Smash Lord
Joined
Nov 26, 2005
Messages
1,810
Alright, this is what I've got so far.

Skarmory is actually much cooler than I thought he'd be from my first looks. You badly need to start replacing the asterisks (***) with more decorative symbols, and the organization is pretty dry, but the ideas are sound. He's got some weird attacks that don't feel Skarmorish, like Toxic (excusable due to competitive Pokemon). Some attacks, like his recovery, are more boring than I'd expect from you. But he's got a really nice trap-based playstyle that plays to his actual strengths; as a Spikes/Whirlwind defensive tank.

I've also read Armaldo, who feels pretty interesting also, although he's a weird Pokemon to make a moveset for and his lack of much beyond random Bug and Rock attacks make him one of Kibble's middling sets (which are still, don't get me wrong, quite good).

And then Cradily, which I just now read. I like this dude's playstyle and am quite impressed with what MT did with him. It all feels very fitting, although, through no fault of your own, many of the attacks feel a bit out-of-place. I think you could have put more emphasis on his rooted style; the Aerials are certinaly the weakest part of the set. But I'm glad you avoided the trap of sticking to only Pokemon attacks.

Metagross... sorry to say... well, he could be better. He definitely feels rushed, and not as creative as the others. I can see you all made a valiant effort to pump him out, but, well, his playstyle is that of the typical heavyweight, you admit yourselves, and therefore not quite up to scratch. I would've liked to see this as Ocon's project completely, but as is... Much of it is just attacks translated directly, as in the case of Scary Face or Psychic. There's not much artistic license, I'm afraid. It's got some redeeming features, but in general, it's a black spot in this set.

Plus, its organization is a shambles. It's hard to see the headers and the damage %s seem tacked on.

I like Claydol a lot for how it makes use of Substitute. It's a real interesting mechanic that almost any Pokeset COULD use, but it feels just right on Claydol. I'd have preferred a few more attacks that use the Substitute in some way, but in general, it's a nice set.

And then there's Aggron, the unlucky last Pokemon. I'd think Metagross would be last, considering it's Steven's last in the actual game, but whatever. This one feels rather like an MYM 4 moveset in that he's loaded with individual move creativity but doesn't have quite as flowing a playstyle as is the norm from a master like HR. I love how you translated the attacks to Brawl and made up some of your own to fit the character, though.

On the whole? I liked it, generally. I think movesets like this and Halberd Crew before it are bound to be poorly received in general because it almost feels like the moveset is created as Top 50 bait. With so many respected moveset makers, it almost makes one want to dislike it. Not me, of course. I'm totally impartial, and I liked it quite a bit, but like Junahu says, I think I would have been more impressed with six individual movesets than with one that feels a touch tossed together.
 

Chris Lionheart

Smash Champion
Joined
Apr 6, 2008
Messages
2,076
Location
Make Your Move
Well, there it is, my last moveset in MYM5 (or rather the last moveset of Warlord, HR, MT, Kibble, Ocon, and myself).

I'll save those who don't know the trouble of guessing:
MarthTrinity made Cradily.
SirKibble made Armaldo.
MasterWarlord made Skarmory, as well as Metagross's grabs/throws and Final Smash.
Hyper_Ridley made Aggron, as well as Metagross's situationals.
Ocon made roughly half of Metagross. Procrastination ftw?
And I made Claydol, as well as Metagross's (away from Steven) Down Special, Aerials, Taunts/Poses, and Playstyle.

For those who don't appreciate this set to its fullest or who simply tl;dr it, I for one will not be disappointed. The making of this set proved to be quite fun... and it was a chance for me to work together with some of the greatest MYM has to offer (not only in talent but in personality as well). Perhaps most importantly, it was our last chance to work with Kibble before his 2 year leave. I'ld like to say good job to every last one of you.
 

Smady

Smash Master
Joined
Apr 29, 2007
Messages
3,307
Location
K Rool Avenue
Prinny - This moveset isn't bad at all, but I can see why you may be upset with having to post it amongst a massive rush of others, quality not withstanding.

Most of the moves are quite charming and the character itself comes across as likable. Your writing style, however, does need some work, as Shadow pointed out. It does seem like you use too much description when it's not needed, extra short sentences that don't really add anything to the moves. This would be far better if you worked on it until MYM6, however and I dislike that you felt obligated to post it when it's quite unpolished. It has the potential to be far better than Plenair with just some medium editing.

Wrath - Another FMA character is goin to put people off a lot, but again, this moveset is decent. It's a tough sell, but from what I read of it, it's good - there's just a major over-saturation problem with FMA characters right now. I didn't read all of Wrath, but I will come back to him and perhaps further comment in the coming week.

Steven - I would like to congratulate you guys on making a moveset so incredibly long. However, it’s not so much of a feat when you realise, there is the bare minimum amount of extras and it’s essentially six movesets glued together. I can’t remember Steven, but I don’t get any kind of personality from this moveset beyond the first three paragraphs, which only goes as far as to say that that Steven is so good there’s no stamina system… and a select screen. This isn’t exactly compelling and coming off of Cutesy, it seems shallow.

Skimming through this beast (which takes about a minute) I don’t see any moves that link together with the other Pokes, which is a bit of a disappointment. Is there any link to Steven whatsoever besides the first three pokegraphs?

I’m not disrespecting any of the movesets included in Steven, but as a whole, it’s just a step too far. I think past about twenty thousand words, you really need to have something very special to keep a reader interested with a moveset and though yours may all be marvellous by themselves, it’s quintessentially like reading six separate movesets at once. I commend you all for your great efforts and I’ll try to read this before I cast my votes in the next week, but the length and lack of cohesiveness makes this as hard to swallow as a boot.

Really, I do understand the man-hours behind this moveset and how hard it must have been developing such a massive project, which is why I will try to read it through. It is truly an accomplishment that you all worked together to make such a gigantic single set, pretty much sacrificing any chance you had by eliminating your own SVs. It would be unfair not to read it therefore, as this is essentially one VERY big and tightly-wrapped present to everyone at MYM, I appreciate that.
 

Agi

Smash Lord
Joined
Jul 27, 2008
Messages
1,120
Location
SE Washington
Okay, so it's a bit late, but I promised you a review, Sundance.

Review ofhttp://www.smashboards.com/showpost.php?p=7463121&postcount=1576 Sakurai

So, you finally finished Sakurai. I've been waiting for this masterpiece ever since you gave me that preview of the Dash Attack, and just by skimming it I'm sure it won't disappoint. It was great to see Kid Goku place in MYM 4, and hopefully your one-set-a-contest mindset will continue to bring forth these incredibly creative sets. (I don't think I ever mentioned this, but that mini-review of Kid Goku actually was what inspired me to continue writing other reviews. :bee:

vvvvv skippable paragraph vvvvv

Since I have a heck of a lot of time on my hands, and I can't really bring myself to decide between the two commonly-accepted methods of reviewing (move-by-move or main points) I'll just give you both... Analysis of individual moves followed by another main-points review. If this doesn't take too long, I'll be sure to use this come next contest.

^^^^^ skippable paragraph ^^^^^

Okay, first off we have the introduction, your interpretation of the madman that is Sakurai... okay, you've already hooked me. Releasing animals to make Missouri more like a Jungle? John Kirby? And I see you managed to work in an "Agi the Biter" reference. Even if this set has no playstyle whatsoever, I'm gonna love it simply for the lulz.

A special ability, eh? As hilarious as it is... I can't really see it being applicable to the actual game. Forcing a final smash on your opponent? Eh. Regardless, Sakurai's "uncreative" aspect truly is emphasized in this, something I'd hoped to see. Unfortunately, I'm writing this review without the benefit of images, so I can't see which Landmaster goes to which character, but that's besides the point. Giving Snake and ROB their own unique Landmasters was a nice touch, although it really wasn't necessary to repeat the "How do I shot web" quote for Snake.

From his stats, Sakurai seems pretty overpowered. He doesn't seem to be lacking in any stats, (besides traction, but that's of lesser importance,) he can run quickly, score KOs and recover pretty well. The only thing possible keeping him from being God Tier at this point is if he has low attack speed or a bad recovery special, so I'm going to have to look for some of Sakurai's bad points later on.

Normally I wouldn't make a seperate section for animations, but these are the best I've ever seen. Your warped sense of humor really pays off here, although I'm guessing the crouching animation was a reference to some movie I haven't seen.

Now, on to the actual moves! It's a bit of a shame you couldn't come up with something besides a punch-punch-XXXX for the Standard Combo. Another thing on this is that you refer to "a quarter of a stagebuilder block" as a good distance. What, are you using MT's blocks now? That's about the range of just a basic jab. I'd recommend that you change the description to make it a bit less conflicting. The Dash Attack sure explains a lot. :p

The FTilt oozes with awesome, and that's saying something for a moveset on this level. Although, since it executes so quickly AND has a healing element, I'd go so far as to say it's overpowered. Just lower the % healed to 1-2ish, or add more ending lag (scraping the Peanut Butter off his hands back into the jar?) while buffing the knockback. I’d like to know just how many multiple hits that Blendy Storm can deal at maximum. And as for the DTilt… this is by far my favorite move in the set so far, simply for the visual. I don’t even care that there’s no mention of lag, it’s that epic. :bee:

Smashes? After reviewing so many non-standard-organization sets, it’s good to get back into the habit I’m used to seeing. So, you managed to get in the bear-blasting you tried to get me to help you with so long ago… and it’s a .gif! Not much else I can say about this move, it seems pretty balanced. It’d just be nice to see a mention of lag. Why do I get the feeling I’ve said this too many times? The USmash is another one of your random moves. I have no idea where you come up with these, and probably don’t want to. :razz: The execution is nice, pretty worthless if C-Sticked but becoming a great damage racker if charged. The DSmash is a great Cast Away shout-out. Although on first glance it’s OOC, anything IN character with this set would be OOC. Therefore, by being out of character you’re staying right next to the source material. But, on to the actual move. The main problem I have here is that you don’t really have a mention of range, which is critical in a move like this. Also, I think that a Magikarp should deal considerably less damage than a Swordfish. :)

Just when I think you’re using standard organization, the Specials come right after the smashes. Bah. Anyway, Tier Punch is probably the most unique “XXXX Punch” move I’ve seen, and continues to reveal more of Sakurai’s personality. LOL TIERS indeed. The side special I’m guessing is more for the wtf factor than anything. Coming out of his own skin?! Gotta love it. Although at first glance this move looks extremely overpowered, you making him take double damage AND only have two moves makes up for it. However… wait, nevermind. I was going to mention something about the skin healing 40% maximum to your opponent, but when you couple that with Sakurai’s overpowered stats it’s also compensated. You did a great job balancing this move in particular, although the descriptions on the additional smashes can be a bit ambiguous at times.

Up special is perfect. Nothing else to say here. As for the down special, I’d actually skipped to the end of the set to see the “mini-moveset” you promised, and I had no idea what the heck it was supposed to be. Glad to see that cleared up. :razz: One question about it… is the chicken effect permanent?

Aerials! While the concept of the NAir is truly lolworthy, I’m really not a fan of the random effects. It seems like you had a couple of ideas of what you wanted the move to be like, and then you just slammed them all together. :ohwell: As for the Knee of Injustice… to knee, of course. Sakurai has enough KO moves that I’d take my 50% and then use something else to get my opponents. I’m glad you saw how broken the move was, but that doesn’t make it unbroken.

The BAir really makes me worry about Sakurai. He can KO, deal plenty of damage, and now he can gimp? What’s next, traps? *continues reading* Minions. He can create cheezy minions. Obviously you threw balance out the window, but hey, Sakurai never really was one for balance, was he? Creating your own Samurai Goroh doesn’t seem plausible, but since it takes so long to form… I suppose I’d have to actually use it in a match to criticize the balance of this move, but it certainly seems overpowered from where I’m at. The heat-seeking missiles from the UAir are another balance concern. That’s 36%! And finally, the DAir. 35% from any move gets a big “NO” from me, especially when it only has a quarter second of lag. Overall, Sakurai’s aerials really need to be looked at, balance-wise.

Time for the grabs. The chloroform was a nice touch, although it really isn’t used in your grabs. OUCH! A cheese grater over their face? That seems more cruel than random. The FThrow seems like it could be absolutely devastating. This is one of those moves you NEED to say how fast the damage goes up. The BThrow seems a bit underpowered, which is… actually a relief to say, after such moves as the BAir. I’d expect Shoop to deal some substantial knockback.

The UThrow is insane. ZOMG THEY’VE BEEN BALLOONS ALL ALONG!! A great move without balance issues here. Perhaps, however, you could make it so larger characters take longer to inflate? The DThrow steals Bowser’s DThrow’s spotlight for innuendo. Nicely done, although now I have to read Warlord’s story mode to understand where that came from. D=

The final smash was an impressive montage of Kirby and the competitive smash scene, although if he could handle creating an AI on the level of M2K I figure we’d have seen it by now. Anyways, in the theoretical sense it works.


Okay! First part of the review is done. Moving on to the main points... (which will be much shorter)


Originality: This moveset is a shining beacon of creativity. Every move was extremely creative and a joy to read. You'd get full marks here, if we gave marks.

Playstyle: I didn't really see much playstyle to speak of. I realize you're part of the anti-playstyle movement, but I'm sure you could have made a couple interactions, or at least a THEME.

Detail: Plenty of detail here. Your lengthy backstories made it a bit difficult at times to pull out all the critical information, but it is all there. However, I'd like to see more mention of lag and range for those disjointed attacks.

Balance: Sakurai, as mentioned many times above, is very overpowered. He can deal damage, KO, gimp, run away from opponents, recover, and even take a hit. Moves such as the DAir and FAir really make me worry about Sakurai. At this rate, a Tier Punch would have no effect on Sakurai himself.

Relevance to Character: Obviously, this is not the true Sakurai. Then again, it never was. I told everyone a long time ago that this was a self-insert, but no one believed me. Anyways, great job incorporating your randomness into the smash world! One of my favorite OCs to read. ;)

Organization: I'm really not a fan of Sakurai's organization. The fluctuating text sizes and alternating full-color paragraphs made it a bit of a challenge to read, making me glad I copied the thing into a word document for the review. I seem to recall that Kid Goku struggled with that too, what with the massive text size... maybe I'm just too used to the standard KRool-approved format.

Extras: Lots. Everything you didn't manage to include in the bulk of the set made it here. Ask someone else for indepth analysis. But one thing I was shocked about... WHERE'S THE YOSHI ALTERNATE COSTUME?! =O

Overall: This set's primary good points are humor and creativity. It's an immensely readable set, and newcomers could easily be pointed to it for some unique ideas. However, it's really held back by being overpowered and lacking some critical details at points, especially things such as the range on the DSmash. The organization could be a bit more uniform, as well. Regardless, it's a shoe-in for "funniest non-joke set" and could easily be seen in the top 50. Nice work!
 

TheSundanceKid

Smash Lord
Joined
Jun 8, 2008
Messages
1,636
Location
The Secret Kingdom
I thank you for the review, Agi. I'm glad that someone actually reviewed him <_<.

I'm glad you enjoyed the set as much as you did and of course you can have my autograph!
 

Meadow

Smash Apprentice
Joined
May 4, 2008
Messages
197
Location
Herndon, VA
Sorry if I'm stealing anyone's spotlight...(I doubt it)


The timid yet cheerful white-spotted Toad denizen of the Mushroom Kingdom, Toadette, has joined the Brawl!

Contents :

I. Introduction [INTRO]
II. Pros & Cons [PRCNS]
III. Statistics [STATS]
IV. Standard Attacks [STDAT]
V. Smash Attacks [SMSHA]
VI. Aerial Attacks [AIRAT]
VII. Special Attacks [SPATT]
VIII. Final Smash [FNLSM]
IX. Grabs & Throws [GBTHR]
X. Situational Attacks [SITAT]
XI. Playstyle [PLYST]
XII. Appearance [APRCE]
XIII. Taunts [TANTS]
XIV. Victory/Losing Poses [VICLO]
XV. Other Extras [OEXTR]

~Introduction~

[INTRO]

Toadette (Japanese: キノピコ Kinopiko) is a female Toad that has a white-spotted pink cap and corresponding plaits, and lives in the Mushroom Kingdom. In Mario Kart : Double Dash!! for the Gamecube, Toadette made her first appearance there as Toad's default kart partner. After that, Toadette appeared in many other games, mostly spin-offs, either as a playable character (Miscellaneous sport games, Mario Party series), a storyline character (Dance Dance Revolution : Mario Mix, Mario Party DS), or a guide/host (Paper Mario : The Thousand-Year Door and Mario Party Advance), with her latest appearance in Mario Super Sluggers.

While Toadette has appeared in quite a few games up to date, her background is relatively unknown. But Toadette has always been shown as a kind and helpful Toad with a sunny personality, but can be easily depressed and upset. She has concerns for animals, and is also a musician. She is shown to have good relationships with other Toads, Peach, and Birdo as well. Toadette has many different talents, although some of them are fan-based, due to Toadette's lack of a background; some of them include her being talented as a gardener, a cook, a musician, a nurse, and an artist as well. Her affinity with mushrooms, as all Toads are affiliated with, are clearly shown in the Mario Kart and Mario Party series. In the Mario Kart Series, Toad and Toadette's special item is a Golden Mushroom with a crown on its head, letting the two use it as a regular mushroom speed boost continuously until the Golden Mushroom's time limit runs out. In the Mario Party Series, Toad and Toadette have the Triple 'Shroom Orb, which allows them to hit two dice blocks for three turns, allowing them to reach almost anywhere on the entire board quickly. Not surprisingly, in other games, such as Mario Super Sluggers and Mario Kart Wii, Toadette is portrayed as a speedy and light character, with similar characteristics to that of her friend Toad. This is the same for her Make Your Move moveset, which you'll see revolves mostly around her agility and coordination.

~Pros & Cons~

[PRCNS]

Pros :
-Very High Ranged Attacks
-KO attacks are extremely powerful
-Fast aerials
-Pretty good at racking up damage
-Speedy
-Floaty
-Lovable

Cons :
-Few KO Attacks
-Other attacks have slight start/end-lag
-Floaty
-Mediocre Recovery
-Bad Edgeguarder/Easily edgeguarded

~Statistics~

[STATS]

Power: 4/10 (Toadette is weak, so she has some trouble KOing opponents)
Weight: 3/10 (Toadette weighs just a tad heavier than Olimar.)
Walking Speed: 5/10 (Average)
Dash Speed : 8/10 (While not the fastest character in the game, Toadette still beats most of the roster in the speed category.)
Fall Speed : 4/10 (Toadette has a bit of a slow fall speed. She falls at the same speed as Peach.)
Size : Toadette is a tad bit shorter than Mario, making her just bigger than Olimar, Kirby, Jigglypuff, and those of similar size.
Jumping: 7/10 (Toadette has surprisingly good jumps for one of her size. Her first jump covers roughly the same height and distance as Marth's, while her second is about ¾ of that.)
Crouch: 7/10 (Toadette, being so short and small, can dodge most of the projectiles in the game in her crouch, aside from wide shots such as Lucario's Fully Charged Aura Sphere and Samus' Fully Charged Energy Ball)
Traction: 6/10 (Normal)
Projectiles : 7/10 (Her music notes can dominate the playing field, and her flowers can be used in a variety of ways, such as luring, baiting, etc. However, they do take a bit of time to get used to, and are tricky to control)
Survivability/Endurance : 8/10 (Toadette particularly excels in this category, mainly because of the fact that she has many moves that let her get out of a troublesome situation easily, as well as her options of being able to dominate the entire stage. And while Toadette's weight slightly contradicts the ranking for her in this category, everything is explained in the moveset.)
Number of Jumps : 2
Wall-Jump: No
Wall Cling: No
Crawl: No
Glide: No
Tether: No

~Standard Attacks~

[STDAT]

A – Marionette : Toadette smiles and takes out a small red mushroom, the same type of mushroom as used in almost every Mario game up to date, which has a similar appearance to the mushrooms in the Smash Bros. Games. The only visual difference is that the mushroom Toadette holds is about half the size as the one in Super Smash Brothers Brawl. Toadette then drops the mushroom from her hand, making it fall toward the floor, but then it is shown that the mushroom was tied on a string to Toadette's fingers, making it seem like the mushroom was Toadette's marionette. In fact, the mushroom will indeed be used as a marionette; Toadette will then fling the mushroom onto her opponent's face and do slight damage to them. After she's finished with the hit, Toadette swiftly and skillfully slides the mushroom down her arm and behind her vest, the strings tied on her fingers disappearing magically. The hitbox of the mushroom will still be intact even as Toadette pulls the mushroom back in, just as a note. [Damage : 3%] (Knockback : Low. The hit from the mushroom makes an opponent slide just a tad bit, which may not let Toadette manage to get her next jab in.) (Range : High. Toadette's mushroom can hit a distance roughly the same as Marth's jab, so it isn't that surprising that Toadette can land a hit from afar.) (Speed : Slow. Toadette's jab has a high start-up lag, making the move not that great for building damage. It has average ending lag as well.)

Comments : Marionette is a good move for the fact that it outranges many other moves in the game; it also has the property of cancelling any projectile and attack that lands on the same frame as the mushroom's hitbox starts, making it good against some of the more projectile based characters, such as Toon Link and Samus. The downside of it being a 'canceller' is that it takes a while for it to start up, so you have to read your opponent ahead of time for you to be able to block the attack. It's also useful for edgeguarding an opponent, because it's easy for others to underestimate when the attack is finished. It should also be noted that the hitstun the mushroom gives is just enough for Toadette to land the second and final hit of her jab on the opponent, but the timing is compact.

A-A – Mushroom Bounce : Toadette takes out her mushroom just like how she did in her first hit of the jab, and proceeds to attack the opponent similarly as well. However, instead of putting her mushroom away, Toadette flips her fingers up suddenly after the first hit and the mushroom bounces off of the opponent's face and onto the top of their head, causing them to flinch, dealing more damage. Toadette then pulls back the mushroom, smiling once more. [First Hit : 3%, Second Hit : 3%] (Knockback : First Hit : Low. Second Hit : None. The mushroom simply bounces off of the opponent's head, so there is no knockback.) (Range : High. The range is slightly less than the hit from the first jab, so there is a possibility that you'll miss with this if you space the move perfectly.) (Speed : Average. The hit comes out fast enough right before the hitstun from the first hit ends.)

Comments : Same thing as her first jab, except with a bit more added damage and no knockback. The hitstun from this second hit is low, so the opponent can shield and counter after Toadette is finished with the attack. The ending lag is the same as the first hit as well. And unlike the first hit of her jab, the second hit of Toadette's jab does not have any cancelling/locking properties, limiting its usefulness. However, it is possible to hit the opponent with Toadette's Ftilt quite easily after they're hit by the mushroom, since the hitstun is quite long, and Toadette's F-Tilt comes out a few frames after Toadette's Jab animation can end. This doesn't mean she can Jab-Cancel, though.

Up Tilt – Hectic Handbell : Toadette slyly smirks before she takes out a small, jingling handbell made out of spotted mushroom caps and shoves it into the air, twirling and swinging it twice in midair before pulling it back down again. Two small quarter notes sprinkled in sparkles will appear out of the bell when Toadette swings it, allowing the bell to hit a maximum of four times on an opponent, two of the swings, and the two notes. The quarter notes will float out in the air even after Toadette puts the bells back, moving slowly in opposite directions (Either Northwest or Northeast), before fading away into the background after two seconds if the notes are untouched. Toadette is free to move as soon as she puts her bell back into her pocket. [Swings : 3% Each, Quarter Notes : 2% Each] (Knockback : Swings : Average. It's not enough for a KO until very high percents, but it can send an opponent a moderate distance away. Quarter Notes : Low. The opponent flinches and jumps into the air, backwards, for a couple of steps, but it's nowhere near enough for a KO at any normal percent [Below 300%]) (Range : Swings : Average. The hitbox of the bell itself covers a moderate distance around Toadette, about the same width of Toadette's head and the same height as her cap. Quarter Notes : VeryHigh. Each quarter note is roughly the same length of a Lip's Stick and width of a Star Rod, which oddly enough, is bigger than the bell itself.) (Speed : Swing : Below Average. While the swings aren't the slowest or the fastest attack in Toadette's arsenal, it still takes a few seconds for Toadette to take out the bell and wave it around her head. There's moderate starting lag and low ending lag on the swings. Quarter Notes : The quarter notes follow an opponent at a snail's pace; A.K.A. the same speed as a Mr. Saturn walking on the ground.)

Comments : Hectic Handell is a mediocre move at first glance, but it's actually quite useful in some situations. The hitbox only hits directly above and around Toadette, making it miss on most characters if Toadette is standing directly next to them. The notes can be used to block characters trying to attack you from the sky, which is especially useful against air-oriented characters such as Peach and Jigglypuff. The notes can also function as a handy edgeguard when an opponent is trying to jump back onto the stage. While you can't control the notes as you would with those from your Royal Trumpet, they're still a pretty big hindrance to your opponents. The attack has a bit of start-up lag though, so be sure not to use it when you know you could be intercepted. Hectic Handbell is the first of one of Toadette's many 'Music Note' moves.

Forward Tilt – Pristine Pearls : Toadette takes out a small, gold-lipped oyster from her pockets and pets it gently in her hand, fondling it with care. The oyster shivers in her hand for a few frames before coughing up a natural pearl in front of Toadette, before flopping down onto the floor and jumping into a puddle of water nearby. Toadette gets flustered and surprised before she takes a look at the pearl, her eyes widening slightly. Once the pearl hits the floor, it will disappear in a puff of small smoke, as how most other items disappear when their time of usage is used up. The pearl acts as a small projectile, and can be reflected by opponents, making this a dangerous weapon to use against those with reflectors, such as Pit, Fox, and Zelda. In a rare case, you might even be able to get a golden pearl (And no, she did not paint it in gold), which appears roughly 5% of the time, and once it hits the floor, can still be used as an item as a projectile once picked up. The golden pearl has slightly higher damage and knockback than the regular pearl, but less speed and distance. [Normal Pearl : 8%. Golden Pearl : 9%] (Knockback : Normal Pearl : The normal pearl doesn't do much knockback to an opponent, but it does knock them down onto the floor no matter what percent, and has a potential to trip an opponent depending on their percent. It's not enough to be a KO move at all, but it could help Toadette string another attack in as the opponent is recovering. Golden Pearl : It's a bit better than the normal pearl, but other than that, nothing else is different; tripping probability, etc.) (Range : Normal Pearl : Above Average. Being a projectile, it's only natural that the pearl has high range. It's hitbox is quite small however, which makes it have less range than most other projectiles. It's hitbox is slightly bigger than the size of a Gooey Bomb, and it can cover a distance of three Stage Builder blocks. Golden Pearl : Average. Being a bit heavier than its plainer counterpart, the golden pearl will only cover a distance of 2.5 Stage Builder blocks. It's still the same size as a Gooey Bomb, however.) (Speed : Normal Pearl : Above Average. Faster than most projectiles, and the fact that the oyster actually spits it out, it's a lot faster than other character projectiles. It has the same speed as a piece of Zero Suit Samus's suit pieces, making it a bit hard to reflect/shield/powershield/dodge. Golden Pearl : Below Average. It has the same speed as Wolf's Blaster. However, for both pearls, the time it takes for Toadette to take out the oyster and spit out the pearl takes about ½ of a second, making it below average.) [Inspiration : Oyster Mushroom]

Comments : Toadette must be pretty rich if she can hoard so many pearls in her vest...and she has golden ones, too! But in all retrospects, Toadette's pristine pearls can prove to be a viable weapon in a match. While the pearls can be reflected, Toadette can use the opponent's brief second of vulnerability after they worry and rush to guard the attack to well...attack them. In my opinion, the normal pearl is better than the golden pearl...the tiny 1% damage increase isn't worth it when you sacrifice some speed and range. Okay, that's really all I have for this move currently, since I forgot what I was going to write...(I hate my abysmal memory.)

Down Tilt – Statue Stationery : Toadette sits down on her bottom and takes out a small notepad, which had gray stone Thwomps and Mushrooms decorated around the fancy border. Toadette plucks out a ballpoint pen, with its end a spotted pink ball, and begins scribbling franctically on the pad, her tongue licking the side of her mouth in concentration. After a ½ second or so, Toadette smiles and happily jumps up into the air before ripping out the paper and laying it gently on the ground. Once the paper is placed upon the ground, in exactly one and a half seconds, a massive, finely carved statue of a Thwomp or a Mushroom will eject out of the ground (Depending on what Toadette drew), in a similar fashion as when Doctor Wright summons a building from the ground in Brawl. The Thwomp covers a higher vertical height than the mushroom and does more damage and knockback overall. The mushroom, while lacking in power and height, covers a wide horizontal distance, and also has a chance to not be the regular mushroom it usually is (Sorry if that didn't make any sense). There is a 75% chance for a Thwomp to appear out of the stationery, while only a mere 24% chance for the mushroom statue to appear. And the rarest of them all, a golden variation of the mushroom, resembling the same Golden Mushroom used in Mario Kart : Double Dash!! and other miscellaneous games, will appear 1% of the time. The Golden Mushroom will do twice the amount of damage a regular Mushroom does, but the knockback remains the same. The Golden Mushroom will also reflect any projectile attacks (Full distance, not half distance like some other reflectors) that might happen to come its way, a trait that the other two statues don't have. [Thwomp : 14%, Mushroom : 11%, Golden Mushroom : 22%] (Knockback : Thwomp : High. The stone Thwomp is one of Toadette's few KO moves, even if it only comes 75% of the time. It can KO Mario from the center of Final Destination at a % roughly estimated to be about 75% or so. Mushroom : Above Average. The mushroom provides a good deal less knockback than the Thwomp, but it's still very good compared to Toadette's other moves. Potting Plants is certainly an exception, though. Golden Mushroom : Same as regular Mushroom.) (Range : Thwomp : Above Average. The Thwomp is as wide as one Stage Builder block, but its height is roughly 1.5 times the size of a Stage Builder block. Mushroom : High. The Mushroom's hitbox is square-shaped, so it has a bit of a disjointed hitbox. The Mushroom, both in height and width, covers 1.5 Stage Builder blocks. Golden Mushroom : Same as regular Mushroom) (Speed : Thwomp : Slow. It takes 1½ seconds for it to pop out, and when it does, it pops out rather...slowly. Mushroom : It's the same as the Thwomp's. Golden Mushroom : Now, here's where the Golden Mushroom has a bit of variation from the regular mushroom. Instead of 1½ seconds for it to come out, the Golden Mushroom will appear out of the ground at one second instead. So if the statue comes out early, don't be worried or surprised, you're just lucky enough to have drawn a Golden Mushroom instead of a regular one.]

Comments : Statue Stationery is a bit of a colorful move; while it takes a bit of time for it to start up, it's great for putting a small trap on the stage when an opponent is chasing you. If you or anyone else is standing on the stationery when the statue comes out, only the opponent will be affected (This of course, includes your teammates if Friendly Fire is turned on.), and not you. The statue will merely appear behind you, as if it were some background scenery. The player can also see what's going to come out before hand if they look on what Toadette is drawing on her notepad; all you have to do is pause and tilt the camera so you can see the notepad clearly. If it has a sketch of a Thwomp on it, then it's going to be...yep, a Thwomp. The main distinguishing detail between the Mushroom and Golden Mushroom is the sparkles that are drawn near the Golden Mushroom; so yes, you can predict what's going to come out if you use that method. The randomness factor of Statue Stationery fortunately doesn't affect too much on Toadette's...er...playstyle. The knockback and damage aren't different enough by a large margin so that one completely dominates the other.

Dash Attack – Tea for Two : Toadette whips out a finely adorned platter with two teacups (One of them a rosy pink, the other white with specks of red; both of which are filled to the brim with steaming steeped tea) and struggles to balance it as she dashes forward. After walking for one or two steps, Toadette yells in surprise as she trips over her own feet with the platter flying out of her hands. The teacups fly into the air and spill their contents all over the area in front of them with a loud crash, damaging any opponents or items in front. The pink teacup will fall at roughly ¾ seconds after the white spotted red teacup falls, both of which fly through the air in a 120° arc. Toadette realizes her mistake and hurriedly rushes to clean up the mess, creating some ending lag and an awkward atmosphere as well. [Each Teacup : 5%] (Knockback : Average. Being scalded by some freshly brewed tea hurts...) (Range : Average. The range of the teapots a wide horizontal distance, but only directly in front of her the opponent is damaged, despite the teacup's seemingly disjointed hitbox) (Speed : Average. Usually when Toadette tries to use her dash attack, it's quite predictable...think of it as a slightly slower version of Mr. Game & Watch's dash attack.)

Comments : Toadette's dash attack is useful in some ways, and in some ways not, but other than that, it might catch an opponent off guard if they're not expecting it. It's average in almost retrospects, from the speed, range, and knockback, all the way to hitstun. The only thing that's a bit off is its ending lag; Toadette pauses to clean up the mess for roughly ¾ of a second, giving the opponent a great opportunity to counterattack. It can KO, but it's not one of Toadette's best or main KO moves. Use it sparingly. Oh, and one small note : If Toadette spills her teacups over the edge, they'll keep falling and won't disappear once they hit the ground, so it could be a handy (Projectile?) edgeguard for someone recovering back onto the stage, but you need precise aim. Tea for Two is Toadette's most handy edgeguard against some opponents with mediocre vertical recoveries, such as Ike, Captain Falcon, and Ganondorf. Still, landing it on an airborne opponent is difficult, but if you want to try your luck, go ahead. So, don't uh, use it straight on against an opponent, unless you want to see Toadette squeal in pain as she gets counter-attacked.

~Smash Attacks~

[SMSHA]

Up Smash – Pirouette Palette : Toadette fumbles a bit with her clothes and takes out a cleanly wiped palette, and then taking out three ink bottles and squirting the three primary colors onto the palette. [Red, Blue, Yellow] Toadette then takes out a wooden paintbrush and twirls it in her hand before quickly sticking it through the thumb hole in the palette, making the brush tip just poke out above the palette. Toadette then lifts the entire palette into the air and stands on one foot, twirling on the spot three times exactly. The palette spins in her hand and a flurry of colors are generated as they splatter in a cyclone-ish fashion above her. Anyone hit by the paint from the palette is damaged, whether by direct contact or if they got hit as the paint drops fall. Once Toadette finishes twirling the palette, any paint drops on the floor or other players will disappear after a brief second, and Toadette pulls the palette back into the folds of her clothes, but not before wiping it clean again using a lavender colored cloth. The palette can hit up to three times on an opponent. Three paint drops fly out of the palette, each doing low damage and knockback. The damage and other stats the paint drop has are shared with the regular hits the palette make.[Uncharged : Each Hit : 3%. Fully Charged : Each Hit : 6%] (Knockback : Very Low. The paint from the palette will merely make the opponent flinch; you'll have to wait until your opponent (Basing off of Mario's weight) to reach 300% before they can even get sent a moderate distance away. However, the hitstun from the paint drops are longer than most would expect, but it's all the more advantageous for Toadette.) (Range : Above Average. The palette is quite wide; it's about 1.5 times the width of Toadette's head, which is not really that surprising, since the palette was designed to protect Toadette from airborne attackers. However, the palette is paper thin, so it doesn't have very much vertical range at all, aside from the few drops of paint that fly into the sky.) (Speed : High. While there is a bit of start-up lag, it's negligible when compared to the speed of the palette as it's spun in the air. The palette will spin three times in less than a third of a second, making it quite fast indeed.)

Comments : Pirouette Palette is a strange Smash Attack compared to most of the other Smash Attacks the other characters have on the Brawl roster. Toadette is able to slightly tilt the palette in the direction she chooses as she twirls the palette, increasing the range (Maybe) of the attack, and also allows her to fend off attackers attacking her from the side with a smash attack of their own. The palette, while looks like a mini-tornado that can suck anyone in when they touch it, does not actually pull players into the palette's colorful vortex. Players can bounce off of the surface of the palette when they're hit by one hit, and bounce onto the next hit of the palette, but that usually only happens when Toadette puts the palette directly above her. Pirouette Palette is risky, but the reward of being able to catch someone with it is usually great. Pirouette Palette can let Toadette set up her next move, because of the low knockback. Oh, and a nice set up using the palette is luck-based, but : If the opponent falls off of the palette after the first or second hit, there may be a chance they'll get hit by a falling paint drop, letting Toadette have an even greater chance of continuing her attack chain. It's a nice guard against some airborne opponents as well, but be aware that some of the other Brawl characters have attacks that outrange and outprioritize the palette, such as Toon Link and Link's Down Air and most of Marth's attacks (Especially when tipped). And don't be fooled by the seemingly long set-up the attack has; Toadette can initiate the attack faster than most would expect. However, despite its speed, it lacks a lot of KO power, which means the only real use for it is for racking up damage, to sum it all up.

Forward Smash – Violin Vex : Toadette takes out a 1/8 sized violin from a case behind her back, and starts to rub the bow with some rosin, causing the strings to vibrate gently. Toadette then slides the bow onto the strings of the violin itself after rubbing the rosin onto the bow for about 10 frames, stretching the string closest to her so that it seems as if Toadette is drawing a crossbow. Toadette licks her lips and sets the bow in place tightly, before letting go of the string and having the bow fly ahead and away from the violin, damaging anything in its path, before getting caught by the front most string and slowly halting to a place on the violin. Toadette drops the violin and bow onto the ground then, which plops into its case perfectly, as Toadette frowns slightly, disappointed that she did not get to play anything. [Uncharged : 10%, Fully Charged : 18%] (Knockback : Average. It sends the opponent sprawling in the air as they're hit by the bow, but typically its knockback isn't enough to KO.) (Range : High. The bow itself is already very long; about the same length as the Lip's Stick, and the fact that it's ejected in front increases its range even more, which could reach up to a width of one Stage Builder block. The downside is is that it has a very thin hitbox, allowing characters to jump over the attack with ease.) (Speed : Average. Toadette needs a spare moments' time to set up her bow and arrow, but there isn't much start or end lag. It still takes her a few tens of frames to set up the attack though, so be a bit cautious of that, please.)

Comments : The bow acts slightly like a boomerang; it goes out, and comes back, although it doesn't have a hitbox when it's going back. You can use Violin Vex to surprise the opponent every once in a while, as it provides pretty good knockback. It can't really help you when you're faced with a 'Roller', that is, one who rolls constantly and is likely new to the game (Like meee~!), since the hitbox lasts for such a short amount of time, similar to Dango Dangle, Toadette's U-Air. It's still a handy tool to have around though, but most players neglect it for most of the match. It can also possibly score a KO if it's kept fresh, but don't count on it.

Down Smash - Potted Plants : Always an avid gardener, Toadette gets ready to plant a...plant into the ground of the stage as she takes out a warm brown pot with a small flower bud planted in soil. Toadette carefully pats the soil around the flower bud using her trowel, and quickly steps away. The plant will then stay in place on the stage for roughly ten seconds; if someone steps on it, a moderately large tulip (According to Brawl's standards) pops out of the ground and propels the person into the air, possibly scoring a ceiling or Star KO. The angle of trajectory the opponent experiences is directly straight, regardless of which angle they came in from. This makes it very useful on stages with low ceilings, such as Flat Zone 2, Mushroomy Kingdom, and Yoshi's Island (Melee). The plant will then disappear in a puff of smoke as Toadette frowns for a brief second to see that her child is gone. If no one steps on the flower, then the flower simply blooms into a golden chrysanthemum and disappears, but not before leaving a trail of sparkles behind. The chrysanthemum will occasionally drop a sticker or two as it disappears, as a gift in return for the care it has been given. [Uncharged : 11%, Fully Charged : 21%] (Knockback : High. While it isn't outrageously broken that the opponent seems as if they jumped on the most powerful trampoline in the world, they still get sent pretty far up. At 55%, Jigglypuff can be KOed from the surface of Final Destination if there is no DI involved, uncharged. If it's semi or fully charged, the knockback will only increase by a margin, which will most likely not affect the percentage of KO that much.) (Range : Average. The tulip patch is around the same width as Toadette. It's a bit shorter than twice the length of Snake's mines [Although the hitbox surely isn't like Snake's]) (Speed : Average. The tulip takes roughly ½ of a second to pop out of the ground, giving any competent player a chance to shield the attack.)

Comments : A unique attack that may benefit all players, the Potted Plants move can be surprising on both ends of the spectrum. If an opponent happens to fall into the plant trap (Thank goodness it isn't a Venus Flytrap), then Toadette will easily be able to attack them while they're rocketing into the air using one of her fast aerials, most notably her Dair and Nair. It's high KO potential makes this one of Toadette's main KO moves, despite it having a bit of a long initiation time. Another good attack in Toadette's arsenal, one of the most useful, in my opinion.

~Aerial Attacks~

[AIRAT]


Imagine Toadette sitting on the Quacker instead of Baby Mario, and it having a mostly pink with white color scheme instead of mostly white and red.

Neutral Air – Quacker : Toadette gives a small shriek as she twirls around in mid-air once and pulls out a pink + magenta colored rubber-ducky shaped motorcycle, which has small, round wheels at the bottom and will start to flap its wings indignantly as it's pulled out from wherever Toadette pulled the Quacker out from. Toadette then pulls up on the handlebars protruding from the Quacker's head and performs a wheelie in mid-air, with white sparks drifting over the bottom wheel. Toadette, if she manages to hit an opponent while doing the wheelie, will then bounce up a bit and land to land another hit onto the opponent, or she can cancel it by pressing any other button other than stationary 'A' in the air. Once the attack ends, Toadette will then twirl once again in mid-air, letting go of the handlebars and the Quacker disappearing behind her as she does so. The opponent may also be hit by the front of the Quacker, hit by the front wheel while Toadette does the wheelie. [Lower Wheel : 7%. Top Wheel : 3%] (Knockback : Low. The Quacker's wheelie doesn't do much knockback; this allows Toadette a few set-ups. The knockback is the same for both wheels.) (Range : High. Overall, the attack covers, unlike some other Nairs, only the front and bottom the way Toadette is facing. The wheels have a slightly disjointed hitbox, being more square than circular, but at least it doesn't reach through Peach's Utilt.) (Speed : Above Average. While not the fastest or most agile attack, Toadette can still easily pull out the Quacker and attack the opponent in a dire situation when the time comes for it. It takes about ½ of a second for Toadette to start the attack, and the same to end it.)

Comments : The Quacker is a very nice tool that lets Toadette continue with a stream of attacks either from the Quacker again itself (As soon as Toadette stales the Quacker, however, the move will automatically end and Toadette will be forced to do something else, so as to prevent an infinite of bouncing repeatedly on the opponent's head. The Quacker also changes color according to Toadette's current color costume, so as to make it fit a bit more.). Toadette can use the Quacker after trapping an opponent from an upward-knockback dealing move, such as her Down Smash and Down Tilt, if she predicts and times the attacks properly. The Quacker can be used in a variety of ways outside of attacking as well; if Toadette lands on the ground while using the Quacker, the Quacker will immediately speed off in front of her and fall off of the stage, but not doing any damage to opponents or items on the stage. Toadette also gains a slight boost when she uses the Quacker, similar to how Wario jumps off of his Wario Bike, only that it's the opposite with Toadette's Quacker.

Forward Air – Knitting Needles : Toadette takes out some multi-colored yarn and a pair of knitting needles and begins to knit at lightning speed. Almost as soon as Toadette takes out the needles and yarn, she's finished with her creation. Once she's finished, Toadette beams and lifts her masterpiece up into the air, which reveals a pair of finely knitted horns and wings, which were all knitted using only left/right plaited stitches, respectively. Toadette then quickly slips into the horns and wings, and rams the opponent using the soft yet deadly horns in a northward direction, the small white wings flapping all the while. Toadette then grabs a small spool and twirls it once in her hand and drops it back into her vest, the horns and wings rolling back up into a roll of yarn again. [10%] (Knockback : Above Average. This is certainly one of Toadette's KO moves, so expect it to have quite a bit of knockback. Think of it as an underpowered spike, or having the same knockback as an 'average' spike; Yoshi and the Ice Climber's Fair can compare relatively well to Knitting Needles, although of course it doesn't actually spike.) (Range : Average. The horns have a bit of a disjointed hitbox however; the opponent can be damaged if they just graze the tip of the horns, although it'll only inflict minor damage and knockback (1%, to be exact). It resembles the hitbox of Samus' Fair, although it's a bit less wide.) (Speed : Slow. Knitting Needles once again is similar to Yoshi and the Ice Climber's Fair...Knitting Needles is just a bit slower than those two aforementioned attacks. And yes, I know what you're thinking : How could this move not be practically done at a snail-speed? [If that makes sense], and well, that's just how it works, okay? D:<) [References : Maitake Mushroom]

Comments : Unarguably the slowest aerial of Toadette's, Knitting Needles, despite its name, does not involve knitting needles (As fun as that would be) to hit the opponent. The plush horns Toadette dons makes her resemble a Pianta slightly, which she can use to her advantage. The hitbox of the horns, as stated in the description, is slightly disjointed and lasts longer than most would expect, so it can usually land a hit on an opponent if they airdodge early, either hit by the horns themselves or the sourspotted hit. It can still be airdodged completely though, so be aware of that when you're using it. Other than for KOing purposes, I can't think of any other reason for you to use this, as it's much too slow to connect with another one of Toadette's attacks. Its priority is pretty good though.

Back Air – Perfumed Shroomy : Toadette puts her hands behind her back and reappears holding out a small, round and orange bottle of perfume labeled, “Bellis Perennis”, and waves it in the air. She turns her head around to aim, and presses the side of the perfume bottle which releases a small spray of yellow smoke into the opponent's face (If the opponent is behind her...which is I think when you'll use this), which causes them to flinch. Taking advantage of this opportunity, Toadette quickly whacks the opponent in the head with the perfume bottle itself, sending them away, smelling dainty and fresh. Toadette stuffs the perfume bottle back to wherever she got it, nodding appreciatively seeing how she had done what she was supposed to. [Perfume : 3%, Bottle Whack : 8%] (Knockback : Perfume : None whatsoever. It's just a distraction so that Toadette can get the second, more powerful hit in. Bottle Whack : Average. The bottle sends them away from Toadette a moderate distance, but due to Toadette's lack of strength, the potential of the perfume bottle is greatly diminished than if a stronger person were to use it.) (Range : Perfume : Above Average. The smoke covers an area the same size as Toadette herself. Bottle Whack : Average. Toadette throws the bottle directly behind her about ½ of a Custom Stage Builder block away, so it covers some pretty good horizontal distance.) (Speed : Perfume : High. Fast as the wind, Toadette can spray the strange perfume into the opponent's face in less than ½ a second. Bottle Whack : Below Average. As for the bottle whack...it's horrendously slow compared to the perfume spray. Toadette takes roughly two-thirds of a second to whack the bottle, giving the opponent a chance to airdodge the attack if they're fast enough.)

Comments : Toadette really enjoys doing strange things to her opponents, huh? Well, Perfumed Shroomy does a pretty good job of allowing Toadette to distract the opponent greatly. The smoke from the perfume disappears about a second after Toadette sprays it into the air (Or on the opponent's face, if she manages to get the perfume hit in), which might let Toadette be able to blanket part of the stage in cloudy yellow smoke, not unlike the smoke that comes out of a Smoke Ball. The hit of the perfume is also quite fast, so Toadette might be able to get a surprise hit in every once in a while. However, the bottle whack is usually anticipated by most players by instinct, and can be shielded easily, and coupled with the non-flinching properties of the smoke, it can be very hazardous and bad for Toadette if the opponent knows when you'll use it if you overuse it. One thing is good about it though : In order for the opponent to dodge the more powerful and dangerous hit of the bottle, they'll have to let themselves succumb to the perfume and then airdodge afterwards, almost always guaranteeing a 3% damage onto the opponent. Perfumed Shroomy is also good for shield pressure combined with a short hop on the ground, and like her other aerials, has the potential to continue an attack chain. Overall, I think Perfumed Shroomy is a pretty good move in Toadette's arsenal, arguably maybe one of her best.

Up Air – Dango Dangle : Toadette loves to make dango of all varieties, relishing in the taste and appearance of each and every single type and flavor of dango, which is all shown in her Up Air. Toadette takes out a skewer with some pre-cooked dango already on it, which comprises of typically one flavor each time she uses it. Each flavor has a different effect, which I'll go into more detail later, but I'll explain the basics of this move. Toadette lifts the dango into the air, and erm, she simply juts the skewer above her in a straight, vertical line rapidly, poking anyone in the the way with a tasty delish. The four dumplings wiggle on the skewer for a moment before Toadette puts it away, resisting the temptation to drop all four balls into her mouth at once. [Damage : Varies. See Below] (Knockback : Varies. See Below. However, for most of the dango varieties, the opponent is knocked in a northwest/northeast direction, rather than exactly straight up.) (Range : High. The skewer is long, as you would have to if you were to eat that dango. The skewer reaches about ¾ the height of Toadette herself, so it shouldn't be hard poking someone when they're recovering. The hitbox is directly on the stick though, so the opponent will have to make direct contact with the dango to get damaged.) (Speed : Above Average. There's a tinge of lag on the start and end, but Toadette can still poke the dango into the air in less than a seconds worth of time.)

Flavors/Varieties

Anko (Red Bean Paste) : This sweet, sticky, and delicious flavor is one of the most popular flavors in Japan, and is appreciated on almost any occasion. [9%] (Knockback : Average. Not enough for a KO, but the taste more than makes up for it.)

Chadango (Green Tea) : These calm and savory green-tea flavored dango is enough to make anyone smile. [7%] (Knockback : Average. The knockback sends the opponent roughly one Custom Stage block away, which is the same as the Anko Dango.)

Hanami (Sakura) : A flowery and colorful dango, this one comes in four different colors : Red, Blue, Green, and Yellow. A treat perfect for the flower-viewing season. [10%] (Knockback : Below Average. The knockback sends the opponent a bit backwards to the left or right if they were hit directly above, as a flurry of pink flower petals fly around the opponent and disappear as Toadette's attack ends.)

Goma (Sesame Seeds) : Covered in tens of delectable sesame seeds, this flavor has a unique combination of tastes; combined with the sweet flavor of the dango dumpling and the sesame seeds, the consumer will experience a strange yet pleasant sweet and salty taste from this dango. [11%] (Knockback : Above Average. The opponent will bounce off of the semi-hard surface of this dango, and will be sent roughly one and a half Custom Stage blocks away from Toadette.)

Mitarashi (Soy Sauce) : This dango is a bit different (Uh, no, not really) than the others; while retaining the sweet taste of the typical dango, it has been splattered with soy sauce and drips oozily from the stick. The salty flavor overpowers the sweet by a tad bit, but it's still delicious all the same. [8%] (Knockback : Low. The opponent actually sticks onto this dango, before launching away from Toadette slightly. Picture someone bungee jumping off of the top of a bus; not a very successful attempt.)

Teppanyaki (Teppanyaki) : A fried dango on a stick; what does this remind you of? The tangy taste of the teppanyaki dango is sure to make anyone delight themselves as they savor the flavor. [9%] (Knockback : Above Average. The opponent will be slightly sizzled as they fly away roughly one and a half Stage Builder blocks away from Toadette.)

Bocchan (Three Flavors) : An easily recognized and delicious flavor, the Bocchan Dango has three differently colored dumplings on it, each of them having their own distinctive flavor. (Red Bean, Egg, Green Tea) People of all ages relish in this sweet and zess t tasting dango. [12%] (Knockback : Above Average. Toadette smiles happily, seeing that she pulled out a Bocchan Dango before waving good-bye to the opponent as they're knocked roughly one and a half Custom Stage blocks away from her.)

All of the Dango Flavors except for the Bocchan Dango have a 15% chance of appearing; the Bocchan Dango only has a 10% chance. However, don't be disappointed if you don't get the Dango you wanted! I personally like all of the flavors (Although I can't say much, seeing how I've only eaten the Mitarashi Dango). And mind you, it was delicious.

Comments : Yay for this attack not making almost any sense at all! I honestly don't know why I came up with this (All of the information about Toadette liking it is fake, in case you haven't realized), but I thought it fitted her, and I just had a lollipop, so that's how the idea came...sorta. But uh, if it works, I guess! Dango Dangle is one of Toadette's most random attacks, as you can see. The Dango Dangle, while unreliable at times, is pretty good at Koing opponents at high percents, provided you get one of the higher knockback dealing Dango flavors, which are the Goma, Teppanyaki, and Bocchan flavors. The hitbox is thin, yet long, so make sure you keep in mind of that; the duration of the hitbox is also really short unlike Link/Toon Link's Uair, so even Peach (Erm, she has the worst airdodge out of all of the characters ;-; I feel so sad) can airdodge it safely without worries if she can predict it. You can use it to steal KOs really easily though, and it's a great (What's the term...) ledge-guarding tool : you can drop from the edge and use your second jump to quickly sprout a dango into the opponent, if they're slow on the intake.

Down Air – Maple Treeway : Toadette pulls out a round and sparkling golden leaf, found usually in the backyard of Creepy Steeple from Paper Mario : The Thousand-Year Door. Toadette lifts the prized leaf and tosses it onto her feet, which then releases a small cyclone of twirling golden leaves all around her feet, as Toadette stomps onto the opponent and is hit multiple times by the golden whirlwind. Four times, to be exact. Once the attack is finished, Toadette breathes out deeply and the wind around her feet disappears, with the leaves fading into the background. Toadette also gets a very slight boost (About the same height as when Mario uses his Cape for the first time in mid-air, or Peach using Toad in mid-air) when she uses Maple Treeway, but that will only work the first time Toadette uses it in mid-air; she'll have to wait until she touches the ground before she can get the mini-boost from the tornado. [Each Hit : 2%] (Knockback : Low. The knockback is low enough so that at least one other hit from the golden leaves will hit the opponent no matter what their percentage is, so the opponent will always receive at least 4% from this attack unless Toadette is interrupted. It has the same knockback as a normal jab, to be frank.) (Range : Average. It covers the bottom portion of Toadette's body and a little bit below her feet, so that provides a bit of flexibility on where she could use it.) (Speed : Above Average. Faster than most of the other Down-Airs the other characters in the Brawl roster have, especially those with spikes, lets Toadette activate the attack in a quick moment. There's a slight end-lag to it though, so it may be a bit challenging to string a bunch of D-Airs consistently on an opponent.)

Comments : A great damage racker for almost all occasions, any competitive player will use Maple Treeway in their gameplay frequently. With functions similar to other drilling D-Airs, and its low starting and end-lag, this is probably one of Toadette's best ways to rack up damage quickly in their low percents. Another good use is on the edge, it can make a handy edgeguard against those with recoveries like Fox/Falco's Side-B, or Lucario's Up-B. Because most of Toadette's attacks other than her aerials provide above average knockback to the opponent in another direction, Toadette can intercept them in mid-air with Maple Treeway and maybe even able to land a hit with the Quacker if she's lucky. The attack has lower priority than most of the other attacks though, and can be canceled by projectiles very easily, but the small boost Toadette gets sort of decreases the chance of that.

Note : And yes, I know that some of you are thinking, “Why is Maple Treeway Toadette's Dair and the Quacker her Neutral Air?”. Well, to answer your questions, I honestly don't know.

~Special Attacks~

[SPATT]

Neutral B - Royal Trumpet : Toadette takes out a small, standard B♭ Piccolo Trumpet from the folds of her vest and puts her lips on the mouthpiece, getting ready to play a random song from the Brawl archive. After a second or so, Toadette will blow into the trumpet and blast out a few notes from a random piece, causing a maximum of three notes to burst into the air. Each of the notes will go sequentially directly in front of Toadette, but you can alter the notes' path by simply tilting the control stick in the direction you want it to go; the only catch is is that it can't go backwards. So, you're free to control the notes as you're battling, but be careful not to collide with them, as they disappear if you touch them. The three notes' speed is also very slow, so try and surround your opponent with the notes as you send them out. It takes a subtle hand to be able to use Royal Trumpet to its maximum potential. The notes will stay for a maximum of eight seconds, before popping as if it were a bubble. Toadette can only blow out more notes after all of the previous ones disappear from the stage, either by time limit or if they manage to hit an opponent. [Each Note : 3%] (Knockback : Average. The opponent, if by chance they get hit by the atrociously slow notes, will be sent back roughly one Stage Builder block distance away, possibly scoring a KO on them at high percentages.) (Range : Above Average. Each note is about the size of Toadette herself (Don't ask me how she can produce such large notes), and has a rectangular hitbox. So uh, that's...pretty big if you're playing as a big character, such as Bowser or Donkey Kong.) (Speed : The time it takes for Toadette to conduct and finish the entire attack takes about two seconds; that's a lot of time, but it shouldn't be more so than the time it takes for Lucario or Samus to charge their charge shots. The notes come out 1 and a ½ seconds into the attack, so there's a half second of end lag there. And the notes travel at a seahorse pace...okay, maybe at a snail pace. But still, it's really slow. One note could cover the distance of Final Destination in around fifty seconds, causing Toadette to really have to think where she should direct her notes to.)

Comments : Royal Trumpet is a tricky move to master; the fact that the notes move as you're battling and that they can bounce off the ground/walls of the stage make it hard for a rookie player to not run into the notes as they're controlling them. If two notes collide with each other, then they'll cancel out each other. However, the potential of this move is high : If used right, it could possibly determine the outcome of the match, either by causing a chain reaction with other moves (Player getting hit by the note and being sent into the ground before getting sent up into the air by a fully charged Potted Plant smash attack, and being KOed in the sky.) or simply trapping them amist a variety of other traps, which uh, isn't that different from the reason prior to this one...er...ignore what I say...said, agh, however the word is used!

Side B – Fickle Fruiterer : Toadette, oddly enough, sells fruit occasionally during the Spring and Summer, from normal fruits such as pineapples and bananas to more exotic fruits such as durians and papayas. So, when you first use this, Toadette takes out a random fruit from a wooden basket with a vine wrapped around the handle(An Apple, Banana, Coconut, Durian, Grape, Melon, Papaya, Peach, Pineapple, or Watermelon), and chucks it ahead of her in an arc (The arc differs for each fruit), damaging anyone coming into contact with it. Then, the fruit will either do one of five things :

  • 1. It will explode into smithereens after landing and flashing for one and a half seconds, damaging anyone within its vicinity, including Toadette. It can be picked up, and it can roll down a hill or some other sloped surface (The speed the fruit rolls obviously counts on its shape.), making this slightly risky if the opponent sees it's about to explode and tosses it back to Toadette. (30%)
  • 2. It will simply lay there, able to be picked up and thrown again twice before disappearing in a puff of smoke. (5%)
  • 3. It will become edible and anyone can eat it to restore a little bit of health, with the exception of the durian. (5%)
  • 4. It will suddenly grow into a tree or vine or whatever it was grown on and stay in its position for three seconds, damaging anyone before disappearing. However, for this to happen, the fruit must first be the second option, and Toadette must then walk over to the stationary fruit and water it with her watering can to make it grow. So, this is uh, sort of tied into option two, making the chance rating the same as it. Sorry if my calculations are wrong. > <; -confused- (Same chance as option 2)
  • 5. It will just disappear after being thrown by Toadette. (60%)

Fruits

Chances of Each Fruit Appearing :

Apple : 30% (→ →)
Banana : 10% (→ → →)
Coconut : 5% (→ ↓ ↑ ←)
Durian : 5% (↑ ↓ ↑ →)
Grape : 20% (→ ← ← →)
Melon : 5% (↑ → ↓ ↑)
Peach : 10% (→ ↑ →)
Pineapple : 5% (← ↑ ↑ →)
Watermelon : 10% (→ ↓ →)

You can also select which fruit you want beforehand, but it is very tricky. The combinations for each fruit is next to the percentages in parenthesis's. Each combination has to be done very rapidly, before Toadette takes her hand out of the basket. If you don't do a correct combination, then the basket will just revert to chance as Toadette pulls out the random fruit. This gives you a bit less than ¾ of a second to enter the combination. So yes, you can control the luck factor, even if it's very hard.

Apple – The 'standard/regular' of all the fruits. All of the other fruits will be compared to the apple, or to itself (Does that even make sense?). The apple is thrown in a slightly curved arc, whose angle measure is probably around 90°. It does 8% damage, and knocks the opponent off of their feet, sending them backwards a moderate distance. It has average speed, so it can be guarded, but at least it isn't lobbed.

If it explodes, it does 10% damage; if it is able to be picked up and thrown, it will do 4% damage; if it is edible, then it will heal 2%. If it grows into an Apple Tree, then it will be about twice the height of Mario, and have leaves and branches growing out in all directions, although it's just background scenery. The real danger is in the apples on the tree, which fall down (Similar to the Whispy Woods when it shakes its apples) and can damage any opponents for 3% damage and average knockback, before disappearing as they hit the ground.

Banana – The banana is a bit stranger than the other fruits; it's thrown in a 270° angle, which is...eh...a bit of a lob, I suppose. The banana doesn't do much knockback, as it just launches them into the air as the banana flies back a bit, possibly scoring another hit on the opponent. Each hit from the banana (A maximum of two) does 5% damage.

If the banana explodes, it does 12% damage. If it becomes edible, then it heals 3%. If it grows into a banana tree (...Huh?), then once its finished growing, it will shake its leaves a bit and multiple bananas will drop, occasionally in bunches. If it's a single banana, then it does 1% damage and merely flinches, but if it's a bunch, it does 4% and may knock an opponent down if they have enough damage.

Coconut – The coconut, being quite heavy for Toadette, takes Toadette ½ a second longer to throw it, causing some more start-up delay. The coconut is thrown in an arc measuring 30°, and does 12% damage on contact, along with some high knockback, which could score a KO on a lightweight opponent. It can KO extremely light characters such as Jigglypuff and Mr. Game & Watch as low as 80% if used on the edge.

The coconut has a bit of a larger explosion range than the other fruits, similar to the Coconut Bomb. If the coconut explodes, it does 15% damage and heavy knockback, very easily scoring a KO on someone. If eaten, it recovers a measly 1% damage, while if it grows into a tree, the coconuts (Maximum of 3 on each tree) will fall at high speed and deal 7% damage. All in all, the coconut is your best chance of KOing an opponent, as one of Toadette's most powerful moves in her arsenal.

Durian – The durian is one of Toadette's more exotic fruits; its spikey-ness adds some knockback to its already high knockback and damage of 10%, possibly scoring a KO on lightweight characters. It's thrown in a 60° arc and can damage anyone who comes into contact with it (Except for Toadette), even while it is still, dealing 3% touch damage and flinching the opponent.

If it explodes, the durian does 12% damage and above average knockback, sending them sprawling across the ground and rarely in a northern direction into the air, making it deadly if it explodes on the edge, which could prevent them from recovering after being sent back. The durian tree is much slower to grow than the other fruits; it takes about ten seconds for the durian to grow into a tree, before dropping its hoard of durians in its leaves and damaging the opponent for 5%, tripping them at a 50% chance, whereas if they don't trip, they fly up into the air with surprisingly high knockback. Oh, and the durian can't be eaten, unfortunately.

Grape – Who doesn't like grapes? They're my favorite fruits, personally. The grapes, when rolled onto the floor, will separate and scatter all across the ground, causing anyone (Including Toadette) that steps on one to take 1% damage with no knockback, and trip, most likely causing them to hit another grape. This builds up damage very fast, and would be one of the most useful ways of racking up damage in the game if it doesn't affect Toadette either, but thankfully, you can jump away to counter this attack.

The grapes, once again, are disastrous when they explode; each one explodes at exactly the same time, which may cause an opponent to go flying from one grape to the next mid-explosion, racking up damage while dealing higher and higher knockback as their damage count flies up. Each grape does 3% damage when it explodes, and medium-low knockback, which is comparable to Ness's FTilt. There are a total of 17 grapes per bunch, which has the potential to do 51% damage if every single grape-bomb hits the opponent (That's very, very unlikely) Each grape has only a 50% chance of healing 1% damage. If the grape grows into a grape vine, then it will ensnare an opponent and do a multi-hitting attack that hits 17 times, doing 1% each, with ½ a second for each hit, unless the one captured mashes the A button to release from the grape vines faster.

Melon – The melon, despite its intimidating size (The same as the very large and bowling ball shaped Coconut), only does 7% damage when thrown at a 45° angle at the opponent. It deals average knockback, so it's not very viable or a good alternative for a KO move if you wish to use Fickle Fruiterer.

If the melon explodes, it will deal 13% damage and average knockback, which isn't a lot more than the knockback it deals when it was thrown, but whatever. It will heal 4% damage when eaten, and will do 8% damage when dropped from its tree if it grows into one.

Peach – This is not the Peach that appears after Peach's Final Smash in Brawl; it's actually a Peachy Peach, as shown by it's cartoon-ish and heart shaped appearance. It's thrown at a 100° angle, and does 6% damage when it hits an opponent while dealing very low knockback.

The Peach, while having the least overall damage and knockback, heals a surprisingly high amount of damage : 7%, to be exact. If it explodes, it deals 9% damage and average knockback, occasionally dropping a sticker, sparkling in the pink explosion. If the Peachy Peach grows into a delightful peach tree, then each peach will do 3% damage and flinching knockback, which also occasionally drops stickers.

Pineapple – The pineapple is a prickly fruit; its sharp exterior makes it similar to the durian, although a bit weaker since its 'spikes' are scarcer than the durian and more spaced out. When it's thrown, it is thrown in a 90° arc, and does 11% damage on contact, along with knockback that sends them into the air as if they hit the Unira when it's quills are out, but has low horizontal knockback.

If it becomes edible, it'll heal a small 2% damage, and if it explodes, then it deals 13% damage with above average knockback, the same as the standard knockback of the coconut. When it grows into a thick pineapple tree, it will contain only up to two pineapples, and each one does 12% damage along with average knockback.

Watermelon – The roundest of the lot, the watermelon does high damage and knockback, but it's still a bit less than the power of the coconut. The measure of the arc the medium-sized watermelon Toadette tosses is roughly 45°. It does 13% on contact, and does high knockback, which could KO an opponent at fairly high percentages (120% mark or so).

If the watermelon explodes, it sends a plethora of watermelon all over the stage while dealing 16% damage and extremely high knockback, the same as one from an Electrode explosion. The only downside of this is that the explosion takes twice as long to commence; that's about three seconds. If eaten, it heals 3% damage. If the watermelon grows...into the uh, ground, then in three seconds, a humongous watermelon the size of a small building pops out of the ground, before rolling the way Toadette faced when she planted it and squishing all items and players in its path, including Toadette. This deals 15% touch damage and below average knockback, so it probably won't KO anyone. It's very slow speed when it's rolling off the stage doesn't really help as well. However, it's range is very large : the height and width of the watermelon is exactly two and a half Stage Builder blocks.

Comments (Overall) : Fickle Fruiterer is certainly the most random and complicated moves in Toadette's moveset. Almost any player will have difficulty remembering what each fruit does and what their combination is, but once you get the hang of it, Fickle Fruiterer is one of Toadette's best moves. Just make sure that you distance yourself properly, because each fruit is thrown in a different arc, some bigger and some smaller than others. Just be aware of the qualities each fruit has as well, and you'll be fine.

Up B – Floaty Fluff : A very tall and dandy dandelion (Sorry for the bad pun...) pops out of the ground with a sproing in front of Toadette, or in the air in a puff of white smoke if Toadette uses it...while in the air. The dandelion is a Parachute Ball Dandelion, and it functions quite similarly as its name. As soon as it appears, Toadette jumps onto the dandelion and clings onto its stem tightly as it lifts her up and into the air. The dandelion has been ready for seed dispersal after it has been pollinated for a few days now, and some seeds of the dandelion will immediately fall off of the clock head as soon as it takes off, before every single seed falls off and Toadette will be forced to let go of the stem as she plummets to the ground. Toadette will be lifted into the air at a very slow rate, but she can change the direction of the path she's taking by tilting the control stick left or right, but it's very gradual. Each of the flowering seeds from the dandelion can hurt an opponent, but because the fly so slowly, it's quite easy for the opponent to shield or dodge the seeds as they fall. The stem also does some damage, albeit much more so than the seeds themselves, unsurprisingly. There are approximately 20 seeds on the dandelion head, where four fall off each second, making the entire attack last for five seconds. [Each Hit of Seeds : 2%, Stem : 4%] (Knockback : Seeds : Very Low. The opponent merely flinches when they get hit by a seed, but that could possibly set them up so that more seeds will fall on top of them, causing a bit of a chain reaction. Stem : Very low. The opponent flinches again, but they're sent downwards a bit so that Toadette won't be risked by a hit of an opponent.) (Range : Seeds : The seeds are quite small, despite the large size of the dandelion. Each seed is about the same size as one of Samus's bombs, but they have some fuzzy, feathery-like hairs protruding out of the top of the seed as they plummet, making each seed overall the size of an unused Pokéball.) (Speed : Very Slow. The dandelion, as one would expect, floats up into the air at an awfully atrocious and low rate. Almost anyone can interrupt Toadette's Up B as she's floating, unless Toadette presses down and lets go of the dandelion.)

Comments : Floaty Fluff travels quite a long distance; the distance Toadette can fly is just a bit higher than King Dedede's Up-B, and the fact that you can control the direction Toadette is going much more so than King Dedede makes Toadette's recoveries one of the best in the game. The only thing that drags it down immensely is its speed, as stated in the speed description. Taking up to five seconds, Toadette needs to be wary of all other players and obstacles so that she doesn't get knocked off of the dandelion and plummet to her doom. This also makes Toadette very susceptible to spikes while she's clinging onto the dandelion, so use it with caution. Toadette can't also use it again if the dandelion lost all of its seeds or if she lets it go, or even if an opponent knocks Toadette off (Meaning that her recovery surely isn't the best out there) but Toadette can still attack as she's falling, so that's a bit of a plus.

VV The move below is up for major revamping VV

Down B – Watering Can : Toadette's watering can, oddly enough, isn't going to be used for attacking purposes most of the time you're using it. The watering can has a variety of uses, most of them activating a dormant attack or maneuver. Toadette can also use the watering can to sprinkle the opponent with very deadly yet pure water, doing a slight amount of damage and knockback, but don't be fooled! This dastardly gardening tool can pack a punch when combined with other...things, such as Toadette's Down Smash. But even with this very flamboyant description using words that I frankly, don't even have a clue of what they mean and simply added them to enlongate the length of this move as I'm scrabbling all over the keyboard on what to write as I have procrastinated far too long and writing a run-on sentence, the uses of the Watering Can are actually quite limited. Sure, you can activate the effects of the Potted Plants, Floaty Fluff, and Fickle Fruiterer if you were to water something from those attacks, other than that, this attack is really just useless. It's merely here for desperation of a filler move, so uh, enjoy~ Oh, and the water hits three times and it pierces shields, so make sure you roll away when Toadette uses her watering can, as most side dodges won't last the entire duration of the attack. [Each Hit : 2%] (Knockback : None. It has the same properties as the rain from Wario's WarioWare stage.) (Range : Average. It reaches ahead of Toadette roughly ¾ of a Stage Builder block away, so it's nothing to be worried about.) (Speed : Average. It comes out the same speed as most of Toadette's tilts, really.)

Comments : Nothing out of the ordinary that could be traited to Toadette's Watering Can, other than a few small handy uses it could be used in. Toadette can water the opponent on the ledge or as they're recovering, possibly scoring damage on them because of the rain's heavy fall, and it's long duration. Other than that, there's not much more to Watering Can, aside from the fact that you can use it in midair to stall for a brief second, but that's only for the first use in the air.

^^ The move above is up for major revamping ^^

~Final Smash~

~Mushroom Monarchy~

[FNLSM]

Toadette gives a light laugh as she twirls on the spot where she activates her Final Smash, spinning and disappearing into the air before reappearing carrying a bundle of freshly picked mushrooms (Which count to eight), throwing them into the air. The mushrooms blossom into Golden Mushrooms, floating down onto the stage at a floaty speed. As soon as the mushrooms land on the stage, they transform into either a : Wooden Ladle, Pink Standard Kart, Pink Tulip, or a Wooden Paintbrush. The assorted items start to dance and sing for three seconds before a large, stamp-like image of Toadette's laughing face is imprinted onto the screen, blinding everyone as the items start to chase after opponents and swinging at them with all of the strength they could muster, creating a catastrophe all around the stage. After ten seconds of chaos, the image of Toadette disappears and so will the floating items, before a humongous Golden Mushroom ¾ the size of Jigglypuff's size when she uses her Final Smash collides into the stage, causing a very large amount of damage and knockback to anyone that comes into contact with it (Except for Toadette, of course.). The Golden Mushroom disappears and the battle resumes, but not before a slightly eerie giggle echoes around the stage, which seemed to have come from Toadette.

The Ladle does 3% per hit, and swipes at the opponents with a moderate speed. The standard kart drives on the ground only, but can jump to a higher level with the aid of a mushroom boost. It does 10% damage on contact, but drives at a slow speed, the same speed as Wario's Wario Bike. The tulip twirls into the air and does only 1% damage per hit, but has a 10% chance of stunning the opponent. It hits the opponent at a slow speed, a ratio of 1 attack for every three seconds. The paintbrush does 1% damage for each hit as well, but it launches a flurry of attacks onto the opponent it's targeting, doing up to three attacks a second. And finally, the Golden Mushroom does a gigantic 25% damage to anyone in its path, as well as some heavy knockback, although not as heavy as the one from Jigglypuff's Puff Up Final Smash.

The items will chase and split evenly among the amount of players in the room, however, if only one or two other players are present, then there will only be two or four items that will appear, respectively, instead of the usual eight.

~Grabs & Throws~

[GBTHR]

Grab : Toadette shuffles her feet forward a bit, trying to grab the opponent with her left hand, almost tripping if she misses. [Range : Average]

Dash Grab : Toadette runs and slides on the floor, pausing for a very brief moment before trying to grab the opponent. Her dash grab is a bit awkward and takes a while getting used to; Toadette has surprisingly high traction when she tries to dash grab an opponent. [Range : Average]

Pummel : Stylish Scribble – Toadette takes out a pen and doodles on the opponent's forehead, drawing either their logo image, the letter “P”, a smiley face, or a mushroom. [3%] (Speed : Very Slow. Toadette takes about 1½ seconds to draw the picture. The image also fades away from the opponent's forehead three seconds after Toadette draws the image.)

Up Throw : Plaits and Bait – Toadette will shove the opponent away and take out a long, wooden stick with a string tied around the end, which has an embarrassing photo of the one held by Toadette latched onto it. The opponent will then flush and immediately try to jump for the photo, but not before Toadette gives them an innocent smile and yanks the rod up into the air, causing them to fall. Toadette's eyes will flash for a frame as she swings her pink plaits right into the opponent's gut, causing them to gasp in surprise and pain, as Toadette swings her strangely and surprisingly hard plaits into the air and knocking them right onto the middle of the rod, causing them to bounce up and away from Toadette. Toadette gives a small sigh of weariness as she puts the rod and photo away. Too bad you can never see what the photo looks like; it's just a blur of black and white. [8%] (Knockback : High. This deals the most knockback out of Toadette's throws, which is about two and a half builder blocks away from Toadette, in a square like fashion. It also has surprisingly high hitstun, similar to Ike's Down Throw.) (Speed : Slow. While the throw is much slower than most of the other throws in the game, it's still not the slowest throw. It takes roughly one second to set up the throw, another half to do the throw, and a last half of a second to end the throw. For those addition incapable of, that's two seconds.)

Comments : Plaits and Baits should be one of Toadette's most abused throws, because it allows Toadette to follow up with almost any of her aerials. You can connect it with most of her aerials, especially with her Quacker. The hitstun is really low, as well as the speed, so the opponent might try and throw an attack at you as soon as they can, so be aware of that. It's knockback is really good; not Ness B-Throw good, but it's still pretty powerful. It's also the only throw that has any KO potential at all in Toadette's moveset.

Forward Throw : Port 'O Bell – Toadette takes out a small, slightly stained yellow bell, which is not not reminiscent of the golden bells in Delfino Plaza from Super Mario Sunshine. She waves it twice in mid-air, causing two small jingles to sound, before taking out a small wooden mallet used for xylophones and bangs it against the bell, creating a large 'Gong'-ing sound that sounds unfitting for that small, petite bell. The opponent yelps in pain as their eardrums were battered, getting sent back a couple of feet as well as being dealt some damage by the ring. Toadette, strangely enough, isn't affected at all by the loud sound; it's quickly revealed though that as the opponent flies away, two small earplugs pop out of Toadette's ears. When did she put those on? [9%] (Knockback : Average. Nothing much to say about this, really.) (Speed : Below Average. Toadette takes a bit less than a second to set up the throw, but that's the only thing that's dragging the speed rating down. There's low end-lag from the throw, giving Toadette a safe moment or so as the opponent is sent flying.) [References : Portobello Mushroom]

Comments : Something to note about the knockback in this throw (Disregard what I said in the actual knockback description ._.) : The knockback is always set to a certain distance, no matter what the person's percentage is (Unless it stales, of course.). This makes the throw quite useful in Team Matches; if you grab your partner by mistake, this is usually the throw you should use. Also, if Port 'O Bell stales, not only will the damage and knockback decrease by quite a wide margin, the bell rings will decrease in volume, until you can barely hear it unless you put the volume on your T.V. all the way up.

Back Throw : Morsels and Morals – Toadette takes out a tangerine, before peeling it and taking three tiny tangy tidbits of the tangerine and putting it into her hand. She pops the rest of the tangerine into her mouth, while the opponent stares at Toadette somewhat hungrily. Toadette then looks at the three pieces in her hand to the person she's holding, before shrugging and tossing the tangerine pieces behind her. The opponent immediately jumps onto the floor, licking and eating the tangerine pieces. Toadette then smiles and happily kicks the opponent on their vulnerable bottom, surprising them and sending them quite far away. Toadette then walks away and leaves the opponent grumbling as they recover from the hit. The tangerine pieces will usually disappear as the opponent eats them, but on rare occasions, on e or two (Never three) pieces will remain, and could be eaten by anyone, even Toadette, which will heal them by 1% damage. This is a rare occurrence however, dropping at the same rate as Peach pulling out a Bob-Omb. The opponent also does not heal while they're eating the pieces, only after the kick do the tangerine pieces gain the healing property. [9%] (Knockback : Above Average. While not enough to KO an opponent, it does usually send them sprawling away from the stage, so this gives Toadette a chance to run away from an opponent after throwing them at almost any percent.) (Speed : Average. Toadette can peel a tangerine and eat it faster than most people due to her talent and abilities at cooking, but it's still not enough to be considered 'Fast'. It takes a little less than ¾ of a second to do the throw, so there's still a pretty high probability that Toadette could be interrupted mid-throw. Think of Mr. Game & Watch's Down Throw speed : that's roughly the same as this one.) [References : Morel Mushroom]

Comments : Morsels and Morals is one of Toadette's more useful moves; it's versatility and uses are good for almost any situation in a 1 vs. 1, not only because it lets Toadette do whatever she wishes to following the throw (Most throws are like that anyways.), but because of the low chance that Toadette could be counter-attacked after the throw. This gives Toadette a lot more options than she usually does; not to say she doesn't have a lot of options already! One more small and disadvantaging feature of the throw is that if the character Toadette holds has a tail, their tail will be waving happily as they chew on the tangerine pieces, which obviously, isn't good for Toadette. Toadette then has a chance of being hit by the tail, which increases if the tail is larger (Fox, Falco, and Wolf are especially dangerous ; Squirtle...not so much.). If Toadette is indeed hit by the tail, then she won't do any damage at all to the opponent and instead she'll receive damage, which again, increases if the tail is larger, and will increase as well when Toadette's damage is high. The only exception of this is I think Charizard's tail, which is flaming, and as you may know, mushrooms and fire don't mix well together. Toadette will always suffer 9% damage from Charizard's tail if she gets hit by it. So all in all, Toadette's Back Throw is a risky move against against the tailed opponents.

For those that want more detail about the chances of Toadette being hit by the tail of an opponent, then here you go (Sorry if I forgot anyone) :

Bowser : 70% Chance [At 0% : 5%. At 100%, 7%.]

Falco : 90% Chance [At 0% : 4%. At 100% : 6%]

Fox : 90% Chance [At 0% : 4%. At 100% : 6%]

Pikachu : 60% Chance [At 0% : 2%. At 100% : 4%]

Yoshi : 75% Chance [At 0% : 4%. At 100% : 6%]

Diddy Kong : 50% Chance [At 0% : 3%. At 100% : 5%]

Lucario : 40% Chance [Varies depending on Lucario's %, between 1% and 10%]

Squirtle : 10% Chance [At 0% : 3%. At 100% : 5%]

Charizard : 75% Chance [Always 9%]

Wolf : 90% Chance [At 0% : 5%. At 100% : 7%]


  • Thin, long tails, like Diddy Kong's and Pikachu's, generally have a chance around 50% of hitting Toadette.
  • Large, bulky tails, such as Bowser and Yoshi's, generally have a 70% chance or so of hitting Toadette.
  • Fluffy, large tails, such as Fox, Falco, and Wolf, have the highest chance of hitting Toadette; an almost 100% chance, to be exact.
  • And lastly, strange, short or bobbed tails, such as Lucario's and Squirtle's, typically have a chance of below 50% of hitting Toadette.

(Characters with such small tails that were insignificant to the effect of this throw weren't taken into account, such as Donkey Kong and Olimar.)

Down Throw : Trifling Truffles – Toadette loves to eat sweets; and she likes making them too! That's all shown here as Toadette whips up a lovely box of chocolates in a typical heart-shaped Valentine box. Toadette unties the red ribbon tied around the box, and without further ado, she takes out a delectable truffle and pops it into her mouth. Toadette closes her eyes and smiles as the chocolate confectionery melts in her mouth, looking as if she were about to go into heaven. Toadette then peers into the box of chocolate, before frowning and twirls as she slams it onto the opponent's head, splattering them in a gooey, sticky mess. Any other remaining truffles land onto the ground, and can be eaten by anyone, healing them by 1% each. The chances of this are extremely low however; only up to three truffles drop onto the ground after one throw, and that's if you're extremely lucky. The chances of an extra truffle dropping is the same rate as Peach plucking a Bob-Omb out of the ground. [9%] (Knockback : Average. The opponent ricochets off of the ground and bounces up into the air at a northeast/northwest direction. The hitstun however, is just long enough for Toadette to not be counterattacked by the opponent. The knockback is roughly the height of one Stage Builder block, but increases as damage goes up [Duh?]) (Speed : Average. Toadette can gobble up chocolate faster than most would expect, but it's still not fast enough to be considered...fast. Toadette can go through the entire sequence in a boring ¾ of a second.) [References : Truffles]

Comments : An average throw all around, I personally recommend it for show-offy situations. But in all seriousness (...Yes, I have a bad sense of... humor?), Trifling Truffles is overshadowed by Plaits & Bait in all aspects except for speed, so I recommend you use that unless it's staled. You can possibly score a hit of Perfumed Shroomy if you pivot (?) and use it quickly enough, but you need precise timing.

~Situational Attacks~

[SITAT]

Get-Up Attack (Faceplant) : Sniffles – Toadette pushes herself up off of the ground and swings her head rapidly, her plaits damaging anyone within a range of a barrel sized hitbox. Toadette sniffles for a few moments, hurt both on the inside and outside, as well as embarrassed, but stands up and wipes her eyes quickly. The plaits can hit the opponent twice if they're unlucky enough. [Each Hit : 2%] (Knockback : Average. Pretty much the same as all other Get-Up attacks.) (Range : Very High. Toadette's Get-Up attack is much higher than some other ones out there, as it can hit above her as well, and not just by her sides. Like stated in the description, the hitbox is about the size of a barrel on its side.) (Speed : Average. An opponent can shield it pretty easily and then attack Toadette out of shield, so it limits some if its usefulness somewhat.)

Comments : Nothing very notable about Toadette's Get-Up attack, other than it has a pretty high range compared to other Get-Up attacks. Toadette is left quite vulnerable once the attack ends, as she pauses for a moment to wipe her eyes.

Get-Up Attack (Pratfall) : Pokey – Toadette sits up abruptly and presses her hands between her feet, blinking. When Toadette rose back up, her plaits shot directly in front of her, to form a sort of croissant shape, hitting whatever is in front of her. Toadette then stands up and brushes her vest for a brief moment, as her plaits swing back and forth. This time, the plaits attack together and form only one hit, rather than two. [4%] (Knockback : Average. It smacks the opponent away from Toadette and they themselves might experience a pratfall or faceplant of their own if their damage is high enough.) (Range : Above Average. Toadette's plaits reach slightly ahead of her, but ahead of her only. Which means that Toadette is completely vulnerable from the back, obviously.) (Speed : Average. Any competent player can shield the attack easily; it takes about ¾ of a second for Toadette to get up.)

Comments : A very bad move for Toadette; almost all odds are against her if she attacks in a pratfall, because the attack only attacks in front of her and is easily shielded, making it troublesome to use against the power-shield happy. There really aren't any pluses in this move, I suggest you roll or stand up instead.

Trip-Recover Attack : Triangle Twisters – Toadette shakes her head as a metallic triangle appears out of the ground and surrounds Toadette. Toadette puts one of her hands on her head and with her other, she takes out a small, wooden mallet. Toadette jumps up and hits the triangle with her mallet, damaging anyone touching the triangle or Toadette. The triangle melts back into the stage once the attack is done. [7%] (Knockback : Below Average. The opponent receives a slight shock from the vibrations of the triangle, causing them to back up a bit.) (Range : Average. While the triangle covers a large portion of both sides of Toadette, the opponent has to be in direct contact with the triangle, which is close to the floor, in order to be hit. Which means that the hitbox is long yet extremely thin.) (Speed : Below Average. A bit slower than most trip-up attacks, almost enough to be considered 'Slow' in my book. It takes about ¾ of a second for Toadette to use Triangle Twisters.)

Comments : This is a good attack to use when someone is approaching you, because if you start the attack early, the opponent will quickly shield and let go as they realize what Toadette is doing, before they're zapped by the triangle. But, that tactic only works against beginners (Such as me!), and won't work one bit on any able player.

Ledge Attack (<100%) : Rump Bump – Toadette clambers up onto the stage slowly, facing the back of the screen for a moment before aiming her bottom suddenly out onto the rest of the stage as she slides herself up. Toadette wipes the area where her eyebrows should be, and stands up back into her normal position. [6%] (Knockback : Average. The opponent is shot a bit less than one Stage Builder block forward by Toadette's surprisingly powerful bottom.) (Range : Average. Not too outstanding in this category, it reaches about one and one fourths widths of her own body onto the stage.) (Speed : Average. It takes about ½ of a second for Toadette to get back onto the stage.)

Comments : Nothing very notable about her ledge attack, really. Probably the most boring attack in Toadette's arsenal, but at least it isn't bad. You might be able to fool the opponent if you use it though, since Toadette's normal climbing onto the stage animation is similar in the beginning to Rump Bump, but usually an opponent will shield >> attack either way. It has average priority, so that may help as well (Or not).

Ledge Attack (>100%) : Metronome – Toadette takes out a metronome out of nowhere and slams it onto the edge of the stage, which starts to tick immediately. Right after she's placed the metronome securely onto the stage, she grabs onto the pendulum and flings herself from the edge onto the stage, damaging anyone nearby. Once Toadette is on the stage, the metronome disappears in a puff of pink smoke. [7%] (Knockback : Average. If Toadette manages to hit the opponent, they are sent away from Toadette in a northeast/northwest direction by about one Stage Builder block at low percents, and higher at higher percents.) (Range : High. Toadette literally flings herself onto the stage, so why shouldn't the range be high? She covers the same distance as Olimar's Down Tilt.) (Speed : Low. It takes about a second for Toadette to shoot herself from the pendulum, making it very easily shielded.)

Comments : Toadette's Ledge Attack (>100%) is very slow, which isn't good for her, especially when she's at or over 100% already, even if it has excellent range, it's a bit difficult for her to recover. But there's also a plus : If your opponent underestimates the time it takes Metronome is used, they may drop their shield and you'll hit them at least (That's what I always do...I get creamed by the Ice Climber's ledge attack almost every single time...). But it's just a skill (Or uh, psychological?) difference. It's better to just roll or jump onto the stage instead, or drop from the ledge and use a quick aerial, such as Dango Dangle.

~Playstyle~​

[PLYST]

While Toadette doesn't have anything particularly special or unique about her that affects her way of play on the field dramatically, her way of dealing things are quite unique by itself. Toadette has a myriad of ways to get out of a troublesome situation, making her a bit unpredictable at times. You can litter the field with music notes, or set the stage up with traps. Toadette's normal playstyle is more defensive than offensive, as she lures the players into her traps on the stage. Toadette's playstyle typically requires the opponent to fall into one of her traps, before Toadette can make a move. She has some pretty fast aerials, albeit a bit of low priority. An interesting fact about Toadette's moveset is that almost all of her attacks don't have her attacking the opponent directly; she uses a tool for almost every single one of her moves. This at least allows her to get some hits in after an opponent flinches from recoil from one of their moves.

Toadette's moves don't really revolve around a certain idea or aspect; it's really just a mish-mash of moves that are related to Toadette's personality/behavior, interests, talents, and hobbies. Hopefully those interests will pay off during a real match. Toadette's moves are varied in speed, knockback, and range from the mid-bottom to the mid-high area : She's usually sacrificing one aspect for another, which can make things a bit tricky. Most of the moves Toadette has don't have any effect until later, which means Toadette has to rely on her skill of predicting when the delay will stop and attack the opponent in between...if that makes sense. But then again, every single character has to be played with good prediction...uh, never mind. But Toadette needs to 'predict' moreso than the others, since most of her attacks are delayed.

For racking up damage, you can use Pirouette Palette and other quick multi-hitting moves, such as Floaty Fluff. While they may do low knockback/have low speed, that's only to Toadette's advantage if it allows her to get closer to luring the opponent with a finishing blow. Her Royal Trumpet is one of her most important and necessary means against a 'campy' player; they'll be forced to dodge the notes, and while they're dodging, Toadette can use this opportunity to attack them with one of her KO moves.

If Toadette has to play defensively, she has quite a bit of options as well : Toadette can set up traps around the stage such as Statue Stationery (Despite its short delay and the fact that Toadette can only set up one at a time) and a Potted Plant, or surround herself with the three notes from Royal Trumpet if she manages to keep them circling around her without them colliding or touching them. Pristine Pearls, Marionette, and Tea For Two are also good options for distancing yourself from an opponent; just make sure that you can recover from the end lag of all of the listed moves before you use them...you wouldn't want to be shieldgrabbed while doing an attack, wouldn't you?

But other than that, Toadette's playstyle is relatively normal : Use high-ranged attacks to distance yourself, and use obstacles to your advantage as you punish their move. So um, yeah, that's that~

~Taunts~

[TANTS]

Up Taunt : Cheering Charm – Toadette takes out a pink, plastic recorder and plays a couple of notes on it, which if connected together, form >this< merry tune from Super Mario Bros. 3. After playing on the recorder for exactly three seconds, Toadette puts her recorder back. Every time this taunt is activated, Toadette will play a different section of the melody. This also makes Toadette's taunt one of the most random as well as the longest taunt in the game.

Side Taunt : Cotton Candy – Toadette takes out a very large piece of fluffy, white cotton candy on a thin wooden stick, and takes a small bite out of it, chewing it carefully. She peeks out from behind it and looks curiously at the screen, savoring the sweet sensation from the cotton concoction.

Down Taunt : Scented Candles - Toadette takes out a randomly colored scented ceramic candle (Red, Blue, Green) that has a label attached to it, which could read, “Raspberry Heaven, Sea Island Cotton, or Celadon Scene”, respectively. Toadette smells the candle as it instantly lights up in her hand, closing her eyes and having a sweet smile appearing on her face as she does so. After about a second, Toadette puts the candle back into her pocket and takes her normal battle stance.

~Victory/Losing Poses~

[VICLO]

Victory Pose 1 : Crackers – Toadette jumps up into the air jubilantly, landing one one foot and dangling her other foot out. She waves her arms enthusiastically, and smiles as she says, “Toadette's the winner!”.

Victory Pose 2 : Sassafras – Toadette swings her plaited locks and puts her hands behind her back, bobbing on the balls of her feet as she says, “OoOkay!”.

Victory Pose 3 : Zoom Shroom – Toadette plops down from the sky in her very own kart, the Toadette Kart, from her debut game, and begins to zoom across the area. She is seen holding a golden mushroom in her hands as she falls, and continues to boost at an incredible speed for the next three seconds, before braking to a halt and waving her arms out with a smile, clearly overjoyed from her victory.

Losing Pose : Chipper Kipper – Toadette claps her hands rapidly with a smile on her face with her plaits bobbing up and down, not minding the least bit that she lost the match.

~Appearance~

Idle : Toadette stands with her arms swinging gently by her side. She will occasionally close her eyes and hum a small, unknown tune every once in a while.

Walking : Toadette skips along merrily, waving her hands beside her, as if trembling with excitement. If she's walking reeeealllly slowly, then Toadette will merely shuffle her feet forward, looking apprehensive.

Running : Toadette jogs quickly with surprising agility; she'll shut her eyes tightly every once in a while, as if fatigued.

Crouch : Toadette gets on her nonexistent knees and covers her domed head with her hands, her entire body and plaits shivering.

Stun : Toadette shuts her eyes tightly and give a small 'Ouch!' of pain. Her plaits are in an awkward position in the air, one turning up, one turning down.

Frozen : Toadette's mouth is agape as she raises her hand, as if trying to ask why was she frozen.

Sidestep Dodge : Toadette backs up against an invisible wall, covering her mouth with her hands in surprise. Her plaits flop into the background before going back to their usual position.

Forward Roll : Toadette twirls daintily in front of her, her plaits surrounding her as both of them spin. Toadette rolls with an air of clumsiness around her.

Backward Roll : Toadette twirls daintily behind her, her plaits surrounding her as both of them spin. Toadette rolls with an air of clumsiness around her.

Air Dodge : Toadette spins in midair in an uncanny-like fashion of her rolls, although she closes her eyes this time, with her bottom lip quivering slightly.

Ledge Recover : Toadette grabs onto the stage and pulls herself up, bottom up. It looks similar to her ledge attack.

Stand Up : Toadette pushes herself off of the ground with her hands and waves her head, her plaits swinging wildly.

KO Yell : Toadette shouts out, "Oouagh!" loud enough so that you could hear it after the ray of light pours out from the side/bottom.

Star KO Yell : Toadette shuts her eyes tightly and yells out “Byyyyeeeee!...” in a squeaky tone.

~Other Extras~

[OEXTR]

Kirby Hat : Kirby gains Toadette's pink and white mushroom cap, along with her plaits. Kirby is then able to use Royal Trumpet, of which everything is the same except for the fact that Kirby cannot control the notes' path. And that happens to be the best quality of the move, unfortunately. Sorry, Kirby~

Events :

Event #8 : Flower Power
Play As : Bowser
Stage : Hanenbow
Opponents : Peach [Level 9], Toadette [Level 9], Jigglypuff [Level 9]
Stock : Yes - You : 2, (Peach, Toadette, Jigglypuff - 1)
Time : Unlimited
Description : The King of Koopas is on a rampage today! And it seems that he wants to torch some flowers...
Objective : KO all of the characters before the flower on the right tree blooms. The event ends if you lose both of your lives or if the flower blooms.

Alternate Costumes :


~

Ugh, I had lots of trouble writing Toadette's moveset...I don't know why or how, but I kept forgetting ideas of things I wanted to say the exact moment I thought of them...I don't know if that's extreme short-term memory loss, or something...I can just say it was extremely annoying. :| I don't think I even managed to get half of what I wanted to write in this moveset. And um, I know the whole thing isn't really realistic, and that it can't be implemented in Brawl. :/ But, I suppose I just wanted to have something in MYM6. I'll try to get a better entry in next time. Oh, and I know Toadette's Down B was just a disaster...I'll try to edit it in the little time I have left. Sorry if I left a bad impression on anyone by uh, simply craving for detail. I suppose the detail factor died down a bit in MYM5.

And um, sorry for the really long delay and er, lies for saying I'd post it last weeks (2). :/ It was troublesome...and sorry for the really large blocks of text. I need to think up of another, more easy-to-read layout for my next moveset(s) in MYM6. I shouldn't have procrastinated...I don't doubt Toadette will be disliked and not well-received (If this doesn't make sense, I'm meaning the negative version), and a bit sad that I couldn't work on her better...she's one of my more liked characters in the Mario series (Which is really the only series that I know any information of).

Oh, and realizing the amount of time I have left, I doubt I'll be able to make any changes...oh well. I shouldn't procrastinate next time.

But, for now, enjoy! Oh, and I'll be leaving for a vacation on the 30th, so I won't be online much (If at all), so good luck for MYM6, everyone!

~

Oh, and those are really nice sets, Emergency and Baloo + SirKibble! I found Prinny to be quite fun to read (Although I only skimmed it, sorries), and while I may not know much about the Disgaea series, I can tell that it's quite true to character! Although, I think I may know why Pleinair was more fun/welcoming...maybe it's because of the atmosphere or feeling/tone the set gives off, as that's how I like to do my sets~ But I'm in no position to say anything...

As for Wrath, well, I'm not much of an FMA fan myself (Yes yes, I know, I'm prepared to be bombarded by incredulous comments by this), Wrath's moveset really seemed realistic, and I wouldn't be surprised that if he were put into a future Smash Bros. installment, that would be the set he'd most likely have.

:o You did a really good job with Steven, MarthTrinity (Agh, my mistake! It was a multi-jointed moveset, sorry! Good job, everyone then!) Ruby/Sapphire was the first Pokémon game that I played (Eep! I know I'll get my head bitten off by this too), and boy, was it a thrill! I haven't played the oldest or newest versions (I'm hoping to get HeartGold though, it seems pretty fun), but that won't matter (Much, hopefully) as I read through your rather ... boulder-like moveset! It's fun to see how everyone thinks what a Pokémon moveset should look like, you can really see the small yet varying traits each Pokémon moveset has when written by their owner. Um, er...that didn't make much sense, did it? Well uh, never mind. (Edit : Wow, that was really...ironic. I'm sorry. I didn't realize it was written by The Sins...Sorry D:)

I'm sure that there's loads and LOADS more of incredible movesets in the thread, and this was only the icing on top : like I said before, I sincerely hope that I could be more active in the thread next contest, and it was fun being with you all ^^ See you soon!
 

UserShadow7989

Smash Journeyman
Joined
Aug 13, 2007
Messages
306
Well, since I was informed it is not against the rules to do so, and K. Rool wants a new page, I'm announcing my Plans for MYM6.
(No Button)
Lovable Servant, Servbot! (Megaman Legends)
(No Button)
Determined Mastermind, Dr. Wily! (Megaman)
(No Button)
Thievious Raccoonus, Sly Cooper! (Sly Cooper)
(No Button)
Master of Mischief, The Mask! (The Mask)

And so this post has worth, I'd just like to put a comment on Steven. The biggest weakness this set has is that there's really nothing special about it. They're all high quality sets individually, but there's nothing that really binds them together. I mean, Skarmory could've had a move that boosted defense (I.E. reduces damage and knockback for a short time) and Baton Pass (switching to another Pokémon and giving it the boost), to help any members of the team that lacked defense or such, or some sort of mechanic that gave a benefit to using more then one of Steven's Pokémon but not making it necisary. It was still a well done series of sets, though. Kudos.
 

KingK.Rool

Smash Lord
Joined
Nov 26, 2005
Messages
1,810
Count Cannoli

Otherwise known as The Silver Zephyr!


Say what you will for the boring puzzles and repetitive mini-games of Wario: Master of Disguise, there are a few things it does have. The first is a great villain.

Count Cannoli is the latest in a family that goes back through generations of cunning thieves. The rather corpulent, elegant, suave crook is a great foil to our own greedy, corpulent thief, Wario. Armed with his ancient wand, Goodstyle, Count Cannoli takes the form of the gentleman thief, The Silver Zephyr. The guy has his own TV show! What kind of thief does so on TV, I ask you?

The second thing Master of Disguise does right is the music. It's got some truly incredible boss themes and level themes that make playing through it actually kinda addictive. I've linked a few of the best right here at the beginning, and I suggest you listen as you read through the moveset.


The Music

Alergia Gardens | This is where it begins. Or rather, where it ends. It's the theme that plays in the tenth and final level, and what a theme it is. The level's a pain, but you never want it to end.

Boss Cannoli | It doesn't get any better than this. Elegant and intimidating at once, when you hear this you know this guy is more than your everyday villain.

The Dastardly Carpaccio | Oh, the OTHER villain in Master of Disguise, the hip, mysterious Carpaccio's boss theme? Yeah, Cannoli hates that guy, but I'm including his theme here anyway, because once it gets going around 1:05, it's incredibly epic.

Boss Battle! | And all the rest. From the king of the dolphins to the insane pharaoh, they all get this, and they had BETTER be happy with it, because you'd never know it wasn't specifically composed for one especially cool boss.

Goodstyle

This rather wonky-looking fellow is the pride of Cannoli's family:


In his Brawl iteration, Cannoli comes equipped with good ol' Goodstyle. Through him, he has access to a number of ingenius disguises, the most important of which is that of The Silver Zephyr, which essentially just swaps out all the purples in his clothes for silvers, as one might imagine.

Goodstyle can also be used when you're just plain ol' Cannoli to take other disguises, several of which will help you with your primary objective - stealing! The Count is all about sneaking up on the foe and snatching their most precious resources, and Goodstyle will be the tool you use to do it.


The Animations

Idling Position | Count Cannoli stands stiff and proud, his cape billowing majestically behind him!

Walking Position | Cannoli's got a special kind of walk to him - he strolls.

Running Position | The Silver Zephyr never runs! But Cannoli does, luckily for us. In great bounds, he rushes forth. It's not a quick run, sad to say.

Crouching Position | Cannoli drops to his knees, resting one hand lightly on the ground like a cat burglar poised to make his next move.

Rolling Position | With agility one would never suspect, Cannoli dives headlong and pulls a rather perfect somersault. A long roll, but he stumbles a bit at the end, ruining his acrobatic feat.

Dozing Position | The Silver Zephyr never sleeps; he dozes. He sits and hunches slightly forward as he takes a snooze.

The Stats

Aerial Mobility | 8
Weight | 8
Attack Speed | 7
Jump | 6
Power | 5
Traction | 4
Floatiness | 4
Run Speed | 3

A K.Rool character with low traction? Impossible! Nah, although he's a thief, Cannoli isn't the most graceful of fellows. The thief side comes out when he goes to the air, with a pretty good jump for such a heavy fellow and great aerial mobility. He's not too strong, but at least his thievery is quick, yes? Quicker than his running, anyway.

The Moveset

:: The Special Attacks ::

Down Special ::: Guise of The Silver Zephyr ∫ Count Cannoli raises Goodstyle up on high. The wand flashes once, making this attack slightly laggy. After the flash, Cannoli's clothes have all turned silver, making him once again The Silver Zephyr! The effect of this on his moveset is that it changes several attacks that were much more Goodstyle-centric into a more thief-oriented style. These are noted in the body of the moveset itself; not many of the attacks are drastically changed in purpose. This attack can also be used to change back. Cannoli always respawns in his regular garb.

Neutral Special ::: The Master Thief at Work ∫ This is probably the most important attack in his arsenal. Cannoli extends a stealthy hand and pickpockets a foe if he's close enough. This attack is very quick to come out, but the hitbox is both short and tiny - the foe has to be practically overlapping Cannoli to be hit by it. However, if the foe's back is to Cannoli when the attack is used, he'll reach about twice as far, giving it decent range.

If this connects, Cannoli will pull away holding a small glowing orange bauble. See, there's not much to steal from characters in Brawl, except for the thing that matters most - their attacks. The bauble has a button input in clear black letters in it, although it's only visible for half a second before Cannoli stashes it in a pocket. That attack can't be used by that character; Specials are less likely to be stolen and Grab can't be snatched, although any throw can. However, if Cannoli is beat on enough, there's a small chance he'll drop his stolen baubles, which can be picked up simply by walking over them. If he's KOed and respawns, he'll drop everything stolen just like Dragoon pieces, so waste no time in dropping and trying to gather up as many as you can. Neutering the foe's moveset is the crux of playing Count Cannoli.


Forward Special ::: Arboral Disguise, or Decoy Battlefield ∫ Cannoli raises Goodstyle on high. With a quick flash, he's suddenly disguised as - a small tree! Hence the name of the attack. In this disguise, he CAN be hit, but he doesn't take knockback. On the flip side, he has only one attack at his disposal in this form, and that's his Neutral B thievery. Maybe in crazy free-for-alls, you might trick someone into stumbling too close and steal a few attacks while they figure out that something's going on.

If this attack is used when you're The Silver Zephyr, it's quite different. With a bit of start-up lag, he pulls out from somewhere behind a little bitty tree that looks more or less identical to the one he can transform into. This he drops in front of him. It's an obstacle that needs jumping over, although it can be destroyed by hitting it for 30%. You can have any number of trees lying about the stage. The connecting factor, of course, is that IF you're disguised as a tree and within a platform of another tree, tilting the control stick will somehow move Cannoli into THAT tree, almost laglessly. By setting up enough of these, you'll be pretty damn hard to hit as you phase from tree to tree, and make it rather easy to get close and snatch more attacks.


Up Special ::: The Mad Inventions of the Cannoli Clan ∫ As Cannoli stands stock still, a metal prong emerges from the top of his top hat and expands into a helicopter-style propellor. During this time, Cannoli continues to fall, but once the blades come out and begin to spin, he stops falling completely. Now you have complete control over his flight for a full five seconds, and all you lose for it is a bit of start-up lag. Any foes who get cut by the propellor take 3% in rapid multiple hits, so they had better watch themselves; this is tough to edgeguard. You move pretty quickly. In addition, Cannoli can use any one of his aerials from this, so it's actually a good move to use on land and chase after the foe from there. He can also use his Neutral B. Versatile recovery, one of Cannoli's strong point.

:: The Standard Attacks::

Jab ~ First Hit ::: Diving Somersault ∫ With a tiny bit of start-up, Cannoli throws himself into a somersault, just as one would expect from the name. He moves about a platform forward, and his body is a low-priority hitbox that deals 9% on contact and hits foes up with long hitstun. If you don't follow up with the second hit, there's a whole lot of end lag.

Jab ~ Second Hit ::: Smoke Bomb Disappearance ∫ At the end of his roll, Cannoli seems to explode in a puff of smoke. This is fairly lagless, and the smoke dissipates after a second and a half. Cannoli, of course, vanishes. If you don't use the third hit, he'll reappear standing in the same place one second after vanishing. He can use an attack immediately after reappearing.

Jab ~ Third Hit ::: Cutpurse ∫ If you press A a third time while you're apparently nowhere, the Count will rematerialize in a second puff of smoke directly behind the foe. If they were hit by the somersault, you can potentially chain this into a steal from behind while they're still stunned.

Dash Attack ::: Distraction Apparatus ∫ When first used, in mid-leap, Cannoli sneakily drops a small motion-sensor bomb-looking object. This is very quick and pretty hard to notice without paying close attention. The second time this attack is used, however, Cannoli snaps his fingers and the small bomb explodes in a puff of smoke. More importantly, this causes any opponents to suddenly turn around and look at it, stunning them for about half a second and turning their back to you. Of course, this lets you pickpocket them from a better range and makes this a great way to approach, provided you set it up right.

:: The Tilt Attacks::

Forward Tilt ::: Goodstyle's Artistry, or Thief's Repertoire ∫ Cannoli raises up Goodstyle. With a bit of lag, he points him at the ground in front of him, causing a thin wall to rise up out of the ground, as tall as Ganondorf, and create a blockade right there on the stage. This wall lasts a full fifteen seconds before vanishing, although it can be destroyed after taking 50%. You can only have one at a time.

As The Silver Zephyr, however, Cannoli shows off his sneaky skills. If there's a wall in front of him, he turns, his back to the wall as though he were being stealthy - which he is, come to think of it. Then he apparently disappears and immediately reappears on the other side of the wall, no matter how thick it was. Use this to manuever about the stage in a way the opponent couldn't hope to match.

Up Tilt ::: Automated Rabbit-in-the-Hat ∫ You can guess, right? Cannoli turns his hat upside down and a nasty-looking robot rabbit bursts out, snarls once, then retracts. This is pretty laggy, but it's a big hitbox, tall as Ganondorf and covering much of Cannoli's front. This attack deals 13% and okay knockback for its whole one-second duration.

If you're the Silver Zephyr, this nice little bunny has an additional effect. He only deals 8%, but if he hits an airborne foe from below or is overlapping a foe when he comes out, he'll snatch an attack bauble himself, obediently handing it off to his master when he pulls back. Only Cannoli could train his machines/pets to steal, too!


Down Tilt ::: Hole in the Ground and Another in the Pocket ∫ Cannoli takes off his top hat in a sweeping motion that deals 3% and tripping to foes directly in front. He flips it on its side so it looks like a black disc, then, with some crazy sleight of hand, drops it on the ground in the form of a black hole. It's like some bad Looney Tunes sketch. Anyway, when he walks over this hole, he can crouch to drop into it, where the tip of his head is barely visible.

Now, this is where the magical part really comes in. By pressing A while you're crouching in the hole, Cannoli will duck into the hole and reappear in a second hole a platform away to the left or the right, at random. This can be used to go between two holes fairly quickly, making the foe play whack-a-mole with The Count. However, by pressing B, he'll apparently emerge; the hole will apparently disappear and play will apparently go on. However, if a foe walks over the spot where the hole was, Cannoli will reach out of solid ground, snatch an attack, tripping the foe, and then emerge in all of his glory, while the Cannoli that's been fighting in the meanwhile breaks, revealing himself as a poorly made decoy. This is a great mindgame, as well as stalling technique, and a crucial part of Cannoli's bag of tricks.


:: The Smash Attacks::

Forward Smash ::: Bag o' Goods ∫ Cannoli immediately produces a stereotypical thief's sack; you know, plain beige bag, big "$" on its side. Before charging even begins, Cannoli rapidly stuffs all the baubles/attacks he's stolen so far into the sack, giving this some start-up. As he charges, however, he takes out special purple bauble and begins depositing them one by one. These also have button inputs written on them; these are his attacks. You can stuff up to three in before charging ends and you attack. The swing of the bag is wide and has good speed. If you had one bauble in the bag, it'll deal 4% with minimal knockback - this ranges all the way up to infinity, although a more realistic total is six, which would deal 21% and good knockback.

This bag comes into play on a few other attacks. After the Smash, Cannoli will immediately empty the bag and return his baubles to his pockets, but if it's interrupted before then, his own attacks, which remain in the bag, can't be used until he's KOed. So be careful with this one! It's best used when you've got enough of their baubles to make it powerful in its own right.


Up Smash ::: "The Cloudy Day I've Been Waiting For!" ∫ As you charge, Cannoli takes out a strange-looking apparatus with a jack-in-the-box handle, and begins to turn it. The more he does so, the more light, puffy clouds are formed in the air above the stage. These simply hover, looking pleasant and in the background, before fading ten seconds later; with no charge, there'll only be one, but with full charge, the sky is full.

After charging, Cannoli stashes the apparatus and raises Goodstyle. With a flash, Cannoli is apparently covered in light, fluffy cloud. He remains in this disguise for five seconds, during which time he's not affected by gravity and can slowly float up or down - he can also fast fall. Use this time to hover among the clouds, totally camouflaged, and when the moment is right, drop onto the foe and steal their attacks. You can use Neutral B or any aerials while you're floating around.


Down Smash ::: Mutually Buried ∫ Cannoli charges by scratching his chin and appearing to think, and slowly taking something out from beneath his cape. It turns out to be Goodstyle. When he's done charging, he swings Goodstyle before him like a baton, not really intending to hit anyone, but if someone's in front of him, they'll take 12% and be buried anyway. Immediately after, Goodstyle flashes, and Cannoli is buried himself. However, he can still steal from this position, making this a good mindgame to use even when a foe isn't nearby, if your timing is good. If a foe is near, you can count on stealing from a grounded foe. However, make sure to mash, because you don't want them to get out before you do.

:: The Aerial Attacks::

Neutral Aerial ::: Invisibility Cloak, or Infiltration Scheme ∫ Cannoli brandishes Goodstyle as he spins once, his cape swirling - and then he vanishes. This disguise lasts eight seconds, during which he's entirely invisible. Make full use of this time to get close to the foe and pickpocket them, as there's notable ending lag as he spins twice again and rematerializes.

If he's in the guise of The Silver Zephyr, Cannoli will still spin around once, his cape swirling, and then vanish. However, he'll almost instantly reappear on the closest surface directly below him. If you tilt down just as you vanish, he'll appear on the next closest surface directly below him, if applicable, so you can use this to skip a drop-through platform or cross half of Temple at once. When he reappears, he spins rapidly, dealing 10% and small knockback to anyone who was right up next to him.


Forward Aerial ::: Penance for My Sins ∫ Apologetic Cannoli takes a stolen bauble from his robes and tosses it forward. It goes on a slight upward arc, travelling forward a platform before beginning its descent; it moves fairly quickly. Upon contact, 12% and knockback that correspond to the angle, although a hit from above will cause slight upward knockback. The bauble disappears after hitting and that attack is essentially given back to the foe; this happens even if you miss them. This attack comes out with slight start-up but has no ending lag. If you have no stolen baubles on you, the one thrown will be purple and will correspond to one of Cannoli's attacks. This attack will also disappear after hitting, but it deals 5% in poison damage in addition to the regular 12%, and Cannoli won't be able to use that attack until he respawns.

Back Aerial ::: Goodstyle's Treachery, or Theft Gone Wrong ∫ With a moment's start-up, The Count brings Goodstyle down beneath him and then in an upwards arc behind him, a lazy, one-handed swing. This deals short knockback with a ton of hitstun, and 9%. Goodstyle flashes just as he hits the foe. A second after contact, as the hitstun recedes, if they haven't since been hit by another attack, they'll suddenly flash and turn into a chunk of rock roughly hewn in the shape of the character. Speed and floatiness plunge. Weight rises drastically. They remain in this form, with access to all of their attacks, for five seconds. The meantime is a great chance to set up tricks or steal from them, as they'll likely be too slow to retaliate.

The Silver Zephyr needs not rely on a magic wand for his attacks! As he does when he botches a burglary, Cannoli draws a long knife. Uh oh... this doesn't sound family-friendly. The swing has less start-up, and deals a full 14%, but the knockback is still just as weak. All the same, chaining knife fights is a great thing to do if the foe catches you red-handed, and it's one of his very best damage-racking mechanisms.


Up Aerial ::: Reverse Lariat ∫ Cannoli laggily flips head over heels in a backflip kick. If he hits a foe with the main hitbox here - his legs - the foe will be given small downward knockback no matter what point they were hit at and Cannoli will be propelled a proportional distance upward, pushing off of them. This deals 11% and is quite boring, sorry.

Down Aerial ::: Mission Implausible ∫ There's a moment of lag, as Cannoli seems to make some strange motions with his hands. Then, without any hesitation, The Count falls, extending his arms and plunging chest first a la Mission Impossible. If he hits anyone, they're spiked by his bulk and take 14%, but unlike Toon Link, he'll continue falling. HOWEVER, if at any moment during his fall you press A, attached by invisible strings, he'll suddenly stop falling and, as if on a bungee, will be pulled back up to where he was when the attack started, upon which he'll suffer no lag and will be able to proceed with second jump or Up B or whatever. This is mindgames, this is spike, and this is the perfect attack to use while you're hiding in the clouds. If he hits ground while falling, he'll hit it head first and suffer a second's lag while he pulls himself to hit feet, so always bounce him back up.

:: The Throw Attacks::

Grab ::: "Prostrate Yourself Before the Silver Zephyr!" ∫ Cannoli clumsily lurches forward, grabbing with one hand. It's a very short and somewhat laggy grab. Nothing more interesting, I'm afraid. Once he catches them, he gives them a mighty downward push, forcing them onto their knees. What now, Cannoli?

Grab Attack ::: Electrifying Trauma ∫ Cannoli takes out a small taser and zaps the foe. No thief should be without a taser! This deals 2% but is slow. If the foe struggles out of this immediately after being zapped, they'll suffer slightly more lag than you do as they slide away. It's something, right?

Forward Throw ::: Impromptu Knighting, or Boot to the Throat ∫ Cannoli takes out Goodstyle and puts him on one of the foe's shoulders. He then turns the wand on himself and it flashes, turning Cannoli into a perfect replica of the foe. Then he uses the character's own Forward Smash to knock them away. He'll remain in their disguise for five seconds after this attack before turning back with a POOF.

If he's already in the guise of the Silver Zephyr, then he'll simply reach toward the foe, snatch an attack as he does in his B, then kick them away, dealing 11% and middling knockback. Not quite as fun, but...


Back Throw ::: Misplaced Objects ∫ Cannoli stalks past the bowing foe, dropping his cape onto them as he does so. He then stomps on the cape, which mysteriously gives way without resistance. The foe takes 9% and reappears on the nearest ledge, if there is one, and if not, face down two platforms away. Cannoli's got quite the bag of tricks, it would appear.

Up Throw ::: Sack o' Goods Again ∫ Cannoli brings out his trusty sack, this time already stuffed full of all his stolen baubles. He then brings it around in a mighty uppercut, which deals anywhere from 3-18% realistically, although it caps with fully stolen movesets from all three foes at 42%. If you've stolen that much, you DESERVE to win.

Down Throw ::: Reparations ∫ Cannoli pulls a stolen bauble from his cape and tosses it at a downward angle. It deals 8% and very little knockback, and immediately that move is given back to the foe it was stolen from. This attack is pretty useless in most ways, as it gives them back their precious resource, but it has one redeeming feature - it can be made a chain grab, fairly easily. The question is, how much are you willing to give back? And how much have you stolen so far? Once you have nothing to throw, this doesn't work.

:: The Super Attack::

Final Smash ::: Steal-O-Matic ∫ Count Cannoli unveils his greatest invention! A massive robot drops from the sky, brandishing long arms ending in pincers. You control one of these around the stage, pressing A to close its pincers, for eight seconds; if you fail, that's it, it's done. If you clamp onto a foe, they'll be picked up, brought to directly above Cannoli, and shaken violently, all of their attacks falling away to be snatched by Cannoli. After this, they're dropped and play resumes, although they have absolutely no attacks for fifteen seconds, at which point, they all seemingly float away from Cannoli and back to the hapless foe. Use those fifteen seconds to do as you will to a foe with no attacks but a grab.

The Style

Count Cannoli is a rather cunning fellow, certainly a thinker's character. He's quite lacking in all the hallmarks of the typical Brawler, with little in the way of damage racking, KOing, speed, spacing, and stage control. What he does have is a hell of a lot of mindgames and a knowledge of how to move around the stage. Nothing stops him, not walls, not platforms, not foes. He moves them all about and among them with equal mastery.

The only way Cannoli can even the playing field is by stealing. He needs to bring the other character's moveset down to his level, by stripping it of as many attacks as possible. The more he steals, the harder it'll be for them to deal him enough damage to take them back - and if he's fortunate enough to strip them of a lynchpin of their moveset, or an Up B, well, that can change the tide of battle all on its own.

With stealing as your priority, then, your method should be to get as close as possible to the foe without them realizing it, and there are plenty of ways to do that. Cannoli has quite a few ways to hide, or to temporarily deactivate the foe, or just to have the foe turn their back to him. At every moment when you think it realistic, try Neutral B. Of course, Up Tilt and Forward Throw when you're The Silver Zephyr can serve the same purpose, but Cannoli's grab is rather predictable and the whole thing is conditional anyway.

And the distinction between the Count and The Zephyr is subtle but important. Cannoli is far more reliant on complex mindgames and considerably more inclined toward stealing than his alter ego, surprisingly enough. The Count's Goodstyle attacks are mostly meant to make it easy to steal, while The Silver Zephyr's replaced attacks are more based toward alternate ways to steal and the basics - damage racking and KOs.

You shouldn't give up your booty lightly, as the only way you're going to come out on top is taking as much as possible, but there ARE situations when damage rackings or simply whacking the foe from afar are going to be important, and that's when you need to give them up. Be it Down Throw or Forward Air, think carefully on every choice you make.

Stealing isn't easy when all eyes are upon you. You need to use the resources at hand to blend in to your surroundings, and never, ever let the foe see which of your bag of tricks you're resorting to next. Whether you're dropping a distractor or dropping from the clouds, take a lesson from the old masters and do it quietly.


Everything Else

First Taunt | Cannoli sweeps off his hat and takes a deep bow, chuckling.

Second Taunt | "Next to me, all the other thieves are mere pickpockets!" he declares, waving his finger about in the air.

Third Taunt | Goodstyle pokes his head out from a pocket. Cannoli pushes him back, scolding him.

Victory Pose I | Cannoli enters the front of the screen in a massive, lumbering machine, sitting in the driver's seat. "Behold the wealth of the Cannoli clan!" he cries.

Victory Pose II | The Silver Zephyr crouches before a small mound of gold and jewellry. "I am the master thief!" He sure is a repetitive fellow...

Victory Pose III | Wario rushes onto the screen, laughing to himself and slapping his belly. He then looks around warily (WARY), then, with a poof, turns back into Cannoli, who quickly stashes Goodstyle.

Kirby Hat | Kirby gains the fancy top hat, the glasses, the bulbous nose, and the moustache. He gains the ability to steal, although his stubby arms mean his range is even shorter than Cannoli's, and attacks are easier to knock out of him due to his weight.

*
 

Kris121

Smash Journeyman
Joined
Nov 26, 2008
Messages
263
Location
THE INTERWEB
GOOD JOB Everyone! I have a few new sets to read and then I shall vote in this Competition!!!!! Perhaps read "The Murray"?
 

half_silver28

Smash Ace
Joined
Apr 25, 2008
Messages
862
Location
MYM, Ohio
So. It's that time again. It's time for the MYM awards!!

MYM 5 Awards

Best Moveset Designer (choose 4)
SirKibble
King K.Rool
MasterWarlord
Spadefox
Hyper_Ridley
Dancingfrogman
Tanookie
Junahu
Chris Lionheart
BKupa666
MarthTrinity
Plorf
Agidius
Wizzerd
UserShadow7989
SkylerOcon
kitsuneko345
Smash Daddy
half_silver28
...I had to do it xd

Best New Designer (choose 2)
Plorf
Wizzerd
UserShadow7989
Darkslash
Kris121
Katapultar
Horlin
darth_meanie

Best One-Hit Wonder (choose 3)
Sakurai (TheSundanceKid)
Metal Man (Plorf)
Sil’fer (Shake~)
Hagiri Kaname (phatcat203)
Megaman.EXE (SkylerOcon)
Madarame Ikkaku (aeolous)
Jealous Bass (Baloo)
Birdon (The_Trophy_Master)
Raiden (Smash Daddy)
Nature (Horlin)
Peter Petrelli (bivunit94)
Toadette (Meadow)
Hero Prinny (emergency)
Magmortar (darth_meanie)

Best Original Character (choose 1)
Husayn Janan (Chris Lionheart)
Mewthree (Hyper_Ridley)
Kira Trine (UserShadow7989)
Disaster (Dancingfrogman)
Cutesy Beau (Junahu)

Best Megaman series Moveset (choose 2)
Megaman.EXE (SkylerOcon)
Acid Seaforce (Hyper_Ridley & Spadefox)
Metal Man (Plorf)
Heat Man (SirKibble & Plorf)
Airman (Agidius)
Bass and Treble (Hyper_Ridley)
Leviathan (Chris Lionheart)
Bubble Man (Agidius)
Ashe/Grey (Spadefox)

Best Pokemon Moveset (choose 3)
Ekans (KingK.Rool)
Shellder (KingK.Rool)
Jumpluff (KingK.Rool)
Articuno (Jimnymebob)
Team Rocket (Junahu)
May (SirKibble)
Hypno (Tanookie)
Gligar (kitsuneko345)
Unown (kitsuneko345)
Azumarill (MarthTrinity)
Missingno (MasterWarlord)
Marowak (Dancingfrogman)
Magmortar (darth_meanie)
Steven (Chris LionHeart, MasterWarlord, SirKibble, Hyper_Ridley & SkylerOcon)


Best Special Moveset Mechanic (choose 8)
Megaman.EXE (SkylerOcon)
Computer Virus (SkylerOcon, MarthTrinity & SirKibble)
Paint Roller (Wizzerd)
Battalion Army (Dancingfrogman)
Chaos 0 (Dancingfrogman)
Arthas (Chris Lionheart)
Klarrann (Chris Lionheart)
Roy Mustang (Chris Lionheart)
Gluttony (MasterWarlord)
Ryuk (MasterWarlord)
Alphonse Elric (MasterWarlord)
Bass and Treble (Hyper_Ridley)
Acid Seaforce (Hyper_Ridley & Spadefox)
Scar and The Hyenas (Bkupa666)
Sebastian (Bkupa666)
Bowser Jr. / Shadow Mario (Bkupa666)
Yuji Sakai and Shana (half_silver28)
Cammy (half_silver28)
Raiden (Smash Daddy)
Ashe/Grey (Spadefox)
Father Time (KingK.Rool)
Agent J (UserShadow7989)
The Three Stooges (UserShadow7989)
Kira Trine (UserShadow7989)
Lyn (UserShadow7989)
May (SirKibble)
Elias (SirKibble)
Super Star Helpers: Ultra (SirKibble)
Richard (SirKibble)
Mia (Tanookie)
Airman (Agidius)
Ema Skye (kitsuneko345)
Unown (kitsuneko345)
Edward Elric (TWILTHERO)
Cutesy Beau (Junahu)

Best Joke Moveset (choose 1)
Cappy holding No Gordos (SirKibble)
Super Gimp Mudkip (SirKibble)
Light Yagami (Kholdstare)
Jack Torrance (TheSundanceKid)
Kitty Vader (MasterWarlord)

Funniest Non-Joke Moveset (choose 2)
Sakurai (TheSundanceKid)
Hyatt (MarthTrinity)
Missingno (MasterWarlord)
Arthur (Bkupa666)
Team Rocket (Junahu)
Richard (SirKibble)
MYM Man (SirKibble)
Excel (half_silver28)

Most Improved Designer (choose 3)
Chris Lionheart
Agidius
MarthTrinity
Half_silver28 (/bias)
Wizzerd
Jimnymebob
Hyper_Ridley
UserShadow7989
kitsuneko345
Shake~
Smash Daddy
SkylerOcon

Most Helpful MYM Poster (choose 2)
SirKibble
King K.Rool
SkylerOcon
MasterWarlord
Hyper_Ridley
Agidius
Chris Lionheart
Half_silver28
MarthTrinity
Junahu

Funniest MYMer (choose 3)
TheSundanceKid
Kholdstare
SirKibble
MarthTrinity
SkylerOcon
Dancingfrogman
Baloo
Plorf
MasterWarlord
KingK.Rool
Jimnymebob
Chris Lionheart

Best Moveset Reviewer (choose 2)
King K.Rool
SirKibble
MasterWarlord
Spadefox
Hyper_Ridley
Bkupa666
Tanookie
MarthTrinity
Agidius
SkylerOcon

Deadliest Sin *a.k.a. Best Sin* (choose 2)
King K.Rool
MasterWarlord
Hyper_Ridley
Spadefox
Tanookie
Bkupa666
MarthTrinity
SirKibble (he's not technically a Sin, but he still worked with them)

MYM 5 WINRAR (choose 4)
SirKibble
MasterWarlord
King K.Rool
Hyper_Ridley
Tanookie
Dancingfrogman
Junahu
Chris Lionheart
Bkupa666
Plorf
MarthTrinity
Agidius
SkylerOcon
Wizzerd
UserShadow7989
kitsuneko345
Smash Daddy
TheSundanceKid

Special Award: Most Missed MYMer (choose 3)
Iron Thorn
Pelikinesis
Chief Mendez
Cheap_Josh
Lenus Altair
Darkserenade
HeoandReo
GreatClayMonkey
Commander Blitzkrieg
~Cruxis~
KoJ
Spadefox

I'd like for everyone to pm their votes to me, not post them in the thread. :bee:
 

KingK.Rool

Smash Lord
Joined
Nov 26, 2005
Messages
1,810
While we're at it, silver...

K.Rool's List of Eligible Voters

-- The Sins

MasterWarlord
KingK.Rool
Hyper_Ridley
MarthTrinity
Tanookie
BKupa666

SirKibble

-- The Voters

Wizzerd
Baloo
Chris Lionheart
Kris121
Jimnymebob
dancingfrogman
Kholdstare
Smash Daddy
phatcat203
Darkslash
agidius
SkylerOcon
flyinfilipino
Junahu
UserShadow7989
Plorf
half_silver28
kitsuneko345
TWILTHERO

-- The AWOL

Heartz
princesspeachluver13
Spadefox

...

Okay, so two things to note about this. Firstly, if you're not on this list but feel you've made a significant enough contribution to MYM - be it through the chat or wherever - you have the right to present your case. If you do so, PLEASE do so somewhere other than the chat where all of the Sins can see and discuss your argument. I have no problem with people other than the above voting, but I'd prefer to first know who they are and why they should be allowed to vote.

Secondly, I'll be tallying most/all of the votes, but feel free to send yours to any of the Sins (other than Warlord). It's just vote diffusion, y'know, to stagger them as it's a pretty big job and also to reduce the power of one person holding lone copies of all the votes.

Lastly, try not to feel obligated to vote. It's better for everyone if you only vote if you've read a significant chunk of the movesets, and not just the ones with the most hype. Just tell me or someone that you won't be voting, your name will be crossed off; it'd be better for everybody.
 

flyinfilipino

Smash Master
Joined
Sep 11, 2007
Messages
4,319
Location
North Carolina
So many awesome movesets were posted in the last few days! Seriously, they all look great. I'll try to find the time to read them all carefully, but I guess I'll start with the most recent one....

@Count Cannoli: I wish he was TAC, but he's just as cool, I suppose Really cool moveset, here! I've never heard of this guy and played Master of Disguise at a store for a grand total of 5 minutes, but he seems to be a cool character. Moveset-wise, he seems to be very sneaky and the perfect character for a kleptomaniac like me which is very nice. The Neutral Special/thievery move is really fun and a nice twist on the "stealing" mechanic. For the most part, each move was really nifty, and I made a some notes on few, let's see...

- For the Jab's third hit, it'd be nice to know which way Cannoli was facing when he reappears on the other side of the opponent

- Does it matter where exactly Cannoli is in relation to the wall when performing is Forward Tilt as the Silver Zephyr? Also, when reappearing on the other side, is his back to the wall there?

- Forward Smash is a cool move that TAC could've used, though it's a shame that Cannoli can't just purposely whiff the move to get his moves back if interrupted. Crime doesn't pay, I guess.

- For the Up Smash, it would be nice to know where exactly the clouds appear on the stage when using this move; how high, at least.

- The Up Aerial is so good, it obviously required much planning and was probably the first move you put into this moveset. Brillliant!

- That Down Aerial particularly stands out to me as a cool move. I dunno, it's just funny to picture, I guess (and is pretty dern creative to boot).

- The Final Smash "robot" you describe sounds like one of those arcade machines that you can grab prizes from. It took me a second to figure that out from the way you wrote it, however, it's quite a suitable and useful Final Smash.

Is that all for nitpicking? Yes! *crumples list of notes and tosses the bauble away* Hopefully I didn't sound too negative there, because as a whole, I really did like the moveset, and for a character with a gimmick, I think I'd have fun using Count Cannoli because I'm a kleptomaniac to piss off opponents by stealing all their moves. Great moveset, K. Rool! :bee:


*eyes name on voting list*
 

Kholdstare

Nightmare Weaver
Joined
Oct 10, 2008
Messages
1,440
*comes out from behind bomb shelter*

Well, 20 movesets to read isn't so bad... I think... ugh.
 

princesspeachluver13

Banned via Warnings
Joined
Nov 13, 2007
Messages
617
Location
Yep. I had it coming. Stupid apathy.
Okay, I know I haven't posted in a LONG time. All I can say is that I'm extremely impressed with the quality of the movesets now.

Also, there's very little chance I'll be returning in MYM6. My eyesight has been, and is still, deteriorating. I can barely see anything on my computer screen without squinting.

If I do get glasses, however, I will most likely only be popping in to say, "Hello" and to see how everyone is doing. Again, most likely.

I'm sure that you're all thrilled about this, some in particular(you know who you are as does everyone else in MYM), so I don't expect to be missed very much or at all, really. I apologize if anyone is upset(if anyone really cares), so yeah. Again, I may come back, but that's a very small chance. So thanks to everyone who's been a friend, Kibble, PC, and Agi especially. You're all awesome.

Finally, I hope to see you all in MYM6. Also, Kibble, I'll miss you. I hope I see you(or anything at all) in a couple years.

Lastly, I thank all of you for a great time in MYM. Maybe I'll see you, maybe I won't. It all depends on my sight. I really hope to see you all again!

Thanks again, PPL13​
 

Agi

Smash Lord
Joined
Jul 27, 2008
Messages
1,120
Location
SE Washington
Okay, I know I haven't posted in a LONG time. All I can say is that I'm extremely impressed with the quality of the movesets now.

Also, there's very little chance I'll be returning in MYM6. My eyesight has been, and is still, deteriorating. I can barely see anything on my computer screen without squinting.

If I do get glasses, however, I will most likely only be popping in to say, "Hello" and to see how everyone is doing. Again, most likely.

I'm sure that you're all thrilled about this, some in particular(you know who you are as does everyone else in MYM), so I don't expect to be missed very much or at all, really. I apologize if anyone is upset(if anyone really cares), so yeah. Again, I may come back, but that's a very small chance. So thanks to everyone who's been a friend, Kibble, PC, and Agi especially. You're all awesome.

Finally, I hope to see you all in MYM6. Also, Kibble, I'll miss you. I hope I see you(or anything at all) in a couple years.

Lastly, I thank all of you for a great time in MYM. Maybe I'll see you, maybe I won't. It all depends on my sight. I really hope to see you all again!

Thanks again, PPL13​
Well... it's sad to see you go without reconciling with the majority of MYM. I know that you have changed, it just seems that few others are willing to accept that. Anyways, here's hoping you get better.
 

KingK.Rool

Smash Lord
Joined
Nov 26, 2005
Messages
1,810
So many awesome movesets were posted in the last few days! Seriously, they all look great. I'll try to find the time to read them all carefully, but I guess I'll start with the most recent one....

@Count Cannoli: I wish he was TAC, but he's just as cool, I suppose Really cool moveset, here! I've never heard of this guy and played Master of Disguise at a store for a grand total of 5 minutes, but he seems to be a cool character. Moveset-wise, he seems to be very sneaky and the perfect character for a kleptomaniac like me which is very nice. The Neutral Special/thievery move is really fun and a nice twist on the "stealing" mechanic. For the most part, each move was really nifty, and I made a some notes on few, let's see...
Thanks, filip! I never saw as the kleptomaniac of MYM; I think Skyler would be a better fit for that. :bee:

- For the Jab's third hit, it'd be nice to know which way Cannoli was facing when he reappears on the other side of the opponent
Ah, of course. He's facing them, yeah, to make it easier to assault them steal from them from behind.

- Does it matter where exactly Cannoli is in relation to the wall when performing is Forward Tilt as the Silver Zephyr? Also, when reappearing on the other side, is his back to the wall there?
Uh, to be unnecessarily honest, I didn't really think about either of those. I suppose no and yes.

- Forward Smash is a cool move that TAC could've used, though it's a shame that Cannoli can't just purposely whiff the move to get his moves back if interrupted. Crime doesn't pay, I guess.
Ah, TAC. I was going to make him, but really, he's yet another Kirby character and I wanted to mix it up - plus Cannoli has his wand. And yeah - don't steal, kids!

- For the Up Smash, it would be nice to know where exactly the clouds appear on the stage when using this move; how high, at least.
Right you are. Maybe I'll edit that in. Probably not. :bee:

- The Up Aerial is so good, it obviously required much planning and was probably the first move you put into this moveset. Brillliant!
I hate Uairs. I finished most of the set two days ago, the Uair I made earlier today. I have no excuse.

- That Down Aerial particularly stands out to me as a cool move. I dunno, it's just funny to picture, I guess (and is pretty dern creative to boot).
I was happy with that one, too!

- The Final Smash "robot" you describe sounds like one of those arcade machines that you can grab prizes from. It took me a second to figure that out from the way you wrote it, however, it's quite a suitable and useful Final Smash.
Yeah, that's basically exactly what it is. I felt it suited his somewhat blundering character to steal by playing a game. Glad you liked it, as I usually treat Super Attacks as a throwaway part of the moveset.

Is that all for nitpicking? Yes! *crumples list of notes and tosses the bauble away* Hopefully I didn't sound too negative there, because as a whole, I really did like the moveset, and for a character with a gimmick, I think I'd have fun using Count Cannoli because I'm a kleptomaniac to piss off opponents by stealing all their moves. Great moveset, K. Rool! :bee:


*eyes name on voting list*
Many thanks for the in-depth commentary and for the compliments, filip!

You should totally vote, though. You've read (and commented) on at least half the thread (the first half). :bee:

EDIT: Goodbye, PPL. You've never seen clearly and it seems that's only going to get worse, so I'm sorry.

For what it's worth, though, I don't think you deserved the treatment you received.
 

princesspeachluver13

Banned via Warnings
Joined
Nov 13, 2007
Messages
617
Location
Yep. I had it coming. Stupid apathy.
Just thought I'ld let you know that that never happened. Goodbye and, to quote Heartz, "Don't let the door hit your *** on the way out."
Just so you know, I can still see if I squint. I really don't appreciate that, but that doesn't make me want to stay away. I'll come back and seriously not even care. I don't even care right now.

Just thought I'd let you know.

EDIT: Thanks, K.Rool, Khold, and Agi. It all really means a lot.
 
Status
Not open for further replies.
Top Bottom