Welcome to Smashboards, the world's largest Super Smash Brothers community! Over 250,000 Smash Bros. fans from around the world have come to discuss these great games in over 19 million posts!
You are currently viewing our boards as a visitor. Click here to sign up right now and start on your path in the Smash community!
It appears that you are using ad block :'(
Hey, we get it. However this website is run by and for the community... and it needs ads in order to keep running.
Please disable your adblock on Smashboards, or go premium to hide all advertisements and this notice. Alternatively, this ad may have just failed to load. Woops!
@darth meanie: I'm going to disagree with you here. Takamaru is undoubtedly underpowered, but he's not as useless as you claim. I'll give you the Side Special, Up Special and Down Tilt, but the rest of the moves are not as useless as you claim. For the Forward Smash, remember that it can be punished but is difficult to punish. Only characters with better range than Takamaru can really punish it, and that's limited to sword users. As for the Up Smash, yes a character with bad KO ability needs to have bad KO moves. One solid KO move could rip that part of the playstyle apart. The Neutral Aerial has infinite range and is very useful for mindgames, not to mention that it's pretty easy to get the opponent grabbed before the katana comes in with Takamaru's great grab range, plus the long duration of his Ring of Fire throw. Also remember that you only refer to some of Takamaru's moves- he still has some useful moves in there, especially with the throws, which you seem to have forgotten. Takamaru is underpowered but not as badly as you claim, and I think you're blowing it out of proportion.
As of the time of this posting, the penalty against posting incomplete movesets has been revoked.
We decided that it was simply too biased to have to decide who to give second chances to and who should have outright revieved a penalty. So, we decided to to say "screw it" and be leniant towards everyone.
However, this does not mean that you should be posting movesets that only have one completed attack just to "get it started". It is still highly perfered that you try to post completed movesets, or at least ones with all of the required attacks to be counted as an official entry. If you need help with a move, you are always welcome to ask your fellow MYMers for advice.
And just because I know someone is going to ask it: Special mechanics that take away an input are acceptable (such as Kangaskahn's grab mechanic which doesn't allow for any throws). Just, you know, don't start taking away inputs without an actual purpose behind it.
The pokemon master uses every pokemon from Brawl/Melee, MYM1, MYM2, MYM3.0, MYM4, MYM5 and MYM6 to decimate his foes. For the sake of keeping the list neat, only the newest set for a given pokemon will be linked (except in certain extenuating circumstances where an older set is more popular than the newer one). Also, no movesets will be linked for pokemon who already appear in Melee/Brawl.
..that is all. [click the pokepics to go to their movesets]
The pokemon master uses every pokemon from Brawl/Melee, MYM4, MYM5 and MYM6 to decimate his foes (No MYM3.0 yet)
..that is all. [click the pokepics to go to their movesets]
As this is ALL the MYM3 pokemon sets, thanks to you looking at every moveset, so I'd just copied the pokemons name down. There are some pokemon already there just for you know.
Here you go, MYM3 pokemon:
Team Rocket (meowth, Arbok, Victreebell, Lickitung, cacnea)
Pokemon Trainer Wes (umbreon, espeon)
Mewtwo
Plusle & Minun
Froslass
Team Big Shots (howncrow, Torterra, Empolean)
Staraptor
Blaziken
Missingno (?)
Pigeotto
Aipom
Darkrai
Regirock,Regice,Registeel
Magmar
Xatu
Hippowdon
Pidgeot
Magikarp
Delibird Professor Oak has no pokemon
Mightyena
Latias
It could still use priority though, and some more BBCode. Bold the headers and make the attack names bigger. Put some space between the attack and the details.
Very nice, Junahu! Wow, almost half of the first gen entries are mine.
The MYM 3 movesets feel a bit out-of-place and behind the times (with the exception of kits' and my own awesome Pidgeot, which is unfortunately behind TWIL's awful Pidgeotto [sorry, man...]), but I can understand why you have them there.
It's such a shame that that list will have doubled in size before MYM 6 ends, considering all of these horrible joint Pokesets that seem to be all the rage nowadays.
Hello. I've been lurking here since the end of MYM 5 and I already have one set in the works. I only want to see how many people know the character. I know Hyper_Ridley does, and I assume Kholdstare does as well. The set? Yami, the Emperor of Eternal Darkness, and final boss of Okami. Anybody know who I'm talking about?
While I have never heard of Yami, or the game Okami as a matter of fact, I don't think wether people have heard of a character or not will really affect anything at all. Even if people have not heard about Yami, it won't matter when you post the moveset and give a background regarding Yami.
Hello. I've been lurking here since the end of MYM 5 and I already have one set in the works. I only want to see how many people know the character. I know Hyper_Ridley does, and I assume Kholdstare does as well. The set? Yami, the Emperor of Eternal Darkness, and final boss of Okami. Anybody know who I'm talking about?
Very nice, Junahu! Wow, almost half of the first gen entries are mine.
The MYM 3 movesets feel a bit out-of-place and behind the times (with the exception of kits' and my own awesome Pidgeot, which is unfortunately behind TWIL's awful Pidgeotto [sorry, man...]), but I can understand why you have them there.
It's such a shame that that list will have doubled in size before MYM 6 ends, considering all of these horrible joint Pokesets that seem to be all the rage nowadays.
Saren: From Daroach, this is a marked improvement, especially with your added images. Half of the moves are inspired – as I had imagined with a Mass Effect set – by the abilities you can use in the game and half are of Saren’s own personality, making it very fitting. The use of Saren’s flying board thing is also pretty nifty as a recovery. For one of the only Mass Effect movesets ever, it’s pioneering and I hope to see more from this great series. A couple of things, though: your moves have a trend here of being underpowered and your use of images is a little underhanded. The updated version is good in that area, but still, some of them [pictures] are a little too big, taking up the entire page width of the boards. I also would have liked to see Saren’s form from the end of ME in here somewhere; aside from that, it’s very respectful; great effort.
Pokémon Master is interesting. We’ve made over sixty sets in all MYMs for different Pokémon, I think. Not really a moveset per se so I can’t exactly comment.
"Memo to me, memo to me, maim you after my meeting..."
Hades
***
BACKGROUND
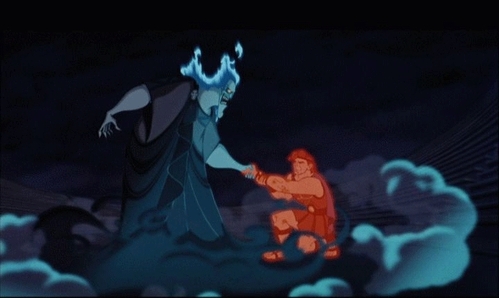
The Lord of the Dead, as seen in the 1997 Disney movie Hercules. This version of Hades is a fast-talking evil deity, reminiscent of Satan, rather than the mythological Hades (who was a passive God who occasionally did a nasty job). Hades is bitter about being isolated to rule the dead in the Underworld for eternity, while the other Gods live the easy life on Mount Olympus. In response, he sets up a hostile take-over plan to overthrow the king of the Gods, his brother Zeus, and rule the cosmos.
Particularly notable about Hades is his flaming hair, which is blue when he is calm. However, if he gets pissed off, his hair will flare like crazy, turning his hair and skin red with rage (this happens quite often). His hair also flares when he's excited or successful, although it stays blue in this case. With a vast reserve of monsters at his beck and call (including his two impish minions, Pain and Panic, who often bear the brunt of Hades' wrath), as well as the ability to manipulate fire and smoke in large amounts, Hades is a force to be reckoned with. Although he can be quite comical, with his motor-mouth always spewing sarcastic and witty comments, Hades is a wrathful God who will stop at nothing to get what he wants.
Here is a video of Hades' finest moments from the movie; I highly recommend you watch it. There are some priceless lines and and scenes in there, and it is great for showing just how the Lord of the Dead rolls.
The movie is not mine, however...
STATS
Power: 8/10
It's only natural that the Lord of the Dead is a powerhouse, and a powerful one at that. However, he is far from the stereotypical heavyweight, having new twists to his hellish strength.
Walking Speed: 1.5/10
Hades is far from any hurry in his walk speed. Most evil Lords don't feel need to waste energy with speed when they can simply obliterate their foe through other means.
Dashing Speed: 3/10
Hades doesn't really run, being too haughty to really put effort into it.
Weight: 7.5/10
Hades is not a full-fledged heavyweight, due to his smoky stature; he's still plenty weighty, but he can't really stick around as long as the likes of Bowser or DK; he's more around the weight of Link or Samus.
Range: 7.5/10
Hades has plenty of attacks that are separated from his body, so this stat is rather high. His melee range is not especially notable, however.
Projectile Distance: 1 - 10/10 Probably the most variant projectile-user in the game; Hades can steal the main projectile of his foes via Down Special, but due to the vastly different nature of these weapons. They can range from awful range to insane range.
Attack Speed: 3/10
While he is faster than several existing heavyweights, and still has viable moves, Hades' attack speed as a whole is really not that good.
Priority: 9.5/10
This is one area where Hades really shines. Almost all of his attacks can cut through nearly any enemy attack at any time. After making a slow attack land, it sure as hell better actually land, right?
Size: 9.5/10
Hades has is rough here; he is slightly wider than Ganondorf and a bit less bulky than Bowser, due to his smoky robes. However, his flaming hair makes him slightly taller than Ganondorf. Hades is one of the easiest characters to combo in the game.
First Jump: 2.5/10
Really pretty poor for a jump. The prospect of unnecessary jumping is not an appealing one to Hades.
Second Jump: 5/10
An average midair jump, nothing special.
Aerial DI: 6/10
While Hades can't maneuver while airborne as easily as some other Brawlers, his smoky composure allows him to drift around fairly easily.
Fall Speed: 4/10
Different from the standard falling speed of existing heavyweights, Hades is once again rather floaty in midair, due to him being formed from smoke.
Recovery: 5/10
Hades' recovery is rather average. It can cover insane distances, but is extremely slow, quite easy to gimp, and damages Hades whenever he moves with it.
Traction: 10/10
Near perfect; Hades is in the same vein as Mewtwo would be here. His running style allows him to dash about with no fear of tripping. It is very rare that Hades will randomly trip, ever. He can also turn around without sliding nearly at all.
Crouch: 0/10
Hades doesn't really crouch here at all. Gods bow before no one! Instead, his crouching pose is a charge of sorts for his Down Tilt.
Comboability: 3.5/10
While experienced players can string several hits together with Hades, most players would be better off using Hades as a powerful character.
Wall Jump: No
Wall Cling: No
Crawling: No
Gliding: No
Tether: Yes
BASIC ANIMATIONS
Standard Pose:
Hades stands up at full height in a bored manner, his hair flaming blue and his smoky robe billowing slightly. Most of the time, he keeps his arms at his side, but occasionally...
Idle Pose
Hades' face turns slightly red, his hair turning orange and flaring slightly, as he conjures up a Greek sundial made of smoke to check the time. The Lord of the Dead does not like to be kept waiting!
Walking:
The underside of Hades' smoky robe starts billowing more, as Hades learns forward slightly, gliding forward along the ground.
Running:
The smoke billows a bit more, as Hades leans forward ever so slightly further, gliding a bit faster.
Dashing:
Hades' robe starts billowing violently in swirls of smoke, as he glides forward faster, this time with his arms held out a bit in front of him, as if trying to terrorize his foes, rather than holding them at his side like the above two poses.
Jump #1:
Hades points both arms down, causing a small cloud of smoke to appear beneath him and boost him up a small distance.
Jump #2:
The cloud of smoke bursts, pushing Hades up an average distance. If Hades uses this without jumping off the ground first, as in when recovering, the cloud appears automatically before bursting, not needing a first jump to appear.
Crouching:
Hades snaps his fingers and takes on a shadowy tint. This does nothing to stop foes from hitting him, but turns him shadowy, black, and transparent, him still staying his normal height.
Ledge-Hanging:
Hades hangs on with one hand nonchalantly, showing off his godly strength.
Swimming:
Hades' robes hiss as he submerges (not disappearing though), as his hair extinguishes. Hades' face (he has no hair to flare now) turns red as he floats in the water. Hades doesn't swim, he merely floats forward or back in the water, the base of his robes behind him like a propeller. It takes a while to get him to drown; he doesn't have much mass.
Hades' hair relights whenever he uses a fire-related attack; unlit hair has no effect on him, simply being an animation. His hair also goes out when it is hit by water or wind attacks.
Forward Roll:
Hades turns into a dark swirl of wind, blowing forward an average distance before rematerializing into his normal form.
Backward Roll:
Hades points two fingers (one from each hand) at the ground in front of him, a small bit of smoke coming out of them like a jet and pushing him back a short distance.
Spot Dodge:
Hades turns into a poof of black smoke, not actually leaving the foreground, but dodging for the same amount of time as a spot dodge before rematerializing.
Air Dodge:
Hades turns into a tornado-esque cloud of swirling smoke for a short period of time before reforming.
Shield:
Hades holds his hands in front of him in a defensive position, forming a non-damaging sphere of fire around him like a normal shield to protect him. The fire starts out blue like his hair, but turns orange, then red as it takes hits. The fire shield vanishes with a hiss if the shield is broken.
Tripped:
Hades' slides forward awkwardly slightly from his glide, ending up in a bended over position that causes him to lag, but not actually falling on his arse, or where said arse should be. He can't lose his evil aura in something as idiotic as a random trip!
Dizzy:
Hades puts one hand over where his heart should be, and groans dizzily, his eyes rolling around dizzily in their sockets.
Sleeping:
Hades maintains his standing position, but his head droops over in front of him as he closes his eyes, arms at his sides, while he snores quietly. A dignified sleeping pose.
***
MOVESET
Mechanic- Hellish Hot-Head
Hades is quite a wrathful God who will stop at nothing for victory. However, he is rather arrogant around those who are obviously weaker than him; mortals, in other words, like the characters in Brawl. While he is immortal, he can still be hurt and damaged. But will the Lord of the Dead let this slip by so easily? I think not. He may be cocky at first, but when you prove your worth to him, Hades starts taking his foes seriously, gaining several bonuses based on his standings in the Brawl.
If Hades has more damage than a foe on the same stock in a 1 vs. 1, his power increases by1/4. While this does nothing to help the lag on most of his moves, Hades can KO foes more easily with this power-up.
If Hades is a stock behind his foe in a 1 vs. 1, he becomes able to perform his moves and jump/dash/dodge with 1/4 times less his normal lag, speeding him up a good deal, but not modifying his power bonus at all.
If Hades is somehow still alive when he's two stocks behind his foe in a 1 vs. 1, his power increases to 1/2 its normal strength, while his speed gets 1/2 lag to it, making Hades a big threat. Finish him off!
Hades gets a boost when he's losing, but as long as you keep in mind that...well, he is losing, probably having a good deal of damage accumulated, you most likely will not have trouble finishing him off. Since his damage starts back at 0% when he respawns, he'll have lost his bonus, at least until his damage rises again. Foes should try to keep Hades winning by a very slight margin of damage before KOing him, to avoid trouble from his powerful moves. When Hades is losing like this, his face turns red and his hair flares, the color of these details getting more obvious and dark depending on how bad Hades is losing. However...
If Hades is one stock ahead of his foe(s) in a 1 vs. 1, he gets a handicap, getting 1/4 times less power. This power is not horrible, even with this handicap; you'll still want to stay behind slightly to remain at normal power, however.
If Hades is two stocks ahead, he now gets the additional penalty of having 1/4 more lag on his moves. This makes his moves weaker and slower, starting to hinder his character as a whole.
Finally, if Hades is somehow three or more stocks ahead of his foe(s) in a 1 vs. 1, he loses 1/2 of his power AND speed, worsening the above handicap. It is quite risky for Hades to utterly destroy opponents, as it may come back to bite him in his smoky butt.
The flipside of this mechanic is also true; Hades will want to be losing by a bit to gain power or speed, then use your new-found bonus to take out your opponents. Hades has to be careful when staying ahead; he gets cocky and stops seeing his foes as worth the effort when he's ahead. He does tend to slack off when absolutely obliterating his foes. Don't destroy your foes; be careful and control what position you stay in to gain or lose power or speed.
Hades gains a cocky grin with his idle position when he's winning, while his hair flares blue with success; the amount of flame increases with how much Hades is winning by. If Hades heals his damage back to below his opponents, he loses his gained power-up; also, if Hades loses his ground when he's winning, he gets his lost power or speed back. This mechanic adds a whole new layer to Hades, making or breaking him, depending on the player's style.
One point that must be noted is that Hades' mechanic is defunct if he's facing more than one opponent, in a FFA or team battle. However, because he's still a strong powerhouse anyways, he can still function perfectly well in party environments.
SPECIALS
Neutral Special - Deal with the Devil
Hades sticks out a hand in front of him, saying rapidly, "How 'bout we shake on it?" His hand extends out about a Stage Builder block. Hades sticks it out quickly as well; his jabbering doesn't slow him down. By holding the B Button, you can keep out his hand for as long as you want. By tapping the button, Hades keeps his hand out for as long as Sheik's Chain before pulling it back in.
Pulling his hand back has above average lag, no matter what. His hand has average priority; if you hit it with an attack that has less priority, you'll be pulled into the following move. If your attack has better than average priority, however, it'll hit Hades' hand and cause it to turn bent-up and black. If this happens, Hades pulls his hand back while looking at it comically and flexing his fingers; this gives him a good deal of punishable ending lag. If a grounded foe touches his hand, the following ritual ensues (this move does not effect aerial foes).
Hades grasps the hand (or the closest thing) of the character tightly, as magical blue light streams from their joined hands. During this time period, the foe glows a sickly reddish color, while Hades' hair flares with blue fire victoriously. He also has an evil grin on his face; things are going his way! After a second of this, the foe trips as Hades releases them.
The foe now has 1/2 times less than their normal strength, having been weakened by Hades' deal. Hades makes this deal with Hercules in the movie to lessen his broken power. Seriously, only Meta Knight and Chuck Norris could beat him! The foe stays weakened forever unless they fulfill the undoing requirement of the curse. Even if they KO themself, the curse will stay around.
To get rid of this liability, the foe must accumulate 15% on themself to lift the curse. They can do this over as many stocks as they wish; still, no matter when they receive it, 15% is the key number to get their power back. Hades should only use this move when he is in dire need of having a weakened foe; perhaps when he's at high damage and wants to stick around to use his enhanced power? This may prove useful when Hades has high damage and wants to use his new-found power.
Foes should try getting hit by weak attacks or hazards to lift the curse. You obviously don't want to just walk into a Smash attack and lift it all at once. If Hades or the victim are hit during the second of start-up for the curse, the curse fails and both characters are freed with no lag. If the move connects successfully, however, Hades cannot use this move again for the rest of his stock. Choose when to use this wisely; it can be a vital tool if you don't waste it.
Side Special - Helm of Darkness
This is an interesting move for Hades, and is the only attack he draws from the mythological Hades. The Helm of Darkness is made of purest dogskin, and is adorned with wings. It renders the wearer completely invisible. The above picture depicts a statue of the hero Perseus, wearing the Helm. In Smash, Hades puts it to use as means to gain a projectile.
When it was first made for Hades, he used it to steal the ammunition of the Titan Lord, Kronos. He uses it the same way in Smash. With below average startup and ending lag, Hades conjures Helm out of smoke and places it on his head. As he does so, he taunts the foe with, "Now you see me...now you don't!" Hades becomes *gasp* invisible once the Helm is on his head. If he is attacked while taking out the Helm, he does not become invisible, however.
Hades stays invisible for five seconds at a time; you can't use Side Special again until he reappears. Unlike with the Cloaking Device item, Hades can take both damage and knockback while invisible. You can't really confuse foes by becoming invisible, so you'll want it to steal projectiles. In addition, you'll have to learn how to control Hades while invisible; you can still see his basic outline, but newcomers should not get careless, or else they might self-destruct.
To steal a projectile, Hades must run through the opponent in question. Hades can pass through characters and enemies (although these don't yield projectiles), but not stage hazards or walls. He has ways of rendering foes vulnerable so as to steal projectiles; opponents with projectiles should always stay on the move against Hades, to prevent him from stealing from them. Unlike Kirby, Hades steals a set number of projectiles from his foe; he can use them anytime without fear of losing them (unless he loses his stock), but he can only have one set of ammo at a time.
Below is a list of the characters that have projectiles that Hades can steal. Keep in mind that Hades can only steal projectiles that the foe uses from a weapon or has a supply of (e.g. Fox, Yoshi). Projectiles that are generated from the character (e.g. Mario, Samus) cannot be stolen. Hades' arm converts to smoke when he uses most projectiles; this allows him to hold it at the height and angle that the original opponent uses the weapon, as most would be awkward for such a tall character to use from his normal position.
: Hades now has the ability to use three Vegetables. By pressing Side Special, Hades conjures a vegetable up from the ground and holds it. He can then press A to throw it. Like Peach, Hades can get different veggie types, as well as items on rare occasions.
: Hades steals three shots from Diddy's Peanut Popgun. What, you wanted him to steal banana peels? No way, a Dark Lord using food remnants to slip his foes would be ridiculous! Anyways, pressing and holding Side Special allows Hades to charge the popgun, while releasing it fires the peanut. Don't let it backfire!
: Hades takes three Yoshi eggs to throw. The eggs can be angled with the Control Stick as usual, as Hades bends his smokey arm to change the trajectory.
: Hades steals three Bombs from Link (his other projectiles are crap). Pressing Side Special causes him to pull a bomb from his robe. Hades can then choose a direction with the Control Stick and press A to throw the bomb.
: Hades gains access to Sheik's needles when he steals from her. Pressing Side Special once charges the needles, while another input fires them. Hades steals two rounds of needles at a time.
: Now that Hades stole from the good version of Link, he inherits Toon Link's Boomerang. Because he uses it with Side Special, the way the move is used stays exactly the same. Hades can throw the Boomerang out three times.
: Hades steals Zamus' Paralyzer. By tapping and holding Side Special, Hades can charge the stunning blast before he shoots it.
: Hades steals three Light Arrows from Pit. By holding Side Special, he can choose the trajectory of the arrow before he fires it.
: This is pretty laugh-worthy; Hades can actually steal two minions from the penguin king. Tap Side Special to...oh, why bother. Hades can still throw Waddle Doos and Gordos on rare occasions.
: If Hades can steal minions, he can steal Pikmin as well! Side Special flings the Pikmin out, just like the standard Pikmin Throw. If they connect, the Pikmin attack as usual; if they fall off or miss, however, they die automatically, like with Olimar's Kirby Hat.
: Hades gains access to ten Blaster shots from Fox. Tap Side Special to fire them in rapid succession from the stolen gun.
: Because Falco's lasers are more deadly and slower than Fox's, Hades can only fire five shots from Falco's Blaster. Tapping Side Special fires them, of course.
: When Hades steals Wolf's Blaster, he can only launch three shots from it. Side Special fires the shots, like the other two Blasters; the point on the Blaster can still stun foes.
: Hades steals ten served food items from Game & Watch. By tapping Side Special, Hades serves the 2-D food from the stolen 2-D pan. What a useless move!
: Hades inherits three of Snake's Grenades. The throwing speed of the Grenades is determined by the input of Side Special; press B and back to throw lightly, tap Side Special to throw normally, and smash the input to chuck it hard.
All projectiles Hades uses have the same properties they always do. The character they were stolen from is still able to use their projectile, even though it was 'stolen' from them, so don't worry. Projectiles lead to some great Hades combos; don't overlook this move just because it lacks Hades' normal power.
Down Special - Reporting for Duty!
Hades yells out the name of one of his minions; a half second later, either Pain or Panic appear at his feet. After his minion appears, Hades lagelessly reappears in the stage's background, unhittable and sitting on his throne. His throne generally stays where Pokemon Trainer would stand (Ryuk's D-Tilt cannot hit Hades, due to ten seconds without switching breaking this move). You can now play *gasp* as either Pain or Panic. The minion that appears is random; if you hold down X or Y while swapping, you can choose either Pain or Panic (X for Pain, Y for Panic).
Pain and Panic are both much weaker than their master, of course. Their stats are absolutely pitiful, although their attacks are super fast. What's the use of them, then? If they are damaged or KOed, it doesn't count against Hades at all. Because of this, Pain and Panic are great at gimping and damaging opponents without any effect on Hades at all. They can switch back to Hades at any time via Down Special. However, if Pain or Panic takes more than 50%, they switch back to Hades automatically. Notable about how the two take damage is that each point of damage counts double; although they can only take 50% before switching, this counts as 100%, so they can be KOed while out. Only one minion can be summoned per stock.
One more twist is added to the move to prevent Hades from spamming this move. Every ten seconds Pain or Panic spends fighting, Hades' boredom increases. This boredom is the same as that Hades experiences when he's obliterating foes in the match himself. So, after ten seconds, Hades loses 1/4 of his power. After twenty seconds, he gains 1/4 more lag, and after thirty seconds, both of these penalties double.
Hades should never keep a minion out more than twenty seconds. After calling Pain or Panic back in, he keeps any penalties for however long he used his minion on the battlefield. Pain and Panic are good in moderation, but make sure you never spam them. The few moves that they have are listed in the appendix, at the end of this moveset. Any lasting effects from moves that Hades has used (e.g. Basic Combo, D-Smash, U-Smash) disappear when Pain or Panic is summoned.
Although Pain and Panic are bottom tier material on their own, you can still hold down L or R to play as them, them switching with Down Special now, and having no penalty. However, they only have 11 moves to use, so this is mainly just for fun and messing around. You can never use them in serious play; they just aren't designed for this.
Up Special - Fire Storm
With minimal startup lag, Hades condenses his body into an orb of smoke and fire. This orb is the size of Kirby, and hovers a tiny distance off the ground. The orb has average priority; it deals 6-7% fire damage and below average knockback to foes. The more important detail about this move, however, is that Hades heals 1-2% per second he is stationary in orb form. While Hades will generally want to keep more damage than his foe in a 1 vs. 1 to hold onto his power-up, this can be handy for lowering his damage if it is vastly higher than his opponent's. Hades has moderate ending lag, however, so it's far from spammable.
Hades can use this move on the ground or in the air. If he uses it in the air, however, Hades can direct the Control Stick in any direction to move in orb form. He travels slowly, at the speed of Ganondorf's walk, and does not sweetspot edges. Hades can stay in orb form for up to ten seconds, floating or moving. He can transform back from orb form at any time, by pressing any button. This does not render Hades helpless; he can use any jumps he has left or attack. Foes who touch the orb take light fiery hits, dealing 4-5% per second and a bit of stun.
The orb has low priority when moving, so Hades can be knocked out of it and edge-guarded rather easily. An infinite recovery sounds broken, right? Well, here's the twist. Every second Hades is moving in orb form, he takes 2-3% himself, from the energy it costs him. You can move around all you want, but you'll take a hell of a lot of damage if you use it for long periods of time. This is bad for Hades; however, if you are barely below your opponent in damage, you may wish to hurt yourself a bit more to power up. The move mediocre for recovery, no matter what, but if used in the right places, it can help Hades gain control over the flow of the match.
BASIC ATTACKS
Basic Combo - Bed of Embers
A pile of orange embers appear in Hades' palm. The Lord of the Dead extends his hand slightly and drops the embers onto the ground in front of him. These embers foes in two ways. Foes who hit the embers as they fall to the ground take 4-5% fire damage and below average knockback. This hits at close range, meaning it can clear room for Hades in tight spots. Hades has little startup or ending lag here. The embers have low priority while falling; they fall for a split second before reaching the ground. If they are dispersed before landing, the following effect does not occur.
When the embers reach the ground, they form a patch the size of a Stage Builder block, directly in front of Hades. This patch can't be dispersed, and lasts for ten seconds before disappearing. Foes who step on the patch take 2-3% fire damage, but no knockback. This effect may sound hard to damage foes with, but Hades has no limit to the number of patches he can have out. If Hades tries pulling this move on you, try to break up the embers while they're falling to prevent the patch.
Dash Attack - Greek Fire
As Hades dashes forward, a swirling ball of green fire appears in his hands. Hades continues his forward momentum for a split second, holding out the fireball, before dropping it to the ground. The fireball can hit foes while Hades is holding it, but loses its hitbox when he drops it. It has moderate priority here, and deals 9-10% fire damage and average knockback to foes who touch it. Hades is punishable after releasing the fireball for a brief period, but this can still clear foes from around him.
Now, the fireball stops hitting foes as soon as it's dropped. The fireball is the size of a Soccer Ball, and merely sits on the ground. However, after fifteen seconds, the fireball detonates in a Bowser-sized green explosion. This deals 18-19% and high knockback to any foe who touches it. The fireball can blow early if it is dealt 25% before fifteen seconds. That's right, the fireball can be attacked, but it does nothing until it explodes. Hades can't be hurt by his own fireball; he can only have one fireball out at a time. Try throwing a foe into it, or blowing it when an attacker is nearby.
TILTS
Forward Tilt - Crown of Thorns
Hades conjures up a black crown of thorns, half the size of Kirby. With a sweep of his arm, Hades sends the crown forward, then back to him, where it vanishes in his hand. The crown soars forward the distance of 1.5 Stage Builder block, at the speed of Falco's Reflector. This move has average lag on both ends. There are two effects of this Tilt. Foes who nick or hit the crown's middle take 7-8% and average knockback. The crown has slightly above average priority, due to the crown being thorny. While the lag can make this move dangerous in some situations, it is generally effective at defending Hades from the front.
Now, if foes hit the crown at close range to Hades (slightly further than the range of Jigglypuff's Rest), it latches onto their head. This deals no damage, but causes one of three negative effects on the foe for fifteen seconds. The crown falls off after this time; foes cannot shake off the crown early. The effect the foe receives depends on their damage level.
If the foe's damage level is 0-50%, the crown limits their attacks to Specials. For most characters, this is pretty bad, but bearable for fifteen seconds. Before you even say it, Hades has other ways of taking care of Meta Knight at this phase.
If the foe's damage level is 51-100%, the crown limits their attacks to their seven slowest attacks. The types of attacks these entail depend for each character, but this is the time for Hades to punish them. The foe's focus should be fleeing during this time.
Finally, if the foe has more than 100%, the crown limits their attacks to their seven weakest attacks. This is generally not a big deal for bigger characters, as almost all of their moves can be used for KOs. The lighter characters who have an easier time fleeing now are the ones affected the most.
In competitive matches, the startup lag will almost always prevent Hades from hitting you this close with an F-Tilt. If he misses like this, Hades is super punishable, just like Jigglypuff. For some characters, the crown may not even be that big of a deal. The first time it's done to you, it may take some experimenting to find out which attacks you're limited to, however. Just in case you're wondering, only one crown can be on an opponent at a time. Hades can still use this move while the foe is wearing one, but only the ranged effect will register.
Down Tilt - Jumping at Shadows
You'll remember that Hades' crouching pose is merely a charge for his D-Tilt. When you crouch, Hades doesn't bend down; his body merely turns transparent and shadowy, while a black shadow creeps along the ground in front of him. The shadow travels forward at about Zelda's dashing speed; its minimum range is the distance of 1.5 Stage Builder block, while the maximum range is four blocks. Hitting Hades while charging cancels the shadow; the shadow also vanishes if Hades stops 'crouching'.
If Hades uses D-Tilt, he disappears, then reappears in a burst of smoke at the maximum range of the current shadow. The closest thing to this is Dimensional Cape, but Hades can't break the game with this. The lag on both ends is about the same, however. Him reappearing is not even an attack, but if a foe is within a Stage Builder block in front of him when he reappears, they trip. Hades has super armor frames while vanishing, but if the foe dodges the trip, he can be punished upon reappearing. Hades' shadow stops if it reaches an edge. If used correctly, this can set up nice combos, as long as Hades is careful.
Up Tilt - Hydra Pump
Hades points up a finger, out of which trails a thin dragon-headed trail of fire, with below average startup lag. The trail extends up the height of Mario, and can be held out as long as you want. Releasing it has average ending lag. The move's priority and damage are at maximum upon first being released, however. The head of the dragon is the hitbox, having moderate priority. If a foe touches it, they take 3-5%, but are held in the area of the dragon's head (no knockback).
If Hades taps the A Button while a foe is in the dragon's mouth, another trail of hydra flame extends from the same finger, dealing 3-5% more damage and still holding the foe. If Hades presses the A Button again with two trails out, a third one comes out as well, dealing 6-7% and above average knockback. Foes can DI out easily when they're caught in a dragon's mouth; if Hades is quick and the foe has high damage, however, this can build easy damage. The extra trails of flame have the same properties as the first trail, in terms of range, speed, and priority.
SMASHES
Forward Smash - Hellfire
Hades reaches into his hair, pulls out a ball of fire, and begins swirling it around in his hands; all of this is part of his charging motion. Upon release, Hades hurls the ball of fire forward with great force. He has below average startup lag, with a moderate amount ending.
The fireball is about the size of Kirby; it can travel from two to four Stage Builder blocks before vanishing, depending on the charge. The speed is also variant on the charge, ranging from the dashing speed of Zelda to that of Meta Knight. The fireball's priority is extremely high, so you should never try to beat it; spot dodging is the answer.
Hades can angle the move up or down slightly, in the few frames before he releases the fireball; if he angles it into the ground, the fireball explodes in a violent explosion, the size of Bowser. Foes who hit the fireball's explosion take 22-26% and high to insane knockback. Foes who merely hit it in the air take a slightly lesser 16-21% and average to high knockback.
At maximum charge, foes who hit the fireball in midair (this does not occur if it hits the ground and explodes) get their controls reversed. This deals the same damage as the normal move, but no knockback. The controls stay reversed for fifteen seconds before switching back, as the hellfire has sunk into their soul. The only way this curse can be undone beforehand is if a fully charged Hellfire hits the foe again. The damage and knockback are great, but if you decide to reverse your foe, beware. It may be nice for the initial shock of the player, but it doesn't guarantee a KO for Hades if the player knows what they're doing.
Down Smash - Raising the Dead
While charging, Hades points both hands to the ground, as if pulling an invisible chain. Upon release, Hades pulls his hands up, slowly and deliberately. Out of the ground beneath him come two skeletons. These skeletons stay out as enemies for Hades to hinder foes with. Pulling them out has above average startup and ending lag, so it definitely can't be spammed.
The skeletons last for twenty seconds, unless attacked. They are the height of Captain Falcon, but hunched over slightly. Being merely skeletons, they have relatively low HP. However, their HP depends on the charge time, ranging from 10 to 25 HP. They walk around mindlessly at the speed of Ganondorf's walk, turning at stage edges. Foes can attack safely with projectiles, but Hades can manipulate foes into the skeletons with his other attacks. Watch for this and react accordingly.
Skeletons have three attacks they use on nearby enemies. If a foe touches one, it grabs them like the Redeads in Melee. This deals 9-12%, but no knockback. Touching a skeleton with any low priority attack results in being grabbed like this. A skeleton can also perform a quick, two-hit slash, like Bowser's Basic Combo. This is much faster than Bowser's, but has lower priority and closer range. The first hit deals 2% and a brief stun, while the second hit deals 3% and low knockback. Finally, a skeleton can throw a simple bone at foes. The bone travels in exactly the same pattern as Mario's Fireball, with the same priority, range, and speed as well. Hitting it deals 5% and low knockback, while the bone makes a clattering sound.
None of the skeletons' attacks are really that damaging or easy to KO with. Hades can attack his own skeletons, although their attacks don't hurt him. Although this may sound like a generic enemy move, Hades can use his skeletons as shields much more easily than other minion-users. This is surprisingly useful, as Hades may need to defend himself if he already has a power-up from being damaged. Hades must wait until both skeletons are KOed before calling out another pair.
Up Smash - Portal to Hell
Hades holds his arms out while charging, like DK charging his U-Smash. Upon release, Hades claps them above his head. This deals no damage, but causes a fiery portal to appear above his head, with moderate startup and ending lag. The portal lasts for thirty seconds before vanishing, but has HP can that be attacked to destroy it early. Depending on the charge time, a portal can have 15 to 30 HP. Portals are the size of Kirby; a moderately-sized ball shape. If you pause the game and look into the portal, you can see various skull-shaped flames and patterns inside the portal.
Being a portal, it has to have some warping effect, right? If a foe touches the portal, it consumes them and vanishes for a second. After this, it reappears over Hades' head, dropping the foe right above Hades. The foe can punish Hades if he's not careful, but Hades can easily chain this into a Hydra Pump, if he times it correctly. U-Smash is especially nice at comboing foes with higher damage; for instance, Hades can grab a foe, throw them into the portal, then combo them with U-Tilt.
The foe moved by the portal takes 10% no matter what; in case you were thinking this, Hades cannot just use another U-Smash on the foe dropped from the portal to keep juggling them. He must wait five seconds in between U-Smashes. One final touch on this is that if a foe warps to Hades while he is over a ledge, they enter their footstool jumped spin for a second. This can be used as a potential gimp, but smart foes know not to get near the portal during this time, so it's not super effective.
AERIALS
Neutral Air - Setting You Free
Probably one of the strangest aerials out there. Hades turns a strange blue tint for a split second, before turning back to normal. There is moderate startup and ending lag; if you miss, Hades can be punished for the whole rest of the move. Hades also has horrendous ending lag here; this is a very situational aerial. The move isn't even an attack for the most part, so there's no priority.
So how do you use it, then? Well, if a foe touches Hades point-blank (like Jigglypuff's Rest), he flashes a bright red color. This causes the foe's soul to leave their body; souls are exactly the same size and shape as the character. However, they can't be attacked or pushed around. Souls can't attack either, but can float around at half the speed of Super Sonic, as well as pass through characters, obstacles, and the stage. They are pretty fast, but they'll need that speed for what they must do next.
Now that the foe's soul is liberated from the body, Hades must dispose of the body to shut out the foe's soul. If Hades manages to knock the body offstage, like in a Stamina match, it counts as a KO for the liberated foe (whose soul disappears and reappears inside their body when they respawn). The opponent must direct their soul via Control Stick into their body to regain control of it.
This is easier than it sounds, due to the speed of the soul. Even if Hades hits the body so it's falling off the stage, the foe can float down into the body and recover. Damage dealt to the body while the soul is out is retained by the body, however. It is hard to gimp with this aerial, so perhaps the best use is to build damage without fear of being attacked back. This is extremely hard to pull off; don't ever spam this, or you'll be put in a world of hurt.
Forward Air - Rotisserie
A fairly simple attack that needs spacing to pull off. Hades waves his hand in front of him, causing a flaming spiral to appear a Stage Builder block in front of him. Hades has low startup lag here; the spiral appears quickly and stays out for a brief period before vanishing, Hades having moderate ending lag. Be cautious short-hopping this; Hades has bad ending lag. He has moderate priority here, but needs foes to directly hit the spiral for anything to happen.
If the foe does indeed hit the spiral, they are stuck spinning around in place. This looks as if they had been footstool-jumped, but the victim stays stationary, right where the spiral was. Hades is now free to attack the foe, but he can't knock them out of the spiral; the foe stays in place in the spiral for three seconds before they drop out. In addition, getting caught deals 5-6% to the spinning foe, but this is nothing special. Definitely a high-risk, high-reward aerial.
Back Air - Boiling Point
Hades turns slightly and sticks an arm backwards, it turning slightly red as he does so. This aerial has below average range, as Hades doesn't turn around too far. The priority of the move is high, but the lag is horrible; the startup lag is similar to that of DK's F-Air, while the ending lag is akin to Ganondorf's Stomp. The landing lag isn't much better. You'll be easily punished if you miss this...but you shouldn't try landing on foes anyways. Not yet, at least.
Getting hit deals 14-15% fire damage and high knockback for an aerial. But the lag would prevent you from ever landing it on an opponent, right? Well, if Hades whiffs the attack once, the lag is cut in half; Hades' anger at missing causing him to get more persistent. This makes the move easier to use, but still not that great. If he whiffs it again, however, the lag is halved yet again. Now, the move is a great poking tool. However, it can't be abused; the lag doubles every time Hades lands it now, until it is back to normal. Space yourself and cut down the lag, then use this to KO out of your combos.
Up Air - Up in Smoke
Hades points a finger upwards a very short distance, his hand turning to smoke slightly. Hades has low lag on both ends of this aerial, but the move does nothing unless a foe touches his hand. The smoke can be beaten by almost any attack; only use this move if you know Hades' hand will touch a foe. If his hand does touch a foe, two smokey wings appear on the foe's back. They are about the size of Pit's wings, and begin flapping upwards rapidly.
Every second the foe has wings on, they take 2-3%. Instead of knockback, however, the wings lift the victim straight up. The wings last as long as a grab on the victim before disappearing; foes can button-mash out in the same way, but they find this harder to do with higher damage. If the wings fly the foe off the top blast line, the victim gets put into a Star KO. Hades uses this best on damaged foes, on the higher areas of stages. Foes should stay below Hades in the air to combo his mass better, rendering this useless in the process.
Down Air - Ring of Fire
Hades points both hands beneath him, causing a small ring of fire to start expanding from them. This move hits opponents in interesting ways. After below average startup lag, the ring appears, covering the distance of one Stage Builder block beneath Hades. Over the course of a split second after this, the ring expands to two Stage Builder blocks' distance before vanishing. The ring is about the height of Mario, underneath Hades.
Hades can't move until the ring has vanished. Touching the ring as it first appears spikes foes powerfully. After that, it merely deals 5-6% and low knockback. The range is decent, but the priority is rather low. Unless you are right above a foe and can spike them easily, try to refrain from using this move in the air.
Sounds like a bad aerial? Well, Hades has another use for it as well. If he touches the ground before the ring vanishes, the ring stays there, the same size it was when it landed. Hades has below average landing lag, so this is worth doing at times. The ring stays in place for fifteen seconds, vanishing afterwards. Opponents can't attack the fire to disperse it. Hades and his foes can walk through the fire at any time, without taking any damage at all.
However, if Hades jumps up and uses another D-Air with a ring onstage, the area inside the ring closes up with fire. This creates a patch of flame, up to two Stage Builder blocks wide, and Mario's height into the air. Foes who touch this take 16-17% and high vertical knockback. The priority of the fire is stellar, so stay away from it. Hades can't be hurt by his own fire. He'll need to set this up for it to work, but it is likely to KO foes who are hit by it.
On a side note, if two Hades are on a team together, the Hades can use D-Air to fill up the ring of fire that the other character set up. Now, one Hades can grab a foe inside the fire, while the other fills it up for the KO. Nifty!
GRAB AND THROWS
Grab - Drag Me To Hell
Hades happens to have a special grab mechanic, all his own. When you press the grab input, Hades' stretches his arms forward menacingly, turning them to smoke in the process. If you keep on holding down the button, Hades' arms can travel as far as you want to snare an opponent. By using the Control Stick, you can loop them around and bend them up or down, as well. Only Hades' hands (not arms) can grab, however.
Hades' arms travel at the speed of Ganondorf's dash. If he catches a foe, he quickly reels them back at tether grab speed; if an outsider hits the pulled victim, they take 4-5% and low knockback. Hades holds his opponents by the throat furiously, ready to punish them. Hades' throws are rather powerful, so if you are caught by Hades, be prepared for some damage.
A potentially infinite grab is broken, right? Well, Hades has a bunch of downfalls here. For starters, Hades is completely vulnerable while grabbing; unlike Snake's Remote-Controlled Missile, Hades can't just cancel his grab on the spot. No, if he misses, Hades must wait for his arms to slowly wind all the way back to him. Because they travel at Ganondorf's dashing speed as well, this can take a long time.
If the arms are attacked, Hades is forced to pull them in early. Because they are merely smoke, they have slightly less priority than a normal grab. Finally, Hades has below average startup lag, so foes can usually tell when he's trying to grab. A small positive point for Hades is that his arms automatically cover a Stage Builder block's distance, so his shield-grab doesn't suck (e.g. Link). His dashing grab covers his distance as well, Hades not being able to stretch his arms from it. However, it has average startup and ending lag as well, so it can't be used as a consistent substitute. It is most certainly dangerous to try to grab with Hades, but you'll be rewarded if you do.
Oh yeah, it's also a tether recovery. Of course, it doesn't mean a thing if he can't reach his target...Hades can lengthen the distance in the air, but he falls as he does so; this makes it almost useless unless he is right next to the stage.
Grab Attack - Flame Strangle
Hades' fist holding the foe around their neck suddenly erupts in flame, dealing 4% fire damage. This is fairly laggy, so it can only be done once for most grabs. If Hades has missed any grabs within the last thirty seconds, a buffed 5% is dealt. The Lord of the Dead is pleased with his triumph of catching the foe!
Forward Throw - Devil's Snare
Hades' smokey arm wraps around the foe tightly, before...detaching itself? Turns out Hades was just binding his foe up in a smokey coil. The foe falls to the ground, tied up, while Hades is free to attack. This throw only deals 2-3%, so the throw itself can't be used to build damage. Hades has a split second ending lag here, while the foe is trapped for one second.
What's more is that the victim can button-mash to lessen this time, although this becomes harder if they are damaged. However, Hades can usually get off the first hit of a Basic Combo or Dash Attack on the victim, so it's not useless. Finally, if he ends up releasing the victim over an edge, they enter a footstool-jumped effect for their second. Not that this is easy to gimp with at all; setting up the foe so as to rack damage on them is the most practical use for this throw.
Back Throw - Smoke Choke
Hades turns around, holding his foe by the neck. Suddenly, he forces the other arm down the victim's throat, turning it to smoke to asphyxiate them. The foe is released after this, but the area a Stage Builder block behind Hades is shrouded in damaging smoke. This smoke stuns foes and deals 3-4% every second. Because the victim is released close to Hades, they are sure to take some damage; they can use DI to lessen the damage they take, however. The smoke lasts for three seconds; Hades is free to move after one second has elapsed. A great combo starter, but this and his F-Throw can't really KO off side boundaries.
Down Throw - Morph
Time for some hellish punishment! Hades ruthlessly and magically blasts the foe to the ground at his feet, where they are morphed into a tiny insect. Larger characters become Deku Nut-sized beetles, while smaller characters become crickets, slightly smaller than a Pikmin. The bug type matters not; the point is that the bug is now super easy to KO.
Bug characters all run at Mario's dashing speed, but are unable to jump, dodge, or attack. Scurrying to safety is the only real option. Hades can either attack the bug to knock it around (it has the relative weight of the character with a Poison Mushroom), or run over it to squish it. Squishing it flattens it in place for a second and deals 10%. Foes can remain bugs for one to three seconds, depending on their damage level. Hades can use this throw to easily KO his victim; because of the bug's superior speed and tiny size, this is easier said than done, however.
Up Throw - Hair Grill
A simple throw; Hades tosses the foe up toward his head, causing his hair to flare up slightly and torch them. This deals 8-9% and moderate vertical knockback to the victim. Finally, a direct KO throw for Hades! Hades has minor ending lag here, so if the foe has low damage, he can be punished. Still, you probably won't be using this throw unless you're aiming for the KO; this is nothing to worry about. The only other interesting thing here is that Hades' hair can hit foes outside the victim in a FFA, dealing the same damage and knockback.
SITUATIONALS
Downed Attack - Ethereal Cross
From his collapse onto his stomach, Hades extends both hands and slashes in a half circle, as he stands up. This creates a fiery purple cross shape in front of Hades. The cross is the size of a Pikmin, and has below average range. The priority is fairly average; the cross comes out quickly and stays out a half second before vanishing.
If a foe hits the cross as it first appears, it snares them and hoists them up high into the air (like Kirby's U-Throw), before slamming them back down. This deals 7-8% fire damage and average knockback. Otherwise, the cross merely stuns foes, dealing 4-5%. Not the best get-up attack out there, as you'll need the element of surprise to hit with the stronger portion of the attack.
Flipped Attack - Through the Fire and Flames
Simply put, Hades' body catches on fire in anger for five seconds, as he gets up. The fire starts almost instantaneously. His body now has below average priority. The fire doesn't extend off his body, meaning you'll have to run into foes to hit them. Getting hit deals 5-6% and a low set knockback to foes. However, you can only get hit once per second; this means Hades can grab a character, pummel them, then have this fire knock them away. Good for combos, but it won't actually KO any foe.
Tripped Attack - Asphyxiation
If you remember, Hades doesn't actually fall over when he trips; he merely stumbles slightly in place. This angers the Lord of the Dead, of course, so he points both hands at the ground at his sides. This creates two clouds of smoke, the width of Wario and the height of Ganondorf. The clouds have low priority, so they can be dispersed, but they last for ten seconds otherwise. Also, only attacks can take out the clouds, not merely walking through them. The smoke hides characters slightly behind them, so it can be hard to see what they're up to.
Also, if enemies stand in the middle of the clouds, they begin taking damage; damage is built at a rate of 1-2% per second. This deals no knockback; however, if a foe stands in the smoke for more than 1.5 second, they collapse into their downed position. They need air! Hades has minor startup and ending lag here, so he can combo quite well from this. Just remember that Hades almost never randomly trips, so it's not like this is a common move to use.
Ledge Attack - Cool Guys Don't Look at Explosions
Hades nonchalantly points a finger behind him as he floats up onto the stage. A second later, a Bowser-sized explosion appears where Hades just was. Hades has low startup and ending lag, but due to not attacking while recovering, he can be punished. However, the explosion has high priority, and surprising range. It deals 13-14% and above average knockback, which is good for a ledge attack. Hades will have to force smart foes into it, as the second before the explosion occurs leaves plenty of time to dodge. Also, Hades can't grab the ledge again until the explosion occurs, so he can't spam this attack.
Ledge Attack (Over 100%) - Into the Abyss
A basic, yet helpful attack for Hades. With above average startup lag typical for these attacks, Hades shoots two fireballs from his hands. The first fireball is shot toward the ground directly in front of Hades, while the second is shot down into the abyss, near the stage. The fireballs have average priority and somewhat close range. Hades has below average startup and ending lag shooting out the balls.
The important part about this move is how the fireballs hit foes. The first fireball knocks foes off the stage behind Hades, in a horizontal path directly into the second fireball. The second fireball spikes foes powerfully. Hades has 1.5 times the normal startup lag for this attack; it's very hard to pull off. However, if your enemy isn't careful, this can be a nice way for Hades to score a KO and start a comeback. Each fireball only deals 2-3%, though.
FINAL SMASH
Final Smash - Freedom of the Titans
Darkness covers the stage, and lights up again on a cinematic cutscene. Hades is seen flying in his personal dark chariot, pulled by a dark thestral-esque creature (they're not Harry Potter exclusive, you know). As a bonus, if Pain or Panic broke the Smash Ball, they'll accompany Hades in his chariot, cowering due to their high speed and how high up they are. Hades flies over a storming sea, and opens a swirling pathway to the bottom.
At the bottom lurk...four monstrous Titans from before civilization. Hades casts down a vast beam of fire to free them from their prison under the sea. He yells down after them, "Now that I set you free, what is the first thing you are going to do?" The four Titans pump their fists up out of the sea, answering in a slightly stupid giant voice, "Destroy them!" We are now given a shot of Hades' opponent(s) on an isle at sea. Hades flies away, calling back, "Good answer!", as the Titans rise from their watery grave and advance on the tiny foes.
The cutscene is now stopped before the oncoming battle, like in the SSE where you choose your characters. However, instead of characters, you now choose the Titan to face your opponent. Move the fiery hand icon to the Titan of your choice and select it. Now, the Titan and your foes appear on the island, ready to fight. The island is a walkoff stage, a typical large boss arena; the Titans are each the size of Galleom from the SSE.
Foes can perform all their normal inputs, but attacking the Titans is futile, as they can't be KOed. Opponents can still attack each other in FFAs here as well. They last for a surprising thirty seconds, as dodging their attacks is like dodging those of bosses. It takes some getting used to, but you can last with enough practice; this is not broken in any way. If a foe is KOed once, they do not return to the isle, even if they have more than one stock left; one KO per foe is the rule. After this, Hades swoops by in his chariot, causing darkness to envelop the screen again and bring it back to the normal stage.
All Titans can move around onstage with the Control Stick, at the speed of Ganondorf's walk. However, because they are so huge, their low speed doesn't hurt them at all. Titans can't jump or dodge, of course, but they have no need to. The Titans have four Special attacks that you can use to deal massive damage and knockback to your foes with. Even though the Titans attacks are never rendered stale, they become predictable over a few uses; mix things up a little. The styles of the Titans differ slightly, but none of them are better or worse than the others.
All four Titans can be clearly seen in this video.
Rock Titan
***
Neutral Special - Landslide
The Rock Titan bends to the side slightly, for a split second, before collapsing on its side. This covers about 3/4 of the Stage, so foes need to time a roll or spot dodge perfectly to avoid it. Getting landing on deals 25-26% and insane knockback. There is a bit of warning here, but if you are within two Stage Builder blocks of the Titan's feet as he bends over, you get stunned in place. Fortunately, the Titan stays down for two seconds before getting up; use this time as a breather, then keep up your defense.
Side Special - Twin Bellow
The Titan bends its two heads down slightly, and roars deafeningly. Foes in front of it get buried in the ground; not only does this render them vulnerable, it takes twice as long to button mash out. There is very little warning on either end, so foes must stay on their toes to avoid this. The roar deals 9-10% to foes, as well. If the Titan roars while the foe is buried, they get knocked back with moderate force. A perfect set-up for a KO.
Down Special - Earthquake
The Rock Titan lifts a massive foot, then brings it down hard. There are two ways this move can damage opponents. First of all, the Titan's foot creates a shockwave on either side of it; this creates a wave of earth that extends from the ground. It is the height of Ganondorf, and travels the entire distance of the screen at Meta Knight's dashing speed.
The earthquake only extends in front of the Titan; if a foe stands behind it, however, they get buried by its rocky foot. Getting hit by the earthquake deals 21-22% and high vertical knockback; getting stomped deals only 9-10%, but leaves the foe open. You'll probably use this move to catch buried foes, as it hits them more easily than its other attacks.
Up Special - Boulder Crush
The Rock Titan crumbles itself into a rocky ball, the size of the Negative Zone, and bounds off the top of the screen. A split second later, it collapses right on top of the nearest opponent, dealing 20-21% and insane knockback. There is little startup lag, but the pause between the Titan's fall gives times foes to dodge. The Titan has moderate ending lag, as it uncurls from its ball. As a general rule, the Rock Titan's attacks are fairly easy to dodge, but by burying the opponents, you can KO them with relative ease.
Ice Titan
***
Neutral Special - Frosty Winds
Unlike most of the other Titans' attacks, the Ice Titan focuses on building damage, rather than KOing. Here, he lets out a fierce stream of icy breath in front of him. This breath is as thin as Bowser's Fire Breath, but extends all the way to the ground from the Titan's insane height. The breath can be angled up and down, as well. There is little startup or ending lag to warn foes of this move. Foes hit by the icy gale build 6-8% per second, and have a 50% chance of freezing in an ice block. As the ice does multiple hits, it's highly likely you'll freeze a foe; trap them to build even more damage with Side or Up Special.
Side Special - Hailstorm
This is a slight variation of the Ice Titan's Neutral Special, but is completely different as an attack. The Ice Titan again lets out an icy breath; this time, it is as thick as Giga Bowser's Fire Breath, extending all the way down. There is little startup or ending lag here, either. However, instead of freezing foes, this breath has icy particles scattered throughout it. The particles have average priority; they can be broken through, but are in high quantity. Unless you are Meta Knight, you'll more likely than not be hit by some. Particles deal 3-4% and a bit of stun each, so they rack up damage quite fast. Use in conjunction with Neutral Special for great effect.
Down Special - Solidification
The Ice Titan breathes down onto the ground, over the course of a split second; this deals no damage or knockback to foes, but instead freezes the ground under their feet for five seconds. The Titan can't overlap freezing the floor. The ice on the stage greatly decreases the foes' traction on the stage. They'll now trip more often, and due to sliding, have a lot more trouble dodging. Use this move as much as possible to ensure chaos for your opponents.
Up Special - Icicle Rain
The Ice Titan roars a high, icy-laugh, causing a row of icicles to fall from the sky. These behave like the arrows on the WarioWare stage; foes in the air are spiked, while foes on the ground take high knockback. Either way, the icicles deal 18-19%. If you freeze your foes with Neutral Special prior to using this, you nearly guarantee yourself a lot of damage built, and maybe even a KO. There is very minor startup lag; foes should try air dodging this, so they'll be spiked if they miss their dodge, rather than blasted back.
Lava Titan
***
Neutral Special - Magma Ooze The Lava Titan's attacks generally blend damage-dealing and KOing. Here, the Titan oozes its mass low to the ground. This causes lava to cover the entire stage floor for two seconds, like on Norfair. Foes who touch the lava take 14% fire damage and average vertical knockback. You can't dodge this on the ground, so you must jump and use your Up Special to avoid the lava. The Titan oozes down and back up with little lag. Used in combination with Up Special, you can build quite a lot of damage with this.
Side Special - Tidal Wave
The Lava Titan stretches upwards for a split second, before slamming down on the entire stage in a huge wave. Foes must perfectly time a spot dodge to avoid this; it can be an instant KO at higher damage levels. Getting hit deals 25-26% fire damage and insane knockback. The Lava Titan has moderate ending lag recomposing itself. The wave extends about two Ganondorfs high when it reaches the stage, so characters with good jumps can dodge in this manner. This is the Titan's main KO move; it doesn't take too long to do, so use it often.
Down Special - Volcanic Prison
With little startup lag, the Titan makes a swirling motion, covering 3/4 of the stage. He swirls over dodging foes in his range, meaning foes who don't flee to the stage's edge will be caught. If the Titan catches a foe, it swirls his body around them, creating a volcano-esque prison, four Ganondorfs high. If it misses, the Titan merely reforms into its normal position.
Foes who are caught have three seconds to button-mash out of the prison. It takes twice as long as a grab to break out of. After three seconds, the prison volcano erupts, sending a stream of lava, as thick as Bowser, off the top blast line. Even if you escape, the volcano still erupts. Hitting the lava deals 35-36% and unholy vertical knockback; however, you are only hit if you are stuck in the volcano (unless you are ******** and jump into the flow). The eruption lasts three seconds, before the Titan reforms.
Up Special - Sulfur Smoke
The Titan turns its head upwards and roars, exhaling a cloud of red smoke. This sulfur air covers the whole top of the stage, from Ganondorf's height up. It lasts for five seconds, and deals no damage. However, every second an enemy is up there, they enter a footstool effect. This means it can be very difficult to air dodge; this makes moves like Neutral and Side Special much more annoying. The Titan cannot overlap sulfur breaths, however. Foes with recoveries that can't be footstooled have the best way around this, but they'll need to get into the air first.
Tornado Titan
***
Neutral Special - Inhalation
The Tornado Titan deals little damage with its attacks, compared to the other Titans, but deals great knockback to make up for it. Here, the Titan gains a pull to its main body, standing in place. It is slightly stronger than that of Dedede's Inhale. Foes who touch the Titan as it's pulling get sucked into its tornado. This move can be held out as long as you want, but it cannot continue if more than one foe is caught in the vortex. Foes spinning in the tornado take 4-5% per second, but no knockback. That is where Side and Down Special come in. There is very little startup or ending lag to this move, so stay away from the Titan at all times.
Side Special - Blow You Away
The Titan roars, causing the foe to be launched out at the angle they're facing in the tornado. Foes cannot escape the Titan once sucked in, but they can DI to move around inside the vortex, controlling the angle they are launched at. Launched foes take 11-12% and high knockback. This wouldn't be too bad, but the Titan can move around with a foe inside it; this allows it to throw the foe right off the side of the stage. Don't get caught in the vortex in the first place, or at least try to DI in the opposite direction when launched.
Down Special - Debris
The Titan rapidly begins sucking in random pieces of ancient debris, from both sides of the screen. The debris ranges in size, from Deku Nut-sized pebbles to pillars the size of Ganondorf. They are pulled in at Mario's dashing speed, in relatively large amounts. The Titan can hold this out to pull in even more debris. Foes hit by the junk as it flies in take 8-9% and average knockback.
However, once it reaches the Titan, it swirls around in its vortex. Now, it's much more dangerous for trapped foes to DI around inside the Titan, as they might hit the flying objects. They do the same damage, but can knock foes out of the tornado lightly. Fortunately, the foe won't be hit by the items unless they DI; the items follow a different path in the vortex. Also, if the Titan is nearing the edge and you are desperate to escape, you may want to hit debris to do so in a less damaging way. Just be careful, as they may knock you to your doom anyways.
Up Special - Tweester
The Titan roars, causing two smaller twisters to spin out from its main body. These twisters travel off the side boundaries, one on each side of the Titan, at Meta Knight's dashing speed. Foes caught in a tornado are trapped in a Whorenado-esque effect, taking constant damage. Also, it is a bit harder to escape from; if you are careless, the tornado will pull you off the side blast line. Tornadoes can deal 2-21% each, but no knockback. The Titan has little lag on either end; although only one pair of twisters can be present at a time, this is a great semi-projectile. It may be helpful to trouble foes fleeing from the suction of the Neutral Special.
OVERALL PLAYSTYLE - LORD OF THE DEAD
Hades plays as quite an interesting character, due to the fact that he has several different ways to play. You might say he's a hybrid of a character. However, his Hot-Head mechanic ties in a lot of new strategies that need to be implemented. You can't just stick to one style, master it, and obliterate your opponents. This has negative effects on you that you definitely won't want; you'll have to do a lot of experimenting to find a unique style that fits you.
First of all, you'll need to take a bit of damage. Hades is a huge target, so this won't be hard at all. Despite his power, Hades has a relatively easy weight to KO. Control how much damage you take; let a few measly projectiles hit you, but don't just walk into an F-Smash to do the job. Anyways, having more damage than your foe buffs your power up by one-fourth. This allows you to take your game to the next step.
At normal power, Hades is best off playing as a trap character. With moves like Dash Attack, U-Smash, and D-Air, Hades can manipulate opponents decently. However, his slow speed makes this only usable to some extent; it'll take a while to KO out of this. On the other hand, with better power, Hades becomes more of a combo-oriented heavyweight, who can KO from his combos. Traps can still be used now, but now, Hades is much more about spacing to connect with powerful moves that he can combo from.
With buffed up power, Hades will probably KO his foe fairly early in the match. Still, his huge size and awful speed mean that he'll probably take a whole lot of damage quicker than most opponents. While he'll keep his power-up this way, his less-than-ideal weight means that he can't stick around forever. This is where his Up Special comes in. By healing in place, Hades can keep his damage above that of his foes, or lower it to a more comfortable percent.
Another way to save Hades from excess damage is to use Pain or Panic for part of a match. This definitely cannot be spammed, as you'll handicap Hades with new-found boredom. However, if you want to build a bit of quick light damage, or gimp foes, send your minions into battle. Nothing that happens to them counts against you, so why not?
Now, Hades also much watch out for how far ahead he gets. If you get even a stock ahead of your opponent, you'll be weakened. Because of this, Hades will want to stay behind his opponent reasonably, before coming back with his power-up and winning. He needs spacing to accomplish this; his D-Smash skeletons can come in handy here, along with several aerials. Using Pain or Panic to build damage until it would penalize Hades is beneficial when Hades is losing.
Several other tools of Hades can be used to keep him in the running when he's losing. Hades' grab is exceptional if used correctly. If he can space himself right and trap foes into his smokey hands, he can deal some powerful blows with his throws. The other major tool Hades has is his Side Special. By turning invisible, not only can you render yourself difficult to see; you can also steal weapon projectiles from your opponent. The projectiles he can steal determines how well Hades performs in some match-ups; don't neglect the subtle advantage projectiles can give you, just to knock foes around.
While Hades has ways of controlling his power on the stage, he also has a few ways to mess with the strength of his foes. With Neutral Special, Hades can half the foe's power, forcing them to take 15% to regain it; this can't be used too much, but it can be a life-saver at times. The other move that comes to mind in these circumstances is F-Tilt. You'll need to be close to your opponent to force the crown onto their head; you'll also need some damage built on them before it'll do much good. Still, restricting your foe to using certain moves really gives Hades the upper hand in several situations.
Being the evil God he is, Hades has a ton of tricks and potential combos that you can perform with him. His size and slowness keep him from being too devastating, on the other hand. His mechanic can either help or hinder him, based on his standing in the match. Playing as Hades requires constant thought as to what to do to take on what position in the current brawl. He also requires practice to employ many of his better techniques to best effect. When you learn to use him properly, however, Hades can quickly become a scary character; you'll really need to turn the heat up to finish him in high level matches.
PLAYING AGAINST - FIGHT FIRE WITH FIRE
There isn't a whole lot of strategy to bringing down Hades, but there are ways you'll want to do it. The only real tactic you'll want to stick to is keeping a lower damage than Hades, to prevent him from getting extra power. If you are an expert, you can always stay a stock behind Hades to weaken him. Still, because there's always the chance you won't be able to make a comeback, you'll probably want to stick to a safer way.
There are many ways to overcome the Lord of the Dead, but the easiest is simply to put him through combo-hell. His towering height and considerable girth make him easy to hit around and trap in multi-hit attacks. If your character specializes in these types of attacks, by all means, go for them. Even some of the larger characters can take down Hades somewhat easily. While they can't combo him as well, Hades has surprisingly low weight for a heavy character. He can't last as long as most large characters, and his recovery damages him in the process. Hit him off and edge-guard aggressively if you can.
The other ways of bringing Hades down mainly revolve around nullifying his main advantages. By keeping your distance, Hades can't run through you to steal projectiles; his grab will be insanely predictable and punishable as well. If he gets lazy and sends Pain or Panic after you, keep on your toes and resort to a more hit and run approach. Hades' minions have speedy, light attacks, but they can combo pretty well. However, they have only a few moves; read them and put the minion in a situation they are vulnerable in. Even if they give you a bunch of damage, Hades will be weakened if he uses a minion for too long. Don't worry too much about them.
Other than these specific strategies, space well against Hades and you will be near untouchable. Nearly all of Hades' ranged moves (save some projectiles he can inherit) can be dodged with relative ease. Now, he'll be forced to try and close the distance between you. Take a combo-focused hit and run approach to Hades; all of his powerful attacks need some time to set up. A few of them require close range contact, so don't get too comfortable. Give Hades a few hits, then roll around, space yourself, and follow up. Just don't own him too bad, or you'll pay the consequences when Hades unleashes his wrath.
MATCH-UPS
Vs. Meta Knight - 45/55: Meta Knight's Favor
Because Hades has high priority moves, he doesn't have as much trouble with several of Meta Knight's moves like other heavyweights do. Granted, he still suffers from the slow speed of other powerhouses. Around Hades, Meta Knight has to be more careful than he does with most characters; many of Hades' trap moves can damage him thoroughly if he gets reckless. Because of his power, Hades can also KO Meta Knight fairly early. Because Meta Knight will want to keep ahead of Hades in damage to keep him at normal power, this can be an issue if the Meta Knight player can't defend.
Despite all this, Meta Knight can keep up a hell of a lot of pressure on Hades. With a flurry of fast aerials, Meta Knight can combo Hades' mass to no end. Meta Knight can't destroy Hades, as he'll have even more trouble against a powered-up Hades. However, he can still control the flow of the match as much as Hades can. This match-up ends up slightly in Meta Knight's favor, but it's still close; either character could come out on top in the end.
Vs. Snake - 70/30: Hades' Favor
Hades has several advantages against Snake, the second best character. First of all, Hades can steal Grenades from Snake fairly easily, as Snake is not the fastest character out there. In addition, Hades' longer ranged and disjointed attacks can easily take out grenades and mines from a distance. This forces Snake to approach Hades.
The Lord of the Dead will now have to work a bit harder for the win, as he is a big target for the likes of Snake's F-Tilt and Basic Combo. In these circumstances, he can always call out Pain and Panic, or just space himself and use aerials (although this is a bit risky with the landing lag). Hades can get KOed by Snake fairly easily, due to his surprisingly low weight. Due to being a heavyweight, Snake can stay ahead of Hades to keep him at normal strength, but he still has issues with Hades' other moves. Hades has enough going for him to win over Snake in most cases.
Vs. King Dedede - 55/45: Hades' Favor First of all, Dedede cannot chain-grab Hades, despite his size. If Dedede attempts this, Hades' hair will burn his arse when the penguin king sits on him with D-Throw. This gives him 5% and stuns Dedede, leaving him open to retaliation. The same occurs with similar throws, like the D-Throws of Peach and Wario, but that's another story.
As existing heavyweights mainly have a 40/60 match-up against Dedede, even without the chaingrab, Hades wouldn't fare much better would he? Well, Hades may not have Dedede's melee range, but he can still take care of Dedede surprisingly well. For one thing, he can steal Waddle Dees easily. Dedede has trouble getting comboed around by Pain and Panic. Hades can still be brought down easily with B-Air, so he'll have to really work with his spacing. Dedede can stick around easily with more damage than Hades, due to him easily lasting with more than 300% with DI. Overall, Hades' advantages outweigh Dedede's, but this is not a guaranteed win for him.
Vs. Bowser - 50/50: Draw
When thinking of characters to keep pressure up on Hades, Bowser doesn't seem like one of them, right? Bowser will have to approach Hades to begin damaging him, which allows Hades the opportunity to try and land the likes of an F-Smash or long-ranged grab. Bowser can get around these, but he must be careful in order to do so. One of the main things Bowser has going for him here is Bowsercide. It is much harder for Hades in this match-up to keep higher damage than Bowser, due to Bowser being able to move damaged foes more easily with Koopa Klaw.
As Hades takes 1/2 less damage from all characters' fire attacks, Bowser can't build damage with Fire Breath as well on Hades. It can still trap Hades' mass, but Bowser needs other ways to approach Hades. Bowser will have to constantly keep on his toes, in order to avoid Hades' attacks and retaliate when he gets the chance. Hades has ways to keep Bowser away from him; Whirling Fortress out of shield is a great close-range option for Bowser, however. Pain and Panic can easily combo Bowser, who has trouble against them (although it doesn't take as long for him to dispose of them). Whoever gets ahead in this match-up first will likely win; it tends to boil down very quickly.
Vs. Mario - 25/75: Mario's Favor
Mario can actually take care of Hades with relative ease. His main tool in this match-up is Cape; as long as the Mario player knows how to land it, he is pretty much untouchable. Hades must be extremely careful with Tilts and Aerials; if he gets Caped, he becomes insanely punishable. Fortunately, because his recovery is infinite, Caping it doesn't destroy Hades; it merely causes him to move for longer and take more damage. Other than Caping, Mario has no real advantages against the Lord of the Dead.
Mario has trouble KOing Hades, as his F-Smash deals half damage because of the fire, and his other moves are more close ranged. F-Air spiking Hades is probably the best option, as it can cut through Fire Storm. Pain and Panic have no real advantage against Mario, so there's no point in really using them here. Mario doesn't take too long to KO, but Hades will need to find openings to do so around the Cape. This is not one of Hades' better match-ups; you're better off switching to a second to face Mario.
EXTRAS
***
Extra Animations
Up Taunt - Highlight of the Fight
A smokey aura surrounds Hades, as he comments in a quiet, vehement voice, "My favorite part of the game...sudden death." While you won't actually be able to use it in sudden death, facing a competent foe, it's still plenty intimidating.
Side Taunt - Deathly Ownage
Hades folds his arms and says, "Aren't we forgetting one teensy weensy but ever so crucial little tiny detail...I OWN YOU!" For the last part, Hades gets pissed, as his entire body flares up in a column of flame. Pretty epic when you're kicking your foe's arse.
Down Taunt - Comedic Approval
Hades does several fist-pumps and cheers, "Boom ba-da boom boom boom, ha!" Best used after a powerful blow is landed.
Entrance - Dark Chariot
Hades soars in on his personal black chariot, pulled by a thestral (I'll say it again, they're not exclusive to Harry Potter). As he steps out and the chariot flies off, he calls out in an echoing voice, "Let's get ready to RUMBLE!"
Victory Pose #1 - Final Showdown
Hades stands on center stage, chuckling evilly, while Pain and Panic fly around above the losers, taunting them. After a while, Hades conjures his chariot up out of thin air. The trio hop into it and fly away, Hades calling back, "So much for the preliminaries, now on to the main event!"
Victory Pose #2 - Underworld Dinner
Hades sits in his smokey throne, sipping a hot pink alcoholic beverage with a slimy green straw. Pain and Panic sit at his feet, sharing a bowl of wormy spaghetti.
Victory Pose #3 - Smoking's Bad For You
Hades chuckles to himself, and declares, "Game...set...match." He then conjures up a brown cigar, lights it with his finger, and smokes it contentedly. Pain and Panic sit at Hades' side, peering up at him, excited at his victory.
Victory Theme - Goal's Completion
Hades uses an orchestrated clip from the main Hercules theme, Go the Distance, as his victory theme. Because it is orchestrated in a slight minor tone, it is not completely cheery and is thus not unfitting for Hades.
Loss Pose - Hades' Wrath
Hades begins screaming in uncontrollable wrath, turning red and fiery all over and losing control. Pain and Panic sit behind him, clapping quietly, so as their master doesn't hear and punish them. Yeah...if you've ever seen the movie's end, Hades is not one to applaud those who defeat him.
Kirby Hat - Kirby of the Dead
Kirby gets a puffball-sized smokey robe, as well as Hades' fiery blue hair. He inherits Deal with the Devil as his Neutral Special. Kirby merely laughs in a squeaky evil tone as he extends his hand, instead of jabbering away like Hades. This makes it up there with Kirby's R.O.B. hat in terms of lulz. Because Kirby's hand is smaller than Hades, the move has about half the range. However, Hades' usual startup and ending lag are halved, making the move viable to use.
Alternate Colors
Normal
Dark Red Robes - Red Team
Navy Blue Robes - Blue Team
Dark Green Robes - Green Team
Dark Black Robes and Hair, White Skin
Plum Robes, Ethereal Purple Hair
THERE YA GO, SUNDANCE!
Codec Conversation
-Press Select-
Snake:Colonel, there's a big fiery deity out here with me. Colonel:You must be facing Hades, Lord of the Dead and ruler of the Underworld. Snake:Really? This sycophantic dullard is the God of the Underworld? Colonel:Surprisingly enough, yes he is. However, he's not stopping there. Hades is trying to overthrow his fellow Gods and rule the cosmos, and he's got the power to do so. Snake:What's with his motor mouth of endless prattle? Is he really as neurotic as he appears to be? Colonel:Whatever you do, Snake, don't get on his bad side. Hades has a mean streak a mile wide. Just remember, even though he's a God doesn't mean he can't be hurt. Snake:I'll keep that in mind...
-End Transmission-
Other
Icon - Olympian Medallion
Hades uses the main Hercules icon as his own; the symbol of the Gods, a golden medallion, emblazoned with a lightning cloud.
Wiimote Sound - Deathly Introduction
Hades introduces himself in his rapid-fire voice: "Name is Hades, Lord of the Dead. Hi, how ya doin'?"
Crowd Chant - Soul Support
A crowd of undead-sounding voices chant, "Hades! Hades! Hades!"
Unlocked By:
Play 666 Brawls
KO ten opponents with a fiery blow (any attack that involves fire, e.g. Falcon Punch)
Get Hades to join your team in the SSE
Unlock Message:
"Hades, the wrathful God of the Underworld, is yours to command. Do you have what it takes to tame his fiery powers?"
Assist Trophy - The Three Fates
The three Fates have arrived on the Smash scene...as an Assist Trophy. They appear together; from shortest to tallest, they are the height of Mario, Marth, and Captain Falcon. The tallest Fate begins speaking a short time after they appear; she says, "We know everything...past, present, and future!" It takes about five seconds for her to finish. Foes need to perform dodges as they are speaking, as otherwise, they will be hit by the attack to come.
Somewhere in a period of five seconds after the Fate finishes, a sickly green aura appears around the foes who didn't dodge the attack. The aura cannot be dodged on the spot or with a shield; you must dodge as much as you can while the Fate is talking, and hope you dodged in the time that the aura appeared in the future. Because of this, there is an element of luck involved here. Fast dodgers should have little problem here, but no summoner is going to let the foe simply sit around and dodge.
If any foes are hit by the green aura, the shortest Fate pulls out their strings of life, while the middle Fate takes out a pair of scissors. The middle Fate tells the smaller one to, "Hold that mortal's thread of life...nice and tight," before snipping it. The foes who didn't dodge the green aura are instantly KOed now. They take no damage, death being painless, but simply fly off the screen's top or side helplessly. The Fates laugh evilly and disappear into the one eye they share after this. They appear rarely as an Assist Trophy. Be sure to distract your dodging foes to score an easy KO.
Stage - The Underworld
This stage takes place deep under the earth, in the gloomy realm Hades rules. This is a three-tiered stage. Foes start out in a small dark boat; it is resized to the size of the Rainbow Cruise ship, but flat and with no platforms. In the background, it is paddled along the River Styx by Charon the skeleton. On either side of the boat is the soul-infested river.
Occasionally, souls climb mournfully onto the boat, trying to toss foes off the side and into the water. These can be blasted away by any attack. The water can be swum in; at the time a character would drown, however, a soul merely pulls them down, instead. About halfway through this section, Hades' pet Cerberus, a massive three-headed dog, appears on an island in the background. He roars viciously and snaps at the boat, but is just like Kraid, in that he doesn't actually hurt combatants.
This boat phase lasts for about thirty seconds, before the boat reaches the main island of the Underworld. This island is flat, the size of Bridge of Eldin. The boat stays on the left, allowing an extra area to fight near the blast zone. However, it takes more damage to KO foes here; it's not like Corneria. The water still has souls, but they don't come onto land here. The right side of the stage is a walk-off, but the blast line is fairly far off here too; early KOs aren't a big issue.
After thirty more seconds, the stage begins scrolling to the right. In the background, you can see torches, and stairs that lead to Hades' throne room. You scroll at a slow speed, enough to fight viably with. After fifteen seconds of flat ground, the terrain slopes steeply upwards to the right. After fifteen seconds of diagonal scrolling, the stage stops. The layout now consists of a flat platform the size of the main Battlefield one, with the stage sloping down to the left. The walkoff blastline is still far off here.
On the right side, however, is a short drop down to the Pit of Souls. This green vortex covers the area of Final Destination to the right. Characters don't swim in this soul-infested water. They float...they all float! Just kidding, but instead of swimming, the characters slowly sink under. Underwater, they have infinite jumps and can attack. However, stay under for more than five seconds, and souls will pull you under for an instant KO. They're angry at you for disturbing their rest. Spike foes into here at high damage for a good chance at a KO; they can still drown as usual.
After thirty seconds here, the screen starts scrolling back to the left. You now scroll back to the start of the stage, just in reverse. After the boat phase reaches the Underworld's entrance to the very far left, it turns around, and the stage starts over. This is a nice counter-pick stage to play on, and a nice Hades home stage.
Pain is one of Hades' two personal impish minions. He tends to be more prominent and bold than Panic, especially when given a task to perform. Pain has the ability to morph into any creature at will. However, no matter what form he takes, he is still far from the brightest guy around. As his name suggests, Pain suffers from physical injuries everywhere he goes.
STATS
Power: 5/10
Pain is the stronger minion of Hades, due to his bulk. That's still not saying a whole lot, though...
Walking Speed: 5.5/10
Pain's walking speed is barely above average.
Dashing Speed: 7/10
His dashing speed is above average; fairly fast, but nothing too speedy.
Weight: 4.5/10
Muscle ways more than fat, which is all Pain has going for him. Below average; it doesn't take a whole lot of damage to KO Pain.
Range: 6/10
Pain has a few disjointed moves that he can use from an average distance, but he still excels more at melee range.
Projectile Distance: 6.5/10
Rather simple; Pain has above average range with his projectile.
Attack Speed: 7/10
Due to being the stronger minion, Pain has better KO moves than Panic, and is therefore slightly slower. He is still far from a slow character, however.
Priority: 4/10
Rather pathetic. Pain's attacks don't pack a whole lot of a punch; they're meant to be strung together.
Size: 4/10
Pain is about the size of Squirtle, but slightly taller, due to his horns.
First Jump: 2/10
Pitiful; you expect those stubby legs to get him anywhere?
Extra Jumps: 1/10 Pain has three small midair jumps, courtesy of his impish wings.
Aerial DI: 9/10
Pain is similar to Wario in this respect, just not as stellar due to being more floaty.
Fall Speed: 3/10
Rather low; his wings keep him airborne for a while.
Recovery: 7.5/10
Pain's wings allow him a decent, although gimpable, recovery.
Traction: 1.5/10
Horrible; Pain stumbles and slides around like nobody's business.
Crouch: 6.5/10
Pain gets low to the ground, but his girth keeps this from being great.
Comboability: 7.5/10 Choose Pain as your minion if you want a chance of KOing foes out of your combos. Panic combos better, but you'll need to be at an insane damage level to KO with him.
Wall Jump: No
Wall Cling: No
Crawling: Yes
Gliding: Yes; Pain's glide is fast, but very awkward to control. He flaps his wings while gliding, rather than soaring.
Tether: Yes
BASIC ANIMATIONS
Standard Pose:
Pain holds his hands together in front of him, peering side to side anxiously.
Idle Pose
Pain gets bored and kicks a pebble at his feet, only to stub his toe on it and hop around holding it in place.
Walking:
Pain begins taking small, quick steps forward, as if tip-toeing.
Running:
Pain begins pumping his arms, picking up the pace a bit.
Dashing:
He now leans his head down, as if bull-charging, while pumping his arms even faster.
Jump #1:
Pain's wings let out a feeble flutter, raising him up slightly.
Extra Jumps:
Pain's wings flap harder, while Pain tries to push down with both hands for some extra air.
Crouching:
Pain gets down on all fours, looking around cautiously.
Crawling:
Nearly identical to Bowser's, Pain simply crawls forward slowly along the ground.
Ledge-Hanging:
Pain hangs on with two hands, facing the stage.
Swimming:
Pain goes under with a grunt, then begins doggy-paddling around. He can swim for a moderate amount of time before drowning.
Forward Roll:
Pain tucks into a ball and does a somersault twice, before popping his limbs and head back out.
Backward Roll:
Pain does a simple backwards flip close to the ground, moving backwards a moderate distance.
Spot Dodge:
Pain collapses on his buttocks into the background, rubs them briefly, then hops back up. This happens quickly, so it doesn't take longer than a normal dodge.
Air Dodge:
Pain holds his arms out and spins, a bit like Wario.
Shield:
Pain puts both hands over his head, as the standard shield forms around him.
Tripped:
Pain stumbles in place, then falls flat on his face, landing in a painful position.
Dizzy:
Pain gets on tip-toes and spins around stupidly, eyes wide.
Sleeping:
Pain curls into a ball on the floor, sucking his thumb stupidly.
MOVESET
***
SPECIALS
Neutral Special - A Sucker for a Sucker
Pain takes one of the spiked lollipops Hades tried to give baby Hercules and tosses it forward with a stupid snicker. The lollipop flies out the range of Link's Boomerang, at the same speed, before returning to Pain. It has rather low priority, but Pain has little startup or ending lag; it can be used in quite a few different situations. Foes who hit the lollipop get it stuck in their mouth for five seconds, taking 1-2% per second. This deals no knockback; it may not seem that useful at first, but if Pain sends out a sucker at a foe who already has one in their mouth, it deals 5-6% and below average knockback. One of Pain's best consistent damage-builders.
Side Special - Wall of Pain
Pain takes out a small vial, full of swirling pink liquid, and tosses it to the ground violently. This causes a smokey wall, as thick and as tall as Ganondorf, to erupt in front of Pain. The wall has 20 HP that can be dispersed to make it disappear, but only foes can take it down. This is because Pain's attacks pass through the walls, while foes are blocked from passing or attacking through it. He can use walls as nice little poking areas, but for overall defense, you'll be better off just running away. The walls last for thirty seconds before vanishing; Pain can only have one wall out at a time. If he tries to put a second wall out, the first wall disappears for the second, like Snake's mines.
Down Special - Mission Complete!
Pain turns to the background and bows to Hades. In response, the Lord of the Dead teleports Pain away, while appearing back on the battlefield himself, his throne vanishing. This takes a split second to do, and neither Pain nor Hades can be harmed while switching. If you are playing around as just Pain and Panic, pressing Down Special causes him to morph into Panic. They do not switch upon being KOed, so no Pokemon Trainer mishaps can happen. Also, when played alone, their 1% = 2% rule they have with Hades is no longer in action.
Up Special - Flight of the Imp
Pain's wings stretch out from his body slightly, carrying him around better. For two and a half seconds now, Pain has controllable recovery. By pressing B, he dumps green liquid from a Gatorade-esque bottle onto foes. This has low priority, but comes out quickly. It pushes foes downwards slightly, like F.L.U.D.D., but deals no damage. Use this if foes pursue you from underneath. Other than this, Pain can use his aerial out of this, but he can only activate this move once while in midair. The flight can be canceled with L or R. Fairly simple for a recovery.
BASIC ATTACKS
Basic Combo - Seduction
A quick two-hit combo. For the first part, Pain tosses out his imp tail like a lasso. This has low priority and below average range, but comes out quickly. If Pain doesn't hit a foe, he pulls his tail back, with below average ending lag. If his tail hits a foe, he pulls them up close to him, dealing 3%. The foe is now caught in a grab-like hold, stuck in Pain's tail. They can easily mash out of this, but Pain can now press A to deliver a chomp to his victim. This has surprisingly average priority and is executed quickly. It deals 6% and below average knockback to foes. This combo can be nice for ground approaches, but it gets obvious after a while.
Dash Attack - Bowling Roll
Pain stumbles in place with an 'Ow!', curling into a ball and rolling forward two Stage Builder blocks' distance, before popping back to his feet. He has as below average priority, but rolls at the speed of Meta Knight's dash. Foes can be caught off-guard by this. Pain rolling has little startup lag, but below average lag as it ends. If Pain hits a foe, they take 6-7% and barely below average knockback. Other than his F-Smash, this is probably going to be one of the moves you use to KO foes. Just be careful not to get shield-grabbed.
TILT, SMASH, AND AERIAL
Forward Tilt - Urn on Your Head
Pain takes out a small Greek urn and slams it down to the ground in front of him, where it vanishes. He does this with little lag on either ends. The urn has low priority, and hits at a below average range. Foes who hit the urn get it stuck on their head, tripping in front of Pain and taking 5%. The urn vanishes off the foe when they get up, but while they're down, it prevents them from getting up with a tripped attack. Pain can combo the downed foe without fear of retaliation now. Sweet!
Forward Smash - Demon's Pitchfork
While charging, Pain takes out a thin red pitchfork, the length of Mario's height, pulling it back like a spear while charging. Upon release, he hurls it diagonally to the ground, on the area of a Stage Builder block in front of him. The pitchfork has average priority, and is thrown with below average startup and ending lag. Foes who hit the pitchfork take 11-14% and below average knockback. Foes who hit the tip as it enters the ground take sweet-spotted average knockback. Pain's main KO move, if there was one. The pitchfork vanishes after a split second on the ground. If Pain hurls it off an edge, it travels all the way off the bottom blast zone. It doesn't spike, however, so don't use it or you'll help foes recover.
Neutral Air - Hellish Blaze
Pain pauses for a split second, before catching on fire. Hades must be angry at him...Anyways, when he initially catches on fire, Pain hops up the height of Mario. He has average priority then, the hitbox being his flaming body. Hitting him rising deals 10% and average vertical knockback. After this, Pain gets below average priority for three seconds, dealing 5% and a bit of stun to those who touch him.
Multiple N-Airs cannot overlap. Pain can build some damage with his aerial; he can be punished while pausing or hopping, however. The flames disappear instantly after three seconds. Pain doesn't catch on fire if he lands early; he suffers average landing lag if this is the case.
GRAB AND THROW
Grab - Strike
Pain morphs into a purple snake, coiled in place, and strikes forward, the distance of a Stage Builder block. The snake grabs extremely quickly, but has average ending lag if it misses. Foes caught by the snake are held in its coils. From a dash, the snake uncoils slightly as it grabs, getting slightly more range, but having slightly more ending lag. Pain can use this grab in midair to tether to the ledge; the snake's range isn't great for a tether, but it brings Pain to the ledge faster than his Up Special.
Grab Attack - Sink Your Fangs In
Just like the attack says, Pain in snake form bites into his victim. This deals 1-2%, and can be done fairly quickly.
Forward Throw - Snake Charmer
Pain's eyes swirl around, as he sets the foe on the ground in front of him. This puts the foe into a hypnotic sleep for a split second, before they can move. Pain has below average ending lag, so he can be punished unless the foe has a high damage level. At a high damage level, foes sleep for longer, so Pain might be able to get off a Dash Attack or F-Smash, if he's lucky. Foes who are put to sleep take 2-3%.
EXTRA ANIMATIONS
Up Taunt - Dazzling Merchandise
A pair of Hercules sandals appear on Pain's feet. Pain poses like in his main picture above, looking at the sandals and grinning stupidly for a second. The sandals stay on his feet until Pain is attacked again; they squeak when he runs, annoyingly.
Entrance - Crash Landing
Pain tries to fly down, but his impish wings cramp painfully, causing him to yell and crash face first to the ground. See, bad things happen to this guy! Pain brushes himself off and puts up his fists, ready to fight.
***
Panic
BACKGROUND
Panic is the other of Hades' two personal impish minions. Panic tends to be tittery and jumpy at whatever he does, in contrast to Pain. Like his fellow imp, Panic also has the ability to morph into any creature at will. Panic is slightly smarter than Pain throughout the movie, but that's still not saying a whole lot. Panic's fear of nearly everything usually leads to all of his missions going up in smoke.
STATS
Power: 2.5/10
Panic has little to no power to speak of; combos are all he is made of.
Walking Speed: 7/10
Seriously, Panic's walking speed can match the running speeds of many characters.
Dashing Speed: 9.5/10
Panic's fear allows him a whole lot of speed to put to good use.
Weight: 2/10
Panic is thin as a twig; he'll have trouble lasting to higher damage levels.
Range: 6.5/10
Panic has slightly better overall range than his buddy, Pain.
Projectile Distance: 5.5/10
Panic's projectile is closer ranged than Pain's, but it can be used much more freely.
Attack Speed: 9/10
Panic's moves are all crazy fast; without that speed, he'd be even worse than the bottom material character he already is.
Priority: 5.5/10
Panic's attacks are actually harder to penetrate than Pain's, due to him having a certain 'jab' to several moves.
Size: 3.5/10
Panic is among the thinnest characters in the game, cutting down his size a lot, but his horns make him Mario's height. He can still slip around quite a few attacks, however.
First Jump: 2.5/10
Panic's height allow him slightly more ground-jumping range than Pain, but that's still not that significant.
Extra Jumps: 0.5/10 Panic has five tiny midair jumps, due to his impish wings.
Aerial DI: 6/10
Panic's twig-like structure allows him some leeway to weave around attacks, but it's still inferior to the DI Pain can pull off.
Fall Speed: 8/10
Panic's fear of heights make his falling speed shoot way up.
Recovery: 8.5/10
Panic's recovery is controllable, like Pain's, but less gimpable, so it's better overall.
Traction: 0.5/10
Even worse than Pain's, if that's possible. Panic's scaredy-cat nature has him slipping and tripping around like crazy.
Crouch: 8.5/10
Panic's crouch is better than Pain's, due to his smaller frame.
Comboability: 9/10
Overall, Panic is harder to learn than Pain; he can combo like nobody's business, but he can hardly ever KO foes. His lighter weight also makes him harder to use. Still, if you want amazing, strict combos, go with Panic as your minion.
Wall Jump: No
Wall Cling: Yes; Panic digs his horns into the wall to cling for about two seconds, before detaching himself. He has no real use for this, however.
Crawling: Yes
Gliding: Yes; Panic's glide is the fastest in the game, but is very hard to control. He flaps his wings while gliding, rather than soaring.
Tether: No
BASIC ANIMATIONS
Standard Pose:
Panic jumps up and down in a panicky manner, like a foe who grabbed Superspicy Curry. He peers from side to side rapidly, as if something's closing in on him.
Idle Pose
Panic starts inhaling and exhaling deeply, making high-pitched breathing sounds. His fright is peaking!
Walking:
Panic begins creeping forward at a cowardly, speedy pace.
Running:
Panic bends over a bit and picks up the pace some more, looking side to side now.
Dashing:
Panic screams and gets down on all fours, sprinting like an animal.
Jump #1:
Panic kicks up with his short little legs, flapping his wings slightly for more distance.
Extra Jumps:
Panic's wings stretch up and flap some more, but Panic keeps looking down, scared, holding him down a bit.
Crouching:
Panic gets on all fours; he looks like a rat, due to his hunched position.
Crawling:
Panic creeps forward along the ground at a rapid pace; this looks like a lower-to-the-ground version of his dashing animation.
Ledge-Hanging:
Panic hangs on with one hand, looking down with a terrified expression.
Swimming:
Panic gasps as he resurfaces, and begins flailing around in the water. He drowns quickly because of this, so never swim for too long with Panic.
Forward Roll:
Panic dives forward along the ground, getting to his feet at maximum range; this looks like Snake's dash attack, almost.
Backward Roll:
Panic does a startled little shorthop backwards a moderate distance
Spot Dodge:
Panic rapidly hops backwards, holding up his arms in front of him, in a flinching pose, before hopping back.
Air Dodge:
Panic holds his breath comically, leaning into the background and back rapidly.
Shield:
Panic covers his eyes, as the standard shield forms around him.
Tripped:
Panic trips in place and falls onto the ground; instead of landing on his arse, Panic gets stuck in the ground head-first, due to his horns.
Dizzy:
Panic puts a hand to his forehead, groaning in place fearfully.
Sleeping:
Panic falls to the ground, moaning and twitching in his sleep. He must be having a nightmare.
MOVESET
***
SPECIALS
Neutral Special - Head of Medusa
Panic pulls out a stone shield in front of him, depicting the head of Medusa. The shield has high priority, but isn't an attack unless it touches a foe. Because the shield has close range, Panic will need to be right next to the foe to pull this off. He has little startup or ending lag, taking out and stowing the shield. Panic can hold out the shield as long as he wants; if he holds it for more than a second, however, the ending lag is increased to average.
Foes who touch the shield turn to stone for a second. The effect is the same as being frozen in an ice-cube, except that the foe is stuck in the position they touched the shield in. The stone character can be attacked, but not knocked back. The character remains a stone for about a second, but they can button-mash to break out early. This move doesn't stick out as one of Panic's main combo moves, but it still has its uses.
Side Special - Thorn in Your Side
Panic spits a small thorn out of his mouth at foes. The thorn is the size of a Deku Nut, and travels about 1/3 of Final Destination at Meta Knight's dashing speed, before vanishing. It has absurdly low priority, but Panic has almost no lag on either ends. Because of this, he can pepper the foe with thorny shots to build damage. Each thorn deals 1-2% and a bit of stun. This move can get annoying to face from a distance; if you find yourself the victim here, approach Panic to nullify the use of this projectile.
Down Special - Mission Complete!
Panic turns to the background and bows to Hades. In response, the Lord of the Dead teleports Panic away, while appearing back on the battlefield himself, his throne vanishing. This takes a split second to do, and neither Panic nor Hades can be harmed while switching. If you are playing around as just Pain and Panic, pressing Down Special causes him to morph back into Pain. They do not switch upon being KOed, so no Pokemon Trainer mishaps can happen. Also, when played alone, their 1% = 2% rule they have with Hades is no longer in action.
Up Special - Trail of Tears
A trail of magical golden dust appears under Panic's feet. For three seconds now, he can move in any direction (except straight up or down), for the trail of dust to follow under his feet. This provides Panic with a nice recovery, which he'll need, considering how light he is. Panic can only use this move once at a time in midair, but it does give him his jumps back. If he is attacked while moving, or time runs out, Panic falls in helpless state. However, because he can attack and dodge while on the trail, he has a bit of defense on his side. It takes time to learn which way to direct the trail for best results, but after a while, it because easy.
BASIC ATTACKS
Basic Combo - Panic Attack
Panic screams and begins flailing his clawed hands about wildly in front of him. His hands hit at a fairly close range, and have quite low priority. However, there is almost no startup lag, and Panic can hold his flailing out as long as he wants. He suffers below average ending lag. Foes caught in his flailing take rapid little hits of 1%. While Panic's low priority can be punished, he can tilt the Control Stick forward or backward to move that direction while flailing. This makes it harder to escape from on the foe's part, but still not that difficult. This can rapidly accumulate a foe's damage if Panic can flail on them against a wall.
Dash Attack - Horny Devil
Panic tilts his head down, so his horns are facing horizontally as he dashes. Touching Panic's horns while he dashes deals 7-8% and below average knockback to opponents. His horns have below average priority, but Panic stays at his normal dashing speed here; you'll need timing to hit him out of this from the front. You can hold down the A Button to keep Panic running like this for as long as you want; if you do anything besides continue your running, or if you hit a wall, Panic will trip and fall out of this, with below average ending lag. He has low lag on both ends otherwise. Because Panic's short figure can hit foes of all sizes, this can be a nice way to approach.
TILT, SMASH, AND AERIAL
Forward Tilt - Dirty Trick
Panic begins pointing forward insistently, with no startup lag. This isn't an attack, so he has no priority; however, if a foe is standing a Stage Builder block's distance or closer to Panic, they'll turn around. What the hell is he so scared of?! By pressing A while the foe is turned, Panic does a sweeping kick, knocking the foe's legs out from under them. This trips them, dealing 5% in the process. Panic has no ending lag here; get out of there before they use a tripped attack. This can set up a nice combo into Panic's F-Smash. However, Panic can't use this on any foe facing away from him; he can only use it on foes he's turned around himself.
Forward Smash - Suddenly, C*cks!
While charging, Panic looks around, nervously. Upon release, his fear reaches a climax, as he morphs into a chicken. Cause, well, he's chicken; get it? Anyways, in chicken form, Panic dashes forward the distance of a Stage Builder block at Fox's dashing speed, clucking and pecking as he goes. He turns back to normal at maximum range, but morphs early if hit out. The hitbox here is the chicken's beak, which has below average priority.
Panic turns into a chicken and back rapidly. Because the chicken is slightly smaller than Kirby, the hitbox is rather small. Foes who get caught by one peck generally have a hard time escaping the rest, however. The pecks can deal anywhere from 1-12%, with below average knockback on the last hit. If you miss, Panic is somewhat punishable, but if you connect, Panic can easily follow this up with several N-Airs or a Basic Combo.
Neutral Air - Mad Old Bird
Panic morphs into a small sparrow, the size of Kirby with a Poison Mushroom, and flies around in a rapid mini-circle, tweeting all the way. There is almost no lag on either end or landing (he turns back to normal after the move); this is one of Panic's bread and butter moves. The hitbox is rather small, but the circle increases this to be more usable. The bird's beak has surprisingly below average priority, despite its diminutive size. Foes hit by the Panic bird take three light hits of 2%; the last hit does a low set knockback. Chaining multiple aerials in a row is perhaps Panic's best method of building damage.
GRAB AND THROW
Grab - Fearful Clinging
Panic lets out a shriek, and jumps forward 3/4 the distance of Monkey Flip. If he misses a foe, he falls to the ground, having below average ending lag. If he connects, he clings around the victim's neck, from behind. This has good range for a grab, and has little startup lag, but it can be foreseen and punished if the Panic player isn't sneaky. Yeah, the priority is pretty bad. From a dash, Panic has slightly more range, but slightly more lag if he misses as well. Don't hop off an edge by mistake!
Grab Attack - Tightening Your Grip
Panic squeezes the foe tightly, refusing to let go. This deals 1% and is insanely spammable. As a side note, escaping from Panic is slightly easier than freeing yourself from normal grabs; if you latch onto a foe, throw them fast!
Forward Throw - Backstabber
From his cling behind the foe, Panic bends his thin little body over backwards, stabbing his horns into the foe's backside. This deals 6-7% and below average knockback to foes. In a FFA (not that you'd actually be using Panic that much in a battle like that), Panic's horns can hit outside foes, as well. Panic can follow up this throw with another grab if he's quick (not a chaingrab), or a nice N-Air or three. Roll away to avoid this, if you are the victim.
EXTRA ANIMATIONS
Up Taunt - Do the Worm!
Panic morphs into a thin green worm and does...the worm, bending and flopping around on the floor for a second, before turning back to normal.
Entrance - Fear of Heights
Panic flies toward the stage in a controlled manner, unlike Pain's crash landing. However, his hands are over his eyes comically, causing him to lose control and get stuck in the ground by his horns. He uproots himself and bites his nails, ready for the fight to come.
***
"Now you know how it feels to be just like everybody else. Isn't it just...peachy?"
Hades: I liked the rage mechanic. Especially the punishment for being ahead. It adds the need for self control to the set. Also, I loved the Stephen King reference. But does one of the souls look like a clown?
Edit: Also, Voltaire? Perfect song for the character. *sings* "Your tears are all the pay I'll ever need."
Dedede is an eagle, stop calling him a penguin king! >_<
This is definitely one of my favorite sets of yours. The mechanic is interesting and lends Hades a cool playstyle, and you managed to create interesting setups without too many traps. I would have preferred if you used less bolding, and I honestly don't think it's a great idea, but it's pulled off way better than Wart, who seemed to have half of his moveset bolded. Great job with this one, Kupa.
Owait, you need criticism? Yeah, there's honestly little to criticize. I don't think Hades really had much need for a mechanic, and the mechanic is honestly a little bland, though I like the playstyle it adds. Also, it seems like you're forcing the matchups a little. I mean, Dedede gets his ass burned when he tries to Dthrow Hades? Where the hell did that come from? This is a problem I've had with most matchup sections, they seem to only mention the broken characters and the underpowered characters. You could perhaps get more interesting matchups if you used less extreme characters. For example, the Ice Climbers are all about building up damage with chainthrows when their opponent can't escape, but Hades can have Pain and Panic out to stop that, and it's bad to get a lead on Hades... hmm...
Yet, these are pretty minor concerns. This is a great improvement over MYM4 Hades who was already good, and it's bursting with personality (I LOLd hard at Panic's Fsmash). The Final Smash is also one of my favorites. Well done, Kupa, well done.
I guess I'll just respond to the comments I have so far.
Less bolding...alright, sounds good. I think that the mechanic requires a little more bolding than some users are comfortable with, but I think I've got the jist of it towards the end of the set. I'll keep that in mind later. The mechanic doesn't really have to be game-changing, IMO; it just has to be in-character and adding to Hades rather than taking away.
Dedede would be able to chaingrab Hades, due to his size, so burning him is a fine solution, I think. Also, I think you're forgetting that Hades gets penalized if he keeps Pain or Panic out for too long. He can only use them for temporary combos. You read that part, right? But anyways, thanks for actually commenting. I had a great time redoing this one.
The Kirby Wiki says he's a penguin, so I'm going with that
Oh yes, and Letchku, welcome to MYM. I was hoping someone would catch that reference; shh...it might give away one of my future ideas. And try as I may, I just couldn't find the Hercules score on Youtube. Because most of the Hercules songs are too cheery for an Underworld environment, I just picked some tight evil songs that came to mind.
I think he is more popular as snake and I am a big fan from him(sorry for my bad english but I'm german)
this char will use alliance weapons cause he uses this weapons in the games too... this char is more on range based...
I think he is a heavyweight cause his armor weights 500kg and his height is 2meters...
he is the fastest heavy weight cause he get genetic manipulations and his MJOLNIR-ARMOR wich gives him more power too
ATTACKS
a: he punch the enemy
jab-combo: he punch the enemy than he punch him again and than he take his pistol and shoot at him(low reach)
forward-smash: he take his plasma sword and hit his enemy like ike
down-smash: he kicks front and backward it seems a little bit like the down smash from ganondorf or captain falcon
up-smash: he take his fist and punch it very strong in the air like marths up-smash without sword
oh sorry i did not see the post where you say that we must post this char in one piece...
I let this peaces there but the rest I post in a few time in one piece...
This guy is my friend... >.> Please, please don't flame him. He doesn't know the etiquette yet... I'm reminding him that he should post actual full movesets..
Also, @Hades: upB is broken. Get stock lead, then upB and spend the entire rest of the game unter the stage.
Razhan, I'll show you what a REAL Master Chief moveset will look like. The only reason I haven't completed it and still am at like 65% is because work has been owning my life.
Thank you for catching that; against a good player, it would be very hard to do so, due to the move's awful moving speed. Still, I put in a limit if Hades is ahead a stock or more.
Dang, my set is gonna get ignored for the next few pages until the big MYMers come back and berate everyone for commenting just because of a joke set... >.>
EDIT: DO NOT REPOST THE MOVESET! There is no penalty for making it a work-in-progress (although less people will read it if it is), but there is for reposting. It creates unnecessary spam. DO NOT DO IT!
I don't think so; KO the opponent, jump off the edge, then start the upB after you're well below the stage. I think maybe MK, and possibly jiggs could deal with that.
Hades:
I liked your MYM4 version of Hades, & this one is, naturally, much better. Pretty much all of his moves are really creative (with the neutral special & up tilt being my favorites). I still love the forward special as well, which I remember from MYM4 Hades. The "trap" moves seems fitting, and for a slow character like hades, you can't rely on them to win the match for you. And the final smash is EPIC, btw.
My biggest complaint for this set would have to be the mechanic, which seems rather tacked-on to me. With just a small percent of damage being the difference between hades having a power boost & having normal power, it all seems like it would fluctuate a bit too much during a typical match. Other than that, its a pretty fitting mechanic that creates an interesting playstyle. My other, much more minor complaint is that all the mini-sets for pain, panic & the titans could easily be put into separate posts. It would just make the set appear much less lengthy & intimidating. But this is probably your best set yet! Great job
Great Hades moveset, I remember when I was a kid and watched the movie. I really liked him in the movie. The moveset was good all around and really does match Hades. It is well organized and is easy on the eyes.
Also I am making a bear hugger moveset, and I just want to know if a kinda laggy forward smash that deals out 20% damage. I also have it were it can be fake ( as in a completly fake forward smash that can scare opponents) and stalled ( as in made to come out a second late.)