• Welcome to Smashboards, the world's largest Super Smash Brothers community! Over 250,000 Smash Bros. fans from around the world have come to discuss these great games in over 19 million posts!

    You are currently viewing our boards as a visitor. Click here to sign up right now and start on your path in the Smash community!

Make Your Move 6 - Nothing Gold can Stay

Status
Not open for further replies.

Wizzerd

Smash Ace
Joined
Feb 24, 2009
Messages
929
leafbarret said:
What do you mean?
Little Photoshopped rectangles that show a MYM character. You can use them in linkup spaces or sigs to make links more aesthetically pleasing. Look at Kupa's linkup space on the first page and you'll see some of them.
 

Junahu

Smash Ace
Joined
Nov 15, 2005
Messages
899
Location
Shropshire Slasher
Obamasnow Abomasnow: This caught me by surprise. The snow mechanic was so deeply ingrained in the moveset, that I had to scroll back up and check whether I was reading a MasterWarlord moveset by mistake.
Switching between green and cyan colour schemes to denote attacks of different elements was a nice touch, though I find it odd how some of his Grass attacks are boosted by snow just as his Ice ones are.
I would have preferred him to have Grass attacks that are better without snow (both as a means of fending off the opponent early match, and as a downside to having too much snow). I also think that abomasnow should have less landing lag when he lands on snow in the middle of an Ice aerial.
The attack descriptions also tailed off a little as the moveset went on.


Definitive Roster: I can't believe I was away for something so important as this. We finally have a nice list of great movesets throughout MYM
I'm super glad both Donna and Cutesy were included, and it's obvious why they'd be favoured over MM9:Megaman (though it arguably has more of a "cult following" than Cutesy does)

I'm also surprised noone has said "OMG U didn't incl ^this charactr guy!" yet.... oh wait, I just did.
 

SkylerOcon

Tiny Dancer
Joined
Mar 21, 2008
Messages
5,216
Location
ATX
MM9 was awesome though... ;_;

In any case, that was a great list, despite that I could go without a few sets (Sakurai... sorry Sundance). It's a great list though. OP linkage?
 

Baloo

Smash Ace
Joined
Nov 14, 2008
Messages
781
That list is wonderfully done, although I too think it could be changed a bit. :p

Also, for a moveset picture thing I'm working on, does anyone know the RBG of the background color here? I'm guessing it's around 30R 30B 30G, but is there any way to find out?

EDIT: Nvm, I figured it out. How does this look?


Jimnymebob

Smash Champion
Joined
Sep 26, 2008
Messages
2,020
NNID
Jimnymebob
That list is wonderfully done, although I too think it could be changed a bit. :p

Also, for a moveset picture thing I'm working on, does anyone know the RBG of the background color here? I'm guessing it's around 30R 30B 30G, but is there any way to find out?
That list is great, and it's nice to see what the leaders of this contest consider the best and most influential sets of contests I was and wasn't present in, so it's always nice to see pre MYM4 sets.

As for your question Baloo, if you are working with Photoshop you could just leave the background clear, but if not I have it at around 37R, 33G, 34B. That's not exact, but it's quite close. Maybe a bit less R.

Nevermind that then XD.

As for the image, it lookks good, but the word Castform is slightly difficult on the eyes, and the top corners look a bit messy compared to the rest of the image. Still, it looks very nice, so well done.
 

JOE!

Smash Hero
Joined
Oct 5, 2008
Messages
8,075
Location
Dedham, MA
Looks like a good list. I can make a story mode for it... :bee:

Also, I have a little request. Is there anybody around here who could make me some character buttons? I would be very happy... :bee:

EDIT: This has been up for twelve hours and I've been the only one to say anything about it...
ill make buttons, just tell me who and what :p
 

Katapultar

Smash Lord
Joined
Nov 24, 2008
Messages
1,258
Location
Australia
That list is useful, I could read the older sets without all of the hassles of scanning MYM2. It's a great list for inspirational cases.
 

Katapultar

Smash Lord
Joined
Nov 24, 2008
Messages
1,258
Location
Australia
Cool Warlord, another story mode by you. I see what you mean by adding the possibility in SSB4. I wonder why you didn't use movesets for Kanghaskan, Hypno and Clefable, though it would be silly for Sakurai to make all those pokemon movesets, makes more sense to have them as bosses. It DOES seem a bit too pokemon orientated for something that could be in SSB4, but you could just say that it is a later part of the story.

MYM is a bit quiet by the way. And just a bit of useless information, Im pretty sure that there are 34 MYM6 movesets listed in the canvas, not to mention that it's been nearly a month since MYM6 started.
 

SkylerOcon

Tiny Dancer
Joined
Mar 21, 2008
Messages
5,216
Location
ATX
@Katapultar: As it is now, we're about on the level that MYM5 was in terms of moveset posting. There were about 40 movesets per month in MYM5, and there are nearly 40 this month. I'm coming out with a new set Friday, and I'm sure a few other people have been planning to release sets soon as well. So, we're right on par with MYM5 (as it should be - the quality standards have barely increased at all. If anything, we should be producing MORE work than MYM5, due to overdetail now being taboo).

But, we need to pick up in thread activity. I'm guilty of being highly inactive in the thread, so starting now, I will try to comment on at least one out of every two sets.

@Tikaro: Is that... really buff adult Link? Looks almost like a MUGEN character.
 

Katapultar

Smash Lord
Joined
Nov 24, 2008
Messages
1,258
Location
Australia
Good to know that MYM5 and 6 are similar. I guess that people are working on big things. Looks like adult likn, i will have to comment on as well.
 

kirbywizard

Smash Hero
Joined
Jan 4, 2009
Messages
6,713
Location
Napa, California . . . .Grapes For Miles
3DS FC
0989-1847-5768
I guess the main reason this thread has gotten inactive is because people are spending a lot of time with there movesets >_<. I am almost done with my Bear Hugger moveset, and I hope that is a fun read for everyone.
 

Apemasta'

Smash Cadet
Joined
Jan 6, 2008
Messages
56
Location
Southern California
Shibuya's Finest


"Neku Sakuraba, the boy who beat death, has joined the Brawl!"


WARNING: The following moveset contains considerable spoilers for the narrative-heavy "The World Ends With You." Read at you own risk.


...The Boy Behind the Phones...
Neku Sakuraba is the star of Square's "The World Ends With You," a DS RPG best known for its sink-or-swim dual-screened battle system. As the game progresses, Neku undergoes a transformation from the typical loner antihero to a much more open-minded individual. An introspect and fan of "urban art" (read: graffiti), Neku's world is thrown for a loop when he awakes one day in the middle of the Shibuya Scramble Crossing, completely invisible to passerby, but somehow able to read their minds. As it would be, Neku has been entered in the Reaper's Game - a twisted game hosted by the Gods of death themselves. Neku is dead. The prize? Your life. Neku's entry fee? His memories.

The Game is a week long series of challenges. The primary obstacles are Noise - psychedelic, tatted animals with a taste for the game's Players. In order to prevent their relentless hunt, all Players must form a Pact with another Player. In the three weeks that Neku plays through The Game, they are (in chronological order) Shiki, Joshua, and Beat. While all Players are able to use Psychs, or psychic abilities, through the use of Pins, Neku is a rarity in that he can use just about any Pin thrown at him. This is primarily do to the strong force of Imagination he hosts, inspired by CAT, a local anonymous artist mogul.


...Meet the Partners...
While the player directly controls Neku, he will always have one of his partners present in the stage's BG; in fact, his current partner will be rubbing elbows with any Pokemon Trainers participating in the Brawl! Depending on the partner, Neku's moveset will change - his specials (as well as Final Smash) are direct manifestations of his partner's abilities.

Your starting partner can be determined on the Character Select Screen, but once the Brawl begins, Neku's Week System comes into play. Neku's partner will only stay in play for one in-game "week." After their week, the next partner cycles in. During a Brawl a Week is 3.5 minutes (30 sec. per day)

Neku's partner will also cycle forward if Neku is KO'd. As is true in the Reaper's Game, a partnerless Player is a dead Player. Upon Neku's defeat, his partner will be assaulted by Noise (in symbol form - Example) and the next will cycle in.


Week 1 - Shiki Misaki
Shiki isn't necessarily the timid airhead you'd expect, but she's no firebrand, either. Her constant chipping away at Neku's hard exterior is what begins to open him up to others, and gives her the title of his first true friend. Shiki fights the Noise by animating her stuffed cat, Mr. Mew. This ability manifests itself through Mr. Mew appearing by Neku's side during the First Week. Mr. Mew hovers next to Neku and has no hurtbox associated with him, and is purely cosmetic until used for attacking.


Week 2 -Yoshiya "Joshua" Kiryu
Joshua's snobby attitude makes a bad impression on Neku from the get-go. His unusual knowledge of The Game and his possible influence in Neku's death drive the suspicion's even deeper. The game's climax reveals that (WARNING) Joshua is, in fact, The Composer, The Game's head honcho disguising himself as a Player in order to play a game of his own with his subordinates. Before this revelation, Joshua's primary method of attack was telekinesis. As he unleashes more and more of his Reaper power, his abilities grow to include levitation and divine laser attacks. Neku himself is unable to contain power on par with the Composer's so Joshua can be seen visibly aiding Neku at the player's command.


Week 3 - Daisukenojo "Beat" Bito
Beat is your typical skateboarding lunk, though he's got the heart of a lion. His intentions are good, but a combination of his dim wits and inability to slow down often do him in. When his partner - and sister - was Erased by Noise while saving him, Beat became a Reaper (signified by the black wings) in order to learn how to summon her Noise form (the red squirrel on his shoulder). Beat uses his agility on a skateboard to attack, and displays an incredible maneuverability while fighting. During the Third Week, Neku gains his transportation abilities, as well as Reaper powers - certain attacks allow him use of the Reaper wings, and Rhyme will constantly fly throughout the BG, waiting to be summoned.

...ESP'er Rank (Stats)...
Height - 7/10: Neku's a tall, lanky teenager, standing about a head shorter than Ganondorf. He stands straight, hands in his pockets. Even in the heat of battle, he's a cool customer.

Weight - 5/10: Despite being so tall, Neku's a skinny guy. He's not exactly floaty, but he won't drop like a rock without a few more visits to the Mexican Dog.

Traction - 9/10: The Reaper's Game has Players running all throughout Shibuya. If a good time isn't made, Players face erasure. With Noise hot on their trail, tripping could mean death. Again.

Crouch - 8/10: Entering the Game three times, Neku's spent a fair amount of time nose-to-asphalt. When he crouches, he hits the deck!

First Jump - 8/10: As with Ness and Lucas, Neku's psychic abilities give him quite a nice lift. He jumps in a Marioesque fashion, one arm thrusting upwards.

Second Jump - 6/10: Still a decent jump - expect to find Neku in the air relatively often. Neku will thrust both arms down in midair, propelling himself further upward.

Aerial Mobility - 5/10: Neku's aerial game is crucial, but relies more on a setup aspect than an actual engagement.

Walk Speed - 3/10: Perhaps Neku is TOO cool a customer?! Without even removing his hands from his pockets, he saunters forward, calculating every step.

Run Speed - 6/10: Neku finally takes the fight seriously, pumping his arms to gain speed.

Dash Speed - 8/10: As mentioned before, speed is key in the Reaper's Game. Neku puts his Psychs to work as he lifts off the ground ever so slightly, throws his arms back, and dashes hovers forward.

Idle Stance - Neku will either place one hand on his headphones and bob his head OR cross his arms and glare forward, tapping his foot as he does so.

Shield - Neku crosses his arms in front of him, protecting his face.

Roll - Neku teleports over 2 stage blocks in 1 second. Minimal lag on both ends.

Spot Dodge - Neku slides back on the ball of his foot.

Air Dodge - Neku leans into the BG, his arms spread wide.


...Tilts...​
Jab - Lance Lunge: Neku throws a punch, and his fist in enveloped in a dull, yellow light shaped like a the tip of a javelin.
The attack has a decent range, extending a full block ahead of Neku. Lag is minimal on both sides, and the attack has high priority, but only deals 2% and flinching knockback. A good attack to ruin an approach.


Jab Combo - Stellar Fury: Neku barely moves from his initial Jab position, then begins firing off jabs high and low. The attack is essentially a rapid firing of his normal jab.
Stellar Fury's damage, range, and knockback remain the same. However, the attack can be held indefinitely, hitting at the same frequency as Fox's Jab Combo. The priority is slightly lower than that of the Lance Lunge.


Ftilt - Shockwave: Neku slashes forward lengthwise with his hand, a thin streak of white light in his wake.
Shockwave deals 5% and low knockback, making it relatively easy to chain. Shockwave has both average priority and lag.


Dtilt - Vortex Sabre: Neku rises onto a knee and spins on a heel, extending Shockwaves from both hands as he does so. He rises into a standing position as he attacks, and will end the attack standing rather than crouching.
Vortex Sabre has a very slight suction effect on close foes. The attack will normally deal 8% and medium knockback, but there is a sweetspot at the apex of Neku's rise. If he hits the opponent just as he fully stands, he will deal 11% and high horizontal knockback. The attack has a slight startup lag, but very low end lag and is of average priority (high at the sweetspot).


Utilt - Vulcan Uppercut: A white light envelopes Neku's fist and he performs a standard uppercut.
Vulcan Uppercut can hit a maximum of 3 times, dealing 3% per hit. The lag on both ends is above average for a tilt, but connecting with all 3 hits will be enough to send the opponent a decent way away. The attack also boasts a high priority.


Dash - Velocity Attack: Neku barely blinks as a red aura surrounds him mid-dash. The attack gives Neku enough propulsion to send him another 2 stage blocks, but will ultimately end his dash.
The attack deals 8% and medium vertical knockback. Combined with it's high priority, it is incredibly useful in forcing your opponents movement. There is a slight end lag, but nothing too punishable.


...Smashes...
FSmash - Piercing Pillar: Neku braces one hand against his headphones and holds the other forward. Depending on the charge, he summons 1-3 pillars of ice from the stage block in front of him.
  • Low Charge: One pillar is summoned, sticking straight into the air.
  • Medium Charge: A second pillar is summoned, sticking into the air at a 75 degree angle.
  • Max Charge: A third and final pillar is summoned, sticking out of the ground at a 45 degree angle.
The pillars are about a head taller than Ganondorf, and their entire being composes their hitbox. The entire attack lasts one second.
The pillars deal between 10-22% on contact, and have a medium forward/vertical knockback. While this attack's KO potential is mediocre at best, any foe hit by the attack immediately enters helpless after s/he is knocked back. Ice Risers have a disjointed hitbox, and have a above-average priority.


Mr. H's Little Black Book​
"Hey there, Boss! You're friendly neighborhood barrista' here, hopin' to help you master the intricacies of this kid. See, Piercing Pillars are Psychs most commonly used to juggle an opponent. You see it all the time - these babies pop outta the ground, and the bad guys're head over heel, waitin' for you to wail on 'em. Use their forced downtime to your advantage! Get in a few free shots. Oh! And these things've got a nice range. Try gimpin' an off-ledge opponent!"

DSmash - Flame Blast: Neku curls up, hands on headphones and eyes closed, as he hovers slightly above the ground while charging. When released, Neku will brace himself and the area around him will be engulfed in flames. Like the Piercing Pillars, charge time determines the range of the attack.
  • Low Charge: The area directly around Neku will be set aflame.
  • Medium Charge: Flames will spread one stage block to the left and right of Neku.
  • Max Charge: On top of the flames spreading left and right, A pillar of blue fire will shoot 2 stage blocks above Neku.
The flames appear immediately upon unleashing the attack. If an opponent is caught by the attack, s/he will suffer 4% per second and flinching in red flames, and 24% and high vertical knockback if hit by blue flames. The flames remain on stage for approx. 3 seconds. Like most fire-based attacks, the priority is very high - the attack cannot be effectively canceled, simply avoided. Fully charged blue flames are Neku's most reliable KO option out of his Smash Attacks, able to KO Mario at only 95%


USmash - Thunder Cloud: Neku faces the screen and holds his hands to the sky. As he does so, a semi-transparent ring begins to form between them. If, while charging, any opponent enters the ring, a small targeting reticule will appear over them. Upon release, a small thunderbolt will be fired at every targeted opponent.
The center of the ring is located between Neku's up-stretched hands, half a head above him. At minimum charge, the ring is approx. the size of 1 stage block. At maximum charge, it's diameter is twice that of Neku's height; the bottom of the ring touches the ground, the top extends one Neku above the user, and the sides reach approx. 2.5 stage blocks to the left and right. The thunderbolts travel at Sonic's Bunny Hood speed - nothing to scoff at. They will pass through opponents and deal 10% to anything they hit, disappearing if they hit a wall. Due to the nature of the ring, it is best used underneath an opponent, and can rack damage quickly in the chaos of a FFA.


...Aerials...
Nair - Spark Core: Neku curls up and braces his hands against his headphones as a ball of lightning the size of Kirby materializes behind him. The orb revolves around him quickly 3 times before fizzling out.
Spark Core comes out incredibly quick, and has virtually no end lag, immediately dissipating once Neku hits the ground. It deals very low knockback, but can hit multiple times because of it, each hit dealing 4%.


Fair - Flame Core: Neku stalls in the air for half a second while performing this move. He cups his hands together and materializes a ball of fire in front of him. The orb's circumference is about 3/4 of Kirby's, and it's trajectory can be slightly guided during launch. Once launched, it will move at Ganondorf's air speed in the specified direction.
Flame Cores move slowly, but pack a punch. If an opponent can be lured into one, s/he will suffer 12% and medium knockback. Unfortunately, there can be only 2 Flame Cores on the field per Neku, and the dissipate immediately upon contact with an opponent or an obstacle.


Bair - Splash Core: Splash Core is nearly identical to Flame Core in that Neku materializes a small, elemental sphere in midair. Splash core, however, remains stationary in the air, and Neku needs only to quickly swipe his hand behind him in order to materialize one.
Splash Cores are stationary until an opponent hits one, in which case they will be knocked back in the direction they came with 9% more on their tab. The Splash Core will also mirror the victim's knockback, making them essentially a movable Bumper. Splash Cores can be hit 3 times before dissipating, and there can only be3 on the field per Neku.


Mr. H's Little Black Book:​
"Listen up, and listen good - this is important. Splash Cores and Flame Cores are essential to Neku's fighting style. By themselves, they can quickly turn the stage into a minefield. Pop! bounce offa Splash Core into a - Ouch! Flame Core. Not into the traps and trickery? Well, you'll still need these babies. I'll talk more about this later, but they're essentially your fuel. Yeah, Neku's partners have some prime attacks in store, but they won't do a thing without the proper elements on the field. So get crackin'!"

Uair - Lightning Arrester: Neku flips onto his back and fires a bolt of lightning towards the ceiling. The bolt's length is about half of Pikachu's, and will travel indefinitely until it leaves the screen. The attack has average lag, but landing before completeing the move will cause Neku to immediately be knocked to the ground.
The Lightning Arrester has two different hitboxes. If an opponent hits the side of the bolt, s/he will suffer 9% and medium horizontal knockback. However, a direct hit with the tip of the bolt will deal 11% and medium vertical knockback. Fortunately for your foe, the bolt is quite slender, and doesn't travel nearly as fast as Pikachu's - only about Diddy's dash speed.


Dair - Grave Digger: Neku stalls midair for half a second, then envelops his hands in white light. He dives down, headfirst, dragging opponents down with this Shockwave-esque attack. This attack can be used to Nekucide.
If used above the stage, hitting the ground results in high end lag. The attack deals 3% per second. Grave Digger has a below-average priority.


...Specials...
Week 1 - Shiki
"Let's go, Neku!"

Neutral Special - O-Pin Imprint: Pressing B will toggle the O-Pin on/off. While Neku is wearing the O-Pin (A black/red recolor of the TWEWY series symbol, the Player Pin), his movement speed and jump height are halved. Why nerf such an agile character? Imprinting. In TWEWY, Players were able to influence their surroundings through what they wore and by "Imprinting" words and phrases into people's minds. If you pass an opponent while wearing the O-Pin, they will gain one of their own.
The opponent's O-Pin has the same effects as Neku's. Their movement speed and jump height are both halved. Unlike Neku's, it cannot be toggled on and off, but will come off on it's own after 7 seconds.


Up Special - Mr. Mew to the Rescue!: "Go, Mr. Mew!"
At Shiki's request, Mr. Mew expands to 1.5 Neku's size and flies beneath him. This process takes a second, and culminates in Neku riding the giant stuffed cat in a specified direction for 2 stage blocks.
Mr. Mew's trajectory is much like Lucario's Extreme Speed, though not as... extreme. Mr. Mew himself becomes a hitbox for the duration of the recovery, dealing 11% and low knockback.


Side Special - Mewzilla Laser: "Get 'em, Piggy!"
This attack can only be used when there is at least 1 Flame Core on the field. Holding the attack will draw the nearest Flame Core to Neku, and Mr. Mew will absorb it, his head doubling in size. Tapping the button will initiate the attack. Neku will shout the above and point forward, and Mr. Mew will fire lasers from his eyes 2-4 stage blocks forward, depending on the charge.
Mr. Mew can absorb a maximum of 2 Flame Cores. While only one is necessary, the second will increase both range and damage. Minimum charge will fire 2 stage blocks away for 13%, and maximum charge will fire 4 stage blocks away for 20%


Down Special - Cat Scratch Fever: Neku closes his eyes and holds his hand toward the screen. After 3/4 of a second, Mr. Mew's eyes will glow red - Neku is in direct control of the little guy. For however long the button is held, Mr. Mew will fly around Neku at blinding speeds, providing a virtual "shield" of deep scratches, signified by blood-red scratch marks.
Each scratch deals 5%, and can easily juggle an opponent who isn't DI-savvy. The attack is very high priority, giving it its shield-like properties. However, it can be ground to a halt by any projectile. Also, Mr. Mew becomes unavailable for half the total time the attack was used. During this downtime, he will alight in Neku's pocket.


Mr. H's Little Black Book:​
"That little piggy - er, cat, is going to be your best buddy during the First Week, so don't tucker him out too fast! Let's say you use Cat Scratch Fever for 30 seconds. Yeah, way to camp. That's 15 seconds of kittyless action. That also means no recovery. Your actions have consequences, kid. Remember that."

"See you on the other side..."

Week 2 - Joshua
"I've been watching you."

Neutral Special - Telekinesis: Neku takes out his cell phone (?!) and begins dialing. Each press (up to 3 in succession) will target the nearest opponent within half of Final Destination's length with a reticule identical to that of Thunder Cloud's. 1 second after targeting, a random object will materialize above the target, stalling a fraction of a second before falling.
  • Car: 10% and spikes.
  • Bike: 15% and medium horizontal knockback.
  • Traffic Cone: 5% and low knockback.
  • Wooly (rare): 20% and high knockback.
  • Smash Ball (extremely rare): The Smash Ball will simply begin floating like normal.

Up Special - Levitation: If used on the ground, Joshua will close his eyes and raise his hands, lifting Neku 1 stage block into the air. This height becomes Neku's new "ground" until he crouches, cancelling the move. Neku loses his specials for the duration of the move, but can now use the Special Attack button to swap between standard and aerial moves on the fly. If used in midair, Joshua will instead materialize a car beneath Neku, lifting him the same height and giving him his jumps back ONCE.
While levitating, Neku loses his good traction - he will slide as across the stage as if he were on ice. Also, Neku will enter freefalll if he levitates over the ledge.


Side Special - Composer Beam: "Josh!"
Neku will rear back as he yells this, as Joshua summons a cherub-like creature 2 Foxes above the stage block in front of him. (Joshua can be seen levitating, focusing as he does this.) 2 seconds after initiation, the cherub will fire a Deoxysesque beam at the ground.
The beam will fire for 4 seconds, dealing 5% per second. Even if Neku (who regains movement after the attack's startup) is hit by an attack, the beam will fire for the full 4 seconds. The beam will cause opponents to flinch until the final hit, which has low knockback.


Down Special - Fire n' Ice: "Follow my lead." "Screw that!"
This attack can only be used if there is at least one Flame/Splash Core on the field. At Joshua's line, all Flame Cores harden into rock and all Splash Cores freeze at the wave of a glowing hand. At Neku's line, he curls up and braces his hands against his headphones, hovering slightly, sending all frozen Splash Cores rocketing downward (Bowser's fall speed) and firing the hardened Flame Cores in random directions (Kirby's dash speed). the entire process takes about5 seconds.
The frozen Splash Cores deal 10% and spike opponents. The hardened Flame Cores 13% and medium knockback in whichever direction they were fired.


"This was unavoidable, I suppose..."

Week 3 - Beat
"C'mon, Phones!"

Neutral Special - Summon Rhyme: Throughout the Brawl, Rhyme will be flying throughout the background. Summoning Rhyme will cause her to fly directly at the screen, taking about 1.5 seconds to get there. If she intercepts an opponent (Rhyme will home into them, to a slight extent), she will latch onto them, halting their movement and attacking.
Rhyme deals no knockback, but has incredibly high priority and deals 10%.


Up Special - Wings of the Reaper: "Pick it Up, Phones!"
Beat's wings shatter, and materialize onto Neku. For 3 seconds, Neku has free flight capability. At the end of this time, the wings will again shatter in random directions, returning to Beat. As an easter egg, any Pokemon Trainers or Partners next to Beat when his wings shatter will look at him in shock.
When Neku's wings shatter, the resulting shrapnel can be used to ward off opponents and assure a safe landing. Each fragment (there is a total of 10) will deal 4%, and could stack surprisingly high.


Side Special - Skull's Chains: Neku will materialize a chain link (approx. 1 stage block), planting it solidly into the ground. If used in the air, The chain link will simply float in place. Upon using the attack again, Neku will extend a chain (Olimar's width) from his hand towards the hook. The chain covers 1/3 of Final Destination's length. If it connects with the previously summoned chain link, Neku will grind along it at Capt. Falcon's dash speed. If the chain does not reach, the move will fail, resulting in a good 2 seconds of end lag, while Beat let's out his signature, "Bwaagh!"
Hitting an opponent with the chain deals a negligible 6% and low knockback, but hitting an opponent while grinding will deal 3% per second and high knockback at the attack's culmination.


Down Special - Tsunami: "Let's start it up!" "No, let's end it!"
This attack can only be used if there is at least one Splash Core on the field. If not, the move will fail, resulting in a "Bwaagh!" At Beat's line, Neku will point to the nearest Splash Core. Depending on the amount of Splash Cores on the field, he will say his line and the following will happen:
  • 1 Splash Core: Water will rush from the Splash Core at Neku, pushing opponents and dealing 4% per second. Holding the special button will allow Neku to ride the stream of water to the Core, jumps intact.
  • 2 Splash Cores: Water will form a ring, connecting the 2 Cores. Catching an opponent in this ring sacrifices the Cores to encase the him/her in a bubble. The opponent is limited to moving in the area within the bubble for 2.5 seconds, at which point it will pop.
  • 3 Splash Cores: Water will rush to the midpoint of the "triangle" created by the Cores. If an opponent is dragged here by the streams, s/he takes 20% and high vertical knockback.
Mr. H's Little Black Book:​
"Beat's an oddball, no doubt about that. Tsunami and Skull's Chains, in particular. I do hafta point this out - those can both be used as recovery moves under the right circumstances. Got a chain link near the ledge? Skull's Chains, baby! Slap a Splash Core over the ledge, and you've got yourself a wet safety net. Beat gives Neku some insane range, so keep your opponent guessin' by ridin' across the stage at Beat speed!"

"I'm in trouble, yo..."

...Grabs...
Grab - Please Don't Kill Me: Neku's grab is peculiar in that he doesn't actually have to "grab" at all. Upon pressing the grab button, Neku will hold a glowing hand out. His grab range covers the 2 stage blocks ahead of him, and once an opponent is in his grasp, they won't retract towards him. Instead, they will simply float in place, bound by his telekinesis.

Pummel - Street Jam: Neku takes his headphones off (gasp!) and aims them at his victim, shooting a shockwave towards them. Deals 2% and can hit multiple opponents if anyone decides to come between Neku and his prey.


Fthrow - Massive Hit: "Get outta my face!"
Neku draws a large Shockwave "blade," and lunges at his victim. In the case of a third party getting in the way, the attack will hit them instead.
Massive Hit deals a whopping 12% and high horizontal knockback, but is easily punishable. The 3 second startup time gives a third party a huge opening, and the victim can actually struggle free during this throw's startup, leaving Neku open during the attack's cooldown.


Bthrow - Apport: Neku tosses his victim cleanly backwards, materializing 5 small boulders above them, which fall as a single hitbox.
The boulders will deal 8%, but reduce the throw's momentum considerably - the victim will skid along the ground a relatively short distance. Like most of Neku's grabgame, this attack can hit a third party.


Uthrow - Twister: Neku crosses his arms as wind whips around him, creating a small tornado. The tornado drags the opponent towards Neku, and tosses them up an average distance.
The tornado deals Neku's victim (or passerby) 7%.


Dthrow - Burst Rounds: Neku swings his arm down, bringing his opponent underneath him. He then cups his hand and fires 3 large energy bullets at point-blank.
Each round deals 3%, and the final hit issues low vertical knockback.


...Situationals...
Get Up - Entanglement: Neku's ground recovery is unusual in that it homes into an opponent. If an opponent is within 1 stage block, he will extend a rope from his hand, tripping them as he pulls himself up. How the tables have turned!

Ledge <100% - Dark Barrier: A purple orb materializes next to Neku, and begins revolving around him. As he flips onto the stage, a purple aura covers him and he dashes forward 1 block, dealing 5% and medium knockback on contact.

Ledge >100% - Fire Barrier: A yellow orb begins revolving around Neku as he kicks his way onto the stage. Very limited range, and only deals 4%, but is nearly unpunishable.


...Final Smash...
Week 1, Shiki - Mewzilla: "Neku! Come on!" "Right behind you!"
Mr. Mew grows to Giga Bowser proportions midstage, where Shiki and Neku can be seen riding his shoulders. Lasts 15 seconds.
  • Down Tilt - Stomp: Mr. Mew stomps his feet, dealing 12% and high vertical knockback.
  • Side Tilt - Punch: Mr. Mew punches in the specified direction, dealing 21% and high horizontal knockback.
  • Special - Mewzilla Lasers: Holding Special causes Mr. Mew to fire lasers at the ground. The lasers can be guided left and right. 4% per second.
Week 2, Joshua - Draco Cantus: "Your time's up, I'm afraid."
Joshua, aglow, descends into the background and transforms into his and Kitaniji's Noise form, Draco Cantus. Neku is transported to the BG platform as four of Draco Cantus's head appear in the corners of the screen. Holding the control stick towards one of the heads will cause it to spew 7 energy blasts every 2 seconds, dealing 5% each and med knockback. 4 heads spewing about 4 blasts per second can become a Japanese shooter very quickly. Lasts 15 seconds.


Week 3, Beat - Reaper Sport 2: Hide and Seek: "Achoo!"
Neku trades places with Beat at his elephantine sneeze. Beat has a full range of motion thanks to his wings. The player now has 10 seconds to touch an opponent. When he does, Beat sinks into the ground and the Final smash would appear to be over. The fight will continue as normal (With Neku still in the BG) for 15 seconds or until Special is pressed again, prompting Neku to yell, "Olly olly oxen free!" Beat will then emerge from his victim's shadow and issue a single, Reaper-empowered punch, dealing 50% and more than likely KO.


...Playstyle...
Psych 'em Out!
Neku isn't a character to be fooled around with. To play a good Neku game, you must not give yourself too much downtime. An obvious facet of this is the Week System. Any good Neku player must be able to make use of each of the Partners to their fullest before their Week is over. Shiki's Week is a damage building week - her attacks have the highest priority and damage-dealing capabilities. Joshua's Week is best used to gimp an already damage-stacked opponent and dealing KO-worthy hits. The Third Week will most likely come after you've lost a life or two, or after you've taken many a big hit. Beat's amazing recovery will serve you well during this time. The proper implementation and transition between Weeks is absolutely crucial.

Time management remains key with Neku's own attacks. While he doesn't fall under the category of "trap-setter," per say, Neku functions at his best when played in a field well-stocked with Splash and Flame Cores. Neku's entire moveset revolves around forcing the opponents movements. A sky full of Cores is not a friendly one - this will force the opponent to Neku's level, where he can either fight face-to-face with his quick tilts or Ice Riser his opponent into the minefield above. Balance stage setup and foe manipulation, and you might just win the Game. (Otherwise you'll lose. The Game. You just lost the Game.)


...Extras...

Alt. Colors


Kirby gains Neku's headphones, as well as...
  • Cat Scratch Fever
  • Telekinesis
  • or Skull's Chains

Wiimote Sound
"Open up your senses."

Entrance
Neku is already present on stage, facedown and clearly unconscious. As the Brawl begins, he slowly stands up.

Taunts
  • Up Taunt - Neku flips a random Pin like a quarter.
  • Side Taunt - Neku crosses his arms as his hair casts a comical, anime-inspired shadow over his face and bluntly says, "Shut up."
  • Down Taunt - Neku closes his eyes, holds his hands to his headphones, and says, "Open up your senses."

Victory
With Shiki:
  • Shiki grabs Neku's arm and says, "Losing's not an option!" while Neku looks away sheepishly.
  • Shiki and Neku start to celebrate, but are interrupted by Mr. Mew flying in circles around them, ocassionally stopping to pump his fists in celebration.
With Joshua:
  • Neku smiles upwards at a small ray of light, where a feather can be seen slowly falling.
  • Neku stretches, and Joshua gives a sarcastic, "Good job, Neku." They both exchange looks that scream "intense."
With Beat:
  • Beat claps Neku on the back and says, "That was tight, Phones!" while Neku doubles over with a pained, comical looks on his face.
  • Noise Rhyme flies onto Beats shoulder, and both boys smile at her.

Loss
Neku claps somberly as...

  • [*]Shiki looks away from the screen and plays with her cell phone.[*]Joshua puts a hand to his chin, as if examining the player...[*]Beat turns away in an attempt to hide the comical tears rolling down his face.

Codec
Snake: Hey, Otacon, what's the story behind the scrawny kid?
Otacon: That's Neku Sakuraba, Snake. He's a master of ESP, and has even managed to overpower the masters of death to regain his life in the Reapers' Game.
Neku: H-Hey, who are you talking to?!
Snake: He can hear us?!
Otacon: Neku is capable of Scanning you, Snake; he's reading your mind.
Neku: Hmph. Two against one is kinda unfair, don'tcha think?
Otacon: Don't listen to him, Snake. He's got allies, too. Say, I'm sure you've heard the expression, "All for one, one for all," right, Snake?
Snake: Yeah, it basically means that they all go down if I take Mindfreak down, right?
Otacon: Eh, something like that...

Thanks for reading, and enjoy the moment~
 
D

Deleted member

Guest
Neku seems like a clever and original moveset if you ask me. The Week system seems to work out pretty well, and, besides the tilts, the attacks are pretty clever. One complaint I have is Josh's Side Special. Two seconds seems to be a pretty long time for an attack to start up. Then again, it deals up to 20%, so perhaps that is best?
 

MasterWarlord

Smash Champion
Joined
Aug 24, 2008
Messages
2,902
Location
Not wasting countless hours on a 10 man community
Cool Warlord, another story mode by you. I see what you mean by adding the possibility in SSB4. I wonder why you didn't use movesets for Kanghaskan, Hypno and Clefable, though it would be silly for Sakurai to make all those pokemon movesets, makes more sense to have them as bosses. It DOES seem a bit too pokemon orientated for something that could be in SSB4, but you could just say that it is a later part of the story.
Well yeah. While I'm having some rather questionable character choices rather on (2 characters for each third party), I'm not making it absolutely ridiculous. If you didn't notice, I was trying to make those three bosses as similiar to their MYM counterparts as possible as somewhat of a tribute to MYM, to be able to "represent" more movesets without making them playable. Those three will be far from the last.

As for the first chapter being Pokemon oriented, it's intentional. Each chapter will (at least mostly) take place in a single location, and thus focus on a single series primairily.

MYM is a bit quiet by the way. And just a bit of useless information, Im pretty sure that there are 34 MYM6 movesets listed in the canvas, not to mention that it's been nearly a month since MYM6 started.
Hence why I'll hopefully churn out another wall of commentary for 5 or so movesets sooner or later. I've still been reading plenty of sets, just been neglecting commenting them recently due to that chapter I just posted
and summer slothfulness.
 

KingK.Rool

Smash Lord
Joined
Nov 26, 2005
Messages
1,810
Definitive Roster: I can't believe I was away for something so important as this. We finally have a nice list of great movesets throughout MYM
I'm super glad both Donna and Cutesy were included, and it's obvious why they'd be favoured over MM9:Megaman (though it arguably has more of a "cult following" than Cutesy does)

I'm also surprised noone has said "OMG U didn't incl ^this charactr guy!" yet.... oh wait, I just did.
Oh, I'd disagree. MM9:MM is a set that everyone loved; I don't remember a single person calling it overrated. Cutesy, on the other hand, many MYMers are quite ardent about disliking, while a fairly small group consider it absolutely fantastic; the main reason, I think, it got so many votes, is because that "cult", if you will, is mostly made up of highly respected MYMers who hold a lot of sway.

That list is useful, I could read the older sets without all of the hassles of scanning MYM2. It's a great list for inspirational cases.
Excellent, because that's exactly what we were shooting for; an easily accessed list of great sets.

But, we need to pick up in thread activity. I'm guilty of being highly inactive in the thread, so starting now, I will try to comment on at least one out of every two sets.
Yeah, I'm guilty of this lately myself. I've just been so busy with making icons and working on my moveset and trying to steel myself up to writing a review...

But as Junahu's statistics showed us, this always tends to be the slowest portion of an MYM, and I have faith the thread will pick up again soon.
 

JOE!

Smash Hero
Joined
Oct 5, 2008
Messages
8,075
Location
Dedham, MA

Yeah, this thing's finally out. This has a very focused roster and is actually intent to be something that could (not likely by any means, as evidenced by some certain character choices) be in SSB4. Hopefully I'll get around to some actual moveset commentary now that this is out of the way.
full of win


Speaking of it's possibility in SSB4, it would be cool to have a SSE kinda story (like you hav e there) per group..like a Fire EMblem story...a Metroid Story, etc.
 

half_silver28

Smash Ace
Joined
Apr 25, 2008
Messages
862
Location
MYM, Ohio
@Neku Sakuraba:
I have to say, this is a great set coming from a newcomer! Even though I haven't played this game for myself, I was able to get a good sense of all the characters. There are a lot of really creative moves here, although there are a few lackluster ones (up tilt). Neku has a great mechanic working as well, and calling in his friends to help him seems to fit with the theme of the game. The flame/splash core mechanic is great as well, & seems like something I would see from a MYM veteran set.

so. I've talked about the good, onto the bad. This set's main weakness has to be its organization. While you obviously used a different color for every aspect of the set, it just looks kind of disorganized. You should probably start by making the headers for each attack a different color than the text. That would just make it way easier to read. I also think that using 3 different colors for the text is pushing it. I don't have a problem with putting damage and other properties in a different color, but I wouldn't bother with a 3rd color.

Now I see that the properties you include for each move are not consistent; you mention lag and priority in some moves, but not for others. You should really include those for just about every move (throws could probably do with just lag). Also, I literally just noticed this: flame cores deal high knockback, yet 2 can be on the field at once? It seems like that move could be toned down a bit; it should either be limited to one at a time or have lower knockback. There are a few balance issues (one was pointed out by Baron), but you'll get better at that with experience. Just one last thing, the playstyle section could use some more fleshing out. The splash/flame cores seem to be Neku's only method of getting reliable KOs (other than the up air and gimping), so you should probably go more in-depth about their possible uses.

All in all, this is a terrific set, especially for a newcomer. Something else I feel I should suggest is for you to request a review for this set at The Canvas. They'll be able to give you even more detailed comments on this set, which I think you'll benefit from a lot.

You can find the Canvas' review queue here: http://chiefmendez.wordpress.com/review-queue/
 

Apemasta'

Smash Cadet
Joined
Jan 6, 2008
Messages
56
Location
Southern California
Thanks for the feedback, everyone, and I'll definitely get it reviewed, Silver. =]

I actually typed this moveset up on an iPod Touch while I had no computer access, so it's no wonder things got a little inconsistent. And I'm starting to see where I got a little TOO obsessive compulsive with the colors. All in all, though, I'm really glad with how this moveset turned out, especially considering my lack of MYM experience.

Trust me, I plan on making this a habit, so the critiques will be taken to heart. Thanks for the ego stroke! =]
 

n88

Smash Lord
Joined
Oct 10, 2008
Messages
1,530
Kee-Mo-Shi, the Marro Warwitch, has joined the Brawl!
Kee-Mo-Shi


-Overview-​

Kee-Mo-Shi is a character from the Heroscape battle system. Heroscape is similar to a Collectible Minis Game in that you buy expansion packs and larger sets to expand your collection. The gameplay is turn-based, and dice are rolled, etc. Heroscape differs from other Collectible games in that it is played on a field of plastic, interlocking hexes that can be acquired in addition to figures.

In the game of Heroscape (Which is set in Valhalla), there are six valkyrie Generals. These generals battle for control of the Wellsprings, mystical sources of power that grant them strange abilities. The foremost of these powers is the ability to summon warriors to Valhalla to do their fighting for them. The various generals employ different types of troops to do their bidding. Utgar, the evil general, summons hordes of monsters, orcs, vampires, werewolves, and his signature Marro.

The Marro are a sentient alien race from the swamp planet Marr. Kee-Mo-Shi is a Marro witch who uses stealth and guile during battle, often forcing her will on her opponents. She also may have found the secret to immortality...

-Mechanic-


Toxic Skin

Kee-Mo-Shi’s skin is covered in a deadly poison. As a result, any opponent whose hurtbox overlaps Kee-Mo-Shi’s hurtbox, if only for a split-second, has a 10% chance of taking Toxic Skin damage. Any opponent that takes Toxic Skin damage will flash green for a moment and take 10% damage, no knockback. Characters that run into Kee-Mo-Shi will also have a chance of receiving Toxic Skin damage. They will be exposed to Toxic Skin every time they move away and then back into contact with Kee-Mo-Shi. Teammates are also vulnerable to Toxic Skin damage, even if Team Attack is off. Attacks that expose the opponent to Toxic Skin damage are labeled in green.

-Stats-​

Size: 11/10
Kee-Mo-Shi is thin, but is even taller than Ganondorf and as wide as Bowser.

Weight: 6/10
Despite her large size, Kee-Mo-Shi is pretty much a walking skeleton. She's about as heavy as Wolf.

Ground Speed: 8/10
Having six legs really helps with movement. Kee-Mo-Shi is able to run at the speed of Sheik.

Traction: 5/10
She doesn’t really have any feet, but she does have six legs to help regain balance.

Attack Speed: 7/10

Power: 5/10

Kee-Mo-Shi deals a lot of damage, but has trouble KO’ing nonetheless.

Priority: 3/10

Reach: 8/10

Kee-Mo-Shi’s magic helps extend her range.

Fall Speed: 3/10
Kee-Mo-Shi falls at a speed comparable to Luigi's.

Recovery: 4/10

Comboing: 5/10

Shielding/Dodging: 5/10

Kee-Mo-Shi has a massive shield, but she needs it to cover her massive body. Her rolldodges are average, as is her spotdodge.

Aerial Movement: 5/10

-Specials-

Neutral Special: Mind Shackle

After 1 second of charge time, Kee-Mo-Shi’s staff glows bright green, and she jabs it forward about the distance of Meta Knight’s F-Smash at opponents. Anyone hit by the staff is unable to move. Kee-Mo-Shi has two choices at this point.

1) Hit B Side again to take control of the stunned player for 3 seconds.

2) Beat the opponent while they are stunned.

The first option sounds better, but isn’t without its downsides. Kee-Mo-Shi is unable to regain control of herself until her 3 seconds are up, meaning that in 3or 4-Player matches, her body is left unprotected. Also, Kee-Mo-Shi goes into shieldstun (the same state that she goes into when her shield is broken) after possessing someone.

Up Special: Platform Control

Kee-Mo-Shi turns to face the screen and bows her head in concentration. As long as the input is held, Kee-Mo-Shi's fall speed is equivalent to Fox spamming Reflector (Very, very slow), and she has control over all platforms she's created through her Up Aerial or Down Smash (Explained in Up Aerial and Down Smash. Duh.). She's able to use the analog to move the platforms at Captain Falcon's Dash Speed. However, after 10 seconds in this state, Kee-Mo-Shi's platforms disappear, and she goes into helpless.

This is a somewhat risky recovery. It relies on having a platform created somewhere, as having to create one on the way down is often too slow to prevent Kee-Mo-Shi from dying. Also, opponents may try to hitch a ride on the platform you're controlling as well, either as a method of recovering themselves or as a transport directly to you. If they do, it may be a good idea to just move the platform below the blast zone and take them with you.

Side Special: Amulet

Kee-Mo-Shi holds her staff over her head as the attack charges (This takes up to 4 seconds). After the player releases the button, Kee-Mo-Shi blasts her staff straight into the ground, creating a small green amulet that remains attached to the ground, much like a motion sensor bomb. The amulet will have 5-20 stamina, depending on charge.

After Kee-Mo-Shi has been KO'd, the amulet will glow bright green, and Kee-Mo-Shi will respawn at the site of the amulet with 10% less damage than she had when she was KO'd, and without losing a stock. There is, however, a 3 second gap between Kee-Mo-Shi's death and her resurrection, giving the opponent a chance to destroy the amulet and keep Kee-Mo-Shi dead. (At least, until she respawns normally)

This doesn't work on the last stock, though, since that lousy announcer calls Game before Kee-Mo-Shi can make a reappearance. Stupid announcer.

Down Special: Teleport Reinforcements

After using this attack, Kee-Mo-Shi goes into a defensive stance (the same as her shield animation, but without the shield bubble) at the same speed that Marth goes into his counter. She remains in this stance for ¾ of a second (45 frames), if she is hit between frames 11-30, one Marro helper will spawn behind her, and she will take no knockback or damage. The helpers are normally spawned randomly, but a button can be held to affect the spawn (Listed in the helper descriptions).

These Marro helpers are CPU-controlled. Kee-Mo-Shi is immune to their attacks. When attacked, the helpers take the same knockback that the sandbag would at 0% damage, and the appropriate amount of damage to their hp. The different helpers are:

Marro Drones


(Hold the Special Button)These Marro are far from powerful. They have 12 hp and use the following attacks:

Swipe - The Drone uses its staff to slash at the opponent. This does 5% damage and low knockback. This is a very fast attack, and has decent priority as well.

Headbutt – If opponents close in on a Drone, the Drone will try to defeat the opponent by ramming them with its enormous head. When the drone uses its headbutt, it moves forward a little farther than Wario does when he uses his F-Smash. The hitbox is the Drone’s head, and it hits for 5% damage and average knockback versus airborne opponents. Opponents on the stage will be pounded into the ground, making this a cheap rip-off of DK's Side Special.

Drones are pretty agressive. Upon spawning, they will immediately try to attack the opponent who hit Kee-Mo-Shi with their staves, and only use their headbutt if the opponent has more than 90% damage.

Kee-Mo-Shi can use her Neutral Special to Mind Shackle Drones. If she does, she gains control of up to nine at one time, in an Ice Climber-esque fashion, just by mind-shackling one. Yikes.

As for actually controlling them, the Drones have generally average statistics in terms of jumping, running, etc. The Attack Button performs a Swipe, and the Special Button a Headbutt.

Marro Stingers


(Hold the Attack Button) Marro Stingers are very powerful ranged Marro, but they aren’t too speedy. Each Stinger has 15 hp, and one attack:

Stinger Drain – The Stinger fires a shot of green goo the size of a fireball from its gun. This travels the same distance at the same speed as Samus’s uncharged Charge Shot before disappearing. If it hits an opponent, it does 8% damage and low knockback, and heals Kee-Mo-Shi 4%.

Stingers, like Drudges, will run away from opponents before trying to snipe them. Stingers have no other attacks besides using their gun, however. Stingers have their health fully replenished by touching one of Kee-Mo-Shi's amulets, which they will do automatically if the opponent loses a stock.

Marro Warriors


(Hold Shield) Marro Warriors are the elite infantry of the Marro Swarm. They have 20 hp each, but there is a maximum of four on the screen at any one time. Marro Warriors have the following attacks:

Single Blast – The Warrior fires a large blast of green goo twice the size of Mario’s fireball from its gun. This shot does 7% damage and average knockback. This shot travels as far as Samus’s fully charged Charge Shot before disappearing.

Rapid Fire – The Warrior fires three fireball-sized shots in quick succession. Each shot does 3% damage and flinching knockback. This travels the same distance as Fox’s lasers before disappearing.

Also, a Marro Warrior will divide into two Marro Warriors, who both have full health, every five seconds or every time they touch water. They still max out at four, but they can be a real pain to deal with, due to having high hp and the ability to clone themselves.

-Standard Attacks-​

Jab Combo: War Chant

Kee-Mo-Shi holds her staff over her head horizontally and waves it in the air o a beat as jungle-drums sound in the background. After two seconds of this, the Marro helpers on the stage gain superarmor, and do double normal damage and knockback. Stingers even heal Kee_Mo-Shi twice as much as normal.

Dash Attack:

Kee-Mo-Shi performs a swipe with her staff. The staff moves from her lower left body and goes across her body and over her right shoulder as she moves it. This attack hits for 6% damage and knocks opponents 1.5 Battlefield Platforms behind Kee-Mo-Shi, regardless of damage. This has average priority and comes out slowly (about 10 frames of start-up).

-Tilts-

Forward Tilt: Leg Cage

Kee-Mo-Shi raises her two front legs above her head, then brings them down sharply. The attack has two parts: Kee-Mo-Shi's wind-up, and the release. When she brings her legs up, they do a measly 5% damage and flinching knockback to all who touch them, although they do expose the victim to Toxic Skin damage.

Up Tilt: Platform Rig

Kee-Mo-Shi jabs her staff into the air above her. If her staff connects with any drop-through platform, then the platform will flash bright green for a moment before fading back to its original color. The next time anyone (Includig Kee-Mo-Shi) tries to step on the platform, the platform will disappear just before they touch it, and only reappears ten seconds later. Who ever tried to land on the platform suffers from two full seconds of hitstun, and continues to fall. This has the same range as Marth’s U-Smash, does 10% damage, and KO’s at ~90% (no DI). It also comes out very fast. Unfortunately, it has crap priority, and cancels with a lot of really wimpy attacks.

This is overall, one of Kee-Mo-Shi's best moves. It's a good killer, and it can turn even ordinary platforms into deadly traps. When combined with her Up-Special, it has some interesting gimping properties. Opponents who try to use Kee-Mo-Shi's platforms as stepping stones are in for a rude surprise. Of course, Kee-Mo-Shi has to remember what platforms she's rigged as well.

Down Tilt:

Kee-Mo-Shi jabs her legs at the opponent’s legs (low and in front of her). This hits for 6% damage, can trip opponents, and is above average in terms of speed, but not great. This has below average priority (about a 3/10). This exposes victims to Toxic Skin Damage.

-Smashes-

Up Smash:

Kee-Mo-Shi waves her staff back and forth over her head, creating a platform of green goo. When the charge is released, the platform flies upwards. The more the attack has been charged, the farther and faster the platform moves upward. When the platform reaches its peak, it disappears. Anyone who is above the platform when they are hit will land on the platform just like on a normal platform. This attack comes out quickly, and has moderate endlag.

Uncharged, the platform deals 6% damage to all who touch it and no knockback whatsoever. It has transcendent priority, and moves upward about the length of the Smashville platform at a speed comparable to DK’s fall speed. Fully charged, the platform deals 10% damage to all who touch it and no knockback whatsoever. The priority is still transcendent. The platform moves upward four Ganondorf-heights at Fox’s fall speed.
This attack deals no knockback. Its main use is to prevent aerial approaches, but it can also be used to carry opponents over the blast line, KO’ing them instantly.

Forward Smash:

Kee-Mo-Shi creates a platform just like in her Up Smash. The most noticeable difference is that this platform is created directly in front of her as a vertical platform. When the attack is released, the platform will remain there. It cannot be destroyed (Although it will automatically disappear if Kee-Mo-Shi loses a stock). The platform is about as tall as Kee-Mo-Shi, and anyone who touches it (besides Kee-Mo-Shi) automatically takes 5% damage. The platform can be walked through by Kee-Mo-Shi or anyone else. This attack comes out very fast, but has a lot of endlag. Only one of these platforms can be created at a time. Using the F-Smash again while one platform is already out will result in the attack having no effect.

This is best used to protect Kee-Mo-Shi from projectile spammers, as all projectiles (Even Dedede’s minions) disappear when they hit the platform.

Down Smash:

Kee-Mo-Shi faces the screen and raises both of her front legs into the air. When the attack is released, she brings her legs down hard. This has high priority and very little cool-down time, but has some serious lag on the front end of the attack. Uncharged, it deals 10% damage and knocks opponents straight up (this has decent knockback, KO’ing Mario at about 150% w/no DI). Fully charged, the attack deals 16% damage and traps opponents in the ground, much like a pitfall.

This is best used as a set-up for her one of her few reliable kill moves, but is extremely hard to hit with, especially since it must be fully charged to use this way. This attack exposes the victim to Toxic Skin damage.

-Aerials-​

Neutral Aerial:

Kee-Mo-Shi fans out her legs and spins around for about 1/3 of a second. The hitbox (Kee-Mo-Shi’s legs) is very large, giving this attack a lot of reach. This deals 5% damage and low knockback, as well as having little start-up or cool-down time. This has terrible priority, but it does make for a good approach. This also exposes the victim to Toxic Skin damage.

Up Aerial:

Kee-Mo-Shi creates a platform above her head. This acts just like a normal platform, except that it gives 8% damage to anyone who touches it, including Kee-Mo-Shi. This comes out very fast, but has enough endlag that Kee-Mo-Shi can’t jump onto the platform immediately after using it, although she can Up-B onto it. This attack can be used to stop attacks like Kirby’s, Yoshi’s and Bowser’s Down-Specials, as well as Stall-then-Fall attacks. It can also be combined with her Up-Special for a very good (If predictable and self-damaging) recovery. Only one of these platforms may be created at a time. The platform disappears after 10 seconds.

Forward Aerial:

Kee-Mo-Shi kicks out with her front legs. This deals out 8% damage and low knockback. It is also average in terms of speed and priority. The attack has a small sweetspot, which is the space where Kee-Mo-Shi’s legs attach to her body. Anyone in this space will take no damage or knockback, and will instead be grabbed by Kee-Mo-Shi’s legs, after which Kee-Mo-Shi will go into helpless state. The victim will break out of the attack after a set amount of time, depending on their damage. After the victim breaks out of the attack, Kee-Mo-Shi remains in helpless state.

0%-29% - Victim breaks out of the hold in ½ a second
30%-59% - Victim breaks out in 1 second
60%-89% - Victim breaks out in 1.5 seconds
90%+ - Victim breaks out in 2 seconds

If Kee-Mo-Shi hits the stage while holding the victim, Kee-Mo-Shi will land upright. The victim will be downed and take 13% damage (The landing is untechable). This attack exposes the victim to Toxic Skin damage.

Back Aerial:

Kee-Mo-Shi does a slow kick with her back legs. This attack has low priority, but gives 10% damage and high knockback. This is a pretty good KO move, KO’ing Mario from the edge of Final Destination at 95% (no DI). This attack has long start-up time for an aerial (Comparable to Mario’s F-Air), but has almost no cool-down time. This attack exposes the victim to Toxic Skin damage.

Down Aerial:

Kee-Mo-Shi brings all six of her legs upward, and then thrusts them down in a vicious kick. This has high priority and average start-up and cool-down time. If the attack hits an opponent that’s in the air, it does 12% damage and knocks them upward (Decent knockback).

If it hits an opponent who is mobile or attacking on the ground, the effects are the same. However, if it hits a character who is performing their Standing, Idle, Dizzy, Helpless, Asleep, or Crouching animation, the attack has a very different effect. Instead of kicking them, Kee-Mo-Shi will use her legs to latch onto the victim’s back. Since Kee-Mo-Shi is so large, this obviously causes some problems. This has different effects depending on the size/weight of the character:

Small Characters: (Pikachu, Kirby, Jigglypuff, Toon Link, Ice Climbers, Diddy, Meta Knight, Olimar, Game & Watch, Ness, Lucas, Squirtle, Ivysaur)

After landing the attack on one of the little guys, Kee-Mo-Shi pins them to the ground with her legs. Pressing A will make Kee-Mo-Shi put more pressure on the poor fighter who’s trapped. The attack does 2% damage, and can be spammed a lot. This works just like a grab in that you have a chance to pummel them before they escape. (They can escape from this the same way they would a grab) Unfortunately, you cannot throw them.

Big Characters: (Bowser, DK, Yoshi, Wario, Link, Ganondorf, Samus, ROB, Dedede, C. Falcon, Charizard, Ike, Snake)

After landing the attack on one of the heavier members of the cast, Kee-Mo-Shi lands on their back. While there, the victim takes 3% damage for every 10 frames Kee-Mo-Shi is on their back. That amounts to 18% a second. The only way to shake Kee-Mo-Shi off is to perform a dash dance. Kee-Mo-Shi can attempt to stay on by tilting the analog in the opposite direction that the victim is running in. However, this isn’t very effective.
Kee-Mo-Shi will fall off if the victim shakes her off (This takes about 1.5 seconds w/o Kee-Mo-Shi resisting) or she can get off herself.

If she falls off, she suffers from a very severe amount of hitstun, meaning that even the slowest of opponents gets a free hit. Exiting manually has cool-down time, so she is still likely to get hit, but not as strongly. This is a high-risk, high-reward type move.

Average Characters: (Mario, Luigi, Pit, Marth, ZSS, Sonic, Sheik, Fox, Falco, Wolf, Peach, Zelda, Lucario)

These characters are hit normally, as though they were in the air. Why? Because they’re too big to pin down and too small to latch onto.
This attack exposes the victim to Toxic Skin damage.

-Grab/Throws-

Grab:

Kee-Mo-Shi reaches out to grab an opponent with one arm. She grabs with a wide, sweeping motion. This has range comparable to Snake’s grab. Once she has someone in her grasp, Kee-Mo-Shi holds them by the neck, one-handed. This exposes the victim to Toxic Skin damage.

Pummel:

Kee-Mo-Shi chokes the victim of the grab. This does 2% and is very spammable.

Up Throw:

Kee-Mo-Shi throws the opponent into the air above her head and creates a platform below them. The platform then rams into the victim, sending them sailing. This does 9% damage and has very high knockback. It can be used as a kill move (KO’s Mario at 110% on stages w/average ceilings). This has a long animation, so it can be interrupted by other fighters. This does have moderate cool-down time.

[SIZE="2"]Back Throw:[/SIZE]

Kee-Mo-Shi turns around and tosses the opponent into the air. Then, she blasts the opponent with a red beam of light from her skull. This does 11% damage and low knockback (Comparable to Marth’s Back-throw), and is useful as a combo-starter. The animation is fast, so this attack is rarely interrupted, and there is very little cool-down time.

Forward Throw:

Kee-Mo-Shi throws the opponent forward and down. She throws them one-handed, straight from the choking position. This can be used as a KO move, but only if Kee-Mo-Shi is at the very edge of the stage. Otherwise, they bounce off the stage about 1.5 Battlefield platforms in front of Kee-M-Shi (This does not change w/damage). When they hit the ground, they take 5% damage and ricochet upwards a short distance (This is dependent on damage). This move has almost no cool-down time.

This is a sucky move that’s extremely situational in use.

Down Throw:

Kee-Mo-Shi throws the victim onto the ground and jumps on them. This launches the opponent upwards and in front of Kee-Mo-Shi (Low knockback) and deals 7% damage. This has little cool-down time, and also makes for a good combo-starter.

-Situational Attacks-​

Ledge Attack < 100:

Kee-Mo-Shi climbs up onto the ledge normally. However, the ledge now has a faint green glow. Anyone except for Kee-Mo-Shi who latches onto the ledge takes Toxic Skin damage. This makes for a nice way to control the stage. The effects wear off after 7 seconds, however.

Ledge Attack > 100:

Kee-Mo-Shi swings her front legs up and latches them onto the ledge. After her front legs are firmly on the stage, she hauls herself up rapidly and does a swipe with her staff. This attack consists of two parts: The latching onto the stage, and the swipe with the staff.
The latching: hits for 5% damage and flinching knockback. This has average priority and comes out surprisingly fast. It doesn’t do much to opponents, but it has two nice side effects: It sets them up for the second hit of the ledge attack, and it exposes them to Toxic Skin damage.

The swipe: hits for 8% damage and has low knockback. It also has incredible speed, coming out a mere 5 frames after the first hit of the attack. Unfortunately, it has crap priority. But it is a nice combo starter, and deals a total of 13% damage (23% if the opponent took Toxic Skin damage!)

Downed Attack:

Kee-Mo-Shi creates a vertical platform on either side of her as she slowly gets to her feet stubs. These platforms cannot be walked through. Anyone besides Kee-Mo-Shi that touches them receives 10% damage and very low knockback away from Kee-Mo-Shi. These platforms disappear once Kee-Mo-Shi is standing.

Tripped Attack:

Kee-Mo-Shi kicks her legs out behind her before doing an athletic flip to regain her footing stubbing. Kee-Mo-Shi’s legs are the hitbox of the attack. The kick does 6% damage and average knockback. The kick has low priority, but comes out very fast. After the kick, there is a small gap (5 frames, or 1/12 of a second) before Kee-Mo-Shi flips herself upright. During the flip, her legs act as a hitbox again, dealing only 3% damage to anyone who is hit, but spiking them with the same strength as Ness’s D-Air. The flip has average priority. This exposes the victim to Toxic Skin damage.

Flipped Attack:

Kee-Mo-Shi swings her arm above her head rapidly. Anyone hit by her arm is grabbed and dragged into the ground as Kee-Mo-Shi pulls herself up. If the opponent is hit, they are trapped (Again, like they had been hit by a pitfall) and take 4% damage. This attack has the highest priority in the game. Unfortunately, victims aren’t trapped in the ground for very long (The effect lasts ½ as long as DK’s Side-B). If Kee-Mo-Shi misses, she suffers from long cool-down time, and remains on the ground in the same position. This attack exposes the victim to Toxic Skin damage.

-Final Smash-


Marro Hive


Kee-Mo-Shi turns towards the screen and raises her staff over her head (She’s invincible while she does this). Behind her, a Marro Hive rises out of the ground. Anyone who comes into contact with the hive is exposed to Toxic Skin damage. (The Hive only has a 5% chance of giving Toxic Skin damage, however). The Hive is roughly the size of Giga Bowser, and has 150 hp. When the hive spawns, it spawns two of each kind of Marro helper with it. Every time one of these helpers is destroyed, the Hive will spawn another in its place. When the hive is destroyed, the helpers remain on the stage. Kee-Mo-Shi may do whatever she wishes while the Hive is around. It basically acts like a fantastic Assist Trophy.

-Playstyle-​

The most effective strategy when using Kee-Mo-Shi is to WIN®. This may seem very straightforward. That’s because it really is! Not only can WINNING® earn you money, respect, and heightened self-esteem, but it also severely reduces your chances of losing! However, WINNING® is not for everyone. Women who are pregnant or may become pregnant should consult a doctor before WINNING®. Please contact a doctor immediately if you have a WIN® lasting more than four hours.

Alright, you caught me. That's not really a playstyle.:urg:

Early in the match, your best bet is to use Tilts, Standard attacks, Throws, and Toxic Skin to rack up damage on your opponents. This is incredibly easy, so most of the match will not be spent doing this. You'll have absolutley no trouble racking damage, but Kee-Mo-Shi's KO moves are limited and extremely risky.

Playing Kee-Mo-Shi is mostly a matter of setting up for the kill. Her Side Special is her most tempting KO move to use. After all, what could be easier than just taking control of the other player and running them off the ledge? However, this has a full second of charge time, short range, and puts Kee-Mo-Shi into shieldstun if she takes control. Her F-Air is also tempting to use as a KO move, but it's extremely difficult to sweetspot, and if the opponent breaks out of it, Kee-Mo-Shi will still die. She has a few other KO moves, but they're not as powerful.

So, ultimately, preparing for the kill and having a good set-up is key. Her tripped attack is a fantastic set-up move, but you won't get a chance to use it often. Her D-Smash is also a great set-up, but it must be fully charged to use that way. One of the best ways to get a kill is to deploy Ke-Mo-Shi's minions. While those guys are keeping your victim busy, you'll be trying to kill them (Hopefully). This is easier said than done, since the Marro are spawned through a counter-type move. You need some awesome mindgames to get your troops on the field, and even more to keep them alive and distracting the opponent.

-Animations-​

Standing:
Kee-Mo-Shi stands as she does in the picture, but she has all of her legs on the ground.

Idle:
Kee-Mo-Shi lifts her front pair of legs off the ground and inspects her staff.

Shield:
Kee-Mo-Shi holds her staff horizontally in front of her for protection while the shield bubble surrounds her.

Rolldodge:
Kee-Mo-Shi slides forward in Lucario style. If she’s doing a forward roll, she’ll turn around. If she’s doing a back roll, she won’t.

Spotdodge:
Kee-Mo-Shi steps into the background and rears up on her back and middle pairs of legs.

Crouching:
Kee-Mo-Shi curls her legs underneath her and ducks her head forward a little bit. This crouch is comparable to Bowser’s in terms of height. It should not be used to avoid attacks. EVER.

Asleep:
Kee-Mo-Shi remains standing, but her upper body slumps over and leans on her staff. Her head droops, and bubbles come out of her mouth.


-Taunts/Victory Poses-​

Up Taunt:
Kee-Mo-Shi raises her staff over her head and waves it there. Kinda like in this video, at 1:16.

Side Taunt:
Kee-Mo-Shi fixes her hair with one hand. Even freaky aliens care about looking good.

Down Taunt:
Kee-Mo-Shi points her staff forward and waves it in the air, forming Utgar’s symbol:


(Sorry, couldn't find a bigger pic)
in the air out of the same material that her platforms are made of. This symbol remains there for 10 seconds before disappearing.

Win Pose 1:
This is the same as the Up-Taunt. Because it’s just that awesome.

Win Pose 2:
Kee-Mo-Shi appears in the same position as her normal standing pose. The only difference is that all the losers have been mind-shackled, and are walking around in a very zombie-esque fashion.

Win Pose 3:
Kee-Mo-Shi holds her staff over her head, and green light glows from its tip.

Loss Pose:
Kee-Mo-Shi claps like everyone else. She seems like she’s a good sport, but she’s really plotting her revenge.
 

Wizzerd

Smash Ace
Joined
Feb 24, 2009
Messages
929
Kee-Mo-Shi: This seems like a good moveset if Kee-Mo-Shi was put actually put into Smash. The balance is very nice- the Toxic Skin thing adds to her playstyle as a damage dealer without KO moves, from what I can tell, though it could use more development- and the detail is very good. This leads into my main criticism- the detail is low but it's good because many attacks have little to them. There are some interesting attacks involving platforms and the dair (which I love), which pleases me since in your earlier sets nearly all moves were pretty generic, but too many attacks are kicks and staff swings. There *are* original attacks, and they show your potential to make them: I'm confident that you can do it. I'm sorry if I seem negative, but it's because the originality sticks out like a sore thumb and it's hard to see past it and into all the positive traits, like the balance and great originality on certain moves, not to mention the hilarious playstyle section (though you really should make an actual one, but it is funny). The bottom line is, I see a lot of potential in you, you've got all the makings of a Top 50 placer if you improve this originality. Really, I think you're a great newcomer. :bee:
 

Atomic Yoshi

Smash Apprentice
Joined
Jul 13, 2009
Messages
100
has anyone created a Bowser Jr. moveset yet for MYM 6? cuz i've got 1 typed up if u want me 2 post it.
 

Darkurai

Smash Master
Joined
Aug 20, 2007
Messages
3,012
Okay, way too tired to finish this today, so I'll just leave a little teaser for my next moveset:


PROTIP: If you want to make a teaser for a moveset, don't name the file "Robolink". This was the first place I looked.
 

Atomic Yoshi

Smash Apprentice
Joined
Jul 13, 2009
Messages
100
Make Your Move 6
Bowser Jr.

Bowser Jr. enters the brawl armed with his paintbrush from Super Mario Sunshine.

Height 3.5/10
Power 3/10
Weight 4/10
Attack Speed 5/10 (not counting his specials)
Running Speed 4/10
Walking Speed 2.5/10
Air Speed 5/10
Recovery 8/10
Traction 3/10
Range 3.5/10 (not counting his specials)
Priority 9.5/10
Size 4/10

Ugh, terrible stats, only thing it looks like he has is priority and recovery. But, don’t give up on Bowser Jr. yet. What wasn’t mentioned is that he has INSANE stage control abilities.

GROUND MOVES

Jab (aaa combo) 2% 1% 3% fast, great priority, about the range of Squirtle’s. This move has low knockback. Use this when they are in your face and your other moves won’t reach.


TILTS

Ftilt - GREAT move, Bowser Jr. shoots out some fire breath about the range of Lucas’s stick. This has low start-up lag, great priority, low knockback, but some considerable ending lag if u miss. 9% on the initial hit of TEH PH1RE. Also, the fire stays on the opponent for 3 more seconds dealing 1% per half second. However, the opponent can make the fire go out sooner by rolling a lot, but I wouldn’t advise that for him, heh heh.

Dtilt - Bowser Jr. hides in his shell for 1 second and if the opponent attacks it, he comes back out and bites them for 11% damage and medium knockback. It works like a counter. This has low-medium start-up lag but HORRIBLE ending lag if u miss. Guess it takes Bowser Jr. a long time to crawl back out lol.

U tilt - Bowser Jr. shoots a paintball high into the air with great priority, medium-high start-up lag, and medium ending lag. If it connects, it does 3% and no knockback. However, it makes all of their aerials now have 1.5 times more lag. If it connects, go get ‘em in the air because it will be really hard for them 2 punish with slow aerials. J


SMASHES

Fsmash - Good range, good priority, medium-high startup lag, and high ending lag. Bowser Jr. swings his paintbrush back and slams it into the ground. (think Ike’s fsmash with less power and lag) This move does 14% uncharged and medium-high knockback.
Charged, this move does 19% and great knockback. This is one of Bowser Jr.’s few KO moves. Maybe you can pull it off when the opponent is caught in a trap of yours.

Usmash - Bowser Jr. does a handstand on top of his paintbrush and kicks upwards. This move has high start-up lag, high ending lag, good priority, and doing a handstand on a paintbrush has 2 give it great range, right? This move has 2 hitboxes, the kick and the paintbrush. The paintbrush does 8% and has low-medium knockback no matter how long you charge it. The kick does 11% uncharged with moderate vertical knockback. Charged, it does 16% with better vertical knockback.

Dsmash - Bowser Jr. takes his bib and spins around with it knocking anyone away. This move is fast in start-up, medium priority, medium range, and medium ending lag. (think Ivysaur’s dsmash) This move does 8% uncharged with low-medium knockback. Charged, this move does 14% with medium-high knockback.


SPECIALS

Neutral B - Graffiti – Bowser Jr. takes his paintbrush and paints a red “M” on the ground. This has medium-high startup lag and medium ending lag. Nothing beats this move in priority. Anyone who touches it (besides jr.) will take 16% with fire sticking to them for 3 seconds like in his ftilt. This move also has medium vertical knockback. Also, this move stays out forever until you use this move again or lose your stock. One cool thing about this move is that you can change the graffiti by holding up or down on the control stick while Jr. is painting the graffiti. If you hold up on the control stick, this gives you electric graffiti. If the opponent touches electric graffiti, the receive 6% and low knockback. However, they will not be able to use any attacks for 2 seconds. Holding down on the control stick gives you brown sludge graffiti stuff. (lol idk what 2 call it) It does 1% per second and stays on the opponent 3x the amount the time the opponent was in the graffiti. Also, it weighs them down like a rock. Their walking and running speed are half of what they were and their falling speed becomes 1.5 times of what it normally was. It also affects their jumps by only giving them 0.7 of the normal height they would get for a normal jump. (FLUDD washes this stuff off the ground though)

Side B – Portal – With his paintbrush, Bowser Jr. paints a portal on the ground. This takes 1.25 seconds to paint but it can be stopped while painting and you can come back to it later. If you make another portal, when you step in one of those and press side B again, then you can teleport with medium startup lag and high ending lag. However, if your opponent steps in a portal, they are automatically teleported whether they want to be or not! They suffer the same amount of lag you do. But one really cool thing about this move is that if you do a smash attack while being teleported, it sends you to a different stage! (the opponent can’t do that) Usmash sends you to FD, Dsmash gives you Yoshi’s Island (brawl), <Smash gives you battlefield, and >Smash gives you smashville. (jr. will lose all of his traps on the current stage if he changes stages. (Other characters such as Snake will lose their traps also.)

Up B – Airship – Jr. takes an airship from Super Mario Galaxy and uses it to fly back to stage. It works like Snake’s cypher and he can be grabbed out of it and fall to his death. However, while you’re in the airship, you can press b to fire bullet bills. Jr. also has super armor when in the airship. The airship yields 2 seconds of controllable flight.

Down B – Item Block – Jr. takes an item block (like Mario Kart) from his shell with moderate start-up lag and low ending lag. The item block spins over Jr.’s head for 2.5 seconds then gives him and item. (Jr. can attack during this time) There is a 54% chance you will get a banana peel, 29% you will get a fake item block, 14% chance you will get a green shell, 2% chance you will get a bob-omb, and a 1% chance you will get a blue shell. The banana, green shell, and bob-omb all work like they do in brawl. A fake item block has the same effect as electric graffiti. A blue shell homes in on the opponent and creates a large explosion. This explosion will break a shield so the opponent will have to spotdodge.


AIR MOVES

Z-air – Jr. takes his bib and grabs the opponent and punches twice for 5% and low knockback. This can also tether recover.

N-Air - Jr. does a cartwheel in the air holding his paintbrush close to him spraying fire graffiti. The cartwheel does 4% and the tip of the brush does 8%. This move is sort of like Diddy Kong’s N-air. This move has low start-up lag and low ending lag.

F-air – Bowser Jr. does a barrel roll, which has almost no startup or ending lag. Unfortunately, this doesn’t have much range or knockback and only does 5%

B-Air – Jr. swipes his paintbrush behind him. This move has low start-up lag and medium ending lag. This move does 5% and has low knockback but has a sweetspot on the tip of the brush, which does 7% and makes the opponent unable to attack for ½ second. (think electric graffiti on a smaller scale) This move also has good range making it a good spacing move.

U-Air – Jr. kick upward for 9% and medium knockback. (This is like a toned down version of snake’s u-air.) This has medium startup lag and low ending lag.
D-air – Jr. thrusts his paintbrush downwards to spike the opponent. This move has medium-high start-up lag and medium ending lag and does 11%. There is a sweetspot on the tip on the brush which covers then opponent which brown sludge graffiti for ½ second. Since brown sludge graffiti makes the opponent sink like a rock, that would be very useful in spiking, right?

GRAB

Jr. takes his bib and uses it to grab the opponent. This can tether recover.

Pummel – Jr. punches with his fists for 1½% each.

B-Throw – Jr. throws the opponent and then throws a paintball at them. The throw does 8% with medium knockback and the paintball does an extra 5%.

F-Throw – Jr. hops on the opponents back and takes a piggyback ride on them for ¾ second. This does no damage but can be used to try to run them into your traps. If you’re at the edge you might be able to Jrcide.

U-Throw – Immediately after throwing them in the air for 5% and medium knockback, Jr. fires a paintball at them which has the same properties as his U-tilt. If it connects, feel free to go chase them.

D-Throw – Jr. throws the opponent on the ground for 5% and has a tantrum on them. The madder he is the more damage they will take. They take 1% for every 15% on Jr. This throw has low knockback, which may help you combo
.

Final Smash

Mecha-Bowser – Jr. hops in mecha-bowser like the one in Super Mario Sunshine. There are 2 ways mecha-bowser can attack. One is to breath flames for 16% and medium knockback. Another is to shoot homing bullet bills, which do 13% and medium-high knockback. Jr. is invincible during this time and anyone who touches mecha-bowser takes 9% and medium knockback.


Thank you for reading my moveset. I hope you enjoyed it. I couldn’t get any pics so I tried to describe my moves by using other characters as demonstration. This was also my first MYM. Please let me know if there is anything I need to add.
 

Kris121

Smash Journeyman
Joined
Nov 26, 2008
Messages
263
Location
THE INTERWEB
nice job on that Neku set... I really have to finish mine....
I like week system although its good we wont have the exact same sets. What a relief


Also for the Bowser Jr. set... GET SOME COLOR it will make it MUCH better.
 

Apemasta'

Smash Cadet
Joined
Jan 6, 2008
Messages
56
Location
Southern California
nice job on that Neku set... I really have to finish mine....
I like week system although its good we wont have the exact same sets. What a relief


Also for the Bowser Jr. set... GET SOME COLOR it will make it MUCH better.
Thanks. I'm actually surprised that I hadn't seen a TWEWY moveset before.

Looking forward to seeing yours. =]
 

Katapultar

Smash Lord
Joined
Nov 24, 2008
Messages
1,258
Location
Australia
I think, that the Neku set is awesome, it has some original ideas such as the Final Smash for Beat, the week system makes it interesting that you stayed true to TWEWY (I have not played the game). :)

The playstyle of Kee-Mo-Shin is a laugh,:laugh: but it's not a play style. I should say more when you re-edit the moveset (Not to sound mean), as you mentioned below, as it is probably not 100% ready yet. (Maybe you will edit the playstyle as well).

Bowser Jr. needs a picture, it would enlighten the moveset a bit. On a good side though, I like the neutral special, and the side special (Though technically it would take a while to load a new stage).
Like Kris121 said, you need colour, it enhances presenation. You should try "Go Advanced" to get some more options. If you don't know how to put pictures on your post, you can ask somebody. (I don't know if that's the case).
 

tirkaro

Smash Champion
Joined
Jun 24, 2006
Messages
2,808
Location
but a pig in the sun
First, there was Link......


Then, there was Young Link.....


And then, there was Toon Link...


Now, get ready for an entirely different version of our hero of the ages!:


☢
☢

bzztbzztbzztbzztbzzztbzzzztbzztbztbzzzt

ROBO-LINK


Oh god that looks horrible when it's transparent


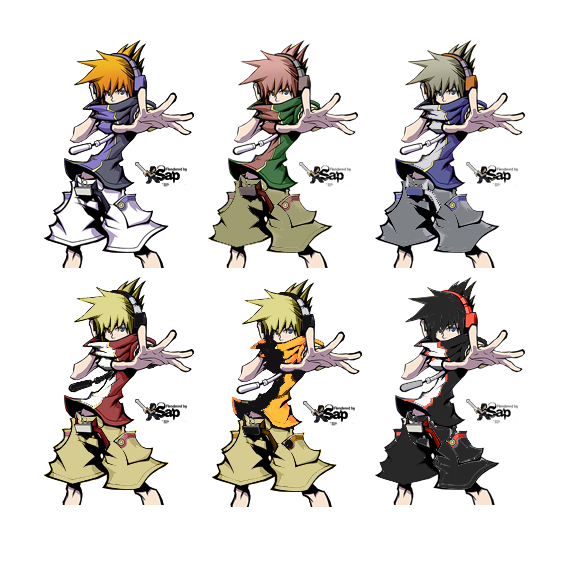
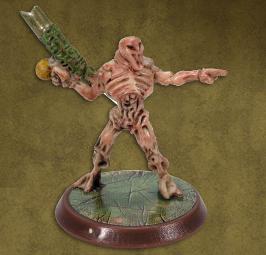
Wait, what the hell?(Overview)


Robo-Link comes from a far-distant future of Hyrule, where the law is upheld by Robotic versions of the hero of time. Most of them are pretty loyal to the government, but this particular one isn't; Some glitch came to be during the production of this certain Robo-Link (no. 1089) and caused his personality to be entirely different. While he still upholds the law to keep out of trouble, he actually hates the government and believes himself to be the true descendant of the "hero" title. Of course he doesn't act like any hero for sure, often picking on those lower than it and lacks respect for anyone but itself.

However, a freak mishap had occurred during one of no. 1089's shifts. An accidental portal had opened up when Master Hand had gone too far in time looking for an actual Link, and sucked up Robo-Link no. 1089 into the smash universe. Now even face to face with the actual heroes of time and wind, Robo-Link not only believes himself to be superior but looks to displace them as true heroes.


tl;dr: Robo-Link is basically the Zelda equivalent to Robo-Ky.


▲ ▲Bzzat!


Robo-Link is much more than a simple clone. Being a robot, RL has access to tons of technology that wasn't even a dream during the main Zelda timeline. But in exchange, he cannot use any magic and isn't as versatile as an organic meatbag.

A "quirk" that he carries on from Robo-Ky is the fact that RL is heavily prone to overheating.
What is overheating you ask? Well, it's a function that initially seems to be a huge setback, but can be used to your advantage in the end.
What happens is that Robo-Link has a small meter right under his damage percent.
This meter is circular, much like a car's speedometer, and displays the current percent of heat that is being stored via percentages.

Robo-Link starts off with 0% heat at the beginning of the match, and the number builds up overtime.
How does it build up? Moving whatsoever, be it running or attacking(with some exceptions), will raise your heat-meter by some degree. Here's some misc things that alter your heat:

-Running will build up the heat meter by 20% for every Final Destination-length area run.
-Standing still will reduce your heat by 3% per second.
-Doing RL's ENTIRE Hover will increase your heat by 85%

So what happens when you reach 100%? Well, you completely combust.
Combusting means you take 30% damage, take horizontal knockback as if you got hit by N64 Ness' Fsmash(in the direction you're facing), you go into helpless mode if you're in the air, and you cannot run for 15 seconds.

While that seems like a huge drawback, there is a way to use this as an attack.
First off, if the opponent is anywhere near you when you combust, they take the exact same damage and knockback you were dealt. RL's entire body pretty much becomes one giant hitbox at this point, and making contact with it is punishing.
What's better is that this applies to when when RL is flying through the air from the knockback, making him into a giant deadly projectile. And what's also good is that contact with an opponent while in the air also completely ceases RL's flight, making him fall to the ground in a helpless state.

Also, this meter is used to power his DownB, and can also be controlled as such.


Oh and there's also these guys.


These little fellas are called "Mini-Links." They're mostly used for RL's Side-B, but they also show up during a lot of RL's standard attacks. I'm just noting them ahead of time to prevent confusion.


St▲ ▲tistics


☢SIZE☢: 8/10
Robo-Link is pretty tall. He's taller than Link himself, just about near Ganondorf's height. His fighting stance is also pretty spread out, making him a rather large target. But don't worry, RL can take a lot of punishment.


☢WEIGHT☢: 10/10
RL is a giganticand extremely dense hunk of machinery. Playing it is like playing with a metal character all the time.

☢WALK☢: 5/10
Pretty standard.


☢DASH☢: 10/10
RL runs like a locomotive; he goes very fast in a straight line, but is horrible at making turns or stopping. Builds up his overheat meter pretty well though, if you need it.


☢TRACTION☢: 3/10
Once again, due to his locomotive-running, Robo-Link has trouble making stops. Anything else is fine though, as long as he isn't running


☢POWAH☢: 6/10
Somewhat mediocre-ish. He isn't really reliant on brute strength


☢ATTACK SPEED☢: 6/10
When Robo-Link stands his ground, he can pull off some good combos. His attacks chain together pretty well, and has little problem with lag. But only when he stands his ground. Even try moving, you're screwed. It's best to stick with projectiles really.


☢RANGE☢: 10/10
This is where RL truly shines. Not only is his sword EXTREMELY long, he also possesses a plethora of projectile attacks, somewhat making up for his complete lack of proper movement.


☢PRIORITY☢: 3/10
For some reason, RL's priority is pretty meh. Most attacks can knock out Robo-Link's projectiles easily, so it's best to either overload the opponent with projectiles, or wait for the right time. Robo-Link's sword is also pretty well beat out by most swords.


☢FIRST JUMP☢: 2/10
RL basically uses this to get off the ground. It's weight causes it to go very low, but it gets the job done I suppose.


☢HOVER☢: 9/10
RL's real jump, RL detracts rocket boosters from his feet and elbows and hovers about the same amount as ROB, but BE CAREFUL! His hover causes RL to overheat VERY QUICKLY, so much that if you try to make a complete hover at 15%, you'll end up combusting.


☢FALL SPEED☢: 10/10
Once again, super-heavy. RL certainly isn't the best to recover with.


☢CROUCH☢: 2/10
Barely even a crouch


Crawl, Wall Jump, Glide, etc: no


▲ ▲nimations


STANDARD POSE
Holds his gigantic sword above his shoulder, pointing it horizontally, while he shifts around in a battle-ready stance.


IDLE
Crosses his arms, Bohemian Rhapsody/Queen II style, and spins his head around.

WALK
Carefully walks forwards with his right arm bent in front of him.

SPEED-WALK
RL brings his arm down and runs more normally.

DASH
Bends his torso over, sticks his sword out as if he was jousting, and his legs move in a train-like fashion.

CROUCH
RL hunches his back down, drags his sword, and looks down, his face no longer visible through his hair.

FIRST JUMP
RL barely lifts himself off the ground in a mechanical fashion.

HOVERING
Straightens his body and flies like Iron Man.

SHIELD
Brings out his completely-out-of-hammerspace SWAT-like shield, and holds out his sword in a defensive manner.

SPOT DODGE
RL puts on a panicked look on his face as he steps into the background.

ROLL
Uses his hover-boots to dodge to the other side

AIR DODGE
Same as his spot dodge, but in the air.

ASLEEP
RL comically brings out a pillow/air bag from his head, and starts sleeping on his side, sucking his thumb.

DIZZY
A bunch of RL's parts are spread apart, with only springs holding them in place, kind of like how robots break in cartoons.


MOVESET


St▲ ▲ndard


Natural Combo-Jinzo Bakaretsu Ken!
Strangely, his sword somehow disappears, and Robo-Link punches forward, Karate-style. He punches again for a second time, and the third time, 4 other arms pop out and he jabs away. Similar to one of Robo-ky's specials, though much weaker. Each punch does 2% per hit. This is perhaps his main method of attacking from his ground, making it very important.

This has pretty standard range, being as ranged as Sheik's natural combo.

The initial 2 attacks raise his meter by 3%, the rest of the combo raises it by 1%.


Dash Attack-Do not stand in front of the tracks.
RL brings out his SWAT shield out of hammerspace and hopes for the best. He can bring this out for 3 seconds at most before stopping again. Any contact with the shield does standard upward knockback and 8% damage. Any projectiles that make contact with it will be destroyed, though stronger ones (like a fully charged Charge shot or Aura Sphere) will cause him to flinch and stop.

Bringing this out doesn't raise the heat meter at all.


TIIILT

Forward- Insult!

During this somewhat laggy move(about as much as Ganon's Fsmash), RL put's on a mischievous expression and and points forward. The Japanese katakana "ペラ!"(Pera, onomatopoeia for talking fast.) appears over and over again over his head at great speed. This move goes on for 1.5 seconds, and any opponent caught within a quarter of a battlefield platform from the front of him becomes "deeply insulted"

When you're "deeply insulted", you're stunned for 2 seconds, and are open for an attack.
However, after you're finished being stunned, your attack and speed doubles for 5 seconds. (So it's a lot like Pokemon's "Taunt")

This doesn't build up heat at all.


Up-MISSLE CARZ

This is a very laggy move, but pretty powerful.
What happens is that RL opens up his head, and a giant missle(about as long as RL's body) pops out, and is being ridden by 2 Mini-Links. This missile moves horizontally, and homes in on the opponent.

What's great about this missile is that RL can ride on it. The missile is pretty much a giant platform for him, and he can quickly make his way to his opponent this way.
However, if the opponent tries to jump on it, or make any contact whatsoever, it instantly explodes, doing 10% damage and about as much knockback as link's bomb.

Be careful though, as RL can be damaged by this missile too, and the missile will automatically explode after 7 seconds. (It will start flashing red when it's about to blow.)
The missile is kinda slow, taking about 1 second to rise from his head, and moving at the speed of Mario's run. This gives it pretty laggy startup, imprinting it's status as a move to be used from afar.

This increases RL's heat by 10%


Down- Kancho!


RL crouches down, puts his sword in between his fingers, points them upwards, and sticks it out. The sword has extremely poor priority during this attack.
This particular tilt has a sweet spot. If the opponent is taking the attack from the front, or is just hit by the sword part, they take some minor 5% damage. However, if RL gets his opponent from behind, and right were his fingers are, the opponent takes double damage(10%) and goes flying(Slightly less than a home run bat, but upwards). This also makes a *SCREAM!* sound. Geez, what a douche.


Sm▲ ▲sh!


Forward- Sting Like a Bee
RL's body starts to surge with electricity, seemingly in a painful manner, as he holds onto his sword. Once the charge is done, RL stabs forward with his sword shrouded in electricity, and sends out a giant beam of electricity. This beam is about half the size of RL's sword, and moves at a somewhat slow rate. (slower than most projectiles at least, just a bit faster than his Uptilt missile.)
A low charged version of this does only 6% with little knockback, while a fully charged version does 19%, with as much knockback as Pikachu's Fsmash.
Be careful: if you let this out fully charged, RL will take 9% damage from all the excess electricity. Additionally, there's about 1.5 seconds of ending lag from this move, so it's best used sparingly.

This raises RL's heat by 9%


Down- Cannonbound
RL ducks down, covers his ears, and a cannon pops out from his bent knee. At this point, a meter appears over it, and goes up and down. Wait, so what is this for? well, this works a lot like Worms and Gunbound: if you let go when the meter is higher, a flaming cannonball will fire out and go further(about as far as 2 battlefield platforms at it's peak). If you let go when the bar is lower, the cannonball goes a shorter distance(Pretty much right in front of him at it's minimum). No matter what, the ball always deals 14%, and has the knockback of Mario's Dsmash.

This increases his heat by 7%


Up- Make a wish, honey.
A Mini-Link pops out of RL's head and is sitting on a canon. At this point, a small crosshair appears in front of the canon, and has to be aimed while RL is charging. There's no rush though, as RL can charge this indefinitely.
By pressing up or down on the analog stick, this can be aimed from right on top of Robo-Link, and straight ahead of Robo-Link. When you let go, 3 orange flares will be fired from the canon, each doing 6% each.(No matter how much you charge it.)
Like his downsmash, the flares from the canon eventually fall to the ground. They go the length of a battlefield platform before flying down.

This attack is basically RL's primary anti-air, and is pretty good at it's job.

This increases RL's heat by 10%


Speci▲ ▲ls


Standard- Pannishment
(This increases RL's heat by 5%)

This is a pretty odd move. When this happens, Robo-Link will hold his sword as if he's about to strike, then a random object forms within the sky, and will knock Robo-Link on the head before he can do the deed. Each object damages Robo-Link and will cause a different effect to happen:


Frying Pan
The most common object. This will deal 6% damage, and will buff RL's attacks up by 15% for 3 seconds.


Chair
Deals 9% damage and makes either a Bob-omb, Mr. Saturn, Beam Sword, or Super Scope pop out of Robo-Link's mouth.


Air Conditioner
Deals 11% damage and decreases your heat back down to zero. This is impossible to get while airborne.


Microwave
This will deal 14% damage, and will make RL invincible for 4 seconds.


Washing Machine
Deals a whopping 22% damage. In exchange, RL gets his Power AND speed buffed up by 50% for 5 seconds.


SUV
The rarest object to get, this deals an unholy 50% damage. The good news is that RL becomes invincible, doubles power and speed, and gives him unlimited heat for 12 seconds.

Side- MiniLinks!


As shown before, these little buggers are little miniaturized versions of RL. When they're summoned, a slide comes down from RL's mouth, taking about 1 second of lag. As long as this slide is out, you can keep on pressing side-b in order to bring out more Mini-Links. Only 3 Mini-Links can be out at a time though. And also, if you brought out 3 at once, ALL of those Mini-Links have to be destroyed or dismissed in order to bring out another one. Meaning if you only brought out one, you can still get rid of the slide(by waiting 1 second), and bring the other 2 out another time.

Each of these things have 25% stamina, and their speed varies. They work kinda like assist trophies, meaning they like to do their own things. They move towards the direction of your opponent, fluctuating between the speed of Mario's walk and Game & Watch's run.

They each do one of 5 attacks:

1- Most commonly, they'll lunge onto the opponent like pikmin and slowly beat them up, 4% a second.
2- They'll take out a bomb, and either throw it or kamikaze with it( ;_; manly tears). The bomb deals 8% when thrown,(knockback of Link's bomb) 12% when kamikaze'd.(Knockback of Mario's Fsmash)
3- They'll shoot a rocket launcher, the rocket doing 7% damage, and as much knockback as a mid-charged initial Aura Sphere.
4- They'll ride a small RC car, going as fast as an excite bike. Getting run over by this does 8% damage and good upwards knockback.
5- Very rarely, they'll take out a machine gun, and go crazy. Each shot does only 1% damage, but they fire a lot with it. They fire about 10 shots per second, and it does very little knockback, meaning they can combo a lot with it.

They CAN jump, but only to reach the opponent. They can only jump if the opponent is on a higher platform, and not in the air.
Of course, the Mini-Links are "dismissed" after 13 seconds, retracting back into Robo-Link's chest.

Bringing each Mini-Link raises RL's heat by 6%

Down- Cool Out
Pretty much what the overheat function is for. This works a lot like the wario waft; as heat builds up, RL will ventilate out a puff of hot steam from it's front. Good move in all forms, always dealing 19% with great knockback(just less as a middle-charged Bowser Fsmash), and it comes out very quickly, with little starting or ending lag!

However, this move can only be used if your heat meter is 80% or over. When the meter is 80% or over, the attack is dealt, and RL's heat is brought back to 0%.
However, if you use this move when you have less than 80% heat, the heat will simply creep out, doing no damage and simply cooling off RL by 30%.


Up-*huff huff huff*

This is kind of like Link's up B, except different. Robo-Link sticks out his sword, and spins in around in a manner that could only by achieved by machinery. Unlike Link's though, you have to keep pressing UpB over and over again in order to get any spin. Also, it's pathetically weak, doing only 3% damage each hit and poor priority. What advantages it does have though is that it has greater range and lasts a lot longer if you have fast enough fingers. It's okay for recovery though, though your fingers must be REALLY fast in order to get anywhere.

This raises RL's heat by 6% when it's executed.


▲ ▲erials


Nair- BZZT
Robo-Link brings out a moderately large hammerspace mallet charged with electricity. This is swung horizontally, has a range of a home run bat, and counts as 3 hits if hit directly. Each hit does 4% with electricity damage.

This increases RL's heat by 3%


Fair- ROKETTO PANCHI!
Robo-Link sticks his fist in front of him, and his arm blasts off as a rocket(he grows back another one). They home into the opponent and deal 10%, though they turn pretty poorly, and have poor priority. It's certainly good for pressuring your opponent, and catching them off guard. Definitely one of RL's more vital moves for competitive play for this reason.
They each go at the speed of Samus' missle and last just as long as them.

This increases RL's heat by 5%

Dair- PIERCE THROUGH HELL
Robo-Link sticks his foot down, and it turns into a drill. This drill will pierce the heavens will then break off and dig into the ground, eventually exploding for 15%! However, it isn't a motion sensor, it explodes on it's own, and can hurt RL too.
This does as much knockback as Snake's Dsmash.

This increases RL's heat by 10%


Bair- Canned heat in my heels
Robo-Link sticks his boots out behind him, and fires off backfire from them for 5% damage and as much knockback as Shiek's Bair. This actually causes RL's heat to decrease by 10%, but you can only use it once while you're still in the air. Can be a real Lifesaver in some situations


Uair- Nananananana nananana!

RL's head explodes. Yeah.
Basically, for 1 second, RL's head charges red and then explodes like a bob-omb. It deals 17% damage, same range as a bob-omb, and has as much knockback as a bob-omb.

However, this move causes RL to take 13% damage. And the explosion stuns RL's body until he gets a new head. For those moments of headlessness, you control a group of Mini-Links trying to defend his body. To be specific, a group of Mini-Links carry around RL's body, and you control the one in the front, who's leading the group.
The opponent can attack RL's body in this state. Their attacks can knock RL's body out, making him lose a stock, made even worse by the MiniLinks lack of a recovery.

The MiniLinks only move at the speed of Mario's run, and can only attack by pressing A and B.

The A button causes the Mini-Links to use his body as a battering-ram, as they move speed of Yoshi's egg roll. Getting hit by this attack deals 18% damage and does as much knockback as Ness' Fsmash.

The B button causes the lead MiniLink to bring out a Bazooka and shoot a giant rocket. The rocket can be charged and aimed like RL's Up and Down smash. The rocket does 7% damage and minimal knockback.

But believe me, this is less of a hassle than it sounds. After 10 seconds, a new head will fly down(it has a propeller on top of it's head) and home into it's body. Once it's on, RL will get back up and go on as normal.

This attack raises RL's heat by 10%


THROWS

Every throw raises RL's heat by 6%

Grab- Look at meee!
RL's grab is kind of like the grappling hook, but different. Like his Fair, he launches his arm in front of him, and whatever makes contact with it gets grabbed and brought back to RL. (the arm simply floats with the opponent in hand, it's not attached to RL)

Pummel- punk!
A MiniLink pops out of RL's mouth and slugs the opponent upside the face for 2%

Forward throw- batter up!
RL takes the foe from the arm and winds him/her up like a baseball. At this point, a MiniLink with a home run bat will pop out of RL's foot and start going a distance. If you throw it too early, it will just be a pretty weak throw of 4%. However, if you throw it right when the MiniLink is ready to bat, not only will the opponent be damaged by the throw, but he'll/she'll also get slugged by the MiniLink dealing the same amount of damage as Ness' Fsmash. (which I forget...)
This is easier said than done though, since the opponent can still escape from the windup, and the MiniLink can fall off the stage if you make the throw to close to the ledge.

Back throw- Ptooey
RL's head turns into a giant cannon, and the opponent is stuffed in by the MiniLinks. Now here's the thing: once the opponent is in, a meter appears above RL's head. Unlike other Meter attacks though, this one requires you to constantly mash on the A button. The more you mash, the higher the meter goes. Thus, the higher the meter is, the farther the opponent will go. Though obviously, the opponent can still escape. The cannon can still be fired when it's not full by pressing back again. The damage always does 9% though.

Up throw- Round and round...
A bunch of MiniLinks latch on to the opponent until they form a chain. Then they start swinging themselves around like a whip, throwing the opponent up in the air for 6%.
This attack is mostly used for setting up his air combos.

Down Throw- Meatbag express
RL slams his opponent to the ground and runs with them, grinding them on the floor. This comes together for an impressive 14%. If RL reaches a ledge while doing this move, he simply throws them behind him.


☢☢☢WARNING☢☢☢


FINAL SMASH

CHAIR BASE


Robo-Link does what looks like his down taunt, but suddenly a gigantic laser cannon pops out of it, piloted by several MiniLinks. In this form, you're free to control each MiniLink by rotating with a cursor. Each MiniLink controls like so-

*The one manning the top cannon fires homing missles. They fire 3 at a time between 3 second gaps. They're about the same as the ones from RL's fair.

*The one manning the second highest cannon fires shots of plasma. They do fire damage, and fire 2 at a time between 2 second gaps. They're pretty much the same as the cannons from RL's Down smash.

*The one manning the dual lasers on the cannon fire, well, lasers. They shoot out like very long, multidirectional versions of the ray gun, and fire one at a time between 2 second gaps.

*the one manning the gigantic cannon need 5 seconds to charge up. After that, it can fire a giant laser lesser than Samus's final smash, but still powerful. (10% per hit!)

This goes on for 15 seconds. HOWEVER, RL cannot turn around while this FS is going on, so it's best to do this on the edge of a stage.


situation▲ ▲ls


Ledge Attack
RL crawls up, with an electric fork in his mouth, doing 2% damage. RL will then slowly crawl up.

Rising Attack
RL rises up like a zombie, then once he reaches the point of his rise, he does a brief "maniacal laughter" pose as electricity flows through his body. Yes, the electricity deals damage of 4%


PLAYSTYLE- DOMO ARIGATO

More or less, Robo-Link is a tank in it's purest form. It's fast, but clunky. Somewhat strong, and can take a lot of damage.
As thus, Robo-Link is somewhat of a campy character. He has a good deal of projectiles, and likes to play keep-away.
The very last thing you want is to be knocked off the stage. While RL's recovery is good, there's only so much it can do before it overheats, and there's a good chance you've gathered some heat when you've been knocked off.
And also remember: even though RL is best played campy, he isn't a god at doing it. He can take punishment, sure, but it's best not to take any at all. One good method of playing keep away is to simply keep your opponent on his or her toes. RL has great range, so use that to your advantage.

MiniLinks are also very wonderful, if only for keeping your opponent busy. If you wish to truly distract your foe, believe in the MiniLinks. However, don't depend on them too much, as they can't take too much, and won't put up much of an effort dodging. Instead, use them to give some breathing room, and set up some projectile camp.

Combusting isn't as bad as it sounds, as it can damage your opponent as well, but don't think it's a gift from god or anything. This attack is still just as deadly as it is to you, and it requires good aim to hit your opponent.


THE REST OF THE CRAP


Up Taunt
RL takes off his head, which then grows a propeller and starts flying around. Unlike his Uair, RL can still fight without his head in this form, and his UpSmash and UpTilt come out from his neck. After 5 seconds, the head comes back down onto it's body, but you can keep on running away from it for teh lulz.

Side Taunt
RL bashes itself on the head, and something random comes out of it's ears:

Common-
1-Flowers
2-Gum Balls
3-Confetti
4-Rupees

Uncommon-
1-Water (cools him off by 10%)
2-Noodles
3-Worms

Rare-
1-Sticker
2-A single piece of food (eatable)
3-CD (if you don't have them all)

Super rare-
1-Mr. Saturn
2-Bob-omb
3-Urina

Super Mege Ultra rare-
1-This drunk salaryman


He just sleeps in the background and disappears after 5 seconds

Down Taunt
Sits down on his royal self-proclaimed throne.

Entrance
A bunch of parts fly together from nowhere, and form a normal looking Link. Then he bends down(Similar to his crouch) and transforms into the normal looking Robo-Link.

Win pose 1
RL places his sword on the ground, turns his back to the viewer as his cape blows in the wind, and lets out exhaust from his head.

Win pose 2
RL gets so smug that he laughs maniacally...and laughs, and laughs, and laughs until his head pops off. Then the body starts comically looking around blindly as RL's head yells at it.

Win pose 3
A seemingly normal link does a victory pose(the one where he sticks his sword up). Then, a bolt of lighting strikes it, frying off the fake skin, revealing it to be Robo-Link.

Lose Pose
Robo-Link throws a giant tantrum, while the MiniLinks clap for the victor.

Icon

▲ ▲
-The triforce of fail.

Kirby Hat
Kirby receives a much smaller Link hat than usual, and has giant winders sticking out of his head. Kirby get's RL's Pannishment, although somewhat nerfed.
The objects look a lot more "cuter" and "cartoony", and they do much less damage. However, the effects last for a much shorter time.

How to unlock
-Clear event no# 1089 "Hyrule Metal City"
-Play 1089 Brawls.
-Clear the entire SSE on normal+ with only Link


Related Events
Event no# 1089- Hyrule Metal City
His name: Robo-Link. His mission: To become the true hero of time. His method: Eliminating you!
Defeat Robo-Link in a 1-on-1 duel!
(Player: Link. CPU: Robo-Link. Stage: Bridge of Eldin.)

Event no# 1102- Sap the sentry!
Solid Snake sneaks by any man. But how will he fare against machine?!
Defeat every Robo-Link without being spotted!
(Player: Snake CPU: 3 Robo-Links. Stage: Hyrule 20XX. In order to defeat every Robo-Link without being spotted, use your mines and projectiles.)

Co-op Event no# 1089- Twisted Transistors
A 2-on-2 battle against your mechanic counterparts!
Play as Link and Sonic, and defeat Robo-Link and Metal Sonic.
(Players: Link and Sonic. CPU: Robo-Link and Metal Sonic. Stage: New Pork City.)


Codec Convo
PRESS SELECT
Snake: Otocon! There seems to be another Link here...
Otocon: Um...I don't know snake...I'm getting a slightly different vibe from this one here....
Snake: Yeah, I know what you mean...The clothes are roughly the same, along with the green hat...but this one seems to be more demented than usual.
Otocon: Heck, if I didn't know any better, I'd say he's a......!
Snake: What? He's a what, Otocon?
Otocon: H-him! He's a robot! A robotic Link!
Snake: Geez, more robots? I didn't know a hunk of machinery could be a hero too.
Otocon: Um, I kinda have a shaky feeling about that "hero" part...

-End Transmission-


dear god this took forever to make for some reason....
 

Katapultar

Smash Lord
Joined
Nov 24, 2008
Messages
1,258
Location
Australia
I didn't expect Robo-Link to be a robot.
Just a note, the n-air, pummel,u-throw,b-throw,all of the situationals, the tilts (More than half of the moves, I think) have no damage percentage. I'd strongly suggest putting more detail into the overheating mechanic, becuase there was no detail over how the overheating builds, though it's a good idea. Other MYMers can give you suggestions as well, I'll leave it at that
On a side note, the video of the d-tilt was hilarious, and you have a good amount of pictures to look at.
 

Clownbot

Smash Lord
Joined
Jun 9, 2009
Messages
1,851
Once again, a petty complaint without commenting on the actual set from me...

Page-stretching text/images are a real annoyer to me, and the Triforce being used for the A's in headers was pretty clever, but it didn't exactly go well, if you look back.

Petty complaints over.
 

tirkaro

Smash Champion
Joined
Jun 24, 2006
Messages
2,808
Location
but a pig in the sun
Fixed, and made the overheat feature more obvious ;)

Page-stretching text/images are a real annoyer to me, and the Triforce being used for the A's in headers was pretty clever, but it didn't exactly go well, if you look back.
It's meant to look like that. (See RL's throne and the description for his symbol)
 

Katapultar

Smash Lord
Joined
Nov 24, 2008
Messages
1,258
Location
Australia
Good, there are damage percentages. I should have mentioned this before, but the overheat mechanic should maybe be used in more parts of the movesets. Now that I think about it, the down special should probably be tonned down, I think its WAY TOO powerful, make it 12% with low knockback or something.
 

JOE!

Smash Hero
Joined
Oct 5, 2008
Messages
8,075
Location
Dedham, MA
ATTENTION, MI MYM AMIGOS:​


Im going to take a break after Round One ends in my "Deadliest Brawler" thread. (current, and final match of round 1 is Mewtwo vs Samus, this one actually breaks the rules and allows superpowers)

The point of the thread is to put the Smash Bros roster into the real world, and see who will win, and we break it down Deadliest Warrior Style (if you have ever seen the show)

After this last fight, Im going to open it up to the MYM'ers to suggest your own sets to combat each other like the rest of the cast has!

What do you say? Feel like seeing how well your creations fare in the real world? :chuckle:


If so, you can either PM or VM me to cast your set as a possible warrior, and Ill make the matches.

Check out the MYM chat, TDB Thread or possibly here (if it's not counted as spam) to see who gets picked!
 
Status
Not open for further replies.
Top Bottom