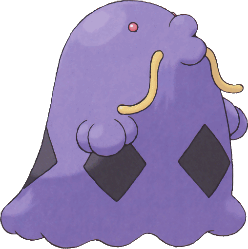
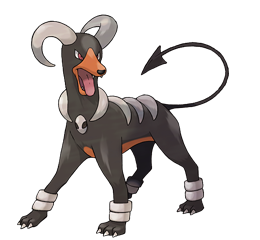
• Welcome to Smashboards, the world's largest Super Smash Brothers community! Over 250,000 Smash Bros. fans from around the world have come to discuss these great games in over 19 million posts!

    You are currently viewing our boards as a visitor. Click here to sign up right now and start on your path in the Smash community!

Make Your Move 7 - It's Over, Nothing to See Here

Status
Not open for further replies.

Kaiser6012

Smash Cadet
Joined
Dec 28, 2009
Messages
32
Location
Brisbane, AUS
Wow. I never thought I'd see the day when I saw something that beastly made up for Brawl. Kudos for the sheer guts, Master!
Before I begin, I'd just like to ask a few questions. Firstly: Blood Rain. It's a good move for making sure the opponent is in a duly deserved state of abject terror, but what is the actual move hitbox like? Is it a comical raincloud-over-head style storm, is it a column of blood that comes pouring from the heavens, is it a stage-wide downpour... you get my drift. Some definite range would be nice.
Also, I feel the wing buffet is just a tiny bit... all-or-nothing, truth be told. If you're constantly buffeting the opponent in an attempt to save yourself, you're not doing anything to actually press the offensive, which (if you'll excuse my assumptions) seems a bit counter-intuitive for a set as focussed on straight-out brute strength as this one.
All being said, though, I do like the set. It certainly attempts to do something that no other set has even dared: biiiiiig opponents. Kudos for that, but overall a bit weak when it came to integrating the magic/summons with the smackdown. The link between the magics and corruption is well proven, especially through stuff like the Blood Elementals and Bloodlust (yeesh... I can only imagine what the characters must feel like), but as for linking that with all the bashing and power? Apart from your up special, there's not really anything that can bring the two together.

Overall, a solid moveset of two parts. The barrier between the two parts is a bit unfortunate, but that provides no barrier for super-powered butt-kicking fun!
I give this character three and a half blood spatters out of five. Great work, but could be made better.

Closer... ever closer... with blade and fist he stalks, with stealth and strength he strikes... he runs like the wind and hits faster than a hurricane...
 

n88

Smash Lord
Joined
Oct 10, 2008
Messages
1,530
Valozarg

Valozarg is among my favorite sets this contest. The concept of a fighter designed for 1v3's is great, and the execution is amazing. The set kept a nice flow going throughout, and the various move interactions were well thoght-out. I particularly enjoyed the corruption mechanic and the various ways Valozarg could manipulate his blood. I suspect Valozarg is broken and OP even for 1v3's, but that adds to his epicness, in a way.

The attacks were, for the most part, sufficiently explained. I did have a few moments where I thought "wat" (Specifically during the D-Special, F-Tilt, and D-Smash-Special), but after re-reading the move, things became more clear. The organization was nothing spectacular, but it was good enough. The four grabs seems strange, but it's not OoC, and fits in with his playstyle.

The playstyle does verge into trap-character territory a bit, but I don't find that it really detracts from the set.

[Insert generic complaint about unsmashness that no-one really cares about here]
 

darth meanie

Smash Journeyman
Joined
Jun 6, 2008
Messages
452
One Day Pokesets! What an Idea!


Probopass

Probopass is the Compass Pokemon, and the evolved form of Nosepass. It always faces magnetic north. As a result of this, Probopass cannot change the direction he faces under any circumstances. He will always face right, and spawn on the leftmost side of the screen. Also, this means he doesn't trip, doesn't fall prone, and can't roll, though he can spot dodge and air dodge. He also can't move either. It has its pros and cons.

Fortunately, Probopass has powerful magnetic fields to help him move around, and can use mini-noses to attack enemies from any position, making him a powerful, if odd, character to play as.

Stats


Range - 10
Size - 9
Weight - 9
Power - 6
Recovery - 3
Attack Speed - 3
Jumps - 0
Move Speed - 0


Specials


Up Special - Magnet Rise

Probopass can't move! Garbage tier right? Well, by tapping Magnet Rise he pops off the ground and levitates a little under a stagebuilder block above the ground, and can strafe forwards and backwards slightly slower than Jigglypuff's dash. What an improvement!

While he's in this levitate, he can use his aerials, specials and grab, and can stay suspended just over the ground indefinitely. If you press up on the control stick though, he'll rise above the ground at a slow pace, as a recovery. Like with ROB's recovery though, he'll exhaust his energy after levitating for a while, and has to stay grounded in order to recover it. Unlike ROB, he can only move about two stagebuilder block's distance when in the air, and slowly at that, making it a very difficult recovery, especially since he has no jumps.

Neutral Special (Grounded) - Mini Noses

While Probopass has a lot of trouble chasing down opponents himself, he doesn't have to when his Nose Units can! Probopass launches the three mini-noses attached to himself into the air and controls them directly. Probopass can move them at around Snake's run speed in any direction, and unlike Probopass himself, they can face forwards and backwards. Attacking the Mini Noses deals set knockback about a battlefield platform away and a third of a second of hitstun.

The Mini Noses can use all of Probopass's aerials and grab, but during the duration of the move, Probopass is defenseless. By pressing the Neutral Special again, the Mini Noses will return to Probopass, but it takes about half a second for them to return if they're distant. Be careful to bring them back manually first so Probopass can at least have some sort of attacks.

Neutral Special (Magnet Rise) - Lock On

Probopass can't control his Mini Noses and his movement both while in the air, so when he's levitating, he'll Lock On to foes instead to aim his attacks. Once Probopass taps it, the nearest opponent gains a red ring around their body for two and a half seconds. While covered with the ring, all of Probopass's aerials will home towards that foe. Probopass isn't as defenseless as he can still move now, and his long ranged aerials now home in!

On the other hand though, it's for a short period, and even with homing, it'll be easy to dodge or shield them when they're coming from a distance than when he's gotten closer with the Mini Noses. Plus, there's another advantage for him to attack from the ground.

Down Special (Grounded) - Iron Defense

The red thingamabob on top of Probopass's head slams down over his eyes, and shines with a gray light. Probopass is now completely invulnerable to the next attack; more importantly he has anti-grab armor for the duration, and can no longer be chaingrabbed and thrown offstage for an easy KO.

On the other hand, Probopass cannot attack either, unless he uses his Mini Noses. He can launch and recall his Mini Noses at will, and use all of his aerials and his grab while remaining invulneable.

Of course, there is a catch; Probopass has about half a second of ending lag after he's hit, where any opponent can punish him for this. Use your Mini Noses to keep them from doing that!

Down Special (Magnet Rise) - Magnet Drop

Like Magnet Rise but in reverse. Probopass stalls for a fifth of a second, then drops to the ground. When he hits the ground, it hits under him and slightly to the sides, dealing 11% damage and diagonally forward knockback that KOs from the top boundary line at around 140%. It's a quicker way to get to the ground than simply ending Magnet Rise, although it does have some ending lag.

Side Special - Magnet Slam

So what if Probopass wants to move a little faster? Well, hold down his Side Special, and his nose will glow like he's the lead reindeer on Santa's sled. Release, and he'll slam himself straight forward, similar to Pikachu and Luigi's Side Special. If he hits someone, he deals 12-19% damage and knockback that KOs around 70%.

He goes far though. Really far. Charge it up for a while, and he'll easily clear over to the other side of the stage and plummet to his death. It's a fantastic KO move, if you hit with it, but you've only really got one shot. Since Probopass can't turn around after using it, he has to Magnet Rise to slowly float to the other side of the screen. It's high risk, high reward.

Oh yeah, it also is a great horizontal recovery option, if you're knocked off the left side of the stage. If Probopass connects with the edge or with the stage at all, his nose clings to it, and he can Magnet Rise himself to the top, no matter what, making him now very difficult to KO from the left side of the stage. Of course, this means he's still vulnerable if someone knocks him the other way, giving opponents all the more reason to attack Probopass from behind.


Aerials


Neutral Aerial - Ancient Power

Probopass shines with a silverish light, and rocks spontaneously generate around him and begin to revolve. Contact with these stones deals 4% damage and light knockback. Probopass can hold the stones in orbit around him, and release the button for them to scatter, forming a hitbox similar to Charizard's Rock Smash, but all around him. It deals between 7-12% damage on hit, with moderate knockback that won't KO except offstage. It's surprisingly quick to start, but has a fair bit of ending lag, and it's difficult to try to trap opponents in the first hits.

If Probopass has locked on to an opponent, the rocks will hurl towards the opponent, and are not subject to gravity. They move rather slow though, and don't change direction after firing. An increase in range, but it loses its ability to force opponents away.

If Probopass is using this attack with his nose units, it remains mostly the same, his nose units spin in a second interior circle as they generate the stones. Not quite as useful, but it can make an area on the field very dangerous to enter, as the nose units make it harder to DI out of the spinning rocks, or can shield Probopass from behind. Further, the nose units can still move while using this attack, but at half speed.

Forward Aerial - Zap Cannon

Probopass generates a ball of lightning in front of his nose. The sphere generates in about a quarter of a second, and deals flinching damage and knockback to anyone who enters the bumper sized area. A split second later, it fires straight forward. During that moment though, Probopass can angle it another direction. It moves slightly faster than Lucario's Aura Sphere and deals 13% damage with knockback that KOs around 125%. If Probopass has locked on to an opponent, it will both automatically fire at the opponent, and curve towards the opponent with the same turning radius as Pit's arrows. The attack remains slower than his arrows though, making it still dodgable.

When used by his Nose Units, all three of them will generate the Zap Cannon in between them. You can fire it in any direction, with even more room for control than you do when used from the air. When used either way, it has a short, but noticeable, period of end lag.

Up Aerial - Magnet Bomb

Probopass's cap glows with a silver sheen, and a flash of white light blossoms out of it. Fired straight up, it will travel about two battlefield platform above his head and explode in a shower of sparks, dealing 10% damage and a great deal of hitstun. You can angle this attack to the left or right though, and it will instead follow a parabolic curve, floating up and then coming back down slowly, forming a streak in the air like a comet. If it comes within a battlefield platform of an opponent though, it will curve towards them instead, but remains slow and easily outrun by most characters. If Probopass Locked on to the foe, it will curve towards the opponent even if they are far away.

It moves rather slowly, making it difficult to hit with directly, but with moves like Zap Cannon and Probopass's Mini Noses, you can easily put it in a trajectory that will zone opponents out. You can also angle it as a defensive shield around Probopass, as Magnet Bomb actually has infinite priority. When used by his Mini Noses, he can angle it in any direction, just like with Zap Cannon. Magnet Bomb is considerably laggier than Zap Cannon on both ends though; use it before you use Zap Cannon if you want to try to force the opponent into an attack.

Down Aerial - Hidden Power

Spheres of light begin to revolve beneath Probopass, but unlike with Ancient Power, they don't do any damage. They spin continuously until Probopass fires it again; then they all fire out to the left and right, dealing 8% damage and mild hitstun, moving at the speed of Falco's blaster. While the move has about a quarter of a second of starting lag, Probopass can fire the second shot absolutely anytime, even in the middle of other moves, making it a great way to follow up on another attack. If Probopass drops to the ground,be it with his Down Special or simply touching the stage, they'll fire as well, doing 11% damage if he hit the ground with Magnet Drop.

If he has locked on to a foe, they'll all stay in a circle though and fly towards the opponent, slower this time, but it deals 10% damage, and retains its ability to be fired in the middle of other attacks.

When fired from a pair of Mini Noses, it has the same effect of delayed firing, but this time, when pressed, they'll explode all around the Mini Noses, making it great in conjunction with Ancient Power.

Back Aerial - Flash Cannon

Probopass charges up energy in the mininose docked on his back, taking about half a second to charge. It then fires a beam of energy directly behind him, shaped like the beam from Lucario's Aura Storm. It deals multiple hits of up to 17% damage, with knockback that can KO starting at around 110%.

The beam travels slightly slower than Fox's blaster, and is angled towards the foe when Lock On is used. When used by Probopass's Mini Noses, they work the same, the Nose Units spinning around and charging up an attack that can be angled with greater freedom than it can be when Probopass uses it normally.


Standard and Tilts


Jab - Block

Probopass's nose flashes and becomes a dull gray. It now is no longer part of his hurtbox and cannot be damaged, blocking any attack that hits it, but preventing Probopass from attack either. Tap the jab button again, and Probopass will jerk, slapping the opponent with his nose for 7% damage and mild knockback, with a quarter second of ending lag.

Probopass can also use this move while using his Mini Noses to attack by pressing the shield button, but it prevents his Mini Noses from attacking as well.

Forward Tilt - Tackle

Probopass hops forward, ramming the opponent with his nose. Hey, he can move a little after all! Probopass moves a whopping Mario's height forward, and his body is a hitbox that deals 6% damage and very light knockback. Probopass cannot Tackle backwards, sadly. This move has a surprising amount of lag; don't expect this to usurp Magnet Rise as his main mode of transportation.

Up Tilt - Headbutt

Probopass hops up a little bit, and the red cap thing on his head raises up and down, dealing 8% damage to opponents around him on both sides. Not particularly impressive, but it has a large hitbox. It also comes out pretty fast, making it a decent way to force opponents approaching from above away, but is otherwise unremarkable.

Down Tilt - Shock Wave

Probopass makes an indecipherable motion, and sparks shoot out from both sides of him, like a single bounce of Pikachu's Thunder Jolt. It deals 6% damage and is fairly spammable, as well as dealing decent damage, but it pushes opponents away, making it impossible to trap opponents in it. Which is good, because you'll mostly be wanting to do this to keep opponents from getting to close to him. Covers the area that Headbutt doesn't.


Smashes

Forward Smash - Discharge

Probopass crackles with electricity as he builds up this attack. When he fires it, two bolts of lightning spark, bouncing off the ground about a battlefield platform ahead of him and shooting off towards the blast zone. The attack does the most damage and knockback after bouncing off the ground, so you'll want your opponent to be in the space around there in front of you. It has very little start up or end lag, making it a seemingly safe option.

However, it only does 2-3% damage if the attack doesn't bounce off the ground first, with negligable knockback. You have to hit the foe with the bounce of the blast to make it effective, where it does 16-25% damage and vertical knockback KOing around 90%.

Fortunately, you're already good at pushing the opponent into spaces in order to defend yourself. Push them into space for Discharge the same way.

Down Smash - Earth Power

Probopass shakes with power as he charges this attack. When released, the ground glows with a golden light as Probopass releases his power. Anyone on the ground will get blasted into the air when released, with damage around 18-26% damage and knockback that KOs around 85%.

Whether by jumping or getting hit, the opponent will certainly be heading towards the air with this attack, so follow them up with Magnet Rise and fire a Zap Cannon, or Magnet Bomb them while they're in the air. The attack has almost no ending lag, allowing Probopass to immediately follow up, but has about three fifths of a second of starting lag.

Up Smash - Explosion

Perhaps Probopass is at a high damage percentage, or the opponent has forced you to the very right edge of the screen. Now is a good time to explode! Probopass glows a bright red when charging this attack, a clear sign to opponents to get the hell away. Even so, Probopass can fire this off pretty quickly, and it has a hitbox the size of a Smart Bomb explosion. If the opponent doesn't react in time, they're getting hit, and will take 25-35% damage, with knockback that KOs around 140%, surprisingly low, don't you think?

Anyways, as you may predict, Probopass rockets straight up into the top blast zone and dies, and will almost always die faster than the opponent at that. At least you can have an easier time on the next stock though, perhaps even get a suicide KO!

Oh yeah, and if you accidentally input this attack like I am so likely to do :urg: then never fear! Tap your shield button and it'll be a false alarm! Opponent won't know any better though, and will still likely run like hell. Of course, use this tactic to get them away, and they'll come to expect it... right when you do nail them with an Explosion.


Grab, Pummel, and Throw


Grab - Magnet Pull

Probopass's Mini Noses create a magnetic field as long as you hold down the Z button, be they in the air, or on his body. As a result, the grab hitbox is larger on the back of Probopass's body than they are in front, which is good considering how much he doesn't want to be knocked the way he's facing.

Pummel - Thundershock

When Probopass has grabbed someone, all three Mini Noses surround the opponent in a magnetic field and suspend them in midair. Tap the pummel for them to bounce bolts of electricity between them, dealing 2% each. Oh yeah, you can also move the Mini Noses and the opponent around freely as long as they're grabbed.

Throw - Repulse

One throw? How lame Darth Meanie. Yeah well, he's already got like fifteen aerials and six specials, and I'm doing this in one day, so shut it. Tap B and hold a direction, the opponent takes 8% damage and gets knocked in the direction you input, with knockback that KOs around 175% and moderate hitstun, good for trying to follow up with another Mini Nose attack. After all, the grab is going to basically be the go to move with his Mini Noses, being able to push the opponent away from Probopass and into space where they're much more vulnerable.


Final Smash


Probopass can only use this move when he has his Mini Noses out. His Neutral Special will therefore function as normal until he's controlling his Mini Noses. When you do use his Final Smash, a ball of energy appears around the Mini Noses for a split second. If you hit the foe with this ball of energy, the twist and contort as they are filled with magnetic energy.

At first, nothing seems to have happened, but soon enough the cruelty of this Final Smash will be revealed. Now your opponent can only face North too! This lasts for the rest of the opponent's stock too, how sadistic! The opponent can still walk backwards, but at half speed. It's time to show them how a real master does it.


Playstyle


So you chose Probopass huh? This guy has a bit of a learning curve, but while he's difficult to get a handle on first, once you do, you'll have a blast playing as him.

The first thing you need to understand, to drill into your head, is that you want to be on the left side of the stage, and you want your opponent on the right. Probopass is very vulnerable when it gets into close combat, and if he's knocked off the right side of the stage, he's a goner no way no how.

So wail on the opponent from a distance. Almost your entire collection of moves is made up of long distance attacks, so use them! Get yourself and your opponent into the air with moves like Discharge and Earth Power, and wail on them with your aerial moveset. Fire Magnet Bombs to close off the distance your opponent can run, then fire Lock On Zap Cannons to burn the opponent down. Toss a Hidden Power in to be set, and let it lose as the opponent bounces between your ranged attacks for some extra damage. If they get to close, no worries! That's what Ancient Power is for friend! Besides, you can always whap them with your Down Special to punish them.

If the opponent is a bit too close for comfort though, switch back to your ground moveset. Your tilts are pretty decent at defending you against attacks, and you can't be grabbed while Iron Defense is active. Use this opportunity to use your Mini Noses to defend; firing close up Magnet Bombs and Ancient Powers, or using Magnet Pull to force the opponent away. Even if the opponent is far away, you can use your Mini Noses to poke at them from a distance and distract them, but even with Iron Defense on you risk being punished.

Magnet Rise back up again though, you're designed to switch between these two 'mini-movesets' on a dime. Force the opponent to play aerial or projectile games now, and use their worse KOing moves when you get to a higher percentage.

When you're going for the KO, you'll want to probably hit the opponent with your Discharge; it's not too hard to hit, and pretty safe to use. Zap Cannon is another good option. If you're ballsy though, you can get a KO much earlier with your Side Special, and with an opponent pinned down by Magnet Bombs, it's not unfeasible to whack the opponent with a magnetically propelled shnoz. Be careful though, because you're just asking to get KO'd if you miss. Of course, you could always just explode though and start again.


Match-Ups


VS Abomasnow - 55 - 45

You know how Abomasnow is all about forcing the opponent to approach and punishing them for it? Not an issue with Probopass, seeing as the only time he's approaching is with his Mini Noses that don't take damage. Plus, Probopass is going to simply be doing a lot more damage with his ranged moves than Abomasnow is. Abomasnow does have his Frenzy Plant to use, but Probopass can tank it easily with Iron Defense, or complete get past it with Magnet Rise.

As damage builds up, both will prefer to stay on the ground, but Probopass still has his entire aerial moveset at his disposal at any time with his Mini Noses, while Abomasnow doesn't.

And Ingrain? Don't make me laugh. Most of Probopass's attacks will ignore that oh so critical defensive maneuver: Discharge, Zap Cannon, Magnet Bomb, Earth Power... and speaking of Earth Power, what better way is there to get Abomasnow killed than by literally forcing him out of his precious snow. You can also build up obscene damage against Abomasnow with a Mini Nose Ancient Power; he can't move while you get hit after hit after hit.

Abomasnow does have one advantage though. He can play a more offensive game of trying to force Probopass off the stage with his gimping tools; and what an impressive collection that is. When Probopass is grounded, Snow Flue will WRECK him if he's in the snow, even if Iron Defense is active. A Snowballed Probopass is similarly vulnerable, and if you combine the two... ouch.

Abomasnow has to play unusually aggressively to kill Probopass, but his specialization in gimping nearly completely offsets Probopass's ability to shut down everything else that Abomasnow can do. It's an odd match, but a desperate one for Probopass, as once Abomasnow has his snow set up, likely at great cost, he can take out one of your stocks in a flash.

VS Sheep Man - 60 - 40

Poor Sheep Man! All those clouds, and Probopass can smack each and every one down with a single hit from his projectiles. All of his cloud tricks aren't going to do too much good; Probopass can smack them easily. Fortunately for Sheep Man, he can make clouds as fast as Probopass swats them down, so it isn't too bad for him, but he'll have a very hard time getting them in the formation he wants.

Fortunately for Sheep Man, that's not all his options entail. Sheep Man will want to focus on building up his static, as moves like his Sheep Splitter and Sheep Splitter crush Probopass. He's on the ground? Use Static Pull. In the air? For once, Sheep Man is in the perfect spot to use Sheep Splitter. With high static, these are both excellent damage and KO moves to hit Probopass with, with little ability for Probopass to protest.

VS Yukari - 25 - 75

Apparently I'm doing these Match-Ups to offset my lack of comments on these movesets. Whee!

Anyways, Yukari will have a lot of fun with Probopass. All those projectiles you've got? Say hello to Yukari's Side Special! Trying to force the opponent to the other side of the field? Yukari's Neutral Special won't stand for that. She'll easily jump behind you, or knock you far further than you'd like to go with some well placed portals. And don't forget what an insane boon Graze is against a projectile spammer.

Probopass usually wants to wall the opponent in with projectiles, but this is a Touhou character. She plays Bullet Hells; Probopass's assault is nothing.

VS Aran Ryan - 42.5 - 57.5

While Aran Ryan doesn't have to worry about Probopass approaching while he stacks up moves like his Neutral Special, he'll be pelted with projectiles. And he'll have a hard time approaching him; Rope Lunge, while normally a fantastic approach tool, might as well have Aran Ryan bend over and beg to get spanked with Probopass's Discharge available.

Now Aran Ryan's Down Special is really going to be hell though. Once that thing get's charged up, you'll have a hell of a time stopping him from knocking you to the right of the stage. In fact, a smart Aran Ryan player may forgo other strategies and try to just entirely focus on knocking Probopass off the right side of the stage; it won't be easy, but it'll be a certain KO if he pulls it off. Probopass will have to play smart while moving back to the left; having a Hidden Power stocked up if he gets to close is ideal, although he can unfortunately still whip at you with Glove on a Rope. Try to Down Special on top of him if you can though.

VS King Dedede - 35 - 65

Like with Donkey Kong, a grab means death. Fortunately, you do have a few defenses that doesn't make this a total wash. Iron Defense will protect you from the grab, for a little bit, but don't let that get you comfortable. Start nailing him with projectiles, his big hurtbox just begs for Magnet Bombs and Zap Cannons from your mini noses.

Magnet Rise will also protect you; he can't grab you from a stagebuilder block in the air! Of course, he's still got moves like his bair that will hurt pretty hard if you let him, so fend him off with moves like Ancient Power.

And try to leave absolutely no space behind you. He can't chaingrab you to the right side of the stage if he can't get to the left of you. This is more imperative than with any other character.

If Dedede does succeed, and any smart Dedede will focus exclusively on this (and all Dedede players already do focus exclusively on it), you'll die. You may want to threaten Explosions if you get a chance, he might take your bluff. If he doesn't, then blow him sky high.
 

MasterWarlord

Smash Champion
Joined
Aug 24, 2008
Messages
2,902
Location
Not wasting countless hours on a 10 man community
Revenge of the 4 hour Pokeset

VENUSAUR


Venusaur is the Grass/Poison fully evolved form of Bulbasaur, one of the starting Pokemon in the original Pokemon Red/Blue games which even those who claim not to like Pokemon are highly familiar with. Indeed, the various forms of the 1st gen starters are among the most recognizable Pokemon, up there with Pikachu and Mewtwo. Jigglypuff? Pfft. A random enemy Pokemon that there’s no need to bother with. Lucario? Nobody played Pokemon beyond 1st gen, dude. Not cool.

Venusaur shares a relationship with the plant on its’ back, the plant giving Venusaur nutrients but at the same time sapping energy from Venusaur to keep itself alive. It could be compared to the mushroom leeches of the Toads of the Mushroom Kingdom – but unlike that awkward relationship where the mushroom saps too much of the Toads’ strength to prevent growth, Venusaur and its’ plant are very complementary to each other. Either way, they both benefit from sunlight, and hence Venusaur seeks out sunlight wherever it may be.


STATS

Size: 10
Weight: 10
Falling Speed: 8
Traction: 7
Aerial Movement: 3.5
Movement: 2.5
Jumps: 1
Recovery: .5

SPECIALS

NEUTRAL SPECIAL - Solarbeam

Venusaur fires a Solarbeam from the massive plant on its’ back. This surprisingly is lagless, and the beam stretches out infinitely. . .However; the power and height of the beam are based on the last time you used it. After 5 minutes, the beam will be fully charged, much like Wario’s fart but with a longer charge time and the charge being lost between stocks. At max charge, the beam is Ganondorf’s height, deals 28% and knockback that KOs at 90%. Venusaur’s plant glows with massive energy when fully charged. Ridiculously good KO move, but most of the power comes in towards the end of the charge, and there’s no way you’re going to survive such an absurdly long period of time.

UP SPECIAL – Sunny Day

Venusaur extends out its’ tongue and flails it about – it’s a common animation for it in the Pokemon Stadium games, alright? This causes a sunbeam the width of Venusaur to extend from the top of the screen down to Venusaur’s location near instantly. This has no affect whatsoever on enemies, though when Venusaur’s under this location Solarbeam charges 3X as fast. Using Sunny Day when the sun is already shining removes the last sunbeam in favor of producing a new one, so you can change your base of operations to a new location if necessary.

Recovery? Who needs such nonsense? Venusaur’s “recovery”, if it can be called that, is his zair, and it’s far from unpredictable how Venusaur recovers, a horrible tether recovery.


DOWN SPECIAL – Synthesis

Venusaur’s plant on its’ back performs photosynthesis for 5 seconds. If he completes Synthesis without being interrupted, Venusaur heals 15%. Standing under a beam of sunlight from Sunny Day won’t make it faster (Though it makes you heal 25%), but you can still move about and attack as normal while photosynthesizing. Why don’t you want it always active, then, considering starting it up is lagless? If your Synthesis is interrupted, the plant on Venusaur’s back will wilt slightly and you won’t be able to perform Synthesis for another 10 seconds.

SIDE SPECIAL – Leech Seed

Venusaur spits out a pair of Leech Seeds that are very small and travel very quickly (Think Sheik’s needles), and Venusaur has .1 seconds of lag on either end of spitting them. Contact with the seeds causes flinching and 6% of leeching damage – leeching damage is the usual poison damage running rampant throughout MYM, 1% per second, but also heals Venusaur of 1% per second. Attempting to spam this won’t make the damage stack, but it’ll increase the duration of any existing Leech Seed.

STANDARDS

NEUTRAL ATTACK - Roar

Venusaur lets out a roar, blowing foes within 1.5 Battlefield platforms in front of it back with double the power of Mario’s FLUDD. This can be held in a manner similar to most jabs to keep up the hitbox, but it weakens over time until Venusaur gets winded after 2 seconds of roaring and can’t use the move at all. It takes 5 seconds without use to fully charge in a similar manner to Charizard’s fire breath with similar lag. While this won’t get Venusaur any damage, it’s good to get the foe the hell away and you generally have enough tools to stall long enough for Roar to be fully ready for use again anyway.

DASH ATTACK - Charge

Venusaur rushes forward, doubling its’ movement speed as it goes forward a Battlefield platform with just a touch of starting lag. Venusaur does exaggerated motions with its’ feet as it does so, stomping down hard as it goes forward. Of course, Warlord’s law means that any stomping means grabbing, and this is no exception. Getting hit by Venusaur’s feet will get you grabbed and scraped along with him to his destination. The earlier on in the move you got grabbed, the more damage you take – though only 10% at most. The move has bad ending lag as Venusaur scrapes up his feet and gives a disgusted look at them as if he got something nasty on them, during which time he releases any foe he “grabbed”. Mainly a way to get the foe into the sunlight shining down from above and/or to get away from the edge.

FORWARD TILT – Take Down

Venusaur opens its’ mouth wide as if uttering a battle cry as it lunges forward with little lag with superarmor. Great KO move? Not particularly, considering the move deals 20% and pitfalls foes rather then making them take knockback. Unfortunately, Venusaur can’t take advantage of the foe’s pitfalled state, as this move also pitfalls himself and deals 12% to him. . .Ouch. Still, with both you and the foe unable to do anything for a few seconds, what happens? You get sunlight for Solar Beam, any leeching damage still happens and what-not. Considering the foe will of taken more damage then you and Venusaur is generally great at keeping his damage low, you might even be able to get out first and take advantage of the foe’s pitfalled state! If you want to use Take Down on a foe already pitfalled, go ahead. It KOs at 180%, and if it doesn’t KO you’ll get punished for pitfalling yourself.

UP TILT – Reflect

Venusaur does a handstand as it gets up on its’ front legs, aiming the plant on its’ back skywards before turning it forwards. If Venusaur is under a sun beam from Sunny Day, then it reflects the sunlight forwards, causing the area in front of itself to glow with sunlight, the various effects of Sunny Day taking place here. The exact area affected is a rectangle 2 Battlefield Platforms wide and a Ganondorf tall. You can hold this position for up to 5 seconds, and the amount of time the sunlight lasts in the area is 3X the amount you charged as well as during the time you charged.

Venusaur’s hind feet are a weak hitbox as he goes into the position, and the undersize of his body is a powerful one as he crashes back down into position. No real lag outside when you have the hitbox crashing down to defend you, but you’re still very vulnerable from the front during this time.


This has nothing to do with the Pokemon move Reflect, and no I’m not trying to make the move name clever by making it the name of a Pokemon move. That’d make the set look like it had Pokemon syndrome. It’s just simply the most fitting title for the move.

DOWN TILT – Sleep Powder

Venusaur quickly emits a large cloud of sleep powder around itself (Don’t worry, Venusaur’s immune to it). This has a very large range of a half a Battlefield Platform to either side of Venusaur and around him, as well as going a Ganondorf up. Contact with this massive hitbox puts foes to sleep. Assuming they’re button mashing at 0%, it should last a single second, an extra second for every 40% they have. If foes don’t have a projectile, they have no real choice but to wait out the attack’s duration – 1 second. The sleep powder disperses immediately after the second is up and Venusaur is left with .65 seconds of end lag, pretty punishable.

SMASHES

FORWARD SMASH – Sludge Bomb

Venusaur opens its’ mouth wide and waves its’ tongue around rapidly as it charges, then upon release shoots out 1-3 Sludge Bombs at the foe, an animation ripped straight from Pokemon Stadium with .25 seconds of lag on either end. The Sludge Bombs travel forward a Battlefield Platform, and each Sludge Bomb deals flinching and 8% in poison damage over 2 seconds (4% per second). Getting hit by additional Sludge Bombs doubles the duration of the poison, meaning if you hit with all 3 the foe will take 4% per second for 8 seconds. You can’t really stack the poison that well with uncharged fsmashes due to the default duration being so short – you need a fully charged one in order to get anywhere. If you can pull it off, though, you’re free to camp away to make the foe stay poisoned forever.

UP SMASH – Giga Drain

Venusaur turns to face the screen and stomps forward slightly and shakes its’ head about as it starts absorbing energy from all around itself into the plant on its’ back. This has a very large range of a half a Battlefield Platform to either side of Venusaur and around him, as well as going a Ganondorf up (Yes, same range as Sleep Powder). While this starts up instantly, it has a very long duration – 2 seconds? Really? That’s Disgusting. The draining around Venusaur absorbs health from the enemy at a rate of 1-2% per every 0.1 seconds they’re inside the hitbox (Meaning this does 20-40% if they’re hit by the whole thing), but deals no knockback, not even flinching. . .How the hell are you supposed to defend yourself with that?!? However; because it doesn’t flinch, though, it means you can drain health from pitfalled/asleep/stunned foes without knocking them out of it.

DOWN SMASH – Rest

Venusaur plops down over .4 seconds to sleep for 4-8 seconds, gaining superarmor/anti-grab armor and healing 3% per second. Seems Venusaur’s a rather sound sleeper, though in the Pokemon games they manage to sleep through earthquakes, fire blasts and what-not fine. Venusaur awakens without any end lag, thankfully.

The idea here is to heal more damage then you take. Start Synthesis before you sleep then let the superarmor protect you from being interrupted. Having Leech Seed active is also a must, and even then you might take more damage then you heal if you’re up against somebody like Wario or Fox with high damage spammable smashes. Considering Venusaur can still heal fine through other means, though, it can be worth the sacrifice for some more time in the sun.


AERIALS

NEUTRAL AERIAL – Summersalt

Vaatisaur turns so that its’ undersize faces the screen, then rapidly “summersalts” forwards. This doesn’t change his horizontal position – he’s doing it towards the screen. Starts up instantly, but has a absurdly long duration of 3.5 seconds and absolutely insane end/landing lag that’ll have you eat a warlock punch. Venusaur’s body is an above average priority hitbox that deals 14% and knockback that kills at 180% on contact, but who cares? That lag is just UNBEARABLE.

DOWN AERIAL – Frenzy Plant

A giant root instantly sprouts up from the ground (Or the bottom blast zone) up to Venusaur’s location, then grabs him if he’s still there and pulls him down to where it is with superarmor before retracting into the ground. The Frenzy Plant goes up one Ganondorf every eigth of a second. The Frenzy Plant can also grab foes instead of Venusaur if they come into contact with it, and if it grabs a foe it’ll hold them for one second before going back into the ground. If a foe is trying to juggle Venusaur off-stage or simply juggling him for damage, this can get them off your back or at least scare them away for a brief breather and get you out of the air. Just don’t expect to use this as part of your ground game – Venusaur’s jumps are so terrible that he’ll near instantly be grabbed by the Frenzy Plant. The fact that the plant retracts from whence it came means this CANNOT help with recovery, Katapultar. . .It's suicide off-stage.

Oh, that unusable nair? This can grab you out of it, interrupting it without any fuss. Activate the dair, then use the nair as a GTFO move while waiting for the Frenzy Plant to pull you back down to earth.


BACK AERIAL – Seed Bomb

Venusaur goes onto it’s hind legs in mid-air before shooting a tiny seed bomb out of the plant on his back that travels one Battlefield Platform, dealing 1% and no flinch on contact. If it’s not destroyed before reaching the end of its’ path, though, it explodes in a pokeball sized explosion that deals 9% and a good second of hitstun. Requires precise spacing, but has good pay-off. The move is fairly fast, and if Venusaur gets onto his hind legs the move won’t be interrupted by landing onto the ground, meaning this move can be used from a full jump without interrupting itself. Either way, though, getting the precise spacing is rather difficult.

If the foe has Leech Seeds on them, then Venusaur just lets out a slight cry with .35 seconds of lag as their Leech Seeds detonate, stunning them for one twelfth of the time that Leech Seed would’ve gone on for, meaning half a second per full Leech Seed left.


FORWARD AERIAL – Rear Swing

Venusaur swings its’ girth around so that its’ facing the opposite direction it does normally. Very fast attack with good priority, though the range is poor and it only deals 6% and a Battlefield Platform of set knockback. . .Indeed, might seem bland at first, but it’s a superb set-up for your bair, putting them directly into the range where the seed explodes and turning Venusaur around so it can use said bair.

UP AERIAL – Into the Sun

Venusaur turns its’ head skyward and roars as it flails its’ tongue about wildly, its’ plant perking up and absorbing with all it’s might. Venusaur’s tongue is a short range hitbox here, though that’s obviously not the point of this. . .Just what the hell is Venusaur doing? He’s preparing to absorb all of the sun’s rays – directly from the sun itself. In order for this move to serve its’ purpose, you have to use it as being star KOd. If you pull it off, Venusaur will be seen flying off into the sun in the distance rather then the usual star KO animation, and when he comes back for the next stock he’ll be fully charged with the sun’s rays, able to spam fully charged Solarbeams for 20 seconds. . .

So the solution for people playing against Venusaur is simple, right? Just don’t star KO him. Considering Venusaur’s recovery is so horrible and Venusaur is so hard to KO vertically due to his healing/weight, there’s no reason to try to star KO him anyway. Seeing Venusaur has no way of getting high enough on his own to do this, this move is just another taunt! What was Venusaur thinking trying something like this? Clearly that plant on its’ back is leeching off its’ brain. . .


GRAB-GAME

GRAB – Vine Whip

It’s Ivysaur’s up B when used in the air, except worse range and more lag. An absolutely horrendous recovery, and Venusaur’s high fall speed and second jump really don’t help matters here. If you do somehow manage to grab somebody in the air with this, Venusaur pulls them under himself for a suicide KO, but they don’t even need to come out to gimp you, you gimp yourself pretty well. As far as getting around edge-hoggers, it’s fairly easy to time climbing onto the ledge for invincibility frames and to block Venusaur’s recovery, so forget that. A shame Venusaur’s recovery is so bad, considering he’d be a god of survival with it.

If you grab a foe with Vine Whip in the air then land on the ground, then you deal 15% to the foe and pitfall them. Not a bad deal, and you can get some free time in the sun. If you use the move on the ground, you can angle Venusaur’s vines, making it a better tether grab then most though still with all the lag of tethers in-tact.


PUMMEL – Entangle

Venusaur starts extending outs its’ vines further and further as you hold down the pummel button, wrapping them around the foe. This deals no damage but makes the grab harder and harder to escape. If Venusaur just holds down the pummel, it’ll take roughly 3X as long for a decent button masher to get out. Obviously good for stalling for Solarbeam/Synthesis/Leech Seed/Poison damage. . .Just don’t expect to get a throw off – Venusaur can’t perform a throw until he unentangles the foe, and he unentangles them at the same rate he entangles them.

FORWARD THROW – Absorb

Some green energy gets absorbed out of the foe into Venusaur’s plant. While this only leeches 3% from the foe, there’s a big catch – Are you tired of waiting eons for Leech Seed to sap health from the foe? This saps any remaining Leech Seed time in the foe to instantly deal the damage to the foe and heal you.

BACK THROW – Razor Leaf

Venusaur turns around and releases the foe as it flings back a Razor Leaf at them, followed by another and another until its’ thrown 6 of them. Each Razor Leaf deals deals 3% for a total of 18% and they combo into each other, but each does a half a Battlefield Platform of set knockback, meaning if the foe gets Razor Leafed off-stage the throw could get cut short. For those times when you have enough space, though, this is very useful for getting space, damage, and even making a bit of time pass by.

UP THROW – Swing

Venusaur headbutts the foe into the air for 6%, but keeps its’ grip on the foe with its’ vines tight. The knockback doesn’t KO until 250%, but has a minimum knockback of 3.5X Ganondorf’s height, strangely. Venusaur begins rapidly swinging around the foe until they hit the ground, them in helpless until they hit the ground and unable to fast fall/DI. If Venusaur is above the foe when they hit the ground, he’ll slam down on top of them to pitfall them and deal 15%.

The time when Venusaur crashes down on the foe varies based off how long he spent swinging around the foe, which varies off their damage percentage. At the top level of Venusaur play, players will have the rough percents (It varies based off the fall speed of foes) that will make Venusaur be on-top memorized. While said percentages are rather spread out, if the foe is just a bit out of range of the percent Venusaur can rely on his Leech Seed/Poison damage to get the foe there before he does the throw, relying heavily on them to consistently pitfall foes. If the foe is at high percents and you’re at a very low percentage (the former easy to do), enough time can pass by without the foe escaping with more damage accumulating on the foe for you to do an infinite chain-grab with this. . .Though by that point, you won’t really need more damage anyway, so it’s not something to get excited about.

As Venusaur is swinging around the foe, he can press any button to let go of his grip and go flying 2 Ganondorfs in the direction he was currently facing. . .This is how you get high into the air and KO yourself off the top blast zone to empower yourself with the sun via uair. You’ll have to get the foe to be around 200% in order to headbutt them high enough to swing into the sun, but considering this pretty much guarantees a very early KO on the next stock it’s well worth it.


DOWN THROW – Acid

Venusaur laps out its’ tongue as acid oozes out of its’ mouth and onto the foe. . .Lovely sight. The acid is yet another type of poison damage that you can stack to make things all the more hellish for the foe, but it’s a very slow working poison. While it lasts for an astounding 60 seconds, it only deals 1% every 8 seconds for a very unimpressive 7% over a stupidly long time frame.

However; when the acid is exposed to the sun (The foe is under a beam of light from Sunny Day), it manages to burn into the foe’s skin, making it significantly more powerful. It deals 2% per second to the foe so long as they’re in the sun beam. It might not sound that much to celebrate about, but considering this lasts so incredibly long and you can stack it with Sludge Bomb poison and Leech Seed things can get pretty ridiculous. A particularly nice move this complements is Rest – if you Rest in the sunlight and the foe has Acid on them, you’ll without a doubt be gaining in percentages against them as they come over to pelt you in your sleep.


FINAL SMASH – VENUSAUR’S FESTIVAL


Venusaur lets out a loud roar, summoning 10 Bulbasaurs which come out from the background and frolic about. They’re only occasionally very weak hitboxes in a similar manner to Waddle Dees as they hop, though thankfully they turn around at edges. Bulbasaurs have an adorable 15 stamina.


If a Bulbasaur stays under a sunbeam for 2 seconds (It doesn’t have to be all at once), it evolves into an Ivysaur which functions as a cpu controlled ally identical to Pokemon Trainer’s Ivysaur. They never do this naturally, though, so you have to grab them to make them stay put (Yes, Venusaur can grab them). . .Considering the foe can easily interrupt this, though, this isn’t that favorable, thus you’re going to be relying on the utilt heavily to spread the sunlight onto the Bulbasaurs to get them to evolve. Cpu controlled Ivysaurs go off into the background 20 seconds after evolving.


PLAYSTYLE

Venusaur wants the match to go on and on as long as possible in order to charge up Solarbeam and get his damage from poisons/Leech Seed, and its’ more then equipped to do that with all of his various healing and GTFO moves. It even has methods to escape juggling despite its’ heavyweight status with his dair-nair combo. . .Once Venusaur gets Leech Seed going, its’ an absolute survival god when you add Synthesis into account, which it can pull off without resting by stunning/sleeping/pitfalling you. While you’re stunned, Venusaur’s going to make more sunlight with utilt so it has more freedom with where it can hunker down and stall, or drain even more health out of you with usmash.

Venusaur is not going to die by traditional means, period. Its’ perfectly capable of keeping his percentage down at 0% with his healing. . .But luckily for its’ foes, Venusaur is perfectly killable at 0% - it makes Link’s recovery look good. Just poke it off-stage and Venusaur has lost a stock. Venusaur will want to make its’ base of operations center-stage away from the edges and get back to the center of the stage ASAP, either with dash or by disabling the foe as they come at you with a stun and retreating back to the sun beam.

Venusaur will want to keep this up its’ survival game as long as possible. When it doesn’t need to heal, Venusaur should focus on stacking up leeching/poison damage and just using moves that generally stall everything, such as fsmash, dsmash, and pummel. If the foe has plenty of Leech Seed/Sludge Bombs/Acid on them, then you can try to go for a pitfalling uthrow, assuming you know the correct percentage needed, you can just wait for all of the slow damage to do its’ work after you land the grab. Sooner or later, Solarbeam should be ready and you can go for a finisher, which is more then easy enough to land. If you’re paranoid about wasting all the effort, though, you can use bair to stun the foe, seeing you’re not going to need the Leech Seeds anymore.

If you’re in a particularly ballsy mode, you can rack the foe’s damage up to 200% to decimate the foe’s next stock in addition to their current one with uair. This isn’t as hard as damage racking up their damage from scratch seeing you should already have the various slow constant damage going, and the foe will be vulnerable to an infinite uthrow chain-grab eventually assuming neither of the poisons/Leech Seed run out. Still, you should think before you do this. . .Considering Venusaur can get down to 0% with ease, the fact you’re killing yourself to get a KO the next stock with Solar Beam spam makes it essentially a suicide KO. Still, it’s certainly not a bad option. Suicide KOs are always ideal when you’re in the lead.


MATCH-UPS

Vs. Abomasnow – 57.5/42.5, Venusaur’s favor

Venusaur and Abomasnow are both survival experts, but Abomasnow’s percentage actually goes up while Venusaur’s consistently comes back down to 0%. The lowered knockback in Abomasnow’s snow means Solarbeam won’t KO any time soon, though you can still uair off the top of the screen as soon as always. Considering you have to rack up 200% either way, may as well get ahead, right? While Abomasnow is a decent gimper without even having to worry about going off the stage, he struggles to knock Venusaur to the edge in order to gimp in the first place due to his own snow reducing Venusaur’s knockback. It’s hard to budge a 10/10 weight behemoth at 0% taking half the normal knockback. Abomasnow still has some tools to force Venusaur over there, but it’s far from Abomasnow’s forte seeing he’s defensive himself.

Vs. Abra – 47.5/52.5, Abra’s favor

As if Abra already didn’t want to play a pressure game against defensive characters, if Abra plays his usual hit and run he’ll just be giving Venusaur more solar energy and taking damage all the while from Venusaur’s poisons and Leech Seed. Abra’s mindgames are fairly useless against Venusaur, and Abra struggles somewhat to get Venusaur to the edge with his pitiful power. If he tries to chain fair/bair, Venusaur’s dair/nair combo will save him more often then not. Venusaur won’t go for his uair here considering Abra’s light and dies early in combination with the fact that his usmash enables him to get high enough quickly enough to stop Venusaur from going up into the sun. Considering he’s got one main shot for Solarbeam, Abra will want to bruiefly play hit and run with a substitute and trick Venusaur into wasting his hard earned solar energy on the fake. Venusaur can figure out which one the real one is with bair, but Abra can either dodge it or go under the stage with dsmash so he can’t be hit when he’s stunned, then use his portal recovery to save himself. While Venusaur can just keep leech seeding the real abra and using seed bomb until it hits, the fact Venusaur has to go through so much trouble to do this and the fact that he simply cannot miss the Solarbeam under circumstances gives Abra the match-up, albeit narrowly.

Vs. Dr. Strangelove – 55/45, Venusaur’s favor

Venusaur has no blatant traps that will set off the doomsday device, and he’s perfectly capable of picking up camp and using Sunny Day wherever Strangelove wants him to go. However, Venusaur has no reason to approach. While Strangelove is busy setting up his traps, Venusaur will want to stack up his poisons and Leech Seed so that once there’s a giant mine field of bombs between Venusaur and Strangelove Venusaur can just sit back and relax while Strangelove takes damage and Venusaur continues to heal himself/gain solar power, easily healing off any damage Strangelove manages to get on you from afar with camping. Once you’ve got a sufficiently charged solarbeam and Strangelove has enough damage, you can feel free to approach. . .Which Venusaur is very very very poor at doing. Venusaur will struggle to get to Strangelove without setting off the doomsday device with his practically non existant-second jump and tether recovery, especially considering Strangelove will of made even more traps then usual due to Venusaur refusing to approach. The match most often ends in the big-bang, though the fact Venusaur can rarely manage to get through Strangelove’s hellish mine field gives him the match-up.
 

Katapultar

Smash Lord
Joined
Nov 24, 2008
Messages
1,258
Location
Australia
This is NOT a quality set at all. Ultra mega akward detailing FTW!

SHEDINJA
Shedinja is the "evolution" of Nincada, formed as an empty shell of Nincada. It floats aimlessly around and steals souls of people who look into it's back.

Shedinja keeps it's special trait in Brawl: completely invincibile to everything. However, Shedinja has no spotdodge or shield, can't use items, and dies if hit by a fire attack, an aerial, any form of rock, darkness, or Final Smashes. Of course, Shed's got stuff to help it survive. And finally, Shedinja can't do damage or whatsoever. It's only method of killing is if a foe looks at his back for 5 seconds. It can be from any range, but the foe has to essentially be looking at Shedinja's back, and in 5 seconds, they suffer a KO. The timer stops if the foe isn't looking at Shedinja, and obstacles such as walls, characters, and all block Shedinja from the foe's vision.

Shedinja's stats are kind of lousy. It's REALLY floaty, really slow, can't jump that high...yeah, you get the point, essentially 2/10 for nearly every stat. Let's get started, shall we?
SPECIALS
Up Special - Reincarnate
A light glows around Shedinja, and in 2 second's time, it has another stock! So, essentially Shedinja has 2 stock? Wrong, Shedinja can keep using this attack as much as it wants. Broken as hell.

Side Special - Heaven's Gift
Shedinja starts shaking vioently, and in 1/2 a second, another Shedinja pops out from behind the current one! It has all the same stats as the original one, but does absolutely nothing. Wether you tap or hold the input depends on where the new Shedinja appears, from right next to or 1/2 Final Destination away. If you input the attack like a smash, you'll take control of the new Shedinja. The attack costs a stock however, so it's up to you wether you want to give a stock to a new Shedinja. Finally, if your Shedinja is KOed, control will switch to another Shedinja.

Down Special - Deathclock
Every Shedinja out in play gains a dark aura for a short peroid of time. If attacked during Ike esque counter frames, the attacked Shedinja will vanish and re-appear in front of the attacker...with it's back facing the foe, not being KOed. From here, Stalker (I'll call it that from now on) will follow the foe wherever they go, so they can't get it out of their gaze. It essentially gives them 10 seconds to kill Stalker for a KO, but that's not a problem, mostly. If the KOed Stalker is in your control, you'll gain control of the nearest CPU Shedinja. Finally, if you use this counter while the foe has a Stalker, the attacked Shedinja will appear as a new Stalker in it's place. Stalkers do not gain counter frames.

Neutral Special - Halo Pass
Control of Shedinja goes to the nearest CPU (Shedinja). You can hold the input to cycle through which CPU you want to take control of using the control stick, the designated one flashing white. You can't do this while attacking however.
AERIALS
Shedinja has aerials in the place of ground attacks, but has Smash attacks for all 4 directions. Essentially, Shedinja has 4 less moves than the average Brawler. How utterly lazy on my behalf. Oh, and Shedinja can turn around in mid-air by double tapping the control stick in the opposite direction.
N-Air - Phase
Shedinja moves backwards 1 SBB at binding speed. Shedinja can't go offstage with this move, and it cannot be used offstage to stall. Shedinja suffers little lag on both ends. Essentially Shedinja's dodge. If used by a Stalker, it will remove it from it's Stalker stats and revert it to normal. A great way to avoid being hit by a reckless foe.

D-AirSmash - Holy Lineup
Ghostly lines connect Shedinja with all CPUs, instantly prompting them to fly towards Shedinja, forming a staight line, lining up in front of Shedinja. Hold the Smash input to keep CPUs allinged. By the way, if a foe KOes any Shedinja and happens to be looking at another one's back right after that, the death timer continues from there. Utilise this with Deathclock, where the foe has no choice but to kill all of the Shedinja. Under most circumstances, if you have a lot of Shedinja and a stalker on the foe (that you're controlling), this is a definite KO option.

F-AirSmash - Confuse Ray
Shedinja gains a shadow aura, and coverts it into a beam as tall as Mario. The beam's range is 1/2 to 2 SBB based on charge. If it hits, it will force the foe out of their current attack. It can even force them out of a jump and send them into helpless. There's no start-up lag, so this attack is just plain good for irritating foes who try to use their Aerials or jump out of the way of sight. Use with CPU for maximum results.

Lazily, this is also the F-air input. Using it prompts the uncharged verison.

B-Air - Flash
Shedinja's back enamates a bright light. With barely any lag, if a foe is looking at the glowing Shedinja's back within a Smart Bomb, that Shedinja is KOed. BUT, for the rest of the foe's stock, the amount of time the foe was looking at the Flashed Shedinja's back for before it flashed is subtracted from the neccesary time the foe has to look at Shed's back before they're KOed. This can never go below 1 second through any of Shedinja's attacks. Use this move if you're near death.

U-AirSmash - Grudge
Shedinja turns a blood red color, staying this way for 3X the length charged. Using again adds to the duration of Grudge. If hit during during the blood red state, the attacking foe's speed is cut by 1/10 for 2 seconds. Shedinja's playstyle is: first, gain a stock and create a clone: all while your back is facing the foe. Switch control to the clone, charge Grudge to force hesitation upon foes. They'll want to attack the original Shedinja rather than risk a speed cut, but that time should have been enough for the original Shedinja to gain another stock. Let the foe attack the original Shedinja, whom can use Deathclock to counter: become a stalker, distract the foe. The other Grudged Shedinja can now continue charging Grudge, reincarnating or cloning. Its an endless stall-fest.

And finally, if the foe does attack a Grudge Shedinja that counters using Deathclock, it essentially gives you 2 free seconds of time which you can save with Flash. Fun fun fun.

U-Air - Take
Shedinja glows green for 1/3 of a second, and soon enough absorbs the grudge of all CPU Shedinja. Reccomended for discouraging the foe's approach.

B-AirSmash - Possess
Essentially a clone of Grudge, except that if a foe hits Shedinja, it will go inside of them. The foe will glow a holy light during this time. But wait, for every 5 seconds Shedinja's inside the foe, they gain a stock! Knowing this, it's an excellent mindgame with Grudge. Though most foes won't risk it, so it's kind of in vain, seeing as how they're just getting a benefit. But there's no way to force the Shedinja inside the foe, and if you KO a possessed foe, you'll lose a stock from your own Shedinja but the foe will lose 3 stock! Super high-risk, high reward attack. Both Possess and Grudge can be active at the same time, so try to land them.

D-air - Further Death
Shedinja loses a stock, but does not traditionally respawn. For the rest of the match, the KO time of Shedinja's mechanic is reduced by 1 second. The first use requires you to have at least 1 CPU out, to which this attack essentially eats away at it. Even if you don't suceed at getting anywhere with your KO mechanic, you can constanly create more clones and sacrafice them.

Z-air - Dispel
How lame. All Shedinja's grab input does is dispel all clones. You don't even get the stock back from them. That's just.....stupid. A horribly worthless attack.
FINAL SMASH - RESTORE
Shedinja can't break Smash Balls, so in order to get the Final Smash, it must overlap the Smash Ball while the foe breaks it. Sounds impossible, but if you manage to pull it off, Shedinja uses his super lame Final Smash to regain 5 stock. Yet on the other hand, you might as well use you Up-Special to set-up and let the foe get the Smash Ball and KO you.
LAME PLAYSTYLE
Shedinja: in a nutshell: it wants to stall and distract the foe from their main target using clones. The playstyle is as followed in the Grudge explanation: create a clone, distract the foe using Grudge and Deathclock. Keep making more stock, stall if you must. if the foe looks at you, Flash to force the timer down. Creating clones and then using Further Death is a great idea if you want to decrease the timer.

All and all, Shedinja can stall, distract. You can't camp or stall against him because he'll keep gaining more and more stock. For foes, the best way to defeat Shedinja is when it's performing an animation (best during reincarnation), where it's vulnerable. It can use Grudge to protect itself and stall, but this really only works when Shedinja has clones.

A 3 hour set made for the sake of joining in the fun. By no means is this a "serious set" but it's not a joke set either. I was lazy on it however. Will comment on Venasaur and Probopass soon.
 

Katapultar

Smash Lord
Joined
Nov 24, 2008
Messages
1,258
Location
Australia
They're probably not top quality (Im not taking them too seriously to be brutally honest), but what the hey, simple is simple. I don't REALLY want to comment on these due to their simple playstyles (I get the gist) and me being tired right now, but I have a reputation. Since DM won't do it now, I will.

[size=+3]Probopass [/size]
Ever since the mass of colored writing (from what I gather at least), I feel that white is very unsuiting for Probopass. Spawns at leftmost side of the screen? That would interrupt some other spawnings. In Super Smash Bros BRAWL, the area players spawn is randomised from the 4 different locations. Imagine a Probopass vs Probopass vs Probopass vs Probopass battle. Impossible. Unsmash. BUT, that can easily be fixed, very forgiveable.

Skims through. Camper playstyle. I don't have a problem with that. Im going to drop out on reading Probopass. Sorry DM, Im just not in the mood right now.

[size=+3]Venasaur [/size]
Im kind of going to be quick with this. Me being a Pokemon fan understands Venasaur's animtions and ability to REST. I've played Pokemon Stadium. I like the job you did with the fan interaction.

Skimming through it, Venasaur's Frenzy Plant might be a bit too good of a recovery. Think about it: foe hits you out of your second jump: Venasaur can simply use it to infinite recover. Vensaur seems to be a rather weak character from what I gather about being KOable at 0% by pushing him off, his somewhat weak poison damage and KO moves. But the Final Smash is interesting, especially for a Pokemon set. Yay. I've kind of had enough. Im gonna close things up now.
 

Neherazade

Smash Journeyman
Joined
Apr 5, 2009
Messages
359
Location
Gensokyo.
Ugg... I never got to reviewing. It's such a pain to do on Wiinet... Maybe I'll do a full write-up tonight. For now...

MY TWO CENTS:

Valo-who's-a-what-zit: He's a great concept. An enemy designed to be taken down by an attacking party. I think they're making a Wii/DS game (monster hunter tri) with the same concept. I was a bit confused by the Specail Smashes. How are these performed? I imagine the controls for Msterhand in Melee. Are these performed using the taunt pad? or do you input smash commands on the special button? How? One thing I like to see incorporated into a set is smash viabiity. Explain how the moves are done, and possibly what use they have. You've done this for the most part, but some of your moves are also incredibly OP. as Katapultar said... Ftilt? Imagine fighting Ridley... and He uses that windattack... ALL THE TIME... except the wind is twice as strong. and if you get close enough to attack him, the move DOESN'T STOP... I would be scared. I think this character could be a welcome addition as a boss in SSB4.

Probo-Saur... Vena-Pass... (or whichever pokemon you Actually chose): O` Deer Gawd.

Venasaur: I'm actually OK with this guy... the sunlight is an interesting idea... though I think that's been done with "Rival Trainer" (MYM5/6 I think). I honestly can't think of anything bad to say... but nothing particularly catches my eye either. Venasaur seems, in any respect, like a toatally normal SSB chracter. As for the writing style, it's relatively clear... I lol'd every time you referenced the tounge from Pokemon Stadium.

Moustachepass: ummm... no. It's an understandable concept - working in some Pokemon lore, using the very essense of a character we all know and love. However, some of the gimmicks seem very... gimmicky. The fact that he always faces right and that he only recovers well from one side of the stage... It doesn't really work in my head. Maybe I'm too new at MYM but this set seems to stretch the boundaries of Smash a bit too far.

My bitc- I mean... Shedinja: Well, I don't know how to start. Shedinja has NO attacks... but he can create near infinate number of clones around the stage (assuming he uses reincranate enough). I could just imagine a fight between him and a character without projectiles. Spam reincarnate at the top of the stage... even off screen if possible. The only way :falcon:/:marth:/:ike: etc could reach him would be to KO himself, then attack from the revival platform. That's ONE free KO. And what if the oppnent has no KO moves? (I remember that happening in RUBY/Sapphire. I killed an entire Gymleader with only Shedinja! :laugh:) but seriously... what would he do? Oh- right. aerials. What about Valo-***? does shedinja **** HIM!?! Here it is guys!: Shedinja vs. Valo-(forget) 99-1 matchup. Back on topic though, after that, Shedinja could just place clones off either side of the stage, and the opponent would ALWAYS be looking at shedinja's back. What then? This character is just annoying. and NOT in the good way.

I guess that's all for now. My rant is over. See y'all soon! nenrz- out.
 

BKupa666

Barnacled Boss
Moderator
Joined
Aug 12, 2008
Messages
7,788
Location
Toxic Tower
Valozarg: Now here's the set that tops Envy as the heaviest character in MYM. I mean, part of his playstyle involves surviving to 999%? Many of the unique aspects of Valozarg that I enjoy stem from his weight. Because of his bulk, you can spam a self-damaging move? (Y) (Y) (Y). Valozarg interacting with his blood to corrupt foes is highly in-character. Before I read him, I wasn't sure how I felt on having every Valozarg battle forced to be a 1 vs. 3. When I saw the madness the could pull by sending a corrupted slave into battle, though...wow. Very nice execution, which is somewhat lacking in sets. Other than that, his various moves that were placed to strategically defend his various hurtboxes were very well thought-out. Like Lunge, Valozarg throws conventional Smash out the window in a good way. He's a small step below Lunge and Cairne, in my opinion, which is still amazing. Hopefully Valozarg will remain a contender...him being experimental should keep him viable, Rool (WARY).

Probopass: Time to 'probe' into the first of the two-hour Pokesets. Probopass using his magnetism brings Sheep Man to mind, but this little guy feels a whole lot more rigid. Such limited movement would spawn such lulz from casuals...ZOMG HE WON'T MOVE, IT'S A GLITCH! Ahem. Probopass seems simple enough, with some great moves scattered in the set (the Mini-Noses are my favorite). Being able to use an Up Special onstage for low-to-the-ground aerials reminds me of Zinger, although Probopass is not even comparable. When you throw in his...interesting mobility, shall we say, his playstyle really comes to life. I could see his competitive placings changing from low, as he is repeatedly pressured to his doom, to rather high, as he learns to defend properly. It's on even ground with Abomasnow in my mind now.

Venusaur: Two MW sets on the same page? I adore the flow between Venusaur's specials. It takes a minute to grasp that sunlight stays out after being summoned, but...damn. Venusaur can charge his KO move under there and heal extra damage? He can't camp to defend while doing so, but his attacks are primarily GTFO. An aspect I like from Valozarg translates over here. Also, the N-Air/D-Air combo, plus U-Air, are very clever. I can't say I like his means for survival over Cairne's, though. Merely stunning and healing over Cairne's more unique options isn't going to cut it for me there. Still, I'd say this edges out Probopass for the better hour-long Pokeset so far, if only just for having more impressive concepts.

Kat, I'll get to your comment as soon as my Valentine's Day 'work' is done.
 

Neherazade

Smash Journeyman
Joined
Apr 5, 2009
Messages
359
Location
Gensokyo.
... You got me hooked. Not sure how this will work... But Im making my debut early. For those of you who are interested, Krazy and I should have our write up done soon. Gonna get a big chunk out of the way tonight. But that's unimportant right now. I think I'm gonna make my own 2-hour pokemon set. What will it be? It's Unknown... *hint, hint, wink, wink*

EDIT: new page... don't want my set to get lost... so I'll post it on the next page.
 

Koppakirby

Smash Cadet
Joined
Aug 13, 2009
Messages
52
Bellsprout Time

BELLSPROUT

Bellsprout is the most pwnsome Pogeyman evur lololololololollolo0lolololooololololo.
Don't believe me? http://www.youtube.com/watch?v=wx-Tb6Wdx94

Stats
Size: Only Slightly larger than a Red Pikmin
Weight: 3/10
Walking Speed: 4/10
Running Speed: 8/10
Priority: 7/10
First Jump: 4/10
Second Jump: 6/10

Special Ability: Ingrain
So. Bellsprout. Wow. Um....What does Bellsprout do? Bellsprout has roots. Roots that double as legs. Bellsprout's roots are the key focus in his playstyle. Bellsprout can drill burrow his body into the ground with his Down Special, and from there is where he becomes a main attacking force. We will get into the complications of these attacks later. Now, stuff!

Specials
Down Special-Root
Bellsprout sticks his roots deep into the ground itself! He is part of the platform now! A KOing force to be familiar with! He cannot move, but he can't take knockback either! Now that he is in the ground, he has free reign over the platform! However, he has to use the move again to detach himself. Other things that detach him are fire, explosions, thrown items, and Final Smashes. Everything else just does damage. To burrow his roots in the ground it takes Bellsprout about .7 seconds to do. So it is quick, but not very quick. If hit during the rooting, he'll take full damage and knockback and the move will stop.

Neutral Special-Endure
Bellsprout color pallet suddenly becomes red-tinted! Now the next attack that is unleashed upon him is negated! Bellsprout will catch the opponent when the attack is executed, and will have a second-long window of opportunity to counter. This attack is rather useful when rooted, as Bellsprout will not be able to move. This move happens instantly, but if Bellsprout uses a move before he is attacked he loses the effect of this move.

Side Special-Razor Leaf
A damage-racking attack, Bellsprout fires two razor-sharp leaves off from its arms, each moving the speed of a Ray Gun shot and traveling just about as far. He can do this when grounded or when standing, no difference. The move is rather quick, taking about as much time as a Ray Gun blast. Now, the leaves do 3% damage and occasionally stun, but that's not the good part. The good part is that they carry the opponent with them when they move. Sure, super-heavy(Valozarg) opponents won't get carried, but lighter ones will. They will feel the 3% damage of the Razor Leaf every .3 seconds. And a Full Blast of the Laser Gun takes about 2 seconds to complete. Meaning they'll take 18% damage at full carry! This also means that this attack can also be used for KOing purposes. Finally, this attack has a bit of ending lag that prevents it from being spammable; sorry!

Up Special-Ingrain
Bellsprout concentrates and pulls up energy from the ground. It heals him 10% damage. But what's this? The Platform shrinks! And thus it becomes easier to KO on it. That's right. When Bellsprout uses this move the platform he is rooted in shrinks tom 90% its size. It will continue to get smaller every time Bellsprout uses this move, making it not just some silly healing move. Bellsprout can only use this move when rooted, however. This move takes a whole .85 seconds to execute, making it sorta long and unspammable. It's worth mentioning that is Bellsprout detaches the Platform returns to normal size. However, there are 2 other moves that relate to Ingrain.

Ingrain Moves
Forward Tilt-Leech Seed Singular
Bellsprout fires a single Leech Seed at an Arc, traveling maybe a little more than Bowser's length. If it hits an opponent, it will slow them. It will then stick to them. This attack takes only slightly less time then the Side Special, but still cannot be spammed.

Forward Smash-Leech Seeds
Now that this attack is charged it is slightly more effective. Bellsprout fires out 3 Leech Seeds instead of one. However, they function just like normal leech seeds. The lag on this one is a lot more than that of the Side Special.

Ingrain Con't
So. Now it's time for Bellsprout to show his POWAH. If there are Leech Seeds on any opponent, when he uses Ingrain he will steal 10% HP from them and add 10% damage to their damage count. And that's 10% PER SEED. And that's not all. After the usage of one Seed-assisted Ingrain, the opponent will get a considerable nerf in stats. Basically, Bellsprout's playstyle is making his opponent look bad in comparison. Their stats will decrease by 1 in every category for the remainder of the match. However, they cannot decrease any more. The seeds vanish after one use and must be reapplied.

Standards
Jab-Cut
Bellsprout juts forward with his leaves; somehow sharp as blades, and attempts to cut the opponent. Yeah. This move actually is really easy to combo and deals 5% damage per hit. It's a really quick, short attack as well. However, there is one move it can intersect with. Which will be stated here now.

Up Tilt-Tree Grow
When planted, Bellsprout will grow a tiny tree in front of him. Like, directly in front of him. He can only do this when rooted, and the tree has about 5% HP. If an opponent is hit by a tree when it is growing, they takes 7% damage and medium knockback. This tree takes about .6 seconds to grow, but has some starting lag. Anyway, this tiny tree is about as big as a capsule. Anyway, if Bellsprout attempts to cut these trees, this happens:

Epic Joint Move-Magical Freaking Leaf
The tree bursts into 3 Magical Leaves. The leaves will hover above Bellsprout for a second, then home in on the nearest opponent. Each one is about as Half as Big as Kirby, they'll move at about Fox's running speed towards the opponent. They deal 8% damage upon contact and deal heavy knockback, having medium priority and a hitbox that contains their whole model. This is one of Bellsprout's main KO moves. It KOs at around 140%.

Dash Attack-Front Flip
Bellsprout front flips away. It doesn't do any damage. He simply front flips out of the way of any attacks. In short, this move is basically a dodge. Doesn't do much else. Of course, what did you expect? It's Bellsprout. Plus, he spends most of his time in the ground.

Down Tilt-Counter
Bellsprout just DROP KICKS the opponent. Seriously. This is the move that should be used in joint with the Neutral Special, as it gives even more time for other moves. You see, it also buries the opponent into the ground. This attack is really quick, taking half a second to perform. It deals 9% damage as well. This attack has a Small hitbox, so it will likely not hit if used in a non-Endure Comboed situation.

Down Smash-Slam
An improved version of the Down Tilt, when charged this baby deals 12% damage! However, it takes quite a bit of time to execute and is laggy. Bellsprout slams the opponent on the head with his root/leg again, but covers is in vine to be more deadly. This one also buries, and has more priority and a larger hitbox. Charging time is pretty big, though.

Up Smash-Frenzy Plant
Bellsprout grows a small tree in front of him, same as last time. But if the attack was charged to certify it into being a smash, it quickly retracts into the ground, a new one popping of next to where the old one was, retraction, a new one popping up next to that one, and on and on. This will continue until it reaches the end of the stage. This is another damage racker, as the knockback has been replaced with hitstun. Each tree still does 7% damage, and this attack can only be used when rooted. Magical Leaf can't be used here.

Aerials
Neutral Aerial-Spinning Attack
Generic Kirby-Style spinning attack is generic. Bellsprout spins for 1.2 seconds, hitbox is center of his body, does multiple hits of 4% damage, last hit has medium knockback. Low priority.

Down Aerial-Growth
Bellsprout's lower body/roots/legs suddenly grow and stretch out the height if Bowser Downward. If they make contact with an opponent, it deals 8% damage and is a meteor smash with heavy downward knockback. If it hits land, he immediately squishes down to regular size, is pulled down tot he platform, and roots in. Great Priority, and nicely sized hitbox.

Up Aerial-Upward Slash
Another generic attack, Bellsprout swings on of its arms above its head, hoping to hit someone. Has a very small hitbox, deals 7% damage with little knockback. Surprisingly good priority though.

Forward Aerial-Leech
Bellsprout leaps Forward 1.5 Bowsers width, and latches onto any opponent he touches in this time. He will attach 3 Leech Seeds to them and then release them. The rush is quick, just under the speed of Fox's Side Special, but the hitbox is small and if Sprout misses he enters Helpless Fall mode. These new Leech Seeds function just like the old ones. You'll need to root to get energy.

Backward Aerial-Swerve
Bellsprout's flexibility makes him quite the acrobat. He performs a back flip and swerves downwards back to the ground, rooting on impact if he hits it. This attack travels about 1.4 times Bowser's height, and has small hitboxes and priority. If Bellsprout hits an opponent with this nosedive, they take medium downwards knockback and 9% damage. This attack could be considered somewhat a Meteor Smash.

Grabs and Throws and Such
Grab-Wrap
This is obvious. Anyway, some vines appear in front of Bellsprout when rooted. Yup. A root only grab. Anyway, they grab the opponent. And they will keep him locked up no matter how much they struggle! For 5 seconds that is. Yeah, 5 Turns is the max time for Wrap in the game, so, I thought that would be a nice tribute to hardcore fans. Vines cannot retract during throws, though.

Pummel-Tickle
You thought it would be Constrict, didn't you? Well, Bellsprout can learn this move. Plus it fits well into his Playstyle. Bellsprout reaches out and tickles the wrapped opponent. How cute. With every little bit of tickling he does, the opponent gets gradually lighter for the remainder of the stock. No damage though. The attack is also quick to execute, though the starting lag is eh. The weight of an opponent can only be lowered to three fourths.

Forward Throw-Vine Toss
The aforementioned vines throw Bellsprout diagonally upward/forward. They'll normally travel about Ganondorf's height, but if you've used the pummel enough they'll travel much further. This throw takes around .6 seconds to execute and deals 4% damage.

Back Throw-Backdrop
Like the epic anime Bellsprout, Bellsprout will grab the opponent out of the vines, holds them over his head and just slams them into the ground behind them. Headfirst. Ouch. No knockback, but they are buried. This attack deals a whopping 15% damage, but is really slow. Has really slow execution. Takes about 1.1 Seconds, and has medium priority. It has a couple invincibility frames as well.

Up Throw-Seeding
Bellsprout throws the opponent up into the air about 1.5 Ganondorf's height, shooting 3 Leech Seeds after him/her. The seeds will attack to the opponents, functioning like normal. The attack is short, about as long as Mario's up throw. The attack deals about 5% damage with the throw.

Down Throw-Bury
The vines retract with the opponent still in their grip, carrying them into the ground with them. This buries the opponent like a Pitfall would, only 3 times as long. Go to town on them, Bellsprout! The attack deals 9% damage, and takes about .8 seconds.

Final Smash

Giga Drain
Bellsprout raises its arms and shouts its name triumphantly! Green globs of energy come out of all opponents on the field, and the get absorbed into Bellsprout! Bellsprout gets a full restore(Pun not intended) on his HP Percentage and a new stock, and all the opponents' damage percentage goes up to 250%. Yeah. Oh course, it's rather improbable that Bellsprout will get a Smash Ball.

Playstyle
So, Bellsprout has 2 things going for him; 1. He's best on the ground. 2. He can mess up everyone else's stats to make himself look good. Now again, I'll go with a simple playstyle. Okay. Let's go.
Find a nice place away from the action to root. Rack up damage with Razor Leaf. Apply Leech Seeds using any of the four moves necessary. Grab the opponent and pummel them to Kingdom come. Bury them. Detach, use down aerial on them. Ingrain now. Use Magical Leaf to finish them.
Playing a defensive game? Root, use Frenzy Plant and Magical Leaf. If that doesn't work, detach and block their block with endure, followed up by slam or counter. Now Back Flip away, and come in with your Neutral Aerial, followed by your Side or Down Aerials. Grab them and use any of the throws.
Bellsprout excels at Ground combat. But his horrible stats need to made look better, so always remember you have the option to Siphon off of your opponent, the stage, and the opponent's weight.
 

Neherazade

Smash Journeyman
Joined
Apr 5, 2009
Messages
359
Location
Gensokyo.
HIDDEN POWER ftw.

Oy! I posted the finished set elsewhere. Look here: Unown for the finished product.

It ain't too good, but I'm happy with it... for now.
 

MarthTrinity

Smash Lord
Joined
Aug 9, 2007
Messages
1,954
Location
The Cosmos Beneath Rosalina's Skirt
SWALOT

Swalot is a 3rd generation pure Poison type Pokemon known as the “Poison Bag Pokemon.” Swalot is the evolution of fellow 3rd gen Pokemon, Gulpin; growing in size and changing to a dark purple when he evolves. Swalot’s claim to fame is his incredible, often insatiable hunger. With his massive maw, Swalot is capable of swallowing a car tire in a single gulp. But what about his poisons too? Well, Swalot is capable of emitting toxins from his pores which he then douses the foe with, weakening them to the point that they can’t fight against being swallowed whole…

Stats

Size: 8
Weight: 8
Fall Speed: 8
Traction: 8
Aerial Movement: 4
Ground Speed: 4
Attack Speed: 4
Recovery: 3

Eights and fours across the board huh? Seems like Swalot suffers when it comes to speed and control. Fortunately his good weight makes him a challenging little blob to budge. That being said, he’s a big target; probably Ganondorf’s height and Dedede’s weight. His recovery and aerial movement are poor so keeping him grounded should be your key priority…thankfully, Swalot has more than a few ways to keep his opponents at bay.


Specials

Neutral Special: Gastro Acid
Swalot stretches out his body so that he’s considerably taller. He then starts gagging as if something were caught in his throat before spewing a shower of green bile before him reaching a maximum distance of a full Battlefield platform with about the lag of an Ike side smash. The bile will stay on the stage for up to three seconds; any opponent who steps on it will begin taking rapid, rapid damage (1% for each 1/4th of a second they’re on it) however, don’t expect it to do a whole lot; they’re free to jump off at any time.

If the bile hits the opponent directly, it can do one of two things. If the opponent was shielding when it hit them, the acid will burn through their shield at an alarming rate (depleting Bowser’s shield in just two seconds). Simple solution? Drop your shield. If the gastro acid hits directly however, it’ll stick to the opponent for four seconds, dealing 16% in the long run. Great way to rack up damage regardless of how you hit the foe; Gastro Acid is a must use for Swalot users.

Side Special: Sludge Bomb
Ever had a sticky ice pop melt in your controller? Then you’re gonna love this move. Swalot rears back and then hacks up a goopy ball of disgusting sludge with Aura Sphere-esque lag. This sludge travels in an arc (that can be controlled like the arc with Snake’s grenades!) at about the speed of a tossed turnip. If it hits a foe, they’ll be covered in the grime for four seconds and take 5%.

Now here’s the real fun; while covered in slime, the opponent’s controls get all screwed up. No this isn’t another random control swap like in Silver; once covered in sludge, the opponent will have to REALLY put some force into their moves! Simply put; inputting a Smash command will give you a tilt or a Special, just like if you had a really sticky controller! Doubling tapping the control stick to dash will give you a walk instead of a dash and you’ll also be unable to grab. Fortunately for you, this move can’t be stacked against you; Swalot can only hit you with this once it has worn off. Fortunately for Swalot, unless you’re Snake, your loses some pretty valuable KO moves to use against you and also have to screw around with their controls to do even the simplest of actions…not only that, but they’re also severely hindered in speed…maybe you can finally catch them now…?

Up Special: Poison Gas
Facing directly upward, Swalot begins hacking and wheezing, spitting up a thick cloud of poisonous smog the size of Bowser about half a second later diagonally in front of Swalot. If the opponent is struck by this attack (or caught in the cloud of gas), they’ll take 1% for each half a second they’re in the cloud plus 1% poison damage for each half a second for a total of five seconds. Simply put, this is another HUGE damage racker, especially if the opponent is stupid enough to stick around in the cloud of gas for any extended period of time. After three seconds, the cloud of gas will evaporate (meaning this can potentially do 16% if they opponent plays it risky). A great anti-air/punishing move, just be cautious as Swalot suffers a bit of end lag after the gas is coughed up. Even though the cloud will be damaging the foe, they can still take this brief moment to hit you with a deadly Smash attack!

Down Special: Gunk Shot
Swalot seems to have a bad habit of hocking up sticky fluids, his Down Special is no exception to this rule. With a tap of this command, Swalot will face downwards and begin vomiting a sticky trail of purple ooze. Just by tapping the button, the trail will only be about the width of Kirby. Fairly pathetic, no? By holding it however, it will grow in Kirby lengths for each ½ second you hold it. Keep in mind that this move doesn’t “charge”. By holding the input, Swalot will continue to vomit the sticky substance until it stretches out it maximum distance of two Battlefield platforms. Once this distance is reached, Swalot will look visually skinnier and will spin a bit as if dizzy. This is just for show/end lag however; you’re still the same tubby blob of goo, your move is just very punishable if you fully exhaust it. The goo will literally stick around for 10 seconds before evaporating. You can pause and continue the vomiting at any time; just be aware that it’ll still vanish after 10 seconds…

So what does this sticky goo do? Gee, I wonder if it…sticks people? Of course! Once an opponent lands on this gunk, they’ll be stuck in place as if grabbed, able to break out at normal grab times, no thrills here. It does what it says on the tin; sticks them in place. That being said…what you do with this time is entirely up to you; douse them in Gastro Acid? Sludge Bomb them? Or perhaps there are further options you can go into. Keep in mind that this move has various other uses; for one, rolling barrels and crates will stop dead in their tracks if they roll over it. Many projectile attacks (like Mario’s Fireballs or Pikachu’s Thunder Jolt) will also be nullified if they touch it…hell, even the almighty Landmaster if it rolls over it will be stopped!


Grab and Throws​

Grab: Why is the grab listed immediately after the specials? Because it’s Swalot’s defining characteristic of course; eating! If used normally, Swalot will lunge forward with similar lag/range to Yoshi’s grab…hey, he’s a hungry boy, he’ll reach if he has to! Granted if you miss, you’re missing big time. Dash grab is the laggiest one in the game; couple that with Swalot’s already poor running speed and you’re in for a pathetic showing.

That being said…if you use the grab right in front of a Down Special gunk trail; Swalot will lean down and start sucking it up, opponent and all! He sucks at a very rapid rate, pulling the foe towards him at Fox’s run speed! Once the foe reaches Swalot’s gaping maw, they’re swallowed whole! He wasn’t lying about being able to swallow anything! Swalot’s grab is also twice as hard to escape as normal grabs; you don’t wanna know what’s going on in that stomach…! Also be aware that Swalot can use his grab to eat items that may be lying around.

Pummel: Digest
Too bad! Telling you anyway! Once inside Swalot, the foe will start taking damage quite similar to the way Gulpin damages foes when summoned from a Pokeball (about 1% per second). This also happens to be Swalot’s prime KO method. Once the opponent has reached 200%, they’re digested by the great hulking goo. Cheap? Hardly when Ice Climbers and Dedede have pretty much insta-kills against certain characters whereas Swalot has to actually WORK for it. Don’t wanna get digested? Don’t get grabbed. Once digested, an article of the opponent’s clothing or their weapon if they have one is then spat out and they’ll revive as normal.

Up Throw: Throw Up
Oh how originally named. Swalot spits the foe up (surprised gasp) and follows it up with a torrent of gastric acid! This attack does 4% to the spat up opponent plus an additional 4% added on for the poison damage. Not only this but it’s quite literally a shot straight up forward providing an easy set up for Poison Gas providing your foe attempts to DI back over to you or quickly retaliate.

Forward Throw: Twist and Crunch
With the foe inside of Swalot, the great goo ball twists his body tightly, constricting the digesting foe inside of him! He then leans forward and spits them at the ground before him dealing 3% for the whole deal. Why so low? Because it -CAN- be a chaingrab! Providing there’s a gunk line before you, Swalot will spit the foe onto the gunk, getting them immediately stuck again in which case he can pull them in a short way and repeat the process for as long as the gunk line exists. That being said, this chaingrab can’t last longer than ten seconds due to previously mentioned reasons; you won’t have any time to lengthen the gunk if you’re going to grab them again before they break free!

Back Throw: Yuck, Bitter!
Bleck! Swalot doesn’t seem to like the taste of your character much. He rocks slowly, his eyes in comical spirals. A moment later, he spins around and vomits the foe up, covered in Sludge Bomb grime! Not only does this have the same effect of the Side Special, it deals a solid 4% plus it takes about three seconds total, adding 3% on for digestion. Very easy to interrupt if you’re in team matches; this move can potentially be deadly if used to toss a foe off stage behind you; they’ll have to Smash input their Up B to recover or fall to their doom.

Down Throw: Gooey Slam
Swalot spits the foe down directly before him then tackles the foe who sticks to his belly as he does some kind of weird forward roll, finally hurling the opponent forward with surprising force, dealing 6% and medium knockback. This throw is excellent for getting your foe away from you if you want more gunk up or if you’re just lazy and want them to come to you. Be aware that it also rolls Swalot forward a stage builder block; if there isn’t that much room, he’ll stop at the edge. Seems like Swalot’s been watching a bit too much wrestling during his binge eating…


Standard Attacks​

Neutral Combo: Hunger Frenzy
Swalot sweeps before him with both hands (which fortunately stretch out so that his range is equal to Mario’s jab) and slaps towards him. If an opponent is caught by this, they’ll be pulled towards Swalot where you can do one of two things.

A.) You can grab the foe quickly before they recover and rack up some damage using digestion and one of Swalot’s throws.

B.) Tap the button again and Swalot will thrust out his big belly, bouncing the foe away a short distance just far enough for you to pull off the move again. At low percents, it makes for a good “infinite”…but don’t expect to rack up more than 15% or so with it; the knockback will increase enough to free them and you’ll flub up your chance to grab the foe.

Dash Attack: The Onionhead
Swalot picks up an amazing burst of speed out of nowhere; seems he’s starving! Running full pelt forward (which for Swalot is Mario’s dash speed), Swalot attempts to plow into the foe! If successful, he’ll smash straight into them, knocking the foe to the floor as if they tripped and dealing a solid 9%! They’ll also covered in Sludge Bomb grime as seen in the back throw and Side Specials as an added bonus for you. Kind of hard to hit with, but everytime you hit another player with it they officially get the right to cry out “He slimed me!”

Side Tilt: Noxious Fumes
Swalot shakes his head slightly before belching out a toxic pink cloud with moderate start up lag the size of an Assist Trophy. This cloud moves at the speed of Jigglypuff’s walk speed and, if it makes contact with a foe, will instantly put them into a broken shield animation as well as dealing 5%. Fairly predictable if used straight up, but you can easily catch a foe off guard with it or even pull them into it if they’re trapped via Down Special.

Up Tilt: Slimeryuken
Swinging one of his stretchy arms forward, Swalot performs a fierce uppercut, exclaiming “Marunoom!” (which comes out sounding somewhat like “MY NUTS D: “) as he strikes the foe and jumps up a ways with them dealing 5% and light set knockback. At the top of his jump (which is only a few inches off the ground really), Swalot sprays a stream of gunk onto his foe, pushing them away kind of like FLUDD dealing no additional damage by acting as a good GTFO away move. If Swalot misses with the first part of the move though (which is very easy, the range is less than a Mario Side Smash) Swalot won’t spray out the stream of gunk and will instead fall face first to the ground after his flubbed Ryu-esque rip-off.

Down Tilt: Toxic
Swalot leans forward and spits a glob of purple acid onto the ground with moderate lag on both ends diagonally downward a stage builder block away. If the glob hits a foe, they’ll take 3% and flinching knockback. If the acid touches the floor however before touching a foe, the ground before Swalot will begin to sizzle. If at any point in the next four seconds a foe walks over that spot, their feet will get stuck in the melting floor! While stuck, the foe gains super armor and no-grab armor until the four seconds are up…but they’re entirely vulnerable to being weakened while they’re struggling to get free!


Smash Atttacks​

Side Smash: Yawn
So he’s not only a glutton…he’s a lazy one at that? Jeez. Anyway, during the charge up of this move, Swalot opens his mouth wide. The longer your charge, the wider and wider his gaping maw opens. Once you release the charge, Swalot exhales and produces a white blob that slowly zigzags towards the foe at the speed of Jigglpuff’s run. If an opponent touches the blob, it will vanish and the opponent will instantly fall asleep. If they touch the blob mid-air, they’ll fast fall downward and fall asleep when they hit the ground. At minimum charge, this move will put an opponent to sleep for the same length of time as Sing and reach about a Bowser width away. At maximum charge, it’ll put them to sleep for double that time and reach slightly longer than a Battlefield platform. This can be used quite well as a gimping tool if push comes to shove but can also be used to use one of your slightly more laggy specials. Be aware though, this attack has a bit of beginning lag.

Up Smash: Swallow/Spit Up
Swalot looks upwards, his beady eyes watching above him. When the move is released, Swalot jumps up (a crouching Pikachu height uncharged and a Dedede height fully charged) and tries to snatch up any opponents who may be above him! If nobody is grabbed, Swalot hits the ground and takes about ¾’s of a second to recover. If he grabs a foe though, he swallows them whole and lands on the ground. The opponent starts taking digestion damage so long as they’re in Swalot’s stomach.

At any time, the Swalot can input a Smash command (in any direction) again to spew the opponent in that direction, sending them flying with medium/high knockback and 10%. Ideally you could just keep them digesting for a while before spitting them out, but wait too long and the foe will break free causing Swalot to be stunned for twice as long as a normal grab break would stun him for.

Down Smash: Acid Armor
As you charge the move, Swalot will glance around nervously, seems he’s really a big softy when it comes to this whole fighting thing! Once the charge is released; Swalot will sweat a storm! This is his so called “Acid Armor.” Unlike Vaporeon, it’s actually a toxic slimy film that Swalot sweats out! Gross! The longer you charge the move the longer it lasts; at minimum charge it’ll last you two seconds, at maximum, it’ll last you six. This is not stackable. Nasty start up lag but little to no end lag.

So what does Acid Armor do for Swalot? Well…any physical move used against him, meaning punches, kicks, headbutts, licks, whatever; if the opponent makes physical contact with Swalot, their attack will still connect but they’ll also take 5%. This also makes Swalot impervious to grabs until the armor wears off; any grab attempts will be met with instant breakout and 5% to the grabber. Be aware though; this attack is quite misleading; it won’t actually protect you from damage or knockback, it’s more for making the score even.


Aerials​

Neutral Aerial: Rapid Goo
Swalot begins rapidly spinning in mid-air, doing front flip after front flip! So long as you keep the button held, Swalot will continue to spin repeatedly, becoming a low priority hitbox. If you hit the ground while doing this move however, instead of landing, Swalot will bounce off like a rubbery basketball! Each time you bounce off the ground you’ll gain height, you can even move horizontally although with limited control meaning you’re very likely to hurtle off the edge. Also keep in mind that you’re a very low priority hitbox; almost any attack can knock you out of this! Each hit will deal 3% to the opponent; little start up lag but mild on the ending.

As a side note, if used in combination with Acid Armor, drops of toxic sweat will fly off Swalot, reaching a maximum distance of a Bowser width away. Anyone hit by the sweat will take rapid hits of 1% like Sheik’s needles.

Forward Aerial: Greedy Lunge
Swalot propels himself through the air a stage builder block forward powered solely by pure hunger, his mouth agape as he jets forward! If he grabs a foe, he’ll swallow them in mid-air and then spit them downward, dealing 13% and a moderate spike, gaining a slight vertical lift himself as he spits the foe out. From here, you can either fastfall and footstool the opponent, or you can fair again if you need to get back to the stage. If you flub this move however…you’ll pay dearly, massive end lag if you hit ground, loss of stock if you don’t.

Up Aerial: Goo Chain
Facing above him, Swalot spits out a stick strand of goo with hopes of ensnaring his foe! If successful, Swalot slurps up the goo, opponent and all! This can either be used as a suicide KO, a way to build up damage/KO via digestion or as a lead in to a throw. As soon as you touch ground, you’re able to throw your opponent providing you input the throw command pretty much immediately after touching down.

Aside from this, Swalot’s up aerial can also be used as a makeshift tether recovery. It has no special features however and is just as predictable and gimpable as any other tether; same lag reach as Zero Suit Samus’ tether.

Back Aerial: Hungry Reach
Swalot twists his head around and tries to gulp down any foe within a Kirby width behind him. If successful, Swalot will then spin his head back around and spin a few times in mid-air before coughing the opponent forward a Kirby width. Overall, this process leaves the opponent with an additional 6% and in the perfect position to follow up with a fair. Be cautious if you miss with it however; like many of Swalot’s moves, it has nasty end lag if flubbed…

Down Aerial: Grime Waterfall
Not much water here unfortunately…well, for your opponent. Swalot faces downward and opens his mouth wide, releasing a huge torrent of sludge that will fall downward indefinitely until it either hits the stage or falls off of it. If an opponent is caught by the sludge, they’ll be pushed downward like a slightly weaker FLUDD. This attack deals no damage at all, has little start up lag but a nasty bit of end lag. So what stops this from being the ultimate gimping tool? Swalot’s a fatty, remember? Good luck keeping him in the air long enough to gimp with this.

As a side note, if this sludge lands on the stage, it’ll start to pool, creating a small area where the trip rate goes up enormously…except for Swalot. After four seconds though, this grime will evaporate.


FINAL SMASH​
SWALLOW A LOT​
Hah, get it? Because that’s what makes up Swa-..yeah, you get it. Anyway, Swalot has the Smash Ball and he’s glowing! With a tap of the button; Swalot…falls off stage?! What just happened? Swalot seemingly falls off the stage only to appear a moment later…but absolutely huge! Swalot then instantly swallows the entire stage, his damage decreasing by 100% in the process like he just grabbed a Heart Container. Don’t worry though if you’re an opponent; it’s not an instant stock loss…

Instead, you fight inside of Swalot! There are no blast zones inside of Swalot so dying isn’t possible, but the entire bottom half of the screen is filled with rising stomach acid, much like in Brinstar. Touching the acid deals 20% and medium knockback. Large drops of stomach acid will also fall from the ceiling; contact with these will deal 10% and a downward spike…just know, there’s a -LOT- of falling drops…

After fourteen seconds are up, Swalot coughs up the stage and then falls from the top blast zone to the center of the arena. If you’re playing on a stage with no middle platforms…it’s kinda like using Great Aether over it; not a pretty ending for anyone.


Playstyle​

Generic yet humorous comment about picking Swalot and how that’s an interesting choice. In case you didn’t pick up from the moveset, Swalot is, as the Pokedex says, all about weakening a foe and swallowing them whole. Fortunately, many of Swalot’s moves aid the weakening process quite well and even more of his moves are very useful for setting up for the big gulp. With Swalot, you’re very, very slow. You’re also very, very big. BUT…all is not lost; if you play smart, you can easily make it so that you’re neigh near untouchable.

First of all, you’ll need to rack up a good deal of damage against your opponent. For this, Sludge Bomb, Gastro Acid and Poison Gas are all prime moves to add up some quick damage. With their initial damage and then their poison damage to come, your opponent will have to think twice about blindly rushing in to put the smackdown on your tubby purple blob. Swalot’s grab and throws can also be quite handy for adding up damage, especially coupled with any poison effects or his digestion “pummel.” Swalot’s chaingrab, while not being entirely reliable, is still a pretty awesome way to rack up some damage, Nair when used in combination with Acid Armor also helps add up a nasty amount of damage.

Okay, you know how to damage your foe properly…but how do you set them up for this beating? Fortunately, you have many ways to do this! Swalot can stick the foe to the ground using his dtilt, allowing him to pull out Gastro Acid…or he could use Yawn to put them to sleep. Yawn is a very flexible move; because the hitbox on it is so weird…not to mention it effects aerial and grounded foes alike. Even if Swalot can’t hustle over to the sleeping opponent, he can still set up his Gunk Shot trail. Ftilt will also effectively disable your opponent for a good amount of time…it’s just fairly unreliable when it comes to hitting a foe with it.

Now that you’ve got your opponent nice and weak, it’s time to finish them off, Swalot style. That being said, you have various options to gulp the foe down. Usmash is an easy one to land, especially if the foe is trying to approach from above, as is a SH’d uair in the same situation. Alternatively, you could always go for the more traditional way of grabbing via Gunk Shot trail. This is probably your safest best as it makes sure you won’t be eating a dair from your opponent. Dash attack and neutral combo are also fairly effective for putting your foe into a good position for being gulped down. Any of these strategies will work quite well for landing your grab/digestion, use whatever fits the situation best.

Alternative strategy? Who would’ve thought Swalot would be so useful when it comes to gimping, huh? Bthrow is right off the bat an awesome strategy for gimping your opponent. If they’re not expecting it and get tossed off, there’s a very likely chance that they won’t Smash input their recovery and will fall to their doom. Alternatively, you can use a combination of bair, fair, dair to drag the foe in front of you with bair, spit them out below you with the fair and then flush them off screen with the dair! It’s not a very useful strategy admittedly, what with how fast Swalot falls…but it’s still a very possible strategy for some easy gimp KO’s.

Defensive kind of player? No problem! Acid Armor is right off the bat an excellent way to stop those nasty chaingrabbing Dedede’s from going to town on the chubby purple goo pile. That being said, Swalot also has numerous ways to make the foe get away from him in case he either wants some more breathing room or wants to set up a longer Gunk Shot trail! Utilt, dthrow, and uthrow are all very useful moves for forcing the foe away. If you’re feeling rather gutsy, you can even use the nair to try and bounce away from your opponent…just be careful not to send yourself soaring off the edge…


Extras​

Up Taunt: Swalot Stretch
Swalot stretches his body out so that it’s incredibly fat at the bottom and top…but very skinny in the middle! Gravity sets in and the top part of his body tilts forward as he flails his stubby arms wildly. Once he hits the ground, he quickly retains his normal shape.

Side Taunt: Sludge Fountain
Swalot takes a pose that you may see on a fancy fountain statue and sprays a jet of sludge into the air above him. A moment later, Swalot falls forward, the sludge hitting the back of his head as he hits the ground.

Down Taunt: Slime Spin
Swalot does a spinning pose much like Kirby’s taunt…except he once again falls flat on his face. Poor guy just can’t stay balanced, can he?

Victory Pose 1: Sirtin Victory
Swalot seems really happy to win as he waves his arms about wildly. He opens his mouth…and a Pinsir comes out of it?! What the heck?! Silly Swalot, you don’t need a Pinsir to help you fight!

Victory Pose 2: Hungry Hungry Swalot
Swalot looks around hungrily, he then decides the camera looks awfully tasty…the whole screen goes black as Swalot swallows the camera whole.

Victory Pose 3: How Did Swalot Find His Competition?
Delicious. Swalot stands happily before the camera as none of his opponents are seen on screen. The only thing that remains are articles of clothing and weapons in the respective spots of where the foe should be…

Also, for anyone who can't see the header font...this is it.
 

Kris121

Smash Journeyman
Joined
Nov 26, 2008
Messages
263
Location
THE INTERWEB
Katapultar... I actually liked Shedinja alot. Way to use Shedinjas abilities and staying to character. I might SV later. All in all nice set. Also about one man band. I did that just to share a bit about myself.
 

MasterWarlord

Smash Champion
Joined
Aug 24, 2008
Messages
2,902
Location
Not wasting countless hours on a 10 man community
SWALOT

I love how I essentially ignored Swalot’s existence until now for the most part only to discover he’s one of my favorite Pokemon. Heh. You certainly manage to make a moveset that feels distinctly Swalot. The main draw to the set is Swalot making the ground sticky and swallowing up the trail, no questions asked. Great concept right there, as well as the nice little chain grab.

While the pummel KO is pretty elementary by this point, it just makes too much sense for Swalot, certainly more then something like Negative Man. My –real- concern here is that Swalot could use a bit more flow. Considering you just list a few damage racking mechanisms in the playstyle and then list the occasional defensive option as an afterthought paragraph feels a bit awkward, him not having enough of the usual defensive camperis/trapperness that goes along with being a grab heavyweight. While that’d make him more stereotypical, I’m not asking you for a revolutionary playstyle concept from a one day Pokeset. Varied playstyle you say? It’s not that varied when he doesn’t seem to be that great at anything (Granted that could be argued as a balance complaint, lol generic number edits).

Of course, Swalot still certainly has some flow, or else I wouldn’t like the set, which I do. The main thing going for it is the set-up moves in order to give Swalot more time to do whatever. There’s also a few nice move interactions here and there, like dsmash/nair, and of course the beauty of Gunk Shot. Certainly leagues better then Tauros while still having the “Punch Out” feel of him (He has traps, okay, but he’s still not remotely over the top), much less given the production time of the two sets.

PROBOPASS

Probopass is very confusing at first, especially to one who doesn’t know what the Mini-Noses are, but most of the information I want added is just a couple sentences or two that I eventually figured out on my own anyway. Considering the fact you made this in the same time frame I made Venusaur, it’s very easily forgiven.

I’m a big fan of the unable to turn around mechanic on Probopass. While I was struggling to understand him at first, Side Special was when I started getting excited and kept reading on eagerly as I began to gather how Probopass played. While the mini-noses aren’t a fascinating concept, when combined with lock-on they give Probopass some decent camperish tools for attacks he’d normally have to get up close to use. Probopass also hardly has any irrelevant button inputs, the standards functioning as the obligatory close range defensive GTFO moves. Granted, the fact you omitted three throws means you sort of covered it up, but you had more inputs to replace them, so. . .Yeah.

All in all, there’s not much to complain about. Probopass comes together very well in the end, though his playstyle wasn’t nearly as obvious and flowing as when reading through Abomasnow. I feel Probopass is a more ambitious and unique take on his genre then Abomasnow with a more unique playstyle concept to shake it up, but Abomasnow’s superior flow keeps him in the running for me. Either way, both are great sets, especially considering Probopass was made so quickly.
 

darth meanie

Smash Journeyman
Joined
Jun 6, 2008
Messages
452
What Awesome Have I Wrought?

Vaatisaurus

So, the second one-day set. And not a bad one at all! The idea of an easily KO’d tank is one that would make many raise their eyebrows, but Venusaur remains both feasible and in character. While at first I was disappointed at Solar Beam, once you explained the relation it had with Sunny Day, and the relation it had with Synthesis… it became quite delicious. And the emphasis on the ability to stall was an excellent complement to the concept.

However, I did feel that some of it felt a little redundant. There were a lot of moves which fit in mostly as being able to just wait away the leech seed and poison damage, and there didn’t need to be nearly as much emphasis on it as I felt. Of course, it’s a one-day set, so I’m not disappointed by something as relatively mild as the redundancy of one or two moves. Things like the pummel though were a little disappointing, seeing as it had you completely sacrifice a throw to use thanks to its unbinding feature, and all it did was let you wait a tad longer.

You talk about his ability to drop back down to 0%, which I question first off whether he even can do, and if it could be balanced if he did. While I love the fact that he heals so he doesn’t have to recover, if he can get back to 0% damage in a competitive match, or close to it, then either his recovery is so weak he can be killed right from the start of a match, and he’s garbage tier, or his recovery is strong enough to consistently save him at the start of a match, and he’s broken. I get the feeling that he’s actually the former, not the latter.

To an extent, these are problems of numbers though, not of concept, although the fact that you suggest that much ability to heal was intentional makes me worry a bit. Still, I’m not going to whine about some numbers that need tweaking on a moveset made in four hours. There were a few lolwut? moments like with the completely useless and ridiculous Uair, but overall, an enjoyable read, and more importantly, a nice way to help kick the thread in the shins and get it moving again.


Shedinja

Shedinja reminds me a lot of Banette, and you know I’ve sung that set’s praises more than it deserves. Unlike others, I think that the way you implemented Wonder Guard was about as good as you could; you couldn’t shut out everything and keep him balanced, so making him only harmed by those moves he’s weak to and aerials (which is also a reference to his flying weakness) was a good move. The creativity in the connection between the Neutral Special and Side Special was so disgustingly phenomenal, although it doesn’t actually balance Shedinja out. As long as Shedinja has two stocks left, he can’t be KO’d, as he’ll always be able to regain a stock during that invincible period.

Shedinja is a balance nightmare, and it could’ve been better, if this moveset hadn’t been so clearly rushed. And that’s part of the one-day moveset idea, but it makes a set like Shedinja really suffer. The incredibly limited number of moves, and the way that it doesn’t all fit together as well as it needs too; Shedinja’s playstyle demanded a scrutiny that you probably weren’t able to give it.

I really liked the concept behind it, just like I did with the one behind Banette (in my mind you’re the 3rd Gen Ghost-type Pokemon God), but Shedinja just didn’t have the meat to bring it together. I wish I could’ve loved this set, but I can’t.


Bellsprout

While Bellsprout’s organization is better than your usual, I still have to say that you’ve gotta step it up. The centered text, missing line breaks, and underlining makes it look sloppier and less inviting. Sure the left-aligned 3 size font (enter) text format is boring, but it looks a lot better. Minor nitpick aside, Bellsprout is a nice example of your evolving grasp on playstyle; he certainly has more of it than the rest of your sets this competition, although there’s still a long road ahead.

Ingrain’s abilities are all slapped together a little haphazardly, but they work pretty cool together. Shrinking the stage is a concept nobody’s ever done before as far as I know, and with moves like Razor Leaf it actually creates an interesting element to his playstyle. I think that your description of Endure is wrong, or its obscenely overpowered. From the way I understood it, once you use it, Bellsprout will instantly counter and grab the next attack sent his way no matter what. Not only does that mean Ingrain is completely superfluous, as he already has the defense he needs, but the opponent literally cannot even get a successful attack without getting punished; hardly fair.

Also, your standards are pretty generic. Several of your smashes are your tilts simply repackaged with more damage; not even Brawl movesets are that repetitive. Throw in some aerials that don’t really do anything for the set itself like the Nair, and there are some disappointments there too.

Nonetheless, this was easily my favorite set of yours so far. While the voice of the set felt a little juvenile, it was the most engaging of all your movesets so far, and everything about the set was more interesting than your usual faire, plus you did this in such a short period of time. Kudos KoppaKirby!


Swalot

MT, you really have an engaging writing style, you know that? Very few people can make the concept of making a controller sticky sound like an awesome idea. Swalot is a cool moveset, and I really liked him overall. He had a few trappish moves here and there, but nothing too ornery, and the grab game was both fresh and playstyle-centric, introducing key concepts and giving the whole set a beautiful amount of flow with the whole digestion system. Although 200%? On a character with pretty good gimping options with his Sludge Bomb? I don’t see Swalot getting to make May cry as much as its focus in the moveset would like me to believe.

There are also a couple moves that feel out of place; the Up Tilt is incredibly whacky, and while funny, it seems rather useless in a standard match. 5% and hard to hit with, without really helping him with his work? Bleck. Also, I was disappointed when Gastro Acid introduced a great way to discourage shielding, but never followed up with a way to take advantage of it. With all of Swalot’s grab attacks, enemies aren’t going to shield much to begin with either.

Swalot was fun though. He flowed so well, and the whole moveset came together so that even with more than a few individual weaknesses, it forms a very strong statement for itself. I liked MT, well done.


Gee, when did I become so complimentary lately? It’s like I’m not even trying to crush souls anymore.
 

Katapultar

Smash Lord
Joined
Nov 24, 2008
Messages
1,258
Location
Australia
Thanks Kris for the comment. I might make a serious pokeset later if I feel like it. Got lots of fellas to choose from.

DM, I wasn't really trying to make Shedinja good. I could remake him to be good, but I didn't really try.

[size=+3]Bellsprout [/size]
*bashes Warlord for not commenting on Bellsprout.*

The one thing that comes out at me is the magnificent "Bellsprout" header at the start. Seriously, great job there, nobody's ever done something like that before. Hehe, might steal it for a set.

I guess you've gotten used to having special mechanics in your sets. Most likely a playstyle sum-up, but not too neccesary. Im just glad it's not tacked on. But I don't really understand: what exactly do you mean in terms of "platform?". Can Bellsprout only use attack on a platform or does he become a platform? It's either situational or senseless.

Bellsprout seems very weak that his best move kills at 140%. But it's unfair that Bellsprout can't be unrooted out by foes who essentially don't have fire. That makes Bell near impossible to knockback. Or do you have a answer for that.

I kind of find it a bit out of place that Bellsprout's Leech Seed, something that he seems to rely on, is mentioned in a rather random move. The order of the attacks in the standards is rather random, and it makes it feel very long winded to have to read like half the set in the standards.

But seriously, I do feel that you just keep improving constantly. Bellsprout is no exception. I loled at Magical Freaking Leaf. I declare this your 2nd best set. I don't know if I should place this in Bully's terms. Yeah, Im gonna bring Bully up so when people read this they think of Bully. Cus Bully's awesome.

[size=+3]Unown [/size]
It's probably not a complete set, but it still gets the same respect like all sets do. I'll give you some advice on sets since others would hesitate to do so. Hopefully it may help your joint set as well.

As most would say, you'll need some BBcoding on the headers. some [size] and [color] would do the trick. If you don't know how to do this, click on "Go Advanced" at the bottom of the page or simply edit the post. Some visual indication of titles like "idle" would be nice. Makes it easy on the eyes.

Secondly, the sentences used to describe the attack doesn't flow greatly. The order of details isn't random (It's well structured in fact), but placing them in seperate senctences really messes up the reading, especially with the 2 lines, such as this:

"It deals more damage the faster it is rolling,
but the change is minimal."


On the other hand, I do like how you described each of the 2 Unown's powers, which gives the reader a glimpse of what's to come next. Definitely has my approval. Displaying the 2 Unown's attacks on the right and left is a smart idea, though I don't really understand the HP concept.

Shows some promise for a newcomer. I'd consider this a warm up in your case, and if you do manage to complete it, remind us through a post or updating it using a URL link to the set. I can finish off commenting on it if you do that.

[size=+3]Swalot [/size]
Surprisingly enough, Im starting to hate white writing. Don't let that be criticism however, Im just getting to be personally.

But enough of that. I do see a problem with the Standard, which seems to a filler and a faster version of the Grab. I'd rather use that than the grab. Also, U-tilt seems OoC, but I guess it's okay to take inspiration from some new video game that came out. Not. F-Smash can kind of cheap gimp, but it's a easy mistake, so no worries. While it is Swalot, it get's difficult to keep track with all these toxic blob moves that get introduced throughout the set.

As expected, there's good writing style and fun, but that's needless to say. I can perfectly understand the small lack of flow, cus when people rush a set's production, they'll put any random junk in. I did it for my old sets, so yeah. Fun, pretty fun.
 

Hyper_Ridley

Smash Champion
Joined
Dec 21, 2007
Messages
2,291
Location
Hippo Island
I caved

ARBOK


Arbok is from the first generation of pokemon and is the evolved form of Ekans. He is a poison-type. If you’re not the know, his name is “Kobra” spelt backwards, a reference to the creature it’s inspired from. It paralyzes its prey with a special power in its eyes. Arbok is also capable of using poison as well, so don’t think you’re safe if you’re blind.

Arbok is a well-known Pokémon due to being utilized by Jessie of Team Rocket. While Arbok started out as a powerful adversary as time went on Team Rocket ended up as comic relief and Arbok didn’t fare much better than his masters. In the games his career isn’t exactly stellar; he’s currently in the NU (Never Used) metagame, the lowest rung of the ladder for having below average stats in all categories, and isn’t even particularly notable within his own tier. On the bright side, his actual signature move Glare is used on his most common set, so at least he plays how he was intended. He also has a somewhat unique set of stats, having better physical attack than defense but having better special-defense than special-attack.

STATS

Ground Movement Speed: Great, as fast as Fox

Traction: Good

Jump height: Below average. Snake’s aren’t exactly known for jumping.

Midair Jump: Below average

Aerial Mobility: Average

Fall Speed: Average. You may have gathered Arbok is ground-based, ironic since he’s weak to ground-type

Size: As long as Bowser’s height when all stretched out. Normally Arbok is coiled up a bit and the part that’s standing upright is as tall as Mario. He is fully uncoiled when moving but he’s so low to the ground he’s like Snake crawling (ololololololol).

Weight: A bit below average

SPECIALS

Neutral Special: Glare
Arbok hisses for .3 seconds before his eyes shine with a yellow glow. This lasts for .3 seconds, and any characters who are in front of Arbok, facing his eyes, and within an area as tall as Bowser and as long as 1/3 of final destination are stunned as though they were hit by Zero Suit Samus’ Paralyzer. This is unblockable AND un-dodgeble but the can technically dodge it through a forwards roll towards Arbok, which would turn them around. The stun effect lasts for .6 seconds and this move has no end lag, but Arbok cannot stack this effect and enemies are immune to the stun for 1 second after it wears off to prevent an infinite. Besides giving Arbok freebie hits, it encourages opponents to come closer since they have to roll towards Arbok to avoid it if they’re in range.

Side Special: Poison Sting
Arbok begins to inhale as purple energy gathers within his mouth, signifying he is charging the move. He can charge for up to 2 seconds and the charge is storable. The actual attack is Arbok firing a series of small needle-shaped energy projectiles in rapid succession, similar in appearance to Shiek’s needles and just as fast. Each needle deals flinching knockback along with 2 seconds of poison damage, each second dealing 1%, and the effect can stack up a maximum of 20 seconds (all poison effects in Arbok’s moveset stack together with the exception of FSmash). There is low lag to charge and fire the needles (with average end lag after firing), and at max charge Arbok fires 10. The needles have low priority so they can’t win in a projectile war, but their point isn’t to allow Arbok to camp, it’s to stop the foe from camping once they get poison damage so they actually have to engage Arbok in order to stay ahead in damage.

Up Special: Solid Spring
Arbok has to improvise for a recovery here. He’ll start to coil up just like a spring, and this is a non-storable charge that lasts for up to 1 second, Arbok’s fall speed halved while he charges. Upon release he’ll launch himself straight upwards from Gannon’s height to 5x that, though he can be angled 30 degrees in either direction with the control stick. His entire body is a hitbox that deals 10% and knockback that KOs at 200%, but the minimum knockback is as far as Bowser’s height. Low startup and end lag.

Down Special: Poison Fang
Arbok leans back for .3 seconds before lunging forwards as far as 1/3 of battlefield on a low trajectory, his mouth open the entire time. His fangs are a grab hitbox and upon connecting he wraps his tail around the victim as he injects his venom into them. This gives the enemy a full 10 seconds of poison damage and Arbok leaves the enemy wrapped in his tail once he finishes, going directly into his grab-game. There is above average end lag if Arbok misses, so you may want to set this up first with Glare. Treat this move as an alternate grab that also deals damage; and trust me when I say that poison damage is the best thing Arbok could start his grabs with…


STANDARDS

Jab: Poison Jab
That isn’t a lazy name, there really is a Pokémon move called that. Arbok does a quick bite in front of himself, having similar lag as Melee Ganon’s (no startup lag and above average end lag). This deals a minor 5% but adds 5 seconds of poison damage. This doesn’t KO till 200% so you can probably tag your enemy twice, but the range is too small to do more than that.

Forward Tilt: Leer
Arbok hisses as his eyes glow blue for .1 seconds. This has .3 seconds of startup lag and low end lag. If an enemy is caught within an area the size of Dedede in front of Arbok and facing him, they will suffer flinching knockback and have a blue tint for the next 5 seconds, disabling all projectiles, summons, and trap moves (and like Glare is cannot be blocked or dodged). What, you say that another set of mine had a move like this and it was too powerful and became their dominant strategy? My boy, this peace is what all true warriors strive for that’s because the moveset had no other viable moves to begin with! Arbok can actually approach competently so this is simply the final way to stop the opponent from escaping!

Down Tilt: My Toe!
Arbok quickly bites at the ground a bit in front of himself, about Mario’s height in total range. His teeth are a hitbox that deal 7% with knockback that KOs at 180% and adds 3 second of poison damage. This is a great approach tool thanks to low startup lag and Arbok being so low as he performs it. It has below average end lag.

Up Tilt: Get over here!
Arbok whips forwards his bottom half while swinging it up. It has a hitbox that deals 9% with knockback that KOs at 190%. There is also a sweet-spot on the very end of his tail. If he hits you with this, he wraps his tail around you and slams you to the ground right in front of Arbok, dealing 10% and leaving the enemy lying down. The enemy can tech the hit but Arbok is still in a prime position for tech-chasing, making this a superb pressure move and a rewarding approach. Below average startup and end lag

Dash Attack: Pursuit
Arbok hastens his already fast dash to Captain Falcon levels, his head having a purple-colored wind-effect around it as he goes. This lasts until he reaches the edge of the platform, takes damage, or presses the Attack Button again to cancel it (no Junahu I am not sorry, it fits his playstyle for him to hold the attack as long as he wants (h)).

Anyways, Arbok’s head down past his frill is a hitbox that deals 12% with knockback that KOs at 180%. You may hold up or down for him to go into the fore/background during his attack, and switch between the main place and the dodge-planes freely, taking .3 seconds to fully transition to the next plane (Arbok’s body that’s left in the previous plane can still be hit). As you might expect, Arbok can only hit enemies in his plane, and likewise for the opponents. You can bypass projectile spam only to come back to the regular stage to hit the opponent, and if you predict a dodge you can hit them anyways! Be careful, though, as Arbok suffers high end lag if he hits a shield as he ends up dazed.

SMASHES

Forward Smash: Toxic
Ekans coils up tightly and hisses for .4 seconds. He then lashes out with his head as far as Falco’s height, his teeth a grab hitbox and he has super-armor during the charge time. If he connects, he sinks his fangs deep into the opponent and injects copious amounts of venom into them. He then tosses them away as far as ½ of battlefield with average end lag, and he has low end lag if he missed with the original bite.

An enemy who was bitten like this has a purple tint and is considered Badly Poisoned. This effect lasts for 7-13 seconds and the opponent takes 2% a second in addition to movement speed in the ground and air that is 75% of their original amount. This overrides regular poison damage until it wears off. If the opponent has any other status effects that tint their coloration, such as Leer, the character will alternate between the colors (and this goes for other combinations of statuses that do this).

Down Smash: Homing Strike
Arbok coils up tightly as he starts to hiss. After .4 seconds of startup lag, if there is any enemy within an area around him the height of Marth, he will lash at them with his teeth as the hitbox, and while they are not a grab hitbox he will reach into the foreground/background so this cannot be dodged. His bite deals 13-24% with knockback in the direction he lunged that KOs at 150-130%, and this adds 5-9 seconds of poison. Low end lag.

Up Smash: Gunk Shot
Arbok looks skyward and shoots a glop of purple spit straight upwards. It is about the size of Olimar and travels as high as Snake’s half-charged USmash before exploding into a ball of poisonous goop thrice its normal size. The concentrated goop deals 10-18% with vertical knockback that KOs at 160-140%, and adds 8 seconds of poison. The explosion deals 14-26% with vertical knockback that KOs at 120-90%, and adds 4 seconds of poison. This has low startup lag so it’s a good anti-air move, but it has average end lag once the goop explodes.

AERIALS

Neutral Aerial: Turning Strike
Arbok spins horizontally in the air, becoming a full circle as he does one and a half rotations over .3 seconds. He has the radius of half his length, and since he reaches into the fore/background this move cannot be dodged. It deals 9% with knockback that KOs at 210%, and if shielded it deals decent shield stun. Average startup lag with low end lag, and Arbok ends the move facing the opposite direction. If you’re using this as you approach, you can continue to pressure with BAir.

Forward Aerial: Fake Out
Arbok curls up before lashing out, chomping with a grab-hitbox that deals 9% and adds 3 seconds of poison. Average startup lag, average end lag, can auto-cancel. If you wish, you may tap the input for Arbok to lunges his head forwards like he was doing the move, but he doesn’t bite, giving the move no end lag whatsoever (where else did you think the name came from?) This makes it a great approach tool since you can mix it up with other moves to punish the opponent’s spot-dodging attempt.

Back Aerial: Poison Tail
Arbok swiftly whips with the back third of his body as some purple venom oozes from it. This deals 9% with knockback that KOs at 200% and adds 4 seconds of poison. It also deals a bit higher shield-stun than normal. This has low startup lag with average end lag, though the part of Arbok’s body that was a hitbox has anti-grab armor during the end lag so you can’t simply shield-grab him out of the move. Combined with NAir this is a nice approaching tool.

Up Aerial: Shed Skin
Arbok “jumps” straight up as he wriggles out of his old skin, going up his length and his entire body is a hitbox that deals 9% with vertical knockback that KOs at 210%. After performing this move, his old skin is left on the ground, disintegrating after taking 20 damage. If Arbok uses Glare or Leer and the shed skin fulfills the conditions of being “affected” by the move, its eyes will reflect the attack and have a hitbox of their own. This means that if the opponent is caught between Arbok and his skin they cannot dodge the staring attacks even if they don’t look at Arbok!

The skin is not solid, and Arbok may have as many of these in play as he wishes. In fact, the light from the staring attacks is reflected off the back of the skin too, so you can effectively have a chain reaction going across the stage! The only limit is that Arbok must wait 4 seconds between uses, or else his skin isn’t ready to be shed and he simply performs the wriggling part (he also will not move up as he does it so he can’t stall). Below average startup and end lag.

Down Aerial: Slithering Spiral
Arbok starts to spin around horizontally like in his NAir, but rather than go in a normal circle he spirals downwards until he hits the ground. His entire body is an un-dodgeble hitbox that deals 12% with knockback that KOs at 170%. Low startup lag and below average end lag.

THROWS

Grab: Wrap
If you did NOT see this coming, please turn off your Internet Browser now. Arbok quickly reaches out with his lower half, reeling the enemy in as he gazes upon them. This naturally has great range and startups near instantly but it’s a bit punishable if he misses.

If an opponent is poisoned while in Arbok’s grab, it is 1.3x more difficult to escape. If the victim is badly poisoned from Toxic, it is TWICE as difficult to escape! Suddenly Poison Fang sounds Godly, yes?

Pummel: Scent Tracking
Arbok licks the opponent, gathering their scent on his tongue over .4 seconds. After the victim leaves the grab (whether it be from escaping or being thrown), Arbok will retain their scent for 5 seconds. As long as Arbok has their scent, his biting attacks deal 2 more damage and add 1 more second of poison damage, and as long as Arbok is within 1/3 of final destination of them his movement speed in the ground and air increases by 20%. Arbok will override the current scent trail if he acquires a new one, and this pummel does not stack, so use it once then throw!

Forward Throw: Death Bite
Arbok opens wide and CHOMPS right onto his prey, dealing 16% with horizontal knockback that KOs at 80%. Yikes! Sadly, this grab has about .6 seconds of startup lag and the grab timer continues to tick down while Arbok prepares the blow...

Back Throw: Trusssst in Me
Oh God no not a reference to Cah from The Jungle Book! CURSE YOU HYPER_RIDLEY!

Arbok forces the opponent to stare at him with his tail as he gazes right into their eyes, Arbok’s eyes glowing a dark purple the entire time. This throw continues until the enemy escapes from the grab. After they escape, they have a faint purple tint on their body for half as long as Arbok stared at them, and during this time they are mesmerized to always face Arbok. They can still dash backwards to an extent, but it is 70% of their regular dashing speed. The most blatant use of this is to just Glare at the opponent and stun them to perform Poison Fang for another grab, but the opponent will fight off your grab 20% faster each time you perform this throw within a minute, very quickly adding up to no grab at all. This is best used to set-up some regular attacks.

Up Throw: Scary Face
Arbok stares at the opponent, a white shine in his eyes. The opponent becomes overwhelmed with a sudden rush of fear, and upon being freed by Arbok they run for their lives! Well, okay, they don’t LITERALLY do it, but they have a white tint that causes them to take 1.2x damage from all attacks so they had better start running from Arbok if they know what’s good for them?

Down Throw: Chomp
Arbok clamps on his prey’s head and starts to chow down! He bites his opponent until they break out of his grab, with each bite taking .3 seconds. Each bite deals 3% and adds one second of poison damage. Arbok has average end lag upon his grab being broken, but he has invincibility frames during the end lag, essentially allowing the opponent to situate themselves without punishing Arbok for LANDING a grab. As you can see, when Ekans evolves, he learns the ability to press down when in a grab. (h)

FINAL SMASH​

Medusa's Glare

Arbok hisses and .35 seconds later as his eyes let off an intese white light. Any enemies in front of Arbok and facing him, at any point in the screen, are turned into statues in their current pose. If they're in the air they will fall down the ground. Enemies are in statue form as long they would remain in a grab, and Arbok is free to attack them. The statues take no knockback or hit-stun but if they sustain 30 damage they will crumble apart, instantly KOing the victim. Poison damage affects the statue timer just like Arbok's normal grab.

This is an actual viable gimping move for Arbok since he can drop enemies to their doom, and if you use it to punish a laggy attack you can either tack on some nice damage or even KO them! Too bad Final Smashes aren't allowed in tourneys unless Doppelori is involved.


PLAYSTYLE

Arbok is a *gasp* offensive character! There we go, nothing more to say, there’s only one way to play offensively so there’s nothing to elaborate on.

Okay, seriously, Arbok likes to fight in mid to close range and pressure his opponents with mix-ups and passive poison damage. The first step is how you GET to that range with all these campers. Poison Sting can work with a decent charge if you punish a whiffed projectile. Granted, it can’t be used to camp yourself, but Arbok wouldn’t want to do that anyway. As you get closer, Glare becomes an excellent option as you force your opponent to move out of their spot. You’re close to the ground as you move, and you have a dash attack that can evade camping. As for some more “simple” approaching moves…

Well, actually, that’s hard to say. Arbok doesn’t just casually spam quick attacks to hit the opponent first, he likes to force the opponent into unfavorable defensive positions with mix-ups. Arbok has a lot of grabs and anti-dodging moves. This allows him to effectively force the opponent into a guessing game where they have to decide which defensive move Arbok is aiming to counter. Shield beats anti-dodge beats dodge beats grab beats shield. Arbok’s attacks are still too fast for the opponent to mindlessly react, but he can’t mash A like Meta Knight.

So now you’ve approached. What next? Now you keep them there! This is when Arbok really gets to stat inflicting oodles of poison damage on his hapless prey. Sure, his opponent may avoid some moves, but they’ll have so much poison in their system that they’ll end up taking a lot of passive damage anyways. This forces your opponent to stick around to try and out-damage Arbok, only to fall to more mix-ups and Glare set-ups. If they do try to escape, Arbok can pin them down with Utilt and chase after them with dash attack. If you land FTilt your adversary can’t even camp once they do escape! In fact, at the start of the match, you may want to take a few moments to set-up some shed skin to form a relay of fugitive catchers.

Two special extensions of his pressure-game are his grabs and aerials. Arbok has a great grab-game, especially when backed by poison damage. He’s got his primary KO move, a good damager, a status inflicter, and a set-up move. His grab’s also not difficult to land when you take his shield vs dodge mix-ups, so you’ll be seeing it a lot. As for his aerial game, Arbok is very much a grounded character but this doesn’t mean his aerials are unviable. Rather, they’re just used as a part of his ground game. His aerials aren’t terribly slow so he can use them despite his awkward jumps, and even the slower ones have benefits on the end so he can’t be punished severely.

His aerials do come back to bite him on the butt when it comes time for recovery. Arbok can’t exactly gimp very well and his recovery is decent at best. But that’s ok, since Arbok is perfectly capable of KOing outright! He just needs to get some poison on the foe (easy), grab them (also pretty easy), and press forwards. By the time the enemy is in KO percent Arbok won’t need to get much poison on them to hold them long enough to connect with his KO move, and even then he can always just use Toxic to ensure they don’t escape.

So Arbok in a nutshell? He’s a pressure rushdown grab-*****. He can stop camping but he himself cannot camp. He turns his prey into a weakened mess before finishing them off with one bite. And he stares into your soul...
 

Junahu

Smash Ace
Joined
Nov 15, 2005
Messages
899
Location
Shropshire Slasher
VALOZARG: I dare say, well done. With a true 3v1 character, VALOZARG would genuinely bridge the gap between casual and competitive players, allowing them to play against eachother without instantly presuming the competitive player would win. VALOZARG is probably a little too strong for that kind of idealistic notion, but then again, 3v1 is a whole different beast from standard FFA.
VALOZARG does suffer a little from overcomplication, just because he's fighting three characters, doesn't mean he has to play like three characters. Directional grabs, would have been excellent simply as disablers, but the extra juggling and moving while grabbing and interactions between pummels and other attacks is mindboggling in its excessiveness.
Still, this is an absolutely brilliant moveset, and a stunning ballsy concept that I absolutely must steal. I've typically been a fan of these thinking-outside-of-the-box sets of yours, and VALOZARG manages to oust Tycoon as my new favourite.

... Three Mario's Vs VALOZARG. CAPE-FLUDD-CAPE-FLUDD-CAPE-FLUDD. No damage, no blood, no real counter (you could grab one Mario with his tail, but that's it. For anything else he has to turn around and get caped again)

... Also, Mario Bros stage, VALOZARG can't fit in it. Similarly VALOZARG would make a lulzy replacement for Donkey Kong on the 75M stage. And... Rumble Falls, Rainbow Cruise, Spear Pillar, Big Blue, Norfair, Frigate Orpheon etc, etc.


Just... insane. So many meh Pokemon in one day. But the messy unfocused-ness of them reminds me greatly of MYM3, when most sets really were made in a day. Ah nostalgia
 

Neherazade

Smash Journeyman
Joined
Apr 5, 2009
Messages
359
Location
Gensokyo.
@katapultar: thanks. As I worked on Unown, I realized I actually liked the concept, so rather than throwing it all out into a 4-hour pokeset, I think I'm gonna try to add some more detail and finish the set the way it should be done. I'll probably just post a like back to the post hen it's done. Thanks for the tips on color. it's a pain to do on wiinet, but I could probably add some color to the headings. As for font, I know you cna change the font style and size, but what is the command for it? I'll try it, cuz maybe it's obvious... but It took my a while just to figure out the BBC coding (:falcon:). Thanks, man. I'm excited to see how the two sets turn out...

EDIT: currently working on 4 sets. Continuing write-up of Unown (might take longer than I had thought due to some newly-discovered internet issues)... continuing write up of Joint set with KrazyGlue... and two other sets by: moi (though I assume others have done similar sets before)...
 

MasterWarlord

Smash Champion
Joined
Aug 24, 2008
Messages
2,902
Location
Not wasting countless hours on a 10 man community
ARBOK

Easily the best thing to come out of this, very glad you “caved” so that this delicious set happened. Arbok takes Dingodile’s occasional filler attack of hitting the background and turns it into one of the core concepts of his set. Arbok does a great job of being an anti-defense offensive character, forcing the foe to either shield or dodge based off whether he’s using background hitting attacks/grabs. While I questioned at first how poison could be relevant on an offensive character as it encourages stalling for said damage to take effect, you linked it into the set splendidly with his grab-game, which links with Glare which links with Shed Skin.

Really great stuff here. . .Though I imagine Wizz and Jun will kill you for not having a Final Smash, though it’s not like you had a choice for it to be a part of the “movement”, and you can just edit one in when you get back. The only real “flaw” in the set is that it has some filler-moves like uthrow and dair and that Arbok seems a tad overpowered, but that’s to be expected for such a small time frame to work with.

VALOZARG: I dare say, well done. With a true 3v1 character, VALOZARG would genuinely bridge the gap between casual and competitive players, allowing them to play against eachother without instantly presuming the competitive player would win. VALOZARG is probably a little too strong for that kind of idealistic notion, but then again, 3v1 is a whole different beast from standard FFA.
VALOZARG does suffer a little from overcomplication, just because he's fighting three characters, doesn't mean he has to play like three characters. Directional grabs, would have been excellent simply as disablers, but the extra juggling and moving while grabbing and interactions between pummels and other attacks is mindboggling in its excessiveness.
Was hoping you’d appreciate this set, considering it’s stretching the boundaries like Lunge but a good deal more intuitive and understandable by human brains, no? He’s not more particularly complicated then a standard MYM character once you get past the 3v1 thing, and even if one has trouble learning him in 3v1 they can always put him into a 1v1/2v1 to not get their ass handed to them while they get used to him.

Admittedly, Valozarg is overpowered for his own setting to an extent, but he’s still beatable and I wasn’t too worried about it seeing he’s banned from all means of tournaments. That, and. . .Well, he needs to be overpowered, seeing there are a lot of potential exploits to take advantage of with his size that I’ll inevitably of missed.

I can’t really agree on the grabs needing simplifying – I was somewhat worried I didn’t put enough into them, honestly.

Still, this is an absolutely brilliant moveset, and a stunning ballsy concept that I absolutely must steal. I've typically been a fan of these thinking-outside-of-the-box sets of yours, and VALOZARG manages to oust Tycoon as my new favourite.
:bee:

... Three Mario's Vs VALOZARG. CAPE-FLUDD-CAPE-FLUDD-CAPE-FLUDD. No damage, no blood, no real counter (you could grab one Mario with his tail, but that's it. For anything else he has to turn around and get caped again)
There are a good deal of exploits, but I wouldn’t say that’s one of them. Jump backwards and dtilt on top of them.

... Also, Mario Bros stage, VALOZARG can't fit in it. Similarly VALOZARG would make a lulzy replacement for Donkey Kong on the 75M stage. And... Rumble Falls, Rainbow Cruise, Spear Pillar, Big Blue, Norfair, Frigate Orpheon etc, etc.
Definitely not gonna try to justify the concept being workable for a lot of stages. It’d probably be most realistic for him to simply have his own stage which is the only one he can be played on or banning him from going to certain stages, but where’s the fun in that? I want to play a 4 player Valozarg giant mode FFA on a custom stage with 4 tiny stage builder blocks with Mushrooms on high.

But seriously, if nothing else, I’m at least glad he can still be pulled out into random item FFAs.
 

Hyper_Ridley

Smash Champion
Joined
Dec 21, 2007
Messages
2,291
Location
Hippo Island
ARBOK

Easily the best thing to come out of this, very glad you “caved” so that this delicious set happened
:bee:

Every time one of these movements happen, I start out reluctant to post an entry, then I end up making of the best ones, lol. I blame that on my perfectionist attitutde.

Arbok takes Dingodile’s occasional filler attack of hitting the background and turns it into one of the core concepts of his set. Arbok does a great job of being an anti-defense offensive character, forcing the foe to either shield or dodge based off whether he’s using background hitting attacks/grabs. While I questioned at first how poison could be relevant on an offensive character as it encourages stalling for said damage to take effect, you linked it into the set splendidly with his grab-game, which links with Glare which links with Shed Skin.
Considering how many sets have had "It hitz 1into teh backgr0und!!!11" attacks, I figured it was only time for a set to actually make it an integral part of the moveset. Glad to see it turned out well.

Poison damage FTW! This set had a lot of inspiration from Acid Seaforce, but you also may noticed it took a few pages from a certain status-inflicting moveset with a trap-disabling FTilt...;)


Shed Skin, funny enough, originally started out as simply a parody of the one Ekans' used since it was the core of his "playstyle". It was a random moment of inspiration that turned it into the move it is now. Ah, the wonders of having to think on the spot to make a moveset in a day...

Really great stuff here. . .Though I imagine Wizz and Jun will kill you for not having a Final Smash, though it’s not like you had a choice for it to be a part of the “movement”, and you can just edit one in when you get back. The only real “flaw” in the set is that it has some filler-moves like uthrow and dair and that Arbok seems a tad overpowered, but
that’s to be expected for such a small time frame to work with.
I didn't realize I left out a final smash, lulz.

Uthrow was a bit of a filler move, yes, but you sure Dair isn't a typo? It's one of his anti-dodge moves afterall. As for balance, I felt that Fthrow KO'd a bit too early, but other than that he's essentially Meta Knight with a better grab-game in exchange for not-as-spammy-moves and much worse gimping and recovery, and Meta Knight doesn't exactly **** any notable tourney characters...


I shall edit in a Final Smash into my set and edit in some commnents on the other Pokesets into this post.

SUPER QUICKIE COMMENT TIME!

Probopass: Incorporating his magnetic properties to the extent that you did was cool, though playstyle-wise it's kinda gimmicky. It just makes him want to camp EVEN MORE, though the ability to use his satelittes for close-range combat to keep the foe away was pretty cool. THe individual moves were fun variations of projectiles, with FSmash being my favorite. And if nothing else, his mechanic would certainly make him fun to toy around with.

Venusaur: So he's a tank but not really, lol. Solarbeam was a really nifty "mechanic" and the ways in which you found to interact with a "timer charge" move were awesome, particularly the Uair (which IS playstyle relevant meanie, learn 2 UThrow). His "infinite healing with no recovery" might lopside a lot of his match-ups, I fear, since characters who can't damage well won;t be able to budge him far enough to get him off the stage in the first place. Still, this is my overall favorite of the quickie-Pokesets.

Shedninja: Amazingly in-character, and conceptually this thing is freaking brilliant. He dies in one-hit, but can have infinite stocks. He can't damage but he can OHKO. He's a really unique "kill or be killed" expierience and the ways you have him manipulate his STOCKS of all things makes him the pinnacle of resource-management characters. From a purely conceptual standpoint, this is one of my favorites movesets ever. Execution-wise I still like this set a lot, but I do wish it had a longer development time so its ideas could really shine.

*will comment on Bellsprout and Swalot in due time*
 

Koppakirby

Smash Cadet
Joined
Aug 13, 2009
Messages
52
Doin it wrong

Tag Mode

It's time to play tag!
What is Tag Mode, you ask? Well, it can be selected just like its ever-popular predecessor, Coin Battle! Tag Mode combines the physics of Smash and the rules of the game Tag into one fun experience!

Tap here until you get to the Green-Tinted time menu!(Not Shown)
I'm not going to say anything because this shows you how to select it. Well, I should note that it uses Time(3 to 10 minutes) and has no stock or handicaps available.

<How to Play>

This player is tagged. He is it. The first person who is 'it' will be chosen randomly!

This person isn't it. They have a blue circle to show this. If a Blue Person hits a another Blue Person or the Tagged Person, it functions as just a regular hit.

Oh no! The guy who was 'it' hit this person! Now they are 'it'!

Now he has a Blue X to signal that they can't be tagged back! They are like this for 8 seconds!

When the timer runs out, whoever is 'it' loses!

You can tag with projectiles as well! Now it's Laser Tag! *Laughs*

Items are locked during Tag! None will spawn!

Percentages only matter with weight!

You need at least 3 people for Tag! Although I suppose you could use some of our EXCELLENTLY programmed CPUs!

Traditional KOs? Don't effect the action on Who's Who! Just a method of keeping the person who is 'it' away!


I don't expect you to like this. This was just a crazy thing I did in the spur of the moment. Part of it's prupose is to bring us back to things that aren't 'Unsmash'. Smash isn't the best, but when were making hypothetical sets for it, shouldn't we be realistic? Not to say I hate Valozarg or anything. Anyway, I know this will either be disqualified or start an age of everyone doing modes(Wouldn't that be nice?), but this was just a spur-of the moment thing. It's supposed to be simple and fun, like a Sakurai Update. Enjoy, I hope this is a refreshing change of pace.
 

Neherazade

Smash Journeyman
Joined
Apr 5, 2009
Messages
359
Location
Gensokyo.
@koppakirby: Gotta love your idea, man. I'm trying not to stray from smash-viability too much in my sets... IF ONLY I COULD ACTUALLY POST MY IDEAS!!!?!!!1111!1!!!?!

I had a crazy day. Completed moveset concepts for... Wait for it... 4 characters. I'm gunning for #5 before I go to sleep tonight. But due to some weird new issues, I'll have to post these sets in installments (like I'm doing with Unown).

I guess that mean you'll get sneak previews of my sets until this thing is sorted out... Not so with the joint set! "So much talk, but where's the product?" well, I'm glad you asked! Once the write-up is finished, KrazyGlue will (hopefully) compile the thing here.

Wish me luck, y'all? I fear I may be in over my head...
 

MasterWarlord

Smash Champion
Joined
Aug 24, 2008
Messages
2,902
Location
Not wasting countless hours on a 10 man community
Revenge of the revenge of the 4 hour Pokeset

Ninetales


Ninetales is the Fire-Type evolution of Vulpix, a Pokemon from the original games. Its’ design is based off the Kitsune in Japanese mythology. . .Any who dare the touch one of the nine tails of the clever fox are doomed to a 1000 year curse, according to the Pokedex. While the Pokedex is known for containing many errors and ridiculous facts such as Machop being able to defeat any human boxer, this keeps showing up in its’ Pokedex entries very consistently and isn’t nearly as far fetched as the other Pokedex entries, generally being considered canon.

Stats

Traction: 8
Aerial Movement: 7
Size: 6.5
Movement: 6
Weight: 5.75
Jumps: 5.5
Falling Speed: 4

Grab~Game


Grab ~ Curse

Inputting Z with Ninetales does absolutely nothing. . .But Ninetales is still perfectly capable of grabbing foes without any direct input. In order to get in a grab, Ninetales has to get grabbed by the foe from the behind – any foe who dares grab her tail will be cursed.

Pummel ~ Squeeze

Ninetales squeezes the foe in her tail, dealing 2% over .18 seconds. Standard pummel.

Forward Throw ~ Spite

Ninetales turns around to face the foe and stares at them spitefully before headbutting them away for 4%. This transfers 75% the power of the last non four non grab/throw moves the foe used to their throws. Power characters lose their advantage and not so powerful characters become too weak to budge you at all. Considering the foe still has the power, though, just in a different area, this strongly encourages them to go for the grab. This cannot stack on the same moves.

Back Throw ~ Captivate

Ninetales waves her nine tails in front of the foe’s face as she smirks, tickling them with the tips of her tails as they glow, utterly mesmerizing the foe with her tail through some dark magic. She gently lets them go with no damage. . .But whenever the foe is within grab range of Ninetales from behind (Dedede’s grab range if their grab is a tether or such), any input you give to the character will translate to their grab unless they’re in the air. This lasts 17 seconds.

Up Throw ~ Grudge

Ninetales turns around to look at the foe and snarls, annoyed that the foe grabbed her tail. She flings the foe upwards off her tail and exudes a magical fiery blast from it, doing 12% and vertical knockback that KOs at 135%. Ninetales’ primary KO move. Not a great one, but Ninetales is severely lacking in them.

Down Throw ~ Imprison

Ninetales smacks the foe to the ground with her tail for 3%, then pins them with her nine tails, making a sort of cage out of them as she casts some sort of magic with her tails. She holds the position for .2 seconds before getting up from it, letting the foe up. They’re now entirely unable to move, jump, or take knockback, though they can still attack and spot dodge. This lasts for 10 seconds.

Specials


Neutral Special ~ Will-O-Wisp

Considering Ninetales has no grab hitbox of her own, this is her answer to shields. Ninetales spits out a fiery wisp the size of a pokeball with .3 seconds of lag that travels forward a Battlefield platform. If it hits, the foe gets burned. No, this doesn’t deal stereotypical poison damage with a fire element – it instead burns away at their shield for 15 seconds, 50% faster then the rate it regenerates. However; the burn on the shield only damages the shield when it’s in use, so the foe can still shield, they just can’t hold it for long. This move’s hitbox ignores shields, of course.

Side Special ~ Flamethrower

This move has a storable 2 second charge. Once you activate the actual move, Ninetales breathes forward a stream of fire half a Battlefield Platform long, keeping it up for the same amount of time you charged. There’s one hit of 1% and flinching every .1 seconds the foe’s caught in the flame for a total of 20% at full charge, though the foe can DI out of it very quickly like Bowser/Charizard’s fire breath, and considering you have to charge this manually and it’s weaker it’s a much worse move then them.

The time to use this is when the foe is imprisoned from your dthrow. They won’t be able to hit you with any melee attacks while you pelt them with Flamethrower from a distance, and flamethrower out-prioritizes any projectiles the foe tries to fight back at you with. Dodging a lingering hitbox is also rather laughable, and if they shield it they break their shield. Recharging is easy – the foe can’t pressure you at all due to being imprisoned. Getting off a dthrow means 40% and a free Flamethrower charge.


Down Special ~ Safeguard

Ninetales brings up a defensive barrier around her body as she howls, giving herself superarmor for twice as long as she charges this auto-release charge attack. If you Imprison the foe and already have Flamethrower fully charged, then after you get your free 40% you can get up Safeguard with little trouble. Of course, the only way to hit Ninetales when she has superarmor is to grab her. Ninetales can’t use Down Special when she already has superarmor and the move has .2 seconds of pre-charge lag.

Up Special ~ Ominous Wind

Ninetales howls skyward majestically over .15 seconds, then gets swept up by an ominous wind that takes her up around half as far as Sonic’s recovery, but unfortunately puts her into helpless. There’s a hitbox dealing rapid hits of 1% around her that makes her somewhat harder to gimp.

When used on the ground, this has .4 seconds of start lag but creates a lasting pushing wind effect directly in front of Ninetales the size of Bowser that pushes foes away as strongly as Dedede’s inhale draws foes in. This Ominous Wind lasts 5 seconds and makes using melee attacks on Ninetales’ front awkward assuming you consistently face towards the Ominous Wind.


Standards


Standard Attack ~ Tail Whip

Ninetales turns her head to look behind her and starts jabbing out with each of her tails one by one for as long as you hold/repeatedly press A. Each tail only does 1% and flinching, but this stance has no lag to enter and Ninetales jabs with a tail every .1 seconds.

Ninetales’ tail jabs have pitifully low priority, though, so you can just smack through them. . .That is, if you weren’t captivated by that d
amn bthrow and/or Ninetales didn’t have superarmor. Ah well. You can still just roll behind her. Oh wait, you can’t, because you’re also imprisoned by the dthrow. Fun!

Dashing Attack ~ Flame Wheel

Ninetales rapidly spits out 10 fireballs in front of itself as it continues to run forward a Battlefield Platform. If anybody is in front of it to take the hits, each fireball deals 1% and flinching. If the fireballs don’t hit anybody, they form a rotating wheel of flame where Ninetales stops the dash, out-prioritizing all melee attacks save grabs. The Flame Wheel lasts only 2 seconds before the flames dissipate, but considering you can make one while running away from the foe it’s a fairly nice defense mechanism.

Forward Tilt ~ Bite

Ninetales bites forwards a tiny distance for 5% and horribly weak knockback, but only .15 seconds of lag on either end. Sound bad? Well, this move has exceptional shield stun, enough so that you can use it to infinite against shields – at least until the move stales, anyway (Still a good 4 bites for a severely crippled shield, though).

On their own, ftilt and Neutral Special can’t stop shields, but together they can break them just fine. Ninetales doesn’t specialize in this – she has a grand total of two moves to deal with shields, just as many as Bowser.


Up Tilt ~ Confuse Ray

Ninetales lets out a cry as a ghostly blob the size of Kirby comes out from her over .3 seconds. If it hits a foe (The range is only right above of/in front of her based off how you angle it), the next input they attempt will be a grab in a similar manner to Captivate, but regardless of where they are. Still, it’s just one input, nothing too bad. . .However; if you hit a foe who’s already in the middle of using a move, it’ll interrupt the move and instead make them use their grab. They hesitate slightly before doing so, so you have enough time to turn around so your tails are grabbed.

Down Tilt ~ Rest

Ninetales curls up her tails around herself as she crouches down, going to sleep for 4 seconds and healing 4% per second. Due to the way Ninetales curls her tails, they cover both sides of her, meaning either way you grab her it counts as a grab for her. This has .25 seconds of start lag and .1 ending.

If the foe is captivated or you have superarmor, then the foe really isn’t left with much of a choice of something to do. They can’t grab you due to the tail covering your whole hitbox, but. . .What else can they do? They can try to out-damage you while you’re asleep if you just have superarmor. . .Which actually isn’t that bad an idea, seeing they can do more then 20% to you in 4 seconds. . .


Smashes


Forward Smash ~ Iron Tail

Ninetales swings her nine tails forward as it turns iron over .4 seconds, dealing 17-27% and knockback that KOs at 170-150%. A decent alternative KO move, but the move has hideous ending lag, an entire .9 seconds, and considering the move isn’t that fast to start it sees use rarely. . .However; Ninetales’ nine tails have superarmor during the whole attack and the ending lag, and obviously Ninetales enjoys having her tails grabbed. . .Ninetales’ defensive position covers her up well during the end lag.

Up Smash ~ Overheat

Ninetales’ main body (Not her tails) turns bright red from overheating during the charging before she releases the heat, spitting out a blast of flame upwards the size of Ganondorf that deals 18-28% in multiple rapid hits. The move has an awkward .7 seconds of starting lag (Though no other lag), but Ninetales’ main body stays overheated during the starting lag and the charging. When her body is overheated, any physical contact with Ninetales will cause the foe to have whatever they were doing interrupted and take 7%. This means they have to attack her tails, which probably have superarmor from Down Special. . .

Down Smash ~ Fire Spin

Ninetales starts running around in circles extremely quickly as she charges, then upon release creates a spinning pillar of fire around herself, creating a mach tornado like hitbox over herself that moves along with her, though it only lasts as long as she charged. Needless to say, though, being able to have what is essentially an allied Meta Knight Mach Tornadoing over you and being able to still attack yourself at the same time is well worth charging for. You can also use this as a defensive measure to give yourself a protective hitbox while you Rest. Ninetales can’t start up Fire Spin when a previous Fire Spin is still in effect and there's .32 seconds of pre-charge lag.

How do you make time to charge the move? Aside from the obvious dthrow, you’re perfectly safe if you have superarmor from Down Special or have the foe captivated from bthrow to force them to grab you. Considering Ninetales is running around in circles so fast as she charges, there’s a 50/50 chance you grab Ninetales by the front or grab her tail, and who wants to take that chance?


Aerials


Neutral Aerial ~ Flash Fire

Ninetales flashes to be pure red. If anyone hits her with a physical contact attack (Yes, including grabs), they burn themselves (Visual effect) and go into helpless, Ninetales not taking any of the effects of the move. This has .1 seconds of lag on either end and lasts half a second, and Ninetales’s fall speed is cut in half during the move’s duration. Unfortunately, Ninetales herself goes into helpless after the move is over, but considering Ninetales wants the foe to constantly be going for grabs this gets you both on the ground where you want the both of you to be.

Forward Aerial ~ Ember

Ninetales spits out a single ember the size of a pokeball with .2 seconds of lag. After being shot out Kirby’s width, the fireball awkwardly gets blown backwards a Battlefield platform, and it deals dragging knockback through mass multiple hits, 11% if they all connect. This naturally positions the foe behind you, and can be good for spacing when used in your ground game.

Back Aerial ~ Tail Sweep

Ninetales does a long ranged sweep of her tail backwards, turning herself around. Only .15 seconds of starting lag, and it deals a decent 8% and knockback that kills at 210%. This is mainly useful for turning Ninetales around so that her tails can get grabbed by a captivated foe. This move also has awkwardly high priority – why don’t you try using a grab to out-prioritze Ninetales’ tails? Yes, yes. . .

Up Aerial ~ Swift

Ninetales howls to the moon for .4 seconds of lag, causing one shooting star per player to come from the background and come up underneath them. This is entirely unavoidable. While on these stars, players can move about freely in any direction at their normal movement speed and are treated as if on the ground, able to use their grounded attacks, including their juicy grab. If they try to jump off the star, the star will hover underneath them too quickly for them to get any air at all. This makes Captivate much more deadly due to foes being unable to escape it in the air, and allows you to continue your general ground-game in the air. This lasts 10 seconds, though you can’t activate it again for 5 more seconds. This of course serves as an excellent alternative recovery to Up Special, but it’s far more gimpable as the foe can chase you out as far as they want without worrying about how they get back to the stage. This move makes your various charging moves and Rest much easier to pull off due to being able to flee while you charge and adds an entirely new level to Ninetales’ game.

Down Aerial ~ Spin

Ninetales spins around rapidly in the air, her body a low priority hitbox that deals 6% and weak knockback. Nothing special here other then to make it awkward for a foe to grab your front in the air, but god knows why they’d be trying to do that. Ninetales always lands on her feet with this attack (No landing lag), it’s quick to start up, and it dramatically increases her falling speed.

Now, if somebody is using a stall then fall when a Swift star comes to pick them up, they’ll keep falling and the game won’t register that they’ve hit ground, meaning the star will keep going up as if they jumped. So. . .This move is suicide when a Swift star comes by. Your point, Warlord? Well, as Swift stars go up, they can get stuck together, so if you can maneuver under the enemy’s star as you skyrocket up, you can use this as a suicide KO. Fascinating, Warlord! I’m not done, da
mmit.

The foe can hit you out of this to prevent your awkward falling, separate the two stars and save themselves from going off the top blast zone. Of course, you’ll have Captivate on the foe or superarmor on. . .Unlike other similar methods of forcing grabs, this doesn’t give any chance for the foe to wait it out – you grab or you get suicide KOd. If they take too long to grab your tail, you can even uthrow them for a KO!


Final Smash ~ Fire Blast


The screen zooms in on Ninetails as it turns to the camera and breathes a massive amount of flame at it, causing the screen to white out (And lose all its’ Pokemonies). When the screen clears half a second later, the whole screen has a red tint and there are four pillars of flame randomly located about the stage that deal 15% and knockback that kills at 120% on contact and all foes have taken 20%. Ninetales can go into the pillar of flame without hurting herself to be near impervious to attack, and sitting in the flame pillars also causes her to overheat like in usmash – meaning whenever she comes out from the flame pillar her front will be invulnerable for however long she hid in the flame pillar. She can also use a no starting lag usmash, though this uses up her heat power. The flame pillars die down after 20 seconds.

Playstyle


Ninetales could be described as a “grab whore”, but the way Ninetales lands her grabs is by forcing the enemy to grab her. Unless the foe is another fellow grab whore, you’re going to have to encourage them to grab significantly. The most obvious thing to do is to get up some superarmor with Down Special before you can really start stacking up various invulnerabilities. Of course, the foe isn’t going to let you do that so casually, so you’ll want to use your dash to get a protective flame wheel around yourself while you charge or use uair so you can run while you charge. While still waiting to get stuff up, fsmash is generally your safest move - use it to scare foes away so you can set up.

With superarmor, you can use usmash to make your front immune to grabs as you charge with virtually no window to be punished or keep your jab up and always turn so that your tails are facing the foe. Dsmash can also potentially bait the foe into grabbing your tail during the charging, and even if they don’t you can pretty easily set something else up while Fire Spin is in effect. You can always run off and rest the damage the foe got on you if you’re above the foe in damage. . .Then again, why bother healing the damage? If you’re behind, use the dair/uair combo to force the foe to grab you or just reset things.

When you do get in your first “grab”, you’ll generally want to make it easier to land more grabs with fthrow/bthrow. Fthrow gives the foe actual motive to grab you outside being forced to, and even if they refuse it makes their normal attacks not hit as hard. Bthrow makes grabbing the only option at close range – essentially free superarmor. Yeah, they can still hit you from the air, but uair quickly eliminates the threat of enemy aerial combat. When the grabs start coming in mass, then go ahead and damage rack with the dthrow/Flamethrower combo, and uthrow when it’s finally time for the KO.


Match~Ups


Vs. Probopass ~ 35/65, Probopass’ favor

Considering Ninetales deals in grabs rather then knockback and has a very poor gimping game, Probopass doesn’t really have to worry about getting knocked away from the left side of the stage, especially considering Ninetales’ KO move (Uthrow) does vertical knockback. If the mini-noses grab when disconnected to Probopass, there’s also nothing Ninetales can do about it. Ninetales will have to stay away from Probopass and get up superarmor/fire spin before rushing in and attacking the one behind the mini-noses to try to pressure him to get the mini-noses re-jointed to himself before she even thinks about pressuring him into a grab. Still, Ninetales can her dair/uair combo to directly force a grab from Probopass, and Probopass struggles significantly to avoid Ninetales’ Swift star as she collides it with his. Even once you do get in the grab, though, bthrow does little to help in getting more grabs due to Probopass’ campy nature (Though it does make him defenseless on the ground), and Probopass will take a while to KO. . .

Vs. Venusaur ~ 40/60, Venusaur’s favor

Venusaur is perfectly willing to forget about uthrow/uair special for Ninetales, thus Venusaur will only really go for one natural grab on his own to get off dthrow, though Ninetales gets in the dair/uair combo pretty easy on him. That said, Venusaur is pretty easy to set up on due to him being unable to pressure Ninetales and him not all that great from a range (Though much better then Ninetales). The problem is Nintales struggles significantly to gimp Venusaur with no aerials for the task and generally low power to poke Venusaur off-stage with. Ninetales taking time to set-up also gives more time for Venusaur’s solar power, and if he wants Venusaur can even take a nap. Due to Ninetales’ usual strategy of getting damage through dthrow/Flamethrower not working and her being a poor gimper, she’ll want to work on weakening all of Venusaur’s moves with fthrow and playing the stalling game herself with her own rest. This is A very slow, agonizing match-up.

When Ninetales has to go for the KO, she’ll want to try to use uair and wall of pain Venusaur away with Flamethrower just enough so he can’t recover while she can when the Swift stars expire, though this is easier said then done, especially since you’re giving Venusaur access to his ground game in the air.


Vs. Swalot ~ 75/25, Ninetales’ favor

Swalot is a very grab oriented character, thus Ninetales doesn’t have to coax him nearly as much as the standard character into using his grab. Swalot’s Down Special can make you rather a sitting duck for a grab – Ninetales obviously can’t counter trap grab hitboxes with her tail. However; it’s rather a joke considering that Ninetales can just casually hover over it with uair, which also does a good job of eliminating Swalot’s alternative to grabbing in his gimping game.

Vs. Arbok ~ 50/50

While Arbok isn’t a Warlordian moveset, he still relies on his grabs a decent amount – it’s the main focus of his poison, and his main KO move is fthrow, giving you some natural grabs rather then having to force them all. Considering how fast Arbok is, though, he pressures you pretty well to prevent you from getting up any superarmor or the like to get unnatural grabs, so you’ll actually need said natural grabs. Your set-ups for your main set-up (Down Special) will do little to help you – Arbok can use his dash attack to go around flame wheel and get inside with you, and his high movement speed means he can chase you faster then you can run when you bring in Swift Stars with uair. Arbok can also focus on punishing dodges rather then shields to not give Ninetales as many opportunities to land her grab, but Ninetales can simply choose to use more shielding then dodging to force more grabs from Arbok. A close match-up.
 

tirkaro

Smash Champion
Joined
Jun 24, 2006
Messages
2,808
Location
but a pig in the sun
JOSH ಠ_ಠv

{CLOYSTER}


Cloyster is an oyster. Actually, he's more like a Bivalve turned on it's side. Wait, aren't oysters Bivalves? Well that doesn't matter, as Cloyster is the #91st Pokemon, so real-live Science need not apply. He's not really the most marketable well-known Pokemon around, but that doesn't make him any less badass. Cloyster is a sideways clamshell thingy with a black pearl for a head that has a permanent evil smile upon it's face, and it also spends it's spare time firing giant spikes and random Pokemon in order to eat them alive. Quite frankly, it doesn't get much more Metal than that. :091:


{STATS/GAMEPLAY}


{SIZE- 7/10}
Standard human size. He floats slightly off the ground, since he's apparently swimming in midair for some reason.
{WEIGHT- 10/10}
Actually kinda varies a bit due to one slight quirk in his gameplay.
{STANDARD MOVEMENT- 2/10}
I say "Standard Movement" because Cloyster moves pitifully slow. However, you'll most likely be using his UpB to get around, which is much faster.
{JUMPING/AERIAL MOVEMENT- 6/10}
You'd think swimming in midair would allow you to get as much aerial height as you want, but no. Cloyster has a pretty standard jump, in which he launches up an average distance, but slooowly floats back down.
{TRACTION- 5/10}
Cloyster is pretty slippery to control. Y'know, since he's swimming and all.
{POWER- 8/10}
Pretty much standard Tank fare. Actually, Cloyster's power isn't instantly obvious; he's meant to build up some damage before finally sending the foe flying with one of his more knockback-happy attacks.
{PRIORITY- 5/10}
5/10 doesn't mean he has average priority, but rather that he's a mixed bag. Some of his attacks, especially those involving his shell, have insane priority whilst his projectiles have it pretty poor.
{RANGE- 9/10}
This is a tirkaro set. C'mon now.
{ATTACK SPEED- 5/10}
Cloyster is a bit like Cirno in that he's quite fond of Chargeable attacks. You shouldn't have much trouble, but using Cloyster to his full potential means buying some valuable time.


If you need me to run that down for you, you could say that Cloyster is a Tank character, but differentiated by the fact that he has a lot of options for approaching.

Now onto the important part. His "Mechanic" (if you can call it that), is the one thing crippling an almost invincible fortress. See his "Weight" stat? Well, in most cases, it certainly lives up to it's number. Cloyster has absolutely insane defense around his shell. Most of the time, Cloyster can't even be knocked offstage until he reaches insane percents such as 600%. What's even worse is that Cloyster has permanent super armor until he reaches 200%. (Save for when he's using his Nspec.)

However, all this overpowered defense comes at one cost: Cloyster's head is incredibly fragile.
The black pearl that makes up Cloyster's cranium is a rather small hitbox, so it's rather hard to hit. Additionally, he also has moves who's purpose serves to protect his head at all costs. But screw up and actually have his head hit by any attack stronger than a jab, and you'll be paying the price. If the average attack's hits Cloyster's head, the screen will pause for an extremely brief second while the stock *SCREAM!* sound effect plays. Cloyster will take the regular amount of damage, but he'll take an insane amount of knockback.
tl;dr: Pretty much any regular attack that hits Cloyster's shell is most likely a 1-hit KO.

This will probably turn off a lot of non-dedicated players, as it's pretty easy to get constantly OHKO'd if you're not protecting your head properly. But learn some of the ropes, and you'll be sailing smooth in no time.


{SPECIALS}


{SHIELD- WITHDRAW}

clois·ter
v.
1. To shut away from the world in or as if in a cloister; seclude.


With almost no lag time at all, Cloyster will withdraw his head into his shell, and then close it. His shell is hardened and then falls straight to the ground. Making up for his crippling weakness, Cloyster has access to the single most overpowered, Chuck Norris/Bruce Lee/Kenshiro-level shield in the whole game. Cloyster's closed shell cannot be broken whatsoever, it can't be grabbed, the startup/ending time for it is almost instant, and Cloyster can even attack right out of it. Also, his shell has the properties of Kirby's stone; while the shell falls down, any opponent under it will take 1~11% damage with light-to-average knockback, depending on how far Cloyster fell.
The weaknesses it does have though, is that the shell takes some knockback upon being attacked, so it's not 100% invincible. You can probably knock it out at like, 300%. Additionally, Cloyster cannot dodge whatsoever, so shielding is the only defensive option he has. So the only alternative he has to airdodging is doing that slow and clunky Stone-drop, but made up for the fact that the drop deals damage with average priority.


{NEUTRAL SPECIAL- SPIKE CANNON}

Nspecs tend to be simple, yet vital, attacks, and Spike Cannon is no different. This is a completely chargeable attack; Cloyster will stand still and point the spike on his head forward. While it's charging, you can change the direction of the spike/Cloysters head any way you want. You can charge this attack for .2~3 seconds, and upon release, Cloyster's spike will shoot projections of 2~7 spikes all in a straight line, that go at the speed and distance of a Super Scope shot. Each of these spikes deal out 2% damage with low knockback, and have low priority.
Also, Cloyster can tilt his head while the spikes are firing. So if you feel like it, you can fire a fully charged barrage of spikes along a 90° angle.
And if you needed me to tell you this, keep in mind that this attack, along with many others, leaves Cloyster's head extremely open. You might want to use this attack from a good distance from a foe.

{SIDE SPECIAL- TOXIC SPIKES}

An odd variation on his Nspec, Cloyster's Sspec will have him pointing the 2 spikes on the side of his shell forwards. While charging, they'll start glowing white, and upon release the Spikes will fire 2 large, bright purple needles, both trailing behind eachother. Each of the needles do a measly 2% damage with medium priority, but as the title implies, these needles keep on giving. The foe will be poisoned upon getting hit by these obviously-poisonous needles, and will take 2% damage every .3 seconds. The poison will typically wear off after 5 seconds, but the foe can try to shake off the poison by moving around a lot.
Unlike Spike Cannon, charging this attack doesn't change the amount of Spikes fired, but rather how far these 2 poison Spikes can travel before dropping to the ground. This move can be charged for .2~3 seconds in order to make them travel .3~3 battlefield platforms far.

{DOWN SPECIAL- DEEP DIVE/SURF}

One of Cloyster's main methods of approaching, this mean Bivalve will somehow dive into the ground and will start automatically swimming. Cloyser's position is given off by a small rift of splashing water, showing that Cloyster is swimming in that location. Cloyster swims at the speed of Jigglypuff's run, and you can change his direction the direction he swims, but not stop it. While underwater, Cloyster can do 1 of 3 things under a 3 second time limit:

*Holding A will cause Cloyster to rise up a bit, so only the spike upon his head is visible above ground. Getting hit by this spike only deals 1% damage, but it constantly combos the foe until Cloyster has to turn around, 3 seconds has past, or if the foe DIs out of it. This spike has medium priority, but any attack that out-prioritizes it will deal the appropriate amount of damage to Cloyster, but not stop the attack completely.
*Pressing B with any other direction besides Down will cause cloyster to jump out of the ground, 3 SBBs high. He'll then dive toward the ground until he lands safely. Getting hit by Cloyster while rising up dishes out 8% damage, while a falling Cloyster does 5% damage. Cloyster will automatically preform this move after 3 seconds of staying underwater, or if he reaches a ledge. Naturally, you can freely influence the direction of which Cloyster is falling.
*Pressing Down and B will cause him to preform quite a different attack. Cloyster's top half will rise out of the ground, while completely open. Shortly, Cloyster will then close his shell and submerge back into the ground. Doing this directly under an opponent will cause Cloyster to drag the foe underground with him, counting as a grab. Now this is your chance to BUTTON MASH, YAY. Mashing the A or B buttons will cause you to constantly rack 1% damage upon the opponent until they break free, but most of the time, you'll end up racking 10% damage upon the foe. Try to get higher than that!

Also, preforming this attack off-stage is pretty much a suicide. Just thought I'd throw that out for you. Also, to prevent you from camping to death with this move, you can't use it again until 5 seconds pass. Just because.


{UP SPECIAL- PROPULSION}

Cloyster's absolute main way of approaching, and at high levels, maybe even moving, period. Cloyster will charge up for a bit, and upon release, will swiftly propel himself a good distance forward. Cloyster moves insanely fast while being propelled, about the same speed as a projectile like Samus' charge shot. Getting hit by a propelling Cloyster deals 7% damage with mediocre knockback.
Now, this move works a bit like ROB Rocket in that you can't really unleash the full power of this attack over and over again. A fully charged 100% propulsion goes as far as 3 Battlefield platforms along an XY axis. After using the whole thing up, Cloyster must stay on the ground for 1.5 seconds before he can use the whole thing again. But it's really best if you just use this move in short, conservative bursts.
Also, Cloyster faces a 70° angle upon first using this move, though you can change the direction while charging. Propelling into the ground or a wall will just cause Cloyster to bump his shell and suffer .3 seconds of ending lag.


{NEUTRAL ATTACKS/TILTS}


{NATURAL COMBO- BUBBLE BEAM}

But it's a pretty weak Bubble Beam. (Which is ironic, since Cloyster's Bubble Beam has a STAB bonus in the actual games.)
Tapping the A button will cause Cloyster to shoot out bubbles, eventually forming a small cluster of bubbles in front of it if you can get that far. They don't instantly harm the foe, as anything that comes into contact with it simply pushes the bubbles away. Rather, after 1 second, the bubble will pop, dealing 2% damage with very low knockback.
The main point of this move, of course, is to keep the opponent away, while still giving a good amount of damage. This is an amazingly versatile move, as it combines elements with a trap along with a normal attack. A really slick Cloyster player can set up wads of bubbles around the stage to keep the opponent on their toes. That said, it's not as vital of a move as it seems, as it's also pretty clunky and maybe a bit predictable. Naturally, it should just be uses as single part in a well-balanced Cloybreakfast. (By the way, who the hell eats a breakfast that big anyway? Last I checked, the cereal WAS the breakfa- eh whatever.)

{DASH ATTACK- TACKLE}

There's superspecialawesome unique moves. And then there's boring-but-practical moves like this. Simply put, Cloyster closes his shell and spins while charging forward. Basically, it's the same as Pikachu's dash attack, EXCEPT HE'S SPINNING WHILE DOING IT, ISN'T THAT INCREDIBLY UNIQUE, OMG OLOLOLOL (h) (Smirk2) (ROLLING)
Also, this does 8% damage, good knockback, has superb priority, and has low startup/ending lag......(kermit) (lolwut) (a1) (CHEW) (goo) (goo) no (go-.....(d) :@

{FORWARD TILT- ICE BEAM}

Exactly what it says on the tin.
By doing a holy combination of A and tilting the control stick forwards, A small white dot of energy will appear on Cloyster's head spike. Why yes, this IS another charging move of course. Upon release, an extremely thin beam of ice will shoot out of his head spike. The length of this beam varies depending on how long you charge it; you're able to charge for .2~3 seconds in order to shoot a beam about .2~2 battlefield platforms long.
Getting hit by the full extent of this attack deals 2% damage each hit for about 1~6 hits. The knockback is low, but the priority is infinite and is a great damage builder overall.

{UP TILT- BRINE}

Pretty much a vertical version of the above attack.
Cloyster will tilt his head directly upwards and will start sucking in water, since this is a chargable attack and all. Upon release, Cloyster will shoot out a thin stream of water directly above him. You're able to charge for .2~3 seconds in order to shoot a stream about .2~2 battlefield platforms tall.
Getting hit by the full extent of this attack deals 2% damage each hit for about 1~6 hits. It has low knockback, but infinite priority.

Now I know what your thinking; Since Cloyster is technically supposed to be IN the water while battling, what with suspension of disbelief and all, isn't Cloyster shooting an actual burst of water kind of a paradox? Good question my boy, and to that I respond with shut your whore ass mouth :mad::mad::mad:


{DOWN TILT- WHIRL POOL}

I guess it's just not a tirkaro moveset without some sort of tornado attack involved, is there?

Cloyster himself stands still, but he summons a small tornado of water to swirl around him like the awesome god he is. This tornado lasts long enough to hit 3 times, and it dishes out 3% damage each hit. There's little lag whatsoever involved in this attack, but it has low priority to keep it under control. A really basic move overall, but it gets the job done.


{SMASH ATTACKS}


{FORWARD SMASH- GIGAAAA HORN DRILL BREEAAKEEER!!!}


I DON'T CARE IF CLOYSTER DOESN'T ACTUALLY LEARN HORN DRILL, I'M KICKING LOGIC TO THE CURB AND DOING THE IMPOSSIBLE

Upon releasing this attack on the masses, Cloyster uses his spiral energy to grow the Spike on it's head to an enormous size. This move can be charged for up to 1.5 seconds.
For .5 seconds, it's horn becomes as big as cloyster. For 1 second, it becomes 1.5 the size of Cloyster! And for 1.5 seconds, it becomes twice as big as cloyster! That's certainly epic enough, isn't it?
His horn then starts spinning around so fast, it looks all sketchy, and Cloyster then thrusts the obvious phallic symbol .5 battlefield platforms ahead of him. If he makes contact with the foe, Cloyster will instantly appear right behind the opponent and the action freezes for a brief second. For that second, Cloyster will awesomely fold the drill back to normal size, and the opponent explodes once it's all over.
Despite the awesome looks, this attack only does a mere 10% damage. But what this move is really for is the knockback. This attack deals GREAT knockback, about slightly more than Bowser's fsmash! Also, this attack would be impossible to implement in an actual game, because the amount of priority in this attack that has to be programmed is roughly Graham's Number.
The one drawback, though, is that it has absolutely pitiful Startup and ending lag. The startup is at least somewhat forgiving, being only .4 seconds long, but the ending lag, woo boy. Even if he doesn't hit a foe, he'll still do that whole "folding his drill back to normal" animation, which takes up roughly .7 seconds. That's about as long as a falcon punch. Getting nervous now? Well then, LET'S SEE YA GRIT THOSE TEETH :mad: *Punches you*
BELIEVE IN THE ME WHO BELIEVES IN YOU, BUT MOST OF ALL, BELIEVE IN THE YOU WHO BELIEVES IN YOU


{UP SMASH- GIGAAAA HORN DRILLMAXIMUMUU!!!}


For this attack, Cloyster naturally DOES THE IMPOSSIBLE SEES THE INVISIBLE ROW ROW FIGHT THE POWAH
jumps up into the air. Shortly after, Cloyster somehow uses his spiral energy to creates a large number of drills around his shell. All these drills then start spinning rapidly, each doing 1% damage each. The drills spin longer depending on how long you charged this, so the damage total should amount to 6%~17%. Of course, in exchange for this awesome damage, the knockback isn't nearly as good, only around average. However, the priority is still better than yours. Even the ultimate chimera's. What? You mean THE CHANCES OF OUT PRIORITIZING THE ULTIMATE CHIMERA IS 0%? SOUNDS MORE LIKE 100% TO ME

Also, funnily, Cloyster's head is still exposed on the very bottom of the clusterf*ck of drills, as you can see in the above image. I guess that makes up for it's insane prirority.
After the whole move is done, which is around .3~2 seconds, Cloyster puts all the drills away much quicker than in his Fsmash, and falls back to the ground.


{DOWN SMASH- RISING GIGAAAA HORN DRILLBREAKAAAA!!!}

Now for something completely different.
Cloyster dives into the ground once again for this attack's charging animation. Upon release, Cloyster's horn drill will rise out of the ground, and start spinning. Not really anything special is it? THINK AGAIN!
While this attack doesn't do much when it fails to hit an opponent, if you manage to buttrape attack the foe with your drill from directly underneath, the attack will then act like a pseudo-grab. The drill will pierce through the opponent, and then spin them around at insane speeds, until they start twisting like rubber. Soon, the foe will launch right out of the drill, and get knocked back a good distance upwards.
Likewise, this is an attack focusing on knockback more than anything. The initial spinning **** does 8~15% damage, but the resulting knockback is GREAT, pretty much a vertical version of the Fsmash. Also, Chuck Norris level priority.
If Cloyster misses this attack, then the resulting standard drill attack deals 2% damage each hit, hitting about 2~4 times.


{AERIALS}


{NEUTRAL AERIAL- HOMING NEEDLES}

Simply put, Cloyster grows a bunch of needles all around it's shell, much like in it's UpSmash. But much unlike it, the needles are much smaller, and they shoot out. And to make matters worse, they even slightly home in on the opponent! Sure, they turn like crap, but they're still there! :070:
Each of these needles deal 1% damage, and there's about 7 of them. They all have poor priority, almost nonexistent knockback, and go as far as a battlefield platform along an XY axis. This is mostly used to annoy the foe, but it can be a great damage racker if used right. The startup lag is a bit hefty, as he takes .3 seconds to detract the needles from the shell, and another .2 seconds to launch the needles.

{FORWARD AERIAL- ICE SHARD}

This move is pretty cool.


Cool as...............


IIIIiiiiiiiccceeeeeeee

Anyway, this is a really quick move. There's almost no startup and ending lag. So naturally, the attack itself is pretty darn weak. Cloyster simply blows shards of ice in front of him, going about half a battlefield platform far. Each shard does 1% damage, and deals 6% damage in total. The knockback and priority is low, making this a rather unremarkable move. But, it's still extremely quick, so use it to poke at your opponents some more and maybe......combo with it? (Ohohoho, yeah, Cloyster comboing, zat iz a good wun:rotfl: *ahahahahuhaohohoahuahas to the tune of the MM8 select screen theme* )


{UP AERIAL- HORN SPIKE}

Think of this attack as a pretty bizarre take on a Spike attack. (Spike as in Meteor Smash, not to be confused with an actual attack involving spikes, nor that one channel that G4 is desperately trying (and failing) to be.)
Cloyster puts on an even more sinister face as his horn extends a short distance vertically, about twice as long as normal. While you could write a school paper about the Freudian symbolism going on here, along with this entire moveset, you're going to have to let it wait a bit. When this attack makes contact with a foe, the opponent will make like the heavens and be PIERCED THROUGH by Cloyster's horn drill. When that happens, Cloyster will tilt himself downwards, and will spike the foe downwards-diagonally.
This is a rather hard move to hit 100% correctly, but if you do, it deals 8% damage with very good knockback. After all, it is supposed to be a spike, right? It has Medium priority.


{DOWN AERIAL- HAIL}

A downwards version of Ice Shard? Naw, really? Well, naw, really. It's quite a bit different.
For this one aerial that I keep forgetting exists, Cloyster charges up this attack by sucking in air/water. Woah, another charging attack? Who'da thunk it? :079:
Anyway, after charging this move for about .2~1.5 seconds, Cloyster will tilt itself downwards and spit out 2~10 chunks of ice, each doing 1% damage. These chunks of ice are spread out quite a bit, around the width of Cloyster's body, so there's no real guarantee all these shards will hit. The shards do absolutely no knockback and the priority is lol, so it's really just a damage racker, and not much more.
Also, Cloyster isn't like Cirno. He still falls down while charging this attack


{BACK AERIAL- BAIR MINIMUM}

Cloyster shoots out a jet of water from behind. That's about it. Hey, they don't call it "Bair Necessities" for nothing y'know.
This jet is about a fireball big, and only lasts for about .2 seconds. It deals 5% damage, and propels Cloyster slightly forward, like ROB's bair. Has average priority.


{GRABS/THROWS}


{GRAB/PUMMEL- CLAMP}

Exactly what you'd expect. Cloyster opens it's shell further and charges a short distance forwards. Anything unfortunate enough to contact Cloyster's shell from hell will get completely swallowed by the shell. :o
Pressing A again will make the shell predictably contract, causing 1% damage upon the poor victim.


{FORWARD THROW- PEARLY WHITES}

Cloyster does his best impression of Snoop Dogg's house, as he contracts himself together, and thick, white gasses start to leak out from his shell. After about that second, Cloyster will spit the foe out of his shell, who is now imprisoned in a pearl. :o
Actually, this "pearl" is just a sphere made of Ice, meant to look like a pearl. The foe can still easily break out of it, but it's up to you to smack it around before they do.
tl;dr, it's pretty much the same as Yoshi's turn-the-opponent-into-an-egg thingy. This attack deals 10% damage.

{UP THROW- MARVEL VS POKEMON '98: NEW AGE OF MARKETING PINGASQUARTZ EDITION}

Cloyster imprisons the foe in a more convenient log of ice, and throws the opponent above his shell. He then turns his shell to the side, as some mystical mystical force causes the log-frozen opponent to magically bang upon his shell in order to make music. In fact, the mystical force manages to play the first 19 notes from "Under the sea", that one song from that one crappy Marvel movie about that Mermaid T-Pain bought or something. ANYWAY, after the frozen foe bangs themselves against Cloyster's sturdy shell, they're somehow launched upwards with Medium knockback and 12% damage.

{DOWN THROW- WHY THE F*CK IS PINBALL ON THE VC BUT NOT NAZO NO MURASAMEJOH WTF}

Cloyster pulls off a move much like that one Japanese Pokemon fighting game that makes MYMers go (SHOCK) because it uses PROOOOOOOOOPS :mad::mad::mad::mad::mad:
Cloyster simply takes the opponent underwater and shortly rises up....along with a Dewgong, a Sealeo, and a Seel. And much like that one even from that crappy Nintendo Pinball game that shouldn't have been on the VC along with China Warrior and DKJ Math (ono), Cloyster and pals will start bouncing the opponent like a ball amongst themselves. This usually does a simple 10% damage....but as a secret, if you manage to time presses of the A button just right so it syncs with the Rhythm of your foe being bounced, you can bring this up to 17%!
This whole animation is about 1.5 seconds in total.

Also, why the hell have I started using XAT speak outside of XAT? I thought I wasn't a f*ggot.

{BACK THROW- I AM PURPLE CYCLONE}

For this attack, Cloyster, and by association, the opponent, rise up in the air as Cloyster starts spinning real real fast. I mean, really fast, like, super fast.

When Cloyster finishes this animation, he'll spit the foe out from behind him, which only does a measly 6% damage. But the catch to this attack is that it makes the foe dizzy! For about 2 seconds, all of the foe's movement-related controls are completely reversed! LOL POINTLESS STATUS INFLICTING MOVE BECAUSE YOU COULDN'T THINK OF ANYTHING BETTER OLO Shut up! :(


{FINAL SMASH- BLIZZARD/DEEP FREEZE}

Cloyster has the Smash Ball, ohshi-
When he uses his final smash, Cloyster goes all out and FREEZES THE ENTIRE STAGE IN ICE. Only Cloyster can move in these 10 seconds of frozeness, who'll most likely proceed to just knock the crap out of his opponents.
Pretty much, it's the same as Dio Brando's/Jotaro Kujo's TOKI WO TOMARE move. (Contrary to popular belief, the move isn't called ZA WARUDO. ZA WARUDO, or rather, The World, is Dio's stand, who he simply calls upon to attack, just like any other stand in JJBA. This technique is actually referred to under the generic title of "Time Stop" in the manga, which was supposed to be the unique ability of Dio's. However, Jotaro Kujo's stand, Star Platinum, eventually learned this technique as well, due to their stands being almost identical in nature.
themoreyouknow.jpg)


{PLAYSTYLE}


Well, everything really important about Cloyster was pretty much explained in the Stats secotion, but expanding upon that....
Cloyster is quite obviously a specialized tank. He's pretty much reliant on his shield, Up and Down special in order to not suck, the rest of his attacks to build up damage, and his Smashes to knock people back. He's a really hard character to get completely used to, but let's face it, you're pretty much used to that by now.
First off, you're going to want to get used to moving with Propulsion and maybe Deep Dive. There's a special art to moving like a Cloyster, and he'll only start being a beast once you nail it down. You'll need to know this, since you need to keep a controlled distance from the opponent in order to use this Bivalve to his fullest. You'll have to keep a safe distance from the foe in order to rack up some damage, then get up close and personal in order to send them flying.
Well, that's Cloyster stripped down to his basics. Let's think up some strategies to make this tank work. First off, you have 2 major helpful factors when it comes to keeping distance: Insane defense and..... Bubbles, apparently. Bubble Beam is like a less versatile trap move, but one with many advantages. You can set them up as much as you want, and you can try and synchronize them with your normal attacks. It keeps the opponent on their feet, and that's all that counts. As for getting up-close, you have your incredible defense to protect you. First, you should learn to master Cloyster's shield. It's one of his biggest advantages, and pretty much the only thing between you, and a humiliating death of a OHKO. If you need to use some close-range damage rackers or one of your Giga Drills, you'll need to be using this quite a bit. Cloyster really has no problems with spacing, it's just really hard for a newcomer to do, and maybe a bit unwieldy, even for a perfect player.

Other than that, he's your standard tank. He has many options for approaching the opponent, and can sure as hell dish out the damage. He's just crippled horribly by his one weakness. That is, getting hit in the head, if you weren't playing attention. And believe me, a lot of attacks end up leaving Cloyster's head exposed if you're not careful. So Ciao~!

{MATCH-UPS}

{MEGA MAN (ANY INCARNATION)- 0/100, CLOYSTER'S FAVOR}
Mega Man will die instantly upon getting hit by one of Cloyster's spikes. So yeah.


--------------
NO EXTRAS FOR YOU, WEENIEMIESTER


DEAR GOD, THIS IS THE LAST TIME I'M DOING A 1 DAY SET, ARGBLARG, THIS TOOK 7 1/2 HOURS TO MAKE RATE COMMENT AND SUBSCRIBE

ALSO, THIS IS NOT A F*CKING TV STUDIO JOSH ಠ_ಠ
 

Katapultar

Smash Lord
Joined
Nov 24, 2008
Messages
1,258
Location
Australia
Koopakirby, I like your idea of tag mode. It sounds fun, but the programmers would obviously make modifications to the whole concept to make it balanced. Great idea though. Needs to be acknowledged to some degree.

My commenting is getting weaker due to having less time to analyze sets and the possibility that you perhaps don't need them. Im also tired. This movement is WAYYY TOO SUCCESSFUL...

[size=+3]Arbok [/size]
Yay another poison Pokemon. One thing I've noticed is that both fellas Swalot and Arbok both have a filler move of extreme: a grab in another move that's better than the standard grab itself. BUT, that's forgiveable for being a 1 day set.

Im not really going to judge these 1 day pokesets. They're one day sets, come on. Like, they're not our BESTEST efforts, but still fairly strong ones. They're kind of signs of improved quality, as I thought so from somebody who said MYM3 nostalgia.

... ... ... ummmm. Cool set.

[size=+3]Ninetales [/size]
There's the interesting concept of wanting to be grabbed here, perhaps not the easiest thing in the world to covert into a set, but you've done well....wait....hold on....

Nitpick: You've stated that Ninetales has no grab, but instead has 2 attacks desgined to eat away at shields. Apart from using a Smash, I don't know why you'd need to break a shield. At least there's an option there.

Ninetales wants to corner foes into tight spaces. Perhaps into a space that's almost so tight that to even get the foe there this foxy lady has to do broken works to get there. Getting Super Amour from a Down Special seems to be cruel to the foe: if she had some sort of punishment where the foe could attack her, it would be alright. And the U-air...far too cruel. It's not fair for 1 character to simply have the ability to manipulate foes that way, wrecking their aerial game in such short notice, even if it's kind of balanced. I can't like this set for that, such an evil move. The way I see it is simply that Ninetales has a KO method that's so hard to obtain, that you have to be broken about it and ruin balance. It's a 1 day set (or 4 hours if you say so), but I can't allow such a imbalance. If you set-up Ninetales more fairly without the death star, then I'd beileve this set to be a pretty darn good one in your books. Sure balance isn't the most important thing ever, but this comes at you and annoys.

I'd come to believe that if you were to balance U-air (Or remove the entire concept, which is very strange for a fox) and maybe give Super amour special some lag, and replace these with better approaches, then it would allows for some more creativity on the playstyle's behalf.

I don't really need to emphasise it too much anymore.

[size=+3]Cloyster [/size]
I shouldn't even need to say it, but teh set is funny. Perhaps I've kind of not really appreciated your funnez. But now I do more. There's lots of fun OoC stuff like growing epicaly large drills that Cloyster can't really do but he does it cause he's Cloyster. In the end the randomness is really distracting and gets away from the main point of the story, kind of like Bobobo-bobo-bobo, but people laugh and appreciate it for that.
 

MasterWarlord

Smash Champion
Joined
Aug 24, 2008
Messages
2,902
Location
Not wasting countless hours on a 10 man community
CLOYSTER

Cloyster’s main playstyle seems to be the standard campyness to keep foes away from his head. While I do like the mechanic and find it fitting, I think you were a bit too subtle in giving him options to protect his head other then simply staying too far away to be hit. There is D Spec/Dsmash, though, so there’s –something- there at least that hides the hurtbox of his squishy head beyond the shield while still letting him attack. . .But he really doesn’t play that differently from a standard defensive camper outside the gimmick and generally lacks flow outside having a billion projectiles/ranged attacks. It’s not blatantly obvious while reading the main moveset due to the lulzy writing style and custom smilies and random anime distracting one, but once we get to the playstyle it’s become apparent that you’re struggling with it – why else is Even Flow not the header for Playstyle?

SHEDINJA

Cool enough concept for a 3 hour moveset, certainly, with the whole staring at his back and invulnerability to anything that isn’t aerial, but I doubt there’s any way his match-ups wouldn’t be ridiculously lop-sided due to him either losing all his stocks at the start of the match or stacking up more then the foe could ever take down. That’s not a common number tweak – you can’t really make that stock thing work and expect it not be wacky in-game. I’d propose just giving Shedinja a generic custom resource other then stocks to make clones with. There are other balance problems in this set, (Lol I’m so scared of having my attack speed by cut by 10% for 2 seconds) but they’re mostly just numbers. . .While the moveset does seem like it had potential, it’s kind of hard to be a fan of it when the moveset unfittingly bashes itself so much.

I added pre-charge lag to Down Special and Dsmash, but I’m content with how uair works, as it's an integral part of the playstyle.
 

Hyper_Ridley

Smash Champion
Joined
Dec 21, 2007
Messages
2,291
Location
Hippo Island
One thing I've noticed is that both fellas Swalot and Arbok both have a filler move of extreme: a grab in another move that's better than the standard grab itself.
Poison Fang has .3 seconds of startup lag, which is a full 18 frames, which is at least three times slower than his regular grab (which would have 5-6 AT MOST) while retaining all the punishability. While it does have better range than his regular grab his opponent will have enough time to possibly react to it from maximum range without set-up whereas his regular grab has great range in its own right and he hits that entire range almost instantly due to being a melee move instead of a lunge. The only big advantage Poison Fang has over his normal grab is that it gives him free poison damage to start out the grab with, and to a lesser extent he can use it from the air. But if you're in your opponent's face, Arbok's regular grab is much more desirable unless you can set-up with Glare or so, which would *gasp* mean that both moves have different uses for different situations!


Cloyster is hilarious just from skimming it, and hopefully I'll have time later today to give him a proper read. Nice to see another set from you Tirk. :bee:
 

MarthTrinity

Smash Lord
Joined
Aug 9, 2007
Messages
1,954
Location
The Cosmos Beneath Rosalina's Skirt
One thing I've noticed is that both fellas Swalot and Arbok both have a filler move of extreme: a grab in another move that's better than the standard grab itself.
Just kinda randomly putting this out there, but I'm not sure which move you're talking about for Swalot. If it's the Neutral Combo (which I'm assuming it is), it's not actually a grab hitbox, just an easier way to pull them towards you, I can see where you'd think otherwise though due to the way I wrote it out, another downside of one day sets, you don't really "have the time" to make sure that everything came out the way you meant it.

If you're not talking about that move, the other grab based moves are nothing out of the ordinary for a grab based character. Up Smash is predictable and easily air dodged/punished whereas the uair is also predictable and only hits directly above him.

Obviously comments on Arbok, Ninetales and Cloyster to come later in the Recap :3
 

Kaiser6012

Smash Cadet
Joined
Dec 28, 2009
Messages
32
Location
Brisbane, AUS
Goshdarnit... you turn your back for five minutes and a whole bunch of Pokemon mob you!
All right then, let's see what we got here. Some (very) condensed thoughts about some of the standout sets so far.

CLOYSTER

*Sigh*. This set, more than anything, stresses a need for a knowledge of when to cease a joke set and where to start a real set. This one suffers from bad puns and visual clutter in the form of bulky animations and, while the author stresses a particular role and a new mechanic, the moveset does nothing to capitalize on the mechanic and most of the rest of the moves, particularly the grabs, lack a certain amount of imagination. Kudos for the submerging moves, but the rest drags you down.
Rating: 1.5 spikes out of 5

NINETALES
Now THIS is how one does a set! An intriguing mechanic that I certainly wouldn't have been able to come up with in a month, combined with intriguing ways of damage racking and making sure the mechanic comes into play is a boon for this set. If I had one complaint, it's that almost half the grapple moves and a fair selection of the normal moves are about making future grapples easier - useless for causing more damage or knockback on a grand scale.
Overall Rating: 4 tails out of 5

SWALOT
SWALOT... ah, a pokemon that has an intriguing but unobtrusive mechanic that augments SWALOT's natural prediliction for nomming the opponent. Writing style is witty, keeping flashes of humour that make reading the set a lot less of a chore while the pokemon itself is a fearsome beast. A few issues, though - moves like Yawn and Slimeryuken seemed a bit useless, either by supplantation by other moves or counter-intuition and the gimping seems like a bit of a tacked-on gimmick to help out against hard-to-grab opponents.
Overall rating: 3.5 stomachs out of 5
 

UserShadow7989

Smash Journeyman
Joined
Aug 13, 2007
Messages
306
Warning, Challenger Approaching!

Houndoom has joined the Brawl!


Background:
http://www.youtube.com/watch?v=OUMC_W5S0mA

Houndoom is the 229th species of Pokémon and the evolution of Houndour. A Dark/Fire type known and feared for it's flames and howls. When angry, a noxious chemical mixes with it's flames, causing those burnt to feel the pain for the rest of their lives. It's howls chill to the bone, and can send even the most bold trainers scrambling away in terror. While it commonly travels in a pack, the leader chosen by a large brawl between the group's members, it seems this one has either left the pack or is simply choosing to fight on it's own.

Flash Fire


On contact with fire, be it from an opponent's attack, stage hazard, or the result of one of his own attacks, Houndoom's attacks deal 1.5x their normal damage and knockback for 2 seconds. In addition, if any of Houndoom's fire attacks whose hitboxes touch an item, enemy, or portion of the stage, that object is set aflame for 3 seconds. Items and foes can't be grabbed while on fire, dealing 3% damage to whoever tries. The fires do 3% damage (no knockback or hitstun) every second until extinguished. Houndoom is unaffected by the flames.

Stats:


Power )))))) 10
Size )))))) 7
Priority )))))) 7
Range )))))) 7
Fall Speed )))))) 6.5
Movement )))))) 5.5
Traction )))))) 5
Attack Speed )))))) 5
Jumps )))))) 4.5
Comboability )))))) 4
Aerial Movement )))))) 4
Recovery )))))) 3.5
Weight )))))) 3.5
Abilities: Crouch, Crawl.

Houndoom has mostly average stats, with poor weight and recovery in exchange for sheer power. His high damage attacks are amplified by the constant damage the flames they leave behind and the power of Houndoom's Flash Fire ability. He's slightly taller then Mario, and much longer. Despite having an average attack speed score, many of his attacks have a punishing ending lag. His First jump is very good, but his second jump is pathetic and contributes little to his recovery. There's nothing fancy about Houndoom. Set fire to everything, then tear your prey apart.

Specials:


Neutral Special {} Flamethrower


Houndoom rears his head back, flames licking it's muzzel. It suddenly lurches forwards and belches a constant stream of flame, reaching 3 Stage Builder Blocks ahead. The flames barely touch the ground and reach 1 SBB upwards. This attack lasts for 2.5 seconds, doing up to 5 hits of 4% damage and pushing the foe back at half the force of Mario's F.L.U.D.D. Long starting and ending lag. High priority. This attack leaves Houndoom open to retaliation and is useless on aerial foes, but is the perfect set up for Flash Fire and a reliable damage racker or gimp.

Side Special {} Fire Spin

Houndoom hops back a Pokéball's width and spits a thin, long trail of fire. The fire moves at speed of Wolf's Neutral Special, straight ahead up to 1 Stage Builder Block. Any foe who touches it is surrounded by a vortex of flame as it coils around them, doing rapid minor damage. The flames do not inflict knockback or hitstun, but follow the foe no matter where they go. The trail of flame travels too high to ignite the floor, but once Fire Spin envelops it's victim, it sets fire to the floor on either side. Fire Spin lasts for 5 seconds, dealing 0.5% damage every quarter a second that passes. Short starting and ending lag. Has no priority, as it ignores and is ignored by all other attacks.

Down Special {} Roar

With a loud shout, Houndoom strikes fear into the opposition's hearts. Anyone within 1.5 Stage Builder Blocks instinctively turn and run until they reach the edge of this attack's range. Aerial foes do not move away, but cannot jump or control the direction they fall for 1.5 seconds. Medium starting and ending lag. Enemies hit by this attack are immune to it's effects for the next 5 seconds. This does no damage or knockback, but forcing enemies to run right back into the flames or spread the effects of Fire Spin is it's own reward.

Up Special {} Burning Leap

Houndoom leaps upwards, flames flowing from it's mouth and down it's body. Houndoom leaps upwards 1.5 Stage Builder Blocks, pauses at the apex of his ascent, then comes down at Fox's fall speed. The player has a slight but difficult to use control over the direction of the jump and fall, granting a maximum of 2 SBBs in horizontal movement. Houndoom's flame-wrapped body is a medium priority hitbox that deals 15% damage and above average knockback until he lands. Everywhere up to half a SBB from the spot he lands ignites. Short starting lag but long ending lag. Hard to control, but a potential KO move and a sure fire Flash Fire boost on top of good positioning.

Standards:


A/AA/AAA {} Shredder


Houndoom lashes out with one paw, then the other, then finishes with a bite. This medium reach attack does 3% damage and flinching knockback with each hit, and has short starting and ending lag for all three attacks. Low priority. Not very exciting, unless you have Flash Fire in effect. When his ability is active, Houndoom's claws and fangs have fire wrapped around them, and can land up to 6 hits (5 alternating slashes and a bite). The final hit has below average knockback that prevents an infinite, but all of the strikes have half their normal lag. This serves as a reliable and straight forward attack that's always an option.

Forward A {} Fire Spray

Houndoom breathes a line of flame half a Stage Builder Block in length, sweeping it up and down in front of itself. The flame barely touches the ground at it's maximum range and reaches a Pokéball's height above Houndoom's hitbox, acting as a disjointed hitbox that deals up to 3 hits of 3% damage and flinching knockback. Lasts 1 secondand has below average starting and ending lag. While Flamethrower has better range and is overall more powerful, this move's speed makes it a more reliable way to kill an attacker's momentum.

Down A {} Scorched Earth

Houndoom spews fire onto the ground in front of himself. The flames reach from a Pokéball's width in front of himself, to 1 Stage Builder Block away across the platform. This attack continues as long as the A button is held, doing 3% damage and light upwards knockback. Medium priority. Short starting and ending lag. The hitbox is too low to the ground to hit an aerial opponent, and does nothing to protect against attacks from above or behind. It's a much faster way to light a section of stage on fire then Flamethrower or Fire Spray, has better range then Spray, and can juggle enemies with poor Aerial DI.

Up A {} Smog

Houndoom sits on his hind legs and exhales a small cloud of venomous gas straight up. The purple puff is a Smash Ball sized disjointed hitbox that does 3% damage and no knockback. Anyone unfortunate enough to touch it is stunned for a full second, falling face first onto the ground. If Houndoom is under the effects of Flash Fire, or the hitbox of this attack touches any source of fire, the poison bursts into flame. This fireball doubles in size and does 12% damage and medium upwards knockback, the normal stun from the move applies the instant they land. Medium starting lag and short ending lag. A great set up or follow up for Flamethrower.

Dash Attack {} Tackle

Houndoom leaps forward 1 Stage Builder Block, turning his body so his side faces the direction he's moving in. His body becomes a Crate sized, high priority hitbox that deals 8% damage and deals medium horizontal knockback. Opponents are knocked head over heels across the ground, taking an additional 3% damage for every SBB of fire they touch. Short starting and ending lag, but Houndoom stops dashing when he lands. Force opponents to run through the burning sections of the stage again, or simply shove them off the stage so you can ledge guard.

Smashes:


Forward Smash {} Overheat


Houndoom releases a massive burst of flame, creating a scorching cloud the size of Bowser directly in front of himself. This large disjointed hitbox lasts 1 second and deals 28~36% damage and medium knockback. After completing the attack, Houndoom stumbles around from exertion and pants heavily. For the next 6 seconds, Houndoom's movement speed, attack speed, and attack damage are all reduced by half. Any benefits he had or would gain from Flash Fire are negated during this time as well, though the time spent weakened is cut in half. Long starting lag and ending lag. Possibly one of the most powerful attacks in the game for it's starting lag, but wasting it has horrible consequences.

Down Smash {} Crunch

Houndoom lurches forward and bites the nearest foe, a dark energy dancing from his sharp canines. He yanks hard, then tackles the enemy away a set 1.5 Stage Builder Blocks. Does 22~29% damage, and long hitstun. Short reach is offset by grab priority. Medium starting and ending lag combine with Houndoom's only average move speed to make this impossible to chain, but it's a potential set up for Flamethrower or Overheat and a means to throw enemies into burning areas.

Up Smash {} Howling Flare

Houndoom sits on his hind legs and tilts his head back. He cries his bone chilling howl, a chorus of Houndoom mimicking him in the background, somewhere out of sight... When used, all burning sections of the stage within 1.5 Stage Builder Blocks shoot upwards as a Ganondorf sized pillar of flame that lasts half a second, doing 12% damage and medium upwards knockback. Medium starting and ending lag, with disjointed priority. Knock them into the air or create a wall of fire to interrupt their approach and kill their momentum

Aerials:


Neutral Air {} Drag Down


Houndoom reaches out and bites in a lightning quick motion, his muzzle acting as a short reach grab priority hitbox. If he misses, nothing happens. If he connects with a foe, however, he latches on for 5% damage and drags them down towards the ground. As long as he holds onto the enemy, his their fall speed are added together and their Aerial DI are added together (if moving in the same direction) or stacked against each other (if moving in the opposite direction).

The opponent can button mash out with half the normal grab difficulty. If they fail to escape before they land, Houndoom slams them into the ground for 15% damage and automatically grabs them normally. If they do escape, Houndoom lets go and enters freefall for 1 second. Does no knockback or hitstun. Short starting and ending lag. A great way to pull them back to (burning) earth and puts Houndoom into position to use his high damage throws.

Forward Air {} Fire Blast

Houndoom fires a slow moving wall of flame forwards. The fire reaches a Pokéball's width above and below Houndoom and move forward at Ike's dash speed, doing 14% damage and no knockback on contact. Instead, those that touch it enter freefall for 1 second. Fire Blast travels a maximum of 2.5 Stage Builder Blocks and disperses once it hits an opponent or reaches that point. Medium starting and ending lag. High priority. There can only be one Fire Blast per Houndoom at any time. While it's not low enough to touch the ground even by short hopping into it, it does pass through fall through platforms and light them ablaze as it goes by. Excepting the space furries, the short freefall isn't enough to kill a recovery. Instead, you'll use it to prevent someone from just jumping over your flames.

Down Air {} Fallout

Houndoom inhales sharply, then aims down and releases a burst of intense heat. The fire ball is the size of a Crate, lingering in the area it was created for 1 second. Contact with the fireball deals 12% damage and light knockback. Medium priority, with medium starting and ending lag. Provides a quick boost when Houndoom falls through, a small patch of fire, and blocks the ledge from someone attempting a recovery.

Back Air {} Flame Wheel

Houndoom does a flip, leaving a trail of fire around him as he spins. The flip takes only a quarter of a second, doing 4% damage and a set knockback of 1 Stage Builder Block. Touching the flames does 6% damage and medium knockback, which stacks with the damage and knockback from the flip if both hit. Low priority. Short starting and ending lag. A quick attack that does decent damage and sets fire to every angle.

Up Air {} Spread Shot

Tilting it's head up, Houndoom sprays fire back and forth above himself. The flames reach up to Ganondorf's height, and cover an area of 1.5 Stage Builder Blocks back and forth. This continues as long as the A button is held or until 2 seconds pass, each trip from one edge of it's reach to the other taking half a second. This does 8% damage and below average upwards knockback. Medium starting lag, and anywhere from short to long ending lag depending on how long the A button was held. Medium priority.

Grabs/Throws:


Grab {} Pounce


Houndoom jumps forward, tackling his prey. He stands on top of the grabbed foe, shoving his fiery muzzle right into their face. This grab is 1.2x as long as normal, but Houndoom suffers double lag if his prey escapes.

Pummel {} Swipe

Houndoom lifts it's paw and slashes the victim across the face. Does 3% damage for each laggy scratch.

Forward Throw {} Agony

Houndoom backs up off the foe, seemingly relenting. Just as they push themselves up, he lunges forwards and bites them with an audible CRUNCH! This does no knockback, but a whopping 16% damage. In addition, attempting a smash for the next 6 seconds causes the area Houndoom bit to throb badly. This brings them to their knees for a full second and inflicts 5% damage. Long starting lag and short ending lag. Interrupting Houndoom's attacks or punishing his mistakes becomes much harder.

Down Throw {} Maul

Snarling, Houndoom brutallizes the foe. He rakes his claws against their body, bathing them in flame and crushing their bones with his burning maw. After 3 seconds of raw fury, Houndoom calmly leaps off the mangled foe back a Stage Builder Block. Like the Forward Throw, this does no knockback and an obscene 19% damage, but can be escaped by buttonmashing before the full damage is inflicted. For the next (2 * seconds before escape) seconds, the victim cannot run or dash due to their injuries. Medium starting and ending lag. Escaping the flames slowly encroaching the stage is now an impossibility.

Back Throw {} Shove

Houndoom yanks the opponent off the floor and swings them behind himself, then headbutts them forward. Does 8% damage and medium horizontal knockback. Short starting and ending lag. While low in damage and having no additional effects, the throw can place a camping enemy in the middle of your flames.

Up Throw {} Red Fountain

Houndoom pulls the foe up by the collar, raises them overhead, then unleashes a point-blank flamethrower that sends them flying. The victim takes 15% damage and medium upwards knockback, and cannot attack or jump until they land. This creates a two Ganondorf high pillar of flame right above Houndoom for a full second, inflicting the same effects to anyone who touches it as the thrown opponent. Medium starting and ending lag. High priority.

!!FINAL SMASH!!
-(Alpha Male)-


Houndoom howls loudly, calling it's pack into the fray. 3 CPU controlled Houndooms with Lvl 5 AI appear at random locations, allied to Houndoom and sporting 35% stamina. Their AI focuses on fire attacks to ignite everything around, but otherwise they act normally. In addition, damage from fire attacks and burning ground increase by 1.5x for the duration of the Final Smash, which stacks with Houndoom's Flash Fire. This lasts until all AI controlled Houndoom lose their stamina or 10 seconds have passed.

Playing as Houndoom:


Houndoom does one thing better then anything else: piling on damage. His low weight and bad recovery make it a kill or be killed situation. Light as much of the stage around you on fire as you can. The constant damage of the flames and the boost to your already sizable attack power make the KOes that much quicker. Unfortunately, you can't rely on the flames to fight for you. The damage is an added bonus, not your main source of power. Let the foe come to you to maximize the damage they take, then step in to gain the attack boost from Flash Fire and go on the offensive.

Enemies capable of camping, setting traps, or with powerful air games require a different approach. For the former two, use the Up Special to close the gap instantly and set up a nice patch of fire right away. This allows you to evade projectiles and go around traps in one bound. The Forward A is an alternate defense against projectiles, so slowly creeping forward is always an option. Using the Down Throw to prevent them from running away or the Back Throw to force them into the burning sections of the stage should be your first priority. For the latter, meet them half way and use the Neutral or Forward Aerial to knock them back to earth, then follow up with a grab to inflict a chunk of damage and handicap them. If they stick to short hopping to evade or reduce the damage, the Up Smash kills their momentum.

Once you have Flash Fire in effect and you've softened them up, it's time to charge in. Other then the Back Throw, all of Houndoom's throws deal heavy damage and the Forward and Down throws prevent Smashes and running/dashing, respectively. Hit them with a throw, then follow up with a Side Special to deal even more damage. The A/AA/AAA combo, the Down A, and Down Smash are effective damage dealers for this phase. Save your Down Special for when you're being overwhelmed or you're setting up for a finishing move.

Finally, it's time to finish them off. If you've nailed them with the Down Special, Up A, or Down Throw, this is easy. Many of Houndoom's moves are great at KOing and ledge guarding, but for stubborn foes that simply must die, you have Overheat. KOing the normal way takes longer and gives the enemy more windows to damage or KO Houndoom, but Overheat leaves you near helpless if you fail to finish them off with it. No matter what you choose, Houndoom loses the moment his opponents gain momentum. Neutral Special, Down Special, Up Special, and Dash Attack puts distance between you and your enemies, at which point you begin again from the start. Otherwise, you want to keep attacking so they never get a chance to do the same.

Houndoom does very well in 2 vs 2 matches thanks to his stage control and the large hitboxes his attacks have. In free for all, Houndoom is suddenly very poor. His light weight and bad recovery do him no favors, and his constant ignition of the battlefield makes him the prime target for most of the match; a poor showing from start to finish.

Playing against Houndoom:


Fighting fire with fire is normally a poor strategy, but in this case it's the best. First, accept that you're going to have to deal with Flash Fire. Sitting on your thumbs won't help, and camping or trying to go over will be met with his Up Special and his Neutral Aerial, respectively. By charging in on foot, you take damage, but at least you aren't getting hit by his other attacks. When you see him about to use one of his higher lag moves, jump over it and hit him from above or perform a dodge roll to get behind him. If you can't do either, pull back to the edge of his attack's reach and wait until the punishable ending lag takes effect.

When picking a character to counter Houndoom, anything with a high weight is your best bet. Houndoom is an aggressive fighter, but he doesn't want to be in a drawn out fight where his light frame comes into play. Decent aerials are helpful, but should never be your focus. Lightweights are out of the question.

Match-ups:


Vs. Subaru 50/50 Dead Even

Subaru has plenty going for her. Houndoom is easy to KO, her Wing Road keeps her off the burning ground, and her speed lets her close in lightning quick. Houndoom has several ways to counter this, however. His Up Special can be used to slam into her and kill momentum gained on Wing Road, or if he's lucky, knock her off the top of the screen. Flamethrower has enough range to hit her before she uses her Forward Smash, and Up Special to get the hell out of the way if she attempts it before coming in range. He has so many ways to kill momentum it's depressing.

So, why is Subaru still 50/50 with him? Well, a number of reasons. Houndoom's crippling ending lag gives Subaru plenty of free shots, and when she does have her momentum built up, he can do nothing but play defensively. She can whittle away at him with her Side Special, or actually stop and fire a Divine Buster into his face. Houndoom's lag also keeps him from capitalizing on the occasion he does knock Subaru out of her attacks.

When Houndoom or Subaru finally do go on the offensive, the crap hits the fan. Houndoom can do a crap load of damage once he has her in his reach, and Subaru can KO really early. Who wins and who loses is decided very quickly. That's exactly the problem. Attacking first means the other can simply counter it and send the other flying. This leads to three drawn out stalemates, the first with Houndoom not attacking for fear of creating an opening and Subaru not attacking because Houndoom will just destroy her momentum, the second where each sticks to their quicker, but weaker attacks so the other won't knock them out of it, or the very quick, very bloody final stalemate where they say "screw it" and go all out, at which point the defender wins. This match isn't equal so much as exactly as painful for Houndoom as for Subaru.

Vs. Venusaur 70/30 Houndoom's Favor

It's Super Effective! What, want more? Okay. Houndoom can push Venusaur out from his Sunny Day beems, can rack up damage faster then the wide majority of characters, and can cancel out most of Venusaur's healing moves through the effects of Fire Spin and Flash Fire, can interrupt Venusaur's laggier healing attacks, and can hit with Flamethrower and the like from outside of the range of Venusaur's GTFO moves. Oh, and Flamethrower makes all that irrelevant anyways, since he can steadily march Venusaur off the stage where chubby can't get back on. Venusaur simply can't charge up Solar Beam before being shoved off.

However, Venusaur doesn't need to rack up much damage on Houndoom before Solar Beam will KO him. Repeatedly using Roar, Charge, and Takedown, are his best bets. If he actually grabs Houndoom, Entangle or Razor Leaf can earn him some extra time. If by some stroke of luck he pulls off the Up Air and respawn with multiple Solar Beams, he can gain a strong lead. Sadly, this just doesn't make up for all the weaknesses he has to Houndoom's attacks.

Closing Comments:

Wow. My first 24 hour moveset, and my first officially entered Pokémon moveset. I don't feel as good about this set as most others, but I'm happy I pulled it off. Houndoom has always been one of my favorite Pokémon, and seeing the sudden rush of Pokésets made me want to try. I've been taking forever with Kira, because of a mix of laziness and perfectionism, so a quick and dirty set was what I needed to refresh myself. The fact I'm able to make a set in less then a week for once has me all hyper.

Now if you'll excuse me, I have to rest my brain. Nighty night.

Updates:
2/18/09: Fixed some grammatical errors, reduced the ending lag of several moves. Added music to the Background header, because I forgot.
2/19/09: Dropped the damage done by the Forward and Down Throws, can now escape during Down Throw, modified and highlighted the differences between the Forward and Down tilts and Flamethrower. Overheat now takes 6 seconds for the negative effects to wear off, but time spent under the effects of Flash Fire counts as double. Reduced the range of Up Special, as it was too powerful to be considered a weakness.
2/27/09: Dropped the durations of the flames and Flash Fire from 6 and 3 seconds to 3 and 2 seconds, respectively. Replaced opening pic with the official art for Houndoom. Thanks Junahu.
 

Katapultar

Smash Lord
Joined
Nov 24, 2008
Messages
1,258
Location
Australia
[size=+3]Houndoom[/size]
Good to see another 1 day Pokeset, especially coming from you.

As I comment more, I start to become aware of more things and speak my mind (Irrelevant to the comment, but kind of is). One thing I seem to notice as of recently is that your sentence structure doesn't seem to have a great amount of flow to it. This comes from the fact that you tend to place a single detail in one sentence and then go off to the next, breaking the flow of the attack description and putting the reader off when it comes to bringing all the details together. This isn't a massive problem, it's more of a one timer thing in most attacks that comes when you mention lag. Giving your attack description some character and interaction could help with this.

Good job on stating Flash Fire throughout the set instead of leaving it as a tacked on mechanic that gets no attention afterwards. In fact, you even went as far as to place the attacks that do cause Flash Fire in a red color while those that don't in gray. This makes it a lot easier on the reader and prevents repeating the same thing over and over, making it a mechanic well worth mentioning at the start of the set. 18% in total seems to be a lot for a simple fire, (hopefully it's not stackable) but the fact that it does no stun balances it.

I kind of think there's a bit of tackyness in the throws, but it's ok. And finally, not having KO percentages makes it a bit hard to tell how strong an attack is, though this also comes from the fact that no best KO move was specified.

Despite the nitpicking, I do think this is a very good set coming from you, especially seeing as it's a 1 day pokeset with his playstyle and well implemented background information (something I didn't mention until the last minute). Well done.
 

Katapultar

Smash Lord
Joined
Nov 24, 2008
Messages
1,258
Location
Australia
A moveset dedicated to the Yesterday of which was my birthday. I was going to post it the day before but I couldn't finish this 1 day set. (Actually it was 1/2 a day, then 1/2 another day).


VERSATILE POKEMON TRAINER


This isn't just any Pokemon Trainer. He's a Pokemon Trainer who has ammased a large collection of TMs, HMs and random pokemon and has bought them into Brawl and gives them Pokemon Syndrome. What wonderful adventures await? And yes, he's in Sprite form for Brawl. I like it.

VPT essentially has Mr. Game and Watch's Stats. He's light and doesn't have great movement. I should also mention that he does not have G&W's great crouch either. He has to lie down.

When VPT spawns, he has 4 random numbers counting from 1 to 100 next to his HUD, none of these mumbers are never the same. Any great Pokemon Trainer should be familiar with TMs, Technical Machines used to teach Pokemon fancy moves, these coming from the D/P/pt series.. Of course, he's also got the 8 HMs so essentially he has 100 in all.

But what do they do you ask? Well, each of the 100 potential Ms from right to left of the HUD are designated to the respective Special from Neutral, Side, Up and Down. Use each Special to give the respective TM move to VPT. But be careful, as once you've chosen, you can't change for the rest of the stock.


Standard - Pokemon Switch
You really thought it was that simple, silly? No, VPT has a Pokemon fight for him. It's not like the trainer himself can do all those moves.

So how does it work? Well first off, you can only use this attack if you've filled in all 4 special slots, which takes no time. Even if they consist of attack combinations you don't like, you can change them later so don't worry.

For the actual attack, VPT instantly enters the background as a completely random Pokemon enters from a shiny Master Ball in the same fashion as Pokemon Switch. Yet the Pokemon is not random. You see, the Pokemon that comes out must be able to learn all 4 attacks that were slotted into the Specials. You know you're Pokemons, right? Example: if you were to get Psychic, Water Pulse, Trick Room and Drain Punch, you could end up getting, say, Jynx. You now play as the Pokemon, who ONLY has those 4 attacks to use, BUT, they have the stats and special mechanics of that Pokemon: providing a moveset has existed for it beforehand (that shouldn't be a problem in MYM's current state). If the Pokemon is KOed, then you lose a stock, both characters share the same damage percentage and all. VPT may return his pokemon back to his pokeball for any reason.

Don't like your Pokemon or it's attacks? Sure, VPT has other attacks to help get you the right combination to beat the snot out of your foe. It's called "Customise your own character.". VPT as a character has many options to choose from before the battle begins against his foe, but in the midst, you have little battle options. Oh, and make sure you do this choosing before you release a Pokemon, because you don't get to switch out for 1 minute after doing so.

Z Button - Pokemon Selection
Using the grab input brings up a image of a random Pokemon right above VPT's head. Hold the Z button and scroll through your 493 choices using the control stick, and once released, you'll get that Pokemon with your Standard (and the portrait above your head until you use your Standard). Changing your Pokemon like this isn't always the best thing to do however. Why? Well not only because it is time consuming, but also because if you replace a Pokemon that has TMs assinged to it's Specials, you won't get those TMs back for the rest of the stock. To solve this problem, you can choose the Pokemon you want at the CSS: it's image will appear besides VPT's frame in sprite form. Scroll through this as you wish.

Smashes - TM Choice
By inputting forward, down or left, a number will appear above VPT like in the Standard. Forward applies for Side Special, Up and Down for the respectives and Back for Neutral (akward yes). This number appears above VPT, where you can adjust it in the same way as you can adjust your item count in the Pokemon/RPG games using the control stick. The number stays until you press either A or B so you don't have to worry about the control stick. If you have a Portrait from the Z attack, you can't choose TMs that the Pokemon cannot learn. TMs can also be adjusted through the CSS, but doing this allows you to choose options that can be used to counter your foe.

Dash Attack - Bike
VPT gets on his bike with no lag and moves forward for 1/2 Final Destination at Sonic dash speed. It has some ending lag, but you've got to use this to get away from the foe.

D-tilt - Randomisation
VPT instantly brings out a Pokemon, except this one is completely random in which moves it has, also randomising the current TMs in your stock. Good for a degree of mindgames, as if you've mastered VPT, you'll know what each of the numbers mean on the HUD. Only use if you unexpectedly get a bad match-up with your Pokemon and want to mix things up a bit. Though it's not always the best thing to do.

F-tilt - Reset
VPT brings out a TM/HM, which has a number above the disc. This acts like a item which can be thrown, being the same size as a music disc. It does no damage if it touches anything, lasts for 1 minute, and cannot be picked up. You can use your Smash input when right next to a TM/HM to change which one it is. Why is this relevant? First off, if you use a Special right next to the TM, it will assign the attack onto that Special if one has not already been assigned. Secondly, the foe can do the exact same: run up to your TM and replace their Special with that move. Yeah, they can do this. Even if they're not a Pokemon. In that case, the foe can only use the TM/HM if the would be able to do the move in character. We can't have Mario using Attract now can we? This Special attack replacement lasts until you're KOed. Don't waste the TMs of this attack, cause once you use one, it's gone for the rest of the stock.

U-tilt - Short Hop
Like the name says, VPT does a short hop. It's actually useful for his aerials...

Aerials - A New Move
VPT's Aerials only work if you're holding a TM. From here, VPT throws the TM as if he were throwing a Bomb-omb in the air. If this TM hits the foe, the last Special they used will be replaced by the move the TM contained, the Special replaced being a random one if one hasn't been used yet. You can't give the foe Cut, Fly, Surf, Strength, De-fog, Rock Smash, Waterfall or Rock Climb cus that's unfair. SO...VPT can also replace the foe's moves? Yes, it's actually quite useful in conjunction with all your 100 Specials...it's up to you.

Final Smash - Game Crash
Uh-oh! The VPT has so many TMs and Pokemon through the use of cheat codes that he's frozen the game! For 15 seconds, all player's damage percentages stay the same, respawning with that DP even if KOed. In addition, a random TM will fall from the sky, replacing a random move of the victim for the rest of the stock. This could even be one of their Standards, Smashes, Aerials or Grabs in addition to their Specials. About 40 TMs appear throughout the FS so by the end of it all the player's attacks are gonna be so messed up, especially considering that this FS doesn't take into account the number of TMs you have in stock, so a player could end up with Earthquake for 5 of their moves,,,

Playstyle
The truth is, VPT doesn't have a playstyle, apart from replacing the foe's attacks. It's really up to the player to decide what kind of character they want, though it would very well be pretty darn hard to list every combination. Just think of you're favourite Pokemon like Rhyperior and give him 4 of the appropriate Specials. See what you come up with. VPT can change his Pokemon to prey on his foe's weakness, but he has so few options that in the end the foe may overpower him with their 32 or so options. But truly, VPT is a budle of fun...do you want to give the foe a random attack like Shadow Ball while you use Light Screen to counter it? Mess up the game real good and make your foe suffer from your broken options. You've really hacked into the game this time by doing the impossible....
 

MasterWarlord

Smash Champion
Joined
Aug 24, 2008
Messages
2,902
Location
Not wasting countless hours on a 10 man community
HOUNDOOM

I’m rather a big fan of the basic concepts here – Houndoom is somewhat of a stage control character with those flames, but doesn’t have to do any obligatory set-up due to the flames lingering on from actual attacks Houndoom does on the foe. Flashfire is a particularly nice mechanic, and you’ve got some nice stuff to complement it in there with moves like Fire Blast and Roar to herd foes into the flame and then using usmash to ignite the flame further. . .Though Houndoom can appear blatantly overpowered at a glance – those throws are just ridiculous. I assume what you meant by the fact it takes 3 seconds that foes can escape during the throw? If so, then it’s more acceptable, considering foes can’t normally escape during throws. . .So his balance isn’t that blatant, although I’d probably nerf his recovery a bit more to pronounce his weakness better, considering it does somewhat of a poor job passing as a crippling weakness. But anyway, balance, blah. I’m a fan of this moveset for the most part, especially considering the filler inputs are kept to a minimum. The ones that do look somewhat filler-esque I assume are the ones that would leave lingering flame everywhere, thus making them not filler. . .Although it’d of been nice if you’d of detailed what lingering flames they create exactly or which moves do and which don’t.
 

King Iwata

Smash Rookie
Joined
Oct 4, 2009
Messages
7
What is with you foolish people making sets for such ancient Pokemon? We can’t milk these Pokemon any longer, we already milked them dry long ago. No, I am not referring to the 4th generation of the Poking of the mon, albeit I applaud Darth_Meanie for being the only one to of made one of them instead of an even older Pokemon. I am talking about the 5th generation! We must begin the advertisement through movesets as soon as possible. Perhaps if you’re all good little boys and girls I’ll let you get your hands on the games early so that you can advertise them for me through your movesets?
 

Smady

Smash Master
Joined
Apr 29, 2007
Messages
3,307
Location
K Rool Avenue
I'll just throw it out there that this MYM may be going on longer than the previous ones - the Conglomerate is playing it by ear, but this would seem to be rather decisive.
 
Status
Not open for further replies.
Top Bottom