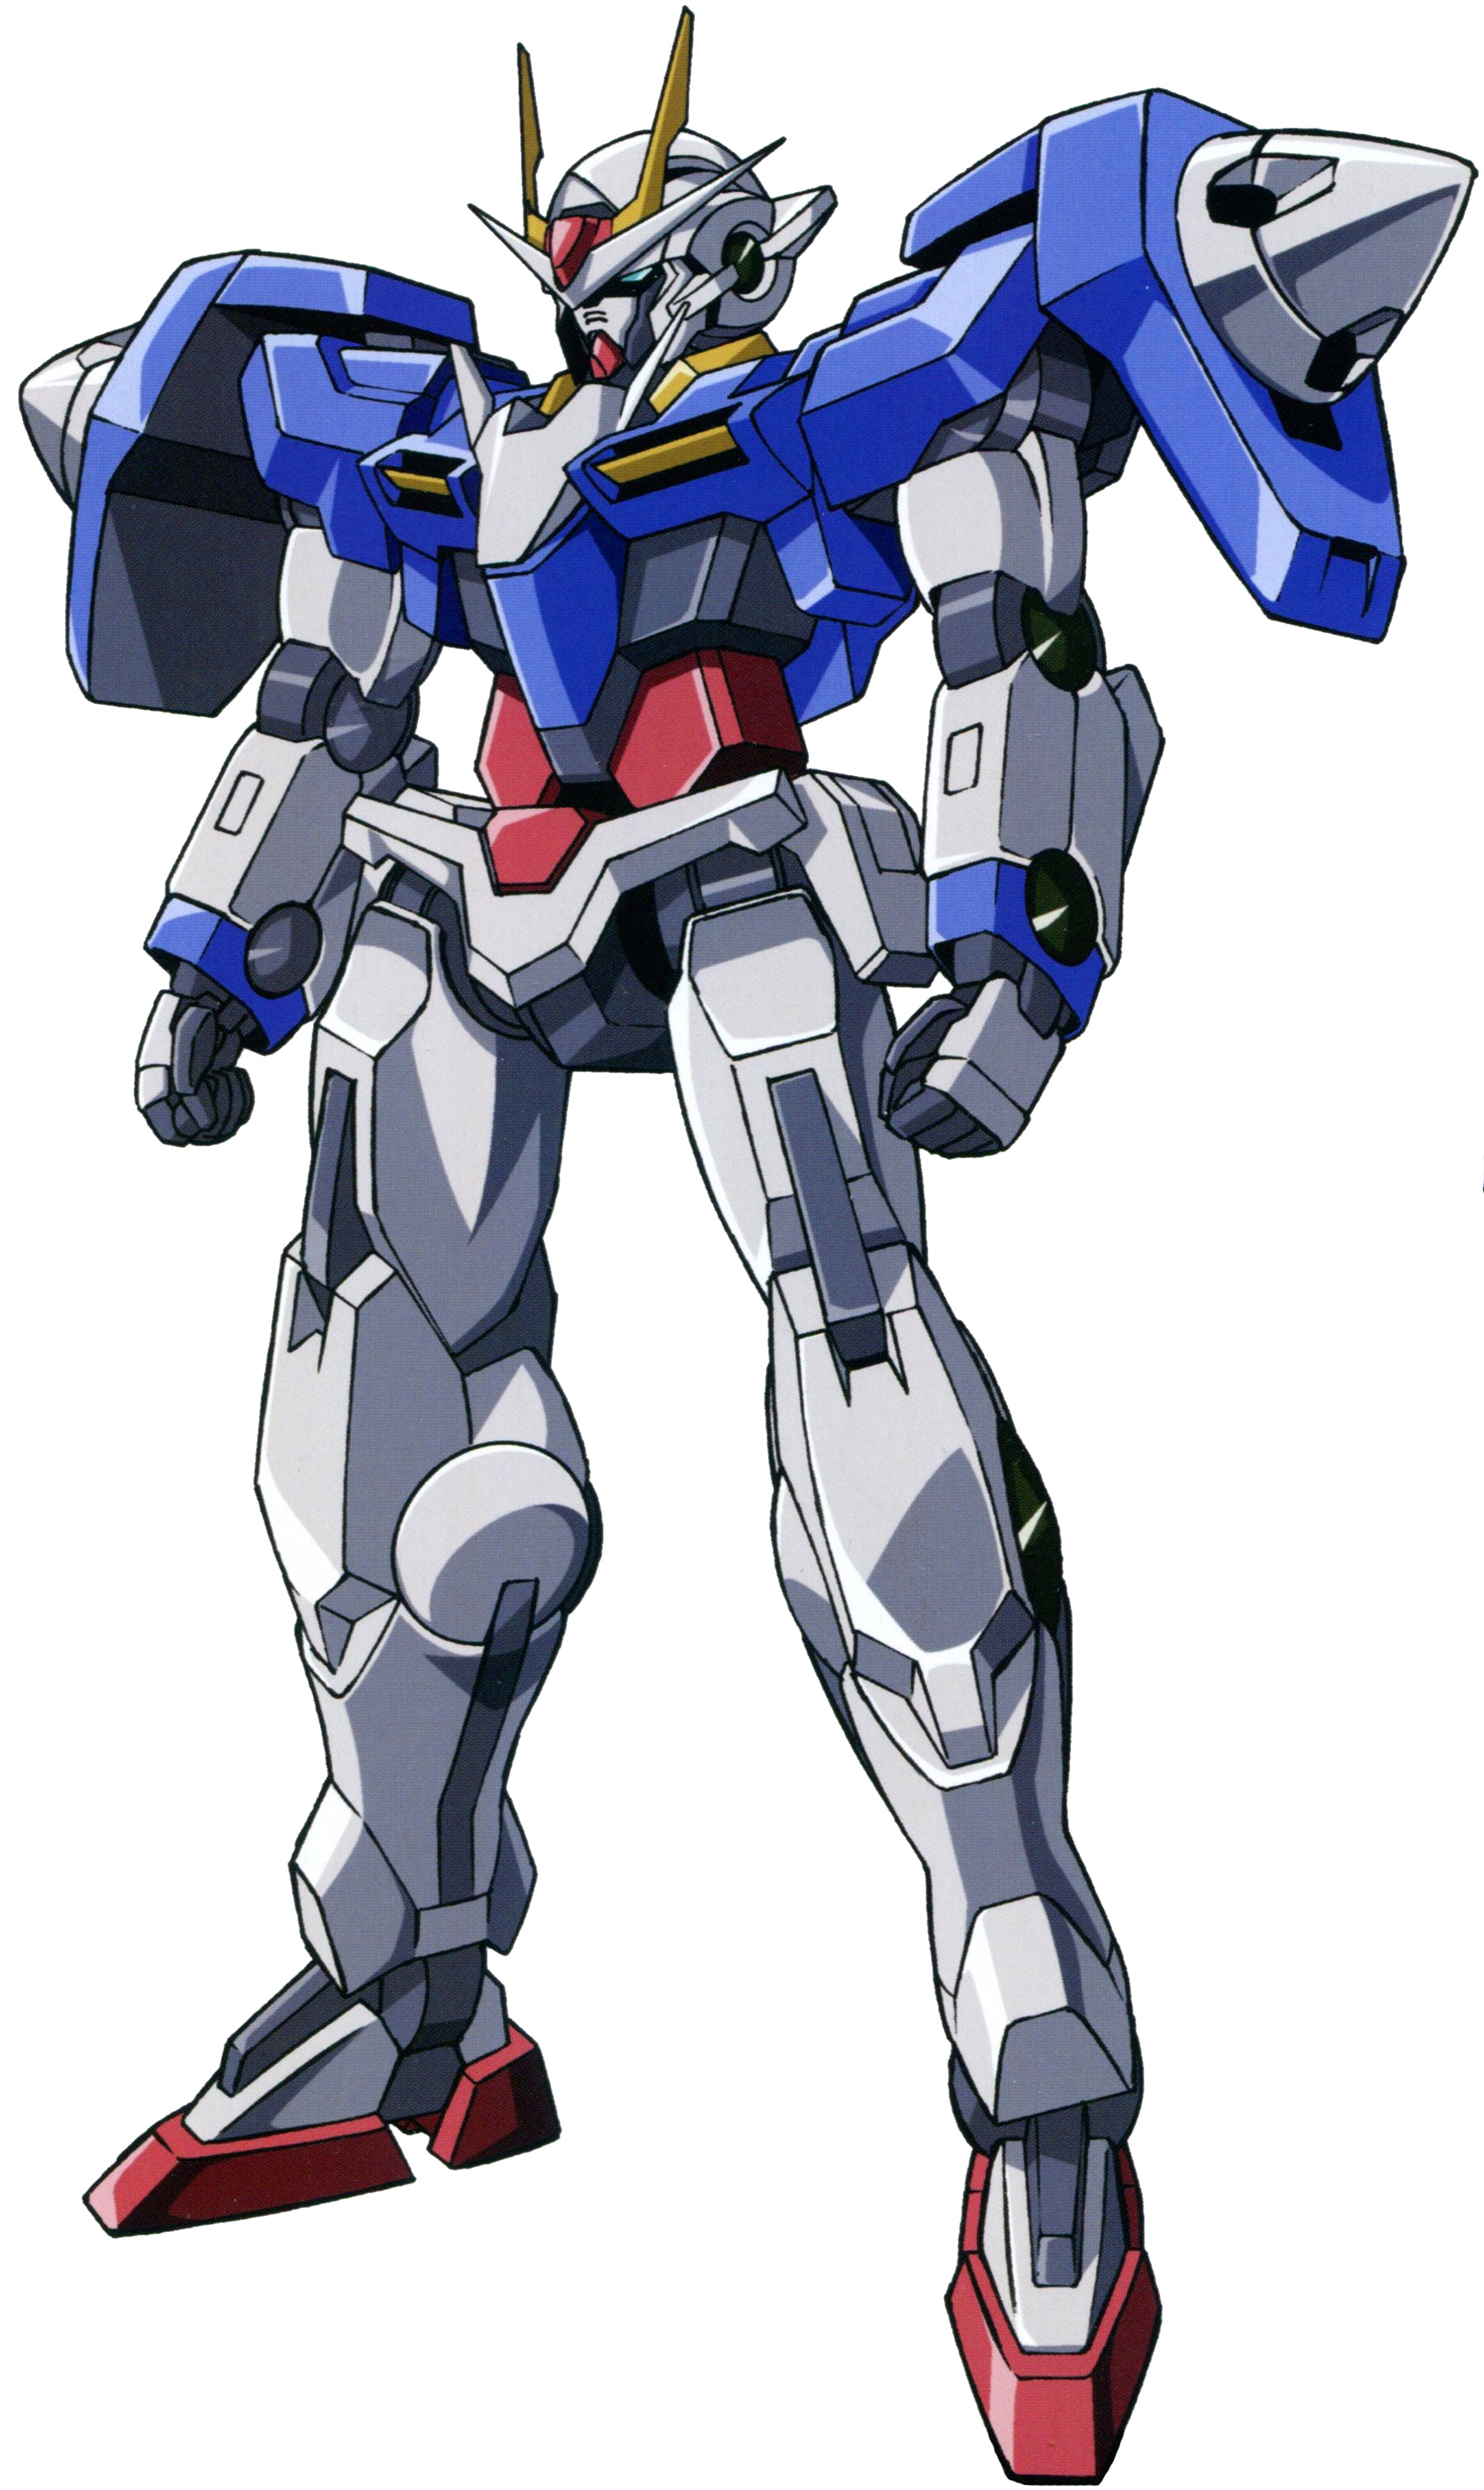
Welcome to Smash Boards, the world's largest Super Smash Bros. 64, Smash Bros. Melee, and Smash Bros. Brawl community! Over 110,000 Smash Bros. fans from around the world have come to discuss these great games in over 4 million posted discussions!
You are currently viewing our boards as a guest, which gives you the ability to view most discussions and articles. By joining our FREE community you will be able to post new topics and reply to threads, communicate privately with other SmashBoards members (PM), sign up for Smash Bros. tournaments, and access many other special features. Registration is fast, simple and absolutely free, so please, join our community today!
If you have any problems with the registration process or your account login, please contact support.
In Brawl they use a particular switching mechanic I copied from Deoxys (lol jk I came up with it before Deoxys). Practically, you start as a random Plankton and with almost all moves, you transform into a specific Plankton to perform the move. After the move, you stay as that Plankton until you perform another transforming move. Since transforming takes half a second, its better to do moves that use the same Plankton you are currently for less lag.
Second, since they're tiny and levitate high, many moves don't hit them. Also, many of their moves are affected by the beat of the background music of the stage you're playing in. These moves move follow the tempo of the song so slow songs will make their attacks slower. BUT, with their Neutral Special, they can modify the beat of the song themselves making it faster or slower at will.
Size: 2/10 - They're all tiny, except the last two. Beatnes is as high as Bowser when standing but when moving he becomes only as long as Bowser. Volvoice is as big as DK almost. Rec-rec is mid-sized
Power: 3/10 - None of them have many killing moves.
Weight: 2/10 - They're all as heavy as Olimar except Volvoice who matches Link.
Running Speed: 7/10 - Pretty good.
Dash speed: 8/10 - Doesn't differ much from the normal run.
Fall Speed: 2/10 - They're all very floaty except Hanenbow who falls faster.
1st Jump: 8/10 - Very nice jump for all of them except Volvoice.
2nd Jump: 5/10 - Meh not so good.
Traction: 6/10 - Slight sliding but not too much.
Wall-jump: No
Wall Cling: No
Crawl: Yes
Glide: No
Tether: Yes
Normal stance - They are all simply in they're respective stances as seen here. They levitate 1 block high.
Walk - They simply move forward slowly.
Run - They now simply move forward quickly.
Dash - They now simply move forward even quicker.
1st jump - They simply face diagonally up and bounce. They then simply tilt forward facing the ground on descent
2nd jump - They simply do 3 frontflips.
Crouch - They now simply touch the ground.
Crawl - They simply move normally at a speed between walking and running but touching the ground.
Tether - Volvoice will swing her antenna diagonally upward latching onto the edge if it touches it. The problem is, the part which needs to touch is pretty small.
Standard Combo
A: Tracy Arrow
An arrow appears in front of Tracy and she dashes forward in front of the arrow then back behind it. She will keep doing this until you let go of A. This is practically an extremely short version of their Side-Special. Its very fast and its good range (for an A attack) keeps foes trapped in it for long. It will do 5% every second if you sum all the hits. Not much ending lag. Also, its not affected by beat.
Mid Range-No knockback-1% each hit
Dash Attack: Sun-Animalcule Drop
First of all, you become Sun-Animalcule and you keep dashing. For as long as you hold the dash attack, The Plankton will keep dashing and leave smaller Sun-Animalcules behind. These Suns release spikes after a bit. You will not lose speed and will keep dashing while the Suns get left behind. After 4 seconds they surround themselves by long arrows. These cause multiple 2% hits. After a second, the arrows dash out half a block doing some knockback with 3% more damage before disappearing along with the Sun. 5 Suns can be on screen at once. The beat affects when they drop a Sun.
Good Range-Mid Knockback-2% x 4 + 3%
Tilts
Forward: Lumiloop Spinning Coin
After the obligatory transformation and some extra lag, Lumiloop dashes a block forward and starts spinning like a coin.
He spins kinda slow and doesn't deal multiple hits but instead deals one big blow. Has significant ending lag, as he spins 5 times, and some starting lag for what looks like a charge. Great finisher, as it kills Mario on 100% if not less.
Good Range-Great Knockback-8%
Up: Hanenbow Leap
You become Hanenbow and leap diagonally forward moving in an arc 2 blocks up and 2 forward. If a foe is caught he will be brought with the plankton in a Piplup-effect. Since this moves you forward 2 blocks, it can be Planktocide. Just leap off the edge with your foe trapped with you. No starting lag but some at the end if you touch the ground since he'll bounce a bit. BUT, if you press A just as you touch the ground, you'll leap again. This is useful if you didn't reach off the edge with your foe. Beat affects when you'll land making the leap slower or faster.
Good Range-Very Low Knockback-7%
Down: Nanocarp Multiplication
You divide into 2 smaller Nanocarps that stand next to eachother close to the ground. You can freely move around and jump but if you perform a move, they both perform it! They both transform into the Plankton needed and perform the move but each one does 50% the damage, knockback and range the moves normally do. But, if you D-tilt again, they will divide again becoming 4 then 8 then 16. They keep getting smaller and keep doing each one less damage and knockback.
Also, by dividing, they become smaller and smaller becoming lighter and lighter thus receiving more knockback. By Up-taunting you return to normal. But beware, if once you divided, one of them dies, then once you return to one normal sized Plankton you will result smaller and lighter! Although after a bit the Plankton starts to grow back to his normal size. No Beat effect.
Aerials
Neutral: Marine-Snow Place
After becoming Marine-Snow, another Marine-Snow appears behind you. Then by Neutral Airing again from somewhere else, you and the clone will swap places. So the clone takes your place and you take his and, from your new position, you can Neutral Air again getting back to your normal position.
Knockback is in the direction you're moving and Beat affects how fast you can swap back and forth in quick succession. Its a fantastic recovery because its completely unlimited; also, the Plankton you place will stay there forever and only changes place when you swap with it. The Plankton pass through solid objects when swapping. Only one can be on screen and they can't be erased or anything so the first one you place must be in a good place. Use it wisely and swap when needed to keep the clone in a good place after recovery.
Infinite Range-Mid Knockback-5%
Forward: Rec-rec Slam
Rec-rec squeezes, then stretches out powerfully hurting foes in front of you and behind you.
The stretch temporarily makes Rec-recs body longer for the attack resulting in good Range. But the squeezing takes almost a second while there is almost no lag at the end. Sends foes forwards and backwards depending on what body part hit you.
Good Range-Great Knockback-9%
Up: Luminaria Rise
After becoming Luminaria, you rise 1 block upwards 3 times. Beat affects the pause between one "rise" and the other. At the end of the move, he does the same thing backwards returning to his normal position.
You stop in mid-air for this move. Also, the rising can sweetspot the ledge so instead of using some wacky recovery move, in some cases this move is enough. Knockback is in the direction you're moving so while going down, you'll meteor smash foes below you with decent power. Hard to hit with this move and its also very punishable if your calculations are wrong.
Good Range-Good Knockback-5%
Down: Beatnes Stretch
Beatnes'es lower body stretches until it touches something. Once he touches it, the upper body lowers itself to return to Beatnes'es normal size.
Its a very slow move but its great for approaching foes below you. If the tip of its tail hits you, you get spiked powerfully! But since you need to touch the ground to end the move, using it over an empty place will kill you too. The tail is the only hitbox. Very slow move and no Beat effect.
Good Range-Great Knockback-10%
Back: Rec-rec Tail Twist
Rec-rec's tail spins quickly behind him and the Plankton propels forward a bit.
Theres a bit of starting lag like with Yoshi's D-air. The tail will them spin for almost a second pushing him forward a bit. No ending lag at all. The tail is the hitbox which deals multiple hits and one final blow and there is no Beat effect.
Mid Range-Mid Knockback-2% x 5
Smashes
Forward: Luminaria Shot
After becoming Luminaria, another Luminaria apears in front of you. It will then move forward like with the U-air 1 block at a time but theres a twist.
The Luminaria has a 50% chance of moving forward 1 block every time and it has 50% chance of turning left and right. This means it's path will be random and can easily change. It will move 5 blocks before disappearing and every time it moves, its body will pulse doing the knockback. The direction of the knockback is also wacky. The foe will fly in the direction the Luminaria will move next. So if its going to move up, the preceding movement will send the foe upwards.
This means that foes around 60% will move with them in a chain reaction. Also, if charged, it will grow bigger and will move 10 blocks but the damage and knockback stay the same. Beat affects the pause between a movement and the other. Not a great killing move but good for keeping the foe away. Although it may seem broken if the foe is trapped in a chain of hits, its easy to DI out.
Excellent Range-Mid Knockback-8% each hit.
Up: Beatnes Array
Beatnes is composed of many squares right? Well for this move, they will all pulse one at a time starting from below. Like with the other Smash, Beat affects the pause between one pulse and the other doing 1% and small knockback upwards. After the squares, its head will pulse powerfully for the final blow which sends the foe directly upwards. The key is being directly on a foe on use of this move so the foe will rise with each pulse and then get the final blow.
Good Range-Good Knockback-10% <at the end
Down: Sun-Animalcule Explosion
You become one normal-sized Sun (bigger than those in the Dash Attack). You first appear round then spikes surround you that dash out 1 block.
This has TONS of lag. You will stay in place for 3 seconds, then the spikes surround the circle for 1 second after which they dash out.
A normal Sun looks round with no spikes around its body so the initial part of the move can't be told apart from simply standing still as a Sun. Good for mind-games, as the spikes appear instantly. While the spikes surround you, they shake a bit dealing multiple 2% hits (5 maximum) then when they dash out you deliver 5% with great knockback which kills at 80%. Hard to use but its worth it. Also, the lag is only at the start as there is no ending lag.
Good Range-Great Knockback-15% in all
Specials
Neutral Special: Beat Pulse
No Plankton change here. The body of your current Plankton pulses and, by pulsing 5 times at the same speed, you'll change the tempo of the current background song! This will make the song faster thus making some moves faster. Is this useless? No.
Since many of the Plankton's attacks change speed depending on the tempo, making it quicker, you speed up your attacks! You actually speed up the song changing it completely. So you can listen to a faster version of Final Destination for example and the moves will go with the song. You cannot use this attack while moving and it takes less than half a second. If you have enough time and space, press B 5 times with the timing you desire to change the song! Pressing it 4 times or less will have no effect so the best time to use this is after you KO'ed your foe. Also, pressing it with a changing Tempo won't have effect either so you really need to feel the rhythm you want.
Side Special: Tracy Line
Tracy suddenly freezes in place, and you can draw a line for it to follow. You control your "invisible pen" with the control stick and it can go up, down, forward, backward, whatever. You draw kinda slow, and Tracy is vulnerable during this so that any attack to her will result in canceling the move. Anyway once you draw the line which can be a maximum of 4 blocks in length (B to end early), Tracy will suddenly ride this line rapidly. Once she gets to the end she'll reappear at the beginning of the line where she'll reride the line and so on. Then what's the point?
If you press B during this infinite ride, Tracy will bounce half a block upwards and the line will disappear sending her into helpless. Also, while she's riding, any foe which interferes with her ride by getting in her way will get brought with her on the ride with multiple hits. This is why its not only a great recovery but its also good for gimping if you draw a line which goes of screen and get the foe with it. Beat affects slightly the speed of the ride although its usually always pretty fast. Also, she enters helpless after it.
Great Range-Low Knockback-1% each hit
Up Special: Lumiloop Rise
You become Lumiloop and then you need to spin the control stick in any direction as fast as you can. By doing this with all your force, Lumiloop will spin how you spin the control stick and start rising. You can do this for 5 seconds after which you enter helpless. The trick is to spin as fast as you can before 5 seconds pass. The faster you spin, the higher Lumiloop will rise. If you're a total maniac, you can even rise 10 blocks but don't count on it. You'll most likely hurt your hands. Also, contact with the spinning body will have a weak bumper effect on the victim with no damage so it acts as a super armor. Although this, he is very vulnerable to projectiles which make him cancel the move early and make him enter helpless. Use wisely!
Down Special: Hanenbow Leaf
After the obvious transformation, a leaf appears below Hanenbow! Just like those in the SSBB stage. If you hold B, you can move it around and place it by letting go. It moves slowly and is pretty laggy. But, if Hanenbow falls on this leaf, he'll bounce diagonally upwards rising a total of 2 blocks You do not enter helpless but the thing is you can use it again after 2 seconds from the placement of the first leaf. This means you can keep using it continiously! But there's a problem. As I said placement is laggy, but also, Hanenbow is very vulnerable and one hit will make the leaves disappear and you enter helpless. Does no damage but if a foe touches a leaf he will bounce like when on a spring. While moving the leaf around before placing it, it will rotate automatically to face Hanenbow. Because of this another use is using it to block your path when you're flying off screen. This is very useful in this case since The Plankton are so light.
FINAL SMASH: Luminaria Camp
Suddenly the entire screen will be covered in small white arrows One for each block. These all face a random direction and there are 4 Luminaria's in each angle of the screen. These will follow the arrows and move to where the arrows indicate. To hit the foes, you need to steer the Luminarias toward the foe. How? By changing the arrows! By moving the control stick in a direction, all the arrows will face that direction resulting in the Luminaria hitting the foe. For example, if the foe is high in the air then tilt the stick upwards to send the Plankton upwards at the right time. Each Plankton have a different speed. This lasts 15% and the Luminaria deal different damage and knockback depending on which one it is. The slowest deals 30% and very high knockback, while the fastest deal 15% and mid knockback but they hit more times since they move faster. the other 2 deal 20% and 25% with high knockback. Its hard to hit with the slowest one as it moves very slow but the others can easily rack up damage.
Grabs
Grab: All grabs take place with Volvoice. She will swing her antenna forward reaching a great 2 blocks with very low lag. Once captured, the foe will be instantly eaten and you can see the poor guy in Volvoice's transparent stomach. The foe inside can actually move, jump, attack although his space is very small. Moving will cause Volvoice to move altogether at a slow speed. This gives the 2 players super armor but Volvoice will still spit him out after the grab time expires normally. This can be used nicely in team Brawls. In 1 on 1s the foe inside can walk off the ledge and, while falling, make Volvoice release him to kill Volvoice and save the foe!
Grab attack: Stomach Acids
As long as you hold the button, liquid will start slowly rising in her stomach. Anyway, depending on how much acid you create the foe inside will slowly start gaining damage like with the Flower effect. The damage can range from 1% every second to 3% every half-second.
U-Grab: Antenna Hit
Volvoice spits the foe upward and then pulls down her antenna, before thrusting it upwards with great power! It can be DI'ed out of because of the lag before the hit. The spit does only 2% while the hit deals a good extra 8% with enough knockback to kill at 100%
F-Grab: Power Swing
Volvoice's antenna reaches inside her stomach and pulls out the foe. Then hoding him with the antenna she will throw him diagonally downwards at the ground causing 12% and powerful knockback although since its against the ground, the foe will bounce off the ground, canceling the knockback. If you use this facing the edge though, you'll throw him to his doom in many cases.
D-Grab: Stomach Ache
Volvoice will moan a bit and inside her stomach, there will be an explosion! This causes 15% but no knockback since the foe will slow down when being spat out after the attack.
B-grab: Egg Lay
Volvoice will concentrate, and then lean forward. Then a small white ball (resembling frog eggs) will bounce out popping after 2 seconds. The pop causes 8% and no knockback but its good for putting the foe in a recovery position since it can't be controlled like Yoshi's Egg Lay.
Situationals
Ledge Attack under 100% - Whatever Plankton you're using will short hop and freeze in mid-air before exploding immediately for 8% and big knockback.
Ledge Attack over 100% - Your Plankton will wobble on stage and then bounce off the ground 3 times like a fish out of the water dealing 3% hits with small range and no knockback.
Rise up Attack - The Plankton will spin producing electricity like in Pikachu's Down-Smash. Deals 5 2% hits with small knockback. Also, instead of producing electric sounds, piano notes will be heard.
Extras
Taunts
Up Taunt: Volvoice speaks and says a random sentence which ranges from "I'm the best!" to "I am superior" to "Whatever" in a random voice. The fun thing is, in Wi-fi, Volvoice will read your in-game taunt messages!
Side Taunt: The Plankton will play that annoying song kids use to make fun of eachother, The sound depends on the Plankton used.
Down taunt: Simply transforms into the next Plankton. Has no lag so it doesn't have any invincibility frames. The order is like in the top image.
Entrance
A bubble appears on stage, and it pops revealing Tracy.
Victory Poses
1. Beatnes plays "Oh he's a jolly good fellow"
2. Volvoice mimics one of his foes. For example for Mario he will go "It's a me! Mario!" or for CF he will say "Falcon Punch!".
3. Tracy goes from left to right across the screen doing loops. Then Hanenbow bounces from left to right. Then Luminaria. And so on.
Alt Costumes
Kirby Hat
He gets a Tracy as a hat and can use Tracy Line.
Codec Conversation
Snake: What the hell are those little insects?
Otacon: I suppose you're talking about Electroplankton.
Snake: Electro-wut?
Otacon: E-LEC-TRO-PLANK-TON. They're marine creatures that produce sounds with their movements.
Snake: Okay now I get it.....kinda.
Otacon: C'mon Snake! They're from a DS game that makes players make music by moving these Plankton around.
Snake: Keep going.
Otacon: They've been created by Toshio Iwai born in Aichi in Japan.
Snake: Okay. So they're submarines that induce people with their movements. They're from a PS game that makes slayers take music by planking these moves around. They've been mutilated by tissues in Wai, corn in Aichi in Japan. Well?
Otacon: Whatever.
Playstyle
In offensive play, the Plankton excel in approaching the foe from wherever he is. Tracy's Line is the main form of approach but if the foe is above you can use Lumiloop Rise to bump the foe off the top of the screen. Other forms of approach are Hanenbow Leap, or Beatnes Stretch.
When they have low %, like at the start of a match, the best thing to do is use Multiplication. Since it lengthens attacks, it can be used to quickly rack up damage. Once your damage is getting high, and you could be easily be KO'ed in your lighter form, forge back together to finish the foe off with the F-Tilt or the Up-Smash or, if you have time and space, the unpredictable Down-Smash.
Once the foe is done for and you have some time, use Beat Pulse to quicken your attacks to take away another stock from your foe. This is how a game against an idiot would work.
But what if your foe is good? Well, this means you'll often be recovering right? In this case, consider yourself safe. With a multi-usable bouncing leaf, a 10 block rising Up-B, a drawable 4-block path to follow, 2 recovery aerials, an unlimited recovery neutral air and a tether recovery why ask for more?
And what if you're flying because of a hit? No fret! Use Hanenbow Leaf to block your path and bounce back on stage.
Since the Plankton are lightweight they will often get hit and this is the time to counter attack with unpredictable recovery. This, is the way of the Plankton.
SSE Role
In my Dexter moveset I said Dexter stayed in the lab where Samus and Pika play and thats where he creates the Electroplankton. When the lab is invaded by Roaders, the Plankton help Dexter escape. After that, they encounter Meta-Ridley which was an experiment gone bad years before. They fight him with the others in the same way and then go towards Subspace.
Location: Making movesets, having fun, summoning lulz.
Posts: 490
that was a great moveset, akiak. electroplankton is something iwould think is impossible, a group of subatomic specimens that produce music from their body. then again, it would go great with the stage. the standard and down specials are great but which song does it go to if you switch?
The song doesn't change. The beat/tempo does. This makes the songs faster or slower changing their moves overall. I'll edit a better explanantion in.
Well, you see, if it were that way, it would be harder to recognize who's who. You'd have to memorize the colors of each Plankton. Imagine my drawings easier to see in Brawl.
so, since Rexais'(yes, i changed his name too) headphones turn the music he listens to turns into a set, and I listen to techno/pop, here is his 1st final preview. Rexais' can turn any genre of music into
Neutral A combo: Rexais lowkicks the opponent, makes a breakdance spin/kick, and then Capoeira kicks the opponent into the air. This is Rexais' most able move, as he can use any one of his aerials to "continue"/"finish" the combo. The best move to use to continue the move is his Up smash. The best move to use to finish would be his side aerial. This move causes 15% overall, making each hit 5%. The last hit has the only knockback: average, but vertical knockback. Because of this knockback, the previously mentioned are of major importance to Rexais' playstyle.
What does everyone think?
Last edited by princesspeachluver13; 01-23-2009 at 06:18 PM.
The mascot of silence, the receptionist of rabbits, and the representation of blank faces...
Pleinair joins the fray
About
Pleinair ( プレネール, Purenēru) is a fictional character who has made appearances in several games in Nippon Ichi's tactical role-playing game series. She is something of a mascot character for the artist and character designer of these games, Takehito Harada. Due to her appearances in video games being little more than cameos, not much is known of Pleinair outside of her physical appearance. She is typically portrayed as a petite, blue-haired girl with red eyes, wearing a red ribbon, a white dress, white stockings, and sometimes glasses. She is often accompanied by a stuffed rabbit named "Usagi-san" and a stuffed shark named "Same-san."
Quoted from Wikipedia's article on Takehito Harada.
This video below will help picture some of the moves I have listed here. (Pleinair is the blue hair girl in the beginning.)
First Attack - End of Days - Final Smash
Second Attack - Usagi Whip - Forward Air
Thrid Attack - Pleinair Flare - Down Smash
Stats and General Profile
Idle Stance
She will hover on the stage, holding Usagi in one hand. Her expression is blank, in a serious way. Walk - 4/10
She drops down from her hover and takes a nice and easy stroll in her desired direction. Run - 6/10
She will remain hovering and dash at the opponent. Traction - 7/10
Pleinair has small troubles when it comes to getting to where she wants to go and turning around.
Crouch - Yes
She will bend down on one knee and kneel, staring ahead of her coldly. Crawl - None
She does not want to get down on the ground and crawl in the dirt.
Roll - 6/10
She will quickly evade her opponent and move evasivly around them in her desired direction. Spot Dodge - 6/10
Pleinair will execute a small twirl into the outer realm, glaring at her opponent. Air Dodge - 6/10
Pleinair will attempt to blend in with the background, and leave the fray for a split second.
Balence Stance
Pleinair will look over the edge, waving her arms in circles while trying to balence herself. Dizzy Stance
Pleinair will hug Usagi and wobbling around trying to regain her thoughts. Edge Grabbing Stance
She will hang from the edge with one hand and holding Usagi in the other, struggling to hold on. Sleep Stance
Pleinair will lie down onto the floor, using Usagi as her pillow. Tripping Stance
Pleinair will do a small flip forward and land of her bottom. Usagi is upsidedown on the ground next to her. Freefall Stance
Pleinair will hang upside down staring blankly. Flinch Stance
Pleinair bends forward as if someone had punched her in the stomach. With her arms and legs in front of her. Swimming Stance
Pleinair will calmly float in the water Drowning Stance
Pleinair shall flail around with her last bits of energy, and sinks...
Tech
Pleinair quickly taps the floor with her hands and switches herself upright. Wall Tech
Pleinair leans against the wall cushioning her impact . Roof Tech
Pleinair holds both of her hands above her hands to absorb the shock. Rolling Tech
Pleinair instinctly tucks her head and pushes her body to roll herself safely.
Height - 6/10
She is just a tad shorter Luigi Weight - 5/10
She is about the weight of Mario. First Jump - 6/10
Pleinair will spring up about her height. Second Jump - 5/10
Pleinair will do a flip and jump just a bit shorter than her first jump. Fall Speed - 4/10
She is supposed to drop fast but due to her mysetrious hover ability, her fall speed is reduced.
Power - 6/10
Pleinair has a variety of moves and they do average amounts of dmage. Attack Speed - 6/10
Pleinair's attacks come out decently quick. Priority - 6/10
Most of her attacks clash with other attacks. Disjointed - 7/10
Even though most of her attacks are average at best, they have disjointed range. Range - 9/10
Pleinair has many projectiles at her disposal, and they can practically go anywhere.
Hover - None
She may have properites of hovering in her idle stance and run, but she cannot muster enough power to float in midair. Glide - None
Pleinair has no permanent wings to glide with. Wall Jump - None
With all of her muscles she cannot push off walls very well. Wall Cling - None
Her delicate little arms do not allow her the ability to hang on walls. Tether - Yes
Her tether is Usagi tied to a rope. Pleinair throws Usagi forward and hangs from the ledge, with her tied on by a lifeline.
Usagi: This is Pleinair's favorite rabbit. She has him everywhere she goes. She can also create them from nothing. Usagi is a bunny with the height of Kirby and a width of half of Kirby. When irritated he will explode. When on the field, he will be AI controlled to move throughout the stage and these option may occur.
Usagi can clamp onto a foe and deal 2% of damage per second. After 5 seconds or being knocked off, Usagi will wander the stage once again.
Usagi can be inflicted damage, which he will then store until he is thrown or attacked with.
Usagi can only hold up to 36% damage, before blowing up.
Usagi can by picked up and thrown from the field like a normal item.
Usagi can be reflected but the possession of Usagi cannot be changed unless picked up.
There can only be 2 Usagis touching the floor at anytime.
If Pleinair picks up Usagi, he will then be the weapon of any attack that involves Usagi (Except Down Smash, Same Cannon, and Jabs).
Sâme: This is Pleinair's shark, the one that is always eating other creatures, and is a animal made weapon. He is Peach's height, horizontally, and is Kirby's height, vertically. Same holds strange hitboxes, and a tipper.
Sâme has reflector properties on the upper half of his body
His head is disjointed and has tipper abilities
He can also eat projectiles and spew them back out through the Cannon.
When used in the Armor UtilityWing , he cannot be used in any attack while idle during this attack.
Prinny: These peglegged penguins are the slaves who atone for their sins, in the Netherworld. They have a tendency to say 'dood'! Be careful though, Handle your Prinny with care! Do not throw, or they will explode!
Can only be pulled out from the Usagi Drop
If thrown at an opponent, he will deal 26% damage with emmence knockback
He cannot wander the field.
He can be related to a Bom-bomb, in explosion hitbox.
Specials
Sâme Cannon -Neutral Special
Pleinair will lean forward and pull from her sleeve Sâme, who will crank his mouth open and Pleinair will pull on his dorsal fin tigger and fire Usagi from Sâme's mouth instantly. During the animation of the cannon being fired Pleinair will recieve super armor and all opponents around the cannon will be damaged (6%). The ending knockback is little so being mobile after a shot is made eaiser. When the cannon is not in use, it automatically charges up until the next shot is fired, which may alter the results of how Usagi is fired.
At 0 seconds, he will throw up a liquid called Sâme-Spit. Foes may slip on this. If Usagi drenches himself in this spit, he will no longer be able to be picked up and will add 2% of damage for collateral damage. 3% for slipping
At 1 second, he will shoot 1 Usagi, in a complete straight path. Small knockback. 5% per hit.
At 5 seconds, he will shoot 2 Usagis, in a V shape form. Small knockback. 4% per hit.
At 10 seconds, he will shoot 3 Usagis, in a \|/ shape. Average knockback. 9% per hit.
At 20 seconds, he will shoot 7(!) Usagis, in a random wave. Small knockback. 4% per hit.
Imperial Armor Wing Utility - Up Special
Pleinair's small wings will slowly enlarge, creating large sparkling wings. At the same time, she will throw Same in any direction she choses, 2 Battlefield platforms away, who will then become a makeshift platform. She will also gain 3 additional jumps (plus her second jump, having 4 jumps total), to get either onto Same or back on the stage. Foes beware, Same is not a platform for you to get on, if you get in his way...He'll chomp you for 10% damage, pushing you back in the same direction you came from. Same disappears after 4 seconds.
Usagi Drop - Down Special
Pleinair will grab into space, and pull from another dimension Usagi and will be into her hands as an item (average startup). When thrown Usagi will deal 7% for the impact, and be latched onto the foe for an additional 3%. Upon latching , the opponent will be weighted down, as well as being slowed down. When materializing from the 4th Dimension, there is a small possibility of pulling out a Prinny. Which may inflict 26% damage with ginormous knockback on impact.
End of Days - Final Smash
Pleinair's wings open up and she will jump to the top of the stage, as she hovers above everything, an aura generates around her body and several Usagi appear in a line beside her. After a exhale from Pleinair, several cannons shall extract from Usagi and her wings and it will rain lasers for 10 seconds, doing 4% each laser. This is where you jam the A button as fast as you can. Doing so will fire the lasers. Each laser is the size of a blaster shot from Fox or Falco, but it is really long.
Smashes
Forward Smash - Reversal Surprise
Pleinair will store a blue flare in her hands, and will be channeled into Usagi. Then after a forward thrust with her arms, the energy in Usagi will rip him open, resulting in the stuffing, springs, and weapons to stretch out in front of Pleinair knocking foes diagonally with (16%-22%) When the springs and other junk reach it's lingering peak point, it will quickly retract backwards and back into Usagi, knocking foes behind Pleinair with (15 - 21%). The attack gives a recoil, giving some cooltime lag. (This attack can only hit you once, depending on where you are when this attack is used.)
Up Smash - Usagi Missles
Pleinair will point toward the sky, and 3 rabbit ears will surface from the ground and launch straight up, about the distance of 3/4ths of a Battlefield platform. Foes will be launched upwards when in contact with the missle. (14%). The rabbits are spaced about a Game and Watch apart. When this move is charged, the more charged means the more missles will be produced. At a maximum of 5.
Down Smash - Pleinair Flare
Pleinair shall clap her hands, and an aura will enrobe her body. The energy will then release and create a wave of white flares with the face of Usagi. The range of the initial blast is 1/4th the size of Luigi's Final Smash, sending foes in various directions depending on where they touched the bubble (15% - 21%). The Shockwave will deal out 11% damage to foes that are touching the ground right next to the attack bubble. The Aftershock just pushes foes back, like Toon Link's Down Aerial.
Tilts
Forward Tilt - Rush Wreck
Pleinair will bend down grasps Same, and while she is staring forward, she puts him into a vertical position, and then rushes forward using Same as a battering ram, running into foes (7%). Tapping the A button will result Pleinair to stop and swing him upwards. (7%).
Up Tilt - Usagi Fly Trap
Pleinair will slightly look up, while creating another Usagi in the hand that her orginal one is not. She will grip both of them and slam both of the Usagis above her head, sending foes diagonally with 5% per Usagi.
Down Tilt - SlideSwipe
Pleinair slides to the ground and executes a lightning fast sweep with her legs and Same across the floor, covering the ground in front and in back of her. Being hit by Pleinair's legs will make foes trip and recieve 7% damage. Being hit by Same causes the foe to be stunned (ZZS Stun) and sent flying up with (11%).
Aerials
Neutral Air - Mass Imbalence
Pleinair creates several Usagis and throws all of them around her. After release the Usagis will make a small detonation, the size of Kirby. Sending foes upwards with (13%). But in that set of 6, one of them is a dud, which will set down into stage.
Foward Air - Usagi Whip
Pleinair quickly swipes Usagi forward conver the space above her head to the tips of her toes. But, after she accumulates a certain amount of damage, Pleinair will pull out more Usagi, to add to the chain. Extending her reach. Foward knockback and 14% damage.
At 0-30% : 1 Usagi
At 31-75% : 2 Usagi
At 60-100% : 3 Usagi
At 101-150% : 4 Usagi
At 150%+ : 4 Usagi and exploding after-effect ( 3% + Increased Knockback )
Up Air - Aerial Jaw' ing
Pleinair leans back and reaches into the air who then throws Same upwards. He will then take a bite on anything that is directly above her. (16%). In this move, Same holds 3 hitboxes, which have their own properties for knockback.
Same's Teeth, Meteor Smash
Same's Body, Upwards
Pleinair, Sideways
Down Air - Same Smasher
Plenair tugs out Same, who will then be flipped to look downwards, immediately after his eyes will shine red and he will fire a beam of energy (width of Pika's height), straight down extending all the way down, causing foes to go downwards (14%) at a relatively average-high knockback . Through the execution of being fired, the recoil will shift Pleinair and Same upwards with some lag.
Back Air - Feather Sparkz
Pleinair's Armor wings will flash blue and shed a white arua. Then shards of glass will quickly emerge from her wings and thrust at any foe behind her.(7%) . Which is also followed by an explosion that creates a wave of diamond crystals ranging like ROB's Fsmash without the disjointed hit box.(10%).
Jabs and Dash Attack
Jab Cambo - Companion Crasher
Pleinair does a fast 3 hit combo with Usagi and Same. She first starts off by swinging Usagi downwards (2%), then swinging him upwards (3%), Usagi will then switch places with Same, who will be swung downwards finishing the strike (4%) knocking foes forward and the last hit.
Dash Attack - Iconic Release
Pleinair bends down, holding Usagi behind her. Then she will dash quickly doing a handstand, then pushing with her arms, lunging her forwards doing several flips. During the flip animation, Usagi will be revolving around Pleinair as she spins rapidly. She will then land in the same stance as she started (6%).
Situational Attacks
Ledge Attack > 100%
Pleinair will execute two slashes with Usagi as she gets up from the ledge (6%).
Ledge Attack < 100%
Pleinair throws Same onto the field, as she slowly gets back onto the stage. While Same guards her for a brief moment (6%).
Get Up Attack
A group of Usagi will come and gather at Pleinair's lying body, and pick her up and throw her back into a upwards position. Pleinair pats one of them and all of them scatter damaging foes from hurting her at the time (8%).
Grabs
Grab
The initial grab is Pleinair throwing Usagi at the opponent, and when he is successful he will drag the foe back to her.
Pummel - Ribbon Wrangler
Pleinair's outfit ribbons will wrap around the helpless opponent and strangle them as the curtain of red buries the foes in it's threads. (1%), inflicting poision which gives 1% damage per second for the whole throw animation.
Forward Throw - Flare Pulse
Pleinair shreds the opponent's neck (or body) into her hands, as she pumps energy through their body. In result, the energy will create a flash explosion of bright light. Which will send the foe flying forward with a large set of knockback. (7%)
Back Throw - Backfire
Pleinair slowly sets Same down, while she loads the foe into the mouth of Same. Then goes to pick him up, and mistakenly has him facing in the wrong direction and fires the foe backwards, sending them straight across. (10%)
Up Throw - Same Mortar
Pleinair kicks up Same into a vertical position and the foe gets swallowed by Same. Who will then chew for a few moments, and spit them straight up (12%). The foe is launched into the air covered SameSpit.
Down Throw - throwDown!
Pleinair leaps in the air and throws the foe down, and transforms Usagi into a sword. She will then slam right into the enemy stabbing the sword into the foe, sending them diagonally (12%).
Special Mechanic Attack
S.M.A (A+B)- Creature Demolition
Pleinair will pull out a staff, with the head of a small Usagi on it. She will then wave it once. As a result, all Usagi, Same or Prinny that are active will simultaneously explode. Giving off 13% damage to all foes in a Motion Sensor Bomb radius.
Extras
Events
Event #69 - Mass Production
Destroy all excess rabbits, before they dominate the world!
Character - Pleinair
Play Against - 20 Usagis
Reward - Kimono Alternative Costume
Event #70 - Baal Redemption
Baal is back! and he brought friends.
Character - Pleinair / Hero Prinny (Ally)
Play Against - Baal and Prinny Baal
Reward - DemonHall Mirror Stage
Alternative Costumes
Red, Blue, Green, Yellow, Kimono, and Dark.
Snake CodeC
Snake: Hey, Colonel. There is this girl sort of just glaring at me, it's creepy.
Colonel: I believe you are looking at Pleinair.
Snake: Sounds...french.
Colonel: She is no ordinary foe. She manipulates rabbits to utilize range.