• Welcome to Smashboards, the world's largest Super Smash Brothers community! Over 250,000 Smash Bros. fans from around the world have come to discuss these great games in over 19 million posts!

    You are currently viewing our boards as a visitor. Click here to sign up right now and start on your path in the Smash community!

Make Your Move 5

Status
Not open for further replies.

smashbro29

Smash Champion
Joined
Oct 9, 2007
Messages
2,470
Location
Brooklyn,NY,USA
NNID
Smashbro29
3DS FC
2724-0750-5127
Nothing in MYM2 can be considered an achievement, especially not for one who placed due to getting his friends to vote for his sets.

Spot reserving is forbidden as spam. It goes along the lines of posting an incomplete moveset.


@Baloo
Do not post the link to the chat in the thread.
Well I've been out of it.
and WOW! I thought I explained myself with that! they told me what they found stupid and I improved on it! geez! and I told them of everything going as far with some as telling them NOT to vote. so please don't assume things like that I'm better then that and so are you.
 

SirKibble

Smash Champion
Joined
May 2, 2008
Messages
2,400
Oh no, another water set!
I promise, it's my last. :p

That was very interesting, and very balanced too. I love how you integrated Panel de Pon into Smash, and despite Elias having no real depth you gave her very interesting and balanced moves.
Thank you. As I got the Panel de Pon thing working, I considered changing the moveset to Lip, since the ideas will feel unoriginal if another Fairy uses the same mechanic, but I wanted to do a lesser-known Fairy, and Elias is my favorite.

My only critique is that Elias's water strength is kind of useless. I believe Delfino Plaza, Pirate Ship and Jungle Japes (thank you for reminding me of the last two, Spadefox) are the only competitive-legal stages with water in them. I would have liked some sort of balanced feature to create pools of water somehow. Maybe for the DSmash? Overall, very interesting. You did great for the very little amount to draw from.
You know, I considered something like that briefly, but ultimately gave up on it. The reason for that was to keep things from being too complicated. With the panel system already in place, I was striving to keep the rest of the moveset as simple as possible while still being interesting and functional. Maybe I'll figure something out for that, though...

Elias has one of the best executed special mechanics I've seen in a long while.
I can't tell you how happy I am to hear approval of the mechanic, as it was easily the most tasking thing to think up in the moveset.

I enjoyed how her specials worked in conjunction with one another, but weren't completely useless when taken on their own. Incorporating her regular attacks into the mix somehow felt natural, though in the heat of battle, I'd probably just use the Dash-attack.
Glad you liked all that. Of course, you do realize that only using the Dash Attack wouldn't get you far, don't you? I tried to keep her Tilts simple and quick enough to switch blocks easily, so... Yeah.

And kudos to you for giving her attacks while swimming. It never made sense how water based characters were as much dead ducks in water as everyone else.
I was always appalled that Squirtle could drown. The thought just recently came to me that he should be able to attack from the water as well as stay afloat, so I used that idea for Elias. :bee:

But as cool as the puzzle mechanic is, I felt it could have used a little more depth, or a reward that was more than "bigger garbage blocks/more Up-B". I'm also somewhat dissapointed that, other than when thrown, there was no real difference between the different colours.
Hmm. I see what you're saying. The problem, I guess, is that I was trying to stick to the PdP formula as much as possible. Heck, I even felt kind of bad making them have those effects when thrown, since the panels are really just different colors in the game so that they're different; no special effects. Maybe I should've taken things farther...

And, Personally, I think garbage blocks should be able to land on top of stacks from her side-special to create a makeshift platform.
Didn't even think of that. That's something I definitely would've put in if I'd thought of it.

Finally, and this greivance is pointed at movesets here in general, I'm getting a little tired of Final Smashes which are "Get a boost to your special mechanic and/or specific moves". How boring would Olimar be if his Final Smash was "Get 6 Pikmin. Pikmin are also invincible for 20 seconds"? Or how about "Lucario has full Aura for 15 seconds"?
I guess I was just so excited about her having water attacks, that I wanted to allow her to use them on any stage... :ohwell: :laugh:
 

bivunit94

Smash Journeyman
Joined
Feb 15, 2007
Messages
364
Location
Vault 101
PETER PETRELLI


Peter Petrelli is the main protagonist of NBC's hit TV Series, Heroes. The show is about ordinary people who discovery that they have superhuman abilities. Peter's ability is called Empathic Mimicry, which is arguably the most powerful ability of all. Whenever Peter is near another evolved human, he gains their ability. The original owner of the ability does not lose it, and Peter can contain an infinite number of abilities at once. In his mother's words, "He is the most powerful of us all."

Stats

Size: Medium
Weight: Light-Medium
Power: Weak
Jumps: 2
Jump 1: Medium
Jump 2: Medium-Low
Speed (Walk): Slow
Speed (Run): Medium
Traction: Medium
Attack Speed: Medium-Fast
Fall: Medium
Range: Medium-Long
Crouch: High
Crawl: Yes
Wall-Kick: No
Wall-Cling: No
Glide: Yes


Specials

Neutral Special (Invisibility)
Peter gained this ability on Heroes from Claude Rains. When Peter uses his Neutral Special, he turns invisible. The effects are the same as if you had picked up the Invisibility item. The attack can only be used for thirty seconds in total for each match. However, for example, if you pressed B to turn off the Invisibility after 10 seconds, you would still have 20 seconds to spare. If Peter gets hit hard enough to be sent tumbling back, he loses concentration and returns to a visible state. There is a half-second lag to start up the move, but no ending lag whatsoever.
0% DAMAGE

Side Special (Electricity Manipulation)
Peter gained this ability on Heroes from Elle Bishop. Peter stops, puts his hand up, and sends out a single, concentrated lightning bolt horizontally from his hand. Depending on how long the move is charged, the bolt will go farther and do more damage. It takes about 3 full seconds to fully charged, and can be charged in mid-air. If it is not charged, the bolt goes about the length of one walk-through Battlefield platform. Fully charged, it goes a little more than half of Final Destination.
5-15% DAMAGE

Up Special (Time Travel)
Peter gained this ability on Heroes from Hiro Nakamura. Peter closes his eyes and brings his body close together. He then disappears, and then one second later, reappears. The spot he reappears in can be controlled by the direction of your control stick after activating the move. In total, you travel about 3/4 of the height of Mr. Game and Watch's recovery. Aerial attacks can be performed after you reappear, but there is a one-second long ending lag for the move.
0% DAMAGE

Down Special (Empathic Mimicry)
This is Peter's pride and joy, the only ability that is not replicated from another evolved human. Peter closes his eyes, thinks hard, and puts both of his hands out. After 2 seconds, he opens his eyes, quickly resumes his stance, and shouts, "Okay!" Peter is vulnerable during the entire move, but once he completes it, he gains his nearest opponent's Down Special. The ability he gains is there to stay until Peter is KO'd. This move is tricky because with one opponent, it's hard to pull off the entire move, but with multiple opponent's, it's hard to get the right opponent nearest to you at the right time, to gain the move that you want. If the move is used on Zelda, Sheik, or any of the Pokemon Trainer's Pokemon, he gains their Neutral Special as his Down Special.
??? DAMAGE

Standard Attacks
Standard Combo (Pyrokenisis)
Peter punches with his right hand first, doing a measly 2-3% damage. If A is pressed again, Peter then moves his left arm up and down with his hand spewing out flames. (He gained this ability from Flint on Heroes). Peter will continue to attack with the fire until the A button is released. None of his standard combo has any range, and the opponent must be very close to be affected.
2% DAMAGE
3% DAMAGE PER SECOND

Forward Tilt (Freezing)
Peter throws his hand forward. If an opponent is not directly in front of him, nothing happens. If there is someone there, Peter will grab them for a second and then let go of them. The opponent will then be frozen in an ice block, but will break out within a second or two. Basically the same effect as if you threw an ice item at them, except easier to break out of, and less damage. There is also NO range on this move. NONE. (Peter gained the Freezing ability from Tracy Strauss on Heroes).
5% DAMAGE

Up Tilt (Enhanced Strength)
Peter does a Mortal Kombat-style uppercut. He obviously puts a lot of force into it, and there are blur effects from the force of his arm while he punches. If hit, the opponent will receive high knockback and decent damage. This is one of Peter's best KO moves. (He gained Enhanced Strength from Niki Sanders on Heroes). However, like most of his other standard A attacks, there is not much range on this attack. It has more range than the Ftilt, though.
10% DAMAGE

Down Tilt (Low Sweep)
One of Peter's only non-super-powered attacks. He simply crouches down and does a quick, low kick. It is very similar to Lucas' Dtilt. It works the exact same way, except has more ending lag, and takes longer to execute.
3% DAMAGE

Dash Attack (Phasing)
Peter gained the ability to phase through solid objects from D.L. Hawkins on Heroes. This is one of Peter's most unique attacks. When this attack is executed, Peter visually gets a bit blurry. It lasts for about 2 seconds, and does not affect his movement. The only affect it has is that he will pass through enemies, and be unable to be attacked. He also will not be able to attack or pick up items. If he jumps or attacks before the 2 seconds are over, he returns to a normal, solid state. This move is mostly for mindgames.
0% DAMAGE

Smash Attacks

Forward Smash (Sound Manipulation)
Peter gained the ability to send out destructive sound waves from Jesse on Heroes. For his Forward Smash, Peter stands in place. He plants his feet firmly in front of him and takes in a deep breath. While he is taking in this breath is when the Smash attack can either be released or charged. The longer it is charged the larger a breath he will take in. Once released, Peter yells, releasing a huge blast of sound. This reaches about the length of a Battlefield platform and vertically reaches Peter's entire height. It has extremely long lag on both ends, but is an almost guaranteed KO against opponents with Medium-High damage.
15-25% DAMAGE

Up Smash (Induced Radioactivity)
Peter gained the ability to create radioactive blasts from his body from Ted Sprague on Heroes. When you charge up this move, Peter looks slightly upwards and gets in almost the same position as when Ryu charges up a Hadoken. When it is released, Peter releases a miniature radioactive explosion above his head. Visually, imagine Mario's Fsmash , except upwards. It is a decent KO move, but has a pretty small range compared to most of Peter's smashes. The explosion gets larger depending on how long you charge the attack, and there is a massive difference between uncharged and charged. Fully charged, this attack is absolutely lethal, while it's a mere joke uncharged. It can be quite tricky to land the hit, though.
5-20% DAMAGE

Down Smash (Flight)
This is also a hugely unique and confusing (for your opponent) attack. Peter gained the ability to fly from his brother, Nathan, in Heroes. While charging, Peter bends down low, ready to take off from the ground at any moment. Once released, Peter takes off into the air. He flies off of the screen for a good second, and then comes crashing down into the ground. It is very similar to Kirby's throw where he takes the person off the screen, or like when you use a Warp Star item. It is great when unexpected, and can really throw an opponent off. It has a slight ending lag as Peter sort of "bounces" back off the ground and lands on his feet. Charging it only affects how hard he hits back down when he lands.
10-15% DAMAGE


Aerial Attacks

Neutral Aerial (Teleportation)
A variant of Hiro Nakamura's Time Manipulation ability, this move is actually one of Peter's less useful one. The easiest way to describe it is like an aerial dodge (a Brawl-style, momentum-carrying one), in which you disappear momentarily instead of just dodging. That's it. You can attack once you reappear, as well.
0% DAMAGE

Forward Aerial (Pyro Punch)
Pyro Punch is a lot like Mario's forward aerial, except Peter does not flip after he punches. Also, it does not spike. Fire pours from Peter's fist as he swipes, leaving fire damage upon the foes, and increasing the attack's vertical range. Overall, a semi-useful attack with no extraordinary aspects.
5% DAMAGE

Backward Aerial (Telekinetic Burst)
Peter gained the Telekinesis ability through Sylar, who had previously stolen the ability, on Heroes. As Peter falls, he puts one hand behind him and puts out a nearly lag-free blast of telekinetic energy. This does no damage whatsoever, but has a very powerful "push" effect (Mario's Fludd, Squirtle's Water Gun, etc.). The move is perfect for giving foes the extra push off of the edge, sending them to their doom. The range is from around the top of Peter's head to his knees, and half of a Battlefield platform across.
0% DAMAGE

Up Aerial (Icy Mist)
Peter throws his hand up above his head and waves it back and forth one time, all the while releasing a bitter cold mist of air from it. In total, there are three possible hits that you can land. The first is when the mist is first released. The second is right in the middle of the attack. The last is right before the attack ends. In total, the attack lasts about 1.25 seconds. There is a .25 second starting lag on the move, but no ending lag. There is also a 5% chance of the enemy freezing. There is almost no knockback on the move.
2-4% DAMAGE EACH HIT

Down Aerial (Electric Kick)
This animation on this move is a lot like C. Falcon's Dair, except Peter does a weak kick with his right foot first, and then follows up immediately with an electric-charged kick from his left foot. This move spikes and has massive knockback. It has high priority, making it good for countering enemies who are coming from below you. The first kick does low damage and no knockback. The second kick is the real offensive beast of this attack.
4% DAMAGE FIRST KICK
10-12% DAMAGE SECOND KICK

Grab and Throws

Grab (Telekinesis)
Peter uses his power of telekinesis to pull the opponent in. It reaches about as far as Link's Tether.


Pummel (Electric Current)
Peter sends a slight electric charge through the enemy.
2% DAMAGE

Forward Throw (Super Speed)
Peter gained the ability of super speed from Daphne on Heroes. Peter takes his opponent and shoves them forward a few feet. The opponent stumbles back, and Peter uses his enhanced speed to run back up to them. He then, without stopping, runs right into the opponent. After he hits them, he skids to a stop. The move has almost no vertical knockback, but can KO off of the side of the screen at medium-high damage levels.
5-8% DAMAGE

Backward Throw (Time Control Combo)
Peter concentrates, and he and the opponent both disappear. They reappear 1/4 of Final Destination's length, behind where they were standing. They have also changed the direction they are facing. Peter then grabs the opponent with both hands and quickly tosses them forward. This move doesn't send the opponent far at all, but is useful if near an edge. Peter & the opponent will teleport off the edge, and Peter will still toss them through the air. Peter can still use his recovery and second jump at this point, while still leaving the opponent dangerously close to the edge of the screen.
3-4% DAMAGE

Up Throw (Enhanced Agility)
Peter gained the ability of enhance agility from Mohinder Suresh on Heroes. This throw is quite simple. Peter leaps miraculously high into the air (about the height of three Dedede's) and just throws the opponent up. No damage is done, but it leaves the opponent high enough up to leave you time to plan a following attack.
0% DAMAGE

Down Throw (Body Insertion)
Now this is a risky one. Peter (well…Future Peter, to be exact) had the ability of Body Insertion from an unknown source on Heroes. He literally leaps into the opponent's body when this throw is used. He then gains control of the opponent. However, this is easy to break free from. Also, if Peter attempts to attack, or takes damage during this state, the bodies are separated again. Mostly useful just to mess with your enemy a bit.
0% DAMAGE

Final Smash

Final Smash (Exploding Man)
The screen dims. Peter begins to glow, as if he is about to burst with energy. He looks at his hands and breathes heavily. He glows brighter and brighter. Peter screams. A huge flash of light overtakes the screen as Peter is lost in a massive explosion. This attack is a one-hit KO to everyone on the screen, and there is no way to dodge it other than if Peter is off the screen (in one of those magnifying-glass things), in which case, the move is basically suicide for Peter. But, there's a catch. For 30 seconds after the Final Smash is activated, Peter is in a dizzied state, due to the force of the explosion he just unleashed. This leaves returning opponents free to beat up on Peter a bit. However, Peter returns to normal once he takes 25% damage, regardless of whether or not it has been 30 seconds.

Playstyle
Peter can use certain moves like his neutral special, dash attack, and down throw to really mess with the opponent's head. Using his side special to keep opponents at a safe distance, he should have no problem rushing in to attack, and then getting away before the opponent can counter. Peter is relatively light, so using his projectiles and defensive moves are essential. However, a great tactic is to simply exploit your best opponent's down special against them by using Empathic Mimicry…which (depending on what your opponent's down special is) can really change the tide of a match. Overall, Peter is a character that is fun to play as, but also has a good amount of depth and a variety of moves that also make him appealing to hardcore players.

Taunts and Poses

Up Taunt
Peter nervously begins floating up in the air using his flight ability, but then becomes wobbly and falls back down to the ground.

Side Taunt
Peter puts both arms up in a fighting stance. His right arm is on fire, and his left arm is frozen.

Down Taunt
His arm begins to glow the same way Peter glows during his Final Smash, but Peter looks down at it, clenches his fist, and it goes back to normal.

Up Victory Pose
Peter appears in the middle of the screen (deactivating his invisibility), and simply crosses his arms.

Side Victory Pose
A vial containing a red liquid is seen dropping towards the floor. It stops in mid-air, and Peter walks in from the side of the screen. He uses his telekinesis to bring the vial into his hand. When the vial is in his hand, he grasps it tightly and says, "Yes!"

Down Victory Pose
Peter turns his back to the screen, and activates pyrokinesis from his left arm. As the fire burns, he says, "This was for the greater good."

Loss Pos
Peter is seen with his back to the screen, obviously upset by his loss. If you listen carefully, you can hear him saying, "I should've been stronger…"

Victory Theme
The music played during the Heroes opening (where the eclipse is shown) is Peter's victory theme.

Extras

Symbol
The symbol for "Godsend" or "Great Talent" which is commonly used in Heroes, is Peter's symbol.

Wii Remote Sound
Peter simply says, "Let's do this."

Entrance
Peter teleports onto the stage from an unknown location and assumes his normal stance.

Kirby Hat
Kirby gains Peter's hairstyle, and his Invisibility move. If Peter is in the Future Peter Alternate Costume, he also gains the scar across his face.

Alt. Colors
There are many, many different outfits that Peter wears, but the most important two are his standard "Genesis" outfit, which consists of a long, tan-colored coat and jeans, and his Future outfit, which is a long black trenchcoat. He also has a scar across his face in his Future version.

Codec
Snake: Mei Ling, this guy is going crazy! I've never seen anything like this before!
Mei Ling: Snake, that's Peter Petrelli, an evolved human. He possesses the power to gain the abilities of those around him.
Snake: How am I supposed to fight someone who can control time, create fire, freeze things, move through solid objects…you get the point.
Mei Ling: He might be super, Snake. But he's not invincible. Stay focused.
Snake: And what if he uses his ability on me?
Mei Ling: Then be prepared to fight against your own weaponry. Good luck, Snake.


Well, I tried. I know its probably not up to par... :( but I've wanted to get back into this. I participated in MYM2, and placed in the top 50, but I've been following since then and...all I can say is WOW. The standards sure have gone up tons. This was way hard to make. I'll add situationals, a stage, AT, and a boss later. PICTURES, too. :p

Btw, SirKibble: I used your Balloon Fighter moveset (which I love, btw) as a template to make sure I had everything on this one. Just wanted to let you know I'm a huge fan of all your stuff :)

Comments would be appreciateddd.​
 

Wizzerd

Smash Ace
Joined
Feb 24, 2009
Messages
929
Actually, I thought that Peter was quite up to par. It had very many original attacks, and was balanced, and surprising detail if you haven't participated since MYM2, though it might need a bit more by MYM5 standards. And it sort of bothered me that it was all centered, but that's not a big deal. Also, what happens if Peter copies a move from Zelda/Sheik or Pokemon Trainer with Empathetic Mimicry? Does he get to transform into the characters? Still, that came out of nowhere but it was still very good! :bee:
 

Agi

Smash Lord
Joined
Jul 27, 2008
Messages
1,120
Location
SE Washington
Review ofhttp://www.smashboards.com/showpost.php?p=7463121&postcount=1576 Sakurai

So, you finally finished Sakurai. I've been waiting for this masterpiece ever since you gave me that preview of the Dash Attack, and just by skimming it I'm sure it won't disappoint. It was great to see Kid Goku place in MYM 4, and hopefully your one-set-a-contest mindset will continue to bring forth these incredibly creative sets. (I don't think I ever mentioned this, but that mini-review of Kid Goku actually was what inspired me to continue writing other reviews. :bee:

vvvvv skippable paragraph vvvvv

Since I have a heck of a lot of time on my hands, and I can't really bring myself to decide between the two commonly-accepted methods of reviewing (move-by-move or main points) I'll just give you both... Analysis of individual moves followed by another main-points review. If this doesn't take too long, I'll be sure to use this come next contest.

^^^^^ skippable paragraph ^^^^^

Okay, first off we have the introduction, your interpretation of the madman that is Sakurai... okay, you've already hooked me. Releasing animals to make Missouri more like a Jungle? John Kirby? And I see you managed to work in an "Agi the Biter" reference. Even if this set has no playstyle whatsoever, I'm gonna love it simply for the lulz.

A special ability, eh? As hilarious as it is... I can't really see it being applicable to the actual game. Forcing a final smash on your opponent? Eh. Regardless, Sakurai's "uncreative" aspect truly is emphasized in this, something I'd hoped to see. Unfortunately, I'm writing this review without the benefit of images, so I can't see which Landmaster goes to which character, but that's besides the point. Giving Snake and ROB their own unique Landmasters was a nice touch, although it really wasn't necessary to repeat the "How do I shot web" quote for Snake.

From his stats, Sakurai seems pretty overpowered. He doesn't seem to be lacking in any stats, (besides traction, but that's of lesser importance,) he can run quickly, score KOs and recover pretty well. The only thing possible keeping him from being God Tier at this point is if he has low attack speed or a bad recovery special, so I'm going to have to look for some of Sakurai's bad points later on.

Normally I wouldn't make a seperate section for animations, but these are the best I've ever seen. Your warped sense of humor really pays off here, although I'm guessing the crouching animation was a reference to some movie I haven't seen.

Now, on to the actual moves! It's a bit of a shame you couldn't come up with something besides a punch-punch-XXXX for the Standard Combo. Another thing on this is that you refer to "a quarter of a stagebuilder block" as a good distance. What, are you using MT's blocks now? That's about the range of just a basic jab. I'd recommend that you change the description to make it a bit less conflicting. The Dash Attack sure explains a lot. :p

The FTilt oozes with awesome, and that's saying something for a moveset on this level. Although, since it executes so quickly AND has a healing element, I'd go so far as to say it's overpowered. Just lower the % healed to 1-2ish, or add more ending lag (scraping the Peanut Butter off his hands back into the jar?) while buffing the knockback. I’d like to know just how many multiple hits that Blendy Storm can deal at maximum. And as for the DTilt… this is by far my favorite move in the set so far, simply for the visual. I don’t even care that there’s no mention of lag, it’s that epic. :bee:

Smashes? After reviewing so many non-standard-organization sets, it’s good to get back into the habit I’m used to seeing. So, you managed to get in the bear-blasting you tried to get me to help you with so long ago… and it’s a .gif! Not much else I can say about this move, it seems pretty balanced. It’d just be nice to see a mention of lag. Why do I get the feeling I’ve said this too many times? The USmash is another one of your random moves. I have no idea where you come up with these, and probably don’t want to. :razz: The execution is nice, pretty worthless if C-Sticked but becoming a great damage racker if charged. The DSmash is a great Cast Away shout-out. Although on first glance it’s OOC, anything IN character with this set would be OOC. Therefore, by being out of character you’re staying right next to the source material. But, on to the actual move. The main problem I have here is that you don’t really have a mention of range, which is critical in a move like this. Also, I think that a Magikarp should deal considerably less damage than a Swordfish. :)

Just when I think you’re using standard organization, the Specials come right after the smashes. Bah. Anyway, Tier Punch is probably the most unique “XXXX Punch” move I’ve seen, and continues to reveal more of Sakurai’s personality. LOL TIERS indeed. The side special I’m guessing is more for the wtf factor than anything. Coming out of his own skin?! Gotta love it. Although at first glance this move looks extremely overpowered, you making him take double damage AND only have two moves makes up for it. However… wait, nevermind. I was going to mention something about the skin healing 40% maximum to your opponent, but when you couple that with Sakurai’s overpowered stats it’s also compensated. You did a great job balancing this move in particular, although the descriptions on the additional smashes can be a bit ambiguous at times.

Up special is perfect. Nothing else to say here. As for the down special, I’d actually skipped to the end of the set to see the “mini-moveset” you promised, and I had no idea what the heck it was supposed to be. Glad to see that cleared up. :razz: One question about it… is the chicken effect permanent?

Aerials! While the concept of the NAir is truly lolworthy, I’m really not a fan of the random effects. It seems like you had a couple of ideas of what you wanted the move to be like, and then you just slammed them all together. :ohwell: As for the Knee of Injustice… to knee, of course. Sakurai has enough KO moves that I’d take my 50% and then use something else to get my opponents. I’m glad you saw how broken the move was, but that doesn’t make it unbroken.

The BAir really makes me worry about Sakurai. He can KO, deal plenty of damage, and now he can gimp? What’s next, traps? *continues reading* Minions. He can create cheezy minions. Obviously you threw balance out the window, but hey, Sakurai never really was one for balance, was he? Creating your own Samurai Goroh doesn’t seem plausible, but since it takes so long to form… I suppose I’d have to actually use it in a match to criticize the balance of this move, but it certainly seems overpowered from where I’m at. The heat-seeking missiles from the UAir are another balance concern. That’s 36%! And finally, the DAir. 35% from any move gets a big “NO” from me, especially when it only has a quarter second of lag. Overall, Sakurai’s aerials really need to be looked at, balance-wise.

Time for the grabs. The chloroform was a nice touch, although it really isn’t used in your grabs. OUCH! A cheese grater over their face? That seems more cruel than random. The FThrow seems like it could be absolutely devastating. This is one of those moves you NEED to say how fast the damage goes up. The BThrow seems a bit underpowered, which is… actually a relief to say, after such moves as the BAir. I’d expect Shoop to deal some substantial knockback.

The UThrow is insane. ZOMG THEY’VE BEEN BALLOONS ALL ALONG!! A great move without balance issues here. Perhaps, however, you could make it so larger characters take longer to inflate? The DThrow steals Bowser’s DThrow’s spotlight for innuendo. Nicely done, although now I have to read Warlord’s story mode to understand where that came from. D=

The final smash was an impressive montage of Kirby and the competitive smash scene, although if he could handle creating an AI on the level of M2K I figure we’d have seen it by now. Anyways, in the theoretical sense it works.


Okay! First part of the review is done. Moving on to the main points... (which will be much shorter)


Originality: This moveset is a shining beacon of creativity. Every move was extremely creative and a joy to read. You'd get full marks here, if we gave marks.

Playstyle: I didn't really see much playstyle to speak of. I realize you're part of the anti-playstyle movement, but I'm sure you could have made a couple interactions, or at least a THEME.

Detail: Plenty of detail here. Your lengthy backstories made it a bit difficult at times to pull out all the critical information, but it is all there. However, I'd like to see more mention of lag and range for those disjointed attacks.

Balance: Sakurai, as mentioned many times above, is very overpowered. He can deal damage, KO, gimp, run away from opponents, recover, and even take a hit. Moves such as the DAir and FAir really make me worry about Sakurai. At this rate, a Tier Punch would have no effect on Sakurai himself.

Relevance to Character: Obviously, this is not the true Sakurai. Then again, it never was. I told everyone a long time ago that this was a self-insert, but no one believed me. Anyways, great job incorporating your randomness into the smash world! One of my favorite OCs to read. ;)

Organization: I'm really not a fan of Sakurai's organization. The fluctuating text sizes and alternating full-color paragraphs made it a bit of a challenge to read, making me glad I copied the thing into a word document for the review. I seem to recall that Kid Goku struggled with that too, what with the massive text size... maybe I'm just too used to the standard KRool-approved format.

Extras: Lots. Everything you didn't manage to include in the bulk of the set made it here. Ask someone else for indepth analysis. But one thing I was shocked about... WHERE'S THE YOSHI ALTERNATE COSTUME?! =O

Overall: This set's primary good points are humor and creativity. It's an immensely readable set, and newcomers could easily be pointed to it for some unique ideas. However, it's really held back by being overpowered and lacking some critical details at points, especially things such as the range on the DSmash. The organization could be a bit more uniform, as well. Regardless, it's a shoe-in for "funniest non-joke set" and could easily be seen in the top 50. Nice work!


Yes, I feel horrible for not commenting the above sets. :(
 

bivunit94

Smash Journeyman
Joined
Feb 15, 2007
Messages
364
Location
Vault 101
Wizzerd: Thanks! :D
and crap. i forgot about shiek/zelda and PT... I suppose Peter would just gain their neutral special. I'll edit that in there later.
 

SirKibble

Smash Champion
Joined
May 2, 2008
Messages
2,400
Considering how long you've been gone, Biv, that was quite the moveset! Glad to have you back! :bee:

As Wizzerd said, being all centered is a bit funny to look at, and I think a few size changes on some text would make it a little more readable, but nonetheless, the material is good, and I was actually quite shocked at the level of detail. I mean, most of the rest of us who participated in MYM2 had to progress up to the current level of detail bit by bit, but you seem to have made the transition without much trouble. You planning on becoming an active MYMer again? Because that'd be awesome. :cool:

And I'm quite appreciative of your comments. Glad to know my work has a fan. :)


I'm getting all giddy inside at the thought of another person from MYM2 rejoining us. I'm not entirely sure why, but this excites me a great deal. :psycho:
 

bivunit94

Smash Journeyman
Joined
Feb 15, 2007
Messages
364
Location
Vault 101
Wow, thanks haha. I'm glad to be back. And yes, (once summer rolls around) I'll definitely be a frequent contributor.

MYM2 seemed like cake compared to this, though. I was pretty intimidated by the new standards around here...

and yeah, I won't center everything next time, lol.
 

peeup

Smash Lord
Joined
Sep 3, 2007
Messages
1,618
Location
Hartford/Mass
As a huge fan of Heroes myself (though I still have to watch the finale from the most recent season), I thought Peter was amazing. I would think that his up-special would have to do with Nathan's flight or something, but you kept it original by using Hiro's ability instead.

As good as it was, though, I would agree with SirKibble and Wizzerd that it's easier to read of it's not all centered. That's easy to change, though.

P.S. Hey Kibble, how far are you with evaluations of movesets and where do you have the evaluations posted (is there a site or a blog or something)?
 

bivunit94

Smash Journeyman
Joined
Feb 15, 2007
Messages
364
Location
Vault 101
The finale was the best episode in a while.
Thank you, though. :)

and yeah, I figured flying was too obvious to be the recovery, so Peter can just glide with it instead.
 

SirKibble

Smash Champion
Joined
May 2, 2008
Messages
2,400
P.S. Hey Kibble, how far are you with evaluations of movesets and where do you have the evaluations posted (is there a site or a blog or something)?
Haha, I don't do those myself anymore. Haven't since MYM3. Nah, there's a whole centralized blog here (http://chiefmendez.wordpress.com/) where reviews and stuff happen now. There's a full list of movesets from this contest and last, and the Review Queue where reviews for movesets are requested. Only one of the authority figures of the contest reviews any given moveset, though, so no guarantees I'll take any particular one.
 

phatcat203

Smash Apprentice
Joined
Dec 12, 2008
Messages
160
Location
I've been everywhere, man.
Well, Elias was great, but I really can't see the water attacks being useful with items off. Except when oyu randomly get knocked into the water on Pirate Ship or Delfino Plaza. Still she was in-depth and unexpected. You turned a character with, really, no combat ability into a formidable fighter.

As for Peter, I liked the phasing dash attack, and the specials, but I think the Final Smash may be a bit broken.... A thirty second relapse is broken on the other side, but taking 25% damage wouldn't be that bad, if you weren't facing a powerful character. Overall, he was creative, I'll give you that, but it did seem that the specials and a few moves needed a little more detail.

Sidenote: For anyone who didn't hear me on the chat last night, my next (or at least an upcoming) set will be a Scyther/Scizor joint set, so could anyone link me to that old Scizor set from MYM4? I don't want to copy it, but I do need to know what it looks like, so that I won't accidentally do so.
NVM: I found the old Wordpress site.
 

flyinfilipino

Smash Master
Joined
Sep 11, 2007
Messages
4,319
Location
North Carolina
@Elias:
Isn't that a guy's name?
Anyway, despite my unfamiliarity with the character, once again you deliver a fun, creative, and easy to read moveset, Kibble (though I had to think a bit about those panels). Another cool set from you! :bee:

@Peter Petrelli:
Eww...Heroes. :p It's definitely not as cool as it used to be, but does have its moments every once and a while.
Anyway, it's a cool and fun set too, with plenty of references to the show for people that are looking. Peter's power is eccentric and the writers don't know what to do with it (along with plenty of other things), but you bring it all together nicely with some nifty tricks. I like the Final Smash too, though it seems a little overpowered. Good job though! :bee:

Also, don't worry about the standards; as long as you have fun and make your movesets easy to read, we'll all enjoy it.
 

bivunit94

Smash Journeyman
Joined
Feb 15, 2007
Messages
364
Location
Vault 101
As for Peter, I liked the phasing dash attack, and the specials, but I think the Final Smash may be a bit broken.... A thirty second relapse is broken on the other side, but taking 25% damage wouldn't be that bad, if you weren't facing a powerful character. Overall, he was creative, I'll give you that, but it did seem that the specials and a few moves needed a little more detail.
Hmm...I was also thinking that the Final Smash was a bit cheap, so I was thinking I would add a special mechanic to it: On Heroes, when the event that his Final Smash is based on happens, it's involuntary, so when Peter grabs the Smash Ball, he can't choose when to use it, however it automatically activates after a certain amount of time...so if everyone else knew he had it, they would all gang up on him.
Or something along those lines...I don't know, lol.

@Peter Petrelli:
Eww...Heroes. :p It's definitely not as cool as it used to be, but does have its moments every once and a while.
Anyway, it's a cool and fun set too, with plenty of references to the show for people that are looking. Peter's power is eccentric and the writers don't know what to do with it (along with plenty of other things), but you bring it all together nicely with some nifty tricks. I like the Final Smash too, though it seems a little overpowered. Good job though! :bee:

Also, don't worry about the standards; as long as you have fun and make your movesets easy to read, we'll all enjoy it.
Thanks! and yeah, hopefully the writers get their acts together soon. :mad:

I've gotten that same feedback about the Final Smash from everyone...but aside from what I said earlier, I can't think of a way to make a massive explosion not overpowered, while still staying true to the source material. After all, Peter's explosion was supposed to destroy New York... :psycho:
 

phatcat203

Smash Apprentice
Joined
Dec 12, 2008
Messages
160
Location
I've been everywhere, man.
Well, you could make the screen pulse a little before it goes off.... In order to give people warning and some time to Air dodge. You could also make the knockback weaken as it radiates outward, as in a real explosion(trust me on this, I have a lot of free time for a certain reason..).
 

peeup

Smash Lord
Joined
Sep 3, 2007
Messages
1,618
Location
Hartford/Mass
Haha, I don't do those myself anymore. Haven't since MYM3. Nah, there's a whole centralized blog here (http://chiefmendez.wordpress.com/) where reviews and stuff happen now. There's a full list of movesets from this contest and last, and the Review Queue where reviews for movesets are requested. Only one of the authority figures of the contest reviews any given moveset, though, so no guarantees I'll take any particular one.
haha, shows how long i've been gone... =D

On a different note, I said that I'd have a moveset all done by sunday morning, though I don't think I'll be able to meet that deadline. I broke my leg yesterday, so I was in the hospital all friday and i'm supposed to get some sleep today, so expect my next moveset to be out sometime late this week or early next week.
 

sethpenguin

Smash Cadet
Joined
May 3, 2008
Messages
26
Location
???
This is my first post in quite a while but anyways, here's my first entry in a long time,

Niko Bellic

A veteran of the Yugoslav Wars, Niko came to America where he thought that his life would be better but soon he found himself admist of Liberty City's criminal underworld.

Size: Medium
Jump: Weak
Power: Weak
Crouch: Strong
Speed: Medium
Strength: Medium


Standard Moves
A: Punch,

A Smash: Baseball Bat,

A Up/Down: Knife,


Smash Attacks
B: Pistol,

B Smash: Shotgun,

B Down: AK-47,

B Up: RPG-7,

Final Smash: Annihilator


Toesses and Grabs
Grab: Niko grabs an oppenent by the neck.
Toss Left/Right: After grabing an opponent Niko will toss an oppenent onto the ground.

Costumes
Default: Niko Bellic,

Alternative 1: Blue Jacket,

Alternative 2: Officer Bellic,

Alternative 3: Mr. Bellic,


Taunts
Taunt 1: Niko says "So this is the American dream."
Taunt 2: Niko says "Why does this keep happening to me!"

Snake Codec
Otacon: So Snake, I see you're Niko Bellic.
Snake: Niko who?
Otacon: Niko Bellic is a former veteran of the Yugoslav Wars and came to Liberty City, there he became a criminal.
Snake: He doesn't look so tough.
Otacon: Don't be fooled Snake, he's got more tricks up his sleeve than you think.
Snake: What kind of tricks are we talking about?
*STATIC*
Snake: What was that?
Roman Bellic: Hey cousin let's bowling!
Snake: I'm not your cousin.
Roman Bellic:Whoops wrong number.

Victory Posses
Vitory Pose 1: Niko puts his right fist in the air and says "I'm the one who survied!"
Victory Pose 2: Niko says "Things will be different."
Defeat Pose: Niko has his back turned at the camera.
Victory Music: GTA IV Mission Complete Theme

Misc Info
Enterance: A helicopter will fly over the stage and Niko will jump out of it and land onto the stage.

Universe Logo:


Stage: Star Junction, Liberty City


Stage Music 1: GTA IV Theme
Stage Music 2: GTA IV Load Theme
Stage Music 3: Flashing Lights by Kanye West
Stage Music 4: GTA III Theme
Stage Music 5: GTA Liberty City Stories Theme
Stage Music 6: GTA San Andreas Theme
Stage Music 7: GTA Vice City Theme

Assist Trophy Little Jacob

Little Jacob will drive onto the stage in a car and will do a drive by shooting which will damage opponents severly.

What do ya'll think?
 

Red Arremer

Smash Legend
Joined
Nov 27, 2005
Messages
11,437
Location
Vienna
This is the most beautiful piece of art I've ever seen.

The sheer originality and detail of the moves and the work put into them would blind a person not familiar with movesets with its sheer elegance. You just have to look at only one move to see how much time and love was put into this set.
It also has more than the necessary moves, going into extreme detail there, as well.

Truly, a masterpiece. Without a doubt, we have our winner right here.
 
D

Deleted member

Guest
Niko Bellic


What do ya'll think?
Absolutley incredible.

Pictures don't make a set. It needs way more description, and it's not even a complete set. Try to put some effort into it. Read some of the other sets to get an idea of how it should be.
 

Agi

Smash Lord
Joined
Jul 27, 2008
Messages
1,120
Location
SE Washington
Another beautiful moveset from a newcomer! This one is even better then Roomba, I don't know how that's even possible. This will CLEARLY be the winner of the contest, hands down. . .Unless this brilliant mind gives us yet another great moveset!

Wow! Awesome moveset! Something as awesome as that... Well, people are gonna start quitting the contest because they know they can't compete. I know I'm thinking about it after seeing that! Wow! Incredible!

That moveset is one of the greatest movesets ever. I just created Number Five- shooting hot steamy liquids from my eyes from witnessing that amazing spectacle.
 

Mardyke

Smash Journeyman
Joined
Sep 8, 2008
Messages
289
Location
Ireland
Guys, why are you bashing him? Seriously, why?

Seth, you seem to have a decent idea in the beta. The keyword is that it's still in the beta - to make a move a proper move, we need to be told what that move does, how much damage it does, and anything else that gives us an insight on what to do.

So it's a good blueprint, but it's not a set just yet. I recommend you take it down and repost it once you're sure it's complete.

Speaking of Niko, wanna pick me up so we can go bowling?
 

Agi

Smash Lord
Joined
Jul 27, 2008
Messages
1,120
Location
SE Washington
Sorry, Mardyke... I guess we're a bit too used to having a Fierce Deity Link. Anyways... just gonna post this one last barb, then we'll be serious. 'kay?


Junahu

Smash Ace
Joined
Nov 15, 2005
Messages
899
Location
Shropshire Slasher
I guess I missed something "awesome", nevermind

Anyway, here's a list of MYM5 assist trophies. The descriptions are as dry as can be, so make sure to read the actual AT entries in their respective movesets rather than my summaries (Clicking an AT's picture will bring you to the moveset it came from)

{}Assist Trophy List{}


Klubba
Appearance: Klubba stands in place patting his spiked club against his palm. Klubba is taller than Ganondorf and slightely thinner than Bowser.
Action: On contact with Klubba, one of two attacks are performed randomly;
1) Klubba swings his spiked club, aiming at the foe or object that touched him. The club deals 25% damage and very high knockback
2) Klubba grabs the foe that touched him and shakes them vigorously. Prop coins pop out of the opponent (though these will be real coins in a coin match, appearing at the opponent's expense). This attack deals 40% damage but does not cause knockback
Lasts for...: 20 seconds


Wrath
Appearance: After briefly laughing, Wrath takes the most direct route possible to his closest targetable opponent (running slightly slower than Captain Falcon). Wrath lacks a second jump so there are some obstacles he cannot clear. If Wrath falls offstage, he will respawn
Action: Upon direct contact with an opponent, Wrath will fuse with them and hold them in place (they will still be affected by gravity but not knockback). Wrath will attack every 2 seconds, dealing 8% damage and flinching. After 10 seconds, Wrath will kick the opponent away for 15% damage and above average knockback.
Lasts for...: 15 seconds unless Wrath reaches an opponent. Wrath also dissapears after he has finished attacking an opponent.


Petey Piranha
Appearance: Petey lumbers towards the nearest targetable opponent. He is only half the size of his boss appearance and cannot jump
Action: Once an opponent is within 3 stagebuilder blocks of Petey's mouth, he will devour them. He then munches on the opponent, building up to 30% damage in 3% increments. Finally, Petey spits the opponent out of its mouth.
Lasts for...: 10 seconds unless Petey eats an opponent. Petey also dissapears after he spits out an opponent.


D.W
Appearance: Dora Winifred begins by twirling around, ballet style. She is quite small, and certainly smaller than Mario.
Action: One of three effects occurs at random. (effects lower in the list are less likely to occur);
1) D.W wanders around slowly while singing. Any opponent within 2 stagebuilder blocks of her will take 2% damage per second and flinching. If an opponent directly touches D.W while standing on the ground, she will force a dummy into their mouth, stunning them while she pours a scalding pot of tea onto them. The tea deals 13% damage and moderate knockback.
2) D.W wanders around slowely while rummaging through a paper bag. Every second she will drop a single food item that heals 2% damage when picked up. Once (and only once) as she wanders she will drop a raw fish that heals 25% when picked up.
3) D.W paces back and forth while murmering to her imaginary friend Nadine. If a foe gets within 1 stagebuilder block in front of her, she will say "sh%t!" with a curious expression, dealing 25% damage and decent horizontal knockback
Lasts for...: 20 seconds


The Sorrow
Appearance: The Sorrow appears in the background and tints the stage a blue hue
Action: For every KO that occurred in the last 60 seconds, a phantom will be summoned to a random spot on the screen. These phantoms, appearing as soldiers from MGS3 drift around aimlessly until they come in contact with an opponent. On direct contact with an opponent, the phantom will shriek, causing the opponent to be stunned as if their shield was broken, and dispelling the phantom in the process.
If there were no KO's in the past 60 seconds, The Sorrow will comment on one of the characters fighting and vanish.
Lasts for...: Varies, but the phantoms stay for a maximum of 15 seconds.


Captian Quark
Appearance: Captain Quark flexes his muscles then flees from the stage like a coward
Action: Quark will suddenly appear the next time someone has their shield broken and punch them, dealing 20% damage and high knockback. He then poses while imaginary photographers take his picture, and leaves.
Lasts for...: The effects of Captain Quark only stop after he has managed to attack someone.


Vamp
Appearance: 4 spotlights shine down onto the stage as Vamp dashes around, chasing random enemies. He has two jumps equal to Falco's and can run as fast as Sonic. Vamp will also respawn if he falls off-stage.
Action: When within 1/2 a stagebuilder block of an opponent, Vamp will slash them for 10% damage and average knockback.
Lasts for...: 60 seconds or until his stamina is brought to 0. He has 30 Stamina but will dodge every attack unless the four lights that appear with him are destroyed.


Kel'Thuzad
Appearance: Kel'Thuzard warps in surrounded by ice, then hovers in place.
Action: Kel'Thuzard casts the following spells at random until its 300 Mana points have been completely drained from all the casting;
1) The air around one foe glows blue. After 1 second, the opponent is hit by an explosion of ice, dealing 10% damage and high knockback. If the explosion was not dodged, the blast radius extends to 3 stagebuilder blocks and anyone touching it that wasn't the inital target will take 20% damage and very-high knockback. This costs 100 mana points
2) A random target (including allies, the summoner and other non-playable characters) is buffed, reducing all damage done against it by 3%. This effect lasts 5 seconds and costs 30 mana points.
3) A random opponent is engulfed by a diseased cloud that follows them around and deals 3% damage and flinching every second to anyone within the cloud.This hits through shields, but does not cancel shielding. This costs 150 mana points.
Lasts for...: Kel'Thuzard lasts until its 300 mana points have been drained to a point where no other spell can be cast.


Shadow Beasts
Appearance: A twilight portal appears in the sky and three Shadow Beasts are summoned. They are as tall as Gonondorf even while hunched over and move slowly, with periodic and slight bursts of speed. The three shadow beats behave like low level CPU's allied to the summoner.
Action: The following attacks are used when an opponent is within range of the attack;
1) The Shadow Beast swings an arm out in front of it, dealing 12% damage and medium knockback. Reaches 1 and 1/2 stagebuilder blocks in front of it
2) Produces a loud low humming noise that deals 4% damage and momentary hitstun to opponents within a battlefield platform ahead of it.
Lasts for...: Shadow Beasts stay around until they are all KO'd. They each have 30 stamina and can be knocked away and interrupted in the middle of attacks. If one Shadow Beast is left on its own, it will immediately shriek and summon two more Shadow Beasts. The key to defeat them, is to KO them all together.


Aerafol
Appearance: Aerafol appears at the top of the stage, flying left and right with its sword and shield at its side.
Action: Every 5 seconds, Aerafol will flap its wings quickly then divebomb the nearest opponent. Contact with Aerafol will deal 20% damage and high knockback in the direction Aerafol was travelling. The dive bomb can be countered (as in, stopped using an attack with counter properties) stopping it from dealing damage
Lasts for...: Aerafol will leave after divebombing 3 times.


Darknut
Appearance: Darknut walks very slowly towards its nearest opponent. He has a very low jump and is as tall as Ganondorf. After taking 30% damage, it loses its armor, allowing it to run and granting it a higher jump
Action: When close enough to an opponent, Darknut will use a random attack. The attacks differ depending on whether or not he has his armor on.
With armor;
1) Darknut swings its sword horizontally in front of him. Deals 10% damage with medium horizontal knockback.
2) Darknut performs overhead sweep to hit foes above him, Deals 14% damage with high knockback.
3) Darknut does a rising sweep with its sword. Deals 12% damage with medium upward knockback.
Without armor;
1) Darknut stabs forward with his sword, dealing 8% damage with average horizontal knockback.
2) Darknut performs three quick horizontal slashes , dealing 3%, 4% and 5% respectively, with low knockback on the first two and medium on the last.
Lasts for...: Darknut lasts until 80% damage is dealt to it. After the first 30% it will lose its armor. Darknut can be knocked away and interrupted.


Tira
Appearance: Tira appears, wielding her ringed blade like a hoola hoop. She chases after the nearest opponent, running as fast as Captain Falcon and having two average jumps.
Action: When within range of her attacks, Tira will perform an attack depending on whether she was running at that moment.
1) Not dashing: A quick slash of her blade toward the opponent that deals 15% damage and average knockback
2) Dashing: A sliding kick forewards that deals 8% damage and below average knockback
Lasts for...: 60 seconds or until her stamina is brought to 0. She has 50 stamina, and once she loses 25 stamina, she will recieve a noticeable speed boost to her attacks thanks to her bipolar personality.


Tyuruu
Appearance: Tyuruu flies around in the air riding her key, only approaching opponents when she decides to attack them specifically
Action:Tyruu uses the follow attacks at random (attacks lower on the list are less likely and the final attack on the list is only used when her time is up);
1)Tyuruu sprays water diagonally downwards at an opponent dealing 3% damage and flinching
2)Tyuruu sprays a sudden gush of water forewards at an opponent that deals high knockback but no damage
3) Tyuruu drops a large bubble from her position (she does not aim this to hit a specific target). Anyone who touches the bubble will be trapped inside and take 5% damage per second until the bubble pops, 5 seconds later
4) As Tyuruu's final attack, she summons a huge screen filling tidal wave from the background. Not timing a spot or air-dodge correctly will result in 20% damage and OHKO knockback.
Lasts for...: 10 seconds


Zira
Appearance: Zira runs around the stage randomly at the speed of Captian Falcon's dash. She has only one jump, which just happens to be the exact height of the obstacle she needs to clear
Action:
1) When within 2 stagebuilder blocks of an opponent, Zira will pounce onto them, rolling allong for 3 stagebuilder blocks. If this rolling takes them off-stage, she will keep hold of the foe and suicide with them. If not, she will knock the foe away, dealing 15% and decent knockback.
2) At random points when not in range of an opponent, Zira will run while carrying a flaming torch for 3 stagebuilder blocks. The torch ignites the ground as she runs, creating flames as tall as Ganondorf that deal 10% damage and average knockback on contact. The flames last 3 seconds
Lasts for...: 25 seconds.


Shemp Howard
Appearance: Shemp dashes straight towards the closest foe
Action: When within 4 stagebuilder blocks of his target, Shemp will come to a screeching halt and throw mothballs to the ground that cover an area equal to DK's width. He then hides in the background with a pipewrench. Once a foe is near enough to Shemp, he will leap out and strike them on the head, dealing 15% and knocking them into the mothballs, which then trip the opponent up.
Lasts for...: If Shemp cannot reach his target within 15 seconds, he will give up without setting the trap. But once set, shemp will wait as long as it takes for someone to approach his trap.


The Chuckolator
Appearance: The chuckolator stands in place, occasionally jumping at random to a new platform.
Action:The chuckolator performs these two actions before leaving;
1) The Chuckolator slashes 5 times, creating 5 balls of goo that behave like hotheads. The Chuckolator may jump to a new platform between slashes. On contact with a ball of goo, the opponent will suffer 15% damage and grow a flower on their head (as if hit by Lip's Stick)
2) The Chuckolator fires one small bubble out of its straw that homes in toward the nearest foe at the speed of ZSS' dash. The bubble lasts until it moves as far as Ness' PK thunder can, and deals 21% damage on contact.
Lasts for...: The Chuckolator vanishes after the bubble he blows out has dissapeared.


Sydonay
Appearance: Sydonay does not move from the spot he was summoned unless he is attacked. If attacked, Sydonay transforms into a large beastly monstrocity and flies directly towards the player who hit him.
Action: Upon reaching his target after transforming (Sydonay can switch targets at will) Syonay will perform one of three attacks at random;
1) Sydonay slashes forewards with one of his claws. This attack has good priority, low start lag and great range. It deals 12% damage and medium knockback to whoever it hits
2) Sydonay grabs in front of him quickly. If he manages to grab someone, he'll immediately toss them away, dealing 20% damage and high knockback.
3) Sydonay fires a blue energy blast that is as large as an aura sphere. It travels as fast as one of Falco's lasers. Upon hitting the ground or a character, it explodes, dealing 25% damage and good knockback to anyone in range.
Lasts for...: Sydonay leaves after 10 seconds if he is not attacked. In his beast form, he leaves after 15 seconds.


Hecate
Appearance: Hecate floats up to the top of the stage, points her staff downwards and says "Aster"
Action: Hecate fires a ball of energy as big and fast as Samus' charged shot, downwards. This deals 25% damage and spikes on contact. After 0.5 seconds, the ball of energy shatters into 5 lasers (all the size of ROB's lasers) which scatter in different directions but all rain downwards. These lasers deal 18% damage and low knockback. After another 0.5 seconds, each laser shatters again into 6 smaller lasers, each the size of Falco's laser. These lasers deal 10% damage and low knockback on contact. At most, these lasers cover the entire width of Battlefield.
Lasts for...: Hecate leaves shortly after all the lasers have hit the floor or left the stage


Fefnir
Appearance: Fenfir moves as is typical for roaming assist trophy, he chases loosely after the nearest foe and attacks randomly when in range. He has a single jump and no recovery options.
Action:Fefnir performs the following 4 attacks at random;
1) Fefnir fires 5 small bolts rapidly out of both arm cannons. They travel, at an average speed, the width of Final Destination and deal 3% damage and low knockback on contact.
2) Fefnir charges a brutal punch (the level of charge is random) forewards which deals 20% damage and high knockback. If he decides to fully charge this, he fires a bomb forewards. It behaves as a single hit Smart Bomb on contact with a foe or the ground. At random, the bomb is fired downwards, creating a mine that explodes 3 seconds later. The bomb deals 20% damage and high knockback,though the mine launches the foe upwards.
3) Fefnir fires a large fireball, the size of himself forewards. The fireball deals high horizontal knockback and 10% damage on contact. If the fireball hits a wall, it will travel up it, leaving a trail of fire behind it that lasts 3 seconds.
4) Fefnir fires a large fireball downwards. This creates a trail of fire that extends 5 stagebuilder blocks wide and lasts 3 seconds. The fire trail deals 10% damage and great knockback
Lasts for...: 20 seconds


Lady VashJ
Appearance: Lady VashJ, forms a sparkling bubble shield around herself. If no target is within range of her attacks, she will slither towards the nearest target, though she cannot jump
Action: Lady VashJ fires frost arrows with the same speed, range, damage and charge properties of Link's arrows, though she can angle her shots in any direction. She will fire an arrow whenever she is capable of hitting with it. On contact, the arrows will also cut the foes' movement speed by 70%.
Lasts for...: Lady VashJ will last 45 seconds unless 20% damage is dealt to her. She cannot be damaged until her mana shield is depleted. Her shield has 120 mana and firing an arrow drains her of 8 mana. Without a mana shield, her frost arrows become regular arrows.


Xane
Appearance: Xane morphs in place. Taking 3 seconds to transform
Action: Xane transforms into the nearest character, then behaves like a Lvl9 character, attacking foes (Xane behaves more offensively than regular Lvl9s, being completely invincible)
Lasts for...: Unless 20% damage is dealt to him during the first 3 seconds, Xane lasts for a full minute


Wild PROF.OAK
Appearance: Wild Professor Oak simply stands motionless in place (his appearance is that of a sprite)
Action: Wild Professor Oak drops 2 pokeballs per second. They open upon landing and contain pokeon that attack anyone. Any pokemon can be found inside, including the following glitch pokemon;
1) LM4: LM4 evolves into a Clefairy which performs a random attack (choices of attack similar to Clefairy in melee). LM4 then evolves into Nidoking, who punches away anyone nearby for 3 seconds (30% damage + extreme knockback)
2) PkMn: PkMn dashes across the screen lightening fast 20 times. Every 5th pass will cause flinching to a random player
3) Charizard 'M: Charizard 'M causes every players' damage to rocket up to "#&9"% for 8 seconds. Any hit a player suffers during this time will KO them regardless of whether or not any knockback was suffered. Any pokemon released when Charizard 'M is active will ecome Charizard 'M's themselves.
Lasts for...: Wild PROF OAK flickers out of existance after dropping 8 pokeballs.


Anton
Appearance: After a brief pause, Anton teleports directly in front of the nearest targetable opponent while saying a quote. The quote he speaks depends on the attack he chooses to use
Action: Anton performs one of 5 combos entirely at random;
1) Anton stabs foreward, causing any opponent he hit to bleed 1% damage per second for ten seconds. He then spins, dealing 2 hits of 7% to any foes either side of him. These strikes ignore shields. Finally, Anton stabs forewards twice, dealing 2 hits of 7%. Shortly after Anton hits a foe with each strike, that foe and anyone within 3 stagebuilder blocks of them will take 10% damage. This effect does not occur if Anton misses
2) To begin, Anton tries to throw a shroud over the foe in front of him. If it hits, the foe will be cursed by a Hex that renders them incapable of moving for the rest of the combo. Anton then strikes foreward, if it hits a foe suffering under any kind of Hex, they will suffer 6% damage and become poisoned for 30 seconds (losing 1% every 3 seconds). He then spins twice around himself, striking foes either side of him and dealing 2 hits of 20%. Foes hit by this will bleed 1% damage every second for ten seconds. Finally, Anton raises his hand in front of himself, every foe in the battle who is poisoned or afflicted by a poison mushroom, will take high vertical knockback (the range of this final strike is infinite)
3) Anton stabs forewards quickly, dealing 10% damage to anyone he hits. If the foe had less than 30% damage, they will suffer an additional 20%. Anton then strikes in front of him again, dealing 10% damage. This strike instantly breaks shields. Finally, Anton stabs towards the nearest foe twice, dealing 2 hits of 10%. These strikes cannot be dodged but can be shielded
4) At the start of the combo, Anton curses his target with a Hex. If that foe is KO'd before the end of the combo, the summoner is healed 20%. Anton then strikes down at the ground with his hand, forcing anyone he hits into the "knocked down" status. Immediately after, Anton will jump onto his target and stab them with both daggers (unless the foe is not knocked down) dealing 10% damage and poisoning them for 30 seconds (losing 1% every 3 seconds). Anton then strikes forewards twice, dealing two hits of 10% and knocking the foe down again. Finally, Anton picks the knocked down foe up and stabs them, dealing 10% damage and high knockback away from him
5) As Anton teleports to the foe, they will be instantly stunned unless they dodge it. Anton then throws numerous daggers in different directions, that travel half the width of Final Destination and deal 10% damage. The targetted foe will be struck by 3 of these daggers, although each of them will only deal 5% damage. If the previous attack lands, Anton then knocks the foe to the ground dealing 10% damage and badly poisoning them for 15 seconds (losing health every 3 seconds. The amount lost starts at 1% and doubles every 3 seconds). If the foe is knocked down, Anton then forcefully stabs them, dealing 10% damage and healing the summoner 10%. Finally, Anton strikes twice either side of him dealing two hits of varying damage. The damage he deals is equal to 1/4 of his target's current damage
Lasts for...: Anton teleports away immediately after performing his chosen combo


Metal Sonic
Appearance: Metal Sonic flies around, cycling between pointless roaming and actual attacking. When attacking, Metal Sonic flies to the best place to use the move.
Action: Metal Sonic can perform two moves. The move he uses, is mainly determined by which would be the most helpful to the summoner.
1) Metal Sonic lands and performs a spin dash across the platform. This fast attack will deal 20% damage and good knockback in the direction he is moving.
2) Metal Sonic attempts to grab the nearest foe, flies away from the stage and drops them. Foes can escape from this like a normal grab, though they will not regain any jumps when released.
Lasts for...: 13 seconds


Rem
Appearance: Rem perches in the background where he was summoned and does not move
Action: If the summoner is hit by a high knockback move, the player who attacked will be targetted by Rem's Death Note. 40 seconds later, the foe will suffer a heart attack (it can be spot dodged) that deals 28% damage and huge vertical knockback.
Lasts for...: 30 seconds unless the summoner is hit by a high knockback attack, in which case Rem will dissolve into a pile of sand that lasts for 30 seconds. The sand beccomes part of the stage during this time and is roughly the size of Wario


Chip
Appearance: Chip waves at the camera then flies to the middle of the highest platform of the stage. If a player approaches him he will motion them to stop.
Action: If a player stops near Chip, he will give them some chocolate then leave after a brief pause. The player will then gain greatly enhanced running speed and reduced eng lag on attacks for 8 seconds. Afterwards the player will suffer a "crash" which slows the player's running speed and increases end lag for 6 seconds.
Lasts for...: 7 seconds, or until he hands out some chocolate


Laser Ball
Appearance: After a brief moment of floating upwards, Laser Ball will begin drifting towards the nearest targetable opponent.
Action: Laser Ball can perform 2 attacks at random
1) Laser ball fires three small energy beams foreward that deal 3% damage and flinching
2) Laser ball pauses for 2 seconds then fires a much larger energy beam foreward. This beam deals 10% and Low/Mid knockback. After this, Laser Ball will explode (explosion the size of kirby). Anyone hit will suffer 15% damage and Mid/High knockback
Lasts for...: 9 seconds


Asha
Appearance: Asha strikes a pose and laughs. He then rapidly teleports around the stage randomly, creating sparks of light as he does so
Action: Asha will stop his teleporting to perform one of 4 attacks at random.
1) Asha appears behind a random foe and swings his red sword at them. Short range hit dealing 12% damage and high knockback
2) He appears on the same platform as a random foe pointing his gun foewards. After 1 second he will fire a constant beam of energy forewards, lasting 1 second. The beam can be ducked under and deals 14% with medium horizontal knockback
3) He appears above a random foe and falls into them with his sword pointing down. Deals 12% and knocks the foe to the ground/trips them up
4) Asha appears high in the air and throws 5 laser blades, each the size of kirby, downards in random directions. They fall at Link's speed, dealing 12% and high hitstun on contact
Lasts for...: Asha teleports away after performing a single attack.


Boom Boom
Appearance: Boom Boom charges left and right on the platform he was summoned on. After suffering 17% damage, he will duck into his shell briefly then sprout wings and patrol the width of the stage in the air
Action: Touching Boom Boom's flailing arms deals 16% damage and high knockback. If airborne, Boom Boom will randomly swoop down towards the nearest foe. If a foe touches him as he swoops they will take 12% damage and decent knockback.
Lasts for...: 17 seconds, or until he has suffered 29% damage


Quendan
Appearance: One of two cheerleading squads will cheer in the background from where they were summoned
Action: The summoner's attacks will deal double damage during the cheer
Lasts for...: 7 seconds


Mina Lowe
Appearance: Mina dashes around in the background as fast as Captain Falcon's run. She will run towards the nearest opponent that is holding an item, though she cannot jump
Action: When passing near an opponent with an item, Mina will snatch it from them and throw the item in a random direction.
Lasts for...: 20 seconds


Winry Rockbell
Appearance: Winry stands in place from where she was summoned, turning to face the nearest opponent.
Action: Winry tosses wrenches in a way similar to a Hammer Bro (with the same properties on contact). She can't jump, but she will clobber opponents that are in her face with a wrench, dealing 20% damage and high knockback. She reacts differently to neaby robotic characters. She will fix them up, healing them 5% every second.
Lasts for...: 20 seconds


Hanpen
Appearance: Hanpen will busy himself constructing a bathtub like structure out of fishcakes
Action: Hanpen creates the head of the tub first, then moves a random distance either side of him and creates the foot of the tub. The head and foot fishcakes are the size of Hanpen. He will then summon two more fishcakes that act as the bottom of the bathtub (their width adapts to the size of the tub). The tub will then fill up with Soy sauce. If an opponent presses A near Hanpen after he has finished filling the tub, they will eat his head, healing 25% damage and killing Hanpen. The bathtub can be swam in, healing 1% every two seconds, but players will drown ten times as fast as if swimming in water.
Lasts for...: 2 seconds after filling the tub with soy sauce


Polly Roger
Appearance: Polly Roger will fly back and forth in the air
Action: Polly performs two attacks at random. The second atack is rarer than the first
1) Polly excretes from his position in the air. Anyone touching the dollop as it falls will suffer 3% damage and light hitstun
2) Polly begins following a random opponent closely, then pecks them after 3 seconds. The peck poisons the foe, dealing 5% damage per second for 10 seconds.
Lasts for...: 30 seconds


Junior
Appearance: Junior will sit in place inquiring about his missing teeth. 5 teeth items will also spwan at random places on the stage
Action: The teeth themselves deal 7% damage and low knockback when thrown. When thrown at Junior, he will catch the tooth and put it into his mouth. If all 5 teeth are returned to him, he will dash left and right aross the stage, chomping wildly. The only player Junior won't damage is the one who threw the last tooth. Each chomp from unior deals 2% damage, but has a piplup effect, dragging them along for more hits (dealing 30% with ease)
Lasts for...: 30 seconds. He will also vanish after 10 seconds of chomping.


O.J Simpson
Appearance: After standing around for a short while, OJ will exclaim his murderous intent and them chase after his target (either the player with the lowest damage, or the nearest female)
Action: OJ rapidly slashes his knife while chasing after is target, dealing 4% damage and low knockback to anyone caught up in it. If he hits his target with the slashing, he will perform a more deliberate strike on the stunned foe, dealing 25% damage and amazing knockback. Afterwards, OJ will spawn a white Bronco, which he drives off the stage. Anyone hi by the Bronco will suffer 10% damage and reasonable knockback.
Lasts for...: 25 seconds, or until he drives off the stage


Wise Man Monoshiri
Appearance: Wise Man stalks the nearest female character around, cheering them on (he can't jump, but he can at least cheer them on from afar)
Action: N/A
Lasts for...: 20 seconds. Wise Man will also leave if there are no female characters to follow
 

Kholdstare

Nightmare Weaver
Joined
Oct 10, 2008
Messages
1,440
Guys...

How about you tell him how he can make a correct moveset instead of mocking him with sarcasm?

plzkthxbai
 

Sun-Wukong

Smash Journeyman
Joined
Nov 24, 2007
Messages
392
Location
Eastern Kentucky
I'm working on a new move set, as the inspiration just hit me like a sack o' bricks a few hours ago. I'll give you a hint, the character is a minor villain from a cartoon based on a comic book. It'll be the last one you expect though...

Also, I gave up on Dante and Randel, there just wasn't enough to work with. I doubt anyone was eagerly awaiting it, but sorry anyway.
 

Red Arremer

Smash Legend
Joined
Nov 27, 2005
Messages
11,437
Location
Vienna
Guys...

How about you tell him how he can make a correct moveset instead of mocking him with sarcasm?

plzkthxbai
Sorry, I'm not going to post the same every 2 pages. He should have read THE RULES IN THE FIRST POSTING and at least one of the sets ON THE FIRST PAGE.

It's not too hard, isn't it? This moveset does not fit the requirements, despite them being in the OP. If he'd have forgotten one single move, no biggie, but he forgot whole sections, and made no descriptions at all.
 

KingK.Rool

Smash Lord
Joined
Nov 26, 2005
Messages
1,810
Very nice, Junahu! It almost makes ME want to make an AT, and considering my aversion to extras, that's quite an accomplishment!

Guys...

How about you tell him how he can make a correct moveset instead of mocking him with sarcasm?

plzkthxbai
:laugh:

When KHOLD of all people tells you to be civil, you know you've got a problem. :laugh:

So... I'm reading Alphonse. Finally. I figure I owe Warlord that for reading all of MY movesets (although, in my defense, I have less than half his number). In fact, I do believe I'll be going back and reading quite a few of the movesets I've missed over the following weeks; I want to be able to make some logical and informed votes, after all.

Right off the bat, I think the organization's a tad dry. I confess, I don't like the use of actual pictures on either side of the headers; they're quite a bit taller than the letters, and look awkward. And as I said, the greys are really drab and boring, and, combined with all the walls of white text, really make it a tough set to approach.

But approach I will...

The Transmutation Circle mechanic, right off the bat, sounds incredibly complicated but incredibly cool. The use of it in Transmute - which is probably one of the most complicated attacks I've ever seen, with how much it does - is really, really cool. Side B is kinda like Shellder's Clamp, I note, but probably better implemented - although it actually strikes me as quasi-useless, with how much damage you take from it.

Y'know, this kinda reminds me of Cervantes. Al is ridiculous if he has a few Circles, but they're laggy to set up and tricky to make the most of. The only difference appears to be that the rest of his moves rely far more on the use of them.

One thing that strikes me with the tilts is that they're quite situational. Up Tilt seems basically useless unless you're facing water or using fire and have pulled off a Side Special. Forward Tilt is useful is friendly fire team battles and mirror matches only. And so on.

I love how Forward Smash is a nod to Headless Horseman, right down to the name. Good job condensing the mechanic of a whole moveset into one attack. This attack also somewhat reminds me of Cortex & Tiny.

As I read on, Side Special makes more and more sense.... hmmm...

I'd call Up Air "Pyre Columns" or something like that. Nothing to be done about the Pokename in the Down Air, I guess.

The chain throw is incredibly cool. Like, unbelievably so. Like, one of my favorite throws, ever.

Your bias to your heavyweights seeps into the set yet again, with the incredibly favorable matchup with Ganondorf. :laugh:

You know why I love this set? Two reasons, really. Firstly, it's just SO dedicated to its mechanic. It makes for an overcomplicated character, yeah, but hey, this isn't Brawl, this is MYM. Secondly, I love the attacks that show off the moveset potential of a plain ol' suit of armor. Great stuff.

My favorite of yours? Maybe. One of the best in the contest? Too soon to call, but I have a feeling that the voting period will be kind to good ol' Al.
 

BKupa666

Barnacled Boss
Moderator
Joined
Aug 12, 2008
Messages
7,788
Location
Toxic Tower
Nice AT list, Junahu! I love how all my old ATs had two or three random effects.

If someone did this for the stages, I'd probably **** in my pants.
 

Red Arremer

Smash Legend
Joined
Nov 27, 2005
Messages
11,437
Location
Vienna
I forgot to comment on it... very good work with the AT list, Junahu. You always have neat ideas for improving the experience of MYM.
 

Darkslash

Smash Master
Joined
Feb 1, 2008
Messages
4,076
Location
Strangereal Equestria
The list is awesome, despite it being incomplete. The question is are you going to keep it on page 112, or are you going to find a way to put it on a page near the OP. I know most people don't read the O.P much these days, but scince the Assist Trophies are from every one's sets, the list should possibly be put in the OP it's self.

Just a suggestion, if you don't like it, then thats okay ;)
 

Heartz♥

Smash Legend
Joined
May 18, 2008
Messages
10,443
Location
Virginia
Wow, so you guys can post AT movesets? It may be a bit easier for one to do since normal movesets take so long. That is actually a great list. Darknut would be pretty awesome.
 

Wizzerd

Smash Ace
Joined
Feb 24, 2009
Messages
929


Tingle

Tingle is a recurring character in the Legend of Zelda franchise. He first appeared as the map-seller in The Legend of Zelda: Majora's Mask. Due to Japan's love of him, he reappeared in minor roles in The Legend of Zelda: Oracle of Ages, The Legend of Zelda: The Wind Waker, The Legend of Zelda: Four Swords Adventures and The Legend of Zelda: The Minish Cap. His popularity in Japan led Nintendo to release Freshly Picked: Tingle's Rosy Rupeeland, where Tingle was the protagonist. Rosy Rupeeland was only released in Japan and Europe due to his lack of popularity in America. Another game, Tingle's Balloon Fight DS, was released in Japan.

Tingle is 35 years old and has made no progress in life, but he is convinced that he is the reincarnation of a fairy. Thus, he always wears green fairy clothing, and he loves Link for wearing his green clothing and having pointed ears. He even has magic words: "Tingle! Tingle! Kooloo-Limpah!"

As such, as much as some hate to admit, Tingle is a very likely candidate for SSB4. Despite his lack of popularity in America, Tingle has massive popularity in Japan and he will continue to be a very important character.

$ Kooloo-Statistics! $

Attacking ~ 4
Defending ~ 8
KOing ~ 5
Movement Speed ~ 6
Traction ~ 2
Range ~ 9
Attack Speed ~ 4
Priority ~ 4
Fall Speed ~ 2
Recovery ~ 7
Size ~ 7
Weight ~ 3
So Tingle isn't the sharpest pencil in the box as far as statistics go. He has great range, and he plays very well defensively, but everything else is...meh. However, this doesn't account for Tingle's exceptional stage control. Tingle's tricks can make him difficult to approach, and he is wonderful at gimping. His tricks enable complex combos and strings. Tingle is difficult to harness, but not necessarily bad.

$ Kooloo-Animations! $

Symbol

A single Rupee represents the universe of Tingle's Rosy Rupeeland.

Wiimote Noise
"Tingle, Tingle, Kooloo-Limpah!" These are the magic words that Tingle created himself. Don't steal them!

Entrance
Tingle lowers to the stage leisurely on a balloon, but the balloon suddenly pops, and Tingle defies gravity for a moment before falling to the ground flat on his face.

Crowd Cheer
The voice of Pinkle, Tingle's assistant and love interest in Tingle's Rosy Rupeeland, call's out Tingle's name in a feminine, seductive voice.

Basic Stance
Tingle stands on the stage, occasionally fidgeting or glancing innocently at the screen.

Idle Stance
Tingle does a pirouette and ends with a flourishing pose with one arm up and one leg stretched out.

Walk
Tingle gingerly treads forwards on the tips of his feet.

Run
Tingle, still treading on the tips of his feet, begins to run at a mediocre speed.

Dash
Tingle jumps onto a magic carpet, dramatically increasing speed from his run. This has above average speed for a dash.

First Jump
Tingle hops up a decent distance.

Midair Jump
Tingle twirls in midair, spreading flower petals as he does so. This covers a bad distance vertically but it could cover a good distance horizontally.

Crouch
Tingle turns his back to the screen and ducks his head to look between his legs. Surprising lowness to the ground considering his size, but he's still combo fodder in this state.

Shield
Tingle does a pirouette as he summons his shield, continuing it as long as the shielding button is held down.

Rolldodge
Tingle does an acrobatic flip to the side. Lasts a while and covers a good distance.

Spotdodge
Tingle miraculously moves into the background while still pirouetting, and moves back to the foreground. Good length, but a bit slow.

Airdodge
Tingle spreads a bunch of flower petals like in his second jump, but this time there are many more of them. You can't see how Tingle is dodging attacks which come his way. The flower petals stay out for a bit after using this dodge, obscuring Tingle's actions but also those of his opponents.

Dizzy
Tingle crosses his legs while standing up, bobbing to the sides as his eyes spin.

Asleep
Tingle somehow finds a four-poster bed to lie down on drooling as he rests.

$ Kooloo-Specials! $

Neutral Special ~ Tingle Bomb
A balloon blossoms on Tingle's back, and it hoists Tingle upwards the distance of two Stage Builder Blocks. A cel-shaded bomb appears in Tingle's hands as he travels up. The entire animation lasts about half a second. Once Tingle has lifted into the air, he is free to move in either horizontal direction, at the speed of his slow run, for three seconds, to cover about 2.5 Battlefield platforms. After three seconds pass- you cannot drop the bomb early- the bomb drops, exploding after reaching the ground or dropping more then two Stage Builder Blocks, and Tingle falls down to the ground for some ending lag as he composes himself from the fall. The explosion will deal 16% and good knockback. If he used it in midair, then he instantly throws the bomb down for only a mild vertical boost. Also, if used in midair, it can only be used once before reaching solid ground, though it does not induce a helpless state.

This may sound like the new Mach Tornado, but it has something holding it back. It deals damage to Tingle. The first time each stock it is used, it doesn't do anything harmful to Tingle, but for each subsequent use, it does 3% more- that is, second use does 3%, third use does 6%, et cetera- maxing out at 15%. In addition, for each 3% dealt by the blast, Tingle takes some small knockback, but this could seriously add up to a self-KO by 5 uses or so. There's a 5% chance that Tingle will be dealt ridiculous upwards knockback, like when Jigglypuff's shield is broken. Do not use this at high percentages.

Tingle Bombs are quite versatile tools. They are effective ways to pressure or approach, and they work as KO moves. They are powerful albeit hard to land edgegarders. Since Tingle rises into the air when he uses them, he is hard to hit while he uses this, so it can be used to play defensively. It can shut down approaches too. But there's a cost for such a versatile move. Tingle is safe the first time he uses it, but each time after he will steadily weaken himself. It's best to use it only 3 times a stock, and only if you need it, because you do not want a one-hit KO, even if it's only a 5% chance. Be very careful with how you dispense this powerful move.

Side Special ~ Bodyguard
Tingle could fight well enough for himself in Rosy Rupeeland, but he could hire bodygurds for extra protection with his ample rupees. For the animation for this move, Tingle pulls out a burlap sack, holding its mouth ahead of himself for a second. For this second, any Rupees onstage summoned with Tingle's Neutral Attack will be drawn into the sack, even if they are all the way across the stage. This does nothing if Tingle has no Rupees.

Once a second passes, Tingle dumps all of his Rupees out, adding all of their values together and coming up with a total amount of Rupees. Then he obtains the most expensive bodyguard in the list below which he can afford, then pours out all of his extra Rupees. This part of the animation is negligibly short, as the bodyguard appears once Tingle dumps out the Rupees. If Tingle cannot afford any bodyguards then the move ends here, but it can still be a convenent way to get all of your Rupees in one place.

Bodyguards essentially act as weak Assist Trophies. Upon appearing, they all have a unique effect they use to attack. Also, it's worth noting that each time you use a bodyguard in a match, their prices rise by ten Rupees, stopping once the prices reach 100 Rupees. This could screw you over if you use a weak bodyguard too much, as their prices might make you pay more for a worse bodyguard!

10 Rupees ~ Zuzu
Zuzu is the cheapest bodyguard money can buy, so he isn't *too* powerful. Upon appearing, after a half-second of startup lag, Zuzu rushes forward while flailing his arms. Zuzu will travel half the distance of Final Destination at the speed of Mario's dash. He stops and turns around, then completes the rest of his dash if he meets a ledge. Contact with him in this state does 12% and below average horizontal knockback. Obviously Zuzu is quite weak, but he works well as an approach, and it can counter pressure as well. Zuzu really isn't good for any one thing, but he's versatile enough to be moderately useful.

30 Rupees ~ Victoria
Victoria is a good defensive option. Upon appearing, she follows Tingle for ten seconds before disappearing. During this period, if any opponent of Tingle walks within a Stage Builder Block of Tingle, Victoria rushes up to them and performs a rapid sword slash, dealing 14% and average knockback. Obviously, no opponent will be stupid enough to walk up to Tingle while he has Victoria hired, so Tingle should bring Victoria to them. This makes Victoria good for pressure, whether it's Tingle or the foe pressuring.

50 Rupees ~ Gixx
Gixx is one of the most powerful bodygards, but he cannot move. Upon being summoned, Gixx stays on the stage for fifteen seconds in place before disappearing. If any opponent walks within 1.5 Stage Builder Blocks ahead of Gixx, he lunges forward with a powerful bite, doing 16% and very strong upwards knockback. It's very difficult to get fifty Rupees, so try as best as you can to knock opponents into Gixx for an easy KO.

100 Rupees ~ Ronny
Ronny is dramatically overpowered, but he is extremely difficult to get. The only way to get 100 Rupees is to somehow manage to get five Red Rupees, and that's unrealistic. Maybe by the end of the match you'll have amassed enough to hire Ronny, but it's really unlikely, especially since your opponents can knock your Rupees offstage.

Anyway, upon appearing, Ronny will begin to run towards the foe and jump to them if they are in midair, for fifteen seconds. If he reaches an opponent on the ground, he powerfully punches them with a bit of startup, doing 24% and unholy knockback. In the air, he uses a sexkick attack that does 18% and great knockback. If you somehow manage to get Ronny, it's a given that all opponents have lost a stock.

Up Special ~ Tingle Balloon
After a bit of startup lag, a balloon magically blossoms above Tingle, like in his Neutral B, but this time Tingle doesn't stop- he floats up, and up, and up. Tingle floats at the speed of Mario's dash, covering a vertical distance of Lucas's PK Thunder 2 before the balloon pops. Tingle does not go into helpless after using this move, but he will not be able to use it until he touches solid ground again. Opponents can attack the balloon to make the move end early. This coud be difficult, however, as Tingle can use any aerial out of this move. However, if Tingle uses an aerial, then the balloon pauses during the duration of the move, causing less distance to be gained. Generally this isn't a problem since Tingle's aerials are usually quick, but trigerring the long animation of his Forward Air could be a terrible mistake.

Down Special ~ Tingle Shield
Tingle begins to summon his shield with a normal animation, but something functions wrong: the shield starts out small and grows! Not to mention that there's some startup lag before the shield appears. The shield takes the same amount of time to grow to full size as a normal shield takes to fully shrink without being attacked, around three seconds. Tingle will begin to glow when the shield is at its full size.

Once this move is released, the shield appears, right there on the stage where Tingle initiated the move. The shield acts like any other natural shield, except not attached to any character. That means that if attacks hit it, they automatically stop, only shrinking the shield exactly as a normal shield would have shrunk. Tingle, by using this move on a shield he has already summoned, can expand the shield at his normal speed, though you should keep in mind that the shield can't get any bigger than a regular shield.

This has a few notable effects that are not in normal shields. It automatically reflects energy-based projectiles, making it an effective tool against Pit or ROB, especially since their range makes them some of Tingle's worst matchups.

$ Kooloo-Standards! $

Neutral Attack ~ Kooloo-Limpah!
In a half-second animation, Tingle sticks out his two arms, each after the other. After this second, Tingle can hold in the move for up to three seconds. After releasing the charge, Tingle quickly lets out his trademark "Kooloo-Limpah!", making various flowers and sound waves pour out of him wih a short animation. The entirety of this attack does no damage, but using it summons a small Rupee below Tingle. The Rupee acts as a weak throwing item.Rupees can stay on the stage infinitely, but they disappear once thrown. Tingle is the only one who can pick up Rupees, but other characters can knock them away with attacks. And remember how he could hold in the attack earlier? The longer he holds in the attack, the higher the grade of the Rupee, and the more powerful the Rupee is.

  • Green Rupees appear with no charge. They can be thrown for 3% and slight flinching.
  • Blue Rupees appear with a one second charge. They do 5%, with more knockback and hitstun the greens.
  • Yellow Rupees appear with a two second charge. They do multiple hits for up to 9% with electric properties, but no knockback.
  • Red Rupees appear with a three second charge. They do 12% with fire properties, and strong KOable knockback.

Notably, some of Tingle's attacks require a certain amount of the Rupees. Each Rupee has a total value that is used to calculate this. If you've played any Zelda you should know them already, but if not they are:
  • Green Rupee- 1
  • Blue Rupee- 5
  • Yellow Rupee- 10
  • Red Rupee- 20

Dash Attack ~ Fairy Dust
From his dash on the magic carpet, Tingle finds a small bag with some lag, and spreads the yellowish contents behind him as he still dashes. This forms a cloud of yellow dust, the height of Kirby but about 1.5X Kirby's length. If any opponent happens to walk into the cloud, they uncontrollably are lifted up the distance of three Stage Builder Blocks and put into a helpless state, as well as taking 6% damage. Projectiles will be deflected upwards by the cloud. Tingle can jump thrice the normal height with a grounded jump inside of the cloud. This is Tingle's best option to get foes into the air.

$ Kooloo-Tilts! $

Side Tilt ~ Olive Branch
Tingle, with a bit of startup lag, takes a short olive branch out of his suit and pokes it ahead of him, holding it out for a second. On contact it deals 6% and small set knockback, with little range and poor priority for a disjointed attack. The speed, and the ability to angle it slightly, make it decent for shield poking but useless for all else...

...or so you think. The olive branch is a symbol of peace, and so, if any opponent uses an jointed attack which connects with the olive branch, instead of performing the attack they shake Tingle's hand. Admirable, no? Well, no, because after a second of hand shaking Tingle unexpectedly pokes the stick out, doing 9% and stronger but still slightly weak horizontal knockback. This is ideal for pushing your opponent into a trap, or to counter comboes.

This is good to throw out occasionally, but using it too much makes it very predictable. The startup lag can be efficiently counterattacked, and during the short period when the olive branch is out Tingle can be grabbed. Overall, this is good to use once in a while, but Tingle becomes very vulnerable if he uses it too much.

Up Tilt ~ Torchlight Trouble
Tingle uses his trademark "Kooloo-Limpah!", in a moderately punishable animation which looks exactly the same as the Neutral A, without the option of charging. After the flowers clear from the stage, a Zelda series torch, as seen above. The torch is the height of Mario, but only the width of Squirtle. It disappears after twenty seconds, and only one can be on the stage at a time. It only has 15 stamina.

However, you'd be hard-pressed to take away stamina from it, as merely touching the flame deals 12% and strong, KOable upwards knockback with fire properties. Shorter characters like Kirby, however, can safely walk underneath the flame. As a rule, characters generally can avoid the flame, meaning that you should connect it in a combo to get it to land. Side Tilt can efficiently get opponents into the flame, as can many of Tingle's quirky throws and his Forward Air.

Torches are some of Tingle's most useful traps. Planting a torch in the right place can be a boon to Tingle's game. Perhaps you could put it in an area where it can knock people into other hazards, or higher parts of the stage to make star KOs easier. An evil tactic is to plant it by the ledge, making it harder to recover. Using ingenuity, torches can do very many things for Tingle's game.

Down Tilt ~ Kinstone
Tingle finds a small Kinstone, the size of a Pokeball, in the space of a half-second. Kinstones can be either red, blue, green or gold. The first three have a frequency of 30%, but the golden one is rare, having a frequency of only 10%. The Kinstone will then become a weak throwing item. The first three do 3% and very low knockback with poor range, and golden Kinstones do 5% and a bit more knockback and range. Obviously, this is near useless- the strength in Kinstones is in fusing them.

By using the Down Tilt over a Kinstone, or using the move with a Kinstone in Tingle's hands, the Kinstones will fuse together in an animation lasting a second. Doing this results in a new, unique Kinstone. Each combination of colors will result in a different Kinstone.

  • +
    = Red Kinstone-A Kinstone with below average range, but 8% and decent knockback with fire properties.
  • +
    = Purple Kinstone- A basic, versatile Kinstone which can be thrown to deal 7% and low knockback, with average range.
  • +
    = Dark Green Kinstone- A Kinstone which has bad range and low knockback, but 9% and good hitstun on contact.
  • +
    = Orange Kinstone- A Kinston which can be thrown for above average range and only 5%, but surprising knockback.
  • +
    = Blue Kinstone- A Kinstone with only 5% and poor knockback, but exceptional range.
  • +
    = Blue-Green Kinstone- A Kinstone with good range and 12%, but no knockback whatsoever.
  • +
    = Pearl Kinstone- A Kinstone with good range, which slows the opponent like the effect of a Stopwatch for ten seconds.
  • +
    = Green Kinstone- A Kinstone which can't be thrown far at all and has bad throwing speed, but does 12% with good knockback.
  • +
    = Gold Dust Kinstone- A Kinstone which dissolves into dust in a Bowser size cloud, which remains for a second, doing multiple hits for up to 15% but no knockback within it.
  • +
    = A Kinstone which can be thrown for great range, 14% and insane knockback. Cry broken if you want, but the odds of getting two golden Kinstone pieces are 1%.

Kinstones always are different and have random effects, but all are useful and can be used usefully. At a high enough skill level, you may even be able to make specific Kinstones, greatly boosting their effectiveness. Kinstones can be tricky to use but they are far worth it.

$ Kooloo-Smashes! $

Side Smash ~ Brawl
In Rosy Rupeeland. Tingle could fight enemies and rise up clouds of dust, like in old cartoons. Tingle utilizes this technique in Smash for his Side Smash. For the charging animation, Tingle comically scrapes his feet on the ground. The animation is subtle, and the first time you use it in a match your opponent may not know what Tingle is doing.

Once the charge is released, Tingle, with small startup lag, lunges forward the distance of a Battlefield platform. If Tingle does not manage to connect with his opponent, he falls on the ground, causing punishable startup lag. If he does, however, then he enters a comic brawl with his opponent, kicking up dust to obscure vision. As they brawl for about two seconds, an invisible meter, visible only to the programming, is above Tingle's head. By mashing buttons, Tingle and his opponent can push the invisible counter on the meter into the green and the red, respectively. Since you can't see the meter, all you know to do is to mash buttons as much as you can. At the end of the two seconds, Tingle tosses the opponent upwards in a high-knockback KO move, doing 14%. If the opponent managed to push the invisible counter into the red, they toss Tingle up for the same effect, which has a good chance of KOing the poor, lightweight Tingle.

Charging this move allows Tingle more headway on the meter when he begins to brawl. If he C-sticks the smash then the counter starts exactly in the center, but by charging the move, Tingle can get a good advantage on the counter, which can make it far easier to succeed unless you suck at button mashing.

This is a powerful finisher, and Tingle's best. In fact, it's probably the move Tingle will use to score the most KOs. What makes it very risky, however, is the possible effect of the opponent tossing you up. Try to practice button mashing in Training mode, or at least be sure to moderately charge this Smash. They won't know what hit them.

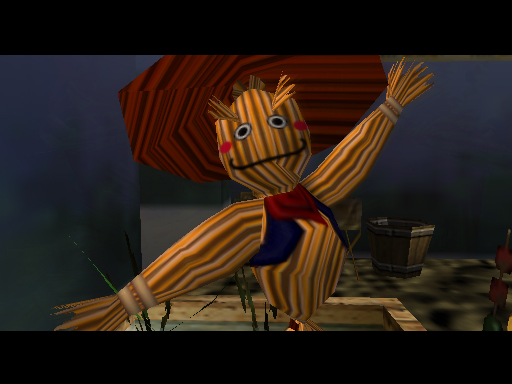
Up Smash ~ Scarecrow
As Tingle charges this trap, he does his Kooloo-Limpah from the Neutral A and the Up Tilt. Once the charge is released, a scarecrow is revealed as the flower petals clear. This move has small startup lag but a bit of ending lag. The scarecrow is the height of two Kirbys but only one Kirby of width. It has 10 to 25 stamina, depending on the charge. Only one scarecrow can be on the stage at a time.

The scarecrow itself does no damage, but while Tingle has a scarecrow out, using his Up Smash again will send him into an odd stance, with his legs crossed on the ground and his arms held outwards. It takes about a third of a second to enter this stance. By pressing any direction, Tingle can make the scarecrow attack in any direction. By tiliting the Control Stick to either side, the scarecrow will do a slowish punch to the side, with good range and 8% to 16% depending on charge, but below average knockback. Pressing the Control Stick down will make the scarecrow quickly slam its hands to the side, with bad range for each side but covering both sides, for 6% to 14% depending on charge. Finally, by pressing up, the scarecrow can do an uppercut, which has narrow horizontal range and has ending lag, but has good vertical range, does 9% to 18% depending on charge and knockback which could KO, though it would take a very high damage percentage. Pressing the B button makes Tingle exit the stance with some lag. He cannot exit it while the scarecrow is preforming an atack. Tingle can be punished during this animation.

The scarecrow's attacks are not as powerful as those used by Tingle, and they are usually a little slower. What makes this move worthwhile is the safety it grants. By planting a scarecrow in the right place, Tingle can effectively pressure and damage from a distance. It grants many other tricks for edgeguarding and attacking with dual strength. Scarecrows open up some very interesting options for Tingle; use them right.

Down Smash ~ Tingle Statue
For the charge of this move, Tingle begins to do his Kooloo-Limpah thing again. Once the charge is released, a small bust of Tingle is revealed. This has small startup lag but some ending lag. Only one bust can be onscreen at a time. The bust is a throwing item, doing 3% to 6% with very low knockback, disappearing after being thrown once. It has 15 to 5 stamina- wait, it loses stamina as you charge it? How useless.

...or so you would think. If any opponent of Tingle destroys the bust while Tingle is not holding it- Tingle cannot damage his own busts, and even if Friendly Fire is on, his allies in team battles cannot either- then Tingle will go on a mad rage. He will begin smoking out of his nose, and his face turns red, as he dashes at his usual 6/10 speed (not on the magic carpet this time, like in his real dash) forwards the length of two Battlefield platforms. Tingle can turn around in this state, then complete the rest of his dash. Contact with the hitbox of Tingle's body will deal 18% and very strong diagonal knockback.

This is one of Tingle's hardest, if not the hardest, trap to use. Obviously your opponents will shy away from attacking the bust, and you can't carry it around to use as a counter, since it can't be damaged while Tingle is holding it. The only real way to get it destroyed is to throw it into an attack, which is far easier said then done. However, if you manage to do it, your opponent is almost certainly KOd. This move is certainly difficult to use, but by no means useless.

$ Kooloo-Aerials! $

Neutral Aerial ~ Compass
In the space of a second, Tingle curls into a ball and spins around in place. After the second of lag, a small compass appears wherever Tingle initiated the move. The compass is slightly larger then a Pokeball. After twenty seconds pass, the compass disappears. Only two compasses can be onscreen at a time.

If any character- opponent, ally or even Tingle himself- walks into an area of Bowser around the compass, it instanty activates. The compass will not activate the first time Tingle creates it, since he then would automatically hurt himself. If activated, the compass rapidly rockets towards the character who walked into the radius, doing 6% and slight set knockback as it does so. The compass has no priority at all; any attack can outprioritize it, although you could be hard-pressed to find an attack quick enough. The compass will disappear upon hitting a character. If it travels outside of the area it could activate in, it disappears.

Compasses are some of the weakest of Tingle's traps, and they are a bit laggy as well. They're near useless on the stage- where they shine is off the stage. Compasses are excellent gimpers. Since you won't have the time to plant a compass while your opponent is recovery, it would probably be best to plant two compasses offstage whenever you can so that they can work properly.

Forward Aerial ~ Dungeon Map
Tingle, with minimal lag, pulls out a dungeon map and holds it before him, as a bunch of balloons sprout on his back. For the next second, by moving the Control Stick, you can draw a line which extends out from Tingle, which can be curved and looped in any direction. In the second the line extends to the length of 1.5 Battlefield platforms. Once a second passes, or you press the A button early, Tingle floats on his balloons at the speed of Mario's dash, except in midair, on the exact path he drew. The range is of course less if you press A early. Contact with the high-priority hitbox of Tingle's entire body deals 12%, with surprisingly strong horizontal knockback.

The most obvious use of this move is recovery. Tingle Balloon, his Up Special, does not put him into helpless, and it could give a great horizontal boost. However, this is also extremely versatile for other uses. You can approach and edgeguard with it, and quickly making a path around Tingle out of a shorthop could clear out some space in a Free-For-All. What you use this for is all up to you; use it in any way and it's sure to help somehow.

Back Aerial ~ Boss Key
Tingle miraculously finds a boss key, as seen above, from the Zelda series, in the space of half a second. The key is as big as Tingle himself, defying logic. Upon pulling out the key, Tingle circles it in a delibrate fashion for a second. The key itself does no damage or knockback, but after the ridiculous second and a half of startup lag, a Zelda series boss door emerges behind Tingle. The door is slightly shorter than Ganondorf but slightly wider than him in midair. The boss door, like all of Tingle's traps, remains onscreen for twenty seconds, and only one can be onscreen at a time.

If any opponent of Tingle walks into the door, they are instantly "grabbed" by being sucked into the door. This part of the move, of course, counts as a grab; it can be escaped at lower percents by button mashing. After "grabbing" anyone, whatever is inside the door roars and throws the character back in the direction they walked into the door from, doing 10% and below average knockback with fire properties. The opponent has all of the one-second-long roar to escape by button mashing.

This is really one of Tingle's worst traps. It's moderately difficult to land, and unlike most of Tingle's other traps, it doesn't have a spectacular effect to make up for it... on the stage. This move shines as a gimper. Used in conjunction with Tingle's Neutral Aerial, this is a quite excellent counter to recoveries.

Up Aerial ~ Hookshot
This is one of Tingle's few direct attacking methods. For this attack, Tingle whips out the hookshot, a Zelda series item, to attack. With low lag, Tingle quickly whips it above himself, covering a range equal to Zero Suit Samus's Up Smash. The hookshot has poor priority despite being disjointed. Contact with any part along the chain of the hoiokshot only does 8% and weak vertical knockback, but the sweetspot directly at the end of the chain will deal 15%, with stronger vertical knockback, which can KO close to the top of the screen, but not very well, as the knockback is lower than the average KO move. This move is best used to occupy the opponent; the speed and range make it easy to hit with. It's exceptionally valuable because Tingle can attack directly with it.

Down Aerial ~ Fishing Rod
In The Legend of Zelda: Twilight Princess, players, instead of defeating the difficult sword form of Ganondorf, found it easier to distract Ganondorf with the Fishing Rod. By casting the fishing line, Ganondorf would stupidly look at the barb, leaving him open to a flurry of sword strikes. Tingle uses the fishing rod to attack for the same principle here. For his Down Aerial, Tingle casts out a fishing rod the length of a Battlefield platform, being able to direct it in any direction with the Control Stick. This has low startup lag, but it has some ending lag. If the end of the fishing rod goes into an area of Bowser around an opponent, the character will stop whatever they are doing and turn around if they need to, then gaze at the end of the fishing rod for a stun slightly better than Falco's blaster. This is a good technique for distraction, and it helps to allow Tingle to force opponents into traps with his attacks, though this is difficult because the ending lag diminishes the effect of the stun. It's a very good edgeguarder as well, but in midair it can only turn foes around without a stun, which is good for confusing them.

$ Kooloo-Grabs! $

Grab ~ Treasure Chest
Tingle pulls out a small, Zelda series, cel-shaded treasure chest. He then opens the treasure chest to reveal the treasures inside. As it sounds, this has some startup lag. Any opponent of Tingle ahead of him in the range of a Battlefield platform will begin to inexorably walk the distance of half of a Battlefield platform, dazzled by the treasures. If the opponent walks into a close range around Tingle, they will instantly be grabbed. If they don't get in range, the ending lag and the fact that they're now very close to Tingle makes this a punishable grab. It's worth noting that any villians- Bowser, Wario, Ganondorf and Wolf (Dedede and Meta Knight are more of anti-heroes)- are so greedy that they will walk the distance of a full Battlefield platform. As an aesthetic note, Wario runs faster than anyone else when lured by the chest.

Pummel ~ Chest Mimic
Tingle opens the chest and reveals it to be a Chest Mimic, a false chest from The Legend of Zelda: Ocarina of Time which had a negative effect. For the duration of the grab, two explosions will occur over the grab-ee each second, dealing 2% for each hit and 4% per second. Tingle cannot preform any throws while this is going on, and he can't cancel it. The grab-ee can mash buttons, just like they are grabbed, to escape. This is a valuable damage dealer at higher damage percentages, but why would you be dealing damage when your opponent has a high damage percentage?

Forward Throw ~ Trap Transpire
Tingle tosses the grab-ee up vertically for low knockback and 7%. The throw ends right there unless there is one of Tingle's traps in an area of Bowser around the opponent at any point during the throw. If any is, the opponent is sucked into it for the normal effect, making this valuable for getting opponents into your traps.

Back Throw ~ Trap Mover
Tingle holds up his hand, as all traps in an area of three Bowsers around him are moved in the direction of Tingle the distance of a Battlefield platform. The traps cannot be moved an area of Bowser around the grab-ee. This is an alternative to the Forward Throw, valuable if you need to trap your opponent in a sea of traps, although maybe you should use the Down Throw if you have a scarecrow around for that purpose.

Up Throw ~ Rupee Curse
A single Green Rupee falls on the head of the grab-ee, doing 2%. For the next twelve seconds, every two seconds, a Green Rupee will fall on the opponent from a length of Squirtle above, each doing 2% but no knockback. This can deal a maximum of 14%, but seeing the possibility of outrunning the Rupees or spotdodging them, this is unlikely. For the full effect of the throw you'll want to pressure our opponent to make all of the Green Rupees fall on them. It's of note that the first five Rupees, or the amount of Rupees Tingle needs to reach five, remain on the ground, acting as normal Green Rupees from Tingle's Neutral A to hire bodyguards with.

Down Throw ~ S'Crow Funk
Tingle begins to... dance with the opponent for two seconds. This just leaves Tingle and his opponent back to square one, being decent for stalling but useless for all else. If, however, a scarecrow is in an area of Bowser around Tingle, he throws the foe to dance with the scarecrow for two seconds. The opponent cannot take damage or knockback while dancing, but it gives Tingle two free seconds to grab items, or, more importantly, set up traps.

$ Kooloo-Situationals! $

Ledge Attack (Under 100%) ~ Distraction
A bunch of confetti appears in a large cloud, covering Tingle and the ledge. When the confetti clears after a second, Tingle is revealed on the ledge. This has no attack to it, but it's pretty unexpected, and the confetti obscures vision long enough for Tingle to clear the way with a weak attack.

Ledge Attack (Over 100%) ~ False Distraction
Exactly the same as Under 100%, but Tingle doesn't reappear. You're going to have to jump up, making this a bit slower. It can be useful for mindgames, but not very well since your opponent can check your damage percentage and react accordingly, and you can't decide whether you reappear or not.

Rising Attack ~ Tingle Splits
Tingle goes into painful splits. This has poor range, but good priority and it covers both sides. Contact with Tingle's feet deals 12%, with good knockback for a rising attack. However, if this misses, the ending lag of this move will be punished.

Tripped Attack ~ Great Sea
Tingle summons a small cloud around him, and two cel-shaded waves roll out from him, as tall as he is. The waves travel half a Battlefield platform, and have a Piplup effect, dragging foes with them and dealing up to 7% in multiple hits. A strong, quick, useful tripped attack; it's a shame you can only use it when you trip.

$ Kooloo-Final Smash! ~ Rupee Curse $
In Rosy Rupeeland, Tingle's life energy was Rupees. He not only needed Rupees to buy items and hire bodyguards, but he needed them as health points, and losing all Rupees meant dying. When this Final Smash is activated, Tingle does a creepy and evil dance, as the symbol of a Rupee envelopes the stage. Once the rupee symbol clears, every opponent of Tingle in the match will turn into a Tingle. Rosy Rupeeland established that Tingle is not a person but rather a state of being. So as a Tingle, characters will wear an outfit similar to Tingle's, but in their own color scheme.

Opponents will stay as a Tingle for twenty seconds. During this period, Rupees from Tingle's will steadily rain from the sky, around two per second. All characters will have a Rupee counter. Characters can pick up Rupees to increase a Rupee counter newly beneath their damage percentage. Tingle himself also has a Rupee counter now. Attacking an opponent will make their Rupees drain out from them, usually bouncing off the stage but sometimes staying on to be picked up by other characters.

So what's the point in this Final Smash? Every two seconds, if a character has less than 10 Rupees, they take 5% and slight knockback but good hitstun. Obviously Tingle himself will not lose damage if he does not have Rupees. At the end of the twenty seconds, all characters will take upwards knockback based on how many Rupees they have. At 10 Rupees and above characters will take no knockback, but for each Rupee below 10 the knockback increases by an increment, maxing out at obscene knockback as bad as the Ultimate Chimera in New Pork City.

This Final Smash is still useful in one versus ones, as Tingle can hoard all of the Rupees as best as he can with his laggy Side Special. However, where this Final Smash really shines is in Free For Alls. Characters will attack other characters and many of the Rupees will spill offstage, making them useless to defend against the Final Smash. It's human nature. They'd be better off sharing all of the Rupees, but of course they don't want to do that...

$ Kooloo-Playstyle! ~ Breaking the Bank $
Tingle is one of those characters who can play decently without practice but needs plenty to function correctly. Any fool can easily plant a few Neutral Airs, place a scarecrow and use an uppercut at a ridiculous damage percentage to finish it off. But without practice, Tingle's moves are just that... moves. They don't really work together so well, and they're really just unconnected tools.

Connecting Tingle's moves is what you always want to accomplish with him. Many of Tingle's moves are hard-to-land traps, and they don't have spectacular effects either. Tingle needs this alleviated to work properly. How do you do that?

Combos. By stringing together the right moves, Tingle can have only minor problems starting to fight, and he can really have a strong effect. His moves, while hard to put together, only work right together. Learning how to do just this is the epitome of Tingle playing.

And how can you link moves together? I don't know. Figure it out for yourself! Tingle's moves are more coherent than they may seem, which is lucky, considering that they are so weak apart. However, a Tingle will have no time to put together his traps exactly the way he wants them to. Managing to combo them means that Tingle needs to think on the go. When in doubt, plant traps, and when in more doubt, plant more traps. They could work, and even if they don't, which may happen a lot, it's better to have trapped and lost than to never have trapped.

$ Taunts $

Side Taunt ~ Belly Dance
Yeah, this is a disturbing one. Tingle belly-dances, his belly rotating and swinging in and out and his hips making a large circle over the ground.

Up Taunt ~ Girlish Giggle
Tingle, as the move suggests, does a girlish giggle, with his hand over his smiling mouth and his face shaking with humor.

Down Taunt ~ Rupee Juggle
Tingle juggles a bunch of Rupees, hopping up and down and swinging his legs arond in an Irish jig as he does so.

$ Kooloo-Victory Screen Poses! $

Victory Pose #1 ~ Wardrobe Malfunction
Leave your imagination to this one, but suffice to say that Tingle's pants rip and everyone who lost, except for other Tingles, run away from the battle.

Victory Pose #2 ~ Juggler
Tingle juggles a bunch of red balls with stars on them until the announcer says that the winner is Tingle. Tingle looks at the screen, honored, and then each of the balls fall on his face in turn, making him fall over.

Victory Pose #3 ~ Tingle's Magic Words
Tingle does his trademark "Kooloo-Limpah!", but after he does, nothing happens. He angrily repeats it, and then he suddenly explodes and comes up covered in ashes. Tingle looks at the losers and says "Shh!"

Loss Pose ~ Clap
Tingle claps, occasionally giggling or doing a Kooloo-Limpah.

$ Kooloo-Costumes! $

Normal Tingle in a green suit.
Tingle in a red suit.
Tingle in a blue suit.
Tingle in a white suit
Tingle in a pink suit.
Tingle in grayscale.

$ Kooloo-Kirby Hat! $
Kirby wears a suit like Tingle's over his body, but only the head part of it. Kirby can use Tingle's Neutral Special for the same effect, though he should watch out, as Kirby is lightweight enough to be at risk of KOing himself.

$ Kooloo-Codec! $

-PRESS SELECT-
SNAKE|Colonel, how did this happen?
COLONEL|How did what happen?
SNAKE|How did Tingle get in?
COLONEL|Because he was popular in Japan, and America is the only place who doesn't really like him?
SNAKE|But he's a pedo!
COLONEL|What does that have to do with how deserving he is?
SNAKE|I don't know.
-END TRANSMISSION-

"Tingle, Tingle! Kooloo-Limpah!"

...These are the magic words that Tingle created himself. Don't steal them!"
 
Status
Not open for further replies.
Top Bottom