• Welcome to Smashboards, the world's largest Super Smash Brothers community! Over 250,000 Smash Bros. fans from around the world have come to discuss these great games in over 19 million posts!

    You are currently viewing our boards as a visitor. Click here to sign up right now and start on your path in the Smash community!

Make Your Move 7 - It's Over, Nothing to See Here

Status
Not open for further replies.

Monkey D. AWESOME

Smash Apprentice
Joined
Feb 28, 2010
Messages
143
Location
Coming to terms with having two people in my mind
VIDEOMAN.EXE

I. Love. This. Moveset.

When I read a moveset, I look for creativity. I look for someone who would be fun to play as if they were in Brawl. And Videoman.EXE is that kind of moveset. Granted, he'd be INCREDIBLY hard for novices to play as; But destroying your opponent with a montage of their best attacks is a very satisfying concept.

This has to be one of my favorite movesets in MYM7, along with Sandslash and Valozarg.
 

darth meanie

Smash Journeyman
Joined
Jun 6, 2008
Messages
452
Hard Man

Sorry you haven't gotten any comments yet, KK! Worry not though, I am on it.

Hard Man reminds me slightly of Probopass in that he can't move like a normal character, and has to use his Specials to jump around. Overall, it's not too bad; the Up Special is an interesting recovery move and overall it does a decent job of giving him a way to move and making it playstyle relevant, which is good. It's a little clunky and awkward to move around with though, and while it works, it doesn't work very smoothly.

This problem appears later in the set too. Your Jab and Up Tilt both do no damage and only affect certain submechanics in the set; generally you want to avoid this. The jab especially is very out of place.

You've got some strong concepts here, and the creativity functions better in each move. Using a tilt to charge a smash is an odd move, but it works decently, and you have a fair bit more individual move flow than you did before.

I find it interesting how you built his playstyle though; keeping the opponent out of the air isn't normally something that you think of as a playstyle focus. All of Hard Man's attacks, grab, and fighting style makes it an actually working playstyle. It's a tad clunky; your writing style is still a tad obtuse and all of your ideas don't flow together in a normal manner, but it works and it's there, and that's a good place to start.

The organization is rather lackluster though. The two-tone blue and lack of line breaks makes it more grating to read than it should be; put a nice ENTER between those attack names and the attack descriptions. Presentation in general is your biggest weakness; you need to make your movesets more inviting to read and your writing more alluring. You've become more communicable than before, but it's still in need of work.

On another note, I found the Challenge that you added in at the end rather good! I had been wondering how to make a concept for a boss battle like that as an extra outside of a Subspace Emissary mission or a dissatisfying event. Making it as a Challenge works perfectly well, and the way you designed it works perfectly. Great job there KK.
 

Junahu

Smash Ace
Joined
Nov 15, 2005
Messages
899
Location
Shropshire Slasher
Easy Man:
I simply have no idea what context to read this set in. The title alone tells me this is closer to a joke than a serious, and the picture, organisation and final smash (DUN NUN!) support this assumption. Add to that the removal of throws and aerials, a work reducing practice I am adverse to at even my most charitable times, and the result is a moveset I simply can't take seriously.
And it doesn't really help that you reduced the movepool to 13 moves and still resorted to a prop for two of them

I did however, massively enjoy the Up-Special. Linking his recovery directly to where the foe is, was an ingenius idea, forcing the foe to come offstage to gimp it. Too bad Hard Man doesn't have any aerials, otherwise he could have taken advantage of this to gimp the foe right back.
 

Wizzerd

Smash Ace
Joined
Feb 24, 2009
Messages
929
Hard Man's a rather... interesting set. The concept behind the playstyle is the most interesting you've come up with before, but I'm not entirely convinced that it works in practice. When Hard Man has only two options for bringing the foe out of the air, it would be easy enough to determine which attacks outprioritize them before a match even begins. And when you consider that he has no air game whatsoever...

That's another problem. As Junahu said, Hard Man's moveset consisting of thirteen moves is an issue, especially when two of them don't do anything offensive. Hard Man sounds a little overly predictable. This wouldn't be a problem if he was intended to be predictable (Viola), but clearly this wasn't your intention.

Your organization could really use improvement too. Don't get me wrong, it's an unprecedented step up, but... the font is rather unsightly despite how fitting it is, and the color isn't near perfect. Please, Koppakirby, use some color codes. They will improve viewer experience immensely.

To conclude, Hard Man has an interesting concept behind him, but the moveset falters in execution. You've come a long way, KK, but there's an equally long way ahead.
 

KingK.Rool

Smash Lord
Joined
Nov 26, 2005
Messages
1,810
Okay, so since we've been on this page for about five days, I'm sure you'll all forgive me for double posting to get a fresh one.

I'm just going to say now that the following set is probably my very last. This is for two reasons, mostly: firstly, I'm kind of depressed about the thread's lack of activity lately and have started worrying that it's dying once and for all; secondly, I'm simply running out of the drive. I was bursting with ideas for this set and every time I worked on it I got all excited all over again... but forcing myself to sit down and work in the first place has been getting harder and harder. I noticed this problem during Abra, too. This doesn't mean I'm leaving MYM, though, so don't worry just yet; I may change my mind as time goes by.

Anyway, I really combined everything I've used in MYMing in the past to make this moveset, so I do hope you all like it. :bee: It takes a set genre that has never really worked out in the past and, I think, squeezes every ounce of potential out of it.

I'd also like to mention now that this is my longest set... ever. I love how that bookends with my first set of this contest, which was my shortest set... ever. That's practically poetic!
 

KingK.Rool

Smash Lord
Joined
Nov 26, 2005
Messages
1,810
...Hey, you punk! What are you doing here?


A Team Rocket grunt is hardly the most intimidating opponent. The foot soldier of Team Rocket, an evil organization bent on taking over the world and also stealing Pokemon just because they can, he's a sort of no-nonsense henchman who isn't really too clever or brave. How can he possibly ever win? Well, he usually doesn't. But when he does, it's because he's perfectly willing to, shall we say, fight dirty. The grunt has absolutely no morals keeping him from cheating in battle.

In a Brawl, the grunt uses a trio of simple, nasty little Pokemon: spastic, spindly Zubat; slow, bulky Grimer; and stolid, loyal Houndour. If used on their own, they wouldn't be too likely to win any battles, any of them; fortunately, the grunt has a unique switch mechanism that allows them to work together in unexpected ways.

You start the battle with the Pokemon of your choice, any one of the three. You switch with your Neutral Special, so be sure you get used to it and don't start pushing it accidentally. You can set who you switch into next through your Taunts: left or up taunt set the order to Zubat-Houndour-Grimer, and down or right reverse it. Simple enough.

Now, you can use Switch to interrupt absolutely any attack (unless you're grabbed or suffering hitstun), and when you do, the grunt immediately sends out his next Pokemon; however, he does not yet recall the previous Pokemon, which stays out and continues doing exactly what it was doing for the next two seconds or so. During this time, it can take damage (but not knockback), so you quite literally have two vulnerable characters on the stage. This shouldn't matter, because if you choose to use Switch at the right moments, you'll be able to combine your separate Pokemon's attacks and create devastating, unfair interactions. You'll be laughing all the way to the bank, you dastardly grunt.

And yeah, you did read that right - it's actually a three-in-one character who demands all three to function! Hallelujah!


A very simple Pokemon, Zubat hides in the dark by day and seeks blood during the night. He has no eyes but makes his way around using echolocation, like any good bat should.

In the grunt's team, Zubat plays the all-important role of speed demon, flitting around with high-speed attacks and generally being a pain to hit. He fights with a variety of sound-based barrages, and also with wing and wind. His wind-based attacks, especially, are compelling when combined with Grimer or Houndour, but I'll get to those in their respective chunks of the moveset.


(((Jump))) 10
(((Run))) 7
(((Slip))) 4
(((Fall))) 3
(((Weight))) 2
(((Power))) 2

Now, Zubat's stats are unimportant, but this is where I tell you about his singular jump pattern. Zubat has a startling fifteen jumps - yes, you read that right. However, each one gives him only the very smallest upward propulsion, having a much more noticable effect when you're travelling horizontally. It also, of course, stops your downward momentum, so this allows Zubat to fly back and forth on the stage with the greatest of ease. He can recover an unprecedented distance, as long as he doesn't have to go up while he's at it.

And I'm going to mention at this point that Zubat hovers a bit off the ground by default, constantly flapping his wings and moving around his small hurtbox. He's very tricky to properly hit, especially when weaving and flapping back and forth in the air.


Neutral Special
Switch - In the background, the grunt tosses out a Pokeball and sends out his next Pokemon, just one platform behind Zubat (or in front of him, if necessary). This action is fairly quick, takes about half a second, all told. Zubat stays out and continues his current action for a further two seconds, then is called back in turn.

This can be used to interrupt just about anything. You lose control of Zubat almost immediately, and if he was just idling or in midair or something along those lines, he'll just hang around helplessly. Also, note that if you use this attack while in midair, the next Pokemon will appear in freefall, so this can hardly be used to refresh your recovery.​
Side Special
Echolocation - Zubat clicks his tongue and sends off a slow sonic wave that's very much aimable, shot on a very precise trajectory of your choice. This goes until it hits a surface, then bounces off, its angle of reflection the same as its angle of incident. This is pure physics, yes? The attack is not too laggy.

Now, the wave is fast-moving, but if it happens to pass through Zubat after bouncing off a surface (you'll have to catch up to it with your wonderful horizontal mobility), he'll get a perfect, clear image of it in his mind. He can then project a residual illusion of any traps or peculiar features of that platform-long patch of terrain by again using FSpecial. Fairly straightforward, and none too useful. The projected illusion sticks around on the ground it's shot onto for five seconds, and Zubat can immediately after that use this attack to get a fix on another chunk of the stage. In this way, you can warp the stage beyond recognition, covered in sound-born illusions. This is especially useful for making traps look more plentiful than they really are, and easier for the foe to stumble into. Zubat doesn't have many traps, but if you've just swapped in from Grimer...

If you happen to get a fix on an opponent through this process, you'll project their image instead of that of the stage. Why bother? The foe's sonic image, you see, can be attacked; it has super armor but you can rack up as much damage as you want on it. Zubat's no pro at racking damage, but Houndour sure is, so this is as good a time as any to switch.

There are two more ways in which this attack can be used, so stay with me. If you get a fix on a lingering Grimer or Houndour in this way, you can project them, creating an afterimage that continues doing what it was doing when you caught the sonic echo, hitboxes and all. You catch a Houndour breathing fire, you'll project a Houndour breathing fire. This gives you five more seconds in which to turn a partner into a leftover hitbox, in addition to the sparse two you get when you first Switch into Zubat.

If you shoot this very carefully and then fly through it before it hits any surface - tricky but possible - you'll capture your own image, and can project that. It'll mimic your actions a set distance away, making it very difficult to tell which is which and rendering Zubat's erratic hurtbox even harder to hit.​
Up Special
Squall - Zubat rapidly flaps his wings for as long as you hold the input. This takes a moment to begin, but leaves Zubat suspended in midair while he uses it. A conic area beneath him and in front of him is affected by a sudden turbulence, pushing foes in the opposite direction at about the strength of Kirby's run. They'll have to approach Zubat either with a projectile or from slightly above. The area affected slowly increases while you hold the button, then caps off at two platforms forward and ends automatically after four seconds. Any items and the like that may be scattered will also be pushed away.

This attack is very relevant when combined with some of Houndour's attacks, and even a few of Grimer's. Zubat continues flapping his wings if you switch during this attack, so it's ideal as a set-up.​
Down Special
Supersonic - Zubat cries sharply, radiating a ring of sound from his mouth. The radius of this quick attack is comparable to that of an exploding Bob-omb, and Zubat doesn't lose any forward or downward momentum while screeching. If any foe is hit by the sound wave, they'll be deeply befuddled, and temporarily lose the ability to successfully dodge. They can still shield, sure - but dodging becomes impossible for a period of about four seconds. Zubat doesn't have all that many ways to capitalize on this - although it always helps that they can't avoid your quick aerials - but Grimer will be most grateful, partial as he is to slow grab hitboxes that can be easily dodged but not shielded.​


Jab
Shuttle Loop - Zubat suddenly turns a loop-di-loop, turning his splayed wings into mobile hitboxes. This action is very sudden and gets you up into the air, as well as dealing upward-oriented knockback to make the foe join you there as well. The option to go directly into a glide from this is also presented to you by continuing to hold the button. Zubat's glide is quite quick and mobile, but so are his jumps, so the main reason you'll want to use it is for your useful glide attack. (7%)
Dash Attack
Poison Sting - Zubat goes into a low swooping motion, holding his twin tail ready like a scorpion. After about 0.4 seconds, he deals a sudden jab with that two-pronged tail - minor forward knockback. This is the first attack to unsheath the grunt's rather complex poison submechanic.

When the foe is poisoned, they start taking 1% every two seconds. This minor affliction wears off after a mere three seconds - but it can be stacked. Not only can it be stacked, but if a poisoned foe is poisoned again, the first affliction is restored to its original three second timer. See, you poison them, they take the damage, it's about to wear off - you poison them again, now they're taking 2% every two seconds, for the full three seconds. Following? This can obviously amount to some quite ridiculous damage racking, especially when using Grimer.

Now, if you manage to stack a full ten poison afflictions onto the foe at once (these are kept track of by little crossbones symbols over the opponent’s character icon), they are automatically KO'd. No fanfare, no bluster - they just keel right over, "fainting", as the Pokemon universe would have you believe. This might sound relatively easy, but it'll take a significant amount of effort to not let them breathe for a thirty seconds, give or take, and consistently poison them every three seconds. You'll only manage that by combining your Pokemon's specialties and taking full advantage of your high-speed switch mechanism. Team Rocket Grunts are notorious for how much they love to poison their opponents' Pokemon. (4%)
Glide Attack
Carrier - Zubat doesn't visibly change, but his lower half - right where his feet should be - becomes a grab hitbox until the glide is cancelled. If he makes contact with a foe, he'll automatically scoop them up and start flying around with them. Now, you can use this to suicide, theoretically, although it's fairly easy to struggle out of this, so it'll only ever work if they don't see your obvious movement toward them and are also at a high percentage. At least they can't dodge it, though, right? You HAVE used Supersonic, right?

Now, this attack takes on a whole new meaning when you consider your other Pokemon. Zubat can indeed lift them as well, and they can struggle out with the very greatest of ease. You can use this by simply flying Zubat forward across the stage and then switching in Houndour, starting your battle off by swooping about, or you can use this after switching to Zubat to move around their leftover hitbox. More specific uses of this interaction will be mentioned later.​


Forward Tilt
Wing Whirl - Zubat spirals suddenly from his hovering position, moving forward about half a platform as he does so. As he wildly swings his wings around him, they form two hitboxes of equal damage, the first dealing flinch knockback and the second sending the foe sliding on a very horizontal trajectory. After the attack itself, Zubat clumsily flutters back to his original position. This attack is fairly quick, although the hitboxes are small, so you'll use it to make Zubat tricky to hit in addition to shoot them through any traps that happen to have been set ahead. Thanks, Grimer!

I'm going to note at this point that many of Zubat's attacks - as well as Houndour's and Grimer's - may strike you as a bit simple. One of the biggest problems with Pokemon Trainer is that mastering three characters is too big a handicap for a competitive player. In that interest, all of the grunt's Pokemon are fairly easy to use in a vacuum. Pick-up-and-play, if you will. (5%, 5%)
Up Tilt
Wing Dropper - Zubat claps his wings above his head abruptly, dealing noticable if unremarkable upwards knockback. As he does so, he obviously is no longer keeping himself fluttering with them, so he drops to the ground, splayed out and prone. Aside from its offensive and juggling use, this attack is a very quick way to turn yourself into a tiny ground-bound hurtbox. This is great for dodging under obvious, powerful attacks that don't hit low to the ground, but otherwise not one of your most important moves. (8%)
Down Tilt
Astonish - Zubat furls his wings around him, drifting in midair on some dark wind as he does so. When you release the button input, he abruptly whips his wings out to either side, making twin hitboxes and screeching sharply. This causes any foes within a platform on any side that wasn't hit by the hitboxes to briefly flinch, but also gives him notable ending lag. I do recommend setting this up and then switching, so Zubat stuns them and then Grimer or Houndour can take advantage of it. Even on its own, though, this is a clever mindgame that can be cancelled by pressing Z. (7%)


Forward Smash
Constructive Interference - More physics! Who knows what happens when two waves of equivalent frequency overlap? Why, we have interference, with nodal lines and diffraction and all that lovely scientific jargon! Here, Zubat projects a sonic wave forward, its charge affecting its radius, or the area it affects. The attack is not all that laggy to start, but has a long duration (that can be extended if you switch out during it). This very high-pitched sound has a few effects.

Firstly, any foes caught in its wide, massive hitbox are dealt multiple small flinching hits, and will generally have a nasty time of trying to get out. The damage you'll deal if you catch them from the start is not as impressive as you'd hope.

Secondly, if this fast sonic wave intersects with a travelling Echolocation, it'll reverse that Echolocation's direction entirely. This is what you do if you pinpointed an enemy but the wave is too far for you to catch up to it - you just reverse its direction and bring it back to you.

Thirdly and finally, you scramble any projected Echolocations in a very strange way. Something that isn't actually there - a fake trap, an illusion of Zubat - becomes corporeal for the rest of its existence. Obviously, this is immensely useful for briefly multiplying sound traps and also for turning your own mirror reflection into a secondary threat that can't be dealt damage. Meanwhile, something that actually IS there - like a projection of Houndour or Grimer or the foe - is no longer there at all. This allows for some really strange mindgames, but is more a handicap on this otherwise overly useful attack than anything. (1%-13%)
Up Smash
Air Cutter - Zubat charges by spreading his wings and drawing air to either side of him. When you release, he flips upside down and claps his wings together, creating an arc-shaped blade of air that flies up and spreads as it goes. Its size and how far it spreads are decided by that charge time. The knockback is negligible, just a bit of juggling, although you can potentially chain quite a few of these together if they're unable to airdodge. Get it?

I should mention here that using this air wave to pass through a cloud of Poison Gas created by Grimer would be a very good idea, since it'd give the cutter a poison property... but since we don't know about Poison Gas yet, on second thought, I'm going to skip that for now.(9%)
Down Smash
Sonic Barrier - Zubat screams a slow-moving sound wave almost directly down, flying slightly upwards as he does so. The wave bounces directly off of the ground and reveals its unusual property when it soars through him - he's invisible as long as he remains covered in it. This won't be for very long, because the wave will soon move too high for Zubat to keep up with it, but in the meanwhile, it allows him to move around the stage in a completely unexpected way and then suddenly swoop out of it. I recommend going into a glide attack from inside the obscuring sound wave and then switching out.

This wave has no effect on foes, although it also makes any projected images created by Echolocation invisible for as long as it overlaps them. Using this to hide a leftover Houndour projection that might or might not be breathing fire... well, now we're getting into advanced interactions, so I'll cut it off there.​

AERIAL

Neutral Aerial
Strafe and Turn - Zubat begins wobbling in midair, moving backwards at a fairly low speed without losing vertical momentum. Vectors, see? It's physics again, vertical and horizontal movement are quite separate. After about half a second of backing up in thnis way, Zubat does an about face, turning to face the other way. This attack allows you to cut off all horizontal momentum and makes you even more unpredictable in midair, as well as allowing you to turn around. Pure mobility. This attack is not lagless and has a long duration, so it's best used when it you stop just out of reach of a foe's aerial.​
Forward Aerial
Wind Rider - Zubat swings both wings, and his whole body, forward, propelling himself ever so slightly and creating a wind hitbox of medium strength. Any foes within a platform ahead or half a platform below are blown horizontally forward and slightly upward by the wind. As with Squall, this attack has useful interactions with a few of Grimer and Houndour's attacks.

More importantly, this attack puts them quite solidly up there and allows you to easily chase them. It's a quick attack, low lag on either side.(3%)
Back Aerial
Nosferatu - Zubat turns a backwards loop-di-loop, his mouth open wide and his teeth bared hungrily. His mouth is the hitbox here, brief and tricky to aim with, dealing a poison affliction in addition to its damage and funny, minor knockback that drags the foe along with you as you go. This attack ends with Zubat flying slightly forward, and you potentially chain together a string of these to dizzy the foe with your aerial acrobatics; Zubat flipping over and over again, especially if he has a sound clone nearby, is pretty staggering. A good way to get started with your poison objective, and if you aim it right and hit the foe slightly down, you can chain it into a Glide Attack, carry them a bit, switch into Grimer or Houndour and continue trying to rack up the poison. (5%)
Up Aerial
Pinpoint Suction - Zubat whirls in midair, swinging his wings inward; he continues doing this peculiar motion for as long as you hold the button input. A thin twister forms around Zubat, going up into infinity and ending on the stage beneath him. Foes that get caught in it will be pulled persistently down, past Zubat and further toward the stage. If you use this without any solid surface beneath you, the twister ends at Zubat; he himself is a hitbox that dishes out minor downward knockback.

Why, oh why, would you want to bring the foe back down to the ground when you finally got them up into the air? Well, much as you dislike the ground, Grimer loves it. There's a very important interaction he and Houndour have, and this is Zubat's supporting role in that - bringing the foe down to where they can pull it off. Switching while Zubat is spinning his twister is as clever an idea as you'll have.(7%)
Down Aerial
Swoop and Lift - In this twist on the classic stall-then-fall, Zubat abruptly drops (especially useful out of a sound wave that you're hiding in). If he makes contact with a foe, he grabs onto them and then flies back up to where he was when he first began dropping. Only when he reaches the apex of his flight does he release the foe, throwing them ever so slightly upward. Rather obviously, this attack gets them up there, where you're most at home. Right from this, you can chain a few Back Aerials. While Zubat is lifting the foe is also a rather safe moment to Switch to a different Pokemon. (9%)


Grab
Bloodsucker - Zubat shoots a sonic wave directly forward, a relatively small one that travels quickly and then vanishes off the other side of the stage. If it happens to collide with a foe, Zubat will immediately and rapidly fly over to that foe and clamp onto their throat; once the vampire finds you, there's no escape through shielding, although you could always dodge (although you couldn't if he's used Supersonic).

Once clamped on, Zubat clings and sucks out 2% a second, stealing the opponent's health and adding it to his own. He can't be dealt damage as he clings, but can be knocked off with a variety of short-range attacks. Unless... if you switch while Zubat's clinging, he gains super armor, right? Now he's immune to anything they try until he gets recalled, so you'll get a few more seconds of free health. Useful little trick to keep in mind.​
Pummel
Cyanide Enzyme - By pummeling, Zubat switches from draining the foe's blood to injecting something of his own directly into their bloodstream. In this case, it's a nasty fluid that changes the way their body reacts to poison. A poison effect no longer wears off after three seconds - it wears off only through movement, after the foe either jumps three times or runs/walks a Battlefield's distance. This may sound like it's easier, but Grimer, who specializes in keeping the foe trapped next to him on the ground, will find this invaluable. The Cyanide Enzyme is the most useful contribution Zubat can give to the team's main objective, apart from using a twister to force the foe onto the ground. This effect wears off after eleven seconds, less if the foe is undamaged or nearly that.​
Special Pummel
Sonic Scream - Zubat draws his fangs out of his victim and screeches loudly into their ear, sending a sonic wave directly into their head. This has more start lag than his regular pummel, so some foes will be able to knock him off before he uses the attack itself unless you switch as soon as you do the input, protecting him with that super armor. The attack itself scrambles the foe's sense and makes multiple Zubats appear, covering almost every corner of the map, overlapping each other and making it very difficult to figure out which is which. If you switch while using this, they'll see a pack of Houndours or a sea of Grimers instead. Mindgames! I love 'em.

Their state of sensory confusion lasts about six seconds, six invaluable seconds in which you can pelt them from any direction with a variety of poison-inducing attacks. (7%)


I'm going to briefly mention, here, Zubat's importance in your grand scheme. This section will be comparatively short, but don't worry, there will be many more mentions of him throughout the rest of the moveset. At this point, what do we have to work with?

On his own, Zubat is a spindly, rather useless fighter. He can't take the hits and he's hopeless at dealing damage and he's hopeless at dealing out KOs. What he can do is survive; he's a very tough target with a constantly fluctuating hurtbox. When you factor in his ability to create sound illusions all over the stage, you've got quite a perplexing foe.

Zubat's role in the grunt's grand scheme is that of supplement. Zubat's wind-based attacks allow you to manipulate Grimer's poison clouds and, much more importantly, to fan Houndour's flames. By using the two in conjunction, you'll have huge hitboxes at your disposal. Better still, Zubat can extend the duration of a leftover hitbox by creating an exact sonic replica. You've got a trick going on with Grimer, but he doesn't stick around long enough for you to pull it off with Houndour - if you Switch into Zubat, make a replica of Grimer, then switch into Houndour, you can temporarily have all three on the field at the same time. The results, if you're clever, can be explosive. Quite literally.

His other important role, of course, is grounding the foe via Up Aerial. This is likely what you'll be setting him to do just before you switch, especially if you're trying to make an explosion happen.

In your grand scheme, poisoning, Zubat is a great way to get started. Chain together a few Back Aerials, lead into a Cyanide Enzyme, then ground the foe and switch off to Grimer, who can take it from there. More on that later; for now, let's get into Houndour's bag of tricks.​


Houndour is a simple, workmanlike Pokemon; its Pokedex entries, written by some sort of genius who could reword the exact same thing in fifteen different ways (no exaggeration), tell us that he communicates with the rest of his pack through a variety of cries as they hunt prey. Put on his own, he doesn't appear to have much going for him, then.

That said, this particular devil dog is crucial to the team, although he's the easiest of the three to play. His simplistic fire attacks become huge hitboxes with a little help from Zubat, and they have an even more important connection with Grimer. I'll get to that promptly.


(((Run))) 8
(((Slip))) 8
(((Fall))) 7
(((Jump))) 5
(((Weight))) 5
(((Power))) 4

Houndour's stats are unremarkable - he's a quick little beast, good at moving around on the ground, but also fairly capable of jumping about. In this way, he acts as a sort of bridge between two highly specialized characters, although this is more an interesting coincidence to note than anything. No trick stats here.


Neutral Special
Switch - In the background, the grunt tosses out a Pokeball and sends out his next Pokemon, just one platform behind Houndour (or in front of him, if necessary). This action is fairly quick, takes about half a second, all told. Houndour stays out and continues his current action for a further two seconds, then is called back in turn.

This can be used to interrupt just about anything. You lose control of Houndour almost immediately, and if he was just idling or in midair or something along those lines, he'll just hang around helplessly. Also, note that if you use this attack while in midair, the next Pokemon will appear in freefall, so this can hardly be used to refresh your recovery. I'm repeating this attack because it's just that crucial, and I know you all secretly have anterograde amnesia and introduce yourselves with "See, I have this condition..."​
Side Special
Howl - Houndour rears back and launches into a howl, calling his packmates to his side. That's his intention, anyway. The attack itself has a duration of just over half a second, and has no immediate visible effect. What you get to do with it is input any other attack while Houndour is doing the animation - you can use aerials, but only if you're quick. Why does this matter in the slightest? Unfortunately, Junahu, this attack's real use is to set up, and tie in with, his Down Special.​
Down Special
Beat Up - Ah, finally, Houndour's packmates join the fray! Except... well... he doesn't really have any, and the grunt, a cruel master, is hardly going to allow him to socialize. He'll have to make do with Grimer or Zubat, instead, the lucky beast.

Instantaneously, the grunt unleashes whoever is next in your set order; they appear directly overlapping Houndour and immediately use an attack. Which attack they use, of course, you set through Howl; if you didn't use it, they'll just use their Jab. They attack and then get recalled, no time wasted, and they can't be attacked - they're little more than temporary hitboxes. They don't stick around, either, so you can't use this as a quicker Switch substitute for interactions.

What you CAN use this for is to essentially play with everyone through Houndour. Now, this is not a brilliant gameplan in and of itself, but it allows him, who is rather monotone and staunch, unable to adapt to various foes, a little bit of versatility. It also lets you plant Grimer's traps through Houndour once in a while (and Houndour, you'll see, loves Grimer's traps), or keep a poison chain going, perhaps, with a quick Zubat dash attack.​
Up Special
Hellraiser - Houndour bursts into flame, turning himself into an immobile fiery hitbox of low priority for as long as you hold down the button input. Contact with him causes respectable upwards knockback, but since he can't move and basically turns himself into a sitting target, this is a poor offensive tactic - it's quick to come out and can be used as a last-ditch attempt to get the foe out of your face, but that's it's limit, because it has considerable wind-down.

This is no recovery, of course... or is it? This hitbox is so concentrated that it affects allies as well as foes, so if you're using Houndour and find yourself falling, well, all you need do is activate this and Switch off. The next Pokemon appears a little ways from you, bumps into you by fastfalling, is dealt strong vertical knockback and likely recovered along the way. A clever trick, no? All their weaknesses patch each other up, as in any good Pokemon team.​


Jab
Bark - Houndour swings his head from side to side in a feral animation each time you tap A, making a small hitbox that's fairly quick on either side of him. Weak knockback. Unnotable on its own.

Now, I'm going to remind you of Zubat's Forward Smash - Constructive Interference. If you use this attack while in a zone of amplified sound, a radiating sound hitbox will form around Houndour, rather like a smaller version of DK's Final Smash. This hitbox doesn't deal damage, but has suction knockback with each hit that serves the dual use of pulling the opponent into the Constructive Interference with you - it deals them damage in small hits, remember - and of course, if necessary, holding the foe more or less in place while you switch off to Grimer. (4%)
Dash Attack
Extremespeed - Houndour picks up the pace ever so slightly, leaving twin trails of fire in his wake as he hurtles forward. These vanish behind him half a second after being created, and deal no knockback at all and only negligible damage. The point, then, is to combine this with Zubat's Squall or some such similar wind attack. If you call him up with Beat Up and then immediately rush forward and use this, you'll quite effectively cause the small flames to be whipped up into a line of fire that Jafar would be jealous of. These flames, unlike their smaller counterparts, are quite potent, dealing about 5% for every half a second the foe is inside of them. Very relevant, you'll see, when we get to Houndour's pummel.

And never forget that you need to actually pursue the foe to effectively keep stacking on poison. This'll definitely help on that front.​


Forward Tilt
Flamethrower - It was to be expected. As long as you hold the input, Houndour breathes a small gout of fire forward. This is thicker and less patchy than Charizard's or Bowser's, giving it less range, but it's also much more manueverable, and you can tilt it at any angle ahead of you, ranging from straight down to practically straight up. This attack is not too laggy to go into and get out of, and it's one of the best attacks to switch out during. Fanning these flames allows Zubat to basically direct them anywhere within half a Final Destination of Houndour, depending on which wind attack you're using. (2% per hit)
Up Tilt
Fireball Rocket - Houndour stands up onto his back paws - giving this move a bit more lag than most of his - and shoots a single fireball directly upward like a cannonball. It goes up rapidly and, upon contact, causes a small explosion that deals knockback comparable to Samus's Homing Missile. Good anti-air tech.

Now, if you've got Zubat set up above you, using his Pinpoint Suction to make a whirlwind, the fireball will be caught up in it and turn the whole tornado into a solid mass of fire, dealing substantial knockback and 14% on contact. Of course, it'll only last until Zubat is switched out, but even at the worst of times, you can go from Beat Up with Zubat set to use Pinpoint Suction into this. It's an effective option. (9%)
Down Tilt
Poison Jaw - Houndour never once forgets your poisoning objective. Usually, when you're making your big push, you'll rely on Grimer and Zubat more, but Houndour is also invaluable, in more ways than one. This lightning-quick attack has Houndour making a sudden chomp at the foe's feet, poisoning on contact. Now, this attack goes right through shield and deals minor knockback that makes it easy enough to follow up on, but it's telegraphed enough to dodge, and a single unlucky dodge can be enough to undo your whole poison chain - so I'd typically advise using Beat Up to bring out Zubat using Supersonic as soon as possible. Once the foe can't dodge, it's that much easier to avoid any unpleasant slip-ups. If you've set the stage with Grimer beforehand, things get even easier. Two rules of thumb to keep in mind before sending out Houndour. (5%)


Forward Smash
Scarmaker - Houndour charges and then lets loose in this laggish Smash, lunging forward to deal a one-pawed swipe. The knockback is pretty minor, but this attack is notable for its additional property - it opens a wound that causes all contact with smoke to deal a single poison affliction to the foe. In addition, all poison gas contact deals a staggering two poison afflictions - one at default, as you'll see on Grimer, and one in addition from the scar. The scar lingers for about eight seconds before vanishing. Follow this one up with Beat Up, bring out Grimer to breathe some poison gas, and watch as the poison stacks and the foe comes ever nearer to their unpleasant end. Charging this attack increases the distance Houndour leaps to slash. (8%)
Up Smash
Evaporation - Houndour plants his head in the ground, a comical animation, while he charges. When you release, he breathes a powerful line of fire forward, but underground. This attack causes the ground to turn to lava for a distance of anywhere between a platform and two ahead of him; that lava deals short upwards knockback on contact, but it can stack up the damage as the foe gets repeatedly thrown up and down by it. Lava hardens and vanishes after two seconds.

In addition, any residual hitboxes - yes, traps - that Grimer has left behind on that space are evaporated by the sheer heat, causing great clouds of smoke to billow up into the air. More details when we get into the individual traps, but each one will generally create a cloud half the size of a smart bomb explosion. These obscure the screen and, of course, deal out poison affliction on contact if the foe has a scar. The clouds disappear after three seconds and can be fanned around the stage by Zubat, for ease of poison. Grimer-Houndour-Zubat is a good way to rack up some significant damage/poison. (3%)
Down Smash
Ring of Flame - Houndour stomps up to four times, depending on charge, and pulls off an unlaggy smash that creates a literal circle of fire on the ground around him. For as long as he doesn't move, he can only be approached from above - rolling toward him obviously doesn't work, because the fire is in background and foreground. When you do move, or after two seconds, the fire disappears into a puff of smoke that resembles an atomic bomb. A simple residual visual effect that vanishes after a second but becomes much moe relevant if they're scarred, and if you combine it by using your Up Smash while hiding in your temporary circle, you can really rack up the poison.

And to think! You can actually set Grimer's traps through Houndour's Beat Up while standing in your fire circle and then immediately turn them into smoke and at the same time, while charging, switch into Zubat and fan the whole unholy mass of smoke and poison forward! I'm telling you, the possibilities are endless. (5%)


Neutral Aerial
Hot Feet - From his midair position, Houndour causes the bottoms of his feet to alight. Any contact with these small hitboxes causes minor damage and knockback that pulls you inward, toward him. Pretty basic, although not too bad a technique for midair. Occasionally, you can use it to pull the foe down. If you fan these flames with Zubat, all of Houndour will be alight, allowing you to do some significant damage; the effect wears off after a second.

Now, you remember Zubat's Carrier glide attack? If you use that to pick up Houndour right after switching out from him, you'll basically create a foolproof way to fly a low hitbox forward. Since the fire pulls the foe with you, you can essentially drag them anywhere across the stage - through poison traps and smoke clouds and whatever you want to, really. (2%)

Forward Aerial
Smoke Rings - With minor lag, Houndour shoots a smoke ring directly forward, its radius about that of an Electrode. If it happens to pass completely around a foe, it'll deal some damage and stack on a poison affliction, in addition to a second one if they've got a scar on them. Naturally, though, this is pretty tricky to aim, and no knockback means that it's dangerous to flub. Zubat can, of course, fan this around the stage with his wind attacks, because it sticks around until it goes off the side of the stage, and never stops moving entirely.

Launching a bunch of these at a recovering foe will put them in a very vulnerable spot when they clamber back onto the stage, especially if you've set some poison traps at the edge of the stage. (5%)
Back Aerial
Pyro Breath - Sorry, folks, but every character needs the occasional spacing attack, and that's what this means to Houndour. He twists his head around and breathes a small stream of very concentrated fire that does some decent knockback and a bit of damage. Simple, yes?

Of course, if you use this right after summoning up Zubat with Beat Up - or switching in from Zubat - the flames can be dispersed amazingly well by a Squall or similar attack. Since they're so concentrated, they'll pretty much turn any wind hitbox into something capable of dealing some damage, in the neighbourhood of 8%. Just wait 'til you see the Pummel, there's a point to Houndour's seemingly random fire and you can probably see it already. Or, even better, wait to see Grimer. (10%)
Up Aerial
Rain of Sparks - Like a wee sprinkler, Houndour points his head up and spews a small fountain of sparks that fly around him erratically, each dealing very insignificant damage and flinch knockback. He continues doing so until you release the button, and will still be using this if you land on the ground. You can switch out, leaving Houndour doing this, and probably should - from there, use Zubat's Echolocation to make a sonar copy of him, and then maybe Down Smash Sonic Barrier to hide him, creating an invisible source of annoying flinch hitboxes.

You can also, of course, fan these flames, but instead of growing larger, the sparks will just be directed at a high speed in the direction you're blowing them in. The foe'll be cursing you as they struggle to approach... (1% each)
Down Aerial
Ball Trick - Houndour curls up, stops his upward momentum, and drops. It's not really an STF, because there is no stall and the fall just gives in to gravity. Contact with Houndour will cause him to light himself on fire and radiate it outward, dealing both damage and decent knockback - he'll also lose all momentum. No contact, and he'll stay curled until he hits the ground and suffers wind-down.

If you use Pinpoint Suction to make a whirlwind, however, or some similar wind attack... you can actually blow Houndour himself around the stage, a potent mobile hitbox. As long as he doesn't touch the foe or the ground, he'll stay curled up, a potential cannonball. Just be careful not to blow him completely off the stage.

My most clever suggestion is to use this as a risky edgeguarding technique. The foe's recovering, so ball yourself, switch to Zubat, and chuck yourself at the foe. If you hit, Houndour loses momentum and can likely DI back to the stage; you have used Supersonic, right? They're not going to dodge, RIGHT?!? (11%)


Grab
Maul - No fancy throw, like Zubat's Bloodsucker, here; Houndour leaps forward about half a platform and takes down any foe he meets on the way. As with all grabs on this team, this is best used after a Supersonic so that the foe can't dodge you altogether, especially because it's not too hard to see coming. It looks like Scarmaker, though, so they might be fooled into trying to shield.

The pummel's the point.​
Pummel
Burn Intolerance - Burn is a status very much like poison, you know. So very similar in function and effect... hmm...

You pull off this pummel, Houndour viciously bites at the foe, sinking his teeth right in there and secreting an interesting poison. Yes, yes, I realize they all secrete interesting poisons through their pummels. For the next ten seconds, the foe will be dealt a poison affliction for every 5% dealt to them by fire-based attacks. Remember all those giant fire-based hitboxes? Yeah... they're pretty dang relevant now. Grimer also has something to do with this, hint hint, although he himself doesn't use fire, of course.

This is a slow pummel and the foe probably will struggle out after one use of it.(3%)
Forward Throw
Rotisserie - Houndour plants his two front paws on the foe, trapping them and making struggling out twice as difficult, and then breathes a steady stream of flame onto their face. This goes on until they can break free, so you can rack up quite a lot of damage from it. You can also switch out while Houndour is torturing them like this, which sounds like quite a clever move, not least because you can attack them with Zubat while they're trapped and get some more poison done. (Variable)
Back Throw
Drag - Houndour clamps his jaws around the foe's leg and you regain full control of him. Until they struggle out - doubly difficult - you can drag them any which way. Drag 'em through traps, drag 'em through smoke clouds. Use this while you have a leftover Zubat fanning Grimer's poison clouds your way, or whatever you feel like. No damage on its own, though.

While you're holding them, you could try to bring out Zubat and pull off Carrier to carry both Houndour and the hapless foe he's gripping clear off the screen in a neat suicide manuever, or, you know, whatever. The point is choice; what you do is entirely your call.​
Up Throw
Volleyball - Houndour tosses them up with his jaws, then swats at them with both paws, dealing somewhat diagonal knockback that has a long hitstun period. Seems like a good opportunity to switch to Zubat and chase them, or even better, a perfect way to toss them through a few smoke clouds. Even the simplest of attacks have their place, right? (7%)
Down Throw
Savage - Houndour wildly slashes at the foe's face, dealing substantial damage but not too much knockback forward. If you somehow manage to pull this off after a Pummel - pretty tricky, that - it'll double the duration for which that attack effects them. Not a very likely outcome, but there you are. (12%)


Houndour's role is complex, so I'm going to break down part of it here before we introduce the third piece of the puzzle to this jigsaw.

On his own, Houndour is pretty fundamentally flawed. Quite a few of his attacks do nothing at all, so to speak, other then billowing smoke all over the place and/or small fire hitboxes. Of course, those small fire hitboxes become quite dangerous when Zubat's there to give you a helping hand, and when you combine with his Pummel, why, all your fire attacks become quite appealing! Remember, you can't let them go for three seconds without poisoning (unless you've used Zubat's Cyanide Enzyme, but that's more useful with Grimer), so all those large hitboxes will come in very useful. And don't get me started on smoke, which is such an unobtrusive, casual visual effect that it's easy to miss that it's just adding to that inevitable counter.

Now, Beat Up - and, by extension, Howl - are more crucial than I've led you to believe. Houndour is quite insular, more so than Zubat (who can turn his teammates into leftover sound hitboxes) or Grimer (who leaves his hitboxes behind after he switches out anyway), so the fact that you can play with the other two through him is very much important. In fact, you can quite realistically play with all three at once, just as you can with Zubat's sound copies. I've discussed that a bit already, in the Smashes.

Now, as for that interaction with Grimer that I've hinted at for so long? Well, read on, friends...


Grimer is about as simple as they come; he's a lump of sludge, garbage, poisons, and sewage that creeps around and stinks terribly. A very unpleasant Pokemon, his Pokedex entries tell us, that eats filth, kills plants by passing over them, and secretes germs. Perfect for the grunt's dream team.

Now, in a way, Grimer plays stage control for the grunt's team, but don't worry, he requires no setup. Rather, just about all of his hitboxes turn into traps after the attack itself, leaving puddles and globs lying around the stage, and for the most part these traps only poison the foe and slow them down along the way. Grimer isn't really defensive, nor is he aggressive. He just slows the game to a crawl.


(((Slip))) 10
(((Weight))) 8
(((Power))) 6
(((Fall))) 3
(((Run))) 2
(((Jump))) 0

Quite the putrid set of stats, eh? Grimer's like a heavyweight with no payoff; he can't even KO, really. On his own, I mean - obviously, you're combining him with Houndour and Zubat, which lets him pull off some rather cheap tricks.

Here is where I tell you about that mystifying 0 jump stat; Grimer's so sticky and so cemented to the ground that he can't jump at all, and that's not all. He doesn't take vertical knockback in any way, only receiving the horizontal component of an attack's knockback. Yes, he is essentially invincible with his back to a wall, but we don't play on stages like that, do we?

Since this is a bit tricky to explain, let me example it up: say you use Mario's FSmash. It deals mostly horizontal knockback anyway; in this case, Grimer is dealt the full horizontal knockback (as well as damage and hitstun), sliding backwards along the ground, but the vertical knockback is completely cancelled. Grimer doesn't leave the ground. Say you use Mario's USmash; Grimer is dealt the horizontal knockback, which, in this case, is tiny, and doesn't really go anywhere. This lets Mario just use the attack repeatedly, always sending Grimer into hitstun and keeping him nearby to be hit again. This is why you need to stay on top of the situation, constantly.

If Grimer would be pushed off a ledge by any attack, he does fall off; this is the only way to get him into the air. He's pretty unlikely to recover, so watch your positioning. Grimer does have a few ways to keep the foe out of the air, and, naturally, Zubat and Houndour have plenty more. This glaring weakness isn't so glaring after all.

Following? That's the last big twist, I promise.


Neutral Special
Switch - In the background, the grunt tosses out a Pokeball and sends out his next Pokemon, just one platform behind Grimer (or in front of him, if necessary). This action is fairly quick, takes about half a second, all told. Grimer stays out and continues his current action for a further two seconds, then is called back in turn.

This can be used to interrupt just about anything. You lose control of Grimer almost immediately, and if he was just idling or in midair or something along those lines, he'll just hang around helplessly. Also, note that if you use this attack while in midair, the next Pokemon will appear in freefall, so this can hardly be used to refresh your recovery. Last time I'm repeating this, don't worry. Repetition is good, no?​
Side Special
Nitroglycerin Sweat - I've been hinting at this for so long, you probably saw it coming. With a spot of lag, Grimer secretes this shiny yellowish ooze that coats him entirely; it fades away about eight seconds later. Unpleasant.

While he's covered in the nitroglycerin, any fire attacks Houndour uses on him will cause him to explode spectacularly, dealing 20% and good upward knockback, an explosion radius equal to a Bob-omb or so (and it also issues a single cloud of smoke, which blossoms upward and disappears after three seconds). Potent, but it also deals a whole lot of upward knockback to Grimer - good thing he can't be knocked upward, eh? Of course, you're probably going to be hitting him with a fire attack when you've switched from him to Houndour anyway, so he'll have that super armor protecting him from the knockback either way. The sweat stays on Grimer if you switch him out and then back in before the eight seconds are up.

Of course, Grimer is so slow that you'll struggle to get close enough to them to land it. Good thing Zubat's so good at bringing the foe down to the ground. Never forget that you can keep Grimer or Houndour sitting around through Echolocation.​
Up Special
Stretch - While you hold the button, Grimer raises both arms and slowly stretches them directly above him, to a potential maximum of two Ganondorfs high. Foes can pass through his arms, although they're temporarily slowed down as they do so and if Grimer releases the input and manages to retract his arms before they make it through, they'll be grabbed. Grimer's hands, at the very top, are grab hitboxes as well.

So you can switch while Grimer is sitting like this to make a kind of obstacle that's tricky for the foe to get around for a few seconds. What's more, if he's covered in nitroglycerin, his explosion hitbox is now much bigger, and very tall.​
Down Special
Harden - Ah, our favourite defensive tactic! This is what you do when the foe's racking up the USmashes on you; Grimer almost instantly stiffens and turns the grey of dried cement. He's basically a statue, impervious to knockback and grabs altogether, although still vulnerable to damage. This attack can be used to interrupt just about any other attack he's in the middle of using. He un-hardens after you release the button or three seconds are up, and there's some wind-down as he does so.

There's a billion things you can do with this. You can Harden while in the middle of an Up Special to basically make an impassable obstacle for all but the very best of jumpers. You can Harden while coated in nitroglycerin to keep it locked in there while you get Houndour into position. There's a few more, but they're related to his pummel, so just keep this attack in mind.

[Also, note that a Hardened Grimer can be blown clear off the stage by any of Zubat's wind attacks, so you need to be careful when using the two in conjunction.]​


Jab
Oooooze - While you hold the button input, Grimer melts, slowly becoming a larger and larger puddle as he does so. He melts outwards on both sides, eventually stretching to be the size of two platforms; this takes about a second and a half, all told, and Grimer is vulnerable to knockback until he fully stretches out... unless, of course, you switch out, granting him super armour until he stretches fully.

In a vacuum, this attack is useless, but the melted Grimer makes the ground incredibly sticky and difficult to walk and jump on, and if you've used Sweat recently, you've got a vast expanse on which the foe will hesitate to tread. Note that you can also use Harden once you're all stretched out to make a doubly slippery stretch of land instead of a doubly sticky one; Zubat hovers right over it, unaffected, and Houndour can take advantage of it by sliding forward, breathing fire all the while, a mobile flamethrower.​
Dash Attack
Leech Reach - Grimer stops dead, and extends a single arm a platform forward; this is quicker than it sounds. If he makes contact with a foe, he'll pull them closer to him, sending them into a brief period of hitstun and lodging them in any traps he may pull them through along the way. He releases the foe as soon as he pulls them right up against him; if you switch to Houndour right after netting the foe in this way and if you happen to be covered in nitroglycerin, this might just be the perfect set-up for an explosion.

If Grimer misses entirely, he goes into a period of wind-down during which his entire over-extended arm dislocates itself and drops onto the ground in the form of goopy puddle. This puddle sticks around (the pun is deliberate) for six seconds and, in the meanwhile, slows down foes that pass over them, as well as doling out one poison affliction for each time they touch it.​


Forward Tilt
Sludge - Grimer leans over and basically pukes out a thick stream of goo in front of him. And you thought Houndour's smoke clouds were irritating.

This attack is fairly laggy, but it deals a lot of small hits with very variable damage and paralyzes the foe for its whole duration -this, even though the hitbox is fairly small. More importantly, after the attack's fairly long duration, the sludge stays on the stage in a thoroughly nasty puddle, this one more runny than the one in his Dash Attack. It lasts for six seconds and deals a poison affliction when a foe passes over it.

Now, you need to note two things here. Firstly, since this puddle is basically made up of Grimer's own guts, it'll be full of Nitroglycerin Sweat if he's currently covered in it, and therefore can be detonated separately from Grimer himself. Since it resembles the other puddles Grimer makes, this can be a fantastic last-minute trick - especially if you've used Zubat's Echolocation to make it look like there's more puddle than there is.

Secondly, the puddle only slows the foe down a wee bit when they pass over it. Good thing you can overlap your puddles, then, eh? (1-16%)

Up Tilt
Poison Gas - From the corners of Grimer's mouth, greenish gas briefly seeps, before he turns his head up and spews a full-out cloud into the air; this is slightly laggy. It's about the size of 1.5 platforms across and one platform high, and lasts for eight seconds before dissipating. Even the slightest contact with the cloud will deal out a poison affliction (two if Houndour's Scarmaker is in effect), and you can waft the cloud around the stage freely with Zubat; if the foe is engulfed, they're dealt a poison affliction every second. The holy grail of Grimer/Zubat is to cover the ground with sticky traps, then waft a poison cloud to overlap the foe. They can't escape quickly enough to prevent the cloud and traps from racking up the poison afflictions at a maniacal rate.

This attack also sort of obstructs visibility, which Zubat will appreciate as he flies about and projects sonic copies of traps and characters. Just a little added note.​

Down Tilt
Glob - Grimer inflates himself suddenly, making this one of his quicker attacks; his body is very briefly a radiating hitbox that deals helpful spacing knockback in all directions, and does a spot of damage to boot. If he doesn't hit a foe, however, he'll deflate weakly and shimmy slightly forward, leaving behind a round glob of goo.

This very sticky lugey doesn't disappear for ten seconds, and, small though it is, it traps a foe who passes over it for about three seconds if they don't button mash to get free. It also deals out a poison affliction.

Now, this attack can also be used while Grimer is Hardened, making it quite unique. However, in this case, it'll emerge rock-solid and remain that way even after Grimer becomes viscous again. You've got this tiny little barrier, what's the point? Well, you're basically making a barrier that prevents Grimer from being slid right off the stage and essentially, therefore, completely invincible. A pity that this super-glob can be shattered if dealt 15%.​


Forward Smash
Sludge Bomb - We've seen the plain old puke Sludge, now's the aimable Sludge Bomb! While you charge, you can tilt the control stick to aim this properly, then release and hawk a large ball of sludge on a very curved trajectory. On contact, it deals out some annoying horizontal knockback and deals a poison affliction. It's sort of laggy, but can be potentially used to keep knocking the foe back onto the ground, where more poison-inducers await.

If you miss entirely, though, the sludge bomb falls to the ground and makes a goopy puddle like the one generated by your Dash Attack - sticky, six seconds, and poison-inducing. Slow down the foe to a crawl, that's Grimer's favourite gameplan. (12%)
Up Smash
Body Slam - This is one of Grimer's favourite tricks - he draws himself up to his full height, then slams down with all of his weight in front of him. It's a laggy smash, but quite worth it, because it deals decent damage and traps the foe under him until he clambers back up, 1.5 seconds later. This also means that it's terrible if you miss it, so I'd watch it; if you connect, though, they're pinned under him and allow you time to switch out and use Echolocation or blow Grimer and the foe up or what-have-you.

If you miss entirely, aside from suffering awful end lag, the stage takes the full force of the attack, and a slight incline is created. This doesn't really do anything but causes all nearby goo puddles to slowly flow toward the lowest point in the incline. Not at all useless if you want to collect all your poison-inducers onto one crucial point - maybe you'll switch into Zubat and blow the foe onto that point? (17%)
Down Smash
Underground Hands - Grimer, without changing his animation, sticks his hands under the ground and begins to stretch them forward - underground. When you release the charge, his hands will burst out of the ground a distance of anywhere from halt a platform to two platforms forward, grasping for foes. If they catch anyone, it's a grab hitbox that freezes the foe in place until they can struggle out. The attack is about as laggy as it sounds - it's not quick, shifting your arms about underground.

This attack has two functions: you can use it just to hold the foe in place and then switch out and begin racking up damage or poison on them; or, if you've got Sweat, you can breathe fire on the immobile Grimer. This will not just cause him and his outstretched hands to blow up, but cause strange eruptions on all the ground in between; these eruptions can deal 10% and do some pretty drastic upward knockback. Switch out after using this, even if you missed grabbing them, and you might yet salvage it with a series of explosions.

Just remember that this attack is really, really slow, especially if you miss.(5%)


Grab
Grasp - This is a basic grab, albeit with a bit more reach as Grimer stretches his arm. It can also be used as a very short-ranged tether, Grimer's single recovery option.​
Pummel
Goo Chain - Grimer hits the foe with one slimy hand - and attaches them to him via a platform-long and fairly thick column of goo. Pummel again to detach it? Why bother? They can break it by dealing 20% to it, anyway, or by hitting Grimer himself a few times. At least their mobility is greatly restricted and they're much more vulnerable to being exploded. Grimer can also actively pull the foe around the stage, since he's so much stickier and harder to budge. Pull 'em through some puddles and clouds, why not?

Of course, you're not just going to start off with them right beside you. You're going to use a throw after attaching yourself to the foe.

Or maybe you prefer the idea of Hardening while the foe is attached to you. Now they're more or less stuck, and you've got quite a few more alternate KO options emerging. There's little better than blowing a Hardened Grimer off the stage with Zubat and watching the foe attached to him go flying helplessly with him. Similar move can be pulled via Zubat's glide attack.​
Forward Throw
Bowl - Spacing, everybody loves it. Grimer picks up the foe and throws them forward like a bowling ball; this has decent knockback unless they're attached to you by a goo chain, in which case it'll stop them from flying any further than a platform from you. The hitstun holds true, though, so you'll have at least a bit of time to drag them around before they wake up and start attacking you.(6%)
Back Throw
Sock - Grimer raises the foe as he stretches himself upward - and then tosses them backwards through him. They don't fly very far, but they do dislodge a puddle of goo just like the Dash Attack one that they're likely to be dragged through as you go creeping off in the other direction. This is what you use if you want to go forward instead of back and want to start with the foe behind you, trying to catch up and free themselves. (8%)
Up Throw
Volley - Grimer tosses the foe straight up like a champion athlete. They hang suspended at the height of their arc for a moment, and then the elasticity of the goo chain - if you have one - will pull them back down to earth. This is the only throw that's likely more useful if you're not attached to the foe, although Hardening when the foe is at the peak of their upward trajectory will basically lock them at the top of a pillar, an easy target for Zubat to deal out a few BAirs to, or for Houndour to blow up in a column of DEATH. (4%)
Down Throw
Swallow - This is the final trick in Grunt's arsenal, and it's really the interaction I've hinted at all along. Sweat nitroglycerin, grab the foe, swallow them like this, and before they can break loose, switch to Houndour and hit the foe with the full brunt of the explosion. Zubat plays the role of trapping the foe on the ground with his Pinpoint Suction, so Grimer can successfully land the grab in the first place. The explosion that ensues is your best chance at a KO if the poison route just isn't working out - say, against an especially fast foe, or one who can flutter above most of your traps. (2%)


Grimer is a bit harder to get a feel for than generic-speed-Zubat or generic-all-rounder-Houndour. He's perpetually groundbound, and revolves around forcing the foe to join him there on the ground. On his own, he wouldn't have a chance at succeeding at this objective; fortunately, he's a part of a team, and Zubat has absolutely no problem with forcing foes downward.

In the big picture, Grimer will be most useful to you to litter the stage with poison outlets. Unlike Houndour and Zubat, who deal out poison by attacking constantly (pressure is the crucial word), Grimer deals out poison by passively leaking it out all over the stage. Since he's creating it as he fights, there'll soon be very little the opponent can do to avoid it.

But since he's so slow and his poison relies on the foe clumsily stumbling into his traps, he'll definitely rely a lot on Zubat's wind shenanigans and Houndour's excellent spacing fire attacks to force the foe into them. He'll also need them to switch in after he's covered the stage and pressure the foe some, of course - unless you've used Zubat's pummel to change the conditions of poisoning. Yeah, sure, go reread it, and remember it.

And if the poison route just isn't working out and the foe is at a ridiculously high percentage, it's time to turn to Nitroglycerin Sweat. More on that - and on bringing the three together into a single character - in the playstyle section below.


The Grunt's losing! He gnashes his teeth and stomps his feet, frustrated... and then his boss, Giovanni himself, appears from a warping panel beside him! He gives the Grunt a stern look, causing him to withdraw his current Pokemon, and then releases his own: it's Kangaskhan! And that's not all - Kangaskhan uses HER Final Smash! Yeah, that's right! It's... GIGA KANGASKHAN AGAIN! SUPER POWERED GENERIC KANGASKHAN!!!!!! DUN DUUUUUN! YAAAAAAAAAY!


Grunt controls three characters, as you've no doubt realized by now, and unlike Pokemon Trainer, mastering them all individually isn't going to fly. Nor can you just use a basic speed-character into damage-racker into KO-character staggered gameplay. These three aren't very strong on their own merits, and the Grunt doesn't care about the rules, so you're going to have to integrate all three of them into your game, overlapping them regularly.

Let's start at the very beginning, with how you're going to KO (wait a second, that's not right, is it?). See, that poison affliction method means that you don't need to worry about damage racking in and of itself - what you do need to worry about is ensuring that you don't let the foe go for three seconds without being poisoned. This is not really as easy as it may sound, but never fear, because you have a lot of options, and which one you lean on most will depend on the foe. Sometimes you'll want to turn mostly to Grimer in conjunction with Cyanide Enzyme. Sometimes you'll want to use Houndour's pummel and then blitz them with fire hitboxes, enlarged by Zubat's wind. Sometimes you'll want to use that very wind to waft around smoke and poison gas and go for a cheap KO that's based around stickying up the stage with Grimer. Sometimes you're just going to go for a full-on assault, largely based around Zubat's quicker poison attacks and some of Houndour's.

In fact, to new Grunt mains, the easiest way to get the feel for the three is to base your game around two of them at a time at first, and then later bring all three together. Each combination is going to have a different focus:

  1. Zubat/Houndour --- This is the combination you'll use if you want to play around with smoke clouds, and, accordingly, if you want to mess with your opponent's head. Zubat can already be a tricky target with his many sound shenanigans, but throw in smoke clouds to multiply and hide in and the fact that he can turn Houndour into a fire-breathing leftover hitbox, and you'll have a combination that can do alright for itself without relying on poison at all. The KOs here will likely be cheap ones, although you have a decent chance if you rely on your fire attacks, bolstered by wind.
  2. Zubat/Grimer --- This is the trap-lover's combination, even if it doesn't seem like it. Here, Zubat will mostly be used to bring the opponent down to Grimer's level, where it's impossible to avoid the puddles he's been generating. It's also where you'll take advantage of Cyanide Enzyme, making it much easier to rack up the full ten poison afflictions required to terminate the foe. This is the trickiest - but potentially easiest - way to win via poison; you need to lay your puddles very carefully, and make it seem all the while like you're earnestly trying to hit the foe.
  3. Houndour/Grimer --- As you may imagine, this is the explosive combination. You can try to poison - it's not impossible, after all, especially since you can use Beat Up to bring in Zubat for the occasionally gust of wind - but with Nitroglycerin Sweat on your side, you're more likely to go for some damage racking through poison and then try for the quick and easy KO. Unfortunately, without Zubat, most quicker characters can run circles around both of these; it's a great reminder that all three are meant to be used in unison.

...And when you do use all three, of course, the result is an unparalleled versatility and the potential for some unyielding pressure. Combine the three maxims above, sprinkle in the variety of smaller, mindgame-laden tricks the Grunt has in store, and you've got a stacked deck that'd be difficult for even the most expert opponent to overcome.


[color=#grey]Against Saber
ololololol terrible set try harder peon

Well, as it happens, Saber is just the kind of simplistic moveset I can use for an example here (plus I think it's awesome and not terrible at all, so there). How does Grunt perform against defensive spacers? In this case, the first question you ask yourself is how to succeed in poisoning. Saber, rather unfortunately, has her own wind hitboxes to waft around your smoke and poison gas with, but at least that means she'll accidentally bolster many of Houndour's fire attacks. Zubat is a tough target to hit, meanwhile, and is quite capable of navigating around Saber's already tricky invisible hitboxes. By leaving a residual Houndour hitbox lying around every once in a while and relying on Burn Intolerance to rack up your poison, you can have a rather good shot at disabling her at a low percentage.

That said, I'd easily avoid Grimer, because Saber is very capable of blowing him clear off the stage and landing KOs at a ridiculously early juncture of the match. If you wander over the Grimer, it'll likely be only after you've tried and failed several times at a poison KO - at such a time, you may be inclined to shoot for an explosion KO, or even a cheap Goo Chain kill. Typically, attaching yourself to Saber is an awful idea, capable as she is of holding you at the point of her sword and repeatedly hitting at you, but if you Harden from there, she's suddenly struck dumb; if she hits at Grimer to force him to release the chain, she runs the risk of accidentally blowing him right off the stage, and her with him.

Pressure, pressure, pressure, if you're shooting for the safe KO. Bombard Saber with powerful fire attacks and make her forget that they're racking up the poison - then switch suddenly into Zubat and hit her again and again, getting those last few afflictions on her. Whatever you do, watch out for the gimp; Zubat can continuously return, no matter how far horizontally she hurls him, but Grimer is a lost cause. This match is about 60/40 in your favour, as losing a character altogether is never a good sign.[/color]​
[color=#grey]Against Zinger
What a fun matchup! Yes, let's pit the two most aerially proficient characters in Brawl against one another! Sadly, if you try to go head to head and wing to wing with Zinger with Zubat alone, you're very quickly going to remember that the Grunt doesn't function unless you use all three of his Pokemon to some degree.

However, Zinger is dismayed to hear that you chase him all around the stage without losing a heartbeat - and have a full two other characters to turn to if you start to get bogged down by mud or honey. Since Grunt is perpetually switching, Zinger's main gameplan falls through, instantly, really. This is another matchup where Grimer's potential is limited, but don't be fooled - his contribution to the team is indelible. If Zinger tries to snipe him, he can snipe just as ably with Sludge Bomb, and by sticking up his arms through Up Special and then Hardening, he's instantly cutting the stage and, with it, Zinger's mobility.

But don't bother with poison; Zinger's so light that it defeats the purpose, seeking an alternate KO route, and anyway he's much to quick to be reliably hit every three seconds. How, then, should you KO? Well, I've already mentioned leaving Grimer around holding his arms up like a silly statue, and you're going to be relying on Echolocation a lot here. By leaving sonic copies of Houndour lying about the stage, breathing fire or creating smoke, you're limiting Zinger's mobility still further. Once he's cornered on the side of the stage, it's not a massive stretch to chase him with Zubat and then repeatedly unload into him with powerful wind attacks. Gimp KO, and to think you never even had to worry about dealing damage.

Or you can just detonate the Grimer statue. Takes a bit more time, getting that Nitroglycerin Sweat going, but there it is, as solid an option as ever.

That's the optimal way this matchup can go. Maybe your spacing goes wrong, the Zinger manuevers around you for long enough to single Zubat out, and then repeatedly pelts you with rapid attacks until you're forced to switch out into a more groundbound character, and an easier target. It's hard to pressure a character who's even harderto hit than Zubat, so this is about 55/45, in your favour.​
[/color]​
[color=#grey]Against Cairne Bloodhoof
The above two matchups were hardly fair to Grimer, so here's something else entirely - a ground-based character!

Cairne is a massive target, and not just that, he creates a pit into which any goop puddles will drain instantly, and right there, you've neutered a substantial part of his gameplay. Cairne wants to stall, and relies on his weight to do so, but the Grunt - that sneaky villain - doesn't care about weight. He'll poison that there Cairne and laugh about it afterward.

This is your optimal enemy; a slow character who likes to stall and who you shut down through one of your many submechanics. You take the high ground with Grimer, drop a few slime puddles at strategic points, and Cairne will have little to do but charge you head on. That's an excellent opening to grab and switch into Houndour - start blowing clouds of smoke, and once you're using Zubat to flutter around his head, Cairne is already starting to look too bulky, too slow, and too vulnerable. Hit him with Supersonic so he can't dodge, then blitz him with a flurry of Nosferatu or something of the sort, then bring him back down to ground and, while Zubat is spinning, bring out Houndour to land his Burn Intolerance and finish the deed. Naturally, you'll also have more than enough time to scatter the stage with poison traps. What does Cairne do? Pin Grimer? Bully for him (pun totally intended) - you promptly switch to Houndour and Poison Fang him a few times. Hide in his pit? That's exactly what you want him to do, and the poison ooze will just go leaking in, nice and easy. This matchup is very favorable, about 80/20.​
[/color]


Monkey D. AWESOME

Smash Apprentice
Joined
Feb 28, 2010
Messages
143
Location
Coming to terms with having two people in my mind
TEAM ROCKET GRUNT

Sad that you're not making movesets anymore, Rool. But when this kind of thing happens, you need to finish with a BANG! And I'm happy to say: that is exactly what you did.

Finally, a Pokemon team moveset that actually has A UNIQUE TWIST. Forcing the player to combine the strengths and weaknesses of each Pokemon in order to score a lot of KOs is a nice touch. Even though it's not my way of doing things, I can tell people are going to like this moveset. My only complaint is the lack of any extras. But, that's just my opinion.

And don't worry; I'll do my best to help keep this thread alive. ;:)
 

Hyper_Ridley

Smash Champion
Joined
Dec 21, 2007
Messages
2,291
Location
Hippo Island
OH SHI-

Err, right. I'll post a real comment in here eventually
(wary)
, but for now I'll say that the switching mechanic is nifty (It's like a buffed version my switch in The Raptors moveset, lol) and you are SO LUCKY that Zubat is pretty different from Crobat that I'm working on. =P


*stuff about losing drive*
I completley understand where you're coming from. Trust me, I've had severl instances where I was ready to say "this is it" regarding my set-making. Dark Gaia was supposed to be my grand finale, then Acid Seaforce, then even as recently as Spadefox 2.0 I was ready to hang up the MYM boxing gloves. Oh heck, I'm not even sure if I'll have stamina for sets after Trainer HR (oh God, 2 MYM veterans retiring after Pokesets, curse you Game Freak!)

Everyone has to take a break from their hobbies every once in a while. I'm sure that in time you'll find yourself typing up a moveset without even realizing it, lol. Even if you don't make another set again, you're still a cool friend in my book. (hug)
 

KingK.Rool

Smash Lord
Joined
Nov 26, 2005
Messages
1,810
TEAM ROCKET GRUNT

Sad that you're not making movesets anymore, Rool. But when this kind of thing happens, you need to finish with a BANG! And I'm happy to say: that is exactly what you did.

Finally, a Pokemon team moveset that actually has A UNIQUE TWIST. Forcing the player to combine the strengths and weaknesses of each Pokemon in order to score a lot of KOs is a nice touch. Even though it's not my way of doing things, I can tell people are going to like this moveset. My only complaint is the lack of any extras. But, that's just my opinion.

And don't worry; I'll do my best to help keep this thread alive. ;:)
Thanks, mysterious stranger!

Seriously, thanks for the prompt comment - welcome to MYM - glad you like it - I hate extras :mad: - newcomers make the world go round! I'll hold you to that. ;)

OH SHI-

Err, right. I'll post a real comment in here eventually
(wary)
, but for now I'll say that the switching mechanic is nifty (It's like a buffed version my switch in The Raptors moveset, lol) and you are SO LUCKY that Zubat is pretty different from Crobat that I'm working on. =P
Oh, yeah, when I saw that Trainer HR included Crobat I actually hurried up to make sure I posted Grunt first, just in case they were similar. I'm nefarious! (vampire)

I completley understand where you're coming from. Trust me, I've had severl instances where I was ready to say "this is it" regarding my set-making. Dark Gaia was supposed to be my grand finale, then Acid Seaforce, then even as recently as Spadefox 2.0 I was ready to hang up the MYM boxing gloves. Oh heck, I'm not even sure if I'll have stamina for sets after Trainer HR (oh God, 2 MYM veterans retiring after Pokesets, curse you Game Freak!)

Everyone has to take a break from their hobbies every once in a while. I'm sure that in time you'll find yourself typing up a moveset without even realizing it, lol. Even if you don't make another set again, you're still a cool friend in my book. (hug)
Awwwww. Thanks, HR. (hug)
 

ElPanandero

Smash Lord
Joined
Jan 31, 2010
Messages
1,100
NNID
ElPanandero
Grunt

I'm not gonna go in depth, but I like how in character you stayed with each pokemon. Lot's of times it's easy to create a pokemon with uber moves and super originality, but it turns out nothing like the pokemon you made a set for. (Of course you set has both). this was especially prevalent with Zubat who epitomized on the annoying pest the grunt's always used to F with me. (I swear I got hurt from confusion more often than I thought humanly possible). Also of course, your organization was well done and looks wonderful.

And it if matters, you have always been my favorite Movesetter here, it's been fun reading your sets.
 

Junahu

Smash Ace
Joined
Nov 15, 2005
Messages
899
Location
Shropshire Slasher
Announcement Announcement Imma Ingnoring Movesets To Make An Announcement

Announcement:-
Submission period for MYM7 ends after the 24th March. So if you have any movesets to post, do so before the clock rolls to 00:00am on the 25th. After that point, MYM7 is finished and we can get on to the juicey advertising/voting period


Here's a basic breakdown on how Advertising/Voting will work out this time around;
There will be one week (that's 26th March-1st April) of advertising, where we all post about our favourite movesets this contest and why we love them. If you are planning to vote, you are required to advertise at least three movesets during that week. Advertise 3 movesets (try to put some gusto into it, they're YOUR favourites after all) and you earn the right to vote. Try not to advertise something that has already been advertised, and really try to sell these sets.
It's as simple as that really. But please bear in mind that the leadership holds the final word on exactly who can and cannot vote. We'll be posting a list of eligible voters at the end of the advertising week.

After the advertising week we have the voting period, in which every eligible voter PMs a list of their votes off to their favourite MYM leader. We're still in the process of deciding exactly how the votes will work this time around, and we'll inform everyone closer to the time, but in general you'll still be picking your 30 favourite movesets and voting for them.

And after voting, you guys get to have a nice break while the leadership tallies and orders your votes into a nice TOP50 list. Go ahead and have a nice chat about moveset making while you wait.


Most of that should be familiar to the regulars who voted in MYM6. But this time, the advertising and voting periods are SEPERATE. OK? Wait until everyone has advertised and the voting period begins before making your votes. Another change from MYM6 regarding voting is that we are relaxing the post/moveset requirements. If your advertisements significantly prove you have followed the contest closely, then you don't have to worry about whether or not you made any posts or movesets.
 

Katapultar

Smash Lord
Joined
Nov 24, 2008
Messages
1,258
Location
Australia
Im finally back after a few days. Been troubled, but that's a bit gone right now.

Decided to quit commenting as it's not neccesarily anyone's cup of tea when I do it. Besides, Im kind of not wanting to create sets for good concepts, but rather want to make them more for fun. When a good idea appears, I'll try to use it. Movesets are fun because of extras. I love extras. Im going to use a lot more, regardless of other people's opinions.

About the Advertising concept, wanting 3 different sets added per mymer out of possibly 100-110 might be a bit much. Would it hurt to place it back down to 2? Regardless, having an advertisement week THEN a voting week is a great idea, as long as everyone is reminded, which will be done of course.
 

Junahu

Smash Ace
Joined
Nov 15, 2005
Messages
899
Location
Shropshire Slasher
Team Rocket:
What a fun 3in1 character this turned out to be. A lot of Meowth's moves were generic as pie, but as I read Jessie/James I realised there was a reason for that. It all seems complicated as heck and its hard to imagine exactly how any player could keep track of everything at once, particularly since this is a set that absolutely requires teamwork to even function. But in the end, the pay off at the end was worth the effort slogging through two sets worth of seemingly half finished attacks.


Team Rocket Grunt:
What a fun 3in1 character this turned out to be. A lot of Zubat's moves completely lost me (sound wave + random effect = creative attack) to the point where for half the set I was just nodding along whenever you mentioned a Zubat interaction. The eventual pay off with Grimer was worth the treacle build up however, dispelling all my previous thoughts of "omg, Zubat sucks" and "houndour seems cool, but... OMG, Zubat sucks". The myriad two-way and three-way interactions between the team members felt astonishingly natural most of the time. And I almost... ALMOST forgive you for making Grunt an alternate KO character with a Final Smash that clearly hates me.
Team Rocket Grunt manages to be an excellent set, with an almost peerless execution, which is pretty much unheard of within long multi-sets like this
Is it just me, or does making a Team Rocket moveset of any kind preclude making a looooonnggg multi-set?


Question Junahu... are we still doing Super votes? I'll fill this space in with Team Rocket Grunt comments
There will still be Super Votes, so don't worry about that

About the Advertising concept, wanting 3 different sets added per mymer out of possibly 100-110 might be a bit much. Would it hurt to place it back down to 2? Regardless, having an advertisement week THEN a voting week is a great idea, as long as everyone is reminded, which will be done of course.
If the process gets truly arduous and three good movesets become that hard to find, you may advertise a set that has already been advertised, providing you don't just copypasta the other ad.
 

Monkey D. AWESOME

Smash Apprentice
Joined
Feb 28, 2010
Messages
143
Location
Coming to terms with having two people in my mind
Im finally back after a few days. Been troubled, but that's a bit gone right now.

Decided to quit commenting as it's not neccesarily anyone's cup of tea when I do it. Besides, Im kind of not wanting to create sets for good concepts, but rather want to make them more for fun. When a good idea appears, I'll try to use it. Movesets are fun because of extras. I love extras. Im going to use a lot more, regardless of other people's opinions.

About the Advertising concept, wanting 3 different sets added per mymer out of possibly 100-110 might be a bit much. Would it hurt to place it back down to 2? Regardless, having an advertisement week THEN a voting week is a great idea, as long as everyone is reminded, which will be done of course.
I like your comments. They're nice, and I don't see what's so bad about them.

But still, I don't think movesets being fun only because of extras. Creative concepts are what really make a moveset fun, in my opinion. Extras are good (and they should be good), but you have to look at ALL parts of the moveset before you judge them.

NOTE: I'VE ALMOST FINISHED EDITING LUFFY. I'VE CHANGED HIS BROKENESS, THE ORGANIZATION, AND ADDED SOME OTHER STUFF. ALL THAT'S LEFT IS TO DO A STAGE (AND MAYBE AN SSE MODE. PROBABLY NOT). CHECK HIM OUT AND VOTE, PLEASE!!
 

JOE!

Smash Hero
Joined
Oct 5, 2008
Messages
8,075
Location
Dedham, MA
Im finally back after a few days. Been troubled, but that's a bit gone right now.

Decided to quit commenting as it's not neccesarily anyone's cup of tea when I do it. Besides, Im kind of not wanting to create sets for good concepts, but rather want to make them more for fun. When a good idea appears, I'll try to use it. Movesets are fun because of extras. I love extras. Im going to use a lot more, regardless of other people's opinions.
Ok, hold on here Kat...

What you are saying, if I understand correctly, is that you do not favor the movesets themselves, but rather the extras tht come along with them?

So taunts, codecs, kirby hats, etc, interest you more than long, thought-out and often amazing concepts for characters and how they'd work in smash?

It's not that extras arent cool/fun, it's that you completley disregard the rest of a moveset in favor of them. Hell, this is coming from the MYM'er who essentially DEFINES himself by his neat extras. I'll tell you rght now, more effort goes into the set than does anything after it, this includes the epic stage I made for the velociraptors. By you essentially liking my sets due to the cool pictures I make is rather insulting, as if for god knows why I make an extra-less set, you'd automaticlaly hate it it seems...

In short, extras are all well and good, but for the love of god dont judge a set by them. We're not trying to be mean to you but...the things yu say are outright frustrating to the people who spend so much more effort on the sets themselves, including myself.
 

Agi

Smash Lord
Joined
Jul 27, 2008
Messages
1,120
Location
SE Washington
I know that I reeeally probably shouldn't ask this, but is there any chance that we could push the deadline back a single day? I mean, it's not like a whole lot of discussion went on in the SBC about it.

Yes Wood Man is almost done. And he'll be done before the deadline. But I wouldn't be able to get computer access until the day after the current deadline so I'm a bit frustrated.
 

Smady

Smash Master
Joined
Apr 29, 2007
Messages
3,307
Location
K Rool Avenue
Thanks to my little friend Junahu for helping me out there, but we are delaying the contest now by one day to end after the 24th of March. Get your breasts lolchillinz movesets out by then, all else in that post of Junahu's stands, though.
 

KingK.Rool

Smash Lord
Joined
Nov 26, 2005
Messages
1,810
So, comments. Remember, everyone: there's a special circle of hell reserved for people who don't comment what they read!

First off is Cloyster, which starts out as a typical tirkaro set. Then, as time goes by and you clearly get into the groove of things, it becomes absolutely unhinged, a mishmash of random humour that brings Sakurai to mind. Which is funny, because... you know, it's CLOYSTER. Very amusing set to read, as expected.

What it amounts to is not unforeseen. The playstyle is fairly basic, but I was impressed with the ways a standard tank playstyle sounds like something much more interesting than it is. I don't know if you're just dressing up a simple concept or what, but Cloyster certainly feels more impressive than you make it out to be.


There's something really appealing about Houndoom. I'm not sure whether it's the easygoing way you explain his attacks - very succinct - or the poetic simplicity of his gameplan. Torch everything. This moveset really does sound like it'd be bloody entertaining to play with.

I feel that making this set all in a rush was good for you; it doesn't feel nearly as stiff and deliberate as most of your movesets, Shadow. Some attacks feel a tad redundant and repetitive, but that's my only real quibble.

Two comments. Unproductive? Maybe. I read most of Golem but then was unfortunately distracted, lost my drive. I'll take care of it soon. ;)
 

half_silver28

Smash Ace
Joined
Apr 25, 2008
Messages
862
Location
MYM, Ohio
Finally, my MYM top 5 list returns! This time I'll be talking about my 5 favorite sets from MYM4! Let's get right into it:

#5: Chef Kawasaki by KingK.Rool


“There are a number of attacks that you can use when near or around the pot to season or otherwise prepare it, which are indicated specially below. A soup requires five things to work out; a seasoning, two DIFFERENT vegetables, salt, and pepper. These can be added in any order but must all be added for a soup to succeed, and not in excess; each one ONCE.”


Where do I even start talking about Chef Kawasaki, MYM4’s winning set? This set has taken its fair share of bashing since it won, probably the most of any MYM winning set (unless you count Raiden among the winners). That doesn’t change the fact that the basic idea behind this set is one of the most awesome ones in the history of MYM. Basing one’s playstyle off of preparing a soup and “cooking” your foe fits Kawasaki quite well, and is something that very few sets (and even fewer MYMers) could pull off like this.

Yes, there are props. A lot of them. And some of them are rather eye-popping (I’ll buy that Kawasaki can pull a salt shaker or a random vegetable out of his apron, and I’ll buy the pot since it’s integral to the playstyle, but an OVEN?!). That aside, the seemingly limited amount of ingredients that Kawasaki can add to his soup add up to nearly endless amounts of different dishes with unique effects. And it was pretty awesome that Rool turned to the MYMers themselves to come up with their own combinations and dishes. A near-perfect blend of smash feasibility (despite the reliance on a stationary pot), MYM4 creativity and one excellent idea: Kawasaki is a moveset that MYMers of all ages can enjoy!


#4: Mr. Shine and Mr. Bright by SirKibble


“While playing as one of these characters, the other floats in the sky, and cannot be damaged or sent flying. However, they share the same damage meter. The character you are mainly playing as performs all Standard Attacks, Smash Attacks, Aerials, and Grab/Throws, while the Special Attacks and the Final Smash all involve the one currently floating in the sky, and with the exception of the Final Smash, must all recharge for 15 seconds after use.”


KIBBLE :’( . Now that that’s out of the way, let’s look at Mr. Shine and Mr. Bright. Out of all of Kibble’s terrific Kirby sets in MYM4, Shine and Bright stand out as the most unique. The concept of a tag team set that involves participation from the character who is actively fighting is something that would work well for so few sets, but Kibble pulled it off very well. Since the character who isn’t fighting sticks themselves into the background and uses their specials from there, this makes them a moveable trap of sorts (ZOMG TRAP CHARACTER). This makes the placement of your partner vital, since you’re probably going to need the extra help to reliably KO. Both Shine and Bright have their own unique style, and there’s not an uncreative move in sight. If you’re one of those new guys who’s never met Kibble, or an oldie like me who awaits Kibble’s return, Mr. Shine and Mr. Bright is worth a read.


#3: Viola by Junahu


“I think I can say without a trace of hyperbole, that you haven’t lived until you’ve seen my arrows in action. And if you’re my enemy, you won’t live long AFTER you’ve seen my arrows in action either… so you’d better pull your head in.”


Back when this gem of a set was first posted, it had a very polarizing effect on the MYM community. The first and only set to this day to be made entirely in Flash, Viola’s presentation was widely praised. Some criticized the moveset itself though, which didn’t meet the crazy creativity standards of that day and age. Looking back on this set, for me, I think Viola was quite underrated. Her base playstyle is fairly simple: she’s a camper/spacing character who doesn’t like foes getting close to her. Viola’s dog, Arco, and her echo bonus mechanic give her moveset a lot of depth. My later Excel moveset uses the idea of a small dog powering up attacks (and do it poorly, mind you). Viola also possesses a wide range of quirky, but powerful damage racking attacks, which she generally has to lead into somehow to land.

And of course, there’s her awesome presentation, complete with moving animations of her attacks, and Junahu’s famous (or infamous) female first-person writing style. All this adds up to make a very interesting set, that’s among the easiest in MYM to read thanks to its unique presentation. If you haven’t read this set (or haven’t read it since MYM4), you really should consider doing so. (y)


#2: Mach Rider by Chief Mendez


“Mach Rider's bike has four gears. Whenever you begin a dash from a dead stop, you're automatically placed in first gear. By using Mach Rider's Dash Attack, you'll shift up to the next gear in line, which will increase Mach Rider's speed dramatically. At 4th gear, he's even faster than Sonic.”


Chief Mendez: the lost MYMer. He all but vanished after MYM4, but his terrific movesets still remain. Mach Rider was the original momentum character, with his playstyle revolving around maintaining and manipulating his momentum. One has to handle Mach Rider and his bike wisely, less they want to end up zooming right off a blast zone. His attacks consist of quick turns, stunts and engine backfires, matching up well with his immense speed and momentum. This set makes me wish Mach Rider were in Brawl, just for a moment (until I realize that Sakurai is nowhere close to making a set this good). Mach Rider also possesses Mendez’s stylized organization, though the pictures are no longer there. The spirit of this set is kept alive in the few recent sets that use moment to their advantage or disadvantage, Bubbles and Subaru being among them. Again, I recommend that you give this set a good read, especially if you’re a newer MYMer who wasn’t around when Mendez was.


#1: Jafar by KingK.Rool


“Jafar removes a small red vial from his billowing robes, and tosses it violently onto the ground beneath him. Copious amounts of red steam emerge, completely obscuring an area about as big as half of a Smart Bomb's max radius. This cloud remains in place for fifteen seconds or so, making it an excellent place for Jafar to hide in and attack from, or plant his traps in secret. You can just barely make out Jafar's silhouette through the smoke (and only his), but not exactly what he's up to.”


Contrary to popular belief, Jafar did not invent playstyle. Rather, this masterpiece took playstyle to a whole new level. Jafar’s playstyle involves a lot of lingering hitboxes, but to call him a Trap character is an insult to both Rool and this set. Rather, he’s a control character. His attacks work with his few “trap” moves to control his foe’s motions, and to generally keep them away from the slow and fragile Jafar. And Jafar’s snake familiars offer him a nice way to rack poison damage, which he can exert some limited control over. Then there are his stun moves like his quicksand, which exist to set up Jafar’s laggy KO move. Like Viola, Jafar was underrated upon his original posting, and it certainly wasn’t because Jafar lacked creative moves. The fact of the matter is likely that Chef Kawasaki overshadowed him at the time. However, Jafar remains one of the few MYM4 sets who can hold his own against sets of this day and age. Now read Jafar. Seriously. Especially if you’ve never experienced this awesome set for yourself.


Honorable mentions: Wispa by Junahu, Charley's Ghost by cheap_josh, Roll.EXE by Meadow, Electrode by KingK.Rool, Black Doom by Hyper_Ridley, Shanoa by MarthTrinity, Peter Pan by Tanookie, Shadow Beast by Kholdstare, Advance Army by SirKibble, Cortex and Tiny by MasterWarlord, Deoxys by Chief Mendez
 

Monkey D. AWESOME

Smash Apprentice
Joined
Feb 28, 2010
Messages
143
Location
Coming to terms with having two people in my mind
They seem like good picks, even though I wouldn't know seeing how I wasn't in MYM4.

**********
Luffy is done. That's it. No more. You can't make me. I refuse. You can shoot me, I don't care. I'll bounce it off. Chuck Norris and Mr. T can make me edit it. Nobody else. Just click on my signature to read it.

My next moveset will be better.
 

vVv Rapture

Smash Lord
Writing Team
Joined
Sep 20, 2009
Messages
1,613
Location
NY
This looks pretty cool. I'll definitely try to enter before the 24th deadline.
 

Junahu

Smash Ace
Joined
Nov 15, 2005
Messages
899
Location
Shropshire Slasher
Hard to disagree with that Top5 list there, they're all winners.. even Kawasaki (because it was the winner). Reaquainting myself with Jafar and Mendez Rider, it's easy to see why MYM4 was so awesome

At the risk of sounding overly nostalgic, MYM4 was so much fun and light in retrospect. Perhaps it's just the growing sloth of the veterans that is causing us to pine for the more energetic days where we really didn't care if our sets went without comments, simply because we enjoyed making them (¬_¬ ok, I've never had that trouble, but other people who are not me have)

But then again, wishing to go back to those unsettled days of "every man for himself" is rather...


You want Ketchup? On a lobster!?​


@Rapture: I would reccommend submitting your moveset when MYM8 starts, instead of rushing to have it done before the 24th. You'll have a lot longer to perfect your set. And from the 25th, everyone will be posting about their favourite movesets this contest, so you'll be able to see what everyone likes and what ostensibly makes a moveset "great"
 

Neherazade

Smash Journeyman
Joined
Apr 5, 2009
Messages
359
Location
Gensokyo.
good ideas... junahu. now that i think about it, I don't think i'll rush my joint set with Kglue. The moveset has been set-in-stone since February, but taking the extra week-and-a-half to organize it will be good. maybe it'll be the first second set of MYM8?

finally read viola and Jafar and NOW I see why they are so good!

not to mention one of my set concepts involves an archer. i was stumped on many of his moves, but that viola set gave me some ideas to get me going again. Thanks, Junahu! I don't plan to rip anything, but you've given me the inspiration to finish what i started. (btw, Katapultar. If you HAT multi-char sets... the set I'm talking about is 4 characters in one... =D)
 

UserShadow7989

Smash Journeyman
Joined
Aug 13, 2007
Messages
306
Hard to disagree with that Top5 list there, they're all winners.. even Kawasaki (because it was the winner). Reacquainting myself with Jafar and Mendez Rider, it's easy to see why MYM4 was so awesome

At the risk of sounding overly nostalgic, MYM4 was so much fun and light in retrospect. Perhaps it's just the growing sloth of the veterans that is causing us to pine for the more energetic days where we really didn't care if our sets went without comments, simply because we enjoyed making them (¬_¬ ok, I've never had that trouble, but other people who are not me have)

But then again, wishing to go back to those unsettled days of "every man for himself" is rather...


You want Ketchup? On a lobster!?​
Agreed. I never entered MYM4 because I found out about it too late to join, but the idea of just cutting loose and coming up with crazy sets for characters I love was what drew me to it in the first place. As one can garner from my rapidly decreasing number of sets per contest, the seriousness everyone approaches sets with just wears on me. I have to spend much more time on each set for less enjoyment overall. Not to mention I keep scrapping sets half way through because I've lost interest or what I've worked on is a tangled mess.

I still focus on creativity, though I'm not blind to playstyle and coming up with ways to blend them is part of the fun too. My commenting has been virtually nonexistent this contest because I find very few sets I can do more then skim through, even ones I love like Subaru. Sets from MYM4 are so much fun to read, with their creative tidbits, while recent sets are a chore to go through and are too much trouble for me to comment on. They're still awesome, just... dull.

Looking back to when I first joined, 1 year ago exactly from today, I was plenty more energetic and enjoyed making sets. This isn't one of those "(Insert MYMer) is leaving! ;_;" comments, I'm not leaving anytime soon. I'm just making a comment on MYM as I see it after seeing the point brought up, and the chat is too spammy lately to have an intelligent conversation in about opinions and views. Now, I can barely bring myself to work on a set, and don't even have anything special to present for my anniversary. Considering how slow MYM7 was compared to the rest, I may not be the only one who thinks this. I just wanted to say why I haven't been commenting much this contest.

...Wow. Considering I only intended to say "I agree.", I said quite a bit.
 

Jimnymebob

Smash Champion
Joined
Sep 26, 2008
Messages
2,020
NNID
Jimnymebob
I still focus on creativity, though I'm not blind to playstyle and coming up with ways to blend them is part of the fun too. My commenting has been virtually nonexistent this contest because I find very few sets I can do more then skim through, even ones I love like Subaru. Sets from MYM4 are so much fun to read, with their creative tidbits, while recent sets are a chore to go through and are too much trouble for me to comment on. They're still awesome, just... dull.
I agree with this thoroughly, that's why I haven't posted since before Christmas. I've spent an hour here or there working on sets, but I don't have the time to make something big and wowing, especially since all I'll get for it is maybe one or two people saying it's good, darth meanie saying it's good by ripping it apart bit by bit, Junahu raging because it'll probably be a "remicks", and everyone else being not in the thread :laugh:.

I don't mind reading sets, as I've tried to read as many as I can, but most of the moves are getting too complicated and un-smash now; so much that it makes MM9: Mega Man's exclusion from votes pointless (something which I felt at the time). Sure, the sets are good, but unless the rules changed somewhere along the line I was led to believe that this contest was to make as creative sets as you can which could fit well into Smash Bros. As a guy who dislikes making match ups as an extra, as they tell you nothing than the movesets creator view of the skills of their set against anothers, I actually feel now that I'd need to include them to make people read my set.

Finally, I believe going into lag and hitboxes in great detail is pointless. If it's a punch, the hitbox is obviously going to be the fist, and possibly the arm, and it'll either be a quick punch, a slow punch, or a moderately paced punch. Either one of those 3 speeds give the reader an idea as to how fast a move is, and the stats at the start of the moveset would probably agree with this, due to the speed of characters attacks usually decreasing the larger and heavier they get, with the exception of some like Snake and Wolf.

So yeah, if I'm ever gonna make a new set, expect it to be more like my MYM4 ones, in the sense that I will stick with the animation of the move, and and it's function. That's all that's really important, nothing more.
 

darth meanie

Smash Journeyman
Joined
Jun 6, 2008
Messages
452
I agree with this thoroughly, that's why I haven't posted since before Christmas. I've spent an hour here or there working on sets, but I don't have the time to make something big and wowing, especially since all I'll get for it is maybe one or two people saying it's good, darth meanie saying it's good by ripping it apart bit by bit, Junahu raging because it'll probably be a "remicks", and everyone else being not in the thread :laugh:
Oh, but ripping a moveset apart piece by piece is how I show I care! It's only good if it's worth destroying bit by bit.
 

Jimnymebob

Smash Champion
Joined
Sep 26, 2008
Messages
2,020
NNID
Jimnymebob
Oh, but ripping a moveset apart piece by piece is how I show I care! It's only good if it's worth destroying bit by bit.
I know that XD.
Most comments I get say I like/ don't like the set. You comment on nearly each bit of it :bee:.
 

Monkey D. AWESOME

Smash Apprentice
Joined
Feb 28, 2010
Messages
143
Location
Coming to terms with having two people in my mind
Oh, but ripping a moveset apart piece by piece is how I show I care! It's only good if it's worth destroying bit by bit.
You got that right.:laugh:

If you hadn't completely destroyed my moveset, I wouldn't have known what to edit. I've fixed most of the problems you said, so could you give Luffy another chance?

*******
Here's a hint on my next moveset:

And the best part: IT'S NOT A CLONE!!!
 

Junahu

Smash Ace
Joined
Nov 15, 2005
Messages
899
Location
Shropshire Slasher
Luffy
I extend my apologies for brutally ignoring this moveset for so long. I have to admit that "One Piece"characters are among the hardest to get others interested in, mainly because there's this immatureness about them that many of us find instinctively disagreeable. Of course, that's the fault of all us "veteran MYMers".

It's a shame too, because as a guy who can stretch his limbs to ludicrous proportions, inflate himself just like a balloon and bounce like rubber, Luffy has some extreme potential.

The ideas are all in the set, but what's missing here is energy and excitement, the core parts of writing that make the reader want to read. You seem to take Luffy's stretching for granted, when the sheer concept of a guy who can snipe foes at the other end of the stage with punches and kicks deserves so much more emphasis. The range and shape of most of Luffy's attacks warrants mentioning, because his rubber consistancy means a "sweep kick" could be anything in terms of how far it reaches. You also seem to ignore the stretching with his playstyle, in which you simply reccommend Gear Second over Gear First and fast attacks over slow ones.

So, in short, you should have taken more advantage of Luffy's stretchyness, both for the set, and the set's writing too


Raichu
I'm looking foreward to seeing how you handle a set like this. Pokemon are both easy, and difficult to make sets for. You really have to get under the skin of the pokemon, understand their motives and strengths, while also drawing inspiration from the animal the pokemon was based off of. I reccommend reading Sandshrew, Caterpie and Venusaur for an understanding of what I mean.
Raichu is a particularly difficult pokemon to make, as it's prevolution is so pervasive in our media, that there is almost no information on Raichu. Or perhaps that's because Raichu is not exactly a natural evolution to begin with (It doesn't appear in the wild, except in the original GB games. Its only wild location there was within Ceruleon Cave and the Power Plant, only the latter of which made sense [high levels of electricity could mimmic the effects of a thunderstone, or perhaps thunderstones are what were used to generate power]. For the former, in which thunderstone could be a naturally forming ore, you would expect to find unevolved Pikachu as well as Raichu.)
 

Neherazade

Smash Journeyman
Joined
Apr 5, 2009
Messages
359
Location
Gensokyo.
Luffy

blah, blah, blah.

moar blah.

blah...gity!

So, in short, blah.


Raichu

Balh

Lahb

nenrz's mystery set

Well, thank you for the compliment on Viola. It's a rather old set, but I consider it one of my better ones (namely for presentation =D ) all the same. It's nice that you're drawing ideas from it... but DON'T RIP! I WORKED HARD ON THAT! :mad:

But good luck anyway. ;) What is the set, btw?​
*fixed*

Well, Junahu, thanks for your response! I don't want to give away any secrets about this set, but i'm rather proud of how it's turned out (concept is complete now). and I made sure NOT to rip anything (though some moves are similar, they are mostly moves I came up with before reading Viola).

and to everyone... Kglue/My set is still... well you know the rest. I've only been saying it for two months... (pathetic fail).

*cries because I need to have conversations like this with myself to feel included...*
 

Agi

Smash Lord
Joined
Jul 27, 2008
Messages
1,120
Location
SE Washington
WGFUDTEDREX

Wood Man


Wood Man was part of the original group of 8 robots created by Dr. Wily to defeat Mega Man. His weapon, the Leaf Shield, is notorious for being incredibly finicky. While it's very useful for Wood Man himself, as he can cause several leaves to fly up and attack Mega Man while he remains in a perfect defense, Mega Man is forced to watch it fly away every time he takes a step. Wood Man is weak to the Atomic Fire in Mega Man 2, which makes him have a 0/100 matchup against MYM5 Heat Man.

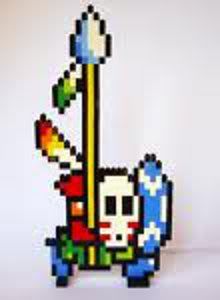
Also, here's the boss fight. It'll help you visualize the Neutral Special and Up Smash.

Statistics


Power: 10
Speed: 4
Height: 7
Jump: 5
Second Jump: 4
Weight: 9
Fall Speed: 7

Specials


Neutral Special ~ Leaf Shield

I'm going to make the assumption here that you've all played Mega Man 2, and know basically what I'm talking about here. When you press B, four leaves begin to circle around Wood Man, slightly beyond the borders of a regular shield. They'll continue to circle Wood Man as long as he remains completely motionless. This serves as basically an automatic counter a la Marth, but doesn't actually deal the damage. Nope, it just blows the foe away with a wind effect. Unfortunately, it'll only be able to ward off one attack before disappearing, and consecutive uses will decrease the number of leaves present, until you're completely out after four uses. They'll come back eventually, 30 seconds for each to respawn, although another use will reset the timer. Yes, that means that if you only wait 29 seconds before using it again, you'll be down to two leaves on your next use and you'll have to wait 30 seconds to get three.

Also! Remember how I said you had to stay still? Well, if you try to move in any direction, your shield will fly away... it's basically a flying wind hitbox. You could probably gimp with it, but its effect isn't that strong, even if the shield itself is a giant obstacle. And as another note, two moves actually won't make the shield fly away... both the Down Special and the Up Smash allow for continual charging while defended.​

Side Special ~ Leaf Blower

Here's a fun move. Wood Man flings his hand forwards and scatters leaves over a wide area, covering about 1.5 SB blocks worth of land when they settle. Like the last move, this is a weak gimp, slowing upwards momentum by about a quarter. No, this is not going to become a gimping moveset, gimme a couple of moves.

Now, if you spread these leaves over the brambles from your DTilt, they'll actually cover them up. The brambles are still there, but they won't have any affect on you or your enemies. If you try to grow a tree in the middle of a patch of leaves, it'll grow, but it won't actually rise up to its height until the leaves are removed. An image would work better to explain, I think.


Oh yeah, prob'ly should've mentioned that the Leaf Shield's wind hitbox is what's blowing the leaves away. I kinda jumped the gun on that. Yeah, launching the Leaf Shield can turn seemingly innocuous ground into a bramble-infested wasteland! And since the wind hitbox still exists even when all you're doing is standing still, you could probably stand on top of your hidden tree, use it, and find yourself somewhere off of the blast area. There are plenty, TONS of applications involving linking these together, and I'll give them their own seperate section in the playstyle.​

Down Special ~ Nature's Will

You already saw mention of this attack in the above move, so hopefully you're all good and warmed up! With an input of the Down Special, Wood Man squats down to the ground, grabs a hold of it with both hands, and begins pulling upwards, straining as he does so. I hate to give you this visual, but it almost looks like he's taking a dump. With that out of the way, you'll notice that as long as you keep holding, Wood Man will actually start to pull himself upwards. About every second and a half, another stagebuilder block of height will be smoothly added to the tree. Here's another image as a visual.


Except, actually, not like this. It's going way faster than I made it go in GIMP. Baah. Just... like that, but slower. The 1 SB block per 1.5 seconds thing I mentioned earlier, go with that.

The tree serves just like a wall. Effectively, you can block off opponents from your side of the stage while you set up. Well... you could, but it's not like it's made out of iron. If the tree takes 40% of damage to any segment, it will fall over at that joint, turning into an absolutely massive hitbox as it falls. As powerful as a fully-charged Dedede Front Smash, with potentially infinite range, your opponent would be an idiot to let you continue to grow it. You've got a couple tricks to help it survive though, which I'll once again touch on in the playstyle section.​

Up Special ~ Autumn Breeze

And then there's the Up Special which really isn't that interesting at all. A giant leaf mysteriously forms under Wood Man, which he uses like a surfboard through the air like the one in Yoshi's Story. Unfortunately, Wood Man's a big lug, hardly the gossamer type. He's gonna fall. In essence, this is a glide recovery similar to, but worse than, Charizard's.

Note that, like the Neutral Special, two moves are available to use while on the leaf. These moves are your Up and Back Aerials. Oh, and you can jump off of the leaf at any time to extend your recovery, assuming you haven't already used your midair jump. Probably should've mentioned that.​


Standards

Neutral A~ Tarzan

I've always wondered why exactly Wood Man saw it necessary to beat on his chest. He's a robot! What kind of primal urges could a robot possibly have? Anyways, Wood Man uses his infamous Tarzan imitation for his Neutral A. As you continue to press the button more often associated with jumping, Wood Man keeps beating on himself, forming a very short-range hitbox. Pounds on the left bounce foes to the right, and vice-versa. While it seems to be the ultimate juggling move, it actually suffers from something called "reverse move decay," a term I created during one of my particularly creative bursts of genious. In essence, the longer you hold this attack out, the stronger it becomes, culminating in the strength of a tipped Marth FTilt after eight consecutive hits.​

Front Tilt~ Back it Up

And speaking of FTilts, here's Wood Man's! Maybe someday I'll come up with an FTilt that isn't a generic punch, or a generic punch with a twist, but not today! At least this one has flow. Anyway, Wood Man's FTilt is very similar to Sheep Man's in execution; he gives a quick shove with an open palm. This knocks opponents about a battlefield platform backward along the ground, dealing 6%. As it sounds like, this is a combo move. It pushes enemies back the perfect distance to get them with your grab without any trouble.​

Up Tilt~ Snare

An UTilt in an Agi moveset that doesn't revolve around the mechanic? What is this I don't even

Oh, quiet, you. Me. Move time. Wood Man flicks his wrist upward, sending two creeper vines spinning to reach overhead opponents. The range is about the same as Ivysaur's Vine Whip, but on a perfectly upward trajectory. If you manage to hit a foe towards the end of the vine, their feet will become... snared! Wood Man then snaps the vine back down bringing him face to face with the opponent. At this point, the ending lag is nonexistant, so you can follow up with an FTilt. Once again, this is really just a combo starter.

Right, if you don't manage to grab onto the foe at the end of the vine, they'll just take 8% with light vertical knockback, and you can't chain this knockback into the snare effect. If you don't snare them, you'll have a bit of ending lag, like Lucas after a missed Rope Snake.​

Down Tilt~ Bramble

To get the ball rolling, Wood Man flings out his arms lengthwise, as if he's preparing to give the foe a giant bear hug. Well, he's not, but this will do 9% with light horizontal knockback, comparable to Sheik's FAir. But what you're really after is the aftereffect. See, when Wood Man made that motion, many hundreds of seeds were scattered around his general area, spreading out over about half Battlefield's length with his position as the center. A few seconds after setting, deep tangles of brambles will spawn, up to about Kirby's height. These brambles are the bread and butter of your stalling game.

Not only is it impossible to run while inside of them, walking itself becomes incredibly time consuming. You know when you had to sneak up on that Pirahna Plant in Super Mario 64? Yeah, that's the speed that opponents inside will have to walk. Crazy, I know. And don't think that they can just jump out of the brambles! If they try, they'll be snapped right back to their original position... in the TRIPPED phase! I'm so devious! Rolling to dodge is simply not an option, but spotdodging and any attack that doesn't involve motion of the legs is still possible.

Now, the brambles do have some shortcomings. If they take three hits of 8% or more, the part that was attacked will be destroyed. Yes, you read that right, you can't just do 24% and be done with it. However, sufficiently tangled undergrowth should hamper the foe's movement enough to give you plenty of time to grow a tree and fall it on them. And don't forget that you can hide the brambles with leaves from your Side Special until you've set up enough for your liking!

Of course, Wood Man is also affected by the brambles. He does, however, have a little trick that the foe doesn't. If you pull up on the ground with your Down Special, you'll be able to pull yourself up and out of the mess you've found yourself in, and jump and glide to safety.​

Dash Attack~ Take Down

You know, Wood Man would probably be good at football. At least, he shows his tackling prowess in this move. By using the Dash Attack, Wood Man will jump into the air, and continue flying somewhat like Superman slightly above the ground. (Most characters could dodge this by ducking.) If he crashes into anyone, they'll be blasted backward with good knockback and take 11%, landing in their tripped animation. There's no limit to how far Wood Man can jump in this manner, but you need to cancel it by either pressing A or moving the control stick in the opposite direction, otherwise he'll fly offscreen.

But there's gotta be more to it than that, right? Right? Right. This is Wood Man's quickest way to take down a tree, hence the move title. If he crashes into it, his head actually becomes imbedded in the tree, a la Luigi's Green Missile. He'll be stuck inside, trying to pull himself out while the tree falls, only freeing himself after it lands. Obviously, this gives him incredible ending lag.​


Smashes


Front Smash~ Razor Leaf

Do I feel bad about stealing another Pokemon move name? No, I don't. That shouldn't be your concern, anyway.

While Wood Man charges the famous 60 PWR attack, leaves of all shapes and sizes (okay, only orange oak leaves) will fly out from around him, and hover in midair. 4-8 will appear depending on charge. When the attack is released, they'll all fly straight forwards, traveling rather quickly. Although they disappear after 1/3 Battlefield's length, they'll do a lot of damage on their way, depending on the foe's... height? Well, yes. Each leaf is successively higher than the last, meaning that while Ganondorf takes the brunt force of the attack, Kirby is only going to get hit by a leaf or two. For each leaf which passes through the opponent, they'll take 4%, with weak horizontal knockback. This is a pretty good damaging move, even if it does have substantial ending lag.​

Up Smash~ Falling Leaves

Once again, I'm kindasorta hoping that you've at least seen Wood Man's boss fight, if you haven't actually fought against him. It'll help with visualization.

Anyways, this is Wood Man's main attack from the actual battle. While he charges, he beats on his chest in a manner unlike his Neutral A. I don't know how the guys down in Graphics will pull this off, maybe add little blue flashes for the Neutral A and take them out here, but it'll work. Anyways, four leaves will fly upwards while he charges, culminating in height about 4 SB blocks overhead. They will then proceed to spread out, about an SB block distance in between each, and drift slowly down. The general effect is that of a giant spiked ceiling slowly falling down on the opponent, albeit one that doesn't actually do knockback and only 16% per leaf touched.​

Down Smash~ Sapling

Considering that my first draft of this move was over 1000 words, let's try to tone down the detail, shall we? The move itself really isn't that complicated. Upon input, Wood Man plunges a hand into the ground, and pulls upwards while he charges. A thin sapling rises up out of the ground along with his hand, reaching captain Falcon's height at full charge. As it sounds, this isn't an actual attack, thus it doesn't have noticeable lag on either side. You can't hide it with brambles, in case you were wondering.

So, what's the point? Well, if you walk over to a grown sapling and grab it with A, (or, y'know, a grab,) you can walk backwards while holding it, and release it. Subsequently, it will crack forward and deal damage and knockback. This behaves like a smash, taking the same amount of time to reach maximum charge and increasing in damage and knockback with more time invested. Power varies from 3% and flinch to 28% with the strength of Marth's untipped FSmash. Of course, your opponent can use the sapling as well, so be wary.​


Aerials


Neutral Aerial~ Darwin

It was the firm belief of Charles Darwin that, over millions of years, small mutations in DNA add up, eventually creating an entirely new species.

What a quack. *dodges tomato thrown by Wiz* Still, it's a cool idea. Let's see what we can get out of it, shall we?

For his Neutral Aerial, Wood Man turns towards the ground at a light angle, and spins around a few times. Fascinating, not even Sakurai could've thought of that! This is a multiple-hit hitbox basically identical to Sonic's FAir. However, as he spins, a light powder forms and slowly drifts down. What possible use could it have?

If the powder works its way down to settle on some exposed (not hidden by leaves or whatnot) brambles, they will undergo a slight mutation. Tiny thorns form over any affected brambles, turning them into (gasp of all gasps) traps! Now, whenever the opponent finds themselves stuck inside, they'll take 2% per second (pps) standing still, 4pps walking, an additional 5% for any attempts to jump out, and 2% for attacking! Now, even if they ARE able to dodge the falling tree, they'll still have to deal with the extra damage.

*is hit by second tomato thrown by Wiz*​

Front Aerial~ Swing

You know, sometimes you just get moves that serve their purpose, and little else. This is one of 'em. Wood Man extends his hands out in a grab hitbox for this move, and holds them out there as a sex kick of sorts. The grab hitbox is only out there on the first couple of frames, and the move decays to a 4% flinching hitbox afterward. If you grab the foe, Wood Man will quickly fling them forward Mario-style for 8% and a bit of distance, but it's not worth writing home about.

If you use this move on one of your trees, however, (you knew it was coming,) Wood Man will grab onto the tree and swing around to the other side. Basically, you can run away from your foe, jump towards the tree, and swing around to the other side with ease. What's your next plan? Drop the tree on them? Keep setting up? It's all up to you.​

Up Aerial~ Spin

Most creative name ever. The title's about right, all Wood Man does for this move is hold his arms above his head and quickly rotate 360 degrees, on a vertical axis. This low-lag, low-knockback maneuver deals 6% and has no place in competitive play whatsoever.

Unless, of course, you're in the middle of using your Up Special. (That's a plot twist, people!) In that case, your spinning motion is translated into the leaf's trajectory, and the pair of you will begin a nosedive downward. You and the leaf together are a powerful duo, pulling enemies down along with you and dealing 12% a second while you fall, potentially leading to a Woodicide.

Now, remember that you can jump off the leaf at any time. If you do so after using this move, the leaf will continue spinning down, but the damage will drop to 4% and will have an extremely weak pull, halting the 'cide altogether.​

Down Aerial~ Cover

Continuing with the generally-accepted idea that Wood Man has an infinite number of leaves and other things to throw at the opponent, here's the Down Air.

Wood Man waves his hand downward once along an arc, in a somewhat laggy motion. No damage is dealt, but we're all really here for the side effects amirite? A blanket of leaves is released from Wood Man's arms along with this motion, forming a thick, slowly-falling arc of... well, of leaves. I should probably think about reworking my sentence structure. Anyways, this has about the same effect as your Side Special, and you can even drop the leaves on the ground in the same way. Considering your Side Special is faster and covers more area, I'd advise against it. No, this is a recovery move. Your downwards descent will be halved while you move through the leaves, giving you an alternative to that god-awful Up Special. And hey, you might even be able to gimp with this, since it also slows upward movement by half. That is, assuming that it was the same attack which blasted you and your opponent away... and that you somehow ended up above them... and that they're slower than you in the air... erm, maybe gimping isn't the best idea after all.​

Back Aerial~ Deku Leaf

Wood Man's BAir is unnervingly similar to DK's FAir in appearance and use, but it only does 12% and has less of a spike. Once again, it's side effects to the rescue! If you use your BAir while using your Up Special, he'll do the same overhead motion... while holding the leaf as a fan with both hands. In effect, the giant gust of wind he makes (which doubles as a gimp, by the way) blows him backwards and upwards a good distance, say Marth's Up Special on a 45 degree angle. Use this to buff up your otherwise pitiful recovery. Oh! I forgot to mention, if you use this move so that the gust of wind blows through a cloud of leaves from your DAir, the gimp will also deal 10%! It's not worth actually setting up, but if you happen to see the chance, take it.

Right right, the gimp's strength... it's about as powerful as half a second's blast from the FLUDD.​


Throws


Grab~ Root

Wood Man has a bit of a twist on the standard ranged grab. About a battlefield's platform away from where Wood Man is facing, (remember that FTilt? =O) several small roots will pop out of the ground. If an opponent is standing there, their feet will become entangled, completing the grab. This move, of course, suffers from the usual horrendous lag of ranged grabs.​

Pummel~ Constrict

I've been meaning to use this pummel title for a while. Or did I already use it? And why the heck am I introducing a PUMMEL for Christ's sake?

The roots around the opponent feet quickly tighten and release their grip, doing about 2% damage at a speed comparable to Wolf's pummel.​

Front Throw~ Sitting Duck

What's this? A move with actual knockback? Agi, how could you?

Wood Man rediscovers his penchant for pigskins with this attack. With the opponent standing tantalizingly in front of him and running out of canonical nature-based attacks to use, he's going to have to result to using brute force. Basically, he runs forward and slams into the foe, dealing 12% with moderate diagonal knockback. He has a bit of ending lag as he slows himself down, giving passers-by an opportunity to retaliate.​

Up Throw~ Hangman

Hangman indeed. This attack really doesn't make much sense, considering that the opponent was grabbed by the roots of some arbitrary tree, but I'm gonna work with it.

The roots that were grabbing the opponent suddenly disappear when you input this throw, and for all intensive purposes, it looks like they escaped. But of course they didn't! While they're still in shock from being released, (you know what I'm talking about,) a small tree (two SB blocks high) suddenly shoots up from underneath them, and suspends them in midair! They'll dangle from the top branch by their shirt collar if they have one, or maybe long hair or a tail. The point is, they'll be stuck in midair for two seconds, less if they can button mash out.

Wheee arbitrarily creative moves which stun the opponent giving you a chance to set up. Did I say that?​

Down Throw~ Plant/Transplant

Maybe the UThrow wasn't enough for you. It's a good enough stall, but it's true that it lacks in areas. Thankfully, the DThrow is a bit better when it comes to holding foes in place. To start the move off, the many roots entangling the foe's feet begin to writhe after a point in their direction from Wood Man. After a short period of time, during which your victim looks down concernedly, the roots will pull down on their feet, releasing a large cloud of dust which obscures their descent into the ground. When the cloud settles, they will be trapped with only their head sticking out of the ground for about four seconds. This is more than enough time to set up some brambles, get a head-start on a tree, or topple one down on them.

Broken, you say? Well... maybe. The balance of any stunning move is hard to gauge, and this one is certainly no exception. There are some aspects of Wood Man's moveset itself that work against this particular trap. Being trapped down to the the head will cover them from all but a single leaf from your FSmash, making it difficult for you to deal damage. It also prevents them from taking any knockback until they squirm their way out, even if you topple the tallest tree on them.

As is this move description wasn't long enough already, here's another idea. Say you walk up right next to the foe and use a grab. Wood Man will rest his palm on top of their head, and close his eyes. Pummeling here will cause him to give the foe a noogie for 4%, but their retaliation (varying by character, Pikachu will flash with lightning, ROB will overheat, Ganondorf will actually try to bite Wood Man's hand) will cause Wood Man to back off, making this process ridiculously slow. No, try throwing them. Inputting left or right will cause Wood Man to push his hapless opponent into the ground. This looks particularly cool on fall-through platforms. Now, about half a second later, they'll pop back out (unharmed) about battlefield's radius in the direction you specified, on their feet and ready to run. Away. From the tree that you should have falling towards them right about now.​

Back Throw~ Nettles

Once again running out of ideas and unwilling to give Wood Man yet another stunning/slow down move, our hero decides to use the crowd favorite... a constant-damage move! Wood Man's BThrow causes the roots around the foes' feet to do something funky that I can't quite visualize, resulting in your opponent's fall toward Wood Man, which ends in a faceplant. Directly beneath them now lies a bed of nettles, which somehow appeared! They're going to have to get off of the 1.5x Battlefield Platform-wide bed of nettles quickly... they'll take 5% per second as long as they stand on it. Not too difficult under normal circumstances, but let's say that they were standing in some brambles when they got grabbed. Anyways, the bed will disappear as soon as the opponent escapes its grasp. You might almost think it was disappointed that it let its prey go.​


Final Smash


It pains me to be almost done with this set, check Wood Man's bio on the Megaman wiki, and discover that his main dislike is harm to nature. So I'll just pretend that I never read that and continue with the Final Smash I'd already planned.

When Wood Man uses his Final Smash, there's no close-up, no special animation, nothing besides the disappearance of the glow in his eyes and an extremely loud sawing noise that even suggests that he used it. Wait, sawing noise?
About a second and a half after inputting the attack, a creaking, groaning sound is heard. And a second after that, the first sign of doom is revealed... a giant redwood in the process of falling sneaks in towards the top of the screen. It'll fall through the whole playing field, and disappear off the bottom of the screen, finally crashing to the ground with a massive thump about two seconds after passing through. Unless an opponent has the incredible timing to spotdodge it, they'll take a hefty 50% and become grounded or spiked, giving you time to set up further. (y)​


Playstyle


Wood Man. Yet another set-up moveset from the one-track mind of agidius. With so many moves to hinder the foe's movement, and one glaringly obvious finishing attack, this playstyle is basically going to write itself. Let's start with setup.

Set-up
The wisest and safest course of action at the beginning of the match is to throw down some brambles. They'll grow over the next couple of seconds to give you something like a base of operations. If you're on a larger course, continue to spread them all around without worrying about finesse, but on a smaller course it would be a good idea to break out your Leaf Blower. Cover a good amount of the playing field with leaves, using the pushing effect from the attack to keep your distance. Continue to spread brambles underneath the leaves. They'll keep growing, hidden, but ready when you need them.

Once you get a satisfactory area covered, you may want to start growing a tree, whether it's hidden until the leaves or out in the open. This will be the most defensive, stally part of the match, so you've gotta have some tools to keep the foe at bay. Fortunately, you have plenty. If you take your attention away from the tree for a while, your UTilt->FTilt->Throw chain will give you plenty of uninterrupted time to keep building. The huge tangles of brambles are a basic, but still very effective tool that you can use if the foe has a particularly poor horizontal recovery. It'll be up to you to find the opponents' myriad weaknesses and exploit them to your benefit.​

On the Offensive
Toppling your tree while the opponent is vulnerable before they can get it it themselves can be a significant challenge. As mentioned several times throughout the set, finding the combination of stunning throws and brambles which works for you is absolutely essential.

More often than not, you'll find yourself in a little predicament... you're on the same side of the tree that your foe is! It's a simple fix, though. Your FAir comes to the rescue. If you jump towards the tree and use it, ol' Woody will swing around to the other side, free to inflict nature's wrath without fear for his own welfare. Now, apart from this problem, your UTilt->FTilt->UThrow with brambles at the base will probably see some good use. But that's just one sort of attack, what else does Wood Man have up his sleeve?

The gimp from the DAir is actually a lot more useful than I made it out to be in the description. Double jump offstage, using DAirs along the way, and surf back to the stage with your Up Special. When you get close to your starting position, a BAir will get Wood Man back onstage and simultaneously blow leaves and foe away! There are plenty of other combinations out there, too. For example, after setting up and hiding thorny brambles using your DTilt, NAir, and FSpecial in tandem, you can ground opponents with a DThrow, get out of the way, and blow the leaves away with a Neutral Special. While they panic and attempt to fight their way out of the brambles, taking damage with every false move, knock over a tree on top of them for the grand finale. There are plenty more interactions that would make this playstyle section even longer, but it's up to you to find them as after completing a moveset I become a lazy jerk.


Oh hey, extra stuff!

The original down smash in its glorious overdetail
Pre-planning of Wood Man. I made a lot of these...

A personal note: I don't feel that Wood Man is my strongest set this contest. Really, I don't. There's a reason for that... he was originally designed for the BitF MYM. Also, one of these days I need to break out of my set-up formula.​
 

Katapultar

Smash Lord
Joined
Nov 24, 2008
Messages
1,258
Location
Australia
You want a good overlooked MYM4 set? How about...

http://www.smashboards.com/showpost.php?p=6179807&postcount=5476

He's one of the greatest villains in video game history, come on! While it's not the most exciting set to read, as well as somebody such as myself disagreeing with some of the attacks, much effort was made by ~Cruxis~ to beef the presentation, especially the Masamune Headers and the sprites. If I was around in mym4, I would have SVed him for sure. Just saying that Sephiroth's a really cool set. Go back to read and appreciate ~Cruxis~'s sets, because they are all worth reading.

Don't worry Neherazade. I for one am looking forward to Seymour since I like Final Fantasy X. It's alright if I have to wait for MYM8 to see him.
 

Wizzerd

Smash Ace
Joined
Feb 24, 2009
Messages
929
You want a good overlooked MYM4 set? How about...

http://www.smashboards.com/showpost.php?p=6179807&postcount=5476

He's one of the greatest villains in video game history, come on! While it's not the most exciting set to read, as well as somebody such as myself disagreeing with some of the attacks, much effort was made by ~Cruxis~ to beef the presentation, especially the Masamune Headers and the sprites. If I was around in mym4, I would have SVed him for sure. Just saying that Sephiroth's a really cool set. Go back to read and appreciate ~Cruxis~'s sets, because they are all worth reading.
Honestly, I'm not sure what you're seeing in Sephiroth; it's really just a standard MYM4 set. It doesn't really have overcreativity like certain MYM4 sets, but the uncreativity doesn't really do anything for his playstyle, which is only a standard combo-based one. I'm not saying you can't continue to like it, but saying it's great over the likes of Dimentio and Jafar because of images is somewhat rude.

Comment on Wood Man coming on the next page along with a Grunt comment and one on MW's new set.
 

MasterWarlord

Smash Champion
Joined
Aug 24, 2008
Messages
2,902
Location
Not wasting countless hours on a 10 man community

HUFF’N’PUFF​


Huff’n’Puff is the sixth boss of Paper Mario for the N64, located in Flower Fields. He was succeeding in his plan to take over the land with clouds and to make a “paradise” for his kind, until that dickwad Mario came along and ruined his plans, defeating him. Even one of his Lakitus, Lakilester, betrayed him to join Mario in his quest! How preposterous. It’s about time Huff’n’Puff made clear just –who- is the boss around here. . .


oOoOoO
(STATS)
OoOoOo


Size: 10
Weight: 10
Traction: 10
Jumps: 4
Aerial Movement: 3
Movement: 1.5
Falling Speed: 1

oOoOoOoOoOoOoO
(CLOUD MINIONS)
OoOoOoOoOoOoOo


As Huff’n’Puff takes damage, his massive cloudy mass starts to disperse and he becomes smaller and lighter. Every 3% Huff’n’Puff takes decreases his weight and size by 2% until he reaches 100% (So you’ll have 2/10 weight/size at that point). Considering being heavy is a burden at low percentages, you have the worst weight you can at all times, making your damage rack up at immense speeds and getting you KOd at low percentages.


Thankfully, Huff’n’Puff’s cloudy fluff doesn’t get destroyed as he’s attacked, it simply separates from him and takes on a consciousness of its’ own as a Tuff Puff. Tuff Puffs are in-between the size of a Poke-ball and Kirby and have random movement (Though they never go off-stage and spread out from each other), only attacking occasionally as often as Waddle Dees with similar power. If Huff’n’Puff orders them off-stage, Tuff Puffs will erratically move back on-stage once Huff’n’Puff is done with them. Tuff Puffs have 10 stamina. Perhaps they’ll make the foe take sympathy on you what with their frailness? Huff’n’Puff will not generate Tuff Puffs upon being hit at minimum size.


OoOoOoOo
(SPECIALS)
oOoOoOoO


NEUTRAL SPECIAL – HUFF

Huff’n’Puff turns to face the screen and sucks in air all around him, having a range of the entire screen to pull foes towards Huff’n’Puff at the speed of Ganon’s walk. If Huff’n’Puff sucks a foe up with the grab hitbox, he spits them upwards for 20% and vertical knockback that KOs at 95%. The move is pretty quick (.2 seconds of start-up), but foes have to stand in front of Huff’n’Puff for a full second to get absorbed, which makes this move all too easy to interrupt.

Tuff Puffs get pulled in from this move as well, albeit a decent bit faster (Ganon’s –dash- speed). Upon absorbing a Tuff Puff, Huff’n’Puff gains the 2% weight and size back and heals 3% damage as if they never left his cloudy mass. Considering the move’s so fast, then, what’s keeping Huff’n’Puff from being god, then? Firstly, Huff’n’Puff needs his Tuff Puffs to accomplish much of anything (We’ll get to that soon), that foes can still kill the Tuff Puffs before Huff’n’Puff absorbs them, and how incredibly frail Huff’n’Puff is in general.


SIDE SPECIAL – PUFF

Huff’n’Puff exhales out a gust of wind. It’s essentially a FLUDD you can hold out forever with no lag, but Huff’n’Puff exhales out a Tuff Puff from his mass for every .2 seconds you hold the move out for. The important thing is that this allows you to produce Tuff Puffs against characters who refuse to attack you and without taking damage, allowing you to still have some Tuff Puffs out and about at 0% potentially. . .With reduced weight. And no, you can’t use this to make Tuff Puffs at minimum size. Absorbing Tuff Puffs that weren’t knocked off of your mass by the enemy won’t heal you, either.

If you use this within a Bowser width of a Tuff Puff, they’ll get blown forward that far. It doesn’t matter how long you hold it, just a slight breeze is all they need, so you don’t have to worry about accidentally making more Tuff Puffs.


UP SPECIAL – HOVER

Huff’n’Puff gets a ridiculously long 10 seconds of free flight at his usual movement speed where he’s free to use his aerials and specials. Indeed, Huff’n’Puff can recovery from anywhere, but that won’t help him as much as it could when he gets sent flying at high percents with no weight. But this –does- basically let you stay off-stage/at the top blast zone forever for any purpose other then blatant stalling for the clock (Since you have to come back eventually). . .

DOWN SPECIAL – STORM CLOUD

Huff’n’Puff charges up electrical energy within himself, glowing dark red and gritting his teeth. All Tuff Puffs follow their master’s example and do the same. After a laggy 2 second period, Huff’n’Puff and all Tuff Puffs shoot down lightning bolts that reach all the way down to the ground/bottom blast zone. The hitbox of the lightning strikes linger on for a good bit to make it impossible to dodge the whole thing. Huff’n’Puff’s lightning does 40 hits of 1% and flinching while the Tuff Puffs do 16 hits. Unfortunately the lag on this move and the stupid nature of the Tuff Puffs makes this near impossible to hit with. . .

oOoOoOoOoO
(GRAB-GAME)
OoOoOoOoOo


Huff’n’Puff motions towards the nearest foe laglessly, then is free to move as all the Tuff Puffs start swarming the foe at Mario’s dash speed, latching on to them like Pikmin. Each Tuff Puff cuts the foe’s movement/jumps/attack speed by 10%, and with 10 on the foe they have to button mash out of the move with grab difficulty, the difficulty increasing by 10% for every extra Tuff Puff on the foe beyond the needed 10. Tuff Puffs automatically pummel the foe, dealing 2% every .6 seconds, regardless of quantity so long as there’s at least 10.

This is a great set-up for your Neutral Special to land the finishing blow and absorbs the Tuff Puffs back into your mass in the process. If there’s any walls in-between you and the grabbed foe, the Tuff Puffs will lift the foe over it as you drag them to yourself with Neutral Special. Unfortunately, the foe will undoubtedly destroy some Tuff Puffs in the process, and if you don’t have a lot of them it’s possible you won’t even be able to get the needed 10 at all, much less enough to hold the foe long enough for them to get sucked up. While having out a swarm of Tuff Puffs make this absolutely unstoppable, it makes you extremely vulnerable.


oOoOoOoOoO
(STANDARDS)
OoOoOoOoOo


NEUTRAL ATTACK – BRACE

Huff’n’Puff braces his arms around himself for as long as you hold A for up to 5 seconds, gaining superarmor and anti-grab armor, what have you. Upon releasing A Huff’n’Puff spreads his arms out in a sweeping motion for a pitiful 3% with bad range and priority, and horrendous ending lag. The main point of this is to abuse the superarmor and let the foe produce Tuff Puffs for you without worry of being unable to heal from them, though be sure to do it right off the bat if you don’t expect to get punished horribly at the end.

DASHING ATTACK – WIND CYCLE

Huff’n’Puff blows out some wind forward as he comes to a halt, decreasing his cloudy mass by 6% but not spawning any Tuff Puffs.The wind Huff’n’Puff sent out then goes in a loop over .8 seconds, during which time Huff’n’Puff is free to move. When the wind finishes it’s loop, it will go back into Huff’n’Puff from behind to propel Huff’n’Puff forwards from behind as it re-enters his mass, assuming he hasn’t moved from his initial location. If Huff’n’Puff isn’t there, he’ll lose the air permanently, but otherwise he’ll be propelled forwards a Battlefield Platform forwards as a high priority hitbox that deals 12% and knockback that kills at 135%.

Using the jab in combination with this move is said move’s primary function, as the superarmor/anti-grab armor prevents the foe from budging you from your spot while the wind blasting you forward will cancel you out of the jab laglessly into the rush forwards. Of course, this combination still has some vulnerable points in the end lag and when Huff’n’Puff first activates the dash attack.


UP TILT – INFLATE

Huff’n’Puff turns towards the ground and starts sucking up some air, not having any suction effect due to him intentionally aiming downwards. After completing the process, Huff’n’Puff quickly grabs a chunk of rock out of the ground, then starts floating upwards slowly at the speed of Ganon’s walk due to the extra air in his mass. This has .35 seconds of starting lag and increases Huff’n’Puff’s size (though not his weight, unfortunately) by 50%.

Huff’n’Puff continues to float upwards like this for as long as you hold A, able to DI back and forth with his usual aerial movement speed. Upon releasing A, Huff’n’Puff drops the rock which falls at Captain Falcon’s dash speed and does 10%/knockback that kills at 170% on contact. Huff’n’Puff continues floating upwards at a now vastly increased speed due to the rock not weighing him down. Pressing A again causes Huff’n’Puff to blow out the wind he sucked up upwards, propelling him down Ganon’s height and returning him to his regular size.

If Huff’n’Puff is hit during this attack, he’ll blow out the excess wind as he’s hit as well as drop the rock, most probably hitting the perpetrator unless they hit him from above. Due to how this attack gets you out of the way and has an automatic counter of sorts in it, this encourages foes to ignore you and attack your Tuff Puffs.


DOWN TILT – TOSS

Huff’n’Puff reaches below himself from his natural hovering position in mid-air to try to grab anybody over .25 seconds. This can be angled diagonally in front of and behind Huff’N’Puff to grab those various characters that are too large to fit under him. Upon grabbing the foe, he’ll throw them in the opposite direction he grabbed them from for 8% and knockback that kills at 170%.

You can also grab Tuff Puffs to use as living projectiles for some basic camping. If you hold down the input Huff’N’Puff will hold out his hand, making the nearest Tuff Puff come to his hand to be thrown. Tuff Puffs travel the distance of Final Destination at Captain Falcon’s dash speed upon being thrown in whatever direction you aimed them, dealing 7% on contact and average set knockback. Their priority’s decent, but you’ll be making the foe’s job in destroying your fluff easier if they have any attacks with better priority.

But really, Huff’n’Puff has better options for camping anyway (Usmash). What’s the point, really? Well, if you throw a Tuff Puff into another Tuff Puff they’ll fuse into a Dark Puff.


Dark Puffs can’t be absorbed and ignore any orders from Huff’n’Puff. While their stamina is doubled, their movement speed is reduced to half of Ganon’s walk (INSANELY slow). The important thing though is that every 5 seconds Dark Puffs cause a lightning bolt to come from the top of the screen down to wherever the foe is that deals 8% and average set vertical knockback. Notably, the lightning ignores shields. This replaces the standard generic Tuff Puff attack. Unfortunately Dark Puffs insist on going back onto the stage like all the other Tuff Puffs where they’re easily picked off. . .


FORWARD TILT – SUFFOCATE

Huff’n’Puff stretches his arm back over .15 seconds before lunging it forward with superb range in a half-arch arc. If he hits a foe, it counts as a grab hitbox where Huff’n’Puff keeps his cloudy arm inside of the foe, suffocating them. From here they take 2% per second until they escape the grab (Rather bad “pummel”).

If you hold down A during the starting lag, Huff’n’Puff will hold his arm back after finishing the starting lag until you release A. This will cause the nearest Tuff Puff to come over into Huff’n’Puff’s hand during the lag. If you successfully land the grab after this, then Huff’n’Puff will retreat his arm after landing the grab (During this lag the foe has hitstun), leaving the Tuff Puff inside the foe. This decreases the foe’s weight by 5%, and the Tuff Puff will still attempt to move to you like any other Tuff Puff, fighting against where the foe wants to go. It’s nothing more then a walking Ganondorf of interference, but it’s annoying to say the least. . .Too bad the Tuff Puffs lose 1 stamina per second, so it’s just a brief annoyance. What an utter waste of your time. . .Not worth the effort considering whiffing the move with a Tuff Puff in hand is rather laggy. Using the ftilt on a foe with a Tuff Puff inside of them pulls the puff out.

Making the foe suffocate on a Dark Puff can be significantly more useful (Yes, they respond to you when you use this input), as they’ll last 20 seconds and it protects the Dark Puff from harm, guaranteeing you that their lightning will strike 4 times with the foe unable to do anything about it.


OoOoOoOo
(SMASHES)
oOoOoOoO


FORWARD SMASH – TACKLE

Huff’n’Puff does a massive tackle forwards, going forwards 1.5 Bowser lengths in his wake. This is yet another surprisingly very fast move, despite dealing 25-35% and knockback that kills at 100-80%. . .Pretty broken crap right here, though the ending lag is absolutely ridiculous as Huff’n’Puff hits the ground and 4 Tuff Puffs get knocked out of his cloudy mass. No, I mean the lag is so bad that they’ll probably be able to come back and punish you for using it after respawing from being KOd. Huff’n’Puff can leap off the stage with this to avoid hitting the ground for the ending lag but he won’t stop until he hits ground, so it’s suicide.

UP SMASH – LIGHTNING STRIKE

Huff’N’Puff charges up with an identical animation to his Down Special, but the lightning doesn’t come from Huff’N’Puff or his Ruff Puffs upon release. Instead, it comes from the clouds up beyond the top blast zone and strikes down at wherever the foe is. This smash can be charged a lot more then the regular smash attack, 4 seconds to be precise. The strike of lightning is lagless, but the power varies a lot based off charge: 8-32% with vertical knockback that kills at 240-100% that goes through shields. If you press B before you release the move, the hitbox is delayed slightly, meaning if they spot dodge in the normal fashion they’ll get hit. Nice tool for encouraging approaches. The main way you’ll prevent foes from dodging this every time is by releasing your usmash shortly after a Dark Puff’s lightning, so that if they dodge the Dark Puff’s lightning they get hit by your lightning bolt instead. If they don’t dodge, all the better, they get hit by both.

DOWN SMASH – CLOUDED VISION

Huff’n’Puff turns to face the screen and extends out his arms to either side during the charging, and during the charging the nearest Tuff Puff comes in front of his master. Upon release Huff’n’Puff claps his hands together with .22 seconds of lag, dealing 14-24% and knockback that kills at 175-140%.

Assuming the Tuff Puff got in front of Huff’n’Puff in time, they’re squashed into a non-solid lifeless obscuring cloud. The cloud is in a box shape as tall as Ganon and as wide as ¾ a Battlefield Platform. It doesn’t affect foes or Huff’n’Puff himself in any way aside from obscuring vision, but if a Tuff Puff enters it they’ll instantly come out of the cloud from a random point, then continue on their merry way. If you’re dragging Tuff Puffs that have grabbed the foe with Neutral Special towards you, they’ll simply appear at the side closest to you, making them come to you faster. Huff’n’Puff can only have two of these clouds out at a time, and can disperse his existing clouds by using dsmash inside of them.

If a Dark Puff goes through the cloud, they’ll come out disguised as a Tuff Puff, the color of the cloud sticking onto the Dark Puff. Unfortunately it’s still obvious they’re a Dark Puff due to their slow movement speed. . .

However; if you squash a Dark Puff into an obscuring cloud, then the cloud will be the same color as the Dark Puff, and any Tuff Puffs that go through the obscuring cloud will take on the coloring of a Dark Puff. The Tuff Puffs are intelligent enough to slow down their movement and not do their generic melee attacks when disguised as Dark Puffs. An easy way to make all your Tuffs come into the Dark Cloud is Neutral Special, as it’ll make all your Tuff Puffs come to you but the cloud will prevent you from sucking them up.

While this prolongs the existence of your Dark Puffs, the foe is obviously going to be tearing through your Tuff Puff population at alarming rates trying to find the Dark Puff, so it’s still not exactly ideal. Now that you’ve disguised all your Tuff Puffs as Dark Puffs, go over to the obscuring cloud and use Side Special. . .This causes the obscuring cloud to separate into 10 clouds the size of a Tuff Puff which randomly move around like Tuff Puffs, but as slowly as Dark Puffs. They’re destroyed in one hit, but 10 stamina may as well be 1 anyway. When Tuff/Dark Puffs go through the obscuring cloud, their faces are also covered up with fluff, so foes won’t be able to tell the difference between the fake clouds and the Tuff Puffs.


OoOoOoOo
(AERIALS)
oOoOoOoO


BACK AERIAL– SPIN

Huff’n’Puff spontaneously spins around in a circle with no lag, dealing 5% and weak set knockback. An excellent GTFO move for Huff’N’Puff early on when he’s combo food.

Later on when you’re small and damaged and one attack is all that’s needed to KO you, this move still has a function. If you use this lagless move 3 times in quick succession (Which is fast and doesn’t leave you defenseless while you do it) when you’re at 4/10 size or smaller, Huff’N’Puff will shed all of his remaining cloudy mass into Tuff Puffs and go beyond minimum size – he’ll become so small that he’ll be a Tuff Puff himself.

As a Tuff Puff you only have the usual 10 stamina and lose access to Neutral B, Side B, dtilt, ftilt, jab, fsmash and dsmash and your personal lightning is as weak as a Tuff Puff’s in Down Special. However; you blend in with your other minions and your movement increases to Mario’s dash as well as gain access to free flight – though you’ll be forced to wander back on-stage and down to earth if you try to cower away to stall off-stage/higher then triple Ganon’s height off the ground. You can use grounded attacks if you’re hovering at minimum height. Lastly, if you go over to join your fellow Tuff Puffs in a grab, then you’ll be able to carry the foe around at the rate of Ganon’s walk.

There’s no animation whatsoever for charging up usmash as a Tuff Puff, and you can move around while charging. This gives you more of an actual point to keep up the act of being an AI Tuff Puff, as the lightning bolts won’t be telegraphed at all. Unfortunately the max power of the usmash lightning bolts as a Tuff Puff is 16% fully charged. Your dashing attack is also changed to the usual generic attack of a Tuff Puff, robbing you of a KO move but allowing you to act as one better.

Obviously being a Tuff Puff has a lot more potential with dsmash obscuring clouds/Dark Puffs roaming around. If you stay in obscuring clouds with Huff’n’Puff a lot, then suddenly use nair and pop out as a Tuff Puff they’ll think you’re still inside and will be flailing away at nothing for a good while before they realize you’re gone. If you can keep the foe thinking this for a while, then you’ll generally want to not charge your usmashes so they’re the same power as the lightning from the Dark Puffs. To make the foe think this for long you’ll have to insist on staying inside your obscuring dsmash clouds a lot and be hard to make come out of them. . .If the foe catches on to this in subsequent stocks/matches, then let them think you left the obscuring cloud to become a Tuff Puff when you’re actually still there camping them. As a Tuff Puff Huff’n’Puff can hide in his clouds of transverse through them like a regular Tuff Puff based off whether he’s dashing or not.

As a Tuff Puff the utilt is changed so that you simply inflate enough to look like your regular self at minimum size. You still have the normal Tuff Puff moveset here, so don’t be fooled. . .However; making the foe think you never left your default state can be advantageous (Mainly if you do it inside a dsmash obscuring cloud), and when you go back into the obscuring cloud and exit as Tuff Puff again the possibility of you being in there is a lot more believable. Using utilt again has Huff’n’Puffn exhale the air to return to regular size.

Inputting bair when already a Tuff Puff has you slowly turn back to normal minimum size over 5 seconds, but you can move around while doing so like with usmash.


FORWARD AERIAL – CHAIN LIGHTNING

Huff’n’Puff shoots out a single lightning bolt the distance of a Battlefield Platform that deals 8% and average set vertical knockback over .4 seconds. That’s the entirety of the attack unless you hit a Tuff/Dark Puff with it, in which case they’ll start crackling with electrical energy. If it was a Dark Puff, they’ll start healing 1% per second.

Upon the next input of fair, the puff will shoot out the lightning bolt forwards with the same properties as Huff’n’Puff’s fair with only .15 seconds of lag (Albeit .85 seconds of end lag. . .For one insignificant Puff you’re no longer using). This doesn’t give Huff’n’Puff himself any lag at all. If the lightning bolt fired by the puff hits another puff, then that puff will then crackle with electric energy and will be the new puff to fire out the bolt when Huff’n’Puff inputs fair. These lightning bolts go through foes, meaning you can damage them with the bolt while still passing it onto another puff.

If the lightning bolt you fired manages to stay in existence for 20 seconds without you botching an fair or the puff that’s hosting it getting destroyed, then if it was a Tuff Puff it’ll become a Dark Puff, absorbing the amassed electric energy into itself. If it was a Dark Puff then it’ll simply turn the next Tuff Puff it hits with the lightning bolt into a Dark Puff. You can make the foe dart all over the stage trying to kill the puff that has the electric charge, only to keep constantly switching which one has the power. Yes, you can turn yourself into a Dark Puff when you’re a Tuff Puff with nair, though it’s best to let cpus take on the burden of reduced movement from being one.

Those fake lifeless clouds that you can create from using a Side Special on a dsmash obscuring cloud? Those can absorb the lightning bolt as well, but you can’t make them fire the bolt. If a puff comes into contact with the cloud though, they’ll absorb the electric charge of it for themselves. Considering you can still move around the fake cloud with Side Special, it’s not too much of an issue to get it back onto a Puff. Why would you want to do this. . .? To make them chase after a fake cloud rather then one of your precious puffs, of course.

Making the foe suffocate on a Tuff Puff (Ftilt) with the lightning bolt from the fair allows you to force a hitbox inside of the victim every second by inputting fair for 10 seconds, the bolt bouncing off the insides of the foe back into the Tuff Puff. Better yet, plant a Dark Puff inside the foe and it’ll last forever (Due to their healing from the bolt), and the Dark Puff’s automatic bolts will still hit the foe also. Unfortunately puffs cannot do more then 12 bolts total in this manner without losing the charge permanently, so you can’t make them –truly- last forever. . .But it’s close enough.


UP AERIAL – CLOUD LINE

Huff’n’Puff laglessly points upwards, causing all Tuff Puffs to come up alongside Huff’n’Puff at the rate of Mario’s dash. Half of them line up to Hufff’N’Puff’s left while the other half line up to his right, though if you input left or right after the uair they’ll all go in that direction. With enough Tuff Puffs, it’s possible to cover a large horizontal distance with them. The application of this is to go high up in the sky with Up Special, line up the Tuff Puffs, then thunder down on them with Down Special. If you have a long enough line of Tuff Puffs to either side, it’ll be impossible for them to get out of the lightning strike. Sure, they won’t be stupid enough to get hit by the lightning of Huff’n’Puff himself and they can dodge the first bit of the Tuff Puff lightning, but they’ll take at least 10% or so due to the lingering hitbox. That or better yet, catching the foe off-stage with it for a gimp.

If a puff has a lightning bolt inside of them from fair, then they’ll move so that they’re as far back in the line as possible. This allows you to use fair every .15 seconds to quickly transfer the bolt through all of your puffs. The point? Well, after a puff loses their charge from the fair bolt, they still crackle with very slight electric energy briefly for 5 seconds. . .What a snazzy visual effect!


NEUTRAL AERIAL – SHOCKWAVE

Huff’n’Puff crackles with electricity all around him in the gigantic radius of a Smart Bomb. This deals 9 hits of 1% and flinching, though the move has a very long duration and there’s enough lag between the 9 hits to hit Huff’n’Puff out of the move pretty easily.

If you hit a puff with this move with leftover charge from the fair lightning bolt, then they’ll absorb up the shockwaves and free Huff’n’Puff from this overly long move. For 5 seconds the puffs will be supercharged with electricity. . .No, you can’t make them all fire bolts with fair, but on contact the puffs now deal 2% and flinching (This won’t knock foes out of their grab), out-prioritizing all non-disjointed attacks. Seeing the puffs are essentially now invincible for 5 seconds, the foe is left with no choice but to attack you instead, coming to your off-stage domain. Either that, or the foe will just run like a pansy to give you more time to easily camp them from afar.

While you can call them back to you again with uair and just repeat the process before they become vulnerable again, the foe is not unable to resist you. They can lure the puffs as far away from you as possible so that the puffs have to go farther to you when you call them back, giving the foe more time to attack the puffs. Besides, due to the awkward AI of your Puffs it’s difficult to catch them all in the radius of the nair, meaning the foe will have –some- puffs to attack if they don’t want to attack you personally.


DOWN AERIAL – CLOUD PLATFORM

Huff’n’Puff claps his hands in a “chop chop!” fashion to cause the 2 nearest Tuff Puffs to come over to him at Mario’s dash speed. The Tuff Puffs fuse into a platform the width of Bowser like the one on the N64 Yoshi’s Island stage under Huff’n’Puff. These platforms expire after being stood on for 10 seconds (Total). This can renew Huff’n’Puff’s Up Special so he can continue stalling off the stage, him able to do so as long as he has Tuff Puffs to rest on. Huff’n’Puff can’t just barely touch the clouds to renew Up-Special but otherwise ignore them to make them last stupidly long, as the clouds slowly float upwards. If they hit the bottom of a –real- platform, they’ll instantly disperse.

This also lets you use your grounded moves off-stage. . .Most notably, if you use your fsmash to hop onto one of these cloud platforms, Huff’n’Puff won’t experience any end lag or loss of Tuff Puffs. Having a pair of cloud platforms off-stage to laglessly hop between with fsmash can be quite terrifying if you can manage to get the foe to come over to you. Cloud platforms can also allow you to camp the foe with usmash, though keep in mind the fact the usmash does vertical knockback – you’ll be helping them approach you. . .Which actually isn’t a bad thing.

Oh, and did I mention that you can also grab cloud platforms with your dtilt and are then treated as if you used your Up Special, able to move around with it? Granted, you can’t attack while carrying around a platform, but this allows you to relocate them. . .More importantly, Huff’n’Puff extends upwards and stretches out his arms below to hover above the platform as he carries it around, becoming solid. There’s enough room for anybody not named Valozarg to fit in-between Huff’n’Puff and the platform, so this can prove to be an invaluable method to take them off-stage. They can still attack you, but you have superarmor/anti-grab armor. Granted, Tuff Puffs will still fly out of you upon being hit, and you can’t stretch your arms far enough at minimum size to do this. . .Either way, though, this is your main way of getting somebody into your realm off-stage if they’re just too defensive/stubborn. It’s a blatant option for suicide KOs, but they can generally escape out of this easily when you actually want to do this (High percents).

The dair/dtilt combo is also the main way you can make your Dark Puffs camp alongside you, safe from harm. Trap them in-between you and the cloud platform, then drag them off-stage with you to camp alongside you. You’ll have to herd the Dark Puff back over to your off-stage camping spot due to it wanting to go back to the stage, but due to the Dark Puff’s horrendous movement (Yes, the bad movement was actually relevant!) it won’t be that often. You can also this technique of trapping puffs to shelter a Tuff Puff you hit with fair while you’re waiting for it to turn into a Dark Puff, though make sure you disguise it as a Dark Puff with a dsmash obscuring cloud first so that it doesn’t go back to the stage so quickly.


OoOoOoOoOoOo
(FINAL SMASH)
oOoOoOoOoOoO


Huff’n’Puff becomes invulnerable and solid upon activation of the Final Smash, then goes directly upwards at Sonic’s dash speed, attempting to take the foe off the top blast zone with him. If he reaches the top magnifying glass with nobody on top of him, then he won’t suicide, the final smash simply ends early. If he does take a foe with him off the top blast zone, it’s not a simple suicide KO, no.

Huff’n’Puff and any victims on his back will be up in the sky above the stage, Huff’n’Puff still solid and invulnerable, as well as gaining infinite free flight. He loses the ability to dodge so he can’t just casually go in the background to drop his foes into the abyss. Foes have to keep moving in the same direction as Huff’n’Puff moves to stay on top of him, which isn’t helped when the sky stage scrolls on with lots of obscuring clouds for you to go through. Your Up Special is replaced by your usmash in this final smash state, due to you having infinite free flight, and the obscuring clouds allow you to bring down thunderbolts on the foe with no warning. You can absorb these obscuring clouds with Neutral Special to heal your damage/cloudy mass by 10% for each one you absorb, and there are 10 in all if the final smash lasts it’s full duration with nobody dying. In a FFA (A setting likely to have Smash Balls), it may be higher priority to heal then to KO the foe.


oOoOoOoOoO
(PLAYSTYLE)
OoOoOoOoOo


Before Huff’n’Puff begins his camping game, he’ll want to get some Tuff Puffs out. While he can produce them on demand with Side Special, this doesn’t allow him to suck them back up when necessary for free healing, so unless the foe is just setting up their own stuff you’ll want to fight the foe like a standard character a while and take some hits to produce some Tuff Puffs. Jab is particularly nice for this due to it producing lots of puffs while not making you take any knockback, assuming you use it in combination with dashing attack (Which allows you to actually fight the foe back while you take the damage). Of course, if you’d rather start off with a clean slate rather then having the ability to heal you can always just go off to a safe place and use Side Special.

Once you’ve got your puffs you’ll want to produce a Dark Puff. From there, make some dsmash obscuring clouds and disguise the Tuff Puffs as Dark Puffs, then drag away the real Dark Puff and one of the Tuff Puffs off-stage with dtilt, fairing the Tuff Puff so his transformation into a Dark Puff can begin. From here you can just use usmash to camp the foe to all hell, using the bolts of the Dark Puffs to stun the foe to land your usmash bolts. Assuming the foe keeps killing your puffs, you can feel free to do what you’re doing to get damage.

But why wait and sacrifice your puffs for damage when you can just gimp them without racking up their damage? Once you’ve got your second dark puff, call your puffs over with uair and have them line up in front of you, then make the fair bolt pass through them then nair them all, then go for a grab to force the foe to deal with you and not the puffs, assuming they’re not of a stally nature. For said stalish characters, dtilt is just the thing to bring them over.

Once they’re in your domain, line up the puffs again with uair then use Down Special on them to gimp them as they attempt to make it back to the stage. If they have good recoveries/aren’t far enough out for that to work, you might prefer to just rapidly hip-hop between some platforms you’ve had time to set up out here with fsmash to abuse the high power low lag move. If you fear them getting back and don’t want your efforts in forcing them over to be pointless, ftilt them and suffocate ‘em Dark Puff with an fair bolt to make their lives absolute hell once they get back to the main platform to resume attacking your puffs. If you feel you’re being pressured and have low cloud mass, go flee and suck up your puffs to get bigger/healthier again, then start all over. This is easier said then done with Huff’n’Puff’s low speed, but they’ll struggle to chase you as you transverse to the other side of the stage from under it.

When you start running low on puffs and clearly can’t hold on that much longer, that’s the general time to go back onto the stage and disguise yourself as a Tuff Puff, continuing to camp with Dark Puffs/usmash until every last puff goes down. This phase of the battle can be easier if you try some rudimentary camping inside dsmash obscuring clouds earlier on when trying to make puffs. Try to stay in them for as long as humanly possible so the foe doesn’t think it’s particularly strange when they keep attacking inside the area and don’t hit anything when you become a Tuff Puff. If you do this, using utilt to pose as your minimum size self also obviously has a lot more potential in making the act believable before you go out as a random Tuff Puff. As you can tell, this is the main phase of Huff’n’Puff’s game that can be varied up a lot and isn’t nearly as reactionary as the rest of playing Huff’n’Puff. The prime time to take it into action is for racking up damage for the next stock, as it excels significantly in it regardless of your percentage. This phase of the game can go on a lot longer if you dedicate your stock to it from the start, but getting a KO out of it is impossible. . .But then again, the foe no longer expects you to be in the dsmash obscuring cloud, so it’s pretty easy to turn back to normal. . .And they sure as hell won’t expect you to come out of nowhere with a dashing attack at high speeds in your main form.


OoOoOoOoOoOoOoOo
(CAPTURE THE FLAG)
oOoOoOoOoOoOoOoO


Huff’n’Puff obviously gets to be one of the characters on the defensive. Unfortunately he won’t be able to suck up his puffs back up due to producing them, but does it really matter? He’s going to be turning them all into Dark Puffs that you can’t suck up anyway, preferably via fair rather then dtilt to get the maximum amount. Seeing you can’t suck up your puffs no matter how you look at it, you may as well turn into a Tuff Puff yourself via bair so that you can’t be grabbed by any of those cursed Spies lingering around. While if you do this your allies will know you’re innocent, there’s not exactly a lot you can do about the Spy once you know he’s there as a Tuff Puff, especially considering the Spy can just poke you for a KO if you make any sudden movements indicating which puff you are. Considering Huff’n’Puff is always way up in the air anyway he won’t have to worry about many enemy Spies grabbing him, and as a Tuff Puff he can’t pick up items. . .Which means he can’t run away with the flag for 10 seconds with free flight. Of course the Spy is another pain in the arse here due to his infinite recovery, though your mass Dark Puffs should be enough to kill the Spy as he reduces his weight with his infinite recovery while your run with the flag. Dsmash is also highly useful for hiding the flag. Even if the flag’s not there, the foe’s likely to search those areas for the flag when in reality all they’ll find is a trap from an ally.

oOoOoOoOoO
(MATCH-UPS)
OoOoOoOoOo


VS. Viola – 60/40, Huff’n’Puff’s favor

How nice of you to give Viola all of these targets to practice on to rack up her echos with! If you play the stalling game, she’s going to beat you out with abuse of her Up Special for healing and preparing her echos until she decides to approach you. While normally her Up Special would probably heal your Puffs (Input grab to force her away from the spot/make it heal the puffs if she decides to let herself get grabbed) instead of her, Arco makes the move lagless free healing, essentially. While you’re letting her knock Puffs out of you early game, you’re going to have to make it a big priority to kill Arco ASAP. Just pick him up and run the hell away from Viola with Up Special, then chuck him off-stage. Of course, seeing you’re so slow to move around that’s easier said then done, though the dtilt/dair combo gives you more room to scoop Arco up with and prevents Viola from stopping you.

Without Arco Viola struggles a lot more against you. When she kills your Tuff Puffs the first time, she’ll have enough echos to kill them all with one giant Side Special when you make more, so it may be a good idea to just run away and use Side Special to make puffs rather then intending to let them come in and out of you to heal over and over again, as this just gives Viola more echos. Granted, if you can predict when she’s going to use Side Special you can use uair to get your puffs the hell out of the way, and then all her hard work is ruined.

While Viola excels in killing Puffs, she struggles killing a camping Huff’n’Puff off-stage. While she can get there fine with uair, she’ll struggle a lot to make it back (Seeing Huff’n’Puff’s cloud platform won’t restore her stale uair). This means her best options are really one of her suicide kill aerials like fair, though she’ll probably just get gimped anyway. This means she’ll want to wait until Huff –has- to come back to the stage and has no puffs left so she can’t get gimped. This means Huff’n’Puff will force Viola into his domain with a dtilt/dair combo or grab/neutral special combo, though then it’s possible for her to get back on-stage due to her not having wasted her uair. . .Though not if Huff’n’Puff does this repeatedly. If she somehow manages to get Huff’n’Puff back on-stage (Probably by keeping him there when he comes over to go for a dtilt/dair combo), she can prevent him from getting away from her pretty easily with her grab, seeing Huff’n’Puff will be nice and light at this point and too slow to escape the tether grab. Still, due to her having to reel Huff’n’Puff in there’s a possibility a Dark Puff will just zap her during the lag to interrupt the grab.


VS. Rocket Grunt – 55/45, Huff’n’Puff’s favor

Grimer’s traps are useless here for the most part due to Huff’n’Puff and his Tuff/Dark Puffs constantly hovering off the ground. Huff has to fall into his knocked down state to receive the effect from grounded traps properly. Part of what makes Grimer’s trap game so great in Zubat’s Side Special is also rather irrelevant, as it makes life much harder for Rocket Grunt’s team due to it making the puffs looks all the more plentiful. Furthermore, Houndour is unable to destroy Huff’n’Puff’s traps (Dsmash obscuring clouds, dair cloud platforms) due to them hovering in the air.

But the Grunt’s team isn’t without its’ own perks. Zubat gives infinite horizontal recovery to reach Huff’n’Puff on-stage, and if Huff has provided a dair cloud platform then Zubat can casually switch to another Pokemon (Houndour) to put the beating on the Huff. Huff’n’Puff can make his platform higher up then Zubat can reach, but then it’ll float off the top of the screen faster. Camping at the top of the screen is ill advised as Huff’n’Puff in general.

Grimer isn’t as entirely useless as you might think in this match-up. Due to Huff’n’Puff usmash doing vertical knockback Grimer can survive forever on the stage as Huff’n’Puff camps off-stage, allowing him to set up whatever he wants. Of course, Huff’n’Puff can still force Grimer off-stage, which isn’t particularly hard, but Huff will still want to rack Grimer’s damage first. Yeah, he can gimp Grimer easier then Link, but if the Grunt is competent he’ll switch (Probably to Zubat) before that happens. Once Grimer’s got his stuff set-up, Zubat can use uair for a prime method of forcing Huff’n’Puff onto the traps, then finally start pressuring him. Just don’t let Huff’n’Puff get too high, as up there he’s far more then capable of stalling for a mere three seconds. KOing Huff’n’Puff with poison is easier said then done. Perhaps you could camp back at Huff’n’Puff by using Zubat to fan over some smoke to him? If you can mange to land Hondour’s fsmash, that is, and if Huff’n’Puff doesn’t just stall off the fsmash’s duration.

But why KO him with poison when he’s so incredibly light and probably damaged anyway? Grimer once again comes into play here – having Houndour explode Grimer will most probably be your main KO method (Which also doubles as a way to recover back to the stage), or just some of Houndour’s generally more powerful attacks.


50 movesets of Warlord. . .
 

KingK.Rool

Smash Lord
Joined
Nov 26, 2005
Messages
1,810
Grunt

I'm not gonna go in depth, but I like how in character you stayed with each pokemon. Lot's of times it's easy to create a pokemon with uber moves and super originality, but it turns out nothing like the pokemon you made a set for. (Of course you set has both). this was especially prevalent with Zubat who epitomized on the annoying pest the grunt's always used to F with me. (I swear I got hurt from confusion more often than I thought humanly possible). Also of course, your organization was well done and looks wonderful.

And it if matters, you have always been my favorite Movesetter here, it's been fun reading your sets.
I completely forgot to comment on this. :embarrass

Thanks, Panandero! It most definitely matters - it's always so nice to hear that there are people out there reading the movesets without posting.

Team Rocket:
What a fun 3in1 character this turned out to be. A lot of Meowth's moves were generic as pie, but as I read Jessie/James I realised there was a reason for that. It all seems complicated as heck and its hard to imagine exactly how any player could keep track of everything at once, particularly since this is a set that absolutely requires teamwork to even function. But in the end, the pay off at the end was worth the effort slogging through two sets worth of seemingly half finished attacks.


Team Rocket Grunt:
What a fun 3in1 character this turned out to be. A lot of Zubat's moves completely lost me (sound wave + random effect = creative attack) to the point where for half the set I was just nodding along whenever you mentioned a Zubat interaction. The eventual pay off with Grimer was worth the treacle build up however, dispelling all my previous thoughts of "omg, Zubat sucks" and "houndour seems cool, but... OMG, Zubat sucks". The myriad two-way and three-way interactions between the team members felt astonishingly natural most of the time. And I almost... ALMOST forgive you for making Grunt an alternate KO character with a Final Smash that clearly hates me.
Team Rocket Grunt manages to be an excellent set, with an almost peerless execution, which is pretty much unheard of within long multi-sets like this
Is it just me, or does making a Team Rocket moveset of any kind preclude making a looooonnggg multi-set?
Ah, a Junahu comment! You know, I'm really grateful for this comment, at that. I didn't get quite as many as I'd hoped for, and this is probably the least critical comment you've ever given me (TAC notwithstanding) - hardly any minor talking points, and I'd feared quite a few. Glad you liked it so much, Junahu.

Silver's Top 5 of MYM 4: It does me good to see that, even if people don't think Kawasaki entirely deserved to win (as I didn't then and still don't know), one of my sets did. Makes me feel like less of a cheapskate, winning on the basis of an undeserved hype train. I always was fond of Jafar.

Reminiscences: The other day, I was rereading MYM 3. Then I went into the chat and just talked a bit about the state of MYM today. I got so depressed over the whole thing - I'm sure anyone who was there could tell you. MYM was definitely more alive pre-banning incident and especially pre-chat, but then again, it wasn't as closely knit or nearly as friendly. We don't have nearly as many disagreements nowadays and we've built some really nice friendships, and whether that's worth the loss of a certain pulse is up for debate.

Moveset-wise, I honestly do have an easier time reading them today then I did in MYM 4. I have a harder time swallowing the state of them today - it feels almost like playstyle has backed us into a corner, and, like I said in early MYM 6, the ideas are simply running out, all either reinventing the wheel or retreading old ground. It's unfortunate, but I trust it'll change with time.

Sephiroth: I always thought that was a really neat set, if only because of the very unique way Cruxyphon approaches MYMing. It's actually so fitting that you'd like it, Katapultar; it's like a match made in heaven. I voted that moveset, but just bear in mind that it's not very popular, and Gryxis in general hasn't been since he disagreed with Warlord on what movesets are about. Anyone else remember how to pronounce his username? KROOSH-iss? ololololololol

I really hate posting without commenting, but there was a lot to catch up on and I do have to be in a certain mood to really get into a commenting groove. I'll do everything I can to read/comment all the remaining movesets before MYM 7 ends - or, worst case scenario, before voting time. Unlike MOST people (cough everyone who didn't comment Romero which means EVERYONE), I don't see anything weird in commenting a set even after the contest ends.

EDIT: I felt terrible about Huff N Puff just above, and Wood Man, posted hours ago and still not a comment to show for it.

You know, there's little I hate doing more than calling a moveset too confusing. It seems especially ridiculous here, because Wood Man is actually very simple - and deliberately so. Maybe that's what threw me off; as I read, I was constantly thinking, did I miss this? Is there something more to this that I missed. I kept thinking, especially pertaining to the specials, that I was missing out. I think I was just overanalyzing.

More than almost any other MYMer, I'm going to have an appreciation for an uncomplicated set - hell, I could see a BiTF-calibre set that I could like more than many MYM sets. Wood Man, though, seems just a tad oversimplified to me (like you're dumbing down our concepts instead of smartening up theirs) - and far too rough a pill to swallow to be that. Referencing attacks that you haven't shown yet drives me crazy most of the time, and, on a completely unrelated note, I'm not really a fan of that earthy, old-school colour scheme. It looks very... Plorf-ish. Plorf on a bad day.

Also, it cracks me up that the entire playstyle - knock a tree down on the foe - is contradicted by one of the only sources we have about what he's actually like. That's hilarious, it's like Kangaskhan except unapologetic.

But I do love that increasingly unique writing style, and I do appreciate how tricky it is to try to market a set to both of your audiences at once. That Wood Man can be an interesting read for me and a palatable one for them speaks volumes to your ability to walk the tightrope.

I want to mention, real quickly, since I just took a look at BiTFMYM, that I find it odd that you chose to represent yourself as someone from this MYM. If it had been me, I would have kept that on the down-low and tried to foster the community without ever revealing my true identity.


Then there's Huff N. Puff, a welcome blast of nostalgia. I have a sense that this is going to be a very popular set - probably not one of the big contenders, because you've got vote split afflicting you and people seem to prefer your more experimental sets as a rule, but still - if only because it's SO unique and SO creative. It's really quite a spectacle, a kind of refined image of the summons character living among his summons. Huff N. Puff turns a Brawl into a game that sort of combines dodgeball, tag, and hide and seek.

You seem to know it, too, and go absolutely insane with some of the most detailed attacks you've ever had in those aerials. There's a lot of passion behind this moveset, clearly; you got right into the flow of things. It's tough to read so much yeasty text sometimes, but it's kind of funny how the big, puffy Huff N. Puff has a lot of fluff and padding. I'm sure you could make the set shorter, but I'm not sure I'd want you to. The use of symbols (yes, SYMBOLS) is very innovative, borrowing a bit from mrg and Yukari.

I like the concept presented early in the Specials: Huff N. Puff is so lazy and so used to being the boss that he prefers to just sit there and let his Tuff Puffs do all his work for him. You don't really go all the way with this, but it's still partially there, and it's very clever.

I think the playstyle section is a bit suffocating, too tightly written to really be interesting. I'd like some references to attacks by name rather than by input, since it's not always as easy to remember input by input and scrolling back up bums me out. Of course, then you'd need more creative attack names than Brace, Tackle, and the ever-popular Toss.

Speaking of suffocating, Suffocate-the-attack strikes me as downright morbid in an attack for a boss who's at the end of happy flower land and who is essentially a big roly-poly cloud. Roly-poly cloud is now cramming his fist down your throat.

As a final note, I did quite like this set (and certainly had a lot to say about it), especially the way you reveal the big picture little by little. However, I do find the set itself heavy to read and, at times, a bit over-the-top. I don't expect this to replace Cairne as your biggest contender (or is Spy now?).
 

darksamus77

Smash Champion
Joined
Oct 18, 2009
Messages
2,987
Location
Seattle, WA
NNID
darksamus77
3DS FC
3282-3124-8340
Well, here's my first moveset attempt in MYM. I must say that I've been following this thread now for a long time. Now I will attempt to present a moveset that I can't really give a whole lot of visual support, so you'll have to bear with me. By the way, to follow the guidelines, I really enjoyed reading Huff 'N Puff. You fit his character perfectly, and it's a great moveset.

Now that that's out of the way...

SPEAR GUY


Shy Guy originally appeared in Super Mario Bros. 2. Spear Guys are a variety of Shy Guys first found in Yoshi's Island. They can also be found in Paper Mario, Yoshi's Island DS, and Mario Power Tennis.

STATISTICS
Size: 5 - In Yoshi's Island, they're about half Yoshi's size, so they're around Kirby in terms of size.
Weight: 3 - Being small in stature, Spear Guys don't weigh a whole lot, which can be a large disadvantage at times.
Jumps: 2 (one being his Up-B Special) Despite few jumps, Spear Guy has a decent recovery. His Side-Special can really save him at times and pull him out of a jam, but two jumps really hinders Spear Guy's recovery. However, his slow falling speed and the fact that his up-b does not enable a helpless state enables Spear Guy to have a nice recovery.
Power: 8 - Spear Guy has decent power, with several moves that can kill at around 100%.
Fall Speed: 2 - This truly makes up for Spear Guy's lack of jumps, as his slow fall speed enables the player to have a much better chance to recover.

SPECIALS

UP-B ->Fly Guy Airlift
2 Fly Guys come instantly from the closest side of the screen to Spear Guy and carry him up for around the distance of Sonic's spring. However, it's about the speed of Samus' screw attack, so it's slightly slower.A big benefit of this move is that it also does not enable the helpless falling state. It also enables him to perform B moves (minus another up-B, like Snake's), so this makes up for Spear Guy's lack of jumping range, so it gives Spear Guy a chance to survive more often. Its range should save Spear Guy from most trouble. Besides the great recovery, it also can rack up 6-8% damage and have more priority than nearly any move in the game. However, ANY meteor smash will overprioritize this move and send Spear Guy to certain doom, so there is a small risk with this move...

SIDE-B->THRUST
Another great recovery option, Spear Guy puts his Spear out in a straight line in the direction he's facing. Now, given the fact that his spear is nearly twice his size, it can cover about the length of Falcon's Raptor Boost. This, with Fly Guy Airlift, ensures Spear Guy will recover from almost anywhere. It's speed is fast, about the speed of ZSS' grab. It also has a simliar effect to ZSS, in the fact that you can perform this move under a ledge and still recover. For combat purposes, this does an impressive 14-16% damage. It leaves Spear Guy completely open from behind, and with decent ending lag, a good roll would allow the opponenet to get a quick counterattack.

DOWN-B->SHIELD
You see that shield in Spear Guy's left hand? Well, that comes in good use here. Spear Guy holds the spear directly in front of him, completely reflecting any attacks in the direction he faces. A very useful defensive tactic, this can prevent a heavy lateral smash or a missile about to hit you in the face. However, Spear Guy is completely vulnerable from above and behind, so use this move wisely...the shield can be held as long as the player holds the B-Button)

NEUTRAL-B->SHOCKWAVE
Spear Guys can control Lightning in Mario Power Tennis. Spear Guy holds his spear slightly in front of him, then expels lightning horizontally in the direction he's facing. This move is chargable, with an automatic release. It requires a full second to reach maximum charge, but it does an impressive 25-28% damage when fully charged. Of course, damage depends on how long the player holds the button. This is definitely one of Spear Guy's deadliest moves, killing around 90% on FD when fully charged.

GRABS
Spear Guy's grab game can rack up lots of damage quickly. It is a better option than a majority of his moves, as it does a GUARANTEED 8-10% damage with jabs. Each jab does 1% damage, but Spear Guy can execute several jabs per second (maximum time you can hold your opponent: 3 seconds). His throws can make grabs much more satisfying, as they work instantly. This is where Spear Guy's speed truly comes into play.

UP THROW->POKE
Spear Guy tosses the opponent up and pokes him directly above him with the spear. It does 4-6% damage with little end lag, so Spear Guy could potentially use this move as a nice setup for an aerial combo.

SIDE THROW->SPEAR SWING
Spear Guy holds the opponent, then swings his spear around in a baseball bat motion, sending the opponent diagonally. This does 6-8% damage, but isn't truly a good finishing move, as it has medium knockback, so Spear Guy will have to use another option to KO an opponent.

DOWN THROW->POUND
Spear Guy throws the opponent on the ground, and slams the butt end of the spear right into the opponent's stomach. Painful as it may seem, it also does 6-8% damage. It sends the opponent skyward, but again is not a KO move until very high percentiles, so Spear Guy must resort to something else...

STANDARD ATTACKS

NEUTRAL-A->SPEAR COMBO
Spear Guy performs a 3-hit combo with three taps of the A-Button. It appears nearly identical to Link's, and it does 10-12% damage. The whole move lasts about a second.

U-TILT->HELICOPTER
Spear Guy spins his spear above his head for as long as the player wants. It protects him from any aerial attack, which is a very good defensive option. It also can hit anyone directly next to Spear Guy, but only does 4-6% damage. It prevents against any aerial attack directly above Spear Guy, which can be very useful to him...

F-TILT->SLASH
Spear Guy performs an overhead slash in the direction he's facing. Low ending lag enables Spear Guy to perform another move right after using his F-tilt. It does only 2% damage, but as it looks simliar to his smash, it can force an opponent to use his shield, then allow Spear Guy to follow up with a grab or smash. A very good strategical move, it should be used often.

D-TILT->JAB
While ducking, Spear Guy merely performs a quick jab with his spear. It can be used many times in a row, but cannot be used for a chaingrab due to it's long ending lag (1/2 a second). It does 3% damage per hit, and can be used to hit an opponent hanging on a ledge, as it is angled slightly downward. The best use of this move is edgeguarding.

DASHING ATTACK->DIVE
Spear Guy dives with his spear in front, sliding for the length of Bowser's shell. This attack hits anyone in Spear Guy's path and does 5% damage. It does have a large ending lag, so use caution when using it, as a bad miss will surely be punished.

SMASH ATTACKS

UP-SMASH->LIGHTNING STRIKE
Spear Guy holds his spear directly above him, and lightning shoots down from the sky. Requiring a full 3 seconds for the move to fully charge, it does a massive 35-40% damage. This is the most devastating move in Spear Guy's arsenal, as it does massive damage if it connects. However, it's long charge requirement means it's easily avoidable and leaves Spear Guy completely open, so it's a high-risk, high-reward move. It also hits anyone directly next to Spear Guy, as the lightning flows throughout his body as well. It can KO starting at 80% with Middleweights and as early as 60% with Lightweights, so it's easily his best KO option. Heavyweights are far less prone to this attack, so this attack does kill them at normal percentiles.

FORWARD SMASH->SPEAR SLAM
Appearing very similar to his F-Tilt when using this move instantly, Spear Guy does a similar motion and hits the ground with his spear. This chopping motion does 18-20% damage when fully charged. A full second is required to charge this smash attack, and the downward spear motion also has a meteor smash effect, making this move a great option for edgeguarding.

DOWN SMASH->SPEAR SWING
Spear Guy swings his spear in a circular motion, completing just one revolution in 1/2 a second. It's a quick, easy way to get damage. It only does 10-12% damage and has little knockback, so it's a very poor KO option.

AERIALS

NEUTRAL AERIAL->GUARD
No, it's not a counter. Spear Guy merely holds his spear horizontally at equal lengths in front and behind him. This guards him from any sideways aerial attack and has slight delay in fall speed, so this move can be used to stall your descent to the stage. It only does 6% damage, but it's truly a defensive move.


FORWARD AERIAL->CHOP
Spear Guy performs a chopping motion, which ends up spinning Spear Guy into performing a flip (no vertical boost, though). It's not the prettiest aerial, but when hitting an opponent just below you, it can be a meteor smash, but not a strong one. This crazy aerial does 8% damage, and has quite a bit of ending lag.

BACK AERIAL->BACKSTAB
In an impressive display, Spear Guy reverses the direction of his spear, then stabs directly behind him. This painful aerial has good horizontal knockback, so it can be used as a KO move at higher percentages. It is a difficult move to land, though, as the whole move takes 3/4 of a second to pull off. A great 9% damage is rewarded for a hit, and it is truly a great aerial option for Spear Guy.

UP AERIAL->SPIKE
Spear Guy holds his spear directly above his head until he hits the ground, very similar to Toon Link's and Link's up aerials. It does 5% damage, and prevents any aerial from above, including meteor smashes. It's another fine defensive option at your disposal, but remember that Spear Guy is vulnerable from the side.

DOWN AERIAL->STAB
Spear Guy holds the spear directly below him, blocking any attack from below. However, he is vulnerable to attacks from the side, so keep that in mind. It's a meteor smash and does 5% damage per hit. It does not have a bouncing effect like Toon Link's. This move has slight ending lag because Spear Guy has to pull his spear out of the ground, but since your opponent is probably still dodging the attack, it's not truly a problem unless there's a bad miss.

FINAL SMASH
After the Final Smash is initiated by the player, lightning strikes Spear Guy, he yells something in Shy Guy language, and he fires a stream of it out in a horizontal line in front and behind him. Anyone unfortunate enough to get caught in the blast will be instantly killed.

PLAYSTYLE
In order to win as Spear Guy, you need to master his defensive tactics. For instance, F-Tilt is a great lead-in to a grab, and his up and down aerials give him complete aerial protection. Up-throw is a great way to start an aerial combo/juggle. His defensive tactics can lead to great success when used properly. His ground game rivals that of most characters, but his light weight means most smash attacks KO Spear Guy at over 80% damage. His lack of a ranged move may lead to projectile campers, which can be countered with a shield. Spear Guy really utilizes speed and defense to his advantage. His surprising power gives him a great edge at close range. Overall, he's very effective against projectile attacks, good at close range, and good at protecting himself.

Well, I'm very pleased with how this set turned out, even if it does not get noticed, I'm ok with it. I held off posting this here for a while in fear that it might get ripped apart (which it still might). It turned out far better than expected, thank you for taking the time to read it!
 

Katapultar

Smash Lord
Joined
Nov 24, 2008
Messages
1,258
Location
Australia
Masterwarlord's 'my' Huff n Puff set made me lol. He uses cheese puffs, aims to win, really easy to read and uses some of the Great Mighty Poo's VPs. A set just for me? How kind. To be honest, I didn't think that you would take the entire concept of me saying i like extras better than movesets to that height (no sarcasm intended).

Welcome to MYM darksamus77! If Im not mistaken you lurk in the Smash Workshop's hacking sort of department cody thingy. Guess it's no surprise that MYM would attract others soon enough. I/we all know what it's like to post something in fear of getting criticism for it.

For a newcomer set, you've certainally got the right idea of writing and explanation. Color is always a good thing, but it's alright if you have your own reasons for not including it. Reading other sets is a good way of getting into the spirit of MYMing, especially reading the comments that others give to the sets of MYMers, as of above and such.

And if you've got the time and dedication, extras and attack images are good for increasing your set's awesomeness. Not many people do it today, but it pays off.

Good luck movesetting throughout the competition.


darksamus77

Smash Champion
Joined
Oct 18, 2009
Messages
2,987
Location
Seattle, WA
NNID
darksamus77
3DS FC
3282-3124-8340
Thanks Katapultar! I used white because it's easiest to read :laugh: I will try to think up a few more, if not for this MYM, than for MYM 8...
 
Status
Not open for further replies.
Top Bottom