
Luthien
Smash Ace
Hello everybody! With the recent release of Brawl, many new smashers have come around, and some of them have decided to main Zelda. This is a guide for those people; I'm sure many of you know all that I have to say already, but hopefully this will teach somebody something new,so that they may think of Zelda's recovery in a different way, improving their game.
As you go through this guide, there are going to be several aspects of Farore's Wind I address, each flowing and contributing to the next. You're going to learn the stuff in the Recovery section before you try to tackle the On-the-Ground Teleporting section. That said, let's begin.
FARORE'S WIND 101
For those of you who don't know, when Zelda is using Farore's Wind, she is not actually teleporting. She's simply flying through the air in a straight line. Think of Lucario's up-b, but she can't bend the direction mid-flight and she's invisible and invincible during the time she's moving. That's why Zelda stops when she hits a hard surface; she's actually flown into it, you just can't see because she had invisibility frames at the time.
With that out of the way, we'll move on to probably the most important and common aspect of Farore's Wind.
RECOVERY
Like most characters in the Smash world, Zelda has three jumps: her initial jump off the ground, her double jump, and Farore's Wind, a magic technique which teleports her far distances across the stage. When Zelda is sent flying offscreen, she can usually get back safely by using her second jump and teleporting back to the ledge or the stage floor.
But sometimes there's a problem. Have you ever been hit off the end of Final Destination, tried to teleport to the ledge and just missed it, only to reappear just below the ledge to fall to your doom? Many people have just accepted that and decided to fix their timing, because they are under the impression that Farore's Wind can only go eight directions. That is a myth.
The general idea amongst smashers, and sadly many Zelda players, is that Farore's Wind only goes these directions (clockwise from 12:00):
1)North (hold 'up', or just let go of the controller; this is the move's natural direction)
2)Northeast
3)East
4)Southeast
5)South
6)Southwest
7)West
8)Northwest
And then you're back to the start at North again. But, this isn't true. Zelda can teleport sixteen different directions. Here's a list (once again, going clockwise from 12:00):
1)North (again, hold 'up' or just let go of the controller; this is the move's natural direction.)
2)North-Northeast
3)Northeast
4)East-Northeast
5)East (hold 'right')
6)East-Southeast
7)South-east
8)South-Southeast
9)South (hold 'down)
10)South-Southwest
11)Southwest
12)West-Southwest
13)West (hold 'left')
14) West-Northwest
15) Northwest
16) North-Northwest
Here's a visual:
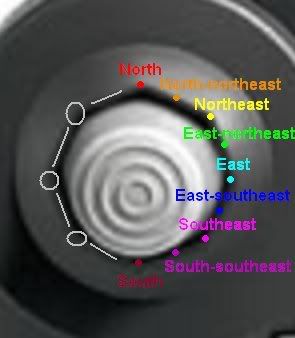
With all these options, you can space almost anywhere and sweetspot the ledge. For example, if you're hit off the east end of Final Destination, you can either:
1) Wait till you're level with the stage and teleport West
2) Wait a little longer and get a little closer to the stage and teleport West-northwest
3) Wait longer, till you're 45 degrees with the ledge and teleport Northwest
4) Wait even longer and get even closer and teleport North-northwest
5) Wait really long, get just below the ledge and teleport North
And that's not all. If you're close enough, you could teleport downwards to the ledge too! That's a lot of options for recovery. However, this will take some practice to perfect.
On the left side of the diagram, you'll see lines and circles. The circles are the places your analog stick will lock into when you push a direction on your controller. They're the corners in the octagon. Any direction that your stick locks into will be:
1)North
2)Northeast
3)East
4)Southeast
5)South
6)Southwest
7)West
8)Northwest
However, the parts on the controller with lines are the parts of the octagon that your stick won't lock into. You'll have to put concscious effort to keeping the stick there, and to keep it from sliding into one of the circle areas. All the areas that are lines are:
1)North-northeast
2)East-northeast
3)East-southeast
4)South-southeast
5)South-southwest
6)West-southwest
7)West-northwest
8)North-northwest
But wait! There's more!
Farore's Wind is not limited to 16 directions. Here's a conversation between myself and sFoster, another Zelda player.
If you're using all 16 directions correctly, you can almost always space appropriately to recover safely. Almost.
If you ever want to go more in depth with your teleporting, the general directions I suggest working on first are the North-northeast and the North-northwest regions. These are the angles where you are under a lot of pressure to recover, and a slip up could cost you a stock.
The East-northeast and West-northwest directions generally aren't as risky, since you've got less pressure pressing too far towards the stage won't send you under it because you're farther away than when you would be using a North-northwest/east teleport. Spacing with them is important, but you can get by with a milimeter's slip of the thumb if you must. Not always true for the North-northwest/east teleports.
Practice for yourself and you should get the hang of it in no time. Recovery will become a breeze if you can master all the directions, and your opponents will have much more to worry about with your arsenal of options. The point of learning all the directions Farore's Wind can go is so that you can recover a safely as possible. What's one of the safest ways to recover? Glad you asked...
Sweetspotting
This is the safest way to recover. If you grab the ledge the instant you appear, the enemy won't be able to hit you. The real reason for knowing how to use every direction of Zelda's teleport is for being able to sweetspot from every angle.
First of all, you know you've sweetspotted if Zelda grabs the ledge the very instant she appears. There shouldn't be a flash of light, and then Zelda grabbing the ledge, Zelda should be in her grabbing animation the second the teleport finishes.
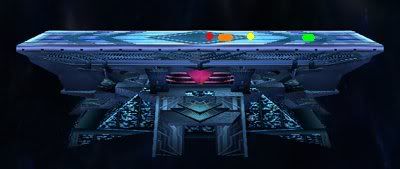
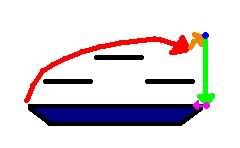
Zelda needs to reappear in a certain location to sweetspot. If she teleports to the ledge too high or too, it could result in a second's delay before grabbing the ledge, or death. Here's the conclusion I've come to:
A) From the upper torso to the head (Green) is Zelda's sweetspotting zone. Practice jumping off the east end of Final Destination and use Farore's Wind when this range is at the same level as the ledge. She should grab the ledge right away.
B) From the waist to the upper leg (Yellow) is the "meh" zone. Zelda will reappear at the ledge and grab it a fraction of a second after reappearing. Again, try it out on FD. Be warned: teleporting downwards and landing in this sweetspot zone usually results in death.
C) The feet (Red). Depending on the angle you teleported, she'll most likely appear on the stage floor, just in front of the ledge. In fact, all of this depends on the angle you teleport.
The easiest directions to sweetspot from are:
1) East/West
2) East-northeast/West-northwest
3) Northeast/Northwest
4) North-northeast/North-northwest
5) North
All of the sweetspot zones above apply here to these teleport directions; try to get Zelda to reappear with the ledge at torso level. However, more difficult directions are:
1) East-southeast/West-southwest
2) Southeast/Southwest
3) South-southeast/South-southwest
4) South (good luck with this one)
The sweetspot zones don't change, but if you miss the situation is far less forgiving. Teleporting directly South in the hopes of sweetspotting isn't nessicarily harder, it's just if you misscalculate, you're gone. When Zelda flies directly North, however, if she bypasses the ledge, she can grab it as she falls down. Zelda won't fall up to grab the ledge if she passes it while teleporting South.
There are some solutions, or rather, compensations for this. First, quesiton why on earth you're teleporting downwards anyway. Try airdodgeing to avoid oncoming attacks and teleport at a safer angle later, when you'll have better post-Farore's momentum.
Or, better yet, don't try to sweetspot. FW attacks out of teleport now, so if you can, try to teleport back onto the stage floor. But if you must absolutely teleport downwards, try teleporting farther back. You won't sweetspot, but if you reappear farther from the ledge and slightly above it, Zelda will finish her spin in time for her to grab the ledge when she gets to it.
ON-THE-GROUND TELEPORTING
Zelda's teleport now has a new aspect in Brawl: when Zelda reappears, she attacks the enemy in a flash of light. This can be an effective counter attack. You shouldn't be basing your game around this, but it's a pretty useful tool that can reset the game. This means: don't spam. Use it smart and sparingly. Make every teleport a mystery; the less you use it, the less of a pattern your opponent can establish.
Hard Platforms
If your opponent is dashing toward you and you start the FW (Farore's Wind) animation, what will they do? Will they assume you're going to teleport behind them and halt their approach? Will they gamble and keep moving forward? Base where you teleport on their actions.
But before you do that, you need to know exactly where you can teleport. If you are on the ground and teleport, you can teleport--
1)North
2)North-Northeast
3)Northeast
4)East-Northeast
5)East
6)West (hold 'left')
7) West-Northwest
8) Northwest
9) North-Northwest
-- and travel the same distance you would as you do when you teleport in the air. But Zelda cannot teleport downwards without jumping, because she'd reappear inside the brick floor and that would be somewhat painful*. So instead, if you press southeast on the controller while teleporting on the ground, Zelda will travel east, but a shorter distance. It's like she's comprimising with physics or something. Anyway the [close to] exact distances are:
South: Zelda will reappear exactly where she teleported on the floor.
East/West: Half the distance of FD
Southeast/Southwest: Slightly more than a third of FD
South-southeast/South-southwest: One fifth of FD
East-southeast/West-southwest: Pretty much the same as southeast/southwest, just a tad farther.
A great diagram which tells you WHY this happens was generously donated by Ztarfish. Here you go (gotta love physics):

Now that you know what options you have, the more you can mess with your oppponent's head. If your opponent is approaching you and you have no idea what they're going to do (or if you have no plan), you can stall for time by casting Farore's Wind. They will either keep approaching, stop moving, take to the air, or turn around. Here's what I generally do:
A) They keep approaching. This is tricky. Depending on how fast their character is, whether or not they've seen this tactic before, and how close they are to you when you use the move, what you do should be different. If they're close and you want to play safe, teleport as far away as you can. Really, you'll just have to use your own judgement.
B ) Stop moving. Once again, this is tricky. If they haven't seen the move before, try hitting them with it, if you're feeling risky. But depending on how close they are, either stay in the same spot or get as far away as possible. The closer they are to you, the more you should consider teleporting away.
C) Take to the air. It's rare, but it happens. Do what you want, really, it all depends on the afore mentioned variables.
D) Start running backwards. This is the jackpot, and it's the easiest reaction to work with. Just stay where you are. They'll have to reset their approach, and nothing has changed except for the fact that you've stallen for time and made them look stupid. Meaning: mission accomplished.
E) Shield. DO NOT TRY TO HIT THEM. You leave yourself wide open for a shield grab. You can avoid this against bad players by trying to reappear behind them, wait for them to try and shield grab, then dsmash/Naryu's/fsmash/whatever them, but against good players this is actually just as bad, if not worse. Especially in Zelda dittos... short-hop Bair out of shield will almost always KO you.
Note: This goes for all reactions: if your opponent is rather stupid, try to hit them with it. I'll be making a list of what you can safely punish with Farore's Wind shortly. If you would like to contribute, feel free to PM me what you know.
Also, if your opponent is incredibly bright, I wouldn't Farore's Wind mindgame in the first place; it's a really risky technique that doesn't have that great of a reward. It's more of a stall than anything; a useful stall, but a stall nonetheless. I'll also be posting methods of punishment for on-the-ground teleporting (believe me, there are many).
Soft Platforms
If Zelda is standing on a soft platform, on-the-ground teleporting won't work. Zelda will simply teleport below the platform, because it is soft. However, if Zelda is in the air, she will not teleport through a soft platform heading downwards. If she is teleporting upwards in the air, though, she'll go through it. I'll make a chart to organize what can and cannot be done with soft platforms:
1) Standing on a soft platform + teleporting downwards = FW through platform
2) In air decent distance (i.e. Zelda's height) above platform + teleporting downwards = FW onto platform
3) Standing on ground below platform + teleporting upwards = FW through platform
4) In air below platform + teleporting upwards = FW through platform
5) Very small distance above platform + teleporting downwards = FW through platform
Basically, the only time Zelda won't teleport through a platform is if she's a considerable distance above it.
ANTI-JUGGLING
In a match, there are going to be times when you are sent flying, but you don't need to use your second jump or Farore's Wind to get back to the stage. Zelda is particularly vulnerable in this position, because she has one attack that hits below her in the air, and it requires a sweetspot. When high in the air, your goal is to get back to the ground safely. One of your safest methods is Farore's Wind, because duh, you teleport. Pretty self explanitory.
So, this is going to combine the Recovery section and the On-the-Ground Teleporting section. You need to be able to apply every direction of Farore's Wind to get back to the ground without being juggled. First of all, if your opponent hasn't been hit by FW before, feel free to just teleport into them to launch a surprise attack. They shouldn't see it coming. But be very careful after that.
Try to mix up when you use the move and what directions you go. If your opponent hasn't seen the move before or is new to the game, try to keep the south-southwest, east-southeast and other complicated directions in your back pocket; save them for a time when you'll need them, and try to catch your opponent by surprise with them later. If you keep them thinking that you can only hit them at 45 degree angles for an entire match, you can decide a stock with one well timed south-southwest teleport attack.
If you opponent has seen the move executed before, and they've been hit by it, generally try to teleport away from them as far as you can. But if you think they'll fall for it, go ahead; sometimes the best defense is a good offense. Keep in mind though, if they shield it, you're pretty much screwed.
Some stages are better for Farore's Wind mindgames than others. For example, it's far safer to FW mindgame on the Bridge of Eldin than on Battlefield. On the Bridge of Eldin, you can teleport pretty much any direction and still be on the stage, whereas one teleport in battlefield and you're pretty much on the other end of the arena. Where you are should affect what you do.
TELEPORT-CANCELLING
If you Farore's Wind off the ledge, and if you go the right distance with the right timing, Zelda can reappear at the stage ledge and fall off without attack lag, with the reappearing attack effect only no animation, and regain her jumps. This has some pretty cool potential, if you ask me.
I have a theory as for why teleport-cancelling works. It all has to do with post-Farore's momentum. When Zelda reappears on the ground, she does indeed slide a little due to Brawl's lack of traction (this is why teleport-cancelling doesn't work in Melee). When you appear on the ledge and slide, Zelda will reappear, but the animation of sliding off of the stage seems to take priority to Zelda's reappearing animation; it interrupts it.
This is why you can reappear different distances from the ledge (albeit very small distances) and have the teleport-cancel still occur a fraction of a second later/earlier (depeding on exactly how close to the ledge you reappeared).
However, I'm not sure if this theory is correct, because that means that teleport-cancelling should apply to Metaknight and Sheik. I checked (not too thoroughly), and Ledgewarping does not work for them. I seem to recall dying as Metaknight every attempt, and having Sheik grab the ledge at best. Neither get their jumps back, and Sheik can ledgehug faster than teleporting due to the teleport's lack of distance.
Any better ideas? At any rate, here's what potential this discovery has:
1) Zelda reappears over the ledge and has no reapearing animation or lag (but of course, the attack frames are still there and hit your opponent if they're in range). Feel free to do what you want after reappearing. You can use any arial attack right away, so experiment for yourself.
You can control your momentum after a ledgewarp. If you press and hold towards the ledge, Zelda will grab it after reappearing. If you hold away from the ledge, Zelda will continue to fall, armed with her second jump and her arial attacks. The choice is yours, depending on what you want to happen.
2) You actually hit some characters already hanging on the ledge when you reappear. Here's the list of characters you can/cannot hit:
Vulnerable to Ledgestealing:
Mario
Bowser
Donkey Kong
Dedede
Metaknight
Olimar
Pikachu
Charizard
Squirtle
Ivysaur
Ness
Lucas
G&W
Yoshi
*At low percents, teleport-cancelling can lead into a Dair or Footstool jump if you choose not to grab the ledge.
Immune to ledgestealing:
Luigi
Peach
Diddy
Wario
Link
Zelda
Sheik
Ganondorf
Samus
Pit
Ice Climbers (WHY?! IT SHOULD WORK!!)
ROB
Kirby (WHY?!)
Fox
Falco
Wolf
C. Falcon
Lucario
Jiggs
Ike
Marth
Snake
Sonic
*You'd think this was bad, but they're worse off due to you being able to Bair right after reappearance. Suckers...
3) You can aim this with any direction of Farore's Wind. If mastered, this might very well actually be considered easy to aim. But now for the bad part....
...it's kind of hard to aim. What you want is something like this:
Here's the REALLY bad news. If you're off by even a little, you'll die. You won't get your jumps back, you won't be able to attack. You've simply Farore's Winded off the stage. So try to avoid doing this:
Some stuff I figured out:
Ledgestealing East or West is slightly faster than running and hugging the ledge due to Zelda's slow dash.
There's actually a pretty decent-sized window for where you have to reappear to ledgewarp. If you reappear close enough to the stage and hold towards the stage, you can reappear without any lag and focus your momentum so that Zelda doesn't fall off the stage at all (this is a little hard to do, however).
Some quick ways to find out how to teleport-cancel teleporting east/west:
1) Teeter on the ledge, teleport into the stage, take a step or two forward, and teleport back.
2) "Basically, get Zelda to stand at an edge, do a dash (but just flick the controller instead of continuing to run - that's a foxtrot), and about halfway into Zelda's dash animation, do a roll in that direction. Then roll in that direction again. Now Farore's Wind in the direction you came from." (Villi's idea in the words of Successor of Raphael.)
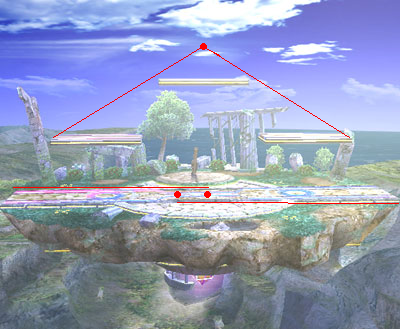
Here's a diagram if you want to try for yourself on Final Destination:
Red dot: Teleport East
Orange blob: Teleport East-southeast (unsure)
Yellow dot: Teleport Southeast
Green blob: Teleport South-southeast (again, unsure)
OTHER STAGES
Battlefield (Villi):
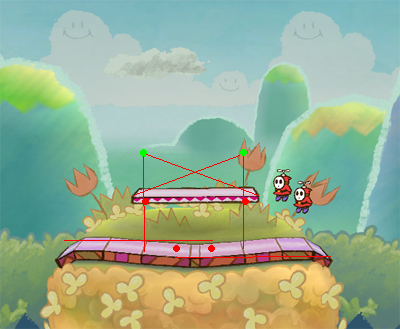
Yoshi's Island (Villi):
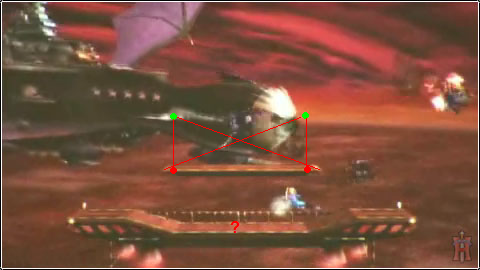
Halberd (Villi):
Also, here'a a video of NinjaLink's Zelda ledgewarping:
http://www.youtube.com/watch?v=x3b_e8T6_wo
Try it out for yourself. Practice. It's fun!
To wrap everything up, practice practice practice. If nothing else, learn to use every direction of Farore's Wind; that alone can make the difference between a two-stocking and defeat. But all this other stuff is fun too. Farore's Wind shouldn't be what your entire game strategy is about, but knowing how to use it amplifies everything else you can do. Hope the colors didn't burn your eyes.
As you go through this guide, there are going to be several aspects of Farore's Wind I address, each flowing and contributing to the next. You're going to learn the stuff in the Recovery section before you try to tackle the On-the-Ground Teleporting section. That said, let's begin.
FARORE'S WIND 101
For those of you who don't know, when Zelda is using Farore's Wind, she is not actually teleporting. She's simply flying through the air in a straight line. Think of Lucario's up-b, but she can't bend the direction mid-flight and she's invisible and invincible during the time she's moving. That's why Zelda stops when she hits a hard surface; she's actually flown into it, you just can't see because she had invisibility frames at the time.
With that out of the way, we'll move on to probably the most important and common aspect of Farore's Wind.
RECOVERY
Like most characters in the Smash world, Zelda has three jumps: her initial jump off the ground, her double jump, and Farore's Wind, a magic technique which teleports her far distances across the stage. When Zelda is sent flying offscreen, she can usually get back safely by using her second jump and teleporting back to the ledge or the stage floor.
But sometimes there's a problem. Have you ever been hit off the end of Final Destination, tried to teleport to the ledge and just missed it, only to reappear just below the ledge to fall to your doom? Many people have just accepted that and decided to fix their timing, because they are under the impression that Farore's Wind can only go eight directions. That is a myth.
The general idea amongst smashers, and sadly many Zelda players, is that Farore's Wind only goes these directions (clockwise from 12:00):
1)North (hold 'up', or just let go of the controller; this is the move's natural direction)
2)Northeast
3)East
4)Southeast
5)South
6)Southwest
7)West
8)Northwest
And then you're back to the start at North again. But, this isn't true. Zelda can teleport sixteen different directions. Here's a list (once again, going clockwise from 12:00):
1)North (again, hold 'up' or just let go of the controller; this is the move's natural direction.)
2)North-Northeast
3)Northeast
4)East-Northeast
5)East (hold 'right')
6)East-Southeast
7)South-east
8)South-Southeast
9)South (hold 'down)
10)South-Southwest
11)Southwest
12)West-Southwest
13)West (hold 'left')
14) West-Northwest
15) Northwest
16) North-Northwest
Here's a visual:
With all these options, you can space almost anywhere and sweetspot the ledge. For example, if you're hit off the east end of Final Destination, you can either:
1) Wait till you're level with the stage and teleport West
2) Wait a little longer and get a little closer to the stage and teleport West-northwest
3) Wait longer, till you're 45 degrees with the ledge and teleport Northwest
4) Wait even longer and get even closer and teleport North-northwest
5) Wait really long, get just below the ledge and teleport North
And that's not all. If you're close enough, you could teleport downwards to the ledge too! That's a lot of options for recovery. However, this will take some practice to perfect.
On the left side of the diagram, you'll see lines and circles. The circles are the places your analog stick will lock into when you push a direction on your controller. They're the corners in the octagon. Any direction that your stick locks into will be:
1)North
2)Northeast
3)East
4)Southeast
5)South
6)Southwest
7)West
8)Northwest
However, the parts on the controller with lines are the parts of the octagon that your stick won't lock into. You'll have to put concscious effort to keeping the stick there, and to keep it from sliding into one of the circle areas. All the areas that are lines are:
1)North-northeast
2)East-northeast
3)East-southeast
4)South-southeast
5)South-southwest
6)West-southwest
7)West-northwest
8)North-northwest
But wait! There's more!
Farore's Wind is not limited to 16 directions. Here's a conversation between myself and sFoster, another Zelda player.
IMO there are more than 16 directions on FW. I don't know who came up with the 16 number..
If I balance myself on the far left edge of FD, so that zelda is standing on 1 foot i know it's always starting in the exact same position.
Maybe I am crazy, but from there it seems like I could get to about 4 different places between N and NE
I repeat: there could be well over 40 directions to Farore's Wind. However, mastering all of them could take a lot of work.Thank you. This is something I've been meaning to bring up.
This has been bothering me for a while. Indeed, on the ground teleporting experiments have given me different results. Sometiemes when I South-southeast teleport, I only move a very short distance away. Sometimes I would move a slightly longer distance away. Sometimes I wouldn't move at all. These differences were even more dynamic in Melee.
However, I wasn't sure about whether or not my eyes were fooling me, or if it was controllable. I still can't say for certain, but I do indeed belive there are 5 direction sensitive areas of the South-southeast direction; no movement (south-south-south-southeast), minimal movement (south-south-southeast), slight movement (south-southeast), just short of a semi-considerable movement (east-south-southeast), and just short of a southeast teleport (east-east-southeast). Over the months, minimal movement and semi-considerable movement seemed the haredest directions to fly. This also applies to the South-southwest input area, and the north-northeast/north-northwest areas as well.
This didn't seem like that big of an issue at the time, and I thought that posting the sixteen directions was confusing enough. However, I'll look into this further; I've been thinking about it for a while, and you've convinced me that it is something I ought to research more thoroughly. Try for yourself; I'll get a lame diagram up eventually, I'm sure. As of now, I'll just make up a simple concept:
Point where you want to go. Pretend the octagon control stick thing is actually a circle.
If you're using all 16 directions correctly, you can almost always space appropriately to recover safely. Almost.
If you ever want to go more in depth with your teleporting, the general directions I suggest working on first are the North-northeast and the North-northwest regions. These are the angles where you are under a lot of pressure to recover, and a slip up could cost you a stock.
The East-northeast and West-northwest directions generally aren't as risky, since you've got less pressure pressing too far towards the stage won't send you under it because you're farther away than when you would be using a North-northwest/east teleport. Spacing with them is important, but you can get by with a milimeter's slip of the thumb if you must. Not always true for the North-northwest/east teleports.
Practice for yourself and you should get the hang of it in no time. Recovery will become a breeze if you can master all the directions, and your opponents will have much more to worry about with your arsenal of options. The point of learning all the directions Farore's Wind can go is so that you can recover a safely as possible. What's one of the safest ways to recover? Glad you asked...
Sweetspotting
This is the safest way to recover. If you grab the ledge the instant you appear, the enemy won't be able to hit you. The real reason for knowing how to use every direction of Zelda's teleport is for being able to sweetspot from every angle.
First of all, you know you've sweetspotted if Zelda grabs the ledge the very instant she appears. There shouldn't be a flash of light, and then Zelda grabbing the ledge, Zelda should be in her grabbing animation the second the teleport finishes.
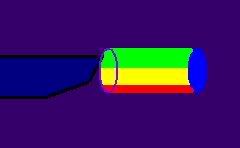
Zelda needs to reappear in a certain location to sweetspot. If she teleports to the ledge too high or too, it could result in a second's delay before grabbing the ledge, or death. Here's the conclusion I've come to:
A) From the upper torso to the head (Green) is Zelda's sweetspotting zone. Practice jumping off the east end of Final Destination and use Farore's Wind when this range is at the same level as the ledge. She should grab the ledge right away.
B) From the waist to the upper leg (Yellow) is the "meh" zone. Zelda will reappear at the ledge and grab it a fraction of a second after reappearing. Again, try it out on FD. Be warned: teleporting downwards and landing in this sweetspot zone usually results in death.
C) The feet (Red). Depending on the angle you teleported, she'll most likely appear on the stage floor, just in front of the ledge. In fact, all of this depends on the angle you teleport.
The easiest directions to sweetspot from are:
1) East/West
2) East-northeast/West-northwest
3) Northeast/Northwest
4) North-northeast/North-northwest
5) North
All of the sweetspot zones above apply here to these teleport directions; try to get Zelda to reappear with the ledge at torso level. However, more difficult directions are:
1) East-southeast/West-southwest
2) Southeast/Southwest
3) South-southeast/South-southwest
4) South (good luck with this one)
The sweetspot zones don't change, but if you miss the situation is far less forgiving. Teleporting directly South in the hopes of sweetspotting isn't nessicarily harder, it's just if you misscalculate, you're gone. When Zelda flies directly North, however, if she bypasses the ledge, she can grab it as she falls down. Zelda won't fall up to grab the ledge if she passes it while teleporting South.
There are some solutions, or rather, compensations for this. First, quesiton why on earth you're teleporting downwards anyway. Try airdodgeing to avoid oncoming attacks and teleport at a safer angle later, when you'll have better post-Farore's momentum.
Or, better yet, don't try to sweetspot. FW attacks out of teleport now, so if you can, try to teleport back onto the stage floor. But if you must absolutely teleport downwards, try teleporting farther back. You won't sweetspot, but if you reappear farther from the ledge and slightly above it, Zelda will finish her spin in time for her to grab the ledge when she gets to it.
ON-THE-GROUND TELEPORTING
Zelda's teleport now has a new aspect in Brawl: when Zelda reappears, she attacks the enemy in a flash of light. This can be an effective counter attack. You shouldn't be basing your game around this, but it's a pretty useful tool that can reset the game. This means: don't spam. Use it smart and sparingly. Make every teleport a mystery; the less you use it, the less of a pattern your opponent can establish.
Hard Platforms
If your opponent is dashing toward you and you start the FW (Farore's Wind) animation, what will they do? Will they assume you're going to teleport behind them and halt their approach? Will they gamble and keep moving forward? Base where you teleport on their actions.
But before you do that, you need to know exactly where you can teleport. If you are on the ground and teleport, you can teleport--
1)North
2)North-Northeast
3)Northeast
4)East-Northeast
5)East
6)West (hold 'left')
7) West-Northwest
8) Northwest
9) North-Northwest
-- and travel the same distance you would as you do when you teleport in the air. But Zelda cannot teleport downwards without jumping, because she'd reappear inside the brick floor and that would be somewhat painful*. So instead, if you press southeast on the controller while teleporting on the ground, Zelda will travel east, but a shorter distance. It's like she's comprimising with physics or something. Anyway the [close to] exact distances are:
South: Zelda will reappear exactly where she teleported on the floor.
East/West: Half the distance of FD
Southeast/Southwest: Slightly more than a third of FD
South-southeast/South-southwest: One fifth of FD
East-southeast/West-southwest: Pretty much the same as southeast/southwest, just a tad farther.
A great diagram which tells you WHY this happens was generously donated by Ztarfish. Here you go (gotta love physics):
Now that you know what options you have, the more you can mess with your oppponent's head. If your opponent is approaching you and you have no idea what they're going to do (or if you have no plan), you can stall for time by casting Farore's Wind. They will either keep approaching, stop moving, take to the air, or turn around. Here's what I generally do:
A) They keep approaching. This is tricky. Depending on how fast their character is, whether or not they've seen this tactic before, and how close they are to you when you use the move, what you do should be different. If they're close and you want to play safe, teleport as far away as you can. Really, you'll just have to use your own judgement.
B ) Stop moving. Once again, this is tricky. If they haven't seen the move before, try hitting them with it, if you're feeling risky. But depending on how close they are, either stay in the same spot or get as far away as possible. The closer they are to you, the more you should consider teleporting away.
C) Take to the air. It's rare, but it happens. Do what you want, really, it all depends on the afore mentioned variables.
D) Start running backwards. This is the jackpot, and it's the easiest reaction to work with. Just stay where you are. They'll have to reset their approach, and nothing has changed except for the fact that you've stallen for time and made them look stupid. Meaning: mission accomplished.
E) Shield. DO NOT TRY TO HIT THEM. You leave yourself wide open for a shield grab. You can avoid this against bad players by trying to reappear behind them, wait for them to try and shield grab, then dsmash/Naryu's/fsmash/whatever them, but against good players this is actually just as bad, if not worse. Especially in Zelda dittos... short-hop Bair out of shield will almost always KO you.
Note: This goes for all reactions: if your opponent is rather stupid, try to hit them with it. I'll be making a list of what you can safely punish with Farore's Wind shortly. If you would like to contribute, feel free to PM me what you know.
Also, if your opponent is incredibly bright, I wouldn't Farore's Wind mindgame in the first place; it's a really risky technique that doesn't have that great of a reward. It's more of a stall than anything; a useful stall, but a stall nonetheless. I'll also be posting methods of punishment for on-the-ground teleporting (believe me, there are many).
Soft Platforms
If Zelda is standing on a soft platform, on-the-ground teleporting won't work. Zelda will simply teleport below the platform, because it is soft. However, if Zelda is in the air, she will not teleport through a soft platform heading downwards. If she is teleporting upwards in the air, though, she'll go through it. I'll make a chart to organize what can and cannot be done with soft platforms:
1) Standing on a soft platform + teleporting downwards = FW through platform
2) In air decent distance (i.e. Zelda's height) above platform + teleporting downwards = FW onto platform
3) Standing on ground below platform + teleporting upwards = FW through platform
4) In air below platform + teleporting upwards = FW through platform
5) Very small distance above platform + teleporting downwards = FW through platform
Basically, the only time Zelda won't teleport through a platform is if she's a considerable distance above it.
ANTI-JUGGLING
In a match, there are going to be times when you are sent flying, but you don't need to use your second jump or Farore's Wind to get back to the stage. Zelda is particularly vulnerable in this position, because she has one attack that hits below her in the air, and it requires a sweetspot. When high in the air, your goal is to get back to the ground safely. One of your safest methods is Farore's Wind, because duh, you teleport. Pretty self explanitory.
So, this is going to combine the Recovery section and the On-the-Ground Teleporting section. You need to be able to apply every direction of Farore's Wind to get back to the ground without being juggled. First of all, if your opponent hasn't been hit by FW before, feel free to just teleport into them to launch a surprise attack. They shouldn't see it coming. But be very careful after that.
Try to mix up when you use the move and what directions you go. If your opponent hasn't seen the move before or is new to the game, try to keep the south-southwest, east-southeast and other complicated directions in your back pocket; save them for a time when you'll need them, and try to catch your opponent by surprise with them later. If you keep them thinking that you can only hit them at 45 degree angles for an entire match, you can decide a stock with one well timed south-southwest teleport attack.
If you opponent has seen the move executed before, and they've been hit by it, generally try to teleport away from them as far as you can. But if you think they'll fall for it, go ahead; sometimes the best defense is a good offense. Keep in mind though, if they shield it, you're pretty much screwed.
Some stages are better for Farore's Wind mindgames than others. For example, it's far safer to FW mindgame on the Bridge of Eldin than on Battlefield. On the Bridge of Eldin, you can teleport pretty much any direction and still be on the stage, whereas one teleport in battlefield and you're pretty much on the other end of the arena. Where you are should affect what you do.
TELEPORT-CANCELLING
If you Farore's Wind off the ledge, and if you go the right distance with the right timing, Zelda can reappear at the stage ledge and fall off without attack lag, with the reappearing attack effect only no animation, and regain her jumps. This has some pretty cool potential, if you ask me.
I have a theory as for why teleport-cancelling works. It all has to do with post-Farore's momentum. When Zelda reappears on the ground, she does indeed slide a little due to Brawl's lack of traction (this is why teleport-cancelling doesn't work in Melee). When you appear on the ledge and slide, Zelda will reappear, but the animation of sliding off of the stage seems to take priority to Zelda's reappearing animation; it interrupts it.
This is why you can reappear different distances from the ledge (albeit very small distances) and have the teleport-cancel still occur a fraction of a second later/earlier (depeding on exactly how close to the ledge you reappeared).
However, I'm not sure if this theory is correct, because that means that teleport-cancelling should apply to Metaknight and Sheik. I checked (not too thoroughly), and Ledgewarping does not work for them. I seem to recall dying as Metaknight every attempt, and having Sheik grab the ledge at best. Neither get their jumps back, and Sheik can ledgehug faster than teleporting due to the teleport's lack of distance.
Any better ideas? At any rate, here's what potential this discovery has:
1) Zelda reappears over the ledge and has no reapearing animation or lag (but of course, the attack frames are still there and hit your opponent if they're in range). Feel free to do what you want after reappearing. You can use any arial attack right away, so experiment for yourself.
You can control your momentum after a ledgewarp. If you press and hold towards the ledge, Zelda will grab it after reappearing. If you hold away from the ledge, Zelda will continue to fall, armed with her second jump and her arial attacks. The choice is yours, depending on what you want to happen.
2) You actually hit some characters already hanging on the ledge when you reappear. Here's the list of characters you can/cannot hit:
Vulnerable to Ledgestealing:
Mario
Bowser
Donkey Kong
Dedede
Metaknight
Olimar
Pikachu
Charizard
Squirtle
Ivysaur
Ness
Lucas
G&W
Yoshi
*At low percents, teleport-cancelling can lead into a Dair or Footstool jump if you choose not to grab the ledge.
Immune to ledgestealing:
Luigi
Peach
Diddy
Wario
Link
Zelda
Sheik
Ganondorf
Samus
Pit
Ice Climbers (WHY?! IT SHOULD WORK!!)
ROB
Kirby (WHY?!)
Fox
Falco
Wolf
C. Falcon
Lucario
Jiggs
Ike
Marth
Snake
Sonic
*You'd think this was bad, but they're worse off due to you being able to Bair right after reappearance. Suckers...
3) You can aim this with any direction of Farore's Wind. If mastered, this might very well actually be considered easy to aim. But now for the bad part....
...it's kind of hard to aim. What you want is something like this:
Here's the REALLY bad news. If you're off by even a little, you'll die. You won't get your jumps back, you won't be able to attack. You've simply Farore's Winded off the stage. So try to avoid doing this:
Some stuff I figured out:
Ledgestealing East or West is slightly faster than running and hugging the ledge due to Zelda's slow dash.
There's actually a pretty decent-sized window for where you have to reappear to ledgewarp. If you reappear close enough to the stage and hold towards the stage, you can reappear without any lag and focus your momentum so that Zelda doesn't fall off the stage at all (this is a little hard to do, however).
Some quick ways to find out how to teleport-cancel teleporting east/west:
1) Teeter on the ledge, teleport into the stage, take a step or two forward, and teleport back.
2) "Basically, get Zelda to stand at an edge, do a dash (but just flick the controller instead of continuing to run - that's a foxtrot), and about halfway into Zelda's dash animation, do a roll in that direction. Then roll in that direction again. Now Farore's Wind in the direction you came from." (Villi's idea in the words of Successor of Raphael.)
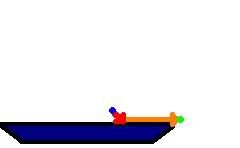
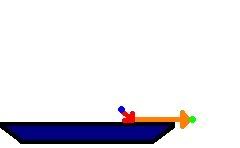
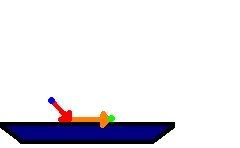
Here's a diagram if you want to try for yourself on Final Destination:
Red dot: Teleport East
Orange blob: Teleport East-southeast (unsure)
Yellow dot: Teleport Southeast
Green blob: Teleport South-southeast (again, unsure)
OTHER STAGES
Battlefield (Villi):
Yoshi's Island (Villi):
Halberd (Villi):
Also, here'a a video of NinjaLink's Zelda ledgewarping:
http://www.youtube.com/watch?v=x3b_e8T6_wo
Try it out for yourself. Practice. It's fun!
To wrap everything up, practice practice practice. If nothing else, learn to use every direction of Farore's Wind; that alone can make the difference between a two-stocking and defeat. But all this other stuff is fun too. Farore's Wind shouldn't be what your entire game strategy is about, but knowing how to use it amplifies everything else you can do. Hope the colors didn't burn your eyes.


")
 ).
).