TL;DR!?
What is the difference between side-B and down-B !??
Charge: Side-B can cancel into shield on the ground before it's fully charged. Damage for the roll is based on how long you hold it. Down-B's charge doesn't shield cancel, and its damage is based on the rate/amount of taps you're pressing B.
Air: Side-B has a hop, and its attack box deals 6 damage (charge doesn't matter) and only lasts until you pass the starting height. Down-B's damage lasts as long as you're moving fast enough, and deals more damage if you're holding a direction. It also does multiple hits as long as your opponent is in range to BE hit, and if you hold shield while landing, it will cancel.
Ground!: lulz, they're the same.
There you go, you silly lurkers and people with short attention spans.
And for the rest of you who want more detail, enjoy.
=========================
Note:
If anyone has seen this guide any time between 4/1/09 and 8/18/09,
EVERYTHING YOU KNOW IS A LIE

It was fun, but I've decided that, like Christmas decorations in New York, this has been up for too long, and so I've brought it back to its regular guide form.
Sasaki Nozomi-chA1 has done her job well.
This guide is legit again! LOL.
First off...
ACRONYMS
This is probably going to be the hardest thing to understand in this whole ordeal. The letters.
SD = Spin Dash (Hop) (Side-B)
SC = Spin Charge (Down-B)
SDR = Spin Dash Roll (the 'rolling attack' part of the move when it reaches the ground)
SDJ = Spin Dash Jump (jump attack that can be done out of a SDR)
ASC = Aerial Spin Charge (air Down-B)
Throughout this thread, I'll try to keep the color coding the same so you can associate them better. Yellow is for side-B, Orange is for down-B. Light blue is for the ground part (it's the same for both moves!), and Dark Blue is the jumping part (same for both moves!)
Phases
You may have noticed that both moves roll, and both Side-B and Down-B can jump after the roll. Well, this is because the roll is actually the same move! Both the Side B and the Down B undergo 'phase changes', where they change 'moves' depending on where they are and what their previous phase was.
NOTE: "Charging" is a phase that is pretty obvious, but will be omitted here. More information will be found in the Move Properties section.

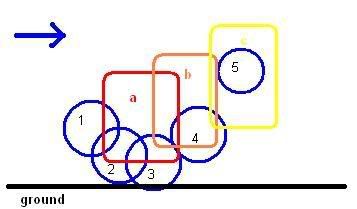
This maps out all the possible 'phases' that the move goes through during and after you release the charge. If you have a double jump, you can jump to cancel any of the aerial phases. Hitting [Up], [Jump], or [Attack] out of the grounded phases (charge, SDR) makes you go into the spindash jump (SDJ).
Note: If a SDR goes to the edge of a platform, it becomes an ASC and assumes its properties. This means that even a Side-B Hop can turn into an ASC as long as you let it roll into the floor first.
Side B: (Aerial or ground)
SD (hop) -> SDR (-> SDJ)
SD (hop) -> jump cancel (while still in air)
SD (charge) -> Spin shot
SD (charge) -> Shield
Down B:
Ground
SDR (-> SDJ)
SDR (-> SDR) (turning around initiates a new SDR with lower power)
SDR (roll off platform) -> ASC
SDR (roll off platform) -> Spin shot
Aerial
ASC (land) -> SDR (->SDJ)
ASC -> jump cancel
ASC (land) -> Shield
ASC (charge) -> Spin shot
Move properties
Yes, believe it or not, there are differences in the moves, and it's not just that side-B hops and down-B doesn't. It becomes more obvious in their aerial versions. Down-B and Side-B both record how much charge the moves have and whether or not you had a double jump when you started charging. It passes this information on to the next part until the move ends - which is... jump cancelling the move while it's in midair, the roll running out of spin, a Spin Dash Jump, or you falling to your death.
STALE MOVE EFFECT: All of these moves share the same Stale Move counter. Each turn-around or phase-change you initiate all pool in for the same move. I guess calling these "phases" really was accurate, since they are all parts of the same move, aside from their starting points. But anyway, even Side-B's hop and ASC diminish each others' effects, as well as the rest of the moves, SDR, SDJ... the whole thing.
TIME LIMIT: After your initial release of the charge, you will remain in ball form until you jump (SDJ, double jump, etc), or until 2 seconds has passed. Keep this in mind when trying to incorporate spindash into your chase and mixup movements. This "timer" begins counting as soon as you release your charge, regardless of if it's side-B hop, ASC, or just a grounded spin charge- your spin will last for 2 seconds after you release.
IN THE AIR: ANY of the aerial phases (charging, side-B's hop, ASC, SDJ) can be 'ended' by double jumping as long as you have a double jump. SDJ is the only phase that you can actually attack out of without having to jump first.
Charge
Note- this covers both side-B and down-B's charge. Features here are common to both side-B and down-B unless otherwise specified.
Spin Dash (SD hop):
Aerial Spin Charge (ASC):
Spin Dash Roll (SDR):
Spin Dash Jump (SDJ):
So if that made any sense, I think the SDR and SDJ are treated as "ending moves" that take in charge / 'remaining jump' data from the Side-B or Down-B. Side B's "true form" can really just be the hop, and Down-B's "true form" is the aerial version; The rolling attack is just tacked on to both moves. A grounded Down-B is already on the floor (duh), so it goes straight into the rolling attack.
Spin Shot spinshot spin-shot
Spin shot is the technique that allows you to do an "instant double jump" at something similar to running speed, allowing Sonic to have *gasp* high air speed!
The basic input for this is usually side-B (charge) > release + [Jump/Attack]
You may have noticed that it only works if you have a double jump remaining, and here's why: Spin shot IS a double jump. It will not work from a grounded Spin Charge because you are not in the air, and it will not work without a double jump because you can't jump-cancel the moves.
...But it is NOT a normal double-jump. The 'jump cancel' from pressing jump or attack during an aerial charge (both side/down-b), SD hop, or ASC is a little different from a normal double-jump, since you go into it pressing either [attack] or [jump]. I'm guessing it's this 'special' double-jump that allows you to Spin Shot.
The 'magic' behind spin shot working is this: You interrupt an phase change to SD hop/ASC with a double jump!
Here are all the possible cases from which you can spin shot:
- Side-B (charge) > SD (Hop) + jump
- Aerial Down-b (charge) > ASC + jump
- SDR (roll off platform) > ASC + jump
You can't do it out of a SDJ because SDJ is the last move - it doesn't flow into any other phases.
Untested: Is it possible cancel a SDR>SDJ with an immediate double jump and get a 'strange effect'?
Air Dash airdash air-dash
"Air Dash" is a situational 'glitch' that works on certain levels only. The basic input for it is:
Side-B charge (upwards) on a 45 degree or steeper slope > release
Again, the 'magic' behind the air dash is, like spin shot, interruption of a phase change. In this case, side-B's charge is supposed to go into the air. However, this phase change is immediately interrupted by the ground. The invincibility frames given by the release then extends for the duration of the move. Performing a turnaround will create a 'new' SDR and turn off the invincibility frames. The reason behind the naming of this technique as 'air dash' is that when Sonic rolls off some edges, he will roll horizontally off the platform, as if he were on an invisible platform.
A few interesting notes about the Air Dash:
Flight behavior
- If the ground ends while completely flat (horizontally) or rising, Sonic will launch horizontally into the air as though he were riding on invisible ground (example: Delphino tower, Pokemon Stadium trees).
- If the ground goes downwards (Brawl Yoshi's Island), you may either: roll off the stage in an invincible ASC, airdash (it tends to happen in custom stages), or stall on the edge while spinning and go flying off the stage in screech stop animation when it runs out of power (Pictochat).
Teleportation
- If he passes a platform (can be above or under him) as he's in the air and makes contact with anything (projectile, person, etc) he will teleport to another height while still rolling.
Turning?
- If you don't have enough momentum to climb the slope and go backwards (ex: single charge), you will still be in the invincible state (like for example, the side platforms in Brinstar or the hills in Pipes).
Phase changes
Airdash = invincible "floating" roll done out of side-B
iSDR = invincible roll
iASC = invincible ASC that results from being slope-reversed and falling downwards off a platform (like in Brinstar).
Air dash phase changes:
SD (charge) > iSDR (uphill/horizontal) > Airdash > (double jump)
SD (charge) > iSDR (downhill) > iASC > (double jump)
SD (charge) > iSDR (uphill, slow) > shield
SD (charge) > iSDR (turn around) > SDR > SDJ
It's very situational, but iSDR can be used to plow through things you normally wouldn't, like for example, a grenade/minefield, among other... fun things.
----------------
Hopefully, it will help explain some things about the moves that you may or may not have been wondering about.
What is the difference between side-B and down-B !??
Charge: Side-B can cancel into shield on the ground before it's fully charged. Damage for the roll is based on how long you hold it. Down-B's charge doesn't shield cancel, and its damage is based on the rate/amount of taps you're pressing B.
Air: Side-B has a hop, and its attack box deals 6 damage (charge doesn't matter) and only lasts until you pass the starting height. Down-B's damage lasts as long as you're moving fast enough, and deals more damage if you're holding a direction. It also does multiple hits as long as your opponent is in range to BE hit, and if you hold shield while landing, it will cancel.
Ground!: lulz, they're the same.
There you go, you silly lurkers and people with short attention spans.
And for the rest of you who want more detail, enjoy.
=========================
just do us all a favor and change the name of the thread to "the difference between side b and down b
Note:
If anyone has seen this guide any time between 4/1/09 and 8/18/09,
EVERYTHING YOU KNOW IS A LIE
It was fun, but I've decided that, like Christmas decorations in New York, this has been up for too long, and so I've brought it back to its regular guide form.
Sasaki Nozomi-chA1 has done her job well.
This guide is legit again! LOL.
Table of Contents
- ACRONYMS
- Phases (updated: 8/24 - "Time Limit")
- Move Properties (ALL UPDATED: 11/17)
- - Charge
- - Spin Dash (SD hop)
- - Aerial Spin Charge (ASC)
- - Spin Dash Roll (SDR)
- - Spin Dash Jump (SDJ)
- Spin Shot
- Air Dash
______
Post 2- Aerial Spin Charge: this move is too good.
- Quick overview on ASC
- Combos don exits! (combo usage and analysis of the ASC)
- - ASC "Simple combo"
- - ASC "Perfect combo"
- - Bonus
______
Post 3- Spin Dash (side-B) and Move Usage
- Spin Dash (side-B) in a nutshell
- - Spin Dash Hop: Approach Tricks! (added 10/14)
- Move Usage (for both side-B and down-B) NEW! 11/17 <-- advanced ;d
- - Overview
- - Spacing
- - Feinting
- - - Double Jump Feint
- - - Ground: Off-rhythm/Delay
- - - Side-B: Charge Cancel
- - - ASC cancel
- - - - - Mid range ASC/"pin"
- Important stuff.
____________- ACRONYMS
- Phases (updated: 8/24 - "Time Limit")
- Move Properties (ALL UPDATED: 11/17)
- - Charge
- - Spin Dash (SD hop)
- - Aerial Spin Charge (ASC)
- - Spin Dash Roll (SDR)
- - Spin Dash Jump (SDJ)
- Spin Shot
- Air Dash
______
Post 2- Aerial Spin Charge: this move is too good.
- Quick overview on ASC
- Combos don exits! (combo usage and analysis of the ASC)
- - ASC "Simple combo"
- - ASC "Perfect combo"
- - Bonus
______
Post 3- Spin Dash (side-B) and Move Usage
- Spin Dash (side-B) in a nutshell
- - Spin Dash Hop: Approach Tricks! (added 10/14)
- Move Usage (for both side-B and down-B) NEW! 11/17 <-- advanced ;d
- - Overview
- - Spacing
- - Feinting
- - - Double Jump Feint
- - - Ground: Off-rhythm/Delay
- - - Side-B: Charge Cancel
- - - ASC cancel
- - - - - Mid range ASC/"pin"
- Important stuff.
First off...
ACRONYMS
This is probably going to be the hardest thing to understand in this whole ordeal. The letters.
SD = Spin Dash (Hop) (Side-B)
SC = Spin Charge (Down-B)
SDR = Spin Dash Roll (the 'rolling attack' part of the move when it reaches the ground)
SDJ = Spin Dash Jump (jump attack that can be done out of a SDR)
ASC = Aerial Spin Charge (air Down-B)
Throughout this thread, I'll try to keep the color coding the same so you can associate them better. Yellow is for side-B, Orange is for down-B. Light blue is for the ground part (it's the same for both moves!), and Dark Blue is the jumping part (same for both moves!)
Phases
You may have noticed that both moves roll, and both Side-B and Down-B can jump after the roll. Well, this is because the roll is actually the same move! Both the Side B and the Down B undergo 'phase changes', where they change 'moves' depending on where they are and what their previous phase was.
NOTE: "Charging" is a phase that is pretty obvious, but will be omitted here. More information will be found in the Move Properties section.
This maps out all the possible 'phases' that the move goes through during and after you release the charge. If you have a double jump, you can jump to cancel any of the aerial phases. Hitting [Up], [Jump], or [Attack] out of the grounded phases (charge, SDR) makes you go into the spindash jump (SDJ).
Note: If a SDR goes to the edge of a platform, it becomes an ASC and assumes its properties. This means that even a Side-B Hop can turn into an ASC as long as you let it roll into the floor first.
Side B: (Aerial or ground)
SD (hop) -> SDR (-> SDJ)
SD (hop) -> jump cancel (while still in air)
SD (charge) -> Spin shot
SD (charge) -> Shield
Down B:
Ground
SDR (-> SDJ)
SDR (-> SDR) (turning around initiates a new SDR with lower power)
SDR (roll off platform) -> ASC
SDR (roll off platform) -> Spin shot
Aerial
ASC (land) -> SDR (->SDJ)
ASC -> jump cancel
ASC (land) -> Shield
ASC (charge) -> Spin shot
Move properties
Yes, believe it or not, there are differences in the moves, and it's not just that side-B hops and down-B doesn't. It becomes more obvious in their aerial versions. Down-B and Side-B both record how much charge the moves have and whether or not you had a double jump when you started charging. It passes this information on to the next part until the move ends - which is... jump cancelling the move while it's in midair, the roll running out of spin, a Spin Dash Jump, or you falling to your death.
STALE MOVE EFFECT: All of these moves share the same Stale Move counter. Each turn-around or phase-change you initiate all pool in for the same move. I guess calling these "phases" really was accurate, since they are all parts of the same move, aside from their starting points. But anyway, even Side-B's hop and ASC diminish each others' effects, as well as the rest of the moves, SDR, SDJ... the whole thing.
TIME LIMIT: After your initial release of the charge, you will remain in ball form until you jump (SDJ, double jump, etc), or until 2 seconds has passed. Keep this in mind when trying to incorporate spindash into your chase and mixup movements. This "timer" begins counting as soon as you release your charge, regardless of if it's side-B hop, ASC, or just a grounded spin charge- your spin will last for 2 seconds after you release.
IN THE AIR: ANY of the aerial phases (charging, side-B's hop, ASC, SDJ) can be 'ended' by double jumping as long as you have a double jump. SDJ is the only phase that you can actually attack out of without having to jump first.
Charge
Note- this covers both side-B and down-B's charge. Features here are common to both side-B and down-B unless otherwise specified.
Charge: The charge "strength" only affects the SDR. Charge will not make a difference on how strong or fast the aerial versions are!
- Side-B's grounded charge can be cancelled by shield before full charge.
- Side-B's charge is unique in that you must hold B to charge (2 seconds for full charge)
- While charging, Side-B's charge moves Sonic backwards. It 'resets' and overrides any horizontal momentum as long as you're not in hitstun.
- Down-B's charge requires you to be holding Down on the control stick. Holding Down for about 1 second then releasing can let you do a single-charged SDR.
- Down-B can be fully charged for damage by tapping 3 times, full speed by tapping 5 times.
- Unlike Side-B, Down-B's charge does not reset momentum, but you can float left/right while charging it in the air by holding down+left/right.
Remaining Jumps: If you begin a charge in the air without a double jump, then the rest of the move is treated as if you don't have one.
Aerial: If you have remaining jumps, can be jump cancelled.
Aerial: If you press Jump or Attack as the charge is released, you do a spin shot (see below or search for Spin Shot for more info).
Ground: If you press [Up], [Jump], or [Attack] while charging, turns into vertical SDJ ("VSDJ"). It has the same properties as a normal SDJ except it starts off going straight up.
Spin Dash (SD hop):
Charge: CHARGE DOES NOT AFFECT THE HOP'S DAMAGE OR SPEED.
Remaining Jumps: If you have remaining jumps, can be jump cancelled, allowing you to follow-up with aerials.
Damage: 5-6% constant damage. This phase only has a temporary hitbox that goes away after you go under your starting height. Keep this in mind for when you're using side-B to directly attack opponents.
Knockback: Little knockback/upwards. Positions your opponent for a double jump U-air at about 60%, if you want to get a feel for how high it sends.
Other traits:
- Has invincibility/dodge frames at the beginning of the hop (for about 5 frames after upon release)
- Has higher max air speed than normal jumps.
- Resets vertical and horizontal momentum upon startup.
Phase changes:
- Next: Turns into an SDR as soon as you make contact with the ground.
- Ending the move: Double jumping via [Jump] or [Attack] is the only way to 'get out' of the move. You cannot shield cancel the landing.
Aerial Spin Charge (ASC):
Charge: CHARGE DOES NOT AFFECT THE DAMAGE NOR SPEED OF THE ASC.
Remaining Jumps: If you have remaining jumps, can be jump cancelled, allowing you to follow-up with aerials.
Damage: This one is really cool. ASC can do multiple hits:
- First hit: 7-11 damage. Damage is based on horizontal velocity, so hold Forward for maximum damage. Likewise, if you hold [Back] and are moving too slowly, you will do less damage or even be able to 'turn off' the hitbox.
- Follow-up hit(s): 7-10 damage. As of now, we're still not sure what changes the damage of the followup hits. You can usually count on the 'worst case' and get the minimum damage from your follow-up hits.
Knockback:
- First hit: High knockback/upwards. This can KO at higher %'s (170-180%+ on grounded opponents)
- Follow-up hit(s): Medium knockback/upwards. Similar, but a little stronger than side-B's knockback. Note that if you hit an opponent with the follow-up hit, it kind of 'kills' the stronger knockback done by the first hit.
Other traits:
- Has higher max air speed than normal jumps.
- Resets horizontal momentum upon startup.
Phase changes:
- Next: Turns into an SDR as soon as you make contact with the ground.
- Ending the move: Holding [shield] as you land will allow you go cancel the move into shield upon landing. While the move is in the air, you can double jump by pressing [Jump] or [Attack] to end it.
UNTESTED: There have been multiple accounts for a phenomenon that I will, for now and forever, dub the OMNOMNOM frames. At some point either right before or during landing, Sonic is in a state where he can "eat" destructible projectiles. Among these projectiles are... boomerangs, arrows, turnips, and fully charged 120%+ aura spheres.
Spin Dash Roll (SDR):
Charge: Charge does affect the speed (and consequently, damage) of the SDR. 
Remaining Jumps: Whether or not you have a double jump remaining is still passed onto the next phase. It doesn't exactly affect this part of the move, but keep that in mind. Your remaining jumps aren't renewed until the move ends.
Damage: 7-10 damage. The SDR's damage is based on how fast you're moving! This implies two things: 1) You don't necessarily have to be moving at max speed to do max damage; and 2) If you do a low charge SDR and roll down a hill to speed up, you will do max damage.
Knockback: Very Low knockback/upwards. This move's knockback was purposefully tailored to combo into SDJ/aerial.
Other Traits:
- SDR gains/loses speed when travelling on slopes (goes faster if going down a hill and slower if going up). It's possible to begin a low charge SDR going up a hill, slow down, and speed up going down the hill without any input from you.
- Turn-around (tap/hold [Back] during the SDR):
--- The turn-around does not deal damage until the blue aura comes back.
--- Performing a turn-around "initiates" a 'new' SDR with lower speed. This becomes important in understanding the iSDR (see the bottom of this post for more detail).
Phase changes:
Next: Hitting [Up], [Jump], or [Attack] will shift the move into an SDJ. Alternatively, you can roll off the platform, which shifts the move into the ASC phase.
- Ending the move: There are two ways to 'end' the move from this point.
a) If the 2 second time limit (from release) runs out during the SDR, you will screech stop until momentum stops. This can be very laggy if you're moving quickly, but you can 'slow it down' pre-emptively by beginning a turn-around just before it ends.
b) If you are moving slow enough (for example, slowed down by a hill, or a single charge roll after making contact with one object), you can hit [shield] and cancel the roll!
Spin Dash Jump (SDJ):
Charge: Charge has no effect on this phase!
Remaining Jumps: If you had a double jump when you began the charge, you can use it out of this phase! If not, then you can't
Damage: 7 damage. Like the SD hop, this does constant damage, not counting stale moves. This move has an attack hitbox for about 1-2 seconds (Untested: exact length of hitbox out).
Knockback: Medium knockback/sideways.
Other Traits:
- Has higher height than a full hop.
- Has higher max air speed than a full hop.
Ending:
- If you you had a double jump during the charge, you can use it out of the SDJ by hitting [Up] or [Jump]
- You can immediately cancel the SDJ with an Aerial, Airdodge, Spring, or Homing Attack. You have to wait until after the hitbox goes away before you can start a new side/down-B.
So if that made any sense, I think the SDR and SDJ are treated as "ending moves" that take in charge / 'remaining jump' data from the Side-B or Down-B. Side B's "true form" can really just be the hop, and Down-B's "true form" is the aerial version; The rolling attack is just tacked on to both moves. A grounded Down-B is already on the floor (duh), so it goes straight into the rolling attack.
Spin Shot spinshot spin-shot
Spin shot is the technique that allows you to do an "instant double jump" at something similar to running speed, allowing Sonic to have *gasp* high air speed!
The basic input for this is usually side-B (charge) > release + [Jump/Attack]
You may have noticed that it only works if you have a double jump remaining, and here's why: Spin shot IS a double jump. It will not work from a grounded Spin Charge because you are not in the air, and it will not work without a double jump because you can't jump-cancel the moves.
The 'magic' behind spin shot working is this: You interrupt an phase change to SD hop/ASC with a double jump!
Here are all the possible cases from which you can spin shot:
- Side-B (charge) > SD (Hop) + jump
- Aerial Down-b (charge) > ASC + jump
- SDR (roll off platform) > ASC + jump
You can't do it out of a SDJ because SDJ is the last move - it doesn't flow into any other phases.
Untested: Is it possible cancel a SDR>SDJ with an immediate double jump and get a 'strange effect'?
Air Dash airdash air-dash
"Air Dash" is a situational 'glitch' that works on certain levels only. The basic input for it is:
Side-B charge (upwards) on a 45 degree or steeper slope > release
Again, the 'magic' behind the air dash is, like spin shot, interruption of a phase change. In this case, side-B's charge is supposed to go into the air. However, this phase change is immediately interrupted by the ground. The invincibility frames given by the release then extends for the duration of the move. Performing a turnaround will create a 'new' SDR and turn off the invincibility frames. The reason behind the naming of this technique as 'air dash' is that when Sonic rolls off some edges, he will roll horizontally off the platform, as if he were on an invisible platform.
A few interesting notes about the Air Dash:
Flight behavior
- If the ground ends while completely flat (horizontally) or rising, Sonic will launch horizontally into the air as though he were riding on invisible ground (example: Delphino tower, Pokemon Stadium trees).
- If the ground goes downwards (Brawl Yoshi's Island), you may either: roll off the stage in an invincible ASC, airdash (it tends to happen in custom stages), or stall on the edge while spinning and go flying off the stage in screech stop animation when it runs out of power (Pictochat).
Teleportation
- If he passes a platform (can be above or under him) as he's in the air and makes contact with anything (projectile, person, etc) he will teleport to another height while still rolling.
Turning?
- If you don't have enough momentum to climb the slope and go backwards (ex: single charge), you will still be in the invincible state (like for example, the side platforms in Brinstar or the hills in Pipes).
Phase changes
Airdash = invincible "floating" roll done out of side-B
iSDR = invincible roll
iASC = invincible ASC that results from being slope-reversed and falling downwards off a platform (like in Brinstar).
Air dash phase changes:
SD (charge) > iSDR (uphill/horizontal) > Airdash > (double jump)
SD (charge) > iSDR (downhill) > iASC > (double jump)
SD (charge) > iSDR (uphill, slow) > shield
SD (charge) > iSDR (turn around) > SDR > SDJ
It's very situational, but iSDR can be used to plow through things you normally wouldn't, like for example, a grenade/minefield, among other... fun things.
----------------
Hopefully, it will help explain some things about the moves that you may or may not have been wondering about.