No Weak Links –Play To Your Strengths!
An advanced Link strategy expansion guide
By MES!
Hey fellow Link players,
Let’s face it, Link is an awesome character who somehow ends up on the bottom tier. A slow, laggy, easily punished, Link is a far too common misconception- the ‘weak Link’. This guide expands on strategies for playing to Link’s strengths and earning him proper respect at high levels- with a helpful control system.
‘Long time Link player, first time guide writer, and I’m new to this site and the Smash community. ‘Though I’m a n00b on this site, take me seriously. This guide has years of experience and tells how to Fsmash with bombs as part of Link’s normal game, how to grab opponents out of the air, infinite/chaingrab insurance, three ways to gimp Meta Knight, how to get Link to the top tier, and much more!
In all three Smashbros Link’s been my only main, when Brawl came out I was frustrated with the changes to Link and the system itself. With a lot of patients and work I’ve overcome the changes and found very effective, very different ways to compete using Link, even at tournament levels. The ’09 C3 was my first and only major tournament; I ultimately lost but surprised people as the only Link player and with several victories. The important thing is I gained valuable experience and had fun. Someone wrote that playing Smash is about winning and having fun, if you do neither there’s no point (tell me if that was you). ‘Hope this guide helps more Link mains do both. Patience is a virtue.
There are many great guides for Link or any character already out: this is meant to be an expansion with useful info I’ve discovered, not an intro. Look at the guides mentioned below before reading this.
All situations are based on a 1 vs. 1, no items, tournament style play unless stated otherwise. Many stages covered are not tournament standards, I know.
I have a character strategy guide that was intended to be part of this one. Because of length, time restraints, and the nature of how it should be updated, I decided to make it a separate guide. It’s a work in progress. I’ll post it when I have enough info down. If you like this, check it out later.(No Weak Links –Play To Your Strengths! Character Strategies)
(I wrote this on Word, some formatting didn’t transfer over. It was 36 pages!)
MES!
Revisions
The controller system was already known. I don't take credit for it. Ignore any statements saying that I do if I missed them. Great minds think alike, right?
I stand by my statement about Link's potential to make top tier.
Index [002]
(Hold ‘Control’ and press ‘F’ then type the code in [brackets] and click ‘next’ once or twice to jump to a section)
Introduction [001]
Revisions
Index (you are here) [002]
Credits [003]
Why would you want to play Link? [004]
Why Not? [005]
Terminology [006]
The four most important things about Brawl Link [007]
Pros/Cons [008]
Melee to Brawl Pros/Cons [009]
Link’s moves overview [010]
Controller System for Link[011]
Explanation [012]
The strong Link [013]
The right setup [014]
1. Spacing direct [015]
2. Spacing indirect [016]
Stages
1.General stage tips [017]
2. Stage type tips [018]
Characters
1. Character types [019]
2. Grab types [020]
Putting it together: Link’s game [021]
1. All situation tips [022]
2. Defensive [023]
3. Offensive [024]
4. Attack alternatives [025]
5. Combos [026]
Training tips [027]
Non-tournament play styles [028]
Not covered in this guide [029]
Conclusion [030]
Credits [003]
First thing’s first. Nintenjoe’s ‘The Triforce of Courage’ and Izaw’s ‘The Art of Link’ guides are excellent. I learned several great advanced techniques and more importantly how to do them from these. SCOTU’s ‘Your First Tournament - A Guide to Making the Most of It’ and ‘A Guide to Playing Smash Competitively’were helpful general guides. READ THEM.
I take credit for my system describe in the shamelessly titled ‘My Innovative Controller System for Link’ and ‘Explanation’ sections. I acknowledge that most of the stuff in here was discovered by other people and this is my collaboration with it.
Obviously other great guides are out there, I happened to read (or view) the above ones. Please don’t get mad if I left something you should get credit for out. Other people probably though of most stuff themselves without me knowing. Tell me if I did anything un-cool; I’m new here.
I have waaaay more respect for anyone who writes guides like this after doing one myself; great job to all the smash people who submit out there.
All rights to any names, scenario, and everything belong to Nintendo and other Brawl associated companies. (Don’t sue me.)
Why would you want to play Link? [004]
If you can master Link, you can match every tactic in the game. A perfect Link has little punishable lag and no fear of long infinites and chain grabs. Link has enormous damage potential, versatility, covers huge areas of any tournament stage through most of a match and is fit for every situation. Debatably the most advanced mindgame and AT character of all, with tons of options: very effective while easily staying unpredictable. …And he solves world hunger; there, I said it.
Why not? [005]
Link’s ATs and even normal play styles are very complex. Pair that with his poor recovery and a tournament level opponent: you’ve little or no room for error. The controls are so specific and sensitive that you will have to practice for many, many hours and avoid other controller types (DS, Playstation, X-Box, etc) before tournaments to be efficient. All of Link’s techniques must become second nature or won’t work. A ‘B’down (ready bomb)>short hop>‘L’ (dodge)>Zair and hold ‘R’ during the animation>fastfall>‘C’forward> release ‘R’ (Fsmash one)>‘A’ (Fsmash two)>‘C’forwards (forward bomb throw) combo must become as natural as a simple Fsmash. If you have to think, you’ll stall or mess-up and be easily punished. Get used to hearing this: Link has an extremely high learning curve!
Terminology [006]
(Skip this unless you’re confused later. Important Link specific terms are bold italicized)
‘A’, ‘B’, ‘L’, ‘R’, ‘Z’- refers to buttons on a GameCube controller, what I use. Sorry, other controller schemes will have to adapt.
‘C’(direction)- tilting the C stick, set for smashes, in that direction.
Damage- The % indicated by a character icon at the bottom of the screen. Damage contributes to the distance a character’s launched.
Launch- To hit an opponent, shooting them away.
Pushback/Knockback- The force that moves characters even if the attack was blocked.
Deathzone/Killzone/Stage Boundary. An area around every stage that will result in a fall or self destruct for any character who passes it. This is made of four borders: ceiling (top), sides left/right and floor (bottom). Some very high jumps will survive passing through ceilings if they’re not out of being launched. All death zones are rectangle shaped.
KO- To hit or somehow force your opponent past the deathzone offstage. +1 point.
Star KO- To KO off the top of the screen.
Fall- To be KO’d by your opponent. -1 point.
Self destruct- To enter the deathzone before the opponent has hit or affected you in a way that gives them the KO. -1 point.
Stock- How many times a character can be KOed before they loose.
Gimp- KO at low damage.
Freefall- Falling unable to take action other than DI until the character lands/edge grabs. Only Up ‘B’ triggers this for Link.
Flinch Resistance/Super Armor Frames- A period during certain actions when a character can take damage but no knockback. Link has none.
Hitbox- Where the game registers an attack’s affect.
Hurtbox- Where the game registers that a character or other component can be hurt.
Standard Attack/standard- Primary attacks executed by using ‘A’ or ‘R’ (see below) alone or with directional input.
Specials- Special moves executed with the ‘B’ or ‘B’+ directional input.
Start-up- The time used for readying attacks.
Lag- The time required after an attack before another action can execute.
Attack wall- Attacks that produce a constant, gapless attack while in effect.
Mindgames- Tricking the opponent into a bad position. (I hope this guide earns the term some respect.)
Ground Actions:
Dash- Tap the control stick left or right to run.
Jog (this could have a different name)- Tilt the control stick to the side to accelerate into a nearly running speed. Use this technique to Ftilt or Fsmash approach instead of dash attack or DAC.
Jump- Fully press the jump button.
Short hop (SH)- Lightly tap the jump button to hop about half the height of jumping, often used in approaches.
Crouch- Holding down while grounded.
Crawl- Some characters can crawl from crouching and avoid high attacks. Link can’t.
Jab- tap standard attack button.
Jab Combo- hold or repeatedly tap ‘A’/‘R’, Link has a three cut combo.
Jab canceling- Start a jab combo but use a different attack for the last hit. Some characters need to crouch to jab cancel, Link doesn’t.
Ftilt- Tilting the controlstick forward+ standard attack.
Utilt- Tilt using up direction.
Dtilt- Tilt using down direction.
Fsmash- Smash the control stick+ standard attack or tilt ‘C’ forward or backwards*. Tap the attack button again if desired during the first Fsmash animation to do Link’s second Fsmash.
Usmash- Smash using up direction.
Dsmash- Smash using down direction.
*‘C’ smashes, without holding a bomb, cannot be charged like regulars.
Fsmash ready- Holding ‘R’ while holding a bomb to be able to ‘C’ Fsmash with the bomb, but unable to perform other standards and ‘Z’ actions until ‘R’ is released. (See below.)
Dash Attack- Dash and tap ‘A’, ‘R’, or ‘C’down for earlier execution.
DAC (Dash Attack Cancel)- Dash>‘C’down>Usmash to slide with a dash attack’s momentum while Usmashing. Very difficult to do: Dash and ‘C’down then after the ‘C’down’s inputted but before the dash attack begins smash the controlstick up and tap (or hold for charge) ‘A’, ‘Z’, or ‘R’.
Grab (Clawshot)- grabbing with ‘Z’ or Shield+ ‘A’ or ‘R’ while grounded.
Grounded Spin Attack/Up‘B’- Up+‘B’ on the ground, can be charged and hits once.
Shield- Block using ‘L’.
Power Shielding/Perfect Frame Shielding- Shield an attack as it connects with perfect timing to suffer no shield pressure and knock back.
Shield Dashing- Dash then shield to slide forward while shielding.
Spot Dodge- tap control stick down while shielding to dodge in place, slight vulnerability follows.
Rolling Dodge- tap left or right while shielding to dodge in that direction, slight vulnerability follows.
Hylian Shield: The shield Link and knights of Hyrule carry, not ‘L’. All references to Hylian shield in this guide refer to guarding while crouching.
Aerial Actions:
Double Jump- Jump in the air. Link has one, some characters have multiples.
Fast-fall- Tap the controlstick down while falling to plummet faster. Dair can trigger this too.
DI (directional influence)- move in the air.
Smash DI- Smash the control stick during hit stun to move in that direction. Great for escaping multi-hit combos.
Nair- Standard attack in the air.
Fair- Standard attack+ forward or ‘C’ forward in the air.
Bair- Aerial standard using the direction your character’s not facing.
Uair- Aerial standard using the up direction.
Dair- Aerial standard using the down direction. If Link does this while rising he will do a slow Dair which bounces off opponents and various things. If Link does Dair while falling he will fast Dair, drop faster and steeper and push through opponents and shields (not auto-breaking them).
Zair (Clawshot)- ‘Z’ or airdodge>‘Z’, ‘R’, or ‘A’ during the animation. Link will shoot his clawshot to grab edges or hit opponents up to twice going out.
Lagless aerials- Standard aerials that cancel when landing with no lag. Link’s are Fair, Bair, and Nair. (Zair, arrows, and airdodges also landing cancel but aren’t included here).
Aerial Spin Atack/Up‘B’- Up+‘B’ in the air. Carries Link up and forward with his existing momentum. Hits multiple times.
Airdodge/Dodge- ‘L’ in the air. Dodges attacks but will not grab ledges while in effect. This can be done multiple times before landing.
Teck- Press ‘L’ as you impact a solid surface to catch it and stop momentum. Angle the controlstick left or right when tecking on the ground to dodge that way.
Ground and Air Moves:
Bombs- Down ‘B’ to pull one out and throw with down‘B’, ‘A’+ controlstick direction, or ‘C’direction (recommended). Lightly drop bombs with non-directional ‘Z’. They will explode after being armed for seven seconds. Link can have two onscreen at once. MUCH more on bombs later.
Fbomb, Ubomb, Dbomb, Bbomb- throwing the bomb Link’s holding with ‘C’ Forwards, Upwards, Down, or Backwards, respectively.
Gale Boomerang/boomerang- Forward ‘B’.
Gale/gale push/gale pull- The wind effect at the end of the Gale Boomerang’s outward motion and as it returns that does no damage and does not reset up‘B’s. The indirect boomerang attack.
Hero’s Bow (Bow, Arrows)- ‘B’, chargeable.
Quickdraw- Tap ‘B’ before landing to shot an arrow with less lag.
Hanging From Ledge (Edge) Options:
Drop- Tap down.
Ledge Jump- Tap up or jump button.
Ledge Roll- Tap ‘L’ to rolldodge on stage.
Ledge Attack- Tap an attack button to attack onto the stage.
Get Up- Tap forward to simply climb onto the stage.
The above section was meant specifically to enhance this guide and my recommended controls. Techniques often have many similar names but I tried to be as accurate as possible. Looking back, most of it was already shown in other guides and a time waster. Oh well.
Down to business… [007]
The four most important things about Brawl Link to remember are:
1. Link’s learning curve is extremely high, higher than previously thought even. 2. Link is not a blitzer. 3. This is not Melee! 4. Link is all about spacing.
Pros/Cons [008]
Pros
Good power
High damage potential
Great reach
Most standard attacks have large disjointed hitboxes
Long duration of effect for most attacks
Extremely variable duration of effect for most attacks
Well timed standard attacks cancel most range attacks.
Three versatile range attacks
Multiply range and standard attacks can be on screen simultaneously
Range attacks are not energy and can’t be absorbed
Good at edge guarding
Hard to star and strait-forward KO.
Tons of ATs
Incredibly versatile attacker
Hylian shield blocks all standard range attacks that hit it while in effect
Cons
Generally slow
Laggy moves
Low mobility
Bad recovery from vertical and horizontal distances
Bad shield/dodging game
Easily punished mistakes and poor planning
Easily gimped
Needs good spacing to be effective
Melee to Brawl Pros/Cons [009]
Pros
Usmash, first Fsmash, Dsmash, Ftilt, Utilt, and second Fair cut all have much better chance of KOing then before.
Clawshot will grab based on where it was executed and homes in on edges.
1. If a strong hit knocks back Link from shielding, grab immediately after the blow connects and you will get the opponent regardless of knockback.
2. Provided Link is in control (not flipping after being hit) and timing/positioning is right, the clawshot will grab ledges REGUARDLESS OF THE FORCE LINK WAS LAUNCHED. Izaw’s ‘The Art of Link’ video shows a use for this.
3. Immediately grabs ledges from a little above and below (but not if Link’s caught directly under a stage).
4. Edgeguarding, long invulnerability and grabs up to three times before having to land on solid ground. Again, see Izaw’s ‘The Art of Link’ video. Seriously watch it.
5. Clawshot itself edgehogs when the chain’s not retracted. Link is vulnerable, but can edgehog opponents with no recovery attack or who are freefalling for a very long time. Hanging by clawshot can be used to avoid long duration item oriented things like normal hammers, horizontal (Pokeball) Pokemon and assist trophy attacks. The clawshot will retract into a normal edge grab after a short time, not drop Link like in Melee. If Link is hit (not the chain) while hanging he has little hope of surviving.
5. The flash on Link’s hand will grab aerial opponents at the start of a grab.
Throws do 1% more damage than in Melee.
Faster bow than Melee.
1. Link’s fastest range move.
2. Quick draw.
3. Arrows do the same damage regardless of distance. Melee’s arrows would give 1% damage at pointblank range at any charge.
Gale Boomerang.
1. At the end of the forward motion pushes and pulls when coming back, neither damage or reset opponents recovery and tag that opponent for KO’s going to Link if they SD until another character hits them (Free-for-alls).
2. Won’t hurt Link if reflected.
3. Can (and should) be curved when thrown.
4. 50% trip chance going out.
5. Subs for Ftilt in attack area (angle up or bounced off the ground) when Link’s holding a bomb or needs more range, more spammable this way.
6. Phantom boomerang (Not covered).
7. Smash for more distance or tilt the controlstick for shorter range.
Bombs.
1. Fsmash while holding. (Could Link do this in Melee?)
2. Link’s bombs will not impact him.
3. Catch with standard aerials.
4. Jump through falling bombs.
5. Bomb shielding.
Easer to ready/use range in the air and while recovering.
Dash attack cancel.
Cons
The overall character weight and power differences are less and recovery differences are more. Heavy, powerful, and short recovery characters from Melee got the raw deal.
Shielding is much more formulaic and easy.
1. Link’s slow startups can be blocked and severely punished.
2. If Link’s ground Spin Attack is blocked once, the rest will miss regardless of if the opponent shields it or not.
3. Most characters are quicker than Link and can counter before he recovers from attacking.
Hylian shield.
1. Link drops his guard while standing still sometimes, like Young Link (Melee) and Toon Link.
2. Smaller guard area relative to Melee.
Auto jab combo doesn’t help Link like many characters.
1. Slower than tapping ‘A’ three times.
2. Link lost his rapid jab attack. In Melee it was pretty worthless anyway.
Sweetspotting the edge is much easer.
1. Link’s Dtilt is almost worthless for a meteor smash,
2. Spin Attack won’t semi-spike and is poor for edge guarding.
3. All characters can grab the edge backwards when falling or recovering (not just spinning up‘B’s any more).
Air dodging.
1. No distance boost.
2. Characters can air dodge multiple times (‘bet Kirby and Jigglypuff players loved this).
3. Link’s bad recovery limits this option’s usefulness while better jumpers really gain from it.
Recovery distance has gotten worse.
1. Aerial Spin attacks don’t gain their own forward momentum.
Clawshot vs. Hookshot.
1. Shorter range.
2. Hits only going out so opponents can roll doge through it.
3. Slower.
4. Can’t scale walls anymore.
5. Can be edgehogged.
Spin Attack
1. Starts slower
2. Less reach
3. Last Aerial hit is much weaker and bad for KOing.
Charged arrows and boomerang do less damage.
Bombs damage Link and opponents equally now. This is a double-edged sword.
Items, especially the smash ball, are usually a disadvantage for slow, short jumping Link.
Link’s moves overview: [010]
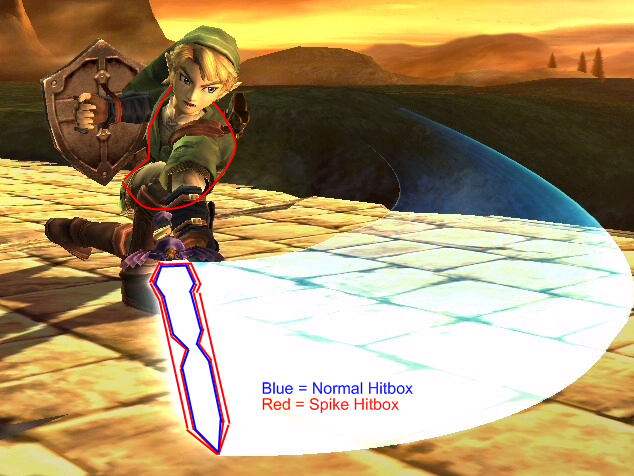
Standard ground attacks: Except for jabbing, usually long to start up with big attack area. Hit forwards, diagonally or up steeply. Ftilt, Utilt, Usmash have long horizontal and vertical reach and hit behind Link a bit. Fsmash strikes far and low but can be avoided with short hops or roll dodging behind Link. Any time during the Fsmash animation, press attack again for an optional second cut, the speed of this varies depending on when you press the button. Dsmash cuts low in front then behind Link. All of Link’s smashes gain a lot more power charged. Dtilt at the right time, so opponents are hit by the blue energy trail and not the blade, is a meteor smash- Link’s only spiking move.
Standard aerials: Nair, Uair, and Dair have long constant attack and cover more area if Link moves sideways or fastfalls. Fair and Bair both hit twice leaving a small gap in between, the second hit’s the strongest. Bair’s Link’s fastest aerial and should be use to regain control after being launched. Dair will slow fall if done while rising and bounces off opponents, shields, and projectiles for a second weaker attack. It often ends before landing with no lag if it bounces. Dair while falling to force fastfalling, this version will push through opponents to the ground and not bounce. Tapping down during a slow-Dair will make it a fast-Dair. Nair, Fair, and Bair landing cancel. Dair and Uair always launch sharply upwards. Fair, Bair and Nair launch sideways with more positional angle variation. No character will edge-grab while standard aerial attacking.
Clawshot, shield>standard attack or ‘Z’ on the ground to grab, in air press ‘Z’ or airdodge>standard attack to Zair. Grounded grabs only while extending and only grabs aerial opponents where the flash is at the start. Very laggy. Grabs out prioritize most attacks. Pummel for 2% damage, this is faster with the right rhythm than mashing attack. Pummeling can add on a lot of damage throughout a match. All throws do 7%. (Chain grab not covered). Zair homes in on close edges as a tether recovery up to three times before landing on the stage (then misses). Link’s tether recovery, like any tether, will not grab an edge that an opponent is holding. If no edge is near Link’s clawshot extends horizontally hitting up to twice. Short hop>Zair while rising for best results. Air dodge first to Zair with an item. Zair landing cancels; fast-fall to cancel sooner. The claw shot is not a range attack and will penetrate reflectors and range blocking elements like the statues in Castle Siege stage. Link’s tether grab and Zair will not be turned by Mario’s cape (only tether grab type 1s have this bonus, see ‘grab types’ below).
Specials:
Hero’s Bow (arrows) neutral ‘B’. Hold ‘B’ to charge, ground or air. Full power’s reached when the arrow tip flashes. Arrows fly faster, farther, and straiter, dealing more damage charged. Firing right before you land landing cancels much of the lag: quickdrawing.
Gale Boomerang, forward ‘B’. Attacks for damage and trips half the time traveling out and pulls without damage at the last part of going out and coming back. Deals greater damage at the start of going out, about the reach of a Ftilt. It can be angled and bounces off slopes. One (per Link) onscreen at a time. Boomerang will never launch opponents even at 999% damage, don’t use it in sudden death. Link will have slight lag catching the returning boomerang unless he is already performing another action (shield, dodge, clawshot, attack).
Bombs, down ‘B’ to ready then works like a throwing item. Link can have two of his bombs on screen at once. Explosions do not count as bombs; Link can ready another while one explodes. They explode after seven seconds and flash six times (think six seconds or after the bomb flashes three times to be safe) unless triggered early usually by an impact. Shield or dodge while holding one as it explodes to attack and take no damage. Very high priority and large attack area; bombs can penetrate opponents holding golden hammer items! Can be thrown at two different strengths in any compass direction by smashing or tilting (down throws are always strong). They curve with gravity. Drop them with non-directional ‘Z’. Catch again with an aerial standard, dash attack, or air dodge. Set situational damage and usually not a being KOing tool make it good to use lots of them and keep KOing attacks fresh. Link will not trigger an impact with his own bombs, aside from canceling up thrown bomb recovery (Melee) this is an excellent thing! Much more later…
Spin Attack, up‘B’. Chargeable on the ground, creates a constant attack wall on both sides that counts as one hit (if blocked once on either side it has no more attack), and deal greater damage/launch power at pointblank range. Aerial Spin Attacks hit multiple times and carry Link upwards and forwards with existing momentum only. Link’s only freefall forcing attack.
Shield/Dodging/Tecking, ‘L’, ‘L’+ down or sideways. Link’s shield game is subpar. Use mainly power-shielding and spot dodges. Rolling dodges are short and have large vulnerability periods. Air dodging characters will not grab edges but Zair will and cancels air dodges early. Dash and shield to slide with your shield up (shield-dashing duh); if you have a bomb use ‘C’ while shielding to immediately throw it in the desired direction. Teck by shielding after being launched right before Link hits a solid wall, ceiling or platform to stop the momentum and get up faster. Tecking + left/right on the ground will make Link dodge that way. Quickdraw is a good alternative to ground tecking if you have a little more time to regain control.
Controller System for Link[011]
Here’s a controller scheme and system that maximizes effectiveness and makes key ATs much easier. I use a gamecube controller, which is what I based these controls on. Other controllers will have to adapt, sorry.
(I’d like credit for this)
A attack
B specials
X/Y jump
Z grab
L shield
R attack
C stick smashes
+ pad taunts
Tap Jump off
Explanation [012]
‘R’ for attacks takes time to get use to but has really helped me. Why? Pulling out a bomb and holding ‘R’ with your pointer finger during the motion going into ‘C’ left/right with your thumb for Fsmash (aka bombsmash, since this works with any throwing item I’m not calling it that) is much less awkward holding ‘A’ and ‘C’ sticking. Release ‘R’ after desired charge and press ‘R’ again or ‘A’ to execute Link’s second strike. Use ‘L’ to shield, you can’t do a ‘Z’ attack when bomb/Fsmash ready anyway. Release ‘R’ to airdodge>Zair, throw or ‘Z’ drop bomb> aerial standard. When holding a bomb (throwing item) you can become Fsmash-ready by holding ‘R’ during any animation that prevents a standard attack (dodges, ‘B’ attacks, even dodge>Zair)! Keep in mind a bomb/Fsmash ready Link cannot throw bombs or use standard attacks other than Fsmash without first releasing ‘R’; Fsmash is the only smash that works with this.
Now Link can integrate bombs with most normal attacks! Like any throwing-item-holding character, Link must throw bombs before using standard attacks: sub your Spin Attack for Dsmash and boomerang for angled approach stopping, mindgames and confusion. After down‘B’+‘R’ readying a bomb (or any directional action while bomb/Fsmash ready) rotate the controlstick left or right to jog, not dash, and Fsmash; use your boomerang for hit-stunning or release ‘R’ and forward bomb throw (Fbomb) or short hop>Dodge>Zair>Bomb shield or Ubomb>short hop>Fair>Dsmash etc for mindgames. Fsmash ready Link can’t dash attack even from dashing until ‘R’ is released. …Any character can Fsmash while holding throwing items but it probably won’t help in tournaments much.
If it’s not too weird you might consider using ‘R’ or ‘C’, not ‘A’ for all standard attacks; this requires less finger repositioning. Link’s slow attack nature also makes it easer. Go with what works best. A dash>‘C’down>‘R’up (not ‘Z’up) dash attack cancel may be easer for people new to the technique to do. Maybe.
Use the ‘C’ stick! It allows Link to throw Bombs any compass direction without loosing momentum. Try jumping backwards>‘C’up, ‘C’forward, or ‘C’down to throw a bomb in that direction>‘C’ forward again for backwards traveling Fair, ‘A’ or ‘R’ for Nair, bow, second jump, repeat, whatever. This works on the ground by shield-dashing: (with bomb) dash>shield>‘C’back, forward, or up to cover yourself and throw it in the respective direction. ‘C’ throwing will turn Link around when used backwards, grounded and in the air. Useful for (with bomb) running>short hop>‘C’ backwards (throwing the bomb)>quickdraw or running>shield>‘C’ back bomb throw>‘Z’ grab. Arrows and ‘Z’ only shoot forward so turning with ‘C’ed bomb throws first is useful. You can even (with bomb) jump off the stage>‘C’back throw>fastfall>Zair edge grab, but probably shouldn’t. Backwards thrown boomerang turns Link too. Grounded directional ‘C’ is the fastest way to smash attack (press an attack button after for second Fsmash cut), use it for immediate attacks (Fair>fastfall>‘C’ up, down, or forward>‘R’/‘A’ second cut). ‘C’ smashes are fastest but completely uncharged (except bomb/Fsmashes). If you are already holding an up/down controlstick direction and ‘C’ in the same direction Link will do the corresponding Tilt (not recommended). Link dashing +‘C’down/forward will dash attack. All directional item throws/aerial standard attacks in this guide are done with the ‘C’stick unless stated otherwise.
It is vitally important to know when Link’s moves are in affect and end. Starting a move before the previous has ended could result in the buffering system Brawl has make it become aerial if Link is launched, which could mean death. A Dsmash inputted before Link’s launched could be registered as a Dair! Know when to input moves relative to other moves and Link’s startup/ending lag/hitstun recovery/shield/dodge durations.
Repeat: Link has a reeeally high learning curve! Using ‘C’ and the control stick in different directions together and switching between Fsmash ready and bomb throw/Zair ‘modes’ must become so you don’t have to think when doing them. Factor in bombs exploding after seven seconds and catching the boomerang occasionally stalling commands too. Level 9 CPU’s are consistent, balanced, fairly predictable partners. Fight them to help you practice tactics and more importantly, recognize when to use them. Don’t even think about brawling tournament players until you can beat Level 9’s with 95% consistency. Expect your consistency to drop when Brawling people and know how to adapt when (not if) you mess-up.
The strong Link [013]
2+2= Link is all about mindgames, advanced techniques, setup, combining attacks that are variable in duration of effect and angle, indirect range, and most of all, spacing. A rush in, blitzer, match-opponents-in-their-stronger-areas Link is the weak link!
Link can out-reach most characters with disjointed sword attacks, including the farthest reaching Fsmash (double Fsmash) in the game. He has the most variable attack effect duration in both standards and specials of any character (overall). Link’s Fsmash, Uair, and Dair, all have the longest attack duration for that type of move in the game, and can KO. (Okay, Toon Link’s Dair can last longer if he starts very high and bounces at the end of it, and Snake’s missile and Dsmash can be attacking for some time, I’m talking overall). Most standards and range curve and attack at odd angles many opponents can’t cover. Link can cover the screen with up to five attacks at once (two bombs, boomerang, arrow, and standard attack, this is extremely unlikely but possible) when using specials indirectly. Link can counter any tactic, including reflectors, and be effective at close and far distances. It’s all about spacing (say this to yourself five hundred times so I can emphasize its importance without wasting room). Blitzing and camping force bad spacing, trying to establish setup when pressured invites bad spacing. This is Brawl Link, play to Link’s strengths!
Apply every option and advanced technique to their full potential, STRATIGICLY. Adapt. Use advanced setups. Stay near the ground; mainly short hop aerials. Force opponents into bad positions with range and long duration (or is it?) attack mindgames. Position and space yourself well. Do not be predictable. Ready bombs at good and punishment safe opportunities; even if only to throw them up (Ubomb). Be aggressive in a strategic, not frontal assault-‘blitz’ way. Be very creative, not reckless. Expect things to not go as planned and use the best available option when they don’t.
Don’t get the wrong idea, Link can be very aggressive. Advanced setups are often as simple as throwing a bomb above Link or throwing your boomerang rather than directly approaching. Setups and not blitzing are merely strategies supporting Link’s spacing. If Link can maintain good spacing, he controls the match. Fortunately, Link has many, MANY, tools to do so.
The right setup [014]
This section focuses on rough setup/spacing for specific situations. If you play Link long enough these should become almost instinctive.
General spacing: Relative to the opponent Link should be a little beyond their reach.
[015] Direct standard attack spacing: attack from the tip of Link’s attack reach, no closer, unless they’re stunned; the tip of Link’s first jab is a good rule of thumb. Factor in Link’s starting lag against fast characters.
What spacing to use which direct attack (closest to farthest):
Ground: For opponents at pointblank range use jab cancel, Utilt, Spin attack, Dsmash. At tip of Link’s first jab’s distance, jab cancel, Ftilt, in place Fair/Bair, grab. If they’re farther, Zair, boomerang (direct) angled up or strait, Fsmash and second Fsmash if needed. Back a little farther (1/3 to 3/5s the length of Final Destination): Gale Boomerang thrown strait or down bounced off the stage, bombs thrown forward, and uncharged or semi-charged arrows. Any farther: shoot charged arrows, ready bombs and plan your repositioning.
Anti-air (attacking up): in place slow Dair, Utilt, in place Fair, Usmash, (height of Link’s second jump) Uair, (higher) Ubomb.
Note: Boomerang throws that are tilted, ground bounced, and strait have almost the same horizontal range. Tilted go the farthest because of horizontal and vertical distance.
[016] If your opponent has any eye-hand coordination, they will shield or somehow avoid simple direct attacks and punish you. Pressure them into bad spots with indirect attacks. Indirect attack spacing:
Arrows: Link’s most direct range. Arrows do have indirect value in how they curve with gravity. Jump and shoot with little or no charge and they’ll fall more as they fly. Know the right charge to hit low-horizontal recovering opponents (more on this later) or attack from higher ground. Arrows also punish characters as they roll-dodge away. Uncharged short hopped arrows curve into the ground and travel 2/3 the length of Final Destination and jumped arrows fly 3/4 the length.
Gale Boomerang: Attack with far, wide, direct and indirect potential every time you use this! Since only one can be on-screen you might want to save it for direct pressuring if bomb/Fsmash ready. Returning the Gale Boomerang pulls opponents in, giving Link better opportunity to hit with a charged smash or both Fsmash cuts. Alone the ‘gale’ effect is a great gimping tool. Throw it above an opponent edge-guarding you and sometimes it will pull them off-stage. If they use a move that forces freefall, it will KO them (edgehog after)! Only Link can pull in this way. The gale will follow Link’s vertical position returning. Usually the boomerang is thrown above, or dodged by the opponent to set-up pulling strategies. At the last part of the forward reach opponents will be pushed by the gale, tilting rather than smashing will shorten the boomerang’s range. Pushing freefalling opponents can on rare occasion lead to KOs.
The push range starts-ends (measured horizontally): Tilted 2/5-1/2 the length of Final Destination, Smashed 1/2-2/3. If Link’s boomerang’s reflected hold still or crouch and Link’s Hylian shield will block the gale or use the spacing to ready a bomb; you won’t take damage. Don’t Spin Attack, it forces freefall and will be pushed. Arrows cancel the gale if Link’s in the air.
Bombs: The key spacing tool. Probably 60%-70% of Link’s metagame revolves in some way around bombs. 80%-90% of how you use bombs should be indirect.
-Readying bombs should only be done when Link’s safe from punishment. At the start of a match dropping through a pass-through platform>readying a bomb and holding ‘R’ (Fsmash ready) is pretty safe; many characters will blitz Link at the start so don’t try to pull one out on small stages. Short hop>ready bomb avoids some range punishment and keeps Link from accidentally dropping through platforms; it also prevents Link from accidently fast-falling if he’s pushed off the stage by F.L.U.D.D. etc or a reflected gale. If two are already out, readying another as one explodes is a very good time; backwards short hop>down bomb throw>ready bomb (Fsmash ready)>land is safe and wonderful for spacing if you do it right. Don’t try to ready one in the air while recovering if your opponent can pressure you, many characters can jump and aerially attack surprisingly fast; Link’s vulnerable when readying a bomb. Play it safe. After moderately launching your opponent is usually a smart and safe time. When hanging from a ledge, drop> jump>down‘B’ (ready bomb)>quickly re-grab the edge, Up‘B’ if you need to (I always have to use up‘B’ but I’ve seen it done with the second jump only). Make sure Link can’t be gimped.
-Non-directional ‘Z’ will make Link drop the bomb he’s holding. Do this while falling then aerial standard to catch it as Link’s attack starts. ‘Z’ drop while jumping or recovering from high up to keep the bomb onscreen longer than Dbomb (down throwing) would. Link can ‘plant’ bombs by jumping through pass-through platforms and dropping one so it rests, not falls, on the platform. Drop a bomb just before Link falls into an edge grab to plant it by the edge. Planting bombs means dropping them in a way that has no impact, but they will still explode after seven seconds. Personally, I discourage bomb planting because it covers much less area than Ubombs, deals less damage, the opponent can jump through planted bombs because the lack of impact, and it’s hard to be accurate enough to not blow yourself up.
-Down throwing bombs (Dbomb) is mostly use to cover above stage recoveries. Be careful your opponent doesn’t jump too close and blow you up with them. Opponents get launched a short distance steeply up and to the direction opposite the bomb hit them. Dbomb down so it explodes on your opponent’s right side and Dair-ing them from above and slightly left should connect well. Link can Dbomb from the rise of a short hop and be ok; this line of tactics is good for creating distance and mindgames.
-Left/Right throws (Fbomb or throwing backwards Bbomb) as indirect attacks let gravity curve bombs down onto the opponent, usually jumped>throw and followed by a quick draw or ground attack, Link turns facing the direction he throws. Bombs can be thrown a long distance if nothing detonates them early, try soft throws from high up on stages like Rainbow Cruise, Norfair (facing in), Green Hill Zone, etc. When recovering from hanging on an edge with a bomb: drop>(immediately) jump>down‘B’ will throw it on stage and Link will re-grab the edge.
-Upwards throwing bombs (Ubomb) is by far the best thing to do with them. It keeps them onscreen much longer than direct throws; they attack up then down with high priority, and will not impact Link. Jump strait through them! Ubomb from a short hop/jump for more delay. Link’s lag is well covered if there’s bomb or two is above him. Up throwing and holding bombs provides insurance against chain grabs, infinites, and every type of close punishment! Stay close under your bombs, you can always jump through and your opponent can’t. Specials and Zair (not dodge>Zair) will not catch bombs. Standard aerials will only catch at the start of the attack. Don’t be afraid of your own bombs, once the timing becomes natural you’ll easily be able to powershield/spot dodge their ground-impact explosions. To space your bomb set-up quickly enough you must use ‘C’ to throw them! Vertical traveling bombs (Ubomb/Dbomb/‘Z’ dropped) will pass through reflectors; they count as the opponents attack but since bombs hurt Link too that doesn’t matter. Reflectors will not change their flight path and the bombs will detonate upon impact with the ground at their feet (or paws). Link is a powerful, versatile, range and standard attacker with mixable long duration moves; throwing up bombs heavily pressures opponents both offensively and defensively in a large, renewable, vertical strip, in addition to this. Simply put: indirect bombs help make up for Link’s lag. Ubombs can pass through a deathzone ceiling and come down. On scrolling stages Ubombs scroll with the screen.
-Bomb shielding is great for driving back close opponents. Bombs’ monstrous priority will even blast opponents out of smash attacks that don’t have flinch resistance. Counting seconds is difficult during a brawl; the ‘shield/dodge after it flashes three times’ rule works better. If you’re pressured a few seconds too early spot dodge repeatedly to avoid being grabbed. Roll dodge from a ledge holding a bomb after it flashes five times to blow up an opponent by the ledge and be safe, usually you’ll have better options. Rather than throwing a bomb, shield dash into your opponent as it explodes for mindgames and potential aerial/Utilt/Usmash combos. Bomb shielding works well paired with bomb Fsmash tactics.
-Recovering down to the stage, dodging into an intercepting opponent as your bomb explodes (often fast-falling) will prevent you from getting caught in the explosion. Mix with quick aerials and other indirect bomb techniques for mindgames. Same three flash rule here. Bombs always launch upwards, putting you in a good place under your opponent.
-Triggering stage elements is easy with bombs because of their large explosion area. In Green Greens, bombs will trigger the bomb blocks even if a normal star block is in the way, ‘careful not to blow your self up. Since bombs hurt Link too, triggering the rotating checkpoint on Green Hill Zone with one will make it spin and hurt the opponent and Link: use arrows or boomerang instead.
-Other bomb uses include recoveries by wall bombing and far side recoveries; if you’re launched hard while holding a bomb don’t throw it, aiming toward the stage second jump>Up‘B’>bomb explodes pushing Link up>Up‘B’ or dodge>Zair. Link’s boomerang will make him turn and face the stage for Zair if necessary. Link has bad recovery, this can be useful. Don’t ready a bomb when recovering from the side, it can accidentally force fast-falling.
-If you blow your self up make ‘lemonade’. Ready another, throw it upwards, fire a few arrows while falling backwards, maybe throw your boomerang: generally reestablish your spacing/setup. Link won’t take more than 9% damage.
-Bomb damage does not ‘grow stale’ like most moves (it might a little). Hard vertical throws deal 9%, soft vertical 8%, all vertical throws coming down 9%, hard horizontal 8%, soft horizontal 7%, dropped bombs factor in distance: right on top Link 4%, short hop distance 6%, jump distance 7%, double jump distance 8%, higher 9%, bombs held (bombshielded) 5%, thrown down at Links feet on the ground 5%, planted bombs 5%. In weird, rare situations (like Ubombing a character on a lower Battlefield platform from the ground directly under) I’ve seen bombs deal 10% damage; this might relate to opponents close together. Other factors can apply, but these numbers are fairly consistent. Impact triggers explosions and has no initial attack. If the opponent is caught in the explosion, even if the impact hit the ground or something else, they will take the full damage. The explosion hitting is what counts. Horizontal bomb impact can be reflected/repelled, explosions can’t.
Triggering stage elements: Several stages have elements characters can interact with. Link’s curve-able range easily triggers these from long distances. Several blocks in Mushroomys and Green Greens can be broken at once, from a safe distance, with bombs or Zair. Mushroomy blocks are more durable than star blocks. The trick is to Zair right on top of the blocks from a jump/hop so the chain retracts as Link comes down. This is particularly useful for triggering bomb blocks in Green Greens. Zair on top the pile from the distance of two ‘imaginary’ blocks from the nearest bomb block and fast-fall to destroy several, including normal star blocks. Zairing directly into a block will destroy that block and stop. Ground grabs have no effect.
Dtilt as a meteor smash must hit the opponent with the energy trail behind the blade. For this to work the opponent must move into the attack at the right time, usually rising while recovering. Aerial opponents can move in from any angle and be ‘meteored’ as long as the blade doesn’t connect and the blue energy trail does. If the blade hits they will be launched up with little power. The timing is very precise and difficult to master but the meteor is powerful and steep. Meteor Dtilt is kind of indirect because opponents must move into it. The blue energy trail is my best guess about how meteors are triggered but I’m not positive. Comments are welcome.
Link’s long disjointed reach can hit through solid barriers. Stage ‘geography’ will not stop attacks and if it’s thin enough opponents on the other side will get hit. For example, Uair from under the Great Fox’s fin in Corneria and Fsmash/Ftilt through Pictochat drawings. This could be considered indirect.
Other indirect attacks: Backwards or in-place jumped aerials and Zair can trick opponents into short-hoping or running into them expecting an approach. Vary the duration of effect with, jumps, short hops, and fast falling after attacking. Pair this tactic with your gale pull.
Stages
General stage tips: [017]
General spacing: Link should stay near the ground, not against an edge, on the main platform (where he won’t have to move if the stage transforms), and save his second jump. These are strictly guidelines and have many exceptions.
Slopes (Yoshi’s Island Melee, Green Hill Zone etc, anywhere with steep slopes): Avoid slopes if possible. Range curves well, standard attacks besides Dsmash and Dtilt do not. Link’s boomerang will bounce off sloped terrain even thrown strait. Try to stay on higher sloped ground, things like Spin Attack and Fsmash will cut harmlessly strait into the stage aimed uphill. In Green Hill Zone ‘range the checkpoint (not with bombs) and use it for cover like up thrown bombs; learn the timing of when to re-spin it.
Water (you know): When Link falls in he will surface and inhale air like in the Zelda series. In Jungle Japes: wait ‘till you see him surface or hear breathing then, not before, full jump>double jump>Up‘B’ or Zair; this can really save you. In slower moving water jump>use range or air dodge>land. If there is a ledge present Zair is very fast and useful. Bombs sink harmlessly in deep water.
Dair bounce-able stage elements (most Sky World platforms, lower New Pork City, King Bulbin, Castle Siege statues, all Hanebow platforms, Luigi’s Mansion pillars, Shellcrawlers, POW block, Shy Guys, Karts, mushroomy blocks, Rumble Falls’ switches, Shadow Moses’ walls, breakable Summit ice, Wario Ware Chisel It!/Pop It! elements, Brinstar breakables, Green Greens blocks, [Melee] Yoshi’s Island blocks, neutral Green Hill Zone check point): side-traveling slow Dair bounces off these like characters reducing the chance of ending lag. Dair the opponent and second bounce the bounce-able terrain/element to land without lag. This only works with strong horizontal motion.
In most stages, Link has places of weakness and power; this varies with his opponent too. Play to your strengths. Link’s Final Smash will stop all stage elements when it is active, including walls breaking and scrolling.
Stage type tips: [018]
Scrolling (Mushroomys, Rainbow Cruise, Rumble Falls): Use the stage’s scrolling to lure opponents into attacks like your range, focus less on bombs, use more Gale Boomerang and short hopped aerials, stay ahead and let opponents come to you. Remember Ubombs will scroll with the stage. Link can roll dodge under one block high gaps in Mushroomy Kingdom 1-2. (Hold ‘Y’/‘X’ when choosing Mushroomy Kingdom to get 1-1, ‘L’/‘R’ for 1-2.)
Huge (75m, New Pork City, Hanebow, Temple): Find a good spot (away from retro DK) and use your abundant curving, long range. Retreat with backward traveling Fairs when necessary. Avoid and counter. On 75m use attacks that go up through platforms without landing on them (Ubombs, Usmash/Utilt/Uair) from low places to push your opponent into the upper ‘spring’ danger zone. Link excels at launching upwards! On Hanebow be careful when recovering. The platform edges by the plant stems are not grab-able and Link’s spin attack can push platform out of reach, so can Electroplankton. Stay in the upper, open area of the Temple stage unless at high damage, avoid tight spots.
Grounded (Bridge of Elden, Mario Circuit, Flat Zone 2, Green Hill Zone, Onett-sometimes Shadow Moses Island, WarioWare Inc, Castle Siege, Delfino Plaza, Distant Planet, 75m, Halberd [start], Port Town Aero Dive, and Yoshi’s Island –anywhere that you can run into the deathzone in general. Mario Bros will be covered separately): Use range a lot to make opponents pinned against the edge come to you then KO them. Fsmash and Up‘B’ are predictable, a short hop Fair might be better and has more follow up options. Sometimes opponents will panic and jump into Dairs and Uairs. Ftilt has good horizontal and vertical reach. If you blitz you’ll fall into a bad spot, remember all of Link’s range attacks have knockback (or gale push) and therefore can KO. Use a gradual Fair or Bair> Ftilt approach or slight backwards retreat vs. reflectors. Needless to say, be creative. When pinned yourself, plan for most opponents to attack quickly, air dodge or shield dash preemptively (see Defensive, Escaping being pinned, below). In the center of big open stages like Bridge of Elden- when intact, consider using less bombs and more Hylian shield blocking against faster opponents with long range like Fox, Falco, and Samus (super missiles will hit Link’s head), to force them to advance. On the floor of Mario Circuit try to hit karts into your opponent, if caught on the jump Spin Attack will cover Link from kart crashes.
Transforming (Castle Siege, Delfino Plaza, Frigate Orphion, Warioware Inc, and others): Similar to scrolling stages, stay ahead, find a good spot/area and let the stage changes force opponents to come into your attacks. Use more bombs and neutral stage strategies.
Safe transforming (Flat Zone 2, Pictochat, Pokemon Stadiums, transforming stages that won’t move characters into a deathzone): Know Link’s places of strength and use them to get the upper hand. This doesn’t mean staying in one place. Also know where to snipe opponents, there are lots of curving range opportunities that will be more of a surprise because the stage doesn’t stay that way. For example: shoot charged arrows under Pokemon Stadium 1’s windmill blades and full jump>Fbomb next to Pokemon Stadium 2’s left mound of dirt in the ground type mode to throw the bomb just over it. Standard through thin stage barriers.
Low ceilings (Corneria, Yoshi’s Island Melee, Green Greens, Mushroomys): Use mainly up-launching attacks to KO except when pinning your opponent against a side; this is more of a guideline. Dsmash a lot. Usmash, Utilt, and Dtilt are extremely effective KOing attacks because of the low ceiling. High Ubombs too. When jumping above the ceiling deathzone any hit will KO.
Mario Bros: Teck really often when launched by normal attacks and use ‘C’ throwing the stage ‘critters’ including up and down for low damage horizontal KOs. Fsmash for fake-outs if you’re holding a critter and your opponent’s not. Flip the critters with range or from underneath, not close up attacks if you can help it. Play defensively and stay in the lower center area of the stage. Critters are not standard range and will penetrate Link’s Hylian shield. Try to POW block flip an upside-down critter so your opponent runs into it. Critters will exit one side of the stage and appear on the opposite side like in the original game, you can’t. Remember the POW has three hits, fireballs will appear, crabs take two hits to flip, and critters run faster after recovering. Behind pipes is safe from critters not fireballs. Okay, technically they’re shellcrawlers.
Sky World: Move around the stage causing range chaos. Only hold your ground on the left and right platforms. Dtilt meteors work here but are risky. Slow fall Dairs moving sideways will bounce off all platforms (not clouds) except the moving lower one. Attack your opponent as they transition to another platform. Bombs can hit opponents who’s heads are brushing the underside of platforms from above. Play it safe.
Norfair: Yeesssss! Link’s best stage. Choose this at every opportunity. The only thing this stage hinders Link on is the dash attack cancel. ‘Z’ edgegrab, snipe, cut up through platforms, and boast Link’s abilities to your heart’s content! Only the low center platform is solid; dropping or fastfalling through higher levels>Zair is a good recovery fake out. Any character’s highest jump (Link should be on an upper platform) will clear the big lava wave coming from the background regardless of visual animation and actual height of the jump.
Neutral (Final Destination, Battlefield, Smashville, Yoshi’s Island, many stages are largely neutral but not completely): Little to no interference; a test of pure skill. Use all of Link’s strategies and strengths to their fullest.
In a tournament generally favorable stage picks for Link are:
(Starters) Pokemon Stadium 1, Smashville, and Final Destination if the opponent can’t outdraw Link.
(Counters) Norfair, Frigate Orpheon, Green Greens.
Avoid stages with slopes, tricky jumps, range blocking elements (Castle Siege statues), and tight spots. Most stages are situational to who you’re brawling.
Characters
Character types: [019]
There are hundreds of potential ways to classify Smash characters. My system is based on how characters should be treated in tournament-style battle. All characters fit into at least two of the sixteen categories and have a 1-5 rating (5=strongest) of how strongly they represent that type.
1. Balanced: Well balanced in offence, defense and versatility. Very little specific weakness to exploit.
5 Mario
4 Mr. Game and Watch
3 Luigi
3 Pikachu
3 Diddy Kong
3 Pit
3 Lucario
2 Wolf
2 Toon Link
2 Iceclimbers (together)
2 Yoshi
1 Squirtle
2. Heavy with limited or no range attacks: Hard to launch with short or no range. These like close but not reeal close fighting.
5 Ganondorf
5 DK
5 Ike
4 Bowser
3 Dedede
2 Charizard
1 Wario
1 C Falcon
3. Floating: Can remain in the air for long periods of time but can’t move quickly making them easy targets.
5 Jigglypuff
5 Kirby
4 Dedede
4 Meta Knight
4 Peach
3 Lucario
3 R.O.B.
4. Blitzers: Rush and attack quickly and feircly. They use little smash charging and usually no real range attacks.
5 Marth
5 Meta Knight
4 C Falcon
4 Jigglypuff
4 Wario
3 DK
3 Sonic
3 Kirby
2 Diddy Kong
2 Wolf
2 Luigi
5. Aerial masters: Attack and adapt quickly in the air, have good recoveries and intercepting tools.
5 Meta Knight
5 Jigglypuff
5 Peach
4 Kirby
4 Luigi
3 Lucario
3 Samus
3 Pit
2 R.O.B.
2 Toon Link
6. Range and spacing specialists: Attack from far distances with specials and need to maintain a certain minimal distance buffer from their opponents to be effective with standards.
5 Link
5 Snake
4 Samus
3 Ivysaur
2 R.O.B.
1 Toon Link
1 Lucario
7. Hard hitters: Have a more difficult time connecting and combo into different standards less but get great results when they do hit.
5 Ike
5 Ganondorf
5 DK
4 Bowser
4 Game and Watch
4 Charizard
4 Wario
4 C Falcon
3 Dedede
3 Snake
2 Link
2 Zelda
2 Ivysaur
1 Lucas
1 Ness
8. Quick and agile: Fast and like to move around their opponent and the stage a lot. High and flexible mobility.
5 Sonic
5 Sheik
5 Zero Suit Samus (ZSS)
4 Diddy Kong
4 Squirtle
4 Toon Link
2 Pikachu
2 Olimar
1 C Falcon
9. Close combo-ers: get close and stay close doing fast multi-move combos. Easily standard attack from pointblank range.
5 Iceclimbers
5 Fox
5 Falco
5 Peach
3Yoshi
2 Squirtle
2 Sheik
2 Mario
1 Meta Knight
10. Compass motion: Have steep left/right, up/down direction to much of their movement and/or attacks.
5 Falco
4 Fox
3 R.O.B.
3 Olimar
3 ZSS
2 Ike
11. Sweet-spotters: Do much better if they can sweet-spot key attacks. Positioning is very important to their metagame.
5 Zelda
4 Marth
3 Lucas
2 Ness
1 Luigi
1 C Falcon
12. Reflectors: These have moves that specifically reflect all range types.
5 Fox
5 Wolf
4 Falco
3 Pit
2 Mario
2 Zelda
13. Remote range artists: Have move(s) that are remotely controlled with the control stick.
5 Ness
5 Lucas
2 Snake
2 Zelda
1 Pit
14. Outlasters: Heavy but relatively weak with far recoveries.
5 Yoshi
4 R.O.B.
15. Transforming: switch character types during a match.
5 Squirtle/Ivysaur/Charizard
4 Zelda/Sheik
3 Samus/ZSS
2 Iceclimbers (together>single)
1 Wario (bike/no bike, fart ready)
1 Olimar (different Pikmin)
16. Unique: Have special traits that don’t fit in other types.
5 Iceclimbers
4 Olimar
2 Wario
Grab types: [020]
Tether grabs: Where a tether of some kind grabs the opponent (duh). I’ve found that tether grabs fall into three sub-categories. All tethers grab only going out.
1. Type 1s can be used for ‘Z’ recoveries and Zair attacks, but will not grab aerial opponents unless at point-blank range (where the flash is at the start). Mario’s cape will not turn grabs or Zairs from this type.
Link, Toon Link, and Samus.
2. Type 2s can grab aerial opponents almost as far away as on the ground. Only Lucas can type 2 ‘Z’ tether recover, but his Zair has no attack. Lucas’ grab can be turned by Mario’s cape, but his Zair can’t.
ZSS, Yoshi, Ivysaur, and Lucas.
3. Poor Type 3 Olimar can’t do any anti-aerial grabbing and must have a Pikmin to grab at all. His ground grab however, is excellent.
Olimar with Pikmin.
Normal grabs: Hand grabs that are faster and usually shorter than tethers.
All other characters.
Notice Link is a 5 Range and spacing specialist, 2 hard hitter, and tether grab type 1.
Putting it together: Link’s game [021]
Here I get down to playing the strong Link based on character/stage situations described above. All characters and most stages fit into multiple type categories. First all situational tips, followed by general defensive and offensive strategies. The following are guideline strategies, use your imagination and stay unpredictable.
All situation tips: [022]
Huuuge spacing tip, this is a common mistake and the main difference between Melee and Brawl Link: Link has no effective direct approach. If Link rushes his opponent, ground or air, they will close the needed spacing too fast for Link to attack properly. Even Slower characters like Snake, some other 6s, 11s, 14s, and ‘range repel-ers’ are able to shield and counter standard attack blitzes. One reason an opponent ‘owns’ Link in most matches is that Link player created bad spacing. Link is very difficult to approach; he also is an expert at forcing and countering approaches. Link can indirectly approach with enormous versatility, arguable the most of any character, and counter every tactic. WITH GOOD SPACING! An indirect approach is as simple as comboing during hitstun or other ‘distractions’. Zair or vertical bomb reflectors, bomb/Fsmash, bomb shield, ‘C’ lag-less aerials, curve attacks, jab cancel, gale pull, Fsmash/jab/Zair to cancel most range (see below), Ubomb, attack duration mindgames, etc, Link can indirectly approach, force approaches, and counter approaches of any other character. There is almost never any reason to play the ‘weak Link’!
Link can arguably beat any character in the attack duration mindgame. Almost every attack Link has can be changed significantly in duration of effect through charging, landing canceling, fast-falling, aiming direct/indirect, strength of direction (tilt/tap), Zair air dodge cancel, ‘Z’ bomb drop, optional second Fsmash. The duration game should be a large part of Link’s game in every situation, even if I don’t mention it.
On stages with large ‘grounded areas’ like Bridge of Elden, Pictochat etc, or if Link has low damage, double jumping provides an even more complicated duration mix-up game for the opponent to decipher. Fair/Bair chains combined with other tactics are more spammable (especially Bair). Use a wide variety of moves during both jumps and end with a fast-fall Fair/Bair/Nair into ground moves. Nair’s constant attack makes it the best option unless the situation calls for Fair/Bair specifically. Do this less and less the more the risk of being launched offstage Link has. Against some opponents double jumping should be minimal at most, regardless of other circumstances (Meta Knight, Toon Link, etc). Don’t use this as a direct approach either, but it can be a great counter/follow-up.
Attack spacing (shown earlier) is important. For most spacing situations and distances Link has several moves that do well and a few with huge punishable weaknesses. Fsmash too close and the opponent can roll behind Link, for example (Dsmash/Ftilt would work better). Every move of Link’s has a right spacing and time to be used. Plan for indirect and direct attacks to work together (Ubomb>Fsmash>second Fsmash, direct boomerang>Fsmash etc). Be smart about combo-ing creatively. Link has no worthless moves!
Shield game vs. range and standard alternatives: Link’s shield game is bad, he’s also slow to start attacks and needs room. Fortunately, most of this can be gotten around. Quick arrows, Zair, and boomerang cancel low priority range attacks. Charged arrows have more priority and bombs are almost unmatchable.
Strong horizontal bomb throws have more priority than weak ones. Bombs push through all except highest priority range, most of which they cancel. Bomb priority has some weird exceptions though. 0%-999% damage Lucario’s fully charged Aura ball, Samus’ fully charged beam and supper missiles, Dedede’s Gordos, Link/Toon Link’s charged arrows and boomerang, Diddy Kong’s charged peanuts, Yoshi’s eggs, Luigi’s fireballs, Ness/Lucas’ PK Fire, Pit’s charged light arrows, Fox’s laser spurts, Sheik’s needle storm, Wolf’s laser, Pikmin, and items thrown at equal or greater strength (turnips, Gyros, grenades, other bombs, ect) will cancel and detonate bombs early. Pressure Samus/Lucario with Fbombs when they’re holding a charge! Link’s normal (bomb) throw has equal priority with Toon Link’s strong bomb throw; Link can out prioritize Toon Link’s normally thrown bombs and push through by strongly throwing his bombs, but their strong throws are equal. Link’s Zair will out prioritize bombs but Toon Link, Lucas and Samus’ Zair won’t, Samus does seem to have better priority than the other two though. Snake’s missile, Kirby’s Final Cutter, Lucas’ PK Thunder, Pikachu’s down‘B’, R.O.B.’s fully charged beam, red Pikmin, gale push/pull, and water streams are the only range that out prioritize strong horizontally thrown bombs, but very fast range like Fox’s laser and needle storm can over power them too (range reflectors/repel-ers not counted here). Fire won’t detonate them but other explosions will. Fire breath, blizzard etc, attack streams can push bombs enough to make them ineffective; strong throws will probably push through and hit. Throwing direct bombs often has better results, offensive and defensive, than holding them while shielding. Notice: weird priority properties like Mario’s fireballs are penetrated but Luigi’s cancel out, Fox’s laser is more effective than Falco’s etc. No menu items are included in this section.
Link’s three range attacks will stop or penetrate most forward‘B’ rush attacks, even ones standard attacks won’t. Bombs are too slow, but boomerang from a distance or in advance, and arrows, even uncharged (the fastest range), will penetrate every space animal’s forward‘B’ and cancel their up‘B’. Don’t shield, there’s great edge guarding potential here. Other rush moves range cancels/penetrates include Jigglypuff’s roll, Yoshi’s Eggroll, Pikachu, Luigi and Ike’s forward‘B’ (even charged), Luigi Tornado, C Falcon and Ganondorf’s down‘B’ and forward‘B’ (if Ganondorf grabs Link with forward‘B’ that will have priority even if the range hits, SpinAttack or jab canceling is better). Notice Meta Knight’s specials and Sonic’s rolling specials are not included, they have priority over range except bombs (being uncharged and loosing momentum, like when Sonic turns, lowers his specials’ priority enough to be susceptible). Range attack defense supports spacing better than shielding and sometimes deals a little extra damage too.
Hylian shield guarding blocks all standard range if you have the opportunity and it hits the shield (not Link’s head).
All Link’s standard attacks will cancel low priority range (not lasers) if they hit it at the start with the tip of the attack. The ‘repel time’ is shorter than the attack duration and Link has slow strikes; there are holes and the timing’s strict. Powershielding is often easer to time, standards continue to attack as they range cancel: use the best option. Jabbing’s fastest (and their-for recommended) but any standard attack, including aerials works. This technique repels both icebergs, missiles/super missiles (Samus), uncharged beam/Aura ball, power suit pieces, charged paralyzer, ‘B’ thunder bolts, turnips, charged gyros, fireballs, charged arrows/light arrows, boomerangs, razor leafs, thrown/smashed Pikmin, peanuts, Wario bike, Chef foods, and PK thunder (head only). Standards stop certain item shots and reverses green shells and barrels. Timed right Link can Fsmash/Fair through any defense/approach using range mentioned above and connect with the second cut. Example: in place short hop Fair Mario’s hop and shoot fireball approach, or Fsmash so the first cut’s tip touches Ice Climbers’ first iceberg, repelling both, and second cut hits them (extremely hard to time). Zair is the most easily timed attack to penetrate short hopped range and has far, good priority, ground canceling attack. Zair also grabs edges based on where it began to execute making it a good anti-water spray return tool. Multi hit range attacks are partially stopped by standards/Zair (fire breath, F.L.U.D.D.), attacking into a water spray actually helps a little. Slow Dair on top of a water spray and take no pushback! Slow Dair bounce on Firebreath with enough horizontal motion and Link can hit Bowser/Charizard with the second bounce (if there isn’t enough side momentum, both Dair hits will happen in a row before bouncing and loose attack). Dair firebreath when the need arises, not as an approach. PK fire and explosives will be detonated early but can still hurt. Once you get the timing down, jabbing is a better option than powershielding for slow projectiles especially Samus’ missles and uncharged beam, Pikachu’s thunder bolts (not down‘B’), a lone Ice Climber’s iceberg, turnips, PK thunder, and boomerangs. Beware banana peels, lasers, Final Cutter, and eggs fully penetrate and bombs explode. Charged Beam and charged (or high damage Lucario’s) Aura Balls can be slow Dair bounced only. (Second Fsmash tip works to stop them but it’s too hard to time.)
Powershielding, air dodging, and spot dodging will still play a big roll. Practice so you can use every option.
Strait vertical traveling bombs’ paths will not be changed by the following range altering moves: Reflectors (Falco’s too), Mario’s cape, R.O.B.’s rotor arms, Hylian shields, Ness/Lucas’ Fsmash. Clawshot as a grab and Zair is not range and cannot be reversed/reflected/repelled either. Even if Mario’s cape hits Link during a grab/Zair link will not be turned (damage still occurs).
Link’s clawshot grab (like any grab) has priority over all ground attacks except range. Grab right after shielding a big hit, smash DIing out of a jab combo, or when an opponent’s attacking and can’t dodge. Clawshot grab opponents when Link can’t standard attack without being hit by their attack wall (Falcon Punch, Lucas’ Usmash, Counters, Wario on his bike, hammer item wielding opponents).
‘Compass motion’ (10) was originally intended for the version of this guide with character specific strategies. I’ll give it a short explanation. Link has wide curves to his attack reach for standards and specials. Many characters have limited options when defending angles that aren’t North/South, East/West, aka up/down, right/left. Link is much stronger when attacking from weird angles that the opponent can’t match. Falco has strong, fast ‘compass motion’ to most of his movement and specials. Don’t approach from strait to the side or fall down onto him. Play to his weaknesses, short hop, drop to his side where he can’t Uair Link but Link can Fair him. Ftilt R.O.B. where he can’t Bair Link, Utilt from where Zelda can’t Fair/Bair or Dair, boomerang along the horizontal path that Fox must forward‘B’ to recover. There’s lots of examples in characters not listed as 10s too. Link is strong from most angles! Note: Ike is listed as a 10 only for his specials and Olimar’s grab works horizontally only on grounded opponents, his smashes are compass motion, and his up‘B’ shoots 45° from in front of him (Northwest/Northeast).
Link can Fsmash with any throwing item the same way he bomb/Fsmashes. Fsmash with character generated items like gyros, banana peels, peanuts, turnips, Mr.Saturns, power-suit-pieces, and Wario Bike parts (not the whole bike). Grenades, Toon bombs, and Bob-ombs, are not recommended. If items are on: any throwing item, and only throwing items work; normal Fsmashing with a beam sword would have been nice, oh well. Remember Link puts away his Hylian Shield when holding items for some reason.
[023] Defense: Recovering, reclaiming control, and regaining setup. A good offence is definitely Link’s best defense. Defense is more accurately restoring good spacing/positioning.
Link is generally best grounded with one bomb thrown above him and another in hand. Do not try to set this up if your opponent is pressuring you: Make room to work. (S-P-A-C-I-N-G). Here’s what to do when opponents get in your face:
Jab canceling is Link’s best close up option, on rare occasion jab once>grab for mindgames. Jab canceling is effective against every too-close character; assume jab canceling comes into close fighting even if I don’t mention it. Dsmash defends against roll dodges and is your best option against 2s, 6s, 7s, and 9s, who aren’t also 5s (aerial masters) due to it’s quick execution, pushback, two attack sweep, and follow up options. Opponents who are more suited for quick aerial combat (3s, 4s, 5s, and 8s) might jump Dsmashes. Utilt and Usmash (if they’re right above you and can’t escape), have better chance of connecting, both hit above and slightly in front and behind Link. Usmash can be punished if the opponent gets to Link’s side; Utilt’s safer and at low damage combos into Utilt/Usmash. Short hop>(immediately) Nair>fastfall sets up quick combos and weak hits all around. Once you make a little room, short hopped in-place or retreating lag-less aerials (Fair, Bair, Nair) to fast-fall>Ftilt/Fsmash/boomerang creates decent spacing. If you want to regroup Zair covers well and blocks low priority range. Against 12s (reflectors) and other range repel-ers Link’s Gale boomerang will either hit them or they’ll dodge, both lead to dash attack and other follow-ups. If they reflect it, you can ready a bomb during the gale push; just be carful near edges (short hop). In place short hopped Fair (Bair if they’re behind you)>Ftilt/Fsmash (‘C’ Fsmash auto turns Link when directed backwards) keeps opponents from rushing again. They probably won’t expect a Fsmash at them after a Bair. Dair starting on top of opponents (not coming down on them) is high risk-high return, but gets less risky pair with other tactics. Quickly pull a bomb and throw it upwards and reestablish your setup.
If you’re holding a bomb and need room, down bounced boomerang, bow, Spin Attack (if your opponent’s real close, careful of the bomb’s detonation timing), Fsmash, and bombshielding are safer than throwing it. Although, Link is heaver than most characters, throwing the bomb down at Link’s feet gives him and his opponent 5% damage instead of much worse punishment (shields bounce bombs back without triggering impact). Short hop (backwards or in place)>down bomb throw>standard lag-less aerial>dash attack/DAC/quick draw/boomerang gets you on the offensive and, done right, takes no bomb damage (if your opponent’s too close the explosion will be high enough to get Link, if it misses regroup).
Link is hard to star KO and falls very fast but is a slow attacker with only one air motion altering special move (up‘B’). How to recover from high over-stage:
Using bombs: Dbomb for a fast attack and ‘Z’ drop for a slower fall or aerial catch. Ubomb for even more delay and a surprise attack when it comes down, or if your opponent’s close enough to catch you in the explosion. Bombs create nice mindgame situations. Do a Dair after a jump or while rising to slow fall and an opponent may be ready with an Usmash but get hit by a bomb then your Dair or instead, tap down and force a fast-fall in your Dair, hitting them on the opposite shoulder the bomb would have. A slow fall Dair started just above the height of Link’s second jump will cancel before landing with no extra lag>ATACK! Or- ‘Z’ drop bomb, fast fall next to it>Fair/Bair land without extra lag>ATACK! Or-or- let your opponent get blowup when they attack as you air dodge with it exploding in your hands (three flash rule). Link has a lot of options so use creative combos. If forced into a bad spot throw or drop a bomb so it explodes on the edge> fast-fall> Zair edge grab (under or to the side of the explosion)>recoil and grab the edge for invulnerability- bombs will not impact Link and help stop aerial edge guarding. Like any time you ready a bomb, have room to work. Link (normal) falls fast, opponents will jump and aerial fast; if there’s any doubt play it safe.
Nair>fast-fall or angling the control stick down to fast-fall and Fair or Bair repeatedly with ‘C’ creates a useful wall of attacks for the desperate and bomb-less; Nair has constant attack, Bair has small gaps, Fair has more gaps but is the most powerful.
Approach opponents down from a diagonal angle. Dair reaches around Link and should be guided left/right into opponents under you, good for answering attacks like Toon Link, Fox, and Falco’s Uair and Marth’s Usmash. Mix this with other ‘C’ed aerials and Zairs. A well timed Fair can hit the opponent from the side with its second, KOing cut, falling around their Usmash and ground cancel. Beware ‘C’down in the air will, like ‘A’/‘R’down, force a fast-falling Dair if not used when rising. Never attack or recover strait down onto an opponent, with one exception: Nair>fast-fall will push through Olimar’s charged Usmash, hit him, and landing cancel, giving Link no damage or knockback! Follow with a ground attack. Nair works and Dair/bombs don’t in this rare situation. Nair reaches down farthest directly under Link.
Nair>fast-fall should be used instead of simply fast-falling unless Link’s holding a bomb, performing another action, or needs to grab the edge. Nair>fast-falling is really useful, learn to do it habitually.
Side recoveries are Link’s weak spot. Link has bad recovery distance, slow aerials, and is easily gimped, but Link does have many options to help: here’s side recovery tips.
DI, Bair with ‘C’, and spam range. Nintenjoe’s ‘The Triforce of Courage’ guide (and others) explains this better than I can. To expand: Link’s recovery lacks, really lacks, cover yourself mainly with your direct boomerang. Bombs pulled with bad timing may trigger unintentional fastfalling and arrows require that you don’t input controlstick direction. If you are close enough and confident arrows are faster and holding a bomb provides a great mix up mindgame. Fair when your opponent is dealing with your range; do it in advance, opponents can be very fast and Fair lasts a while. Second jump>slow fall Dair will bounce off projectiles fired at Link as long as they hit the attack box. Dair works especially well against big things like Samus’ charged shot and Lucario’s Aura Sphere, but takes damage from bombs and has no effect on lasers. Up‘B’ from under edge level (duh).
Zair edge grabbing is useful but inconsistent and high risk: It will miss if you are too far away, under or over the stand-on-able stage (be to the side a little), facing backwards, the opponent is edgehogging (even when they’re vulnerable), Link has already Zair grabbed a ledge three times without landing, or the stage turns so the chain falls on a surface sloping diagonally down (Lylat Cruise and maybe Rainbow Cruise or Pirate ship can do this). Link will dodge instead if he’s flipping from being launched or not finished with the animation of throwing a bomb; dodge>Zair helps eliminate these risks. Zair cancels air dodges early; Link can Zair any time from an air dodge where other moves would have to wait for the animation to end. Learn Zair’s tether reach; Zair edge grabs above and below the stage and is great for fake outs.
Instead of Zair grabbing the edge, try Zair above the stage enough to hit your opponent and manually snagging the edge- good against reflectors at the right distance. Fair, bow, or boomerang>falling past the edge>Up‘B’> edge grab are good for mix-ups with this. Don’t fast-fall these. Zair can lead into another Zair and is an excellent defense, don’t neglect it. Link is vulnerable through the entire Zair tether recovery until he grabs the edge with his hand, tap ‘Z’ (attack) immediately after the clawshot grabs the edge to recoil into a normal edgegrab. Tether recovering is more of a close-to-the-stage-mix-up than distance recovery tool. Link is vulnerable, can be gimped easily, and will have a hard time reaching the edge if the clawshot misses. Play mindgames by mixing Fair, boomerang, arrows, bombs, Zair attack, and Zair recovery. Use up‘B’ to recover.
The desperate at mid to high damage can throw a bomb against walls going down to get ‘blown up’ then Up‘B’. If you’re launched sideways really far and are already holding a bomb, time an up‘B’ so the bomb explodes in Link’s hands (three flash) just after it giving a vertical boost and another up‘B’. Link needs all the help he can get.
Returning from a ledge Link can drop>jump and: Ready/throw bombs, Zair up to three times (tap away from the edge>‘Z’>‘Z’ recoil clawshot each time, don’t jump), shoot arrows, and catch the ledge again. He can drop>(immediately) jump> Fair or Nair (or Up‘B’ not recommended) and land if timed right. All in addition to standard ledge attacks, jumps, rolls, and taping towards the stage to simply get up. Mix it up because all have their weaknesses. Be careful on stages with pass-through main platforms like Halberd; stay to the side with drop>attack options: Link will miss the edge if under or ‘in’ the platform.
(Edge) dodge or attack as the returning gale hits a guarding opponent, they will have to avoid it, move, or be pulled offstage. Beware Link will catch the boomerang if he’s not performing another action, with his poor recovery this can mess up your timing enough to kill Link.
Do not show off, as there is no room for error.
There are several stages where characters can be ‘pinned’ against death zones and hazards. Escaping being pinned:
Plan for most characters to quickly attack. Dash>(immediate) shield dash>spot dodge fakes out grabs. If you have room and time in place Zair or Fair/Nair depending on the opponent’s type and distance can counter them rushing, follow with a dash attack. Shield/dodge preemptively. Down bounced boomerang has slight stun and covers a wide area in front of Link. Don’t try to rush by; Link will likely run in to a trap. If you are absolutely forced to advance or act, spot dodge or roll dodge in; at least you won’t be launched into a deathzone if you’re punished. Beware of moves that launch backwards like Samus or Toon Link’s Dsmash.
Chaingrab/jab lock/infinite prevention:
First of all, knowing the opponent is the foundation of your strategy. Some character can’t infinite Link, others make it their key strategy. Gale boomerang pull can disrupt spacing enough for Link to escape, but it’s not very effective. Like some gale gimping, use Link’s boomerang directly often and when it misses the returning gale is more of a bonus than a solid tactic.
Indirect bombs are, as always, Link’s insurance. Ubomb and stay close under it. Try to maintain having one of Link’s two bombs above him. Overlap Ubombs with short hops and position Link in the safest place for the situation, which is often directly under them. Holding a bomb supports the Ubomb defense and can disrupt infinite/chain grab patterns. Throwing a bomb down when Link’s on the ground triggers an immediate explosion that does 5% damage to Link and a close opponent; it’s better than being chaingrabbed. Bomb/Fsmash and Zair work together with anti-infinite tactics.
Of course, Link can’t be chaingrabbed if he isn’t grabbed in the first place. Link’s normal good spacing is the best anti-infinite etc defense.
Preventing kamikaze moves:
Some characters have strategic move that KO themselves and the opponent. Ubombs are best for any situation, Gale Boomerang doesn’t help because the gale has no attack, and held bombs work differently on a situational basis.
Kirby, and Dedede, have swallow moves where they hold Link in their bellies a fall into the deathzone (or spit Link into a side one). Wiggle the control stick like crazy if Link’s swallowed, escaping is the best option; they sometimes can spit Link out to his death and recover. Holding a bomb helps. If it detonates inside them Link will escape and take 10% damage and they will take 5%. If Link escapes by holding a bomb, immediately jump, if Link has a second jump saved, and up‘B’ towards the edge, the explosion will launch Link up and reset his recovery. The better option is to throw the bomb in their mouths, they’ll take 5% damage and enough in place stun to be Fsmashed. If Wario eats a bomb he will take 6% damage and stun. If Link’s holding a bomb and in Wario’s mouth when it explodes, Wario will take 5% damage and Link takes 5%-8%. Other situational factors can apply to the damage %.
If Link’s in hand bomb explodes during Bowser’s forward‘B’ both characters take 5% damage and the move is canceled. Either character can then jump back to safety if their second jump’s available, and Link’s up‘B’ is reset from the blast. ‘Same goes for Ganondorf’s forward‘B’ in the air but I don’t think that will ever come up.
Held bombs exploding when DK’s forward throw’s carrying Link break him free, but do a measly 5% to DK and 11% damage to Link! At mid to high damage and depending on how much fuse time was left when Link was grabbed, the explosion does break Link free faster.
[024] Offense strategies:
Most offense is based on who you’re brawling but here’s a few strategies. Stay close to the ground. Short hop most movement unless bomb Fsmash ready, then jog (not dash). Switch in and out bomb/Fsmash mode often. Usmash and Utilt up through platforms. Keep range attacks onscreen as much as possible but with some reserve (throw one bomb hold the other, etc). Throw bombs up in places where they will fall in between minor platforms (like in between the middle and right/left pass through platforms on battlefield). Jump/short hop while Ubombing to move and make them stay onscreen falling longer. Stay close under bombs. Fbomb or short hop and Dbomb held bombs that will explode too soon to make a wall when thrown upwards>ready another and use it instead. Watch held bombs for the three flash rule. Diversify Link’s range. Often attack indirectly and where the opponent could soon move. Vary duration of almost every attack as needed. Attack in advance boasting Link’s reach. The tip of standards is almost always the prime spacing. Spacing is key, range and setups are support. Don’t show off, Link’s metagame is a master art. Be confident with every strategy before using them in a tournament. Stay unpredictable, be creative.
Don’t forget the basics. Advanced techniques are often less effective, especially if a bomb’s already thrown over Link. Fsmash, Ftilt, Fair, Dsmash, and (sometimes) Nair have better launch-power and damage than bombs or Zair. Take good attack opportunities. Indirect bombs and gale boomerang create the necessary distraction (and insurance) to allow basic, effective attacks. Link’s controls are complicated and unforgiving, fancy combos are only good if you can pull them off. Go with what works, advanced techniques are not about showing off.
Link is not an in place camper! Moving camps support link’s spacing, in place camps limit it. This is a common mistake. I cannot say this enough: Setup, range, Zair, movement, and weak standards, all support spacing! Link is effective close and far if he has good spacing. Don’t trade spacing for setup, you’ll regret it.
Charging smashes and Spin Attacks greatly boosts their power and damage. Link is an expert at forcing opponent’s movement with range and can charge for a long time. Even a small charge does wonders. If possible, charge smashes and use non-chargeable tilts and in place aerials if not. But the nature of the attack needed takes priority over charging. Use varying charge time in attack-duration mindgames.
Dair doesn’t landing cancel but slow Diar bounces. It also has a strong upwards launch, 18% damage (when fresh) first hit, a second weaker hit, and constant attack. Slow and fast Dairs play a large part in the duration game. Dair is a common move of Link’s and will be expected, Ubombs, indirect range, and duration guessing games should be paired with it. Sometimes the opponent will jump or special attack into a Dair. Slow Dair over where a recovery must move and the opponent will be forced into it, return with the bounce. Dair recoveries traveling up through one-way pass through stages too (Halberd etc). Dair’s long duration punishes air dodges and can be done through a pass through platform without landing on it for landing/spotdodge punishment. I mention lag-less Fair/Bair/Nair a lot but Dair is an awesome move when used cleverly. Opponents expecting a Dair might be surprised by a fast-fall Fair/Bair/Nair hitting their side.
Air dodges landing cancel, slow Dair on an opponent who tries to dodge past Link it will hit as they land. The same principle applies with Spin Attacks. Both moves have high lag if missed, but their constant attack guarantees a hit in the slight normal landing vulnerability of all characters. Execute the attack on top of them (not higher altitude ‘on top’) right before they land. Charge Spin Attacks for better power and delayed execution. Spin Attack is a good follow up if the opponent air dodges an Utilt down close to Link.
Link doesn’t have the fastest draw in the game but mixing different indirect and direct range ‘floods’ large areas and forces opponents to avoid multiple attacks in a row as they deal with Link’s standards. Indirect/direct range used should be at least a 2-1 if not 3-1 ratio. Uncharged arrows cancel weak range attacks and are about as fast in execution as fireballs, Pikachu’s thunder bolts, light arrows, Wolf’s lasers, etc. Link is not slow to draw.
Once Link starts a combo he should stay with it until the opponent is launched enough to regain control. Link can’t effectively blitz, but he can effectively combo if there’s an opening. Don’t retreat from good offensives.
Dtilt as a meteor (the opponent must move into the blue energy trail for it to be a meteor) is very hard to time right and has almost no value on grabable edges because of Brawl’s easy sweet-spotting. Some recoveries won’t sweet-spot and an opponent moving into Dtilt from any angle at the right time (Fox/Falco’s forward‘B’) will be powerfully spiked even at low damages. Several edges aren’t grab-able and several stages are pass through too. If you feel confident or really lucky Dtilt meteors are very effective when done right. If the timing’s off the opponent will be launched up a set amount plus slight additional distance for their damage. Combo with jumped in-place Fair.
Ftilt reaches behind, above, in front, and down slightly in front of Link. It reaches down as far as Dtilt and is great for edge guarding. A well timed Ftilt hits some opponents before they can sweetspot the edge while covering a large portion of their potential recovery area.
After Link grabs if the opponent has 30%+ damage pummel them a few times. Knowing the rhythm to pummel fastest and approximate damages for when the opponent will break free will earn you lots of additional damage through out a match. Each hit dose 2% when fresh. All of Link’s throws are equal in damage (7%), so throw in the best direction, which is usually towards the edge or up. (Chaingrabbing not covered.)
Expanding on the technique ‘gale guarding’, where Link throws his boomerang against a stage wall from a close distance so the returning gale goes through Link and continues out to pull recovering characters away from the stage, I found that many characters can be gale pushed before they land. Up‘B’s often out prioritize range like Link’s boomerang at the up part but not the down motion, if any, or freefalling after. Gale push does not reset recoveries and can gimp opponents recovering over the stage from far away. Tilted boomerang gale push is 2/5-1/2 the length of Final Destination, smashed 1/2-2/3, horizontal distance is the same thrown forward, down bounced and angled. Learn the spacing and be opportunistic using gale push gimping to stop recoveries across the stage. Kirby and Ike’s Up‘B’s can be gimped with good spacing/timing as they come down. Zelda’s forward‘B’ and Lucas, Ness’ remote range moves are gimp-able if they can’t DI close enough to grab the edge. Any freefalling character is vulnerable and won’t expect the push to gimp them. Meta Knight’s light and all of his specials force free-falling. There, gale pull, gale push, and Dtilt can gimp Meta Knight. I kept my word.
Link, like normal grab characters, can grab Sonic and Snake out of the air after their up‘B’, wait without pummeling or throwing until the break free, and they won’t be able to jump. Sonic will fall to his death. Snake can down‘B’ bomb himself back up so be ready to edgehog. Grab close at the start, where and when the flash effect is.
Attack alternatives [025]
Dsmash vs. grounded Spin Attack: general.
Use Spin Attacks, charged preferably, when you: need more vertical coverage (against close short hop attacks), need a constant attack wall on both sides, are on ledges or vanishing platform over the main stage (pushback can trigger a falling air-up‘B’ to cover your landing and Link won’t land on his back), want to launch opponents sideways.
Use Dsmash when: a faster slightly longer horizontal, less vertical, attack is best, you need more instant power and knockback, are on a sloped platform, you want to catch an opponent jumping up to your level with out a grab-able edge, want two hits (front then back), your opponent is stunned from ending a missed counter, or their shield’s broken (get close and charge for max damage), you want to launch an opponent up. Dsmash is safer if you’re not sure which to use.
Fsmash vs. Ftilt vs. (in place short hopped) Fair vs. ground Spin Attack: launching sideways.
Fsmash when the opponent is farther away, grounded, and/or pinned against an edge. Fsmash has the most power and longest/most variable duration of attack, can be charged, and optionally hits a second time.
Ftilt has the most vertical reach and hits behind Link a little in a single attack wall. The best option for pushing back opponents who try to get over Link. Hits closer to Link and the length of his first Fsmash. Ftilt hits hard through the entire move and is more difficult to punish than Fsmash or Spin attacks.
Fair (short hopped in place) is generally the best option. It cuts twice for 21% damage total (9% first, 12% second) and ground cancels into other moves. Tap ‘C’ sideways while rising to short hop both cuts, fast fall if you want to cancel the second. Unlike Melee the second cut’s more powerful in every way, like an uncharged Fsmash, but if the opponent’s too close and has some damage they will only take the first. If this happens fast-fall cancel the second, which won’t hit anyway. Because this is also commonly used in many other situations it might not be as ‘fresh’ as Ftilt. Fair attacks twice but leaves gaps fast attacks can exploit (low under the first cut and slightly in between the two). The first cut has bad launch power; if you want the full effect of Fair, wait until the second cut and don’t fast-fall.
Spin Attack is usually Link’s worst option compared to the other three, but does have its place. It attacks close on both sides and does best at pointblank- unlike most of Link’s moves. Spin Attacks defend against short hops and roll dodges aimed behind Link and has the longest ‘gapless’ attack. Spin Attack rather than shielding rush attacks like Jigglypuff/Yoshi/Sonic’s roll moves, Ganondorf/C Falcon’s forward ‘B’s, etc. Some downsides include: it forces freefalling, does not cancel range like standards unless fully charged, when charged it cancels together with the range including weak attacks that jabs penetrate, and it’s the easiest to punish. If pushed back off a ledge it will turn into a falling air Spin Attack and Link will freefall.
Usmash vs. Utilt vs. Uair vs. Ubombs: down to stage recovery punishing.
Usmash cuts three times in a wide area and is chargeable. It’s a good option if Uair misses. Many characters have far horizontal movement as they fall and can get around Usmash and punish its long duration; DAC or bombs thrown up next to Link help. Usmash cuts through low platforms and the last cut has slightly better reach and launches. Use it through low platforms, against slow falling opponents if they’re low or dodge Link’s aerial move.
Utilt is like a faster, weaker, one hit Usmash. It’s easer to spot dodge but has less vulnerability if the opponent does get around Link. Utilt combos into another Utilt or Usmash against low damage opponents. Use Utilt if you’re not confident with an Usmash’s safety or need to refresh Usmash. Utilt has power enough to star KO. Light opponent matches and brawls on low ceiling stages favor Utilt over Usmash.
Link’s Uair has a constant attack wall, disjointed hitbox, and is the longest lasting Uair in the game, but doesn’t ground cancel. When your opponent’s about at Link’s second jump’s height, full jump, preferably forward/backward, Uair and curve the jump with your opponent’s movement. Fast-fall if they try to air dodge under Link. Usmash and Utilt are stronger launchers but Uair can KO at mid-high damages, use it more to juggle your opponent then ready a bomb or something. Uair is best for punishing opponents falling at Link’s second jump height. It also creates an attack wall against opponents landing on, or dropping through, higher platforms.
Ubombs cover all of the other options and potentially all of Link’s techniques. They severely limit the opponent’s recovery area and are great jugglers for floating and slow falling characters, plus they can’t be reflected back down. However if the opponent’s low enough to be hit by Uair/Usmash/Utilt you should use that; Link’s vulnerable while readying bombs and explosions hurt him too. After launching your mid-high damage opponent is an excellent time to ready and throw a bomb up.
Jab cancel options: what to follow jab>jab>? with.
If opponents are close, Dsmash. Close but not grounded, Spin Attack/Utilt or Usmash if they’re pinned somehow (edge, wall). Farther away, grab or Fsmash/both Fsmashes; a jab canceled Fsmash can be sped-up or delayed depending on when you tap the attack button and if the Fsmash is charged, ‘A’>‘A’>‘C’forward>‘A’ is the fastest way to four hit combo this. Ftilt has too much starting lag to follow jab cancels very often, except repelling offstage recovering opponents. Occasionally mix in a single jab cancel (‘A’>Dsmash); Link’s slow jab rate has the ‘silver lining’ of not having to crouch to jab cancel.
Fair chains, vs. Bair chains, vs. Uair, vs. Dair, vs. Nair: attack walls.
Fair cuts twice, the second has the strength of a weak Fsmash. Both cuts launch; if the first knocks the opponent too far for the second to connect, fast-fall and cancel it. Fair hast the largest gaps when chained. The first cut is often used early to pressure the opponent so the second connects. Fair when you need to hit the side of the opponent with power, cancel weak range then launch, or if Link’s facing toward the opponent already. Fast-falling from a jump or higher lowers where the KOing cut hits (mindgames) but ground cancels the second cut if miss timed. Fair is the least attack wall combo-able, but landing cancels into other launching move combos.
Bair is Link’s fastest aerial and his most spam-able. Bair chains have little launch power but often connect with both hits. Bair if Link’s to the side, not facing the opponent. Bair chains edge guard into edge hogging; Link attacks out while facing the stage for a tether recovery. Bair combos into its self, deals damage while maintaining good spacing, and can gimp, but isn’t for power KOing. Bair should be used frequently and paired with moves that auto turn Link (boomerang, Bbomb) because it doesn’t need to be fresh and transitions into other options the most easily.
Uair only attacks above Link, but has a constant, long, disjointed, attack. Uair best reaches through high platforms, juggles opponents who are recovering down, and is like a weaker, safer, slow Dair. Uair’s reach is longer than most Dairs and forces the opponent to evade, timed right it outlasts air dodges. Although Uair can KO, it is better for high platform piercing and juggling. Uair high, it stops attacking once Link lands but has lag.
Dair is Link’s most powerful constant attack. Slow Dair at first is usually preferable because duration mindgames, the bounce, and it can become a fast Dair if needed. Dair’s weak points are its short reach can’t beat many Uairs/Usmashes and it has landing lag (which can be canceled by bouncing). Dair when you need strong upward launch power, when the opponent might be forced into it (by range or their recovery path), to punish low spot dodges, to bounce projectiles, need a long-lasting, powerful aerial, or the opponent can’t cancel it with their available options. Dair reaches around Link’s lower half and has great priority as long as a disjointed attack doesn’t cancel it and Link’s head and shoulders aren’t hit. Guide Dair into aerial opponents to add additional distance to its launch, it always launches sharply up.
Nair is the weakest option. That aside, it gimps, has constant attack in front of and slightly under Link, and landing cancels. Hitting with Link’s foot at the start has the best damage and launch power. Fair/Bair hit hardest at the end. Nair when you need a quick gapless attack to stop the opponent before you transition into a different offence, need an immediate attack that landing cancels, or need constant cover as Link falls. Nair>fast-fall covers the largest attack area out of all Link’s aerials without lag.
Combos [026]
Throw a bomb up from the ground and Fsmash both cuts- Link will be a safe distance from the explosion behind him. Behind Link is Fsmash’s biggest vulnerability, at least it was. A quick jab>jab>Fsmash (uncharged)>second Fsmash combo is fast enough to be safe. This is a handy insurance setup.
Jabbing is a tactic that can hold opponents in place. Jab to combo with falling Ubombs or stage hazards.
Backwards short hop with a bomb>‘Z’ to drop it>boomerang/quickdraw protects range and creates space. Drop the bomb at the end of the short hop rise, Link will be safe.
Almost any short hop with a bomb is a good time to Ubomb, mix this with other tactics.
Run away with a bomb, short hop>Bbomb>(land) quickdraw. Link will turn while throwing the bomb and shoot an arrow backwards at the opponent. This covers two vertical levels for approaching stopping.
Utilt>Utilt>Usmash>Uair. This works, at least partially, on heavy opponents and most characters at low damages.
Slow Dair above the opposite shoulder of an opponent that a falling bomb hits, they’ll be launch up steeply at that angle. This is effective but common. Play attack duration mind games for better results.
Throw the opponent into a bomb. Do this on a situational basis.
Zair>fast-fall>Ftilt/Fsmash. Zair stops short hopped range like fireballs easily.
Short hop towards opponent with a bomb>Dbomb>Nair. This can combo up to 19% damage and mixes up indirect approaches, especially against range repel-ers (vertical bomb used).
Bair chains>(land) Fsmash. Backwards‘C’ Fsmash as Link lands.
Repeated short hop>Zair retreats stop range and might work a few times before the opponent catches on. Build up easy damage this way. Don’t repeat much against opponents with range that penetrates Zair.
While holding a bomb repeatedly direct-boomeranging/short hop>dodge>Zair the opponent>Fbomb and combo into other attacks to play mindgames once the opponent catches on to Link’s bomb/Fsmash.
Short hop Fair through a platform from under it, both cuts can connect with the above opponent>fast-fall>Utilt/Usmash. Link can cancel this combo early and has less vulnerability than simply Usmashing. Fair reaches higher than Bair/Nair.
Training tips [027]
Lv 9 CPUs are good training partners but people are better. Learn and practice the dynamics against CPUs but practice completive brawling against (good) people. People will punish lazy patterns, fight much smarter, more aggressively, and use tricks like chain grabbing, etc that CPUs won’t. You must really be confident in Link’s game to win against tournament level players.
Practice against a Lv 9 Link on Battlefield for a while. CPU Link won’t use ATs but has a good sense of primary spacing for attacks. If CPU Link’s getting the better of you, observe his spacing and try to integrate that with your indirect attacks and ATs. CPU Link’s getting hits in because you traded setup and overly elaborate ATs for spacing. Also notice how vulnerable Link is beyond the edge and learn from it. He’s very easy to gimp.
Lv 9 Toon Link is a good character to fine-tune spacing against. Link must play to his strengths to best the little melon-head. (Yeah, I’m a Link main who doesn’t like Toon Link; I’m such a rebel.)
Practice new strategies, my control system, etc when you’re not pressured in a tournament. You should be confident with everything you’ll do in a tournament before entering it.
Find out the rules for the upcoming tournament/event and practice with those. Turn off ‘random select’ stages that won’t be included. Have an idea of strong and weak stages for Link against each character and practice on them both.
In tournaments you will be in a high-energy environment brawling people who won’t play characters in a familiar way. Expect your consistency to drop. Be creative, adaptive and play in your most confident style. Example: don’t DAC if you’re nervous about it; you’ll probably be punished. Stay in a calm state of mind, take a few deep breaths in between matches; it really helps. As you grow more experienced you confidence and consistency will grow too.
Link’s game is so precise to controller input you should avoid controllers other than what you brawl with before big events. The day before you might want to exclusively play Link in Brawl. Your thumbs should know where every button and angle is without any thought. Make sure you change your controller settings so ‘R’=attack, and tap jump is off, before using my system in a tournament.
Invest in loss: learn from your losses. At all times, winning or loosing, have fun.
Non-tournament play styles [028]
Advanced setup and indirect range is much less important in free-for-alls. Space Link similarly to 1 vs. 1s, but with three opponents factored in. Try not to get surrounded. Think of far away opponents like stage hazards in the sense of ‘how can I position Link’s attack if opponent ‘A’ gets launched or dodges opponent ‘B’ to best KO them. Charged attacks are much better and more likely to connect with three opponents on screen. Link’s off stage edge guarding is riskier and often should be replaced with range guarding.
Time matches: the Gale Boomerang is a great KO stealing tool. Throw it above an opponent being launched upwards fast by another opponent (or stage element like F-Zero racers) and the gale will give Link the KO. ‘Tag’ opponents with quick range on hazardous stages in case they SD.
Items: Link hits twice for extra damage when dash attacking with battering items. Fsmash with throwing items and throw them in different directions with ‘C’. Hylian shielding (pokeball) pokemon Staryu and Chikorita’s attacks is the best defense. Your Pokemon and Assist Trophies will become your enemy if Manaphy ‘Heart Swaps’ Link and an opponent. Superspicy Curry flames have no effect on any of Link’s range. Tiny, normal and, mega Link have the same height when using all three jumps; their first and second jumps are proportionate to their size but tiny Link’s Up‘B’ rises more distance and mega Link’s rises less. Clawshot is proportionate to size, so mega Link can tether recover from long distances if he doesn’t hang below the floor deathzone. Bunnyhood Link’s up‘B’ rises less that normal. DAC at the right time with a Bunnyhood to slide about the length of Final Destination! Soccer balls launch at the same angle the attack would launch an opponent. The best way to get the Smashball is to wait a little and Dair it. The Smashball’s ‘HP’ drains over time; weaker, faster attacks are best if it’s been onscreen for awhile. Use close Final Smashes like Fsmashes, attack when the opponent’s distracted (not with arrows). Link’s Final Smash can be used as a recovery, he will ‘Triforce dash’ to the target’s location.
Multi-Man Brawl- Utilt does wonders, remove explosive items from the stage quickly. In Cruel Brawl, run and short hop off stage throw Link’s boomerang backwards angled up>Zair the edge when you start. Gale pull the Alloys off stage, Bair them, tether grab the edge, return on stage with an attack that hits all edge guarding Alloys (you may have to drop a few times), backwards hop and repeat. Alloys have no third jumps and will die if their second is interrupted, except the Green ‘Kirby’ ones, beware them. Stay safely off stage as much as possible. I KOed ten in Cruel Brawl this way, but R.O.B is by far the best character for it.
Boss Battles: once you learn each boss’ moves and start up animation Link excels against bosses, even at intense levels. Link’s damage potential is huge and bosses can’t block. Dair bounces and Fair landing cancels. Hit hard and dodge a lot, air dodges last the longest. ‘Range them when Link can’t get close. Double Fsmash Ridley repeatedly when he flaps his wings to blow Link away. On intense, offence is the best defense. The sooner you defeat them, the less likely they’ll do many big annoying moves. Don’t use bombs much.
In Subspace one player or co-op, Link’s Hylian shield defends well, enemies slow Dair bounce, and be more aggressive and direct. Snipe off screen enemies with charged arrows. Recover with up‘B’ if you don’t know if a ledge is grabbable. Flinch resistance stickers really benefit Link.
Not covered in this guide [029]
Speed Ledge Hugging
Craq Walk
Pivot Boost
Footstool Jumps
Jab Lock
Chain Grab
Arrow B Reversal
Bombsliding
Pivot Grab
B-sticking (incompatible with my system)
(Others)
Conclusion [030]
One thing Link embodies in the Zelda series is triumph through trials and persistence. Brawl Link is no exception: it will not be easy, but Link has potential to be the #1 ranked character. Practice until the strong Link comes naturally. Work hard, don’t take the path of least resistance and play Meta Knight (sorry, I had to say that). Link can beat any character, AT, and tournament. His diversity, advanced game, and strengths make Link an incredible character once they’re perfected. Any one who’s gotten to this point in the guide is obviously not afraid of hard work. Expand my strategies by mixing them with yours. Okay, Link community: Play the strong Link and earn him the respect he deserves!
MES!