
#HBC | Dark Horse
Mach-Hommy x Murakami
- Joined
- Jun 12, 2010
- Messages
- 3,739
Gotta know it all! Pokemon
Part 1 of the series, I present to you...
Pokemon Stadium 1 analysis
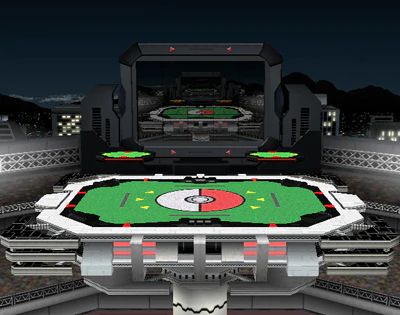
To start off, I'll detail the five transformations (no pics again ).
).
Normal
To start off, I'll detail the five transformations (no pics again
).
Layout: Flat ground, with 2 platforms above it on the left and right.
Rock
Layout: Rugged bottom platform, with 5 aerial platforms in the center. Two on the left are very small and attached to the mountain, they are parallel and are flat. The other three on the right are all on top of each other, each with their own different angle. The bottom aerial platform is at a steep angle that touches the ground so that you can walk on it. The moutain itself is the largest part of the stage. The top can be stepped on and the left side of the mountain is a steep drop to the edge of the stage
Grass
Layout: Flat main platform. There is a small elevated plateau on the right, it ends about 1/3 of the level through, followed by a flat grass area that goes the rest of the level through. There is also a river a little left of the halfway mark that has a minor depression. There are three aerial platforms of this second stage. One medium sized one halfway of the staged and risen and another one higher than it and to the left. The second platform starts halfway of the first platform. The third and final platform is to the right that is flat and very small.
Water
Layout: It is flat on the right side with an elevated left side that depresses back down before the stage ends at the left side. On the smooth right side of the level, there are two aerial platforms. A lower one just left of the halfway mark, and a higher one to the right of it. The thing that makes this stage very memorable is the windmill on the left side. The arms of the windmill spin slowly and you can stand on them, but they will dump you off if you stand on the current lowest arm.
Fire
Layout: The bottom platform is not very flat at all. The middle is a small valley. Where the valley ends on the right, it is flat through the rest of the level. There is one floating platform that follows the elevated plateau for the rest of the level. That floating platform is flat. To the left of the valley in the middle is an unusual shaped obstacle. As soon as the valley ends on the left, there is a strait up elevation that you can not pass through (however some attacks can, that is a good strategy to keep in mind). Most characters need to double jump this hurdle, which you can stand on the top of it. After the platform that is the top of the hurdle, it goes straight down again, but only half way. At a 45 degree angle up and left, there is a medium sized platform that sticks out to the end of the level. It is possible to stand under that 45 degree angle and the platform to the left.
8-Minute Timer
I color-coded everything again. See above for the colors.Also, the transformations start when the screen starts to show the icon.
And now for the data:
Code:
8:00 [COLOR="Sienna"]7:19[/COLOR] 6:48 [COLOR="Red"]5:58[/COLOR] 5:24 [COLOR="Blue"]4:30[/COLOR] 3:59 [COLOR="Green"]3:05[/COLOR] 2:32 [COLOR="Red"]1:36[/COLOR] 1:03 [COLOR="Blue"]0:09[/COLOR]Similar to PS2, this stadium also seems to follow the 4-set rule (Sets of 4 transformations are randomly made, however the same transition does not appear twice in a set. the sets come one after each other).