
-
Welcome to Smashboards, the world's largest Super Smash Brothers community! Over 250,000 Smash Bros. fans from around the world have come to discuss these great games in over 19 million posts!
You are currently viewing our boards as a visitor. Click here to sign up right now and start on your path in the Smash community!
It appears that you are using ad block :'(
Hey, we get it. However this website is run by and for the community... and it needs ads in order to keep running.
Please disable your adblock on Smashboards, or go premium to hide all advertisements and this notice.
Alternatively, this ad may have just failed to load. Woops!
Please disable your adblock on Smashboards, or go premium to hide all advertisements and this notice.
Alternatively, this ad may have just failed to load. Woops!
Make Your Move 3.0: It's over, it's done, moving on.
- Thread starter Collective of Bears
- Start date
- Status
- Not open for further replies.
MasterWarlord
Smash Champion
*Is NOT lame*
Chapter 4: Deafening Mute City
Level 24: Mute City - Suburbs
Play as: Zelos Wilder, Sain, or Peter Griffon
The Street Performer is seen doing what she does best. . .Performing in the street, break dancing and what not. Several people are there to watch her, regularly giving tips, her having an exceptionally good day today. Sain, Peter Griffon and Zelos Wilder suddenly join the people watching, slowly, one by one. They watch her performance, their eyes glued to her. Their eyes keep following her around, notably zooming in on her breasts and buttocks for some strange reason. . .Sain tosses her some money, Zelos seeing this and not wanting to be outdone. Zelos tosses a sizable amount of cash to outdo Sain, chuckling and folding his arms. Peter reaches into his pockets to see if there's anything he can give to the street performer, but finds out he has no money. To solve this problem, Peter mugs a random person and steals his money, then gives it to the street performer, doing his trademark stupid laugh. The three characters continue watching her until they notice each other, then suddenly turn to each other, putting up their fists. A free for all starts between the three hopeless men, you getting to choose your character.
After the three men come out of the brawl, the winner comes up to the street performer, having knocked out the other two cold. A different cutscene will play depending on which of the characters won.
Peter Griffon: The street performer finishes her routine, taking a bow, oblivious to the fight that had ensued over her. Peter hastily goes up to her and stares at her chest for the street performer to put her head into Peter's view, questioningly, not used to this sort of "attention". Peter shoves her head out of the way and continues looking at her cleavage for the street performer to get fed up with him and kick him in the crotch. Peter curls up and holds his crotch, letting out a cry of pain, causing a battle to start between them, you playing as the street performer.
Zelos Wilder: After the Street Performer's done street performing, she gets into her basic stance and starts counting her money, walking on her hands, using her feet to sort through the money. Zelos goes up as she does so, weirded out, and decides that this girl isn't "worthy" of him. He goes to take his money back, but the street performer kicks him in the face as he does so, sending him away. Zelos puts up his fists angrily and goes to smack her, but the street performer grabs his arm with her legs and swings him around, throwing him against a wall. A battle follows between the two characters, you playing as the street performer.
Sain: Sain, having been mounted on his horse all this time, dusts himself off after his battle against the other two men. He turns his gaze back to the street performer, who is still performing, having his horse go over in front of the other people watching to see her. His horse however disobeys his orders and charges forward, trampling the street performer. Sain hastily gets off his horse and goes to help her up, trying to explain it's an accident, only for the street performer to get in her basic stance (Walking on hands) and kicks his hand back in his face. A battle starts between the two characters, you playing as the street performer.
After the Street Performer knocks out the man who was interested her, she walks away in her scorpion like way, taking her money with her. The other people who were watching leave, having throughly gotten their money's worth with all the fights. The three hopeless men lay there unconcious for a while, until they all suddenly reawaken. The see a foggy figure in front of them as they regain conciousness, the camera showing their perspective, then they rubs their eyes to clear their vision and see Shannon. They all get big dumb grins and rush forward at her, her rolling her eyes and getting her staff ready. As they come up to her, she hits each of them in the crotch with her staff playfully, chuckling, causing the men to get infuriated at her rather then infatuated, holding their balls in pain. They all once again charge her, Shannon chuckling, you playing as her against the other three male characters. While the male characters are all out at once and on a team against you, they still aren't particularly fond of each other, meaning team attack is on.
Level 25: Mute City - Pizza Land World
Play as: Leonardo or Pizzaman
Leonardo is seen walking down the streets of Mute City, looking around at all the various sights in awe. He goes into the street and a futuristic hover car is about to run him over, but he ducks into his shell, it sending him flying away into the distance. He gets up out of his shell and dusts himself off, annoyed, for his stomach to start growling. Thankfully, there are two pizza resturants nearby, Pizza Hut, and "Pizza Land World". Pizza Land World looks ridiculously unprofessional, the sign being made of cardboard and the place being tiny, so Leonarndo rubs his tummy and hastily goes up for the superior resturant. However; Pizzaman sees this from the window of his amateur resturant and hastily zips up in front of Leonardo, putting his arm around his shoulder, grinning, and pointing to his resturant. Leonardo shrugs it off and continues going to Pizza Hut, but Pizzaman suddenly takes out a card that says "99% OFF!", shoving it in his face. Leonardo takes the card and rapidly nods his head happily to agree, and they go off to Pizza Land World together.
Inside, Pizzaman goes behind the counter while Leonardo gives him a single penny due to it being 99% off, Pizzaman bowing slightly in most honest thanks. Pizzaman goes off into the back and whips up a pizza in record time, Leonardo eagerly rubbing his hands together as prepares to open the box. Upon opening it up, the pizza has mouldy green cheese, is terribly burnt, and has live fish all over it, causing Leonardo to look sick. He hastily goes to the bathroom after which vomiting noises are heard, then comes out, whiping some puke off his mouth. Leonarndo extends out his arm and rapidly opens and closes his palm, demanding his money back, but Pizzaman folds his arms and shakes his head, shoving the Pizza towards Leonardo. Leonardo shoves the pizza back towards Pizzaman for Pizzaman to takes out the penny Leonardo gave him and swallow it, laughing smugly. At this, Leonardo angrily takes out his blade and takes a swing at Pizzaman for him to whip his cape forward at Leonardo, letting out an obnoxiously annoying battle cry. A battle starts between the two, you getting to choose your character.
After the gameplay, the not so epic fight between the two pizza lovers rages on, Pizzaman throwing burnt nasty pizzas at Leonardo and other awkward attacks. Leonardo slices the pizzas in half as they keep getting thrown at him with his blade, coming ever closer to Pizzaman, but their battle is suddenly cut short as a bunch of the Mute City police comes into Pizza Land World. A health inspector comes out from among the police officers and reluctantly takes a sample of the one of the pizzas to look disgusted, then turn and nod to the officers. The officers charge Leonardo and Pizzaman, Leonardo constantly shaking his head to try to deny being involved in this affair, but the policemen ignore this. You play as both characters in a battle against the policemen at the start, and then afterwards must run through Mute City for a level to get the cops off your tail. The cops are futuristic and have laser nets, which they will catch you in and try to drag you off the screen with for guaranteed KOs.
After successfully losing the cops, a cutscene shows that the two characters have gone in one giant loop and have ended up back in front of Pizza Land World. Leonardo smacks his hand on his face and walks away, while Pizzaman goes back into his returant to continue business as usual. He gets a phone call, and on the other end of the line is Tiny the Tiger (A giant dumb brute from Crash Bandicoot, the screen splits to show Tiny.), who lets out intolerable roaring. Pizzaman naturally takes this as an order and gets one of his pizzas ready in a box, then soars away towards wherever Tiny told him to go, his cape blowing in the wind.
Level 26: Mute City - Rock Concert
Play as: The Delicious One, Mallow
Joe Perry is seen rocking out on a massive stage with the rest of the Aerosmith band, playing some of their signature hits such as "Dude looks like a lady" and most of their songs present in Guitar Hero: Aerosmith. The screen cuts away from them to show the Delicious One watching from afar inside a trash can. He sighs, unable to get a good view or hear it very well, and is unable to go up close due to the humans there who would eat him in a heartbeat. Suddenly, a human comes up behind him and lifts the lid off the trash can, the Delicious One not noticing it. However; he has no choice when the individual starts drooling, the drool raining down on him, turning up to look at the human. It turns out to be none other then a mindless Zombie, who says "Braaaaaaiiiinnnnnsss. . .", extending his arms out in a mindless fashion to try to grab the Delicious One.
The Delicious One screams and jumps up out of the trash can, fleeing towards the rock concert, the Zombie hastily chasing after him. The Delicious One manages to lose the Zombie in the massive crowd, slipping under a woman's skirt, causing her to scream. The women proceeds to faint as she sees the Zombie, then the Zombie looks around stupidly for where the Delicious One went off to. As looking around, he spots a small little white marshmallow puffball known as Mallow happily watching the concert. The zombie turns to him, putting his arms out in front of him, the camera showing the Zombie's view. In the Zombie's vision, Mallow turns into a brain puffball rather then a marshmallow, Zombie saying "Braaaaaaaaiiiinnnnnnssss. . .". Mallow turns around, seeing this, screams, then flees off also. Zombie chases Mallow for the marshmallow to bump into the Delicious One, and they both start fleeing from the Zombie together.
You play as the two victims, running through the crowd as a cpu controlled Zombie chases you. The Zombie is a playable character, his damage meter not going up, and reviving shortly after he's KOd to continue chasing you. The screen slowly scrolls to the right, there begins tons of fans which are blocking the way which you must either force out of the way or jump over. The Zombie attacks all in his way as he makes his way towards you, so it's generally a better idea to not attack the random people. Aerosmith can be seen performing in the background, their various songs being the background music for the level, switching to different ones as the level goes on.
After the chase, Mallow and the Delicious one climb up onto the stage where Aerosmith is performing, Zombie hastily getting up to follow them. The two victims decide to put up a fight against their persuer, nodding at each other and putting up their fists. The Zombie however suddenly rips off his own head and starts blundgeoning the characters with it, the head chomping them as the body does so, causing the characters to be much more intimidated. The fans cheer all the louder, thinking it's part of the show, while Aerosmith must go on with their show. You play as Zombie against both Mallow and the Delicious One, Aerosmith once again being in the background performing one of their songs at random.
After the battle, it looks like Zombie is just about to devour both of the characters, having knocked them out, but Joe Perry comes over and smacks the Zombie over the head with his guitar. The Zombie turns around hastily, most surprised at this turn of events, the crowd only cheering all the louder. The Zombie rips off his head and swings it at Joe Perry, but the guitarist swings his guitar like a baseball bat to knock the head away. The body catches the head and puts it back on, and a battle starts between the two, you playing as Joe Perry. The band once again plays in the background despite their lead guitarist not playing, as he's giving busy giving a much larger dose of fan service to the people.
Level 27: Mute City - Tightwad Towers
Play as: Pizzaman
We first see CEO sitting in a comfy chair behind a gold plated desk which he has his foot up on on top of, two beautiful assistant women in suits at his sides. The CEO snaps his fingers for one of the assistants to go gets him some coffee while the other one lets in some guests. These guests are none other then Black Shadow, Bowser, and Dr. Neo Cortex (Main villian of Crash Bandicoot, a ****** mad doctor.) riding his dumb brute Tiny, up on his shoulders. Tiny is randomly calling people on Cortex's cellphone, like he did to Pizzaman, having fun and laughing stupidly. Cortex swipes the phone away from Tiny angrily, pocketing it, much to Tiny's dismay. Black Shadow and Bowser ignore the dumb pair and come up to the CEO, rubbing their fingers together, demanding their pay for the dirty work they've done for the CEO. The CEO chuckles and casually takes out two large golden bars from his desk and tosses them at the two characters, them getting smiles which spread from ear to ear. The CEO chuckles and takes out a picture of Captain Falcon, then takes out another gold bar which he hastily puts away. Bowser and Black Shadow nod as the CEO puts away the picture and folds his hands, letting out a sinister laugh.
The cutscene goes on to rejoin Pizzaman on his not so epic quest to deliver terrible pizzas, him soaring off towards two massive towers built alongside each other. He lands down in front of one, letting out a stupid cry and disturbing all with his wacky underwear on the outside appearance, then goes into the towers. He goes up with his pizza to a woman in a suit at the front desk, the Pizzaman mumbling some inunderstandable nonsense as he points to his pizza. The woman presses a button for a screen to come out of the cieling (The CEO being insanely rich and Mute City being futuristic) and the CEO shows up on it. Pizzaman points to his pizza and lets out more inunderstandable gibberish questoiningly for the CEO to smack his hand on his face and give a dissmissve motion with his other hand, letting out a deep sigh. The screen turns off and goes back into the cieling as a bunch of the CEO's security sorrounds Pizzaman, causing him to let out a crazy berserk battle cry and start fighting them all.
A level starts with you playing as Pizzaman, the start of it being a battle against the CEO's bodyguards, whom are all very buff, wear black suits, and use guns. After the brief starting battle, you must make your way to the top of the Tightwad Towers to deliver the CEO his pizza, using elevators and avoiding setting off alarms which trigger more bodyguards to come out. It's along ways up the massive Tightwad Towers, and the level will end before you get all the way to deliver the pizza to the CEO.
Another cutscene starts up after you finish the level, once again showing the CEO's ridiculously exspensive office. The CEO, Bowser, Black Shadow, as well as Cortex and Tiny are seen drinking coffee together and are being fanned by the CEO's beautiful assistants. Suddenly, there's some knocking at the door, and one of the assistants goes to open it to reveal the grown up versions of Bowser Jr. and Nina Cortex. The CEO motions to two opens seats for them, but they're too shocked at seeing their former mentors, Bowser and Neo Cortex, also present, squinting their eyes and staring at them. Bowser Jr. (Who is around Bowser's size in his adult age) tackles Bowser, Bowser not expecting it, and ends up tackling him out the window, where they go into a father vs son battle, although the camera stays in the CEO's office. Cortex hastily gets behind his bodyguard, Tiny, not wanting to be the next victim, pushing him forward to fight Nina. Nina rolls her eyes and charges forward for Tiny to grab Cortex and use him as a club to beat Nina with, and a battle starts between Nina against Cortex and Tiny (You getting to pick your character). Cortex and Tiny is not an Ice Climbers type character, and instead functions by having Cortex mounted on Tiny's shoulders.
After the gameplay, the fight between the Neo Cortex and his niece Nina is seen going on, the CEO eagerly watching with his hands folded and sipping coffee. Black Shadow considers the fight too boring, tapping his foot and folding his arms, but his boredom is silenced as Pizzaman enters the CEO's office. He goes up to run up to the CEO, but Black Shadow would hardly let this chance for some fun pass, now would he? Stepping in front of Pizzaman's way to the CEO, he does a sparta kick, knocking him down, and a battle starts between Pizzaman and Black Shadow, you playing as Pizzaman. Nina can be seen fighting against Cortex and Tiny can be seen in the background as well as an exceptionally entertained CEO.
After defeating Black Shadow, Pizzaman comes up to the CEO and opens the pizza box, smiling stupidly and pointing at it. CEO is most angry at this and points for him to leave, shoving the pizza away. Pizzaman refuses to have an unsatisfied customer, and instead forces the pizza on him. . .Quite literally shoving it in his face. The CEO, covered in cheese and pizza sauce, angrily gets up and screams "Money PAUUUUNCH!" knocking Pizzaman away. A battle starts between the CEO and Pizzaman, you playing as the CEO, Nina and Cortex (And Tiny) still also fighting in the background.
After the battle, the CEO manages to finish off Pizzaman and knock him out, him falling face forward, knocked out, his face landing in one of his nasty pizzas. The CEO shoves his head into the pizza to see how he likes it, chuckles, then presses a button for his security to take him away. Suddenly though, before they take him away, an lightbulb appears above his head, with "LAWSUIT!" written in it. The CEO cackles and motions for his security to leave, then turns to Nina, who's finally managed to finish off Cortex and Tiny. She goes to behead Cortex, but the CEO angrily comes in front of her, him being a priceless minion of his. Nina folds her arms, wanting a reason not to, and the CEO casually tosses her a bar of gold to sway her to his side. Bowser Jr. comes into the CEO's office, tired from his battle with Bowser. A picture of Bowser appears above CEO's head as he shrugs, asking where he is, for Bowser Jr. to just laugh and point out the window. Nina and the CEO go look to see nothing but a bunch of toxic waste. Bowser Jr. comes over and points into the waste and laughs evily, as CEO sighs and leaves, annoyed at losing a perfectly good minion.
Level 28: Mute City - Supreme Court
Play as: Phoenix Wright or CEO
The cutscene shows all the characters from the chapter gathered in court. Pizzaman is up on the defense stand, being sued by the CEO, while CEO is in the prosecutor's box along with his minions (Besides the deceased Bowser). The rest of the characters have all been forced to be members of the jury, even Zombie, who is creeping out those near him with his cry of "brrrraaaaaiiiiinnnnnssss. . .". The judge drums his fingers as he waits for the defense for Pizzaman to arrive, and he comes into the courtroom to turn out to be none other then Phoenix Wright, ace attorney.
The Judge starts banging his gavel down to cause the court to start, causing everybody to stop talking except for the idiotic Tiny and the mindless Zombie. The judge keeps banging his gavel to try to silence them for Cortex to zap Tiny to shut him up, Nina rolling her eyes. The Delicious One puts a big cork in the Zombie's mouth to stop his mindless cry of "brrrrrrrraaaaaaaaiiiiiiinnnnnnnsssss. . ."., Mallow chuckling slightly at it.
Now that the court's ready to begin, the judge motions forward for the CEO to present his evidence against Pizzaman. The CEO snaps his fingers and his lawyer comes forth and shows one of the horrible pizzas of Pizza Land World. The Judge sees this and looks grossed out, raising a sign with "GUILTY" written on it, rapidly banging his gavel with his other hand. Phoenix Wright suddenly comes forth and says "OBJECTION!", then brings forth a TV set that shows how the CEO was the one who did the first attack against Pizzaman. The jury gasps as they turn to the CEO, the CEO being most angered by Phoenix having caught this. He leaps up and does his "Money PAUNCH!" at Phoenix for him to casually dodge, and a fight starts between the two characters, you playing as Phoenix. The judge can be seen rapidly banging his gavel in the background, damaging you if you get too close to him.
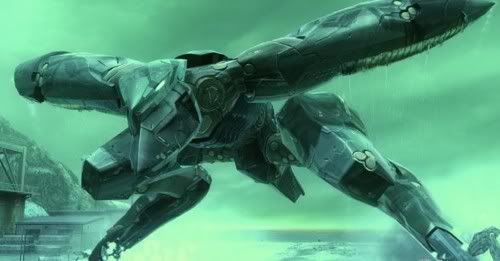
After Phoenix subdues the CEO, he folds his arms and chuckles as the security comes to take him where his money will do him little good. The CEO has no intentions of being taken to jail, though, and had prepared a secret weapon in case something like this might happen. He takes out a remot control and presses a button, causing a gigantic mech to burst through the walls of the courtroom. This giant machine is none other then Metal Gear RAY, the CEO having bought one of the last ones in existence, hastily going up into the cockpit and laughing evily. The other characters not on the CEO's side rush down from the jury to fend off this mechanical menace, and a boss battle begins.
Boss: Metal Gear RAY
Play as: Street Performer, Peter Griffon, Sain, Zelos Wilder, Shannon, Pizzaman, Leonardo, The Delicious One, Mallow, Zombie, Joe Perry, Phoenix Wright
The CEO can be seen vaguely in the cockpit of the Metal Gear, laughing evily as he does the attacks. In the background, the judge will be long gone, while Nina, Bowser Jr., Black Shadow, as well as Cortex and Tiny will be seen in the background, laughing evily and taunting the characters. When the Metal Gear RAY gets down to 75% or 50% health, the mechanical menance will open it's cockpit and the CEO will be knocked down against the controls. The CEO will straighten his tie and glasses before closing the cockpit and attacking again, giving you a chance to directly hit him to do double damage against the health bar of the boss. Considering the ridiculous amount of hp this thing has to be taken down, you have little choice but to take advantage of the opportunity.
Attacks:
Stomp: A simple stomp by Metal Gear RAY. RAY lifts its foot up and slams it down about five feet ahead of him, causing intense knockback. Lots of knockback, but not TOO much. Very predictable. 20% on Intense Mode.
Machine Gun Fire: RAY starts aiming with his arm, and a little target appears on the ground. The target will follow you quickly for the next 4 seconds. When those 4 seconds are up, RAY will stop the target and IMMEDIETLY fire a massive burst of machine gun fire in the target’s direction, dealing lots of damage. The machine guns’ fire continues over time like Tabuu’s bullets (In this case about 5 seconds), but it doesn’t end with a large final hit. Very low knockback, but lots of damage. Getting behind Rex can result in this attack being easily avoided. Potential Damage: Each bullet does about 3% on intense mode. If you get hit by the full force of the attack, it can do up to 60%.
Slide: Possibly RAY’s most annoying attack. RAY dives off the edge of the stage and into the water so its off the screen… And then jumps back on, sliding like a penguin on ice forward. This attack is very fast when RAY slides, and has major knockback. On intense difficulty, it’s just sick. Don’t shield it, unless you want a smashed shield. 35% on Intense Mode.
Slide Hop: Just like the slide, but when Ray slides, it hops in midair, going about 10 feet in the air. It has the exact same damage and knockback, but you have to respond differently. Instead of jumping over it, stay on the ground in the middle of the stage. 35% on Intense Mode
Leap of Death: RAY jumps high up in the air, and slams down on the other side of the stage with both feet, and then turns around. Pretty easy to avoid, but DON’T shield it. Large knockback. 25% on Intense Mode.
Attacks added at 75% health:
Missiles: RAY charges up for 2 seconds, creating some light from the launcher on his back. It then fires four slow traveling heat seeking missles from there, which home in slowly. They all have medium knockback. Going behind Ray will stop the missles from locking on. Get the missles to hit RAY for extra damage. 20% each on Intense Mode.
Jet Missile: This attack has the same charging up animation as the normal missles. However, instead of firing several slow moving missles, it instead fires a single large missle at high speed that has significantly more power and knockback. Shield it or spot-dodge or roll if you have to. Getting close to or behind RAY will stop this attack from hitting at all, as the missle’s speed insures it doesn’t turn as easily. 40% on Intense Mode.
Attacks added at 50% health:
Missile Tube: This attack is quite easy to avoid, luckily. A target appears on the scene and follows you very quickly for 2 seconds and then freezes for another second. Then, six small missles fire out from Metal Gear RAY’s launcher, hitting the targeted area. Each one has small knockback, luckily. 10% each on Intense Mode.
Water Jet Cutter: RAY’s most powerful move. The Metal Gear dives into the water, underneath the stage and out of site. When it jumps back up, instead of doing the sliding move, RAY bends down and fires a concentrated jet of water from its “mouth” at ground level for 4 seconds. This attack will KO at 0% on Intense Mode, so AVOID IT AT ALL COSTS. Jumping over it is wise, as RAY will not lift up its head until it has finished. Ledge-grabbing will also dodge it. 60% on Intense Mode.
Water Jet Cutter Scan: RAY does the same setup as last time, but instead of merely bending down and firing it, RAY fires its beam straight down right in front of it and then begins moving it slowly across the stage away from RAY until it reaches the other edge, at which point it’ll disappear. Air dodge, roll, spot-dodge, or move to the other edge and jump over the beam when it reaches there. 60% on Intense Mode.
After taking down Metal Gear RAY, the CEO weakly falls out of his mechanical masterpiece, knocked out. Pizzaman jumps on top of his body and does a pose, but is knocked away by Tiny and Bowser Jr., who both roar at him. Nina, Cortex and Black Shadow come alongside them and join them, posing together, Nina and Cortex staring angrily at each other, and you play as them all against the characters you just played as to defeat the boss. Thankfully, you get an extra life to use both Nina and Bowser Jr., meaning the stock isn't too far in the enemy's favor.
Level 29: Mute City - F-Zero Track
Play as: Street Performer, Peter Griffon, Sain, Zelos Wilder, Shannon, Leonardo, The Delicious One, Mallow, Zombie, Joe Perry, Pizzaman, Phoenix Wright, Grown up Bowser Jr./Nina Cortex, Cortex and Tiny, CEO
The battle between all the characters is seen raging on, Joe Perry batting Zombie's head at Cortex while Black Shadow kicks Peter Griffon in the groin, him having an exceptionally bad day, seemingly. The cutscene fades out from the fighting and fades in to show a gigantic portal opening in the middle of Mute City, which dumps out True Dracula and all his vampiric minions. His collection of vampires is exceptionally large now, featuring Simon Belmont, Sandslash, Isaac, Knuckles, Shadow, Gibari, Big the Cat, the Squeak Squad, Captain Syrup, Plusle & Minun, Chao, Jack Sparrow, K. Rool and Gecko Moria. True Dracula lets out a massive roar, turning the meat of the citizens in the city to vampires, then starts motioning the playable character vampires off in different directions to convert more minions for him.
True Dracula rampages towards the court house, which was just barely out of the range of being affected, and bursts through the wall, ready to rip apart any who stand in his way. The characters all hastily flee, the CEO regaining conciousness and joining them, Tiny dragging Cortex along the ground for him to be in large pain. Black Shadow is leading the pack, a decent bit ahead of the others, and they flee into the pit stop of the Mute City racetrack. Black Shadow hastily gets in his Black Bull F-Zero machine and zooms away to safety, leaving the other characters to rot. Having no other choice, the characters hop onto the other F-Zero machines ready for the race about to take off, zooming away from True Dracula to safety.
You play as the entire roster of this chapter for the level with the exception of Black Shadow, who is safely tucked away in his F-Zero machine. The level is like Big Blue, the past melee stage, although the background is mute city as opposed to big blue. You can actually see the racers in their cars through the glass vaguely, able to spot the cast of F-Zero as you go through the level. There will be a number in the upper right hand corner of the screen that says what percentage of the course you've gone through so far, and if you don't get to the car in the lead by the end you lose the level. You have to progress accross the racing machines of the entire cast of characters from F-Zero, and they're generally not very close together, meaning you have to make deadly jumps from one to the next, your huge character roster quickly getting killed off like flies. Some of the F-Zero machines will be ramming each other when they come on screen, and shortly after you see the machines the one you can actually step on will be rammed off the course, meaning you must jump to it hastily. There will be some parts of the course that will be straight up, and you'll have to hold on to your f-zero machine like hanging from a ledge to survive. Large jumps are also common fare, and you'll get whisked away if you land on the track like in the big blue stage, so falling off means near certain death. Black Shadow is the racer in the lead, followed closely by Captain Falcon (Who is riding in his giant Falcon Flyer instead of his small Blue Falcon).
Upon getting to Black Shadow's car, another cutscene will start up. The other villians will first hop onto Black Shadow's car, angry that he just left them there, but Black Shadow points out there's only one seat in his ride. Bowser Jr. tries to take him out of it, but Black Shadow jumps out and smacks him, sending him flying onto the Falcon Flyer, where the rest of the characters are. Black Shadow gets in a defensive position, ready to defend the only seat that will survive the racetrack, and a battle begins. You play as Black Shadow against all the other characters you just played as throughout the level, thankfully having 4 stock. You play on the Black Bull as well as the Falcon Flyer, the Falcon Flyer being on the Black Bull's tail, there being enough breathing room to fight the battle comfortably.
After the battle, all the characters will be seen on the Falcon Flyer, knocked out, except of course for Black Shadow. He lets out an evil laugh and goes to go back into his Black Bull, but Captain Falcon finally takes action and leaps out of his F-Zero machine, saying "Show me ya moves!", then does the Falcon Knee to send Black Shadow flying off into the distance. He proceeds to say "COME ON!", flexing, but the CEO weakly gets up. Captain Falcon readies a Falcon Punch while the CEO does the same with his Money Punch, them both letting out their signature phrases, and a massive explsosion engulfs the track as they both say "PAUUUUNCH!". The characters all go flying off in seperate directions from the blast of pure manliness, the level ending.
Level 30: Mute City - Black Shadow's Lair
Play as: Leonardo or Grown up Bowser Jr.
Pizzaman, Mallow, The Delicious One, Zombie as well as Cortex and Tiny wake up, having been blasted off by the two manly punches into Black Shadow's lair. The Zombie and Tiny stare at Mallow and the Delicious one, licking their lips, Zombie envisioning them as brains while Tiny's perfectly content to picture them as fast food. Pizzaman sees the two hungry customers and takes out two of his terrible tasting pizzas, shoving them in their faces. . .For their terrible tastebuds to actually like the stuff. Tiny and the Zombie happily start eating up the rotten pizzas, Mallow and the Delicious one being relieved, Cortex sighing at the stupidity of his minion. The camera pans a bit away to Leonardo and Bowser Jr., who are a bit farther away from the other characters, both waking up from the attacks weakly. Due to having slain his father, Bowser Jr. is the new king of the koopas, and demands the teenage mutant turtle to bow down before him, pointing his finger down at his feet. Bowser Jr. laughs and looks the other way, closing his eyes, but Leonardo gets angry at this and stabs the grown up Bowser Jr. with his blade. A battle starts between the two turtles, you getting to pick your character.
After the gameplay, the other characters will be seen watching the two turtles duke it out, Pizzaman, Tiny and the Zombie chowing down on Pizzas to help the cinematic feel. Tiny accidentally take The Delicious One instead of another Pizza while the Zombie does the same with Mallow, about to chomp into them, but both this and the battle are interrupted by Black Shadow's minions finally arriving to dispose of the intruders. You play as all 7 characters in a battle against the enemies, Bowser Jr. and Leonardo having to put aside their petty differences. After the battle at the start of the level, you must make your way down out of Black Shadow's lair back to the outside world in another level.
After the level, the characters are seen walking out together to see the newly vampirized city, looking at all the vampires with a look of shock and terror on their faces (With the exceptions of Tiny and the Zombie, who are too mindless to realize what's going on.). Suddenly, some vampires come up to attack them, consisting of Sandslash, Knuckles, Gecko Moria, Chao, Storo of the Squeak Squad, Gibari, and Big the Cat. Big and Storo, being the fatties they are, chase after Mallow and the Delicious One, and the rest go into a normal battle. It's a 7 vs 7 battle, the sides being evenly matched.
After the gameplay, the battle is seen still going in the cutscene. Things are starting to look bad for the characters no yet undead, the Zombie and Tiny stupidly joining Big and Storo in trying to devour Mallow and the Delicious One. More random vampires from the streets join the playable character vampires in trying to take them down, and they have no other choice but to run, Pizzaman pulling along the Zombie while Cortex snaps Tiny out of his stupidity.
Level 31: Mute City - EAD Research Facility
Play as: Joe Perry
Shannon, the Street Performer, Zelos Wilder, Sain and his horse all find themselves strapped to disection tables inside the EAD research facility. Mr. EAD (A racer in the F-Zero series) is strapped to another table, there being wires attached to the other characters and some attached to Mr. EAD. Some scientists in the room start pressing buttons to cause the wires to start electrfying the characters strapped to the table in pain, causing their brains to slowly be sucked out into Mr. EAD. Surely, Mr. EAD will be the perfect cyborg with this added intelligence! The characters thrash around, trying to get away, but to no avail. The camera pans outside the room to show Joe Perry, who was tossed aside as his disapperance would draw suspicision to them, what with him being a famous rock star. Joe Perry looks into the room and sees what's going on, then smacks one of the scientists over the head with his guitar. The scientists call in their security to take care of the rock star, and a battle follows against the enemies.
After defeating the enemies, Joe frees the other characters from their bonds, although he's too late to save Sain's horse. The horse's brain is added to Mr. EAD's intelligence. . .But this was a foolish decision, as it it has only made the cyborg more stupid. Mr. EAD breaks free of his bonds and neighs, walking on all fours. The characters stare at Mr. EAD, weirded out, while Sain goes over to his dead horse, sad for the loss of his trusty steed. Zelos casually points to a mechanical horse nearby and Sain shrugs, getting up and mounting it, then the characters proceed to flee the research facility.
You play as the five characters, although Sain is in an alt costume where his horse is robotic and futuristic. The enemies from the level are more security for the research facility as well as some various experiments gone wrong, prototypes of Mr. EAD, who will break out from their prisons as you pass and attack you. The mutations are enemies from various series as well as a few original ones, there being quite the variety of enemies for you to take out on your way down to the base floor of the research facility.
After you complete the level, before Sain or Zelos can try to hit on the girls again, some vampirc characters come to greet them as they escape from the research facility. The vampiric characters are Isaac, Captain Syrup, Plusle & Minun, Spinni of the Squeak Squad, and Jack Sparrow, who hastily lash out with their fangs to attack the characters. You have a 5 vs 5 battle against the characters, after which more random vampires are seen joining the vampiric characters in their attempt to convert Joe Perry's group. They are left with no other choice but to run for dear life, the level ending.
Level 32: Mute City - Dark Alleys
Play as: Phoenix Wright
The last group of characters (Nina, Black Shadow, the CEO, Phoenix Wright, and Peter Griffon) have been blasted off to a dark alley in a crime filled corner of town, all laying there unconcious. Peter Griffon awakens before any of the others, and wastes not time in taking advantage of the situation. He hastily searches the CEO's pockets to find a massive amount of money, doing his stupid laugh and pocketing it for himself. He does the same to the other characters, slightly annoyed they don't have as insane amounts of money as the CEO, but comes to Nina last. Before he can reach into her pocket, his eyes are too distracted by her boobs. His tounge comes out of his mouth, but he then looks up and sees her ugly face with the buck teeth and looks disgusted. Peter shrugs and gets a paper bag which he puts over her head, then proceeds to fall down on top of her to get in a sexual position in a motion like Bowser's dthrow, but his plans are foiled as Phoenix Wright comes in front of him, extending out his arm to poke his belly with his pointer finger and saying "OBJECTION!". A battle starts between the ace attorney and the fat fool, you playing as Phoenix.
After the gameplay, the battle is still seen going on between Peter and Phoenix, there being no clear winner in sight. The other three characters regain their conciousness, and some vampiric italian mobsters sorround the characters. Peter puts his hands up to the other characters to tell them to let him handle it, and he proceeds to go up in front of the vampiric italian mobsters. Peter speaks gibberish while doing a italian immitation, the vampires letting out annoyed mumbling with their italian accents. They mobsters come to attack more viciously before, angered, while Phoenix facepalms. A battle starts against the vampiric mobsters, you getting to use all five characters.
After the battle, a larger amount of vampiric mobsters are seen in the distance, far too many to defeat. The characters go to flee, but the CEO comes in front of them and shakes his head. The characters get questioning exspressions on their faces, but the CEO takes out five jetpacks for all of them. The characters put on their jetpacks and try to turn them on, but they say they're seemingly out of fuel. Black Shadow points to the jetpack questionginly then shrugs for the CEO to reach into his pocket. He takes out one dollar and points to it for the other characters to smack their hands on their faces that his jetpacks use money for fuel, and the CEO proceeds to reach further into his pocket to not find anything. The CEO is shocked at having no money on him, the other characters glaring at him. They suddenly turn to see that Peter Griffon is sneaking away quietly, his pants being filled with money from when he pick pocketed the CEO, then hastily runs away upon being spotted. You play as Peter Griffon against the other four characters, having two stock and fighting them all one at a time.
Now that Peter's safely defended his stolen money, he stomps on the CEO's head and does his trademark stupid laugh in victory. The other characters are most angered at this, but before more fighting can ensue more vampiric characters come to attack them. The last of the vampiric characters consist of Simon Belmont, Shadow, Doc of the Squeak Squad and K. Rool. Peter runs off with his money while the vampires go to attack the characters Peter beat up on, a 4 vs 4 battle starting. Upon defeating the last of the vampiric characters, the mass vampiric italian mobsters finally catch up to the characters, leaving them no choice but to join Peter in fleeing. The vampiric playable characters join the mobsters in chasing them, and the level ends.
Level 33: Mute City - Lawsuit Lane
Play as: Street Performer, Peter Griffon, Sain, Zelos Wilder, Shannon, Leonardo, The Delicious One, Mallow, Zombie, Joe Perry, Pizzaman, Phoenix Wright, Grown up Bowser Jr./Nina Cortex, Cortex and Tiny, CEO, Black Shadow
The characters all meet up on the street outside the Tightwad Towers, all being chased in seperate directions by the playable character vampires. They all back up against the mass of chemical waste Bowser was thrown into by Bowser Jr., and the vampires sorround them. Dracula is seen in the background, laughing evily with his arms folded, pleased that the last of the survivers have been cornered like rats.
A massive scale battle follows between a pretty large portion of the roster of this crazy version of Brawl, featuring all the playable characters against vampiric versions of Simon Belmont, Sandslash, Isaac, Knuckles, Shadow, Gibari, Big the Cat, Storo, Spinni, Doc, Captain Syrup, Plusle & Minun, Chao, Jack Sparrow, K. Rool, and Gecko Moria. The grand total of the match is 17 vs 16, the total being one in your favor. You start with a random character in the battle against one of the vampires at random, and upon defeating that vampire the two characters will switch to two random new ones. You only get one spare stock throughout all the battles, and if you don't die at all one of your characters will be unused, picked at random due to the random order. The grand total of characters counts transformations, and just in case things aren't hard enough a few random enemy vampires will come into the battle throughout it, the playable enemy vampires being immune to their fellow undeads.
After the characters who have yet to fall under Dracula's rule defeat the vampires, Dracula comes out from among them angrily, disgusted with the failure of his most trusted generals. Lord Dracula turns to his true form once again, and as True Dracula swipes violently at the characters. The characters do their best to dodge and Dracula ends up shaking up the chemical waste Bowser was thrown into. Causing a reaction like shaking a bottle of soda pop, making the chemicals start bubbling violently. The large circular tin containing the chemicals breaks as a massive entity comes out of the chemicals. Having once been Bowser, this beast is ready to exact revenve on all those who dared oppose him now that he's Dry Giga Bowser. He lets out a massive roar that causes even Lord Dracula to flee, and then eyes his son, Bowser Jr., who caused all this to happen to him. The father and son stare hatefully at each other, Dry Giga Bowser picking him up in one of his fists in a rage where they continue their brief staring contest of hatred. However, Nina hastily goes up to her friend's aid by doing a drop kick at Dry Giga Bowser's fist, causing him to drop his son, despite not taking much pain. Dry Giga Bowser breathes fire at the cast of characters, causing a battle to start.
Boss: Dry Giga Bowser

Play as: Street Performer, Peter Griffon, Sain, Zelos Wilder, Shannon, Leonardo, The Delicious One, Mallow, Zombie, Joe Perry, Pizzaman, Phoenix Wright, Grown up Bowser Jr./Nina, Cortex and Tiny, CEO, Black Shadow
Cortex, Cortex and Tiny, CEO, Black ShadowConsidering you have 16 characters to use against this behemoth, he's as hard as any of the other bosses, but is still certainly a good notch above the rest due to how late in the game he is. Some of his attacks are from that of the playable character version of Giga Bowser, but he's in a boss format, meaning he can't be knocked back and has a health bar, as well as plenty new attacks in store for you. Some of his attacks also revolve around his "Dry" status, making use of his bones. Dry Giga Bowser stays at the right side of the screen, and while you can go behind him to dodge some of his attacks, the boss will only be damaged by attacks from the front, meaning you won't get in any free hits in this battle.
Attacks:
Fireballs: Dry Giga Bowser spits out five fireballs which all ricochet about, bouncing off the sides of the screen if they're going to go out of the playing field. These fireballs do below average knockback and average damage, but are hard to dodge as they travel very fast, are numerous, and go in a rather unpredictable pattern when there are so many of them. The fireballs last a decently long while, and Dry Giga Bowser is still able to do attacks while fireballs are out bouncing around.
Bludgeoning Bones: Dry Giga Bowser takes off both of his arms with his mouth and then rapidly slams them up and down, beating the player with them. The range of the attack is nearly the entire duration of the battlefield, you having to be either behind the boss or at the total opposite end of the arena as him to avoid it. While you can dodge the attack with several well timed sidesteps, this is very hard to do. Picture dodging 6 of Tabuu's red rings of death in a row. If hit by the bones the boss is using as a club, you'll be dealt heavy damage and knockback.
Spike Missles: Dry Giga Bowser turns his back to the player, and spikes rapidly start firing out of the back of his shell (Them regrowing as they're sent out), doing massive damage to the player. It's easy to get caught in the never ending flurry of spikes, the only guaranteed way of dodging the attack being to go behind Dry Giga Bowser. While the attack does no knockback, it's an incredible damage racker. If you're hit for the entire duration of the attack, one of the mere small fireballs of the boss will kill you.
Fire Breathe: Dry Giga Bowser does his regular fire breath attack from his moveset as Bowser, although the range is quite massive and can catch the player in it quite easily. Unless you're lucky enough to be behind the boss when he does this attack, you'll be carried off screen in the stream of never ending fire. It's impossible to jump over the attack for the entire duration, but you can jump over it long enough to avoid being swept away off screen for a KO by it. Another good damage racker. At the end of the attack, Bowser's flames will run short like with the normal Bowser's flame breath, after which he'll end his attack.
Bowser Bomb: Dry Giga Bowser jumps to the top of the middle of the arena, then does his down special from the Smash series. If you're directly under Dry Giga Bowser when he does this, your death is guaranteed, but he thankfully only covers up around a third of the arena with his size. Two large shockwaves go out from Dry Giga Bowser's sides as he does the attack which have a Piplup effect that will drag you off the screen, meaning the attack isn't nearly as simple as it was in Bowser's moveset. Thankfully, after you dodge all the attacks, there's decent ending lag as Dry Giga Bowser gets back up in fighting position and goes back to the right side of the arena.
Attacks added at 75% health:
Whirling Fortress: Dry Giga Bowser goes tucks himself into his bony shell then spins over to the opposite side of the arena and off the screen. If you get caught in the attack, Dry Giga Bowser will pull you along with him in a piplup effect off screen, all the while racking up severe damage on you in the event it somehow doesn't kill you. Upon going off the side of the screen, Dry Giga Bowser will go accross the stage again the other way to go back to where he was originally. Due to the massive size of the boss, this attack is very hard to roll away from, you still being caught for some of the attack if you do. The safest way to dodge the attack is to jump over the boss, but this is no easy task due to his massive size and the fact you have to do it twice quickly.
Chemical Waste: Bowser starts coughing and hacking, looking as if he's choking, the move having some decent starting lag, then hurls out some of the chemical waste that caused him to turn into this form. The attack does no damage at all, but causes massive knockback in a fashion like Mario's FLUDD or Squirtle's neutral B, washing you off the stage. It's impossible to avoid being washed off the stage by merely jumping over the attack, unlike the fire breath, which means the only way to avoid death is to get behind Bowser. After the attack is complete, the chemical waste remains on the battlefield until Bowser uses his fire breath attack again and cleans the waste away. The chemical waste makes the arena more slippery like ice does, and also increases the chances of random tripping (Or introduces it at all, in a perfect world with no totally random tripping).
Dry Minions: If there is chemical waste present, there is a chance Dry Giga Bowser will let out a horrific roar which causes regular Dry Bones enemies to come forth from the chemical waste. They patrol back and forth, throwing bones, being generally bothersome and immune to Bowser's attacks. If you kill them, they'll just revive shortly after, just like the traditional Dry Bones. All Dry Bones will be burnt to ash when Bowser chooses to do his fire breath attack, meaninig they hopefully shouldn't annoy you too long.
Attacks added at 50% health:
Bone Bowler: Dry Giga Bowser takes off his head, does a quick wind up, then throws it accross the screen like a bowling ball. Dry Giga Bowser proceeds to do so with the rest of his body parts, throwing all his limbs until only one arm is left. Due to having no arm to throw his remaining arm, the boss tucks the arm into the shell and fires it out, then does whirling fortress to the other side of the screen. Dry Giga Bowser will proceed to do whirling fortress, the shell being his only remaining on screen body part, then will come back with another whirling fortress after which he'll be back in his basic stance, all the parts of his body reconnected. All the body parts deal large damage and knockback, them coming out in quick succession of each other, although the head does the most.
Headless Koopa: Dry Giga Bowser's head levitates off his body and goes into the background, where it will regularly send massive fireballs that cover the entire screen for 20 seconds. These fireballs must be dodged like Tabuu's red rings of death or else they will mean your end, as they aren't dodgeable by any other means. What's more is Dry Giga Bowser's body will rapidly do his whirling fortress while this attack is going on, giving you two hard things to dodge shortly after each other constantly for the attack's duration. If you're hit by the giant fireballs, you'll be hit as if by a red ring of death from Tabuu, there being no chance for survival.
After the defeat of the Koopa King, Bowser Jr. steps up on his father's lifeless head and lets out a mighty roar, letting the world know his dominance as his rightful position as king of the Koopas. He beats his chest and proceeds to breathe some fire in his triumphant victory, but his troubles, as well as those of the other characters, are far from over. Dracula reveals himself, not having any real fear of Bowser, only wanting his enemies to weaken each other by fighting. Dracula applauds their efforts and decides that they are indeed most worthy to join his ranks of generals, transforming back into True Dracula and letting out a massive roar for all in Mute City to hear. The characters of Mute City turn into vampires, with the exception of the already undead Zombie, laughing around their master evily. Bowser Jr. resists as best he can, not wanting his moment of victory to be ruined, but Dracula turns back to his more lowly form and comes over to convert him himself. Dracula opens a massive portal back to his chaos citadel and goes in for all of his vampires to follow him, new and old, the Zombie mindlessly following due to liking being around fellow mindless undeads. Lord Dracula's army had been formed, the time for the rest of the world to know his rule had come.
Chapter 4: Deafening Mute City
Level 24: Mute City - Suburbs
Play as: Zelos Wilder, Sain, or Peter Griffon
The Street Performer is seen doing what she does best. . .Performing in the street, break dancing and what not. Several people are there to watch her, regularly giving tips, her having an exceptionally good day today. Sain, Peter Griffon and Zelos Wilder suddenly join the people watching, slowly, one by one. They watch her performance, their eyes glued to her. Their eyes keep following her around, notably zooming in on her breasts and buttocks for some strange reason. . .Sain tosses her some money, Zelos seeing this and not wanting to be outdone. Zelos tosses a sizable amount of cash to outdo Sain, chuckling and folding his arms. Peter reaches into his pockets to see if there's anything he can give to the street performer, but finds out he has no money. To solve this problem, Peter mugs a random person and steals his money, then gives it to the street performer, doing his trademark stupid laugh. The three characters continue watching her until they notice each other, then suddenly turn to each other, putting up their fists. A free for all starts between the three hopeless men, you getting to choose your character.
After the three men come out of the brawl, the winner comes up to the street performer, having knocked out the other two cold. A different cutscene will play depending on which of the characters won.
Peter Griffon: The street performer finishes her routine, taking a bow, oblivious to the fight that had ensued over her. Peter hastily goes up to her and stares at her chest for the street performer to put her head into Peter's view, questioningly, not used to this sort of "attention". Peter shoves her head out of the way and continues looking at her cleavage for the street performer to get fed up with him and kick him in the crotch. Peter curls up and holds his crotch, letting out a cry of pain, causing a battle to start between them, you playing as the street performer.
Zelos Wilder: After the Street Performer's done street performing, she gets into her basic stance and starts counting her money, walking on her hands, using her feet to sort through the money. Zelos goes up as she does so, weirded out, and decides that this girl isn't "worthy" of him. He goes to take his money back, but the street performer kicks him in the face as he does so, sending him away. Zelos puts up his fists angrily and goes to smack her, but the street performer grabs his arm with her legs and swings him around, throwing him against a wall. A battle follows between the two characters, you playing as the street performer.
Sain: Sain, having been mounted on his horse all this time, dusts himself off after his battle against the other two men. He turns his gaze back to the street performer, who is still performing, having his horse go over in front of the other people watching to see her. His horse however disobeys his orders and charges forward, trampling the street performer. Sain hastily gets off his horse and goes to help her up, trying to explain it's an accident, only for the street performer to get in her basic stance (Walking on hands) and kicks his hand back in his face. A battle starts between the two characters, you playing as the street performer.
After the Street Performer knocks out the man who was interested her, she walks away in her scorpion like way, taking her money with her. The other people who were watching leave, having throughly gotten their money's worth with all the fights. The three hopeless men lay there unconcious for a while, until they all suddenly reawaken. The see a foggy figure in front of them as they regain conciousness, the camera showing their perspective, then they rubs their eyes to clear their vision and see Shannon. They all get big dumb grins and rush forward at her, her rolling her eyes and getting her staff ready. As they come up to her, she hits each of them in the crotch with her staff playfully, chuckling, causing the men to get infuriated at her rather then infatuated, holding their balls in pain. They all once again charge her, Shannon chuckling, you playing as her against the other three male characters. While the male characters are all out at once and on a team against you, they still aren't particularly fond of each other, meaning team attack is on.
Level 25: Mute City - Pizza Land World
Play as: Leonardo or Pizzaman
Leonardo is seen walking down the streets of Mute City, looking around at all the various sights in awe. He goes into the street and a futuristic hover car is about to run him over, but he ducks into his shell, it sending him flying away into the distance. He gets up out of his shell and dusts himself off, annoyed, for his stomach to start growling. Thankfully, there are two pizza resturants nearby, Pizza Hut, and "Pizza Land World". Pizza Land World looks ridiculously unprofessional, the sign being made of cardboard and the place being tiny, so Leonarndo rubs his tummy and hastily goes up for the superior resturant. However; Pizzaman sees this from the window of his amateur resturant and hastily zips up in front of Leonardo, putting his arm around his shoulder, grinning, and pointing to his resturant. Leonardo shrugs it off and continues going to Pizza Hut, but Pizzaman suddenly takes out a card that says "99% OFF!", shoving it in his face. Leonardo takes the card and rapidly nods his head happily to agree, and they go off to Pizza Land World together.
Inside, Pizzaman goes behind the counter while Leonardo gives him a single penny due to it being 99% off, Pizzaman bowing slightly in most honest thanks. Pizzaman goes off into the back and whips up a pizza in record time, Leonardo eagerly rubbing his hands together as prepares to open the box. Upon opening it up, the pizza has mouldy green cheese, is terribly burnt, and has live fish all over it, causing Leonardo to look sick. He hastily goes to the bathroom after which vomiting noises are heard, then comes out, whiping some puke off his mouth. Leonarndo extends out his arm and rapidly opens and closes his palm, demanding his money back, but Pizzaman folds his arms and shakes his head, shoving the Pizza towards Leonardo. Leonardo shoves the pizza back towards Pizzaman for Pizzaman to takes out the penny Leonardo gave him and swallow it, laughing smugly. At this, Leonardo angrily takes out his blade and takes a swing at Pizzaman for him to whip his cape forward at Leonardo, letting out an obnoxiously annoying battle cry. A battle starts between the two, you getting to choose your character.
After the gameplay, the not so epic fight between the two pizza lovers rages on, Pizzaman throwing burnt nasty pizzas at Leonardo and other awkward attacks. Leonardo slices the pizzas in half as they keep getting thrown at him with his blade, coming ever closer to Pizzaman, but their battle is suddenly cut short as a bunch of the Mute City police comes into Pizza Land World. A health inspector comes out from among the police officers and reluctantly takes a sample of the one of the pizzas to look disgusted, then turn and nod to the officers. The officers charge Leonardo and Pizzaman, Leonardo constantly shaking his head to try to deny being involved in this affair, but the policemen ignore this. You play as both characters in a battle against the policemen at the start, and then afterwards must run through Mute City for a level to get the cops off your tail. The cops are futuristic and have laser nets, which they will catch you in and try to drag you off the screen with for guaranteed KOs.
After successfully losing the cops, a cutscene shows that the two characters have gone in one giant loop and have ended up back in front of Pizza Land World. Leonardo smacks his hand on his face and walks away, while Pizzaman goes back into his returant to continue business as usual. He gets a phone call, and on the other end of the line is Tiny the Tiger (A giant dumb brute from Crash Bandicoot, the screen splits to show Tiny.), who lets out intolerable roaring. Pizzaman naturally takes this as an order and gets one of his pizzas ready in a box, then soars away towards wherever Tiny told him to go, his cape blowing in the wind.
Level 26: Mute City - Rock Concert
Play as: The Delicious One, Mallow
Joe Perry is seen rocking out on a massive stage with the rest of the Aerosmith band, playing some of their signature hits such as "Dude looks like a lady" and most of their songs present in Guitar Hero: Aerosmith. The screen cuts away from them to show the Delicious One watching from afar inside a trash can. He sighs, unable to get a good view or hear it very well, and is unable to go up close due to the humans there who would eat him in a heartbeat. Suddenly, a human comes up behind him and lifts the lid off the trash can, the Delicious One not noticing it. However; he has no choice when the individual starts drooling, the drool raining down on him, turning up to look at the human. It turns out to be none other then a mindless Zombie, who says "Braaaaaaiiiinnnnnsss. . .", extending his arms out in a mindless fashion to try to grab the Delicious One.
The Delicious One screams and jumps up out of the trash can, fleeing towards the rock concert, the Zombie hastily chasing after him. The Delicious One manages to lose the Zombie in the massive crowd, slipping under a woman's skirt, causing her to scream. The women proceeds to faint as she sees the Zombie, then the Zombie looks around stupidly for where the Delicious One went off to. As looking around, he spots a small little white marshmallow puffball known as Mallow happily watching the concert. The zombie turns to him, putting his arms out in front of him, the camera showing the Zombie's view. In the Zombie's vision, Mallow turns into a brain puffball rather then a marshmallow, Zombie saying "Braaaaaaaaiiiinnnnnnssss. . .". Mallow turns around, seeing this, screams, then flees off also. Zombie chases Mallow for the marshmallow to bump into the Delicious One, and they both start fleeing from the Zombie together.
You play as the two victims, running through the crowd as a cpu controlled Zombie chases you. The Zombie is a playable character, his damage meter not going up, and reviving shortly after he's KOd to continue chasing you. The screen slowly scrolls to the right, there begins tons of fans which are blocking the way which you must either force out of the way or jump over. The Zombie attacks all in his way as he makes his way towards you, so it's generally a better idea to not attack the random people. Aerosmith can be seen performing in the background, their various songs being the background music for the level, switching to different ones as the level goes on.
After the chase, Mallow and the Delicious one climb up onto the stage where Aerosmith is performing, Zombie hastily getting up to follow them. The two victims decide to put up a fight against their persuer, nodding at each other and putting up their fists. The Zombie however suddenly rips off his own head and starts blundgeoning the characters with it, the head chomping them as the body does so, causing the characters to be much more intimidated. The fans cheer all the louder, thinking it's part of the show, while Aerosmith must go on with their show. You play as Zombie against both Mallow and the Delicious One, Aerosmith once again being in the background performing one of their songs at random.
After the battle, it looks like Zombie is just about to devour both of the characters, having knocked them out, but Joe Perry comes over and smacks the Zombie over the head with his guitar. The Zombie turns around hastily, most surprised at this turn of events, the crowd only cheering all the louder. The Zombie rips off his head and swings it at Joe Perry, but the guitarist swings his guitar like a baseball bat to knock the head away. The body catches the head and puts it back on, and a battle starts between the two, you playing as Joe Perry. The band once again plays in the background despite their lead guitarist not playing, as he's giving busy giving a much larger dose of fan service to the people.
Level 27: Mute City - Tightwad Towers
Play as: Pizzaman
We first see CEO sitting in a comfy chair behind a gold plated desk which he has his foot up on on top of, two beautiful assistant women in suits at his sides. The CEO snaps his fingers for one of the assistants to go gets him some coffee while the other one lets in some guests. These guests are none other then Black Shadow, Bowser, and Dr. Neo Cortex (Main villian of Crash Bandicoot, a ****** mad doctor.) riding his dumb brute Tiny, up on his shoulders. Tiny is randomly calling people on Cortex's cellphone, like he did to Pizzaman, having fun and laughing stupidly. Cortex swipes the phone away from Tiny angrily, pocketing it, much to Tiny's dismay. Black Shadow and Bowser ignore the dumb pair and come up to the CEO, rubbing their fingers together, demanding their pay for the dirty work they've done for the CEO. The CEO chuckles and casually takes out two large golden bars from his desk and tosses them at the two characters, them getting smiles which spread from ear to ear. The CEO chuckles and takes out a picture of Captain Falcon, then takes out another gold bar which he hastily puts away. Bowser and Black Shadow nod as the CEO puts away the picture and folds his hands, letting out a sinister laugh.
The cutscene goes on to rejoin Pizzaman on his not so epic quest to deliver terrible pizzas, him soaring off towards two massive towers built alongside each other. He lands down in front of one, letting out a stupid cry and disturbing all with his wacky underwear on the outside appearance, then goes into the towers. He goes up with his pizza to a woman in a suit at the front desk, the Pizzaman mumbling some inunderstandable nonsense as he points to his pizza. The woman presses a button for a screen to come out of the cieling (The CEO being insanely rich and Mute City being futuristic) and the CEO shows up on it. Pizzaman points to his pizza and lets out more inunderstandable gibberish questoiningly for the CEO to smack his hand on his face and give a dissmissve motion with his other hand, letting out a deep sigh. The screen turns off and goes back into the cieling as a bunch of the CEO's security sorrounds Pizzaman, causing him to let out a crazy berserk battle cry and start fighting them all.
A level starts with you playing as Pizzaman, the start of it being a battle against the CEO's bodyguards, whom are all very buff, wear black suits, and use guns. After the brief starting battle, you must make your way to the top of the Tightwad Towers to deliver the CEO his pizza, using elevators and avoiding setting off alarms which trigger more bodyguards to come out. It's along ways up the massive Tightwad Towers, and the level will end before you get all the way to deliver the pizza to the CEO.
Another cutscene starts up after you finish the level, once again showing the CEO's ridiculously exspensive office. The CEO, Bowser, Black Shadow, as well as Cortex and Tiny are seen drinking coffee together and are being fanned by the CEO's beautiful assistants. Suddenly, there's some knocking at the door, and one of the assistants goes to open it to reveal the grown up versions of Bowser Jr. and Nina Cortex. The CEO motions to two opens seats for them, but they're too shocked at seeing their former mentors, Bowser and Neo Cortex, also present, squinting their eyes and staring at them. Bowser Jr. (Who is around Bowser's size in his adult age) tackles Bowser, Bowser not expecting it, and ends up tackling him out the window, where they go into a father vs son battle, although the camera stays in the CEO's office. Cortex hastily gets behind his bodyguard, Tiny, not wanting to be the next victim, pushing him forward to fight Nina. Nina rolls her eyes and charges forward for Tiny to grab Cortex and use him as a club to beat Nina with, and a battle starts between Nina against Cortex and Tiny (You getting to pick your character). Cortex and Tiny is not an Ice Climbers type character, and instead functions by having Cortex mounted on Tiny's shoulders.
After the gameplay, the fight between the Neo Cortex and his niece Nina is seen going on, the CEO eagerly watching with his hands folded and sipping coffee. Black Shadow considers the fight too boring, tapping his foot and folding his arms, but his boredom is silenced as Pizzaman enters the CEO's office. He goes up to run up to the CEO, but Black Shadow would hardly let this chance for some fun pass, now would he? Stepping in front of Pizzaman's way to the CEO, he does a sparta kick, knocking him down, and a battle starts between Pizzaman and Black Shadow, you playing as Pizzaman. Nina can be seen fighting against Cortex and Tiny can be seen in the background as well as an exceptionally entertained CEO.
After defeating Black Shadow, Pizzaman comes up to the CEO and opens the pizza box, smiling stupidly and pointing at it. CEO is most angry at this and points for him to leave, shoving the pizza away. Pizzaman refuses to have an unsatisfied customer, and instead forces the pizza on him. . .Quite literally shoving it in his face. The CEO, covered in cheese and pizza sauce, angrily gets up and screams "Money PAUUUUNCH!" knocking Pizzaman away. A battle starts between the CEO and Pizzaman, you playing as the CEO, Nina and Cortex (And Tiny) still also fighting in the background.
After the battle, the CEO manages to finish off Pizzaman and knock him out, him falling face forward, knocked out, his face landing in one of his nasty pizzas. The CEO shoves his head into the pizza to see how he likes it, chuckles, then presses a button for his security to take him away. Suddenly though, before they take him away, an lightbulb appears above his head, with "LAWSUIT!" written in it. The CEO cackles and motions for his security to leave, then turns to Nina, who's finally managed to finish off Cortex and Tiny. She goes to behead Cortex, but the CEO angrily comes in front of her, him being a priceless minion of his. Nina folds her arms, wanting a reason not to, and the CEO casually tosses her a bar of gold to sway her to his side. Bowser Jr. comes into the CEO's office, tired from his battle with Bowser. A picture of Bowser appears above CEO's head as he shrugs, asking where he is, for Bowser Jr. to just laugh and point out the window. Nina and the CEO go look to see nothing but a bunch of toxic waste. Bowser Jr. comes over and points into the waste and laughs evily, as CEO sighs and leaves, annoyed at losing a perfectly good minion.
Level 28: Mute City - Supreme Court
Play as: Phoenix Wright or CEO
The cutscene shows all the characters from the chapter gathered in court. Pizzaman is up on the defense stand, being sued by the CEO, while CEO is in the prosecutor's box along with his minions (Besides the deceased Bowser). The rest of the characters have all been forced to be members of the jury, even Zombie, who is creeping out those near him with his cry of "brrrraaaaaiiiiinnnnnssss. . .". The judge drums his fingers as he waits for the defense for Pizzaman to arrive, and he comes into the courtroom to turn out to be none other then Phoenix Wright, ace attorney.
The Judge starts banging his gavel down to cause the court to start, causing everybody to stop talking except for the idiotic Tiny and the mindless Zombie. The judge keeps banging his gavel to try to silence them for Cortex to zap Tiny to shut him up, Nina rolling her eyes. The Delicious One puts a big cork in the Zombie's mouth to stop his mindless cry of "brrrrrrrraaaaaaaaiiiiiiinnnnnnnsssss. . ."., Mallow chuckling slightly at it.
Now that the court's ready to begin, the judge motions forward for the CEO to present his evidence against Pizzaman. The CEO snaps his fingers and his lawyer comes forth and shows one of the horrible pizzas of Pizza Land World. The Judge sees this and looks grossed out, raising a sign with "GUILTY" written on it, rapidly banging his gavel with his other hand. Phoenix Wright suddenly comes forth and says "OBJECTION!", then brings forth a TV set that shows how the CEO was the one who did the first attack against Pizzaman. The jury gasps as they turn to the CEO, the CEO being most angered by Phoenix having caught this. He leaps up and does his "Money PAUNCH!" at Phoenix for him to casually dodge, and a fight starts between the two characters, you playing as Phoenix. The judge can be seen rapidly banging his gavel in the background, damaging you if you get too close to him.
After Phoenix subdues the CEO, he folds his arms and chuckles as the security comes to take him where his money will do him little good. The CEO has no intentions of being taken to jail, though, and had prepared a secret weapon in case something like this might happen. He takes out a remot control and presses a button, causing a gigantic mech to burst through the walls of the courtroom. This giant machine is none other then Metal Gear RAY, the CEO having bought one of the last ones in existence, hastily going up into the cockpit and laughing evily. The other characters not on the CEO's side rush down from the jury to fend off this mechanical menace, and a boss battle begins.
Boss: Metal Gear RAY
Play as: Street Performer, Peter Griffon, Sain, Zelos Wilder, Shannon, Pizzaman, Leonardo, The Delicious One, Mallow, Zombie, Joe Perry, Phoenix Wright
The CEO can be seen vaguely in the cockpit of the Metal Gear, laughing evily as he does the attacks. In the background, the judge will be long gone, while Nina, Bowser Jr., Black Shadow, as well as Cortex and Tiny will be seen in the background, laughing evily and taunting the characters. When the Metal Gear RAY gets down to 75% or 50% health, the mechanical menance will open it's cockpit and the CEO will be knocked down against the controls. The CEO will straighten his tie and glasses before closing the cockpit and attacking again, giving you a chance to directly hit him to do double damage against the health bar of the boss. Considering the ridiculous amount of hp this thing has to be taken down, you have little choice but to take advantage of the opportunity.
Attacks:
Stomp: A simple stomp by Metal Gear RAY. RAY lifts its foot up and slams it down about five feet ahead of him, causing intense knockback. Lots of knockback, but not TOO much. Very predictable. 20% on Intense Mode.
Machine Gun Fire: RAY starts aiming with his arm, and a little target appears on the ground. The target will follow you quickly for the next 4 seconds. When those 4 seconds are up, RAY will stop the target and IMMEDIETLY fire a massive burst of machine gun fire in the target’s direction, dealing lots of damage. The machine guns’ fire continues over time like Tabuu’s bullets (In this case about 5 seconds), but it doesn’t end with a large final hit. Very low knockback, but lots of damage. Getting behind Rex can result in this attack being easily avoided. Potential Damage: Each bullet does about 3% on intense mode. If you get hit by the full force of the attack, it can do up to 60%.
Slide: Possibly RAY’s most annoying attack. RAY dives off the edge of the stage and into the water so its off the screen… And then jumps back on, sliding like a penguin on ice forward. This attack is very fast when RAY slides, and has major knockback. On intense difficulty, it’s just sick. Don’t shield it, unless you want a smashed shield. 35% on Intense Mode.
Slide Hop: Just like the slide, but when Ray slides, it hops in midair, going about 10 feet in the air. It has the exact same damage and knockback, but you have to respond differently. Instead of jumping over it, stay on the ground in the middle of the stage. 35% on Intense Mode
Leap of Death: RAY jumps high up in the air, and slams down on the other side of the stage with both feet, and then turns around. Pretty easy to avoid, but DON’T shield it. Large knockback. 25% on Intense Mode.
Attacks added at 75% health:
Missiles: RAY charges up for 2 seconds, creating some light from the launcher on his back. It then fires four slow traveling heat seeking missles from there, which home in slowly. They all have medium knockback. Going behind Ray will stop the missles from locking on. Get the missles to hit RAY for extra damage. 20% each on Intense Mode.
Jet Missile: This attack has the same charging up animation as the normal missles. However, instead of firing several slow moving missles, it instead fires a single large missle at high speed that has significantly more power and knockback. Shield it or spot-dodge or roll if you have to. Getting close to or behind RAY will stop this attack from hitting at all, as the missle’s speed insures it doesn’t turn as easily. 40% on Intense Mode.
Attacks added at 50% health:
Missile Tube: This attack is quite easy to avoid, luckily. A target appears on the scene and follows you very quickly for 2 seconds and then freezes for another second. Then, six small missles fire out from Metal Gear RAY’s launcher, hitting the targeted area. Each one has small knockback, luckily. 10% each on Intense Mode.
Water Jet Cutter: RAY’s most powerful move. The Metal Gear dives into the water, underneath the stage and out of site. When it jumps back up, instead of doing the sliding move, RAY bends down and fires a concentrated jet of water from its “mouth” at ground level for 4 seconds. This attack will KO at 0% on Intense Mode, so AVOID IT AT ALL COSTS. Jumping over it is wise, as RAY will not lift up its head until it has finished. Ledge-grabbing will also dodge it. 60% on Intense Mode.
Water Jet Cutter Scan: RAY does the same setup as last time, but instead of merely bending down and firing it, RAY fires its beam straight down right in front of it and then begins moving it slowly across the stage away from RAY until it reaches the other edge, at which point it’ll disappear. Air dodge, roll, spot-dodge, or move to the other edge and jump over the beam when it reaches there. 60% on Intense Mode.
After taking down Metal Gear RAY, the CEO weakly falls out of his mechanical masterpiece, knocked out. Pizzaman jumps on top of his body and does a pose, but is knocked away by Tiny and Bowser Jr., who both roar at him. Nina, Cortex and Black Shadow come alongside them and join them, posing together, Nina and Cortex staring angrily at each other, and you play as them all against the characters you just played as to defeat the boss. Thankfully, you get an extra life to use both Nina and Bowser Jr., meaning the stock isn't too far in the enemy's favor.
Level 29: Mute City - F-Zero Track
Play as: Street Performer, Peter Griffon, Sain, Zelos Wilder, Shannon, Leonardo, The Delicious One, Mallow, Zombie, Joe Perry, Pizzaman, Phoenix Wright, Grown up Bowser Jr./Nina Cortex, Cortex and Tiny, CEO
The battle between all the characters is seen raging on, Joe Perry batting Zombie's head at Cortex while Black Shadow kicks Peter Griffon in the groin, him having an exceptionally bad day, seemingly. The cutscene fades out from the fighting and fades in to show a gigantic portal opening in the middle of Mute City, which dumps out True Dracula and all his vampiric minions. His collection of vampires is exceptionally large now, featuring Simon Belmont, Sandslash, Isaac, Knuckles, Shadow, Gibari, Big the Cat, the Squeak Squad, Captain Syrup, Plusle & Minun, Chao, Jack Sparrow, K. Rool and Gecko Moria. True Dracula lets out a massive roar, turning the meat of the citizens in the city to vampires, then starts motioning the playable character vampires off in different directions to convert more minions for him.
True Dracula rampages towards the court house, which was just barely out of the range of being affected, and bursts through the wall, ready to rip apart any who stand in his way. The characters all hastily flee, the CEO regaining conciousness and joining them, Tiny dragging Cortex along the ground for him to be in large pain. Black Shadow is leading the pack, a decent bit ahead of the others, and they flee into the pit stop of the Mute City racetrack. Black Shadow hastily gets in his Black Bull F-Zero machine and zooms away to safety, leaving the other characters to rot. Having no other choice, the characters hop onto the other F-Zero machines ready for the race about to take off, zooming away from True Dracula to safety.
You play as the entire roster of this chapter for the level with the exception of Black Shadow, who is safely tucked away in his F-Zero machine. The level is like Big Blue, the past melee stage, although the background is mute city as opposed to big blue. You can actually see the racers in their cars through the glass vaguely, able to spot the cast of F-Zero as you go through the level. There will be a number in the upper right hand corner of the screen that says what percentage of the course you've gone through so far, and if you don't get to the car in the lead by the end you lose the level. You have to progress accross the racing machines of the entire cast of characters from F-Zero, and they're generally not very close together, meaning you have to make deadly jumps from one to the next, your huge character roster quickly getting killed off like flies. Some of the F-Zero machines will be ramming each other when they come on screen, and shortly after you see the machines the one you can actually step on will be rammed off the course, meaning you must jump to it hastily. There will be some parts of the course that will be straight up, and you'll have to hold on to your f-zero machine like hanging from a ledge to survive. Large jumps are also common fare, and you'll get whisked away if you land on the track like in the big blue stage, so falling off means near certain death. Black Shadow is the racer in the lead, followed closely by Captain Falcon (Who is riding in his giant Falcon Flyer instead of his small Blue Falcon).
Upon getting to Black Shadow's car, another cutscene will start up. The other villians will first hop onto Black Shadow's car, angry that he just left them there, but Black Shadow points out there's only one seat in his ride. Bowser Jr. tries to take him out of it, but Black Shadow jumps out and smacks him, sending him flying onto the Falcon Flyer, where the rest of the characters are. Black Shadow gets in a defensive position, ready to defend the only seat that will survive the racetrack, and a battle begins. You play as Black Shadow against all the other characters you just played as throughout the level, thankfully having 4 stock. You play on the Black Bull as well as the Falcon Flyer, the Falcon Flyer being on the Black Bull's tail, there being enough breathing room to fight the battle comfortably.
After the battle, all the characters will be seen on the Falcon Flyer, knocked out, except of course for Black Shadow. He lets out an evil laugh and goes to go back into his Black Bull, but Captain Falcon finally takes action and leaps out of his F-Zero machine, saying "Show me ya moves!", then does the Falcon Knee to send Black Shadow flying off into the distance. He proceeds to say "COME ON!", flexing, but the CEO weakly gets up. Captain Falcon readies a Falcon Punch while the CEO does the same with his Money Punch, them both letting out their signature phrases, and a massive explsosion engulfs the track as they both say "PAUUUUNCH!". The characters all go flying off in seperate directions from the blast of pure manliness, the level ending.
Level 30: Mute City - Black Shadow's Lair
Play as: Leonardo or Grown up Bowser Jr.
Pizzaman, Mallow, The Delicious One, Zombie as well as Cortex and Tiny wake up, having been blasted off by the two manly punches into Black Shadow's lair. The Zombie and Tiny stare at Mallow and the Delicious one, licking their lips, Zombie envisioning them as brains while Tiny's perfectly content to picture them as fast food. Pizzaman sees the two hungry customers and takes out two of his terrible tasting pizzas, shoving them in their faces. . .For their terrible tastebuds to actually like the stuff. Tiny and the Zombie happily start eating up the rotten pizzas, Mallow and the Delicious one being relieved, Cortex sighing at the stupidity of his minion. The camera pans a bit away to Leonardo and Bowser Jr., who are a bit farther away from the other characters, both waking up from the attacks weakly. Due to having slain his father, Bowser Jr. is the new king of the koopas, and demands the teenage mutant turtle to bow down before him, pointing his finger down at his feet. Bowser Jr. laughs and looks the other way, closing his eyes, but Leonardo gets angry at this and stabs the grown up Bowser Jr. with his blade. A battle starts between the two turtles, you getting to pick your character.
After the gameplay, the other characters will be seen watching the two turtles duke it out, Pizzaman, Tiny and the Zombie chowing down on Pizzas to help the cinematic feel. Tiny accidentally take The Delicious One instead of another Pizza while the Zombie does the same with Mallow, about to chomp into them, but both this and the battle are interrupted by Black Shadow's minions finally arriving to dispose of the intruders. You play as all 7 characters in a battle against the enemies, Bowser Jr. and Leonardo having to put aside their petty differences. After the battle at the start of the level, you must make your way down out of Black Shadow's lair back to the outside world in another level.
After the level, the characters are seen walking out together to see the newly vampirized city, looking at all the vampires with a look of shock and terror on their faces (With the exceptions of Tiny and the Zombie, who are too mindless to realize what's going on.). Suddenly, some vampires come up to attack them, consisting of Sandslash, Knuckles, Gecko Moria, Chao, Storo of the Squeak Squad, Gibari, and Big the Cat. Big and Storo, being the fatties they are, chase after Mallow and the Delicious One, and the rest go into a normal battle. It's a 7 vs 7 battle, the sides being evenly matched.
After the gameplay, the battle is seen still going in the cutscene. Things are starting to look bad for the characters no yet undead, the Zombie and Tiny stupidly joining Big and Storo in trying to devour Mallow and the Delicious One. More random vampires from the streets join the playable character vampires in trying to take them down, and they have no other choice but to run, Pizzaman pulling along the Zombie while Cortex snaps Tiny out of his stupidity.
Level 31: Mute City - EAD Research Facility
Play as: Joe Perry
Shannon, the Street Performer, Zelos Wilder, Sain and his horse all find themselves strapped to disection tables inside the EAD research facility. Mr. EAD (A racer in the F-Zero series) is strapped to another table, there being wires attached to the other characters and some attached to Mr. EAD. Some scientists in the room start pressing buttons to cause the wires to start electrfying the characters strapped to the table in pain, causing their brains to slowly be sucked out into Mr. EAD. Surely, Mr. EAD will be the perfect cyborg with this added intelligence! The characters thrash around, trying to get away, but to no avail. The camera pans outside the room to show Joe Perry, who was tossed aside as his disapperance would draw suspicision to them, what with him being a famous rock star. Joe Perry looks into the room and sees what's going on, then smacks one of the scientists over the head with his guitar. The scientists call in their security to take care of the rock star, and a battle follows against the enemies.
After defeating the enemies, Joe frees the other characters from their bonds, although he's too late to save Sain's horse. The horse's brain is added to Mr. EAD's intelligence. . .But this was a foolish decision, as it it has only made the cyborg more stupid. Mr. EAD breaks free of his bonds and neighs, walking on all fours. The characters stare at Mr. EAD, weirded out, while Sain goes over to his dead horse, sad for the loss of his trusty steed. Zelos casually points to a mechanical horse nearby and Sain shrugs, getting up and mounting it, then the characters proceed to flee the research facility.
You play as the five characters, although Sain is in an alt costume where his horse is robotic and futuristic. The enemies from the level are more security for the research facility as well as some various experiments gone wrong, prototypes of Mr. EAD, who will break out from their prisons as you pass and attack you. The mutations are enemies from various series as well as a few original ones, there being quite the variety of enemies for you to take out on your way down to the base floor of the research facility.
After you complete the level, before Sain or Zelos can try to hit on the girls again, some vampirc characters come to greet them as they escape from the research facility. The vampiric characters are Isaac, Captain Syrup, Plusle & Minun, Spinni of the Squeak Squad, and Jack Sparrow, who hastily lash out with their fangs to attack the characters. You have a 5 vs 5 battle against the characters, after which more random vampires are seen joining the vampiric characters in their attempt to convert Joe Perry's group. They are left with no other choice but to run for dear life, the level ending.
Level 32: Mute City - Dark Alleys
Play as: Phoenix Wright
The last group of characters (Nina, Black Shadow, the CEO, Phoenix Wright, and Peter Griffon) have been blasted off to a dark alley in a crime filled corner of town, all laying there unconcious. Peter Griffon awakens before any of the others, and wastes not time in taking advantage of the situation. He hastily searches the CEO's pockets to find a massive amount of money, doing his stupid laugh and pocketing it for himself. He does the same to the other characters, slightly annoyed they don't have as insane amounts of money as the CEO, but comes to Nina last. Before he can reach into her pocket, his eyes are too distracted by her boobs. His tounge comes out of his mouth, but he then looks up and sees her ugly face with the buck teeth and looks disgusted. Peter shrugs and gets a paper bag which he puts over her head, then proceeds to fall down on top of her to get in a sexual position in a motion like Bowser's dthrow, but his plans are foiled as Phoenix Wright comes in front of him, extending out his arm to poke his belly with his pointer finger and saying "OBJECTION!". A battle starts between the ace attorney and the fat fool, you playing as Phoenix.
After the gameplay, the battle is still seen going on between Peter and Phoenix, there being no clear winner in sight. The other three characters regain their conciousness, and some vampiric italian mobsters sorround the characters. Peter puts his hands up to the other characters to tell them to let him handle it, and he proceeds to go up in front of the vampiric italian mobsters. Peter speaks gibberish while doing a italian immitation, the vampires letting out annoyed mumbling with their italian accents. They mobsters come to attack more viciously before, angered, while Phoenix facepalms. A battle starts against the vampiric mobsters, you getting to use all five characters.
After the battle, a larger amount of vampiric mobsters are seen in the distance, far too many to defeat. The characters go to flee, but the CEO comes in front of them and shakes his head. The characters get questioning exspressions on their faces, but the CEO takes out five jetpacks for all of them. The characters put on their jetpacks and try to turn them on, but they say they're seemingly out of fuel. Black Shadow points to the jetpack questionginly then shrugs for the CEO to reach into his pocket. He takes out one dollar and points to it for the other characters to smack their hands on their faces that his jetpacks use money for fuel, and the CEO proceeds to reach further into his pocket to not find anything. The CEO is shocked at having no money on him, the other characters glaring at him. They suddenly turn to see that Peter Griffon is sneaking away quietly, his pants being filled with money from when he pick pocketed the CEO, then hastily runs away upon being spotted. You play as Peter Griffon against the other four characters, having two stock and fighting them all one at a time.
Now that Peter's safely defended his stolen money, he stomps on the CEO's head and does his trademark stupid laugh in victory. The other characters are most angered at this, but before more fighting can ensue more vampiric characters come to attack them. The last of the vampiric characters consist of Simon Belmont, Shadow, Doc of the Squeak Squad and K. Rool. Peter runs off with his money while the vampires go to attack the characters Peter beat up on, a 4 vs 4 battle starting. Upon defeating the last of the vampiric characters, the mass vampiric italian mobsters finally catch up to the characters, leaving them no choice but to join Peter in fleeing. The vampiric playable characters join the mobsters in chasing them, and the level ends.
Level 33: Mute City - Lawsuit Lane
Play as: Street Performer, Peter Griffon, Sain, Zelos Wilder, Shannon, Leonardo, The Delicious One, Mallow, Zombie, Joe Perry, Pizzaman, Phoenix Wright, Grown up Bowser Jr./Nina Cortex, Cortex and Tiny, CEO, Black Shadow
The characters all meet up on the street outside the Tightwad Towers, all being chased in seperate directions by the playable character vampires. They all back up against the mass of chemical waste Bowser was thrown into by Bowser Jr., and the vampires sorround them. Dracula is seen in the background, laughing evily with his arms folded, pleased that the last of the survivers have been cornered like rats.
A massive scale battle follows between a pretty large portion of the roster of this crazy version of Brawl, featuring all the playable characters against vampiric versions of Simon Belmont, Sandslash, Isaac, Knuckles, Shadow, Gibari, Big the Cat, Storo, Spinni, Doc, Captain Syrup, Plusle & Minun, Chao, Jack Sparrow, K. Rool, and Gecko Moria. The grand total of the match is 17 vs 16, the total being one in your favor. You start with a random character in the battle against one of the vampires at random, and upon defeating that vampire the two characters will switch to two random new ones. You only get one spare stock throughout all the battles, and if you don't die at all one of your characters will be unused, picked at random due to the random order. The grand total of characters counts transformations, and just in case things aren't hard enough a few random enemy vampires will come into the battle throughout it, the playable enemy vampires being immune to their fellow undeads.
After the characters who have yet to fall under Dracula's rule defeat the vampires, Dracula comes out from among them angrily, disgusted with the failure of his most trusted generals. Lord Dracula turns to his true form once again, and as True Dracula swipes violently at the characters. The characters do their best to dodge and Dracula ends up shaking up the chemical waste Bowser was thrown into. Causing a reaction like shaking a bottle of soda pop, making the chemicals start bubbling violently. The large circular tin containing the chemicals breaks as a massive entity comes out of the chemicals. Having once been Bowser, this beast is ready to exact revenve on all those who dared oppose him now that he's Dry Giga Bowser. He lets out a massive roar that causes even Lord Dracula to flee, and then eyes his son, Bowser Jr., who caused all this to happen to him. The father and son stare hatefully at each other, Dry Giga Bowser picking him up in one of his fists in a rage where they continue their brief staring contest of hatred. However, Nina hastily goes up to her friend's aid by doing a drop kick at Dry Giga Bowser's fist, causing him to drop his son, despite not taking much pain. Dry Giga Bowser breathes fire at the cast of characters, causing a battle to start.
Boss: Dry Giga Bowser
Play as: Street Performer, Peter Griffon, Sain, Zelos Wilder, Shannon, Leonardo, The Delicious One, Mallow, Zombie, Joe Perry, Pizzaman, Phoenix Wright, Grown up Bowser Jr./Nina, Cortex and Tiny, CEO, Black Shadow
Cortex, Cortex and Tiny, CEO, Black ShadowConsidering you have 16 characters to use against this behemoth, he's as hard as any of the other bosses, but is still certainly a good notch above the rest due to how late in the game he is. Some of his attacks are from that of the playable character version of Giga Bowser, but he's in a boss format, meaning he can't be knocked back and has a health bar, as well as plenty new attacks in store for you. Some of his attacks also revolve around his "Dry" status, making use of his bones. Dry Giga Bowser stays at the right side of the screen, and while you can go behind him to dodge some of his attacks, the boss will only be damaged by attacks from the front, meaning you won't get in any free hits in this battle.
Attacks:
Fireballs: Dry Giga Bowser spits out five fireballs which all ricochet about, bouncing off the sides of the screen if they're going to go out of the playing field. These fireballs do below average knockback and average damage, but are hard to dodge as they travel very fast, are numerous, and go in a rather unpredictable pattern when there are so many of them. The fireballs last a decently long while, and Dry Giga Bowser is still able to do attacks while fireballs are out bouncing around.
Bludgeoning Bones: Dry Giga Bowser takes off both of his arms with his mouth and then rapidly slams them up and down, beating the player with them. The range of the attack is nearly the entire duration of the battlefield, you having to be either behind the boss or at the total opposite end of the arena as him to avoid it. While you can dodge the attack with several well timed sidesteps, this is very hard to do. Picture dodging 6 of Tabuu's red rings of death in a row. If hit by the bones the boss is using as a club, you'll be dealt heavy damage and knockback.
Spike Missles: Dry Giga Bowser turns his back to the player, and spikes rapidly start firing out of the back of his shell (Them regrowing as they're sent out), doing massive damage to the player. It's easy to get caught in the never ending flurry of spikes, the only guaranteed way of dodging the attack being to go behind Dry Giga Bowser. While the attack does no knockback, it's an incredible damage racker. If you're hit for the entire duration of the attack, one of the mere small fireballs of the boss will kill you.
Fire Breathe: Dry Giga Bowser does his regular fire breath attack from his moveset as Bowser, although the range is quite massive and can catch the player in it quite easily. Unless you're lucky enough to be behind the boss when he does this attack, you'll be carried off screen in the stream of never ending fire. It's impossible to jump over the attack for the entire duration, but you can jump over it long enough to avoid being swept away off screen for a KO by it. Another good damage racker. At the end of the attack, Bowser's flames will run short like with the normal Bowser's flame breath, after which he'll end his attack.
Bowser Bomb: Dry Giga Bowser jumps to the top of the middle of the arena, then does his down special from the Smash series. If you're directly under Dry Giga Bowser when he does this, your death is guaranteed, but he thankfully only covers up around a third of the arena with his size. Two large shockwaves go out from Dry Giga Bowser's sides as he does the attack which have a Piplup effect that will drag you off the screen, meaning the attack isn't nearly as simple as it was in Bowser's moveset. Thankfully, after you dodge all the attacks, there's decent ending lag as Dry Giga Bowser gets back up in fighting position and goes back to the right side of the arena.
Attacks added at 75% health:
Whirling Fortress: Dry Giga Bowser goes tucks himself into his bony shell then spins over to the opposite side of the arena and off the screen. If you get caught in the attack, Dry Giga Bowser will pull you along with him in a piplup effect off screen, all the while racking up severe damage on you in the event it somehow doesn't kill you. Upon going off the side of the screen, Dry Giga Bowser will go accross the stage again the other way to go back to where he was originally. Due to the massive size of the boss, this attack is very hard to roll away from, you still being caught for some of the attack if you do. The safest way to dodge the attack is to jump over the boss, but this is no easy task due to his massive size and the fact you have to do it twice quickly.
Chemical Waste: Bowser starts coughing and hacking, looking as if he's choking, the move having some decent starting lag, then hurls out some of the chemical waste that caused him to turn into this form. The attack does no damage at all, but causes massive knockback in a fashion like Mario's FLUDD or Squirtle's neutral B, washing you off the stage. It's impossible to avoid being washed off the stage by merely jumping over the attack, unlike the fire breath, which means the only way to avoid death is to get behind Bowser. After the attack is complete, the chemical waste remains on the battlefield until Bowser uses his fire breath attack again and cleans the waste away. The chemical waste makes the arena more slippery like ice does, and also increases the chances of random tripping (Or introduces it at all, in a perfect world with no totally random tripping).
Dry Minions: If there is chemical waste present, there is a chance Dry Giga Bowser will let out a horrific roar which causes regular Dry Bones enemies to come forth from the chemical waste. They patrol back and forth, throwing bones, being generally bothersome and immune to Bowser's attacks. If you kill them, they'll just revive shortly after, just like the traditional Dry Bones. All Dry Bones will be burnt to ash when Bowser chooses to do his fire breath attack, meaninig they hopefully shouldn't annoy you too long.
Attacks added at 50% health:
Bone Bowler: Dry Giga Bowser takes off his head, does a quick wind up, then throws it accross the screen like a bowling ball. Dry Giga Bowser proceeds to do so with the rest of his body parts, throwing all his limbs until only one arm is left. Due to having no arm to throw his remaining arm, the boss tucks the arm into the shell and fires it out, then does whirling fortress to the other side of the screen. Dry Giga Bowser will proceed to do whirling fortress, the shell being his only remaining on screen body part, then will come back with another whirling fortress after which he'll be back in his basic stance, all the parts of his body reconnected. All the body parts deal large damage and knockback, them coming out in quick succession of each other, although the head does the most.
Headless Koopa: Dry Giga Bowser's head levitates off his body and goes into the background, where it will regularly send massive fireballs that cover the entire screen for 20 seconds. These fireballs must be dodged like Tabuu's red rings of death or else they will mean your end, as they aren't dodgeable by any other means. What's more is Dry Giga Bowser's body will rapidly do his whirling fortress while this attack is going on, giving you two hard things to dodge shortly after each other constantly for the attack's duration. If you're hit by the giant fireballs, you'll be hit as if by a red ring of death from Tabuu, there being no chance for survival.
After the defeat of the Koopa King, Bowser Jr. steps up on his father's lifeless head and lets out a mighty roar, letting the world know his dominance as his rightful position as king of the Koopas. He beats his chest and proceeds to breathe some fire in his triumphant victory, but his troubles, as well as those of the other characters, are far from over. Dracula reveals himself, not having any real fear of Bowser, only wanting his enemies to weaken each other by fighting. Dracula applauds their efforts and decides that they are indeed most worthy to join his ranks of generals, transforming back into True Dracula and letting out a massive roar for all in Mute City to hear. The characters of Mute City turn into vampires, with the exception of the already undead Zombie, laughing around their master evily. Bowser Jr. resists as best he can, not wanting his moment of victory to be ruined, but Dracula turns back to his more lowly form and comes over to convert him himself. Dracula opens a massive portal back to his chaos citadel and goes in for all of his vampires to follow him, new and old, the Zombie mindlessly following due to liking being around fellow mindless undeads. Lord Dracula's army had been formed, the time for the rest of the world to know his rule had come.
Hyper_Ridley
Smash Champion
It's funny, I thought the Beauty and the Beast unit would be my grand finale, and while I still think it's cool, Bass and Enker definatley trump it. But then again, I don't really feel bad about any of my move sets, even in my weaker ones such as Omega Ridley, I can find something that I feel proud of thinking up for it.
And with that said... We return you to your regularly scheduled SSE.
Edit: That SSE was both Win and LOL rolled together. The boss fights were so out-of-place with those characters that the LOL factor was only further enhacned. I can't wait to see how this going to end.
And with that said... We return you to your regularly scheduled SSE.
Edit: That SSE was both Win and LOL rolled together. The boss fights were so out-of-place with those characters that the LOL factor was only further enhacned. I can't wait to see how this going to end.
smashbot226
Smash Master
Can't wait for Yoda's entrance. He's gonna OWN them villains.
Teach that Dracula how ***-kicking is DONE
Teach that Dracula how ***-kicking is DONE
Hyper_Ridley
Smash Champion
Dracula: What is a man? A miserable little pile of...Can't wait for Yoda's entrance. He's gonna OWN them villains.
Teach that Dracula how ***-kicking is DONE
*Yoda stabs him from behind*
Yoda: Owned you are.
 This SSE brought to you by the SmashBoards censor system.
cheap_josh
Smash Ace
Funny stuff man, it was very enjoyable to read. Pretty crazy too. Looking forward to the conclusion.
And also I have no idea how three of my characters got in but thanks for that too.
Heh... I noticed CEO is seen piloting Metal Gear Ray in two different SSEs. Awesome.
And also I have no idea how three of my characters got in but thanks for that too.
Heh... I noticed CEO is seen piloting Metal Gear Ray in two different SSEs. Awesome.
Red Arremer
Smash Legend
Don't try it. He's the guy who made the first Ridley, and the first K. Rool in this thread. Remember them?D: I've been waiting for someone to do Scorpion forever. But you're going to need a LOT more than that if you wanna get anywhere in this contest
Also, w00t @ MasterWarlord, Dry Giga Bowser's awesomeness.

smashbot226
Smash Master
He drowned in mine. No worries. He'll be back, albeit wetter...Funny stuff man, it was very enjoyable to read. Pretty crazy too. Looking forward to the conclusion.
And also I have no idea how three of my characters got in but thanks for that too.
Heh... I noticed CEO is seen piloting Metal Gear Ray in two different SSEs. Awesome.
Oh wellz. Preview time:
-----------
Stage: Water Temple
Played As: Isaac, Crono, Chao, Zora Soldier, Waddle Doo
Played Against: Primids, Zora Turncoats, Morpha, C.E.O.
Music:
(Part 1 Water Temple): http://www.youtube.com/watch?v=E3TWiE_1iz4- Water Temple
(Part 2 Traitors!): http://www.youtube.com/watch?v=mWywKbZHW4A- Final Battle (PH)
(Part 3 Morpha Battle) www.youtube.com/watch?v=n7KqfJ5WXN0- Morpha Battle
(Part 4 C.E.O. Found): http://www.youtube.com/watch?v=gbgupNMxNrA&feature=related- Boss Battle (Majora's Mask)
(Part 5 Escape!!!): http://www.youtube.com/watch?v=rQAL0RmpyyY&feature=related- Sacred Grove
(Part 6 CUTSCENE- Sacrifice): http://www.youtube.com/watch?v=ea7OVC21TjQ&feature=related- Final Destination/ His World Remix
dancingfrogman
Smash Ace
Miles “Tails” Prower

Back-story/Description:
Miles Prower, better known by his alias Tails, is a character in the Sonic the Hedgehog series of video games, comics, and animated series released by Sega. The name "Miles Prower" is a pun on "miles per hour", a reference to the famed speed of the Sonic the Hedgehog series. He is an 8-year-old golden-yellow, anthropomorphic fox with two tails (similar to the mythological kitsune), hence the nickname. He is able to use his two tails to propel himself into the air like a helicopter for a limited time. His debut was in October 16, 1992, introduced in the 8-bit version of Sonic the Hedgehog 2; the 16-bit version was released that November. During his first appearance in Sonic the Hedgehog 2, his fur was an orange color, but the color was changed to yellow-orange for Sonic Adventure, and light-yellow for Sonic Heroes. In 1993 and 1995, he starred in his own games, Tails and the Music Maker for the Pico, Tails Adventure, and Tails' Skypatrol for the Game Gear. Tails is the third most popular character of the series, behind Sonic and Shadow, according to official polls.
Notes:
Tails mainly uses his 2 tails and some machinery to attack people with, I’m going to try to include as many moves from sonic battle/sonic the fighters as possible, a bit like sonic (many of his moves are from sonic the fighters).
Stats:
Power: 6.3/10 his tail attacks are weak, but the moves that uses machines are quite strong.
Walking Speed: 6.8/10
Dash speed: 8.4/10
Range: 6.7/10
Projectile distance: 8/10
Weight: 2.9/10
Drop Speed: 4.3
Size: 5.2/10
1st jump: 7/10 Tails Jumps up into the air in a ball with his 2 tails hanging behind him.
2nd Jump: 7/10
Crouch: 6.2/10
Traction: 7.3/10
Combo: 6.8/10
Wall jump: no
Wall cling: no
Crawling: no
Glide: no
Specials:

Neutral B: Magic Hook: Tails picks up a robotic boxing glove on to his right hand, and Tails body position is facing towards the screen, but Tails leans a tiny bit forward, and his eyes are looking at that direction, The direction Magic Hook goes around his back, and the boxing glove attacks in front of him, This is a chargeable but not storable move, which takes 2.65 seconds to fully charge. This can hit behind Tails and also in front of him, but its sweet spot is when it hits directly in front of Tails. And the direction you are sent when you sweet spot this goes low diagonally up-wards and the direction you are sent when it isn’t sweet spotted is upwards which is angled slightly to the left/right depending where you hit them.
___When this is sweet spotted when it’s uncharged, this does 11% and mid-high knockback, but when it isn’t sweet spotted, it does 6% and mid-low knockback. When this is sweet spotted when it’s fully charged, this does 21% and high knockback, but when this isn’t sweet spotted, this does 14% and mid-high knockback. This has some starting lag, and quite a bit of ending lag. All in all, this is a good KO move. This is the same when used in the air.
Origin: Sonic Battle

Side B: Spin-dash: Tails Rolls up into a ball, which you cam see his 2 tails hanging out behind Tails back, you have to tap the B button quuickly to gather more speed and power, and you can jump out of it by pressing Y/X, linking with Tails Aerials. The range of this when it’s maxed charged is the same size as Jigglypuffs Roll-out range (and when uncharged, this goes the range of a half-way charged Jigglypuffs Roll-out). When you go over an edge of a platform, or a steep-slope going up-wards when using this, you go flying up or down the sky depending how steep the slope/hill is. When uncharged, this does 6% and low-high knockback. When charged to the max, this does 12% and mid-low knockback. This has a bit of ending lag, and can provide, at some situations, a good recovery distance, but when this is used in the air, this has quite a lot of ending lag.
Origin: Sonic 2

Up B: Tail Propeller: Tails spins his Two tails around very quickly like a helicopter, this does no damage what so ever, and is very useful for recoveries, this covers this distance of 4.3 stage builder blocks going upwards and 8.4 stage builder blocks going horizontally (this includes when the recovery ends and you falling down), as you can tell you have great aerial movement when the recovery ends, and the falling animation when the move ends is when Tails get tired of flying in Sonic 3, and you can’t attack after it, and this is a very predictable recovery, and is very vulnerable to spikes, you can control it to make it more vertical recovery, otherwise it’s always the same distance and direction. It’s a very useful, but predictable recovery move.
Origin: Sonic 3
Down B: Medi Bot: Tails pulls out a little grey metalic ball, which then follows Tails where ever he goes, and if you use this in a team match, it follows your mate instead of you! You can only have one of these out at a time! what the medi bot does it actually rather obvious, it heals you/ your team mate, the amount you recover isn't great, you only recover 2% every 3 seconds! The amount of time the Medi bot stays out for is an maxinum of 21 seconds, so the maxinum you can recover in one sitting is 14%, which is very hard, because if the Medi Bot takes 8% damage, it blows up and disappears (the explosion doesn't hurt). and the Medi Bot only heals you if you are very close to it (like the bot has to be at least 1 captain falcons way from you!), so you have to stand in one spot, because the bot goes about 0.67 time your speed, and if you stand in a spot, your going to be hit in the face hard, and you can't make you team partner protect you because the medi bot heals them, so you have to protect them if they want to be healed the most! This move has soo many pros and cons about it! a Cape-like effect like Marios side-b does not effect this.
Origin: Sonic Chronicles
Standard:

Neutral A: IQ Spin Tails First Punches with his left hand which has very little start-up lag, and this does 4% damage, and the punch allows you to use the second part of the A combo. The second part of the neutral a combo is a tail whip, Tails spins around quickly until his looking the opposite way, this also does 4% which lets you do the final part of the Neutral A combo. The final part of the Neutral a combo is that Tails spins his two tail around in a circle quite fast while facing the opposite direction, this does constructive hits which do 2%/1% damage with every hit.
The first two hits originated from sonic battle.
Hold Down A: Tails Continually does the first part of the Neutral a combo

F-tilt: Hand Clamp: Tails Lean Back a bit with his arms far outwards to his side, and claps both of his hands together in front of him, this is a bit faster than what it was in Sonic the fighters, but there is still a little bit of start-up lag, this sends the foe very slightly up angled horizontally. This does 12% and mid knockback, while I have stated that this has some start-up lag, and it still has some ending lag, this doesn’t combo into anything very well however.
Origin: Sonic the Fighters

U-tilt: Glove Flail: Tails has both of his arms up in the air while facing the direction he is looking at with his eyes closed, and waves his arms forward and back quite fast. You can see Tails kicking up as well, but this does no damage. This can hit anyone who is around Tails really close by, and above. The range isn’t great at all. This does 3/4 constructive hits altogether, with each hit doing 3% and the final hit doing mid-low knockback. This has little start-up and ending lag.
Origin: Sonic the Fighters
D-tilt: Tail Dance: Tails turns around while crouching, and while he turns around, his left/right tail stuns the enemy which allows the next part of the attack to hit, and while Tails is turning back around the direction he came from, attacking the foe with his right/left depending which way your facing when you do this move, this comes out quick and there is little ending lag, this is a good damage dealer, each tail hit does 6% and the final hit of the two part move does mid-low knockback.
This has no origin!

Dash Attack: Tail Spin: while running, Tails will spin around twice before this moves ends, This can hit foes in front of Tails, and also behind him as well. This also does one hit instead constructive hits, and what’s also good is that it’s hard to spot dodge this move as well, and you should roll to dodge it. This comes out quickly and there is some ending lag, this does 9% and mid-low knockback.
Origin: Sonic Adventure
Smashes :
F-Smash: Tail Crack Tails Spins around quite quickly around in a spot, allowing his two tails to attack, This has a two hit part, the first hit stuns the enemy slightly, and the final hit sends the foe far away, this is quite a good damage dealer, but it’s harder to hit with both tails, as you can actually DI out of it if you hit the enemy within the white area of the tail, so you have to get in close to hit with both tails, while this comes out quick, and doesn’t have much ending lag, it’s hard to land both hits, and the range is decent. When uncharged, the first tail does 7%, and the second tail does 7% and mid-mid high knockback. When fully charged, the first tail does 9%, and the second tail does 10% and high-low high knockback.
This has no origin!

U-Smash: Boxing Thrust Tails stands in one place, and a red boxing glove with a spring attached underneath the Boxing glove appears in front of Tails. The boxing glove springs up to the height of Tails ears. There is a sweet spot in this move, when you get hit by the boxing glove in the middle as soon as Tails U-smash was released, it does great knockback, and it will send you straight up-wards . You can get hit by the edge of the glove, or you run into the spring when the move was on its ascent will send you horizontally up-wards. There is a little bit of start-up lag, and a fair amount of ending lag as well, so you are vulnerable when you fluff up the move. When uncharged, when you hit its sweet spot, this does 17% and high-low knockback, when you don’t sweet spot it, this does 7% and mid-low knockback. When you hit its sweet spot when it’s charged completely, this does 23% and high-high knockback, when you don’t hit its sweet spot, this does 12% and mid-high knockback. This is Tails best ground kill move.
Origin: Sonic the Fighters

D-Smash: Wind-up Chu2 Bomb: Tails picks up a Wind-up mice which was originated in the Dreamcast game Chu Chu Rocket, which was a cameo appearance in Sonic Battle, when you charge this move, instead of increasing the damage and knockback it does, instead, it increases the range of how far the Wind-up mice will travel, this has some start-up lag and some ending lag. It only travels in one direction, which is the direction you faced when you used this move and will blow-up on contact with any thing, and this doesn’t walk off edges as well. The mice will always travel at the same speed. This will do 14% and mid knockback. When uncharged, this will only travel 3 steps before blowing up (abouth 1 and a halve of a stage block distance), when charged, this will travel over 5.75 stage builder blocks.
Origin: Sonic Battle
Aerials:

N-air: Tail Typhoon: Tails Spins around, letting his two tails to hit people with in a pose like in the above picture, Tails does this once and he does it slow compared to his dash attack, this does one hit, and it sends the foe horizontally. Tails actually tilts his body slightly when he does this move, this has little start-up lag and ending lag, but this has quite a bit of landing lag however, this does 11% and does mid knockback, this can be auto-cancelled on the frames tails starts to look the opposite direction.
Origin: Sonic Battle
F-air: Feet and Tails: As Tails in the air, Tails spins around once around to his left. This move does 4 hits in it, as Tails spins around, his right foot, sticking 45 degree upwards, hits first, then his 2 tails attacks the foe, and it ends with a hit from his left foot, also pointing 45 degrees upwards. This comes out quick, but it has quite a bit of ending and landing lag however. The first hit does 3%, and the 2 tail hits do 3% damage as well, and with the final hit with his right foot does 4% and mid-low knockback. this can DI'd out of the 3rd or second hit if you have good DI.
This has no origin!
B-air: Tail Twirl: Tails spins his two tails in two different directions, making his two tails tangled together, and then he spins both his tails the opposite direction to untangle his two tails, this does about 6 constructive hits and can cause quite a bit of good damage, this comes out quick, and has a little bit of ending lag and landing lag. This does 15% and the final hit does mid-low knockback, this is hard to DI out of, but it is possible. this is a great damage dealer, and is great for eating shields away!
This has no origin
U-air: Boxing Pound: While having an position that looks like Warios U-air, Tails picks up the boxing glove and send it diagonally upwards, the boxing glove with the spring is halve its size compared to his U-Smash, so this has good range for an u-air, but not to good range, this sends the foe up-wards, this can be used to juggle people, this does 13% and mid knockback, and this has quite a bit of start-up, ending and landing lag.
This has no origin, but the boxing glove is based on the moves “Magic hook” and “Boxing thrust”.
D-air: Tail Dunk: While facing the camera, Tails spins around downwards, and when his two tails spins downwards, that is when it does damage and knockback, this will send the foe up-wards into the air when you hit with hit, this has a wee bit of start-up and ending lag, abut less lag when he lands, this does 12% and mid knockback. Tails almosts turns into a ball in this move, but not completly.
The name is from a Sonic Battle move, but it’s not based from the actual move (otherwise there would've been a picture =P)
Grabs:
Grab attack: Knee Up: While holding the enemy, Tails sticks his right knee up into the gut of the enemy, making them go do a tiny bit, this does 3%.
F-throw: Fox Thrower: Tails grabs the foes back with both of his hands, and Tails body position is looking towards the screen, but his head and eyes are looking in the direction he grabbed the foe, Tails first pulls them back not that far behind Tails, and flings the foe forward, this sends the foe a more horizontal direction. This does 7% and mid-low knockback, can set up a quick dash attack at lower percentages.
This has no origin!
B-throw: Under Toss: Tails jumps up, and over the enemies head (depends on how big the character is, it might be a full-scaled jump, or might be a little hop over someone like kirby or Squirtle), and when Tails on the descent, Tails Back kicks with both his feet, and the Feet gets bigger than they normally are. You can do a jump before you actually land, but this doesn’t really help much in any way, this sends the foe horizontally rather than vertically, this does 8% and mid-low knockback, sets up for a quick dash attack depending how high the foes percentage is.
This has no origin!

U-throw: Flying Slam: Tails jumps into the air, just over the opponents head, and grabs the foes head/shoulders, and carries them up into the air, and then quickly goes down to the ground with the opponent, dropping the foe on the ground while Tails is still in the air! This sends the foe upwards, and Tails actually goes the height of R.O.Bs U-throw, this does 12% and mid-high knockback.
Origin: Sonic the Fighters
D-throw: Frantic Tail: Tails first sweeps the foes legs with his 2 tails, and while the foe is airborne, just a few inches higher than Tails when he is standing on the floor, Tails does a front-flip in the air, which lets his 2 tails hits the foe downwards, and on the ending frames, it looks like his in a ball, this sends the foe vertically. The first hit does 5%, and the second hit does 6% and mid knockback, combos well into U-air.
This has no origin!
Other Attacks:
get up attack: Tail Twirl: Tails spins around on his around once up-side down, in a handstand postition, letting his two tails hit the foe when he gets up, this sends the foe up-wards angled slightly. This does 8% and mid-low knockback, not that useful all in all.
This has no origin.
Edge attack over 100%: Foot Stick: Tails crawls on, and he sticks his both of his feet as far outwards as he possible can, while holding his left arm against the floor, and sticking his right arm up in the air, this sends the foe horizontally. This does 6% and mid-low knockback, this doesn't combo well with moves all that well.
This has no origin!
Edge attack under 100%: Spinning Tail: as Tails gets up from the ledge, tails spins around in a spot, and angle his 2 tails diagonally up-wards, and Tails moves his left hand in the direction the tails are going, this sends the foe up vertically, this does 8% and mid knockback, may follow up withan aerial at small percentages.
This has no origin!
Final Smash: The Tornado

Tails hops onto his aeroplane from Sonic 3, Tails is allowed to drive this vehicle for a whole 15 seconds before ending, Tails has 2 moves he can choose from, or he can run into the enemy, which does 12% and mid knockback. Turning around does 10% and mid knockback which sends the foe horizontally when you are hit by the tail of the plane. you can only use one move at a time. You fly around in the air like Yoshis Final Smash (but 2.3 times faster).
The Moves
1. Bullet barrage: Tails shoots out loads of small bullets in a small space of time, you have to tap the B button fast to deal more bullets, each bullet does 2% and no knockback.
2. Homing shot: if you hold the B button, you can lock onto enemie (With a blue line which covers the distance of here the tornado is, and to the side of the level, this can't go through walls) , this does 14% and mid knockback.
3. Bomb drop: if you press down-b, you will drop a big dark bomb directly downwards, which explodes on contact will anything, the bomb does 19% and high-low knockback, the radius of the bomb blast is the same as a bom-omb.
4. Light Speed: if you press side b, Tails drives super-quick, making it looks like there are duplicates of the tornado, just like fox illusions effect, you will cover 1/3 of final destination in 0.5 seconds, with very little start-up and ending lag. This move does 16% and mid-high, borderline high-low knockback, which sends the foe 45 degrees up-wards.
5. Taking it for a spin: you can either press the A button very fast, or just hold it down. Tails spins the Tornado around very fast, which does lots of constructive hits, the last hit you do will always do mid-low knockback which sends your foe up-wards. each spin does 2%/1% damage, you can do about 8% damage with every spin, which is one every 0.6 seconds. The hitbox is the entire plane, but it can be DI'd out of.
If you are in a team match, your team mate can jump on, so they are invincible to, however, Tails is the only person which can move both of you around, and your team mate can only use his B move selection however! only really making characters neutral B with a projectile work well, this means people like Jigglypuff, Captain falcon, Marth etc almost useless, and only making people like R.O.B, Lucas, Link etc useful in this mode.
Origin: Sonic 3
Pros
Tails has some good KO moves.
Tails is very fast (Same as Metaknights Speed)
Good jumps
Quick attacks
Cons
Tails best KO moves most of the time has quite a bit of lag
Tails is also rather light.
Predictable recovery
Easily dodged specials
Animations
Dizzy: Tails puts both of his hands by his side, and Tails rocks back and forth, with his eyes closed halve-way.
Sleep: Tails falls a sleep sitting on the floor crossed legged, and his head rocks back and forth.
Idle: Tails rocks side to side normally, but he can sometimes looks at the camera, and yawns with his hand over his mouth.
Running: as Tails runs, his two tails spin around quickly.
Crouch: Tails goes down on the floor with his left knee showing and his right leg on the ground.
Drowning: tails waves his right hand around, and his eyes wide open.
Alternate costumes:
1. Tails skin is yellow (default)
2. Tails skin is Lime
3. Tails skin is Blue
4. Tails skin is Purple
5. Tails skin is Red
6. Tails skin is Dark Orange (Classic tails)
Taunts:
Up: Tails Jumps up and down in a star shape twice, Just like how he won a match in Sonic the Fighters,
Side: Tails sticks his left arm out, while his whole body is slanted a bit, this is his pose when he wins an act in Sonic 3
Down: Tails bounces up and down, side to side in a ball, then jumps out with his eyes shut, and he is looking happy
Victory Taunts:
1. Tails does a quick front flip on a spot, and ends it with sticking his hands next to his sides, this is based on how he poses when he beats a level in Sonic adventure. Tails yells "I did it!"
2. Tails runs past a check point from the right of the checkpoint which has a Sonic face on, it’s spins and shows a Tails picture, Tails stood to the left of it, and then he runs off.
3. Tails drives his tornado, he waves at the camera, and flies it to the right of the screen.
Entrance
The Tornado falls out vertically where Tails entrance place is, and it explodes, then Tails jumps out of it, based on one of the first chase mission on Sonic Adventure
Lost animation
Tails scratches the top of his head, like he is wondering why he lost.
Crowd Chant
TAAAAILLLLS (in the same tone as Sonics Crowd Chant)
Wii remote Sound:
The 1-up jingle from Sonic 3
Stage: Tails House – Egg carrier Chase

Section 1:
You first appear on a flat platform, and to your left there is Tails house, you can jump on the house as well, to the left side of the screen is a walk-off area, and to your right is also a walk-off area as well, this area has no hazards, you stay in this formation for about 30 seconds, at 25 seconds, if you look hard enough, you can see the Egg Carrier going by,
Section 2:
after 30 seconds the main platform (in the picture above) will fly you up into the sky and follow the Egg Carrier, the main platform itself has no hazards, but when you get near the Carrier, you’ll see cannon balls fly out and hit the stage (which can hit you, which does 15% and mid-high knockback.) in every place, then the egg carrier goes faster, and when the main platform is directly behind the Egg carrier, the back will open up and shoot a giant laser which will blow the main platform away, this part takes up 50 seconds.
Section 3:
And then you be falling from the sky, onto the first platform, which has no platforms and with no hazards, (don’t worry though, it will always put you near the top of the stage, so you can never die automatically), this takes up 8 seconds, and then the cycle continues.
Music:
Tails theme (Believe in myself): http://uk.youtube.com/watch?v=3DTjw_SXB8Q
Sky Chase mission: http://uk.youtube.com/watch?v=8mrJrBkwkz8&feature=related
E-101 mkii theme: http://uk.youtube.com/watch?v=4PTcEw0XsTc&feature=related
Emerald hill zone: http://uk.youtube.com/watch?v=6vaBxXCH9b8
E-102 Theme: http://uk.youtube.com/watch?v=a2sOpyF1nF4
Kirby Hat

Kirby gains Tails 2 ears and hair flick
Related Items:
Assist Trophy: Cream the Rabbit: Cream the rabbit jumps out, but then she jumps too the back of the stage as she hates fighting, this isn’t useless though, Cream claps the person who released her from the assist trophy on as you fight like normal, boosting your attack and defence by 1.2 times increasing weight, knockback and the like. This lasts for 10 seconds. This is based on one of her abilities in Sonic Chronicles!
Item: Ring: Rings appear in the air or on the ground, these normally appear as regulary as Food, and come out quite often from party balls in large numbers, you simply run through the rings to recover 3%-5%
Item: Teleport box: used in Sonic 2's 2 player mode, you can jump or punch a tele box which is flashing slowly and a picture of a red platform with a laser looking thing frrom it, when you use this, you simply swap places with anyone randomly, which can be a hit or miss, as in you hit the box, and you get teleported to underneath the stage, or it can help you stay on if you hit this box while falling to your doom!
Trophy Descripition
Tails

A friendly fox with two tails whose true name is Miles Prower. He can fly for a limited time by spinning his tails rapidly. Originally impressed by the sight of the speedy Sonic, Tails became his sidekick, rarely leaving his side. To assist Sonic in staying one up on Dr. Eggman, Tails utilizes his knowledge of electrical engineering to create mechanical devices.
Sonic

The world's fastest hedgehog, who can run at supersonic speeds. Generally speaking, he loves being able to do what he wants and loathes being constrained. Holding still is something he would never consider. He's got a bit of an attitude but can't pass by someone in trouble. When he collects the seven Chaos Emeralds, he transforms into the mighty, gold Super Sonic.
Knuckles

A powerful red echidna also known by his full name, Knuckles the Echidna. Knuckles resides on Angel Island, where he guards the Master Emerald. Both friend and rival of Sonic, Knuckles is a martial-arts expert who can break through rocks with his spiked fists. In addition, he can climb walls and use the wind to glide through the air.
Amy Rose

A Sonic-obsessed pink hedgehog whose full name is Amy Rose. Amy is Sonic's self-appointed girlfriend. She is almost always optimistic and cheerful, and while she motivates her friends, she also shows aggressive tendencies, like when she uses her massive Piko Piko Hammer. Speaking of which, her hammer's hiding spot remains unknown to this day.
Dr. Ivo "Eggman" Robotnik

A self-proclaimed scientific genius. Dr. Eggman sports an IQ of 300 and wants to conquer the world and build his evil empire of Eggmanland. An expert in his field, Dr. Eggman places robotics over all else in life--a reflection of his selfish personality. He doesn't know when to quit and always comes back for more no matter how many times he is defeated by Sonic.
plus more which I guess you know about
Stickers
Tails (Sonic heroes): Boost tail attacks by 20%
Classic Tails: boost speed by 20%
Tornado: boost weight by 40%
1-up box: gain an extra stock (Very rare)
Ring: food effect increases by 8%
Big Ring: food effect increase by 28%
Chaos emerald: increases flinch resistance by 23%
Master emerald: increases Flinch resistance by 84% (quite rare)
Event:
Name: Fight of the skies!
Playing: Tails in the Tornado (infinity time)
Opponent: Falco in an Arwing (thats right, ARWING {infinity time})
Stage: Tails House (in the Egg Carrier part which never ends, also no main platform)
Style: Stamina (Both at 250%)
Time: 2:10
Description: looks like Tails met up with his rival, falco, Take him out of the skies!
Snake Codec:
Snake: Its a two tailed fox... that must be Miles "Tails" Prower
Colonel: another side-kick who is over shadowed by the main man, Sonic
Snake: HEY, Tails might not be the speed freak Sonic is, but he can fly and has a very high IQ, show him some respect.
Colonel: look at him all alone, wondering where his blue friend is, what a sad live he has, chasing his friend.
Snake: What has gotten into you, Colonel? answer me NOW!
Colonel: La li lu le lo! La li lu le lo! La li lu le lo!
SSE part
Since sonic wasn’t given a good part in the SSE, I have to make this up.
___Sonic is running along with Tails at a steady pace, and then he sees a Blue car whizzing by, Sonic looks at this, and grins, and Sonic runs at the fastest he can to meet the person in the car, Sonic jumps on the blue car, which stops, and Captain Falcon gets out, Tails is running far behind, and he sees Sonic chatting to Captain Falcon, Tails runs faster to them, and as soon as he gets to Captain falcon and Sonic, they just speed off without him, as if they agreed to race each other, Tails sighs and is walking away slowly, until he sees the sky going a purple colour in the sky, Tails looks up to see the Halberd pouring out primids, Tails picks a remote control and presses a button, which sends the Tornado to him as quick as a flash, Tails hops onto the Tornado, driving off, running over Primids before going up into the air to see the Halberd.
___A level plays where you play in the Tornado in an automatic side scrolling level, with cannons shooting you and enemies in the sky; you have a health bar as well (about 150%). There are walls which you have to dodge as well. At the end the level, you see Tails in the Tornado looking directly at the Halberd, which then shoots a giant laser at the aeroplanes right ring, which sends the Tornado going flying down-wards.
After this event, Diddy Kong appears next to a lake, and he sees Tails and the broken tornado on the ground in front of foxes Arwing, Diddy runs towards Tails, until Diddy feels the ground shakes and looks at the Lake, which then a Rayquazza appears, and flies over Diddy and picks him up, as it picks Diddy up, it roars! and it looks like Rayquazza is going to eat Diddy, however, Fox jumps up and hits Rayquazzas hand with fox illusion, letting Diddy free! Rayquazza fires a Dragon ball at Fox, and he just reflects right back at Rayquazzas face, then a fight against Rayquazza happens between Fox and Diddy Kong. after Rayquazza is defeated, Tails gets up and looks around, and he sees Diddy pointing towards him, Tails walks over to Diddy, who shouts and pointing in a direction, Tails shrugs and walks a different direction, looking for Sonic, but Diddy grabs his right arm and drags him to his destination!
Please Give Feedback
Iron Thorn
Smash Lord
That SSE was the best yet. It was hysterical and really hardcore cool at the same time. It has vampires, vampire pirates (vampirates?), men's genitals being injured, and really hard bosses. The best part was definitely Peter Griffin putting the bag over Nina's face, though Nina's def. a two-bagger.
http://www.smashboards.com/showpost.php?p=5426665&postcount=4742
Yau's basic stuff is finished, misc. stuff will come soon
How is it?
Great SSE MasterWarlord, definitely my fav so far...
Yau's basic stuff is finished, misc. stuff will come soon
How is it?
Great SSE MasterWarlord, definitely my fav so far...
Collective of Bears
King of Hug Style
I absolutely love Bowser Jr's role. You can have...
The seal barrage!!!

The seal barrage!!!
KingK.Rool
Smash Lord
- Joined
- Nov 26, 2005
- Messages
- 1,810
That was epic, MasterWarlord. I love how you worked Phoenix Wright in there, although Peter seems a bit... evil? Anyway, all hilarious stuff.
Chris Lionheart
Smash Champion
Very nice MW... awesome and funny at the same time (a bit much ball kicking though don't you think?)
I wonder how long I'll have to wait to post my next chapter for it to be noticed...
I wonder how long I'll have to wait to post my next chapter for it to be noticed...
dancingfrogman
Smash Ace
Hey All, I've updated My Miles "Tails" Prower moveset with standard moves, I know it isn't complete, but how do you think it's shaping up.
Iron Thorn
Smash Lord
The only fault I see is that his stats are too good. He'd definitely be a lightweight. I myself tend to favor polarized stats (9/10 speed and 3.2/10 weight, anyone?).
Stats are updatedhttp://www.smashboards.com/showpost.php?p=5426665&postcount=4742
Yau's basic stuff is finished, misc. stuff will come soon
How is it?
Great SSE MasterWarlord, definitely my fav so far...
dancingfrogman
Smash Ace
thank you for pointing that out, I'll sort that out...The only fault I see is that his stats are too good. He'd definitely be a lightweight. I myself tend to favor polarized stats (9/10 speed and 3.2/10 weight, anyone?).
...Done, I've sorted out his stats a wee bit.
EDIT: I've finished his aerials now, the link is above and is also in my big orange link, feedback would be appreciated.
MasterWarlord
Smash Champion
Glad you all liked it. I was defenitely going for lol factor that time, it sort of writes itself with those great characters. Congrats on making those movesets.
Dry Giga Bowser was all mine, but Metal Gear RAY was made by Koj. He requested it to be in there. If you have any bosses which have at least 7 attacks you want to be in, PM me them, as seeing the next chapter's the final one, there can be plenty of bosses in it.
(*Cries in corner about infraction I didn't deserve*) Oh, one more thing. . .
BLITZKRIEG, CHECK YOUR PMs.
That is all.
Edit: (Banjo Kazooie by Luvtoy Rogue Wireframe has been reviewed.)
teen-robot
Smash Cadet
OMFG! thanks to season 3 or so?8DDOkayz, I've finally decided on my next moveset:
The big, bad, boogeyman, hungry for your brain...
.jpg)
SYLAR!!!
Expect all sorts of crazy powers!
COMING SOON, and will most likely be found on page 417.
i hope your moveset is worthy enough for sylar>:3
LUVTOY77-ROGUE WIREFRAME
Smash Champion
- Joined
- Jul 26, 2006
- Messages
- 2,372
@ Masterwarlord:
I'm not sure if this is supposed to be done in PM's cuz it's considered spam, so from now on I'll do it over PM's, but--
Thanks for the review and constructive critisism!
About the Final Smash, I was considering having it just be the wonderwing, can't exactly remember what changed my mind, but I still wanted it in somehow, so I threw it in..
But yeah, thanks for pointing out the things that could be 'bettered' up a bit! And I'll get to work on it right away!
Chillstar7
Smash Rookie
What the? I came here to make a warriors cat character!That creepy! Oh well.
TheSundanceKid
Smash Lord
I love the delicious one's role in your SSE, Warlord.
Agi
Smash Lord
I found it kinda funny how he teams the two "food" movesets up with eachother, even though you can't eatz Mallow. I wonder if that was intentional...I love the delicious one's role in your SSE, Warlord.
TheSundanceKid
Smash Lord
I think it is. XD. Thank you Warlord for proving Mallow is eatz-able.
LUVTOY77-ROGUE WIREFRAME
Smash Champion
- Joined
- Jul 26, 2006
- Messages
- 2,372
I've recently updated my MEWTWO moveset once again!
It's on page 305!
--I have a link to it in my sig, but it isn't showing up; do I have too much text in my sig or what??
How can I make a 'blog' like a few other people have in order to post links to all my movesets?
-Help would be much appreciated! :D
It's on page 305!
--I have a link to it in my sig, but it isn't showing up; do I have too much text in my sig or what??
How can I make a 'blog' like a few other people have in order to post links to all my movesets?
-Help would be much appreciated! :D
Smasherk808
Smash Journeyman
- Joined
- Jul 12, 2008
- Messages
- 231
The blog thing im not sure about.
The link shows up fine for me... You could try just having the link go directly to a single post but thats all i could really help with
The link shows up fine for me... You could try just having the link go directly to a single post but thats all i could really help with
smashbot226
Smash Master
We should make a Facebook.
In celebration of Halloween Horror Nights 2008...
I'm gonna be making a moveset after I finish Amaterasu...
Based On:

In celebration of Halloween Horror Nights 2008...
I'm gonna be making a moveset after I finish Amaterasu...
Based On:
TheSundanceKid
Smash Lord
FS: NIGHTMARE- Freddy goes in a characters dreams and uses their fear against them.
Ex. Luigi is bombarded by ghosts.
Ex. Luigi is bombarded by ghosts.
MasterWarlord
Smash Champion
To make sure Blitzkrieg actually does check his PMs, I get to post this on every page now.
BLITZKRIEG, CHECK YOUR PMs.
To make a blog, go to somebody else's blog and click "Your blog" on the sidebar. Use the blog in my sig to get to the bloggy area.
Oh, and Sundance, check the MYM user group.
BLITZKRIEG, CHECK YOUR PMs.
To make a blog, go to somebody else's blog and click "Your blog" on the sidebar. Use the blog in my sig to get to the bloggy area.
Oh, and Sundance, check the MYM user group.
He's too scary too be a character. We have to settle for him being a boss.
On topic: Sagi is almost done. I just need to add the aerials and stuff like that. I just need to know what i should do for FS.....
TheSundanceKid
Smash Lord
( 8 Year-Old) Mommy, what's Freddy doing to Mario?
Edit: Also Brawl would not do him justice because there is no blood.
Edit: Also Brawl would not do him justice because there is no blood.
smashbot226
Smash Master
But of course. The different characters are bombarded by different things, but with the same properties.FS: NIGHTMARE- Freddy goes in a characters dreams and uses their fear against them.
Ex. Luigi is bombarded by ghosts.
IDK what they'll be yet...
Agi
Smash Lord
FINALLY! A flash of inspiration hit me out of the blue...

TheSundanceKid
Smash Lord
Hmm...how do you bombard someone with manliness without Brawl turning sick?But of course. The different characters are bombarded by different things, but with the same properties.
IDK what they'll be yet...
Chris Lionheart
Smash Champion
I finally got around to finishing the 3rd agers moveset. Check it out and comment please.
Morwen would definitely be fun to play as.
Morwen would definitely be fun to play as.
smashbot226
Smash Master
No, I'm bombarding Captain Falcon with Melee Knees.Hmm...how do you bombard someone with manliness without Brawl turning sick?
- Status
- Not open for further replies.