Reaper Talk
Smash Apprentice
- Joined
- Jan 23, 2015
- Messages
- 135
- NNID
- Tricky32
- 3DS FC
- 0946-2336-1376
Pac-Man Stage Analysis and Discussion Thread
“Separating the Pac-Boys from the Pac-MEN”
“Separating the Pac-Boys from the Pac-MEN”
Welcome to the Pac-Man Stage Analysis thread! The purpose of the thread is to discuss how Pac-Man performs on all tournament legal stages. Every week, the Pac-Man Board will analyze the pros and cons of each stage in order to increase our knowledge of proper counter picking and to learn how to play on unfavorable Pac-Man stages. Although Pac-Man is a versatile character, we do have to recognize the importance of picking stages in a tournament setting.
I have made this rating criteria to keep a consistent rating for all stages in this thread.
Stages will range from, Not Preferred -> Equal -> Favorable
As well as your rating, please give your recommended custom move set that you would use on this stage and include you opinion of difficult matchups.
CRITERIA
Not Preferred: Not preferred stages either limit Pac-Man from his full potential or make Pac-Man have to work harder against certain match ups. In other words, when a stage is listed as Not Preferred, try to avoid it. Never choose these stages as a counter pick and ban your opponent from choosing it if you can.*Just because a stage is not preferred does not mean Pac-Man can’t win. These stages require a different approach and a change in strategy. If these stages are chosen, it’s not the end of the world
Equal: Equal stages are not horrible but do no possess qualities that make Pac-Man shine. These stages usually can work well for any character in the roster. Typically, equal stages provide a 50/50 matchup for each player. Winning is typically dependent on player skill.
Favorable: Favorable stages give Pac-Man a noticeable advantage over the other player. These stages provide Pac-Man a chance to utilise his moveset to the fullest extent and dominate the stage. Whether it be a certain technique or strategy Pac-Man has at his disposal on these stages, favorable stages are the ones you need to know by heart if you want to compete using Pac-Man (as a main or a secondary)
As well as your rating, please give your recommended custom move set that you would use on this stage and include you opinion of difficult matchups Pac-Man might face.
Criteria is subject to change based on this thread’s feedback.
To keep things clean, please use this format in your post:
Stage Name :
Rating:
Recommended custom sets:
Difficult Matchups:
Example:
Final Destination
Rating: Neutral
Recommended Custom Sets: 2232, 1111, 2111
Difficult Matchups: Rosalina and Luma, Sheik
Rating: Neutral
Recommended Custom Sets: 2232, 1111, 2111
Difficult Matchups: Rosalina and Luma, Sheik
Stages we will be discussing (list to be updated)
EVO 2015
Battlefield
Final Destination
Smashville
Delfino Plaza
Halberd
Lylat Cruise
Town and City
Other stages
Skyloft
Pilot Wings
Kongo Jungle (doubles and up)
Pokemon Stadium 2 (3v3 or 4v4)
Pyrosphere (3v3 or 4v4)
Norfair (3v3 or 4v4)
Yoshi's Island (3DS)
Battlefield
Final Destination
Smashville
Delfino Plaza
Halberd
Lylat Cruise
Town and City
Other stages
Skyloft
Pilot Wings
Kongo Jungle (doubles and up)
Pokemon Stadium 2 (3v3 or 4v4)
Pyrosphere (3v3 or 4v4)
Norfair (3v3 or 4v4)
Yoshi's Island (3DS)
Stages we have already covered
Duck Hunt
Rating: Favorable
Recommended custom sets: 1133, 2132, 3132
Difficult Matchups: ROB, Villager, other campy characters
For a more in-depth analysis, these are some summaries users submitted.
Some quotes are cut short for convenience and to emphasize important tips for Pac-Man.
Recommended custom sets: 1133, 2132, 3132
Difficult Matchups: ROB, Villager, other campy characters
For a more in-depth analysis, these are some summaries users submitted.
Some quotes are cut short for convenience and to emphasize important tips for Pac-Man.
Duck Hunt is a phenomenal Pac-man Stage. With the smaller blast zones Pac-man is more able to finish out kills before crazy percents become an issue. The Tree its a great spot for a breather to charge fruit. The other side is great for recovery options against aggressive edge guarding. The ducks only slightly hinder Pac-man's attacks, and they do not stop hydrant from dealing damage. With the ability to set where the Dog will spawn based on where you kill ducks. You are able to add yet another layer to Pac-man's traps.
...The issues with the stage are very few, Pacman does lose his Stage spiking, but this is negligible, as higher levels of play opponents should be able to tech pretty easily. The smaller blast zones that help Pac-man, do hurt him as well on the receiving end. If you do not pay attention to the background, you are prone to make mistakes with setups, like missing a hydrant smash, or worse trying to hydrant dash a smash attack, then falling short, missing and getting punished. The ducks are a large part of the beauty of the stage.
I feel this is Pac-man's strongest stage.
Duck Hunt is basically FD in a lot of ways. It's fairly flat for the most part which is conducive for our traps. The tree provides nice breathing space if you can get to it and will give us a massive advantage in matchups against low jump characters as we can probably just z drop/spam hydrants on them. I'd say the main drawback to this stage is actually one of it's strengths too. Although the tree is great for camping, we aren't the campiest character and characters like Rosalina (I've experienced this personally) can take advantageous positions and camp the tree.
Rating: Favorable
Recommended Custom Move Sets: Default (1111), 2122, 3122
Difficult Matchups: None in Particular
For a more in-depth analysis...(note: some quotes were condensed, special thanks to @ fromundaman
for this excellent summary.
fromundaman
for this excellent summary. 
Recommended Custom Move Sets: Default (1111), 2122, 3122
Difficult Matchups: None in Particular
For a more in-depth analysis...(note: some quotes were condensed, special thanks to @
↑
Assume in every post I make that I am talking about our default moveset.
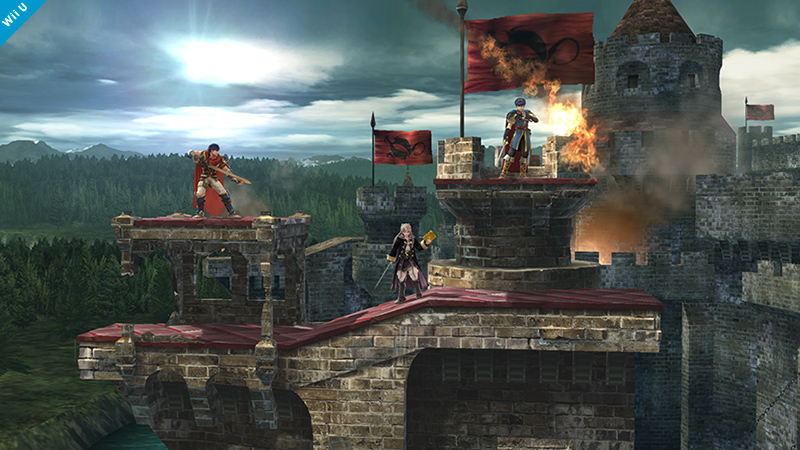
1st phase:
-Slanted surface. This is ALWAYS an advantage. We can easily regrab Galaga, Strawberry, Melon and Apple. Z-dropped fruits get horizontal movement when dropped on the slant. Interesting bounces on fruits and hydrants (Keep in mind Orange does not bounce off of slants but will stay active and follow the slant along the ground when thrown).
During this part of the stage both platforms are low enough for Usmashes to go through, and fruit/hydrant bounces to reach. They are also low enough that Fair>Hydrant will bring us on top of the platform, so keep that in mind.
The slant in the middle is what allows us to control pretty much everything.
A Z-dropped fruit on that slant controls the area below the left platform. If you have a Hydrant down there, when the fruit hits it, it will bounce up to the platform, controlling some of that space too.
If you Z-drop a fruit in this same situation while a water blast is coming out, your fruit will be gushed back to the right side, controlling that area.
This alone controls most of the screen without launching a hydrant, actually throwing a fruit or placing a trampoline.
Once you mix all of those in, the entire stage is yours to command.
For example, put a trampoline by the ledge: Bam, the entire area below the platform near that ledge is now off limits and they are forced to recover above the platform. Murder them for this as there is no longer a guessing game at all.
-Low platforms allow Usmash launched hydrant when the hydrants are on the platform and you are below. This launches it at an interesting angle, so that's useful too (Can also be done on BF and Lylat, though on BF it's kind of less useful since it hits the top platform).
-Small-ish blast zones. When combined with our stage control on this phase, this becomes a boon as we pretty much control the match then kill whenever we want on this phase.
2nd phase:
-This is the camping phase. Hydrants, Keys, Galaga and bell all go through the statues. Abuse this heavily.
-Galaga, Melon, Apple, and Strawberry are all easily regrabbed off of the slanted top platforms. The first 3 in this list can be useful for instant launching the hydrant (I am refering to the instant redrop tactic I put in the social thread the other night).
-My personal strategy for this phase is to camp with keys and hydrants, constantly launching the hydrants. They will attempt to camp the platforms on top of the statues, but within 6-8 hydrants you will knock both of those out, turning the stage into another FD.
The issue with this is that you are going to completely scale your hydrant. On the plus side, it means other moves that would usually be to stale to kill like Nair and Bair are back to full kill power. Also even staled out, hydrant is powerful, and opponents are still going to try to stay far from it.
3rd phase:
-Tilts everywhere. Abuse this and make things bounce in unpredictable ways.
-Be very aggressive offstage. This form has a huge offstage area, and due to the tilts a lot of characters have some issues recovering, so make their job of recovering that much harder.
-This is basically a tilting FD. It has all of the advantages of FD with the added benefits of the two above factors.
-Hide trampolines: Due to the rapid tilting, you can throw a trampoline down, have the stage cover it, then tilt again to put it back in the opponents way again before it disappears. This is pretty situational, but once they've been punished for hitting a hidden tramp, they will think twice about approaching any place you recently put one down, especially since most people won't know exactly how long those last.
Transitions:
-Dthrow on top of where pits are going to be is pretty much a suicide throw.
-Throwing fruits as the transition appears/disappears changes the way they act. As transitions appear, the ground will rush up and grab the item, allowing you to regrab it (I actually need to test if this will work with key). As the transition disappears, it will cause the fruit to have a downwards diagonal angle compared to it's usual trajectory. This is most visible with the melon, which controls the a large portion of the stage when thrown this way.
-If a transition comes up and grabs a launched hydrant, the hydrant will bounce in place, acting as a wall, regardless of it's previous trajectory, so long it was close enough to the ground for the transition's floor to reach it. I haven't messed with this one as much as I probably should.
That concludes Castle Siege !
Assume in every post I make that I am talking about our default moveset.
1st phase:
-Slanted surface. This is ALWAYS an advantage. We can easily regrab Galaga, Strawberry, Melon and Apple. Z-dropped fruits get horizontal movement when dropped on the slant. Interesting bounces on fruits and hydrants (Keep in mind Orange does not bounce off of slants but will stay active and follow the slant along the ground when thrown).
During this part of the stage both platforms are low enough for Usmashes to go through, and fruit/hydrant bounces to reach. They are also low enough that Fair>Hydrant will bring us on top of the platform, so keep that in mind.
The slant in the middle is what allows us to control pretty much everything.
A Z-dropped fruit on that slant controls the area below the left platform. If you have a Hydrant down there, when the fruit hits it, it will bounce up to the platform, controlling some of that space too.
If you Z-drop a fruit in this same situation while a water blast is coming out, your fruit will be gushed back to the right side, controlling that area.
This alone controls most of the screen without launching a hydrant, actually throwing a fruit or placing a trampoline.
Once you mix all of those in, the entire stage is yours to command.
For example, put a trampoline by the ledge: Bam, the entire area below the platform near that ledge is now off limits and they are forced to recover above the platform. Murder them for this as there is no longer a guessing game at all.
-Low platforms allow Usmash launched hydrant when the hydrants are on the platform and you are below. This launches it at an interesting angle, so that's useful too (Can also be done on BF and Lylat, though on BF it's kind of less useful since it hits the top platform).
-Small-ish blast zones. When combined with our stage control on this phase, this becomes a boon as we pretty much control the match then kill whenever we want on this phase.
2nd phase:
-This is the camping phase. Hydrants, Keys, Galaga and bell all go through the statues. Abuse this heavily.
-Galaga, Melon, Apple, and Strawberry are all easily regrabbed off of the slanted top platforms. The first 3 in this list can be useful for instant launching the hydrant (I am refering to the instant redrop tactic I put in the social thread the other night).
-My personal strategy for this phase is to camp with keys and hydrants, constantly launching the hydrants. They will attempt to camp the platforms on top of the statues, but within 6-8 hydrants you will knock both of those out, turning the stage into another FD.
The issue with this is that you are going to completely scale your hydrant. On the plus side, it means other moves that would usually be to stale to kill like Nair and Bair are back to full kill power. Also even staled out, hydrant is powerful, and opponents are still going to try to stay far from it.
3rd phase:
-Tilts everywhere. Abuse this and make things bounce in unpredictable ways.
-Be very aggressive offstage. This form has a huge offstage area, and due to the tilts a lot of characters have some issues recovering, so make their job of recovering that much harder.
-This is basically a tilting FD. It has all of the advantages of FD with the added benefits of the two above factors.
-Hide trampolines: Due to the rapid tilting, you can throw a trampoline down, have the stage cover it, then tilt again to put it back in the opponents way again before it disappears. This is pretty situational, but once they've been punished for hitting a hidden tramp, they will think twice about approaching any place you recently put one down, especially since most people won't know exactly how long those last.
Transitions:
-Dthrow on top of where pits are going to be is pretty much a suicide throw.
-Throwing fruits as the transition appears/disappears changes the way they act. As transitions appear, the ground will rush up and grab the item, allowing you to regrab it (I actually need to test if this will work with key). As the transition disappears, it will cause the fruit to have a downwards diagonal angle compared to it's usual trajectory. This is most visible with the melon, which controls the a large portion of the stage when thrown this way.
-If a transition comes up and grabs a launched hydrant, the hydrant will bounce in place, acting as a wall, regardless of it's previous trajectory, so long it was close enough to the ground for the transition's floor to reach it. I haven't messed with this one as much as I probably should.
That concludes Castle Siege !
If you have any questions or recommendations, please private message me and keep posts on the thread related to the stage we are discussing.
Last edited: