Myollnir
Smash Ace
RISK/REWARD AND KEY KO PERCENTS
How to use:
This is for all of you who've worked so hard to mindgame the crap out of your opponent to land that sexy Ivysaur u-smash only to have your opponent survive. This data shouldn't be memorized, but rather if you're having trouble with a specific matchup, this might be a good thing to take a look at and keep in mind.
Why does this matter? Move decay is very noticeable in Brawl, and you want to save your KO moves for when they'll actually KO. If you land Charizard's u-smash at 5% before it's guaranteed to KO, that move is now staler, and won't kill for even longer. If you had waited for another 5%, that u-smash would have meant the stock. Also, most KO moves are punishable, and you don't want to risk leaving yourself open when the reward if you hit won't even get the KO.
Judging the risk-reward factor of an action is important in Brawl, especially for high risk moves such as smashes. To consider every aspect in judging risk-reward requires too much thought to be done in a real match. However, one important and easily analyzed factor is whether KO moves will actually KO. Moves like the u-smashes that only kill off the top are relatively simple, as you only have your opponents DI to consider. Moves without a strictly vertical trajectory are more complicated, as you have to think about where you are on the stage as well. The optimal DI for a vertical launch is horizontally. For any other move, optimal DI would be towards the corner of the stages. It's fairly easy to achieve perfect DI for vertical launches, but significantly harder to be perfect at aiming for the corner.
Analyzing Pokemon Trainer in this way has the added variable of fatigue. Each move has 8 values listed per matchup, because there are three parameters to consider when making your decision: stage, fatigue, and opponent's DI. The tested values were chosen to provide a good range for each parameter. If you're at the third transformation of Castle Siege and you're on the side that's tilted up, you know that you'll KO a few percentage points before you would on FD. If you're just barely fatigued (80% power) you know that you'll kill before you would at full fatigue, but after you would unfatigued. Lastly, if you suspect that your opponent will mess up their DI, you might try to land the move before the DI percentages shown. Your own percentage is something to consider as well. Each time you attempt to land a move you need to make a judgement call - if you're at 110% as Ivysaur and Snake has to miss his DI and forget to momentum cancel in order for u-smash to KO, you're probably better off choosing a safer option.
Moves with trajectories that are not purely horizontal are more complicated. As mentioned before, it is more difficult to DI these moves perfectly. This means that even though a KO may not be guaranteed with Squirtle's d-throw, for example, you might still use it anyways and hope that your opponent doesn't DI perfectly. Think about the skill of your opponent and how much experience he might have against Pokemon Trainer. If he doesn't know the exact trajectory of Squirtle's d-throw, it is much more likely that he won't use optimal DI. Where you are on the stage is also a factor - obviously if you get the grab on the edge of the stage your opponent is forced to DI up more, and may be killed off the top sooner than if you get the grab in the centre.
What these values mean:
All of these values listed have already taken into account momentum cancelling, since it's reasonable to expect that your opponent will be able to buffer and fast fall an aerial consistently. DI or NO DI refers only to the direction your opponent is sent, not on whether he momentum cancels. These were not done in training mode, and all values are assuming the move is fresh. Fatigued values are taken at full fatigue (ie- 70% of your unfatigued power), so keep in mind that if you're just barely fatigued you will kill somewhere between fatigued and unfatigued values. Halberd was chosen because it has the lowest ceiling of the common legal stages - all testing was done while the stage was on the ship itself (not the moving platform). Final Destination was used because its ceiling has the same height as many common stages. Taken from Thinkaman's Project Vertical, common stage ceiling heights are:
100/97/93 - Jungle Japes
88/84/78/67 - Luigi's Mansion
85 - Pirate Ship
84 - Pictochat
83/75 - Pokemon Stadium 2
82/75/68 - Battlefield
82 - Final Destination
82 - Delfino Plaza
82/74/67 - Norfair
82/75 - Yoshi's Island
82/74 - Lylat Cruise
82, 88, 81 - Castle Siege
82/74 - Smashville
81, 77 - Frigate
81/74/68 - Brinstar
77/75/68, 73/65 - Halberd
75 - Rainbow Cruise
75 - Green Greens
...where numbers separated by slashes denote different platform heights, while numbers separated by commas denote different stage transformations.
Note that on Rainbow Cruise when you're on the boat the ceiling is actually comparable to Halberd's. Also, Pictochat and Pirate Ship have ceilings that are just slightly higher than Final Destination.
One important thing to note: I tested these values myself, inputting both the KO move and optimal DI. When I reached a percent where I was no longer able to survive, I wrote this number down as the data presented. Since I was inputting for both characters, it's entirely possible I messed up the DI and your opponent may be able to survive even at the percents shown here. This, combined with the fact that Brawl keeps track of fractional percents, means that these values should not be considered as completely accurate. However, if you add 2-3% on to each number, I'd be very surprised if your opponent survives then.
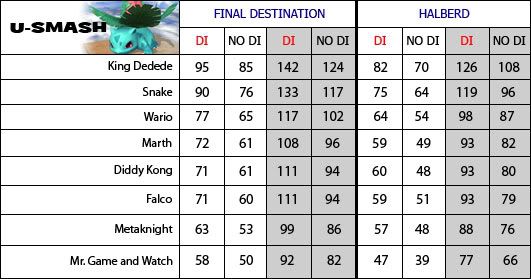
The Data:
I chose eight of the more common characters in today's scene. Values on each stage are given with DI and with no DI (but still with momentum cancelling). Numbers in the grey boxes show KO percents when fully fatigued.