
WHO: This guide is for Windows users who have wanted to give Linux a try, but never got around to it. Or perhaps you didn't know how to go about installing it, or maybe it was just unfamiliar. This guide is for you. I will provide you with a step-by-step guide describing how to make it so that your computer has both Windows and Linux installed on it, and asks you which you want to boot at startup.
WHY: For a long time, Linux was a great alternative to other OS's for computer experts. But it was notoriously "user-unfriendly". Certainly not something you'd install on your grandmother's machine!
But this is not true anymore thanks to the currently most popular version (referred to as "distributions" or "distros") of Linux is called Ubuntu. (pronounced "OO-boon-too") The motto of Ubuntu is "It just works", and that is so very true. You will find the user experience extraordinarily simple and streamlined.
But more than that, Ubuntu is Free. Free in the sense of both price and of liberty. Ubuntu is Open Source, and community supported. Show your support for the future of software by installing Ubuntu, and release yourself from the proprietary clutches of Microsoft!
WHAT: We will be installing Ubuntu version 8.10 on your machine that already has Windows on it. The process will not destroy or in any way harm your files. We are not deleting Windows in any way. In fact, Windows won't even know that anything happened.
WHEN: Now! I dunno, I figured I'd put a "when" in here, but it doesn't make much sense. I guess.
HOW: Before I start I want to say: Read the entire guide before executing any of it. I don't want to scare anyone off, but we ARE going to be changing your partitions and stuff, and it can be difficult to reverse any changes once made.
Now then, let's get into it!
1) Making an Ubutnu install CD
The first thing you're going to need is Ubuntu of course! The most current version right now is 8.10. You can download it here. Just click "Download" and then "Begin download", making sure that Ubuntu 8.10 is selected right above that.
What you are downloading is an ISO file. That is a CD image file meant to be burned to a CD. So you're going to need a CD burner and a spare burnable CD.
Note: I've heard of problems arising from using CD-RW's. Try using standard CD-R's instead. You shouldn't be needing to rewrite to the disk anyways.
*how to burn an ISO to a CD*
<-- I'll edit in a step-by-step on how to burn the ISO to a disk and make sure it's bootable. For now, just google around for it. It's pretty standard.
Alternatively, you can order a CD from Canonical (guys who make and support Ubuntu) for a relatively small price. But of course burning your own CD is cheaper and faster!
2) Booting from the CD
So now you have your CD with Ubuntu 8.10 burned on it. Go ahead and label it something cool. I dunno, maybe "Linux: OS for Ninjas". This step is important.
The CD is "bootable" which means that your computer can read off of it and load Ubuntu right from the disk when the computer starts. Right now, your computer is set to read off of your hard drive (where Windows is) and boot from that. We might have to go into the bios of your computer to make it so that we boot from the CD.
But first just put the CD into your computer and restart it. Hopefully it will pop up some message asking you if you want to boot from the CD, or it might just go right into Ubuntu without asking. If either of these are the case then you're lucky, and set to move onto step three.
If not, if Windows just comes back up like normal, then we have to do something else. Go ahead and restart your computer, but this time you'll have to hold down on a button as it starts. It's usually F12, but can potentially change depending on your computer. As the machine is booting, it should say somewhere: "Push Del to enter Setup. Push F12 to to edit boot menu" or something to that effect. Going into the boot menu is what we want.
*pictures of boot menu*
Now you should see different options of devices to boot from. You should see your Hard Drive there, your CD drive, maybe a floppy is you have one, any USB drives, etc...
Select your CD drive. Ubuntu should now begin to load.
3) Play around. That's right. Just mess with it.
Ubuntu at first will only do a "Live" version. This means that you can run it, use it, play with it, but not actually make any changes to your computer! You will notice that it may run a bit slower than it will when fully installed. This is because it's running from the CD, which is rather slow. Once fully installed, it will be much faster etc...
It is important that you play around a bit because up until this point, we have made no actual changes to your machine. If you stop now for any reason, then you will have made no changes to your system and are home free. So if there are any major problems, deal with them now.
4) Making a partition for Ubuntu
Now that you're ready to install Ubuntu, we need to give it a place to live. Currently, Windows is hogging your entire Hard Drive, so we need to tell it to give us some space.
Vista has a very nice partition editor for us to use. In the past, edition partitions was very difficult, but not so much anymore.
Inside Windows, go to Start -> then right click "Computer" and click "Manage". This will bring up the Computer Management window.

On the left hand side, there is an option that says "Storage", click that then click "Disk Management" right below it. You should now be able to see the different disk partitions that your computer has. A partition is a way of separating your Hard Drive into several different ones. That way your computer thinks you have multiple hard drives when really there's only one.
What you want to do is right click on the C: drive and select "shrink partition". Then shrink it by however much you would like. Keep in mind that you probably still want to keep SOME space for Windows. But also keep in mind that however much you select now is going to be the total space available to Ubuntu. Note that you will need 2 Gigs of space as a "swap" zone that isn't going to be for either Ubuntu nor Windows.
Now, what we need to do is make two new partitions. But since Microsoft is dumb and doesn't want you to switch to Linux, you can't make them through the Windows partition manager. For this, we need to switch back to Ubuntu.
Follow step 2 again and boot from the CD into Ubuntu.
On the top of the screen, select Administration, then Partition Editor. This will bring up GParted, Ubuntu's partition editor.

Right click on the Unallocated space and tell it to create a new partition. Select the file format as "SWAP" (it might call it Lunux-swap). Tell it to be 2 Gigs in size. Now make another partition out of the unallocated space which is has the file format "EXT3", and use the rest of the unallocated space.
Select "apply changes" and give it a minute to do the work.
Now you're ready to actually install!
5) Installing Ubuntu
This part is remarkably easy. On the desktop of Ubuntu is a link called "Install" with a big arrow on it.
Double click that.
Now you'll be prompted with some options about language and timezone and stuff. Go ahead and fill it out for yourself. Keep going through the menu options until you get to this:
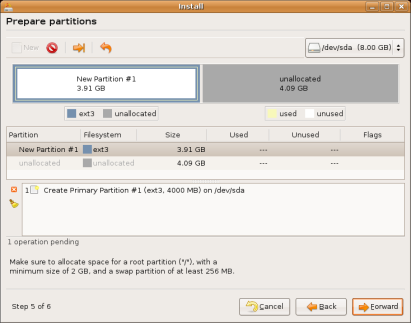
This is where you get to choose where to install Ubuntu. Select "Manual" and hit next. Now you'll be presented with a list of your partitions.
*picture of next screen*
Make sure to select the EXT3 partition you just made as the install path.
Hit next and you're on your way. The computer may restart.
6) Profit
You've done it! You're all set! You now have a machine dual-booting with Windows and Ubuntu Linux.
When the computer starts, you should see a menu option of which Operating System to start, Ubuntu or Windows.
If you wish to edit this menu, you can proceed to the next step. But if you're satisfied with how it is, you can stop here and enjoy!
7) (Optional) Editing the GRUB boot menu
By default GRUB (the thing which asks you which OS to load when your computer starts) will have Ubuntu at the top and Windows at the bottom, and if you don't select anything within 8 seconds, it will automatically boot into Ubuntu.
GRUB looks like this by default:

You can change this, however. You can make it do and say all sorts of cool things. One of my favorites is to put in an option called "Self-Destruct" which then runs a countdown and then shuts off.
Lol.
*details on editing GRUB to come*
There you have it! I will be editing this a lot soon with pictures and more details. But this should be good to go off of for now. Hopefully I will add some color and stuff to make it mooe readable, too.
I would appreciate any feedback, so feel free to let me know what you think.
Enjoy!
-AltF4
WHY: For a long time, Linux was a great alternative to other OS's for computer experts. But it was notoriously "user-unfriendly". Certainly not something you'd install on your grandmother's machine!
But this is not true anymore thanks to the currently most popular version (referred to as "distributions" or "distros") of Linux is called Ubuntu. (pronounced "OO-boon-too") The motto of Ubuntu is "It just works", and that is so very true. You will find the user experience extraordinarily simple and streamlined.
But more than that, Ubuntu is Free. Free in the sense of both price and of liberty. Ubuntu is Open Source, and community supported. Show your support for the future of software by installing Ubuntu, and release yourself from the proprietary clutches of Microsoft!
WHAT: We will be installing Ubuntu version 8.10 on your machine that already has Windows on it. The process will not destroy or in any way harm your files. We are not deleting Windows in any way. In fact, Windows won't even know that anything happened.
WHEN: Now! I dunno, I figured I'd put a "when" in here, but it doesn't make much sense. I guess.
HOW: Before I start I want to say: Read the entire guide before executing any of it. I don't want to scare anyone off, but we ARE going to be changing your partitions and stuff, and it can be difficult to reverse any changes once made.
Now then, let's get into it!
1) Making an Ubutnu install CD
The first thing you're going to need is Ubuntu of course! The most current version right now is 8.10. You can download it here. Just click "Download" and then "Begin download", making sure that Ubuntu 8.10 is selected right above that.
What you are downloading is an ISO file. That is a CD image file meant to be burned to a CD. So you're going to need a CD burner and a spare burnable CD.
Note: I've heard of problems arising from using CD-RW's. Try using standard CD-R's instead. You shouldn't be needing to rewrite to the disk anyways.
*how to burn an ISO to a CD*
<-- I'll edit in a step-by-step on how to burn the ISO to a disk and make sure it's bootable. For now, just google around for it. It's pretty standard.
Alternatively, you can order a CD from Canonical (guys who make and support Ubuntu) for a relatively small price. But of course burning your own CD is cheaper and faster!
2) Booting from the CD
So now you have your CD with Ubuntu 8.10 burned on it. Go ahead and label it something cool. I dunno, maybe "Linux: OS for Ninjas". This step is important.
The CD is "bootable" which means that your computer can read off of it and load Ubuntu right from the disk when the computer starts. Right now, your computer is set to read off of your hard drive (where Windows is) and boot from that. We might have to go into the bios of your computer to make it so that we boot from the CD.
But first just put the CD into your computer and restart it. Hopefully it will pop up some message asking you if you want to boot from the CD, or it might just go right into Ubuntu without asking. If either of these are the case then you're lucky, and set to move onto step three.
If not, if Windows just comes back up like normal, then we have to do something else. Go ahead and restart your computer, but this time you'll have to hold down on a button as it starts. It's usually F12, but can potentially change depending on your computer. As the machine is booting, it should say somewhere: "Push Del to enter Setup. Push F12 to to edit boot menu" or something to that effect. Going into the boot menu is what we want.
*pictures of boot menu*
Now you should see different options of devices to boot from. You should see your Hard Drive there, your CD drive, maybe a floppy is you have one, any USB drives, etc...
Select your CD drive. Ubuntu should now begin to load.
3) Play around. That's right. Just mess with it.
Ubuntu at first will only do a "Live" version. This means that you can run it, use it, play with it, but not actually make any changes to your computer! You will notice that it may run a bit slower than it will when fully installed. This is because it's running from the CD, which is rather slow. Once fully installed, it will be much faster etc...
It is important that you play around a bit because up until this point, we have made no actual changes to your machine. If you stop now for any reason, then you will have made no changes to your system and are home free. So if there are any major problems, deal with them now.
4) Making a partition for Ubuntu
Now that you're ready to install Ubuntu, we need to give it a place to live. Currently, Windows is hogging your entire Hard Drive, so we need to tell it to give us some space.
Vista has a very nice partition editor for us to use. In the past, edition partitions was very difficult, but not so much anymore.
Inside Windows, go to Start -> then right click "Computer" and click "Manage". This will bring up the Computer Management window.
On the left hand side, there is an option that says "Storage", click that then click "Disk Management" right below it. You should now be able to see the different disk partitions that your computer has. A partition is a way of separating your Hard Drive into several different ones. That way your computer thinks you have multiple hard drives when really there's only one.
What you want to do is right click on the C: drive and select "shrink partition". Then shrink it by however much you would like. Keep in mind that you probably still want to keep SOME space for Windows. But also keep in mind that however much you select now is going to be the total space available to Ubuntu. Note that you will need 2 Gigs of space as a "swap" zone that isn't going to be for either Ubuntu nor Windows.
Now, what we need to do is make two new partitions. But since Microsoft is dumb and doesn't want you to switch to Linux, you can't make them through the Windows partition manager. For this, we need to switch back to Ubuntu.
Follow step 2 again and boot from the CD into Ubuntu.
On the top of the screen, select Administration, then Partition Editor. This will bring up GParted, Ubuntu's partition editor.
Right click on the Unallocated space and tell it to create a new partition. Select the file format as "SWAP" (it might call it Lunux-swap). Tell it to be 2 Gigs in size. Now make another partition out of the unallocated space which is has the file format "EXT3", and use the rest of the unallocated space.
Select "apply changes" and give it a minute to do the work.
Now you're ready to actually install!
5) Installing Ubuntu
This part is remarkably easy. On the desktop of Ubuntu is a link called "Install" with a big arrow on it.
Double click that.
Now you'll be prompted with some options about language and timezone and stuff. Go ahead and fill it out for yourself. Keep going through the menu options until you get to this:
This is where you get to choose where to install Ubuntu. Select "Manual" and hit next. Now you'll be presented with a list of your partitions.
*picture of next screen*
Make sure to select the EXT3 partition you just made as the install path.
Hit next and you're on your way. The computer may restart.
6) Profit
You've done it! You're all set! You now have a machine dual-booting with Windows and Ubuntu Linux.
When the computer starts, you should see a menu option of which Operating System to start, Ubuntu or Windows.
If you wish to edit this menu, you can proceed to the next step. But if you're satisfied with how it is, you can stop here and enjoy!
7) (Optional) Editing the GRUB boot menu
By default GRUB (the thing which asks you which OS to load when your computer starts) will have Ubuntu at the top and Windows at the bottom, and if you don't select anything within 8 seconds, it will automatically boot into Ubuntu.
GRUB looks like this by default:
You can change this, however. You can make it do and say all sorts of cool things. One of my favorites is to put in an option called "Self-Destruct" which then runs a countdown and then shuts off.
Lol.
*details on editing GRUB to come*
There you have it! I will be editing this a lot soon with pictures and more details. But this should be good to go off of for now. Hopefully I will add some color and stuff to make it mooe readable, too.
I would appreciate any feedback, so feel free to let me know what you think.
Enjoy!
-AltF4


")