• Welcome to Smashboards, the world's largest Super Smash Brothers community! Over 250,000 Smash Bros. fans from around the world have come to discuss these great games in over 19 million posts!

    You are currently viewing our boards as a visitor. Click here to sign up right now and start on your path in the Smash community!

If this thread gets over 100,000 replies...

Status
Not open for further replies.

deepseadiva

Bodybuilding Magical Girl
Joined
Mar 11, 2008
Messages
8,001
Location
CO
3DS FC
1779-0766-2622
And just in case there seems to be a flaw...

Link - -7
Peach - 79
 

Psychoace

Smash Champion
Joined
Jan 20, 2006
Messages
2,689
Location
Manliest city in Texas
Link had 20 hurt and a extra 5 hurt for anyone near the victim. Since no one was NEAR peach, that effect couldn't happen no more.

Peach however didn't have anything special. Just her heal and her 3 types of attacks. That's why I was able to combine it into one big attack.
I was told by a1lion that I couldn't combine captain falcons final smash...
 

Rockin

Juggies <3
BRoomer
Joined
Oct 16, 2006
Messages
3,546
Location
Bronx, New York
I was told by a1lion that I couldn't combine captain falcons final smash...
That was because before then, there was plenty of people. Once the list got smaller to the amount that was less then three, I was able to combine it. Mario was doing plenty of that as well for his Final Smashes.
 

Cha0s Finale

Smash Cadet
Joined
Dec 6, 2006
Messages
68
That was because before then, there was plenty of people. Once the list got smaller to the amount that was less then three, I was able to combine it. Mario was doing plenty of that as well for his Final Smashes.
FYI: I never combined Mario's FS's. Only thing I ever did was not use all of the attacks of it. I thought you couldn't combine them. If I knew that, I would've.
 

A1lion835

Smash Champion
Joined
Jan 7, 2008
Messages
2,844
Location
Lurking the Kirby Social thread with my rock buds.
That means, however, that you didn't have enough firepower to finish us off, even WITH 2 final smashes! It's still on, *****es! The last attack made by Peach started with us having 5 HP, but in reality, we had 13 (Meno's fs on this page illegally combine too many hurts). You jabbed which brought us down to 8! So we still have 8 health! Meno's previous 15-damage fs was also illegal, which means we actually have 15 health! add me fsing, and voila.

Link - 23
Peach - 56
 

Rockin

Juggies <3
BRoomer
Joined
Oct 16, 2006
Messages
3,546
Location
Bronx, New York
*sigh*

Let's end this.

Link - 16
Peach - 59

I'm surprised none of ya didn't noticed this a lot sooner. Seriously >___>
 

akkon888

Smash Journeyman
Joined
Aug 20, 2008
Messages
236
Link - 13
Peach - 55

Wow, that was truly ingenius.

It should be that we have more health due to the continuous stacking, but oh well. It's a game.
 

chandy

Smash Journeyman
Joined
Jul 22, 2008
Messages
358
Location
UK
After falling over a 2nd time Link stood up again wearily clutching his head... <.<
 

AndreVeloso

Smash Apprentice
Joined
Feb 26, 2009
Messages
155
Location
North London, UK
That breeze was a final cutter, as said by Kirby,
The bay's a touch of cold and the day is no longer early,
The water fills my hair and it is no longer curly,
This rhyme was made by a boy, though it sounds girly.
 

akkon888

Smash Journeyman
Joined
Aug 20, 2008
Messages
236
Link - 87
Peach - 40

Yeah, we just want to be able to kill you guys once. If we were sore about it we'd be whining ftl.
 

rm88

Smash Ace
Joined
Jul 14, 2005
Messages
830
NNID
Rm88Go
3DS FC
5241-1973-5614
Crouch-cancelled-Melee-Dsmash

Link - 5
Peach - 100
 

ranmaru

Smash Legend
Joined
Feb 10, 2008
Messages
13,297
Switch FC
SW-0654 7794 0698
OH BUT IT WAS YOU WHO PASSED THE INTERSECTION! Please please, no more question. That is the end of the lesson. Now don't you be messing. SO NOW YOU HAVE MY BLESSING, if you were guessing.
 

Plorf

Smash Apprentice
Joined
Jan 28, 2009
Messages
124
Location
Silver Spring, MD
Workspace


|||SIMIRROR|||

"The master of reflection, Simirror joins the Brawl!"


|||||||


|||BACKGROUND|||

Simirrors are mythical, wizard-like enemies that appear in Kirby Super Star and its remake. They are garbed in flowing green robes and wear white wizard hats with stars on them. They wield powerful wands which can slash out with mirror-like objects. They give Kirby the Mirror ability when inhaled and swallowed.
Simmirors are also the helpers for the Mirror ability. They always wear red robes with a light brown hat and can do virtually anything Mirror Kirby can.
The shadowy faces and robes of Simirrors, as well as their status as wizards, are reminiscent of the Black Mages of Final Fantasy fame.

Simirrors serve as both an enemy and a helper in these games. They wander the levels waiting for Kirby to approach, and then unleash a barrage of glassy magic at him when he steps into their range. If you fire a projectile at this shield (such as Cutter Kirby's boomerang), it will be reflected off (hence the name) and inflict damage. As stated above, Simirror gives the Mirror ability in his game.
In Helper to Hero, Simirror is playable. This version of Simirror features a green robe, much like the enemy version, but has the same brown hat that the helper version wears. They can shield themselves in a rainbow-colored bubble to protect themselves, much like Mirror Kirby can.


|||STATS|||


Size

Weight

Walk

Run

Traction

Power

Attack Speed

Range

Priority

First Jump

Second Jump

Recovery

Fall Speed

Crouch

Hover:
Crawl:
Wall jump:
Wall cling:
Glide:


|||ANIMATIONS|||


Standard Pose

Idling

Walking

Running

Dashing

Crouching

First Jump

Second Jump

Shield

Spot Dodge

Roll

Air Dodge

Asleep

Dizzy


|||||||


|||MOVESET|||


|||||||


|||SPECIALS|||


Standard -

Forward -

Up -

Down -


|||STANDARDS|||


Standard Attack -

Dash -


|||TILTS|||


Forward -

Up -

Down -


|||SMASHES|||


Forward -

Up -

Down -

|||AERIALS|||


Neutral -

Forward -

Back -

Up -

Down -


|||THROWS|||


Grab -

Forward -

Back -

Up -

Down -


|||FINAL SMASH|||

Final Smash -

|||||||


|||EXTRAS|||
 

A1lion835

Smash Champion
Joined
Jan 7, 2008
Messages
2,844
Location
Lurking the Kirby Social thread with my rock buds.


SIMIRROR

"The master of reflection, Simirror joins the Brawl!"


|||||||

|||BACKGROUND|||

Simirrors are mythical, wizard-like enemies that appear in Kirby Super Star and its remake. They are garbed in flowing green robes and wear white wizard hats with stars on them. They wield powerful wands which can slash out with mirror-like objects. They give Kirby the Mirror ability when inhaled and swallowed.
Simmirors are also the helpers for the Mirror ability. They always wear red robes with a light brown hat and can do virtually anything Mirror Kirby can.
The shadowy faces and robes of Simirrors, as well as their status as wizards, are reminiscent of the Black Mages of Final Fantasy fame.

Simirrors serve as both an enemy and a helper in these games. They wander the levels waiting for Kirby to approach, and then unleash a barrage of glassy magic at him when he steps into their range. If you fire a projectile at this shield (such as Cutter Kirby's boomerang), it will be reflected off (hence the name) and inflict damage. As stated above, Simirror gives the Mirror ability in his game.
In Helper to Hero, Simirror is playable. This version of Simirror features a green robe, much like the enemy version, but has the same brown hat that the helper version wears. They can shield themselves in a rainbow-colored bubble to protect themselves, much like Mirror Kirby can.


*** TWIST ***

Simirror has a lot of attacks that reflect different things, and a lot of quirky disjointed hitboxes. WATCH OUT!

*** STATS ***

Size

Weight

Walk

Run

Traction

Power

Attack Speed

Range

Priority

First Jump

Second Jump

Recovery

Fall Speed

Crouch

Hover:
Crawl:
Wall jump:
Wall cling:
Glide:

*** ANIMATIONS***

Standard Pose
Same as above, just put the stuff you'd usually put next to the stat down here.

Idling

Walking

Running

Dashing

Crouching

First Jump

Second Jump

Shield

Spot Dodge

Roll

Air Dodge

Asleep

Dizzy

***


*** MOVESET ***

*** SPECIALS ***


Special - Name here
Info here. Apply to all.

Forward -

Up -

Down -

*** STANDARDS ***


Standard Attack -

Dash -

*** TILTS ***


Forward -

Up -

Down -

*** SMASHES ***


Forward -

Up -

Down -

*** AERIALS ***


Neutral -

Forward -

Back -

Up -

Down -

*** THROWS ***

Grab -

Forward -

Back -

Up -

Down -

*** FINAL SMASH ***

Final Smash -

***


*** EXTRAS ***​
Uh...not to be rude, but...why are you posting this here?
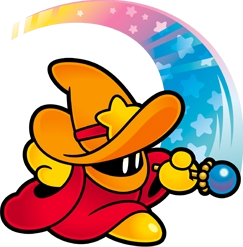
 

MPH Deku

Smash Journeyman
Joined
Jul 14, 2008
Messages
451
Location
the sea of unconsciousness


SIMIRROR

"The master of reflection, Simirror joins the Brawl!"


|||||||

|||BACKGROUND|||

Simirrors are mythical, wizard-like enemies that appear in Kirby Super Star and its remake. They are garbed in flowing green robes and wear white wizard hats with stars on them. They wield powerful wands which can slash out with mirror-like objects. They give Kirby the Mirror ability when inhaled and swallowed.
Simmirors are also the helpers for the Mirror ability. They always wear red robes with a light brown hat and can do virtually anything Mirror Kirby can.
The shadowy faces and robes of Simirrors, as well as their status as wizards, are reminiscent of the Black Mages of Final Fantasy fame.

Simirrors serve as both an enemy and a helper in these games. They wander the levels waiting for Kirby to approach, and then unleash a barrage of glassy magic at him when he steps into their range. If you fire a projectile at this shield (such as Cutter Kirby's boomerang), it will be reflected off (hence the name) and inflict damage. As stated above, Simirror gives the Mirror ability in his game.
In Helper to Hero, Simirror is playable. This version of Simirror features a green robe, much like the enemy version, but has the same brown hat that the helper version wears. They can shield themselves in a rainbow-colored bubble to protect themselves, much like Mirror Kirby can.


*** TWIST ***

Simirror has a lot of attacks that reflect different things, and a lot of quirky disjointed hitboxes. WATCH OUT!

*** STATS ***

Size

Weight

Walk

Run

Traction

Power

Attack Speed

Range

Priority

First Jump

Second Jump

Recovery

Fall Speed

Crouch

Hover:
Crawl:
Wall jump:
Wall cling:
Glide:

*** ANIMATIONS***

Standard Pose
Same as above, just put the stuff you'd usually put next to the stat down here.

Idling

Walking

Running

Dashing

Crouching

First Jump

Second Jump

Shield

Spot Dodge

Roll

Air Dodge

Asleep

Dizzy

***


*** MOVESET ***

*** SPECIALS ***


Special - Name here
Info here. Apply to all.

Forward -

Up -

Down -

*** STANDARDS ***


Standard Attack -

Dash -

*** TILTS ***


Forward -

Up -

Down -

*** SMASHES ***


Forward -

Up -

Down -

*** AERIALS ***


Neutral -

Forward -

Back -

Up -

Down -

*** THROWS ***

Grab -

Forward -

Back -

Up -

Down -

*** FINAL SMASH ***

Final Smash -

***


*** EXTRAS ***​
Hell yes! My people!
 

Plorf

Smash Apprentice
Joined
Jan 28, 2009
Messages
124
Location
Silver Spring, MD
I'm pretty new here, so I just found some old thread to use as a workspace for MYM5, as I don't have enough old posts to edit. Sorry if I disturbed you!
-----------------------------------------------------

>>MAHAGANESHARIFF

剛球大魔神


BASIC INFO<<

Maha Ganeshariff is the boss of the RETRIEVE DATA mission in Mega Man Zero. He doesn't have much have much of a personality, being more task-oriented. Maha is modeled after the Hindu god Ganesha, who is elephantine.

MEGA MAN ZERO COMPLETE WORKS BIO
The Mutos Reploid responsible for the storage and distribution of information for the Deep sea Squadron lead by Leviathan. To help ensure the security and integrity of the data Maha Ganeshariff handles, he was built to be a data server that can not only transport information, but defend itself if necessary. With valuable servers as innards, his outer body was built as a large, solid shell to protect their contents.


Statistics

Size 11/10
Maha Ganeshariff is easily the biggest character in the game. His main body is the size of Bowser, meaning his total size is immense.

Weight 11/10
Naturally, to go along with this massive size is massive weight.

Power 6/10
Maha's not actually a true heavyweight in this respect, but he does have KO power that's a little above average.

Ground Speed 1/10
When you're just measuring his walk/dash speed, Maha is quite sluggish, but this can be helped.

Air Speed 6/10
In a nice turn of events, Ganeshariff is actually fairly nimble in the air.

Attack Speed 5/10
A lot of his most important attacks come out quickly, but there are enough laggy attacks to give him an overall average rating.

Range 9/10
Even on his own, Maha's huge size contributes to a large physical range. Even excluding that, though, he has several projectiles at his disposal.

Priority 8/10
Maha's priority ranges from utterly supreme to above-average, generally speaking. He really got lucky in this department.

Traction 3/10
Turning around is no easy feet when you're a bazillion feet tall, you know.

Jumps 4/10
His first jump is rather mediocre, but his second is actually pretty good. However, he won't be spending much time in the air.

Falling Speed 6/10
Oddly enough, he doesn't quite have a really fast fall speed. This can't really be explained rationally.

Recovery 5/10
Ganeshariff's recovery is, in essence, a basic tether.

Crouch 1/10
... You're kidding, right?


Basic_Animations

Standard Pose
Fake Man stands completely motionless, his hands behind his back.

Idle Pose

This one's basic, he simply stands in place while in a looping "fighting stance" animation. There are no variations in this pattern. The animation above shows the idle pose as well as the standard combo.

Walking
For lack of a better term, Maha waddles. This is slow.

Running
Ganeshariff waddles... a little faster.

Dashing
At last now his waddle isn't really awkward looking. That doesn't mean it's any better in comparison.

Crouching
Maha simply retracts his legs a little ways in.

First Jump
Maha Ganeshariff visibly has to kick off the ground here, with both legs needed.

Second Jump
Without as much effort, he does a similar motion.

Shield
Faster than in any attack, Ganeshariff transforms into a sphere to protect himself. This is an irregular shield, being comparable to Yoshi's.

Spot Dodge
While in a ball, he moves back a little and forward again. Long duration.

Roll
This is about as close to a real roll as you can get.

Air Dodge
Ganeshariff actually looks somewhat silly as he sprawls out his limbs momentarily.

Asleep
Ganeshariff merely stands utterly motionless.

Dizzy
Maha's head and torso spin in different directions.


MOVESET<<

Special_Attacks

Neutral Special Tusk Boomerang
Maha Ganeshariff grabs one of his tusks and throws it forward, with a slight curve towards the nearest enemy. The tusk then returns to him wherever he is. There can only be two out at a time, since Maha only has two tusks. This attack has relatively poor range, being half of final destination. Low lag on either end, 6% in one light hit that won't KO.

Side Special Spin Dash
First and foremost, this move is extremely important for moving Maha around the stage, since he's horrendously slow otherwise; in fact, this should be his main way of moving. That aside, Ganeshariff obviously has a Sonic complex, as he turns into a ball and rolls around in this attack. With rather punishable starting lag for tucking in all his limbs, Ganeshariff turns into a near perfect sphere and can move around freely-- and quite quickly: the same speed as Sonic's spin dash. He can even jump. This will dish out 5% a hit but very low knockback, meaning you can hit the same person multiple time in a row if they have bad DI. You also have very good priority in this move, beating out a nice chunk of attacks. When you press B again, you'll simply transform back with reasonably low lag. However, if you hit a wall, you'll bounce back quite a ways and experience a little more ending lag. That's not all bad though, since that bounce back deals some extra knockback.

An interesting thing happens if you press A while rolling: you'll launch out a bomb just like the one in your down special (below) that travels in a tight arc behind you before exploding on contact with anything. Maha can only shoot out a bomb every other second, meaning bombs are not quite spammable. The bombs are, however viable KO moves, doing 10% and some knockback that KOs at 150%, if the opponent is bad at surviving. Bomb explosions have disappointingly small hitboxes; they're the size of a crate item. The long startup lag might be offputting, but there are ways around it.


Up Special Trunk Tether
Tucking into an orb once more, Ganeshariff quickly extends his trunk a fair distance upwards, about the height of three R.O.B.s. Obviously, this is a tether recovery. Once he's sweetspotted the ledge with his trunk, Maha is able to freely swing horizontally and vertically. His trunk can't extend past the initial length, however. The main disadvantage of this is that Maha can't instantly pull himself up to the edge with invincibility frames, instead having to drag himself up over a few seconds. The plus side is that his body is a hitbox that deals 10% and light to moderate knockback depending on the momentum of the swing. The extending trunk will also deal damage upon contact: 7% and upwards knockback. Some starting lag, low ending lag.

Additionally, Maha can grab with this move. Foes who come in contact with the the tip of the trunk at any time during this move will stick to it. This allows Ganeshariff to reel them in and use throws, or just swing them around. Be careful, though, since the enemy won't be held for very long before they manage to break out. This could be extremely detrimental were Ganeshariff to try to recover with a foe on his trunk, but in reality the foe wattatched to the trunk will automatically perform a ledge grab themselves if they're in range of it. Maha will hang from them while they hang from the ledge: this earns them 3% damage per second until they go off the ledge, at which point Maha will grab the ledge himself (with his trunk).


Down Special Burst Cracker
Maha Ganeshariff pounds his fists together so his hands retract, and when he separates them, he's holding a bomb identical to the one used in the side special. It's only identical in looks however: this bomb is much deadlier. These bombs can be carried and thrown like an item, and can't be detonated on contact with the stage, or anything that isn't a hitbox. This means they'll only detonate upon being struck by something. The bombs, if let out on the stage, will explode after five seconds idle, whereas if it hits an opponent's hitbox, for example, it'll explode immediately. The blast mostly streams upwards, with strong upward knockback and 15% damage. There's also a lingering plume of smoke that rather obscures vision.

If your foe knows how to play against you, they'll know you have a few bomb moves that look identical, and here's a funny thing: just like Galaxy Man's probe-things, Ganeshariff's bombs can be swapped in their payload just through physical contact. This means that if you had a Burst Cracker on the ground, and landed a bomb from the down tilt or the side special on it, they'd switch places if they touched, essentially. Mindgames make this move work. Startup lag similar to G&W's bucket, low ending lag.


Standard_Attacks

Neutral Attack Flurry
Without much starting lag, Ganeshariff extends his arm and quite rapidly moves it up and down, rather like Kirby on a grander scale. This series of rapid strikes has extremely high priority, and will cancel out every projectile and physical attack. Luckilyfor your opponents, it only covers Ganeshariff's front, and has rather annoying ending lag. While you're attacking though, you can aim the strikes a bit upwards or downwards, but that only really helps against small characters or overhead projectiles. This attack deals 3% per hit, so racking up damage is not the main use.

Forward Tilt Spin Drive
Similarly to the standard attack, Maha thrusts his palm forwards, an action which does 6% and absolutely no knockback. This part of the attack also has extremely high priority, able to cancel out just about anything. It'll even stop someone's momentum. Anyway, if you press A again, Ganeshariff's torso will turn and his other hand will give the stunned foe a large blow that knocks them back half a Battlefield away. This isn't real knocback; they'll be in a constant flinch animation as if they've just been repelled by an invisible force. Fun attack, and useful too. You can see Maha's playstyle emerging already!

Up Tilt Strike Chain
Using his trunk once again, Maha extends it upwards, in one hit that does 7% and light upwards knockback. It has a fairly long duration, and a sweetspot at the tip that does 10% and decent knockback, but otherwise it's generic. However, this move is very similar to Sheik's chain. That means that, by holding A, you may move the trunk around in various patterns, while the sweetspot disappears. The tip of the trunk now has a very minute suction effect, while the body of the trunk will now do 4% per hit and much less knockback, meaning the move itself is a combo. You may use other attacks pretty soon after this, but there's still some lag to punish during.

Down Tilt Shock Wave
Maha Ganeshariff takes his fist and slams it down on the ground with a great deal of force. This is pretty laggy on either end, but it does have payoff. The obvious one is that the fist pound creates a sizable shockwave that extends out a platform in either direction, with the fist being the center. Obviously, it gets weaker as it goes, but foes who are on the ground when this move happens take 9% and are knocked upwards a ways. Those who are hit by the fist take an impressive 14% and rather high knockback upwards, as they bounce off the floor.

The more subtle benefit of this move is that, like in the down special, Maha's fist retracts as it punches, and it comes back out with a bomb with the same appearance as the other two. You can throw this one exactly like the the one from the down special. This one's a bit different than the other two, however. Instead of being a fiery explosive, the bomb gives off a stunning burst. The blast radius is quite large, being a Bowser in every direction. What it does is prevent the foe's inputs from taking any effect for about a second, then going into tumble animation. That means that you can approach the foe unhindered during that time. Very fun, especially if you swap it with a Burst Cracker. As a note, this bomb also detonates after five idle seconds, and earlier if it touches a hitbox.


Dash Attack Run Over
Finally using that sharp spike on his head, Maha leans forward from his dash as he takes a short hop in the air. The hitbox of this move is quite small: it's ONLY the spike. However, if the opponent hits it, they get stuck, and are forced to bear with Ganeshariff as he clumsily lands on the ground and picks himself up again. This transitions seamlessly into his normal grab, though you can skip another step if you add a button input.

Using a Spin Dash from this move will skip the grab process, and will instead proceed directly into the forward throw. If you'd like to know what that is, simply scroll down to the throw section. Perhaps use the "Find" function to get to it?


Smash_Attacks

Forward Smash Bump
This is another move in which Maha Ganeshariff curls into a ball. Before doing so, however, he extends his arms so that anyone who decides to go into them gets grabbed while he does the next part of the move. Now Maha springs forward and retracts all his limbs, knocking the foe against him as he transforms for 14-26% and forward knockback. Charging will also increase the initial range that he covers. Since Maha ends this move in a ball, rather than experience awful ending lag, he may use the side special directly from this, as well. Nifty.

Up Smash Tusk Extension
Maha Ganeshariff faces the screen. He proceeds to quickly extend his tusks upwards so that they resemble a beetle's horns. Each horn deals 9-13% based on charge and moderate knockback, meaning that if both hit the foe, they'll get high knockback and 18-26% damage. This is rather laggy at the start, and really slow to recover. Fortunately, you can press A or B to simply use a variation on your neutral special, only this one has a homing property. That means that if your opponent doesn't dodge, they'll get get hit in the face with one or two boomerangs for 6% each.

Down Smash Galactic Tornado
Well, it looks as if Maha is turning into a sphere again for this move. This time, though, his arms remain out. He then proceeds to spin his upper body quite quickly. This has a long duration. Contact with the arms deals out 16-27% damage and impressive knockback reminiscent of a bumper. There is a great deal of lag on either end, though, which can be a turnoff. Anyway, while you're waiting for this move to end, instead of grabbing a bite to eat, why not tilt the control stick to change the angle at which Ganeshariff spins?That way, you can optimize where you want to punish the foe, or where they won't punish you. If you tilt so that you touch the ground, you'l simply bounce back up a little. One last thing: You can jump while using this move. Interpret that as you wish.


Aerial_Attacks

Neutral Aerial Pop Out
Upon one press of A, Maha retracts all his limbs and head, a fairly laggy process. In this state, he takes knockback but no damage, this being somewhat of a defensive move. When you press A again, he pops his limbs back out again with each limb as a hitbox that deals 8% and pretty good knockback. It could go in one of five directions, of course. This is yet another move you can use your side special from at any point during it. If you land while still in ball form, you will automatically transfer to the side special.

Forward Aerial Around the World
Ganeshariff thrusts his arm forward like he wants to shake hands. This is not the case, as he instead tightly grips the enemy and very forcefully throws them backwards. There's an extremely small hitbox, and this deals no damage, but it has tremendous backwards knockback for an aerial, rivaling several smashes. Bad ending lag.

Backward Aerial Pachyderm Turnover
Maha, still facing forwards, leans back while extending his tusks. Those tusks have a grab hitbox, though, so foes who touch them will be carried along for the ride. Once the tusks are facing roughly forward, Maha lets go and the foe goes flying straight forward with 9% damage and pretty nice knockback. The catch is that the opponent still has time to escape Ganeshariff's grip, though chances are they won't anyway. This move has scarcely noticeable lag on either end, and a fairly short duration for what happens during the attack.

Up Aerial Twist
Maha Ganeshariff raises both arms and grabs the enemy by their feet. He then spins his upper torso and manages to toss them upwards while they're stuck in their spinning animation. The foe takes 7% and moderate upwards knockback, though they are indeed stuck spinning for a few moments. If the opponent misses the grab hitbox, the fists will still deal regular damage and regular knockback, 6% and light knockback that's good for comboing into an up special.

Down Aerial Pirouette
Maha's lower half does all the work for this move: the bottom section spins for 4% a hit, with his legs as a hitbox. This is easily escapable, though. Anyway, it has low beginning lag but moderate end lag. The long duration can be inconvenient, but if you hit the ground while rotating your legs, your upper half will spin since your lower half is grounded. The arms deal the same 4% but instead deal one big hit with satisfying knockback.


Throws

Grab Bear Hug
For all purposes, this is a standard grab. Maha reaches forward with both arms and brings the foe in tightly. This has the range and lag of Dedede's grab.

Pummel Swing
Once you press the pummel input, Ganeshariff begins to swing his torso around so that with each consecutive press of A/Z he'll have rotated 180°. Naturally, the more you pummel, the more momentum you gain, and so once the foe breaks out of the grab, they'll be thrown quite a ways, depending on how much you spun. One press will do 3% and wimpy knockback, but if each press after that gets you 2% more and a bit of a knockback increase, you're looking at an extremely viable pseudo-throw.

Forward Throw Tuck and Roll
Maha tucks in all his limbs except his trunk; with that he holds the enemy. Ganeshariff then skewers the foe on his head-spike and rolls forward. Maha will keep rolling until the opponent breaks free, usually a few short seconds later. However, the massive robo-pachyderm has super armor throughout the move, so he can't be punished while catching up. In any case, while rolling, the captured foe takes 4% a second, usually adding up to about 12%. I'll note that even if the opponent does break free, Ganeshariff stops while forming into a humanoid again with little lag, allowing him to perhaps score a couple of free hits. This throw will also function off the ledge.

Backward Throw Pound
Having multiple pivot points really comes in handy here. Lifting the foe with his trunk, Maha spins his torso around ahead of time to get a good beating in. The trunk then flips the enemy over his head and into his arms, which proceed to pummel him senseless. The fist-beating does 12% total, with one final hit that does diagonal downwards knockback, which bounces towards upwards knockback. Very fun animation in this one, with low lag. Ganeshariff is still facing the same way at the end of the throw.

Up Throw Stick
This is a deceptive attack. While it looks like Maha simply tosses the foe upwards a bit, which he does, there's something else going on. What he has done is plant a tiny yet powerful bomb on the opponent's back, or an equally suitable hiding spot. This has a fuse of ten seconds. Once those ten seconds are up, the foe is thrust in the air with 14% and high knockback, this being similar to a Gooey Bomb. It shares another property with that item-- it will pass from one character to another upon contact, so it's rather like a game of hot potato. That initial toss upwards deals no damage but has a bit of upwards knockback-- just enough to perhaps land an UAir.

Down Throw Club
Ganeshariff slams his foe into the ground for 4%, but this is not the end of the throw. He then jumps up into the air, and before you can say "situationals", he brutally whacks them backwards with both fists. This has bad ending lag if you don't do anything about it, but like many of his other moves, he can use a Spin Dash from this. The instant you hit the foe, a press of side B will transform Maha into the sphere. This move deals a mere 6%, but has knockback that KOs at 130%.


Situationals

Ledge Attack (Under 100%) Ram
From the ledge hanging position, Maha does a quick handstand before retracting all limbs and thrusting forward in sphere form. This part does 7% and knockback you'd rather want to avoid. Of course, you may also use a Spin Dash from this.

Ledge Attack (100% +) Cracker Launcher
Ganeshariff raises one arm and launches one of his clone-bombs a short ways forward, so that it rests neatly next to the ledge. This alone is a hitbox that does 4% and pathetic knockback. Maha then climbs up normally, with invincibility frames. Now, whether or not he picks it up, after five seconds without contact with a hitbox, it begins to emit smoke, acting more like a smoke ball item than a cracker launcher, as the attack name suggested. The smoke lasts ten seconds and is not colorful at all; it merely conceals whatever the holder is doing. If attacked, it will explode in a puff that willl give the unlucky wielder 6% and somewhat hefty upwards knockback.

Get-Up Attack (From Front) Acrobatics
Aware he's lying on the floor, Maha grabs the ground and athletically thrusts out his palms and lands on the floor. As he's still in the air, he spins both halves of his body in opposite directions. He becomes a hitbox that hands 8% and moderate knockback to the foe. This attack is hard to whiff, though, since it has a noticeable cooldown.

Get-Up Attack (From Back) Roll Out
From lying on his back, Maha folds up into a ball and travels in a small, precise circle before popping up into a standing position. This will hit both in the foreground and the background, meaning dodges don't affect this move. Yet another attack that has side special compatibility. Ganeshariff's body is a hitbox that does 7% and fairly light diagonal upwards knockback.

Tripped Attack Slicer
Maha is quite annoyed that he's sitting prone on the floor. So, he grabs both his tusks and breaks them off, doing a sweeping circle with them that does 6% and knockback that makes foes skid along the ground. He gets to keep his tusks as weapons even as new ones grow in their absence. The weapons are simple battering items similar to beam swords, though much lower on range. They're unique, however, in that they are dual-wieldable, while remaining separate items entirely.


Final_Smash

Super Attack Augmented Weapons System
For one final time, Ganeshariff transforms into a ball, as a crosshair appears near the middle of the stage. You can't control Maha during this Super Attack, rather, you control the crosshair. Moving the crosshair is quite easy; it's very fast and simple to control. You have to press an attack button for anything to happen, however.

Once you've pressed A or B, you'll find Gansehariff immediately travels to the spot you "clicked" on, his body being a hitbox that deals 30% and surprisingly low knockback. It's fun to combo rather than KO immediately. Another entertaining trick is pressing the shield input near an opponent to lock on to them. It's nearly impossible to avoid Ganeshariff once he's locked on to you, but if the foe tries to lure you off the stage, press shield again to disengage the lock function. The elephant is invincible during this Super Attack, and stays in this state for fifteen seconds.


EXTRAS<<


Taunts_&_Victory_Poses

Up Taunt
Similar to R.O.B., Maha spins each body segment separately.

Side Taunt
Rather evoking his inspiration, Ganeshariff trumpets with his horn, sounding a bit robotic as he does so.

Down Taunt
This taunt can actually be used for mindgames, since the elephant pounds his fists together normally, without a bomb coming out. This looks exactly like his down special.

Up Victory Pose
Further mimicking Sonic, Maha rolls onto the screen from one side, then goes to the other, evenually getting to his spot and standing triumphantly.

Side Victory Pose
An explosion is seen far in the bakground, then suddenly Ganeshariff falls in from the top of the screen, smoking. He tucks into a roll and assumes a proud stance.

Down Victory Pose
Hanging on from some invisible anchor point, Maha swings around from his trunk before landing and reforming.

Loss Pose
Maha claps very loudly and slowly. Suits his personality.

Victory Theme
I don't know Zero music much at all, so I'll just say it's a remix or something of this theme.


Playstyle

Maha Ganeshariff's playstyle is not one that requires careful planning. That being said, there are still some tricks you can pull off, but often times it's more about reflexes than forethought. Anyway, you most important tool is absolutely the Spin Dash. Without this, you'd essentially be a sitting duck. Never try to use it on its own, though; it's no good. Instead, why not use it from the end lag of some compatible moves? That way, it's ambiguous to the enemy whether or not you're going to roll out.

From the Spin Dash we go into bombs. Maha's bombs are nearly as useful as his side special, but as opposed to being a tool, they are mainly offensive. Going through your explosive utilities, you have: Burst Crackers, stun grenades, sticky bombs, and smoke bombs. If you have all these in play at once, it can become quite frantic for the opponent to try and guess which bomb is which. If they've memorized which bombs come from which animation, then confuse them some more by tossing them all in a mixing bowl. That way, with all these bombs swapping functions, your foe will never know which is which. I'll remind you, the reader, that sticky bombs look a little bit different from normal bombs, but can be swapped the same way.

So, although you're a heavyweight, you don't play as a power character. Since you can be comboed to hell and back, you might want to set up some defensive options, like those bombs I was talking about. Neutral Combo and FTilt are superb for outprioritizing-- in fact, they have perhaps the best priority in the game. In addition, you have a few throw moves and low-knockback moves that just yearn to turn into combos. For example, side special can combo into a number of moves, dtit-nspec can be fun, as long as you follow it up with something else, dash attack into fthrow, the list goes on.

You also have a few power moves, like your FAir/Bair, so those are indeed useful. If you're not going to use bombs, maybe try a sweetspotted DTilt or an USmash. If you're looking to grab, use a pummel or Dthrow to KO. Maha doesn't have a whole rack of options, but in higher percents, more and more moves become viable. Throws, bombs, and smashes are the main path here.

Playing as Maha doesn't mean you'll be getting a defined playstyle, rather, Maha is a certain kind of character. By comboing your way up a little, using some mindgames, grabbing and throwing, you've basically unearthed your entire point of existence. Side special, bombs, standard combo and ftilt. Outprioritize to survive. It goes on. There isn't one way to play him, so, well, just experiment a little.


Alternate_Colors


Maha's alternate costumes are not all solid colors; these merely demonstrate what the base color is for each costume.


Other_Extras

Symbol

The symbol here is just the Z used in the title menu of the Zero games.

Entrance
Coming in from the background, Maha flies down to the stage from the air in ball form. Upon landing, a huge explosion occurs and when the smoke clears, he's standing in his idle position.

Kirby Hat
Kirby basically turns into a miniature version of Maha, the only difference being the transition from Ganeshariff to Kirby-- Kirby's entire body is his head. Anyway, Tusk Boomerang is absolutely unchanged when Kirby uses it.


Plorf

Smash Apprentice
Joined
Jan 28, 2009
Messages
124
Location
Silver Spring, MD
SHEEPφMAN

“Baa.”


B a s i cφ I n f o

Tomahawk Man is a Robot Master from Mega Man 6. He was built by a scientist somewhere in Middle America, modeled after a Native American chieftain. Unlike many of the other Robot Masters in the game, Tomahawk Man was created specifically for the 1st Annual Robot Competition. During his boss fight, he attacks using his tomahawk (what a twist!) and by shooting feathers from his headdress. He is very brave and rather strong, but is also quite exclusive and proud of his background. Tomahawk Man is keen on horseback riding, but will not tolerate a liar. The weapon Mega Man gets when he defeats Tomahawk Man is the Silver Tomahawk, which is ironically red.


Statistics

Size φ 6/10
Tomahawk Man is fairly short, having a height similar to Luigi, though his headdress puts him a fair bit above that.

Power φ 3/10
Tomahawk Man is not a powerhouse by any stretch of the imagination, but a few of his axe-based attacks hit pretty hard.

Weight φ 4/10
He is unfortunately on the lighter end of the spectrum, but can last long enough out on the battlefield.

Ground Speed φ 7/10
Tomahawk Man is very agile, as he shows by his running speed.

Air Speed φ 8/10
When you fight Tomahawk Man in Mega Man 6, he soars above you in the air. One of his strong points.

Traction φ 8/10
While not perfect, Tomahawk Man has nice traction, beating out most other characters.

Attack Speed φ 7/10
Tomahawk Man benefits from fast attacks, though there are still a few that come out with some lag.

Range φ 8/10
Many of Tomahawk Man's attacks are a disjointed hitbox of some sort, and he has several projectiles at his disposal.

Priority φ 7/10
The projectiles, though, don't have great priority, and Tomahawk Man still has a fair share of close-range attacks. Even so, he still has reasonable priority overall.

Jumps φ 8/10
Tomahawk Man has a slightly above average first jump, but a great second jump. He actually fares pretty well in the air.

Falling Speed φ 4/10
Tomahawk Man is reasonably floaty, though not as much as characters like Wario and Jigglypuff.

Recovery φ 6/10
Tomahawk Man has a decent recovery, but has a few options to get it.

Crouch φ 8/10
Tomahawk Man is not afraid to get his head low to the ground. One of the better crouches in the game.

Wall Jump φ Yes
Wall Cling φ Yes
Crawl φ Yes


BasicφAnimations

Standard Pose
Tomahawk Man stands leaning slightly back, his axe behind him.

Idle Pose
When left alone for a while, Tomahawk Man will start fiddling with his throwing axe, carefully handling it like a precious gem.

Walking
Proudly, Tomahawk Man walks forward, making his body very slightly bigger.

Running
Tomahawk Man starts running briskly while his headdress trails feathers that act like Ivysaur's when dashing.

Dashing
With spirit, Tomahawk Man soars forward, his feet barely touching the ground.

Crouching
Tomahawk Man brings his entire body close to the ground, his hands bracing his fall. It looks similar to Snake's, though his headdress adds to his height significantly.

First Jump
Tomahawk Man looks upwards as he springs into the air, looking forward to spending some time there.

Second Jump
Tomahawk Man spreads his arms out and pushes downwards, imitating a bird.

Shield
Tomahawk Man holds his axe-arm vertically in front of him as he squats in a defensive pose.

Spot Dodge
In a fairly standard animation, Tomahawk Man leans back and quickly swings one arm back. This has a short duration, but has very low lag.

Roll
Tomahawk Man leans sideways and kicks off the ground with a lot of force, profiting him a good distance. However, there's a small bit of lag as he properly positions himself at the end.

Air Dodge
For this dodge, Tomahawk Man turns to face the foreground and appears to be kicking off air, ending up in a reclining position. Lengthy, but good duration.

Asleep
Tomahawk Man droops his head down and subconsciously struggles to maintain balance, since he's top-heavy.

Dizzy
Tomahawk Man stands straight, not struggling to keep balance, but seemingly unable to do anything at all.


M o v e s e t

SpecialφAttacks

Neutral Special φ Silver Tomahawk
Just like in Mega Man 6, Tomahawk Man will shoot forward a spinning red disc-looking object that is actually one of his tomahawks. This comes out almost instantly. The throwing axe is about the size of Kirby crouching, but quite a bit flatter. The axe first dips down within a Stage Builder block in front of Tomahawk Man, and then proceeds to drift upwards at a diagonal arc. If it's any help, watch a video like this (near the end) to get an idea of what this looks like. They travel quickly, around Captain Falcon's dashing speed. The actual hitbox is fairly small, and does 3% damage per second in multiple hits, while the tomahawk continues along its path. It also has infinite range, which is a plus on large stages. However, damage is not the only purpose of this move. The tomahawks thrown are spinning so fast that they create a little bit of wind around them. What this means is that to the left and right of the blade, there's is a minute push-back effect for those who go near the tomahawk without actually touching it. In addition, there's also a bit of suction on the top of the weapon, which pulls characters that are directly over the tomahawk underneath it a little bit. This has some light ending lag, but enough to be punished if the enemy is expecting it. You can only have three tomahawks out at a time. Low ending lag.

Side Special φ Triple Feather
As the name may imply, Tomahawk Man shoots out three large feathers from his headdress for this attack. They're about the size of his tomahawks, but a little thicker, and larger towards the front. They are stacked, one on top of another, but only for the start of the attack. After this point, they move strictly horizontally and will continue to move after they've hit an opponent. The bottom one, however, moves slower than the middle one, which is slower than the top one. Essentially, if the feathers are given enough space, they can cover a large area. The feathers move at King Dedede's, Mario's, and Captain Falcon's dashing speeds, respectively. For the actual attack portion, the feathers cause an interesting effect on those who hit them. If they are on the ground, they will be knocked down instantly and take 7% damage, this being good for stopping approaches.

However, if they're in the air, they will actually trip on the feathers, however that's possible. Air-tripping is similar to normal tripping, having the same animation, but instead of falling on the ground, they enter tumbling animation. They will still take the 7% damage, however. This is a great anti-air move, and while it has moderate start-up lag, it has virtually no ending lag. This has infinite range, and there can only be one set of three feathers out at a time. Additionally, if you're quick enough (believe me, you are), you can use the feathers as makeshift platforms that will fall down as soon as you jump on them, since you can't reliably walk on them. Opponents hit by the falling feather will experience the same effects as they normally would, depending on if they were in the air or on the ground when hit.


Up Special φ Axemerang
For this attack, Tomahawk Man simply tosses an axe that spins on a horizontal axis, about half of Final Destination away from him. It will move diagonally upwards by default, though it's easily maneuverable. It moves at Sonic's dashing speed, and will always return back to Tomahawk Man under any circumstances. The axe is almost exactly the dimensions of Kirby's sphere portion, constantly spinning. If the tomahawk hits any solid material, it will sink in and proceed its path back toward Tomahawk Man. This means that if it hits the stage while Tomahawk Man is in the air, the stage will move towards him, not the other way around. However, any items and characters not touching the stage will not be taken along for the ride, potentially being a very good gimp.

However, this will not home into ledges, and since the axe travels so quickly, it can be quite tricky aiming properly. For example, if you hit the underside of the lip on Final Destination, you will get there and find yourself in a nasty situation, having little to no options to get back on stage. If the tomahawk hits an enemy on its path, they will also be pulled back towards Tomahawk Man as well as take 6% damage. This counts as a grab. In fact, you can even pull items closer to you, snatching them out of mid-air. Really, this is a bread-and-butter move, having no limit to its use. Tomahawk Man is unable to aim the tomahawk downwards except by a small bit, so recoveries won't suffer so much.He will also experience twice as much lag if he hits the stage from the top with this move. Moderate start-up lag and high ending lag.


Down Special φ Seed
Tomahawk Man procures a seed from his palm and tosses it downwards by default. You can change its trajectory by holding down B and aiming before you release it, but the seed has rather bad range in most cases. It will, however, travel indefinitely down and remain in its location for as long as one of Snake's mines if it hits the ground. If it hits an enemy, it will embed itself in he/she/it, and nothing further will happen until you use your USmash. A fully charged USmash will result in vines springing forth from the character and somewhat reducing their movement and attack speed. The vines, however are destructible, similar to Olimar's Pikmin. They're twice as hard to shake off though, but they're vulnerable to fire attacks. With TWO fully charged USmashes, it becomes more deadly. The vines are now much thicker, and much more debilitating. They'll slow you down quite a bit more, and are harder to shake off to boot. As useful as this is, the down special should in no way be used for just that.

Should the seed land on a Rift from the neutral attack, the hole will immediately seal up, locking the seed underground. If left untouched, absolutely nothing will happen. However, once you use a Rain Dance, it becomes apparent what must be done. Two fully charges USmashes (or the equivalent) will yield a fully grown tree, which stands a head or two higher than Ganondorf, and is about as wide. However, its branches extend out half a Bowser in either direction. Anyway, the tree will actually grow in the background, so it's no hindrance to the playing field. But! Tomahawk Man has a large axe, no? That's exactly what he can use to chop down that tree- any move using the tomahawk that swings horizontally can cause the tree to fall into the foreground, slowly and treelike. It takes maybe three seconds for the tree to completely collapse, an action which does 26% and rather hefty knockback. Nice payoff, eh?

However, it doesn't stop there! once the tree has fallen, you can chop it up even more by using vertically-swinging axe moves, and as a rule, it'll take 5 or so swings to turn the log into a pile of wood. The wood can be picked up simply for use as a throwing weapon that deals 4% and decent knockback on contact, but that would be boring. Instead, why not use your down special while holding a piece of wood to fashion a few wooden spikes to set in the ground? This process takes as long as it takes for Snake's trip mine to come out, and has a similar effect. The wooden spikes are set low in the stage though, so the tips are flush with ground level. The trap (There, I said it!) is a bit less than a stage builder block wide, and causes 8% damage and light set knockback- similar to the spikes on stage builder stages!

Now, should you decide not to use your tree for anything, be it making traps or throwing wood chunks, there's something else you can do with the fallen tree. Tomahawk Man's forward aerial, the fire arrow, will set the tree alight if it hits. It'll turn the tree into a blaze the size of Bowser, if a bit taller, that deals 8% and knockback that never realistically kills upon contact. If you leave the fire to burn away into nothing, it does so, taking 12 seconds to exhaust itself of burning material.

Of course, there's yet another twist. Your down smash, the massive controllable tomahawk, is just the thing one needs to create smoke signals. Moving the tomahawk onto the fire and off again will make puffs of smoke appear, drifting upwards. These'll make your enemy helpless for as long as they're in them, which shouldn't be a very long time. See, the more you hold the hatchet down on the fire, the more you smother it. Should you keep it covered for more than five seconds, you'll extinguish the fire, leaving it a useless pile of smoldering waste. That is generally a bad thing. The plus to holding down the axe is that it makes your smoke puffs larger. Holding down the tomahawk for no time at all makes a smoke puff the size of Olimar, as opposed to a Bowser-sized puff when held for just under five seconds. At this point, once the tree has been completely used up, it'll simply just fade into nothing, so you can start another cycle.

As you can probably tell, this move is incredibly versatile, and should you choose it, it's the cornerstone of Tomahawk Man's playstyle. Obviously the tree won't come into fruition on a moving stage or one with only falling platforms, but the down-b still has use beyond that. The vines are great for slowing down your opponent enough to perform one of your brutal throws on them, or pull of one of your laggier moves. Sure, new Tomahawk Man players might find this whole deal a bit confusing, but as long as they test out all his moves, they'll probably figure it all the paths eventually. There is one more move interaction with the down special, but I'll save that for later.


StandardφAttacks

Neutral Attack φ Hack
This is a fairly simple attack in which Tomahawk Man swings his axe downwards so it hits the ground. It follows a similar arc to that of King Dedede's Forward Smash, but the range is cut in half (that's still a good bit!). This is about as laggy as Mario's Forward Smash, but has slightly higher ending lag. The strike will deal 10% damage and knockback that kills at 230% if it hits a foe, but when it reaches the ground, something entirely different happens. It will create a rift in the ground that is as wide as Ganondorf, due to scraping the axe along the ground. It lasts 30 seconds before disappearing. Anyone other than Tomahawk Man that steps into the rift will be unable to use spot dodges, and shields will decay very quickly. People rolling into the rift will hit it and be stunned and pushed back as if they hit an invisible wall, though will retain invincibility frames.

Another twist to this attack is that if you tap A while Tomahawk Man is swinging his axe, it will go flying, provided you had the right timing. It will never go more than a third of Battlefield away, and when it lands, it will stay there until he passes over it. There will be a rift in the ground there instead, acting just like the normal one. Enemies can also pick it up to use a battering item that does 7-10% and has a sweetspot on the axe head, which does pretty good knockback. The thrown axe will deal 10% and low knockback, but will additionally cause 1% per second for five seconds due to being stuck to the enemy. Unfortunately, the projectile version suffers from a bit more ending lag as Tomahawk Man regenerates his axe. Only one rift can be out a time, with the newest one replacing the previous.


Forward Tilt φ Spinning Hatchet
Tomahawk Man swings back his axe-arm, then swings it forward to toss it in a horizontal direction. It looks just like his Silver Tomahawk, except it won't go up by default. This one instead will only go up through holding the A button, behaving similar to the game "Helicopter". It falls about a third of Final Destination away if you don't press A after firing, but it can potentially have infinite range if you keep pressing A. However, since pressing A will only move the tomahawk, you can't use A-button moves while this is out. It can be canceled by shielding, but it moves quickly enough (Captain Falcon's dashing speed) so that you likely won't need to. Unlike the Neutral Special, this does single-hit light upwards knockback and 8% damage. This is pretty good at edge-guarding, as you can let it drop onto a recovering opponent or aim it upwards to hit characters taking a higher route. There can only be one tomahawk out a time, and the attack has a good bit of start-up lag, but very low ending lag.

Up Tilt φ Totem Pole

When Tomahawk Man first presses Up + A, nothing happens for a very short time, then a massive totem pole suddenly springs up from underneath him. This carries him upwards quite a bit, as the totem pole is about twice as tall as Ike and a little wider. Tomahawk Man can jump off any time while it's rising, but that doesn't take very long. The totem pole will face the direction you were facing when you did this move, so give some forethought before using it. The totem pole can also be destroyed by both you and your enemies, having 50 HP. However, it acts as a normal wall otherwise, though you can roll behind it. While it is out, it will randomly shoot out red projectiles the size of Pitfall items from any of its four mouths, which do 5% damage and an interesting effect. They'll actually make the opponent have slow but uncontrollable upwards movement for three seconds, during which they can still attack. The effect does not stack.

Three shots will be fired from the totem pole for every two seconds that pass, but only if there is someone in front of it anywhere. In addition, if an enemy tries to jump over it, the totem pole will also jump, being able to reach its own height. This won't do any damage, but blocks foes from reaching certain parts of the stage, provided they don't quickly slip underneath it while it's still airborne. Tomahawk Man will have very slightly increased jump height and air speed, and slightly decreased falling speed if he's within a Smart Bomb's explosion radius of the totem pole. A new totem pole cannot be summoned until the old one is destroyed, and even then you have to wait a few seconds before making another.

NOTE: If you use the Up Tilt over a rift from Hack, the enemy will be unable to roll behind the totem pole, which can be very advantageous. Tomahawk Man can also wall-jump and wall-cling from the totem pole. If used near a ledge, foes will still be able to grab it and jump from it. However, this robs you from a possible tree-planting location. Be careful, now.

Down Tilt φ Spirit Overdrive
For the start of this move, Tomahawk Man leans down to the ground and points his axe-hand to the floor. This has a bit of start-up lag, but nothing severe. If you continue to tap A, however, the axe will begin to spin, and various visual effects will occur. Sparks will start to fly on the floor, wind will ripple around Tomahawk Man, and the area will look frenzied as it vibrates. These will each do minor things: the sparks do 1% non-flinching damage, the wind gives a push-back effect, and the vibration stuns the foe for a very short while, reminiscent of Ganondorf's Final Smash. When you release A, Tomahawk Man will spring upright, spreading out his arms in a powerful position. What this does is boost exactly half his stats at random, and weaken the other half by the same amount. As a rule, Tomahawk Man strengthens/weakens these stats 5% per button press, it taking a decent while to have a 100% change. While this could be a very powerful enhancement, keep in mind that cancelling out of the overdrive state by pressing Down + A gives Tomahawk Man one full second of lag, so this has situational use.

Dash Attack φ Bury the Hatchet
From his dash, Tomahawk Man leaps up in the air about the height of his short hop, keeping his forward momentum. This translates into a striding air rush that'll go nearly a platform if uninterrupted, followed by a plunge to the ground in which Tomahawk Man slams his tomahawk to the ground. Any foe hit by this portion will have the Pitfall effect, being stuck in the ground-- with a hatchet in their back. The pitfall-smack deals a mere 5% damage, but while the enemy's buried in the ground, they take constant damage of 2% per second. However, a lunge in which you only attack at the end of a long arc sounds useless, right?

Wrong. Tomahawk Man can interrupt his rush at any moment by pressing A again, performing the attack early. Additionally, while his body is in motion, Tomahawk Man will push anyway who's in his way forward-- without any damage or knockback, mind you, just they move in that direction. This move can be used for Tomahawk-cides if he goes off he ledge, which can actually be quite useful. This move has fairly high priority, nonxistent start-up lag, and annoying ending lag if Tomahawk Man misses.


SmashφAttacks

Forward Smash φ Frenzy
Tomahawk Man rears back his axe-arm and slashes forward horizontally in front of him with about the range of Mario's FSmash. This deals 3% and pitiful knockback uncharged, and 5% with slightly better knockback when fully charged. Well, I suppose the lag on this move isn't terrible, with slightly above average starting lag and below average ending lag.

The twist comes when you press the button input again-- with no warning, Tomahawk Man slashes again from the opposite direction, and again and again depending on how many time you press the button. The timing gets a little harder to maintain after a while, though, since the window of button input grows smaller with each repetition. Anyway, your furious swipes will likely end up carrying your enemy right where you want them-- into the area of your tree, or perhaps off the edge or to another hazard. This move really exists to move your foe around and not much else, though it is a good way of chopping down your home-grown tree.


Up Smash φ Silver Tornado
Obscuring his tomahawk from sight, Tomahawk Man hunkers down, preparing to do something cool. He then somehow procures a tomahawk several times bigger than the one he normally carries, spinning as he tosses it so that is hovers right above him. Once it's out, it can be controlled similarly to Snake's Nikita Missile, having the same maneuverability, though it's quite slower. It can also cancel with [shield], though that will make the axe drift in the last direction it was going for the duration of the move. The more you charge this move, the longer you are able to control the spinning axe, ranging from 3 seconds to 7 seconds.

This giant tomahawk is so large that any character can stand on it while it's floating through the air-- granted, it's spinning a lot, so think the spinning platforms from Top Man's stage for a visual. Foes that land on top of the blade will enter a dizzied state for as long as the spinning lasts, and when it's finished, the hatchet disappear in a flash of light, catapulting any foe standing on it straight upwards, helplessly tumbling until they reach the pick of their jump, in a similar animation to a shield breaking. Another note. Should someone touch the side of the tomahawk while it spins, they take about 8% and below-average knockback for a smash, increasing to 12% and more average knockback. This is mainly advantageous during the startup of this move, being a spacing attack. Rather annoying startup lag, nice ending lag, average priority, KOs at 170%.


Down Smash φ Rain Dance
Tomahawk Man will just start dancing in place while you charge this smash. He sort of hops around a bit, stuff like that. Dancing? That doesn't sound really useful, now... Well, before you get turned off by this move, Tomahawk Man's flailing will inspire the foe to dance, though it's doubtful that they're willed into dancing, except with characters like Peach. They'll only dance for a little less time than the charge lasts, meaning Tomahawk Man will have a bit of an opportunity to start a combo with one of his quicker moves. That aside, once Tomahawk Man finishes the charge, nothing happens. That's it.

Then it starts raining (Oh, so that's why he was dancing). Yes, about five second after Tomahawk Man has finished his smash uninterrupted, it starts pouring across the entire stage, decreasing everyone's traction, and making tripping a good deal more likely. Additionally, the rain has a wind effect along with it, very slightly pushing everyone in one direction. It's random which way the wind is blowing. Furthermore, there are lightning strikes that occur maybe once or twice per charged smash. They're quite powerful, dealing 20% and knockback that will KO pretty early, but here's the thing: they will strike the highest things on the stage, which are usually the characters. Your tree is the obvious target, though, and if you don't hit your foe above that tree, you have a strong chance of paying a price. Your tree will collapse and burn, fizzling out and becoming charred wood if exposed to more than three seconds of rain. The bigger the tree gets, the more likely it is to get hit, which falls in line with the rain MAKING the tree grow. All in all, a high-risk, high-benefit move.


AerialφAttacks

Neutral Aerial φ Quick Draw!
With little starting lag, duration, and ending lag, Tomahawk Man spins into a blur, with his headdress colors clearly visible. This is strikingly similar to Chef Kawasaki's Neutral Aerial... in fact, you could say it was a clone, if not for a little fact: the momentum of the spinning launches a couple dozen feathers and flings them around Tomahawk Man, falling down at a slow pace. Recalling Kawasaki once more, the feathers act just like the chef's up tilt, the sprinkle of oregano. This means they deal no damage, but trap opponents in flinching multiple hits. The feathers disappear once they hit ground, though as a visual effect, they'll get stuck in Tomahawk Man's tree.
Kawasaki turns a somersault in midair unexpectedly! He can move quickly when he wants to - this one takes only a couple of frames to pull off! It does a mere 2% but has unique knockback; no matter what angle you hit the foe from, they'll be knocked directly in front of you, probably still in the air. So, as you can tell, you and your foe are suddenly facing each other, both lag-free. It's all about reflexes here. You should have the edge, since they probably weren't expecting this, but now you must use a high-speed, high-priority attack to edge out your foe. Use more power! Use your speed!

Forward Aerial φ Searing Chill
Ignoring the quizzical move name for now, Tomahawk Man sticks his hatchet out in front of him with each side of the blade facing up and down, respectively. It has sex-kick properties, the hitbox being out for a while. There's a sourspot on the handle. Oddly enough, this does ice damage, with 8% and decent knockback either straight up, straight down, or in the direction Tomahawk Man is facing. This is a standard attack, and most of the time, it's simply this. But, as expected, there's a twist.

When the BAir is active (read below for details), the hole in Tomahawk Man's arm where his axe would normally be has a peculiar use for this move-- firing fire arrows. Upon the press of the button, his hand socket extends a pair of prongs imitating a bow and launches a fiery arrow all very quickly. It's quite spammable. The fire arrows, of course, deal fire damage and have a similar trajectory to cracker launcher missiles-- you can even hold down A to aim your shot before firing. Each arrow deals 4% and knockback in the direction the arrow is pointing. In fact, the arrow will stick to the player that's hit, if only for a visual effect.


Backward Aerial φ Tomachopper
Tomahawk Man swings his hatchet arm behind him and back forward with moderate lag for an aerial. You might notice something strange, however. The tomahawk remains spinning behind him, as if connected magnetically. It deals 3% in multiple hits like the neutral special, and can only be put back in Tomahawk Man's hand-socket if you use a tomahawk again or are dealt 15% while the axe is spinning behind you. When you use any tomahawk-based attacks while this is active, the hatchet behind Tomahawk Man will hover around to whatever position it needs to be in for said attack, and he will have his normal control scheme again. For example, if you use your neutral A while the axe is behind Tomahawk Man, it will go over his head and into his arm as he swings, doing a little extra multi-hit damage, and so on for every hatchet move. Nice little bonus-attack.

Up Aerial φ Feather Blast
Rather plainly, Tomahawk Man's headdress seems to explode in a shower of little feathers with great aerial range, going up at least a stage builder block. A good deal of starting lag, astoundingly low ending lag. The main damaging hitbox is actually quite small, only being in the area just above Tomahawk Man's head. This has good KO potential, though. Anyway, the residual feathers look just like the ones from the NAir; these, however, don't deal any direct damage. Instead, they'll sort of swarm around opponents who get near them and make them unable to attack. The feathers are light, however, and can be shaken off easily by button mashing. A straightforward move.

Down Aerial φ Fake Out
Tomahawk Man sticks his axe down as he crouches in midair, in something of a downwards sex-kick, with a lasting hitbox. This'll do a respectable 8% and pretty nice knockback either left or right, with some legit KO potential. This has fairly low lag on either end. What makes this suddenly more interesting is what you can do while the hitbox is out: pressing A again will make Tomahawk Man kick off the hatchet and spring into the air to the height of his first jump. Naturally, this makes the tomahawk fall to the ground, and while it falls (slowly rotating, as if footstooled), it does the same 8% only with upwards knockback. The axe falls at around Tomahawk Man's falling speed, if it means anything to you, dear reader.


Throws

Grab φ Undercut
Blatantly ripping off Hector's grab mechanic, though adding a unique flair, Tomahawk Man swipes low to the ground with his axe, tripping the opponent and dealing 6% damage in the process. Tomahawk Man cannot use any throws from this.

Pummel φ Grab
Pressing the pummel input (grab or A, normally) will simply make Tomahawk Man grab the enemy normally, with average range and lag. Pressing it again will make Tomahawk Man regrab, possibly making it harder for one to escape the grip. Useful for stalling, perhaps?

Forward Throw φ Axe Glider
Placing his hatchet on his back, Tomahawk Man pulls the enemy in close and jumps forward, activating his foot jets. Yes, Robot Masters have foot jets. Anyway, since that generally wouldn't be useful due to gravity and all, the tomahawk, while on his back, takes steroids and grows into a functional pair of wings! This'll make the throw handle like a quick but awkward glide. He keeps gliding with the enemy until they manage to get off with button mashing, in which case they'll enter a tumbling state as they fall. The heavier the opponent is, the slower and more awkward the glide feels. This does no damage, but is great for setting up an aerial or stalling, like some other moves. Notable startup lag.

Backward Throw φ Pony Ride
Tomahawk Man makes a robotic noise akin to whistling while holding on to his enemy, and out of nowhere a mechanical horse eerily similar to Centaur Man bursts out of the ground in front of him and the opponent. The horse, doing most of the work here, thrusts the opponent onto its back, with some help from Tomahawk Man as he makes sure they won't accidentally fall off. The horse then gallops quite quickly backwards with the victim on its back, who must button-mash frantically to avoid the explosion at the end of their run, which happen at the five-second mark of it.

Either they can escape with 2% damage, caused by being roughed up a bit before riding, or they can get hit by the explosion, doing an additional 10% and frightening knockback upwards. The plus-side is that if the horse rides off the edge with someone on it, which it can (and will) do, the explosion will normally help recovery so they won't get super-gimped. This throw is a mixed back; it's a great spacing tool on one hand, but on the other, it's quite laggy and the throwee may still escape before the real payoff, even during the starting lag. Still though, it's made a little more difficult to break free just for the sake of practicality.


Up Throw φ Wheel of Fortune
This is a fun throw. Lifting the enemy up with his free hand, Tomahawk Man detaches his axe form his arm while it levitates right nearby, floating magnetically. As this happens, the hatchet spins quite quickly, taking hardly any time at all to look like a disembodied buzzsaw coming from his arm. Of course, he hits the opponent with it, them taking 3% a second in multiple hits. The real benefit comes by interrupting the throw yourself by pressing A while it happens. What this does is essentially launch the foe in a random direction determined by which way the axe's momentum would have carried someone. This can KO, but only around 200% or so... It really is just a nice get-out-of-my-face attack, like all of Tomahawk Man's throws. This is also his fastest throw, though it has some nasty ending lag if you don't interrupt it and go for straight-up damage instead.

Down Throw φ Stapler

Tomahawk Man unceremoniously drops the foe to the ground and pins them there, retreating his axe into his arm and taking out from it... the enemy seen in the image above. In case you didn't figure this out already, this is essentially a robo-stapler. Tomahawk Man uses it to pin down each of the enemy's limbs/body and leave them on the ground. This does 4% straight up (1% for each staple!), and holds the foe in place, vulnerable. This is especially useful under a tree that's about to fall, or on a spike trap. If it's the latter, the trap will do 2% per second as long as they lie on it. Speaking of which, they'll stay there on the ground forever unless they break out, which is fairly easy, though it takes maybe three or four seconds. This is quite nice, it lets you run around while the enemy is idle, whereas the back throw has the horse doing everything. This is pretty important if you ever want to land a tree KO.


Situationals

Ledge Attack (Under 100%) φ Launch
Tomahawk Man switches his hand grabbing the ledge (he only grabs with one hand) so that the axe is hanging on. He then uses that magnetic tension to hang lower with the axe still attached to the edge. That doesn't take as long as it sounds. As he releases the tension, he catapults himself into the air about the height of his first jump, but a little more diagonally. The hatchet, though, stays behind, only to return to Tomahawk Man like a boomerang, wherever he is. It does 5% and surprisingly strong knockback upon contact. If you don't want to end up in the air, however, press A once you've gotten your tomahawk back and you'll plummet to the ground, axe outstretched, which is now a hitbox that does 8% and a light spike to the stage floor. When Tomahawk Man reaches the ground, he experiences some annoying lag, pulling the axe from the stage. Be careful now.

Ledge Attack (100% +) φ Silver T. 2
Tomahawk Man detaches his axe and tosses onto the ledge, as it spins around like his neutral special. In fact, these moves are very similar, having the same suction effect and doing 3% a second in multiple hits. The only difference is that this tomahawk moves straight upwards after pausing, rather than diagonally. If the opponent gets caught in it, they'll end up some ways above you as you crawl up the ledge. As with most every tomahawk attack, the axe grows back automatically. Average speed.

Get-Up Attack (From Front) φ Push-ups
Tomahawk Man is a fit robot. Naturally, he exercises all his motors and whatnot, so that's what he does here. He simply does a few one-handed push-ups and does one final one that pushes him back up into a standing position. Each thrust of his arm makes him go up and then back down, an action that does 5% and some fairly nice knockback upwards, while the final push does more diagonally backwards knockback. Long duration, low lag.

Get-Up Attack (From Back) φ Uprightification
Tomahawk Man's headdress is behind is head, so when he's lying on his back, it touches the floor. This leads to a fun but straightforward get-up attack--his headdress erupts in feathers, which makes him spring straight upright, rather like a zombie or Frankenstein's monster. This is fast and does 8% and pretty satisfying, albeit weak, forward knockback. The feathers that linger are purely for visual effect.

Tripped Attack φ Shield Slicer
The name of this attack has double meaning-- not only is a slicing move that shields Tomahawk Man, it eats through enemy shields as well. How this is works is that the axe detaches from Tomahawk man once again and circles around him quite rapidly as he gets up. This absolutely kills shields, and does 4% per second to boot! It's got a rather lengthy duration, but since it has incredibly high priority, you want to stay away from this move. Shame it's only a situational.


Final Smash

Super Attack φ Nature Spirit
So, Tomahawk Man has snagged a Smash Ball. Lucky for him, he has a pretty nice super attack. When he presses B, a robotic eagle, or some sort of bird of prey, appear high up in the center of the stage, in the foreground. Upon its appearance, it's a hitbox that does 20% and good knockback straight away from it. After that little flashy entrance, the eagle swoops towards Tomahawk Man and, when it reaches him, transforms into a new, giant, ultimately better tomahawk. He then retracts his axe-arm and takes the superior hatchet in its place.

So what can he do with this special new gift from above? Well, for starters, all his attacks, including non-tomahawk attacks, have a boost of 10% damage and some more knockback. In addition, since this is a sort of air/nature spiritual type... thing, it improves some of Tomahawk Man's stats-- namely, jump, run, attack speed, things of that nature. The nature part kicks in when you realize that it also buffs his down special game. Everything involving the tree growing will move faster, like the whole rain deal. In short, this is a basic buff, though there's one extra note: the FSmash is changed to an overhead axe swing that has a massive shockwave that goes outwards, being a move that does 20-28% damage and very nice knockback.

There's another twist. Reminiscent of Metal Man, this final smash allows Tomahawk Man to have a Shield Special. Pressing B while shielding will desync the new axe with Tomahawk Man, meaning it's an eagle again. This will rob him of all the new buffs, but the eagle has its own AI, so it can fly around freely, and quite quickly. It will try to home in on the nearest opponent to perform a pecking attack, which does 5% a second and is extremely annoying to shake off. It can also pick up foes and carry them off the edge, though, it lets go once there a little ways off. Additionally, it uses a wind move in which is flaps its wings for a few seconds, pushing anyone in front of it away like a weaker FLUDD.

It has one last surprise, though, and this one's rather evil. Sometimes, it will fire a small, but incredibly fast-moving shot of energy that goes to wherever the foe was when it was fired. This does 30% and very light knockback-- knockback isn't the point in this case though. Instead, it completely stuns the opponent and prevents them from moving, or attacking, or anything, for five seconds. For example, if they were in the middle of performing an aerial, they'll just cut themselves off and drop to the ground, helpless.

So, this all sounds really broken. To be honest, it kind of is. But keep in mind that Tomahawk Man is not invincible during all this, and the eagle has 50 HP, and is able to be damagedand knocked around normally. This super attack lasts a whopping 20 seconds. A final note: if someone hits the eagle as it's appearing for 25% damage and good knockback in one hit, it won't appear in the first place, and the super attack is wasted. A suitable, if inconvenient way to balance this. Once the attack is done, the eagle disappears in a flash of light.


E x t r a s


Tauntsφ&φVictoryφPoses

Up Taunt
Similar to Fox and ZSS, Tomahawk Man tosses his axe over his head and catches it behind him.

Side Taunt
This one's silly: Tomahawk Man does a yell and covers his mouth while doing so. #indiancall2

Down Taunt
Tomahawk Man simply takes the pose found in the sprite at the bottom of the moveset, with his axe raised behind him. This can be held indefinitely-- just like Metal Man!

Up Victory Pose
Tomahawk Man seems to be showing off his moves ("YES!" -Captain Falcon) and takes a ton of axe slashes and whatnot.

Side Victory Pose
Now he appears to be sitting cross-legged on the floor... smoking a peace pipe? Wha? I thought this was a fighting game...

Down Victory Pose
Tomahawk Man chucks his axe at the ground, where it stays. He folds his arms in a pose of power and triumph.

Special Victory Pose (vs. Yamato Man)
Tomahawk Man is quite proud of his American heritage, as he stands with his back facing Yamato Man, completely ignoring him.

Loss Pose
Tomahawk Man is seen sitting on the ground visibly worn out, and rather upset that he lost.

Special Loss Pose (vs. Plant Man)
Tomahawk Man is surrounded by plants and the like, trying to shake off various petals and chop through vines.

Victory Theme
This one's a redone intro to Tomahawk Man's stage music.


Playstyle

Tomahawk Man's playstyle has one main focus, and that's his down special. Really, this move is insane. It can be used for everything. Set up a seed as early as you can, keep feeding it, and then you'll find yourself with a KO move and more. Of course, without a tree, you can still manage, and that's the beauty of Tomahawk Man; he really doesn't have a predetermined playstyle.

Alright, so let's say you want to take the seed path. First step is to use your neutral A; that'll bust up the ground so you can plant a seed. Use your nice throws to get the opponent away from you and your tree while you do rain dances and such. When it comes time to chop things down, use your throws some more, and get the foe right under the tree. Hopefully, you'll have scored at least one KO by now.

The rest of the tree playstyle sort of explains itself, and it's really not all that interesting. Basically, just experiment with different paths, things like that. Now, Tomahawk Man has a couple of other moves that control the stage-- the neutral A and the up tilt. Neutral A is mainly useful with the tree, but if you decide to pair it with the up tilt, you have a formidable wall to stop approaches and projectiles. Even the wood trap is useful, it can pop the foe up in the air so you can punish them with some of your more useful aerials.

Speaking of aerials, Tomahawk Man has a rather nice aerial game. Use a NAir to FAir combo if you're into gimping, since that can have spike potential. The BAir is also good at stopping approaches, though don't rely on it all the time. The other aerial attacks are used for spacing, like many of his attacks.

Tomahawk Man really isn't so much about KOing, though he does have a few moves capable of doing that. I won't go into specifics, really, since I assume you read the set at least a little, but you should try to focus on gimps more, if anything. So yeah, since you have so many multi-hit attacks, damage shouldn't be a problem, and if you want someone closer for any reason, just use your up special to take care of them, maybe use a forward or back throw to get them off the stage.

As a Tomahawk Man player, things can be a little tough, since a lot of his essence is in controlling the stage. If he's pressured a lot, often times he'll have to resort to a separate playstyle. You can use aerials and throws to your advantage, since Tomahawk Man is rather good with those. Did I mention the situationals are actually pretty fantastic? Yup, they do have use after all. I'm leaving this playstyle section pretty bare since really, it's up to the player to decide what you want to do with the character. In Tomahawk Man's case, you have a lot of freedom when it comes to playstyle. Just make the best of things, and always adapt.


AlternateφColors


Stage

Restricted Area


This stage comes straight from Tomahawk Man's level in Mega Man 6, specifically the beginning part. Now, the stage is not absolutely identical to the image above; it has some little adjustments made to it. The first change is that barrels like the ones you already see will randomly spawn from any one of the yellow vertical objects on the ground. The barrels can be destroyed when dealt 30% damage, and carry random items inside. They can also be used as cover for Colton assist trophies. The walls of the stage, as you might notice, are prime targets for chain-grabbers. Fear not, because if the stage detects you're using a wall for infinites, it'll spawn a Colton right behind the attacker to put them out of business for a while...

Anyway, the upper blast line is actually pretty high, and the upper left edge is not a walk-off, but a cliff face! All the others are walk-off, though. There's a nifty thing on the top level... See those spikes on the right? Well, normally, they extend to cover that hole leading to the lower level, but they can be removed... once you've been fighting on the upper level for a minute, Proto Man himself will appear next to the spikes and blow them away wordlessly, allowing access to the lower level. By the way, the spikes act like normal stage builder spikes.

So yeah, this is a pretty fun, hectic stage, though it's hardly tourney-viable. Oh well. This is really just to represent the level, anyway. Brawl could use some more wacky stages.


Music
Tomahawk Man's theme
Silver Setting Sun
Plant Man's theme
Amazonian Flower
Blizzard Man's theme
Flurry of Frozen Fury
Flame Man's theme
Flaming Desert Sand
Wind Man's theme
Wind Swoop
Centaur Man's theme
Odyssey Beyond the Falls
Knight Man's theme
Fortress of the Knight
Yamato Man's theme
Rising Sun Warrior
Mega Man 6 medley

OtherφExtras

Assist Trophy


So you got an assist trophy. What's in it? Colton, from Tomahawk Man's stage in Mega Man 6. So what does it do? Well, it shoots. Yeah, it's pretty simple. However, the AI has been upgraded from Mega Man 6, so instead of standing and shooting once every few seconds, it actively walks around, jumps, finds cover, etc. as well as shooting. The shots deal 10% and enough knockback to want to avoid it. at all, really. It's important to note that this enemy won't accidentally jump off the ledge, so no easy riddances. It also can be destroyed: it has 50 HP. This assist trophy stays on the screen for 20 seconds.

Symbol


Entrance
The eagle from his final smash appears here, carrying Tomahawk Man in from above, similar to the Ice Climbers.

Kirby Hat
Kirby gets Tomahawk Man's headdress and face paint, and the ability to use Silver Tomahawk. He looks like the one in this picture.


F

fazil.vp

Guest
My Program found 4 results. First 3 found in 1 Min 48 seconds. Complete scan took 7 Min 19 seconds

Result:
{0, 0, 1} - 0 Sec
{450, 4500, 5050} - 6 Sec
{7350, 6000, 6650} - 1 Min 48 Sec
{27150, 1500, 1350} - 6 Min 24 Sec

Program:
void main()
{
unsigned long double LHS, RHS, Duration;
int a, b, c, Left, Right;
time_t Start, Stop;

time( &Start );
for( a = 0; a < 31427; a++ )
{
for( b = 0; b < 31427; b++ )
{
Left = 0;
Right = 31428;

while( Left < ( Right - 1 ))
{
c = ( Left + Right ) / 2;

LHS = unsigned long double(a) * 987654321;
LHS += unsigned long double(b) * 123456789;
LHS += unsigned long double(c);

RHS = unsigned long double( a + b + c );
RHS = RHS * RHS * RHS;

if( LHS == RHS )
{
printf("\n\n987654321*%d + 123456789*%d + %d = %.0Lf\n", a, b, c, LHS);
printf("(%d + %d + %d)^3 = %.0Lf\n", a, b, c, RHS);
printf("987654321*%d + 123456789*%d + %d = (%d + %d + %d)^3\n\n", a, b, c, a, b, c);
break;
}
if( LHS < RHS )
{
Right = c;
}
else
{
Left = c;
}
}
}
time( &Stop );
Duration = difftime( Stop, Start );
int Seconds = (int)fmod( Duration, 60 );
int Minutes = (int)fmod( floor(Duration / 60), 60 );
int Hours = int(Duration / 3600);

printf("\rCompleted:%0.1Lf%%", (a * 100.) / 31427);
printf("\tElapsed Time:%02d:%02d:%02d", Hours, Minutes, Seconds);
}
}

Output:
987654321*0 + 123456789*0 + 1 = 1
(0 + 0 + 1)^3 = 1
987654321*0 + 123456789*0 + 1 = (0 + 0 + 1)^3

Completed:1.4% Elapsed Time:00:00:06

987654321*450 + 123456789*4500 + 5050 = 1000000000000
(450 + 4500 + 5050)^3 = 1000000000000
987654321*450 + 123456789*4500 + 5050 = (450 + 4500 + 5050)^3

Completed:23.4% Elapsed Time:00:01:48

987654321*7350 + 123456789*6000 + 6650 = 8000000000000
(7350 + 6000 + 6650)^3 = 8000000000000
987654321*7350 + 123456789*6000 + 6650 = (7350 + 6000 + 6650)^3

Completed:86.4% Elapsed Time:00:06:24

987654321*27150 + 123456789*1500 + 1350 = 27000000000000
(27150 + 1500 + 1350)^3 = 27000000000000
987654321*27150 + 123456789*1500 + 1350 = (27150 + 1500 + 1350)^3

Completed:100.0% Elapsed Time:00:07:19
 
F

fazil.vp

Guest
0 * 987654321 + 0 * 123456789 + 1 = (0+0+1)^3 = 1
450 * 987654321 + 4500 * 123456789 + 5050 = (450+4500+5050) ^ 3 = 1000000000000
7350 * 987654321 + 6000 * 123456789 + 6650 = (7350+6000+6650) ^ 3 = 8000000000000
My computer found those 3 in 3min40seconds.
the 1st one is easy, the 2nd one can be verified by hand without much trouble,and the 3rd one is a lot harder to check.
however even knowing the solutions, I don't know of any simple way to figure them out.

My Program found 4 results. First 3 found in 1 Min 48 seconds. Complete scan took 7 Min 19 seconds

Result:
{0, 0, 1} - 0 Sec
{450, 4500, 5050} - 6 Sec
{7350, 6000, 6650} - 1 Min 48 Sec
{27150, 1500, 1350} - 6 Min 24 Sec

Program:
void main()
{
unsigned long double LHS, RHS, Duration;
int a, b, c, Left, Right;
time_t Start, Stop;

time( &Start );
for( a = 0; a < 31427; a++ )
{
for( b = 0; b < 31427; b++ )
{
Left = 0;
Right = 31428;

while( Left < ( Right - 1 ))
{
c = ( Left + Right ) / 2;

LHS = unsigned long double(a) * 987654321;
LHS += unsigned long double(b) * 123456789;
LHS += unsigned long double(c);

RHS = unsigned long double( a + b + c );
RHS = RHS * RHS * RHS;

if( LHS == RHS )
{
printf("\n\n987654321*%d + 123456789*%d + %d = %.0Lf\n", a, b, c, LHS);
printf("(%d + %d + %d)^3 = %.0Lf\n", a, b, c, RHS);
printf("987654321*%d + 123456789*%d + %d = (%d + %d + %d)^3\n\n", a, b, c, a, b, c);
break;
}
if( LHS < RHS )
{
Right = c;
}
else
{
Left = c;
}
}
}
time( &Stop );
Duration = difftime( Stop, Start );
int Seconds = (int)fmod( Duration, 60 );
int Minutes = (int)fmod( floor(Duration / 60), 60 );
int Hours = int(Duration / 3600);

printf("\rCompleted:%0.1Lf%%", (a * 100.) / 31427);
printf("\tElapsed Time:%02d:%02d:%02d", Hours, Minutes, Seconds);
}
}

Output:
987654321*0 + 123456789*0 + 1 = 1
(0 + 0 + 1)^3 = 1
987654321*0 + 123456789*0 + 1 = (0 + 0 + 1)^3

Completed:1.4% Elapsed Time:00:00:06

987654321*450 + 123456789*4500 + 5050 = 1000000000000
(450 + 4500 + 5050)^3 = 1000000000000
987654321*450 + 123456789*4500 + 5050 = (450 + 4500 + 5050)^3

Completed:23.4% Elapsed Time:00:01:48

987654321*7350 + 123456789*6000 + 6650 = 8000000000000
(7350 + 6000 + 6650)^3 = 8000000000000
987654321*7350 + 123456789*6000 + 6650 = (7350 + 6000 + 6650)^3

Completed:86.4% Elapsed Time:00:06:24

987654321*27150 + 123456789*1500 + 1350 = 27000000000000
(27150 + 1500 + 1350)^3 = 27000000000000
987654321*27150 + 123456789*1500 + 1350 = (27150 + 1500 + 1350)^3

Completed:100.0% Elapsed Time:00:07:19
 

john g

Smash Cadet
Joined
Nov 4, 2006
Messages
63
Location
laverton-&gt;melbourne-&gt;victoria-&gt;australia
Something like that:

After you draw one of the papers, swallow it. The jailer will be forced to check the remaining paper to determine what the one you drew said. The jailer will of course see a paper with "DEATH" written on it, assume you drew the one with "LIFE" written on it, and set you free.

Next one:

The man who invented it doesn't want it. The man who bought it doesn't need it. The man who needs it doesn't know it. What is it?
it is a coffin.
if a man presented you with two fists and says one has a dollar and the other two dollars how do you find the two dollars.
 

Oracle

Smash Master
Joined
Apr 15, 2008
Messages
3,471
Location
Dallas, TX
Well one has all three dollars from how you said it.

What is greater than God, more evil than the devil, the poor have it, the rich need it, and if you eat it you'll die?
 

finalark

SNORLAX
Joined
Nov 23, 2007
Messages
7,829
Location
Tucson, Arizona
Well one has all three dollars from how you said it.

What is greater than God, more evil than the devil, the poor have it, the rich need it, and if you eat it you'll die?
My friend just asked me this riddle yesterday. The answer is nothing.

What does no one want to have, but no one wants to lose?
 
Status
Not open for further replies.
Top Bottom