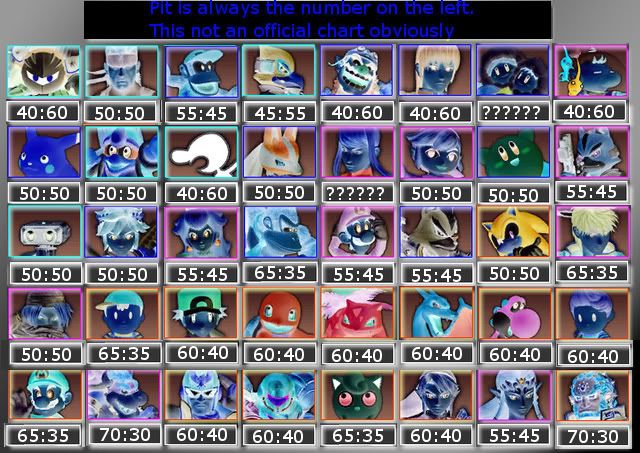
• Welcome to Smashboards, the world's largest Super Smash Brothers community! Over 250,000 Smash Bros. fans from around the world have come to discuss these great games in over 19 million posts!

    You are currently viewing our boards as a visitor. Click here to sign up right now and start on your path in the Smash community!

The Art of War for Palutena's soldiers! [Official Match-Up Thread]

Kuro~

Nitoryu Kuro
Joined
Jan 30, 2010
Messages
6,040
Location
Apopka Florida
PIT MATCHUP THREAD


Okay so i will be the new master of the mu. You can find the old thread here---> http://www.smashboards.com/showthread.php?t=197115

This WILL be finished.

For new pits i highly suggest the following readings~
http://www.smashboards.com/showthread.php?t=181610 this is EXTREMELY helpful for new pits. Helped me conceptually alot when i first started pit.

http://www.smashboards.com/showthread.php?t=190383 this is one of my all time favorite reads for pit. As it improved my game in many areas through a chainreaction and helped me in mu's.

:pit:
-2: :metaknight:
-1: :marth: :gw: :wario:
0: :diddy: :falco: :olimar: :pikachu2: :lucario: :zerosuitsamus: :toonlink: :kirby2: :peach: :sonic: :snake: :popo: :dedede: :wolf: :sheilda: :fox: :sheik:
1: :rob: :ike: :ness2: :yoshi2: :lucas: :luigi2: :mario2:
2: :dk2: :falcon: :samus2: :jigglypuff: :link2: :zelda: :pt:
3: :bowser2: :ganondorf:

________________


each character will be added and the summary under the picture. The links to each discussion will be here--->

FINISHED Matchups


+0 for Pit
To start this off lets list each character advantages over each other.

Pit:
1. Chaingrab at the beginning can easily lead to 40%-50% lead right off the bat.
2. even though neither really “outcamps” each other, Pit’s arrows **** fox off stage.
3. Pit overall out ranges fox.
4. Pit is pretty much the only one who will be getting gimps in this MU due to his vastly superior recovery.
5. Jab and AR wreck shop near the edge and on stage when used right.
6. Planking>fox

Fox:
1. DJC (double jab cancel), Dair, and Nair all lead into true combos for damage and kills.
2. Fox kills us way earlier with his oh so reliable usmash.
3. he is faster than us and his reflector stops camping to a certain extent.
4. He can gimp us on stages like YI and PK Stadiums (where we can’t go around).

Overall while this is a pretty even MU there are a few things which allow pit to generally win this match up both on and off stage.

ON Stage:
Since everyone knows the ramifications that CGs have in any match lets just focus on normal gameplay. On stage your jab and your dtilt are going to be your best friends as you will be using them a lot. These keep fox away from you while constantly allowing you to reset spacing. Also sh nair and just using fair in general is pretty effective as a mix up. Fox will most likely try to grab a lot so always watch out for that. Also juggling with uair, usmash, utilt, and throws are pretty effective here however you must not get hit by his dair or you will eat a lot of damage from any of the things it combos into. In the air while our aerials over all outranges his none of his aerials are to be under estimated. Obviously nair and dair combo and such, his uair and bair are effective kill moves, and his fair can damage AND kill if used properly. However our nair eats his moves for breakfast. Also fair is a great spacer and bair can used to get kills and gimps if he is offstage.

OFF STAGE

A fox off stage is a dead fox when playing pit. While he can shine stall to help deal with arrows, the fact is when he uses a jump or recovery move our arrows shut him down. Also AR both when held in the line of his phantasm stops him and his recovery in his tracks. Mirror shield reflects fire fox. If he is recovering from below a fast falled bair will gimp or stage spike almost every time (unless they are a god of teching).

MISC.:

• A lot of foxes abuse their dair and can become predictable. Shield Grab>fox’s dair.
• While he has a reflector, do not count arrows out completely.
• Fox’s shine shenanigans can allow him to gimp your WOI if you are not care as without something to stop his recovery he can recover from just about anywhere with fox copter and fire fox.

in the end this is not a terribly advanced match up and as such does not require as big a summary as some of the others.


48:52 Marths favor. Can also be 45:55 but all that matters is that marth does have an advantage. A -1 For pit
Stages to aim for:
FD
Smashville
Strike YI
BF/LYlat depending on your personal preference.

CPs:
Halberd
Delphino
FD
Pictochat
Rainbow Cruise
Frigate( the abover are 9/10 times better however)

Things to look out for:
He can UpB Out of our jab canceling combos(eg jab grab or jab jab grab or jab dtilt etc etc.) so if u think hes gonna do that Shield to PS it and then punish.
Stutter step fsmash. Seriously...be careful.
Shield breaker

Summary:
In this mu you really need to make marth work hard to get in. Arrows, arrows, and more arrows. Along with mixups like sh nair,fair,and dtilt.
Marth has amazing range on his sword. If he gets in close try to reset the situation asap in any way u can. One of the best ways to get him off your jock is the simple 1,2,3 jab combo(not infinite). He has frame traps with dtilt, DB, jab possibly so just watch out and know what u can punish. This mu is somewhat similar to MK mu in that you NEED to KNOW your options/punishes at ALL times. We can really camp marth hardcore with planking and arrows. YES u can plank marth u just need to pay attention to their movement so u know whether or not they are going for a tipper smash. Speaking of, like most of the cast marth has fthrow tipper smash on us at 0% just in case u didnt know. The thing we have that makes this mu as close as it is, is our ability to exploit marth's greatest weakness. Pressure from below is how we will handle marth for the majority. If you get a jab you should get a grab. If he wiffs go for a grab. My personal tried and true favorite is uthrow because while dthrow works as well uthrow sends them up higher creating more opportunities for juggling and dealing more damage in just the grab alone. This may seem like a daunting task with marths sword range and our flimsy standing grab range but just force him to approach with arrows, sh nairs and dtilt and the likes and you will cause mistakes. I cant stress enough how you must abuse arrows wisely as they create openings in what could be an otherwise flawless marth's gameplay. After the uthrow it's best to jump towards his di direction while pulling out an arrow this way you follow his movement while pressuring from below. After the arrow continue to either arrow pressure or go for the uair as its highly unlikely the marth will dair. Even if he does that thing lags so much u can simply dair him back or go and grab him again. If you predict an airdodge fastfall utilt(FRAME 2 BABY!!!!) or dair or bair if at kill %. I've gotten alot of kills off a forced airdodge to bair. It works wonders. Now, i have to say something. Most pit's advocate pits roll, however, marth's are always on the look out for rolls just like snakes. And with marth's dancing blade he has the means to punish many of the rolls. So that being said, if you want to reset your position, either roll very smartly( i mean really know what your opponent is going for) or go to the ledge and just go to the other side and play the waiting/planking game. If your shield is low/mid health PLEASE AND I MEAN PLEASE, be careful of two things;Shield breaker and stutterstep or regular fsmash. THESE WILL EITHER BREAK THE SHIELD(former) OR PIERCE IT ( Ladder) I being a marth main as well have gotten so many kills on shield poke tipper stutterstep fsmash. IT IS SOOOOOO GOOD! So know your spacing in comparison to marth at all times. Now as for CP's.

Halberd:Great sharking potential on the first part and it provides a way to avoid marth till the other beneficial(to camping) part. In the first part just plank. PLANK PLANK AND PLANK. Then the second part is long like FD this helps your camping game greatly. ABUSE IT. Hazards can mess up marth or help him pressure us more. Be careful. PLEASE FOR THE LOVE OF GOD SDI THAT DANG LASER LOL.The low room can lead to early kills by us with hypen usmash, uairs, fairs, bairs, dsmash, or fsmash. This stage helps our killing potential alot. However that being said, you have to be even more wary of two moves. The all priotized dolphin slash and the god forsaken tippers. A great CP nonetheless. One of the top choices to choose from.

Delphino: A more gimmicky version of halberd. It's really down to personal preference between the two. Simply treat this like you would halberd and plank when u can. Sharking is amazing. Just watch that you dont get stuck in the water as that might lead to some very early and unfortunate deaths cause of marth pressuring options once your in it( not to mention his spike).

FD: A very polar stage. Flat, long, high walls. Both characters live longer(pit is heavier though being one of the heavier midweights and will out survive marth for the most part). Pit can camp sooooooo hard here because its flatness and loooong length. If you choose hear know it will be a long campy battle (as it should) and you will come out on top.

Pictochat: a gimmicky FD. The gimmicks can help for kill set-ups with both characters and lead to some nice early kills. Pit benefits from several parts of this stage in camping potential(such as being inside the whale and camping-same goes for the building and mans face) the side spikes can lead to some nice kills as well.

Rainbow: You've seen marth vs mk here yes? its pretty much gonna be what all RC battles turn to. Running and taking advantage of each stage part while u can. I will say beware getting dtilt locked on the boat in the underhang on the right side. Other than that just run away and stay under marth at all times.

Frigate: Can mess up marth recovery and on second part we can camp the middle of the stage well due to the platform being there.

Ban YI/Battlefield as those are marth's two best stages to take us to. PS1 can be dangerous as well. So i'd say ban ps1/YI as BF is much more manageable. Ps2 marth has a real nice stalling gimmick on the air part. It's friggin hilarious but with our arrows he would probably get shot and die from being so high up. Ps2 is actually pretty useful for us. but not worth of a cp by us.


Dedede mu summary +0
Stages to aim for:
Final Destination
Lylat
Strike YI/BF
Smashville is the most normal of all of these for this mu

CPs:
FD
Rainbow Cruise
Brinstar
Halberd
Delfino
Ban Ps1/YI/CS

Things to look out for:
Obviously one thing is his chaingrab. This will be a nice source of dmg for him. Also, for the love of god don’t get hit by the Gordo. You can literally mirror shield it on reaction because of how slow it moves. Utilt actually has invincibility frames and kills earlier than snakes. Pretty stupid huh? His spot dodge is uuber ******** because of its mechanics in relationship with the z-axis of brawl. It can dodge our whole nair. And only has 2 frames your able to punish with certain moves.

Summary:
Surprise surprise, guess what you’ll be doing a bunch of in this mu? CAMPING!!! So grab some marshmallows, turn up your focus, strengthen your resolve, and be ready to test your patience! Again arrows are our best tool in this mu because it forces approach and slows the game down to a pace we prefer. They also rack up damage and strengthen edge guarding ability. Mix in angel rings, SH ART’s, retreating FF fair (unpunishable even by dedede if spaced correctly, amazing right? :D) and full hop dairs. Other good assets for CQC are inf jab and utilt. So the majority of this mu will be spent with you camping and punishing looking for punishes. Once you get those punishes, CAPITALIZE, CAPITALIZE, And CAPITALIZE!!!! D3 is one fat ***** and he won’t die any time soon. So TAKE YOUR TIME. YOU DON’T HAVE TO KILL HIM EARLY AS LONG AS YOU ARENT TAKING AN ABUDNACE OF DAMAGE/DYING YOURSELF. We have a chain grab to around 47% on him as well so if you get a grab at low % go for it. Edge guarding and juggling is all important in this mu. His up-b is extremely susceptible to being edge guarded and if we get him in the air onstage we can juggle him real well. If you start to notice a pattern of him FF air dodging to avoid juggles fake-out a juggle and FF regrab instead. It’ll make him think twice. Planking/scrooging also ***** the crap out of dedede. He has almost no response to it. Just be wary of timeouts if you pass the LGL of ~50. Only use it to stay safe till you ARE safe and to get him off your back some. Pit is one of the hardest characters to CG so if he can’t cg you can ~65% of the time assume he doesn’t know the mu well. Which means he won’t know many of pit’s mixups most likely. However dedede is such a simple character he can win this mu without mu knowledge. Also, you can mirror shield his recovery BUT IT HAS TO BE ON HIS WAY DOWN and proceed to WoI to possibly gimp him. Also you can jab the waddle dees/doos to refresh your moveset. So ya, avoid his cg, camp hard, use CQ and SH mixups, edge guard and juggle is vital and KEEP PATIENT.

FD: A very polar stage which enables us to camp harder but extends D3’s lifespan quite a bit. One of the top choices.

Rainbow cruise: Forces Dedede in the air which is good for us and could give us (and him) early kills. Beware of the wall infinite on the boat part. The only downside to this stage is when it’s moving on the third part after the pendulum it changes the fighting style you can best use. Find what works for you. Also one of the best CPs.

Brinstar: A similar stage to rainbow except it can hinder our camping ability and doesn’t give as good juggling opportunities as RC. A viable choice but not one of the best. D3 is not as bad on this stage as people assume.

Halberd: Definitely a top counter pick. The first part enables amazing scrooging/planking very well and the second part enables camping to the likeness of FD except we can’t go under. We will kill (slightly) earlier here so that is somewhat of a bonus. But so can he and he has more viable kill moves than us so beware. Also, watch out for stage gimmicks.

Delfino: a more planking oriented stage than halberd. Is also much more high-risk, high-reward than halberd due to dedede walk offs.

Ps1: Low ceiling/walls, many opportunities to wall infinite, messes up our camping, can’t go under. Enough said. Bad. Ban it.

YI: another viable cp for dedede as the small stage enables him to close the gap much quicker.

CS: Not a bad cp if he takes you here. Plank the first part, run away on the top left/right platforms on the second part to avoid walk offs, and camp the third part. He’s pretty ignorant if he takes you here.


Zero suit samus mu summary
Pit vs zss is a +0 or 50:50
Stages to aim for:
Final Destination
Lylat Cruise
Smashville
Strike Yoshis Island and Battle field. The difference between BF and SV is player-based. Strike whichever one you like less for the mu.

CPs:
Frigate Orpheon
Rainbow Cruise
Final Destination
Brinstar
Halberd
Delphino

Bans(in order best choice to least effective): PS2, PS1, Castle Siege, Brinstar, Halberd, YI. Player knowledge will help in knowing what to ban.

Things to look out for: Dsmash chain DOES NOT WORK!!!!! On pit. To prevent getting 50+ dmg when dsmashed at 0 HOLD UP TO DI OUT SO YOU CAN JUMP AWAY B4 THE NEXT DSMASH. Pivot grab can be annoying. Don’t die to her down b…please. Side B offstage=early kill so pay attention to her zoning and be ready. Her Dsmash while planking. Don’t ever, ever, ever try to shield grab a dsmash. 99% of the time it won’t reach and you’ll get followed up by a dsmash to dsmash to uair etc. etc.

Summary: First off, two things to talk about. Good reaction time is a god send in this matchup. It makes stuff like dsmash on shield, uair baits, bair baits, power shielding side-b all much easier to punish and/or realize in time. Second, learn how to utilize the pieces. Pit ***** with them sooooo hard when done CORRECTLY. Once he gets a piece it “should” be a stock that’s how amazing he is with them. Stuff like downthrow piece WoI to stop her momentum to bair or footstool to fsmash. He can do hella combos with insta-throwing and his multiple jumps. He can create legitimate walls that she can’t get passed so it makes reads that much easier. Gives him a good OoS option for any situation. A quick approach in Glide Toss. Pit is gonna be using a bunch of arrows, nair, dair, and ftilt in this match. Recongnize how she telegraphs her side-b and dair when she is. Dair’s awkward arcing hitbox can hit her b4 the side b can hit you if done right. Nair allows for a good anti-appraoch move. Your arrowing she’s approaching through, nair(or fh retreating dair). Ftilt’s range(rivaling snakes ftilt if not longer) is aaaaaammmmmmmaaaaaazing in this matchup. She thinks she can zone in on you? Pft ftilt that hoe. When you get her in the air treat her like snake. Juggle her all day. Use arrows to trap her into a bair. Bair kills her super early. Watch out for her uair. That **** is scary and dangerous and a serious threat to pit. Always be ready to hold down so you can PS her jab. Cuz if you don’t it makes this matchup that much harder. If she downsmashes your shield, you have enough time to Nair OoS. That’s your best option cuz it gives you the most leeway. Edge guarding is a must. If she likes to down-b footstool trick onto the stage be ready to upsmash and juggle as she down-b. If she likes to grab the ledge with side b arrows stop that. If she has to use up-b do a quick FF bair towards the stage and your likely to Stage spike her. That being said you won't likely gimp zss on a neutral, but you can edge guard her pretty well. She excels at mid-range so you want to be either in long range, or short range. We have moves to get us out of Mid-range safely such as dair, running, ftilt, nair.

Counterpicks:
Frigate Orpheon: Oh how I love thee, frigate orpheon. This stage is beast mode in this matchup. The first transformation is BEGGING TO GIMP HER. It’s so easy to gimp her at this part. The stage flips can hurt her super bad. The second part, we can camp under the middle platform nicely. The downward slants also give our bair a super awesome hitbox that sweetspots down and out and up. It makes it much easier to land a bair. The BEST cp once you learn it.

Rainbow Cruise: Similar to frigate in that it helps gimps, but her uair potential here and possible early kills for her are what makes this only the second best choice.

Final destination: No platforms to support her juggling you, long flat stage to camp, we are heavier than her and “should” live longer.

Halberd: The low ceiling assits her uair too much. Planking is effective but still a large hassle and large risk vs reward. Do it at your own risk. The second part is no different than FD besides the platform and hazards and low celing. All of which can support her. Which is what gives FD the edge over halberd.

Brinstar: Extended hitboxes, low celings/walls, lava combos, uair deaths. Not the best CP for us. But definitely has perks like super early bair kill and lava+WoI combos.

Delphino: See above statements about planking. Realize that’s what delphino is for. Don’t choose it.

Bans(in order of best to worst):
PS2: Oh my god, oh my god. If you know a zss picks ps2 ban that **** immediately. Yes we have that nice Ice gimmick but it is not enough. She will **** the **** out of you at the wind stage. I mean total, ****ing anal probing. ****’s nasty. She can Sideb through the hill and basically keep us out on that part. Small stage helps her more than us. We can’t fly under. The treadmills help her punish us on the ledge and make her dsmash even more safe on shield. She can do a sliding dsmash on the ice part. Shiet.

PS1: A less dramatic ps2.
Castle Siege: Helps her ability to stay on top of us.
Brinstar: See above posts about uair etc. etc.
Halberd: See above
YI: messes with our recovery doesn’t hurt her. Not too bad but if you really really despise it and know she won’t pick ps2? Ban YI.


+0
Lucario mu summary
Stages to aim for:
Battlefield
Smashville
Lylat Cruise
Strike Final destination no matter what. Then eliminate Yoshi’s, pokemon stadium 1, and Castle siege in order of preference/player knowledge.

Counterpicks:
Smashville/Battlefield/Lylat Cruise*
Rainbow cruise
Brinstar
Halberd
*In case you want to play it safe pit does well vs lucy on these neutrals

Bans(in order of best choice to least effective): Final destination, Yoshi’s island, Pokemon stadium 1, Castle Siege, Frigate Orpheon.

Things to look out for: Mirror shield POCKETED aura sphere as they take a much longer time to release from input time, PS non pocketed, Recover smartly(aka don’t get hit by auraspheres and watch out for dair/bair), JCUS punish when dair’d on shield, Aura sphere b-reverse to mix up landings, space your upair so it beats dair, be ready to punish rolls, Don't attack with aggression unless your mixing up, you should never attack first. , abuse rolls more than usual, be smart if you plank, try your best to get the kill early with fsmash or bair, bair gimps, dash attack is good.

Summary: Ok so as stated above you aren’t gonna really wanna be the aggressor as opposed to certain mu that you need to be. Of course there are exceptions like juggling , pressing your advantage, edgeguarding, reads, or good mix-ups. Dtilt out ranges every ground option BUT fsmash. Jab is still really good as well but is outranged by his ftilt. Retreating dair, spaced fair, nair crossups, and GENERAL PIT ZONING make this mu. Arrows, arrows, arrows but be wary because his fair CAN simply stop arrows in their tracks in general. If you do get him offstage don’t expect a gimp. So use this opportunity to rack up some major damage with arrows, fair, and bair. Bair CAN gimp but isn’t reliable exactly… We can punish dair on shield with JCUS. Be very careful if he gets you in the air at both low % and high %. Low percent because the aerial strings will be sure to follow. High % because lucario can juggle pit really well tbqh. And it should be how he gets his kills if you’re playing right. Be very safe when recovering and pay attention to your opponents movements. Abuse your rolls smartly vs lucario and be ready to punish his. Uptilt in close quarter combat. It really is an amazing move in this mu. Abuse platforms to the fullest extent. Especially on smashville. It facilitates the whole STAY SAFE AND DON’T APPROACH stuff. Just be careful to not fall into a linear pattern with it and mix it up. Abuse stages where he can’t wall cling; this will help you gimp him.
Counterpicks:
Battlefield: This is probably my favorite stage for Pit vs Lucario. The stage is small, and the platforms benefit Pit alot more than Lucario. Lucario cannot wall cling on this stage or Smashville, so you don't have to worry about an additional recovery option. I would recommend staying under the two platforms on either side. Be weary of his obvious dairs, and make sure you get a hard punish everytime he gets on a platform. If Lucario is on the ledge, don't jump after him, there's no need to go for unnecessary gimps. There are two flashing circles on the left AND right side of

Battlefield, about two Bowser lengths away from the ledge. Stay there and you're in the safe zone. You won't get hit from him getting back on stage, however you're close enough to make a punish. The top platform is useful on this stage if you have a lead, because Lucario only has one move that can hit upward. Bait and dair him.

Smashville: The moving platform is a changing factor in this match. If you're going with the momentum of the platform, you can fthrow CG lucario to 36% then Fsmash him at the end. You can mix up with DA as well. I can't stress enough how good this platform is against Lucario. We have arrows and we really need to utilize our aerial mobility. The platform stays moving so it's constantly resetting the situation, which is excellent in Pit vs Lucario because Pit is good at poking and Lucario needs to string attacks. Arrows are really decent on this stage just because it's a decently sized straight stage. I don't think arrows are necessarily too effective against Lucario in the air, but on the ground definately. This stage is really basic, but I think it changes the ratio in Pit's favor.
Lylat Cruise: The slants help pits zoning and hurt lucarios strings, the slant CAN hurt his recovery( not necessarily facilitate gimps but punishes w/edgeguarding), the slants facilitate landing bairs, the platforms are positioned perfect to play it safe, and if you’ve mastered platform canceling they really help with mixing it up or getting out of tight situations. An overall good stage if you’re worried about various factors such as them changing or you not being exactly use to the better(which will be below this) counterpicks.

Rainbow Cruise: Lucario gains little while pit gains a bunch. Nuff said. If they don’t ban it, it’s a very wise choice. Play VERY safe shark with arrows, and just abuse the stage to the fullest by staying safe. Don’t fight on the boat that much.

Brinstar: Helps with sharking, helps with dair camping and stalling with glide and the like, helps land bairs( A BUNCH), helps us kill way earlier(AWESOME!:D). Another very wise choice.

Halberd: Halberd would be better for Pit, the excessive sharking during the travelling part + large horizontal sprawl (on the ship's deck part of the stage) yet small ceiling makes for good Pit camping and helps us kill earlier with Dash attack, fsmash, and dair. Sweet. Be wary of getting upaired here though…choose this if you don’t like brinstar/rc . Advice choosing this over others only if you know it well and are willing to risk stage gimmicks like claw, laser, and bomb becoming a factor.


[collapse="pikachu mu summary"]text[/collapse]


[COLLAPSE="Wario mu summary"]text[/collapse]


[collapse="Peach mu summary"]text[/collapse]


[collapse="Wolf mu summary"]text[/collapse]
 

Snopy

Smash Apprentice
Joined
Mar 12, 2009
Messages
83
Location
Germany
A lot of these ratios seem to be pretty wrong if you ask me.

- Diddy should not be in Pit's favour. It's even or Diddy has a small advantage here. It really depends on the stage.
- Pikachu, Lucario and maybe TL. God, this Matchups can be really frustrating and it's really hard sometimes. I think they both have a small advantage.
- Peach, Shiggy and maybe Luigi should be even
- DK should - at best - only be 60 in favour of pit, same goes for Ike and Mario
- Ness is never EVER 65 in Pit's favour
- Snake is more like 55-45 in Snake's favour if he plays the MU right
 

Maharba the Mystic

Smash Master
Joined
Dec 5, 2009
Messages
4,403
Location
Houston, Texas
ya dude let me make a new poster board for you with more accurate numbers. that was when i was doing those MUs on my experiance and i have definately changed my mind about a lot of those especially on ness, ike, and i believe snake and diddy are at BEST 50/50. ill make you a better more accurate chart AFTER all the mu numbers are agreed on in discussions. so guys don't pay attention to the chart yet it aint done. and since im back i will put up a better fox summary
 

Kuro~

Nitoryu Kuro
Joined
Jan 30, 2010
Messages
6,040
Location
Apopka Florida
A lot of these ratios seem to be pretty wrong if you ask me.

- Diddy should not be in Pit's favour. It's even or Diddy has a small advantage here. It really depends on the stage.
- Pikachu, Lucario and maybe TL. God, this Matchups can be really frustrating and it's really hard sometimes. I think they both have a small advantage. - Peach, Shiggy and maybe Luigi should be even
- DK should - at best - only be 60 in favour of pit, same goes for Ike and Mario
- Ness is never EVER 65 in Pit's favour
- Snake is more like 55-45 in Snake's favour if he plays the MU right
50:50 snake 60:40 ness 60:40 dk 55:45 ike 55:45 mario 50:50 diddy 50:50 peach na luigi is 55:45 TL is 50:50 lucario is 50:50 pikachu is possibly 45:55 but i still say 50:50

ya dude let me make a new poster board for you with more accurate numbers. that was when i was doing those MUs on my experiance and i have definately changed my mind about a lot of those especially on ness, ike, and i believe snake and diddy are at BEST 50/50. ill make you a better more accurate chart AFTER all the mu numbers are agreed on in discussions. so guys don't pay attention to the chart yet it aint done. and since im back i will put up a better fox summary
i realize that i simply took as a momentary representation i myself disagree with quite a few of them. Maha just wait till we finish all mu to make a new one. and ya remake the fox mu and pm it to me when you are done.


Also for those who didnt read the social can you plz get me a link that works for each characters picture. Im tired of trying em just to have em not work. And i use photobucket.
 

~ Gheb ~

Life is just a party
Joined
Jun 27, 2008
Messages
16,917
Location
Europe
Snake is 45/55 - 4/6
Diddy depends a lot on the ruleset
GW is 6/4 for Pit
Wario is 45/55 or even

Imo

:059:
 

Snopy

Smash Apprentice
Joined
Mar 12, 2009
Messages
83
Location
Germany
GW is 6/4 for Pit

Sorry but........
Never, not even close to it. It's not that bad as some Pit Mains may claim, however it will never be 6/4 for Pit. And since I use GW as my secondary I pretty much know what both charcters can do.
 

Kuro~

Nitoryu Kuro
Joined
Jan 30, 2010
Messages
6,040
Location
Apopka Florida
Sorry but........
Never, not even close to it. It's not that bad as some Pit Mains may claim, however it will never be 6/4 for Pit. And since I use GW as my secondary I pretty much know what both charcters can do.
Save it for the discussion thread guys. All the arguments can happen there.
 

Damix91

Smash Journeyman
Joined
Apr 18, 2009
Messages
272
Location
London, UK
Any chance we can get a different matchup chart. I find that one so ugly.

Also can we do the thing where we actively discuss certain characters at a time but have threads for all the characters which can be posted in at any time.
 

Nitrix

Smash Ace
Joined
Jul 1, 2008
Messages
867
Location
London, Ontario
Lets not go crazy over these initial matchup numbers. Just discuss them when the weekly discussion arises.

Thank you for your initiative Kuro. I wish you all the luck and ambition that I didn't have <3
 

dskank

Smash Journeyman
Joined
May 30, 2010
Messages
469
Location
da swamps of polk county
Save it for the discussion thread guys. All the arguments can happen there.
why would he save it for the "discussion thread" if hes talking about match-ups?

Any chance we can get a different matchup chart. I find that one so ugly.

Also can we do the thing where we actively discuss certain characters at a time but have threads for all the characters which can be posted in at any time.
You guys lets not go crazy over these initial matchup numbers. Just discuss them when the weekly discussion arises.

Thank you for your initiative Kuro. I wish you all the luck and ambition that I didn't have <3
this is what this should be

good luck with this thread kuro
 

Kuro~

Nitoryu Kuro
Joined
Jan 30, 2010
Messages
6,040
Location
Apopka Florida
why would he save it for the "discussion thread" if hes talking about match-ups?


this is what this should be

good luck with this thread kuro
to answer your question its cuz when i go to write the summaries i want ALL the info in one place to efficiently do it. I dont want to have to search through clutter. However if a person has a strong point or QUESTION about a matchup then they should gladly post it in here.
 

Kuro~

Nitoryu Kuro
Joined
Jan 30, 2010
Messages
6,040
Location
Apopka Florida
I suggest marth being discussed first. kuro get some threads made
sry realized i forgot to post the order of mu atm.

heres how its gonna go with a couple being negotiable based on public choice

marth
d3
lucario
zss
g&w
tlink

no matter what g&w will be near to last as R@vyn and that thread did a really good job on hitting all the points. marth and d3 are first two no matter what. lucario zss and tlink can be switched around.


and i already told yall get me some picture links that work and we'll get started. I have one request and that's it. Once i have those ill begin immediately. One picture for each character.
 

Krystedez

Awaken the Path
Joined
Feb 22, 2010
Messages
4,301
Location
Colorado Springs
"some picture links"

What kinda picture links? Any art style that fits your fancy?

And also I'm pretty good with Photoshop, I can do some cool stuff with the chart. Also, I might be able to help clean up any of the unofficial matchup stuff and contribute more this weekend :o
 

Kuro~

Nitoryu Kuro
Joined
Jan 30, 2010
Messages
6,040
Location
Apopka Florida
"some picture links"

What kinda picture links? Any art style that fits your fancy?

And also I'm pretty good with Photoshop, I can do some cool stuff with the chart. Also, I might be able to help clean up any of the unofficial matchup stuff and contribute more this weekend :o
any type of "interesting" picture of the character. Just want a visual representation available. Once you have the working links just pm em to me.
 

Purple

Hi guys!
Joined
Mar 26, 2009
Messages
10,383
Location
Duluth, Georgia
Alright guys, this thread has been official'd and stickied. Let's get the discussions flowing here from now on please :)
[collapse=Nitrix Information][collapse="Pit Data"]


[collapse="Weight List"]


Weight List
1. Bowser (120)
2. Donkey Kong (116)
3. Snake (113)
4. King Dedede (112)
5. Charizard (110)
6. Ganondorf (109)
7. Samus (108)
8. Wario (107)
8. Yoshi (107)
10. R.O.B. (106)
11. Ike (105)
12. Captain Falcon (104)
12. Link (104)
14. Wolf (102)
15. Ivysaur (100)
15. Lucario (100)
17. Mario (98)
18. Luigi (97)
19. Sonic (95)
20. Lucas (94)
20. Ness (94)
20. Pit (94)
23. Diddy Kong (93)
24. Ice Climbers (92)
24. Toon Link (92)
26. Peach (90)
27. Marth (87)
28. Sheik (85)
28. Zelda (85)
30. Falco (82)
30. Olimar (82)
32. Zero Suit Samus (81)
33. Fox (80)
34. Meta Knight (79)
34. Pikachu (79)
36. Kirby (78)
37. Mr. Game & Watch (75)
37. Squirtle (75)
39. Jigglypuff (68)
[/collapse]

[collapse="Air Speed List"]

Air Speed List
1. Yoshi (1.32)
2. Jigglypuff (1.27)
3. Wario (1.22)
3. Wolf (1.22)
5. Captain Falcon (1.18)
6. Sonic (1.11)
7. Donkey Kong (1.08)
7. Mr. Game & Watch (1.08)
7. Squirtle (1.08)
10. Lucas (1.05)
11. Bowser (1.03)
11. Marth (1.03)
11. Zero Suit Samus (1.03)
14. Charizard (0.99)
14. Lucario (0.99)
14. Samus (0.99)
14. Zelda (0.99)
18. Ness (0.96)
19. Mario (0.94)
19. Snake (0.94)
19. Toon Link (0.94)
22. Ike (0.92)
23. Pikachu (0.91)
24. Falco (0.89)
24. Fox (0.89)
24. Peach (0.89)
24. Pit (0.89)
24. R.O.B. (0.89)
29. Ganondorf (0.85)
29. Kirby (0.85)
29. Sheik (0.85)
32. Diddy Kong (0.83)
33. Olimar (0.82)
34. Link (0.81)
35. Ice Climbers (0.77)
36. Ivysaur (0.75)
36. Meta Knight (0.75)
38. Luigi (0.73)
39. King Dedede (0.66)
[/collapse]

[collapse="Fall Speed List"]

Fall Speed List
1. King Dedede (2.73)
2. Link (2.67)
3. Captain Falcon (2.57)
4. Fox (2.56)
5. Snake (2.42)
6. Falco (2.39)
7. Pikachu (2.38)
8. Ganondorf (2.31)
8. Ike (2.31)
10. Donkey Kong (2.21)
10. Sheik (2.21)
12. Marth (2.10)
12. Squirtle (2.10)
14. Diddy Kong (2.00)
14. Sonic (2.00)
14. Zero Suit Samus (2.00)
17. Pit (1.99)
18. Wario (1.96)
19. Bowser (1.95)
19. Meta Knight (1.95)
21. Lucas (1.92)
22. Kirby (1.90)
22. Toon Link (1.90)
22. Wolf (1.90)
25. Charizard (1.89)
25. Ivysaur (1.89)
27. Ness (1.83)
28. Olimar (1.82)
29. Yoshi (1.81)
30. Mario (1.79)
31. Mr. Game & Watch (1.74)
32. Luigi (1.71)
33. Ice Climbers (1.68)
33. Lucario (1.68)
33. R.O.B. (1.68)
36. Zelda (1.58)
37. Samus (1.50)
38. Peach (1.47)
39. Jigglypuff (1.37)
[/collapse]

[collapse="Walk Speed List"]

Walk Speed List
1. Marth (1.5)
2. Fox (1.45)
3. Sonic (1.40)
4. Zero Suit Samus (1.33)
5. Sheik (1.30)
5. Wolf (1.30)
7. Falco (1.28)
8. Diddy Kong (1.25)
9. Pikachu (1.24)
10. Meta Knight (1.22)
10. Toon Link (1.22)
12. Donkey Kong (1.20)
12. Link (1.20)
12. Squirtle (1.20)
15. Pit (1.18)
16. Yoshi (1.15)
17. Mario (1.10)
17. Mr. Game & Watch (1.10)
17. R.O.B. (1.10)
20. Luigi (1.08)
21. Ivysaur (1.05)
21. Samus (1.05)
23. Lucario (1.00)
24. Ice Climbers (0.96)
25. King Dedede (0.95)
25. Kirby (0.95)
27. Olimar (0.90)
28. Ike (0.88)
29. Ness (0.86)
29. Peach (0.86)
31. Captain Falcon (0.85)
31. Wario (0.85)
33. Snake (0.84)
34. Lucas (0.82)
35. Bowser (0.80)
35. Zelda (0.80)
37. Ganondorf (0.73)
38. Charizard (0.70)
38. Jigglypuff (0.70)
[/collapse]

[collapse="Running Speed List"]

Running Speed List
1. Sonic (3.50)
2. Captain Falcon (2.18)
3. Fox (2.08)
4. Zero Suit Samus (1.93)
5. Sheik (1.92)
6. Meta Knight (1.85)
7. Charizard (1.80)
8. Pikachu (1.76)
9. Diddy Kong (1.72)
10. Marth (1.70)
11. Yoshi (1.68)
12. Toon Link (1.65)
13. Donkey Kong (1.62)
14. Pit (1.58)
15. Mr. Game & Watch (1.55)
16. Bowser (1.53)
17. Ivysaur (1.50)
17. Lucas (1.50)
17. Mario (1.50)
17. R.O.B. (1.50)
21. Samus (1.45)
22. Falco (1.43)
23. Lucario (1.41)
24. Olimar (1.40)
24. Wolf (1.40)
26. Ice Climbers (1.39)
26. Ness (1.39)
28. Ike (1.37)
28. Kirby (1.37)
28. Squirtle (1.37)
31. Peach (1.35)
31. Snake (1.35)
31. Wario (1.35)
34. Luigi (1.34)
35. Link (1.33)
36. King Dedede (1.22)
36. Zelda (1.22)
38. Ganondorf (1.16)
39. Jigglypuff (1.10)
[/collapse]

[collapse="Spot Dodge List"]


Spot Dodge List
2-20 / 22 Link
2-20 / 22 Pikachu
2-20 / 22 Falco
2-20 / 22 Yoshi
2-20 / 22 Toon Link
2-20 / 24 Marth

2-20 / 25 Mario
2-20 / 25 Samus
2-20 / 25 Zero Suit Samus
2-20 / 25 Kirby
2-20 / 25 Fox
2-20 / 25 Game & Watch
2-20 / 25 Luigi
2-20 / 25 Diddy
2-20 / 25 Zelda
2-20 / 25 Sheik
2-20 / 25 Pit
2-20 / 25 Metaknight
2-20 / 25 Squirtle
2-20 / 25 Ivysaur
2-20 / 25 Charizard
2-20 / 25 Ike
2-20 / 25 Snake
2-20 / 25 Peach
2-20 / 25 Ganondorf
2-20 / 25 Ice Climbers
2-20 / 25 Wolf
2-20 / 25 Lucario
2-20 / 25 Ness
2-20 / 25 Sonic
2-20 / 25 Wario
2-20 / 25 R.O.B
2-20 / 25 Captain Falcon
2-20 / 25 Lucas

3-20 / 25 Olimar
3-16 / 25 Jigglypuff
2-20 / 27 King Dedede
2-23 / 30 Donkey Kong
3-24 / 32 Bowser
[/collapse]

[collapse="Forward Roll List"]

Forward Roll List
5-12 / 23 Metaknight
4-19 / 27 Lucario
4-17 / 27 Pit
4-15 / 27 Zero Suit Samus
4-19 / 29 Diddy
4-19 / 29 Squirtle

4-20 / 31 Kirby
4-19 / 31 Donkey Kong
4-19 / 31 Fox
4-19 / 31 Pikachu
4-19 / 31 Luigi
4-19 / 31 Zelda
4-19 / 31 Sheik
4-19 / 31 Falco
4-19 / 31 Peach
4-19 / 31 Ganondorf
4-19 / 31 Ice Climbers
4-19 / 31 Wolf
4-19 / 31 Ness
4-19 / 31 Sonic
4-19 / 31 Captain Falcon
4-19 / 31 Lucas

3-19 / 32 Jigglypuff
4-19 / 32 Mario
4-19 / 32 Ivysaur
4-19 / 32 King Dedede
4-19 / 32 Olimar

4-19 / 33 Ike
4-21 / 34 R.O.B
4-19 / 34 Yoshi
4-19 / 35 Charizard
4-19 / 35 Marth
4-19 / 35 G&W
4-17 / 35 Snake

4-21 / 37 Wario
4-19 / 37 Link
4-19 / 37 Toon Link
5-20 / 39 Bowser
4-23 / 44 Samus

[/collapse]

[collapse="Back Roll List"]

Back Roll List
4-19 / 27 Lucario
4-19 / 29 Diddy
4-19 / 29 Squirtle

4-20 / 31 Kirby
4-19 / 31 Donkey Kong
4-19 / 31 Fox
4-19 / 31 Pikachu
4-19 / 31 Luigi
4-19 / 31 Zelda
4-19 / 31 Sheik
4-19 / 31 Falco
4-19 / 31 Lucas
4-19 / 31 Wolf
4-19 / 31 Ness
4-19 / 31 Sonic
4-19 / 31 Ganondorf
4-19 / 31 Ice Climbers
4-19 / 31 Captain Falcon
5-20 / 31 Peach

4-19 / 32 Jigglypuff
4-19 / 32 Mario
4-19 / 32 King Dedede
4-19 / 32 Ivysaur
4-19 / 32 Olimar
4-17 / 32 Pit

4-19 / 33 Snake
4-12 / 33 Metaknight
4-21 / 34 R.O.B
4-23 / 35 Marth
4-19 / 35 G&W
4-19 / 36 Charizard

4-21 / 37 Wario
4-19 / 37 Ike
4-19 / 37 Link
4-19 / 37 Zero Suit Samus
4-19 / 37 Yoshi
4-19 / 37 Toon Link
5-20 / 39 Bowser
4-23 / 44 Samus
[/collapse]

[collapse="Air Dodge List"]

Air Dodge List
3-29 / 39 Metaknight
4-29 / 39 Zero Suit Samus
4-29 / 39 Diddy
4-29 / 39 Pit
4-29 / 39 Squirtle
4-29 / 39 Ivysaur
4-29 / 39 Charizard
4-29 / 39 Ike
4-29 / 39 Snake
4-29 / 39 King Dedede
4-29 / 39 Lucario
4-29 / 39 Wario
4-29 / 39 R.O.B
4-29 / 39 Olimar

4-29 / 48 Ice Climbers
4-29 / 48 Ness
4-29 / 48 Sonic
4-29 / 48 Lucas

4-30 / 49 Bowser
4-29 / 49 Mario
4-29 / 49 Donkey Kong
4-29 / 49 Link
4-29 / 49 Samus
4-29 / 49 Kirby
4-29 / 49 Fox
4-29 / 49 Pikachu
4-29 / 49 G&W
4-29 / 49 Luigi
4-29 / 49 Zelda
4-29 / 49 Sheik
4-29 / 49 Falco
4-29 / 49 Yoshi
4-29 / 49 Ganondorf
4-29 / 49 Wolf
4-29 / 49 Toon Link
4-29 / 49 Captain Falcon
4-29 / 49 Jigglypuff

5-30 / 49 Marth
4-19 / 49 Peach
[/collapse]

[/collapse]


[collapse="Suggested Stage Counterpicks"]

:bowser2:Bowser
Counterpicks: Frigate Orpheon, Final Destination, Lylat
Bans: Norfair, Corneria

:falcon:Captain Falcon:
Counterpicks: Final Destination, Battlefield
Bans: Distant Planet, Corneria

:diddy: Diddy Kong:
Counterpicks: Norfair, Rainbow Cruise, Lylat Cruise
Bans: Final Destination, Yoshi's Island

:dk2:Donkey Kong:
Counterpicks: Lylat Cruise, Frigate Orpheon
Bans: Corneria, Jungle Japes

:falco: Falco
Counterpicks: Norfair, Rainbow Cruise
Bans: Jungle Japes, Final Destination

:fox: Fox:
Counterpicks: Lylat Cruise, Frigate Orpheon
Bans: Corneria, Halberd, Yoshi's Island, Green Greens

:gw: Game & Watch:
Counterpicks: Final Destination, Brinstar
Bans: Green Greens, Corneria

:ganondorf: Ganondorf
Counterpicks: Final Destination, Frigate Orpheon
Bans: Pirate Ship, Corneria

:popo: Ice Climbers
Counterpicks:Norfair, Rainbow Cruise
Bans: Final Destination, Pictochat

:ike: Ike
Counterpicks: Final Destination, Lylat Cruise
Bans: Pirate Ship, Corneria

:jigglypuff: Jigglypuff
Counterpicks: Battlefield, Lylat Cruise
Bans: Jungle Japes, Frigate Orpheon

:dedede: King Dedede
Counterpicks: Battlefield, Norfair
Bans: Pokemon Stadium 1, Green Greens, Castle Siege

:kirby2: Kirby
Counterpicks: Lylat Cruise, Delfino Plaza
Bans: Rainbow Cruise, Yoshi's Island

:link2: Link
Counterpicks: Frigate Orpheon, Lylat Cruise
Bans: Norfair, Pirate Ship

:lucario: Lucario
Counterpicks: Lylat Cruise, Frigate Orpheon
Bans: Luigis Mansion, Jungle Japes

:lucas: Lucas
Counterpicks: Battlefield, Lylat Cruise
Bans: Brinstar, Yoshi's Island

:luigi2: Luigi
Counterpicks: Norfair, Luigi's Mansion
Bans: Corneria, Yoshi's Island

:mario2: Mario
Counterpicks: Norfair, Final Destination
Bans: Corneria, Yoshi's Island, Halberd

:marth: Marth
Counterpicks: Brinstar, Lylat Cruise
Bans: Yoshi's Island, Battlefield, Green Greens

:metaknight: Metaknight:
Counterpicks: Final Destination
Bans: Green Greens, Lylat Cruise, Yoshi's Island

:ness2: Ness
Counterpicks: Battlefield, Lylat Cruise, Frigate Orpheon
Bans: Brinstar, Luigi's Mansion

:olimar: Olimar
Counterpicks: Frigate Orpheon, Rainbow Cruise
Bans: Norfair, Luigi's Mansion, Corneria

:peach: Peach
Counterpicks: Norfair, Delfino Plaza, Halberd
Bans: Castle Siege, Luigi's Mansion, Green, Greens

:pikachu2: Pikachu
Counterpicks: Battlefield, Lylat Cruise
Bans: Final Destination, Corneria

:pt: Pokemon Trainer
Counterpicks: Frigate Orpheon, Battlefield
Bans: Corneira, Castle Siege

:rob: R.O.B
Counterpicks: Norfair, Battlefield
Bans: Luigi's Mansion, Yoshi's Island, Rainbow Cruise

:samus2: Samus
Counterpicks: Rainbow Cruise, Delfino Plaza
Bans: Yoshi's Island, Luigi's Mansion

:shiek: Sheik
Counterpicks: Final Destination, Delfino Plaza, Halberd
Bans: Yoshi's Island, Corneria

:snake: Snake
Counterpicks: Norfair, Rainbow Cruise, Jungle Japes
Bans: Corneria, Halberd

:sonic: Sonic
Counterpicks: Norfair, Lylat Cruise
Bans: Corneria, Rainbow Cruise

:toonlink: Toon Link
Counterpicks: Frigate Orpheon, Lylat Cruise
Bans: Pirate Ship, Corneria

:warioc: Wario
Counterpicks: Smashville, Final Destination
Bans: Jungle Japes, Yoshi's Island

:wolf: Wolf
Counterpicks: Frigate Orpheon, Lylat Cruise
Bans: Yoshi's Island, Luigi's Mansion

:yoshi2: Yoshi
Counterpicks: Frigate Orpheon, Lylat Cruise
Bans: Halberd, Corneria, Rainbow Cruise

:zelda: Zelda
Counterpicks: Norfair, Lylat Cruise
Bans: Luigi's Mansion, Brinstar, Corneria

:zerosuitsamus: Zero Suit Samus
Counterpicks: Frigate Orpheon, Rainbow Cruise
Bans: Luigi's Mansion, Yoshi's Island
[/collapse]


[collapse="Helpful Pit Threads"]


SHART (Short Hopped Angel Ring Tech) Thread

http://www.smashboards.com/showthread.php?t=274969

Pit AT Montage by Ayoub

http://www.smashboards.com/showthread.php?t=282534

Grab Releases

http://www.smashboards.com/showthread.php?t=252871

Guide for Advanced Pit

http://www.smashboards.com/showthread.php?t=177160

Dr.X Pit Guide

http://www.smashboards.com/showthread.php?t=217044

Spikable Characters at the ledge

http://www.smashboards.com/showthread.php?t=190021

Wing AT's

http://www.smashboards.com/showthread.php?t=217814

Arrow Follow Ups

http://www.smashboards.com/showthread.php?t=273494

[/collapse]


[collapse="Previous Matchup Discussions"]


Old Matchup Discussion

http://www.smashboards.com/showthread.php?t=174796

:metaknight: MK Discussion

http://www.smashboards.com/showthread.php?t=212803

:metaknight:Another MK Discussion

http://www.smashboards.com/showthread.php?t=262257

:snake: Snake Discussion

http://www.smashboards.com/showthread.php?t=267528

:snake: Snake Discussion

http://www.smashboards.com/showthread.php?t=201644

:pikachu: Pikachu Discussion

http://www.smashboards.com/showthread.php?t=268528

:diddy: Diddy Kong Discussion

http://www.smashboards.com/showthread.php?t=268527


:wario: Wario Discussion

http://www.smashboards.com/showthread.php?t=226329

:wario: Wario Discussion

http://www.smashboards.com/showthread.php?t=262283

:wario: Wario Discussion

http://www.smashboards.com/showthread.php?t=199833


:zerosuitsamus: Zero Suit Samus Discussion

http://www.smashboards.com/showthread.php?t=268529

:zerosuitsamus: Discussion

http://www.smashboards.com/showthread.php?t=246704

:dedede: King Dedede Discussion

http://www.smashboards.com/showthread.php?t=267529

:gw: Game and Watch Discussion

http://www.smashboards.com/showthread.php?t=263056

:gw: Game and Watch Discussion

http://www.smashboards.com/showthread.php?t=229007

:ike: Ike Discussion

http://www.smashboards.com/showthread.php?t=263629

:falco: Falco Discussion

http://www.smashboards.com/showthread.php?t=234333

:marth: Marth Discussion

http://www.smashboards.com/showthread.php?t=254261

:bowser: Bowser Discussion

http://www.smashboards.com/showthread.php?t=250721

:dk2: Donkey Kong Discussion

http://www.smashboards.com/showthread.php?t=243385

:toonlink: Toon Link Discussion

http://www.smashboards.com/showthread.php?t=267530

:toonlink: Toon Link Discussion

http://www.smashboards.com/showthread.php?t=245870

:pikachu: Pikachu Discussion

http://www.smashboards.com/showthread.php?t=246276


:diddy: Diddy Kong Discussion

http://www.smashboards.com/showthread.php?t=246281

:rob: ROB Discussion

http://www.smashboards.com/showthread.php?t=217509

:pt: Pokemon Trainer Discussion

http://www.smashboards.com/showthread.php?t=232665

:popo: Ice Climbers Discussion

http://www.smashboards.com/showthread.php?t=231183


:sonic: Sonic Discussion

http://www.smashboards.com/showthread.php?t=212871


[/collapse]


Matchup Summaries


Diddy Kong:

Link to Thread: http://www.smashboards.com/showthread.php?t=208012
Advantage Ratio: 60:40
Summary:
Nanerz, Nanerz, Nanerz!!!

Diddy Kong sometimes considered the “other” monkey is capable of turning around the course of a game in a heartbeat in a mixed flurry of fur and bananas. This matchup isn’t bad for Pit but it isn’t easy enough that you can be complacent and hope to win with no effort.

First lets a take a look at the main tool in Diddy’s game, his self produced item, the banana peel. Arguably the most annoying projectile in the game, Diddy Kong’s banana peels cause the opponent to trip whether Diddy directly throws them into an opponent or if you run over them while they are on the ground allowing Diddy Kong to follow up with either an attack of his choice or a grab. His ability to lay down two banana peels at once also gives him great stage control and enables him to shut down opponents who prefer to approach on the ground. However, bananas that hit an opponent while he is in the air will only cause damage and won’t have any adverse effects such as tripping. With that in mind, and an angel at your disposal you should know by the time I finish this sentence that you’re going to generally want to take this fight to the sky. However, that doesn’t mean you’re totally helpless on the ground, in fact you’re not really at as large as a disadvantage as you might think here.

Diddy’s ground game is mostly centered around his bananas and the ability to compile a large amount of damage in a short amount of time as long as the momentum of the match swings his way, conversely Pit has a number of ways with which he can interrupt Diddy’s momentum bringing the tempo of the game down to a level that you’ll be more comfortable with. Angel Ring and Palutena’s Arrow are going to be your main tools in disrupting Diddy’s momentum, each with its own significant purpose in the matchup. As you should know, Pit has two reflectors, the previously mentioned Angel Ring and the Mirror Shield, each with its own specific differences from the other. Ideally in this matchup you’re going to want to use the Angel Ring to reflect Diddy’s bananas as the lunge forward as well as well as the larger reflecting surface, really aid more in disrupting Diddy’s flow than the stationary Mirror Shield, which although can be useful at opportune times can result in an easily baited punishment from a smart player. Palutena’s Arrow is also ideal for limiting Diddy’s banana approach from a distance and even in relatively close areas can prevent Diddy from following up with an attack string or a grab.

With Pit limiting Diddy’s ground game somewhat as well as generally staying airborne during the course of the match Diddy will look to take the fight to the air and the chimp is no slouch in the aerial department and is quite capable of taking out an unprepared Pit. However you do generally outclass Diddy in this part of combat and with some smart playing you should come out on top most of the time. It should be noted that most Diddy’s actually combo into their aerials though their dash attack however, Pit’s Dtilt and SH Dair can easily punish a Diddy that decides to get dash happy. Back on the subject of aerials, versus a Diddy the main aerial attacks you’re going to be looking out for are his Fair and Bair, but Diddy’s won’t miss out on a possible chance to spike you with their Dair so that is something you should always keep in mind when offstage. Ideally you are going to want to either get over or under Diddy where you can either use your Dair to pop him into the air or your Uair to rack up damage but Fair, Bair and Nair all useful here with Fair having the potential of gimping Diddy and Bair capable of killing Diddy at relatively low percentages, while Nair as always being a decent move for racking up damage. SH Nair also doubles as a relatively easy way to pick bananas that are on the ground as well as bananas falling in the air. Wingdashing over banana peels also allow you to pick them up, so that’s one more thing to keep in mind.

As far as gimping is concerned it’s not going to be particularly easy for you to gimp Diddy as he has a fairly versatile recovery encompassing both his Side B and Up B. Diddy’s mostly recover using their Side B and only really use their Up B is necessary, however, if you do manage to force a Diddy to use his Up B then you have the option of gimping him with either your arrows or with any attack as either will force his rocket barrels to detach and most likely lose a stock, even throwing one of Diddy’s own bananas work, but keep in mind the rocket barrels can fly at you and have ko potential, so they should be avoided. On Diddy’s side it isn’t as hard as it is for most characters to gimp Pit but if a Diddy does somehow force you to use up all of your jumps as well as your glide and you have to rely on your WOI to recovery you should note than an aerial, a peanut from his peanut pop gun or simply a throw banana can spell doom for you in this state so if so take care to be especially careful against a Diddy in forced into this situation.

In the end, Diddy is a very momentum based character and allowing an opposing Diddy to get good momentum is not going to be a pretty picture for you. However, Pit has a fair amount of tools with which he can prevent Diddy from gaining momentum as well as bringing slowing down or even stopping him from gaining much momentum at all. This matchup isn’t extremely difficult nor is it a tremendously easy match, but stay on your toes, or rather in the air and you should be able to win this one without too much of a hassle.
Donkey Kong:

Advantage Ratio: 60:40
Summary:
Incredibly far reaching attacks, powerful kill moves and being relatively fast for such a big guy makes Donkey Kong quite the formidable opponent. It doesn't help that he is also the second heaviest character in the game but, how does he fare against Paletuna's loyal servent?

DK easily outranges Pit and due to the strength of his attacks and his heavy weight, you're going to be seeing DK live to some obscene percentages while you will find yourself simply being KOed around 100% if you try to take him head on. However, Pit is hardly at a disadvantge in this matchup. On the contrary we could say Pit actually has the overall advantage! Pits Arrows play a key role in this fight, limiting a number of DKs options and allowing Pit to get kills easier than one might initially expect. DKs are infamous for their effective Bair approach which can be quite problematic for most characters, however, this isn't the case with this angel as Pit's Arrows disable this approach and force DK players to find an alternative means of approaching.

Pit's Arrows also eat up DK's midair jump relatively easily, which leads me on to another one of Pits advantages in this matchup, the Mirror Shield. As we know the Mirror shield is capable of reversing the direction of most melee attacks and DK's Up B is no exception. Off the edge DK is already vunerable due to his limited options for recovery and Pits exceptional ability to gimp most opponents but the Mirror Shield's attack reversing capabilities means that a DK forced to use his Up B is pretty much a dead DK.

With these satiable amount of advantages one might think that this match would be entirely in Pit's favour, but of course things are never that easy. DK isn't exactly going to walk off the edge for you to kill him. The hardest part of the matchup is in fact actually forcing DK off the edge to try to edgeguard him. DK is heavy, and difficult for Pit to force off the edge and its unavoidable, you had to get up in this big apes face at some point. This is where DK excels and where Pit needs to be most careful to avoid DK racking up too much damage and scoring an easy KO with his multitude of killing moves. Watch out for DK's Dtilt, which has long reach and is capable of tripping you, which can set you up for another combo, DKs' Nair is also extremely good and kills at low percentages and DK's Up B has super armor frames so be extremely wary of these three moves. DK is not without his own problems at close range though. At the beginning of a stock Pit can chaingrab DK to about 40% and then follow up with a down grab to Uair resulting in a decent amount of damage. Pits nairs are also extremely effective at wearing down DK's mediocre shield and can rack up major damage, the same can be said for Pits Uair and an airbourne DK.

At the end of it all this is one of Pit's easiest matchups and a totally uphill battle for an opposing DK. Take advantage of DK's big frame with your multi-hitting moves, arrows and his gimpable recovery and watch out for DK's powerful kill moves and you should come out on top.

King Dedede:

Link to Thread: http://www.smashboards.com/showthread.php?t=204215
Advantage Ratio: 50:50
Summary:
The King is here!

King Dedede has a fair amount of advantages that lend to his aid in most matchups, namely his Dthrow Chain Grab, his inability to be KOed at low percentages and in turn his ability to KO opponents at relatively low percentages as well as his excellent recovery.
First of all let’s deal with his grab game. Dedede has a Chain Grab on most of the cast with his Dthrow, Pit included. It is a bit harder for Dedede to Dthrow Pit in comparison to most of the cast but in the higher echelons of play this factor is almost negligible and if you get grabbed, expect a series of Dthrows to follow in quick succession. After reaching the edge of the stage with the Chain Grab, Dedede has a number of options that will result in him piling on even more damage such as his Bthrow which deals an impressive 16%, his Fthrow which deals 13%, Ftilt and Dtilt which can kill at higher percentages. You’re best option in the immortal words of which ever smasher said it first is simply “Don’t get grabbed”. Obviously preventing a grab against Dedede for an entire game is improbable due to his ridiculous grab range and the fact that you have to get close to him at some time to actually kill him but Pit has a fair amount of options that will lessen his chances of being grabbed while still being able to approach and significantly damage Dedede. It should be of note however that Pit actually has his own Chain Grab against Dedede with repeated Fthrows to about 40%, which makes for a nice way to rack up some damage at the beginning of a stock, but be careful getting close enough to grab Dedede least you switch roles and become the one on the end of a Chain Grab.

As far as approaching is concerned SH Nair is going to be to your most effective one. It can shield poke larger targets such as Dedede and if you DI over Dedede’s head or retreat with it then it becomes almost impossible for him to retaliate with a grab. Another option is FH Dair. When used with a full hop Dair becomes impossible to shield grab, especially since you can retreat with other aerials but take care not to SH Dair as you can and will be grabbed after it. Also make sure you space yourself well to avoid a possible Utilt, which can kill Pit at relatively low percentages.

While on the subject of kill moves it should be noted that Dedede has quite a few ways in which he can dispose of his opponents. His most common and practical way of killing is hit Utilt, which comes out pretty quickly and can be used to punish missed or shielded aerials. His Dsmash and Usmash are also killers but they have considerable start up and cool down lag so shield and punish each accordingly. Dedede’s Bair can also be used as a kill move at higher percentages and he can also WOP with it at lower ones. Through air dodging and your multiple jumps it should be relatively easy for Pit to avoid being killed via a WOP but take care to avoid Dedede’s Fair as well as it is somewhat slow on start up but it has good knockback. There is also the option of his Fsmash, Jet Hammer and his Dash attack, but they are abysmally slow and easily telegraphed, so they shouldn’t pose much of a threat.

As you can see Dedede has a myriad of moves that can take Pit out but Pit on the other hand is at somewhat of a loss when it comes to actually trying to KO Dedede due to his heavy weight. However all is not lost as Pit can rack up damage on Dedede pretty fast so more or less both characters should be KOing each other around the same time provided you don’t let Dedede rack up too much damage. Pit also has the option of gimping Dedede off stage as Dedede has a fairly poor horizontal recovery so its easy to rack up damage and eat his jumps with your arrows when he is trying to recover as well as WOP him with Fairs of your own.
Overall it’s not too hard of a match for Pit and doing well in this matchup is mostly going to be about your spacing, avoiding his grabs whilst retaliating with attacks of your own, attempting to gimp Dedede where possible and just never allowing Dedede to maintain momentum in this matchup.

Marth:

Link to Thread: http://www.smashboards.com/showthread.php?t=204736
Advantage Ratio: 40:60
Counter Pick Stages:
Stages to Avoid:
Summary:
Marth, the only guy capable of wearing a tiara while still being considered a worthy adversary.

Marth is a very balanced character, who has speed, range and power all packed together to create one of the games most capable opponents. Marth isn't all advantages however and does have some significant weakness that can be exploited fairly easily with a bit of effort. First of all Marth is extremely light for a guy of his size, lighter than Pit in fact which means that you shouldn't have much trouble KOing him. Comparatively Marth doesn't have much trouble KOing you either as his smashes are strong and will KO you at lower percentages, especially if Marth manages to land a tipper with any of them. However none of Marths smash attacks are safe for him on block but i'll delve into that a bit later in the summary.

Another weakness of Marth lies in his recovery. Marth has good vertical recovery with his Dolphin Slash (Up B), however his horizontal recovery is extremely poor and generally if Marth is sent far enough from the stage it becomes pratically impossible for him to recover. This is one aspect of the matchup where a Pit should definitely aim to take advantage of. Pit's Arrows eat away at his jumps and push Marth further away from the stage, coupled with the fact that Pit can WOP Marth off the stage as well as reverse the direction of his Dolphin Slash with his Mirror Shield all make for quite an advantageous situation once Pit gets Marth offstage. Pits should however still be wary when chasing a Marth offstage with a WOP as Marth has more than enough aerial options to challenge Pit even when on the defensive, therefore your best option is to generally ping Marth with Arrows to eliminate his second jump before attempting to WOP him, therefore even if he attempts to try to prevent your WOP by attacking you he still remains in a disadvantageous position when trying to get back to the stage. If you're feeling confident you can even attempt Mirror Shielding his attacks offstage as a sort of psuedo-WOP, but it is discouraged as you generally have safer options.

Marths last real "weakness" is that most of his attacks including all of his smashes aren't really safe on block unless spaced correctly. This "weakness" isn't as easily exploited as his other ones especially with Pit's comparatively poor melee options in this matchup but it is possible to create openings in Marths game with which you can capatalize on, primarily your grabs which can lead to other follow-ups and your Fsmash which can punish Marth relatively well OoS. You don't really have to worry much about diminishing your Fmash in this matchup as your Dsmash will generally kill Marth around the same percentage Fsmash would and for the most part just as reliable. You can however alternate which move you want to use, Fsmash as the punisher and Dsmash as the killer or vice versa, but take care not to readily use both moves for punishing least you diminsh both to the point where they are hard to kill with. In addition Pit will always force Marth to approach due to his Arrows which means Marth has to take the offensive in this matchup. It's at this point when Marth has gotten inside his comfort zone that you now have to focus mostly on your spacing. For the most part in this matchup you are going to want to get underneath Marth where he has somewhat of a blindspot. Your Uair, Dthrow, Usmash and Utilt are great moves when in this position and will help greatly in building up damage for a possible KO. However take care not to be too predictable as Marth's Counter (Down B) can seriously put a damper in your plans if you give him ample oppurtunities to use it.

Overall its definitely a tough matchup, one that is going to require patience and quick reactions. Your Arrows and your spacing are going to be one of the key elements in this matchup so don't utilize them correctly and it's your funeral.


Link to Thread: http://smashboards.com/showthread.php?t=197928
Advantage Ratio: 50:50
Summary:
Short, yellow and shocks things...enough said.

Seriously speaking, Pikachu is one hell of a character with few disadvantages and quite a challenge for most opponents, Pit included.

First of all Pikachu is short which means hes going to be a bit harder to hit with your arrows than most characters and this problem is only aggravated by his ability to crawl and the use of his erratic Quick Attack Cancels. Pikachu also has two projectiles, the first being Thunder Jolt, a projectile that travels along the stage as well as over edges and Thunder, a projectile that is initiated in the sky. Similar to other characters with projectiles Pikachu will be spamming them (Thunder Jolt) anytime he isn't directly attacking you, however Pit has two reflectors, so put them to good use and you shouldn't have too much of a problem with Thunder Jolt. Thunder is a bit different. The same principles apply in that your reflectors will still turn Pikachu's own attack againt him but because of the properties of this move you should still remain cautious when fighting Pikachu. As previously mentioned Thunder starts in the air and comes down to the stage in a long vertical path and is easily capable of killing off the top of the screen, Pikachu's will use this move sparingly due to Pit's reflectors but it is still definitley a move to be wary of especially when recovering with WOI or Gliding.

Pikachu also has extremely good aerials albeit being short ranged and can pose quite a problem to Pit. You're definitley going to want to keep this fight on the ground where the only moves you're really going to have to worry about will be Pikachu's Down Smash which you should always remember to DI upwards out of and his Forward and Up Smashes which are somewhat predictable. The advantage on the ground is definitely Pits so aim to keep the fight there as long as possible. Aside from Aerials, Pikachu also has excellent recovery options with Skull Bash and Quick Attack so don't think you're going to be gimping a good Pikachu anytime soon. Pikachu however has a better chance of gimping Pit than most characters due to the fact that he won't be scared to take the fight to the air and Thunder Jolt can also be used as a way to knock a Pit recovering from underneath a stage out of his Up B, so be cautious here as well.

Pikachu has a lot going for him, but remember he's still a light character and can be KOed fairly easily. Arrow usage although not as prominent as in most matchups is still quite important. As far as stages go i'd recommend No Fair as a counter pick as the platforms will definitley help against Pikachu in terms of limiting his attacking options, and take care to avoid stages like Final Destination or Smashville where Pikachu can readily abuse moves like QAC and Thunder.

Snake:

Link to Thread: http://www.smashboards.com/showthread.php?t=201644
Advantage Ratio: 55:45
Summary:
Solid Snake, currently occupying the second spot on the tier list you can be assured that he can be quite potent in the right hands.

Ok first of all Snake is heavy, (the third heaviest character in the game),has a fantastic and powerful close range moveset with a few moves having some deceivingly large hitboxes and his myriad of projectiles which allow him to more or less control the stage and the tempo of the game at his leisure, if he weren’t playing Pit that is.

Snakes projectile game consists of 5 projectiles; more than any other character in the game and each of them have their own distinct purposes. First are his Grenades. A projectile that comes out on frame 1 and lasts for 5 seconds before it explodes. Snake can utilize this projectile in quite a number of ways. It enables Snake to potentially get out of chain grabs as well as combos from other characters once he is able to pull it out before that opposing character’s attack connects with Snake. If he is successful then his opponent’s attack will hit the Grenade and it will explode on impact, damaging both Snake and his opponent and with Snakes heavy weight and above average recovery he won’t mind taking a little damage here or there as he will generally live to some fairly high percentages. This aspect of Snake’s game is a pure nuisance for Pit as a lot of Pit’s attacks such as Uair and Nair are multi-hitting attacks and will cause the Grenade to explode before the attack is finish. Snake can also throw these Grenades , which do roughly the same damage as one of Pit’s Arrows if they hit you directly and significantly more damage if they explode on you, however it should be of note that Pit can reflect these back at Snake using either Angel Ring or Mirror Shield without much if any harm to himself, but should be wary if Snake “cooks” the Grenade (holding it himself until it is near ready to explode) before throwing it as you won’t be able to reflect the explosion with the Angel Ring and you will get hit. However, Mirror Shield will enable you to block the explosion if you are directly behind it so most of the time you should be opting for Mirror Shield over Angel Ring when attempting to reflect Grenades.

Snakes next projectile is his C4, a projectile that can be stuck to any character or placed on the ground and detonated at Snake’s leisure. This projectile is extremely annoying as you have to constantly keep in mind where Snake has placed it and generally avoid that area of the stage as much as possible to avoid being hit. Sounds easy enough but the C4 is extremely small and camouflages well in certain stages and it’s easy to remember it’s there until it’s too late. If Snake stick the C4 to you directly then he is free to hit you whenever he pleases however when it is detonated it is possible to shield the explosion to avoid damage so if you find yourself stuck with a C4 it would be best to avoid the air until you can get the C4 to drop off or until Snake detonates it himself.

The Mortar or Snake’s Up Smash is a projectile where Snake places a launcher on the ground and fires a Mortar upwards that explodes on contact with and opponent or when it makes contact with the ground after falling, Snake is also unaffected by the resulting explosion. The Mortar can be a bit of a hassle for Pit when trying to make it back to the stage but it follows a set trajectory and is generally easy to avoid through Gliding, the use of Woi or simply spacing your jumps well. Angel Ring and Mirror Shield are again useful here in that they reflect the explosion now allowing it to hit Snake, while doing no damage to Pit. In contrast to Grenades Angel Ring is the more useful reflector here as with Mirror shield you have to be spaced very well to actually reflect the explosion and avoid being actually hit where Angel Ring’s lunging effect allows you a bit more safety when reflecting Snake’s projectile. Snake can also use this projectile in close range combat in tandem with a cancelled Dash Attack to form his Snake Dash. In a Snake Dash Snake cancels his Dash attack and immediately goes into this Up Smash which now gains horizontal momentum from the Dash Attack. It makes for quite a decent approach against most characters but isn’t really that useful against Pit as his Arrows disrupt it, his Mirror Shield reflects the direction of it and as will all other characters Snake can be shield grabbed out of it. The attack is also generally telegraphed as it is probably the only time you will see a Snake start to run towards you so you should have little trouble with it.

Snake’s remaining two projectiles are the Nikita Missile and his Landmines. Neither is used much but each has specific uses and should not be overlooked. Firstly the Landmines or Snake’s Down Smash is somewhat similar to Snake’s C4 in that they are also placed on the ground and can be difficult to see but they actually detonate on impact from anything or anyone, this includes projectiles and even Snake himself. Snake takes a little while to lay down a Landmine and if hit before he gets back up he will not place down the mine. Pit’s Arrows are extremely effective here as they prevent Snake from laying Landmines as well as explode Landmines they come into contact with. These aren’t really that much of a threat to Pit but still something that you should be on the lookout for as they do pack quite a punch if you get hit by it.

Nikita Missiles are remote controlled missiles that Snake has to direct himself. Snakes cannot move when using the Nikita so you should aim take advantage of that as much as possible. Nikita Missiles are normally used to edgeguard but they aren’t much of a thread to Pit as they are only fast when travelling in a straight line but very slow when changing direction. Spacing your jumps, air dodging, Woi and Gliding should allow you to easily out maneuver one of them. Nikita Missiles can also be reflected back at Snake with your Mirror Shield; however the Angel Ring will only slow them down as will any other damaging move. Generally it isn’t really a projectile you should be too concerned about. Overall your projectile game is better than his in this matchup as it will limit his own as well as force him to approach. Abuse that fact and try to keep control of the tempo of the match.

Now that projectiles are out of the way we can look at Snakes close range moveset and offstage game. Snake has some ridiculous range on his close range attacks and they are all very powerful and for the most part outclass your own in both aspects. In terms of close range combat Snake will generally only be using 3 melee moves, his F-Tilt, his U-Tilt and his Jab combo. His F-Tilt is comprised of 2 hits. An initial hit with his knee which can sometimes trip you followed by a two handed swing. It has incredible range and when fresh will do 21%. Pit doesn’t have any moves that outrange the lunge of the second hit of his F-Tilt aside from his Angel Ring which wouldn’t be the most ideal move to be using in this situation so your best option will be to try to shield grab the first hit or to simply wait out both hits before trying to retaliate. Once spaced well Pit’s SH Fair outranges anything Snake can throw at you from off the ground aside from the second hit of his F-Tilt so it will mostly likely be your move of choice when attempting to take Snake on from close range. Snake’s U-Tilt is another commonly used move that has deceiving range for its looks and is also incredibly powerful, KOing Pit off the top of the screen when fresh before 100%. You cannot shield grab Snake out of his U-Tilt so it is best to simply shield it then retaliate with your own F-Tilt which has the same range. Mirror Shield can reflect the direction of the U-Tilt as well as protect you from it if recovering from above so that’s also another option here. Snakes Jab combo is also extremely good, does 14% when fresh and simply tells most characters to GTFO of Snake’s face as it has good knockback for as simple AAA combo. Your best response to it would be to shield grab after the first two hits or reply with a D-Tilt or F-Tilt of your own after all three hits. Pit can chaingrab Snake to around 40% with his Forward Throw so don’t hesitate to chase after Snake after your initial throw provided you are still at a low percentage. Another thing to watch out for when at close range would be Snake’s Down Throw as it can be tech chased into a myriad of options, I won’t analyze any of them here but try to be as unpredictable as possible with your getting up options as to avoid any kind of tech chase.

As far as Snake’s aerial game is concerned, it’s pretty lackluster. On the contrary this is where Pit excels and where he should be aiming to take the matchup every time. The only moves Pit really has to be remotely concerned with here are Snake’s Fair which can spike and his 4 hit Nair which has a fairly powerful final blow. However it is avoidable with good DI so as far as Snakes aerial game is concerned Pit really has nothing to fear. A lot of Pit’s moves such as his Dair, D-Tilt and Down Throw propel opponents upwards (ironic since they are all downwards aimed attacks) and these three moves should be staples when fighting Snake at close range.

Snake’s recovery is above average in that it allows Snake to recover really high into the air easily enabling him to get back to the stage once knocked in a horizontal direction. However, Snake is relatively easy for Pit to gimp once he gets him offstage as his recovery has a fairly obvious trajectory and really isn’t too hard for Pit to take advantage of. WOP Fairs and Bairs are the way to go to in taking Snake out offstage. Arrows aren’t as useful as they are with other characters because Snake’s Cypher gives him superarmor frames and it would require to Pit at least half charge his Arrows before they are capable of taking him off the Cypher, time better spent simply jumping off the stage after Snake or using Wing Refresh to chase after him.

Overall the match is a relatively easy one for Pit in comparison to the other top tier characters. Your Arrows and two Reflectors are the keys to your success here as they limit Snake’s projectile game and force him to play in a more offensive manner, one that be capitalized on fairly easily with some smart playing. Don’t think this match will be a walk in the park however, as Snake is powerful and his attacks will kill you at relatively low percentages. Aim to take the fight to the air and offstage and you should be able to win it.

Sonic:

Link to Thread: http://www.smashboards.com/showthread.php?t=212871
Advantage Ratio:50:50
Summary:
Sonicz Da Edgehawg!

Courtesy of Kinzer, with a bit of editing by yours truely.

This matchup is a bit different to most of Pit's matchups as he can't rely on his arrows as much due to Sonic's incredible ground speed and ability to punish the slightest bit of lag you have on a move. Sonic obviously will do the approaching in this matchup, but coupled with his speed and the possible mixups to throw you off your timing you'll have to be on top of your game to avoid being overwhelmed. Sonic is similar to Pit in some ways in that he has the same problems Pit is known for... probably some of the same benefits as well. Sonic has trouble killing people thanks to his lack of K.O. moves, and the ones that can be used will frequently be decayed to the point that any non-gimp kills from Sonic will be coming past 120% or more depending on character weight. Pit is in the mid-lighter half of the cast which means a fresh Fsmash or a Bair (Sonic's strongest kill moves) should KO you around mid to high 100s depending on your positioning on the stage. Pit has quite a bit more KO potential with his Fsmash, Ftilt, Dsmash, Glide Attack and Bair which for the most part KO, Sonic at slightly lower percentages and given their speed and the sheer amount of options you have it really shouldn't be too hard for you to KO the blue hedgehog as long as you can get the damage on him.

Pit also generally outranges Sonic (Pit outranging someone?, Don't hear that too often :p) so you should use that to your advantage, however don't think you are a Marth or ZSS and get complacent. Sonic has average range and will outrange you in some situations, so be on the lookout for that. Offstage can go either way, but in this matchup it isn't recommended that you aim to strike down Sonic with arrows as Sonic can afford to airdodge them due to his ability to recover from just about any place off the screen, you'd be better off just getting out off the stage after him with your Fair, Bairs and Nairs to hit Sonic WOP him out. When it comes to you recovering, it's not unbelievable to see Sonic gimping you, especially if you're forced to use your WOI, but it shouldn't really come down to this with your multiple jumps, glide and airdodges. You also have the option of harassing Sonic with arrows while you're recovering to deter him from chasing you offstage. Take care to avoid being gimped from the spring from Sonic' s Up B especially if you're recovering from below with WOI.

Mirror Shield shouldn't see too much use in this matchup. There are a few little uses for it here and there but all together it won't be too useful here .You can use Mirror Shield to try and turn Sonic around the other way if he decides to go for the Spring recovery, but that's only going to work offstage and you would probably just be better off just grabbing him out of his Spring recovery, but Sonic can use Uair to keep the ledge relatively safe for him to return on so take care to look out for that.

You don't really have much to fear from Sonic in the way of aerials, when Sonic is above you, he has no answer to your Uair, so feel to abuse it in that situation. Sonic's Fair will trade hits with Pit's Nair at worst and Sonic's own Nair is generally useless unless they try to gimp you with it. Bair is the aerial you should mostly be concerned about as it has decent range and can score KOs if fresh.

In the end it simply comes down to don't be too commited to any of your moves unless you're absolutely sure they're going to hit, and you'll generally be fine.
Toon Link:

Link to Thread: http://www.smashboards.com/showthread.php?t=199843
Advantage Ratio: 50:50
Summary:
Toon Link, a character simlar to Pit in his own right. Excellent projectile game, average ground game and a pretty good aerial game, all of these similarities may sound like you're playing a mirror match but you'd be a bit of a way off in that assumption.

Toon Link has 3 projectiles, Bombs, Arrows and a Boomerang. Most of the time these would overwhelm other characters and lend towards his advantage in most matches, but it's a slightly different case with Pit. Pit's two reflectors in conjunction with his own projectile, Palutena's Arrow, will keep Toon Link's projectile game at bay but don't let this fool you into thinking the matchup will be easy as it's far from.

Close range combat is just about average for both characters, and the winner here will mostly be determined by who is the more experienced player, however, Toon Link does have some nice options for close ranged fighting. His jab combo which helps him with spacing and his U-Tilt easily combos into a variety of other moves. Toon Link's Smashes also come out relatively fast but are for the most part fairly predictable and can be avoided. Fsmash is comprised of two hits with the second hit being the "killing blow". You can DI out of the second hit though and there is some lag before Toon Link actually does the second slash, so there is enough time to jab or grab him provided you shielded the first hit. Usmash is Toon Link's main kill move and it is relatively fast but after you reach about 100% or so you can expect it to be more frequently used so act accordingly.

Toon Link strongest points in this matchup lie in his mid range arsenal which will mostly consist of Toon Links aerial attacks and the occasional Bomb tossed around from time to time. All of Toon Link's aerials have some purpose to expect to see them mixing them up to throw you off. Bair is Toon Link's best comboing aerial/move and can easily rack up damage if you aren't careful. It can also combo into his Dair which can spike you, so be on the look out for that. It should be noted that Pit's Uair can outprioritize Toon Link's Dair but only if the blades of your attack are the only thing that connect with Toon Link's blade, otherwise you'll be on the recieving end of the attack, and that might not go so well, especially if you're off stage for some reason. Toon Link's Fair and Uair are normally used as kill moves, but keep in mind Fair can also be used to combo into itself at lower percentages and Zair which autocancels is generally used for spacing. Pit has his own good options for mid range play, Angel Ring, retreating Nairs and Fairs are all work well if spaced correctly but, you're definitely going to be at a disadvantage if you try to take on Toon Link at this distance and you should be better off retreating once you find yourself in such a position.

Pit gains somewhat of an advantage when it comes to edgeguarding but Toon Link is definitely no slouch and can gimp an unprepared Pit with relative ease with his own WOP of Bairs and his myriad of projectiles to take out Pits Up B. Toon Link also has great horizontal movement and excellent vertical movement with his UpB as well as a tether recovery so he definitely has a variety of ways of getting back to the stage. Aim to take out his second jump with an Arrow then try proceed to WOP him off the stage is the easiest way to go from Pits point of view, yes it sounds generic and fairly easy, but Toon Link is a small target for your Arrows and has quite a few ways of making it back to the stage as previously mentioned, there is also the issue of his Dair which can spike you if you mistime one of your off the stage Fairs, so be careful when attempting a WOP. Your Mirror Shield can also reflect his recovery but it carries him so high he might just make it back to the stage anyway or you will still be forced to hug the ledge to prevent him from grabbing it on his fall.

Overall the matchup is mostly about spacing and the amount of pressure each side can apply to the other and really just a test to see who is the more skilled player. However in terms of characters this matchup is more or less even.

Falco:

Link to Thread: http://www.smashboards.com/showthread.php?t=234333
Discussion starts on page 19
Advantage Ratio: 45:55
Summary:

Lazers, chaingrabs and aerial spikes, oh my! Falco is a character who's strengths are as obvious as he is arrogant and half of this match simply revolves around avoiding Falco's major strengths. One of the biggest obstacles is the chaingrab, which can easily mean 40% or more from a single mistep. Avoiding this at the start of the match should be a very large priority. Remember to space well, and staying near the ledge at the start of the match can help shorten the duration of his chaingrabbing if it occurs. Falco's second strength is his lazers, which can be fired frequently due to Falco's short-hopping. Lazers may be weak in terms of damage but they cause flinching upon impact and can be used while Falco is moving thus setting up hits and grabs. Although lazers can disable several characters, Pit has his Mirror Shield, Angel Ring and is quite mobile. As long as you keep pressure on Falco and use your reflectors to counter his lazers, they shouldn't be a huge problem.

Although in terms of killing power they are fairly even, offstage is where Pit can shine. Falco's recoveries are fairly predictable. Expect a phantasm the vast majority of the time if Falco is above the stage. Most Falco's will usually try to get on-stage with this move and ignore the ledge. If you can predict it, use Angel Ring since it will inturrupt the phantasm and cause Falco to fall downwards and thus resort to his up-b which is a much worse move and easily gimpable.

In the end, Pit can pressure Falco and possibly gimp him offstage. The lazers however, force Pit to approach which is tough and the chaingrab can mean 40% or more which is a very nasty strategy in this match. When everything is taken into consideration, this matchup is 45:55 to 40:60 Pit.


Dealing with the chaingrab:


While the obvious being that flat stages benefit the CG, so maybe being on small platforms often (like on Battlefield), or trying to camp/keeping distance until you take a decent amount of damage (probably like 30% damage) can prevent the CG.
Knowing the CG to spike or CG to DACUS being able to do heavy damage, maybe taking about 30-40 damage (not sure bout percents) from blasters may be better than taking like 50%+ damage from the CG.
Standing by the ledge can be tempting too since Falco has that sliding Pivot grab capability, which can turn the CG around.
The chaingrab is really nasty. Since Pit doesn't like long range against Falco thus mid-range and close range are the only options. For close range, D-Air is nice since it pressures Falco and more importantly gets you airborne. Falco's spotdodge is beast, and alot of Falco's generally have the "spotdodge then react" strategy when it comes to boxing. Thanks to the spotdodge, Pit's non-multihit attacks aren't too useful in close range combat since he can just spotdodge then grab or jab (which comes on frame 2). Thus Pit's N-Air, U-Smash and Jab are all nice since they can hit him out of it. Try to space the jab, since Falco can grab you out of it if it is before the infinite jab animation. If you feel like you have a really good awareness of when Falco will spotdodge, nail 'em with an Angel Ring teach him a lesson :laugh:

PS: One possible strategy if you think you will get grabbed, is to camp until you get 32%, then the chaingrab becomes escapable.
The chaingrab isn't that scary. 50% will NOT win a match. It's also avoidable. Just camp the air or near the ledge and trade hits w/ arrows for lasers until Pit's percentage is around 40%

Falco's "boxing" game is better than ours w/ his quick jabs, f-tilt and grab setups. We still have a fast jab and uptilt to combat it.
Falco's chain grab is still devastating as he can 0 -40% us followed by a spike. If the falco is experienced enough, the tech chase can increase the damage up to 70%+. At lower percents, you would like to play falco closer to the edge to avoid the major damage racking form his chaingrabs. Platform camping can be a viable option. Make sure you DI up and away and spam jumps which would prevent falco from his boost pivot chaingrabs to rack up more damage. You will footstool him if he attempts.


Pit's Airgame vs Falco's Airgame


Pit should have the slightly better priority, and when it comes to Falco D-air vs Pit's U-air, a Pit that is angled below rather than completely below Falco should have a better priority. Since Falco F-air is barely used, I won't talk about that. As for his B-air, I am not sure if Pit's F-air can go through it and its lingering hit-box.
Pit's air game may be the better air game.

As for when Falco's doing his SH blaster junk, that right here makes it hard for Pit to go up in the air in the first place as long as Falco keeps on pressuring. Even when Pit's airborne, Falco does have pretty high jumps, allowing him to reach a bit.
U-Air is very nice against his air game in general. Falco's D-Air does go through it, but only when in the very center. Otherwise U-Air beats it and scores a nifty 15-ish damage. It also has horizontal knockback so Falco can be tossed off the stage which can lead to arrow pegging his phantasm and gimps in general.
Falco's base recoveries are his side B and up B. Falco uses his side B much more often. Falco's side B can not be mirror shielded but can be stopped by using Angel ring over the edge, which can force him to use his up B. Falco's side B has small lag before he actually illusions across. Target that zone with an arrow which can also force him to use his Up B. You can also, chase him if predicted and finish him with a fair or bair before he has the chance after he uses his 2nd jump. Falco rarely uses his Up B because it doesn't send him very far. He is usually forced into doing his Up B when his horizontal side can't get onto the stage. His up B can B mirror shielded.

Falco, he prefers the air, but franky we are better at it.


Dealing with Lazers:


SH Arrows can help a bit against the lazers but it is more of a distraction than anything. At the start of the match alot of Falcos just lazer, so SH arrows can get you out of the lazers and land a few arrows. This can either lead to Falco trying to reflect the SH arrows which is good since it gives you control, or it can lead to Falco jumping and trying to lazer you while in the air which is bad. Either way tho, it should allow you to eliminate some distance at the start of the match which is nice.
Fortunately for pit, his lazors are not a big deal as we have multiple ways to over come them. Pit can easily maneuver through falco's monotone high, low, high pattern. We have 2 reflectors that can force falco to approach. One more way is to jump and shoot falco while he shooting his aerial lazor which will make him think twice about his camp game.
Bowser:

Code:
Link to Thread: [URL]http://www.smashboards.com/showthread.php?t=217503[/URL]
Advantage Ratio: 60:40
Summary:
 
All the way from koopa-land, its Bowser! Despite the massive size, creepy fire-breathing and shell with spikes, Pit actually can handle this giant mutated turtle (although he isn't a complete pushover) Despite the size, Bowser is actually quite mobile due to his side-b bounce AT. This can lead to annoying bouncing arround the field and may seem like a tricky deterence but don't let it fool you into stopping the arrow pressure or approaching. His side-b, much like Wario's Bite can lead into a nasty grab animation that gives plenty of damage if caught in. You want to avoid this, especially if your down to the last stock and near the ledge since this will cause Bowser to land off stage with the throw animation instead of on-stage. This results in his win, despite the death of you both and is not fun to lose to :embarrass
 
If Bowser gets irresponsible with his claw hopping, realize you can easily dish up a fresh plate of U-Air and there isn't much he can do about it since his D-air is easily his worst aerial. With Bowser, try to concentrate on the combos (getting a throw is golden due to weight) but remember about his Up-B. It comes out rediculously fast and is a very safe move that is his go-to OoS option. If you manage to get him off-stage, remember that the mirror shield can give him a death sentence if you intercept his recovery properly. 
 
In terms of killing Pit, Bowser will typically go for a f-air or a grab release D-tilt. The f-air is a great aerial, and scores for nice damage. In terms of the grab, Bowser will try to grab Pit, but instead of throw he will wait until Pit breaks out and lands on the ground a small distance away. Lucky for Bowser, he can react to this situation and score a d-tilt faster than Pit can react (much like a chaingrab) and this can kill Pit at decent percents. Bower's F-Tilt is decent too, and has suprising range as well as speed. For a slow koopa, he does have a few tricks up his sleeve. Although very hard to land, Bowser's U-Air is very powerful and can kill Pit at low percentages so watch out for that as well. 
 
In the end, this battle is about maintaining your flow and not slipping up to any of Bowser's slow but powerful attacks. Although Pit definately has the upper hand, you can't afford any major slip-ups since they will REALLY hurt and hurt your progress. 
 
[COLOR=darkorange]Admiral Pit's Summary[/COLOR]
 
[COLLAPSE]
 
Intro: The King of Koopas is the heaviest character in the game. Where comes his great armor and moderate power comes the price of which he is somewhat slow, but moderately fast for a heavyweight, believe it or not. Pit may have a very slight advantage, but if the Pit doesn't know how to deal with Bowser, he may have more problems than he's asking for. Pit does have a bit of an edge in some areas.
 
Range/Priority
Bowser does have a few moves that can outrange Pit, like F-tilt and F-air. These easily outprioritize Angel Ring, along with an airborne Bowser Side-B that can do the same thing. Bowser generally has slightly more range than Pit, allowing Pit to have not too much difficulties approaching compared to what some other characters, especially Marth, can do to Pit.
One should note that Bowser's F-air can be shorthopped without the landing lag if Bowser F-airs automatically upon jumping, so Bowser may be a bit quicker than some think.
 
Bowser Hit-Boxes
[URL="http://www.youtube.com/watch?v=qkMlsPV_p-8"][COLOR=#cccccc]http://www.youtube.com/watch?v=qkMlsPV_p-8[/COLOR][/URL]
 
Weight/Power
As said before, Bowser is really big and heavy (the heaviest in the game), and add that with Pit's lower than average KO ability, so Bowser could live quite a while. Thankfully Bowser's big, so he's an easy to hit due to his size, especially with arrows.
Now, we can do an F-throw chain on Bowser around 40%, but do keep in mind that Bowser could escape using Up-B if the Pit doesn't CG quickly enough. This usually can occur after your 2nd F-throw. If you can predict a Bowser that may do this, you may cancel the Chaingrab, let the Bowser do Up-B, and attack again.
 
Camping
Pit wins this obviously, where Bowser is a big target, limited to a fire breath semi-projectile, Bowser would have to approach. Bowser's ledge game isn't that bad at all, if you ask me, and I should know this, since I use Bowser too.
 
Speed
Pit is obviously faster, and for a heavy weight, Bowser isn't completely slow as some people think.
For the attack speed, Bowser does have some quick moves, some being Jab, and F-air.
 
 
Bowser's Defenses and Grabs
One of the moves you really need to watch out for is Bowser's Up-B. It's one of his fastest moves, and one of the best OOS (out of shield) moves in the game. It has invincibility frames too, and does decent at KOing.
 
Normally, SH N-airs may work on some large heavy chars, but it's not as easy with Bowser having range, his firebreath and of course, Up-B OOS. It's really the Up-B OOS that Bowser could use, even more so than a shieldgrab.
Speaking of grabs, all of Bowser's grab are average at damage, 12% from D-throw, 10% from F-throw, 10% from B-throw, and 10% from U-throw.
Also, Bowser has a nice Grab Release game. The way it works is because Bowser's frames from an opponent escaping his grab are less than the frames of how long it takes a character to move when they have broken free from a grab. (Bowser's 20 frames to the opponent's 30 frames, I think), giving Bowser a small amount of time to react and perform his next move.
The link to the list is located here.
 
[URL="http://www.smashboards.com/showthread.php?t=193617"][COLOR=#cccccc]http://www.smashboards.com/showthread.php?t=193617[/COLOR][/URL]
 
As you can see, compared to many of the other characters, Pit is very resistant to his Grab release game (Poor Wario), but still that doesn't mean that you can get careless. The Air release to F-air can be a killing tactic when your damage is high if you struggle. Technically, without struggle, Pit will be ground released, unlike MK and other smaller chars.
 
Edgeguarding/Gimping, Bowser to Pit
Edgeguarding and Gimping, for Bowser to Pit, Bowser's F-air has great range, and can be good when he's pursuing a Pit, supposingly if the Pit isn't shooting arrows while recovering. B-air from Bowser should be stronger in terms of KOing not just because the average Bowser uses F-air quite a bit, and could be stale.
If Pit is forced to using Up-B, he needs to watch out. One single touch of a Fire breath could gimp Pit like that. A Bowser could go to the ledge and aim the flames downward, and that can stop a bottom approach from the stage. You can either try recovering high, or fly to the other side of the stage if the stage you're on grants you that capability.
As for the ledge, there are occasional times where a Bowser will go near the ledge and throw in a Bowser Bomb. The Bowser Bomb can allow Bowser to grab the ledge if he isnt too far from it, and do damage to you if you get close. However, if you edgehog a Bowser quickly, that's an instant stock loss for Bowser.
 
Edgeguarding/Gimping, Pit to Bowser
For Pit to Bowser, Bowser will have some difficulty getting back up with his limited recovery. He has a midair jump and his Up-B, very poor on recovering vertically. Pit can shoot arrows at him to give him a bit more damage and knock him back a bit. You can Mirror Shield his Up-B. Try getting close and horizontal with Bowser and his Up-B.
The Mirror Shield Gimp should be able to help Pit KO Bowser quickly, which will make up for Pit's poor KO power against Bowser's weight. If you think you can't land the Mirror Shield gimp, you can use aerials instead, not just to try to gimp em, but to do more damage, in case Bowser does make it back. Just remember Bowser isn't completely helpless when recovering, but he is vulnerable if he Up-Bs at a high elevation due to the Up-B landing lag.
If you do approach him quickly, be cautious of a possible F-air, Side-B (Can be a Bowsercide depending on how much stock and % you and Bowser have), or airdodge.
 
 
Stage CPs/Bans
As far as stages go, the old stage CP/banning data for Pit can be found here. 
 
[URL="http://www.smashboards.com/showthread.php?t=206886"][COLOR=#cccccc]http://www.smashboards.com/showthread.php?t=206886[/COLOR][/URL]
Note that the list is old and is NOT up to date as of now.
 
Counterpicks Known:
-FD: Great for Pit, mainly due to Pit having plenty of room to camp, while at the same time, Pit has many of his recovering options, which do include gliding under the stage and to the other side. This is generally Pit's "Big" playground.
 
-Lylat: The tilting stage messes up Bowser's recovery more than it does Pit, and Pit can still recover by gliding under the stage. The tilting stage can also interfere with the grab release game.
 
 
Bans Known:
-Battlefield: This is Bowser's best neutral stage, and is a small one too, which means there is less room for Pit to run around. Regardless of which u can glide and fly under the stage, Bowser can simply approach you quicker since the stage is small, generally not much room to camp on.
 
-Norfair: Even though Norfair may not be even available from the start, but if you are ever taken here, know that Bowser simply can live much longer here with the supporting platforms, and lava can help him live even further. Our chaingrab against him is limited with the small platforms. Not much more is known.
 
-Yoshi's Island (Brawl)
As you know, Pit is bad on this place and is his worse neutral. He can't glide under the stage, and Shy Guys can block arrows.
When playing a Bowser here, like BF, there is not much room for Pit to go around and camping. With the Shy guys around, the camping effectiveness is lowered even more. Also, since Pit can't fly under the stage, if Pit's forced to use Up-B, he really loses the "under the stage" option and has a higher chance of getting gimped by Bowser's fire breath.
 
More Stage research may be needed.
The matchup ratio has been ranged from 60-40 Pit to 55-45 Pit, mostly leaning towards 55-45 Pit.
 
Synopsis
60:40 Pit's advantage
The matchup favors Pit, not only because Pit has his projectile against the big, slow target, but him being able to gimp Bowser fairly well and the F-throw CG being really effective against Bowser and other pressuring tactics (camping) make it hard for Bowser to do things.
Now, Bowser does outrange Pit just a bit, and has some good defenses and is really heavy, but Pit can use that weight against him (again, the CG). A skilled defensive Pit will have easy times against Bowser for the most part. Even an offensive Pit that knows about Bowser's defensive capabilities can pressure Bowser, too, but being reckless can be a bad idea.
[/COLLAPSE]
 
[/QUOTE]


[QUOTE] 
 
Captain Falcon:
[URL="http://imageshack.us"][IMG]http://img367.imageshack.us/img367/3301/viewtifulfalcondk2.png[/IMG][/URL]
Link to Thread: 
Advantage Ratio:
Summary:
 
[COLOR=darkorange]Summary courtesy of Darky-Sama:[/COLOR]
 
 
[I][COLOR=#ffffff]-Pit should NOT approach Falcon whatsoever.[/COLOR][/I]
[I][COLOR=#ffffff]-Pit can hurt Falcon badly with properly directed arrows offstage.[/COLOR][/I]
[I][COLOR=#ffffff]-Pit should never attempt to recover vertically while close to the stage.[/COLOR][/I]
[I][COLOR=#ffffff]-Stay out of the air as much as possible.[/COLOR][/I]
 
[I][COLOR=#ffffff]Although Falcon is a terrible character, his unique speed, fastfalling, auto-canceling and aerial control make him heavily underrated. In the hands of a player who isn't trying to show off the entire match and perform non-existing // not guaranteed combos, Falcon can actually prove to limit the play styles of most characters. Pit isn't much of an exception to this. Falcon can't do much at a distance, but he still holds an aerial advantage when Pit's above him, like he does against most characters.[/COLOR][/I]
 
[I][COLOR=#ffffff]The main thing about this match-up is to watch out for Falcon's unique ways of punishing. Since his dash often places him closer toward his target than he'd desire to be, some Falcons {including myself} will short hop and fastfall consistently to place themselves as close to their target as they need to be. From there, he can spam short hop, fastfall Bairs over and over {about two Bairs per second} until he hits something.[/COLOR][/I]
 
[I][COLOR=#ffffff]Utilt, Bair and Uair are the main things to watch out for when Falcon starts short hopping to approach.[/COLOR][/I]
 
[I][COLOR=#ffffff]Falcon can also dash toward Pit, pull up a shield out of his dash and shield grab to punish Pit's reactions. Since Falcon's shield out of dash makes him slide so close to the opponent, he's often placed within range to shield grab characters without any problem whatsoever. Which usually leads to Falcon trying to force Pit into the airspace above him so he can juggle him around the stage with aerials.[/COLOR][/I]
 
 
[COLOR=darkorange]Darky-Sama's Complete Captain Falcon Summary[/COLOR]
 
[COLLAPSE]
 
[QUOTE]
 
[I][I]{Range and Priority} In terms of range and priority, Pit definantly holds the advantage. Where Falcon has a lack of projectiles, Pit has some of, if not, the best projectile shenanigans to promote a large control of the stage. Without a projectile game, Falcon is often pressured into a position where he's forced to approach. At close range, Pit once again holds a good advantage over Falcon's moveset. Between range, priority and the frames of which attacks come out, Pit has Falcon outranked almost completely.[/I][/I]
 
 
[I][I]{Weight and Power} Captain Falcon is one of the heavier characters in the game. He's an extremely high fastfaller with some of the best launch resistance properties around. Yet, unlike most of the heavy characters, Falcon isn't nearly as slow, making him a harder target to hit, as well as KO.[/I][/I]
 
[I][I]Falcon has two of the strongest KO potential moves in the game:[/I][/I]
[I][I]The Knee of Justice, which can often guarantee a KO on Pit fresh at 75-80% and a Falcon Punch which can KO at 65-70% fresh {or 55-60% if a Reverse Falcon Punch is used}. While both are considerably difficult to pull of, Falcon has the mobility to punish with a Knee accordingly if he's able to predict his opponent correctly. Other moves that have good KO potential are Falcon's down smash, forward smash, up tilt, down air and back air. All of which can KO a Pit around 95-100% fresh.[/I][/I]
 
 
[I][I]{Camping} Falcon is limited when it comes to camping against his opponents. Without a projectile, he can't really do much at all except hold a shield up against projectile based characters or air dodge. Surprisingly, he's not the worst character when it comes to camping though due to his ability to short hop air dodge -> fast fall -> shield -> jump out of shield -> air dodge -> repeat. Due to his amazing fastfall speed, he can land quick enough to maintain all of his air dodge frames without the risk of being punished.[/I][/I]
 
 
[I][I]{Speed} Speed, the main aspect that keeps Falcon's horrible priority in check. Being the second fastest character in the game, Falcon can easily approach an opponent, pull up a shield out of his dash and punish reactions with a shield grab. When a character uses an attack with a high cooldown time, Falcon can run toward an opponent and punish them with anything that time will grant him. He's a generally quick character on the ground and in the air. His fastfalling and auto-canceled aerials give him some of the best buffering abilities in the game.[/I][/I]
 
 
[I][I]{General Basics} One thing to keep in mind while playing against Captain Falcon is that you shouldn't underestimate his ability to punish. He might lack priority, but his speed provides him with the ability to punish even one mess up with a grab. Most Falcons tend to play completely offensive, which is perhaps the WORST thing they could possibly do in this match-up. Punishing an offensive Falcon really doesn't take much of an explaination, however, a defensive one could approach with a shield out of dash and often guarantee their chance to punish. Considering that's a defensive Falcon's best option, it's wise to look out for that if playing a considerably skillful and competitive Falcon. Pit's side+B is actually really good in this situation since it eats through Falcon's shielded approaches.[/I][/I]
 
[I][I]Falcon's aerial game is one of his best qualities. His attacks come out quick, have decent range and auto-cancel almost flawlessly, with the exception of Fair and Dair. Falcons will often try to pressure a Pit with their up airs and back airs, considering they're the safest spacing options he has avaliable.[/I][/I]
 
[I][I]On the ground, it's best to watch out for Falcon's smashes and up tilt considering they have loads of priority and range compared to the rest of his moveset.[/I][/I]
 
 
[I][I]{Gimping; Pit to Falcon} Pit's arrows are absolutely devastating to Falcon's recovery, considering it takes the Falcon Dive {up+b} about a second before Falcon even begins to make any vertical movement from his current recovery spot. Arrows can be spammed and curved around the stage to hit Falcon out of his recovery multiple times before he even gets close to the ledge. When Falcon is below the stage, that's definantly one of the best options against him. The main problem about gimping Falcon is that most characters lack a disjointed hitbox for their aerials. Any attack that comes within the Falcon Dive's range that ISN'T disjointed is often outprioritized by the Falcon Dive's grappling effect. Make sure to time aerials properly when attempting to gimp Falcon via aerials.[/I][/I]
 
 
[I][I]{Gimping; Falcon to Pit} Falcon has amazing gimping potential. Running off a stage, he can flub a knee -> rising back air -> up+B under the stage. Most characters on the roster are subjectable to it around 50%. Falcon's down air covers a lot of range, but majority of it's hitbox in this game causes more of a vertical knockback than a spike.[/I][/I]
 
[I][I]While Pit's recovering with his up+B, Falcon can easily gimp him with an aerial unless he goes around the outter boundaries of the stage, where Falcon would have a difficult time recovering himself. It's best to keep that in mind while playing against a Falcon offstage.[/I][/I]
 
 
[I][I]{Synopsis} Overall, Pit holds a great advantage over Falcon in this match-up. Patience and camping are essential, even though it's not very difficult to deny Falcon of his approaches, or even take advantage of his fastfalling properties at low percents for comboing at close range.[/I][/I]
 
[I][I]Final Destination is one of the main stages to counterpick against Falcon. The airspace and room to camp does wonders against Falcon in this match-up, PLUS the lack of platforms eliminates most of Falcon's force getup combos and pressure options.[/I][/I]
 
[I][I][I]Things to keep in mind about this match-up:[/I][/I][/I]
 
[I][I][I]-Pit should NOT approach Falcon whatsoever.[/I][/I][/I]
[I][I][I]-Pit can hurt Falcon badly with properly directed arrows offstage.[/I][/I][/I]
[I][I][I]-Pit should never attempt to recover vertically while close to the stage.[/I][/I][/I]
[I][I][I]-Stay out of the air as much as possible.[/I][/I][/I]
 
[I][I][I]Although Falcon is a terrible character, his unique speed, fastfalling, auto-canceling and aerial control make him heavily underrated. In the hands of a player who isn't trying to show off the entire match and perform non-existing // not guaranteed combos, Falcon can actually prove to limit the play styles of most characters. Pit isn't much of an exception to this. Falcon can't do much at a distance, but he still holds an aerial advantage when Pit's above him, like he does against most characters.[/I][/I][/I]
 
[I][I][I]The main thing about this match-up is to watch out for Falcon's unique ways of punishing. Since his dash often places him closer toward his target than he'd desire to be, some Falcons {including myself} will short hop and fastfall consistently to place themselves as close to their target as they need to be. From there, he can spam short hop, fastfall Bairs over and over {about two Bairs per second} until he hits something.[/I][/I][/I]
 
[I][I][I]Utilt, Bair and Uair are the main things to watch out for when Falcon starts short hopping to approach.[/I][/I][/I]
 
[I][I][I]Falcon can also dash toward Pit, pull up a shield out of his dash and shield grab to punish Pit's reactions. Since Falcon's shield out of dash makes him slide so close to the opponent, he's often placed within range to shield grab characters without any problem whatsoever. Which usually leads to Falcon trying to force Pit into the airspace above him so he can juggle him around the stage with aerials.[/I][/I][/I]
 
[/QUOTE]
 
[/COLLAPSE][/QUOTE]
 
 
[QUOTE]
Fox:
[URL="http://imageshack.us"][IMG]http://img74.imageshack.us/img74/684/foxwithbgbypnutinkod1.jpg[/IMG][/URL]
Link to Thread: 
Advantage Ratio:
Summary:
 
[COLOR=yellow]Kiraflax Summary[/COLOR]
 
[COLLAPSE]
[quote="KiraFlax, post: 10630006"]Fox is acctually one of my worst match ups but i wont let that get in the way of this .
 
Fox that ***** from space against our pit is a quite interesting match up pair.
 
 
first off the basic Fox strategy is Mindgame>Dair>Utilt>Airial ****
This is something that ***** hard and we all need to avoid
 
Much more to fox is his speed allows him to pull off that strategy and many more ussually racking up hardcore damage, we are talking 20-45+ since pit s light he can tend to get out of fox's combos more efficiently
 
Most Foxes use these damage racking combos and then save thier up smash til it can kill pit which is around 90 but if you have correct DI it will save you till 100.


Pits range is exceeding due to arrows but on the long run Fox can counter with his shine
vice versa happends with fox's camping game, the lasers easily gets reflected by our mirror shield and angel ring forcing one another to approach. The one that approaches in this match up will be screwed up. So all the aggresive pits includeing myself should change to a defensive style in this match. If pit is approaching, and since a fox player ussually runs on mindgames and speed, he can use his speed to catch u off guard, Its just simply hard to react to fox's fast @$$ moves, and thus making it easier for fox to Dair to Uptilt to ****.
 
I say a good strategy for pit is to let fox approach you. At this point up close and grounded a tactic which i find very help ful is to use the multi jab. while grounded I see most foxes tend to mindgame to dair most characters by running up to them to shield to short hop Dair to either grab or Utilt. Fox wont be able to leave the ground when fox is doing this tactic.
 
Another popular strategy for pit against fox is if fox switches it up to full hop, double jump, or just coming staright down on ur @$$ with Dair, Utilt out of shield works perfectly. Dair to anything is one of foxes best strategy so this hurts that A hole a ton in this match up. Also this prevents Dair to Usmash which would be incredibly good for fox.
 
 
Alright lets whoop Fox's @$$ again guys. 
Offstage we win. Fox's Up B Recovery is horrible against us due to our mirror shield. if fox is coming from directly under we can obviously not mirror shield it since is not coming at an angle Edge hogging becomes the immediate answer. Also if fox is using it and about to get on the stage and pit is no where near to edge hog or mirror shield them in time, pit can guide the arrow to hit fox forceing him to try and recover again which gives u more time and pit can keep repeating that til he gets to seal the deal. Also Fox has his Foward B recovery onto stage or onto legde. On to stage he can be quickly intercepted through the air with a Nair or if spaced correctly there will be time for any smash. It is possible for pit to mirror shield his Foward B but u must be close to him.
 
Pits may need to watch out a bit when trying to recover to the ledge or the stage with UP B fox can follow off stage at a good distance without worry due to his long recovery. 


Most flat stages like Final D i feel give the advantage to fox. much more easier to do his mindgames with a simple flat stage. Flat stages are good for pit in most occassions due to his camping game but since its eliminated by fox we need to change it up a bit
 
 
Stage CPs I feel are good for pit vs. fox


Battlefield
Well i feel this stage hurts fox more than it would pit. first off theres no pressure and no worries about fox's Dair from far above due to the platforms. Up air and up tilt work well against fox here.
 
Figrate Orpheon
No legde on the right for fox to hang on so if fox does make it on due to UP B lag it calls for an easy punish. Second part of stage if pit stays in the middle below the platform it can give the advantages the battle field platforms do. Assumeing pit is on the side and below the platform and fox is in front of pit, pit can just Multi jab and it would eliminate the possibility of a Dair from high above due to the platform being in the way and a short hop down air due to the multi jab. 
 
Delfino plaza
I feel this gives an advantage for pit because a lot of the time its not flat and platforms appear often which throws off fox more than it does pit.
 
 
Bans i feel should be banned against fox with pit 
 
Final Destination
Smashvile 
Castle siege
 
(I know theres more stages to be mentioned then the six listed but im lazy)
 
Final Judgement Intro
Fox does eliminate pits camping arrow game but pit eliminates one of fox's best strategies which in this match up that strategy is more important to fox than the arrows are important to pit. Really depending on who approaches will determine who will have favor. But also take into account that off stage pits wins by a significant amount. Also there are more stages that benifit pit over fox. 
 
Final Jugdment
Adding all of the above info all together I believe the match up comes to a 
[SIZE=3][COLOR=red]55-45[/COLOR][/SIZE]
Get screwed fox and take that arrow up ur @$$[/QUOTE]
 
[/COLLAPSE]
 
 
[COLOR=yellow]Tetsion Summary[/COLOR]
 
[COLLAPSE]
 
[quote="Tetsion, post: 10654875"]agreed. I have fought good fox users online even, they aren't easily gimped. Side B prevents Pit from mirror shielding it. The only time you will shield a fox is probably in the lower/higher corner of stages not directly below or above you. (I dont know why a fox would be up Bing down towards a stage.)
 
My go on this is for potential.. 50-50 or 5 in each others favors. I say this because, they both do have reflectors.. but I feel fox's is better in this situation because our 2 reflectors have more lag I think. Fox is quite quick so overall camping each other is pretty pointless, but I know fox has a pressure game more than pit does.
 
I have played fox as well, and doing SH laser waiting for ur opponent to make a mistake can be quite aggravating to the opponent. Those little %'s rack up.. but don't let it make Pit take the super offensive.. and as weird as this sounds I think Pit should approach fox if he chooses to by walking/running. Doing SH's I feel is honestly pointless (from my experience) none of pit's moves are quick like MetaKnights. Fox's moves from SH laser are Dash attack or sliding with up Smash. Pit doesn't have those options, and can't react as fast to them either.. so staying grounded is more ideal than SH arrow.. or any aerial. Not to say don't use them but keep it scarce..
 
avoid low ceiling stages with fox, he can kill you a lot faster with up Smash than his other moves, and pit can recover from any distance he isnt killed at, Up Smash will kill us though. 
 
Best "starter" stage against fox if Lylat, the tilts in the stage mess up Fox's timing more than it messes ours up. Another is possibly.. Battle field. I say this because larger stages like FD and SV althogh usually ideal for Pit users.. are not useful when fighting fox as he is faster as well as his lasers. He can in all honesty out camp us better and react to our arrows better than we can to his lasers, even if they dont knock us. Don't give him the distance to do so, battle field leaves less distance between you, arrows have less distance to go to hit fox, and it's harder for him to stay distant from you.
 
Pit has slightly better up-close fighting range though, I don't know for sure faster but he has more range than fox I believe (going from observation, most of what I typed is from observation and experience, sorry if it's inaccurate if someone knows it is) and that is quite crucial and part of the reason I feel this match-up is pretty even.
--------------------------------------------------------------------------
Summery?
 
Fox is faster has a better reflector compared to ours, and can camp/bait us better than we can him.
 
Pit can gimp Fox's recovery and overall has more range than Fox does. We also have less stage dis-advantages compared to fox (even though I only discussed starters)
 
so my..opinion is leaning towards 50-50. As I said earlier though it can be 45-55 in either of their favor though.. it's pretty close imo. 
 
PS. Apologies for structure of the write-up, I just sort of "went with it" I didn't plan to make it organized, I just brainstormed and typed.. laziness~ It always gets me.[/QUOTE]
 
 
[/COLLAPSE]
 
[COLOR=yellow]Dualseeker's Summary[/COLOR]
 
[COLLAPSE]
 
[quote="dualseeker, post: 10630258"]I actually do not have that much trouble with the Fox Match Up. In basis, you just need to be wary of what the Vulpine can do, and be prepared to punish it. I agree with a lot of the things you say, Kira. It's a good summary, but I would also like to say some things on this particular MU.
 
On stage:
One of Fox's main strategies is to start combos with his Dair>Utilt>Aerial combos. The obvious counter against this is ShieldGrab. From there we can proceed to either Chain Grab, or use Dthrow to any Aerial attack (if he is at a low percentage). If he lands behind you, roll away or walk away. Fox is too fast to counter if he lands behind you, and he can punish with his spammable smashes.
 
Once you are at a percentage that Fox can take you out with a Usmash, I advise staying away from Fox. Since the most favored tactic is to suddenly rush in and use Usmash, you should allow enough distance between yourself and Fox to allow enough time for you to react. Although, beware that they mindgame you into using your shield for too long and they grab you. Fox's grabs can't do much, but they can still cause unneeded damage. If you successfuly shield Fox's Usmash, either counter with a grab, Dsmash, or Dtilt.
 
I disagree with Kira that Fox's reflector kills our Arrow game, in my opinion, it does not. Unlike Falco's Reflector, Fox's doesn't travel a certain distance forward. This means, that as long as you stay an adequate distance away and angle your Arrow's upwards or downwards, you do not have to fear your own Arrows. I also recommend Arrow Looping (I just know someone is going to bash me for this, but whatever. This strategy is usefull). Make your opponent think that you like to Loop Arrows, or make him think that he needs to pull out his shine each time you take out an Arrow. Then, when you are close enough, pretend to Loop an Arrow. If the enemy pulls out his shine, that is your chance. Use any attack you would like, or grab him, as his shine does cause lag. 
 
It is a good idea to let a Fox approach you, as Kira said. Using Dtilt can ruin their game, since it is a great way to get them when they are dashing towards you.
 
Also, as Kira said, Fox's speed is a useful tool, and makes the Vulpine much more deadly. Try not to think that you can escape his combos by retaliating, since he can usually execute his next attack before you can attack back. Try to jump away from his combos, since that is the best way to get out of them. Don't try to attack while you are in the combo, it only makes things worse. Also, try not to airdodge or spot dodge too much. This actually helps Fox get more hits on you. And watch out for the Uair, it is surprisingly deadly.
 
Also, they do have a nice Boxing game. It isn't as good as Falco's, but it can prolong combos. You can punish their infinite with a Dtilt. If you see a Fox using an infinite a lot, try using a Dtilt. It outranges them.
 
Offstage:
We have the advantage if we are going after him offstage. If he uses his Up B (I'll just call it Fire Fox, don't know the actuall name) and he is in a position to be mirror gimped, go for it. You can also easily gimp him if he is trying to use Fire Fox vertically. Since his Fire Fox has considerable start-up time, if you are near the ledge, try to Fast Fall and hit him with a sweetspot Bair before it takes effect. And, even if it takes effect, you can still sweetspot Bair the Vulpine since he is not invincible while Fire Fox takes effect. Altough, you have to watch out for the hitboxes. If you do not land a sweetspot Bair, jump again and use Bair again. You'll usually sweetspot it; if not, you would have probably knocked him far enough that recovery should be impossible for him. Also, I would advise you use Kira's options against his Side B recovery. That works wonders also.
 
If he is chasing after you, be VERY CAREFULL OF HIS SHINE!!!! I can't stress this enough. Fox can still go far away from the stage and still recover safely, so he does have the option of chasing you. Be wary not to use your WoI, since his Shine can gimp you easily. If you have the option, glide or WoI under the stage. Since Fox is fast, you might have to mindgame him into going to the other side, then returning to the other edge instead. It is actually better to recover high, but you still have to be wary of Uair, since it can kill and combo into other moves. Plus, Fox jumps pretty high very quickly, so you have to be prepared for his quickness.
 
In my opinion, this Match Up is either 50:50 or 55:45 in Pit's favor. I do not consider the Vulpine to be a threat.
 
To answer Nitrix's questions:
 
His Dash>Usmash, and Dair>Utilt>any Aerial.
 
Shield Grabbing, OOS options, playing defensively, and gimping his Fire Fox offstage.
 
We do not have to shut down our Projectile game just because he has a reflector. And we can gimp his Fire Fox easily. And we shut down his Projectile game.
 
Not really, other than the fact that we have to be careful on when we go on the offensive.
 
I pretty much agree with what's already on the Match Up thread.
 
Here are some combo videos of Fox. Watching them helps: [URL]http://www.youtube.com/watch?v=KmDLU3D0EZo&feature=related[/URL]
[URL]http://www.youtube.com/watch?v=a-xTk66kk1k&feature=related[/URL]
 
I feel I didn't do a good job with this summary -_-... I might revise it. But basically, just play defensive and be ready for his Dair. I've been studying this for a while, and I don't think we need to be too afraid of the Vulpine. All we need to do is play defensive untill we can find an opening. ShieldGrabs help IMMENSELY for me.[/QUOTE]
 
 
[/COLLAPSE]
 
[/QUOTE]
 
Game & Watch:
[URL="http://imageshack.us"][IMG]http://img74.imageshack.us/img74/9285/smash11mrgameandwatchbykz7.png[/IMG][/URL]
[CODE]Link to Thread: [URL]http://www.smashboards.com/showthread.php?t=229007[/URL]
Advantage Ratio: 
Summary:
Ganondorf:

Code:
Link to Thread: 
Advantage Ratio:
Summary:
Ice Climbers:

Code:
Link to Thread: [URL]http://www.smashboards.com/showthread.php?t=231183[/URL]
Advantage Ratio: 60:40
Summary:
Ike:

Code:
Link to Thread: 
Advantage Ratio:
Summary:
Jigglypuff:

Code:
Link to Thread: 
Advantage Ratio:
Summary:
Kirby:

Code:
Link to Thread: 
Advantage Ratio:
Summary:
Link:

Code:
Link to Thread: 
Advantage Ratio:
Summary:
Lucario:

Code:
Link to Thread: 
Advantage Ratio:
Summary:
Lucas:

Code:
Link to Thread: 
Advantage Ratio:
Summary:
Luigi:

Code:
Link to Thread: 
Advantage Ratio:
Summary:
Mario:

Code:
Link to Thread: 
Advantage Ratio:
Summary:
Meta Knight:

Code:
Link to Thread: [URL]http://www.smashboards.com/showthread.php?t=212803&highlight=metaknight[/URL]
Advantage Ratio: 40:60
Summary:
Ness:

Code:
Link to Thread: 
Advantage Ratio:
Summary:
Olimar:

Code:
Link to Thread: 
Advantage Ratio:
Summary:
Peach:

Code:
Link to Thread: 
Advantage Ratio:
Summary:
Pit:

Code:
Link to Thread: 
Advantage Ratio: 50:50
Summary:
Pokémon Trainer:

Code:
Link to Thread: [URL]http://www.smashboards.com/showthread.php?p=7314856#post7314856[/URL]
Advantage Ratio:
Summary:
R.O.B.:

Code:
Link to Thread: [URL]http://www.smashboards.com/showthread.php?t=217509[/URL]
Advantage Ratio: 50:50
Summary:
Samus:

Code:
Link to Thread: 
Advantage Ratio:
Summary:
Sheik:

Code:
Link to Thread: 
Advantage Ratio:
Summary:
Wario:

Code:
Link to Thread: [URL]http://www.smashboards.com/showthread.php?p=6958918#post6958918[/URL]
Advantage Ratio: 40:60
Summary:
Wolf:

Code:
Link to Thread: 
Advantage Ratio:
Summary:
Yoshi:

Code:
Link To Thread: 
Advantage Ratio:
Summary:
Zelda:

Code:
Link to Thread: 
Advantage Ratio:
Summary:
Zero Suit Samus:

Code:
Link to Thread: 
Advantage Ratio:
Summary:
[/collapse]

[collapse=Maharba Information]


^this is a modified version of the old chart^

So i am basically making this thread so that Kuro doesn't have to do to much work when he makes the official thread. Enjoy my MU summaries.


SNAKE 50:50

The biggest **** in the game. Here’s my run down on the snake match-up.
Snake is an amazing character. His ground game is unequalled in this game hands down. He has one of the best camping games in brawl; his up close game is overpowered and disjointed as all hell. With his C4, snake dash, nades, and tilts snake can overwhelm most characters. However when push comes to shove Pit has all the tools necessary to keep up with Snake’s extraordinary game play and come out on top to boot.

In the beginning of the match you have 2 options that are open to you that make sense. You can start the game off by:
1. Camping. This is by far the safest thing to do against snake in the beginning of the match. Between your arrows, your reflectors, and just throwing nades (pay attention as to whether or not he tries to strip them) back at snake if he is camping as well, you more than out camp snake especially in the beginning of the game. On stages like BF and other stages that limit your camping ability understand just how much more they allow you to juggle snake once you have him in the air. On battle field if snake is above you there is no excuse for you not to get in some good juggling time. Between baiting air dodges and punishing with grab, and using dair, nair, usmash, and utilt to keep him up when he doesn’t dodge. Or you can be a mega **** and only juggle with WOI platform cancel to throw if he lands on a platform and camp under them with arrows.

2. The more risky option going for the chain grab on snake or just close quarters in general to get him off stage and put him in Snake’s worst position early on. Off stage in the air. However be advised that if you approach you are doing exactly what the snake wants you to do so you must be prepared to handle his close quarters combat. It is high risk high reward. If you do get him off stage you should camp with arrows till you eat his jump then either camp more or go after him either by just jumping off and going for him or using your Wing Refresh to chase him down fast. While snake has nothing on Pit in the air be careful of his powerful b-air, u-air and his grenades. Aside from that arrows, throws, and u-air should keep snake in the air with relative ease for a while.

After the beginning of the match snake will undoubtedly be the main aggressor due to your superior camping game. His main approaches are all ground based. Until he gets close enough for cqc you should be making his life miserable with arrows especially since he can’t just crawl under them like other projectiles. One of his main approaches is the Snake Dash (Snake’s DACUS). He will sometimes do this while holding a nade so keep that in mind. This approach is countered mainly with arrow, pivot grab, boost pivot grab, fair, angel ring, jab (infinite part), and dtilt.

He may also use a combination of nades and platforms (based on the stage) to approach at a slower pace. Here grabs and jab are more efficient. Grabs are especially efficient if you have a lower controller port than snake because then when either of you grab each other and an explosion goes off he goes flying because he is in a higher controller port and you stay where you are.

Or he could just walk up to you while shielding arrows and start to abuse his tilt game and his down throw game on you. Oh wait most snake’s don’t know that they don’t really have a down throw game on pit. If Pit gets up and immediately spams u-tilt snakes d-throw options are pretty much gone. He can’t get another grab if he shields it, it clanks with his own tilts, and moves Pit’s hurt box out of its normal position. This means that the only cqc game you need to worry about are his tilts, jab, and his other throws which put far away enough to start camping again.

However don’t let all the above think you have everything in bag. There is a reason this is 50:50. Those tilts rack up massive damage and most Snake’s know how to keep on an opponent. Also he not only has a great dash attack he can Gatling combo it. Also Snake’s have plenty of cqc options when they are holding a nade. He also has one of the longest reverse grabs in the game so don’t underestimate the range of his already long *** grab. His u-tilt can also kill us with good DI at most stages around 100% give or take about 10% based on the stage. A Snake that has control of the center of the stage and is going agro is a fearsome thing to behold.

And that is just when we are both on the stage. When snake is edge guarding us things become quite difficult. His dtilt and utilt can hit us on the edge. He can plant C4 there for added pressure. He can strip nades to blow up right by or even under the lip of the stage. His nair is a wall in and of itself. However, when you are being edge guard, also remember… YOUR PIT. If you feel uncomfortable on that edge, try flying under the stage to the other side or make it look like you are and then go back and get up. Obviously don’t if he has C4 on the other side.

On the other hand, Snake does not want to be getting edge guarded by Pit either. If he is hanging on the edge we can dtilt him (spike or not), we can loop an arrow to hit just below the lip, and we can punish all of his ledge options with our aerials, jab, grab, and fsmash.

Getting the kill on a good Snake (not talking about gimping yet) with good DI should not even be thought of until about 140% unless you are near the edge of the stage and you just landed a fresh (or at least refreshed) fsmash, dsmash, or bair crit. Also on stages like smashville which has no lip on the edge and the moving platform we can spike him out of his cipher (which is easier than you would think trust me) and even out of his C4 recovery (this one being highly unlikely but I’ve pulled it off). We can also grab him out of cipher, bair stage spike, catch his C4 recovery with a footstool or WOI, or just WOI edgehog him.

When it comes to gimping, to be honest it’s not that easy. A good snake should not be getting gimped because a good snake should not be off the stage until they are above 100%. This is why the chain grab is so high risk/reward and honestly should only be used if you get the chance. Thanks to Falco being the chain grabbing ***** he is, most Snakes have conditioned themselves to not being chain grabbed. However should you find snake off the edge early on in the game as a Pit player it is your duty to better his metagame by punishing him so hard he never forgets why you don’t mess with Pit offstage with Snake. Between multiple fairs out of his cipher, low percent bair kills near the edge of the screen, just keeping him offstage, and of course never missing a chance to gimp his C4 with WOI if he goes low. And don’t forget about chasing him with Wing Refresh stuff too. In the end though good luck getting him off stage early game.

In the end I believe this mu to be 50:50 and nothing else.


Wario 40:60

Wario is one of the hardest MUs for Pit to play against for sure. Fortunately I have a lot of experience in this MU so I feel I’ve got a good run down on it.

First off before you even start to fight Wario BAN BATTLEFIELD!!!!!! With his vastly superior airspeed his ability to efficiently circle camp the platforms, to make your arrows almost useless in the process, and out prioritizing you in the air to boot makes this the worst stage ever to fight him against. However I will go over some BF tactics later.

Now onto the general metagame. Wario has some of the greatest aerial mobility ever. His long lasting air dodge followed by any of his amazing aerial repertoire is a reliable approach that he has on us. This and a combination of his bike and DACUS are the most common approaches actually. However this does not mean we can’t camp him. We can but every shot must count for something be it baiting the air dodge with a charge or setting up for something nutty like a loop hit to grab, you must be smart and mobile while your camping. A good thing to do is come up under him at an angle with Nair halfway through an air dodge as that guarantees that he will be hit back out.

Once Wario has gotten inside your best option is going jab, utilt, fsmash, and grab (in that order). Jab is fast and gives you 3 options that all have there own pros and cons:
1. You can do the normal jab combo. This sets him up to be shot at by our arrows and gets him away from you at the same time.
2. You can do the jab infinite for a while. Sometimes it eats their second jump which confuses them and keeps them in until they DI out once they realize their jump GOT NOMMED.
3. You can do jab cancel grab into any amount of pummeling and throwing you can get away with.
Utilt is good because when they land close enough for it to hit, congratulations! Utilt comes out faster than anything he can do! Even his gay mouth grab! It clanks with his fsmash at any distance as well. It combos into itself, usmash, uair, aimed up arrow, and best of all crit bair which is how you will wind up getting 90% of your kills on Wario.
(extra credit section just for Bair)
This is the move that you will use to make your kills on Wario. As a Pit player getting in the crit bair should be even sharper as your arrow game. You must know the dthrow setups. Like jumping and then waiting till they air dodge to do the attack. Also the up close WOI set ups are the most useful because of the spacing you get as well. Be it through hitting him with it when he jumps at the top of WOI or you do it to fast fall it on him, it is going to be fresher than your fsmash I guarantee it.
Close up fighting with Wario wouldn’t be so hard if Wario’s fsmash didn’t have super armor. It beats everything we have up close, does great damage, and kills early near the edge. Also when he combines his fsmash and jab game his sh uair and dair make for a frightening addition to the mix ups he can do. Also Wario has BS grab range. It straight up does not make sense but don’t:
a. underestimate his grab range
b. try your best to read what he is gonna do after he dthrows you otherwise you’re in for a world hurt because he will keep succeeding until you outsmart him.

Another thing that you must remember is not to be above Wario ever! He can juggle you with his uair, he can out prioritize you with uair, and he can kill you with uair. Being above Wario just is not good for Pits health so don’t do it. Another thing to watch out for is his fully charged fart as it does massive damage, has super armor, and kills early. What requires even more attention is his 1/2 and 3/4 charged fart which does like 3x the knock back at the cost of the super armor. This will kill you below 50% based on stage placement and can be combo-ed into to boot.
Yet another annoying thing that we must deal with when trying to get him up close or even with a well spaced glide attack is his stupid neutral b, the mouth grab. If you manage to avoid it only punish it with an arrow as anything else you use could get you grabbed because of its weirdness.

One thing that gives us the advantage believe it or not is Wario’s self produced item, his schweet schwweeeet haawwg. The bike by itself can deal Wario serious damage if tries to bounce combo you with it. If he is chillin by a bouncing bike you are obligated to charge head first full steam into that with Angel Ring. It will catch Wario in its multihit frame long enough for the bike to fall back down on both of you. Now the bike has been reflected by your angel ring and is keeping Wario in both hitboxes one of which is faster and does 1 ½ times more damage. This can then be followed up by just about anything if you time it right. Also if you grab either of his bikes tires when it breaks switch between bouncing them where you are standing and camping with arrows, Nair, and uair as this takes away all of his options.

Also I forgot to mention earlier not to bother going for the kill until he is at 130% or more (unless you are set up for bair near the edge of the map of course) because he is heavy and has good DI moves. Also don’t bother trying to gimp him as he has one of the best sets of recovery moves in the game. With his bike jump, his second jump which is incredible, his up b, and his charged up waft I guarantee we are not gimping him anytime soon.


Lou E. Dgieh 55:45

What a random match up for a person to have experience in. However, since my best friend happens to be a Weegee main I felt obligated to right this match up out because it is one of those match ups that you must know how to play against or a good Luigi will get inside you deal 80% and then jab>up b you for the kill. Let me get started on how to avoid this.

Start off the match with arrow camping. While weegee has his approaches your camping is superior if you camp smartly. When people start to get within close range what you would most commonly use to reset the camp spacing are jab and grab. Well these tools work amazingly on luigi too. Both infinite jab and the knock back hit beat out weegee pretty effectively. We can chain grab weegee out of jab cancel grab too at low percents. Be advised that you must not try to regrab past 27% or you will eat a fat nair to the face.

Another option that is opened to us this match up more is our WOI offensive game. Due to Luigi’s almost non-existent traction our WOI just ***** whatever up game he was going for if he was on the ground. We can actually keep him at bay WOI>divebomb fair and dair to continue our camping game. Use WOI> dair> utilt, usmash, uair and nair for juggling and damage racking and use bair for and killing.

When it comes to killing our main tools are going to be fsmash, bair, and believe it or not, dtilt spike. Fsmash is going to be where the majority of our kills come from this match. Since he is always going to be the one to approach for the most part, we are going to beat his attempts at hitting us with his short ranged ground arsenal and stuff this in his face out of jab or sidestep. Bair is going to come in on the action when weegee is approaching from the air. Be advised that this is where you must be cautious because messing with weegee in the air is a double edged sword. Be sure to time that bair well or brace yourself for some crazy weegee damage string. Lastly there is dtilt spike. This works wonders on weegees that like to recover near the edge with his down b cyclone recovery. The actual spike hitbox hits well below pit and can even hit through certain spots on stages like BF. He doesn’t grab the ledge out of cyclone immediately either so its possible to jab to dtilt him. Also do to his shape if he falls back off the edge to jump up and attack we can spike him the moment he leaves the edge. This works better than most people would think and the fact is even if it doesn’t spike dtilt still puts him in a bad position making it a perfect edge guarding tool as well.

When edge guarding against weegee combine arrows with off stage fair and bair chasing and the previous section on down tilt if he recovers low. If he tries to rocket for the edge mirror shield it. If his up b doesn’t sweet spot the edge if your quick WOI ledge cancel to blow him away from it and grab it first. If he comes in high juggle him with uair. That’s all I have to say on that one.

Now for the part that shows why it’s nothing more than 55:45 between talented players. When luigi gets close on pit at low percents he has plenty of ways to rack up a quick 50% or more within a series of 6 or 7 seven hits. His dthrow combos utilt combos into itself and into his uair which combos into itself. If he dtilts you there is a good chance you slipped from it. From there he can jab>whatever he wants, which most of the time it will be combo-ed into shoryuken (up close up b). This move can kill you reliably at anything above 85% on most legal stages. His nair has more priority than whatever you just tried to hit him with and it comes out faster too. Don’t let yourself get put in the position to get hit by his nair because it combos at low percents and kills at high percents.
Lastly, don’t get hit by a miss-fire. I can’t say how to get around miss-fire. Ya all I can say is don’t get hit by it. That’s all I got for this one.


Falco 45:55

This MU is pretty even but the bird’s got slight advantage on us. Let me start off with how you should start off.

Camp until you are at NO LESS!!! than 36% or else you’re looking at a guaranteed 50% with follow ups that can lead to our demise or at least massive damage. Now if falco does grab you DI back and up and spam jump because if he tries to boost pivot you will footstool him and escape.

Even if you don’t hit him with arrows because of the reflector that’s fine because at 36% we can catch up with Fthrow x3 into dash attack into utilt for over 40% damage. This also sets up juggling potential which allows us to possibly gimp him if we get him offstage.

After up close combat begins due our inability to out camp him there are a few things to keep in mind.
1. Nothing we have beats falco’s jab up close. It has ungodly priority and he can jab cancel it into all sorts of follow ups. Fortunately our jab our ranges his and our infinite part is the only thing that stops is normal jab. The best moves for dealing with his jab are (in order) dtilt, jab into infinite, any properly spaced aerial, arrow, WOI.
2. Even after 36% try your hardest not to get grabbed because falco can dthrow>bdacus no matter what and that is a kill combo at 120%. At mid-mid high percents he can dthrow>jab into laser lock if you don’t tech it correctly.
3. now here are the things you should do once you inside falco’s range and not dealing with the above 2 parts:
• The majority of your damage should come from jab>infinite, grabs, and dtilt. Jab infinite is what you should use if you just got inside, you are punishing a spot dodge, if his jab whiffed you barely, or you are reading a phantasm.
• Grabs are to be used as punishment for anything you can punish with it. Don’t waste your fsmash and don’t use arrows if he is within grab range (duh). Try and set up for a gimp if possible when you grab him.
• Dtilt is used to outrange any move he uses on the ground and clank with anything it does manage to hit. This is your best option because dtilt never fails to lead into a situation that is good for you and bad for them.

Ledge Game
Let me get this out of the way right now. If you need to go under a stage to recover keep an eye on falco in case he tries to shoot you out of up b. That being said here we go.

This match up becomes easier for Pit if he is edge guarding. Falco is susceptible to being gimped by our arrows and our AR more than many other characters. His terrible up b is easy to edge hog and AR handles phantasm. Dtilt them if they are on the edge either to hit them off or if you can spike ‘em (<highly unlikely against falco but don’t forget when it is an option).

If we are being ledge guarded he is going use his angled ftilt, shine, laser, bair, and fsmash.
• Ftilt can be angled to hit us while we are hanging. It can kill at high percents and does good damage. Is also very long and kinda disjointed.
• If we try to jump onstage we will get shined. However we can mirror shine turn him around if we are spaced right. Otherwise find another way up.
• Laser can eat jumps and hit us out of glide and up b. Sometimes falling back and then getting up with AR or mirror out works to reflect them back.
• Bair is a pseudo WOP and can stage spike us.
• Fsmash is strong, disjointed as hell, and can hit us while we are hanging there. If he does this just fall back and regrab or use it as your chance to go to the other side of the stage.

Killing
Kills won’t be coming until higher percents (approximately 120ish %) for both of you (unless you go and get spiked early on) so keep in mind to save fsmash or dsmash and not to miss a chance to bair him near the edge. Also gimping as mentioned before is a great strategy as well.

Falco will use bair, fsmash, and usmash to get there kills. His bdacus out of laser (and sometimes dthrow) is true so don’t let him get you in that position. His fsmash is disjointed and overpowered (especially behind him). His bair will also kill you when fresh and has a lasting hit box.

ANGEL RING
In this MU this move gets its own section for use. This move will serve you very well in this match up if you use it correctly. Use it wrong though and you’re eating fat damage so pay attention to this part. I will go over its main purposes in order.

What properties make this move use- this move has unique properties which allows it to be a great punishing tool. Here I will list all of its purposes in this MU. If you need help learning any ATs just post down in reply section.
• Because this move is a reflector we can use it to aid in our approach. If you can do ART then all the better because then you can also jump to avoid laser spam and continue forward with your reflector out.
• Holding this just over the lip of the stage against a recovering hits him if he is hanging there and stops or clanks with phantasm.
• This is the technique that is a little more difficult but not to hard once you got it down. Let me first go over how to do GROUNDED WAVEBOUNCING. As we all know when we are in the air we can wave bounce any special move by making sure we hit backwards within 10 frames or so after hitting B (special). To wave bounce mirror for example it would be: down b>opposite way you are facing on the control stick. Well that effect still happens when you do it on the ground but because there is traction you don’t notice the momentum shift usually just the pivot animation. Here is where knowing this with AR makes it almost necessary against falco.
• Grounded AR Wave bounce is going to be in essence how you punish falco a lot. When you see someone spot dodge dash behind them and then wave bounce AR so that you go back through falco. Now there spot dodge frames are gone and they are stuck in AR. This is also a great way to punish phantasm’s landing on the stage, especially if they are close enough to ledge on landing for it to push them back offstage. Due to the fact that Pit still launches out forwards when he does AR and the fact that it’s a reflector it allows it to punish a lot of different mistakes as well as mind game the opponent. I’m sure you guys will find your own uses for it as well.

That’s all I’m writing on falco for now.


Donkey Kong 65:35

Oh my god…. poor poor Donkey Kong. We have so many different set ups for early stock kills it’s just crazy. Let me go over why Pit ***** gorillas.

Start this match of by chain grabbing him. You can air-dodge and then land and shield grab between his down-b slaps. You can get the 62% chain grab as long as you don’t damage him above 8%. This means you can jab cancel>into grab, arrow hit into grab, and maybe even utilt. Once you get the grab take him to the edge and then get him off of it. Then just eat his jump or bait him going semi low while airdodging and jumping out before using DK copter. Once he starts his recovery mirror it. And if for some reason he gets back on you now have 2 possible options:
1. Continue chain grabbing him if he is within chain grabbing percents and did not hit with anything but f-throw.
2. Start playing DK with your camping game now that you have the lead.

How to Camp DK

The easiest way to camp DK is to play keep away and arrow him. Between gliding away or scrooging away or just throwing him away or fsmash or nair or fair or dair or dtilt or jab hit and infinite or ART (you guys get what I mean when I say poor poor DK?) we wreck his shop.

When DK is above you he can’t do anything against our uair save super armor frames on his specials. We can juggle him with uair and aimed up arrow for quite a while. Getting a bair kill on DK is easy because he is so big and there are so many ways to set it up. Even just throwing it out up close works because the front crit hits easier on DK.

His Recovery Solved:
Mirror the DK copter
Arrow Gimps
Stage spikes with bair
Dtilt (spike or not) on ledges

What He Can Do Back:
Do not underestimate how good some DKs are at not getting grabbed. If you find that you cannot get a grab on him before you hit 22% then give up the grab and camp him. He will keep you at bay with the range and speed of all his tilts, his bair (<don’t mess with his bair, just shoot him), his grounded up b, his dsmash, and his down b.

DK has an amazing Bair. It’s disjointed, got range, is fast, combos into itself, does great damage, and kills. It is everything you could ever want in a move. However you can just shoot him with arrows and you will be fine.

DK’s ftilt has incredibly long range and can be angled up and down. It has good priority and damage as do all of DK’s moves. However it extends his hurt box so you can grab him out of it.

His dtilt is shorter but still long in range. It is very fast, does good damage, and it tripps at low to moderate percents. This is dangerous because then the DK can side B to fsmash us and get an early stock kill. This move kills near the edge below 75% with good DI. Dtilt also can combo into dsmash which is fast, very strong, and shoots you at a strange angle. Watch these moves.

His down b goes out farther than any melee move so approach with arrows and dodges and such from the air. It does 14% on the first hit, is fast, and eats shields for lunch.

His up b has super armor and does good damage if you don’t DI out…. so DI out.

Be careful of DK’s not fully charged punch as it has more than 2.5x the knock back of a fully charged one and will kill below 65% near the edge. The fully charged kills around 80% and has super armor.

Really not to hard a match up. As long as you don’t get laid back about it and play smartly the DK won’t make a stock comeback in 7 moves (<seen it done).


Fox 55:45
i just copied from mine and krystedez's discussion. i figure since kuro is posting his soon ill just stop here at fox.

infinite jab ***** fox up close. as does jab cancel>dtilt, utilt, and grab.
Angel Ring always stops both of his recoveries and if held just over the lip of a stage pretty guarentees damage if not an easy gimp.
chaingrab>dash attack>utilt is great for an early lead.
I will say that infintie jab isnt as useful as just sending him off on his way with a regular jab combo. But it's great to use the infinite and wait and see what he does, except when he gets out immediately and just fires lasers at you. If he doesnt shoot lasers, he can get around you and try to punish, that's it.

chaingrab X's 4, shoot arrow
chaingrab X's 3, throw up, shoot arrow or uair (or other aerial)
chaingrab X's 3, throw behind, shoot arrow
chaingrab X's 4, dash attack at LEDGE only (on stage you can get punished with dair, even with your 2-frame utilt, it only hits the 2-frame on the bottom of Pit's foot, way too far from Fox's position. My room mate always punishes me on the dash attack.
chaingrab X's 4

I agree about angel ring, especially if you ART, it's great to push them off with and float around waiting for Fire fox and just bair them or soft bair them under the stage LOL!

[/QUOTE]


i mainly was refering to jab infinite when hes near the edge but i see that i did not mention that originally. infinite jab ***** near the edge. other wise i like jab jab grab or jab jab dtilt the best in close combat.
those are some very solid throw follow ups there. i do however believe you can bait the dair and thus dash attack on stage with proper spacing and then sheild grab the dair.

i know that arrow gimps are really easy to get fox with if he has to jump to recover. they will either stop their jump to early with dodge or shine and from there get edge guarded son (i second fox and falco so trust me i know how this goes.) i also find planking for a bit helps you get your bearings as fox can do nothing against a good edge game as long as you watch out for shine spike and bair. and you can always find a way to get back on stage if/when neccessary.

fox has a pretty good shield pressure game on pit and when our shield gets low his dair gets in and so do his fox shenanigans. also any fox that matters will kill way earlier than we will if we let him get close enough even once (of course this is actually a stage dependent remark based on stage ceiling height as i find pit can kill horizantally easier than fox can since our fsmash and bair are far more deadly than his are).

also idk if its just me but i find always going for the footstool when hes out and down never really results in any thing bad for pit as it is usually an unexpected tactic.

more to come soon. hope this helps you out kuro :)[/collapse]
 

Abel1994

Smash Lord
Joined
Mar 15, 2010
Messages
1,882
Location
Dacula,GA
So this means Pit basicly is a even even charector compared to everyone? NICE that means it comes down to skills :D
 

Kuro~

Nitoryu Kuro
Joined
Jan 30, 2010
Messages
6,040
Location
Apopka Florida
So this means Pit basicly is a even even charector compared to everyone? NICE that means it comes down to skills :D
Please ignore the mu chart on the opening page though. That is a PREDICTED rough draft b4 we do all mu discussions.

however...imo yes.
 

Abel1994

Smash Lord
Joined
Mar 15, 2010
Messages
1,882
Location
Dacula,GA
Well fighting people like wolf falco n fox are like 50/50 on me because arrows help a lot when their offstage lol :p I love hiting falco off his recovery range its like the best feeling in the world!
 

Maharba the Mystic

Smash Master
Joined
Dec 5, 2009
Messages
4,403
Location
Houston, Texas
kuro not trying to be pushy but i wanna see the marth summary already. that discussions been over for hella days now. im getting anxious to see (but to be honest idk why. it's just a summary but still new stuff is new stuff and i need something to do like read a summary on mu that i know incredibly thoroughly. weird huh?)
 

Kuro~

Nitoryu Kuro
Joined
Jan 30, 2010
Messages
6,040
Location
Apopka Florida
kuro not trying to be pushy but i wanna see the marth summary already. that discussions been over for hella days now. im getting anxious to see (but to be honest idk why. it's just a summary but still new stuff is new stuff and i need something to do like read a summary on mu that i know incredibly thoroughly. weird huh?)
and i need u to read my posts :p i told u im stayin home and not going to a tournament i could go to this weekend to 1) catch up on school 2) make some extra cash 3) catch up on my brawl shiz including mu summaries....
 

Maharba the Mystic

Smash Master
Joined
Dec 5, 2009
Messages
4,403
Location
Houston, Texas
oh. sry must've missed it. or forgot. man its sad when this board's new posts r the most exciting thing that happen 2 me. gonna go pour some jack d :p no but seriously im not even tired and its almost 4am. hello jack and dr. pepper. XD
 

Kuro~

Nitoryu Kuro
Joined
Jan 30, 2010
Messages
6,040
Location
Apopka Florida
oh. sry must've missed it. or forgot. man its sad when this board's new posts r the most exciting thing that happen 2 me. gonna go pour some jack d :p no but seriously im not even tired and its almost 4am. hello jack and dr. pepper. XD
Lol i get around enough. Boards are still fun for me though. So nothin wrong with that. And you should work on that driking :(
 

Luckay4Lyphe

Smash Master
Joined
Apr 8, 2009
Messages
3,915
Location
College Park, MD
Shield then run over to her, its not that difficult for Pit since we have arrows and reflectors.

Speaking of samus, I just finished a couple MMs against the best samus in our region. Only my pikachu played his samus, but Pit played his sheik which is also really good. It's funny because I think if I flip-flopped mains and went Pit against Samus and Pikachu against Sheik, I would've had an easier time. Uploading the matches right now.
 

Maharba the Mystic

Smash Master
Joined
Dec 5, 2009
Messages
4,403
Location
Houston, Texas
kuro that is a good summary. however i think you meant to say he can DS out of AR not jab combo (unless u meant jab cancel combos. the txt there was a lil confusing) and it may be personal preferance but i think u may wanna go into a little more detail about camping with things like run away pivot arrow and using wing dash backwards as those are 2 of the most fundamental ways for pit to outspace marth's range (arrows are longer than sword) and to keep marth away in higher level play. over all i give ur summary a 9/10 just because of the confusing jab combo txt. i really like how in depth u went on counter picks. that was most excellent. last thing is be sure to mention/add that basic jab combo is key to getting marth off ur back as opposed to fsmash for the newer pits. but like i said im just being picky lol
 

Kuro~

Nitoryu Kuro
Joined
Jan 30, 2010
Messages
6,040
Location
Apopka Florida
kuro that is a good summary. however i think you meant to say he can DS out of AR not jab combo (unless u meant jab cancel combos. the txt there was a lil confusing) and it may be personal preferance but i think u may wanna go into a little more detail about camping with things like run away pivot arrow and using wing dash backwards as those are 2 of the most fundamental ways for pit to outspace marth's range (arrows are longer than sword) and to keep marth away in higher level play. over all i give ur summary a 9/10 just because of the confusing jab combo txt. i really like how in depth u went on counter picks. that was most excellent. last thing is be sure to mention/add that basic jab combo is key to getting marth off ur back as opposed to fsmash for the newer pits. but like i said im just being picky lol
Ill add the jab part. That's my bad. However pit's should do the camping research on their own. We have many(if not too many) resources on our boards. And yes i did mean jab cancel combos. That's why i said jab to grab. As that's one of the best ways to get marth in the air as the second jab pulls him in.

you like the pictures ive chosen thus faar? they make me lol.


Edit:added jab part on resetting position portion and clarified the DS issue.
 

Maharba the Mystic

Smash Master
Joined
Dec 5, 2009
Messages
4,403
Location
Houston, Texas
ok sweet. now it's 10/10. and ur right. it is just a summary. if peeps wanna learn hardcore camp tactics they can do the research. and ya im digging the pics dude! they're great (DDD such a lol)
 

Krystedez

Awaken the Path
Joined
Feb 22, 2010
Messages
4,301
Location
Colorado Springs
So guys, what do you think of Pit on the NEW! MU CHART?

I'm only unhappy really about Snake V Pit, the others that are disadvantages can go either way to me so Im not too worried.
 
Top Bottom